workday - texas a&m forest service...payroll functions for all employees •it is replacing...
TRANSCRIPT

1
WorkdayEmployee Training

2
What is Workday?
• Manages the Human Resources, Benefits, and Payroll functions for all employees
• It is replacing Timetraq, Leavetraq, HRConnect, iBenefits, Great Jobs
• Go LIVE is December 17th!

3
Workday Fundamentals
• Organizations
– used to group people, resources, and workers to an the agency, department, or program
• Business Process
– set of tasks used to accomplish a specific goal
– automatically route specific steps in a workflow
• Security Roles
– determines what you can see and do
– these are not job titles but functional responsibilities

4
Accessing Workday
• Access will be through Single Sign On (SSO)

5
NAVIGATING WORKDAY

6
Workday Home Page

7
My Workday Account
• Provides access to the drop-down menu for access to:
• Your worker profile
• The home page
• Your inbox and notifications
• Favorites you have saved
• Account settings
• Access to sign out of Workday

8
Worklets
• Icons found on Home page to make it easier to access information needed on routine basis based on your security
• Paystubs
• Benefit elections
• Enter time
• Request time off
• Access you inbox

9
Adding a Worklet
• All monthly employees must add the Timeworklet to their Home page
1) Select the gear on your Home page
2) Click the plus sign underoptional worklets

10
Adding a Worklet
3) Enter Time in theworklet search barand press enter
4) Select Time andpress OK, then Done
5) Time Worklet is now added to your Home page

11
Workday Inbox
• Action items to approve, review, and to-dos are accessed through your Workday inbox

12
Workday Inbox
• Action items will remain in your inbox until appropriate action is taken

13
Notifications
• Messages letting you know about tasks that have been completed or may require additional attention
• Request for time off is approved• Job requisition was created
• To view Notification:– Click the my account icon– Select Notifications from the menu

14
Worker Profile
• Basic information about workers - organization, manager, contact, pay information, performance, education, etc.
• The level of information displayed depends on your security role.

15
EMPLOYEE SELF SERVICE

16
To make changes to your contact information, citizenship status, military service, emergency contacts, preferred name, etc.
1) Click on the Personal Information Worklet.
2) In the Change section, click on the appropriate box.

17
3) Click the Edit icon in the section you wish to change.
4) Make the change and click the check box icon.
5) Click Submit. If required, the change request will route to manager for approval.

18
• Photo Change– Do not make any photo changes.– All photos will be the same as currently in Epstar.– Contact Employee Development to change photo.
• Preferred Name Change– This name is displayed on your profile and in the search
directory.– It will not be used in place of your Legal Name.– Use only for a preferred name change and not nicknames.
For example, the employee’s legal name is Mary Jane Meyer.
She prefers to be called Jane. Therefore, she can make a preferredname change in Workday to read Jane Meyer.

19
Changes to Withholding Elections (W-4)
1) Click on the Pay Worklet.
2) In the Actions section, click on Withholding Elections box.
3) Select the type of
elections to update
and click the
update button.

20
4) Your name, company, and effective date
appears on the screen. Click OK.
5) Update your current elections and click the I Agree check box. Then, click OK.
Changes will take effect on your
next pay date.

21
Changes to Payment Elections (Direct Deposit)
1) Click on the Pay Worklet.
2) In the Actions section, click on Payment Elections box.
3) Current banking accounts are listed along with the current payment election type.

22
4) To update your list of banking accounts, click the change, delete, or add account box.
5) Select the Account Type.
Enter the Bank Name,
Routing Transit Number,
and Account Number.
Click OK.
23
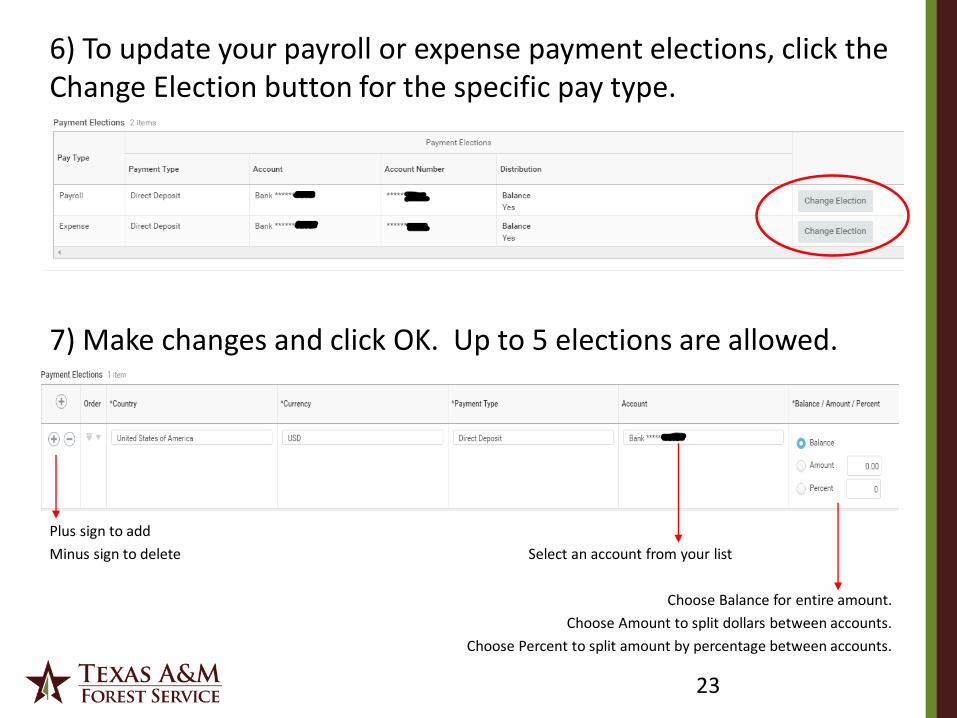
6) To update your payroll or expense payment elections, click the Change Election button for the specific pay type.
7) Make changes and click OK. Up to 5 elections are allowed.
Plus sign to add
Minus sign to delete Select an account from your list
Choose Balance for entire amount.
Choose Amount to split dollars between accounts.
Choose Percent to split amount by percentage between accounts.

24
Changes to Tax Documents (W-2)
1) Click on the Pay Worklet.
2) In the View section, click on My Tax Documents.
3) Click Edit to change tax document printing election. Click OK.
4) Choose your new elections. Click OK.

25
Payslips
1) Click on the Pay Worklet.
2) In the View section, click on Payslips box.
3) Click View or Print next to the pay period.

26
Other Employee Self Service
Benefits
• Life changing event
• Annual enrollment (July)
Contact Dorithie Thomas
979-458-9337
TDA/RTH/ORP Changes
• Enroll, change, or remove
Contact Kristen Suehs
979-458-6623

27
ENTERING TIME

28
Entering Time
• Hourly Employees:– Time will be entered, certified, and submitted by the employee and approved by their
manager.
– Two completed work weeks will be submitted each pay period by every other Monday.
• Monthly Employees:– Time will be entered, certified, and submitted by the employee and approved by their
manager.
– One completed work week will be submitted each week by the following Tuesday.
• If an employee is unavailable to enter, certify, and submit time,– the manager may on behalf of the employee, or
– the timekeeper may on behalf of the employee but the timesheet will not route to the manager for approval. Timekeepers must retain documentation from the employee and manager certifying the time. This may be an email, a signed printed copy of the timesheet detail, or a manual timesheet.

29
How to Enter Time
1) Click on the Time Worklet.
2) Click This Week and the time calendar will display.

30
How to Enter Time
3) Click the date where you want to add hours. A blue Enter Time box appears and a pop-up will display.
31
How to Enter Time
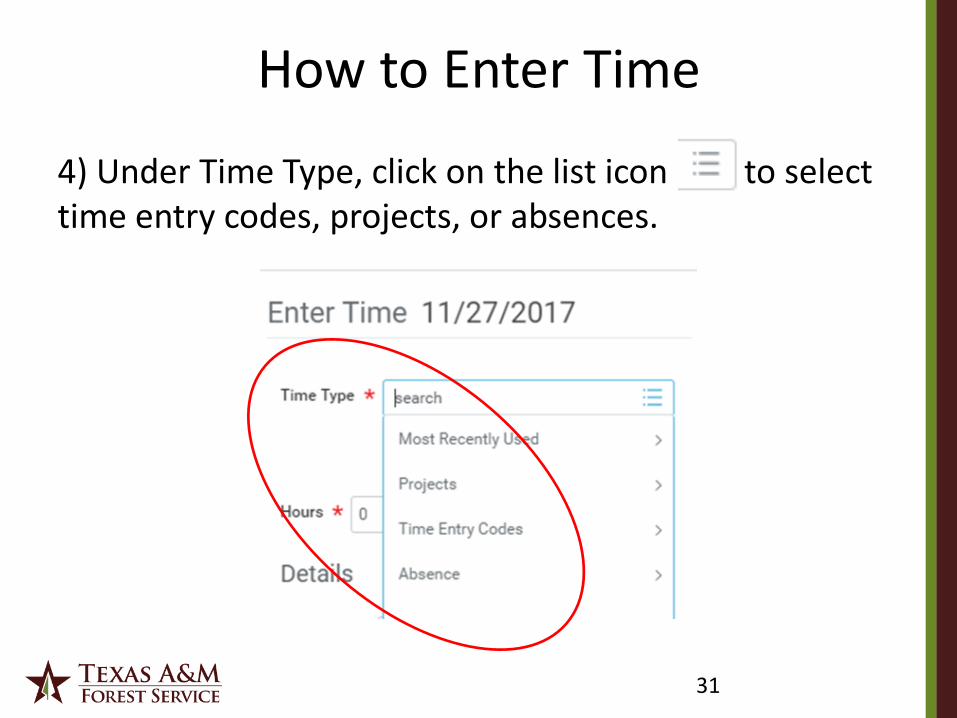
4) Under Time Type, click on the list icon to select time entry codes, projects, or absences.

32
Time Entry Codes
• Based on your employment type– Budgeted: Hourly, Salaried, Law Enforcement
• Includes all regular hours and comp time

33
Projects
• Based on your assignment– Budgeted
• Local paid overtime
• In/Out State Incidents (TX numbers)
• Special Projects (GLO, Eqip, etc.)
– Temporary/Casual or Student Worker• List of project account numbers
• You will only see what you are assigned to
• Contact your Timekeeper if a project is missing

34
Absence
• May select from the time off types listed• Vacation
• Sick
• Comp Time – FLSA
• Comp Time – State
• You will only see what is available for you to use.

35
How to Enter Time
5) Under Hours, enter the number of hours worked on the time type. Press OK.

36
How to Enter Time
6) Hours for that day have been added for the time type chosen.
- If additional hours under a different time type for the same day is needed, repeat steps 3 to 5 until the day is complete.
- Continue to repeat steps 3 to 6 until each day worked for the period is complete.

37
How to Enter Time
7) Once the time period is complete, press the green Submit button.

38
How to Enter Time
8) The certification statement will appear. Click the green Submit button again. The timesheet is complete and waiting for approval by manager.

39
TIME OFF/LEAVE OF ABSENCE

40
What’s Changing
• Absences are divided into Time off and Leaves of Absence– Time Off is short in nature and using accrued leave– Leave of Absence is unpaid leave for more than 30 days
• To indicate a paid time off and also an FMLA absence, users will request FMLA time off concurrently with their paid time off
• Employees can cancel or update their time off requests themselves
• Time Offs do not include the specific hours the employee will be out (e.g. 2 hours) We prefer the employee notes in the comment section the actual hours they were off
• State Comp time hours will expire the first of the month earned instead of actual date

41
View Time Off Balances
1) Click on the Time Off Worklet.
2) Click the Time Off Balance button.

42
View Time Off Balances
3) View each Absence Plan balances.

43
View Time Off Balances
To view State comp time expiration date, click on the hours in the Carryover Balance column in the State Comp Time row.

44
Accrual Chart and Carry Forward Balances

45
How to Request Time Off
1) Select the Time Off Worklet
2) Click the Time Off box

46
How to Request Time Off
3) The Time Off Calendar View appears. The left side shows the balance available per leave plan.

47
How to Request Time Off
4) Select the days you would like to take off, then submit your request. The days selected will appear blue.
- By holding down shift key, you can request more than one day at a time.
- Must be requesting the same leave type and quantity of hours each day.

48
How to Request Time Off
5) Select the Type of leave you are requesting off.
• You will only see what is available for you to use.
• Educational Activities is listed as it’s own leave type.
• Leave that requires Director’s approval, continue to use Request for Personal Leave Form
(i.e. death of a family member, leave without pay, bad weather days, etc.)

49
How to Request Time Off6) Enter the Daily Quantity you are requesting off.
• Requesting leave for multiple days, the total hours must be the same for each day (e.g. physical therapy)
• Requesting leave for multiple days and the hours are different, a separate entry needs to be made per day
• Requesting several weeks of leave at one time, make one entry per week
• In the comment section, note the hours actually taken (8–9:30 am)
• Do NOT attach any files.

50
How to Request Time Off
7) Click Submit.• The request will routed to the manager
for approval.• Once approved, the time off request
will appear on your Time Off Calendar,which is visible to you and your manager.
If an employee is unavailable to enter time off,- the manager may on behalf of the employee, or- the absence partner may on behalf of the employee but the time off request will
not route to the manager for approval. Absence Partners must retain documentation from the employee and manager certifying the time off request. This may be an email, a signed printed copy of the request or signed copy of timesheet.

51
Correct Time Off
• Used to change the time off type, length of time off, or dates taken for time off.
• Employees can correct their own time off and mangers can approve corrections.
• Only approved time off request can be corrected• Unapproved time off requests can be cancelled and re-entered
• After making a correction, a manual timesheet must be sent to Payroll. Payroll will review for overtime rules.
• If the Absence Partner makes the correction, it’s a one and done deal. The manager does not see or approve the change. Make sure the Absence Partner has approval/documentation to backup the entry.

52
How to Correct Time Off
1) Select the Time Off Worklet
2) Click the Time Off box

53
How to Correct Time Off
3) Select date to correct. 4) Make necessary changes then Submit.

54
Leave of Absence
• Used only for a very specific kind of absence that meets all of the following criteria:
• Unpaid
• Continuous for 30 days or longer
• Full days
• open-ended until action taken to return from leave
• Everything else is TIME OFF.

55
Leave of Absence
1) Click the Time Off worklet.
2) Click the Leave of Absence button.
3) Complete fields, click submit. Do not upload documents.

56
Leave Without Pay
Leave of Absence
• 30 days or longer
• Continuous, full days of unpaid leave
• Form 500 process must be followed
• Needs Director approval
• Employee Development will process leave of absence request
Time Off• Less than 30 days• Not continuous or partial days of
unpaid time off• 3 days or Fewer
– Employee enters unpaid time off request– Manager approves
• 4 to 9 days– Complete Request for Leave form– Manager and Associate Director approves– Associate Director’s office sends copy of form to
Employee Development and Payroll– Employee Development will process time off
request
• 10 to 29 days– Complete Request for Leave form– Manager, Associate Director, Director approves– Director office sends copy to Employee
Development and Payroll– Employee Development will process time off
request

57
Questions?