maneuvers manual - evektor - desert flying clubdesertflying.club/wp-content/uploads/2016/01/... ·...
TRANSCRIPT

Aero-Tech, Inc. Maneuvers Manual Evektor Sportstar Page 1
Aero-Tech, Inc. Copywrite 2006. All Rights Reserved. Revised: 12/13/07
Aero-Tech, Inc. Blue Grass Airport, Lexington, KY 40510
859-254-8906 859-255-3250 FAX www.aerotech.net
Maneuvers Manual
2006 Evektor SportstarLight Sport Airplane

Aero-Tech, Inc. Maneuvers Manual Evektor Sportstar Page 2
Aero-Tech, Inc. Copywrite 2006. All Rights Reserved. Revised: 12/13/07
Introduction
This Manual is a compilation of standardized train-ing procedures for training in the Evektor Sportstar Light Sport Aircraft. Procedures are outlined for each maneuver listed in the Aero-Tech Sport Pilot, Sport Transition and Sport Instructor courses.
While this information is valuable in assisting cus-
tomers, it is written as reference, guaranteeing the stan-dardization of the flight instructor staff at Aero-Tech. There may be more than one way to fly a maneuver, but it is im-portant that all instructors at Aero-Tech adhere to this stan-dardized method.
Burger King and McDonalds both cook hamburgers
– but they use different methods and recipes. When a cus-tomer at McDonalds has paid for a Big Mac, they don’t want a Whopper. The customers of Aero-Tech have enrolled in a course of training here because they like our “recipe.”
Instructors who fail to instruct within standardized
methods will result in customers who are confused, training that is incomplete and unable to pass progress checks. We consider this poor customer service. For this reason, in-structors who fail to instruct within the standardized training methods outlined in this Maneuvers Manual must evaluate their continued success at Aero-Tech. Customers who may find issues with instructor standardization are asked to communicate with the Chief.
During training, the Aero-Tech standard for What is
a Good Pilot is used in determining the standards for train-ing and for graduation. Accepted deviations from altitude, heading and airspeeds are not used during the introduction and instruction of the maneuver.
PTS states only the minimum acceptable standards
to pass the test. PTS deviations are introduced during the final three hours in preparation for the checkride. Acceptable deviations from PTS vary from course to course. Accept-able deviations are available in the appropriate PTS for the course.
The following reference materials have been used in producing this document. Further information about maneuvers may be obtained by referring to these materials. It is strongly recommended that these materials be refer-enced to develop further understanding of each maneuver. • FAA H8083-3 Airplane Flying Handbook • Sportstar Information Manual • CFR 14, Federal Aviation Regulations
• Practical Test Standards
There will never be a contradiction between the Aero-Tech Maneuvers Man-ual and the above reference materials, as they may be from time to time revised. Information contained in FAA and manu-facturer reference material preempts, and is the final authority on any operations at Aero-Tech. If a contradiction is found, please contact the Chief.
Recommended changes to any publi-
cation or suggestions on how we may improve customer training, support and mentoring may be submitted to the Chief by anyone. The rec-ommendation should be written including an example for how the item should be written. E-mail to [email protected].
Aero-Tech, Inc. Maneuvers Manual Evektor Sportstar Page 3
Aero-Tech, Inc. Copywrite 2006. All Rights Reserved. Revised: 12/13/07
Table of Contents Enrollment … 4 Positive Exchange of Flight Controls … 4 Use of Checklists .4 Cockpit Resource Management (CRM) … 4 The Practical of Practical Training … 4 Aeronautical Decision Making … 4 Preflight Preparation Weather Information … 5 VFR Cross Country Flight Planning … 5 Ground Operations Preflight Inspection … 5 Cockpit Management … 5 Engine Starting … 6 Taxiing … 6 Before Takeoff Engine Run-up … 6 Radio Com and ATC Clearances … 7
Airport Traffic Patterns Light Gun Demonstration … 7 Loss of Communications … 7 Traffic Pattern Operations … 7 Basic Flight Maneuvers Straight and Level Flight … 8 Level Turns … 8 Climbs and Level Off’s … 8 Descents and Level Off’s … 9
Takeoffs, Landings and Go-Around Normal Takeoff and Climb … 10 Normal Approach and Landing … 11 Crosswind Takeoff and Climb … 11 Crosswind Approach and Landing … 15 Soft Field Takeoff and Climb … 11 Soft Field Approach and Landing … 12 Short Field Takeoff and Climb … 12 Short Field Approach and Landing … 12 Forward Slip to a Landing … 13 General Guidelines on all Approaches … 13 Go Around … 13 Touch and Go’s … 14 Performance Maneuvers Collision Avoidance Procedures … 14 Clearing Turns … 14 Steep Turns … 15 Ground Reference Maneuvers Rectangular Course … 25 Turns Around a Point … 15 S-Turns Across the Road … 16 Navigation Pilotage and Dead Reckoning … 17 GPS … 17 Diversion to Alternate … 17 Lost Procedures … 17
Slow Flight and Stalls Maneuvering During Slow Flight … 18 Power Off Stalls …19 Power On Stalls … 19 Emergency Operations Recovery from Unusual Attitudes … 20 Steep Spiral … 20 Emergency Approach and Landing … 20 Systems and Equipment Malfunctions … 20 Postflight Procedures After Landing … 21 Parking and Securing … 21 What is a Good Pilot … 22
Recommended The term “recommended” refers to the manufacturer’s recommendation. If the manufacturer’s recommendation is not available, the description in FAA H8083-3, Flight Training Handbook will be used.
References to he/him/his is meant to include he/she and him/her. We apologize for any in-appropriate use of gender. We have done so only to make the manual easier to read.

Aero-Tech, Inc. Maneuvers Manual Evektor Sportstar Page 4
Aero-Tech, Inc. Copywrite 2006. All Rights Reserved. Revised: 12/13/07
Enrollment • All pilots must be enrolled in a specific training program
by the Chief or his designee. • All pilots in a training program will have a training re-
cord. This includes those customers enrolled in BFR, ICC/IPC and Aero-Tech aircraft checkouts. The training record for an aircraft checkout is located on the back-side of the checkout form.
• All pilots in a training program will have a copy of their syllabus.
• All pilots must have a copy of the Safety Procedures Manual and the signed Proof of Issue Form filed in the training record.
Positive Exchange of Flight Controls There must always be a clear understanding between pilots and flight instruc-tors as to who has control of the aircraft. Prior to flight, a briefing will be conducted that includes the following proce-dure for the positive exchange of flight controls. • When the flight instructor wishes to take control of the
aircraft, he says to the customer, “I have the flight con-trols.” and the customer replies, “You have the con-trols.”
• When the flight instructor wishes the customer to take control of the aircraft, the instructor says, “You have the controls” and the customer replies, “I have the controls”. And a visual check to see that the customer actually has the flight controls.
• If the intent of the instructor is to assist on the controls, the instructor should say, “I have the controls, but you stay on the controls to feel what I do.” Who is in control must always be clear. Having two pilots on the con-trols at the same time is not normally recommended, but useful at times.
Use of Checklists The importance of consistent checklist usage will be emphasized during all pilot training. The major objective is to establish habit patterns, and provide a logical and standardized method to operate an airplane. Checklists to be used during training must match - in sequence and elements, that checklist provided in the appropriate Pilot Information Manual.
Checklists for normal procedures will be taught, us-ing the “read and do” format. That is, the pilot reads the checklists and performs the item before continuing to the next item. This method is used instead of the “do then ver-ify” method. Checking items solely from memory is not acceptable. Pilots will read the checklist aloud.
Checklists for abnormal and emergency operations are memorized and used with the “do then verify” method. All abnormal and emergency checklists provided by the manufacturer will be used taught and emphasized during training.
Cockpit Resource Management (CRM) CRM refers to the effective use of ALL available resources; human resources, hardware, and information. CRM is not a single task, but it is a set of competencies that must be evident in all tasks. CRM does not refer to crew resource management as pilots flying in the Sportstar are expected to control all phases of flying as the single pilot on board. The Practical of Practical Training To the fullest extend possible, training at Aero-Tech will have a practical application. Ground aca-demics are incorporated into flight experiences. The easiest way to accomplish practical skills is for the instructor to provide “scenarios” for men-tal rehearsal and skill practice. Scenario based training allows instructors to provide real-life experience and mental-rehearsal in dealing with a wide variety of flight situations. Aeronautical Decision Making Training at Aero-Tech will incorporate effective decision making. Most pilots may think that good judgement is only acquired through years of experience. However our new pilots of little experience, cannot rely upon experience as a teacher. Instructors will give Aero-Tech pilots a head-start by teaching these aeronautical deci-sion making: • Installing personal limitations so that a
situation is not allowed to develop. • Not to rely solely on Regulations as the
safety benchmark. • The knowledge required to understand the
situation, • The information available. How to search
for information and identify possible op-tions.
• When to stop searching for options and choose a course of action.
• The skills required to execute the decision. • The self-awareness to recognize when
hazardous attitudes are influencing deci-sions.
• The self-awareness to recognize the “acci-dent chain” of events and how to cut the chain.
Instructors will provide “scenarios” for mental rehearsal as the most effective way for pilots to gain experience in making correct decisions. “You are here, this happens … what would you

Aero-Tech, Inc. Maneuvers Manual Evektor Sportstar Page 5
Aero-Tech, Inc. Copywrite 2006. All Rights Reserved. Revised: 12/13/07
do” is a good example of scenario mental-rehearsal and will be used during flight lessons, progress checks and oral ex-aminations. Instructors will use the guided questions method of teaching to allow pilots to make decisions regarding preflight inspec-tion squawks, aircraft airworthiness, weather, go/no go, and enroute diversion to alternate. Instructors will always closely supervise and lead pilots into making the correct decision. Weather Information Provide scenarios and drill-practice to read, interpret and analyze weather reports, charts and forecasts via telephone, computerized and personal FSS-visit sources, with emphasis on making a competent “go/no go” decision based on real weather information. VFR Cross Country Planning Three different forms of VFR navigation are taught: GPS, pilotage and dead reckon-ing. However, on most VFR cross county flights, a combina-tion of all available nav aids and reference points are used. After being taught separately, pilots are then taught to use the different navigation techniques together. • All cross-country flights at Aero-Tech are at least trian-
gles. There is not enough new experience flying home along the same course that the pilot flew out on.
• On cross-country flights, the pilot will carry $100 cash or $25 cash and a major credit card. On dual flights, the instructor must meet this requirement. On solo flights, the instructor must check that the customer meets this requirement.
• Instructors must schedule 30-45 minutes to review the pilot’s prepared Navigation Log and to dispatch a solo cross-county, on the day of the flight, at the airport. Re-view at least: • Current and forecasted weather and winds along
the route of flight and within 100 NM either side of the route.
• Current charts, easily identifiable checkpoints, ob-structions, terrain, airspace, selection of altitude, etc.
• Calculations on the NAVLOG: headings, flight times, fuel requirements/fuel reserves.
• Accurate performance data and power settings taken or interpolated from the POH.
• Navigation systems and frequencies to be used. • Appropriate communication frequencies to be
used, whom to talk to and when. • Pertinent data from NOTAMS and airport publica-
tions. • Procedures for opening the flight plan, updating the
flight plan once enroute and closing the flight plan. • Pilot limitations, restrictions and endorsements. • Remind pilots of the importance of monitoring the
NAVLOG, to open flight plans, get takeoff times and listen to ATIS early.
Instructors must also schedule 30 minutes to debrief the returning solo cross country, on the day of the flight, before the pilot leaves the air-port. Did the pilot cancel their flight plan? Re-view the NAVLOG, checking for recorded ETAs, ATAs, GSs, problems, was it fun? Did the flight go as planned. What is the current level of pilot confidence? The customer’s completed NAVLOG will be filed in the training record. Preflight Inspection Conduct the aircraft visual inspection as pre-scribed in the manufacturer’s recommended checklist. Provide scenarios to test the candi-dates true awareness during preflight. (I.e., a piece of masking tape on the belly) • Provide scenarios to teach and determine
that the aircraft is in condition for safe flight:
• Fuel quantity, grade, type and contami-nates
• Oil quantity, type and leaks • Structural damage • Ice and frost removal • Proper security of tow-bar, baggage and
equipment • Provide scenarios to teach and understand
the names and functions of items to be in-spected, the reasons for checking and how to detect possible no-go situations.
• Provide scenarios to teach and determine that a safe under-power departure from the tiedown can be made. If the aircraft is parked close to the hangar or other aircraft, pull the aircraft forward by use of the tow-bar.
Cockpit Management - A systematic method of organizing materials and equipment so they are available. • Arriving at the aircraft, verify that all
equipment and materials needed for the flight are accounted for. This may include but is not limited to: charts, POH, check-lists, pen/pencils, plane and airman certifi-cates, etc.
• Organize and properly secure items so that they are readily available.
• Check the cockpit and cabin for loose items that may be tossed about if turbu-lence is encountered. Secure.

Aero-Tech, Inc. Maneuvers Manual Evektor Sportstar Page 6
Aero-Tech, Inc. Copywrite 2006. All Rights Reserved. Revised: 12/13/07
• Only one person may board the aircraft at a time. Only one person may be on a wing at one time.
• Ensure that the pilot is adjusted properly in the seat. If additional cushions are used to elevate the pilot, assure that the cushions do not interfere with controls or door locks.
• Ensure pilot understands how to adjust rudder pedals and checked that left and right rudder controls are locked in same position.
• The use of safety belts and shoulder harnesses, canopy lock, air vents, and emergency procedures.
• Use a knee-board or other writing tablet to copy clear-ances and organize flight notes.
• Use recommended checklists. • Perform passenger briefing. • During all phases of flight, remain well organized and
alert to the changing environment. Engine Starting • Ensure aircraft is in safe position for start. Do not allow
prop to blast people or hangar. • Conduct the engine start by recommended checklist. • Use appropriate starting procedure in consideration of
atmospheric conditions. • Discuss the use of external power source. • Discuss the elements of safe hand propping. it is not a
recommended procedure, however, the pilot should be aware of the procedure, its risks and how to make it as safe as possible.
• Yell “Clear” loudly, and wait for a response from per-sons who may be nearby before engaging ignition.
• When activating the starter, one hand is on the throttle, allowing a prompt response.
• NOTE: The engine has a reduction gear that is equipped with a shock absorber. To prevent impact load, • Start with throttle in the idle position or at most, at
10% open. • After having reduced the power, wait at least 3
seconds before increasing power again. • Activate starter for no more than 10 seconds then let it
cool down for 2 minutes. • After start, reduce throttle to 2,000 to 2,500 RPM. • Immediately after engine starts, check oil pressure.
Within 10 seconds oil pressure should be 4.5 to 5.0 for a cold engine.
Taxiing • Observe ground safety procedures as stated in Aero-
Tech Safety Procedures Manual. • Conduct a brake check soon after starting the initial taxi
roll.
• Taxi speed will be a slow walk on the ramp area or near other aircraft or obstructions. Taxi speed should be reasonable for exist-ing conditions when operating on taxiways.
• Pilot’s left hand will remain on the control wheel with controls positioned appropri-ately for wind direction. Position flight con-trols for wind.
• Do not taxi using the brakes. Pilot heels should remain on the floor.
• Control direction and speed without exces-sive use of brakes or throttle. Do not gun the engine. Maintain a smooth and consis-tent throttle setting of 2,000 to 2,500 RPM.
• Maintain taxiway centerline unless other aircraft or conditions dictate otherwise.
• Taxi defensively - remain aware of chang-ing outside conditions, aircraft, people and hazards.
• Maintain a safe distance from and behind other taxiing aircraft.
• Comply with airport signage, markings, ATC clearances and instructions
• Maintain attention outside of aircraft cock-pit. STOP if something requires attention inside aircraft.
• Do not taxi while writing ATC clearances. Have cockpit organized before taxiing.
• Lean after Engine Run-up Checklist and during all normal ground operations - about 1 inch.
• Contact ground control only after cockpit duties are complete and you are READY FOR TAXI. Even if there is another aircraft in front of you, the controller should know that you are ready so that he may establish your sequence.
• Avoid taxiway incursions. Avoid conflict with traffic prior to movement and prior to entering any new taxiway.
Before Takeoff Engine Run-up. • Aircraft should be turned into the wind, to
the side of the taxiway as not to block the taxiway.
• Insure that prop blast is directed so as not to cause disruption, damage or injury to persons or property.
• Insure that aircraft is not sitting on ice, snow, standing water, gravel or other haz-ards.
• Complete recommended checklist, each item announced out loud.

Aero-Tech, Inc. Maneuvers Manual Evektor Sportstar Page 7
Aero-Tech, Inc. Copywrite 2006. All Rights Reserved. Revised: 12/13/07
• Ensure that the engine temperature and pressure are suitable for run-up and takeoff.
• Understand the elements being checked, the reasons for checking each item and how to detect a possible no-go situation.
• Divide attention inside and outside cockpit during run-up.
• Avoid incursions. Avoid conflict with traffic Radio Communications and Clearances • Contact the appropriate controller only after cockpit
duties are complete and you are READY to taxi or takeoff. Don’t dilly-dally after the clearance has been issued and you have accepted it.
• Pilots are expected to talk on the radio starting at flight lesson #2, even if it is required that the instructor tell the customer “Just say this...” and the pilot says it. Instruc-tors should not talk on the radio during normal opera-tions in normal flight sessions.
• Do not ask “permission”. A clearance is not the same as permission.
• Pronounce numbers correctly. 200 is two-zero-zero. 2,500 is two thousand, five-hundred.
• When reading back clearances, don’t repeat every word. Just repeat the numbers.
• Review the pilot/controller responsibilities outlined in the Airman’s Information Manual. Assure the pilot under-stands the elements related to ATC clearances and the pilot/controller responsibilities.
• Acknowledge radio communications using recom-mended phraseology. Do not use “roger”, “tally-ho”, “wilco,” and other slang.
• Never argue or show disrespect to controllers on the radio. You may call them on the phone once on the ground and discuss the situation.
• If a clearance is not accepted, first say “Negative.” then the aircraft call sign. Let there be no question that the pilot is not complying with the controller’s request. Then offer a brief explanation of why you can’t comply (“that heading will take me into the clouds”), and if you’re really sharp, offer an alternative action that you can safely conduct.
• Use the Aero-Tech Pilot Aid to assist in organizing the radio communication.
Light Gun Demonstration Light signals are taught to sport pilots, as Aero-Tech is located at a controlled field. Light signals facilitate communication between pilot and ATC in the event of a radio failure. A light gun signal dem-onstration must be performed prior to first solo. The instruc-tor will brief the pilot on where to look, and what he is ex-pected to see prior to the demonstration. • Instructor negotiates with tower controller for a light gun
demo about 3 miles from the airport.
• Instructor flies the aircraft and instructs the customer to look directly at the black tower cab.
• Instructor assists pilot in locating and iden-tifying the signal.
• Instructor performs pre-landing checklist and establishes the aircraft in a stabilized approach configuration.
• Pilot resumes control of the aircraft to land. Loss of Communications • Should 2-way communication with ATC be
lost while on the ground at the controlled field, obtain the tower’s attention by flash-ing the aircraft landing light and abide by the light gun signals in order to return to the ramp.
• If loss occurs while in the practice area AND you have been trained and authorized in cross-country flight, proceed to another local airport. Phone Aero-Tech for direc-tions once on the ground.
• If flight training has not yet included arrival at another airport or have not been author-ized in cross county flight, pilots should not attempt to navigate outside of the known practice area. Return to your home base. Squawk 7600. Maintain 2,500 MSL until descent should be made to enter the traffic pattern. Broadcast intentions into the blind on tower frequency.
• Enter the normal traffic pattern. If at any-time a light gun signal is observed, follow light gun signal directions.
• If loss occurs while in the traffic pattern, remain in the normal traffic pattern, squawk 7600, look closely for traffic, attempt to get the tower’s attention by flashing a landing light or gently rocking wings. (Don’t loose control of the aircraft.) Follow light gun signal directions. If no light gun signals are observed, continue in the normal traffic pattern, make a go-around, re-enter the traffic pattern and look for light gun signals. Chances are excellent that an aircraft mak-ing a no-radio go-around will receive light gun signals upon return to the downwind.
Traffic Pattern Operations – the traffic pattern is an orderly flow of traffic for aircraft arriving, departing and operating in the vicinity of air-ports. Arriving:
• Obtain ATIS information and contact the controlling agency prior to entering airspace, with your intentions. Give

Aero-Tech, Inc. Maneuvers Manual Evektor Sportstar Page 8
Aero-Tech, Inc. Copywrite 2006. All Rights Reserved. Revised: 12/13/07
the tower or approach control time to work you into the traffic flow.
• Determine the active runway by an appropriate method.
• Arrive at the appropriate traffic pattern altitude a minimum of two miles from the airport.
• Inbound aircraft observe other aircraft already in the traffic pattern and conform to the traffic pattern in use.
• Complete the pre-landing checklist. • Traffic pattern entries must be made which provide
a clear view of the entire traffic pattern and traffic on the ground. At no time should an entry be made which would conflict with the normal pattern. Generally, entry into the traffic pattern will be at a 45-degree ground track angle to the downwind leg abeam the mid-point of the landing runway, unless otherwise directed by ATC. Other accepted traffic pattern entries include: Flight over the runway at traffic pattern altitude, midfield, to the downwind.
Entry onto the crosswind leg • Proceed to a point well clear, 5 miles, of the traffic
pattern, until able to make an acceptable pattern entry.
• Traffic pattern altitude is 800 feet AGL. Maintain a safe altitude throughout the traffic pattern consider-ing the possibility of an engine failure - be able to glide to the runway.
• Maintain normal cruise speed unless conditions dictate otherwise or until opposite point of intended landing.
• Correct for wind drift for tight, close, rectangular pattern, using about ¼ to ½ mile distance from run-way along downwind, ¼ to ½ mile base and ¼ to ½ mile final legs.
• Visually check both left and right before turning to next leg.
• Announce intentions “into the blind” on CTAF fre-quency on uncontrolled fields, after turning each leg of the traffic pattern.
• Avoid traffic collisions. Avoid wake turbulence and wind shear.
Departing the airport and traffic pattern: • Establish a position perpendicular to the takeoff
runway so that you can see traffic on final ap-proach.
• Check final for traffic prior to pulling onto runway. Consider a 360-degree turn on the taxiway prior to taking the runway to clear traffic on downwind, base and final.
• Avoid traffic collisions. Avoid wake turbulence and wind shear.
• After liftoff, maintain proper runway alignment and appropriate climb airspeeds.
• Departures from the traffic pattern may be done by continuing the upwind leg until well clear of the traffic pattern (5 miles), or from a 45-degree angle off of downwind.
NOTE: The above procedures assume an ideal pattern situation. Additional traffic, ATC, local pattern restrictions, obstacles, etc., may dictate modification of these procedures. In all cases, the pilot will exercise good judgement and maintain positive aircraft control. Straight and Level Flight • Apply level flight power setting, 4,500
RPM. • Establish the flight attitude that results in
straight and level flight. – Wings level, no change in heading, Level pitch, no change in altitude.
• Maintain the straight and level attitude by reference to the attitude indicator and cross checked with the altimeter and head-ing indicator.
• Trim to relieve control pressures. • Make small adjustments by reference to
the horizon and maintain the desired head-ing and altitude.
• Maintain orientation outside cockpit for traffic avoidance.
Level Turns Medium bank turn to the left and right are prac-ticed first by reference to the horizon and a prominent landmark. • Look outside for traffic avoidance in the
direction of the turn, above and below the horizon.
• Bank ailerons with the use of proper rudder into the desired direction of the turn.
• Once the attitude is established, neutralize the controls.
• Once the landmark is in sight, apply oppo-site aileron and rudder control input to re-turn wings to level flight.
Climbs and Level off from Climbs Normal enroute climbs are performed with full power and a constant attitude. Proper attitude is nose slightly above the horizon, to allow for maxi-mum visibility. • Place nose in climb attitude with wings
level.

Aero-Tech, Inc. Maneuvers Manual Evektor Sportstar Page 9
Aero-Tech, Inc. Copywrite 2006. All Rights Reserved. Revised: 12/13/07
• Smoothly rotate in full power. • Add required right rudder to maintain heading. • Maintain power and attitude until the altitude is
achieved. • Note: If you find, time and time again, that you are left
of your desired heading – then you do not have enough right rudder!
Level off from climb after the selected altitude has been achieved. Do not anticipate level off from climb early. After the selected altitude is achieved. • Transition aircraft attitude to straight and level • Don’t retard throttle immediately. Allow airspeed to
increase to about 90 KIAS. • After normal cruise speed is achieved, then reduce
power to normal cruise power setting. (4,500 RPM) Descents and Level off from Descents Normal cruise descents are made with partial power to keep engine clear and to make a comfortable descent rate. • Reduce power to descent power setting (usually 3,000
to 3,500 RPM). • Place nose on or slightly below the horizon with wings
level. Level off from descents are anticipated by approximately 10% of the rate of descent, or in most cases, about 50 feet. Approximately 50 feet before reaching the desired altitude, • Smoothly rotate power in to cruise power. • Transition aircraft attitude to straight and level flight
attitude with wings level. Trim. Transition from a Climb to a Descent In the case of a longer climb which has resulted in the engine temperatures being in the yellow arcs, it is not recommended to suddenly reduce the engine power to idle and transit to a descent, because engine lubri-cation will be interrupted for a certain period of time. Therefore the throttle lever should be pulled back gradually and not suddenly.
Normal Takeoff and Climb
• Establish a position perpendicular to the
takeoff runway so that you can see traffic on final approach. Practice effective traffic avoidance. Check final for traffic prior to pulling onto runway.
• Use appropriate checklist. Set 15 degrees flaps.
• Transponder set to ALT. • Contact control tower only after cockpit
duties are complete and you are READY FOR TAKEOFF. Even if there is another aircraft in front of you, the controller should know that you are ready so that he may es-tablish your sequence for takeoff.
• Do not stop on the runway unless specifi-cally directed by the tower to do so.
• Align the aircraft with runway centerline, ailerons deflected into the wind, with eleva-tor neutral.
• Rotate power quickly and slowly until full power is achieved – cross check engine instruments.
• As aircraft reaches 35 KIAS, begin apply-ing back pressure on the control wheel un-til the takeoff attitude is reached. (Nose on the horizon.)
• Approximate time for takeoff is 7 seconds! • Allow aircraft to accelerate to Vy and main-
tain that airspeed until reaching 200 feet AGL, then accelerate to enroute climb speed. (70 KIAS) The enroute climb speed will provide better engine cooling during summer months.
• Retract flaps after Vy is achieved with a positive rate of climb.

Aero-Tech, Inc. Maneuvers Manual Evektor Sportstar Page 10
Aero-Tech, Inc. Copywrite 2006. All Rights Reserved. Revised: 12/13/07
• After aircraft reaches an altitude of 400 feet AGL, a turn
to the assigned heading should be initiated. Should ATC request an early turn out, pilots are urged to deny the request until reaching a safe altitude.
• Consider a safe emergency landing sight. • Trim. • Maintain directional control, coordination and proper
wind drift. Remain over runway centerline. • Comply with noise abatement procedures • Reduce power to 5,500 RPM. Full power of 5,800 is
limited to no more than 5 minutes. Normal Approach and Landing All approaches at Aero-Tech are “stabilized” approaches. Stabilized approach means that the aircraft is in a configuration and position where minimum change in power, trim, crab angle, and con-trols will result in a safe landing. Excessive control input is an indication of improper planning. Planning can be im-proved by establishing tasks to be accomplished on each leg of the traffic pattern. Downwind Leg: Objective - maintains altitude, stabilize approach airspeed. • Advise tower of your position and receive instructions
prior to turning base leg. • Perform pre-landing checklist abeam the touchdown
point. • Abeam the touchdown point, reduce power to approxi-
mately 3,500 RPM, maintaining altitude. Do not leave traffic pattern while flying away from the airport!
• After airspeed has entered the white arc, add 2 notches flaps. Allow airspeed to decrease to and maintain 60 KIAS.
• Trim. • After airspeed is stabilized, turn base.
Base Leg: Objective - maintain previously sta-bilized airspeed. Stabilize glide path. • Altitude - begin descent necessary to pro-
vide normal glide path to runway. An alti-tude providing for a safe glide to the run-way should be maintained (in the event of engine failure)
• Airspeed - stabilized at (60 KIAS). • Verify all pre-landing checklist items are
complete. • After glide path, rate of descent and air-
speed are stabilized, turn final. Final: Everything is stabilized, only small adjustments are made. • Airspeed is (55-60 KIAS) not more than
1.3 Vso, stabilized. Reduce throttle as ap-propriate.
• Always be mentally primed for a safe go-around.
• Glide path - stabilized with constant rate of descent between 500 and 800 FPM.
• Trim. • Over touchdown threshold, slowly retard all
power. • Touchdown should be full stall, exactly on
centerline, with no side load, no power, no brakes.
• Touchdown smoothly at or within 200 feet of the desired point, (But within the first 1/3 of runway unless wake turbulence condi-tions dictate otherwise)
• After main wheels have touched down, continue holding backpressure on nose wheel and crosswind direction control until aircraft speed slows. Nose will lower when aerodynamically ready.
• Apply brakes, remaining on centerline. (You should hear centerline lights on the nose wheel).
• Maintain full attention now, outside cockpit until the aircraft has exited the runway and comes to complete stop on taxiway.
• Do not attempt to adjust trim, flaps, fre-quencies, etc while aircraft is moving.

Aero-Tech, Inc. Maneuvers Manual Evektor Sportstar Page 11
Aero-Tech, Inc. Copywrite 2006. All Rights Reserved. Revised: 12/13/07
Crosswind Takeoff and Climb
• Establish a position perpendicular to the takeoff runway
so that you can see traffic on final approach. Check for traffic prior to pulling onto runway.
• Set 15 degrees flaps. • Contact control tower only after all cockpit duties are
complete and you are READY FOR TAKEOFF. Even if there is another aircraft in front of you, the controller should know that you are ready so that he may estab-lish your sequence for takeoff.
• Do not stop on runway unless specifically directed by the tower to do so.
• Apply power smoothly and slowly until full power is achieved – cross check engine instruments
• Align the aircraft on runway centerline. • Full aileron deflection into wind. Aileron deflection is
slowly taken out as airspeed increases. • Rudder as necessary to keep nose straight. • Lift off at slight higher airspeed to assure clean liftoff -
not to settle back to ground. (50/55 KIAS) • Establish wind correction “crab” to maintain runway
centerline as aircraft climbs. • Reduce power to 5,500 RPM. Full power of 5,800 is
limited to no more than 5 minutes. Crosswind Approach and Landing • Maintain a normal traffic pattern approach and glide
path until final leg. • Use wind correction “crab” angle method to maintain
centerline track during final leg. (Not slip method) • During landing flare, use aileron to control drift. • Use rudder to control runway alignment with longitudi-
nal axis of aircraft. • Touchdown only after a full stall has been established,
at or within 200 feet of the desired point (but within first 1/3 of runway unless conditions dictate otherwise), ex-actly on centerline with no side load and no power.
• Continue to hold aileron after landing until full deflection is reached.
• Apply brakes, remaining on centerline dur-ing after landing roll-out.
• Maintain full attention outside cockpit until the aircraft comes to complete stop on taxiway.
• Do not attempt to adjust trim, flaps, fre-quencies, etc while the aircraft is moving.
Soft Field Takeoff and Climb
Soft field takeoffs may be done with or without a 50 ft obstacle at the departure end of the runway. Generally a nose high attitude is main-tained during the takeoff roll so as to transfer the aircraft’s weight to its wings and lift off as soon as practical. After lift off, the aircraft is maintained in ground effect until accelerating to a safe flying speed. • Establish a position perpendicular to the
takeoff runway so that you can see traffic on final approach.
• Check final for traffic prior to pulling onto runway.
• Set flaps 15 degrees • Contact control tower only after cockpit
duties are complete and you are READY FOR TAKEOFF. Even if there is another aircraft in front of you, the controller should know that you are ready so that he may es-tablish your sequence for takeoff.
• Once taxi roll to runway has begun, do not brake to stop after aligning with centerline. Allow aircraft to roll. - Unless specifically directed by the tower.
• Align the aircraft with runway centerline. • Position flight controls for wind. • Apply power smoothly and slowly until full
power is achieved – cross check engine instruments.
• Maintain runway centerline. • Pitch attitude - lift off at lowest possible
speed. But do not over rotate. • After liftoff, decrease pitch attitude to
straight and level flight attitude to remain within ground effect and accelerate to Vx or Vy as appropriate.
• Climb at Vx or Vy, retract flaps.

Aero-Tech, Inc. Maneuvers Manual Evektor Sportstar Page 12
Aero-Tech, Inc. Copywrite 2006. All Rights Reserved. Revised: 12/13/07
• Maintain directional control, coordination and proper wind drift to remain over runway centerline during clim-bout.
• Reduce power to 5,500 RPM. Full power of 5,800 is limited to no more than 5 minutes.
• Above 400 ft AGL, establish cruise climb. Soft Field Approach and Landing The approach is same as a normal approach, but power is added during the flare to provide forward momentum. The touchdown will be slower and softer than normal. Maintain a normal traffic pattern, approach and glide path, until final: See Normal Approach and Landing for downwind and base legs. On short Final: Everything is stabilized, only small correc-tions are made to maintain centerline. • Airspeed between 55 and 60 KIAS – stabilized, with 30
degrees (2 notches) flaps • Glide path - stabilized with constant rate of descent 500
to 700 FPM. • Trim. • During landing flare, apply a small momentary burst of
power (about 300 RPM) and pitch control to achieve forward momentum, but with minimum speed. Then immediately retard throttle.
• Touchdown in first 1/3 of runway unless conditions dic-tate otherwise, nose high attitude, with no wind drift
• Continue holding back pressure to keep the weight off the nosewheel as long as possible – but do not over ro-tate.
• After main wheels have touched down, continue holding backpressure on nose wheel and crosswind direction control until aircraft stops. But do not over-rotate.
• Do not use brakes. Remain on centerline. • Maintain full attention outside cockpit until the aircraft
comes to complete stop on taxiway. • Do not attempt to adjust trim, flaps, frequencies, etc
while the aircraft is moving. Short Field Takeoff
• Establish a position perpendicular to the takeoff runway so that you can see traffic on final approach.
• Check final for traffic prior to pulling onto runway.
• Set flaps 15 degrees. • Contact control tower only after cockpit
duties are complete and you are READY FORTAKEOFF. Even if there is another aircraft in front of you, the controller should know that you are ready so that he may es-tablish your sequence for takeoff.
• After cleared for takeoff, taxi onto the run-way, utilizing all available runway, align the aircraft with the centerline, straighten nosewheel and stop.
• Position flight controls for wind. • Hold brakes so that aircraft cannot roll. • Rotate power in smoothly and quickly until
full power is achieved - check engine in-struments.
• After full power is reached, release brakes and maintain runway centerline.
• Allow all wheels to remain on the ground until (52 KIAS). Lift off at Vx and climb at Vx (52 KIAS).
• When clear of obstacle (50 foot AGL), ac-celerate to Vy. At Vy, retract flaps.
• Reduce power to 5,500 RPM. Full power of 5,800 is limited to no more than 5 min-utes.
Short Field Approach and Landing The purpose of a short field approach and landing is not simply to utilize the minimum runway, but to put the aircraft on the runway at a specified point. For training purposes, this is not nor-mally the runway threshold. Instructors will provide a margin f safety by choosing the 2nd or 3rd runway light as the selected landing point. The short field may be conducted over a 50-foot obstacle or it may not have an obstacle. Use a slightly enlarged traffic pattern to allow for planning. Base: Full 50 degrees (3rd notch) flaps down. Final: Everything is stabilized; only small corrections are made to maintain centerline. • Airspeed 55 KIAS - stabilized. However
this airspeed must be adjusted during the transition to an airspeed that will result in little or no float upon landing. The adjusted airspeed will vary due to existing condi-tions.

Aero-Tech, Inc. Maneuvers Manual Evektor Sportstar Page 13
Aero-Tech, Inc. Copywrite 2006. All Rights Reserved. Revised: 12/13/07
• Glide path - slightly steeper than normal, stabilized with constant rate of descent.
• Trim. • Power – smoothly retard throttle once specified point on
the runway is assured. • Touchdown smoothly, full stall, at or within 200 feet of a
specified point, with no wind drift. • After main wheels have touched down, continue to hold
back pressure. Retract flaps to allow weight to be shifted to main landing gear. Hold controls full aft to force aircraft weight on to main gear.
• Tap the toe brakes and release, several times, to stop in the shortest distance consistent with safety. Don’t burn up the brakes. Don’t skid. Remain on centerline.
• Maintain full attention outside cockpit until the aircraft comes to complete stop on taxiway.
• Do not attempt to adjust trim, flaps, frequencies, etc while aircraft is moving.
Forward Slip to Landing NOTE: Slips are normally used as an alternative to flaps. For that reason, slips are performed WITHOUT FLAPS. Executing a slip as a maneuver to loose altitude with the Sportstar is not as effective as using the flaps to loose alti-tude, Downwind and Base legs are like a normal approach. • On downwind, slow aircraft to normal approach speed
- about (60-65 KIAS) without flaps. • On base and final, plan a slightly higher altitude than
normal to give the aircraft room for the high rate of de-scent normally associated with a slip.
• Plan the slip entry. Begin a forward slip only from a position that the slip can be continued throughout land-ing, in the first 1/3 of the runway. (Conditions allowing.)
• The slip is not considered successful if the pilot has not planned the entry to allow the slip to continue all the way to the point of touchdown.
• Conduct the slip with wing into the wind. • Exaggerate or lessen the degree of the slip using rud-
der to control glide path, normally about 700 to 800 FPM
• Maintain ground track aligned with runway centerline using ailerons.
• Maintain approach speed until the flare. The aircraft is flying at an angle to the relative wind (a high drag situa-tion) and care must be taken to maintain a safe pitch at-titude.)
• Make a smooth recovery from the slip by removing any excess rudder pressure and ailerons
• Keep the nose up, to maintain airspeed which results in minimum float during roundout.
• Make sure that the longitudinal axis is aligned with the runway to prevent the air-craft from touching down with side-loads.
• Touchdown smoothly making a normal, full stall on the centerline touchdown at or within 400 feet beyond a specified point.
• After touchdown - maintain centerline dur-ing roll out.
• Maintain full attention outside cockpit until the aircraft comes to complete stop on taxiway.
• Do not attempt to adjust trim, flaps, fre-quencies etc. while the aircraft is moving.
• Never slip with fuel quantity with less than ¼ tank because during a slip, fuel may move to the outside of the fuel tank outlet.
General Guidelines on all Approaches • Never try and stretch the glide path. Go
around. • Never slip once flaps have been extended.
– go around. • Never retract flaps once extended. Go
around. • Never sacrifice safety just to land on a de-
sired spot. This macho-attitude is danger-ous.
• A proper base leg altitude and glide path will determine the probability of a landing at the desired touchdown point.
• On short final: concentrate on making a safe touchdown, full stall, corrected for wind drift, on centerline.
• Always be mentally primed for a go-around Go-Around/Rejected Landing/Low Approach A go-around is simply an aborted landing. The Control Tower may also refer to a go around as a “low approach”, “rejected landing, ”or “missed approach.” Instructors will instruct customers on the many terms that mean the same thing: do not touchdown on the runway. The objective is to make a timely decision to abandon the approach, to transition the aircraft from the landing configuration to the climb con-figuration while maintaining positive control.
Smoothly apply coordinated, full power. • Increase pitch attitude to straight and level
flight. Stop the descent. Don’t try to climb yet – but stop the descent. Don’t touch-down.
Once the decision is made to go-around – don’t change your mind. Continue with the go-around.

Aero-Tech, Inc. Maneuvers Manual Evektor Sportstar Page 14
Aero-Tech, Inc. Copywrite 2006. All Rights Reserved. Revised: 12/13/07
• Flaps – retracted to 20 degrees. Maintain control. • Attitude - Set for Vy climb • Retract remaining flaps. Maintain control. Trim. • Maintain directional control and proper wind drift. • Once obstacles are cleared, adjust pitch for normal
climb. • Use collision avoidance techniques. • Use recommended go-around checklist. Touch-and-Go’s versus Stop-and-Go’s Touch and goes are not recommended. Stop-and-Go’s should be re-quested thus allowing the pilot to complete the landing roll and come to rest prior to beginning the takeoff. This allows the landing sequence to be completed and it allows the pilot and instructor o mentally prepare for a safe takeoff. After touchdown and prior to takeoff: • Come to a complete stop on runway centerline • Throttle - idle. • Flaps retracted to takeoff position. • Trim to neutral. • Release brakes. • Throttle – increase smoothly to full. Check engine in-
struments. • Adjust controls for wind corrections. • Maintain centerline. In circumstances where the runway remaining distance is not judged to allow a safe takeoff, then after touchdown, taxi back to the end of the runway for a full-length departure. Collision Avoidance Procedures Collision avoidance pro-cedures are a collection of techniques the pilot uses to “drive-defensively”. The ultimate goal of collision avoidance techniques are to allow pilots of two different aircraft to spot and to avoid each other and allow our aircraft to be-seen while moving under its own power, in flight or on the ground. Collision avoidance procedures used at Aero-Tech include, but are not limited to: • During ground operations, have your full attention
outside the cockpit. Don’t get distracted inside by writ-ing clearances, looking at the checklist, or programming the GPS.
• Prior to taking the runway, scan for traffic on base and final. Also look down the runway and look on final and base legs of the opposite runway.
• Conduct clearing turns, prior to pitch change maneu-vers.
• When turning, first look for traffic in the direction of the turn. Begin your scan from as far back, toward the tail as you can see – and continue all the way forward to the nose. Scan below your aircraft altitude all the way up to the bottom of your wing.
• When in traffic patterns, make climbing turns not more than 30 degrees angle of bank. This aids in seeing over the cowling.
• When at uncontrolled airports, announce turning each traffic pattern leg on CTAF frequency.
• While in the traffic pattern at controlled fields, announce the downwind leg and re-ceive a sequence prior to turning base.
• Know the right-of-way rules, but be willing to give up your right-of-away, should safety dictate.
• At night, turn on your landing light upon entering the traffic pattern.
• Sit correctly in the pilot seat. Be ready to
react appropriately to avoid a hazard by remaining in a normal flying position with hands and feet on controls.
• Consider that the other aircraft does not have you in sight and expect the unex-pected.
An aircraft on the horizon, growing in size, which remains in the same relative position on your windshield is on a collision course with you. Take immediate action. The closure rate on converging aircraft is fast. A lot of discussion is given to the use of aircraft lights (beacon, nav and/or landing) for collision avoidance during the day. The Flight Training Handbook does not recommend the use of the lights during the day as an anti-collision proce-dure. Thus the school does not recommend it either. Utilizing lights during the day increases the chances that the lightbulbs will be unusable at night - when they are needed. Clearing Turns Clearing Turns confirms to the pilot that the airspace immediately surrounding the aircraft is clear of other traffic, obstacles and hazards. Clearing turns proceed maneu-vers requiring a change in pitch attitude includ-ing slow flight and stalls on solo flights. Clear-ing turns are not required on dual flights at the instructor’s discretion. Clearing turns are two 90-degree turns in the opposite direction. • Visually scan the area to the left and the
right of the aircraft. • “Clear” the area by looking for traffic in
front of aircraft, above and below.
NOTE: Sport pilots are not permitted to fly at night. However, an appropriately rated pilot may fly the Evektor Sportstar at night.

Aero-Tech, Inc. Maneuvers Manual Evektor Sportstar Page 15
Aero-Tech, Inc. Copywrite 2006. All Rights Reserved. Revised: 12/13/07
• Enter a medium bank turn. Continuously scan the area above, below and ahead of the flight path.
• After 90 degrees of turn is completed, roll the aircraft level and into a medium bank turn back to the start heading.
• Begin the process turning 90 degrees in the opposite direction and return to original heading/
• Your heading should now be the same as the initial assigned heading, arriving at the appropriate airspeed for the maneuver, ready to immediately start the ma-neuver.
Steep Turns Consists of a, coordinated, 360-degree turn, maintaining a constant 45-degree bank, while maintaining an assigned altitude. At the completion of the first turn, roll out on the start-heading and smoothly rotate the controls to enter a turn into the opposite direction. Steep turns are best performed when a constant attitude relative to the horizon is maintained. This is not a maneuver that can be accom-plished by reference to instruments. Large pitch changes to maintain altitude will not be successful. The mission of the steep turn is to develop smoothness, coordination, orienta-tion, division of attention and control techniques. • Select an altitude no lower than 1,500 feet AGL. • Visually clear the area, establish Va. • Smoothly roll into a coordinated turn in either direction,
at the 45 degrees angle of bank. • As the bank angle and load factor increases, increase
backpressure to maintain a level attitude • Increase power to maintain airspeed. • Trim for a level-turn attitude. • Maintain a constant bank angle, altitude and airspeed
during the turn. • Divide attention between airplane control, traffic avoid-
ance and orientation. Use the outside horizon to main-tain a smooth, constant level-bank attitude.
• Lead a coordinated roll-out by about 20 degrees. Roll out on the initial heading and roll immediately into a 360-degree turn in the opposite direction.
• After completion of the second turn, return to straight and level at cruise.
Ground Reference Maneuvers Ground reference maneu-vers teach the pilot to divide his attention between the air-craft performance, outside references and traffic avoidance. Ground reference maneuvers at Aero-Tech are taught at 800 feet AGL. The rectangular course is introduced first, followed by turns around a point then S-Turns to enable the private pilot to build on each new skill. Rectangular Course This procedure consists of maneuver-ing the aircraft over a predetermined ground path. The pilot will vary the crab angle to compensate for wind. The result-ing ground path will be parallel lines to the reference course. The pilot will lead or delay turns for wind drift to maintain
equal distance from the reference course all the way around course. • Select a clearly defined course – a horse
farm, or rows of trees. • Use vigilance in possible landing site in the
event of engine failure. • Apply adequate wind drift correction, to
maintain uniform distance along all legs – about ½ mile
• Maximum bank angle is 45 degrees. • Enter maneuver on a 45 degree angle to
downwind, making the first circuit with turns to the left.
• Vary the crab angle to maintain a uniform distance from the reference course.
• Plan to lead or delay the entry of the turn leading into the next side of the rectangle to remain equal distant from the course during the turn, rolling out, in proper posi-tion to begin the next leg.
• Maneuver is complete after one full rectan-gle.
• Maintain traffic pattern altitude - 800 feet AGL.
• Roll out on original heading and altitude. • Prepare to reverse the course if requested. • Maintain division of attention between traf-
fic avoidance, reference course, ground track, and altitude
Turns Around A Point
During this procedure, a constant distance will be maintained from a prominent reference point. The resulting ground track will be a per-fect, round circle. The angle of bank and the crab angle will vary, to compensate for the wind and associated changes in groundspeeds. All turns must be coordinated. • Determine the wind direction and turn to a
downwind heading.
Aero-Tech, Inc. Maneuvers Manual Evektor Sportstar Page 16
Aero-Tech, Inc. Copywrite 2006. All Rights Reserved. Revised: 12/13/07
• Clear the area. Return to downwind heading. • Choose a suitable reference point:
• Away from congested area or obstacles. • Out the pilot-side window. • Ahead – given time to descend and get ready. • Just off the wingtip distance out. • A small round object is best. A silo, tree, or inter-
section of roads is better than a object that does not look the same from all sides.
• With possible nearby emergency landing site. • Descend to 800 AGL. • Entry to the maneuver will be made downwind. • Discuss first the crab angle pertaining to wind-drift to
maintain a constant radius circle. • Then discuss bank angle and how it relates to wind
correction and ground speed. • Apply coordinated bank and crab-angle together for
wind-drift correction to track a constant radius circle around the reference point with a bank of no more than 45 degrees at the steepest point in the turn.
• Use proper coordination. • Maneuver is complete after two complete circles of uni-
form distance from the reference point. • Maintain traffic pattern altitude - 800 feet AGL. • The maneuver is complete after two complete circles. • Roll out on entry heading, altitude and airspeed. • Maintain division of attention between traffic avoidance,
reference point, ground track, altitude and angle of bank.
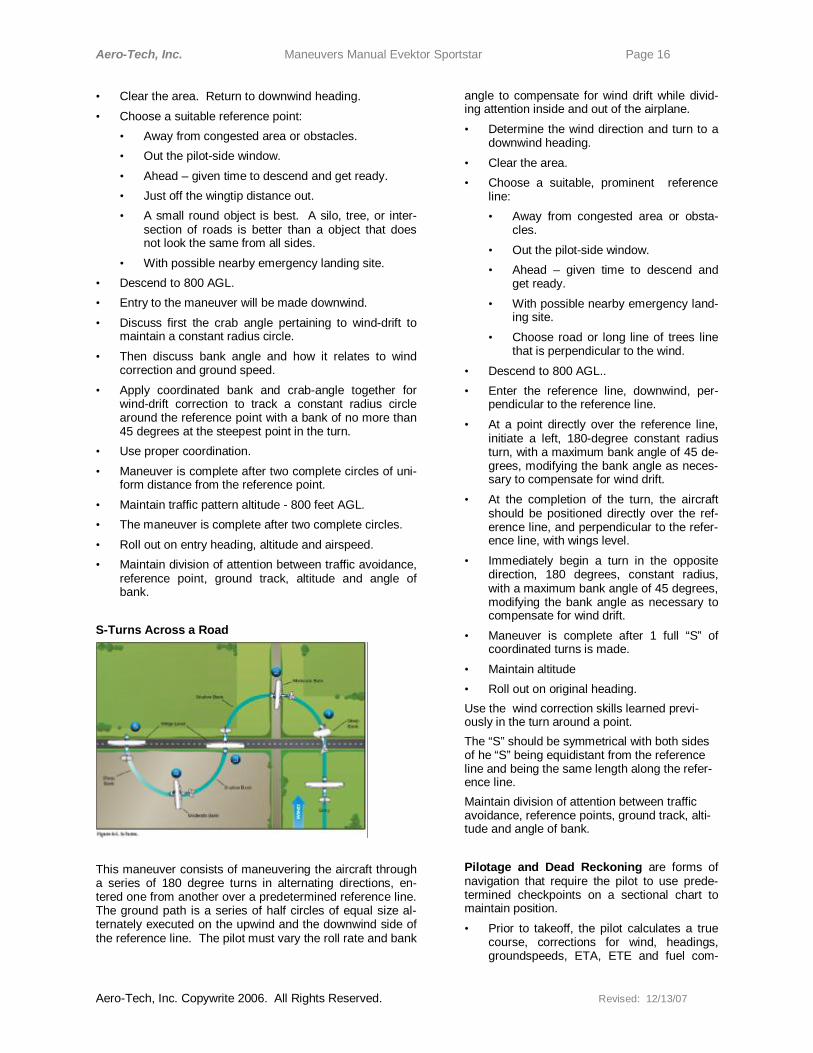
S-Turns Across a Road
This maneuver consists of maneuvering the aircraft through a series of 180 degree turns in alternating directions, en-tered one from another over a predetermined reference line. The ground path is a series of half circles of equal size al-ternately executed on the upwind and the downwind side of the reference line. The pilot must vary the roll rate and bank
angle to compensate for wind drift while divid-ing attention inside and out of the airplane. • Determine the wind direction and turn to a
downwind heading. • Clear the area. • Choose a suitable, prominent reference
line: • Away from congested area or obsta-
cles. • Out the pilot-side window. • Ahead – given time to descend and
get ready. • With possible nearby emergency land-
ing site. • Choose road or long line of trees line
that is perpendicular to the wind. • Descend to 800 AGL.. • Enter the reference line, downwind, per-
pendicular to the reference line. • At a point directly over the reference line,
initiate a left, 180-degree constant radius turn, with a maximum bank angle of 45 de-grees, modifying the bank angle as neces-sary to compensate for wind drift.
• At the completion of the turn, the aircraft should be positioned directly over the ref-erence line, and perpendicular to the refer-ence line, with wings level.
• Immediately begin a turn in the opposite direction, 180 degrees, constant radius, with a maximum bank angle of 45 degrees, modifying the bank angle as necessary to compensate for wind drift.
• Maneuver is complete after 1 full “S” of coordinated turns is made.
• Maintain altitude • Roll out on original heading. Use the wind correction skills learned previ-ously in the turn around a point. The “S” should be symmetrical with both sides of he “S” being equidistant from the reference line and being the same length along the refer-ence line. Maintain division of attention between traffic avoidance, reference points, ground track, alti-tude and angle of bank. Pilotage and Dead Reckoning are forms of navigation that require the pilot to use prede-termined checkpoints on a sectional chart to maintain position. • Prior to takeoff, the pilot calculates a true
course, corrections for wind, headings, groundspeeds, ETA, ETE and fuel com-

Aero-Tech, Inc. Maneuvers Manual Evektor Sportstar Page 17
Aero-Tech, Inc. Copywrite 2006. All Rights Reserved. Revised: 12/13/07
pensation and researches information about destination airports and possible alternate destinations. Planning is not complete until all available information regarding the planned course is obtained by the pilot. This includes but is not limited to: weight and balance, takeoff and landing distances, airspace and a full weather briefing.
• Use the POH for all airplane performance. • Use a highlighter marker to make the true course line
easy to see. Clearly identify landmarks. • Prepare a one page, neatly organized Navigational Log
by which to monitor the flight plan. • Utilize good cockpit management, placing all equipment
and charts within easy reach. • Navigate by means of pre-computed headings, correct-
ing for and recording the difference between preflight calculations and those found to exist.
• Follows the preplanned course by reference to land-marks.
• Maintain appropriate altitude for direction of flight, most favorable winds, terrain clearance and checkpoints to be used.
• Maintain an awareness of airspace and radio communi-cation requirements.
• Corrects and records the differences between preflight groundspeed and heading calculations and those de-termined en route.
• Verify the airplane position within 3 nautical miles of the flight planned route at all times.
• Arrive at the enroute checkpoints and destination within 5 Alternately switch fuel selector from LEFT to RIGHT position to ensure even fuel pumping from both tanks. minutes of ETA.
• Consider planning a backstop point for the destination - so as not to overfly the destination.
GPS The Global Positional System is a form of navigation using satellite navigation. GPS may be a stand-alone lesson for a pilot at any level, however it is normally introduced to pilots, one function at a time during routine lessons. The extent of instruction in GPS depends on the aircraft being flown: While pilots are not required to have specific knowledge of GPS, they are required to navigate and to use all available resources. Because the Evektor is equipped with a Garmin 296 GPS, the pilot must have conceptual knowledge of the GPS sys-tem as well as button-ology skills of the unit. • Basic skills include: • Pages and chapters. • Entering a flight plan. • Direct to • Nearest airport and nearest COM frequency
• Interpretation of the on course indication, making corrections for on course.
• Recognizing signal loss. • Interpreting groundspeed, ETA information
and other information. Entering a flight plan is the preferred method of using the GPS while navigating cross-country. Direct-To is the preferred method of returning to the airport at the completion of the lesson. NRST is the preferred method of dealing with an emergency. Diversion to an Alternate When it becomes necessary to change course while enroute, a new course will be plotted and flown and the ETA revised. • Determine present position and the loca-
tion of the new destination. • Select an appropriate route to the alter-
nate. • Divert promptly toward the alternate. • Draw the course on your chart and note
the starting position and time. • Determine distance and magnetic heading. • Make an accurate estimate of heading,
groundspeed, arrival time and fuel con-sumption to the alternate.
• Fly your new route as planned. Maintain an appropriate altitude.
• Maintain an awareness of airspace consid-erations and communication requirements.
• Revise your flight plan as necessary with the nearest FSS.
• Utilize all available resources to accom-plish the task.
• If the GPS is operational, select the NRST function.
Lost Procedures Pilots must know the types of assistance available as well as how to re-quest it. However, for purposes of progress checks and FAA checkride, pilots must be able to determine position and reestablish a course without ATC assistance. • Stay calm. Do not panic. You probably
knew where you were 15 minutes ago. At an average ground speed of 100 knots, you are probably within 15 miles of your last known position.
• Maintain positive aircraft control. • AVIATE, NAVIGATE, COMMUNICATE

Aero-Tech, Inc. Maneuvers Manual Evektor Sportstar Page 18
Aero-Tech, Inc. Copywrite 2006. All Rights Reserved. Revised: 12/13/07
• Maintain your planned heading until a decision has been made to change headings, don’t wander, don’t circle.
• Normally, a heading paralleling the planned true course will result in recognizing planned landmarks.
• Verify heading with compass/GPS/chart.. • Trim the aircraft for straight and level flight. Use the
autopilot if installed. • Use all available resources, nav aids, and landmarks to
determine position. • Consider climbing to a high altitude for better nav aid
reception. • Remain aware of terrain clearances and airspace re-
quirements. • Plan a precautionary landing if deteriorating weather
and or fuel exhaustion is imminent. • DO NOT circle or wander. Slow Flight and Stalls The objective of slow flight is to develop the pilot’s ability to use the controls correctly, to improve proficiency in performing low airspeeds and to es-tablish and maintain the airspeed appropriate for landing. Emphasize outside references. Correlate the stall attitude learned in the practice area to the landing attitude. The objective of teaching stalls is not to emphasize the pro-cedure of doing the stall, but rather to teach the recognition of the impending stall, plus the recovery of the stall. Altitude loss of 300 to 400 feet are acceptable on initial lessons to insure the customer perfects recovery procedures. Recov-ery procedures will emphasize nose below horizon before adding power. Stalls may be imminent, meaning that recovery is made as soon as the first indication of an oncoming stall, thus the stall does not fully develop. Or, they may be full, meaning that the stall is allowed to occur. Power on stalls may be introduced initially with partial power (3,000 RPM) until the correct reactions have been learned. Power off stalls may be done in the clean configuration or in the landing configuration. Additionally, stalls should be practiced from left and right turns. • When a power off stall includes a turn, it is commonly
referred to as an Approach to Landing Stall. When a power on stall includes a turn, it is commonly referred to as a Take off and Departure Stall. When a stall is con-ducted while turning, it is normally done with about 20 degrees angle of bank or less.
• All stalls and stall recoveries must be coordinated. • Stalls must be performed to allow the task to be com-
pleted no lower than 1,500 feet AGL.
Maneuvering During Slow Flight
Maneuvering during slow flight is taught so that pilots understand the flight characteristics and controllability at it’s minimum flying speed. The pilot will experience control surfaces that are “mushy” and less responsive. And, additional power is necessary to maintain altitude in this high drag configuration. • Choose an altitude at least 1,500 AGL. • Use outside references, nose on the hori-
zon. • Clearing turns. • Begin on a known heading and altitude. • Gradually reduce throttle. • Allow the airspeed to decrease, noting the
position of the nose on the horizon. • Raise nose as necessary to maintain alti-
tude. • Maintain coordination and traffic avoid-
ance. • As airspeed is decreased into the white
arc, add full flaps if desired. • Maintain altitude. Additional power is
added as speed is reduced behind the power curve.
• Establish 46 – 50 KIAS, an airspeed at which any further increase in angle of at-tack, increase load factor or reduction in power would result in a stall.
• Re-trim often and compensate for changes in control pressures at slow airspeeds.
• Maintain coordination. Maintain heading. • Divide attention between airplane control
and orientation. Scan for traffic. • When attitude, airspeed and power have
been stabilized, introduce shallow bank turns (15 degrees or less) to assigned headings, left and right to practice maneu-vering at slow flight.
• Then introduce climbs and descents to assigned altitude at slow flight.
Recovery, • Add full power.

Aero-Tech, Inc. Maneuvers Manual Evektor Sportstar Page 19
Aero-Tech, Inc. Copywrite 2006. All Rights Reserved. Revised: 12/13/07
• Retract flaps one notch at a time. Abruptly raising flaps will result in lift being lost and the aircraft to sink or stall.
• Maintain heading, altitude and coordination. • Allow airspeed to increase to normal cruise. • Reduce power to cruise. • Divide attention between airplane control and orienta-
tion. Scan for traffic. Distractions should be included as part of the Slow Flight training. They could include: asking the pilot simple ques-tions, asking the pilot to dial a frequency into the Com, ask-ing pilot to cancel radar service with ATC, etc. Power Off Stall (and Approach to Landing Stall)
• Choose an altitude at least 2,000 AGL • Use outside references, nose on the horizon. • Clearing turns • Begin on a known heading and altitude • Entry
• Gradually retard throttle to idle. • Allow the airspeed to decrease, noting the position
of the nose on the horizon. • Increase pitch attitude to maintain altitude. • As airspeed decreases into white arc, full flaps may
be added. • Maintain coordination and traffic avoidance. • Continue to increase backpressure to increase an-
gle of attack until the first sign of stall occurs. (Buf-feting)
• Recognize the stall and recover. • Recovery – In sequence:
1. Relax backpressure on the control stick to allow nose to come below the horizon.
2. After nose is below the horizon, smoothly add full power.
3. Transition to straight and level flight attitude 4. Maintain coordination. 5. Allow airspeed to increase. 6. Retract flaps prior to accelerating above the white
arc. 7. Climb back to initial altitude.
8. Resume normal cruise on original heading
9. On recovery with flaps extended en-sure you do not exceed speed with flaps extended (70 KIAS)
Power On Stall (and Takeoff and Departure Stall)
• Choose an altitude at least 2,000 AGL • Use outside references, nose on the hori-
zon. • Clearing turns • Begin on a known heading and altitude • Entry
• Gradually retard throttle to idle.. • Allow the airspeed to decrease, noting
the position of the nose on the hori-zon.
• Increase pitch attitude to maintain alti-tude.
• Flaps - none. • Allow airspeed to decrease to about
50 KIAS. • Maintain coordination and traffic avoid-
ance. • Apply 4,000 RPM power. • Briskly pull back on controls to in-
crease back pressure until first sign of stall.
• Maintain coordination. • Recognize and recover.
• Recovery – In sequence 1. Set pitch attitude below the horizon to
recover from stall. 2. Level wings.

Aero-Tech, Inc. Maneuvers Manual Evektor Sportstar Page 20
Aero-Tech, Inc. Copywrite 2006. All Rights Reserved. Revised: 12/13/07
3. Transition to straight and level flight attitude 4. Maintain coordination. 5. Climb back to initial altitude. 6. Resume normal cruise on original heading 7. On recovery with flaps extended ensure you do not
exceed speed with flaps extended (70 KIAS) Emergencies. Emergencies vary greatly in their type and the proper way to handle each. A complete list of appropri-ate checklists is available in the pilot operating handbook for dealing with systems ad equipment malfunctions. A thor-ough review of these checklists should result in memory items specific to most emergencies. The best glide ratio of the Sportstar is approx. 9:1 and is achieved with the wing flaps retracted, with power at idle and 57 KIAS. The rate of descent varies around 630 ft/min. To loose altitude as fast as possible, then instead of slipping it is recommended with the Sportstar to fully extend the wing flaps and glide at 65 KIAS. The rate of descent will be around 1,400 ft/min. Recovery From Unusual Flight Attitudes The instructor will place the aircraft in an unexpected attitude. When told to recover, the customer will assume control, stabilize the aircraft and return it to straight and level. Pilots will learn to recognize and recover from an unusual attitude by reference to horizon and available instruments. • The pilot is instructed to remove his hands and feet
from the controls, and close his eyes. • The instructor puts the aircraft into either a nose high or
nose slow critical flight attitude. • Then the instructor will clearly announce, “Open your
eyes and recover.” • The customer will open his eyes; correctly determine
what kind of attitude the airplane is in, the risk associ-ated with he attitude and how to best recover.
• Correct recovery is initiated and the aircraft is stabilized without scarring anyone.
• Return to original flight path as rapidly as practical. While space does not allow for a complete discussion of all possible situations, two common situations and their respec-tive recovery procedures are: Nose-high – airspeed low, decreasing: • Lower the nose below the artificial horizon and simulta-
neously apply full power • Level the wings. • Cross-check and verify instruments. • Establish straight and level flight at cruise power on
original flight path.
Nose low- airspeed high, increasing • Retard throttle • Level wings • Smoothly raise the nose to level flight atti-
tude with over stressing the aircraft. • Cross-check and verify instruments. • Establish straight and level flight attitude,
cruise power on original flight path. Steep Spirals A steep spiral is a continuous gliding turn, during which a constant radius around a point on the ground is maintained. The objective is to improve pilot proficiency in power off gliding turns, wind drift control, plan-ning, orientation and division of attention. Aero-Tech teaches the steep spiral to sport pilot candidates as an emergency maneuver. • Maneuver the aircraft to a point abeam a
prominent reference. Note heading. • Select an altitude sufficient to continue for
the desired number (at least 3) descending turns.
• As the aircraft is being maneuvered into place, reduce power to idle and allow the aircraft to slow to 65 KIAS prior to starting the descending spiral.
• Maintain 65 KIAS. • Adjust the bank angle, correcting for wind,
to track a constant radius circle around the selected reference point with bank not to exceed 45 degrees.
• Divide attention between coordinated air-craft control, traffic avoidance and ground track
• The instructor will clear the engine by ad-vancing the throttle at least once each 360 degrees of turn.
Upon completion of the specific number of turns, but not below 1,500 AGL, terminate the maneuver by applying full power, returning to straight and level, at cruise speed on initial heading. Emergency Approach and Landing (Simu-lated Engine Failure) Engine failure in any flight phase is simulated by pulling the throttle lever to idle. Never shut down the engine to practice engine failures! This procedure consists of maneuvering the aircraft without power so as to land at a prede-termined landing site while simultaneously completing the appropriate cockpit procedures. • Establish and trim to best angle of glide
speed (60 KIAS)

Aero-Tech, Inc. Maneuvers Manual Evektor Sportstar Page 21
Aero-Tech, Inc. Copywrite 2006. All Rights Reserved. Revised: 12/13/07
• Select a suitable field within gliding distance or spiraling over top of landing site, considering wind.
• Stay in the immediate vicinity of the landing site. • If time and altitude permits, establish a near-normal
traffic pattern around the landing site. • While enroute to the landing site, attempt to determine
the malfunction and verbally announce each item on the emergency checklist to attempt a restart. • Check fuel selector – switch tanks • Fuel pump – ON • Throttle – check, then move to a new position
If all attempts to restart the engine fail and a forced landing is imminent, continue to the landing site and, time permit-ting: verbally announce each item on the emergency check-list • Passenger will secure objects located in baggage area
and collect coats for protection of occupants’ face at touchdown.
• Transponder - 7700. • COM: Current frequency if already in contact with an
agency or 121.5. Radio call: “Mayday, mayday, N603EV“, position, forced landing, # persons on board, aircraft colors.”
• Airspeed - maintain best glide speed (60 KIAS) • When on short final prior to touchdown:
• Fuel shut off valve - off. • Flaps - as required. • Master switch - off. • Seat belts/shoulder harnesses - tight. • Canopy - unlatch prior to touchdown. • Prepare for ditching.
Simulated engine failures will not be practiced during solo flights.
Systems and Equipment Malfunctions It is important for the pilot to practice and drill a variety of different malfunc-tions and to use the appropriate checklist. The following malfunctions are introduced at the appropriate point in the curriculum.
• Partial power loss (50%) • Complete power loss. • Engine roughness and overheating.
• Carburetor or induction icing. • Loss of oil pressure. • Smoke/fire in engine compartment • Inadvertent canopy opening (Gnd scenario only!!!) • Inoperative trim. • Passenger ground evacuation
After Landing • Never attempt to adjust flaps, frequencies,
trim, etc. while on the runway, after rollout or while moving.
• After coming to a full stop, clear of runway, then perform recommended checklist.
• Position controls for wind. • Taxi defensively, full attention outside,
minimum brakes or power. Parking and Securing – a complete and sys-tematic conclusion to a flight that insures the safety of passengers, pilots, ground personnel and the aircraft. • Select and taxi near an appropriate parking
spot. • Maneuver aircraft near tiedown by hand
and/or use of the towbar. • Don’t “gun” engine at high power settings
above 3,000 RPM. Don’t attempt to pivot the aircraft in front of tiedown area. Plan to maneuver by hand into parking.
• Perform shutdown checklist. • No deplaning may occur until the aircraft is
safely shutdown. • Supervise the deplaning of passenger,
giving special attention to anyone not famil-iar with the dangers of ramp areas.
• Only one person may deplane at a time. • Use caution when the canopy is up and
could possibly lower on hands and fingers. • Tiedown securely using tight ropes and
appropriate knot-techniques. • Re-check master switch off. Re-check
master switch off. Re-check master switch off. Re-check master switch ...
• Check HOBBS meter. • Secure controls with seat belt. • Clean out trash, close forward canopy
vents, and side vents. • Lock canopy with key. • Perform a post flight visual inspection.
NOTE: Simulated engine failures will not be practicedimmediately after takeoff. Instructors must begin with at least 800 AGL before simulating engine failure.
Aero-Tech, Inc. Maneuvers Manual Evektor Sportstar Page 22
Aero-Tech, Inc. Copywrite 2006. All Rights Reserved. Revised: 12/13/07
• Escort customer into lobby. Remain with the customer. • Verify that aircraft discrepancies have been recorded.
What is a Good Pilot The Aero-Tech graduate is: • Proficient in controlling the plane • Competent in making decisions • Comfortable with cockpit technology • Confident in a wide variety of flight situations • Respectful of his privileges • Responsible for his actions • Always thinking about safety