how to construct a sturdy, all wood ... - penn state extension
TRANSCRIPT
HOW TO CONSTRUCT A STURDY, ALL WOOD MASON BEE HOUSE
by Don Harper Lawrence County Master Gardener
INTRODUCTION
The construction method described below is based on a presentation made by Lawrence County Master Gardener Dave Hughes in 2007. The construction process can obviously be modified, depending on the availability of power tools and the preference for using one piece of 4x6 wood instead of two pieces of 2x6. Construction, once you are familiar with the process, requires about a day. Waiting for glue to dry is the only part of the process that really slows down construction. Given the diminution of populations of honeybees due to colony collapse disorder, it is hoped that everyone with a garden will make at least one of these houses available for mason bees in which to lay eggs. This will lead to the next generation of bees, and over time increase the population of these native pollinators.
NATURAL HISTORY OF MASON BEES
Orchard mason bees (Osmia lignarum) are native pollinators in North America, unlike honeybees that were imported from Europe. More recently the hornfaced mason bee was introduced from Japan to facilitate pollination of crops. The bees are fairly easy to differentiate: orchard mason bees have a bluish to blue-greenish color over their entire bodies, while hornfaced bees have a yellow and black banded abdomen. Not so easily seen are small projections (“horns”) on the front of the head that give the bee its common name. Mason bees are solitary, non-hive producing bees. Often confused with carpenter bees that use their mandibles to chew round holes in dry wood, including structural members of buildings, mason bees utilize previously constructed holes made by wood boring insects, or hollow reeds, in which to lay their eggs. Mason bees will utilize almost any proper-sized hole, including the ground receptacle of a 3-prong electrical outlet and the dust port of a palm sander. Mason bees are not aggressive (they are not defending a hive), and generally will not sting unless grabbed or stepped upon. Unlike honeybees, all females are fertile and there are no worker bees. They are immune from Varroa mites that parasitize honeybees, but do have their own set of wasp, beetle, and other parasites whose larvae consume the pollen food supply, and/or the mason bee larvae. Mason bees are ideal pollinators for orchards and fruit and vegetable gardeners, and it is in the gardener’s best interest to attract as many mason bees as possible. The easiest method to attract mason bees is to construct “houses” in which the bees can lay their eggs. These houses have drilled holes that extend up to 5 ½ inches into the wood and mimic naturally-occurring holes that the bees find attractive. The eggs laid closest to the front of the hole are unfertilized and develop into male bees, thus male bees emerge first in the spring. The males wait around the nursery for females to emerge. They mate, either near the nesting site, or on nearby flowers. The inseminated female then searches for a suitable nesting site. When a site is located, she collects mud, using her mandibles, and lines the back of the nesting site with a mud wall. This process requires numerous mud-collecting trips. Gardeners can make life easier for the bees by providing a saucer of mud in their gardens. Once the wall is completed, she begins the process of collecting nectar and pollen. The nectar and pollen are carried to the nest site she has selected and is deposited at the back of the hole, in front of the mud wall. Upwards of 75 visits to flowers are made to collect enough nectar and pollen. When enough has been accumulated, she lays an egg on the mass. The space is then sealed off with a mud wall to create a chamber. She then accumulates more nectar and pollen in front of the mud wall, lays an egg, and seals off this egg. This process continues until the entire hole has been divided into egg chambers and then the external opening of the hole is plugged with a thick wall of mud (see photo on the next page). Fertilized eggs produce females and unfertilized eggs produce males. Five to seven eggs are deposited in a nesting cavity of 6 inches in length. If a female is unfertilized, all progeny will be male. The typical sex ratio in a balanced population of mason bees is 1.5 to 2 males per female. A female lives an average of 20 days. During this time she can collect enough pollen and nectar to provision up to 4 nests. Her progeny will consists of 2 to 4 females and 5 to 8 males. Mason bees have a strong preference for fruit tree flowers, but will collect pollen and nectar from a wide variety of plants.

For those interested in obtaining more information on these bees, refer to the excellent article by Bosch and Kemp listed in the references section of this report.
A female mason bee adding mud to the thick mud wall plugging the nesting chambers. Only one generation is produced per year. After hatching, the larva consumes the pollen mass, then spins a cocoon and becomes a pupa. The pupa metamorphoses into the adult bee which reaches maturity in the fall or during winter. The bee hibernates inside the cocoon until they emerge in the spring. Cold temperatures are required to complete the life cycle. Temperatures of about 50 degrees F are required to activate the bees and cause them to chew through the mud wall and take flight. The females’ foraging range is about 100 yards, so it is best to place the bee houses relatively close to gardens. The pages below detail the construction steps needed to create a bee house. For those without the tools, or the inclination, to manufacture their own bee houses, an order form is included at the end of this article. The Master Gardener program of Lawrence County has bee houses for sale at a cost of $20. All proceeds go to further Master Gardener programs and activities.

CONSTRUCTION There are several designs for mason bee houses, some quite simple. The following design is constructed entirely of wood and is relatively impervious to weather and destruction by animals seeking to get at the eggs. Materials needed for each house
2 pieces, 2x6 untreated wood, at least 12.5 inches long 1 piece, 1x2 untreated wood, 5 feet in length 1 piece, 1x8 untreated wood, 6 inches in length ¼ x 2 ½ inch strip of wood #8 screws, 2 inches in length glue plastic wood
Tools needed
circular or table saw drill or drill press, if you have one 5/16, 1/8 & 3/8 inch bits Philips screwdriver or Phillips attachment for drill clamps square rat tail file & sandpaper hammer
Construction steps
1. Clamp the two 2 x 6s together, making sure all the edges line up. 2. Measure 12.5 inches from the end along one edge and 11 inches along the other. 3. Connect the marks with a straight line.
Note: The measurements create a 45° angle. If it is desired to make several bee houses, simply measure 12.5 inches from the apex of the 45° angle, mark the board, and draw a line across the board using a square. Then measure 12.5 inches on one side from the horizontal line and 11 inches on the other to create another 45° angle. And so on along the length of the boards.
4. Using the circular saw, cut along the diagonal line.

Note: Most power saws will not cut through both boards, but the lower board will have a cut mark that is easy to for the saw blade to follow. If the boards are clamped together the cuts will be approximately the same and minimal work will need to be done to get the tops of the two boards aligned.
5. Cut the lower board 6. Apply glue to the inner surface on one piece and join the two pieces. 7. Clamp the two pieces together until dry.
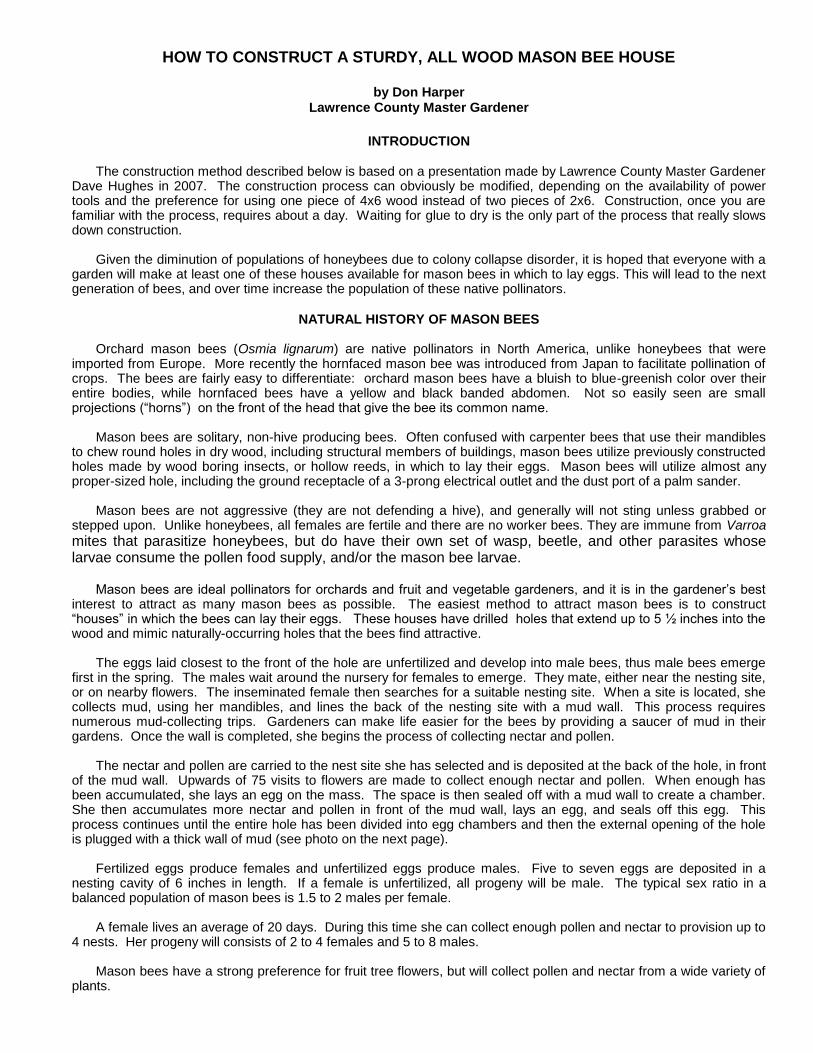
8. On the front face of the house, draw lines vertically and horizontally that are spaced at ¾ inch intervals.

Note: At the end of this article is a pattern. If the pattern is enlarged so the upper and lower ends are at the upper and lower edges of an 8.5 x 11 inch piece of paper, you will have a template with the correct spacing for drilling holes.
Note: if making several bee houses, it is best to make a jig that can be attached to the front face to guide the drill, as shown below.
9. Drill 5/16 holes on the ¾ inch centers.
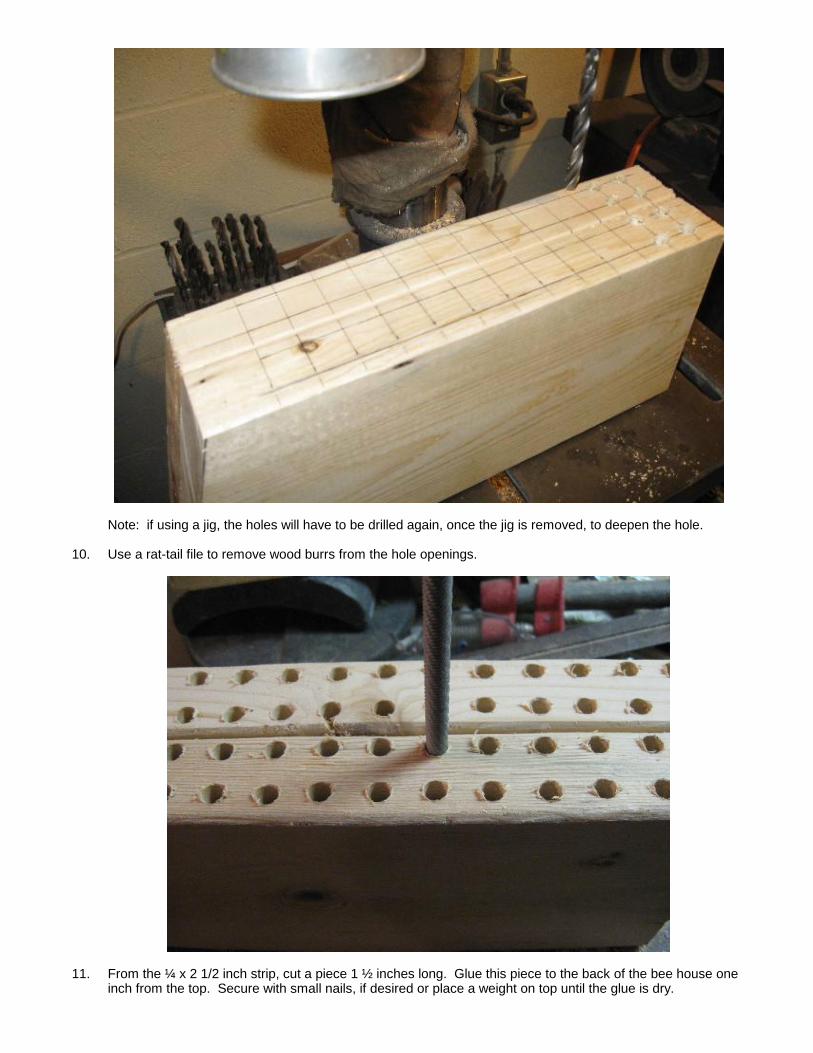
Note: if using a jig, the holes will have to be drilled again, once the jig is removed, to deepen the hole. 10. Use a rat-tail file to remove wood burrs from the hole openings.
11. From the ¼ x 2 1/2 inch strip, cut a piece 1 ½ inches long. Glue this piece to the back of the bee house one
inch from the top. Secure with small nails, if desired or place a weight on top until the glue is dry.

Note: This strip of wood causes a slight downward incline of the house and prevents rainwater from entering
the holes.
12. When the glue is dry, sand the piece so it tapers slightly downward to match the angle of the mounting pole.
13. Position the 5-foot long 1x2 pole so 2 inches project above the top of the house.
Note: This will give you a top surface of the pole to pound on if you want to drive the pole into the ground. 14. Center the pole on the back of the house and drill a 1/8 inch pilot hole through the pole into the back of the
house, making sure not to penetrate one of the chambers. 15. Countersink the hole using the 3/8 inch bit.

16. Drive a #8 two-inch screw into the hole. 17. Make sure the pole is still centered on the back of the house, then drill two holes through the pole, through the
small tapered block of wood and into the back of the bee house, one hole into each half of the house. Angle the bit so no chambers are penetrated.
18. Adjust the circular saw to make a 20° cut. 19. Cut along the length of the 2 x 6 to create a beveled edge.
20. Cut 6-inch sections from beveled board. These will form the roofs. 21. Apply glue to the sloping upper surface of the house. Position the pole so the sloped upper surface is horizontal.
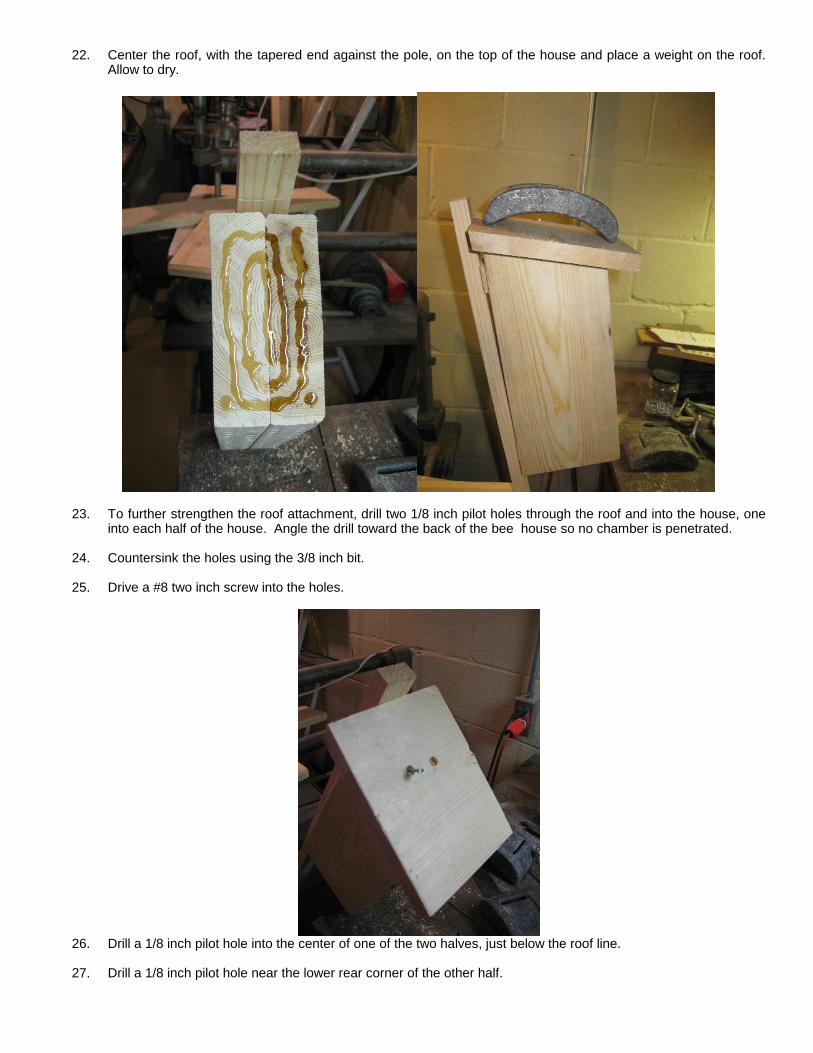
22. Center the roof, with the tapered end against the pole, on the top of the house and place a weight on the roof. Allow to dry.
23. To further strengthen the roof attachment, drill two 1/8 inch pilot holes through the roof and into the house, one
into each half of the house. Angle the drill toward the back of the bee house so no chamber is penetrated. 24. Countersink the holes using the 3/8 inch bit. 25. Drive a #8 two inch screw into the holes.
26. Drill a 1/8 inch pilot hole into the center of one of the two halves, just below the roof line. 27. Drill a 1/8 inch pilot hole near the lower rear corner of the other half.

28. Countersink the holes using the 3/8 inch bit. 29. Drive a #8 two-inch screw into each of these holes. The screws provide additional structural strength.
Note: Galvanized nails may be used instead of screws, but they are more likely to allow separation of the two
halves over time. 30. Fill all holes with wood putty. Allow to dry and then sand smooth. 31. If the pole is to be inserted in the ground, cut the bottom of the pole to create a V-shaped point.
Note: One alternative is to use cable ties to secure the bee house pole to a tree. Another, which eliminates the need for a pole, is to staple cable ties to the back of the bee house and secure the house directly to a tree.
MOUNTING THE BEE HOUSE The house should be mounted at least 3 feet above the ground. Place the bee house where it will receive the morning sun. The bees are cold blooded and must be warmed by the sun to become active in the morning before beginning their foraging activities. Mine are oriented approximately east-northeast. It is best to place the bee house outdoors in spring, after the ground has thawed. Once a female chooses your house, you will see her entering and

leaving the hole she has selected. You may also see a female resting inside a hole with just her forelegs and front of her head protruding from the hole. I placed my first bee house outside in late April 2008. At least one bee had begun laying eggs in my bee houses approximately 2 weeks after I placed it outside. The photo below was taken on 4 May 2008. Several of the holes have already been plugged. This bee house has been outside continuously since it was first made available. It has been used by mason bees each spring.
A female mason bee about to enter a hole. Note all the holes already plugged.

The bee house does not need to be maintained frequently. A potential problem is the occurrence of parasites in the holes, so about every three years the holes should be bored out. There is a very short interval in the spring between the emergence of the overwintering adults and the bees beginning to lay the first batch of egg, and unless you are very lucky, or very observant, you will miss this interval. The bees inside the chambers will be killed by the cleaning process. It is therefore probably best to place several bee houses on your property and stagger the cleaning process over a period of two or three years. After the holes have been drilled, chlorine bleach should be squirted in each hole, and then the holes should be rinsed repeatedly to remove the chlorine. Allow the wood to dry before placing outside again.
REFERENCES Anonymous. Everything About Mason Bees.
www.everythingabout.net/articles/biology/animals/arthropods/insects/bees/mason_bee/ Bambabra, Stephen, How to raise and manage orchard mason bees for the home and garden. North Carolina State
University Cooperative Extension. www.ces.ncsu.edu/depts/ent/notes/Other/note109/note109.html Batra, Suzanne W.T. 1997. Management of Hornfaced Bees for Orchard Pollination. Bee Research Laboratory,
Agricultural Research Service, USDA, Beltsville, MD. http://www.pollinatorparadise.com/solitary_bees/hornface.htm
Bekey, Ron and E. C. Lostermeyer. Gardening in Western Washington. Washington State University King County
Extension Publication 156. gardening.wsu.edu/library/inse006/inse006.htm Bosch, Jordi and William P. Kemp. 2001. How to Manage the Blue Orchard Bee as an Orchard Pollinator.
Sustainable Agriculture Network, National Agricultural Library Handbook Series Book 5. (Available on line at: www.sare.org/publications/bee/blue_orchard_bee.pdf) Gareau, Tara P. Conserving Wild Bees in Pennsylvania. Penn State College of Agricultural Sciences.
pubs.cas.psu.edu/FreePubs/pdfs/uf023.pdf Sugden, Evan A. Orchard Mason Bees. Agriculture and Natural Resources Fact Sheet #525 and Horticulture Fact
Sheet #83. King County Washington State University. king.wsu.edu/foodandfarms/documents/masonbee.pdf Wickipedia: en.wikipedia.org/wiki/Mason_bee

Figure 1. Template for locating holes.

Date received _______
Penn State Extension in Lawrence County
MASON BEE HOUSE ORDER FORM
Contact Information
(please print) NAME: ADDRESS: TELEPHONE: EMAIL: This information can be printed and delivered to the Penn State Extension Office in the Lawrence County Courthouse, or mailed to: Penn State Cooperative Extension in Lawrence County 430 Court St. (Courthouse) New Castle, PA 16101 724-654-8370 or fax an order to: 724-656-2298 Bee houses will be completed in the order in which requests were made. Please allow at least two weeks for construction. You will be contacted when your bee house is completed.
The cost is $20, payable to PSCE Lawrence County, Prepayment is required.
All proceeds go to the Lawrence County Master Gardener program. Many thanks for supporting the program.