cheap sturdy 1 hour quadcopter
DESCRIPTION
DIY Cheap Sturdy 1 Hour QuadcopterTRANSCRIPT

http://www.instructables.com/id/Cheap-Sturdy-1-Hour-Quadcopter/
Food Living Outside Play Technology Workshop
Cheap, Sturdy, 1-Hour Quadcopterby marhar on June 1, 2013
Table of Contents
Cheap, Sturdy, 1-Hour Quadcopter . . . . . . . . . . . . . . . . . . . . . . . . . . . . . . . . . . . . . . . . . . . . . . . . . . . . . . . . . . . . . . . . . . . . . . . . . . . . . . . . . . . . . . . . . . . . . . . . 1
Intro: Cheap, Sturdy, 1-Hour Quadcopter . . . . . . . . . . . . . . . . . . . . . . . . . . . . . . . . . . . . . . . . . . . . . . . . . . . . . . . . . . . . . . . . . . . . . . . . . . . . . . . . . . . . . . . . . 2
Step 1: Parts . . . . . . . . . . . . . . . . . . . . . . . . . . . . . . . . . . . . . . . . . . . . . . . . . . . . . . . . . . . . . . . . . . . . . . . . . . . . . . . . . . . . . . . . . . . . . . . . . . . . . . . . . . . . . . 3
Step 2: Center Plates . . . . . . . . . . . . . . . . . . . . . . . . . . . . . . . . . . . . . . . . . . . . . . . . . . . . . . . . . . . . . . . . . . . . . . . . . . . . . . . . . . . . . . . . . . . . . . . . . . . . . . . 4
File Downloads . . . . . . . . . . . . . . . . . . . . . . . . . . . . . . . . . . . . . . . . . . . . . . . . . . . . . . . . . . . . . . . . . . . . . . . . . . . . . . . . . . . . . . . . . . . . . . . . . . . . . . . . . . . 5
Step 3: Arms and Frame Assembly . . . . . . . . . . . . . . . . . . . . . . . . . . . . . . . . . . . . . . . . . . . . . . . . . . . . . . . . . . . . . . . . . . . . . . . . . . . . . . . . . . . . . . . . . . . . . 6
Step 4: Battery Mount, Landing Gear, Motors, and Top . . . . . . . . . . . . . . . . . . . . . . . . . . . . . . . . . . . . . . . . . . . . . . . . . . . . . . . . . . . . . . . . . . . . . . . . . . . . . . 8
Step 5: ESC, Motors, Orientation, Props . . . . . . . . . . . . . . . . . . . . . . . . . . . . . . . . . . . . . . . . . . . . . . . . . . . . . . . . . . . . . . . . . . . . . . . . . . . . . . . . . . . . . . . . . 10
Step 6: Power Distribution . . . . . . . . . . . . . . . . . . . . . . . . . . . . . . . . . . . . . . . . . . . . . . . . . . . . . . . . . . . . . . . . . . . . . . . . . . . . . . . . . . . . . . . . . . . . . . . . . . . . 12
Step 7: Flight Control Board . . . . . . . . . . . . . . . . . . . . . . . . . . . . . . . . . . . . . . . . . . . . . . . . . . . . . . . . . . . . . . . . . . . . . . . . . . . . . . . . . . . . . . . . . . . . . . . . . . 13
Step 8: Finishing Up . . . . . . . . . . . . . . . . . . . . . . . . . . . . . . . . . . . . . . . . . . . . . . . . . . . . . . . . . . . . . . . . . . . . . . . . . . . . . . . . . . . . . . . . . . . . . . . . . . . . . . . . 15
Step 9: Configuration . . . . . . . . . . . . . . . . . . . . . . . . . . . . . . . . . . . . . . . . . . . . . . . . . . . . . . . . . . . . . . . . . . . . . . . . . . . . . . . . . . . . . . . . . . . . . . . . . . . . . . . . 16
Step 10: Flying . . . . . . . . . . . . . . . . . . . . . . . . . . . . . . . . . . . . . . . . . . . . . . . . . . . . . . . . . . . . . . . . . . . . . . . . . . . . . . . . . . . . . . . . . . . . . . . . . . . . . . . . . . . . 17
Step 11: Real-time Build Video . . . . . . . . . . . . . . . . . . . . . . . . . . . . . . . . . . . . . . . . . . . . . . . . . . . . . . . . . . . . . . . . . . . . . . . . . . . . . . . . . . . . . . . . . . . . . . . . 18
Related Instructables . . . . . . . . . . . . . . . . . . . . . . . . . . . . . . . . . . . . . . . . . . . . . . . . . . . . . . . . . . . . . . . . . . . . . . . . . . . . . . . . . . . . . . . . . . . . . . . . . . . . . . . . 19
Advertisements . . . . . . . . . . . . . . . . . . . . . . . . . . . . . . . . . . . . . . . . . . . . . . . . . . . . . . . . . . . . . . . . . . . . . . . . . . . . . . . . . . . . . . . . . . . . . . . . . . . . . . . . . . . . . . . 19
Comments . . . . . . . . . . . . . . . . . . . . . . . . . . . . . . . . . . . . . . . . . . . . . . . . . . . . . . . . . . . . . . . . . . . . . . . . . . . . . . . . . . . . . . . . . . . . . . . . . . . . . . . . . . . . . . . . 19

http://www.instructables.com/id/Cheap-Sturdy-1-Hour-Quadcopter/
Intro: Cheap, Sturdy, 1-Hour QuadcopterHere's a quadcopter build that we did in under an hour to win a bet . We've got some experience building and took some shortcuts (such as using a flight controller fromanother unit, saving us the time of having to configure it), but I think it's reasonable to say that most makers could build this frame and get everything installed in a day,and still have some time left over to start flying it.
The frame is made from wood... 3/4" x 3/4" fir for the arms, and 1/4" plywood for the body. It's cheap and sturdy... It will take some pretty serious abuse, and if you breakit it's easy to repair. The power system (motors, motor controllers, battery) is pretty standard, and uses easily obtainable parts. The flight controller board is an ArdupilotMega.
About us: We're Mark Harrison and Andreas Oesterer. We've been flying planes, multicopters, and assorted drones for a couple of years. If you like this instructable,come visit us and see what else we're up to!
eastbay-rc.blogspot.com
anddiydrones.com .
(photo note)Almost all the images here have interesting and laboriously typed "image notes" -- mousing over them gives details about what is being shown. The default view of littlepictures don't show the image notes, but you can see them if you embiggen them by clicking on the first image of each set.tl;dr: click on the first image of each set to see photo commentary. )(end photo note)
Image Notes1. Andreas Oesterer2. Arcticopter IV, homebuilt3. gopro, professionally attached with blue tape.4. Mark Harrison5. Visit us athttp://eastbay-rc.com
Image Notes1. often called a "drone", it's more properly called a "quadcopter"
Image Notes1. successful first flight!2. time from start of build to in the air: 51m, 24s. Andreas won a bet because ofthis!
Image Notes

http://www.instructables.com/id/Cheap-Sturdy-1-Hour-Quadcopter/
1. Here's the general plan.
Step 1: PartsYou've got some flexibility in ordering parts. You can pay more or less for things like the radio and flight controller. There's a lot of flexibility in these specs, so if you canget some motors, etc, in the same ball park they will probably work well for you.
Frame
arms: 3/4" x 3/4" fir stick (approx 5 ft)center plates: 1/4'' or 5mm Plywood (approx 6"x18”)Machine screws & bolts, and washerslanding gear: 4 wiffle ballszip tiesbattery mount: 3/8" x 3/8" stick (approx 1 ft)Bamboo SkewersPiece of soft foam about 1/2'' thick, slightly bigger than your flight control boardvelcro, double-sided(approx 8'')velcro, single-sided, sticky, soft side (approx 6'')
Power System
battery: LiPo 3S 3000-4000mAh (we like this one: 3S 3000 mAh 25-50C )4 x 40A Turnigy Plush ESC (motor controller)4 x NTM 35 1100 KV motors2 10"x3.8" APC SF Props2 10"x3.8" APC SFP (counter clockwise) props (buy some extras of each prop for when you crash)power distribution board , presoldered or homemade power distributor
Radio System (remote controller)
This is what we use regularly. Our preference is for FrSky gear. We have found it to be highest quality, and quite reasonably priced.
HobbyKing 9xrFrSky module and receiver
or
TFrSky Taranis
Here's a cheaper entry-level system .
Flight Control Board
There are quite a few options available. Here are two options that I've used and can vouch for:
3D Robotics Ardupilot Mega ($234). full featured autopilot, full autonomous operation, ground control capabilities.
HobbyKing KK2 ($30). basic quadcopter flight, acrobatic and stabilized modes.
Equipment
saw, drill, hot glue gun
Image Notes1. props2. props, reversed3. flight control board and receiver4. radio transmitter5. motors6. whiffle ball landing gear7. ESCs8. power distribution unit9. velcro10. duct tape
Image Notes1. superglue2. batteries3. flight controller manual4. motor mount

http://www.instructables.com/id/Cheap-Sturdy-1-Hour-Quadcopter/
Image Notes1. When you buy parts, they often come with many little bits packed in bags.
Image Notes1. separating everything out tidily pays off big time!
Image Notes1. Ardupilot Mega by 3DRobotics
Image Notes1. KK2 by HobbyKing
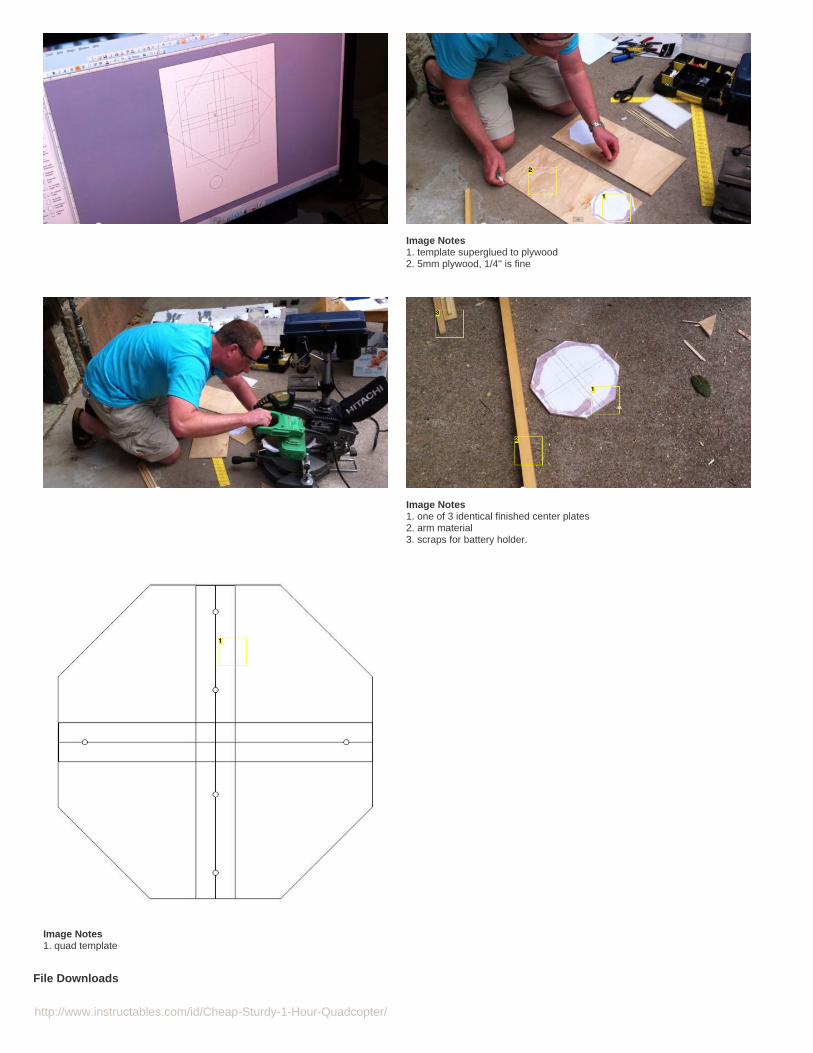
Step 2: Center PlatesFirst we need to make the center plates, which perform two functions:
- hold the arms securely in place.- platform to hold the electronics.
Print out 3 copies of the template, superglue them onto the plywood, and cut out the three center plates. Two of the plates will sandwich the arms to hold them in place,and one plate will go on top to provide a flat base for mounting the electronics.
To follow this instructable exactly, use the quad template. You can make a hexacopter or octocopter by using one of the other templates and adding more arms.
http://www.instructables.com/id/Cheap-Sturdy-1-Hour-Quadcopter/
Image Notes1. template superglued to plywood2. 5mm plywood, 1/4'' is fine
Image Notes1. one of 3 identical finished center plates2. arm material3. scraps for battery holder.
Image Notes1. quad template
File Downloads

http://www.instructables.com/id/Cheap-Sturdy-1-Hour-Quadcopter/
hexa.pdf (1 KB)[NOTE: When saving, if you see .tmp as the file ext, rename it to 'hexa.pdf']
octo.pdf (1 KB)[NOTE: When saving, if you see .tmp as the file ext, rename it to 'octo.pdf']
quad.pdf (1 KB)[NOTE: When saving, if you see .tmp as the file ext, rename it to 'quad.pdf']
Step 3: Arms and Frame AssemblyCut the arms
Cut the arms to length and mark the center of the long arm.
- 2 arms, 12 inches- 1 arm, 24-3/4 inches
Attach the arms
Put the arms in place over the template on the center plate. Make sure everything aligns well and superglue into place.
Superglue the top center plate over the arms, paper-side up, aligned with the bottom center plate.
Drill holes through the plates and arms as marked. Bolt the arms to the center plates.
Drill motor mount and landing gear fitting
Now we're ready to drill the motor mount holes. Leave a 3/8'' gap from the end of the arm (we measured this with a scrap of wood), and mark the two motor mount holes,using a motor mount as a template. Drill these through the arm.
Drill horizontally through each arm, centered halfway between the motor mount holes. This will be for the landing gear.
Image Notes1. center long arm first
Image Notes1. drill through plates and arm at the same time.
Image Notes1. marking motor mount bolt holes.

http://www.instructables.com/id/Cheap-Sturdy-1-Hour-Quadcopter/
Image Notes1. drilling motor mount bolt holes
Image Notes1. all bolts attached with washers and nylon lock nuts
Image Notes1. landing gear hole
Image Notes1. 3/4'' x 3/4 inch fir, from the local hardware store

http://www.instructables.com/id/Cheap-Sturdy-1-Hour-Quadcopter/
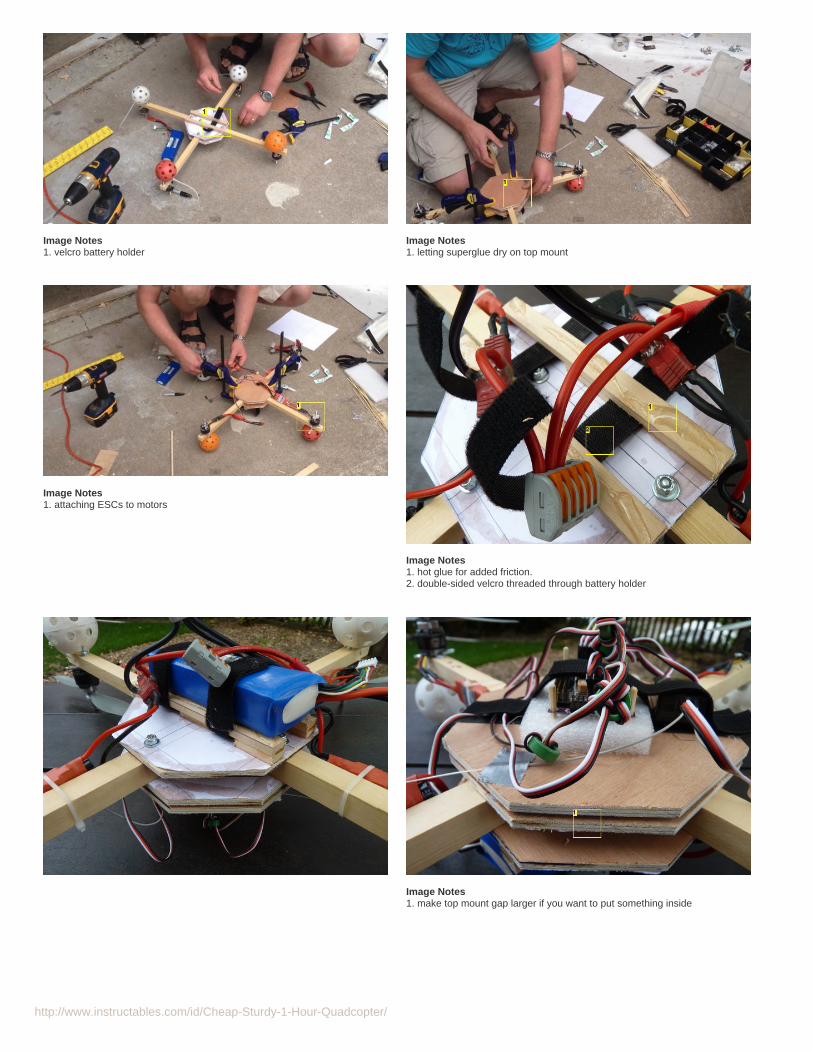
Step 4: Battery Mount, Landing Gear, Motors, and TopBattery Mount
The battery mount serves two purposes:
- holds the battery away from the protruding bolt- provides a place to attach the velcro which will hold the battery in place
You can use any sized scrap of wood for this, so long as it keeps the battery from touching the bolt. We had some scraps about 3/8'' high and 1/2'' wide.
Cut 6 pieces about 1'' inch long each, and 2 pieces as long as the center plate.
Line the small pieces up with one of the arms, place the long pieces on top of them, and align them so that they fit your battery nicely. Be sure the gap between the smallpieces is big enough for your velcro straps.
Superglue the 6 small pieces into position, and then superglue the large pieces on top of them. Clamp for a minute or two to make sure you've got a good bond.
When you attach the battery, it will be slippery against the wood. In order to prevent this, put a strip of hot glue on the wood. You're not gluing the battery on, you're justgiving the battery mount more friction so the battery doesn't slide in the mount.
Motors and Landing Gear
For each arm, bolt the motor onto the motor mount and bolt the motor mount onto the arm. Use zip ties to attach the landing gear.
One nice feature of the whiffle balls is that, unlike pointed landing gear, they don't stick in the grass or earth when you take off.
Top Center Plate
Cut a couple of spacer strips and superglue them to the top center place which is already attached to the body. At a minimum the spacing should be enough to clear thebolt heads. Optionally, you can leave more room if you want to put some extra gear inside there (for example, the optional power distribution board discussed below).
Superglue the top center plate onto the spacers, and clamp for a few minutes to ensure a tight bond.
Image Notes1. size to fit your battery
Image Notes1. bolt motor with washers, nylon lock nut
Image Notes1. attach wiffle balls with zip ties for landing gear
http://www.instructables.com/id/Cheap-Sturdy-1-Hour-Quadcopter/
Image Notes1. velcro battery holder
Image Notes1. letting superglue dry on top mount
Image Notes1. attaching ESCs to motors
Image Notes1. hot glue for added friction.2. double-sided velcro threaded through battery holder
Image Notes1. make top mount gap larger if you want to put something inside

http://www.instructables.com/id/Cheap-Sturdy-1-Hour-Quadcopter/
Image Notes1. read whiffle ball for rear arms2. attach with zip ties
3. use locking nuts to attach motor
Step 5: ESC, Motors, Orientation, PropsESCs
The ESC has several wires. Three of them stick out of one end and attach to the three motor wires.
For each arm, attach the ESC to the motor. The order doesn't matter at this time, but you may have to switch them when you're setting up the flight controller. Attach theESCs to the arm with zip ties.
Orientation
Look at your flight controller documentation. It will tell you three things important at this time:
- each arm will have a number. Different flight controllers use different numbering schemes, so be careful.- each motor will have a direction, clockwise or counter-clockwise.- which way is front.
Mark all of these on your arms and body.
Props
Attach the props to the motor. Note that you have two props that rotate clockwise, and two that rotate counter-clockwise. Try and get this right, or your first flightexperience will be flipping upside down into the ground.
Props have the sizes (and usually orientation) molded on their front edge. For multicopters, the numbers face up[*]. We recommend using genuine APC (not "APCcompatible") because they're strong and generally come from the factory properly balanced.
To balance the props, put them on a screwdriver so they can spin freely. Bring them level horizontally, and they should maintain that position. If one end droops down, itis heavier than the other end. Put a small piece of scotch tape on the back end of the light side, and repeat until the prop is balanced.
[*] oldtimers, I know that back in 1806 you had a pair of props with the numbers on the other side, but let's not confuse things. Any props that are being sold formultirotors will be as described.
To attach the props, put the washer on the motor with flat end up, attach one of the prop sizers (the little round things in the package) to the prop so that it fits snugly onthe prop shaft, and screw down the prop collet. Snug it down firmly, it will be uninteresting to you if it flies off loose in the air.
Prop Safety Note
These props spin with enough speed and power to easily cut flesh. Whenever you see safety instructions to remove the props, REMOVE THEM!!!! It's not somelegal blah blah, it's a legit thing right up there with warnings about not sticking your tongue into lamp sockets. If you fail to do so, be sure and upload a picture of yourinjury as you're waiting in the emergency room for stitches as a warning to others. And if you've got a reasonably strong stomach, google "prop strike" to see otherpeople's uploaded pictures and their pleas to learn from their mistakes!

http://www.instructables.com/id/Cheap-Sturdy-1-Hour-Quadcopter/
Image Notes1. 10x3.8 SF, a good quad prop.2. genuine APC, worth the money..3. 10x.3.8 SFP. "P" means its a "backwards" prop
Image Notes1. points to front2. arm 3, clockwise
Image Notes1. 3 wires connect to the motor
Image Notes1. attach loosely when you're assembling, then snug up.
Image Notes1. prop size. 10 inches, 3.8 inch airscrew. Numbers go on top!2. APC, a good brand of props

http://www.instructables.com/id/Cheap-Sturdy-1-Hour-Quadcopter/
Image Notes1. Two-bolt attachment is fine.
Step 6: Power DistributionThe purpose of the power distribution system is to attach the positive and negative battery leads to the positive and negative power leads on each of the ESC's("electronic speed controllers") which control the motors.
We built a WAGO-based power distribution system , but now you can buy a power distribution board for about $4, so that might be a bit easier for this build.
If you buy one of the power distribution boards, you may find it fits nicely in the gap between the top and middle center plates. If you go this route, leave enough room tofit it in and be sure there's room between your spacers. If you've determined that your electronics are all properly fitting, you can even place the power distribution boardas you're attaching the center plates to each other. If you do this, you might use small flathead wood screws rather than superglue so that if you need to readjust you canremove the power distribution board easily.
Update: Hobby King is now selling a pre-soldered equivalent of this here . I would recommend buying this as it's probably cheaper than making your own.
Update: and here's the power distribution board . If your motor and ESC wires are long enough, you can just solder the power leads from the ESC directly to the board.
Image Notes1. Wago connectors are nice. They're popular in Europe but were easy to buy onEbay.2. thick wires going to the battery.3. 4 pairs of thin wires, going to the 4 ESCs.
Image Notes1. Wago power distribution unit

http://www.instructables.com/id/Cheap-Sturdy-1-Hour-Quadcopter/
Image Notes1. control lines, attach to flight controller2. motors have 3 wires3. the 3 wires in the ESC attach to the motor4. ESC (motor controller) units5. to battery6. power distribution
Image Notes1. pre-soldered power cable from hobby king
Image Notes1. Solder your ESC power leads here.2. solder your battery leads here.
Step 7: Flight Control BoardStart by attaching the receiver to your flight control board according to the flight control board documentation.
Figure out which end of the flight control board is the front end. Most boards will have an arrow pointing to the front.
Cut a piece of the foam to be a bit larger than your flight control board. This is an important piece in that it helps protect the board from vibrations, whick will make thesensors go crazy. Any 1/2'' or so thickness electronics packaging foam will be fine. It should be the spongy kind, not the styrofoam kind.
Hot glue the foam to the frame and attach two strips of velcro as shown.
Align the flight control board so it's centered and pointing forward properly. Then, for each of the four holes in the board, put some hot glue on the sharp end of a skewerand poke it through the hole into the foam. The skewer will anchor into the foam, and the hot glue will form a gasket shape that keeps the flight control board from slidingaround into an incorrect orientation, which will cause it to crash. Snip off the skewers then the glue has cooled.
Put a strip of velcro across the top of the flight control board to hold it in place. Along with the skewers, this will hold the board securely. If your flight control boardmentions something about covering the barometer chip (so it's not affected by the wind), the velcro strip might do this as well.
Loop the velcro strip over, wrap it around your receiver, and attach the velcro strip back to itself on the body.
If your receiver has dangling antennas, tape them to the down so they don't fly into the props.
Finally, attach each of the 4 ESC control wires to the flight control board.

http://www.instructables.com/id/Cheap-Sturdy-1-Hour-Quadcopter/
Image Notes1. APM 2
Image Notes1. recycled electronics packing material
Image Notes1. low temp setting, so foam does not melt
Image Notes1. single sided adhesive velcro
Image Notes1. bamboo skewers2. hot glued to foam pad through mounting holes

http://www.instructables.com/id/Cheap-Sturdy-1-Hour-Quadcopter/
Image Notes1. 2-sided velcro secures electronics
Image Notes1. zip-tie ESC to arm2. 3 wires of ESC connect to 3 wires of motor
Image Notes1. hot glued2. strapped down
Step 8: Finishing UpFinally, flip the unit upside down and install the battery in the battery holder. Don't attach the battery power. It should fit snugly and when you shake the quad around itshouldn't slide loose.
Flip it back over, and you've finished your quad build and are ready to get it configured and flying.
Congratulations! Upload some pictures of your first flight!
It's not a bad idea to make some kind of cover, so in case you flip and land upside down your electronics will have some protection. Here's a simple method using atomato container .
Image Notes1. battery doesn't slide because of hot glue

http://www.instructables.com/id/Cheap-Sturdy-1-Hour-Quadcopter/
Image Notes1. "a thing of beauty is a joy forever"2. red balls in back
Image Notes1. battery
Image Notes1. farm fresh quad cover
Step 9: ConfigurationGeneral Configuration
We'll briefly cover a few of the general configuration steps, but since this is so tied to the brand of flight control board, radio, etc, you're best off following the instructionsprovided with those units.
(note: we skipped a few of these steps because we had just removed the flight controller and radio from a working quad, but we do these steps whenever we're buildingout a new unit. And we NEVER skip steps related to prop safety.)
Prop Safety Warning
REMOVE YOUR PROPS BEFORE YOU POWER UP THE FIRST TIME.
IF YOU HAVE SOMETHING MISCONFIGURED, THE UNIT COULD POWER ON AT FULL THROTTLE AND HURT YOU.
Radio Binding
Many radios have a "bind" procedure which pairs your receiver and transmitter. Do that if necessary, following the manufacturer's directions. Perform any other necessaryconfiguration steps as well. It's typical to power on the radio before powering on the aircraft, and power off the aircraft before powering off the transmitter. Be sure andfollow that order if your radio manufacturer recommends it.
Testing Power
With the props off, plug in the battery and immediately watch for any indications of miswiring or short circuits. Most flight control boards have some kind of powerindicator, and most ESCs will beep.
Setting Blade Rotation and General Check
With your blades still off, arm (as per the manufacturer) your system and apply throttle. The more throttle, the faster the motors should spin.

http://www.instructables.com/id/Cheap-Sturdy-1-Hour-Quadcopter/
Now you need to carefully check your motor rotation direction. Each motor has a direction it should spin, clockwise or counter-clockwise.
If one of the motors is spinning backwards, stop the motors and switch any two of the three power wires for that motor. That will reverse the direction of the motor.Double-check all four motors.
Now, with blades still off, power up your motors, pick up your quad, and do these tests:
- tip quad to left. left side motors should speed up, right side motors should slow down.- likewise, tipping quad to right, front, back.- likewise, tipping at 45 degrees. In general, a lowered arm arm should always try to compensate by speeding up, and vice versa for a raised arm.
- holding the quad level, pull the aileron (right stick) stick to the left. left side motors should slow down, right side motors should speed up.- likewise for pushing the right stick forward, right, and back.- pull the rudder (left stick) left and right. opposite pairs of motors should speed up and slow down to rotate ("yaw") the quad. For example, opposite motors 1 and 3 willspeed up, and opposite motors 2 and 4 will slow down.
(note, these stick directions are the most common, but might be different according to your transmitter).
Propeller Test
Finally, unplug your battery, attach your blades, and tie your quad to something heavy. I use a barbell weight.
Repeat the tests above. All the props should be blowing air down, not up. If a prop is blowing air up, the motor needs to be reversed.Doing the stick tests should make the quad lean in the appropriate direction, of course constrained because you've got it tied down.
When everything checks out, you're ready to fly!
Image Notes1. spinning backwards, needs to be reversed
Image Notes1. swapping wires reverses motor direction2. unplugged while working near props!
Step 10: FlyingAs with configuration, there's a lot of details you will need to get from your flight controller documentation, but here's some general hints for getting started.
- It's great if you can find an experienced quad pilot to try things out for you. We didn't know any when we first got started, so it's definitely doable to teach yourself.
- buy extra props (in both directions).
- If you have a minor crash and crack or chip a prop, replace it. It's uninteresting for a cracked prop to finish breaking off in the air.
- try to find a large area with plenty of soft grass to cushion your landings.
- don't fly with anybody around, especially pets and kids who might run up to unit.
- don't fly over houses, cars, people, or anything else expensive to replace.
- when taking off, "hop" out of the prop wash. When the unit is within one or two feet of the ground it's not very stable because of the air being blown back up off theground.
- be super-gentle on the sticks, You usually don't need much stick motion to move around. Definitely less than you might be used to from playing video games.
- Keep track of your orientation, know which way is front. We put red balls on the back arms.
- Bring it up to about 6-8 feet, and just try to hover in place to get the feel of things.
- A unit this size will probably get 10 minutes or so of gentle flight. Bring it down and check the battery level to get a feel for how much juice you have left.
- If it's starting to get away from you, reduce throttle gently so that it lands wherever it's at.
- If you panic, still try to reduce the throttle gently. But if necessary, cut the throttle completely. It's cheaper to replace some blades or arms than to lose the unitaltogether.
- Have fun, and send us a picture of your creation!

http://www.instructables.com/id/Cheap-Sturdy-1-Hour-Quadcopter/
Image Notes1. 9 minutes to spare!2. flying stably
Image Notes1. first launch
Image Notes1. 8 lb load.
Image Notes1. When Andreas was young this would be beer, now it's baby wipes!
Step 11: Real-time Build VideoFull back story here: http://eastbay-rc.blogspot.com/2012/07/black-sheep-eats-tasty-crow.html
Part 1:
Part 2:
Image Notes1. timelapse taken with gopro, other vids/pics taken with iphone

http://www.instructables.com/id/Cheap-Sturdy-1-Hour-Quadcopter/
Related Instructables
Aerial GroupPicture with aDrone byjeffmazter406
Quadcopterframe design(fiberglass). bystarkec
A SK450 DeadCat Quadcopterto Call YourOwn by Toglefritz
IndestructibleDrones ForDummies Thekey to Realstable flights bytreyes4
SturdyQuadcopterBuild byChris_Schroeder
How to Fly anFPV QuadcopterWith Goggles bycamman61898
Advertisements
Comments
50 comments Add Comment view all 69 comments
TeamC2 says: Jul 13, 2014. 2:06 PM REPLYWhat is the software you used to make the templates?
marhar says: Jul 14, 2014. 10:25 AM REPLYMicrosoft Word.
Smithypatterson says: Jul 7, 2014. 10:51 AM REPLYhey instructables! First off let me say that this is a wonderful guide and it's what convinced me to take the leap into mulitrotors. So I purchased the battery,motors(1100kv) and escs(40a) specified in this instructable. Along with a 550mm frame, some 10"4.5 props, a kk2.1.5 fc, and the turnigy 9xr. Beingcompletely new to this, I got these parts based upon hours of reading and what not. But there's nothing quite like some real world feed back from thecommunity. Does anybody see any holes in this setup? Advice, recommendations, words. Thanks!
Bobby vonsandwichface says: Dec 29, 2013. 10:31 AM REPLYHi, I'm 15 and I'm looking to build a quadcopter, I have never made one before. I've read through your instructable, and I find it very interesting, it hasmotivated me to try and build my own.Here is my question:I am on a limited budget and I am trying to build this quadcopter as inexpensively as possible. And I am wondering if I could use the HobbyKing 4ch Tx Rxremote instead of the more expensive ones you recommended. Do you think this would be an issue with the quadcopter or if it wouldn't send a signal farenough, or are there any other issues that could be a problem? Any other suggestions for someone who hasn't built anything like this before,Thanks
DrGoob says: Jun 15, 2014. 6:29 PM REPLYHere are some parts that I found that may be useful (I haven't built a quadcopter yet) :
Motors: SunnySky Angel A2212 980KV; link: http://www.hobbywow.com/en-sunnysky-angel-a2212-98... x4
Propellers: hobbyking propellers, pick your own, there are many varieties; link: http://www.hobbyking.com/hobbyking/store/__562__50...
Flight control system: Hobbyking KK2.1.5 Multi-rotor LCD Flight Control Board With 6050MPU And Atmel 644PA (I would reccomend a mini arduinoboard and an MPU-6050 gyroscopic sensor, link to both: http://www.ebay.com/itm/like/131141127299?lpid=82 (arduino) ;http://www.ebay.com/itm/like/251413239297?lpid=82 (gyroscopic sensor))
Power distribution board: http://www.hobbyking.com/hobbyking/store/__28255__...
Battery: just find a good one that will work judging from specs
Controller: get the one you want to use
Frame: make it out of pvc pipe.
Bobby vonsandwichface says: Jun 17, 2014. 8:50 AM REPLYThanks
markee010781 says: Jun 2, 2014. 5:27 AM REPLYNice project!

http://www.instructables.com/id/Cheap-Sturdy-1-Hour-Quadcopter/
Stan1y says: Apr 5, 2014. 12:20 PM REPLYI'll vouch for electric motors and props being dangerous I have a miss shaped index finger thanks to an early experiment with electric flight
elliot4206 says: Mar 26, 2014. 8:00 AM REPLYis it a problem to have motors that are over 1100kv?
elliot4206 says: Mar 26, 2014. 6:57 AM REPLYHow much did the total build cost, and how long can the quadcopter run for?
robertabt says: Jun 9, 2013. 3:05 AM REPLYHi, i've been wanting to buy/make a quadcopter for quite a while now so when i saw this i did a bit of research on the parts you say to use, i went for themost expensive first, and my question is do you think this (http://www.hobbyking.com/hobbyking/store/__37328__HKPilot_Mega_V2_5_Flight_Controller_USB_GYRO_ACC_MAG_BARO.html ) is good value or not?be great to hear back from you.
Thanks
oesti says: Jun 9, 2013. 1:34 PM REPLYThat HK board is a clone of the 3DR original. Clones are OK since the HW and SW of the APM are open sourced. The only question is whether it works100% like the original. They might have used different components. Might be advisable to look for feedback from previous buyers. You should not expectany support from the diydrones.com community if you have problems with your clone. Please remember that you also need the GPS module for fullyautonomous operation (and return to home features).
The great thing about the APM is that you can use it in a x-copter, helicopter, plane, flying wing, boat or car. There is no other autopilot on the marketwith similar broad capabilities.
gwenhastings says: Dec 22, 2013. 8:10 PM REPLYwhy should people expect no support through diydrones.com.?. is it solely the house organ of 3drobotics.com or is it a truly open diydrones site(hintits the latter).. no matter who founded it... All flight controllers are discussed there as well as the clones, we even welcome old paparazzi folk likemyself..rcgroups.com is another place you can get help....
gwen
karan11 says: Dec 16, 2013. 1:19 AM REPLYhey..your instructables are really helpful..but i have a little doubt..how do you control the current to the brushless motors so that the motors don't burn. I amusing 1270kv outrunner with max watt- 204W and max current- 20A ratings and im using 3s LIPO battery..i need aprox 500 gm of thrust from one motor. Sohow do i make sure i don't burn my motor? please help.
Wormeater says: Dec 5, 2013. 6:39 PM REPLYdoes the size of the arms matter because i can find a 3/4 by 3/4 piece of wood
Wormeater says: Dec 5, 2013. 8:37 PM REPLYCan't*
gkhandelwal says: Oct 20, 2013. 9:43 AM REPLYcoolcan i get more information about power distributionsince i m in mechanical field so i don't know the ic circuits !response will be appreciated.rply asap
agoaga says: Oct 2, 2013. 3:10 AM REPLYcool, hope i can make it too (from indonesia)
Aerospecies says: Sep 28, 2013. 12:17 AM REPLYHi, is there anyway to build this with custom flight computer? we have to do this from scratch in an MEng group project. - I.e. we have to write the controlprogram in C

http://www.instructables.com/id/Cheap-Sturdy-1-Hour-Quadcopter/
eriknf says: Aug 26, 2013. 4:48 PM REPLYWhat is the run time for your model?
AndrewAF1 says: Aug 17, 2013. 2:22 PM REPLYLooks good!! What was the total price.
NinjaBoy12 says: Jul 23, 2013. 4:19 PM REPLYHow long did it take to build?
marhar says: Jul 23, 2013. 5:07 PM REPLYIf you watch the timelapse, it shows about 52 minutes from start to flight.
csphar says: Jul 19, 2013. 7:16 PM REPLYDoes the OrangeRx T-SIX 2.4GHz DSM2 6CH Programmable Transmitter w/10 Model Memory (Mode 2) work with FrSky D8R-II Plus - 8 Channel Receiverw/ telemetry?
marhar says: Jul 19, 2013. 10:57 PM REPLYNo, the DSM2 protocol is not compatible with the FrSky protocol. You can use any of the OrangeRx receivers from HobbyKing, or the (very excellent)LemonRx receivers from lemon-rx.com.
ActionTekJackson says: Jul 16, 2013. 3:38 PM REPLYHi, do you happen to have a document or ible on connecting an APM? Preferably one of the newer 2.5-2.6 models? I am slightly confused how they interfacewith a manual flight controller? Do you have to get a separate DSM2 receiver to connect to the APM?
Also I've seen that to wire the ESC's to the motors correctly is done by trial and error? This doesn't seem right to me, is there not a schematic indicatingwhich wires from the motor go to which wires on the ESC or did I just get terribly bad information?
If I wanted to build a basic autonomous tri-quad etc. do you have an essentials parts list to use with the APM w/GPS? Would this be correct?:-ESC's for each motor-APM w/GPS-applicable battery-Motors-Props-wireless controller receiver?(see previous question)
One last question, sorry for the bombardment, in a tri-copter build do all the props spin the same direction or no? Thanks!
oesti says: Jul 17, 2013. 8:10 AM REPLYTrial and Error might sound unscientific but there is method to the madness:
The ESC and BL motor each have three wires (one for each phase). No matter how you connect them the motor will spin. However the direction in whichthe motor will turn can't be predicted without trying it first. If the motor spins the wrong direction, any two wires can be swapped. Since the ESCs and BLmotors are usually connected with bullet connectors this is a quick task.
ActionTekJackson says: Jul 17, 2013. 12:11 PM REPLYgot it, that makes sense. Thanks!
ActionTekJackson says: Jul 16, 2013. 4:33 PM REPLYSeems I should not seek forum advice first, go straight to the source... my bad.
http://copter.ardupilot.com/quick-start-assembly/
StraydogEOD says: Jul 7, 2013. 10:14 AM REPLYFirst of all, awesome write up. Really leads me to believe I can build one myself and I just might have to. My primary goal with an RC Quad is aerial video formotorcycle racing, will this power setup lift a GoPro camera? Or is that too much weight?
marhar says: Jul 7, 2013. 11:08 AM REPLYThanks! A GoPro will be no problem.
hkaous says: Jun 17, 2013. 3:31 PM REPLYthis looks awesome

http://www.instructables.com/id/Cheap-Sturdy-1-Hour-Quadcopter/
DonMcKee says: Jun 15, 2013. 6:55 PM REPLYThanks to oesti and marhar for the advice. Much appreciated!
-Don
(Sorry for the clutter, "Reply" not working for me.)
DonMcKee says: Jun 13, 2013. 1:55 PM REPLYI'm interested in earning my "wings", with the end-goal being to use a UAV to do some personal aerial photography. Would this project, using the less-expensive component path (probably), be a good one to develop my "chops"? I have zero RC experience, and have read elsewhere that a ready-to-fly microor mini quad is the better choice for a first-timer.
Thoughts?
-Don
marhar says: Jun 14, 2013. 3:43 PM REPLYI think this is a good path... at least it's the path that both Andreas and I went down!
The micro quads are a lot of fun in their own right. The only problem from my viewpoint is they're pretty small and hard to see if they move away. But I'vegot a "ladybird" model that I love, so it's definitely a possibility.
I agree with Andreas, money on the remote and charger will pay off in the short and long term.
oesti says: Jun 15, 2013. 10:19 AM REPLYMy view on micro quads: They are great fun and can aid in training. They are also surprisingly robust. BUT if they break they are much harder (orimpossible) to repair and troubleshoot. I have one LB clone that fell on it's head a few times too many. I can still fly it but it acts borderline crazy ;)
oesti says: Jun 14, 2013. 7:39 AM REPLYThis project is a good start. Instead of the more expensive APM, you can start with a KK board. That will make you a good pilot. Don't save on theremote, chargers etc. Because all those components can be reused as your skill-set grows.
haopengyou says: Jun 7, 2013. 7:32 AM REPLYI am also interested in having something that can stay airborne for a longer time. Has anyone considered a hybrid dirigible (blimp) and this quadcopter? I amwondering if the blimp were just large enough to let the quadcopter float about 10 feet above ground without power....
oesti says: Jun 8, 2013. 4:40 PM REPLYYes, and look what happened:
aebe says: Jun 14, 2013. 1:25 AM REPLYWhoever authorized the money for that contraption needs be committed , and given large amounts of immobilizing drugs .
oesti says: Jun 14, 2013. 7:36 AM REPLYHe went on to become the set designer for Wild Wild West ;)
oesti says: Jun 11, 2013. 9:12 AM REPLYPictures of a Tricopter and a Hexacopter built using the same method.

http://www.instructables.com/id/Cheap-Sturdy-1-Hour-Quadcopter/
robertabt says: Jun 9, 2013. 3:13 PM REPLYoesti, i cant seem to get the recaptcha box to load to reply inline but i've copied and pasted my comment below, sorry for messiness / confusion caused.
They all seem to be 4 or 5 star reviews so it must be fairly decent... i've also been looking at copters here www.4copter.co.uk/ they seem to be cheap, notsure if they're nasty too, but i wonder if this board could be cobbled together with one along with a gps module? if i manage it / have time i may make aninstrucable of it. won't be for a month or so if anything though, because i'm doing my final exams at the moment. hopefully i should be able to do it, as i'mfairly into arduino and 'tronics in general :)
thanks for your help, any way i can upvote or something like that?
oesti says: Jun 10, 2013. 8:34 AM REPLYI'm all too aware of the Instructables.com UI issues ;)
http://www.instructables.com/community/Cant-reply-to-comment-or-post-a-new-comment-on-my/
HK does sell the GPS module for the APM-compatible board.
The little copters from the UK website are not bad to get you started with pilot training. But probably impossible to fix if you have some really hardcrashes.
What I would recommend is to build a sturdy quad with good components, but use a cheap KK board. This is a harder start but will make you a goodpilot. Once you mastered that, you can spend more money an buy an APM and install it in the same quad and make it a drone. The starting point for this,including the remote, battery, chargers etc should be less than $300. But most components are reusable for any other RC project. For example, thesame motors and ESCs also power my Bixler2.
How you can support us? Add this instructable to your favorites and vote for it in the competitions that we are participating (vote flag in upper rightcorner). Thanks in advance!
ArtisanEclectic says: Jun 6, 2013. 9:39 AM REPLYNext instructable: How To Build A Workbench in Under One Hour! =D
Great project guys. Maybe someday I will be able to get around to building one myself.
oesti says: Jun 8, 2013. 4:39 PM REPLYHaha, it's simply too dark for filming at my workbench (and too messy!)
gabrielsan says: Jun 7, 2013. 3:20 AM REPLYAHHAHA nice one
AndyPipkin says: Jun 8, 2013. 3:56 PM REPLYTip: Don't over tighten the cable ties on the ESC's, it can squash the heat-sink insulator and cause a short!
rickharris says: Jun 7, 2013. 12:59 AM REPLYNice and well documents thanks. No doubt you know about these guys .
Another project to put on the list for to do in the near future
marhar says: Jun 7, 2013. 5:34 PM REPLYWe love those guys! In fact, Andreas and I met through David Windestål who apprears on many of the flitetest videos!
view all 69 comments