golfit hr band - · pdf fileon the course performance with a sleek, stylish ... and return to...
TRANSCRIPT

HR BANDGOLFIT

INTRODUCTIONThe Callaway Golfit HR Band combines elite, on the course performance with a sleek, stylish fitness band. On the course, get accurate distances to Front, Center, Back of the green. Off the course, track your steps, heart rate, and sleep pattern.
SPECIFICATIONS
Product Callaway Golfit HR Band
# of Courses 38,000+ Worldwide
Battery 170mAh Lithium Ion Polymer
Battery Life Up to 7 hours (Golf Mode) Up to 8-10 days (Time Mode)
Weight 1.2 oz
Display Size 1”
Band Length 10”
2 INTRODUCTION

ENGLISH 3
CHARGING1. Attach the magnetic pins on the charging cord to the magnetic charging ports located on the back of the band (under the heart rate sensor). 2. Be sure the pins are aligned, then insert the other end of the charging cord into a USB port or AC adapter (not included).
CHARGING PORT
CHARGING PINS
SETTING THE TIME
1. To set the correct time, the device must be connected to satellites (must be outside). This can be done by using Golf Mode or by going to Settings.

DESCRIPTION OF TERMS • PRESS - Press & Release button quickly. • HOLD - Press & Hold button until desired screen appears or change happens.
A. [ POWER / BACK ] - HOLD to Power On/Off. Press & Release to return to a previous screen.
B. [ OK ] - Press & Release to select options. C. [ UP ] - Press & Release to scroll. HOLD while in Golf Mode to access Shot Distance screen.
D. [ DOWN ] - Press & Release to scroll. HOLD while in Golf Mode to access Scorecard.
4 HOW TO USE
ENGLISH 5
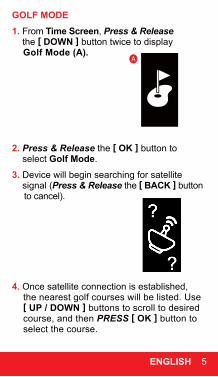
GOLF MODE1. From Time Screen, Press & Release the [ DOWN ] button twice to display Golf Mode (A). 2. Press & Release the [ OK ] button to select Golf Mode.
3. Device will begin searching for satellite signal (Press & Release the [ BACK ] button to cancel).
4. Once satellite connection is established,the nearest golf courses will be listed. Use [ UP / DOWN ] buttons to scroll to desired course, and then PRESS [ OK ] button to select the course.

6 HOW TO USE
DISPLAY DIAGRAM
A. Distance to the Back of GreenB. Distance to the Center of GreenC. Distance to the Front of GreenD. Hole NumberE. Par for the holeF. Unit of Measure (Yards or Meters) 5. While on the Play Mode screen, HOLD the [UP] button to access Shot Distance, or HOLD the [DOWN] button to access the Scorecard.
PLAY MODE

ENGLISH 7
SHOT DISTANCE1. From the Play Mode Screen, HOLD the [ UP ] button display Shot Distance. 2. As you travel to your ball, the distance will begin calculating.
3. Once you arrive at your ball, the distance displayed is the distance of your previous shot (the distance you traveled). 4. Press & Release the [POWER/BACK] button to exit and return to Play Mode.
SCORECARD1. From the Play Mode Screen, HOLD the [DOWN] button display the Scorecard. 2. Press & Release the [UP/DOWN] buttons until your correct score is displayed.
3. Press & Release the [POWER/BACK] button to exit and return to Play Mode.

8 HOW TO USE
END ROUND 1. To end your round, PRESS [ POWER/BACK ] button.Scroll to the desired option then PRESS [OK] button to select.
• Save & Exit - Save Scorecard, end round,and return to Main Menu.
• Discard & Exit - Discard Scorecard, endround, and return to Main Menu.
• Cancel - Select to return to Play Mode.
STEPS 1. From Time Screen, Press & Release the [ DOWN ] button to display the Steps screen. 2. As you walk the number of steps you are taking will calculate and be displayed at the bottom of the screen (approx). 3. To save the number of steps to the device’s memory (so it can be uploaded to the free APP later), you must return to the Time Screen by Pressing the [UP] button. 4. To reset the steps back to zero, HOLD the [OK] button.

ENGLISH 9
HEART RATE 1. From Time Screen, Press & Release the [ DOWN ] button until you reach the Heart Rate screen. 2. Press & Release the [OK] button to start. (Wait 1-2 minutes for the heart rate to calibrate). 3. To save the Heart Rate data to the device’s memory (so it can be uploaded to the free APP later), you must return to the Time Screen by Pressing the [UP] button.
CALORIES 1. From Time Screen, Press & Release the [ DOWN ] button until you reach the Calories screen.
2. The device will count how many calories you are burning (approx.) 3. To save the burned calories data to the device’s memory (so it can be uploaded to the free APP later), you must return to the Time Screen by Pressing the [UP] button.
10 HOW TO USE
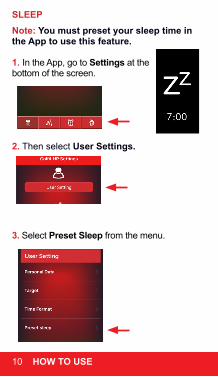
SLEEP Note: You must preset your sleep time in the App to use this feature.
1. In the App, go to Settings at the bottom of the screen.
2. Then select User Settings. 3. Select Preset Sleep from the menu.

ENGLISH 11
4. Set the time you usually fall asleep (start time) and the time you usually wake up (end time). Then click Save.
5. The band will measure the amount of time you are sleeping based on movement during the preset sleep hours.
6. If the band senses movement for 3-5 minutes, the band will exit sleep mode.
7.Then, the band will return to sleep mode (if it does not sense any movement) and continue to measure your sleep time.

12 HOW TO USE
SCORE HISTORY 1. From Time Screen, Press & Release the [ DOWN ] button until you reach the Score History screen.
2. Press & Release the [ OK ] button to select Score History. 3. Use the [UP/DOWN] buttons to scroll to the scorecard you would like to view, then PRESS [OK].
4. Use the [UP/DOWN] buttons to scroll to the scorecard you would like to view, then PRESS [OK]. Note: If you have already uploaded the scorecard to the App, it will no longer appear on the band.

ENGLISH 13
SETTINGS 1. From Time Screen, Press & Release the [ UP] button until you reach the Settings screen.
2. Press & Release the [ OK ] button to select Settings. 3. Use the [UP/DOWN] buttons to scroll to the setting you would like to change, then PRESS [OK]. LANGUAGE
1. Use the [UP/DOWN] buttons to select your desired language, then PRESS [OK] to select.
Choose from: English, Spanish, French, German, or Japanese. 2. Press & Release the [ POWER/BACK] button to return to the Main Menu.
14 HOW TO USE
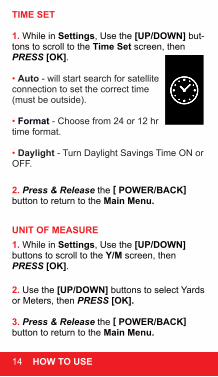
TIME SET 1. While in Settings, Use the [UP/DOWN] but-tons to scroll to the Time Set screen, then PRESS [OK]. • Auto - will start search for satellite connection to set the correct time (must be outside). • Format - Choose from 24 or 12 hr time format. • Daylight - Turn Daylight Savings Time ON or OFF.
2. Press & Release the [ POWER/BACK] button to return to the Main Menu.
UNIT OF MEASURE1. While in Settings, Use the [UP/DOWN] buttons to scroll to the Y/M screen, then PRESS [OK]. 2. Use the [UP/DOWN] buttons to select Yards or Meters, then PRESS [OK]. 3. Press & Release the [ POWER/BACK] button to return to the Main Menu.

ENGLISH 15
SCREEN DISPLAY1. While in Settings, Use the [UP/DOWN] buttons to scroll to the Screen Display screen, then PRESS [OK]. 2. Use the [UP/DOWN] buttons to select Type 1 or 2, then PRESS [OK]. 3. Press & Release the [ POWER/BACK] button to return to the Main Menu. FREE APPSearch for GOLFIT HR in the Google Play StoreTM or in iTunesTM
Note: Compatibility depends on model of Smartphone and version of operating software. Features may vary or could be limited due to compatibility conflicts.
For AppleTM: Compatible with iOS 9.0 or above. For AndroidTM: Compatible with OS 5.0 or above.*ANDROID IS A TRADEMARK OF GOOGLE INC.

PAIRING BAND WITH APP1. Make sure the phone you’re pairing tohas Bluetooth enabled and your Golfit HR is powered on. 2. Open the GOLFIT HR App. Select the settings tab in the bottom right corner.
3. On the settings screen, scroll down to “Bluetooth Pair” and select.
16 PAIRING