3246-1 ppt 2010 lesson 05 - cci...
TRANSCRIPT

3246-1 v1.00 © CCI Learning Solutions Inc. 131
Microsoft® Office Specialist 2010 Series
Microsoft®
PowerPoint 2010 Core Certification
Lesson 5: Enhancing Presentations Lesson Objectives In this lesson, you will learn how to enhance a presentation by animating objects and applying transitions between slides. You will also learn how to make global formatting changes using slide masters and how to enter presenter notes. Upon successful completion of this lesson, you should be able to:
animate slide elements
adjust animation timing
apply slide transitions
edit a slide master
enter presenter notes
For E
valu
atio
n Onl
y
Lesson 5 Enhancing Presentations
132 3246-1 v1.00 © CCI Learning Solutions Inc.
Using Animation Successful presenting entails focusing on important points, controlling the flow of information, and holding the audience's interest in your presentation. Animation is a way of moving text and objects around on your slides, to capture the audience’s interest. For example, you might animate a set of bullet points by making each one fly in from the left, one at a time. You can also animate objects such as charts, tables, and graphics so that they move across your screen from top to bottom, or you could use animation to cause a slide title or your company logo to spin around on the slide.
Animations enable you to add emphasis to text or objects on your slides. They also help your audience follow your presentation by leading them through important points in your presentation. You should avoid overusing animations as they can make your presentation too busy, distracting the audience from your message and content. Using animation sparingly will grab your viewers’ attention and guide them through your presentation more effectively.
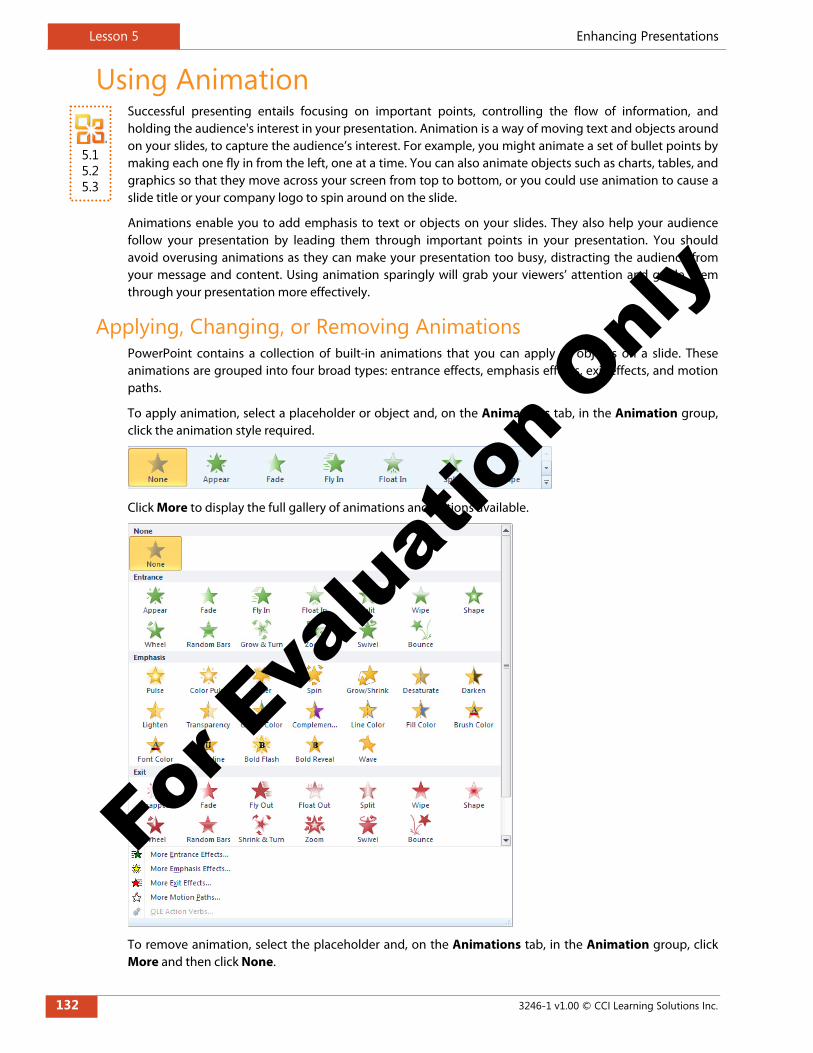
Applying, Changing, or Removing Animations PowerPoint contains a collection of built-in animations that you can apply to objects on a slide. These animations are grouped into four broad types: entrance effects, emphasis effects, exit effects, and motion paths.
To apply animation, select a placeholder or object and, on the Animations tab, in the Animation group, click the animation style required.
Click More to display the full gallery of animations and options available.
To remove animation, select the placeholder and, on the Animations tab, in the Animation group, click More and then click None.
5.1 5.2 5.3
For E
valu
atio
n Onl
y
Enhancing Presentations Lesson 5
3246-1 v1.00 © CCI Learning Solutions Inc. 133
As you add an animation effect to an object, a box appears on the slide with a number. This number represents the order in which a sequence of animations will occur. You can adjust the order in which the animated objects appear using the Animation Pane.
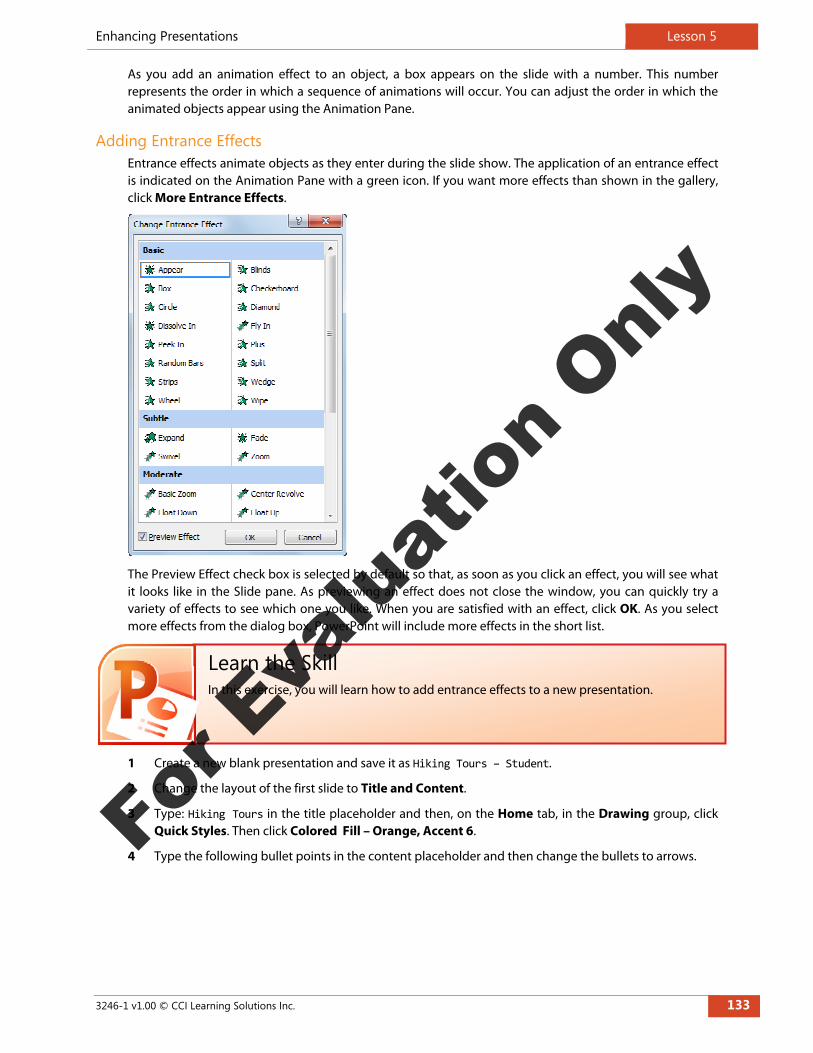
Adding Entrance Effects Entrance effects animate objects as they enter during the slide show. The application of an entrance effect is indicated on the Animation Pane with a green icon. If you want more effects than shown in the gallery, click More Entrance Effects.
The Preview Effect check box is selected by default so that, as soon as you click an effect, you will see what it looks like in the Slide pane. As previewing an effect does not close the window, you can quickly try a variety of effects to see which one you like. When you are satisfied with an effect, click OK. As you select more effects from the dialog box, PowerPoint will include more effects in the short list.
1 Create a new blank presentation and save it as Hiking Tours – Student.
2 Change the layout of the first slide to Title and Content.
3 Type: Hiking Tours in the title placeholder and then, on the Home tab, in the Drawing group, click Quick Styles. Then click Colored Fill – Orange, Accent 6.
4 Type the following bullet points in the content placeholder and then change the bullets to arrows.
Learn the Skill In this exercise, you will learn how to add entrance effects to a new presentation.
For E
valu
atio
n Onl
y
Lesson 5 Enhancing Presentations
134 3246-1 v1.00 © CCI Learning Solutions Inc.
5 Click the title placeholder and then click the Animations tab. Click More in the Animation group to review the animations. Then click Zoom.
6 Click the first bullet point in the content placeholder and then, on the Animations tab, click Fade.
7 On the Animations tab, click Preview to view all the animations on this slide.
8 Press + to add a new slide.
9 Type: Hiking Tours in the title placeholder and then, on the Home tab, in the Drawing group, click Quick Styles. Then click Colored Fill – Orange, Accent 6.
10 In the content placeholder, click Clip Art.
11 In the Clip Art pane, enter: hiking in the search box. Check the media file types drop-down list to ensure that Illustrations is selected and then click Go. Click one of the clip art or photo images related to hiking to insert it into the slide.
12 With the clip art or photo selected, on the Animations tab, click the Float In animation.
13 On the Animations tab, click Preview to view all the animations on this slide.
14 Save the presentation.
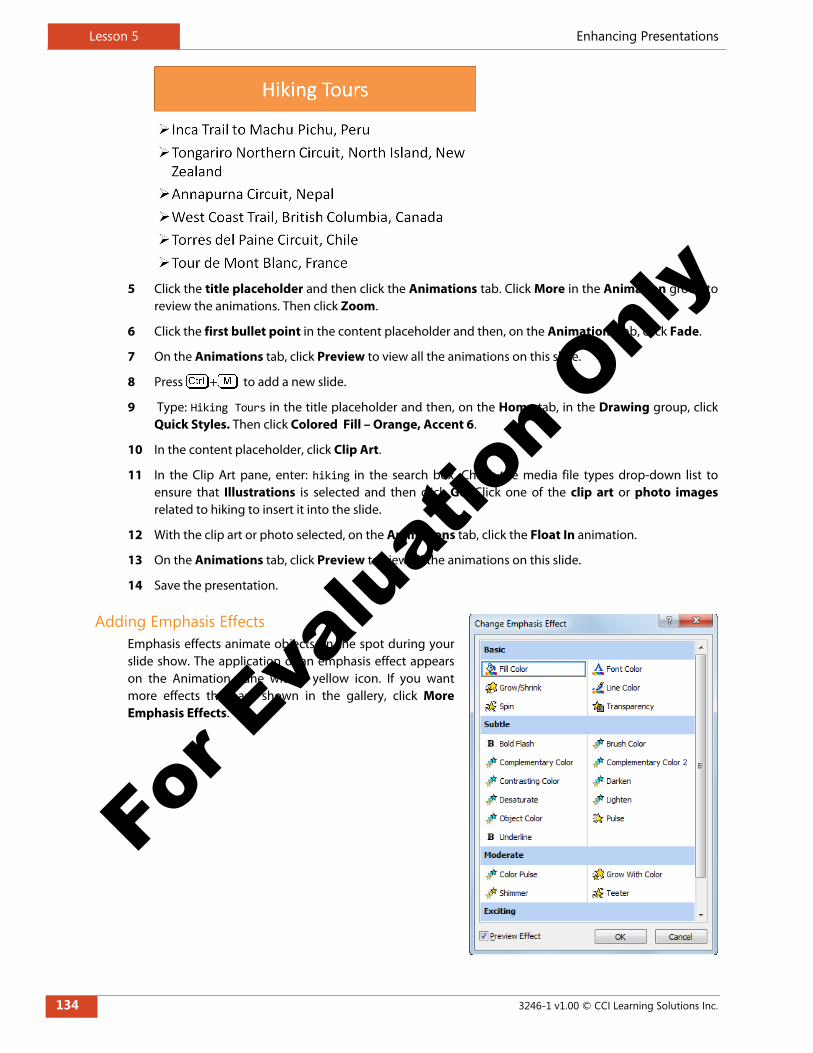
Adding Emphasis Effects Emphasis effects animate objects on the spot during your slide show. The application of an emphasis effect appears on the Animation Pane with a yellow icon. If you want more effects than are shown in the gallery, click More Emphasis Effects.
For E
valu
atio
n Onl
y
Enhancing Presentations Lesson 5
3246-1 v1.00 © CCI Learning Solutions Inc. 135
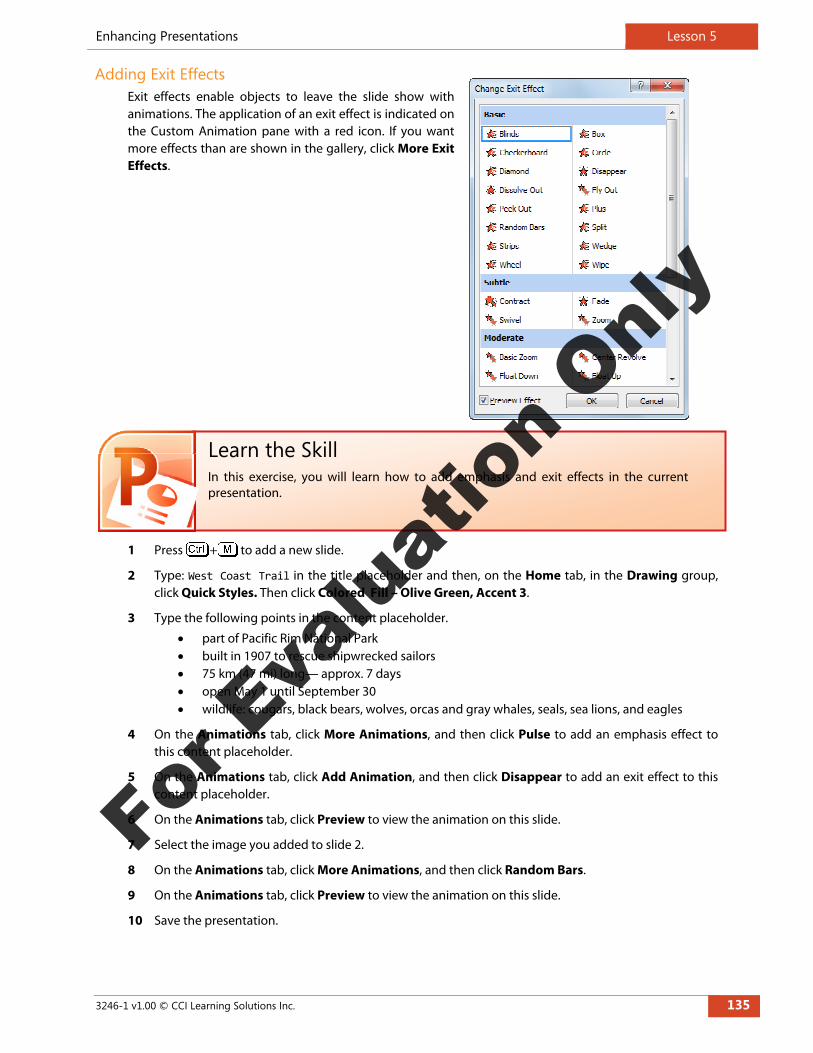
Adding Exit Effects Exit effects enable objects to leave the slide show with animations. The application of an exit effect is indicated on the Custom Animation pane with a red icon. If you want more effects than are shown in the gallery, click More Exit Effects.
1 Press + to add a new slide.
2 Type: West Coast Trail in the title placeholder and then, on the Home tab, in the Drawing group, click Quick Styles. Then click Colored Fill – Olive Green, Accent 3.
3 Type the following points in the content placeholder.
part of Pacific Rim National Park built in 1907 to rescue shipwrecked sailors 75 km (47 mi) long— approx. 7 days open May 1 until September 30 wildlife: cougars, black bears, wolves, orcas and gray whales, seals, sea lions, and eagles
4 On the Animations tab, click More Animations, and then click Pulse to add an emphasis effect to this content placeholder.
5 On the Animations tab, click Add Animation, and then click Disappear to add an exit effect to this content placeholder.
6 On the Animations tab, click Preview to view the animation on this slide.
7 Select the image you added to slide 2.
8 On the Animations tab, click More Animations, and then click Random Bars.
9 On the Animations tab, click Preview to view the animation on this slide.
10 Save the presentation.
Learn the Skill In this exercise, you will learn how to add emphasis and exit effects in the current presentation.
For E
valu
atio
n Onl
y
Lesson 5 Enhancing Presentations
136 3246-1 v1.00 © CCI Learning Solutions Inc.
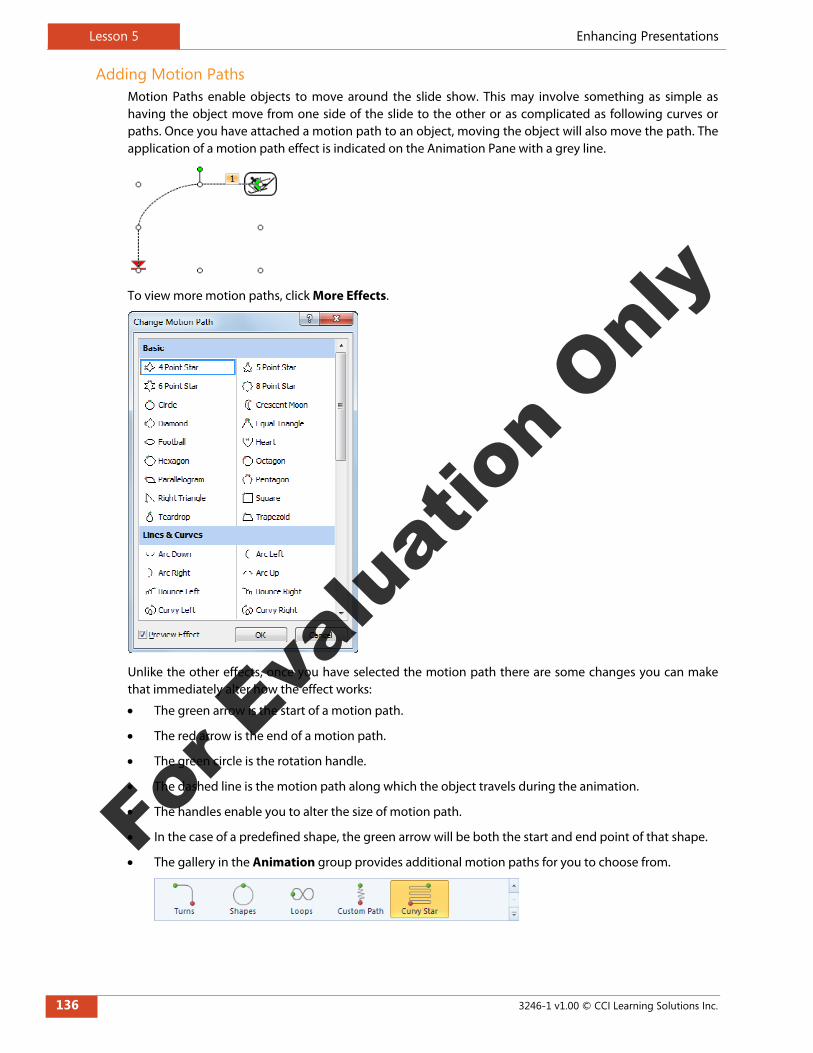
Adding Motion Paths Motion Paths enable objects to move around the slide show. This may involve something as simple as having the object move from one side of the slide to the other or as complicated as following curves or paths. Once you have attached a motion path to an object, moving the object will also move the path. The application of a motion path effect is indicated on the Animation Pane with a grey line.
To view more motion paths, click More Effects.
Unlike the other effects, once you have selected the motion path there are some changes you can make that immediately alter how the effect works:
The green arrow is the start of a motion path.
The red arrow is the end of a motion path.
The green circle is the rotation handle.
The dashed line is the motion path along which the object travels during the animation.
The handles enable you to alter the size of motion path.
In the case of a predefined shape, the green arrow will be both the start and end point of that shape.
The gallery in the Animation group provides additional motion paths for you to choose from.
For E
valu
atio
n Onl
y
Enhancing Presentations Lesson 5
3246-1 v1.00 © CCI Learning Solutions Inc. 137
1 Select slide 3, then press + to add a new slide.
2 Select slide 2 and click the title placeholder, then press + to copy it to the Office clipboard.
3 Select slide 4 and click the title placeholder, then press + to paste the title from slide 2.
4 If the Clip Art pane is still visible with hiking images, select one to insert.
5 With the image selected, on the Animations tab, click More Animations, and then click Loops.
6 On the Animations tab, click Preview to view the animation on this slide.
7 Save the presentation.
Changing Animation Settings Each animation you apply has its own set of default options that you can adjust to suit the presentation. Not all animations have the same settings, although there may be similar options for different effects. For instance, you can set bullet points to appear (or disappear) all at once or one point at a time,; you can set each point to dim when the next point appears; or you can set all points to dim once all points have appeared on the slide.
To change the settings for an animation, use one of the following methods:
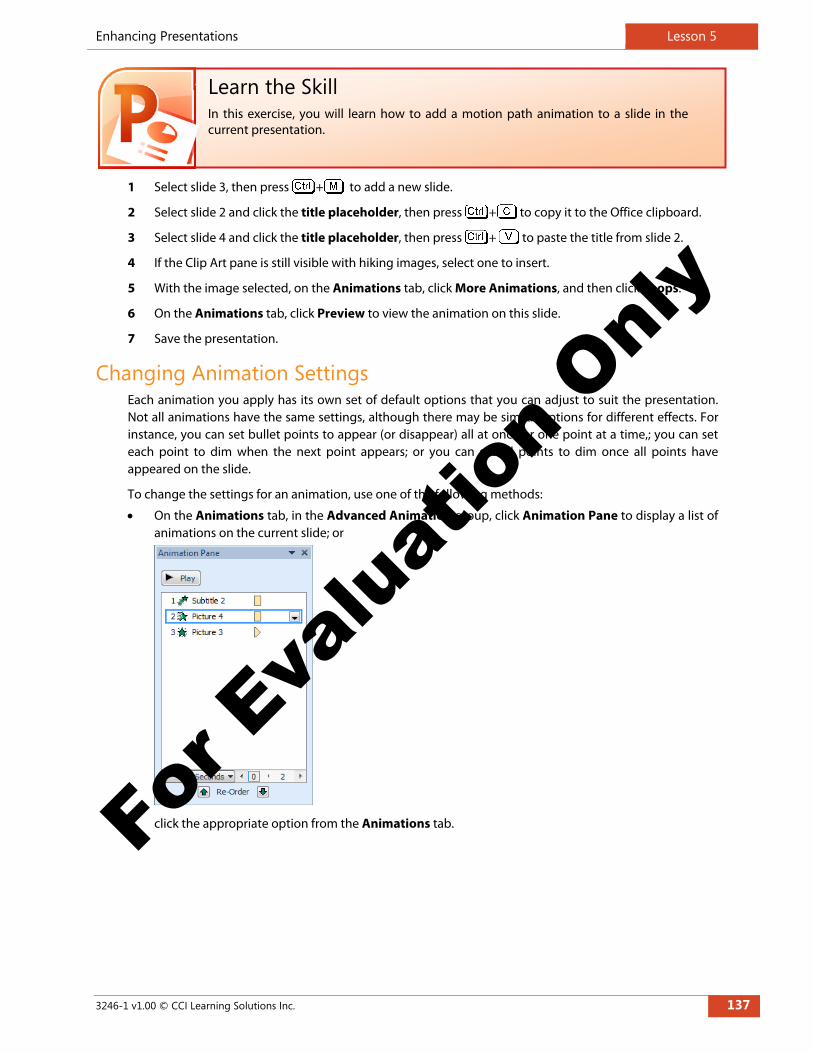
On the Animations tab, in the Advanced Animation group, click Animation Pane to display a list of animations on the current slide; or
click the appropriate option from the Animations tab.
Learn the Skill In this exercise, you will learn how to add a motion path animation to a slide in the current presentation.
For E
valu
atio
n Onl
y
Lesson 5 Enhancing Presentations
138 3246-1 v1.00 © CCI Learning Solutions Inc.
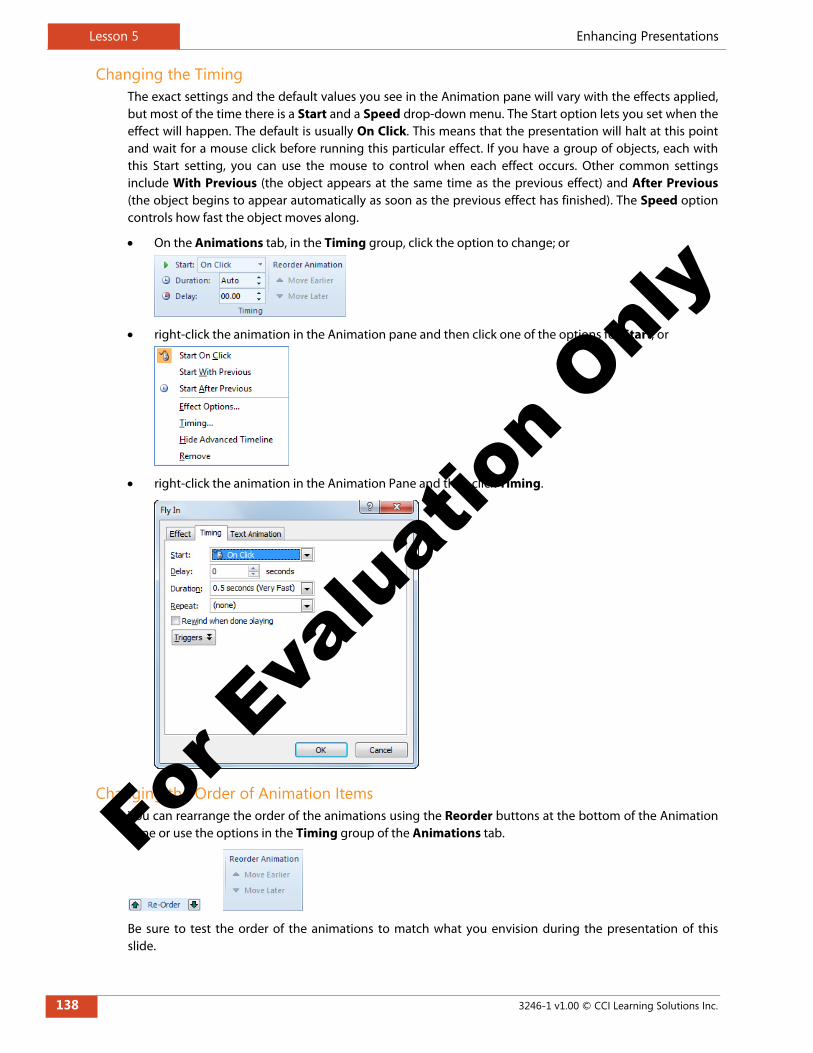
Changing the Timing The exact settings and the default values you see in the Animation pane will vary with the effects applied, but most of the time there is a Start and a Speed drop-down menu. The Start option lets you set when the effect will happen. The default is usually On Click. This means that the presentation will halt at this point and wait for a mouse click before running this particular effect. If you have a group of objects, each with this Start setting, you can use the mouse to control when each effect occurs. Other common settings include With Previous (the object appears at the same time as the previous effect) and After Previous (the object begins to appear automatically as soon as the previous effect has finished). The Speed option controls how fast the object moves along.
On the Animations tab, in the Timing group, click the option to change; or
right-click the animation in the Animation pane and then click one of the options for Start; or
right-click the animation in the Animation Pane and then click Timing.
Changing the Order of Animation Items You can rearrange the order of the animations using the Reorder buttons at the bottom of the Animation pane or use the options in the Timing group of the Animations tab.
Be sure to test the order of the animations to match what you envision during the presentation of this slide.
For E
valu
atio
n Onl
y
Enhancing Presentations Lesson 5
3246-1 v1.00 © CCI Learning Solutions Inc. 139
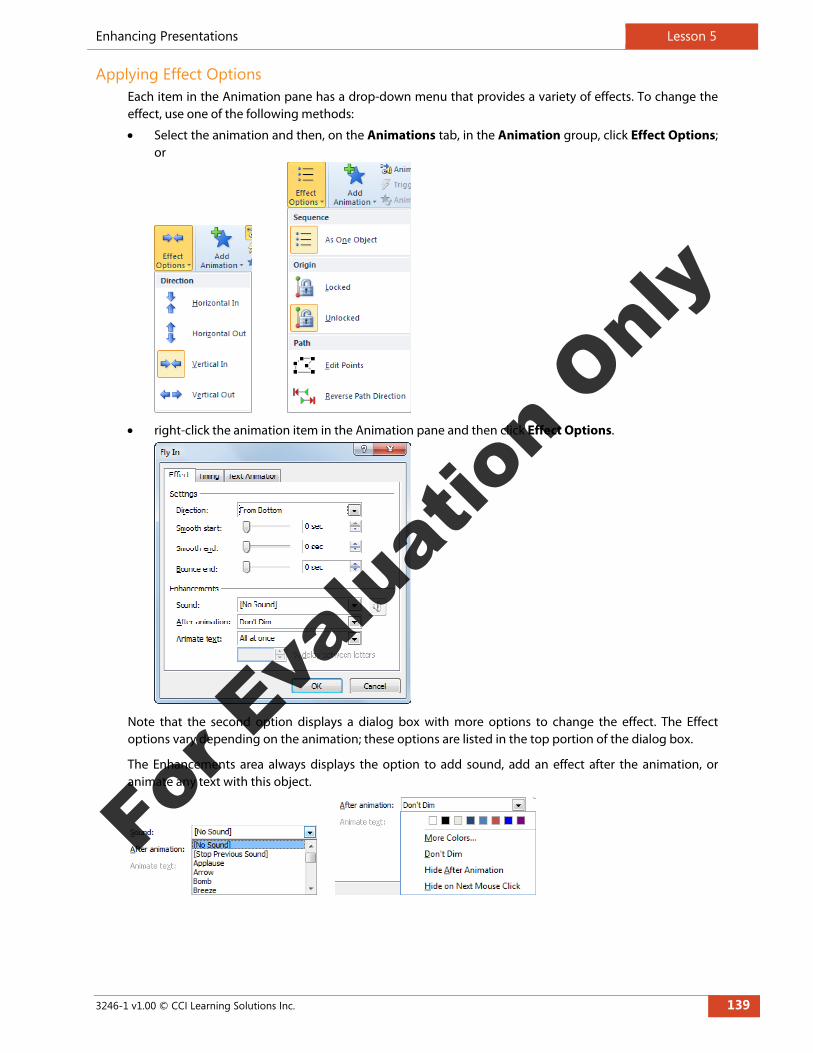
Applying Effect Options Each item in the Animation pane has a drop-down menu that provides a variety of effects. To change the effect, use one of the following methods:
Select the animation and then, on the Animations tab, in the Animation group, click Effect Options; or
right-click the animation item in the Animation pane and then click Effect Options.
Note that the second option displays a dialog box with more options to change the effect. The Effect options vary depending on the animation; these options are listed in the top portion of the dialog box.
The Enhancements area always displays the option to add sound, add an effect after the animation, or animate any text with this object.
For E
valu
atio
n Onl
y
Lesson 5 Enhancing Presentations
140 3246-1 v1.00 © CCI Learning Solutions Inc.
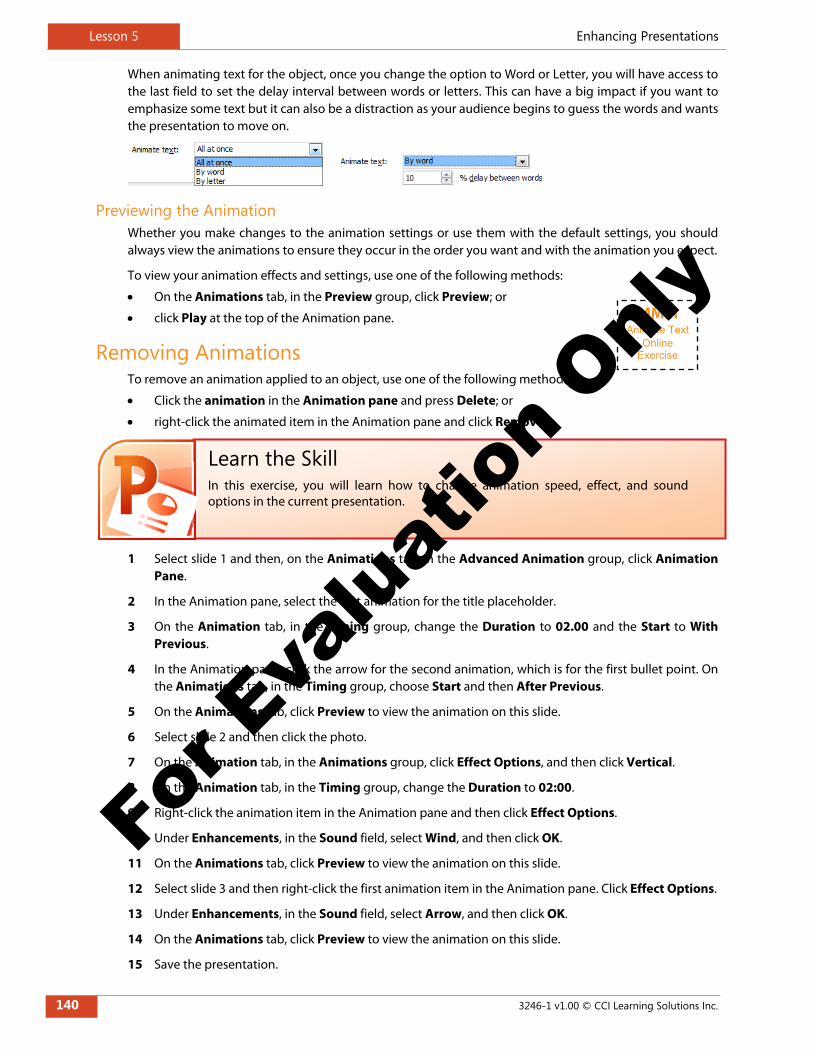
When animating text for the object, once you change the option to Word or Letter, you will have access to the last field to set the delay interval between words or letters. This can have a big impact if you want to emphasize some text but it can also be a distraction as your audience begins to guess the words and wants the presentation to move on.
Previewing the Animation Whether you make changes to the animation settings or use them with the default settings, you should always view the animations to ensure they occur in the order you want and with the animation you expect.
To view your animation effects and settings, use one of the following methods:
On the Animations tab, in the Preview group, click Preview; or
click Play at the top of the Animation pane.
Removing Animations To remove an animation applied to an object, use one of the following methods:
Click the animation in the Animation pane and press Delete; or
right-click the animated item in the Animation pane and click Remove.
1 Select slide 1 and then, on the Animations tab, in the Advanced Animation group, click Animation Pane.
2 In the Animation pane, select the first animation for the title placeholder.
3 On the Animation tab, in the Timing group, change the Duration to 02.00 and the Start to With Previous.
4 In the Animation pane, click the arrow for the second animation, which is for the first bullet point. On the Animations tab, in the Timing group, choose Start and then After Previous.
5 On the Animations tab, click Preview to view the animation on this slide.
6 Select slide 2 and then click the photo.
7 On the Animation tab, in the Animations group, click Effect Options, and then click Vertical.
8 On the Animation tab, in the Timing group, change the Duration to 02:00.
9 Right-click the animation item in the Animation pane and then click Effect Options.
10 Under Enhancements, in the Sound field, select Wind, and then click OK.
11 On the Animations tab, click Preview to view the animation on this slide.
12 Select slide 3 and then right-click the first animation item in the Animation pane. Click Effect Options.
13 Under Enhancements, in the Sound field, select Arrow, and then click OK.
14 On the Animations tab, click Preview to view the animation on this slide.
15 Save the presentation.
Learn the Skill In this exercise, you will learn how to change animation speed, effect, and sound options in the current presentation.
MMMAnimate Text
Online Exercise
For E
valu
atio
n Onl
y
Enhancing Presentations Lesson 5
3246-1 v1.00 © CCI Learning Solutions Inc. 141
Using the Animation Painter You can quickly and easily copy animations from one object to another using the Animation Painter. To copy animation from one object to another, select the object with the animations that you want to copy and then, on the Animations tab, in the Advanced Animation group, click Animation Painter.
1 Select slide 2 and then click the image on it.
2 On the Animations tab, in the Advanced Animation group, click Animation Painter.
3 Select slide 4 and then click the image to apply the animation.
4 On the Animations tab, click Preview to view the animation on this slide.
5 Save the presentation.
Inserting and Modifying Action Buttons Action buttons allow you to navigate quickly and efficiently within a slide show. You can also use action buttons to activate hyperlinks, enabling you or others to jump outside of the show to visit useful Web sites, another presentation, or an Office file. To create an action button, add an action to a selected object to specify what should happen if you click it or point to it with your mouse. Action buttons contain shapes, such as arrows, as well as commonly understood symbols for moving to the next, previous, first, or last slide, or for playing movies or sounds. Action buttons are most commonly used in self-running presentations. To use an action button, you must be in Slide Show view. To create an action button, use one of the following methods:
Select an object and, on the Insert tab, in the Links group, click Action; or
on the Insert tab, click Shapes, and then select one of the shapes under Action Buttons.
You then create the action settings depending on whether you want to click your mouse or point to an object. The action will be either to hyperlink, run a program, or play a sound.
Learn the Skill In this exercise, you will learn how to use the animation painter to copy an animation in the current presentation.
MMM Add Action
Buttons Creative
Application Exercise Fo
r Eva
luat
ion
Only
Lesson 5 Enhancing Presentations
142 3246-1 v1.00 © CCI Learning Solutions Inc.
To edit an action, select the text or the object and then use one of the following methods:
On the Insert tab, in the Links group, click Action; or
on the Insert tab, in the Links group, click Hyperlink; or
press + ; or
right-click and click Edit Hyperlink in the shortcut menu.
To remove an action, select the text or the object and then use one of the following methods:
On the Insert tab, in the Links group, click Hyperlink, and click None; or
on the Insert tab, in the Links group, click Hyperlink, and click None; or
press + and click None; or
right-click, click Remove Hyperlink in the shortcut menu, and click None.
1 Select slide 3 and then select the title placeholder.
2 On the Insert tab, in the Links group, click Action.
3 In the Action Settings dialog, select the Mouse Over tab, select Play Sound and Applause, and then click OK.
4 Click the Slide Show button in the status bar to view this slide as it will appear in the slide show and then move the mouse over the title placeholder to hear the sound.
5 Press to exit the slide show.
6 Select slide 4 and then, on the Insert tab, in the Illustrations group, click Shapes. Click Action Button: Home.
7 Draw an action button in the bottom right corner of the slide. In the Action Settings dialog, select Hyperlink to: First Slide.
8 Click the Slide Show button in the status bar to view this slide as it will appear in the slide show. Click the Home action button to return to the first slide in the presentation.
9 Press to exit the slide show.
10 Save the presentation.
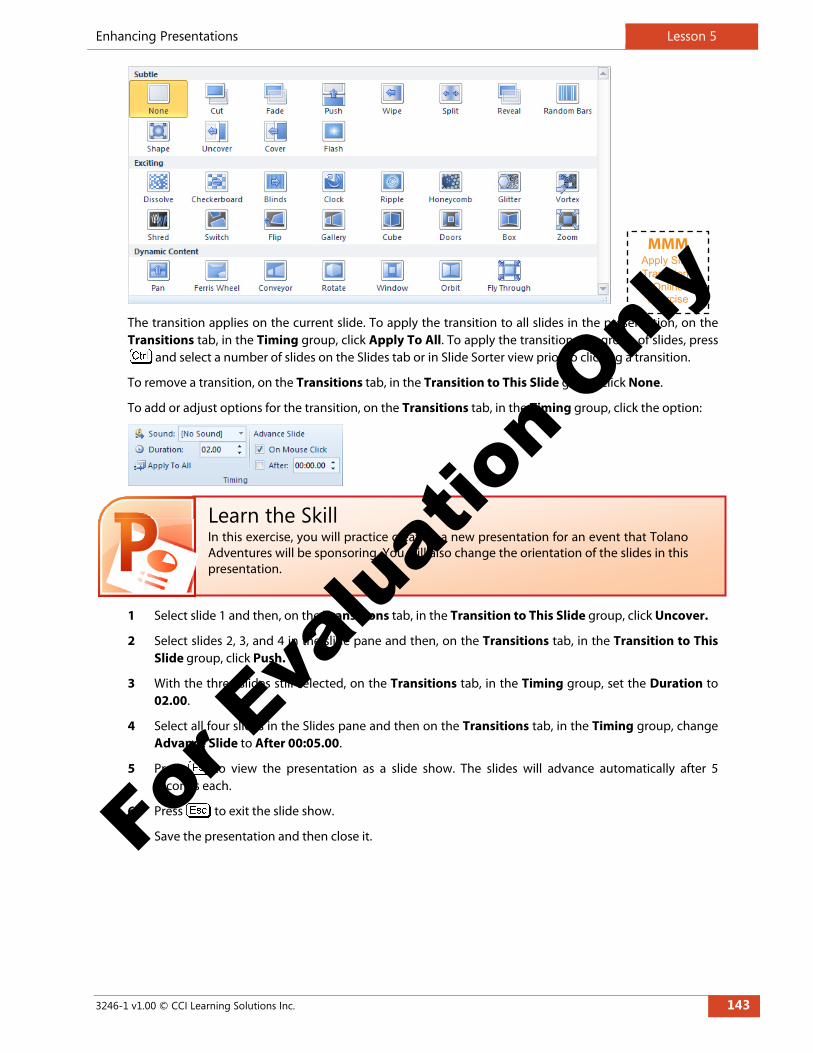
Using Slide Transitions You have transitions that control how each slide replaces the previous one. The default is a simple cut from one slide to the next but, for reasons of content or aesthetics, you may want the change from one slide to another to have a different look. Transitions are attached to slides.
To change the transition between two slides, you must add the transition to the second slide (that is, the slide that is appearing, not the one that is disappearing). Transitions add impact; however, you should be careful that you do not add so many different and dramatic transitions that it takes away from the content of the presentation.
To add or modify a transition, on the Transitions tab, in the Transition to This Slide group, click a transition from the gallery.
Learn the Skill In this exercise, you will learn how to insert and modify action buttons in the current presentation.
5.4 For E
valu
atio
n Onl
y
Enhancing Presentations Lesson 5
3246-1 v1.00 © CCI Learning Solutions Inc. 143
The transition applies on the current slide. To apply the transition to all slides in the presentation, on the Transitions tab, in the Timing group, click Apply To All. To apply the transition to a group of slides, press
and select a number of slides on the Slides tab or in Slide Sorter view prior to clicking a transition.
To remove a transition, on the Transitions tab, in the Transition to This Slide group, click None.
To add or adjust options for the transition, on the Transitions tab, in the Timing group, click the option:
1 Select slide 1 and then, on the Transitions tab, in the Transition to This Slide group, click Uncover.
2 Select slides 2, 3, and 4 in the slide pane and then, on the Transitions tab, in the Transition to This Slide group, click Push.
3 With the three slides still selected, on the Transitions tab, in the Timing group, set the Duration to 02.00.
4 Select all four slides in the Slides pane and then on the Transitions tab, in the Timing group, change Advance Slide to After 00:05.00.
5 Press to view the presentation as a slide show. The slides will advance automatically after 5 seconds each.
6 Press to exit the slide show.
7 Save the presentation and then close it.
Learn the Skill In this exercise, you will practice creating a new presentation for an event that Tolano Adventures will be sponsoring. You will also change the orientation of the slides in this presentation.
MMMApply Slide Transitions
Online Exercise
For E
valu
atio
n Onl
y
Lesson 5 Enhancing Presentations
144 3246-1 v1.00 © CCI Learning Solutions Inc.
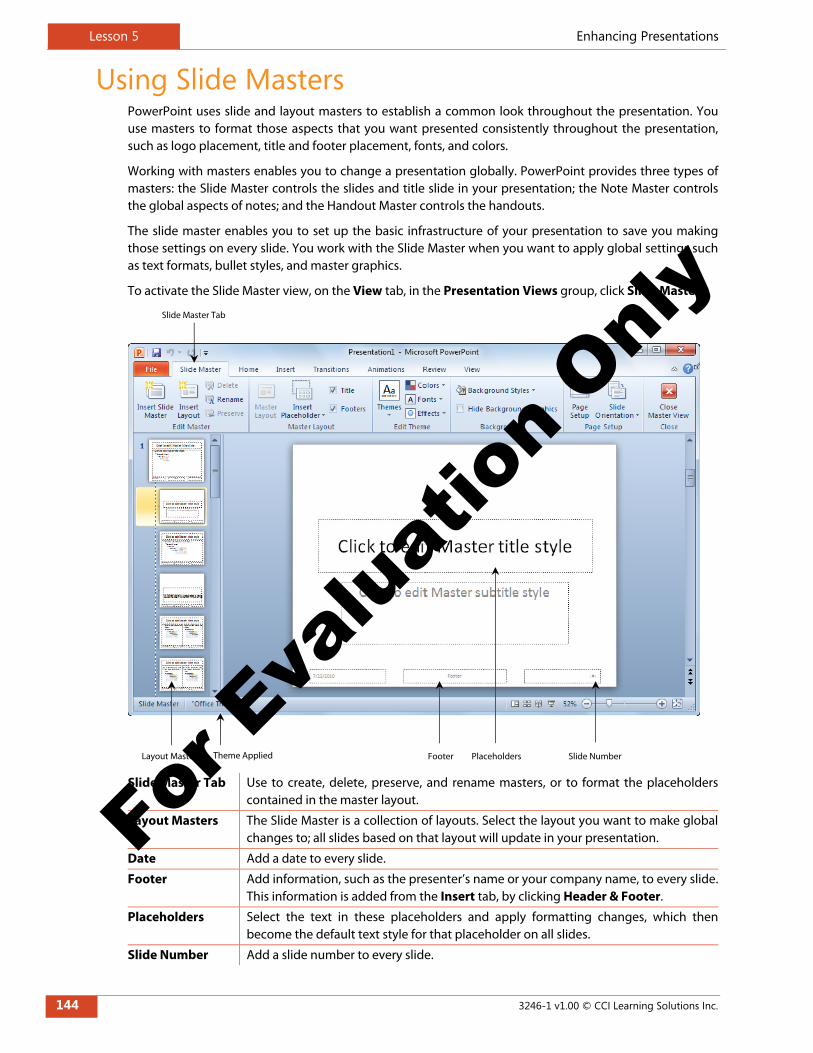
Using Slide Masters PowerPoint uses slide and layout masters to establish a common look throughout the presentation. You use masters to format those aspects that you want presented consistently throughout the presentation, such as logo placement, title and footer placement, fonts, and colors.
Working with masters enables you to change a presentation globally. PowerPoint provides three types of masters: the Slide Master controls the slides and title slide in your presentation; the Note Master controls the global aspects of notes; and the Handout Master controls the handouts.
The slide master enables you to set up the basic infrastructure of your presentation to save you making those settings on every slide. You work with the Slide Master when you want to apply global settings such as text formats, bullet styles, and master graphics.
To activate the Slide Master view, on the View tab, in the Presentation Views group, click Slide Master.
Slide Master Tab Use to create, delete, preserve, and rename masters, or to format the placeholders contained in the master layout.
Layout Masters The Slide Master is a collection of layouts. Select the layout you want to make globalchanges to; all slides based on that layout will update in your presentation.
Date Add a date to every slide.
Footer Add information, such as the presenter’s name or your company name, to every slide.This information is added from the Insert tab, by clicking Header & Footer.
Placeholders Select the text in these placeholders and apply formatting changes, which thenbecome the default text style for that placeholder on all slides.
Slide Number Add a slide number to every slide.
Slide Master Tab
Theme Applied Footer Slide Number Placeholders Layout Masters
For E
valu
atio
n Onl
y
Enhancing Presentations Lesson 5
3246-1 v1.00 © CCI Learning Solutions Inc. 145
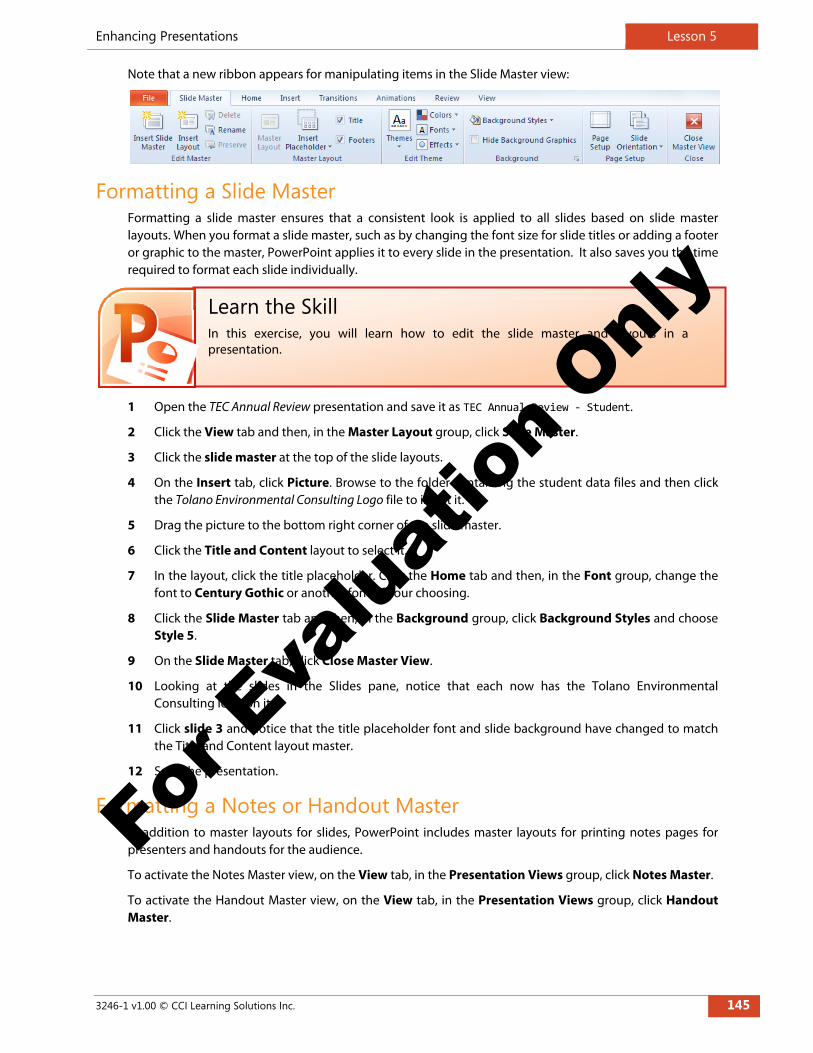
Note that a new ribbon appears for manipulating items in the Slide Master view:
Formatting a Slide Master Formatting a slide master ensures that a consistent look is applied to all slides based on slide master layouts. When you format a slide master, such as by changing the font size for slide titles or adding a footer or graphic to the master, PowerPoint applies it to every slide in the presentation. It also saves you the time required to format each slide individually.
1 Open the TEC Annual Review presentation and save it as TEC Annual Review ‐ Student.
2 Click the View tab and then, in the Master Layout group, click Slide Master.
3 Click the slide master at the top of the slide layouts.
4 On the Insert tab, click Picture. Browse to the folder containing the student data files and then click the Tolano Environmental Consulting Logo file to insert it.
5 Drag the picture to the bottom right corner of the slide master.
6 Click the Title and Content layout to select it.
7 In the layout, click the title placeholder. Click the Home tab and then, in the Font group, change the font to Century Gothic or another font of your choosing.
8 Click the Slide Master tab and then, in the Background group, click Background Styles and choose Style 5.
9 On the Slide Master tab, click Close Master View.
10 Looking at the slides in the Slides pane, notice that each now has the Tolano Environmental Consulting logo on it.
11 Click slide 3 and notice that the title placeholder font and slide background have changed to match the Title and Content layout master.
12 Save the presentation.
Formatting a Notes or Handout Master In addition to master layouts for slides, PowerPoint includes master layouts for printing notes pages for presenters and handouts for the audience.
To activate the Notes Master view, on the View tab, in the Presentation Views group, click Notes Master.
To activate the Handout Master view, on the View tab, in the Presentation Views group, click Handout Master.
Learn the Skill In this exercise, you will learn how to edit the slide master and layouts in a presentation.
For E
valu
atio
n Onl
y

Lesson 5 Enhancing Presentations
146 3246-1 v1.00 © CCI Learning Solutions Inc.
Adding Presenter Notes When delivering a presentation, it can be helpful to the presenter to have notes as a remind about the information to be delivered with each slide, especially if that information is not displayed on the slide.
To add notes to a slide:
In Normal View, type notes in the Notes area below the slide; or
click the View tab and then Notes Page.
You can use Presenter View to show slides on a second monitor or through a projector, but show the slide and your notes on your laptop or computer screen.
To use presenter view, on the Slide Show tab, in the Monitors group, click Use Presenter View.
1 Select slide 2. In the Notes area below the slide, type: Our first wind farm and run‐of‐river power plant projects this year.
2 Select slide 3. In the Notes area, type: We hope to add more staff in the coming year.
3 Click the View tab and then, in the Presentation Views group, click Notes Page.
4 Use the scroll bar or to advance to slide 5.
5 In the Notes area below the slide, type: Although staff retention is the last bullet in the slide, it’s certainly not the least important aspect of our business.
6 On the View tab, in the Presentation Views group, click Normal.
7 Save the presentation and then close it.
Learn the Skill In this exercise, you will learn how to add notes to the current presentation.
For E
valu
atio
n Onl
y
Enhancing Presentations Lesson 5
3246-1 v1.00 © CCI Learning Solutions Inc. 147
Review Questions 1. How do you add an animation?
2. What are the four types of custom animation effects you can add to an object?
3. How do you add an Emphasis animation?
4. What is a motion path?
5. How do you remove an animation?
6. How do you add a sound file to an animation?
7. How do you change the direction of an animation?
8. How do you change the speed of an animation?
9. How do you start an animation immediately after the previous animation?
10. How do you rearrange the animation order?
11. What is an action button?
12. What is a slide transition?
13. How do you apply a slide transition to all slides in a presentation?
14. What is a slide master?
15. How do you format a slide master?
16. What are presenter notes?
17. How do you add presenter notes?
Lesson Summary After completing this lesson, you should be able to:
animate slide elements
adjust animation timing
apply slide transitions
edit a slide master
enter presenter notes
MMMGo online for
Additional Review and
Activities
For E
valu
atio
n Onl
y

Lesson 5 Enhancing Presentations
148 3246-1 v1.00 © CCI Learning Solutions Inc.
For E
valu
atio
n Onl
y