usb pcb layout guidelines
TRANSCRIPT

7/26/2019 USB PCB Layout Guidelines
http://slidepdf.com/reader/full/usb-pcb-layout-guidelines 1/22
Application ReportSPRAAR7E–August 2014–Revised July 2015
High-Speed Interface Layout Guidelines
Embedded Processor Applications
AB STRACT
As modern bus interface frequencies scale higher, care must be taken in the printed circuit board (PCB)layout phase of a design to ensure a robust solution.
Contents
1 Introduction ................................................................................................................... 3
2 General High-Speed Signal Routing ...................................................................................... 4
3 High-Speed Differential Signal Routing ................................................................................. 10
4 References .................................................................................................................. 18
Appendix A Device Layout Parameters....................................................................................... 19
List of Figures
1 Rotation of the PCB Image ................................................................................................. 4
2 Routing Angle Rotation ..................................................................................................... 5
3 Zig-Zag Routing .............................................................................................................. 5
4 PCB Fiberglass Style Examples ........................................................................................... 6
5 Length Matching ............................................................................................................. 6
6 Incorrect Plane Void Routing............................................................................................... 7
7 Correct Plane Void Routing ................................................................................................ 7
8 Incorrect Plane-Split Signal Routing....................................................................................... 89 Stitching Capacitor Placement ............................................................................................. 8
10 Overlapped Planes .......................................................................................................... 9
11 Stitching Vias ................................................................................................................. 9
12 USB3/SATA/PCIe Differential Signal Spacing (mils) .................................................................. 10
13 USB2 Differential Signal Spacing (mils)................................................................................. 10
14 Differential Pair Symmetry ................................................................................................ 11
15 USB Through-Hole Receptacle Connection ............................................................................ 12
16 Via Length (Long Stub) .................................................................................................... 13
17 Via Length (Short Stub) ................................................................................................... 13
18 Anti-Pad Diameter .......................................................................................................... 14
19 AC-Coupling Placement ................................................................................................... 15
20 Reference Plane Voiding of Surface-Mount Devices .................................................................. 16
21 Signal Bending Rules ...................................................................................................... 16
22 Flow-Through Routing ..................................................................................................... 17
List of Tables
1 Critical Signals ............................................................................................................... 3
2 Example PCB Stackups................................................................................................... 17
3 AM335x/AM437x ........................................................................................................... 19
4 DRA7xx/AM57xx ........................................................................................................... 19
All trademarks are the property of their respective owners.
1SPRAAR7E– August 2014 –Revised July 2015 High-Speed Interface Layout Guidelines
Submit Documentation FeedbackCopyright © 2014–2015, Texas Instruments Incorporated

7/26/2019 USB PCB Layout Guidelines
http://slidepdf.com/reader/full/usb-pcb-layout-guidelines 2/22
www.ti.com
5 KeyStone II - K2K, K2H, K2L, and K2E Devices....................................................................... 20
2 High-Speed Interface Layout Guidelines SPRAAR7E– August 2014– Revised July 2015
Submit Documentation FeedbackCopyright © 2014–2015, Texas Instruments Incorporated

7/26/2019 USB PCB Layout Guidelines
http://slidepdf.com/reader/full/usb-pcb-layout-guidelines 3/22
www.ti.com Introduction
1 Introduction
1.1 Sc op e
This application report can help system designers implement best practices and understand PCB layoutoptions when designing platforms. This document is intended for audiences familiar with PCBmanufacturing, layout, and design.
1.2 Critical Signals
A primary concern when designing a system is accommodating and isolating high-speed signals. As high-speed signals are most likely to impact or be impacted by other signals, they must be laid out early(preferably first) in the PCB design process to ensure that prescribed routing rules can be followed.
Table 1 outlines the high-speed interface signals requiring the most attention when laying out a PCB.
Table 1. Critical Signals
Signal Name Description
DP USB 2.0 differential pair, positive
DM USB 2.0 differential pair, negative
SSTXP SuperSpeed differential pair, TX, positive
SSTXN SuperSpeed differential pair, TX, negative
SSRXP SuperSpeed differential pair, RX, positive
SSRXN SuperSpeed differential pair, RX, negative
SATA_RXP Serial ATA (SATA) differential pair, RX, positive
SATA_RXN Serial ATA (SATA) differential pair, RX, negative
SATA_TXP Serial ATA (SATA) differential pair, TX, positive
SATA_TXN Serial ATA (SATA) differential pair, RX, negative
PCIE_RXP PCI-Express (PCIe) differential pair, RX, positive
PCIE_RXN PCI-Express (PCIe) differential pair, RX, negative
PCIE_TXP PCI-Express (PCIe) differential pair, TX, positive
PCIE_TXN PCI-Express (PCIe) differential pair, TX, negative
3SPRAAR7E– August 2014 –Revised July 2015 High-Speed Interface Layout Guidelines
Submit Documentation Feedback Copyright © 2014–2015, Texas Instruments Incorporated

7/26/2019 USB PCB Layout Guidelines
http://slidepdf.com/reader/full/usb-pcb-layout-guidelines 4/22
General High-Speed Signal Routing www.ti.com
2 General High-Speed Signal Routing
2.1 PCB Fiber Weave Mitigation
When routing differential signals across common PCB materials, each trace of the pair will experiencedifferent dielectric constants and corresponding signal velocities due to the differences in static permittivity(Ɛr) of the fiberglass weave (Ɛr is approximately 6) and epoxy (Ɛr is approximately 3) that comprise aPCB. As signals travel faster when Ɛr is lower, an interpair skew can develop if a signal in a differentialpair travels over a higher ratio of fiberglass or epoxy than does its companion signal. This skew betweenthe differential signals can significantly degrade the differential eye diagram as presented to the receiver,cause significant AC common-mode voltage noise, and cause EMI issues. The extent of this problem willdepend on the bus speed, the length of the traces, the trace geometries, the type of fiberglass weaveused, and the alignment of the traces to the weave pattern of a PCB. Problems from fiber weavealignment vary from board to board. This variance makes issues difficult to diagnose.
Figure 1, Figure 2, and Figure 3 show the three most common methods to minimize the impact of PCBfiber weave in a board design. The goal of each method is to ensure that both signals of the differentialpair will share a relatively common Ɛr across the length of the pair routing.
The entirety of the signaling image plane is rotated 10° to 35° in relation to the underlying PCB fiber weave.
The PCB manufacturer can effect this rotation without making changes to the PCB layout database.
Figure 1. Rotation of the PCB Image
4 High-Speed Interface Layout Guidelines SPRAAR7E– August 2014– Revised July 2015
Submit Documentation FeedbackCopyright © 2014–2015, Texas Instruments Incorporated

7/26/2019 USB PCB Layout Guidelines
http://slidepdf.com/reader/full/usb-pcb-layout-guidelines 5/22
www.ti.com General High-Speed Signal Routing
Only the high-speed differential signals are routed at a 10° to 35° angle in relation to the underlying PCB fiber weave.
Figure 2. Routing Angle Rotation
The high-speed differential signals are routed in a zig-zag fashion across the PCB.
Figure 3. Zig-Zag Routing
5SPRAAR7E– August 2014 –Revised July 2015 High-Speed Interface Layout Guidelines
Submit Documentation Feedback Copyright © 2014–2015, Texas Instruments Incorporated

7/26/2019 USB PCB Layout Guidelines
http://slidepdf.com/reader/full/usb-pcb-layout-guidelines 6/22
Length-Matching at Matched Ends
Length-Matching at Mismatched Ends
1080 2116 7628
General High-Speed Signal Routing www.ti.com
Because the ratio of fiberglass to epoxy is the primary contributor to the Ɛr disparity, choose a PCB stylewith a tighter weave, less epoxy, and greater Ɛr uniformity across longer trace lengths. Before sendingyour design out for fabrication, specify a PCB style that can best accommodate high-speed signals. For examples of common PCB styles, see Figure 4.
Figure 4. PCB Fiberglass Style Examples
2.2 High-Speed Signal Trace Lengths
As with all high-speed signals, keep total trace length for signal pairs to a minimum. For trace lengthrequirements for each device, see Appendix A.
2.3 High-Speed Signal Trace Length Matching
Match the etch lengths of the relevant differential pair traces of each interface. The etch length of thedifferential pair groups do not need to match (that is, the length of the transmit pair does not need tomatch the length of the receive pair). When matching the intrapair length of the high-speed signals, addserpentine routing to match the lengths as close to the mismatched ends as possible. See Figure 5 for more details.
Figure 5. Length Matching
6 High-Speed Interface Layout Guidelines SPRAAR7E– August 2014– Revised July 2015
Submit Documentation FeedbackCopyright © 2014–2015, Texas Instruments Incorporated

7/26/2019 USB PCB Layout Guidelines
http://slidepdf.com/reader/full/usb-pcb-layout-guidelines 7/22
n (Tracewidth x 1.5)>
n
nnPLANE
VOID
PLANE
VOID
www.ti.com General High-Speed Signal Routing
2.4 High-Speed Signal Reference Planes
High-speed signals should be routed over a solid GND reference plane and not across a plane split or avoid in the reference plane unless absolutely necessary. TI does not recommend high-speed signalreferences to power planes.
Routing across a plane split or a void in the reference plane forces return high-frequency current to flow
around the split or void. This can result in the following conditions:• Excess radiated emissions from an unbalanced current flow
• Delays in signal propagation delays due to increased series inductance
• Interference with adjacent signals
• Degraded signal integrity (that is, more jitter and reduced signal amplitude)
For examples of correct and incorrect plane void routing, see Figure 6 and Figure 7.
Figure 6. Incorrect Plane Void Routing
Figure 7. Correct Plane Void Routing
7SPRAAR7E– August 2014 –Revised July 2015 High-Speed Interface Layout Guidelines
Submit Documentation Feedback Copyright © 2014–2015, Texas Instruments Incorporated
7/26/2019 USB PCB Layout Guidelines
http://slidepdf.com/reader/full/usb-pcb-layout-guidelines 8/22
General High-Speed Signal Routing www.ti.com
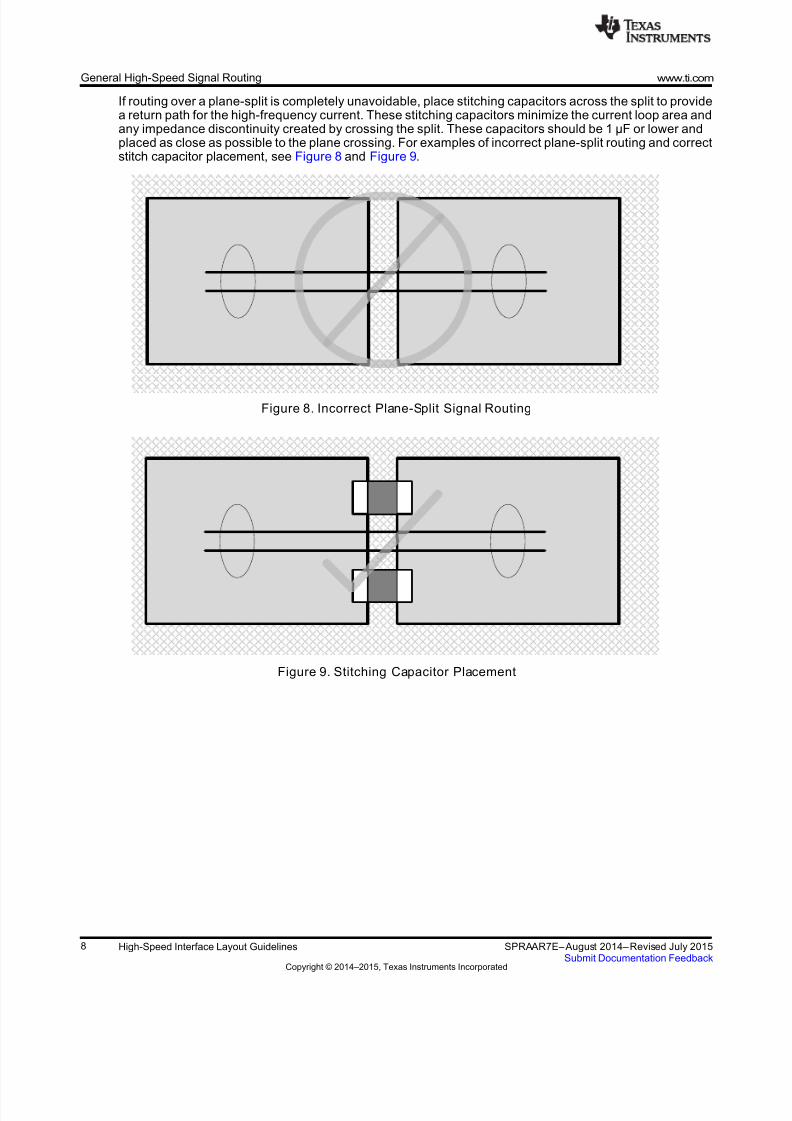
If routing over a plane-split is completely unavoidable, place stitching capacitors across the split to providea return path for the high-frequency current. These stitching capacitors minimize the current loop area andany impedance discontinuity created by crossing the split. These capacitors should be 1 µF or lower andplaced as close as possible to the plane crossing. For examples of incorrect plane-split routing and correctstitch capacitor placement, see Figure 8 and Figure 9.
Figure 8. Incorrect Plane-Split Signal Routing
Figure 9. Stitching Capacitor Placement
8 High-Speed Interface Layout Guidelines SPRAAR7E– August 2014– Revised July 2015
Submit Documentation FeedbackCopyright © 2014–2015, Texas Instruments Incorporated

7/26/2019 USB PCB Layout Guidelines
http://slidepdf.com/reader/full/usb-pcb-layout-guidelines 9/22
200 mils (max)
200 mils (max)
GND stitching via
Signal via
www.ti.com General High-Speed Signal Routing
When planning a PCB stackup, ensure that planes that do not reference each other are not overlappedbecause this produces unwanted capacitance between the overlapping areas. To see an example of howthis capacitance could pass RF emissions from one plane to the other, see Figure 10.
Figure 10. Overlapped Planes
The entirety of any high-speed signal trace should maintain the same GND reference from origination totermination. If unable to maintain the same GND reference, via-stitch both GND planes together to ensurecontinuous grounding and uniform impedance. Place these stitching vias symmetrically within 200 mils
(center-to-center, closer is better) of the signal transition vias. For an example of stitching vias, seeFigure 11.
Figure 11. Stitching Vias
9SPRAAR7E– August 2014 –Revised July 2015 High-Speed Interface Layout Guidelines
Submit Documentation Feedback Copyright © 2014–2015, Texas Instruments Incorporated

7/26/2019 USB PCB Layout Guidelines
http://slidepdf.com/reader/full/usb-pcb-layout-guidelines 10/22
6 630 508
General Keep-Out High-Speed/Periodic Keep-Out
DP DM
6 6 6 630 50508 8
General Keep-Out High-Speed/Periodic Keep-OutInter-Pair Keep-Out
TXn TXp RXn RXp
High-Speed Differential Signal Routing www.ti.com
3 High-Speed Differential Signal Routing
3.1 Differential Signal Spacing
To minimize crosstalk in high-speed interface implementations, the spacing between the signal pairs mustbe a minimum of 5 times the width of the trace. This spacing is referred to as the 5W rule. A PCB designwith a calculated trace width of 6 mils requires a minimum of 30 mils spacing between high-speeddifferential pairs. Also, maintain a minimum keep-out area of 30 mils to any other signal throughout thelength of the trace. Where the high-speed differential pairs abut a clock or a periodic signal, increase thiskeep-out to a minimum of 50 mils to ensure proper isolation. For examples of high-speed differential signalspacing, see Figure 12 and Figure 13.
Figure 12. USB3/SATA/PCIe Differential Signal Spacing (mils)
Figure 13. USB2 Differential Signal Spacing (mils)
3.2 High-Speed Differential Signal Rules
• Do not place probe or test points on any high-speed differential signal.
• Do not route high-speed traces under or near crystals, oscillators, clock signal generators, switching
power regulators, mounting holes, magnetic devices, or ICs that use or duplicate clock signals.
• After BGA breakout, keep high-speed differential signals clear of the SoC because high currenttransients produced during internal state transitions can be difficult to filter out.
• When possible, route high-speed differential pair signals on the top or bottom layer of the PCB with anadjacent GND layer. TI does not recommend stripline routing of the high-speed differential signals.
• Ensure that high-speed differential signals are routed ≥ 90 mils from the edge of the reference plane.
• Ensure that high-speed differential signals are routed at least 1.5 W (calculated trace-width × 1.5)away from voids in the reference plane. This rule does not apply where SMD pads on high-speeddifferential signals are voided.
• Maintain constant trace width after the SoC BGA escape to avoid impedance mismatches in thetransmission lines.
• Maximize differential pair-to-pair spacing when possible.
10 High-Speed Interface Layout Guidelines SPRAAR7E– August 2014– Revised July 2015
Submit Documentation FeedbackCopyright © 2014–2015, Texas Instruments Incorporated

7/26/2019 USB PCB Layout Guidelines
http://slidepdf.com/reader/full/usb-pcb-layout-guidelines 11/22
www.ti.com High-Speed Differential Signal Routing
3.3 Symmetry in the Differential Pairs
Route all high-speed differential pairs together symmetrically and parallel to each other. Deviating fromthis requirement occurs naturally during package escape and when routing to connector pins. Thesedeviations must be as short as possible and package break-out must occur within 0.25 inches of thepackage.
Figure 14. Differential Pair Symmetry
3.4 Crosstalk Between the Differential Signal Pairs
In devices that include multiple high-speed interfaces, avoiding crosstalk between these interfaces isimportant. To avoid crosstalk, ensure that each differential pair is not routed within 50 mils of another differential pair after package escape and before connector termination.
11SPRAAR7E– August 2014 –Revised July 2015 High-Speed Interface Layout Guidelines
Submit Documentation Feedback Copyright © 2014–2015, Texas Instruments Incorporated

7/26/2019 USB PCB Layout Guidelines
http://slidepdf.com/reader/full/usb-pcb-layout-guidelines 12/22
USB SIGNAL TRACE
USB Receptacle
Through-hole pin acts as a
stub when USB signal
trace terminates on top
layer
PCB Cross-Section View
USB SIGNAL TRACE
USB Receptacle
Through-hole pin is part of
direct transmission path
when USB signal trace
terminates on bottom
layer
PCB Cross-Section View
High-Speed Differential Signal Routing www.ti.com
3.5 Connectors and Receptacles
When implementing a through-hole receptacle (like a USB Standard-A), TI recommends making high-speed differential signal connections to the receptacle on the bottom layer of the PCB. Making theseconnections on the bottom layer of the PCB prevents the through-hole pin from acting as a stub in thetransmission path. For surface-mount receptacles such as USB Micro-B and Micro-AB, make high-speeddifferential signal connections on the top layer. Making these connections on the top layer eliminates the
need for vias in the transmission path. For examples of USB through-hole receptacle connections, seeFigure 15.
Figure 15. USB Through-Hole Receptacle Connection
3.6 Via Discontinuity Mitigation
A via presents a short section of change in geometry to a trace and can appear as a capacitive and/or aninductive discontinuity. These discontinuities result in reflections and some degradation of a signal as ittravels through the via. Reduce the overall via stub length to minimize the negative impacts of vias (andassociated via stubs).
Because longer via stubs resonate at lower frequencies and increase insertion loss, keep these stubs asshort as possible. In most cases, the stub portion of the via present significantly more signal degradationthan the signal portion of the via. TI recommends keeping via stubs to less than 15 mils. Longer stubsmust be back-drilled. For examples of short and long via lengths, see Figure 16 and Figure 17.
12 High-Speed Interface Layout Guidelines SPRAAR7E– August 2014– Revised July 2015
Submit Documentation FeedbackCopyright © 2014–2015, Texas Instruments Incorporated

7/26/2019 USB PCB Layout Guidelines
http://slidepdf.com/reader/full/usb-pcb-layout-guidelines 13/22
ayer
Layer 8
Layer 10
< 15 mils
Short Stub Via
Layer 3
Layer 10
These long via stubs
should be back-drilled.
Long Stub Via
www.ti.com High-Speed Differential Signal Routing
Figure 16. Via Length (Long Stub)
Figure 17. Via Length (Short Stub)
13SPRAAR7E– August 2014 –Revised July 2015 High-Speed Interface Layout Guidelines
Submit Documentation Feedback Copyright © 2014–2015, Texas Instruments Incorporated

7/26/2019 USB PCB Layout Guidelines
http://slidepdf.com/reader/full/usb-pcb-layout-guidelines 14/22
Via Pad Anti-Pad
High-Speed Differential Signal Routing www.ti.com
3.7 Back-Drill Stubs
Back-drilling is a PCB manufacturing process in which the undesired conductive plating in the stub sectionof a via is removed. To back-drill, use a drill bit slightly larger in diameter than the drill bit used to createthe original via hole. When via transitions result in stubs longer than 15 mils, back-drill the resulting stubsto reduce insertion losses and to ensure that they do not resonate.
3.8 Increase Via Anti-Pad Diameter
Increasing the via anti-pad diameter reduces the capacitive effects of the via and the overall insertion loss.Ensure that anti-pad diameter for vias on any high-speed signal are as large as possible (30 mils providessignificant benefits without imposing undue implementation hardship). The copper clearance, indicated bythis anti-pad, must be met on all layers where the via exists, including both routing layer and plane layers.The traces connecting to the via barrel contain the only copper allowed in this area; non-functional or unconnected via pads are not permitted. For an example of a via anti-pad diameter, see Figure 18.
Figure 18. Anti-Pad Diameter
3.9 Equalize Via Count
If using vias is necessary on a high-speed differential signal trace, ensure that the via count on eachmember of the differential pair is equal and that the vias are as evenly spaced as possible. TIrecommends placing vias as close as possible to the SoC.
14 High-Speed Interface Layout Guidelines SPRAAR7E– August 2014– Revised July 2015
Submit Documentation FeedbackCopyright © 2014–2015, Texas Instruments Incorporated

7/26/2019 USB PCB Layout Guidelines
http://slidepdf.com/reader/full/usb-pcb-layout-guidelines 15/22
www.ti.com High-Speed Differential Signal Routing
3.10 Surface-Mount Device Pad Discontinui ty Mitigation
Avoid including surface-mount devices (SMDs) on high-speed signal traces because these devicesintroduce discontinuities that can negatively affect signal quality. When SMDs are required on the signaltraces (for example, the USB SuperSpeed transmit AC coupling capacitors) the maximum permittedcomponent size is 0603. TI strongly recommends using 0402 or smaller. Place these componentssymmetrically during the layout process to ensure optimum signal quality and to minimize reflection. For
examples of correct and incorrect AC coupling capacitor placement, see Figure 19.
Figure 19. AC-Coupling Placement
15SPRAAR7E– August 2014 –Revised July 2015 High-Speed Interface Layout Guidelines
Submit Documentation Feedback Copyright © 2014–2015, Texas Instruments Incorporated

7/26/2019 USB PCB Layout Guidelines
http://slidepdf.com/reader/full/usb-pcb-layout-guidelines 16/22
> 5 x Trace Width
> 1.5 x Trace Width
> 1.5 x Trace Width
> 135°
VOIDSMD
PAD
SMD
PADSIGNAL TRACE SIGNAL TRACE
High-Speed Differential Signal Routing www.ti.com
To minimize the discontinuities associated with the placement of these components on the differentialsignal traces, TI recommends partially voiding the SMD mounting pads of the reference plane byapproximately 60% because this value strikes a balance between the capacitive effects of a 0% referencevoid and the inductive effects of a 100% reference void. This void should be at least two PCB layers deep.For an example of a reference plane voiding of surface mount devices, see Figure 20.
Figure 20. Reference Plane Voiding of Surface-Mount Devices
3.11 Signal Bending
Avoid the introduction of bends into high-speed differential signals. When bending is required, maintain abend angle greater than 135° to ensure that the bend is as loose as a possible. For an example of high-speed signal bending rules, see Figure 21.
Figure 21. Signal Bending Rules
16 High-Speed Interface Layout Guidelines SPRAAR7E– August 2014– Revised July 2015
Submit Documentation FeedbackCopyright © 2014–2015, Texas Instruments Incorporated

7/26/2019 USB PCB Layout Guidelines
http://slidepdf.com/reader/full/usb-pcb-layout-guidelines 17/22
USB 3.0
Host Controller 8 mm
www.ti.com High-Speed Differential Signal Routing
3.12 Suggested PCB Stackups
TI recommends a PCB of at least six layers. Table 2 provides example PCB stackups.
Table 2. Example PCB Stackups
6-LAYER 8-LAYER 10-LAYER
SIGNAL SIGNAL SIGNALGROUND GROUND GROUND
SIGNAL (1) SIGNAL SIGNAL (1)
SIGNAL (1) SIGNAL SIGNAL (1)
POWER/GROUND(2) POWER/GROUND(2) POWER
SIGNAL SIGNAL POWER/GROUND (2)
GROUND SIGNAL (1)
SIGNAL SIGNAL (1)
GROUND
SIGNAL
(1) Route directly adjacent signal layers at a 90° offset to each other (2) Plane may be split depending on specific board considerations. Ensure that traces on adjacent planes do not cross splits.
3.13 ESD/EMI Considerations
When choosing ESD/EMI components, TI recommends selecting devices that permit flow-through routingof the USB differential signal pair because they provide the cleanest routing. For example, the TITPD4EUSB30 can be combined with the TI TPD2EUSB30 to provide flow-through ESD protection for bothUSB2 and USB3 differential signals without the need for bends in the signal pairs. For an example of flow-through routing, see Figure 22.
Figure 22. Flow-Through Routing
17SPRAAR7E– August 2014 –Revised July 2015 High-Speed Interface Layout Guidelines
Submit Documentation Feedback Copyright © 2014–2015, Texas Instruments Incorporated

7/26/2019 USB PCB Layout Guidelines
http://slidepdf.com/reader/full/usb-pcb-layout-guidelines 18/22
High-Speed Differential Signal Routing www.ti.com
3.14 ESD/EMI Layout Rules
• Place ESD and EMI protection devices as close as possible to the connector.
• Keep any unprotected traces away from protected traces to minimize EMI coupling.
• Incorporate 60% voids under the ESD/EMI component signal pads to reduce losses.
• Use 0402 0-Ω resistors for common-mode filter (CMF) no-stuff options because larger components will
typically introduce more loss that the CMF itself.• Place any required signal pair AC coupling capacitors on the protected side of the CMF and as close
as possible to the CMF.
• If vias are needed to transition to the CMF layer, ensure that the vias are as close as possible to theCMF.
• Keep the overall routing of AC coupling capacitors + CMF + ESD protection as short and as close aspossible to the connector.
4 Ref er en ces
• Hall, Stephen H., and Garrett W. Hall. High Speed Digital System Design: A Handbook of InterconnectTheory and Design Practices. New York: Wiley, 2000.
• Johnson, Howard W., and Martin Graham. High-speed Signal Propagation: Advanced Black Magic.
Upper Saddle River, NJ: Prentice Hall/PTR, 2003.• Hall, Stephen H., and Howard L. Heck. Advanced Signal Integrity for High-speed Digital Designs.
Hoboken, N.J.: Wiley , 2009.
• Heck, Howard. USB 3.1 Electrical Design. USB 3.1 Developer Days, 2014.
18 High-Speed Interface Layout Guidelines SPRAAR7E– August 2014– Revised July 2015
Submit Documentation FeedbackCopyright © 2014–2015, Texas Instruments Incorporated

7/26/2019 USB PCB Layout Guidelines
http://slidepdf.com/reader/full/usb-pcb-layout-guidelines 19/22
Appendix ASPRAAR7E–August 2014–Revised July 2015
Device Layout Parameters
Table 3. AM335x/AM437x
Parameter MIN TYP MAX Unit
USB2.0 Tracelength (total) 4000 12000 Mils
Skew within any USB2.0 differential pair 50 Mils
USB2.0 DP/DM pair differential impedance 81 90 99 Ω
USB2.0 DP/DM pair common-mode impedance 40.5 45 49.5 Ω
Number of stubs allowed on any USB differential pair trace (total) 0 Stubs
Number of vias allowed on each USB2.0 differential trace (total) 4 Vias
Number of test points permitted on any USB differential pair trace0 Test Points
(total)
USB differential pair to clock or high-speed periodic signal trace50 Mils
spacing
USB differential pair to any other signal trace spacing 30 Mils
Table 4. DRA7xx/AM57xx
Parameter MIN TYP MAX Unit
USB3.0 (SuperSpeed) Tracelength (Total) 3500 Mils
Serial-ATA (SATA) Tracelength (Total) 3050 Mils
PCI-Express (PCIe) Tracelength (Total) 4700 Mils
USB2.0 Tracelength (Total) 4000 12000 Mils
Skew within any USB3/SATA/PCIe differential pair 5 Mils
Skew between all PCIe RX pairs (Total) 550 Mils
Skew between all PCIe TX pairs (Total) 550 Mils
Skew within any USB2.0 differential pair 50 Mils
USB2.0 DP or DM pair differential impedance 81 90 99 Ω
USB2.0 DP or DM pair single-ended impedance 40.5 45 49.5 Ω
SuperSpeed SSRX or SSTX pair differential impedance 83.7 90 96.3 Ω
PCI-Express RX or TX pair differential impedance 90 100 110 Ω
PCI-Express RX or TX trace single-ended impedance 51 60 69 Ω
Serial-ATA RX or TX pair differential impedance 85 100 115 Ω
Number of stubs allowed on any differential pair trace (Total) 0 Stubs
Number of vias allowed on any USB3 differential trace (Total) 2 Vias
Number of vias allowed on any PCIe/SATA differential trace (Total) 0
Number of vias allowed on each USB2.0 differential trace (Total) 4 Vias
Number of test points permitted on any differential pair trace (Total) 0 Test Points
Differential pair to clock or high-speed periodic signal trace spacing 50 Mils
Differential pair to any other signal trace spacing 30 Mils
19SPRAAR7E– August 2014 –Revised July 2015 High-Speed Interface Layout Guidelines
Submit Documentation Feedback Copyright © 2014–2015, Texas Instruments Incorporated

7/26/2019 USB PCB Layout Guidelines
http://slidepdf.com/reader/full/usb-pcb-layout-guidelines 20/22
Appendix A www.ti.com
Table 5. KeyStone II - K2K, K2H, K2L, and K2E Devices
Parameter MIN TYP MAX UNIT
USB3.0 (SuperSpeed) Tracelength (Total) 5500 Mils
Serial-ATA (SATA) Tracelength (Total) 5500 Mils
PCI-Express (PCle) Tracelength (Total) 5500 Mils
SuperSpeed Insertion Loss at 2.5 GHz (device to connector) 10 dBUSB2.0 Tracelength (Total) 4000 12000 Mils
Skew within any USB3/SATA/PCIe differential pair 5 Mils
Skew between all PCIe RX pairs (Total) 550 Mils
Skew between all PCIe TX pairs (Total) 550 Mils
Skew within any USB2.0 differential pair 50 Mils
USB2.0 DP or DM pair differential impedance 81 90 99 Ω
USB2.0 DP or DM pair common mode impedance 40.5 45 49.5 Ω
SuperSpeed SSRX or SSTX pair differential impedance 83.7 90 96.3 Ω
PCI-Express RX or TX pair differential impedance 90 100 110 Ω
PCI-Express RX or TX trace single-ended impedance 51 60 69 Ω
Serial-ATA RX or TX pair differential impedance 85 100 115 Ω
Number of stubs allowed on any differential pair trace (Total) 0 Stubs
Number of vias allowed on USB3 differential trace (Total) 2 Vias
Number of vias allowed on any PCIe/SATA differential trace (Total) 0 Vias
Number of vias allowed on each USB2.0 differential trace (Total) 4 Vias
Number of test points permitted on any differential pair trace (Total) 0 Test Points
Differential pair to clock or high-speed periodic signal trace spacing 50 Mils
Differential pair to any other signal trace spacing 30 Mils
20 High-Speed Interface Layout Guidelines SPRAAR7E– August 2014– Revised July 2015
Submit Documentation FeedbackCopyright © 2014–2015, Texas Instruments Incorporated

7/26/2019 USB PCB Layout Guidelines
http://slidepdf.com/reader/full/usb-pcb-layout-guidelines 21/22
www.ti.com Revision History
Revision History
Changes from C Revision (August 2014) to E Revision ................................................................................................ Page
• Changed to High-Speed Interface from USB.......................................................................................... 1
• Added signals following SSRXN ........................................................................................................ 1
• Updated specifications.................................................................................................................... 2
• Added high-speed interface.............................................................................................................. 3
• Added signals following SSRXN ........................................................................................................ 3
• Changed from USB to High-Speed throughout document........................................................................... 6
• Changed to high-speed differential from SuperSpeed ............................................................................. 10
• Added "each differential pair is not routed within 50 mils of another differential pair " ......................................... 11
• Changed from 50 to 30 ................................................................................................................. 14
• Updated specifications. ................................................................................................................. 20
21SPRAAR7E– August 2014 –Revised July 2015 Revision History
Submit Documentation Feedback Copyright © 2014–2015, Texas Instruments Incorporated

7/26/2019 USB PCB Layout Guidelines
http://slidepdf.com/reader/full/usb-pcb-layout-guidelines 22/22
IMPORTANT NOTICE
Texas Instruments Incorporated and its subsidiaries (TI) reserve the right to make corrections, enhancements, improvements and other changes to its semiconductor products and services per JESD46, latest issue, and to discontinue any product or service per JESD48, latestissue. Buyers should obtain the latest relevant information before placing orders and should verify that such information is current andcomplete. All semiconductor products (also referred to herein as “components”) are sold subject to TI’s terms and conditions of salesupplied at the time of order acknowledgment.
TI warrants performance of its components to the specifications applicable at the time of sale, in accordance with the warranty in TI’s termsand conditions of sale of semiconductor products. Testing and other quality control techniques are used to the extent TI deems necessaryto support this warranty. Except where mandated by applicable law, testing of all parameters of each component is not necessarilyperformed.
TI assumes no liability for applications assistance or the design of Buyers’ products. Buyers are responsible for their products andapplications using TI components. To minimize the risks associated with Buyers’ products and applications, Buyers should provideadequate design and operating safeguards.
TI does not warrant or represent that any license, either express or implied, is granted under any patent right, copyright, mask work right, or other intellectual property right relating to any combination, machine, or process in which TI components or services are used. Informationpublished by TI regarding third-party products or services does not constitute a license to use such products or services or a warranty or endorsement thereof. Use of such information may require a license from a third party under the patents or other intellectual property of thethird party, or a license from TI under the patents or other intellectual property of TI.
Reproduction of significant portions of TI information in TI data books or data sheets is permissible only if reproduction is without alterationand is accompanied by all associated warranties, conditions, limitations, and notices. TI is not responsible or liable for such altereddocumentation. Information of third parties may be subject to additional restrictions.
Resale of TI components or services with statements different from or beyond the parameters stated by TI for that component or servicevoids all express and any implied warranties for the associated TI component or service and is an unfair and deceptive business practice.TI is not responsible or liable for any such statements.
Buyer acknowledges and agrees that it is solely responsible for compliance with all legal, regulatory and safety-related requirementsconcerning its products, and any use of TI components in its applications, notwithstanding any applications-related information or supportthat may be provided by TI. Buyer represents and agrees that it has all the necessary expertise to create and implement safeguards whichanticipate dangerous consequences of failures, monitor failures and their consequences, lessen the likelihood of failures that might causeharm and take appropriate remedial actions. Buyer will fully indemnify TI and its representatives against any damages arising out of the useof any TI components in safety-critical applications.
In some cases, TI components may be promoted specifically to facilitate safety-related applications. With such components, TI’s goal is tohelp enable customers to design and create their own end-product solutions that meet applicable functional safety standards andrequirements. Nonetheless, such components are subject to these terms.
No TI components are authorized for use in FDA Class III (or similar life-critical medical equipment) unless authorized officers of the partieshave executed a special agreement specifically governing such use.
Only those TI components which TI has specifically designated as military grade or “enhanced plastic” are designed and intended for use inmilitary/aerospace applications or environments. Buyer acknowledges and agrees that any military or aerospace use of TI components
which have n ot been so designated is solely at the Buyer's risk, and that Buyer is solely responsible for compliance with all legal andregulatory requirements in connection with such use.
TI has specifically designated certain components as meeting ISO/TS16949 requirements, mainly for automotive use. In any case of use of non-designated products, TI will not be responsible for any failure to meet ISO/TS16949.
Products Applications
Audio www.ti.com/audio Automotive and Transportation www.ti.com/automotive
Amplifiers amplifier.ti.com Communications and Telecom www.ti.com/communications
Data Converters dataconverter.ti.com Computers and Peripherals www.ti.com/computers
DLP® Products www.dlp.com Consumer Electronics www.ti.com/consumer-apps
DSP dsp.ti.com Energy and Lighting www.ti.com/energy
Clocks and Timers www.ti.com/clocks Industrial www.ti.com/industrial
Interface interface.ti.com Medical www.ti.com/medical
Logic logic.ti.com Security www.ti.com/securityPower Mgmt power.ti.com Space, Avionics and Defense www.ti.com/space-avionics-defense
Microcontrollers microcontroller.ti.com Video and Imaging www.ti.com/video
RFID www.ti-rfid.com
OMAP Applications Processors www.ti.com/omap TI E2E Community e2e.ti.com
Wireless Connectivity www.ti.com/wirelessconnectivity
Mailing Address: Texas Instruments, Post Office Box 655303, Dallas, Texas 75265Copyright © 2015, Texas Instruments Incorporated