syllabus plus enterprise - university of adelaide · syllabus plus enterprise page | 4. 1. document...
TRANSCRIPT

Syllabus Plus Enterprise
Syllabus Plus Installation Instructions
Version 6.3
Syllabus Plus Enterprise P a g e | 1

Revision History
Date Version Author Description
6/07/2016 1.0-4.0 Fred Rochler Initial draft
8/07/2016 5.0-5.2 Steve Harlington Initial draft
21/07/2016 6.0 Steve Harlington Updated template, restructured and included more detail.
26/07/2016 6.1 Steve Harlington Updated control panel images
2/09/2016 6.2 Steve Harlington Added Course Planner Template setting
6/09/2016 6.3 Steve Harlington Restructured and added automated deployment section
Approval History
Name Title Signature Date
Syllabus Plus Enterprise P a g e | 2
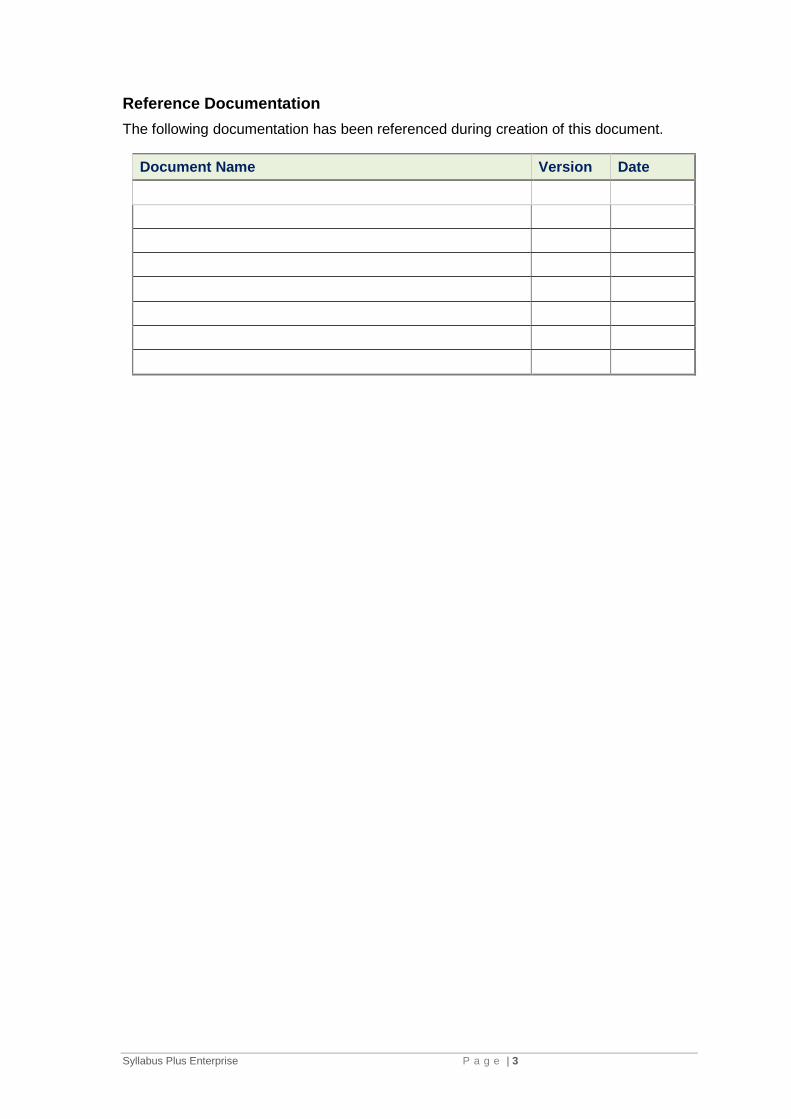
Reference Documentation The following documentation has been referenced during creation of this document.
Document Name Version Date
Syllabus Plus Enterprise P a g e | 3

Table of Contents
1. Document Overview ............................................................................................. 5
2. Prerequisites ......................................................................................................... 5
3. Browser Support ................................................................................................... 5
4. Browsers that are not Supported ....................................................................... 5
5. Installation Instructions ....................................................................................... 5 5.1. Automated Deployment of SPE Pre-requisites............................................................. 5
5.1.1. Deployment Steps ................................................................................................ 5 5.2. Summary for Manual Deployment of SPE Pre-requisites ............................................. 6 5.3. Detail for Manual Deployment of SPE Pre-requisites................................................... 6
5.3.1. Pre-requisite Setup ............................................................................................... 6 5.4. Connecting to Syllabus Plus Enterprise and Testing ................................................... 15 5.5. Application Configuration ........................................................................................... 19
5.5.1. Timetabler Settings. ........................................................................................... 19 5.5.2. Course Planner Template Setting ....................................................................... 19
Syllabus Plus Enterprise P a g e | 4

1. Document Overview The aim of this document is to outline the process for installing Syllabus Plus Enterprise on the end users computer.
2. Prerequisites • User has admin access. • SQL Server Express Advanced 2014 64 bit. • .NET 4.5.2 or greater. • Internet Explorer 11 or Firefox 47 or greater (with FX-ClickOnce Plugin).
3. Browser Support • Internet Explorer 11 or greater. • Firefox 47 or greater.
4. Browsers that are not Supported • Chrome. • Safari. • Opera. • All other browsers.
5. Installation Instructions
5.1. Automated Deployment of SPE Pre-requisites
For PCs that have not had Syllabus Plus Enterprise installed for any users previously an automated deployment of the required pre-requisites can be performed. To request the deployment contact service desk (33000) and request an ‘SCCM’ rollout for; Collection Name: “Scientia Syllabus Plus Enterprise Prerequisites v001”.
5.1.1. Deployment Steps 1. Service Desk organises for your computer to be added to the deployment list. You will
also be added to the Syllabus Plus active directory group. This means anyone within this group can use Syllabus Plus Enterprise on the respective PC.
2. Once step 1. has been completed you will be asked by the service desk to reboot your computer.
3. You will then need to wait a full day for the roll out to complete. During this time your computer will need to be turned on and you will also need to be logged on. The computer maybe used for normal tasks during this time or locked if necessary for security reasons.
4. The deployment will roll out the pre-requisites required for Syllabus Plus Enterprise. 5. Once the pre-requisites have been installed you will need to follow the process from
section 5.4.
Syllabus Plus Enterprise P a g e | 5
5.2. Summary for Manual Deployment of SPE Pre-requisites
1) User must be logged in with admin access. 2) Check and install .NET 4.5.2 if necessary (dotNetFx45_Full_setup). You will need to
download from https://www.microsoft.com/en-au/download/details.aspx?id=30653 3) Install click once plugin for Firefox (FX-ClickOnce) (https://addons.mozilla.org/en-
us/firefox/addon/fxclickonce/). Note this step is only required if the user intends to use Firefox.
4) Install SQL Server Express Advanced 2014 64 bit (SQLEXPRADV_x64_ENU.exe). You will need to download from https://www.microsoft.com/en-au/download/details.aspx?id=42299
5) Launch the Syllabus Plus Enterprise Portal https://splus.adelaide.edu.au (See Section 5.4)
6) User logs in to the Portal. 7) Select ‘Enterprise Timetabler’ then select ‘ClickOnce’ Install. 8) When the data source configuration dialog appears select the ‘Configure’ button
quickly. Or to provide more time select the pause button. 9) Select ‘Test Connection’ button, if successful select the ‘Use Connection’ button. 10) Select to ‘Reload data from the Server’ radio button then select ‘OK’. 11) After approx. 30 seconds the Timetabler application should be displayed, if not check
the task bar for a ‘TT’ icon, if present on the task bar select the icon to view Timetabler. 12) Testing: From the views pane top left select ‘Modules’ then click on a few modules
below. If the system is working correctly, you should see activities in the bottom right hand ‘Combined Timetable’ pane (assuming they have been scheduled). Be careful not to make unintended changes as this is a production environment.
13) Close the application selecting when prompted to ‘Save Locally’. 14) Launch the application again from the portal. 15) This time select ‘Use locally save data, if available’ option when prompted within the
data source configuration dialog. 16) Repeat steps 11 to 13. 17) Setup application options. (See section 5.5) 18) Finished.
5.3. Detail for Manual Deployment of SPE Pre-requisites
5.3.1. Pre-requisite Setup 1) User logs on with admin access. Note if you do not have admin access on your
computer submit a service desk request asking for temporary access, this may require approval from your manager. Alternatively call the help desk on Ext. 33000.
2) Some users may feel uncomfortable with the following procedure, if so please contact the service desk who can perform the tasks.
3) Check your .NET version. To perform this task select Start MenuControl PanelPrograms and Features.
Syllabus Plus Enterprise P a g e | 6
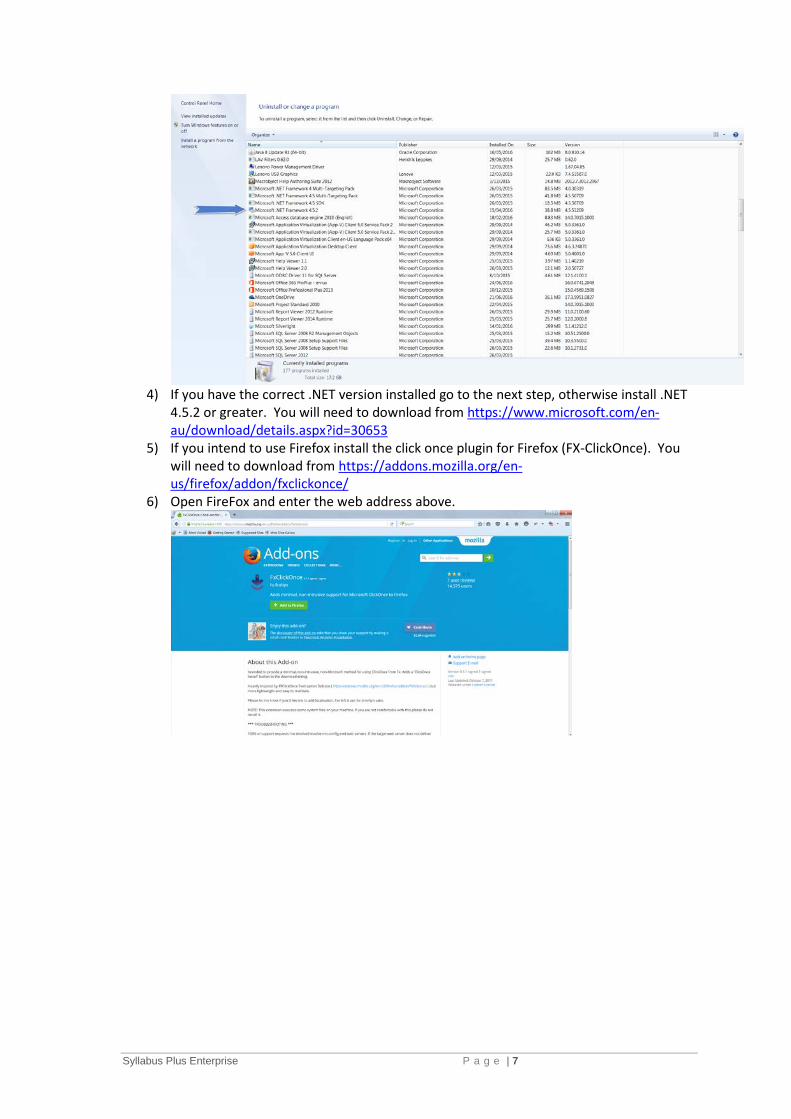
4) If you have the correct .NET version installed go to the next step, otherwise install .NET
4.5.2 or greater. You will need to download from https://www.microsoft.com/en-au/download/details.aspx?id=30653
5) If you intend to use Firefox install the click once plugin for Firefox (FX-ClickOnce). You will need to download from https://addons.mozilla.org/en-us/firefox/addon/fxclickonce/
6) Open FireFox and enter the web address above.
Syllabus Plus Enterprise P a g e | 7
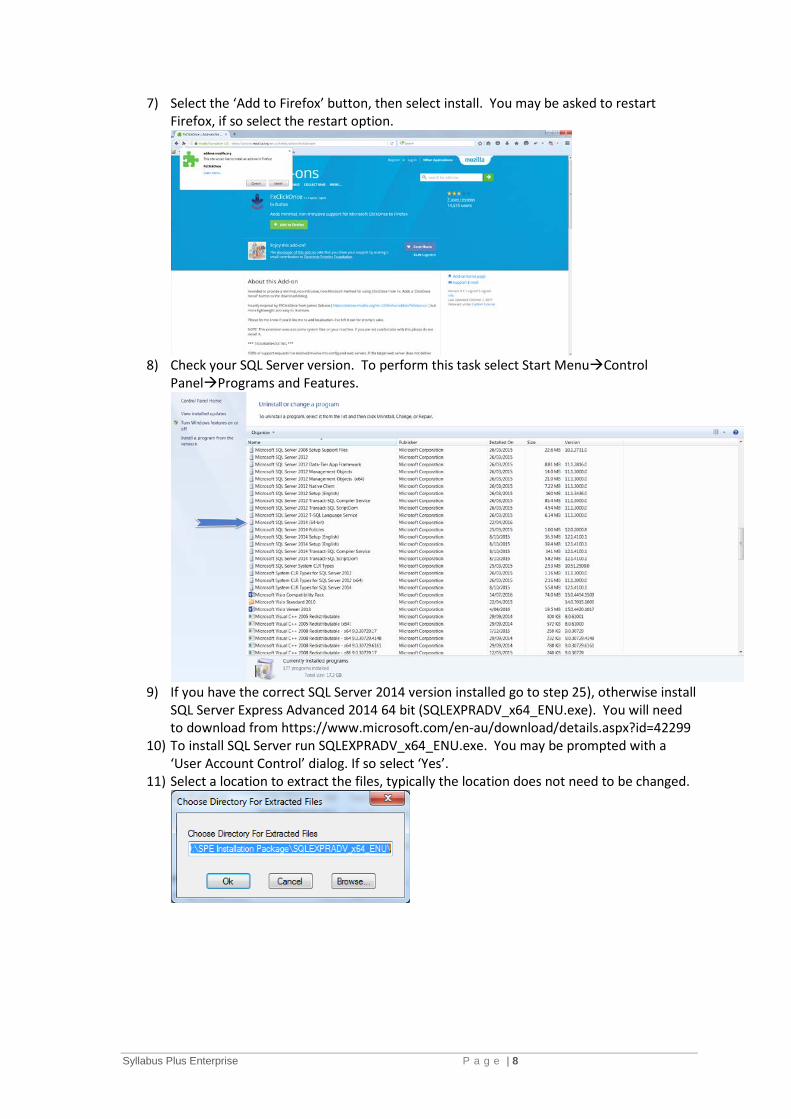
7) Select the ‘Add to Firefox’ button, then select install. You may be asked to restart Firefox, if so select the restart option.
8) Check your SQL Server version. To perform this task select Start MenuControl
PanelPrograms and Features.
9) If you have the correct SQL Server 2014 version installed go to step 25), otherwise install
SQL Server Express Advanced 2014 64 bit (SQLEXPRADV_x64_ENU.exe). You will need to download from https://www.microsoft.com/en-au/download/details.aspx?id=42299
10) To install SQL Server run SQLEXPRADV_x64_ENU.exe. You may be prompted with a ‘User Account Control’ dialog. If so select ‘Yes’.
11) Select a location to extract the files, typically the location does not need to be changed.
Syllabus Plus Enterprise P a g e | 8

12) Wait for the package to extract.
13) Select ‘New SQL Server stand-alone installation or add feature to an existing installation’
link.
14) Select the ‘I accept the license terms’ checkbox followed by the ‘Next’ button.
Syllabus Plus Enterprise P a g e | 9

15) Select the ‘Use Microsoft Update to check for updates’ checkbox followed by the ‘Next’ button.
16) Wait for the ‘Install Setup Files’ to complete then select the ‘Next’ button.
Syllabus Plus Enterprise P a g e | 10
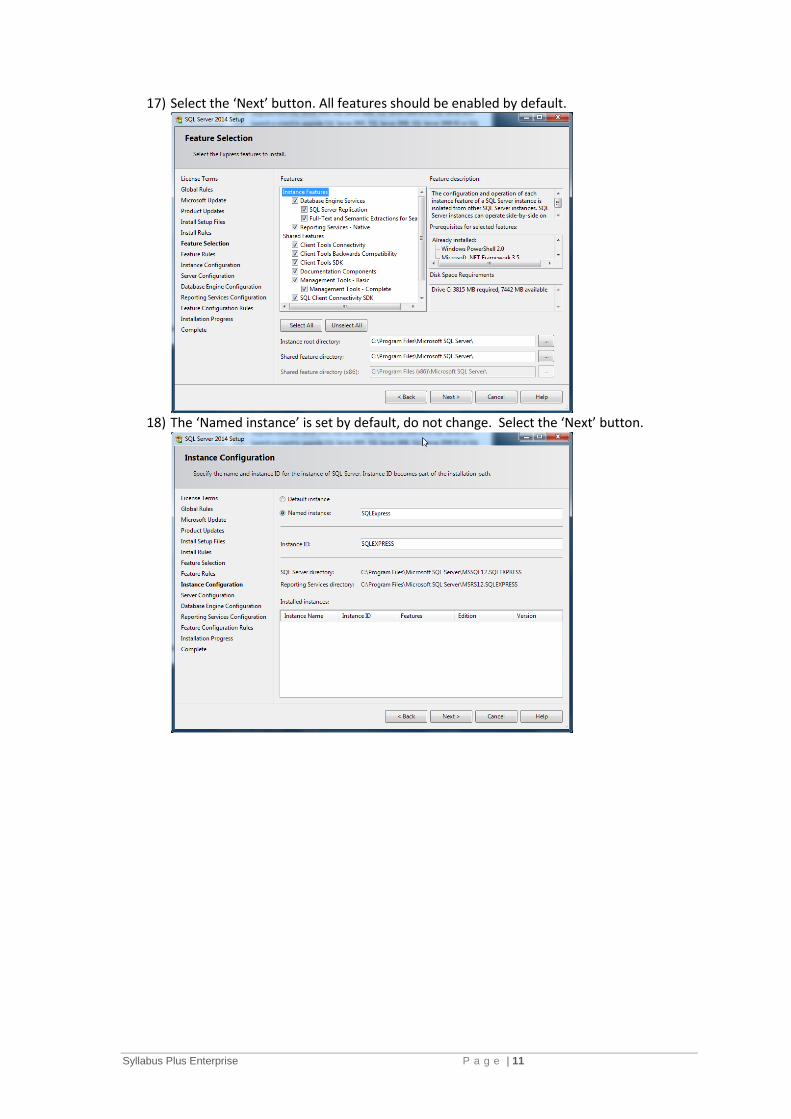
17) Select the ‘Next’ button. All features should be enabled by default.
18) The ‘Named instance’ is set by default, do not change. Select the ‘Next’ button.
Syllabus Plus Enterprise P a g e | 11

19) The ‘Server Configuration’ is set by default, do not change. Select the ‘Next’ button.
20) The ‘Authentication Mode’ is set by default, do not change. Select the ‘Next’ button.
Syllabus Plus Enterprise P a g e | 12
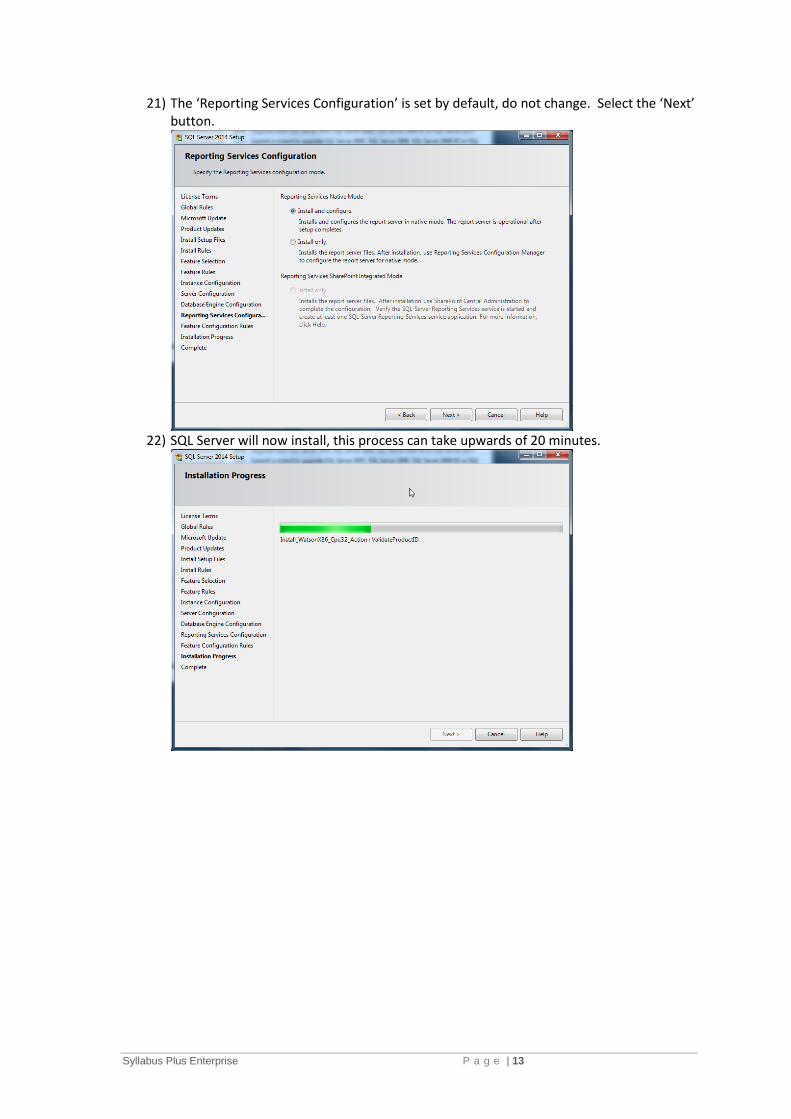
21) The ‘Reporting Services Configuration’ is set by default, do not change. Select the ‘Next’ button.
22) SQL Server will now install, this process can take upwards of 20 minutes.
Syllabus Plus Enterprise P a g e | 13

23) Once the installation is complete check the status of all modules is ‘Succeeded’, then select the ‘Close’ button.
24) Close the application as the SQL Server installation process is complete.
Syllabus Plus Enterprise P a g e | 14
5.4. Connecting to Syllabus Plus Enterprise and Testing
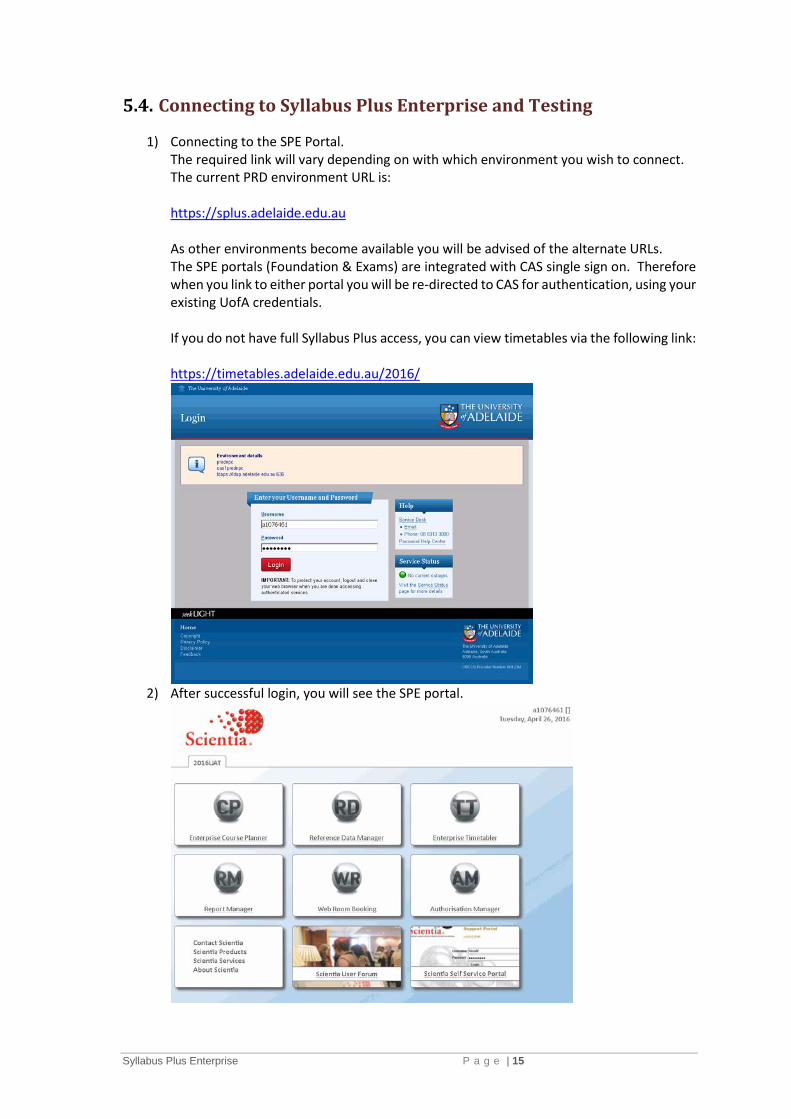
1) Connecting to the SPE Portal. The required link will vary depending on with which environment you wish to connect. The current PRD environment URL is: https://splus.adelaide.edu.au As other environments become available you will be advised of the alternate URLs. The SPE portals (Foundation & Exams) are integrated with CAS single sign on. Therefore when you link to either portal you will be re-directed to CAS for authentication, using your existing UofA credentials. If you do not have full Syllabus Plus access, you can view timetables via the following link: https://timetables.adelaide.edu.au/2016/
2) After successful login, you will see the SPE portal.
Syllabus Plus Enterprise P a g e | 15

The modules available to you include RD (Enterprise Desktop Reference Data Manager), CP (Enterprise Course Planner), TT (Enterprise Timetabler) and WRB (Web Room Bookings). Any other modules are for central use only and will not appear on the portal. Users who only use SPE for ad-hoc bookings will only see TT and WRB. *NOTE* If there are multiple SDBs i.e. current & future year(s), you will need to select the relevant tab to see the available applications. It is important to note that RD, CP and TT need to be installed for first time use, and are activated by single-clicking on the relevant Icon. Allow the module to be installed – this will take a few minutes. This process is not unlike downloading a new image in classic and will result in a local copy of the database on your client machine. Subsequent use will be much quicker, as you will have the option of loading from the local copy. It is recommended that you click on the TT option first, as this is the most commonly used module.
3) Installing applications: When you click (once) on the TT Icon, and if you are using Firefox, you will see an open dialogue box – select the button ‘ClickOnce Install’.
4) The TT module will be installed, and an Enterprise Timetabler dialogue box will appear,
allowing you to select from a number of options.
Syllabus Plus Enterprise P a g e | 16

The first thing to note is that the dialogue box is on a timer (8 seconds), so for the initial run, please press the pause button. This will give you time to check your SQL settings. If the dialogue shows no tick in the ‘I can use SQL Server’ tick box then click on the ‘Configure…’ button. The SQL Server Configuration dialogue box will appear.
If the ‘Instance:’ does not show ‘SQLEXPRESS’ then type this value in the box. Then press the ‘Test Connection’ button. If the message box shows ‘Connection success!’, press the ‘Use Connection’ button. You will be returned to the Enterprise Timetabler dialogue box. It should now show a tick in the ‘I can use SQL Server’. You should leave the default option ‘Use locally saved data, if available’ ticked on. If locally saved data is not available on your client, SPE will automatically reload data from the server. You should only select ‘Reload data from the server’ if you want to refresh all data from the central server and overwrite any locally saved data. Click on the OK button again to bypass the timer and install TT. It will take a few minutes for the module to install. **NOTE** the additional step of configuring SQL Server only needs to occur once on a client machine. Also, the loading of subsequent applications e.g. CP will be much faster since the local data has already been loaded with TT.
Syllabus Plus Enterprise P a g e | 17
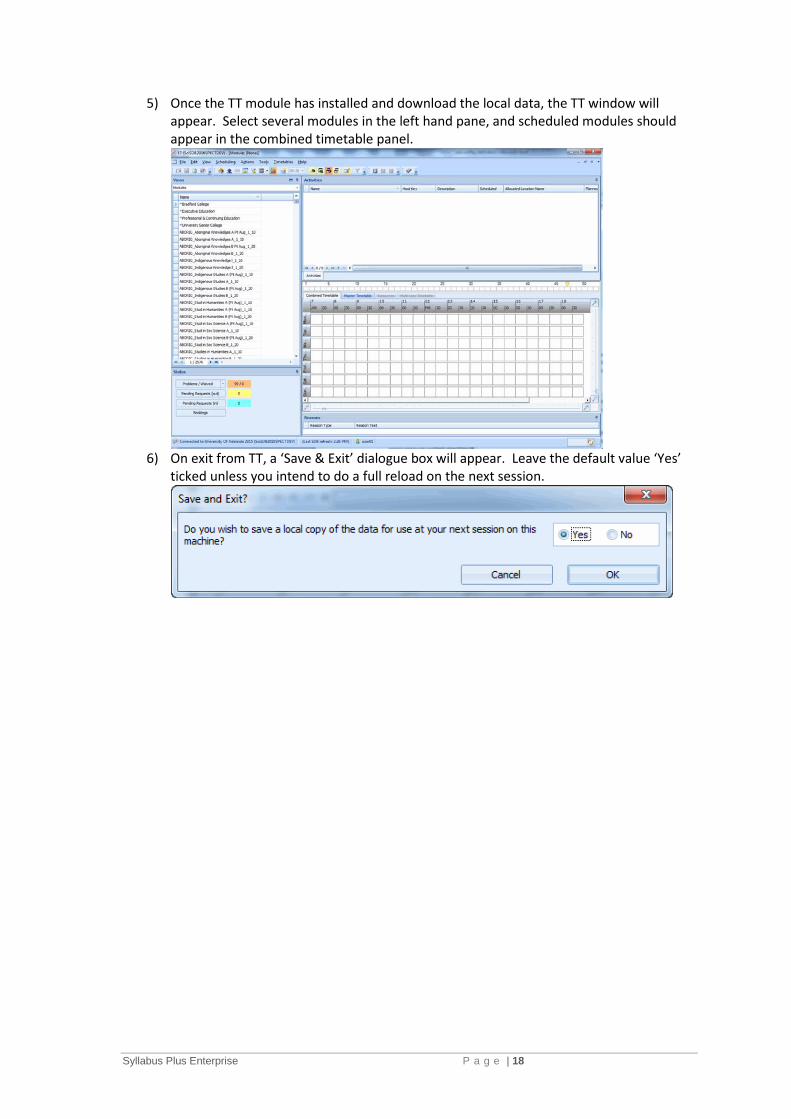
5) Once the TT module has installed and download the local data, the TT window will appear. Select several modules in the left hand pane, and scheduled modules should appear in the combined timetable panel.
6) On exit from TT, a ‘Save & Exit’ dialogue box will appear. Leave the default value ‘Yes’
ticked unless you intend to do a full reload on the next session.
Syllabus Plus Enterprise P a g e | 18
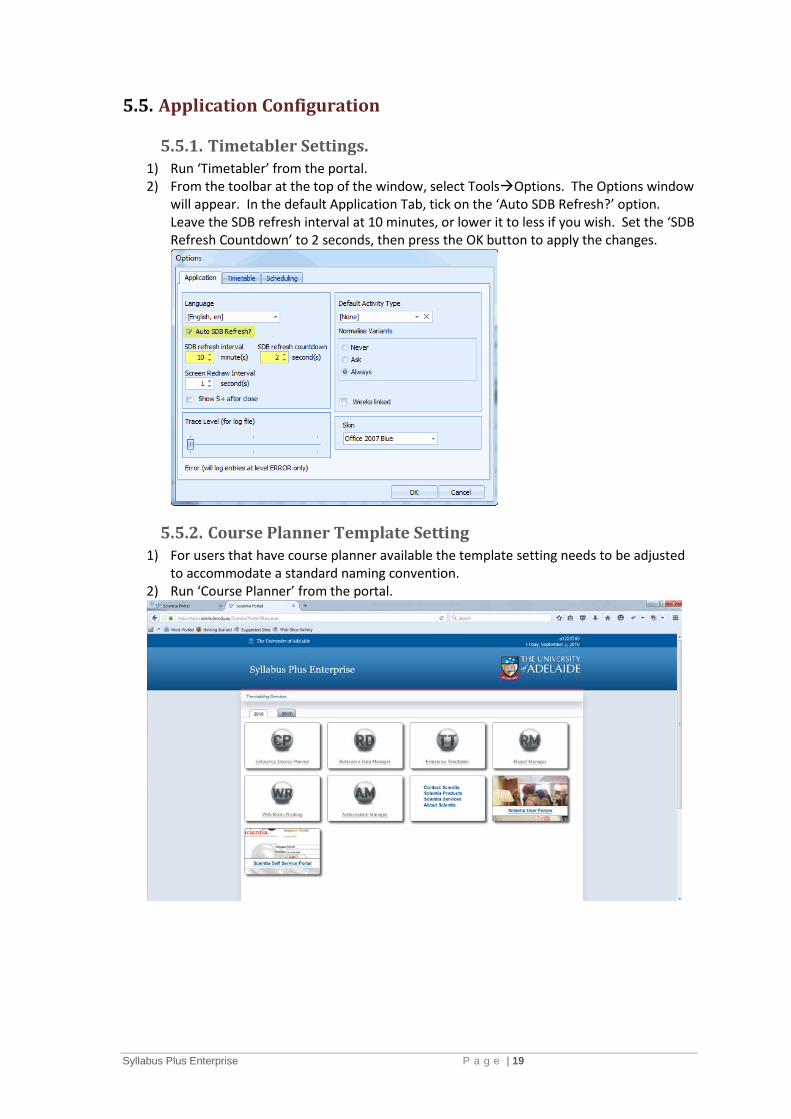
5.5. Application Configuration
5.5.1. Timetabler Settings. 1) Run ‘Timetabler’ from the portal. 2) From the toolbar at the top of the window, select ToolsOptions. The Options window
will appear. In the default Application Tab, tick on the ‘Auto SDB Refresh?’ option. Leave the SDB refresh interval at 10 minutes, or lower it to less if you wish. Set the ‘SDB Refresh Countdown’ to 2 seconds, then press the OK button to apply the changes.
5.5.2. Course Planner Template Setting 1) For users that have course planner available the template setting needs to be adjusted
to accommodate a standard naming convention. 2) Run ‘Course Planner’ from the portal.
Syllabus Plus Enterprise P a g e | 19

3) Select the ‘Show’ button under the templates section.
4) Select the ‘Settings’ icon.
5) The default ‘activity generation’ settings will be displayed.
Syllabus Plus Enterprise P a g e | 20

6) Change the ‘activity generation’ settings as shown in the image.
7) Select the ‘Save’ button to complete the process and return to the ‘activity template
editor’.
Syllabus Plus Enterprise P a g e | 21