princess sumaya university for technology computer - abandah
TRANSCRIPT

1
Princess Sumaya University for Technology Computer Engineering Department
22440: Microprocessor Lab
MASM Tutorial Follow this tutorial step by step:
You can use almost any text editor to create an assembly program. In this example, we will use Microsoft’s EDIT. Type “edit example1.asm” on the command prompt and enter the text of the program. Save the file by “Alt-F” and “Alt-S”. Exit “Alt-F” and “Alt-X”
2
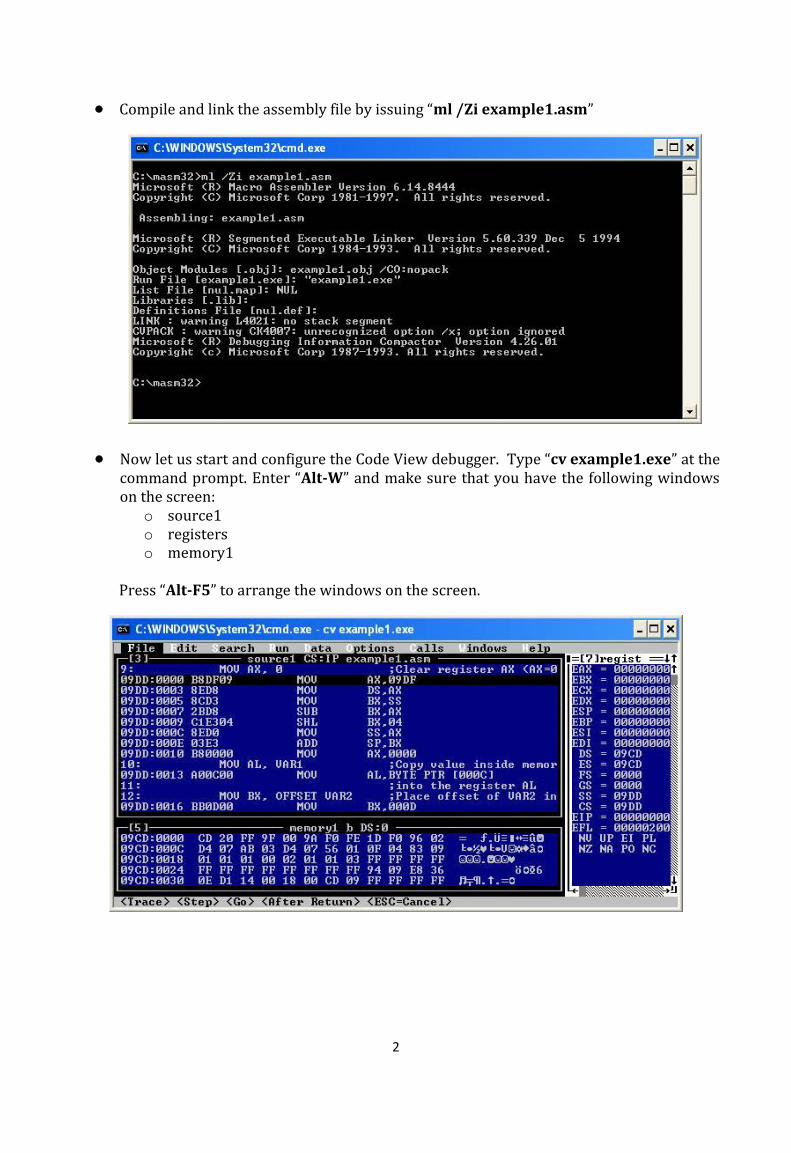
Compile and link the assembly file by issuing “ml /Zi example1.asm”
Now let us start and configure the Code View debugger. Type “cv example1.exe” at the command prompt. Enter “Alt-W” and make sure that you have the following windows on the screen:
o source1 o registers o memory1
Press “Alt-F5” to arrange the windows on the screen.

3
Set the options through “Alt-O” -> Preferences. Set the options as shown below and click “OK”.
Set Source 1 window options as shown below through “Alt-O” -> “Source 1 window”

4
And the memory window options through “Alt-O” - > “Memory 1 window”
The configuration is now complete.
Let us examine the cv program.

5

6
Step through the program and observe the execution of every instruction. o Press “F10”. o The debugger shows execution of the first line of the initialization code. o Press “F10” multiple times until the instruction “MOV AX, 0” is highlighted. This
is the first instruction of your program.
Observe the value in the register EAX. Register AX contains the number 09DFH.

7
Now press “F10”. The debugger will execute the highlighted instruction. Note the
change in the content of EAX and the fact that the register has been highlighted by the
debugger, indicating the change.
The highlighting of the code window moved to the next instruction.
Note that the line of the source code “MOV AL, VAR1” became
“MOV AL, [000C]” where 000CH is the actual offset of VAR1 in the data segment. You
can check that this is true by checking the contents of memory location DS:000CH in the
memory window.
Now execute this instruction by pressing “F10”. The content of the register AL changes, taking the value from VAR1.
8
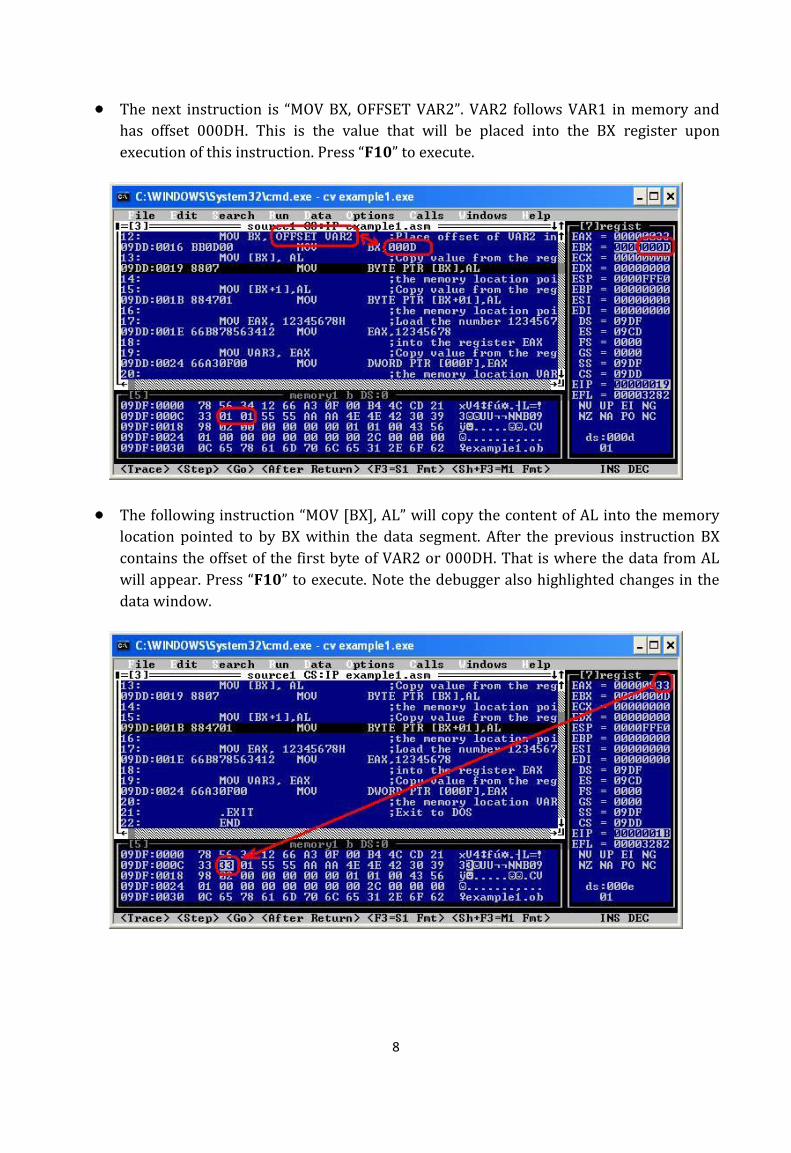
The next instruction is “MOV BX, OFFSET VAR2”. VAR2 follows VAR1 in memory and
has offset 000DH. This is the value that will be placed into the BX register upon
execution of this instruction. Press “F10” to execute.
The following instruction “MOV [BX], AL” will copy the content of AL into the memory
location pointed to by BX within the data segment. After the previous instruction BX
contains the offset of the first byte of VAR2 or 000DH. That is where the data from AL
will appear. Press “F10” to execute. Note the debugger also highlighted changes in the
data window.
9
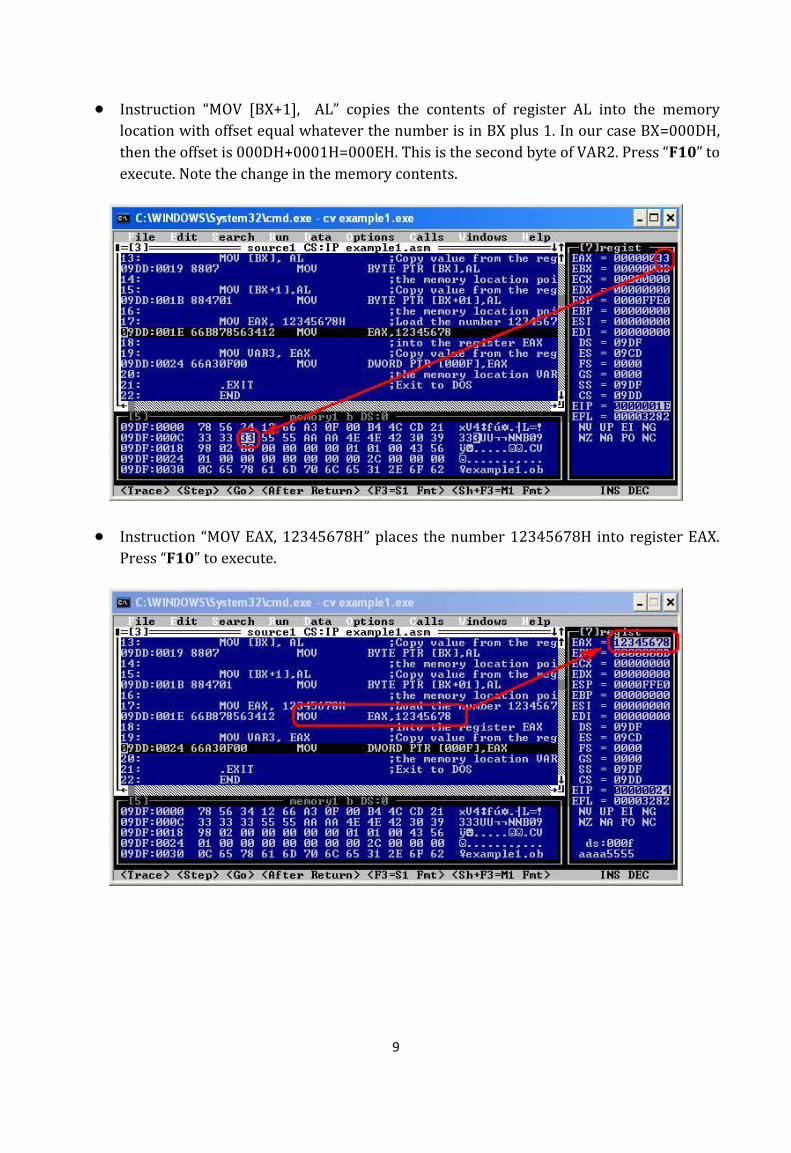
Instruction “MOV [BX+1], AL” copies the contents of register AL into the memory
location with offset equal whatever the number is in BX plus 1. In our case BX=000DH,
then the offset is 000DH+0001H=000EH. This is the second byte of VAR2. Press “F10” to
execute. Note the change in the memory contents.
Instruction “MOV EAX, 12345678H” places the number 12345678H into register EAX.
Press “F10” to execute.

10
The instruction “MOV VAR3, EAX” became “MOV DWORD PTR [000F], EAX”. VAR3 has
been replaced by the actual offset (000FH) of VAR3 in the data memory. This
instruction takes the contents of EAX and places them in the four consecutive bytes of
memory (a 32-bit variable) starting at the offset 000FH. Press “F10” to execute.
This was the last instruction of the user program. The remaining instructions are
generated by the .EXIT directive and serve to terminate the program. Press “F10”
multiple times until the process terminates.
Reference
http://www.intelligent-systems.info/classes/ee360/tutorial.htm