information for users in the uk - philips · information for users in the uk ... the department of...
TRANSCRIPT

Information for users in the UK(Not applicable outside the UK)
Positioning the TVFor the best results, choose a position where light does not fall directly on the screen, and at some distance away from radiatorsor other sources of heat. Leave a space of at least 5 cm all around the TV for ventilation, making sure that curtains, cupboards etc.cannot obstruct the air flow through the ventilation apertures.The TV is intended for use in a domestic environment only and should never be operated or stored in excessively hot or humidatmospheres.
General PointsPlease take note of the section 'Tips' at the end of the English section in this booklet.
Interference
The Department of Trade and Industry operates a Radio Interference Investigation Service to help TV license holders improvereception of BBC and IBA programmes where they are being spoilt by interference.If your dealer cannot help, ask at a main Post Office for the booklet "How to improve Television and Radio Reception".
Mains connection
Before connecting the TV to the mains, check that the mains supply voltage corresponds to the voltage printed on the type plateon the rear panel of the TV. If the mains voltage is different, consult your dealer.
Important
This apparatus is fitted with an approved moulded 13 Amp plug.To change a fuse in this type of plug proceed as follows :1. Remove fuse cover and fuse.2. Fit new fuse which should be a BS1362 5A,A.S.T.A. or BSI approved type.
In order to maintain conformity to the EMC directive, the mains plug on this product must not be removed.
Connecting the aerial
The aerial should be connected to the socket marked x at the back of the set. An inferior aerial is likely to result in a poor,perhaps unstable picture with ghost images and lack of contrast. Make-shift loft or set-top aerials are often inadequate.Your dealer will know from experience the most suitable type for your locality.Should you wish to use the set in conjunction with other equipment, which connects to the aerial socket such as TV games, or avideo camera, it is recommended that these be connected via a combiner unit to avoid repeated connection and disconnection ofthe aerial plug.
Loop aerial (if provided)
The loop aerial packed with the set will give satisfactory reception under good signal conditions. Fit the aerial bracket and lead bypushing the peg into the square hole in the backcover until it latches in place. Then insert the plug on the lead into the aerialsocket.


1
En
glis
h
Your remote control 2
Preparation 3
Installation 4
Store TV channels 4
Select the menu language and country 4
Automatic installation 5
Manual installation 5
Give name 6
Reshuffle the programme list 6
Select favourite TV channels 6
Install TV setup 7-8
EasyLink features are based on the “one touch operation” approach.Thismeans that a sequence of actions are executed at the same time in boththe television and the video cassette recorder, provided both are fittedwith the EasyLink function and connected with the eurocablesupplied with your video recorder.
Installation
Operation
Use of the remote control 9-10
Use of the menus
Picture menu 11
Sound menu 12
Features menu 13
Dual Screen 14
NEXTVIEW 15-18
Teletext 19-21
The keys in front of the TV 21
Connect peripheral equipment
Connecting and selecting equipment 22-24
Remote control functions for peripherals 24-25
Recording 26
Tips 27
Index 27
Glossary 28
Help?If this instruction manual does not give an answer or if‘Tips’ do not solve your TV problem, you can call yourLocal Philips Customer or Service Centre. See thesupplied World-wide guarantee booklet.Please, have the Model and Product number whichyou can find at the back of your television set or onthe packaging, ready, before calling the Philips helpline.
Model: . . . . . . . . . . . . . . . . . . . . . . . . . . . . . . . . . .Product No: . . . . . . . . . . . . . . . . . . . . . . . . . . . . . .
Contents

2 Preparation
M h a
SMARTACTIVE
CONTROLSMART
21 3
54 6
87 9
0
B
w
® Ò ‡ π †
æ b
Ï
i
M q a
S Q
TV
MOVIE SPORT CHILD NEWS OTHER
VCR DVD SAT
TUNER CD
OK MENU
TAPE CDR
SMARTSMART
PICTURESOUND
¬V P
0
◊
U
X P
f hU f
yÚ
o
œ
p π
yÚ
® q
b fic d
INSTANT
ZOOM
Teletext p. 20U time display/subpage selection f solution to puzzles
display PDC/VPS code
h enlarge
h Zoom p. 10
P no function
Smart Controls
M smart sound p. 10
h active control p. 10
a smart picture p. 10Dual screen p. 14
b dual screen on
c no function
d still teletext picture
fi strobe p. 10
B switch to standby p. 9
i on screen info p. 9
0 previous programme p. 9
◊ video recorder function p. 9
X bilingual choice/sound info p. 10
TXT language group selection p. 19
EasyLink p. 10® INSTANT recording
q picture format p. 10
b teletext on/off p. 19
Ï main menu on/off p. 9
cursor to select your choice p. 11
Installation p. 4
V volume up/down p. 9
¬ sound mute p. 9
P programme selection p. 9
Peripherals p. 24
w selection of EXT1, EXT2, EXT3
or FRONT
TV, video recorder (VCR), DVD,
Satellite (SAT), TUNER, CD, TAPE or
cd-recordable (CDR) selection.
Colour keys
- direct teletext page or subject selection p. 19
Audio- and Video equipment p. 24-25
O no function
S freeze the picture p. 9
hold teletext page p. 20
Q surround modes p. 9
æ NEXTVIEW/TXT guide on/off p. 9
OK activate your choice
Your remote control
Installation

& Place the TV on a solid surface.
For ventilation, leave at least 5 cm free all around the TV.Do not place the TV on a carpet.To prevent any unsafe situations, do not place any objects on top of the TV.Avoid heat, direct sunlight and exposure to rain or water.Remove, if present, the blue protection foil at both front sides of the TV.
é Insert the aerial plug firmly into the aerial socket x at the back of the TV.
“ Insert the mains plug in the wall socket having a mains voltage of 220V-240V.To prevent damaging the mains (AC) cord which could cause a fire or electricshock, do not place the TV on the cord.
‘ Remote control: Remove the cover of the battery compartment.Insert the 2 batteries supplied (Type R6-1.5V).Press the TV key to be sure your remote control is in the TV mode.
The batteries supplied do not contain the heavy metals mercury and cadmium.Nevertheless in many countries exhausted batteries may not be disposed of withyour household waste. Please check on how to dispose of exhausted batteriesaccording to local regulations.
Note: this remote control functions with TVs which use the RC6 signalling standard.
( Switch the TV on : Press the power switch A on the front of your TV.A green indicator on the front of the TV lights up and the screen comes on.If the indicator is red, press the - P+ key on the remote control.
The green lamp blinks every time you press a key on the remote control.When you switch on your set for the first time, the menu LANGUAGEautomatically appears on the screen.The explanation appears in different languagesone at a time. Choose your own language and press the OK key on the remotecontrol.
Go on to page 4.
3Preparation
R6 / 1,5V
B
w
æ b
S Q
VCR
MOVIE OTHERNEWSCHILDSPORT
TV DVD SAT
CDTUNER TAPE CDR
TV
CABLE
1mmin.
R6 / 1,5 V
Preparation

4 Installation
After the new or extra TV channels have been stored, the TV automatically transfersthose TV channels to the video recorder if it is equipped with the EasyLink function.The message EasyLink : downloading ...... appears on the screen. Theprogramme list of the video recorder is now the same as the one of the TV. If the TVis connected to a video recorder which supports the NEXTVIEWLink function, the TValso automatically transfers the language and country selections to the videorecorder.
MENU TITLE
Menu language
J INSTALLATION
MENU TITLE
United Kingdom........
J Country
MENU TITLE
English........
J Menu language
& Open the door of the remote control.
é Press U and f at the same time.
& Use the cursor in the up/down, left/right directions to select a menu item.
é Press the OK key to activate.
“ Use the Ï key to return or to switch the menu off.
MENU TITLE
Subject 1Subject 2Subject 3
J Subject 4Subject 5Subject 6
J Subject 4 L M
o
œ
p πo
œ
p π
54 6
87 9
0i 0
◊
U
X ® q P
f
yÚ
h
ZOOM
INSTANT
21 3
B
w
æ b
Ï
TV VCR DVD SAT
TUNER CD TAPE CDR
¬V P
S Q
MOVIE OTHERNEWSCHILDSPORT
OK MENU
select menu item
return or switchmain menu off
activate
Select the menu language and country
First, select your language and country.
& Select Menu language and press the OK key.
é Select your language and press the OK key.Use the cursor up/down to scroll through the list and to bring up otherlanguages which are not displayed on the screen at present.
“ Select Country and press the OK key.
‘ Select the country where you are now located and press the OK key.Use the cursor up/down to scroll through the list and bring up othercountries which are not displayed on the screen at present.
Select Other when none of the countries applies.
You can now search for and store the TV channels in two different ways:using automatic installation or manual installation (tuning-in channel bychannel).Select your choice and press the OK key.
Store TV channels
To use the menus
Select the INSTALLATION menu

5Installation
Automatic installation
StartStop
TV is searchingOne moment please ...
J Stop K
Automatic installation
StartStop
1 BBC12 BBC23 CNN........
J Start K
Manual installation
(Selection mode)SystemProgramme no.SearchFine tuneStore
J System K
Automatic installation
In the Automatic installation menu select Start and press the OK key toactivate the searching. All TV channels are searched for and storedautomatically.
If a cable system which broadcasts ACI (Automatic Channel Installation) or aTV channel transmitting a teletext page with the frequencies and programmenames of all the TV channels which can be received, is detected, the search isstopped and a programme list appears.The programme list is automatically filled with all the programme numbersand names of the TV channels transmitted.
It is possible that the cable company or the TV channel displays a broadcastselection menu. Layout and items are defined by the cable company or the TV channel.Make your choice with the cursor and press the OK key.
To exit from the menu press the Ï key on the remote control.
Go on to page 6.
Manual installation
Searching for and storing TV channels is done channel by channel.You must go through every step of the Manual installation menu.
Selection mode is only present and lights up if the country selected alsooffers the channel option (C-channels for aerial channels, S-channels for cablechannels).You can choose either channel or frequency mode.
& Select the TV systemSelect the country or part of the world from where you want to receive theTV channel.If you are connected to a cable system, select your country or part of theworld where you are now located.
é Press the cursor down and enter the programme number with the digit keys.
“ Search for a TV channelPress the cursor left/right.The frequency or the channel number increases until a TV channel is found.
Direct selection of a TV channelIf you know the frequency, the C- or S-channel number, enter it directly withthe digit keys 0 to 9.Ask for a list from your cable company or dealer, alternatively consult theTable of frequencies on the inside backcover of this handbook.
‘ Fine tuneIn case of poor reception, you can improve the reception by adjusting thefrequency with the cursor left/right.
( To store your TV channel, select Store and press the OK key.
Repeat steps & to ( to store another TV channel.
§ To exit from the menu press the Ï key on the remote control.

6 Installation
It is possible to change the name stored in the memory or to assign a nameto a TV channel which has not yet been entered.A name with up to 5 lettersor numbers can be given to the programme numbers 0 to 99. For exampleSUPER, BBC1,... Between 99 and 0 you can also name any peripherals thatare connected to a euroconnector.
& Select Give name in the INSTALLATION menu and press the OK key.
é Select the programme number.
“ Press the OK key.
‘ Select the character with the cursor up/down.
( Select the following position with the cursor right.
§ Select the following character.
è Press the OK key when finished.
! Press the Ï key to return to the INSTALLATION menu.
Space, numbers and other special characters are located between Z and A.
According to your preference you can change the order of the stored TVchannels.
& Select Reshuffle in the INSTALLATION menu and press the OK key.
é Select the programme number you want to exchange.
“ Press the OK key.
‘ Select the new number you want to exchange it with.
( Press the OK key.Repeat the operation until all TV channels are allocated as you like.
§ Press the Ï key to return to the INSTALLATION menu.
After leaving the installation you can browse through the TV channels bypressing the - P + key. Only those TV channels which are in the favourite listwill be displayed. Non-favourite TV channels can still be selected with the digitkeys. By default all stored channels are added to the favourite list.
& Select Favourite programmes in the INSTALLATION menu and pressthe OK key.
é Select your favourite programme number.
“ Select Yes or No with the cursor left/right.
‘ Repeat for every TV channel you want to make a favourite or anon-favourite TV channel.
( Press the Ï key to return to the INSTALLATION menu.
In order for NEXTVIEW to function properly, the first TV channel from the favourite listshould also broadcast the correct local date and time via teletext.
INSTALLATION
Menu languageCountry
Automatic installationManual installationGive nameReshuffleFavourite programmes
SETUP
J Give name
Give name
EXT1EXT2EXT3FRONT0 1 BBC12 BBC23 ....4 ....5 ....
J 0
Reshuffle0 1 CNN2 BBC23 ....4 ....5 ....
J 1 CNN
Favourite programmes
EXT1EXT2EXT3FRONT0 ... No1 ... Yes2 ... No3 .... No4 .... Yes5 ....
J 2 ... Yes
Select Favourite TV channels
Reshuffle the programme list
Give name

7Installation
The Setup menu allows you to adjust initial settings, i.e. those which are notrelated to the installation of the TV channels.The Setup menu contains items that control the settings of the TV’s functions,features, services and peripherals you may have connected.
& Use the cursor in the up/down, left/right directions to select the menu item.
é Use the OK key to activate.
“ Use the Ï key to return or switch menu off.
Digital sources (for future use)
Define Decoder/Descrambler programme numbersIf a decoder or a descrambler is connected, see p. 22, you can define one ormore programme numbers as decoder programme numbers.
Press the cursor left/right to select the input used to connect to yourdecoder Off, EXT1 or EXT2.Select Off if you do not want the selected programme number beingactivated as a decoder programme number.
Select EXT2 when the decoder is connected to your EasyLink video recorder.When selecting the decoder, the message EasyLink: downloading presets....appears on the screen.
Picture tilt Select Picture tilt with the cursor up/down.Keep the cursor left/right pressed to adjust the rotation of the picture.
Information lineSelect On and after the selection of a TV programme or after pressing thei key on the remote control, a TV channel which broadcasts teletext maytransmit the name of the TV channel, the programme name or anothermessage.This is displayed on screen next to information about sound andpicture format.When selected Off, only sound and picture format information is displayedafter the selection of a TV channel or after pressing the i key.
Factory settingsSelect Factory settings and press the OK key to restore picture and soundsettings, predefined in the factory.
Auto FormatSelecting Yes causes the screen to automatically fill as much of the picture aspossible when TV programmes are not carrying special signals detecting thecorrect screen format.With the q key on the remote control you can still select other pictureformats. See p. 9.
INSTALLATION
Menu languageCountry
Automatic installationManual installationGive nameReshuffleFavourite programmes
SETUPJ SETUP
Decoder/Descrambler
ProgrammeDecoder status
J Programme
SETUP
Digital SourcesDecoder/DescramblerPicture tiltInformation lineFactory settingsAuto format yes/noAuto SurroundINSTALLATION
J Decoder/Descrambler
Install TV Setup

8 Installation
Auto SurroundSometimes the broadcaster transmits special signals for Surround Soundencoded programmes. In that case, the TV automatically switches to thebest Surround Sound mode when Auto Surround is switched on. VirtualDolby* Surround will be reproduced, see p. 9.Overruling this surround mode remains possible.
InstallationSelect Installation and press the OK key to return immediately to theINSTALLATION menu.
‘ To exit from the menu press the Ï key repeatedly.
SETUP
Digital SourcesDecoder/DescramblerPicture tiltInformation lineFactory settingsAuto format yes/noAuto SurroundINSTALLATION
J Auto Surround
‘Dolby’ ‘Pro Logic’ and the double-D symbol aretrademarks of Dolby Laboratories Licensing Corporation.Manufactured under license from Dolby LaboratoriesLicensing Corporation.

9Use of the remote control
M h a
SMARTACTIVE
CONTROLSMART
PICTURESOUND
21 3
54 6
87 9
0
B
w
® Ò ‡ π †
æ b
Ï
i
TV VCR DVD SAT
TUNER CD TAPE CDR
¬V P
0
◊
S Q
MOVIE SPORT CHILD NEWS OTHER
OK MENU
w Select peripheralsPress this key repeatedly to select EXT1,
EXT2, EXT3 or FRONT, according to whereyou connected the peripherals (p. 24).
TV VCR DVD SAT TUNER CD TAPE CDR
Press one of these keys to use the remotecontrol directly in the TV, video recorder,DVD or satellite mode. A green indicatorlights up. Press the same key again within 3seconds to use the remote control in themode indicated below the key (tuner, CD,tape or CD-recordable).A red indicator lights up.Press the key again to return to the functionmentioned above the key.
B StandbyThe set is switched off.To switch the TV on again, press - P + or thedigit keys.If your EasyLink video recorder has thesystem standby function and you press thestandby key for 3 seconds, both the TV andvideo recorder are switched to standby.Your TV consumes energy in the standby mode.Energy consumption contributes to air and waterpollution.We advise to switch off your TVovernight instead of leaving it on standby.Yousave energy.
®Ò‡π† Video recorder see p. 24
æ NEXTVIEW/TXT Guide on off see p. 15
OK Press this key to activate your choice,when in the menus.
S FreezeTo activate/de-activate the frozen picture andto hold a teletext page.
Q Surround modes
Incredible SurroundWith stereo transmission, and whenIncredible Surround is selected, it seems asthough the loudspeakers are spread furtherapart from one another.Virtual Dolby Surround (optimal with Dolby Surround signals)Virtual Dolby Surround enables you toexperience the effect of Dolby Surround ProLogic, reproducing a rear sound effect.See Sound menu,Virtual Dolby effect, p. 12.
i Screen information
Press for 5 seconds to activate/de-activatethe extended or reduced display of TVchannel and programme information on thescreen.
Press briefly to display information about theselected TV channel and programme, thesound reception, picture settings and theremaining time set with the sleeptimer.
0/9 Digit keys
To select a TV channel.For a two digit programme number, enter thesecond digit within 2 seconds.To switch immediately to a selected one digitTV channel, keep the digit key pressed a bitlonger.
0 Previous programmeThe previously selected TV channel is displayed.The ◊ indication is only for video recorder.
b Teletext on/off see p. 19
Ï Main menu on/off see p. 11
V Volume
Press + or - to adjust the volume.
¬ Mute
Temporarily interrupt the sound or restoreit.
P Programme selection
To browse through the TV channelsactivated in the Favourite Programme menu.
Use of the remote control
Operation

10 Use of the remote control
U
X ® q P
f h
INSTANT
ZOOMyÚ
w
TV VCR DVD SAT
TUNER CD TAPE CDR
V P
◊
MOVIE SPORT CHILD OTHER
OK MENU
NEWS
b
Ï
® Ò ‡ π †
1 2 3
54 6
87 9
0i 0
Q
B
¬
æ
b c d
M ah
SMARTSMARTACTIVE
CONTROL
fi
S
Smart KeysTo select predefined picture and sound settings.
M Smart SoundEach time it is pressed, a different sound setting is selected, correspondingwith specific factory settings of the graphic equalizer.
a Smart PictureEach time it is pressed, a different picture setting is selected, correspondingwith specific factory settings of Contrast, Colour, Sharpness and DynamicContrast.
Personal refers to the personal preference settings of picture and soundselected in the picture and sound menu.Remark: the moment you are in a predefined smart sound or picture setting and youmodify a setting in the picture or sound menu, all values of the menu will overwritethe previously made settings.
fi StrobePress this key to reproduce the picture image by image.Press the fi key again to have a faster speed.Press the fi again to switch off the strobe function.
U Time displayThe time, downloaded from the TV channel(with teletext) stored on programme number1 or the lowest favourite programme number,is displayed on the screen.
This function is not available when continuoussubtitles have been switched on.
SUfh Teletext functions see p. 20
h ZoomPress the ZOOM h key repeatedly to selectone of the zoom magnifications (x1, x4, x9,x16). Additionally you can shift the selectedzoom window over the screen with the cursor.Press i to activate/de-activate thecontinuous display of the zoom magnification.The zoom window is reset after: selectinganother TV channel, another picture format orwhen another picture format is selectedautomatically.Zooming is disabled in Dual screen mode.
h Active controlActive control is a pro-active and automaticsystem.The TV continuously measures andcorrects all incoming signals in order toprovide the best picture possible.Press the h key to select the Active Controlvalues Off or On.Off Sharpness and Dynamic Contrast are
controlled automaticallyOn Sharpness, Dynamic Contrast and Noise
Reduction are controlled automatically.Press the cursor in the up/down directionswhile the selected Active Control settinginformation is on top of the screen.The Active Control menu appears.The picture settings are being adaptedcontinuously and automatically.The menu items cannot be selected.Press the cursor in the up/down directionsagain to switch off the menu.
X Bilingual choice and sound mode selection
Press this key • to switch from Stereo to Mono sound, in
case of stereo transmission, or fromNicam Stereo to Nicam available, in caseof digital transmission;
• to choose between language Y (Dual Y) orlanguage Z (Dual Z), in case of bilingualtransmission.The setting is separatelystored for each TV channel.
® Instant recordIf your video recorder has the EasyLinkfunction the INSTANT ® key for record canbe operated in the TV mode.
q Picture formatPress this key repeatedly to select anotherpicture format: 4:3, Movie Expand 14:9,Movie Expand 16:9 with or without subtitling,Wide Screen, Super Zoom or Automatic(when Auto format is set to Yes in theSETUP menu).Auto format makes the picture to fill thescreen as much as possible.Sometimes also video recorder programmescarry special signals which will automaticallyswitch the TV to the correct screen format.Auto format is disabled when in Dual screen.When in Movie Expand 14:9 or 16:9 orSuper Zoom picture format you can makesubtitles visible with the cursor up/down.
P no function

11Use of the menus
PICTURE
ContrastBrightnessColourSharpnessTintDigital options Dynamic Contrast
J Contrast L M
MAIN MENU
ContrastSOUNDFEATURESPROGRAMMES
J PICTURE
OK key to activate
cursor to selectadjustments
return or switchmain menu on/off
21 3
54 6
B
w
æ b
Ï
TV VCR DVD SAT
TUNER CD TAPE CDR
¬V P
S Q
MOVIE OTHERNEWSCHILDSPORT
OK MENU
& Press the Ï key to display/cancel the MAIN MENU.
é Use the cursor in the up/down directions to select the PICTURE, SOUND orFEATURES menu or to select the PROGRAMMES.
“ Press the cursor right to activate the selected menu.
‘ Use the cursor in the up/down, left/right directions to select the menu item.
( Use the OK key to activate.
§ Press the Ï key repeatedly to return or to switch the menu off.
Picture menuIf an NTSC peripheral is connected to one of the euroconnectors, the option Huealso appears.
TintSelect the colour temperature: Normal, Warm or Cool.
Digital optionsAlthough Natural Motion is the most ideal setting, it may be preferable toswitch back to Digital Scan and/or 100 Hz.To make all the 4 digital options available at the same time and selectable, firstselect a 4:3 picture format.
• 100 Hz = 100 Hz only (Field flicker reduction)• Dig. Scan = 100 Hz + Dig. Scan (Field and line flicker reduction)• Natural Motion = 100 Hz + Dig. Scan + Natural Motion (Field and line
flicker reduction and smooth movement reproduction)• Double lines = provides for a doubling of vertical resolution which adds
astonishing sharpness and a total absence of visible picture lines.Motion compensation reduces jitter and offers smooth, yet sharp motion reproduction.
Note: if the menu item Digital options is not present, first select a 4:3 picture formatwith the q key.
Dynamic ContrastTo make the contrast in the darker and the brighter picture areas morenoticeable, select the Med setting.In certain circumstances it may be preferred to select Min, Max or Off.
The modified adjustments for Contrast, Brightness, Colour, Sharpness,Tint,Digital Scan and Dynamic Contrast are automatically stored for all TVchannels.Select Factory settings in the Setup menu to restore the predefined factorysettings, see p. 7.
Use of the menus

12 Use of the menus
SOUND
VolumeBalanceGraphic EqualizerHeadphone VolumeAVLDelta volume Virtual Dolby effect
J Volume L M
OK key to activate
cursor to selectadjustments
return or switchmain menu on/off
21 3
54 6
B
w
æ b
Ï
TV VCR DVD SAT
TUNER CD TAPE CDR
¬V P
S Q
MOVIE OTHERNEWSCHILDSPORT
OK MENU
Sound menu
& Press the Ï key to display/cancel the MAIN MENU.
é Use the cursor in the up/down directions to select the SOUND menu.
“ Use the cursor in the up/down, left/right directions to select the menu item.
‘ Use the OK key to activate.
( Press the Ï key repeatedly to return or to switch the menu off.
The modified adjustments for Volume, Balance, and Graphic equalizer areautomatically stored for all TV channels.Select Factory settings in the Setup menu to restore the predefined factorysettings, see p. 7.
Graphic EqualizerHere you can select the preferred sound setting which corresponds with thepersonal sound settings.
Headphone volumeSee Connect Peripheral Equipment, p. 23, for the connection of theheadphone.
AVL (Automatic Volume Leveller)AVL automatically controls the volume level to avoid too large leveldifferences, especially when switching to another programme or duringcommercial breaks.AVL will reduce the dynamics of the sound.To maintain original dynamics, usethe Delta volume feature.
Delta volume
Here you may adjust the volume differences of each selected TV channel orexternal device separately.This can compensate volume differences betweendifferent broadcasters.Use the - P + keys to compare to the volume of other TV channels orexternals.
Virtual Dolby effectVirtual Dolby enables you to experience the effect of Dolby Surround ProLogic without the need of having rear speakers connected or activated.Select the level of Virtual Dolby effect with the cursor left/right.

13Use of the menus
Sleeptimer OffChild lock OffSubtitle Off
J FEATURES
OK key to activate
cursor to selectadjustments
return or switchmain menu on/off
21 3
54 6
B
w
æ b
Ï
TV VCR DVD SAT
TUNER CD TAPE CDR
¬V P
S Q
MOVIE OTHERNEWSCHILDSPORT
OK MENU
Features menu& Press the Ï key to display/cancel the MAIN MENU.
é Use the cursor in the up/down directions to select the FEATURES menu.
“ Press the cursor right to activate the selected menu.
‘ Use the cursor in the up/down directions to select a menu item.
( Use the cursor in the left/right directions to select the desired setting.
Sleeptimer
With the sleeptimer you can set a time period after which the TV shouldswitch itself to standby.The counter runs from Off up to 180 min.One minute before the TV is set to go to standby, the remaining secondsappear on screen. Not visible in dual screen mode.You can always switch offyour set earlier or change the set time.
Child lock
If the child lock is on, the TV can only be switched on with the remotecontrol.The P - and + keys in front of the TV cannot be used to select a TVchannel. In this way you can prevent unauthorised use of your TV.If the message Child lock On appears, the child lock must be switched offbefore you can use the P - and + keys in front of the TV to select a TVchannel.
Subtitle
TV channels with teletext often transmit certain programmes with subtitling.See Teletext, Continuous Subtitles, p. 21 how to select the proper subtitlepage from the teletext index.Select Subtitle On or Off.
Press the Ï key to switch off the Features menu.
Programme list& Press the Ï key to display/cancel the MAIN MENU.
é Select PROGRAMMES with the cursor up/down.
“ Press the cursor right to display an overview of all the TV channels installed.
‘ Press the cursor up/down to run through the list and press OK to select thedesired TV channel.
( Press the Ï key to switch off the Programme list.

14 Dual Screen
& Press the b key to switch on Dual Screen.The TV screen is divided into 2 parts:- the left side for the normal main picture,- the right side for teletext broadcast by the selected TV channel or for
NEXTVIEW/Teletext Guide.
To operate NEXTVIEW/Teletext Guide, see p. 15.To operate teletext, see p. 19.
If Dual Screen is Off, the picture, teletext or NEXTVIEW/Teletext Guide are displayedfull screen.
é Press the q key under the door of the remote control to select a verticalsqueezed or a non vertical squeezed picture size.
“ Press + P - to run through the teletext pages.
‘ Select still teletext picture.Press the d key to freeze only the teletext picture.The info in this page isnot being updated by the teletext broadcaster.
( When in Teletext Dual Screen, press the b key to return to a full picture screen or press the b key to return to a full Teletext screen.
§ When in NEXTVIEW/Teletext Guide Dual Screen, press the æ key to returnto a full picture screen or press the b key to return to a fullNEXTVIEW/Teletext Guide screen.
21 3
54 6
87 9
0
B
w
æ b
Ï
i
S Q
TV VCR DVD SAT
TUNER CD TAPE CDR
¬V P
0
◊
POK MENU
b
qU
X ® q P
f
yÚ
h
ZOOM
INSTANT
b dc fi
M ah
SMARTSMARTACTIVE
CONTROL
b
d
Dual Screen

15NEXTVIEW
“ Enter the proper programme guide page numberwith the digit keys or with the – P + keys.
‘ Press the cursor left/right to run through thesubpages.
( Select a programme with the cursor up/down.
§ Press one of the colour keys to select one of thebasic functions (if available); record, remind, info.See Basic functions further on.
è Press the OK key to return to the header areaagain.
“ Select a programme with the cursor up/down.
‘ Press one of the colour keys to select one of thebasic functions (if available); record, remind, info.See Basic functions further on.
( Press the OK key to return to the header areaagain.
OK key to activate
cursor to selectadjustments
21 3
54 6
B
w
æ b
Ï
S Q
TV VCR DVD SAT
TUNER CD TAPE CDR
¬V P
MOVIE OTHERNEWSCHILDSPORT
OK MENU
æ
NEXTVIEW
selection
Channel OverviewBBC1 BBC2
p.202 p 01 02 ... π
BBC111.03 ................
14.35 ................ 226/317.50 ................ 231
RecordRemindInfo
Teletext Guide NEXTVIEW
Monday 9 Oct 18:03Channel Theme Overview
BBC1 NEXTVIEW
What’s on nowPreviewThemesRatings
RecordRemindInfo
Today, most broadcasters in Europe, are offering teletext pages containing their programme schedule of today.These pages can be requested by switchingthe TV to Teletext Guide.An increasing number of broadcasters are offering an extended programme guide service called NEXTVIEW. NEXTVIEW is a new way of presenting programme schedules and offers more features than common teletext.With NEXTVIEW it is possible to show for instance all the movies comingtonight.
Both facilities are integrated in this TV: NEXTVIEW and Teletext Programme Guide. If a TV channel supports NEXTVIEW then the TV will automatically present the NEXTVIEW programme schedule. If the TV channel supports just teletext, then the TV will switch automatically to Teletext Guide.Both facilities are offering the same functions: record, remind and info.However in case of Teletext Guide the broadcaster is responsible if thesefunctions are possible.You can search for the programmes you want to watch up to 7 days inadvance. It is also possible to search for a programme by theme, e.g. sport,movie, etc. Once a programme has been selected it can be tagged, to remindyou, or to record on the video recorder automatically (provided the videorecorder is equipped with NEXTVIEWLink Level 2.0), once, daily, weekly orseries.Teletext Guide/NEXTVIEW also allows direct access to detailedinformation about programmes if provided by the broadcaster.
The broadcaster is responsible for the contents of the information.The TV is responsible for the capture of that information and for the presentation tothe user.
Use of the Teletext Guide/NEXTVIEW menus
& Press the æ key on the remote control to display/cancel the Teletext Guide/NEXTVIEW menu.
é Use the cursor in the up/down, left/right directions to select the date,CHANNEL for the channel guide, THEME for the theme guide, OVERVIEWfor an overview of all the programmes which are marked as reminders or forrecording, the programme guide page number or to enter the programme list.
NEXTVIEW / Teletext Guide

16 NEXTVIEW
Channel Theme OverviewBBC 1 BBC 2 CNNp.202 p 01 02 ... π
BBC 211.03 ................
14.35 ................ 226/317.50 ................ 231
One moment please
RecordRemindInfo
Monday 9 Oct 18:03Channel Theme Overview
BBC1 CNN BBC2
BBC1 NEXTVIEW
........
........
........
RecordRemindInfo
Monday 9 Oct 18:03Channel Theme Overview
Culture Movie ....
BBC1 NEXTVIEW
BBC1CNNTVE
RecordRemindInfo
Monday 9 Oct 18:03Channel Theme Overview
BBC1 NEXTVIEW
BBC1 17.10CNN 17.30TVE 18.05BBC2 19.00
RecordRemindInfo
Teletext guideTV channels which broadcast teletext also transmit a page with theprogramme guide of the day. For each selected TV channel the programme guide page can be selected with the æ key:- automatically if the selected TV channel supports services like PDC
(Programme Delivery Control) or MIP (Magazine Inventory Page).- if automatic pre-selection is not possible then the index page is displayed
and the proper programme guide page number of the selected TV channelhas to be entered with the digit keys.
The programme guide page will be stored automatically only if it satisfiesVideo Programming via Teletext (VPT) requirements.
Every time you press the æ key, the programme guide page of the selected TV channel will be available if the TV channel does not support NEXTVIEW.
The function items record, remind and info, corresponding with the colouredkeys, become highlighted if the displayed programme page satisfies the VideoProgramming via Teletext (VPT) requirements. Select a programme item andpress one of the function keys, e.g. Record or Remind. See Basic functionsfurther on.The Info item is enabled if the selected programme contains a page number with an optional subcode referring to a page with more info about theprogramme.
NEXTVIEW modes to sort and represent informationChannelThe Channel guide provides an overview of all programmes that arebroadcast by a single channel during one day.Already passed programmes can be made visible via cursor up.The list will start with the earliest broadcast programme.With cursor left/right another favourite TV channel can be selected.
ThemeThe theme guide displays a list of all programmes at the selected date, thatmatches with the selected category (news, sport, culture, movies, …).The default starting item will be the current or next programme on thecurrent TV channel.The THEME selection is only present if programmes in the TV guide havedefined themes.
OverviewThe Overview menu provides a list of programmes that are marked asreminders or to be recorded each day.When more than one programme to be recorded has an overlap in time,these programmes will be marked by a red colour.
After the programme has been broadcast, all items set for once will bedeleted from the list the following day.This menu can be used to change areminder or recorder.
Note: the TV will automatically interpret the broadcast time (as shown on theteletext guide) of your selected programme into the correct local time anddate.

17NEXTVIEW
RecordRemindInfo
Info block
Date timeCHANNEL THEME OVERVIEW
CNN
11.03 Travel Guide
14.35 World news
17.50 Insight............................
R!
pOnceπ Daily Weekly Clear
Basic functionsThe functions Record, Remind and Info can be activated with thecorresponding colour keys on the remote control.If the function is not available, then the text is shown at reduced brightness.Select a programme with the cursor up/down.
Record R or Remind !
& Press the red colour key to activate Record or the green colour key toactivate Remind.If the programme number of the broadcaster is not yet known, a message appearswith the request to input the correct programme number with the cursor left/right.Press OK.A small menu pops up in which you can choose the interval: once, daily orweekly, or clear an earlier made record or remind setting.The default intervalis set to Once. If a programme is an episode of a series, it is identified by thesystem and the options daily and weekly are replaced by the option series. Inthis case the system identifies when the next episode of the series will bebroadcast.This is not possible in the Teletext guide.
é Use the cursor in the left/right directions to select the interval.The colour of the tag refers to the interval.
“ Press the OK key.
When Record R is activated:Storing is displayed to indicate the video recorder is programmed.When Remind ! is activated:- a message will be displayed the moment the tagged programme
with ! starts, when watching the TV later on.- the TV switches on the moment the tagged programme with ! starts,
when the TV is in standby.Note: Recordings and reminders are not possible when the broadcaster does nottransmit dates and times of the programmes.The message No TV programming possible appears.Make sure you are on the TV programming page.
Info & Press the yellow colour key to activate Info.
Advertisements or information relating to the selected programme aredisplayed. In some cases all of the information does not fit on the screen. Usethe cursor up/down to browse through all the information.
é Press the yellow colour key again to switch off the information.

18 NEXTVIEW
21 3
54 6
87 9
0
B
w
æ b
Ï
i
TV VCR DVD SAT
TUNER
MOVIE SPORT CHILD NEWS OTHER
CD TAPE CDR
¬V P
0
◊
S Q
OK MENU
b c d fi
M ah
SMARTSMARTACTIVE
CONTROL b
æ
Select Picture/NEXTVIEW-Teletext GuidePress the æ key.Press the b key.The screen is divided into two parts: the left side for the normal main picture,the right side for NEXTVIEW/Teletext Guide.Press the b key to return to a full NEXTVIEW/Teletext guide screen orpress the æ key to return to a full picture screen.
Acquisition and updating of NEXTVIEW informationAcquisition and updating of NEXTVIEW is done when you are watching a TVchannel supporting NEXTVIEW.
Video recorder restrictions with NEXTVIEW
The Record item and the automatic recording will only be present andpossible if your video recorder is equipped with NEXTVIEWLink.Your video recorder should be connected to EXTERNAL 2. See ConnectPeripheral Equipment, p. 22.
The daily, weekly and series options, the number of recordings set and theway overlapping recordings are managed, depend on the type of videorecorder you have.When all video recorder timers are full, the item Recordin the menu will not be present.
Upload video recorder overview.When the TV is switched on, the timer recordings are uploaded to the TV tocheck if any manual addition or deletions have been done.This is shown in theoverview.The video recorder manages and removes timer recordings when performed.
Some NEXTVIEWLink video recorders do not allow a daily programming of therecording to start on a Saturday or Sunday. In this case the item daily will beremoved from the menu on those days.

19Teletext
cursor to selectpages
colour keys toselect
21 3
54 6
87 9
0
B
w
æ b
Ï
i
S Q
TV VCR DVD SAT
TUNER CD TAPE CDR
¬V P
0
◊
OK MENU
b
0
XU
X ® q P
f
yÚ
h
ZOOM
INSTANT
87 9
0i 0
◊
b c d fi
M ah
SMARTSMARTACTIVE
CONTROL b
Most TV channels broadcast information via teletext.Each channel which broadcasts teletext transmits a page with information onhow to use its teletext system. Look for the teletext page with the mainindex (usually p. 100).Depending on the TV channel, teletext is transmitted in different systems.The colours used in the options line correspond with the colour keys of yourremote control.
About Easy Text Easy Text considerably reduces the waiting time (on condition that theteletext broadcast of the particular TV channel is received for at least half aminute) by :• a direct selection of previous and following pages which are in transmission
and of the pages referred to in the options line• a habit watcher list: frequently used pages are put automatically in a list of
preferred pages, so that they are immediately available • the precapturing of the page numbers referred to in the displayed page• the precapturing of all the subpages.
Switch Teletext on and offPress b to switch the teletext on or off.The main index page appears on the screen together with two informationlines at the top and one option line at the bottom of the screen.
Remark: if the displayed teletext characters on screen do not correspond with thecharacters used in your language, press the X key, under the door of the remotecontrol, repeatedly to select Language group 1 or 2.
Select a Teletext pageWith the digit keysEnter the desired page number with the digit keys.The page counter seeks the page or the page appears immediately when thepage number has been stored in the memory.A message appears when you have entered a non existent or incorrect pagenumber. Page numbers beginning with 0 or 9 do not exist. Choose another number.
With the option lineSelect with the colour keys, corresponding to the coloured options at thebottom of the screen, the desired subject.
Select Picture/TeletextSelect a TV channel which broadcasts teletext.Press the b key.The screen is divided into two parts:the left side for the normal main picture,the right side for teletext broadcast by the selected TV channel.Press the b key to return to a full screen picture orpress the b key to return to a full teletext picture.
Quickly run through the teletext pagesPress the cursor up/down or the - P + key to run through the previous orthe following pages.
Select the previously selected txt pagePress the 0 key.
Teletext
20 Teletext
cursor to selectsubpages
OK to activate
S
21 3
54 6
87 9
0
B
w
æ b
Ï
i
S Q
TV VCR DVD SAT
TUNER CD TAPE CDR
¬V P
0
◊
OK MENU
U
X ® q P
f
yÚ
h
ZOOM
INSTANT
Ufh
i
MOVIE SPORT CHILD NEWS OTHER
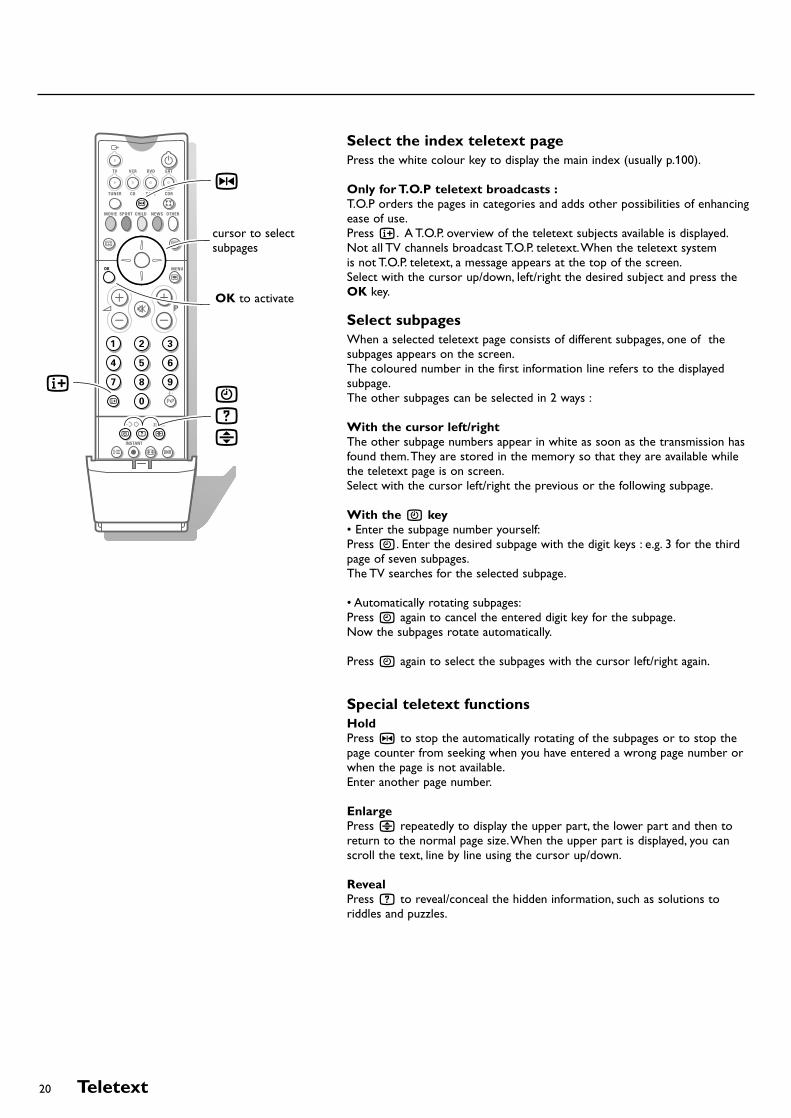
Select the index teletext pagePress the white colour key to display the main index (usually p.100).
Only for T.O.P teletext broadcasts :T.O.P orders the pages in categories and adds other possibilities of enhancingease of use.Press i. A T.O.P. overview of the teletext subjects available is displayed.Not all TV channels broadcast T.O.P. teletext.When the teletext system is not T.O.P. teletext, a message appears at the top of the screen.Select with the cursor up/down, left/right the desired subject and press theOK key.
Select subpagesWhen a selected teletext page consists of different subpages, one of thesubpages appears on the screen.The coloured number in the first information line refers to the displayedsubpage.The other subpages can be selected in 2 ways :
With the cursor left/rightThe other subpage numbers appear in white as soon as the transmission hasfound them.They are stored in the memory so that they are available whilethe teletext page is on screen.Select with the cursor left/right the previous or the following subpage.
With the U key• Enter the subpage number yourself:Press U. Enter the desired subpage with the digit keys : e.g. 3 for the thirdpage of seven subpages.The TV searches for the selected subpage.
• Automatically rotating subpages:Press U again to cancel the entered digit key for the subpage.Now the subpages rotate automatically.
Press U again to select the subpages with the cursor left/right again.
Special teletext functionsHoldPress S to stop the automatically rotating of the subpages or to stop thepage counter from seeking when you have entered a wrong page number orwhen the page is not available.Enter another page number.
EnlargePress h repeatedly to display the upper part, the lower part and then toreturn to the normal page size.When the upper part is displayed, you canscroll the text, line by line using the cursor up/down.
RevealPress f to reveal/conceal the hidden information, such as solutions toriddles and puzzles.

21Teletext
Should your remote control be lost or broken you can still change some ofthe basic picture and sound settings with the keys behind the door in front ofthe TV. Push to open the door.
Press the MENU key repeatedly to select Volume, Brightness, Colour orContrast.Press the P - or + keys to carry out the selected adjustment.When the menu adjustment is not displayed, the P - or + keys enable you to select the TV channels, the V - or + keys to adjust the volume.
The selected adjustment automatically switches off when no action has beenexecuted within 10 seconds.
- V + MENU - P +
Keys in front of the TV
Select Continuous SubtitlesTV channels with teletext often transmit programmes with subtitling. Foreach TV channel you can store a subtitle page which will be displayedcontinuously if the programme being broadcast is transmitted with subtitles.
Switch on teletext and select the proper subtitle page from the index.Switch off teletext.Now the subtitle page is stored for the selected TV channel.
Once subtitles have been stored and Subtitle On has been selected they willautomatically be displayed on the selected TV channel if subtitles are in thetransmission.Select Subtitle On or Off in the Features menu, see p. 13.The subtitle symbol j appears when Subtitle On is selected.
Remark: you are in teletext mode, so only teletext functions are available.

22 Connect Peripheral Equipment
There is a wide range of audio and video equipment that can be connectedto your TV.The following connection diagrams show you how to connectthem.
Connect the aerial cables 1, 2 and, to obtain the optimum picture quality,eurocable 3 as shown opposite.
If your video recorder is provided with the EasyLink function, the eurocable suppliedwith it should be connected to EXTERNAL 2 to benefit from the EasyLinkfunctionality.
If the eurocable 3 is not used the following steps are required:
Search for and store the test signal of the video recorder
& Unplug the aerial cable 1 from the aerial socket x of your video recorder.
é Switch on your TV and put the video recorder on the test signal.(See the handbook for your video recorder.)
“ Search for the test signal of your video recorder in the same way as yousearched for and stored the TV signals. See Installation, Searching for andstoring TV channels, Manual installation, p. 5.
‘ Store the test signal under programme number 0 or between 90 and 99.
( Replace the aerial cable in the aerial socket x of your video recorder afteryou have stored the test signal.
Decoder and video recorderConnect a eurocable 4 to your decoder and to the special euroconnectorof your video recorder. See also the video recorder handbook.See Define Decoder/Descrambler prog. numbers, p. 7.You can also connect your decoder directly to EXTERNAL 1 or 2 with aeurocable.
VCR 1
CABLE
1
4
EXTERNAL 2
2
3
EXTERNAL 2
VCR 1
CABLE
11
2
5 3
SAT
EXTERNAL 1
4
(except Digital Sources)
& Connect the aerial cables 1, 2 and 3 as shown opposite. Better picturequality can be obtained if you also connect eurocable 5 to EXTERNAL 2and a eurocable 4 to EXTERNAL 1 or 3.
é Look for the test signal of your peripheral in the same way as you do fora video recorder.
When a video recorder is connected to EXTERNAL 1 you can only record aprogramme from your TV.Only when a video recorder is connected to EXTERNAL 2 it is possible to record aprogramme from your TV as well as from other connected equipment. See Recordwith your video recorder, p. 26.
Note: EXTERNAL 1 can handle CVBS and RGB, EXTERNAL 2 CVBS and Y/C,EXTERNAL 3 only CVBS.
Video recorder and other peripherals
Video recorder
Connect Peripheral Equipment

23Connect Peripheral Equipment
& Connect your camera or camcorder to sockets at the front side of your TV.
é Connect the equipment to VIDEO 2 and AUDIO L 1 for monoequipment.
Press the X key repeatedly to select the sound coming from one orboth loudspeakers of your TV.
“ For stereo equipment also connect AUDIO R 1.
S-VHS quality with an S-VHS camcorder is obtained by connecting the S-VHScables with the S-VIDEO input 3 and AUDIO inputs 1.
21 3
S-VID
EO
VIDEO
A
UDIO
LR
Connect your digital equipment with a eurocable 1 to one of theeuroconnectors (EXT1, EXT2 or EXT3), or with a cinch cable to the VIDEOinput at the front side of the TV (see illustration above).
Note: the low quality of some digital picture material may be the cause of digitalimage distortion. In this case select Eco under the SMART PICTURE a key on theremote control as this setting is intended to improve distorted picture quality.
EXTERNAL 1/2/3
DVD
1
& Insert the plug into the headphone socket L at the front side of the TV.
é Press ¬ on the remote control to switch off the internal loudspeakersof the TV.The headphone impedance must be between 8 and 4000 Ohm.The headphone socket has a 3.5 mm jack.
In the SOUND menu select Headphone volume to adjust the headphonevolume, see p. 12.
Connect the audio cables to the audio input of your audio equipment and toAUDIO L and R at the back of your TV.
You can listen to your TV sound via your audio equipment.
If you want to connect more equipment to your TV, consult your dealer.
L
AUDIO
Audio equipment / Amplifier
Headphone
Digital equipment (DVD, digital satellite tuner,...)
Camera & camcorder

24 Connect Peripheral Equipment
If the TV is connected to a video recorder with the EasyLink function, in some casesthe TV will be switched on, even when it was in standby. (E.g. playback tape,...)This is not possible when Child lock On is selected.
Equipment connected with an aerial cable only :Select the programme number under which you have stored the test signalwith the digit keys.
Equipment connected to a euroconnector or to the front side of the TVPress the w key repeatedly to select EXT1, EXT2, EXT3 or FRONT,according to where you connected your equipment at the back or the frontside of your TV.Remark : Most equipment (decoder, video recorder, satellite receiver) carries out theswitching itself when they are activated.
If you want to change to TV channels?Enter the programme number of the TV channel which you want to watchwith the digit keys or press the w key repeatedly to select TV.
Most of the audio and video equipment from our range of products can beoperated with the remote control of your TV.
Press the VCR, DVD, SAT,TUNER, CD,TAPE or CDR key according to theequipment you want to operate with this remote control. See Use of theremote control, p. 8.
Video recorderPress one of the video recorder keys after you pressed the VCR key:
® for record,
Ò for rewind,
‡ for stop,
π for play,
† for fast forward,
◊ for selecting 1- or 2-digit programme numbers from the videorecorder,
- P + for fast programme selection from the video recorder tuner,
0 to 9 to select a programme number from your video recorder tuner,
B to switch the video recorder to standby
U VCR timer
These keys function with equipment which use the RC5 signalling standard.
If your video recorder has the EasyLink function, the key INSTANT ® for recording,under the door of the remote control, can be operated in the TV mode.If your EasyLink video recorder has the system standby function, press the B key for3 seconds to switch both TV and the video recorder to standby.
B
w
æ b
VCRTV DVD SAT
CDTUNER TAPE CDR
w
S Q
MOVIE OTHERNEWSCHILDSPORT
VCR
21 3
54 6
87 9
0
B
w
æ b
Ï
i
TV VCR DVD SAT
TUNER CD TAPE CDR
¬V P
0
◊
® Ò ‡ π †
S Q
OK MENU
INSTANTU
X q P
f
yÚ
h
ZOOM
INSTANT
®
®
U
®Ò‡π
†
Audio and video equipment keys
To select connected equipment

25Connect Peripheral Equipment
DVD keysPress one of the following keys after you have pressed the DVD key.
Ï to switch the DVD menu on or off
0 to select a DVD chapter
b to select a DVD title
æ to select your choice of subtitle language
Ò to search down
‡ stop
π play
† to search forward
® pause
0-9 to select a programme number from your DVD
OK to enter the selected menu item
These keys function with equipment which use the RC6 signalling standard and withPhilips DVD players.
Satellite receiverPress one of the TV keys after you have pressed the SAT key.
These keys function with equipment which use the RC5 signalling standard.
Tuner, CD,Tape and CDR keysPress one of the following keys after you have pressed the TUNER, CD,TAPE or CDR key.
Ï to switch the menu on or off (tuner)
0 to select a frequency (tuner)
® to record
Ò to search down (tuner); rewind (CD/tape); speed down (CDR)
‡ stop
π play
† to search up (tuner); forward (CD/tape); speed up (CDR)
b RDS display (tuner); info on screen (CD/CDR)
æ RDS news/TA (tuner); select following disc (CD/CDR)
S pause (CD/CDR/tape)
Q surround modes (CD/CDR/tape)
+ P - next/previous (CD)
DVDSAT
21 3
54 6
87 9
0
B
w
æ b
Ï
i
TV VCR DVD SAT
TUNER CD TAPE CDR
¬V P
0
◊
® Ò ‡ π †
S Q
OK MENU
®Ò‡π
†
æ b
Ï
0
b c d fi
M ah
SMARTSMARTACTIVE
CONTROL
TUNERCDTAPECDR
21 3
54 6
87 9
0
B
w
æ b
Ï
i
TV VCR DVD SAT
TUNER CD TAPE CDR
¬V P
0
◊
® Ò ‡ π †
S Q
OK MENU
®Ò‡π
†
æ b
Q
S
Ï
0
b c d fi
M ah
SMARTSMARTACTIVE
CONTROL
MOVIE SPORT CHILD NEWS OTHER

26 Record
To record S-VHS quality, connect an S-VHS peripheral directly to the video recorder.
Record a TV programme& Select the programme number on your video recorder.
é Set your video recorder to record.See the handbook for your video recorder.
Switching programme numbers on your TV does not disturb recording !
Record a programme on your video recorder connected toEXTERNAL 2 from Audio/Video equipment connected to EXTERNAL 1, EXTERNAL 3 or to sockets on the front side of the TV
& Switch on the equipment.
é Select the right external on your video recorder.
“ Set your video recorder to record.You record what you are watching on the screen.
Do not switch programme numbers or do not switch off your TV when you arerecording !
If you have connected an S-VHS video recorder provided with the EasyLink function,you can record S-VHS-quality from an S-VHS peripheral connected to the front sideof the TV. (E.g. from an S-VHS camcorder.)
In TV mode, it is possible to start a direct recording of the programme which is beingdisplayed on the TV screen.Press the INSTANT ® record key, under the door of the remote control.The video recorder switches on from standby and a message of what is beingrecorded appears on the screen.The video recorder starts recording the programme you are watching.Switching programme numbers on your TV does not disturb recording !
When recording a programme from a peripheral connected to EXTERNAL 1, 3 orFRONT, you can not select another TV programme on the screen.To watch TV programmes again, press the programme number you want to selecttwice.Attention: the recording is stopped and your video recorder switches to standby.
If you switch to standby during recording of a programme from a peripheralconnected to EXTERNAL 1, 3 or FRONT, the blinking lamp on the front of your TVindicates that you are still recording.The blinking stops after the recording is finished.
If your video recorder is equipped with NEXTVIEWLink, and you tagged one or moreprogrammes to be recorded automatically in the NEXTVIEW mode, it is not necessaryfor the TV to be in the standby mode or switched on for the recording to start.
87 9
0i 0
◊
U
X q P
f h
INSTANT
yÚ ZOOM
®
INSTANT
®
Record with your video recorder with NEXTVIEWLink
Record with your video recorder with EasyLink
Record with your video recorder without EasyLink

27Tips & Index
Care of the screen• Clean the TV with a slightly damp soft
cloth. Do not use abrasive solvent as itcan damage the TV screen.
Poor Picture• Have you selected the correct TV
system? • Is your TV or house aerial located too
close to loudspeakers, non-earthedaudio equipment or neon lights, etc.?
• Mountains or high buildings can causedouble pictures or ghost images.Sometimes you can improve the picturequality by changing the direction of theaerial.
• Is the picture or teletextunrecognisable? Check if you haveentered the correct frequency. SeeInstallation, p. 5.
• Are brightness and contrast out ofadjustment? Select Factory settings inthe Setup menu, p. 7.
• Sometimes poor picture quality ispossible when having activated an S-VHScamera or camcorder connected to thefront side of your TV and anotherperipheral is connected to EXT1 orEXT2 at the same time. In this caseswitch off one of the other peripherals.
No picture• Is the aerial connected properly? • Are the plugs tightly connected in the
aerial socket?• Is the aerial cable in good condition and
does it have suitable plugs?• Are the connection facilities to a possible
second TV in good condition? If in doubt,consult your dealer.
No sound• No sound on any channel? Check if the
volume isn’t at minimum.• Is the sound interrupted with the mute
key ¬?
Remote control• If your TV no longer responds to the
remote control, the batteries may bedead.
• You can still use the MENU key and the-/+ keys at the front of your TV.
Menu• Have you selected the wrong menu?
Press the Ï key gain to exit from themenu.
No solutionSwitch your TV off and then on again
once.Never attempt to repair a defective
TV yourself.Check with your dealer or call a TV
technician.
End of life directivesPhilips is paying a lot of attention to
produce environmentally-friendly ingreen focal areas.Your new TV containsmaterials which can be recycled andreused.
At the end of its life specialised companiescan dismantle the discarded TV toconcentrate the reusable materials andto minimise the amount of materials tobe disposed of.
Please ensure you dispose of your old TVaccording to local regulations.
How to dispose of dead batteries?The batteries supplied do not contain the
heavy metals mercury and cadmium.Nevertheless in many countries deadbatteries may not be disposed of withyour household waste. Please ensure youdispose of dead batteries according tolocal regulations.
a ACI, 5active control, 10auto format, 7automatic installation, 5auto surround, 8
b bilingual broadcast, 10c camcorder, 23
child lock, 13continuous subtitles, 21country, 4
d decoder/descrambler, 7digital options, 11dual screen, 14DVD, 25dynamic contrast, 11
e easy text, 19eurocable, 22
f factory settings, 7favourite programmes, 6freeze, 9frequency, 5
g give name, 6
h headphone volume, 12hue, 11
i incredible surround, 9 info on screen, 9information line, 7interrupt the sound, 9
l language, 4m manual installation, 5
menu language, 4n NEXTVIEW, 15
nicam, 10p picture adjustments, 11
picture format, 10picture tilt, 7programme list, 13
r recording, 26reshuffle, 6
s satellite receiver, 25search for TV channels, 5setup, 7sleeptimer, 13
smart picture and sound, 10
sound adjustments, 12stereo, 10store TV channels, 4strobe, 10subpages teletext, 20S-VHS, 26switch TV on, 3
t teletext, 19v video recorder, 22
virtual dolby surround, 9volume, 9
Index
Tips

28 Glossary
100 Hz100 Hertz provides a superior solution tothe problem of picture flicker which isparticularly noticeable with larger screensizes. In a conventional TV, the picture areais scanned 50 times a second (50 Hertz) –a frequency which is still detectable by thehuman eye in the form of a flickeringpicture. In 100 Hertz sets, the picture areais scanned at a rate of 100 times persecond (100 Hertz).At this frequency, theeye cannot detect flicker, resulting in aclearer picture which is more relaxing tothe eye.
Automatic Channel Installation (ACI)Automatically installs all TV channels inthe same order as offered by your cablecompany, provided of course that the datais transmitted. It also automaticallyincludes programme number andprogramme name.With ACI, channel installation is fullyautomatic, simple and fast.
Child lockFeature to prevent unauthorised use ofyour TV.
Digital ScanIf you look at a television screen you willsee small imperfections in the picturecaused by line vibration. Digital Scan (aninternal process) removes interline flicker.When combined with 100 Hz, you will seea totally stable image.
Easy LinkDigital ‘intelligent’ ESI bus-system betweenTV and VCR (Scart connection required).Turns source selection and control into aone-button operation.
Easy TextTeletext memory that automaticallymemorises Teletext pages and gives youinstant access to them.
EuroconnectorA 21-pin connector system enabling youto simply connect various types ofaudio/video and computer equipment.
MenuOn-screen display of functions andfacilities in a well-organised survey, whichyou can select using your remote control.
NEXTVIEW
NEXTVIEW is a new feature to assist the TVand VCR user in selecting the programmesshe or he likes to watch from a televisionprogramme guide on the screen. It enablesthe user to see a description of everyprogramme, and mark interestingprogrammes to be reminded (auto TV on)or recorded (NEXTVIEWLink videorecorder required).
NTSCThe broadcasting system used in the USA,Japan and parts of South America andSoutheast-Asia.
Smart Picture and Sound controlsKeys on the remote control to selectpredefined picture and sound settings.
SleeptimerFunction with which you can set a timeperiod after which the TV should switchitself to standby.
Picture FreezeTV mode which allows you to “freeze” acertain image in order to study a specificdetail at ease, e.g. to make notes of certainprogramme information like phonenumbers.
TeletextSee also Easy TextWST:World Standard Teletext.FLOF: Full Level one Features. Systemapplied by the BBC, RVE.... that provides afast access to the teletext pages.TOP:Table of (Teletext) Pages. Germansystem for an easy access to the teletextpages.
Tint TV-function to modify the general colourbalance between cool and warm and toadjust it according to your personalpreference.
3104
315
21
19.1
Glossary

Information for users in the UK
Contents
Your remote control
Preparation
Select the INSTALLATION menu
To use the menus
Store TV channels
Select the menu language and country
Automatic installation
Manual installation
Give name
Reshuffle the programme list
Select Favourite TV channels
Install TV Setup
Operation
Use of the remote control
Use of the menus
Picture menu
Sound menu
Features menu
Programme list
Dual Screen
nexTView / Teletext Guide
Teletext
Keys in front of the TV
Connect Peripheral Equipment
Video recorder
Video recorder and other peripherals
Camera & camcorder
Digital equipment (DVD, digital satellite tuner,...)
Headphone
Audio equipment / Amplifier
To select connected equipment
Audio and video equipment keys
Record with your video recorder without EasyLink
Record with your video recorder with EasyLink
Record with your video recorder with nexTViewLink
Tips
Index
Glossary