information for users in the uk - philips
TRANSCRIPT

Information for users in the UK(Not applicable outside the UK)
Positioning the TVFor the best results, choose a position where light does not fall directly on the screen, and at somedistance away from radiators or other sources of heat. Leave a space of at least 5 cm all aroundthe TV for ventilation, making sure that curtains, cupboards etc. cannot obstruct the air flowthrough the ventilation apertures.The TV is intended for use in a domestic environment only and should never be operated orstored in excessively hot or humid atmospheres.
General PointsPlease take note of the section 'Tips' at the end of this booklet.
InterferenceThe Department of Trade and Industry operates a Radio Interference Investigation Service to helpTV license holders improve reception of BBC and IBA programmes where they are being spoilt byinterference.If your dealer cannot help, ask at a main Post Office for the booklet "How to improve Televisionand Radio Reception".
Mains connectionBefore connecting the TV to the mains, check that the mains supply voltage corresponds to thevoltage printed on the type plate on the rear panel of the TV. If the mains voltage is different, con-sult your dealer.
Important This apparatus is fitted with an approved moulded 13 Amp plug.To change a fuse in this type of plug proceed as follows :1. Remove fuse cover and fuse.2. Fit new fuse which should be a BS1362 5A,A.S.T.A. or BSI approved type.3. Refit the fuse cover.
In order to maintain conformity to the EMC directive, the mains plug on this product must not beremoved.
Connecting the aerialThe aerial should be connected to the socket marked x at the back of the set. An inferior aerial islikely to result in a poor, perhaps unstable picture with ghost images and lack of contrast. Make-shift or set-top aerials are unlikely to give adequate results.Your dealer will know from experience the most suitable type for your locality.Should you wish to use the set in conjunction with other equipment, which connects to the aerialsocket such as TV games, or a video camera, it is recommended that you consult your dealer onthe best method of connection.
Stand (if provided)
Use only the stand provided with the set, making sure that the fixings are properly tightened.A dia-gram showing how to assemble the stand is packed with the stand. Never use a make-shift stand, orlegs fixed with woodscrews.

1
Contents
EasyLink features are based on the “one touch operation” approach.Thismeans that a sequence of actions are executed at the same time in both thetelevision and the recorder, provided both are fitted with the EasyLink functionand connected with the eurocable supplied with your recorder.
R End of life directivesPhilips is paying a lot of attention toproducing environmentally-friendly ingreen focal areas.Your new TV containsmaterials which can be recycled andreused. At the end of its life specialisedcompanies can dismantle thediscarded TV to concentrate thereusable materials and to minimisethe amount of materials to bedisposed of.Your TV contains a (tolerated) smallamount of mercury. Please ensure youdispose of your old TV according tolocal regulations.
Help?If this instruction manual doesnot give an answer or if ‘Tips’ donot solve your TV problem, youcan call your Local PhilipsCustomer or Service Centre. Seethe supplied World-wideguarantee booklet.Please, have the Model andProduct number which you canfind at the back of yourtelevision set or on thepackaging, ready, before callingthe Philips helpline.
Model: 32PF9956Product No: ...........................................
Care of the screenSee Tips, p. 25.
Due to continuous productimprovements this manual is subjectto change without notice.
Preparation. . . . . . . . . . . . . . . . . . . . . . . . . . . . . . . . . . . . . 2Keys on the right side of the TV . . . . . . . . . . . . . . . . . . . . . 2Use of the remote control RC4304 . . . . . . . . . . . . . . . . . . 3To use the menus . . . . . . . . . . . . . . . . . . . . . . . . . . . . . . . . 5TV setup . . . . . . . . . . . . . . . . . . . . . . . . . . . . . . . . . . . . . . . 5Select the menu language and country . . . . . . . . . . . . . . . 5Store TV channels. . . . . . . . . . . . . . . . . . . . . . . . . . . . . . . . 6
Automatic installation 6Give name 6Reshuffle the programme list 7Select Favourite TV channels 7Manual installation 7
General menu. . . . . . . . . . . . . . . . . . . . . . . . . . . . . . . . . . . 8Source menu. . . . . . . . . . . . . . . . . . . . . . . . . . . . . . . . . . . 10Decoder menu . . . . . . . . . . . . . . . . . . . . . . . . . . . . . . . . . 10Demo . . . . . . . . . . . . . . . . . . . . . . . . . . . . . . . . . . . . . . . . 10TV menu . . . . . . . . . . . . . . . . . . . . . . . . . . . . . . . . . . . . . . 11
Picture menu 11Sound 12Features menu 14
Teletext/Text guide . . . . . . . . . . . . . . . . . . . . . . . . . . . . . . 15Switch Teletext on and off 15Select a Teletext page 15Previously selected teletext page 15Select the index teletext page 15Select subpages 15Picture/Teletext 15Enlarge a Teletext page 15Hypertext 15Textguide 16Functions keys 16Teletext menu 17
Digital Media Reader . . . . . . . . . . . . . . . . . . . . . . . . . . . . 18Inserting a memory card / memory stick 18Removing the memory card / memory stick 18
Content Browser menu . . . . . . . . . . . . . . . . . . . . . . . . . . 18Connect Peripheral Equipment . . . . . . . . . . . . . . . . . . . . 20
Recorder (vcr-dvd+rw) 20Other equipment (except digital sources) 20Digital equipment (DVD, Digital set top box,…) 21MultiChannel Surround receiver 21HDMI (High Definition Multimedia Interface) connector 21Connect extra subwoofer 22Side connections 22To select connected equipment 23Recorder with EasyLink 23
Record with your recorder with EasyLink . . . . . . . . . . . . 23Audio- and video equipment keys . . . . . . . . . . . . . . . . . . 24Tips . . . . . . . . . . . . . . . . . . . . . . . . . . . . . . . . . . . . . . . . . . 25

2
& Wall mounting instructions/Table standHow to mount the supplied wall mountbracket and table stand, see the suppliedseparate leaflet. Make sure that the wall mountis being fixed securely enough so that it meetssafety standards.The weight of the TV (excl. packaging) is about20 kg.Note: Other (not supplied) stands are optionalaccessories. Consult your dealer.
é Place or hang the TV wherever you want, butmake sure that air can circulate freely throughthe ventilation slots. Do not install the TV in aconfined space such as a book case or a similarunit.
To prevent any unsafe situations, no nakedflame sources, such as lighted candles, shouldbe placed on or in the vicinity.Avoid heat,direct sunlight and exposure to rain or water.The equipment shall not be exposed todripping or splashing.
“ Insert the aerial plug firmly into the aerialsocket x at the bottom of the TV.
‘ To connect other peripherals, see p. 20.In order to obtain the best result, please useonly the supplied aerial cable between the TVand recorder, and between recorder and aerialconnector.
( Insert the mains cord supplied into the mainsat the bottom of the TV and in the wall sockethaving a mains voltage of 198-264V.To prevent damaging the power (AC) cordwhich could cause a fire or electric shock, donot place the TV on the cord.
§ Remote control: Insert the 2 batteriessupplied (Type R6-1,5V).
The batteries supplied donot contain the heavymetals mercury andcadmium. Please check onhow to dispose ofexhausted batteriesaccording to localregulations.
è Switch the TV on : Press the power switch Bat the right side of the TV.A blue indicator on the front of the TV lightsup and the screen comes on. If the TV is instandby mode (red indicator), press the -P+keys or the B key on the remote control.
Should your remote be lost or broken you can stillchange some of the basic settings with the keys on theright side of your TV.
Press:• the + V - key to adjust the volume;• the + P/CH - key to select the TV channels or
sources.
Press the MENU key to summon the main menuwithout the remote control.Use:• the + V - key and the + P/CH - key to select menu
items in the directions as shown;• the MENU key to confirm your selection.
Note:When activated via the MENU key on the right side of theTV, only Exit lets you remove the menu.Navigate to Exit and press the MENU key.
MENU P/CHV B
TVSetupDemo
Exit
Picture Sound Features
Keys on the right side of the TV
Preparation
33
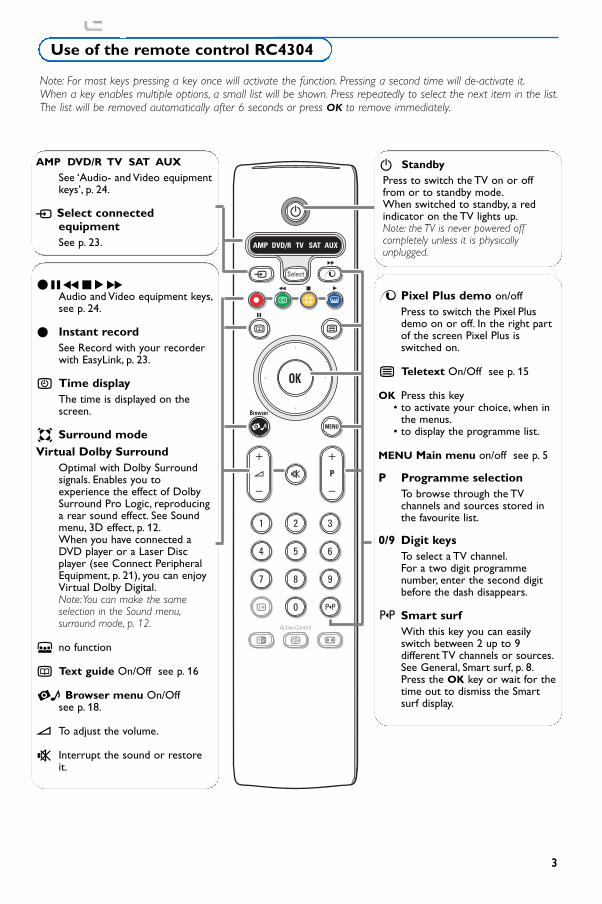
®ºÒ‡π†Audio and Video equipment keys,see p. 24.
® Instant recordSee Record with your recorderwith EasyLink, p. 23.
U Time displayThe time is displayed on thescreen.
Q Surround modeVirtual Dolby Surround
Optimal with Dolby Surroundsignals. Enables you toexperience the effect of DolbySurround Pro Logic, reproducinga rear sound effect. See Soundmenu, 3D effect, p. 12.When you have connected aDVD player or a Laser Discplayer (see Connect PeripheralEquipment, p. 21), you can enjoyVirtual Dolby Digital.Note:You can make the sameselection in the Sound menu,surround mode, p. 12.
Ì no function
æ Text guide On/Off see p. 16
= Browser menu On/Off see p. 18.
V To adjust the volume.
¬ Interrupt the sound or restoreit.
AMP DVD/R TV SAT AUX
See ‘Audio- and Video equipmentkeys’, p. 24.
v Select connectedequipmentSee p. 23.
x Pixel Plus demo on/offPress to switch the Pixel Plusdemo on or off. In the right partof the screen Pixel Plus isswitched on.
b Teletext On/Off see p. 15
OK Press this key • to activate your choice, when in
the menus.• to display the programme list.
MENU Main menu on/off see p. 5
P Programme selectionTo browse through the TVchannels and sources stored inthe favourite list.
0/9 Digit keys To select a TV channel.For a two digit programmenumber, enter the second digitbefore the dash disappears.
0 Smart surf With this key you can easilyswitch between 2 up to 9different TV channels or sources.See General, Smart surf, p. 8.Press the OK key or wait for thetime out to dismiss the Smartsurf display.
Note: For most keys pressing a key once will activate the function. Pressing a second time will de-activate it.When a key enables multiple options, a small list will be shown. Press repeatedly to select the next item in the list.The list will be removed automatically after 6 seconds or press OK to remove immediately.
B
bæ
¬
+
-
V
+
-
P
v
b
i 0
h q
Select
AMP DVD/R TV SAT AUX
MENU
1 2 3
4 5 6
7 8 9
0
Ò
®
‡ π
º
Ì
†
Active Control
®
®
®®
Browser
OK
=
®
B StandbyPress to switch the TV on or offfrom or to standby mode.When switched to standby, a redindicator on the TV lights up.Note: the TV is never powered offcompletely unless it is physicallyunplugged.
Use of the remote control RC4304
4
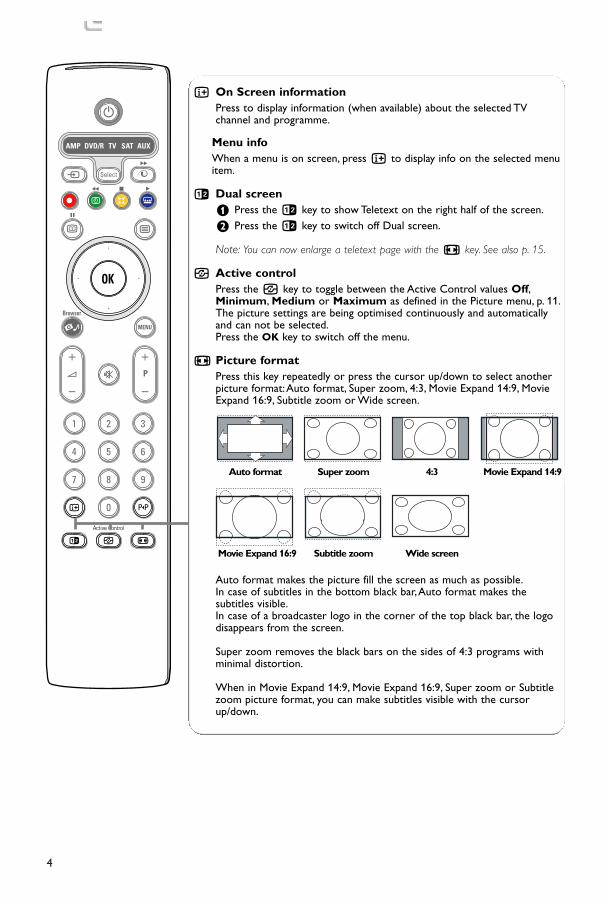
i On Screen informationPress to display information (when available) about the selected TVchannel and programme.
Menu infoWhen a menu is on screen, press i to display info on the selected menuitem.
b Dual screen& Press the b key to show Teletext on the right half of the screen.é Press the b key to switch off Dual screen.
Note: You can now enlarge a teletext page with the q key. See also p. 15.
h Active control Press the h key to toggle between the Active Control values Off,Minimum, Medium or Maximum as defined in the Picture menu, p. 11.The picture settings are being optimised continuously and automaticallyand can not be selected.Press the OK key to switch off the menu.
q Picture format Press this key repeatedly or press the cursor up/down to select anotherpicture format:Auto format, Super zoom, 4:3, Movie Expand 14:9, MovieExpand 16:9, Subtitle zoom or Wide screen.
Auto format makes the picture fill the screen as much as possible.In case of subtitles in the bottom black bar,Auto format makes thesubtitles visible.In case of a broadcaster logo in the corner of the top black bar, the logodisappears from the screen.
Super zoom removes the black bars on the sides of 4:3 programs withminimal distortion.
When in Movie Expand 14:9, Movie Expand 16:9, Super zoom or Subtitlezoom picture format, you can make subtitles visible with the cursorup/down.
Auto format Super zoom 4:3 Movie Expand 14:9
Movie Expand 16:9 Subtitle zoom Wide screen
Browser
b
¬
+
-
V
+
-
v
b
i 0
h q
Select
1 2 3
4 5 6
7 8 9
0
Ò ‡ π
†
Active Control
®
®
®®
æ
P
®
º
MENU
Ì
AMP DVD/R TV SAT AUX
B
OK
=
®

5
& Press the MENU key on the remote control to summon themain menu.At any moment you can exit the menu bypressing the MENU key again or navigate to Exit and pressthe OK key.Note: If you have connected equipment with EasyLink, moremenu items are present.
é Use the cursor left/right to select Picture, Sound orFeatures. Use the cursor in the up/down direction to selectthe TV, Setup or Demo menu.Note: Sometimes not all the menu items are visible on the screen(indicated by a cluster of blue balls). Use the cursor down or rightto reveal all items.
“ Use the cursor in the left/right direction to select the menuitem.
‘ Use the cursor up/down again to select the control youwant to select or to adjust.
Note: Items temporary not available or not relevant are displayed in alight grey colour and can not be adjusted.
b
+ +
v Select
Ò
®
‡ π
†
®
®
®®
æ
B
AMP DVD/R TV SAT AUX
º
MENU
OK
Browser
=
®
cursor to selectadjustments
OK key toactivate
return or switchmain menu on/off
& Press the MENU key on the remote control.
é Use the cursor down to select Setup.
“ Use the cursor right to select Install.
‘ Use the cursor down to select Language and press thecursor right to enter the list. Use the cursor up/down toselect your preferred language. Press OK to activate.
( Use the cursor down to select Country and press thecursor right to enter the list. Press OK to activate.
§ Select the country where you are now located.Select Other when none of the countries applies.
è Proceed with the Install menu.
TVSetupDemo
Exit
Picture Sound Features
Setup
General Install Manual Source Decoderinstall
The Setup menu contains the following items:
EasyLinkIf your video recorder has an EasyLink function, during installation, the language, country and available channels areautomatically transmitted to the video recorder.
Install
LanguageCountry
Automatic installGive name
Reshuffle
Setup
Press the i key to getinformation about the selectedmenu item.
EnglishDeutschFrançais
Install
.....Country
......
Setup
AustriaBelgiumCroatia
Select the menu language and country
TV setup
To use the menus

It is possible to change the name stored in the memory or toassign a name to a TV channel for which a name has not yetbeen entered.A name with up to 5 letters or numbers can begiven to the programme numbers 0 to 99.
& Select Give Name in the Install menu and press the cursorright.
é Select the programme number.Note: keep the cursor up/down pressed to scroll through theprogramme list quickly.
“ Press the cursor right.
‘ Select the character with the cursor up/down.
( Select the following position with the cursor right.
§ Select the following character.
è Press the OK key when finished.
! Press the cursor left repeatedly when you have finished thename giving.
ç Select another programme number and repeat steps “ toè.
Space, numbers and other special characters are locatedbetween Z and A.
6
& Select Automatic install in the Install menu.Note: All channels must be unlocked in order to autoprogram. Ifrequested, enter your code to unlock all channels. (See TV,Features menu, Childlock, p. 14.)
é Press the cursor right to start the installation.
“ The message Searching appears and the progress ofautoprogramming is displayed.
If a cable system or a TV channel which broadcasts ACI(Automatic Channel Installation) is detected, a programme listappears.Without ACI broadcast, the channels are numberedaccording your language and country selection.You can useReshuffle to renumber them. See p. 7.
It is possible that the cable company or the TV channel displays abroadcast selection menu. Layout and items are defined by the cablecompany or the TV channel. Make your choice with the cursor andpress the OK key.
After language and country are set correctly, you can now search for and store the TV channels in twodifferent ways: using Automatic Installation or Manual Installation (tuning-in channel by channel, seefurther).
Install
.....
.....Automatic install
Setup
Stop/Start
Install
.....
.....
.....Give name
Setup
VCR1.......
Give name
Automatic installation
Store TV channels

7
You can change the order of the stored TV channels.
& Select Reshuffle in the Install menu.
é Select the number you want to exchange.Confirm with the OK key.
“ Select the new number you want to exchange it with.Confirm with the OK key.
Install
.....
.....
.....
.....Reshuffle
Setup
VCR1BBC2.........
Searching for and storing TV channels is done channel by channel.You must go through every step of the Manual Installation menu.
& Select Manual install in the Setup menu.
é Press the cursor down.
Note: Search or direct selection of a TV channel.If you know the frequency, the C- or S-channel number, enter the 3 or2 digits of the frequency or the channel number directly with the digitkeys 0 to 9 (e.g. 048). Press the cursor down to proceed.
Repeat to search for another TV channel.
Manual install
Selection modeSystem
ProgrammeSearch
Fine tuneStore
Setup
Manual installation
Reshuffle the programme list

8
The Setup menu contains items that control the settings of the TV’sfunctions, features, services and peripherals you may have connected.
The General menu allows you to change settings that will typicallybe accessed only occasionally.The Source menu allows you to select a source.The Decoder menu allows you to define one or more programmenumbers as decoder programme numbers.
Press the i key on the remote control to get informationabout the selected menu item.
General
Smart surfFavourite programmes
Factory settingsOSD
Programme titleTeletext 2.5
Set/Change codeAuto surround
Subwoofer external
Setup
Smart surf& Select Smart surf.
é With the cursor left/right, select• 2 programmes if you want the 0 key to toggle between the
current and the previously selected channel,• 9 programmes if you want the 0 key to summon a list of up
to 9 channels which can be selected,
To add/remove a channel or source to the 9programmes list:Tune to the channel or source you wish to add or remove.Press the 0 key and press the cursor right to add or remove.Note: If there are already 9 channels/sources in the list, the one atthe bottom of the list will be removed.
Favourite programmes& Select Favourite programmes.
é Press the cursor right to enter the programme list.
“ Select your programme number with the cursor up/down.
‘ Press the OK key to make a TV channel favourite or notfavourite.
( Repeat “ and ‘ for every TV channel or external you wantto make a favourite or a non-favourite.
Factory settingsThis resets the picture and sound settings to their predefinedfactory values, but maintains the channel installation settings.
OSD (On Screen Display)& Select OSD.
é Press the cursor right to select Normal or Minimum.Normal to activate the continuous display of the programmenumber and extended display of TV channel and programmeinformation on screen. Minimum to activate the display ofreduced channel information.Note:When subtitles is switched on, see Features, p.14, display of theprogramme number is not possible.
General menu

9
Programme titleSelect Programme title Yes or No.When selected Yes, after the selection of a TV programme orafter pressing the i key on the remote control, a TV channelwhich broadcasts teletext may transmit the name of the TVchannel or the programme title.
Teletext 2.5Some broadcasters offer the opportunity to see more colours,other background colours and nicer pictures in the teletextpages.
& Select Teletext 2.5.
é Press the cursor right to select Teletext 2.5 On to takeadvantage of this feature.
“ Press the cursor right again to select Teletext 2.5 Off if youlike the more neutral teletext layout.The selection made is valid for all channels which broadcastteletext 2.5.
Note: It may take a few seconds before teletext broadcast switchesover to Teletext 2.5.
Set/Change codeThe Child lock feature (see TV, Features, p. 14) allows you tolock channels to prevent others from watching certainprogrammes.To watch locked channels, a 4-digit code must beentered.The Set/Change code menu item allows you to createor change a Personal Identification Number (PIN).
& Select Set/Change code.
é If no code exists yet, the menu item is set to Set code.If a code has previously been entered, the menu item is set toChange code. Follow the instructions on screen.
Important:You have forgotten your code !& Select Change code in the General menu and press OK.
é Press the cursor right and enter the overriding code 8-8-8-8.
“ Press the cursor again and enter a new personal 4-digitcode.The previous code is erased and the new code is stored.
Auto SurroundSometimes the broadcaster transmits special signals forSurround Sound encoded programmes.The TV automatically switches to the best surround soundmode when Auto Surround is switched On.Note:When Auto Surround is switched On and the analogue or digitalinput signal is Dolby Pro Logic encoded, the surround mode VirtualDolby Surround is automatically selected as surround mode.Thisautomatic selection can still be overruled.
Subwoofer externalSelect On if you installed an external subwoofer. See ConnectPeripheral Equipment, Connect extra subwoofer, p. 22.

If a decoder or a descrambler is connected, see p. 20, you can define one or more programmenumbers as decoder programme numbers.
& Select Decoder with the cursor right.
é Select Programme.
“ Select the programme number under whichyou have stored the programme coming fromyour decoder.
‘ Select Status.• Select the input used to connect your
decoder: None, EXT1 or EXT2.• Select None if you do not want the selected
programme number being activated as adecoder programme number.
Note: Select EXT2 when the decoder is connected toyour EasyLink recorder.
10
Decoder
ProgrammeStatus
Setup
The Demo menu allows to demonstrate the TVfeatures separately or in a continuous loop.
If Auto demo has been selected the demo willautomatically present the features sequentially in aloop. Press one of the cursor keys to stop the Autodemo.If one of the features has been selected, thisparticular feature demo will run only once.Note:The Technical features demo is not part of theautomatic sequence and can only be activatedseparately.
Auto demo.....
Pixel Plus.....
TVSetupDemo
Exit
Demo
Decoder menu
This menu allows you to indicate the peripheralyou connected to one of the external inputs.
& Press the cursor right to enter the list of typesof peripherals attached to the selected input.
é Select the peripheral device with the cursorup/down.
Once you have selected the source type, e.g. DVD,this source will automatically be selected whenyour remote control is in DVD mode, see p. 3, andwhen you press the v key on the remotecontrol.
Centre input - Centre in volumeWhen you have connected a surround receiverto the TV, see p. 21, the loudspeakers of the TVcan act as centre speaker, making a separatecentre speaker unnecessary.Select Centre input On.When having selected On you can adjust theCentre in volume with the cursor left/right tocorrect volume level differences of the externalaudio receiver and speakers.
Digital audio in 1Select Dig. audio in 1 when you connectedyour digital device together with the additionalaudio cable you connected to the SPDIF INsocket of your TV. See Connect peripheralequipment, Digital equipment, p. 21.
Source
EXT1EXT2EXT3
HDMI 1Side
Centre inputCentre in volume
Dig. audio in 1
Setup
Source menu
Features Technicalfeatures

11
& Press the cursor right to select Picture.
é Select the menu items in the Picture menu with the cursorup/down.
“ Adjust the settings with the cursor left/right or enter the list ofsubmenu items with the cursor right. Select a submenu itemwith the cursor up/down.
Press the MENU key on the remote control to summon the main menu.Note: Dependent on the input signal, one or more menu items may not be selectable.
Press the i key on the remote control to get information about the selected menu item.
Picture Sound Features
Smart pictureContrast
BrightnessColour
SharpnessTint
Digital optionsDynamic contrast
DNRColour enhancement
(Hue)Picture formatActive Control
TV
Smart pictureSelect Smart picture to display a list ofpredefined picture settings, each correspondingwith specific factory settings.Personal refers to the personal preferencesettings of picture in the picture menu.Note:This Philips Flat TV has been set at the factoryto look best in bright store environments which usefluorescent lighting. As your home will likely not beas well lit as a store, we recommend you that youcycle through the various Smart picture modes tofind the one that best suits your own viewingconditions. Most consumers will find that Natural isthe correct choice.
Digital options Pixel Plus is the most ideal setting.Dependent on your own preference, selectStandard.
Dynamic contrastSets the level at which the TV automaticallyenhances the details in dark, middle and lightareas of the picture.
DNRThis sets the level at which noise is measuredand reduced in the picture.
Colour enhancementThis makes the colours more vivid andimproves the resolution of details in brightcolours.
HueThis compensates for the colour variations inNTSC encoded transmissions.
Picture formatThis will adjust the size of the picturedependent on the broadcast format and yourpreferred setting. See also Use of the remotecontrol, Picture format, p. 4.
Active ControlThe TV continuously measures and corrects allincoming signals in order to provide the bestpicture possible.
& Select Active Control.
é Press the cursor right to enter the list ofActive control values.
“ Press the cursor right repeatedly to select theActive Control values Off, Minimum, Mediumor Maximum.The picture settings are being optimisedcontinuously and automatically which isdisplayed by bars.The menu items can not beselected.
‘ Press the OK key or wait for the time out todismiss the Active Control display.
Picture menu
TV menu

12
Sound
Smart soundEqualizer
VolumeBalance
Headphone volumeSurround mode
(Dual I-II)(Mono/Stereo)
(3D effect)(AVL)
Delta volume(Dolby Digital)
TV
& Press the cursor right to select Sound.
é Select the menu items in the Sound menu with the cursorup/down and adjust the settings with the cursorleft/right.Remember, control settings are at normal mid-rangelevels when the bar scale is centred.
Smart soundSelect Smart sound to display a list of predefined sound settings,each corresponding with specific factory settings of Treble andBass. Personal refers to the personal preference settings ofsound in the sound menu.
Notes:- Dual X is only available with dual sound transmission.- Mono/Stereo is only selectable in case of analogue stereo
transmission.
EqualizerThis gives you the possibility to select the preferred soundfrequencies which correspond with your personal soundsettings.
VolumeThis will adjust the sound output level.
BalanceThis will adjust the output of the right and left speakers toobtain the best stereo reproduction for your listening position.
Headphone volumeThis controls the level of sound through the headphones.
Surround modeThis selects the modes for more spatial or surround soundreproduction.
Dual I/IIThis will select, per channel, Language I or Language II, whendual sound transmission is available.
Mono/StereoThis selects, per TV channel, mono or stereo sound whenanalogue stereo broadcasts are available.
3D effectDepending on the encoding of the signal, this will select thelevel of spatial effect in Virtual (3D) Surround mode.
AVL (Automatic Volume Leveler)This automatically reduces the volume differences betweenchannels and programmes, providing a more constant overalllevel.This will also reduce the dynamics of the sound.
Delta volumeThis allows you to correct for any permanent volumedifferences between TV channels or external sources.
Sound

13
Manufactured under license from DolbyLaboratories.‘Dolby’ ‘Pro Logic’ and the double-Dsymbol are trademarks of DolbyLaboratories.
Dolby DigitalIn case a Dolby Digital signal is detected, you may select thesound level.Select Dynamic to keep the original sound level, Standard fora sound level with reduced loud and raised soft passages,Compressed for a raised average sound level with reducedloud/raised soft passages.
Digital sound reception info via the i keyPress the i key.When Digital sound is reproduced, the sound info on screendisplays the number of signals which are encoded in the audiosignal.This is indicated by 2 numbers: the first one indicates thenumber of front signals, the second one the number of rearsignals.This gives an indication of the possible quality of the surroundreproduction.Note:The Virtual Dolby Digital TV will only reproduce the audio signalsvia the 2 integrated loudspeakers.

14
OffOnOn during mute
Features
SubtitleSleeptimerChild lockOn timer
TV
& Press the cursor right to select Features.
é Select the menu items with the cursorup/down and adjust the settings with thecursor left/right.
Use the on-screen Menu-Info i for moreinformation about the menu items
Select subtitlesThe subtitle page must be stored for each TVchannel:Switch on teletext and select the propersubtitle page from the index. Switch offteletext.Subtitle On will automatically display them onthe selected TV channels if subtitles are in thetransmission.A symbol will indicate that themode is on.Select On during mute when you want tohave the subtitles automatically displayed onlywhen the sound has been muted with the ¬key on the remote control.
SleeptimerThis sets a time period after which the TVautomatically switches to standby.
On timer& Select On timer with the cursor down.
é Press the cursor right again to enter theprogramme list.
“ Select the TV channel or external you wantyour TV to switch to on a selected time andday.
‘ Press the cursor right again to select a day ofthe week or to select Daily.
( Press the cursor right once again to enter thetime with the digit keys or with the cursorup/down.
§ Select On and press the cursor right again.
è Press the MENU key to turn off the menu.
Note:To check your timer settings, press the i key.
Child lock& Select Child lock.
é Press the cursor right to enter the Child lockmenu.You’re summoned to enter your code.Note:You have to re-enter your code each time youenter the child lock menu.
Important:You have forgotten your code !See p. 9.
“ Select one of the menu items of the child lockmenu:
• Lock if you want to lock all channels andexternals.
• Custom lock and press the cursor right.Select:- Lock after if you want to lock all
programmes from a certain time onwards.Press the cursor right and enter the timewith the cursor up/down and right.Select On with the cursor right.
- Programme lock if you want to lock acertain TV channel or external;
• Select Unlock to disable all locks you have set.
Child lock
LockCustom lockUnlock
Lock afterProgramme lock
SundayMonday.......Daily 15:45On timer
Off
On
VCR1BBC2CNNTVE π.....
Features menu

15
Most TV channels broadcast information via teletext.This TV has a 1200 pages memory that will storemost broadcasted pages and subpages to reduce waiting time. After each programme change, thememory is refreshed.
Switch Teletext on and offPress b to switch the teletext on.
Select a Teletext page- Enter the desired page number with the digit
keys, the cursor keys up/down, left/right orwith the -P+ key.
- Select the options at the bottom of the screenwith the colour keys.
Previously selected teletext page (Only possible in case there is no list of favouriteteletext pages available. See p. 17.)Press the 0 key.
Select the index teletext pagePress the grey colour key † to display themain index (usually p.100).
Only for T.O.P teletext broadcasts :Press i. A T.O.P. overview of the teletextsubjects available is displayed.Select with the cursor up/down, left/right thedesired subject and press the OK key.Not all TV channels broadcast T.O.P. teletext.
Select subpagesWhen a selected teletext page consists ofdifferent subpages, a list of available subpagesappears on the screen.Press the cursor left or right to select the nextor previous subpage.
Picture/Teletext & Press the b key. Press the b key to show
Teletext on the right of the screen.
é Press the b key to switch off dual screen.
Enlarge a Teletext pagePress q repeatedly to display the upperteletext part, the lower teletext part and thento return to the normal teletext page size.When the teletext page is enlarged, you canscroll the text, line by line using the cursorup/down.
HypertextWith hypertext you can quickly jump to apagenumber or search for a specific wordshown on the current teletext page.
& Press the OK key to highlight the first word ora number on the page.
é Use the cursor up/down, left/right to select anyother word or number you want to search for.
“ Press the OK key to confirm.The search starts.A message appears at the bottom of the screento indicate the searching, or that the word orpage is not found.
‘ Use the cursor up to exit hypertext.
LIONS RECORD ANOTHER WIN 430Index 100 News 300BBC Info 110 Headlines 305Children 120 Weather 400Cookery 150 Sports 415Education 200 Radio 500Lottery 230 Travel 550Finance 240 Subtitling 888Music 280 TV Listings 600Red Green Yellow Blue
102 «03 04 05 06 07 08 09 10 11 12»BBC CEEFAX 102 Mon 05 Feb 16.35.22
B B C C E E F A X
Teletext/Text guide

16
The function items Record, Remind,Watch and Review,corresponding with the red ®, green U, yellow Q and blue Ìcolour keys on the remote control, become highlighted at thebottom of the screen.Select a programme item and press one of the functions keys.
Record: to programme the recording of the video /DVD recorder (if ithas a NEXTVIEWLink function and is connected to EXT. 2).
Remind: to automatically switch on the TV if it is in standby or bydisplaying a message if the TV is on.Notes:- For the functions Record or Remind, a small menu pops up in which you
can choose the interval: once, daily or weekly, or clear an earlier maderecording or reminder.The default setting is Once. To confirm thefrequency, press the OK key.Use the cursor keys left/right to select the interval.If the message No channels has been found appears, please selectthe channel and press OK.
- Tags (a red bar for record, a green bar for remind, appear next to aprogramme to indicate a recording or a reminder.
- Next to a selected programme you can set both a record and areminder.
Watch: to watch the selected and currently broadcast programme.
Review: this menu provides a list of programmes that are marked asreminders and those that have to be recorded.This menu can beused to change or remove marked programmes.
b
¬
+
-
V
+
-
P
v Select
1 2 3
Ò
®
‡ π
†
®
®
®®
æ
B
AMP DVD/R TV SAT AUX
º
MENU
OK
Browser
=
®UQÌ
®
Functions keys
TextguideTV channels which broadcast teletext also transmit a page with the programme guide of the day.If the displayed teletext programme guide page, of the TV channel you have selected, satisfies the VideoProgramming via Teletext (VPT) requirements, it will be possible to record, remind or watchprogrammes.
& Select the TV channel on which you want to execute a Textguide function.
é Switch teletext On.
“ Select a programme guide page (e.g.TV guide page).
‘ Press the æ key.
( Press the OK key.
§ Select a programme with the cursor up/down and press one of the function keys on the remotecontrol.Note: Sometimes selected programme guide pages contain a page number with a 3-digit subcode referring to apage with more information about the programme. In this case you are back in normal teletext mode.To returnto the previous page, press the 0 key or the æ key on the remote control.
è Press the b key to switch the teletext off.

17
Teletext menu & Switch teletext on and press the MENU key to
activate the menu.
é Press the cursor up/down to select the menuitems.
“ Press the cursor right to activate.
RevealReveals/conceals hidden information on a page,such as solutions to riddles and puzzles.Press the cursor right to activate.
FavouriteYou may create a list of eight favourite teletextpages in total, selected from various TVchannels.
To add a favourite page to the list:& Select a favourite teletext page.
é Select Favourite in the teletext menu andpress the cursor right to enter the list.
“ Press the cursor right again to add the page.
‘ Press the MENU key to watch the currentpage.
To watch a favourite page from the list:When in Teletext, use the 0 key to browsethrough the favourite pages of the TV channelactually selected.
Note: only the pages of the current channel can beselected.
SearchYou may search for random words in theteletext pages.
& Press the cursor right.
é Select the character with the cursor up/down.
“ Select the following position with the cursorright.
‘ Select the following character.
( Press the OK key when finished.
§ When the word is found, it is highlighted in ateletext page.Press the OK key again for a next search of thesame word.
è To stop searching and to leave the teletextpage displayed, press the cursor up repeatedlyto leave the page and until the puck is on thepage number again.
Cycle subpages (if available)
Makes the subpages cycle automatically.Press the cursor right to activate and to de-activate again.
LanguageIf the displayed characters on screen do notcorrespond with the characters used by theteletext broadcaster, you can change thelanguage group here.Select Group 1 or Group 2 with the cursorright.
Press the MENU key to leave the Teletextmenu.
LIONS RECORD ANOTHER WIN 430Index 100 News 300BBC Info 110 Headlines 305Children 120 Weather 400CNN 150 Sports 415BBC1 200 Radio 500BBC2 230 Travel 550ARTE 240 Subtitling 888
Red Green Yellow Blue
Mon 05 Feb 16.35.22
B B C C E E F A XRevealFavouriteSearchCycle subpagesLanguage

18
SourcesCart slotPortable memoryUSB SlotCamera
Content typePicturesMusicAll files
USB
DIGITALMEDIAREADER
b
+ +
v Select
Ò
®
‡ π
†
®
®
®®
æ
B
AMP DVD/R TV SAT AUX
º
MENU
OK
Browser
=
®
Content browser
......
......Content type
MusicAll files
CollectionAll picturesLast playedCannesSki holidayTop level folder
Portable memory
Pictures
Collection
Top level folderLast playedCannesSki holiday 2003
Pictures
Portable memory > Pictures
All pictures
Pictures Picture info
Pict0023.jpg150x10012.02.2003
Portable memory > Pictures > All pictures
Press OK to show
OK
Content Browser menu
Two memory card slots and a USB slot allow you to access datastored in the devices inserted. Different types of memory card canbe read to have your JPEG images displayed on TV or to play MP3and MP3 Pro audio files. (Compact Flash I & II, Memory stick, SDCard/Mini SD Card, Smart Media, Micro Drive, MultiMedia Card).
Notes:- Only FAT/DOS-formatted memory devices are supported;- If your digital camera is not supported, try one of the following solutions:
•make sure your camera is switched on and verify if its configuration settings are correct (see the manual of your camera);
• remove the memory card from your camera and insert it in thememory card slot.
Refer to www.philips.com/support for more information.- Philips cannot be responsible if your USB device or memory card is not
supported.
With the Content Browser menu you are able to browse throughthe various files, directories, music and photo collections which arestored on the inserted memory card or the connected USB device.You can also setup a slide show or playback a playlist.
Inserting a memory card / memory stickInsert a memory card in one of the card slots at the right side ofthe TV.In case of a memory stick or a digital camera connect it to the USBconnector at the left side of the TV.When a memory card or a USB device are inserted, the ContentBrowser menu is displayed automatically. See further.
Removing the memory card / memory stickRecommended: do not remove when the content is being reador while browsing.First switch off the Content Browser menu with the = key onthe remote control. Remove the card.
Digital Media Reader

19
& Press the = key on the remote controlafter having inserted a memory card or USBdevice and switched on the TV.
é On the left menu panel the highlight is set onthe content name of the inserted memorydevice.The right menu panel has a list of variouscontent type choices: pictures, music, all files.
“ Press the cursor right to enter the contenttype list.
‘ Press the cursor up/down to select a contenttype list and press the cursor right.• If the highlight is on Pictures, the right menu
panel will consist of all the picturescollections, which can either be an album or adirectory, which contains JPEG images.
• If the highlight is on Music, the right menupanel will consist of all the music collections,which can either be a playlist or a directory,which contains MP3 or MP3 (Pro) audio files.
• If the highlight is on All files, the right menupanel will consist of all the files that arepresent on the memory device at the firstlevel in the system hierarchy.
( Press the cursor right again to enter an album,a playlist, a collection or a directory.The right menu panel shows all the images(thumbnails), songs, files that are contained inthe selected collection in the left panel.
In case a picture collection is selected, pressthe OK key to start a slide show.In case a music collection is selected, press theOK key to start a loop playback.To stop a slide show, press the OK key.To stop a loop playback, press the green colourkey on the remote control.Note:Your TV supports slide shows with backgroundmusic. See www.philips.com/support.
§ Use the cursor keys to select and press theOK key to view or to play.Press one of the colour keys on the remotecontrol to perform the corresponding functionmentioned at the bottom of the screen (torotate a picture, to shuffle, to select the slideshow interval,....).If an audio file or a JPEG file is selected, theright menu panel will give a description of theaudio file or a description and a preview of theJPEG image (the artist name, the album name,the duration, the title of the track and year fora MP3 file, the file name, the resolution and thedate for a JPEG file).If an item in All files mode is selected, the rightmenu panel will contain information about thehighlighted file.Note: If a not supported file (in All files mode) isselected, the right panel will give the name and thesize of the file.
Function keys at the bottom of the screenRotate to rotate a picture;
Hide/Show to hide or to show the function keys at the bottom of the screen ;
Effect on/off to select a transition effect between the displayed pictures during a slide show;
Timing to select the duration a picture will be displayed in a slide show;
Pause/Resume to pause a slide show.Also the background music will stop. Not backgroundmusic will go on playing;
OK to start a slide show or a loop play back;
Shuffle to shuffle music collections in a random way;
Repeat to repeat the playback of a music file.
Following icons may appear:
memory card
USB device
folder
pictures
music
all files
self made playlist/album

20
There is a wide range of audio and video equipment that can be connected to your TV.The following connection diagrams show you how to connect them.
Note: EXT1 can handle CVBS and RGB; EXT2 CVBS, Y/C and RGB; EXT3 CVBS; HDMI can handle VGA (640x480via a DVI or HDMI connector) and 480p, 576p, 480i and 576i.It is preferable to connect peripherals with RGB output to EXT1 or EXT2 as RGB provides a better picture quality.
Note: If your recorder is provided with the EasyLink function, it should be connected to EXT2 to benefit from theEasyLink functionality.
EXTERNAL
RECORDER DECODER
4
1 2 3
CABLE
1/2
EXTERNAL
CABLE
12
RECORDER
43 5
& Connect the aerial cables 1, 2 and 3 as shown(only if your peripheral has TV aerial in-/output).Connect your equipment with a eurocable 4 or 5 toone of the euroconnectors EXT1, 2 or 3 to obtain abetter picture quality.
é Look for the test signal of your peripheral in the sameway as you do for a recorder.
“ When a recorder is connected to EXT. 1 you can onlyrecord a programme from your TV. Only when arecorder is connected to EXT. 2 it is possible to recorda programme from your TV as well as from otherconnected equipment.
Other equipment (except digital sources)
Connect the aerial cables 1, 2 and, to obtain theoptimum picture quality, eurocable 3 as shown.If your recorder does not have a euroconnector, theonly possible connection is via the aerial cable.You willtherefore need to tune in your recorder’s test signal andassign it programme number 0 or store the test signalunder a programme number between 90 and 99, seeManual installation, p. 7.See the handbook of your recorder.
Decoder and RecorderConnect a eurocable 4 to your decoder and to thespecial euroconnector of your recorder. See also therecorder handbook. See Decoder, p. 10. You can alsoconnect your decoder directly to EXT1 or 2 with aeurocable.
Recorder (VCR-DVD+RW)Note: Do not place your recorder too close to the screen as some recorders may be susceptible to signals from thedisplay. Keep a minimum distance of 0,5 m from the screen.
Connect Peripheral Equipment

21
2
SPDIF IN
1
EXT 1/2/3
& Connect your digital equipment with a eurocable 1 to one ofthe euroconnectors (EXT 1, 2 or 3), or with a cinch cable or aS-VHS cable to the video input at the left side of the TV.
é To enjoy Multichannel surround sound from digital sources witha Digital audio output also connect an audio cable 2 to theSPDIF IN socket of your TV. Select Dig.Audio in 1 in theSetup, Source menu, p. 10.
“ According to the connected digital equipment, select REC, DVD,DVD-R, SAT, Game or Digital STB in the Setup/Source menu.See p. 10.
HDMI is the leading new standard for Digital video and audiointerconnection. Eg. with a Digital Set top box or compatible DVD-R,AV receiver, with DVI-equipped devices like a PC (only 640x480display mode), ...
Connect your HDMI device with the HDMI connector.
Note: Due to legal requirements it is possible that with certain copyprotected PCM audio qualities from a device connected to the HDMI input,the SPDIF output signal is muted.(This is not the case with the analogue AUDIO OUT output signal.)
HDMIL
R
HDMI (High Definition Multimedia Interface) connector
MultiChannel Surround receiver& Connect a MultiChannel surround receiver (with or without
digital input connectors) to the AUDIO OUT R and Lconnectors at the bottom of your TV 1.
é If you want the loudspeakers of your TV to act as centrespeaker, also connect an audio cable 2 to the MultiChannelsurround receiver centre out connector and to the centre inconnector at the bottom of your TV.
“ Select Centre input On in the Setup, Source menu. See p. 10.The loudspeakers of the TV will now only produce centresound.
‘ If necessary, adjust the volume level of the centre sound in theCentre in volume menu item of the Source menu.The overallvolume has to be controlled via the MultiChannel surroundreceiver.
( In case of a Digital MultiChannel surround receiver, also connectthe receiver to the SPDIF OUT connector.
2
CENTRE IN
L
R
1
AUDIOOUT
SPDIFOUT
Digital equipment (DVD, Digital set top box,…)

22
To enhance the sound reproduction of your TV you can connect anexternally powered subwoofer (between 20 and 250 Hz).
& Connect the audio cable of the external subwoofer to theSUBWOOFER socket at the bottom of your TV.
é Select Subwoofer in the Setup, General menu, p. 9.
“ Adjust the frequency of the external subwoofer to 100-120 Hz(according to your personal preference) if present on thesubwoofer.
‘ Adjust the volume level of the external subwoofer, presumedthis control is present on the subwoofer.See also the instruction manual of the external subwoofer.
SUBWOOFER
VIDEO
AUDIO
3
2
1
S•VIDEO
USB
Camera or Camcorder& Connect your camera or camcorder as shown.
é Connect to VIDEO 2 and AUDIO L 3 for monoequipment. For stereo equipment also connect AUDIO R 3.S-VHS quality with an S-VHS camcorder is obtained byconnecting the S-VHS cables with the S-VIDEO input 1 andAUDIO inputs 3.Do not connect cable 1 and 2 at the same time.This may causepicture distortion !
Headphone& Insert the plug into the headphone socket L as shown.
é Press ¬ on the remote control to switch off the internalloudspeakers of the TV.The headphone impedance must be between 8 and 4000 Ohm.Theheadphone socket has a 3.5 mm jack.In the Sound menu select Headphone volume to adjust theheadphone volume.
USB connectorConnect your device with a USB output connector (e.g. a digitalcamera, a USB memory stick) to the USB connector.
Side connections
Connect extra subwoofer

23
In TV mode, it is possible to start a direct recording of the programme which is being displayed on theTV screen. Continue to press the ® record key on the remote control for more than 2 seconds.
Note: Switching programme numbers on your TV does not disturb recording !When recording a programme from a peripheral connected to EXT 1, EXT 3 or Side, you can not selectanother TV programme on the screen without disturbing the recording..
Press the v key on the remote control repeatedly, or select Source in the Setup menu (see p. 10) toselect EXT1, EXT2, EXT3, Side or HDMI 1 according to where you connected your equipment.
Remark : Most equipment (decoder, recorder) carries out the switching itself, when it is switched on.
Record with your recorder with EasyLink
Recorder with EasyLink
The recorder can be operated with the remote control via the Recorder menu on screen.
& Press the MENU key on the remote control.
é Select the Recorder menu with the cursor up/down.
“ Press the cursor left/right, up/down to select one of the recorder functions.
The key ® for recording can be operated in the TV mode.If your EasyLink recorder has the system standby function, when you press the B key for 3 seconds, both TVand the recorder are switched to standby.
Rwd Play Stop Play Ffw Rec Eject Ò p ‡ π † ® Ï
Recorder
To select connected equipment

24
This system remote control operates the following Philips equipment:TV,VCR,DVD, DVD/R, SAT (RC5/RC6),AMP (+TUNER), CD, CD/R.
Press the Select key to operate any of the equipment indicated in the display(AUX = CD; DVD/R = DVD, SAT = SAT (RC5).Another device can be selected bypressing Select repeatedly within 2 seconds.The led will blink slowly to indicatethe device.Press one of the keys on the remote control to operate the peripheral equipment.To return to TV mode press Select while the led is blinking.When no action is taken within 60 seconds, the remote goes back to TV mode.
When you do not want the remote to go back to TV mode, and to stay in themode selected, proceed as follows:Select the desired mode with the Select key.Wait until no LED is lit. Press theSelect key again simultaneously with the OK key for at least 2 seconds.The remotewill not go back to TV mode from now on and will remain in the mode selected.To go back to the default setting of the remote (TV mode) repeat what is explainedabove, selecting the TV mode.
Note:When the Select key is pressed and held for more than 2 seconds, the RC5/RC6system select command is transmitted.
b
¬
+
-
V
+
-
v
b
i 0
h q
Select
1 2 3
4 5 6
7 8 9
0
Ò
®
‡ π
†
®
®
®®
æ
B
P
AMP DVD/R TV SAT AUX
MENU
®
º
Active Control
OK
Browser
=
®
B to switch to standby
ºæ for pause (VCR, DVD, CD)RDS news/TA (AMP);to shuffle play (CD/R)
® for record
Ò for rewind (VCR, CD);search down (DVD, AMP)
‡ for stop
π for play
† for fast forward (VCR, CD);search up (DVD, AMP)
b RDS display (AMP);to select your choice of subtitlelanguage (DVD);
i display information
MENU to switch the menu on or off
- P + for chapter, channel, trackselection
0 to 9 digit entry
0 tape index (VCR),select a DVD title/chapter,
select a frequency (AMP)
U VCR timer
cursor up/downto select the next or theprevious disc (CD)
cursor left/rightto select the previous orfollowing track (CD)search up/down (AMP)
Additionally the DVD/R, SAT and AUX indicatorcan be programmed to operate the DVD-R, DVD +receiver, DVD-R + receiver, SAT (RC6), CD-R andVCR instead.
& Select TV with the Select key.
é To program • DVD-R, press the OK key + digit 2;• SAT (RC6), press the OK key + digit 4;• CD-R, press the OK key + digit 6;• DVD + receiver, press the OK key + digit 7;• DVD-R + receiver, press the OK key + digit 8;• VCR, press the OK key + digit 9.
“ Select the corresponding DVD/R, SAT, AUXindicator.The remote control will operate yourDVD-R, DVD or DVD-R in combination with areceiver (DVD/R), SAT (RC6) (SAT), CD-R orVCR (AUX).
Note:To return to the modes programmed in thefactory, either remove the batteries for a fewminutes, or press the OK key + digit 1 (DVDmode); or + digit 3 (SAT-RC5) or + digit 5 (CDmode).
Audio- and video equipment keys

25
Tips
Care of the screen Do not touch, push or rub or strike the screen with anything hard as this mayscratch, mar or damage the screen permanently.And please do not rub with dust clothes with chemical treatment.Do not touch the surface with bare hands or greasy cloth (some cosmetics aredetrimental to the screen).Unplug the TV before cleaning the screen.When the surface becomes dusty, please wipe gently with absorbent cotton orother soft materials like chamois soaks.Do not use acetone, toluene and alcohol because they cause chemical damage.Do not use liquid cleaners or aerosol cleaners.Wipe off saliva or water drops as soon as possible.Their long time contact withthe screen causes deformations and colour fading.
Poor Picture • Have you selected the correct TV system in the manual installation menu? • Is your TV or house aerial located too close to loudspeakers, non-earthed audio
equipment or neon lights, etc.?• Mountains or high buildings can cause double pictures or ghost images.
Sometimes you can improve the picture quality by changing the direction of the aerial.
• Is the picture or teletext unrecognisable? Check if you have entered the correct frequency. See Installation, Manual installation, p. 7.
• Are brightness, sharpness and contrast out of adjustment? Select Factory settings in the Setup, General menu, p. 8.
No Picture • Are the supplied cables connected properly ? (The aerial cable to the TV, the other aerial to your recorder, the power cables.)
• Has the child lock been switched off ?• Switch your HDMI-source to a correct display mode in case you have connected
a HDMI device.• In case of weak or bad signal, consult your dealer.
Digital distortion The low quality of some digital picture material may be the cause of digital image distortion. In this case select the Soft setting using the Picture menu, Smart Picture,without changing the picture settings manually.
No sound • No sound on any channel? Check the volume isn’t at minimum.• Is the sound interrupted with the mute key ¬?
No solution found Switch your TV off and then on again once. Never attempt to repair a defective for your picture or TV yourself. Check with your dealer or call a TV technician.sound problem ?
Remote control • Check if the remote control is in the correct mode.• If your TV no longer responds to the remote control, the batteries may be dead.• You can still use the MENU key and the -/+ keys on the right side of your TV.
Standby Your TV consumes energy in the standby mode. Energy consumption contributes to air and water pollution. Power consumption: 1 W.
Miscellaneous See Extras, Specifications on this CD.
Blinking red LED Unplug your TV and then plug in again once.No solution ? Check with your dealer or call a TV technician.
Tips

26
OK !Operation Succesful !
Software Download Application V1.0
SW Version :TL31E-1.0_ 45678HW Id : 32PF9956/12
Upgrade busy...........
usb0:\philips\hetv\TL31E-1.1—45678.upg<1>
Loading ........ DoneDoneDone
Validating ........Programming ........
Software updates for your TV
Philips offers software upgrade capability for your TV using portable memory or USBstorage compliant devices (e.g. USB memory stick).The new firmware can be uploaded to the TV by yourself.You can obtain the new software in two ways:- download from the Philips website to your PC.Transfer it from your PC to the
memory device;- or ask your dealer for a memory card containing the latest update.
Downloading:& Go to the www.philips.com/support website on your computer.
é Download the new software archive after you filled in the typenumber of your TV.See your TV manual or the typeplate on the TV.
Prepare portable memory device:“ Decompress the downloaded zip archive.Transfer it to the root of your portable
memory device (including the directory structures).Note: Only FAT/DOS-formatted memory devices are supported
Uploading:‘ Power off your TV and remove all inserted memory cards or USB devices.
( Insert the portable memory that contains the updated software.Switch on your TV again.
§ At startup the TV will scan the memory card or USB memory until it finds theupdate content.The TV will go to the update mode (only English languageavailable) and, after a few seconds, displays the status of the upgrade procedure.Note: if you try to upgrade a software equal or lower than the current version, aconfirmation will be asked during the procedure.A message appears if the updating has been successful.
è Switch off your TV with the power switch and remove the portable memory.
! Power on the TV again. It will start up with the new software.
Example:

Table of TV frequencies.Frequenztabelle der Fernsehsender.Liste des fréquences des émetteurs.Frequentietabel TV-Zenders.Tabella delle frequenze delle trasmittenti.Lista de las frecuencias de las emisoras.Lista das frequências dos emissores.Liste over TV senderne.Tabell over TV-frekvenser.
Tabell över TV-frekvenser.TV-taajuustaulukko.Kατάλ�γ�ς συ�ν�τήτων π�µπών.Spisok hastot peredathikov.A televizió−adóállomások frekvenciáinak a listája.Lista częstotliwości stacji nadawczych.Seznam frekvenčních pásem vysílačů.Zoznam frekvenčných pásiem vysielačov.
GBThe frequencies used by a cable company may differ from thefrequencies on the table. Consult your cable company or yourdealer for detailed information.
DIn Kabelfernsehanlagen können Abweichungen von den in denFrequenztabellen aufgeführten Frequenzen vorkommen. Bittewenden Sie sich an Ihren Fachhändler oder IhreKabelfernsehgesellschaft, die Ihnen die zutreffenden Frequenzenmitteilt.
FLes fréquences utilisées par une société de télédistributionpeuvent être différentes de celles sur la liste des fréquences.Consultez votre société de télédistribution ou votre revendeurpour des informations plus détailées.
NLDe frequenties die gebruikt worden door een kabelmaatschappijkunnen verschillen van deze op de tabel. Raadpleeg uwkabelexploitant of uw handelaar voor meer informatie.
ILe frequenze usate per una società di teledistribuzione possanoessere differenti di quelle nella tabella. Consultate la società diteledistribuzione o il vostro rivenditore per informazione specifica.
ELas frecuencias utilizadas por las empresas de distribución deseñal por cable, pueden ser diferentes de las que se encuentranen esta tabla. Consulte con su compañia de distribución detelevisión por cable o con su distribuidor para que le proporcionenuna información más detallada.
PAs frequências utilizadas por uma sociedade de teledistribuiçãopodem ser diferentes das indicadas na lista de frequências.Consultar a sociedade de teledistribuição ou o vendedor parainformações mais detalhadas.
DKFrekvenser benyttet af kabel operatører kan være afvigende fradisse, kantakt deres kabel operatør eller forhandler for næmereinforma-tion.
NFrekvensene som benyttes pa et kabelnett kan avvike fra de somer oppfört i tabellen. Kontakt ditt kabel-TV selskap eller dinforhandler for næmere opplysninger.
SFrekvenserna som används i kabel-TV-näten kan avvika frånfrekvenserna i tabellen. Kontakta ditt kabel-TV-bolag eller dinradiohandlare för vidare information.
SFKaapeliyhtiöden käyttämät taajuudet voivat poiketa taulukossaolevista taajuuksista.Tarkat tiedot saat kaapeliyhtiösta tai myyjältä.
GR�ι συ�ν�τητες π�υ �ρησιµ�π�ι�ύνται απ� µια εταιρεία τηλεµετάδ�σηςείναι δυνατ�ν να είναι δια��ρετικές απ� αυτές π�υ περιέ�ει � κατάλ�γ�ς.(Συµ��υλευθείτε την εταιρεία τηλεµετάδ�σης ή τ�ν πωλητή γιαλεπτ�µερέστερες πληρ���ρίες).
CEIHastoty na kotoryx peredaòt telakampaniä mogutotlihatæsä ot hastot na dannoj tablice. (Obratitæsä kVaπej telekampanii ili Vaπemu prodavcu zadopolnitelænoj informaciej.
HEgy televizió−adóállomás sugárzáshoz használt frekvenciatar−tományai lehetnek a táblázatban közöltektől eltérőek is. (Abbanaz esetben, ha bővebb információkra van szüksége, forduljon azeladóhoz.)
PLOperator sieci telewizyjnej może stosować inne częstotliwości,niż te, które figurują na tablicy (bardziej szczegółowych infor−macji na ten temat zasięgnąć u operatora lub sprzedawcy).
CZFrekvence používané některými televizními společnostmi semohou lišit od údajů uvedených v tomto seznamu. Informujte seblíže u příslušné společnosti nebo v prodejně, kde jste televizorkoupili.
SKFrekvencie používané niektorými spoločnos9ami televíznehoprenosu sa môžu liši9 od údajov uvedených v tomto zozname.Informujte sa bližšie u príslušnej spoločnosti alebo v predajni,kde ste televízor kúpili.
EUROPECH ..FREQ (MHz)
E2.............48.25E3.............55.25E4.............62.25E5...........175.25E6...........182.25E7...........189.25E8...........196.25E9...........203.25E10.........210.25E11.........217.25E12.........224.25S1...........105.25S2...........112.25S3...........119.25S4...........126.25S5...........133.25S6...........140.25S7...........147.25S8...........154.25S9...........161.25S10.........168.25S11.........231.25S12.........238.25S13.........245.25S14.........252.25S15.........259.25S16.........266.25S17.........273.25S18.........280.25S19.........287.25S20.........294.25H1 ..........303.25H2 ..........311.25H3 ..........319.25H4 ..........327.25H5 ..........335.25H6 ..........343.25H7 ..........351.25H8 ..........359.25H9 ..........367.25H10 ........375.25H11 ........383.25H12 ........391.25H13 ........399.25H14 ........407.25H15 ........415.25H16 ........423.25H17 ........431.25H18 ........439.25H19 ........447.2521...........471.2522...........479.2523...........487.2524...........495.2525...........503.2526...........511.2527...........519.2528...........527.2529...........535.2530...........543.2531...........551.2532...........559.2533...........567.2534...........575.2535...........583.2536...........591.2537...........599.2538...........607.2539...........615.2540...........623.2541...........631.2542...........639.2543...........647.2544...........655.2545...........663.2546...........671.2547...........679.2548...........687.2549...........695.2550...........703.2551...........711.2552...........719.2553...........727.2554...........735.2555...........743.2556...........751.2557...........759.2558...........767.2559...........775.2560...........783.2561...........791.2562...........799.2563...........807.2564...........815.2565...........823.2566...........831.2567...........839.2568...........847.2569...........855.25
E-EUROPECAN..FREQ (MHz)
R1 ..........49.75R2 ..........59.25R3 ..........77.25R4 ..........85.25R5 ..........93.25R 6 .......175.25R 7 .......183.25R 8 .......191.25R 9 .......199.25R10 ......207.25R11 ......215.25R12 ......223.25S1 ........105.25S2 ........112.25S3 ........119.25S4 ........126.25S5 ........133.25S6 ........140.25S7 ........147.25S8 ........154.25S9 ........161.25S10 ......168.25S11 ......231.25S12 ......238.25S13 ......245.25S14 ......252.25S15 ......259.25S16 ......266.25S17 ......273.25S18 ......280.25S19 ......287.25S20 ......294.25H1 ........303.25H2 ........311.25H3 ........319.25H4 ........327.25H5 ........335.25H6 ........343.25H7 ........351.25H8 ........359.25H9 ........367.25H10 ......375.25H11 ......383.25H12 ......391.25H13 ......399.25H14 ......407.25H15 ......415.25H16 ......423.25H17 ......431.25H18 ......439.25H19 ......447.2521.........471.2522.........479.2523.........487.2524.........495.2525.........503.2526.........511.2527.........519.2528.........527.2529.........535.2530.........543.2531.........551.2532.........559.2533.........567.2534.........575.2535.........583.2536.........591.2537.........599.2538.........607.2539.........615.2540.........623.2541.........631.2542.........639.2543.........647.2544.........655.2545.........663.2546.........671.2547.........679.2548.........687.2549.........695.2550.........703.2551.........711.2552.........719.2553.........727.2554.........735.2555.........743.2556.........751.2557.........759.2558.........767.2559.........775.2560.........783.2561.........791.2562.........799.2563.........807.2564.........815.2565.........823.2566.........831.2567.........839.2568.........847.2569.........855.25
FRANCECAN..FREQ (MHz)
2 ..............55.753 ..............60.504 ..............63.755 ..............176.06 ..............184.07 ..............192.08 ..............200.09 ..............208.010 ............216.0B............116.75C............128.75D............140.75E ............159.75F ............164.75G ...........176.75H............188.75I .............200.75J ............212.75K............224.75L ............236.75M...........248.75N ...........260.75O ...........272.75P ............284.75Q ...........296.75H1..........303.25H2..........311.25H3..........319.25H4..........327.25H5..........335.25H6..........343.25H7..........351.25H8..........359.25H9..........367.25H10........375.25H11........383.25H12........391.25H13........399.25H14........407.25H15........415.25H16........423.25H17........431.25H18........439.25H19........447.2521 ..........471.2522 ..........479.2523 ..........487.2524 ..........495.2525 ..........503.2526 ..........511.2527 ..........519.2528 ..........527.2529 ..........535.2530 ..........543.2531 ..........551.2532 ..........559.2533 ..........567.2534 ..........575.2535 ..........583.2536 ..........591.2537 ..........599.2538 ..........607.2539 ..........615.2540 ..........623.2541 ..........631.2542 ..........639.2543 ..........647.2544 ..........655.2545 ..........663.2546 ..........671.2547 ..........679.2548 ..........687.2549 ..........695.2550 ..........703.2551 ..........711.2552 ..........719.2553 ..........727.2554 ..........735.2555 ..........743.2556 ..........751.2557 ..........759.2558 ..........767.2559 ..........775.2560 ..........783.2561 ..........791.2562 ..........799.2563 ..........807.2564 ..........815.2565 ..........823.2566 ..........831.2567 ..........839.2568 ..........847.2569 ..........855.25
ITALYCAN..FREQ (MHz)
A ..............53.75B ..............62.25C ..............82.25D ............175.25E ............183.75F.............192.25G............201.25H ............210.25H1 ..........217.25S1 ..........105.25S2 ..........112.25S3 ..........119.25S4 ..........126.25S5 ..........133.25S6 ..........140.25S7 ..........147.25S8 ..........154.25S9 ..........161.25S10 ........168.25S11 ........231.25S12 ........238.25S13 ........245.25S14 ........252.25S15 ........259.25S16 ........266.25S17 ........273.25S18 ........280.25S19 ........287.25S20 ........294.25H1 ..........303.25H2 ..........311.25H3 ..........319.25H4 ..........327.25H5 ..........335.25H6 ..........343.25H7 ..........351.25H8 ..........359.25H9 ..........367.25H10 ........375.25H11 ........383.25H12 ........391.25H13 ........399.25H14 ........407.25H15 ........415.25H16 ........423.25H17 ........431.25H18 ........439.25H19 ........447.2521...........471.2522...........479.2523...........487.2524...........495.2525...........503.2526...........511.2527...........519.2528...........527.2529...........535.2530...........543.2531...........551.2532...........559.2533...........567.2534...........575.2535...........583.2536...........591.2537...........599.2538...........607.2539...........615.2540...........623.2541...........631.2542...........639.2543...........647.2544...........655.2545...........663.2546...........671.2547...........679.2548...........687.2549...........695.2550...........703.2551...........711.2552...........719.2553...........727.2554...........735.2555...........743.2556...........751.2557...........759.2558...........767.2559...........775.2560...........783.2561...........791.2562...........799.2563...........807.2564...........815.2565...........823.2566...........831.2567...........839.2568...........847.2569...........855.25


Annex : Philips Flat TV Slideshow Format
Notes:- The latest version of this document can be found on the Philips support website (www.philips.com/support).
Use the type number of your TV (e.g. 32PF9956/12) to find this documentation and other related files.- Philips can’t be held responsible for any problems that may occur as a result of the content in this document. Errors
reported to Philips will be adapted and published on the Philips support website as soon as possible.
• The slideshow will use plain ASCII XML syntax to allow the creation and editing of the slideshowfiles using simple tools.
• All references to network content must be based on the global address of the content.
• Content on a Portable Memory (PM) doesn't have a global address; as a result content from a PMcan never be referenced from a slideshow not stored on the PM itself.
• To maintain portability, a slideshow stored on a PM should ONLY reference content on the samePM. Referencing global addresses can result in inconsistencies if the PM is used on a non-networkedCE device. The latter is however not forbidden, it is only a recommendation.
• It is preferable that URL’s referencing PM content are based on a relative path starting from thedirectory where the slideshow is stored. This path includes the device or drive name of the PM.
An absolute path to content will also be supported.- relative path: pictures\test1.jpg, tamper.jpg, ..\new\bird.jpg, …- absolute path: USB1:\pictures1\foo_bar.jpg, C:\f1.jpg, \organisation.jpg, …
General Rules
Introduction
This document explains how to make a Philips slideshow file with background audio.Be aware that the content of this document is addressing technical or software skilled users.
To start the slideshow open the slideshow file in the Content Browser of your TV.
& Press the = key on the remote control after having inserted a memory card or USB device andswitched on the TV.
é Go to where you stored the slideshow file (.alb) on your portable memory.“ Select the slideshow file and press the OK key to start the slide show.‘ To stop a slide show, press the OK key.
1

The following table gives a description of the XML syntax.
Supported XML-tags
Tag Name
philips-slideshow
title
audio
slide-duration
slides
slide
Use
mandatory
optional
optional
optional
mandatory
optional
Description
Philips slideshow signature including the version.
The title of the playlist.
The audio-URL following this tag will define the music playingin the background during the slideshow.A single song or playlist (.m3u & .pls) are the only valid audioreferences. Other reference will not result in any audioplayback. If a single song is referenced the song will berepeated forever. If a playlist is referenced the playlist will beplayed in sequence with a repeat at the end of the playlist.
The default display time (in 0,1 second) of a slide. The TVapplication isn’t obliged to support this tag. The TV applicationcan force the use of one or multiple predefined display times.(Not supported by the 32PF9956/12 TV set)
Identifies the slides to show.
Identifies the URL of the individual slide.
The format and syntax below will be used to create the slideshow file (simple ascii text) with theextension .alb (.ALB)
Examples: slshow1.alb, summer_holiday_2004.ALB, test.alb, …
The following syntax should be used to create the text file:
General Format
<?xml version="1.0" encoding="ISO-885h9-1" ?> <philips-slideshow version="1.0" >
<title>Title of the slideshow</title><audio>audio_url</audio><slide-duration>30</slide-duration><slides>
<slide>slide_1_url</slide> <slide>slide_2_url</slide> <slide>slide_3_url</slide> <slide>slide_4_url</slide> <slide>slide_5_url</slide> <slide>slide_6_url</slide> ... <slide>slide_N-1_url</slide> <slide>slide_N_url</slide>
</slides></philips-slideshow>
2

3
Example
<?xml version="1.0" encoding="ISO-8859-1" ?> <philips-slideshow version="1.0" >
<title>Select this to start slideshow</title><audio>USB1:\Philips_Digital_Image_Gallery\Nature_clip.mp3</audio><slide-duration>80</slide-duration><slides>
<slide>USB1:\Philips_Digital_Image_Gallery\Philips001.jpg</slide> <slide>USB1:\Philips_Digital_Image_Gallery\Philips002.jpg</slide><slide>USB1:\Philips_Digital_Image_Gallery\Philips003.jpg</slide><slide>USB1:\Philips_Digital_Image_Gallery\Philips004.jpg</slide><slide>USB1:\Philips_Digital_Image_Gallery\Philips005.jpg</slide><slide>USB1:\Philips_Digital_Image_Gallery\Philips006.jpg</slide><slide>USB1:\Philips_Digital_Image_Gallery\Philips007.jpg</slide><slide>USB1:\Philips_Digital_Image_Gallery\Philips008.jpg</slide><slide>USB1:\Philips_Digital_Image_Gallery\Philips009.jpg</slide><slide>USB1:\Philips_Digital_Image_Gallery\Philips010.jpg</slide><slide>USB1:\Philips_Digital_Image_Gallery\Philips011.jpg</slide><slide>USB1:\Philips_Digital_Image_Gallery\Philips012.jpg</slide><slide>USB1:\Philips_Digital_Image_Gallery\Philips013.jpg</slide><slide>USB1:\Philips_Digital_Image_Gallery\Philips014.jpg</slide><slide>USB1:\Philips_Digital_Image_Gallery\Philips015.jpg</slide><slide>USB1:\Philips_Digital_Image_Gallery\Philips016.jpg</slide><slide>USB1:\Philips_Digital_Image_Gallery\Philips017.jpg</slide><slide>USB1:\Philips_Digital_Image_Gallery\Philips018.jpg</slide><slide>USB1:\Philips_Digital_Image_Gallery\Philips019.jpg</slide><slide>USB1:\Philips_Digital_Image_Gallery\Philips020.jpg</slide>
</slides></philips-slideshow>