document management service user guide/media/files/the-market/operating-at... · the dms can only...
TRANSCRIPT

Document Management Service (DMS)
User Guide
Version: 1.1
Issue Date: 15/07/2013
Copyright Information
© Xchanging 2013
All rights reserved. No part of this publication may be reproduced, stored in a retrieval system, or transmitted in
any form or by any means, electronic, mechanical photocopying, recording, or otherwise, without the prior
permission of Xchanging.
Xchanging Confidential – do not copy or forward on. The document and the information it contains is
restricted and the circulation list is controlled by the author who should be identified in the document.
Note only signed hard copies and electronic masters of documents will be controlled. Any other copy may not be
current.
Trademark Information
Company, product, or brand names mentioned in this document, may be the trademarks of their owners.

Document Management Service (DMS) User Guide
Version 1.1
© Xchanging 2013 – Confidential Document uncontrolled once printed Page 2 of 33
Contents
OVERVIEW .......................................................................................................................................................... 3
WHAT IS THE DOCUMENT MANAGEMENT SERVICE? ............................................................................................ 3
1 INITIAL STEPS ........................................................................................................................................ 4
1.1 ADOBE FLASH PLAYER INSTALLATION .................................................................................................... 4
1.2 ADDITIONAL WORKSTATION REQUIREMENTS .......................................................................................... 4
2 SCREEN NAVIGATION OVERVIEW .................................................................................................. 5
3 INVOKING THE DMS ............................................................................................................................. 6
4 VIEWING A CLAIM FILE ...................................................................................................................... 8
5 CONFIRMING THE PRESENTATION OF A CLAIM FILE ........................................................... 12
6 UPLOADING NEW DOCUMENTS ...................................................................................................... 14
6.1 SELECTING FILES FOR UPLOAD ............................................................................................................... 16
6.2 DE-SELECTING FILES FOR UPLOAD ......................................................................................................... 17
6.3 RECORDING INFORMATION ABOUT A FILE .............................................................................................. 17
6.4 RETURNING TO THE DOCUMENT SUMMARY SCREEN WITHOUT UPLOADING ANYTHING ......................... 18
6.5 UPLOADING THE SELECTED FILES TO THE DOCUMENT REPOSITORY ....................................................... 19
7 VIEWING INDIVIDUAL DOCUMENTS ............................................................................................ 20
7.1 VIEWING THE CONTENTS OF A DOCUMENT ............................................................................................. 20
7.2 VIEWING CLAIM RELATED DOCUMENTS ................................................................................................. 20
8 SESSION TIME-OUT ............................................................................................................................. 21
9 ACCESSIBILITY .................................................................................................................................... 22
9.1 KEYBOARD SHORTCUTS ......................................................................................................................... 22
9.2 SCREEN NAVIGATION ............................................................................................................................. 22
10 TROUBLESHOOTING .......................................................................................................................... 23
11 GETTING ASSISTANCE ....................................................................................................................... 26
12 GLOSSARY ............................................................................................................................................. 27
13 DOCUMENT CONTROL ...................................................................................................................... 28
13.1 DOCUMENT INFORMATION ..................................................................................................................... 28
13.2 REVISION HISTORY ................................................................................................................................ 28
14 APPENDIX A – ACCEPTABLE FILE FORMATS ............................................................................. 30
APPENDIX B: LIST OF RISK DOCUMENT TYPES ................................................................................... 31
APPENDIX C: LIST OF CLAIM DOCUMENT TYPES ............................................................................... 33

Document Management Service (DMS) User Guide
Version 1.1
© Xchanging 2013 – Confidential Document uncontrolled once printed Page 3 of 33
Overview
This guide has been prepared to assist brokers, fee collection agencies and third party experts/service providers in using the Document Management Service (DMS) introduced as part of the Broker Portal ECF Enhancements project.
Section 1 describes initial steps that may need to be undertaken prior to using the Document Management Service.
Section 2 provides an overview of the DMS screens and their relationship with the CLASS claim data entry screens.
Section 3 describes how the DMS is invoked.
Sections 4, 5, 6, 7, 8 & 9 describe how to use the features of the DMS.
Sections 9 and 10 provide details on troubleshooting and obtaining assistance with the DMS.
What is the Document Management Service?
The Document Management Service (DMS) is designed to improve the quality of claim submission by introducing stricter validation around documentation and presentation of the claim file. It is a web-based application that can be accessed seamlessly via the Claim Data Entry module in CLASS (Lloyd’s and Company). The DMS is comprised of two main screens which provide the following functions:
Viewing a list of risk and claim documents that have already been uploaded against a claim
Viewing the actual documents that have already been uploaded against a risk or claim
Uploading new documents against a risk (UMR) or claim (UCR)
Confirming that the presentation of the claim file is complete so that the transaction can be released in CLASS

Document Management Service (DMS) User Guide
Version 1.1
© Xchanging 2013 – Confidential Document uncontrolled once printed Page 4 of 33
1 Initial Steps
1.1 Adobe Flash Player Installation
Adobe Flash Player ® is required to utilise the full functionality of the DMS. Specifically, when
selecting new files for upload, the software is required to be able to highlight multiple files for selection.
If the software is not installed on your system, it can be downloaded for free from the Adobe website:
http://get.adobe.com/flashplayer/
By default, an option will be set to download and install the Google Toolbar as part of the
installation. De-select this option if you do not wish to install the toolbar.
If you do not have the correct permissions to perform the installation yourself (your system should
notify you of this if you attempt the installation without the correct permissions), you will need to
contact your security administrator.
1.2 Additional Workstation Requirements
If your workstation is already configured to use CLASS and the IMR, there are no additional desktop
requirements for DMS other than those stated above. New users should refer the IMR & ECF Desktop
Software Compatibility Guide, specifically the sections on IMR and General Settings, for more
information.

Document Management Service (DMS) User Guide
Version 1.1
© Xchanging 2013 – Confidential Document uncontrolled once printed Page 5 of 33
2 Screen Navigation Overview
Figure 1 below shows the various navigation paths between CLASS and DMS, and within DMS.
Figure 1

Document Management Service (DMS) User Guide
Version 1.1
© Xchanging 2013 – Confidential Document uncontrolled once printed Page 6 of 33
3 Invoking the DMS
There are two methods by which the DMS can be invoked:
(1) Automatically, after entering basic claim details in CLASS and pressing ENTER (Figure 2)
(2) Manually, by selecting the ‘DMS’ option (Figure 3, Ref: 1) when you reach a specific point in the
claim advice creation/update process in CLASS, specifically the CONFIRMATION screen.
The DMS can only be invoked by the above methods where the ECF Flag (Figure 2, Ref: 1) entered
against the claim transaction is ‘Y’ or ‘T’. Where the ECF Flag is ‘N’, DMS will not and cannot be invoked
either automatically or manually.
Figure 2

Document Management Service (DMS) User Guide
Version 1.1
© Xchanging 2013 – Confidential Document uncontrolled once printed Page 7 of 33
Figure 3

Document Management Service (DMS) User Guide
Version 1.1
© Xchanging 2013 – Confidential Document uncontrolled once printed Page 8 of 33
4 Viewing a claim file
When the DMS is invoked either automatically, or manually as described in Section 3 Invoking the DMS,
the initial landing point is the Document Summary screen, which is shown in Figure 4 below.
Figure 4
This screen displays a list of all risk and claim documents that have been uploaded for the claim that the
current claim transaction is associated with and for which you have the appropriate permissions to view.
The header area of the screen (Figure 4, Ref: 1) shows the UMR, UCR, TR and Bureau associated with the
current claim transaction.
The upper list-box (Figure 4, Ref: 2) shows any risk documents that have already been uploaded for the
claim and for which you have the appropriate repository permissions to view. The risk documents list-box
includes the following information about each document:

Document Management Service (DMS) User Guide
Version 1.1
© Xchanging 2013 – Confidential Document uncontrolled once printed Page 9 of 33
Column Name Description Can be used to
sort?
Document Name The name of the document; set by the system during
upload.
Where the value exceeds what can be displayed in
the column, hover the mouse pointer over the value to
show a pop-up containing the entire value.
Document Description A description of the document; entered during upload.
Where a document originated as an attachment to an
email file, Document Description is shown as
‘[Attachment]’ followed by the Document Description that
was entered for the email file during upload.
Where the value exceeds what can be displayed in
the column, hover the mouse pointer over the value to
show a pop-up containing the entire value.
Has Attachments Where an email file type is uploaded using the DMS and
there is an attachment to that file, it is separated out
from the email.
Has Attachments indicates ‘Y’ where an attachment to
an email file is also an email type file, and that file has
one or more attachments.
Uploaded By The USERID of the person who uploaded the document
to the document repository; set by the system during
upload.
Date Uploaded The date that the document was uploaded to the
document repository; set by the system during upload.
Size (KB) The size of the document file in kilobytes, set by the
system during upload.
Original Doc Date The original creation date of the document; entered
during upload.

Document Management Service (DMS) User Guide
Version 1.1
© Xchanging 2013 – Confidential Document uncontrolled once printed Page 10 of 33
Column Name Description Can be used to
sort?
Risk Document Category The classification/category (e.g. ‘Policy’, ‘Slip’,
‘Miscellaneous’) of the risk document; set by the system
during upload based on the selected Document Type.
The lower list-box (Figure 4, Ref: 3) shows the claim documents that have been uploaded for the claim
and for which you have the appropriate repository permissions to view. The header bar of the claim
documents list-box shows a count of the number of claim documents that are associated with the current
claim transaction. In addition to the information shown in the risk documents list-box, the claim documents
list-box also includes the following:
Item Description Can be used to
sort?
Current TR Indicates whether a document is associated with the
current claim transaction.
‘YES’ is displayed where a document is associated with
the current transaction.
Additional TRs Indicates whether a document is associated with
transactions other than the current claim transaction. If it
is, the transaction references (TRs) of the other claim
transactions are shown.
Where the value exceeds what can be displayed in
the column, hover the mouse pointer over the value to
show a pop-up containing the entire value.
Note: ‘Risk Document Category’ is only relevant for risk documents and thus does not appear in the claim
documents list-box.
Click on the name of a column in the risk or claim document list-box to sort the list-box by that column.
The paging buttons below the risk document list-box (Figure 4, Ref: 4) and the claim document list-box
(Figure 4, Ref: 5) are enabled when it is not possible to show all documents on the screen at the one time,
and therefore need to be presented across multiple pages. Use the forward and backward paging controls to
scroll the pages as required.

Document Management Service (DMS) User Guide
Version 1.1
© Xchanging 2013 – Confidential Document uncontrolled once printed Page 11 of 33
The Document Summary screen includes several operations which can be performed by either clicking the
appropriate pushbutton, or by using a keyboard shortcut.
Operation Corresponding push-
button
Corresponding
keyboard shortcut
Confirm that the presentation of the claim file is
complete
Click on the checkbox. CTRL+SHIFT+M
Go to the Document Upload screen to upload a
new risk document
Add Risk Docs
(Figure 4, Ref: 6)
CTRL+SHIFT+A
Go to the Document Upload screen to upload a
new claim document
Add Claim Docs
(Figure 4, Ref: 7)
CTRL+SHIFT+C
Navigate to the IMR to view a list of the claim
related documents uploaded against the claim
IMR
(Figure 4, Ref: 8)
CTRL+SHIFT+R
Refresh the risk and claim document lists Refresh
(Figure 4, Ref: 9)
CTRL+SHIFT+S
Return to CLASS claim data entry Continue
(Figure 4, Ref: 10)
CTRL+SHIFT+E
If the Document Summary screen has been left idle for an extended period during which time the
contents of a claim file may have changed (for example, additional documents may have been directly
uploaded via the IMR), it is suggested that you click the ‘Refresh’ push-button (Figure 4, Ref: 9) to refresh
the risk document and claim document list-boxes.
Many of the functions on the Document Summary screen include online help text that can be displayed
by hovering your mouse pointer over the icon next to the function.

Document Management Service (DMS) User Guide
Version 1.1
© Xchanging 2013 – Confidential Document uncontrolled once printed Page 12 of 33
5 Confirming the presentation of a claim file
Once the DMS has been invoked (whether automatically or manually), you must confirm that the
presentation of the claim file is complete in order to be able to release the claim transaction when you return
to CLASS.
The checkbox used to do this is only enabled where the system has determined that the minimum
documentation requirements have been satisfied for the claim. For brokers, this is that at least one risk
document (of category ‘Slip’ or ‘Policy’) and one claim document have been uploaded for the claim, and
these documents are visible on the Document Summary. For third parties, this is that at least one claim
document has been uploaded for the claim, and this document is visible on the Document Summary.
To confirm that the presentation of the claim file is complete once you have reviewed the claim file, click the
checkbox labelled ‘The Presentation of the Claim File is Complete’ at the bottom of the Document Summary
screen (Figure 5, Ref: 1).
Figure 5
To exit DMS and return to CLASS claims entry, click the ‘Continue’ push-button.
Attempting to return to CLASS claims entry without confirming that the presentation of the claim file is
complete will cause the system to display a message with options to cancel and remain in the DMS, or to
proceed back to CLASS.
If you choose to cancel and remain in the DMS, then you can navigate to the Document Upload
screen to upload the required documentation which will then allow you to confirm that the
presentation of the claim file is complete.

Document Management Service (DMS) User Guide
Version 1.1
© Xchanging 2013 – Confidential Document uncontrolled once printed Page 13 of 33
If you choose to proceed back to CLASS, it will not be possible for you to release the claim
transaction, until you re-invoke the DMS and confirm that the presentation of the claim file is
complete. You may still save the transaction with errors and return to it later to do this.
If you confirm that the presentation of the claim file is complete and select to return to CLASS, but none
of the claim documents that have been uploaded against the claim were uploaded against the current claim
transaction (thus associating the document(s) with the current claim transaction), a warning message will be
displayed with options to remain in the DMS or proceed back to CLASS.
If you choose to proceed back to CLASS, you will still be able to release the claim transaction.
If you choose to cancel and remain in the DMS, then you can navigate to the Document upload
screen to upload one or more claim documents against the current claim transaction.

Document Management Service (DMS) User Guide
Version 1.1
© Xchanging 2013 – Confidential Document uncontrolled once printed Page 14 of 33
6 Uploading new documents
To upload a new risk document, click the ‘Upload Risk Docs’ push-button on the Document Summary
screen. To upload a new claim document, click the ‘Upload Claim Docs’ push-button on the Document
Summary screen.
The Document Upload screen will be displayed, as shown in Figure 6 below. Depending on the upload
option selected in the Document Summary screen, the screen header will either show ‘Risk Document
Upload’ or ‘Claim Document Upload’. The process for selecting and uploading files is the same.
Figure 6
The header area of the Document Upload screen (Figure 6, Ref: 1) shows the UMR, UCR, TR and Bureau
associated with the current claim transaction.
The Document Upload list-box (Figure 6, Ref: 2) shows a list of files that have been selected for upload; it is
initially empty.
The Document Upload screen includes several operations which can be performed by either clicking the
appropriate push-button, or by using a keyboard shortcut.
Operation Corresponding push-
button
Corresponding
keyboard shortcut
Select one or more files to be uploaded Browse CTRL+SHIFT+B

Document Management Service (DMS) User Guide
Version 1.1
© Xchanging 2013 – Confidential Document uncontrolled once printed Page 15 of 33
Operation Corresponding push-
button
Corresponding
keyboard shortcut
(Figure 6, Ref: 3)
Upload the files that have been selected for
upload
Upload
(Figure 6, Ref: 4)
CTRL+SHIFT+U
Cancel out of the Document Upload screen
and return to the Document Summary screen
Cancel
(Figure 6, Ref: 5)
CTRL+SHIFT+N
Many of the functions on the Document Upload screen include online help text that can be displayed by
hovering your mouse pointer over the (?) symbol next to the corresponding control.
Document Management Service (DMS) User Guide
Version 1.1
© Xchanging 2013 – Confidential Document uncontrolled once printed Page 16 of 33
6.1 Selecting files for upload
In order for a file to be selected for upload, a number of criteria must be satisfied:
The size of the file cannot exceed 20 Megabytes (MB) and must be greater than 0 Kilobytes (KB)
The file type must be a valid file type for upload (refer Appendix A – Acceptable File Formats for
details of the file types that are valid for upload)
No more than 20 files (including email attachments) must have already been selected for upload.
This includes files that have already been selected for upload and added to the Document Upload
list-box.
The file must not have already been selected for upload (a soft warning will be displayed in such
cases)
STEPS
1. Click the ‘Browse’ push-button (Figure 6, Ref: 3), which will invoke the browse files dialogue box.
2. Highlight the files to be selected for upload, holding down the CTRL key to select more than one file
(Note: Adobe Flash Player is required to perform multi-select, please refer to Section 1.1 Adobe
Flash Player Installation for further details).
3. Click the ‘Open’ button to continue. This will cause the system to validate the selected file(s) to
ensure that they meet the criteria listed above.
o Where one or more of the files do not satisfy one or more of the criteria, they are not added
to the Document Upload list-box, and an error message is displayed in the error message
area of the screen (Figure 6, Ref: 4).
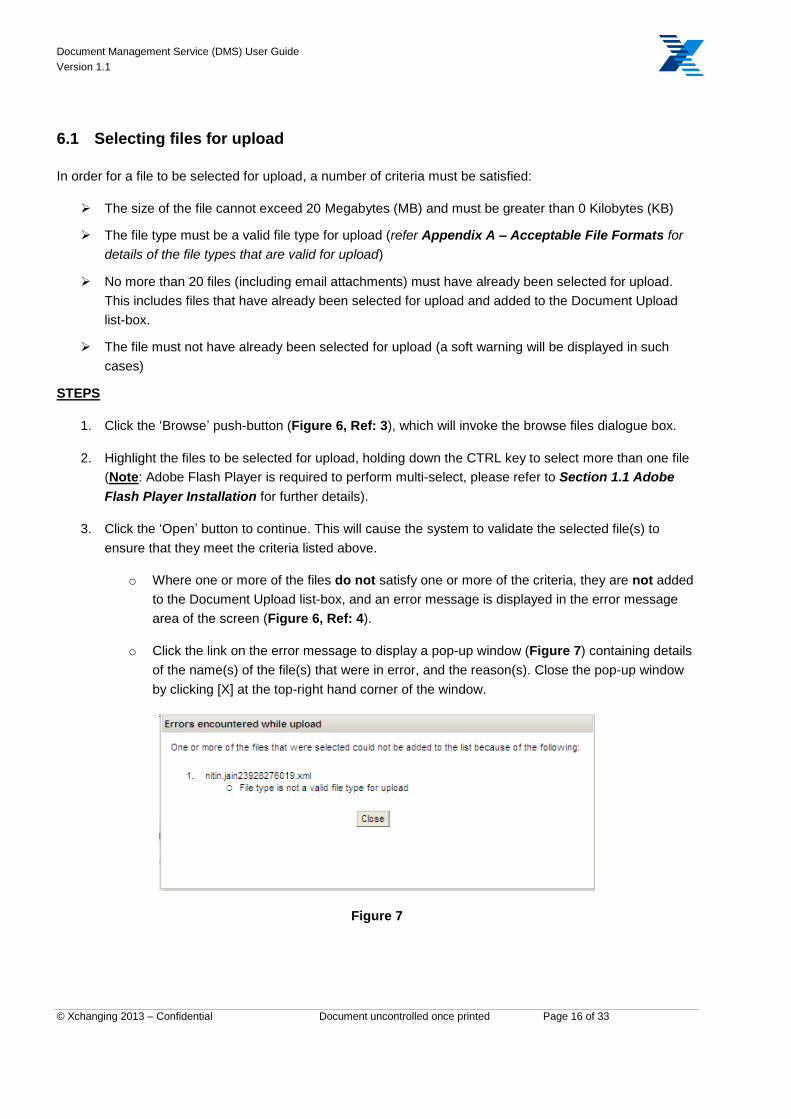
o Click the link on the error message to display a pop-up window (Figure 7) containing details
of the name(s) of the file(s) that were in error, and the reason(s). Close the pop-up window
by clicking [X] at the top-right hand corner of the window.
Figure 7
Document Management Service (DMS) User Guide
Version 1.1
© Xchanging 2013 – Confidential Document uncontrolled once printed Page 17 of 33
Those file(s) that satisfy all of the criteria are added to the Document Upload list-box.
Where an email file (i.e. a file with a file extension of .msg or .eml) is selected for upload and the email
contains attachments, the attachments are separated out as individual files for upload (as illustrated in
Figure 6; the second, third and fourth items in the list are attachments that have been separated from the
first item). Any invalid attachments will be highlighted in red and strikethrough font and automatically de-
selected for upload.
The Document Upload list-box includes the following information defaulted by the system for each selected
file:
Item Description
Name The filename of the selected file. This is displayed for informational purposes and is not
stored during upload.
Where a file has originated as an attachment to an email file, Name is the filename of
the attachment.
Format The format of the file, which is based on the file extension of the file.
6.2 De-selecting files for upload
If you have selected a file for upload, it can be de-selected (i.e. removed from the Document Upload list-box)
by clicking the ‘waste basket’ icon against the file at the right-hand side of the Document Upload list-box
(Figure 6, Ref: 6).
If you de-select a file, you can re-select it by following the steps in Section 6.1 Selecting files for
upload.
6.3 Recording information about a file
When a file is selected for upload, the Path and Format information is defaulted by the system, but some
additional information needs to be entered before the file can be uploaded.
Note: Additional information does not need to be separately entered for attachments that have been
separated from email files; upon upload, the files inherit the necessary information entered for the email file
from which the attachments were separated.
Item Description Valid Format
Document Type The category of the document. E.g. ‘Slip’, ‘Claim
Correspondence’
Restricted to
values in the
Document Management Service (DMS) User Guide
Version 1.1
© Xchanging 2013 – Confidential Document uncontrolled once printed Page 18 of 33
Item Description Valid Format
This is a mandatory value that must be selected to
upload a document.
drop-down list.
Refer
Appendix B
and C for full
list of values.
Original Doc Date The original creation date of the document.
This is a mandatory value that must be completed
to upload a document. The value cannot be greater than
today’s date.
Date
(dd/mm/yyyy)
Document Originator The author/creator of the document.
This is a mandatory value that must be completed
to upload a document.
Text
Document Description A meaningful description of the document.
Click the button in the field to display a pop-up in
which a detailed description can be captured.
Text
Document Name is automatically set by the system based on the values entered by the user, namely
‘Original Document Date’ (format YYYYMMDD) + ‘Created by’ + ‘Document type’. E.g.
‘20040602JOHNForm’. If a file is an attachment that was separated from an email file, this value is set by the
system (upon upload) to the Document Name of the email file from which it was separated + ’-‘ + the
filename of the attachment.
6.4 Returning to the Document Summary screen without uploading anything
To return to the Document Summary screen without uploading any files, click the ‘Cancel’ pushbutton at any
time. You will be prompted to confirm that you wish to return to the Document Summary.
Click ‘Yes’ to continue back to the Document Summary screen
Click ‘No’ to remain in the Document upload screen. Note: Even if you have selected one or more
files for upload, if you click ‘No’ the file upload of the selected file(s) will be aborted and you will be
returned to the Document Upload screen.

Document Management Service (DMS) User Guide
Version 1.1
© Xchanging 2013 – Confidential Document uncontrolled once printed Page 19 of 33
6.5 Uploading the selected files to the document repository
Once you have entered the information for each file, click the ‘Upload’ push-button (Figure 6, Ref: 4) to
upload the file(s) to the document repository. This will cause the system to validate the selected files to
check:
that all of the mandatory information has been entered for each file
that the format of the information that was entered is correct
that the selected file(s) still exist in the location from where they were selected
Where one or more files fail validation, an error message is displayed and the file(s) that are in error are
highlighted accordingly.
Resolve the error(s), and then click the ‘Upload’ push-button to re-attempt the upload.
While the file(s) is/are being uploaded, a progress indicator is shown. Once the upload is completed the
Document Summary screen will be re-displayed.
If any errors occur during the upload process, notification will be provided for the file(s) where error(s)
occurred and which could not be uploaded. Files which do not encounter errors during upload will be
uploaded. Refer to Section 10 Troubleshooting for details on what action can be taken.

Document Management Service (DMS) User Guide
Version 1.1
© Xchanging 2013 – Confidential Document uncontrolled once printed Page 20 of 33
7 Viewing individual documents
7.1 Viewing the contents of a document
The contents of a document can be viewed by clicking the hyperlink on the Document Name (Figure 4, Ref:
11) in the Document Summary screen, which will open a new window and automatically sign you into the
IMR. Click the ‘View’ option to open the document.
When you have finished viewing the document, close the window by clicking [X] in the top right-hand corner
of the browser window.
For risk documents, this is only possible where you have access to the Native Repository facility
AND/OR the A&S Direct Load facility on the IMR. For claim documents, this is only possible where you have
access to the Native Repository facility on the IMR.
7.2 Viewing claim related documents
Where one or more claim documents have been uploaded against a claim, these can be viewed in the IMR
by clicking the ‘IMR’ option (Figure 4, Ref: 8) in the Document Summary screen. This will open a new
window and automatically sign you into the IMR, displaying the All – Claim Related Documents tab.
When you have finished, close the window by clicking [X] in the top right-hand corner of the browser window.
This option is only available where you have access to the Native Repository facility on the IMR AND
claim related documents have been uploaded for the claim.

Document Management Service (DMS) User Guide
Version 1.1
© Xchanging 2013 – Confidential Document uncontrolled once printed Page 21 of 33
8 Session Time-out
If your DMS session has been left idle for 35 minutes, a warning message will be displayed. Click ‘OK’ to
keep your session active. If within 4 minutes of the system displaying the warning message you have not
selected the ‘OK’ option, the DMS session will timeout. The system will provide notification that your session
has timed-out.
Document Management Service (DMS) User Guide
Version 1.1
© Xchanging 2013 – Confidential Document uncontrolled once printed Page 22 of 33
9 Accessibility
9.1 Keyboard Shortcuts
Keyboard shortcuts are provided for all of the key functions of the Document Management Service.
These have been detailed in the relevant sections throughout this user guide.
9.2 Screen navigation
It is possible to navigate around the screens of the Document Management Service using the TAB key.

Document Management Service (DMS) User Guide
Version 1.1
© Xchanging 2013 – Confidential Document uncontrolled once printed Page 23 of 33
10 Troubleshooting
Problem Likely cause Action to take
Document Summary
The system is telling me that I do
not have the appropriate
permissions to use the
Document Management Service.
There is a problem with your
account.
Contact the Xchanging Service
Centre using the details in
Section 11 Getting Assistance
The system is telling me that the
Document Management Service
can’t be started.
There is an unexpected problem
with the system process that
loads the Document
Management Service.
Select RETRY to retry, or
CONTINUE to try again later.
If the problem persists, contact
the Xchanging Service Centre
using the details in Section 11
Getting Assistance
The new DMS functionality does
not appear to be available during
Claims Data Entry.
The changes have not been
switched on for your
organisation.
Contact the Xchanging Service
Centre using the details in
Section 11 Getting Assistance
When I click on the Document
Name to view the contents of a
document, nothing happens.
You do not have a native IMR
repository licence which is
required in order to view the
contents of a document on the
IMR.
Contact the Xchanging Service
Centre using the details in
Section 11 Getting Assistance
I can’t use the option to navigate
to the IMR to view the list of
claim related documents, as the
option is disabled.
You do not have a native IMR
repository licence which is
required to view the list of claim
related documents on the IMR.
Contact the Xchanging Service
Centre using the details in
Section 11 Getting Assistance
I am unable to confirm that the
presentation of the claim file is
complete, as the option to do so
is not enabled.
The minimum documentation
requirements have not been
satisfied.
For Brokers:
If no claim documents appear for
the claim in the Document
Summary screen, upload at least
one. If no risk documents appear
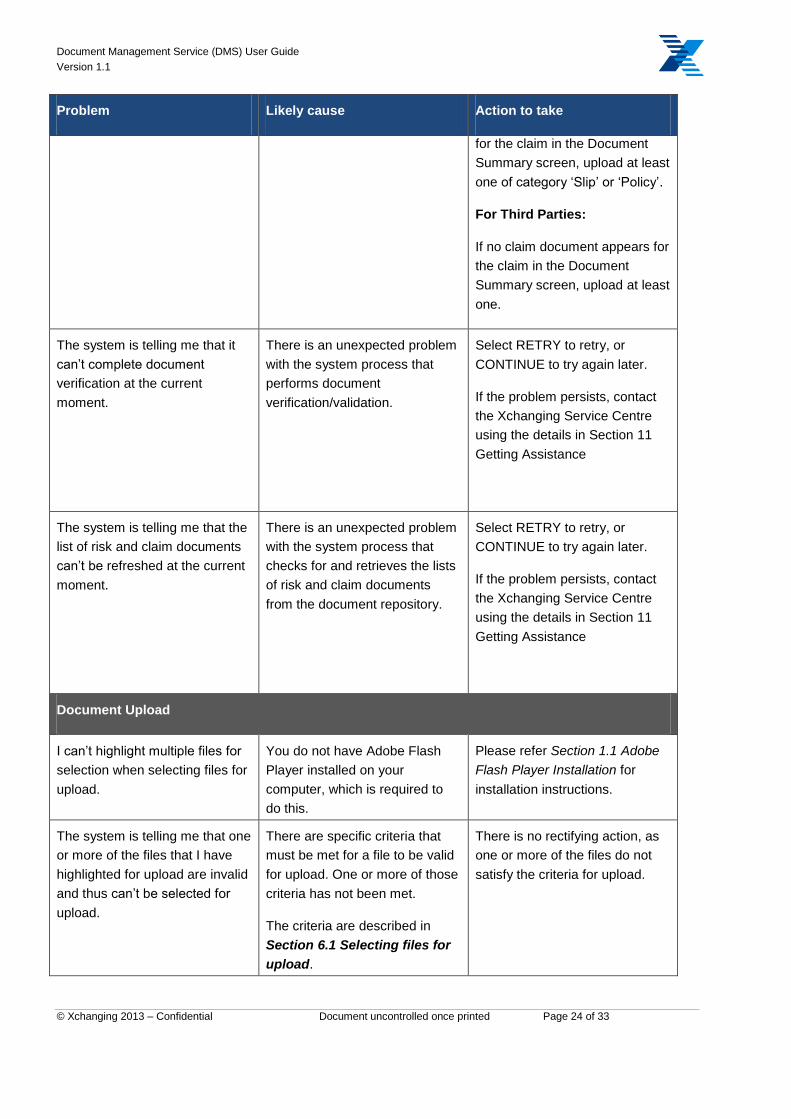
Document Management Service (DMS) User Guide
Version 1.1
© Xchanging 2013 – Confidential Document uncontrolled once printed Page 24 of 33
Problem Likely cause Action to take
for the claim in the Document
Summary screen, upload at least
one of category ‘Slip’ or ‘Policy’.
For Third Parties:
If no claim document appears for
the claim in the Document
Summary screen, upload at least
one.
The system is telling me that it
can’t complete document
verification at the current
moment.
There is an unexpected problem
with the system process that
performs document
verification/validation.
Select RETRY to retry, or
CONTINUE to try again later.
If the problem persists, contact
the Xchanging Service Centre
using the details in Section 11
Getting Assistance
The system is telling me that the
list of risk and claim documents
can’t be refreshed at the current
moment.
There is an unexpected problem
with the system process that
checks for and retrieves the lists
of risk and claim documents
from the document repository.
Select RETRY to retry, or
CONTINUE to try again later.
If the problem persists, contact
the Xchanging Service Centre
using the details in Section 11
Getting Assistance
Document Upload
I can’t highlight multiple files for
selection when selecting files for
upload.
You do not have Adobe Flash
Player installed on your
computer, which is required to
do this.
Please refer Section 1.1 Adobe
Flash Player Installation for
installation instructions.
The system is telling me that one
or more of the files that I have
highlighted for upload are invalid
and thus can’t be selected for
upload.
There are specific criteria that
must be met for a file to be valid
for upload. One or more of those
criteria has not been met.
The criteria are described in
Section 6.1 Selecting files for
upload.
There is no rectifying action, as
one or more of the files do not
satisfy the criteria for upload.

Document Management Service (DMS) User Guide
Version 1.1
© Xchanging 2013 – Confidential Document uncontrolled once printed Page 25 of 33
Problem Likely cause Action to take
The system is telling me that one
or more files have failed to
upload to the repository.
There is an unexpected problem
with the system process that
uploads documents to the
document repository.
Select RETRY to retry uploading
the files that failed, or CANCEL
to abandon uploading the files
that failed.
If the problem persists, contact
the Xchanging Service Centre
using the details in Section 11
Getting Assistance
Document Management Service (DMS) User Guide
Version 1.1
© Xchanging 2013 – Confidential Document uncontrolled once printed Page 26 of 33
11 Getting Assistance
The Xchanging Service Centre can be contacted via telephone on 0870 380 0830 or by email at
For telephone enquiries during Core Service hours a Service Desk Operator will respond, for Non-
Core Service hours an answer machine will be in operation.

Document Management Service (DMS) User Guide
Version 1.1
© Xchanging 2013 – Confidential Document uncontrolled once printed Page 27 of 33
12 Glossary
Term Description
Adobe Flash Player A multimedia platform used to add animation, video and
interactivity to web pages. For the DMS, Adobe Flash Player is
required to perform multi-select when selecting documents for
upload on the Document Upload screen.
Claim document UCR document
CLASS Claims processing system within the London ILU and LIRMA
markets, and Lloyd’s for broker creation of claims only. The
corresponding response system for Lloyd’s carriers is ECF or
ECF2. The creation/update/deletion of records on claims in
CLASS will provide the data for inclusion in the CWT data feed.
DMS Acronym for Document Management Service
IMR Acronym for Insurance Market Repository. The document
repository for the London Insurance Market.
Risk document UMR document
TR Acronym for Transaction Reference
UCR Acronym for Unique Claim Reference
UMR Acronym for Unique Market Reference
Document Management Service (DMS) User Guide
Version 1.1
© Xchanging 2013 – Confidential Document uncontrolled once printed Page 28 of 33
13 Document Control
13.1 Document Information
Prepared by: Sheldon Smiltnieks
Project Manager: Andy Nunn
Programme Manager: Paul Baynham
13.2 Revision History
Version Date Author Description
0.1 25 June
2012
Sheldon Smiltnieks Draft document created.
Updates based on feedback from the
training team (13/07)
0.2 17 July
2012
Sheldon Smiltnieks Updates to mention fee collection
agents and third party experts as
users of the DMS. Also updated to
reflect change to rules around being
able to confirm that the presentation of
the claim file is complete (17/07).
Refer to Functional Change Log ref 22
(https://xir.xchanging.com/worksitemp
/link/V3/LEGALREPOS/C/D$100011/)
Updates to navigation diagram
(27/07). Refer to Functional Change
Log ref #36
(https://xir.xchanging.com/worksitemp
/link/V3/LEGALREPOS/C/D$100011/)
Minor updates to reflect where the
labels of controls were changed during
development/testing (11/09)
Added in screenshots based on
Document Management Service (DMS) User Guide
Version 1.1
© Xchanging 2013 – Confidential Document uncontrolled once printed Page 29 of 33
Version Date Author Description
current development version of DMS
(14/09)
0.3 2 May 2013 Sheldon Smiltnieks Updates to incorporate enhancements
made to the DMS as part of the ICS
Phase 2 project (primarily in relation to
the splitting of file attachments from
email files).
1.0 5 Jul 2013 Jay Mehta Reviewed and updated following
UAT/MAT.
1.1 15 Jul 2013 Jay Mehta Clarification on minimum
documentation requirements

Document Management Service (DMS) User Guide
Version 1.1
© Xchanging 2013 – Confidential Document uncontrolled once printed Page 30 of 33
14 Appendix A – Acceptable File Formats
Below is the list of file types that are valid for upload using the Document Management Service, as at
June 2013.
File Type File Extension
MS Word doc, docx
Text file txt
MS Excel xls, xlsx
MS Powerpoint ppt, pptx
Comma separated values csv
Rich text format rtf
Web files htm, html
JPEG image jpg, jpeg
Tagged Image File Format tif, tiff
Windows Bitmap Graphic bmp
Portable Network Graphics png
Graphical Interchange Format gif
Adobe Acrobat Portable Document Format pdf
AVI Movie File avi
MP3 Audio File mp3
WAV file wav
MS Outlook message format msg
Email message format eml
Document Management Service (DMS) User Guide
Version 1.1
© Xchanging 2013 – Confidential Document uncontrolled once printed Page 31 of 33
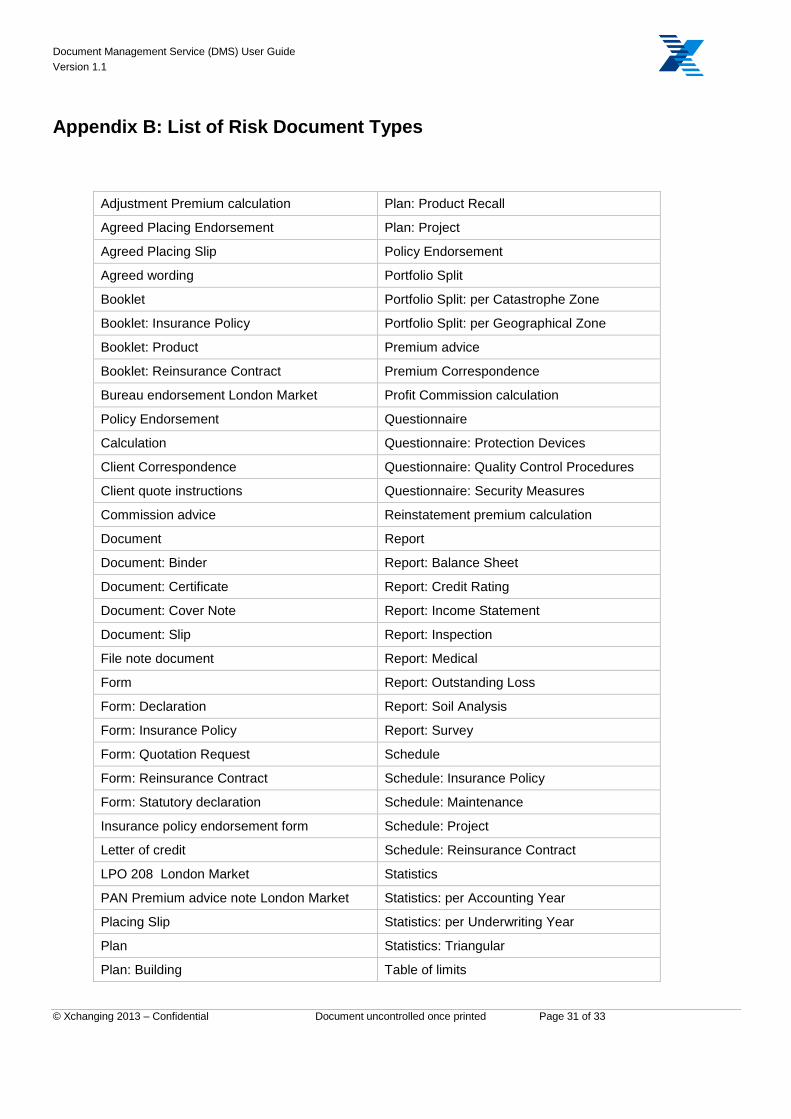
Appendix B: List of Risk Document Types
Adjustment Premium calculation Plan: Product Recall
Agreed Placing Endorsement Plan: Project
Agreed Placing Slip Policy Endorsement
Agreed wording Portfolio Split
Booklet Portfolio Split: per Catastrophe Zone
Booklet: Insurance Policy Portfolio Split: per Geographical Zone
Booklet: Product Premium advice
Booklet: Reinsurance Contract Premium Correspondence
Bureau endorsement London Market Profit Commission calculation
Policy Endorsement Questionnaire
Calculation Questionnaire: Protection Devices
Client Correspondence Questionnaire: Quality Control Procedures
Client quote instructions Questionnaire: Security Measures
Commission advice Reinstatement premium calculation
Document Report
Document: Binder Report: Balance Sheet
Document: Certificate Report: Credit Rating
Document: Cover Note Report: Income Statement
Document: Slip Report: Inspection
File note document Report: Medical
Form Report: Outstanding Loss
Form: Declaration Report: Soil Analysis
Form: Insurance Policy Report: Survey
Form: Quotation Request Schedule
Form: Reinsurance Contract Schedule: Insurance Policy
Form: Statutory declaration Schedule: Maintenance
Insurance policy endorsement form Schedule: Project
Letter of credit Schedule: Reinsurance Contract
LPO 208 London Market Statistics
PAN Premium advice note London Market Statistics: per Accounting Year
Placing Slip Statistics: per Underwriting Year
Plan Statistics: Triangular
Plan: Building Table of limits

Document Management Service (DMS) User Guide
Version 1.1
© Xchanging 2013 – Confidential Document uncontrolled once printed Page 32 of 33
Plan: Maintenance Underwriter correspondence
Wording
Wording addenda
Wording: Construction Contract
Wording: Insurance Policy
Wording: Maintenance Contract
Wording: Reinsurance Contract

Document Management Service (DMS) User Guide
Version 1.1
© Xchanging 2013 – Confidential Document uncontrolled once printed Page 33 of 33
Appendix C: List of Claim Document Types
Adjuster Report
Attorney Correspondence
Claim Closing Notice
Claim Movement Advice
Claim Reserve Calculation
Claim Correspondence
Coverage Counsel Correspondence
Defense Counsel Report
Document
Fee Bill
File Note Document
General Correspondence Cedent
Initial Notice
Initial Notice – Precautionary
Inquiry Response
Manual Calculation
Outstanding Loss and Loss Adjustment Expense (LAE) Reserve Bordereau
Paid Loss and LAE and Outstanding Loss and LAE Reserve Bordereau
Paid Loss and Loss Adjustment Expense (LAE) Bordereau
Reinstatement Calculation
Reinstatement Premium Calculation
Reinsurer Status Request
Reinsurer Status Update
Report
Settlement Documentation
Subsequent Proof of Loss
Underwriter Correspondence