user guide and test case training scenarios: entering data ... · test case training scenarios:...
TRANSCRIPT

ADEM e2 Project
Page 1 of 32
E2
User Guide and
Test Case Training Scenarios:
Entering Data into the e2 System
Prepared by:
ADEM
November 5, 2009
Updated: October 19, 2015
ADEM e2 Project
Page 2 of 32
Table of Contents I. Introduction ............................................................................................................................. 3
A. Electronic Reporting and the e2 System: ......................................................................... 3 B. e2 System Goals and Benefits: ........................................................................................ 3 C. Overview of the e2 System: ............................................................................................. 3 D. Minimum System Requirements ...................................................................................... 4
II. Using the e2 System: .............................................................................................................. 5 A. e2 Website Login ............................................................................................................. 5 B. Creating and Submitting Reports ..................................................................................... 8
III. eDMR Instructions ............................................................................................................. 10 A. Step 1: Create a New Report: ......................................................................................... 10
B. Step 2: Edit an Open Report: C. Select Multiple Reports to Submit/Delete D. Copy and Paste from a MS Excel Spreadsheet E. XML File Upload IV. SSO Instructions…………………………………...……………………………………...23 V. Viewing and/or Revising Past Submissions .......................................................................... 23 A. Viewing Past Submissions ............................................................................................. 28 B. Making Report Revisions ............................................................................................... 31
ADEM e2 Project
Page 3 of 32
I. Introduction
A. Electronic Reporting and the e2 System: The e2 System is a Web and XML-based information system that allows wastewater facilities to electronically send Discharge Monitoring Reports (DMRs) and Sanitary Sewer Overflow (SSO) reports to ADEM. This system is designed to provide an alternative to submitting hand-written or paper-based Reports that is faster, more efficient, and less burdensome for both the regulated facilities and the Department. As a fully operational electronic reporting system, all of the necessary legal, security, and electronic signature functionalities have been included for this system to serve as a completely paperless reporting system.
B. E2 System Goals and Benefits: There are a number of beneficial goals that have been considered and which have guided the development of the e2 System. Among them are:
Support online availability of up-to-date DMR reporting requirements and
tracking status of submitted DMRs and SSO Reports. Improve the accuracy of compliance data by eliminating potential errors that
would otherwise be introduced through manual data entry. Improve the security of Report submissions from wastewater facilities. Reduce the wastewater discharge facility’s compliance costs by offering a
streamlined reporting method using readily available computer tools. Save ADEM administration and compliance costs by reducing, and eventually
better utilizing resources required for managing paper-based DMR and SSO reports.
Improve the overall effectiveness of wastewater discharge programs with faster responses for data analyses, compliance assessment, enforcement support, and decision-making.
C. Overview of the e2 System: The e2 System is a Web-based application accessible to the participating wastewater facilities via the Internet. The system will serve as an electronic file cabinet to manage reporting requirements provided by ADEM, and to receive / store reports submitted by wastewater facilities.
Wastewater facility access privileges are administrated through the use of a PIN, username, and password. All Report submissions are verified via PIN authentication with software security to ensure that the content of the data is original, truthful, legitimate, and unaltered. A complete chain-of-custody of all records will be maintained in the e2 server.

ADEM e2 Project
Page 4 of 32
The system makes available up-to-date reporting requirements from ADEM’s centralized data system, allowing wastewater facilities to submit original or revised Reports, and allows for reviewing previously submitted reports on-line.
Reports received at the Server are uploaded to the Data Exchange System for use ADEM to support compliance, permitting, and environmental planning programs.
D. Minimum System Requirements Wastewater facilities will need to have the ability to access the Department’s e2 System web site through the Internet. Typically, such access is available either through a dedicated connection through the wastewater facilities local area network or through a connection to an Internet Service Provider.
In addition to the Internet connection, the wastewater facility will need an Internet browser program. The e2 application is verified to work with Microsoft Internet Explorer Version 6.0 or greater, which can be downloaded for free from http://www.microsoft.com/downloads. Facilities may find that other Internet browsers may work but the Department cannot ensure that all of the features of the e2 web system will be available.
In summary, to use the e2 system, a facility participant will need:
A Computer/Laptop Internet Access Microsoft Internet Explorer, version 6.0 or greater
ADEM e2 Project
Page 5 of 32
II. Using the E2 System
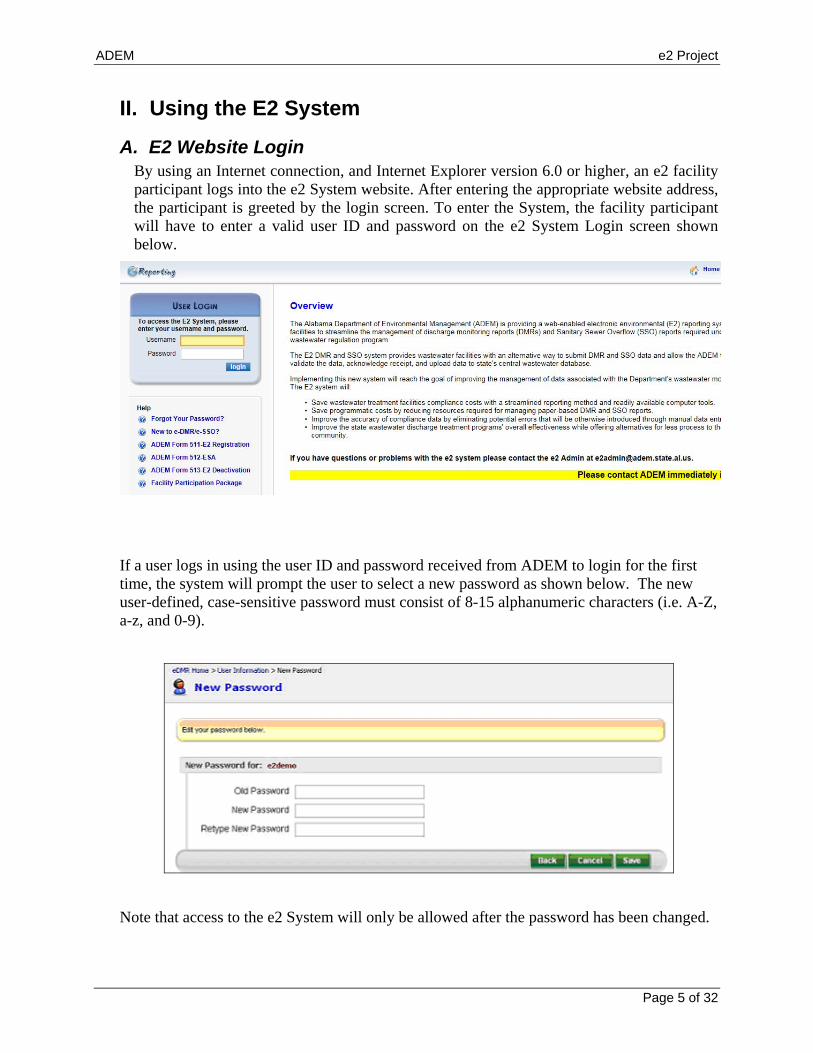
A. E2 Website Login By using an Internet connection, and Internet Explorer version 6.0 or higher, an e2 facility participant logs into the e2 System website. After entering the appropriate website address, the participant is greeted by the login screen. To enter the System, the facility participant will have to enter a valid user ID and password on the e2 System Login screen shown below.
If a user logs in using the user ID and password received from ADEM to login for the first time, the system will prompt the user to select a new password as shown below. The new user-defined, case-sensitive password must consist of 8-15 alphanumeric characters (i.e. A-Z, a-z, and 0-9).
Note that access to the e2 System will only be allowed after the password has been changed.
ADEM e2 Project
Page 6 of 32
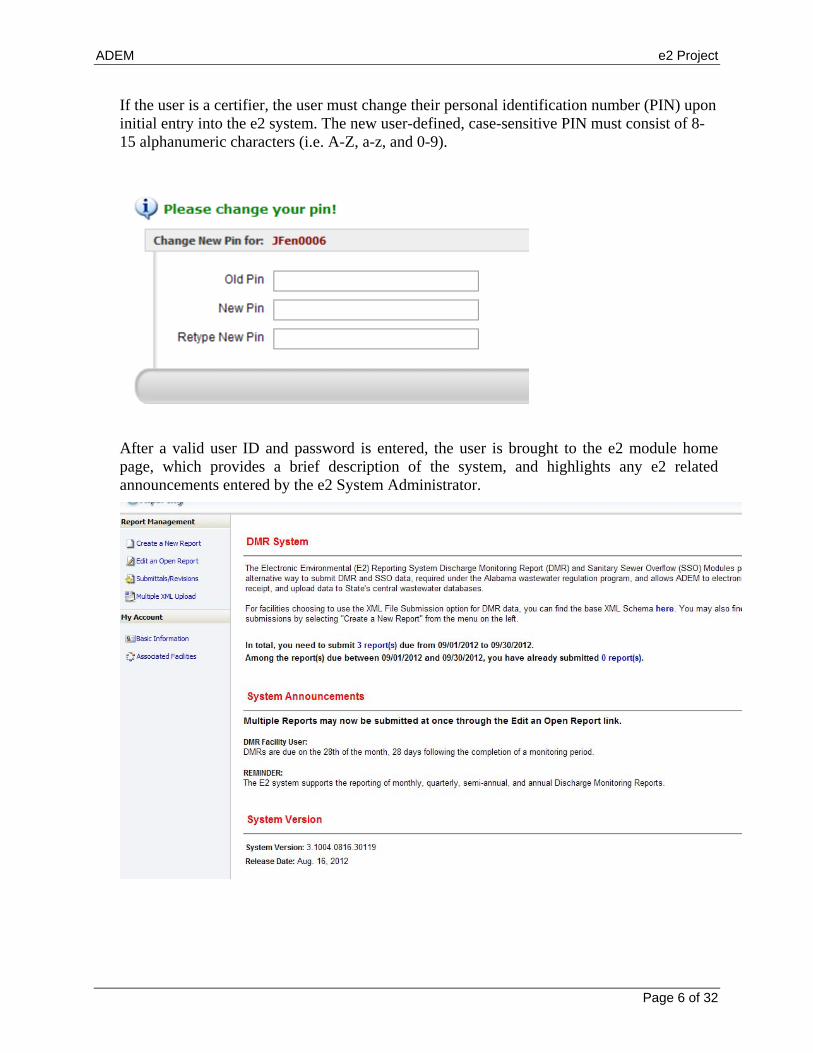
If the user is a certifier, the user must change their personal identification number (PIN) upon initial entry into the e2 system. The new user-defined, case-sensitive PIN must consist of 8-15 alphanumeric characters (i.e. A-Z, a-z, and 0-9).
After a valid user ID and password is entered, the user is brought to the e2 module home page, which provides a brief description of the system, and highlights any e2 related announcements entered by the e2 System Administrator.

ADEM e2 Project
Page 7 of 32
Before proceeding, we will be taking a closer look at the layout of the application as a whole, starting with the status bar.
The status bar is intended to provide quick access to user information, system help, and general system functions.
The Home icon allows the user to return to the e2 module home page, pictured above.
The user can access online help by clicking on this icon.
Once finished using the e2 System, the user may log out using this icon. The username of the current logged-in user is also displayed in parenthesis.
To continue on with the layout of the application, the function bar is located in the frame to the left of the main area of the screen. Each functional area is highlighted below.
Under Report Management are the following topics:
The Create a New Report icon leads to the heart of the e2 System. Up-to-date reporting requirements can be viewed, printed, and downloaded here. Also, web forms that look very similar to the paper e2 can be used to enter data. Much of this document will focus on this functional area.
By clicking on the Edit an Open Report icon, a user can make changes to or delete a report that is currently in progress of being edited, but has not yet been certified and submitted to ADEM.

ADEM e2 Project
Page 8 of 32
Reports that have been submitted to ADEM can be viewed and downloaded by clicking on Submittals/Revision. Submissions can be viewed and searched by submission ID, facility, permit, and date.
Under My Account are the following topics:
The user’s general account information can be seen by clicking on Basic Information. Email address and Password changes can be made in this section.
Facility Information functions, such as viewing the facilities that the user is associated with, the user’s role in reference to that facility, and additional reporting requirements for the facility, are available by clicking on this icon.
B. Creating and Submitting Reports The e2 System provides three primary methods to allow facilities to submit their Daily and Summary DMR reports. These methods are:
Online data entry (eDMR and eSSO): An online Report Wizard will guide the user through entering their DMR results online through a series of Web pages.
(This option is ideal for facilities that currently do not use a spreadsheet or database program to store or track their DMR results and can therefore use the e-DMR application to directly enter their DMR results.)
Copy and Paste Using Excel Template (eDMR only): The user can download a blank Excel file from the e-2 system that contains the parameters that the facility must report. The facility can then use this spreadsheet to enter in their DMR results while being disconnected from the Internet. Then, when the user is ready to submit to the Environmental State Agency, he or she can copy the data from the Excel file and paste this information into the Web form.
(This option is ideal for facilities that currently use a spreadsheet program such as Microsoft Excel to store or track their DMR results. Using the Copy and Paste approach allows the facility to avoid needing to “double enter” their DMR results.)
XML File Upload (eDMR only): The user can download a blank XML file from the e-2 system that contains the parameters that the facility must report. The facility can then use this blank XML template file to enter in their DMR results while being
ADEM e2 Project
Page 9 of 32
disconnected from the Internet. Then, when the user is ready to submit to the Environmental State Agency, he or she can upload the XML file including DMR results directly.
(This option is ideal for facilities that currently have a comprehensive system to track their DMR results and have the IT resources to create a converter that converts their DMR results into the electronic XML format required by the State. )

ADEM e2 Project
Page 10 of 32
III. eDMR Instructions
A. Step 1: Create a New Report
1) Click the Create a New Report link
2) Search for the
report you want to enter. If you need to enter data for a semi-annual report for the last half of the year, the report due To field would be 1/28/2016.
Click Search.

ADEM e2 Project
Page 11 of 32
3) Click On-line entry for the report for which you need to enter data.
4) If you want to hand enter the data select the Online Entry Form button. Then click Continue.
5) Enter data into the red rectangles. Click Save Change. When done entering data click the Next button. If you have more than one monitoring point, click on the drop down box to add data for the other monitoring points. If you have No Discharge, Click the ‘No Discharge’ check box.
ADEM e2 Project
Page 12 of 32
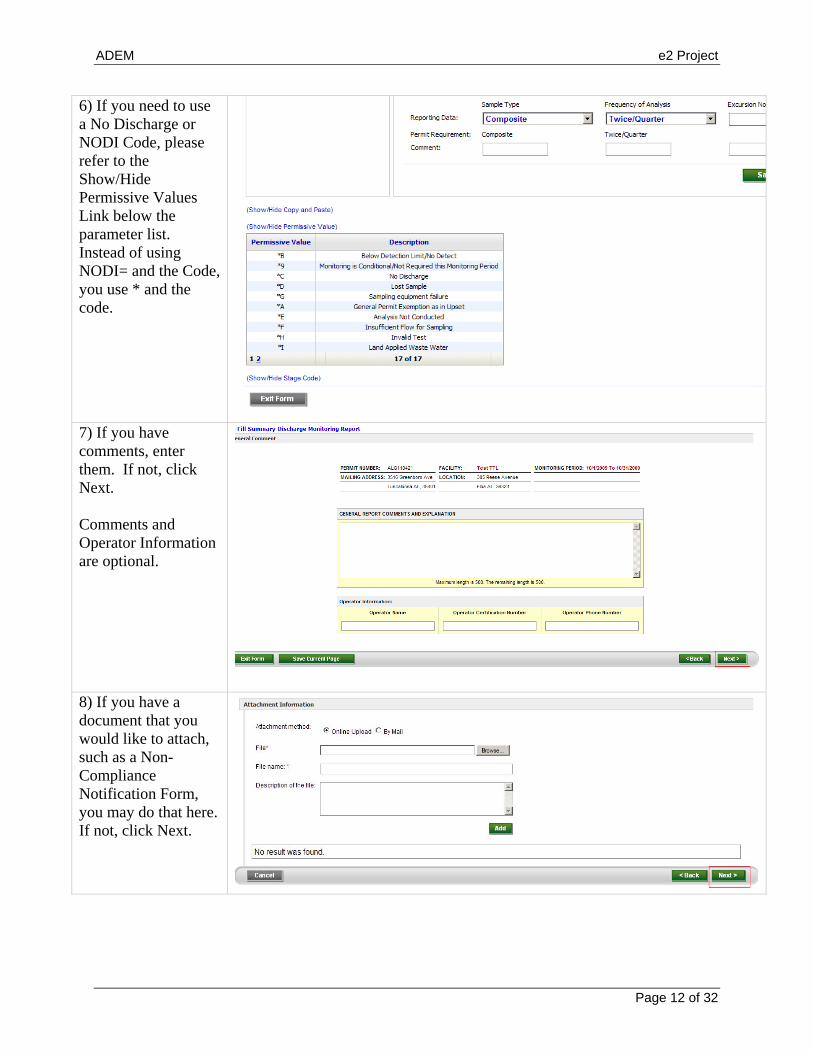
6) If you need to use a No Discharge or NODI Code, please refer to the Show/Hide Permissive Values Link below the parameter list. Instead of using NODI= and the Code, you use * and the code.
7) If you have comments, enter them. If not, click Next. Comments and Operator Information are optional.
8) If you have a document that you would like to attach, such as a Non-Compliance Notification Form, you may do that here. If not, click Next.
ADEM e2 Project
Page 13 of 32
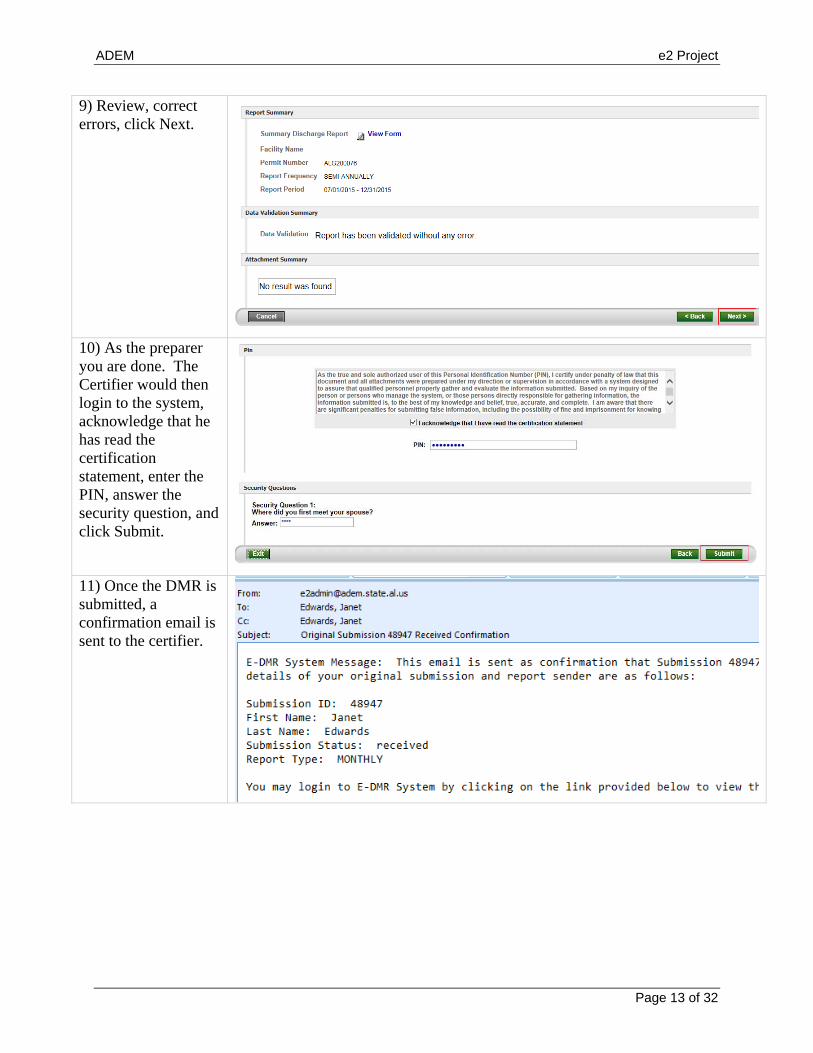
9) Review, correct errors, click Next.
10) As the preparer you are done. The Certifier would then login to the system, acknowledge that he has read the certification statement, enter the PIN, answer the security question, and click Submit.
11) Once the DMR is submitted, a confirmation email is sent to the certifier.

ADEM e2 Project
Page 14 of 32
B. Step 2: Edit an Open Report
1) If you have started a report and not submitted it, you may Edit it by clicking Edit an Open Report.
2) Choose the report you want to edit.

ADEM e2 Project
Page 15 of 32
3) Choose Edit Form. Click Continue.
4) Make the necessary changes. Click Next.
5) See step 7 through 10 above.

ADEM e2 Project
Page 16 of 32
C. Select Multiple Reports to Submit/Delete:
1)Select Edit an Open Report
2) Search for Reports.
3) If you want to submit all open reports Click the Select All box. If you want to select some but not all of the reports, click each individual report.

ADEM e2 Project
Page 17 of 32
4) Once you have reports selected, click Submit to submit the reports or Delete to delete any selected reports. 5) If submitting reports, repeat steps 7 through 10 above.

ADEM e2 Project
Page 18 of 32
D. Copy and Paste from MS Excel Spreadsheet
1) Create a New Report
2) Search for Report. Click the Excel link.
3) Save the MS Excel file to your computer.

ADEM e2 Project
Page 19 of 32
4) Open the File. Add your data. Do not change the data around. Only enter data in blank cells (no asterisks). Be sure to include the excursion number (number of times a limit is exceeded).
5) Once you have entered your data, select the data on the spreadsheet and right click. Select copy from the menu
6) Go back to e2 and search for the report you want to enter. Select On-Line Entry.
ADEM e2 Project
Page 20 of 32
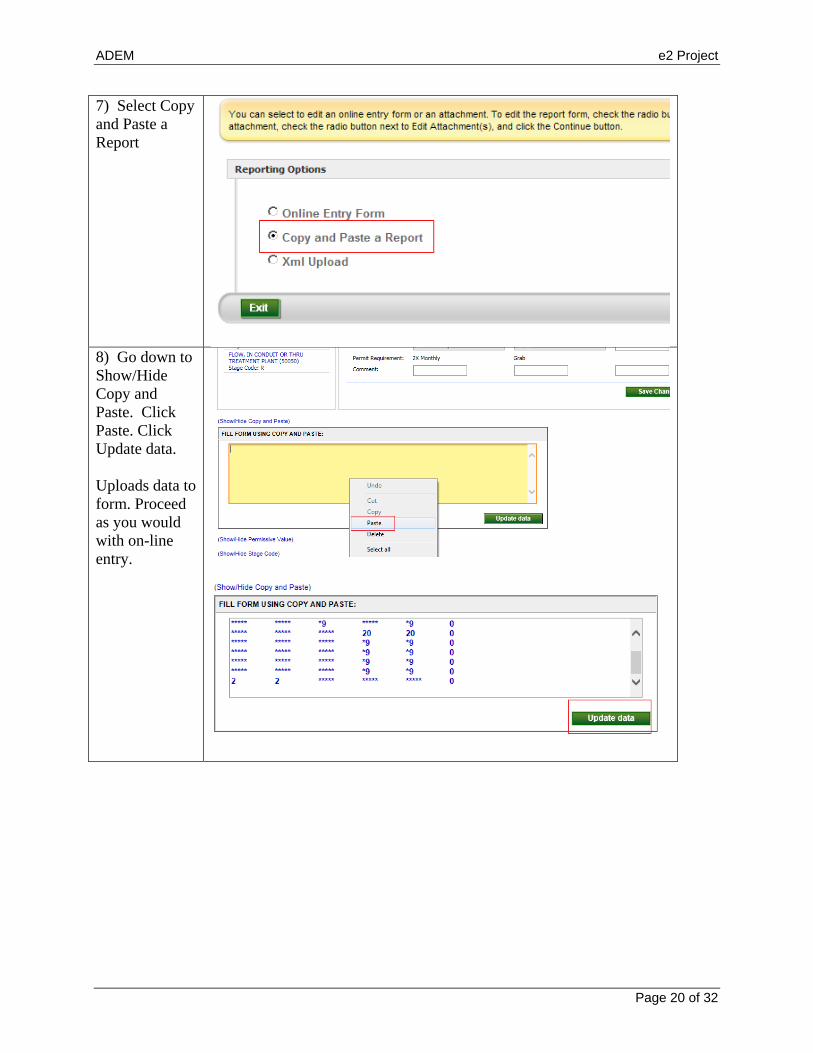
7) Select Copy and Paste a Report
8) Go down to Show/Hide Copy and Paste. Click Paste. Click Update data. Uploads data to form. Proceed as you would with on-line entry.

ADEM e2 Project
Page 21 of 32
E. XML File Upload 1) Search for Permit
2) Click the XML link 3) Save the file to your computer.
4) Open the file to view the structure. Notice that the file lists the outfalls and parameter codes.

ADEM e2 Project
Page 22 of 32
5) The specific information responding to each parameter is identified within the XML file.
6) Your IT person should be able to take this file structure and input your data from your database into the file.
7) Once you have saved your information in the XML file, you should return to eDMR to Online Entry.
8) Choose XML Upload from the Reporting Options Menu. Then click Continue.

ADEM e2 Project
Page 23 of 32
9) Browse to the location of your saved XML file. Click Upload. Continue as you would with on-line entry.
IV. Sanitary Sewer Overflow (SSO) Reporting
Create an SSO Report 1) Click the Create a
New Report link

ADEM e2 Project
Page 24 of 32
2) Change the Report Type to SSO Event Report. Select your facility and permit number. Enter the Date and Time SSO began to create a New Report.
3) Enter details about
the SSO event. An * indicates a required field.
4) When finished
enter SSO details, click Save Current Page then Next.
ADEM e2 Project
Page 25 of 32
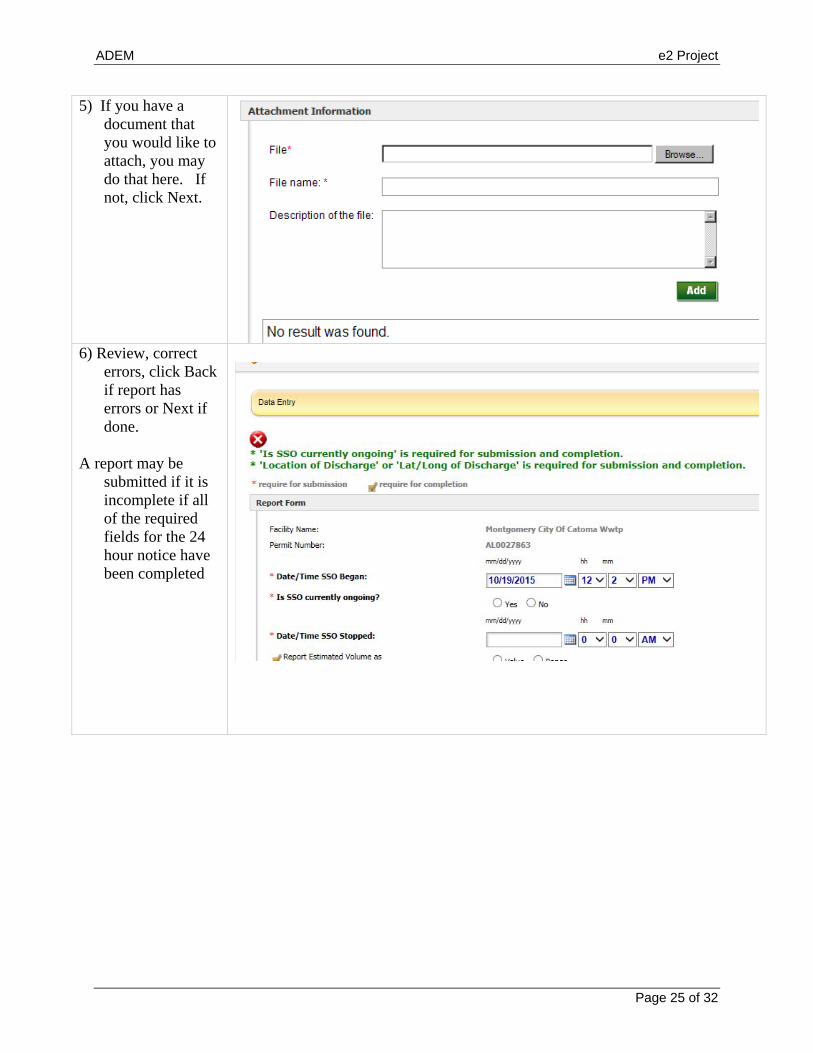
5) If you have a document that you would like to attach, you may do that here. If not, click Next.
6) Review, correct
errors, click Back if report has errors or Next if done.
A report may be
submitted if it is incomplete if all of the required fields for the 24 hour notice have been completed
ADEM e2 Project
Page 26 of 32
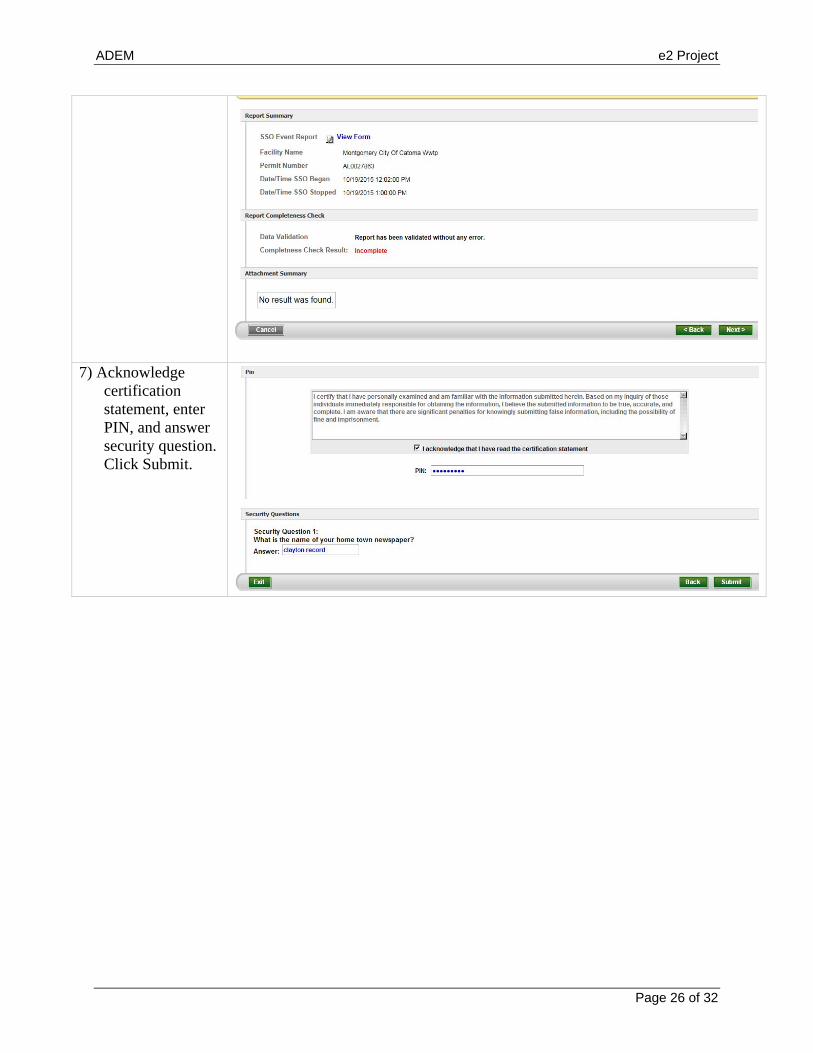
7) Acknowledge certification statement, enter PIN, and answer security question. Click Submit.

ADEM e2 Project
Page 27 of 32
8) Once the SSO Event Report is submitted an e2 receipt appears and you receive a confirmation email.
ADEM e2 Project
Page 28 of 32
V. Viewing and/or Revising Past Submissions
A. ViewingPastSubmissions
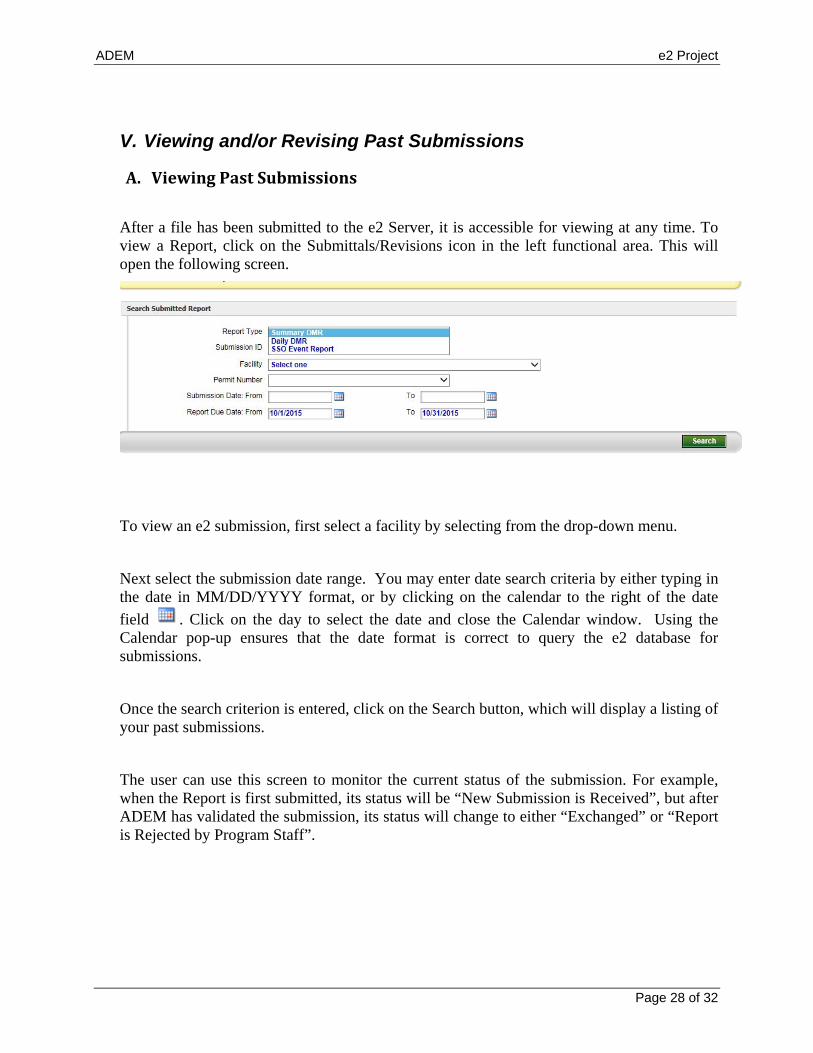
After a file has been submitted to the e2 Server, it is accessible for viewing at any time. To view a Report, click on the Submittals/Revisions icon in the left functional area. This will open the following screen.
To view an e2 submission, first select a facility by selecting from the drop-down menu.
Next select the submission date range. You may enter date search criteria by either typing in the date in MM/DD/YYYY format, or by clicking on the calendar to the right of the date
field . Click on the day to select the date and close the Calendar window. Using the Calendar pop-up ensures that the date format is correct to query the e2 database for submissions.
Once the search criterion is entered, click on the Search button, which will display a listing of your past submissions.
The user can use this screen to monitor the current status of the submission. For example, when the Report is first submitted, its status will be “New Submission is Received”, but after ADEM has validated the submission, its status will change to either “Exchanged” or “Report is Rejected by Program Staff”.
ADEM e2 Project
Page 29 of 32
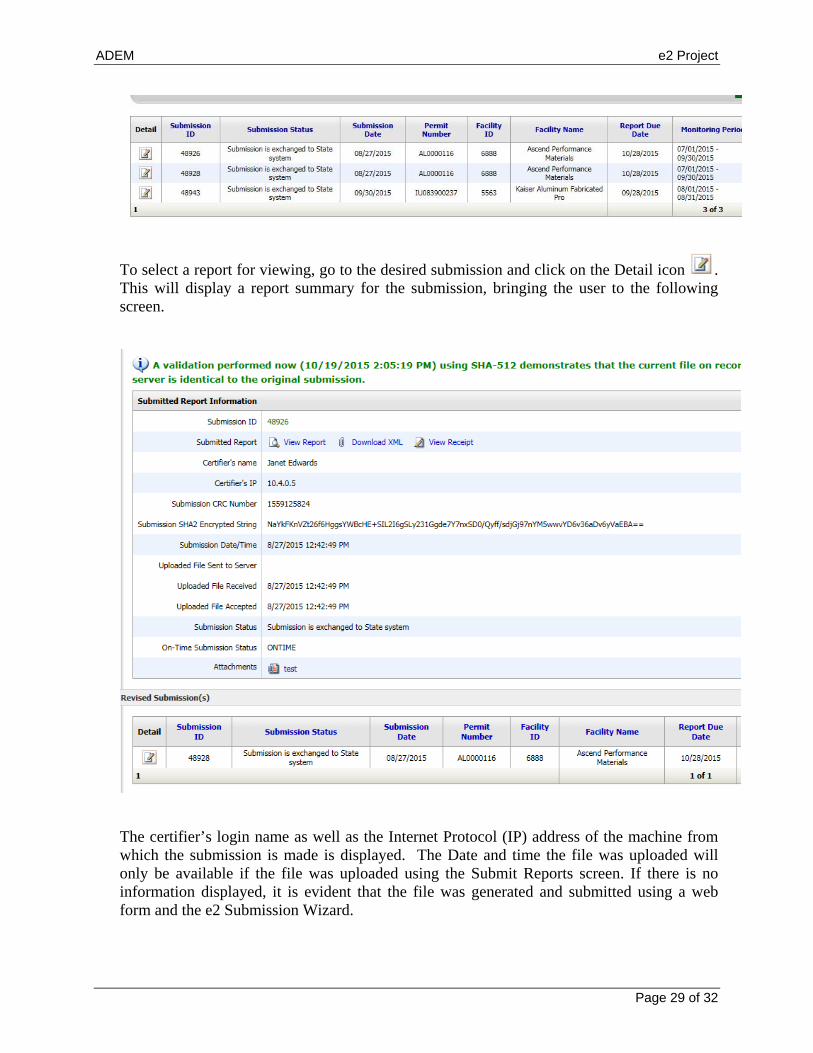
To select a report for viewing, go to the desired submission and click on the Detail icon . This will display a report summary for the submission, bringing the user to the following screen.
The certifier’s login name as well as the Internet Protocol (IP) address of the machine from which the submission is made is displayed. The Date and time the file was uploaded will only be available if the file was uploaded using the Submit Reports screen. If there is no information displayed, it is evident that the file was generated and submitted using a web form and the e2 Submission Wizard.

ADEM e2 Project
Page 30 of 32
This screen also displays the date that confirmation was sent. Also listed is the Submission Status of the submitted file. The last piece of information is the checksum validation. The checksum validation is a mathematical validation performed to make sure that the file on the server is the same as the one submitted. This prevents tampering with the files, and is another security feature of the e2 System.
CRC No, which stands for Cyclic Redundancy Check, is used to track the changes of the original document or XML file submitted to the e2 system. In the e2 System, once the user submits a report, the system will calculate the CRC number, and the user can use this to confirm that the submission file has not been altered by the system in any way.
You can view the submission by clicking on the View Report icon .
The Form displays the submitted DMR XML in a format that is very similar to a completed paper form. The form at this point is considered a completed discharge monitoring report, since the permit limits and parameters are listed with their corresponding actual measured values.
The readable format is accomplished by using a style sheet. This type of style sheet is used to display XML, the language adopted to communicate between environmental facilities and agencies because it is independent of platform. In order to understand any type of message, common definitions and rules must be adopted and enforced, which is where the XML Schema specific to discharge monitoring reporting, the e-DMR schema, comes into play.
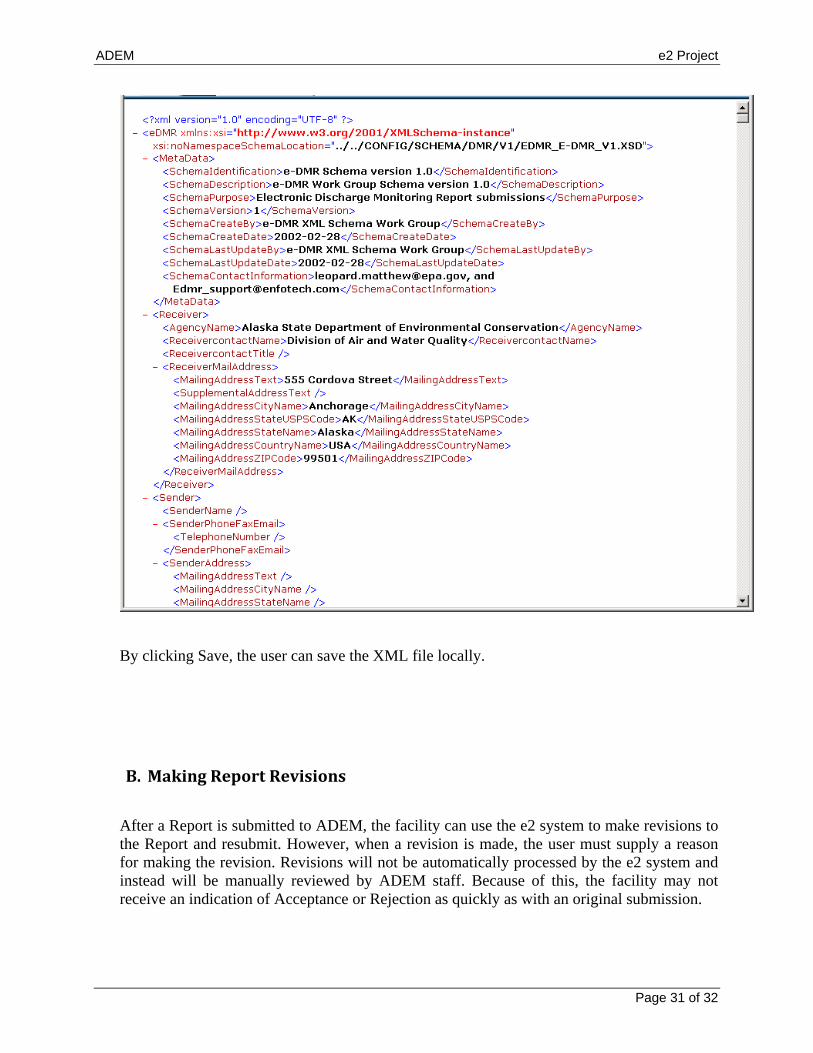
To view the XML report click on the Download XML icon . This report allows you to take a peek behind the scenes at the data being displayed.
ADEM e2 Project
Page 31 of 32
By clicking Save, the user can save the XML file locally.
B. MakingReportRevisions
After a Report is submitted to ADEM, the facility can use the e2 system to make revisions to the Report and resubmit. However, when a revision is made, the user must supply a reason for making the revision. Revisions will not be automatically processed by the e2 system and instead will be manually reviewed by ADEM staff. Because of this, the facility may not receive an indication of Acceptance or Rejection as quickly as with an original submission.
ADEM e2 Project
Page 32 of 32
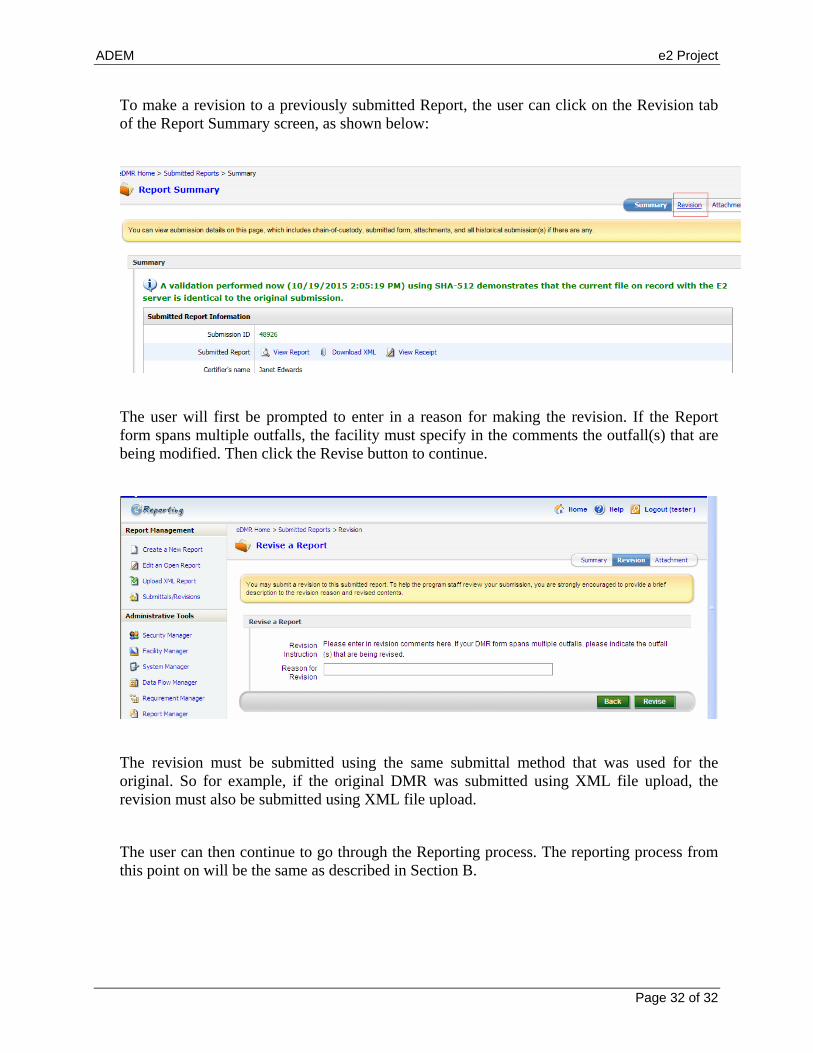
To make a revision to a previously submitted Report, the user can click on the Revision tab of the Report Summary screen, as shown below:
The user will first be prompted to enter in a reason for making the revision. If the Report form spans multiple outfalls, the facility must specify in the comments the outfall(s) that are being modified. Then click the Revise button to continue.
The revision must be submitted using the same submittal method that was used for the original. So for example, if the original DMR was submitted using XML file upload, the revision must also be submitted using XML file upload.
The user can then continue to go through the Reporting process. The reporting process from this point on will be the same as described in Section B.