e2 travel management service user guide · e2 travel management service user guide. release 1.0. e2...
TRANSCRIPT
United States Agency for International Development Bureau for Management
Office of Chief Information Officer
E2 Travel Management Service User Guide
Release 1.0
E2 User Guide
Revisions
Release Number Author Comment 1.0 Leslie Mansir
Page 2 of 170
E2 User Guide
Table of Contents 1. Introduction ................................................................................................................................................. 14
1.1 User Role .............................................................................................................................................. 14 1.2 Travel Arrangement Functions ............................................................................................................. 14
1.2.1 Trip-by-trip Travel Arrangement Functions ................................................................................. 14 1.2.2 Trip Support Functions ................................................................................................................. 15
2. Accessing E2 Solutions ............................................................................................................................... 16 3. Trip-by-Trip Authorization (E2 Solutions Traveler and Travel Arranger) ......................................... 18
3.1 Create a Travel Authorization ............................................................................................................... 18 4. Approval Process For A Trip-by-Trip Travel Authorization. ................................................................ 52
4.1 Approving the Travel Authorization ..................................................................................................... 52 4.1.1 Trip Type and Purpose Review. .................................................................................................... 54 4.1.2 Trip Locations and Dates and Cabin Class Review ...................................................................... 55 4.1.3 Estimated Lodging and Meal Expenses Review ........................................................................... 55 4.1.4 Estimated Transportation and Other Expenses Review ................................................................ 61 4.1.5 Edit Total Allocated to Accounting Codes (Committer Only) ...................................................... 62 4.1.6 Trip-by-Trip Approval or Return to Traveler ............................................................................... 74
5. Amendment of a Trip-by-Trip Travel Authorization ............................................................................. 80 5.1 Amending a Trip-by-Trip Travel Authorization (Traveler or Travel Arranger) ................................... 80 5.2 Approval of an Amended Travel Authorization (Approver) ................................................................ 85
5.2.1 Approval of an Amended Travel Authorization by Funds Committer (Approver) ....................... 85 6. Travel Advance ........................................................................................................................................... 88
6.1 Requesting a Travel Advance ............................................................................................................... 88 6.2 Approval of Travel Advance ................................................................................................................ 91
7. Trip-by-Trip Travel Voucher (Traveler/Travel Arranger) .................................................................... 96 7.1 Creating the Travel Voucher ................................................................................................................. 96
7.1.1 Lodging and Meals ....................................................................................................................... 96 7.1.2 Per Diem Meals and Incidental Expenses ................................................................................... 103 7.1.3 Official Days Off (Optional – Only for Official Days Off During Trip) .................................... 104 7.1.4 Shared Lodging (Only Required if Traveler Used Shared Lodging) .......................................... 105 7.1.5 Transportation and Other Expenses ............................................................................................ 106
7.2 Travel Voucher Approval (Approver) ................................................................................................ 119 7.2.1 Approving a Travel Voucher ...................................................................................................... 119 7.2.2 Reducing a Claimed Expense ..................................................................................................... 124
8. E2 Solutions User Account Creation ....................................................................................................... 130 8.1 E2 Solutions New User Access. .......................................................................................................... 130
9. E2 Solutions User Profile.......................................................................................................................... 134 9.1 Access Your E2 Solutions Profile. ...................................................................................................... 134 9.2 Default Home site ............................................................................................................................... 136 9.3 Address Information ........................................................................................................................... 138 9.4 Email Address Information ................................................................................................................. 139 9.5 Adding Travel Arrangers .................................................................................................................... 140 9.6 Credit Card Information ...................................................................................................................... 142 9.7 Travel Preferences .............................................................................................................................. 145 9.8 Flight Preferences ............................................................................................................................... 147
9.8.1 Hotel Preferences ........................................................................................................................ 148
Page 3 of 170

E2 User Guide
9.8.2 Rental Car Preferences ................................................................................................................ 149 9.8.3 Frequent Traveler Programs ........................................................................................................ 150 9.8.4 Passport and Travel Visas ........................................................................................................... 152 9.8.5 TMC Profile Complete ................................................................................................................ 153
9.9 Other Features ............................................................................................................................. 154 9.9.1 View Approval Routing .............................................................................................................. 154 9.9.2 Favorite Accounting Codes (Place Holder -To Be Determined) ............................................... 155 9.9.3 Edit Password Information .......................................................................................................... 161 9.9.4 Printable Profile .......................................................................................................................... 162
10. Open Authorizations ................................................................................................................................. 164 11. Appendix A. Travel Authorization (TA): ............................................................................................... 165 12. Appendix B Travel Voucher (TV) ........................................................................................................... 166 13. Appendix C Special Trip Types ............................................................................................................... 168 14. Appendix D Acceptable Remarks............................................................................................................ 169 15. Glossary ..................................................................................................................................................... 170
Page 4 of 170
E2 User Guide
Table of Figures Figure 1. E2 URL .................................................................................................................................................. 16 Figure 2. E2 Login Screen .................................................................................................................................... 16 Figure 3. User's Home Page ................................................................................................................................. 17 Figure 4. My Travel Link...................................................................................................................................... 18 Figure 5. Create Travel Authorization Link ......................................................................................................... 18 Figure 6. Loading in Progress Window ................................................................................................................ 19 Figure 7. Trip Planner Window ............................................................................................................................ 19 Figure 8. Select Travel Type - Drop-down Menu. ................................................................................................ 20 Figure 9. Specific Travel Purpose Window .......................................................................................................... 20 Figure 10. Site 1 - Begin Window ........................................................................................................................ 20 Figure 11. Departing Calendar Icon...................................................................................................................... 20 Figure 12. Departing Calendar Date ..................................................................................................................... 21 Figure 13. Select Departure Time ......................................................................................................................... 21 Figure 14. Departing Link..................................................................................................................................... 21 Figure 15. Site Search ........................................................................................................................................... 22 Figure 16. Airport Icon ......................................................................................................................................... 22 Figure 17. Select Country window ....................................................................................................................... 23 Figure 18. Air port Codes window ....................................................................................................................... 23 Figure 19. Calendar Icon....................................................................................................................................... 23 Figure 20. Going To link ...................................................................................................................................... 24 Figure 21. Site Search window ............................................................................................................................. 24 Figure 22. Custom Per Diem Rate window .......................................................................................................... 25 Figure 23. Standard US Rate Search windows ..................................................................................................... 25 Figure 24. Foreign Areas link ............................................................................................................................... 26 Figure 25. TDY Destination and Airport window ................................................................................................ 26 Figure 26. Mode of Transportation field. .............................................................................................................. 26 Figure 27. Reason for Stop ................................................................................................................................... 27 Figure 28. Travel Authorization Itinerary ............................................................................................................. 27 Figure 29. Departing Calendar Icon...................................................................................................................... 28 Figure 30. Calendar ............................................................................................................................................... 28 Figure 31. Departure Time Menu ......................................................................................................................... 28 Figure 32. Departing From and Airport window .................................................................................................. 28 Figure 33. Mode of Transportation ....................................................................................................................... 29 Figure 34. Trip Planner window ........................................................................................................................... 29 Figure 35. Create Trip Summary Authorization window ..................................................................................... 30 Figure 36. Trip Summary ...................................................................................................................................... 31 Figure 37. Save Reservation Details window ....................................................................................................... 32 Figure 38. Reservation Details .............................................................................................................................. 32 Figure 39. Send to Travel Agent window ............................................................................................................. 33 Figure 40. Trip Confirmation window .................................................................................................................. 33 Figure 41. Reservations Details ............................................................................................................................ 34 Figure 42. Retrieve Reservation window.............................................................................................................. 34 Figure 43. Confirmation Code .............................................................................................................................. 34 Figure 44. Reservation Details .............................................................................................................................. 35 Figure 45. Edit Lodging Estimation. ..................................................................................................................... 35
Page 5 of 170
E2 User Guide
Figure 46. Edit Lodging Expenses ........................................................................................................................ 36 Figure 47. Reimbursement Type. .......................................................................................................................... 36 Figure 48. Estimated Expenses window ............................................................................................................... 37 Figure 49. Daily Lodging Rate ............................................................................................................................. 37 Figure 50. Estimated Daily Expenses window ..................................................................................................... 38 Figure 51. Estimated Daily Expenses - Official Days Off .................................................................................... 39 Figure 52. Per Diem M & IE - Estimated Daily Expenses ................................................................................... 40 Figure 53. Per Diem Meal window ....................................................................................................................... 41 Figure 54. Transportation and Other Expenses ..................................................................................................... 42 Figure 55. Expenses window ............................................................................................................................... 42 Figure 56. Edit Expense link ................................................................................................................................. 43 Figure 57. Add Expense Amount window ........................................................................................................... 44 Figure 58. Add Expense window ......................................................................................................................... 45 Figure 59. Expenses Pending window .................................................................................................................. 45 Figure 60. Expense drop-down menu ................................................................................................................... 46 Figure 61. Save Added Expenses window ............................................................................................................ 47 Figure 62. Expense Authorization Summary ........................................................................................................ 48 Figure 63. Expenses, Funding, and Travel Advances ........................................................................................... 48 Figure 64. Add Remarks ....................................................................................................................................... 48 Figure 65. Close Remarks field............................................................................................................................. 49 Figure 66. Field Display Remarks ........................................................................................................................ 49 Figure 67. Send to Approver ................................................................................................................................. 49 Figure 68. Confirmation window .......................................................................................................................... 50 Figure 69. Authorization Summary ....................................................................................................................... 50 Figure 70. Save Trip as Template ......................................................................................................................... 50 Figure 71. My Approvals link ............................................................................................................................... 52 Figure 72. Trip ID ................................................................................................................................................. 53 Figure 73. Review Travel Authorization window ................................................................................................ 53 Figure 74. Approve Travel Authorization ............................................................................................................ 54 Figure 75. Trip Locations and Cabin Class Review ............................................................................................. 55 Figure 76. Edit Estimated Lodging and Meals Expenses ..................................................................................... 55 Figure 77. Estimated Daily Expenses .................................................................................................................. 56 Figure 78. Traveler's Daily Expenses ................................................................................................................... 57 Figure 79. Shared Lodging.................................................................................................................................... 58 Figure 80.Official Days Off .................................................................................................................................. 59 Figure 81. Authorization Summary ....................................................................................................................... 60 Figure 82. Review Estimated Transportation and Other Expenses ....................................................................... 61 Figure 83. Lodging and Meals Authorization Summary ....................................................................................... 62 Figure 84. Edit Total Allocated to Accounting Codes link ................................................................................... 62 Figure 85. Add and Save Accounting Codes ........................................................................................................ 64 Figure 86. Save Selected Accounts and Continue ................................................................................................ 64 Figure 87. Add Another Account Code ................................................................................................................ 65 Figure 88. Add and Save New Accounting Code ................................................................................................. 66 Figure 89. Percent to Allocate............................................................................................................................... 67 Figure 90. Remaining Amount to be Allocated .................................................................................................... 67 Figure 91. Zero Remaining Amount ..................................................................................................................... 68
Page 6 of 170
E2 User Guide
Figure 92. Save and Continue ............................................................................................................................... 68 Figure 93. Split Funds ........................................................................................................................................... 69 Figure 94. Split Finds Detail - Account Code. ...................................................................................................... 70 Figure 95. Split-Funding Details - Continue. ........................................................................................................ 71 Figure 96. Save and Continue ............................................................................................................................... 71 Figure 97. Slit Funds link. .................................................................................................................................... 72 Figure 98. Split-Funding Detail ............................................................................................................................ 72 Figure 99. Split-Funding Accounting Coses ......................................................................................................... 73 Figure 100. Continue Split-Funding Accounting Codes ....................................................................................... 73 Figure 101. Save Split-Funding Accounting Codes and Continue ....................................................................... 74 Figure 102. Approve Split-Funding ...................................................................................................................... 74 Figure 103. Add Remarks to Split-Funding .......................................................................................................... 75 Figure 104. Optional Remarks .............................................................................................................................. 75 Figure 105. Add Remarks Confirmation ............................................................................................................... 76 Figure 106. Pending Approved ............................................................................................................................. 76 Figure 107. Return to Travel - Add Remarks link ................................................................................................ 77 Figure 108. Return to Traveler link ...................................................................................................................... 78 Figure 109. Optional Remarks .............................................................................................................................. 78 Figure 110. Remarks Added Successfully ............................................................................................................ 78 Figure 111. Confirm Return to Traveler ............................................................................................................... 79 Figure 112. My Travel Link. ................................................................................................................................. 80 Figure 113. Amend A Trip link ............................................................................................................................ 80 Figure 114. Select Trip ID .................................................................................................................................... 81 Figure 115. Proceed Amending Trip Confirmation .............................................................................................. 81 Figure 116. Appended Trip ID. ............................................................................................................................. 81 Figure 117. Edit Estimated Transportation and Other Expenses ........................................................................... 82 Figure 118. Add Expense ...................................................................................................................................... 82 Figure 119. Enter and Save Pending Expenses ..................................................................................................... 83 Figure 120. Lodging and Meals Authorization Summary .................................................................................... 83 Figure 121. Save Reservation Details ................................................................................................................... 84 Figure 122. Send Reservation Details to Approver ............................................................................................... 84 Figure 123. Reservations Confirmation ................................................................................................................ 84 Figure 124. Approver Submittal Successful ......................................................................................................... 84 Figure 125. My Approvals Link ........................................................................................................................... 85 Figure 126. Pending Approval .............................................................................................................................. 85 Figure 127. Total Allocated to Accounting Codes ............................................................................................... 85 Figure 128. Edit Total Allocated to Accounting Codes ........................................................................................ 86 Figure 129. Verify, Save and Continue Amount to be Allocated ........................................................................ 86 Figure 130. Edit Total Allocated to Accounting Codes ........................................................................................ 87 Figure 131. Select MyTravel ................................................................................................................................ 88 Figure 132. Select Travel Advances ..................................................................................................................... 88 Figure 133. Select and Create Travel Advance ..................................................................................................... 88 Figure 134. Send Travel Advance to Approver .................................................................................................... 89 Figure 135. Travel Advance Status ....................................................................................................................... 89 Figure 136. Pending Travel Advances .................................................................................................................. 90 Figure 137. Select My Approvals ......................................................................................................................... 91
Page 7 of 170
E2 User Guide
Figure 138. Select Advance ID ............................................................................................................................. 91 Figure 139. Enter Accounting Code Details ......................................................................................................... 92 Figure 140. Total Allocate to Accounting Codes ................................................................................................. 93 Figure 141. Account Code Created - Save and Continue ...................................................................................... 94 Figure 142. Approve Travel Advance Detail ........................................................................................................ 95 Figure 143. Travel Advance Pending Approval ................................................................................................... 95 Figure 144. Select Trip ID .................................................................................................................................... 96 Figure 145. Lodging and Meals link ..................................................................................................................... 97 Figure 146. Verify Lodging and Meals. ................................................................................................................ 98 Figure 147. Save Lodging Amounts ..................................................................................................................... 99 Figure 148. Update Successful ........................................................................................................................... 100 Figure 149. Receipt and Trip Date Details.......................................................................................................... 101 Figure 150. Daily Expenses Saved ..................................................................................................................... 102 Figure 151. Select Meals and Save ..................................................................................................................... 103 Figure 152. Select and Save Official Days Off ................................................................................................... 104 Figure 153. Transportation and Other link.......................................................................................................... 106 Figure 154. Expanded Transportation and Other field ........................................................................................ 107 Figure 155. Enter Actual *LCU Amount ............................................................................................................ 108 Figure 156. Save *LCU Amount ........................................................................................................................ 109 Figure 157. Review Cost Variance ..................................................................................................................... 110 Figure 158. Voucher Totals ................................................................................................................................ 111 Figure 159. Select Continue ................................................................................................................................ 112 Figure 160. Send To Approver Details ............................................................................................................... 113 Figure 161. Select Final or Not Final Voucher ................................................................................................... 114 Figure 162. Amount to Allocate ......................................................................................................................... 115 Figure 163. View/Edit Advances and Liquidation .............................................................................................. 115 Figure 164. Verify and Save Travel Amount to Advance .................................................................................. 116 Figure 165. Save Successful ............................................................................................................................... 117 Figure 166. Accept and Send to Approver. ......................................................................................................... 117 Figure 167.Outside Advances Verification......................................................................................................... 118 Figure 168. Voucher Sent to Approver Message ................................................................................................ 118 Figure 169. My Approvals Link ......................................................................................................................... 119 Figure 170. Select Vouchers Link ...................................................................................................................... 119 Figure 171. Select Trip........................................................................................................................................ 119 Figure 172. Cost Variance .................................................................................................................................. 120 Figure 173. Voucher Link ................................................................................................................................... 121 Figure 174. Review Claimed Expenses .............................................................................................................. 122 Figure 175. Daily Expense Summary - Date link and Date Column .................................................................. 123 Figure 176. Daily Expense Summary ................................................................................................................. 123 Figure 177. Expense to be Reduced .................................................................................................................... 124 Figure 178. Enter Summary and Submit ............................................................................................................. 125 Figure 179. Select Voucher link ......................................................................................................................... 125 Figure 180. Enter Total to Accounting Codes link ............................................................................................. 126 Figure 181. FM Approval ................................................................................................................................... 127 Figure 182. Add Remarks ................................................................................................................................... 128 Figure 183. Add Optional Remarks .................................................................................................................... 128
Page 8 of 170
E2 User Guide
Figure 184. Close Optional Remarks .................................................................................................................. 129 Figure 185. Confirm. ........................................................................................................................................... 129 Figure 186. Successful Approval ........................................................................................................................ 129 Figure 187 New User Access .............................................................................................................................. 130 Figure 188 Initialize Security Information ......................................................................................................... 130 Figure 189 Edit Password Information ............................................................................................................... 131 Figure 190 Rules of Behavior ............................................................................................................................. 131 Figure 191 Home Page ........................................................................................................................................ 132 Figure 192 My Profile Link ................................................................................................................................ 134 Figure 193 User Profile ....................................................................................................................................... 135 Figure 194 Default Home Site ............................................................................................................................ 136 Figure 195 Edit Default Home Page ................................................................................................................... 136 Figure 196 Default Homesite .............................................................................................................................. 137 Figure 197 Edit Default Home site ..................................................................................................................... 137 Figure 198 Return to User Profile ....................................................................................................................... 137 Figure 199 Edit Address Information Link ......................................................................................................... 138 Figure 200 Edit Address Information Screen ...................................................................................................... 138 Figure 201 Address Information ......................................................................................................................... 138 Figure 202 Edit Email Information Field Link ................................................................................................... 139 Figure 203 Edit Email Screen ............................................................................................................................. 139 Figure 204 Travel Arranger - Edit Arrangers link .............................................................................................. 140 Figure 205 Travel Arranger - Search Screen ...................................................................................................... 140 Figure 206 Travel Arranger - Delete Travel Arranger ........................................................................................ 141 Figure 207 Credit Card Information Link ........................................................................................................... 142 Figure 208. Edit Credit Card Information Link .................................................................................................. 143 Figure 209 Edit Credit Card Information Window ............................................................................................. 143 Figure 210 Successful Credit Card Save ............................................................................................................ 144 Figure 211 Edit Travel Preferences Link ............................................................................................................ 145 Figure 212. OBE Account Screen ....................................................................................................................... 146 Figure 213 Flight Preferences Window .............................................................................................................. 147 Figure 214 Save Flight Preferences .................................................................................................................... 147 Figure 215 Hotel Preferences Window ............................................................................................................... 148 Figure 216 Rental Car Preferences Link ............................................................................................................. 149 Figure 217 Rental Car Preference Window ........................................................................................................ 149 Figure 218 Frequent Traveler Program Link ...................................................................................................... 150 Figure 219. Add Frequent Traveler Program ...................................................................................................... 150 Figure 220 Save Frequent Flier Information ....................................................................................................... 151 Figure 221 Add Travel Document Window ........................................................................................................ 152 Figure 222 Save Travel Document ..................................................................................................................... 152 Figure 223 Account Window .............................................................................................................................. 153 Figure 224 Select View Approval Routing ......................................................................................................... 154 Figure 225 View Rules Link ............................................................................................................................... 154 Figure 226 Back Button ..................................................................................................................................... 155 Figure 227 Edit Favorite Accounting Code ........................................................................................................ 155 Figure 228. Accounting Code Search Window .................................................................................................. 156 Figure 229. Continue Search. .............................................................................................................................. 156
Page 9 of 170
E2 User Guide
Figure 230 Refine Search Code .......................................................................................................................... 157 Figure 231. Display Available Accounting Codes Window ............................................................................... 158 Figure 232. Select Accounting Code .................................................................................................................. 159 Figure 233. Close Accounting Codes Search ..................................................................................................... 160 Figure 234. Return to User Profile ...................................................................................................................... 160 Figure 235. Edit Password Information ............................................................................................................. 161 Figure 236. Continue Edit Password .................................................................................................................. 161 Figure 237. Save Password ................................................................................................................................. 162 Figure 238. Credentials Updated Successfully Window ..................................................................................... 162 Figure 239. Print User Profile ............................................................................................................................. 162 Figure 240. Completed User Profile .................................................................................................................. 163 Figure 241 Select Currency Code ....................................................................................................................... 165 Figure 242. Travel Authorization Foreign Currency Format .............................................................................. 165 Figure 243. Expenses Pending Add .................................................................................................................... 166 Figure 244. Local Currency Disbursement ........................................................................................................ 166 Figure 245. Travel Voucher Foreign Currency Format ...................................................................................... 167
Page 10 of 170

E2 User Guide
This page intentionally left blank
Page 11 of 170
E2 User Guide
Using This Guide This guide provides all the instructions necessary to create, modify, delete, route, and print a travel document using E2 Solutions Travel Management tool. It is intended to support training as well as serve as a reference for post-training use. The focus of this guide is the primary travel users - the Travel Arranger and the Travel Approver. Support and administrative functions, such as Auditors, Card Coordinators, and System Administrators, will be covered in other documentation.
After the Introduction, the guide is arranged by E2 Solution's most common uses, such as creating a travel request, down to one time events such as adding a new user to the E2 Solutions system.
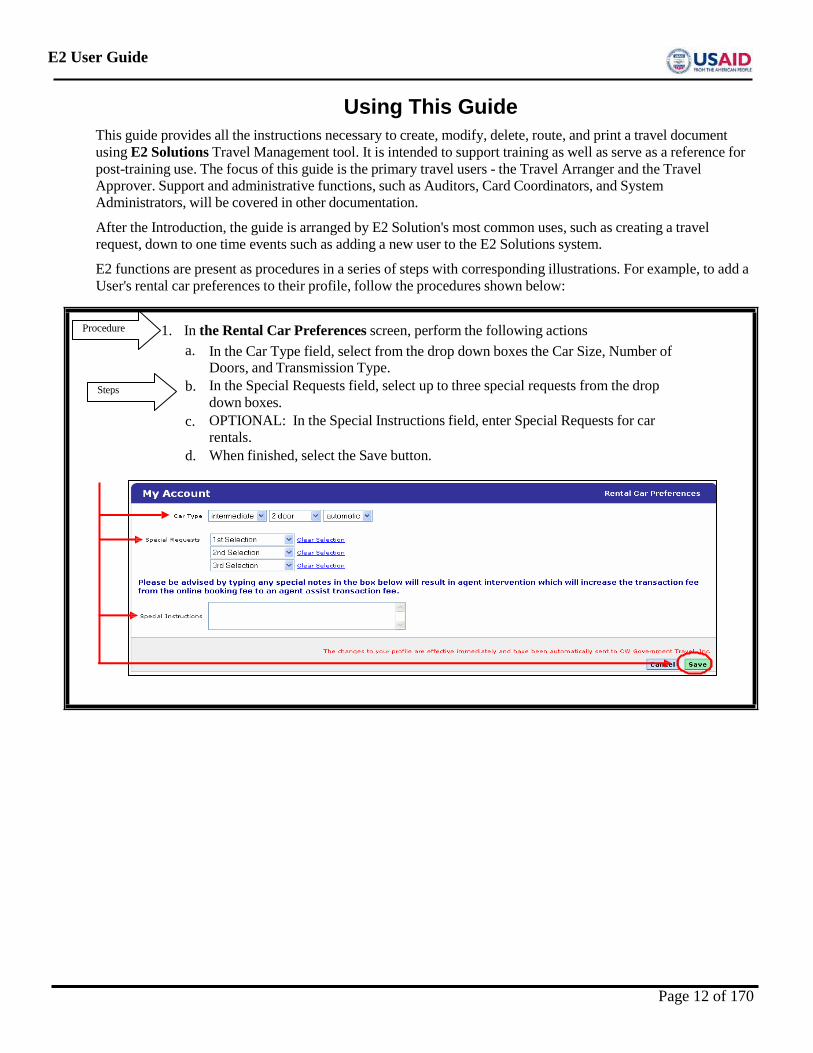
E2 functions are present as procedures in a series of steps with corresponding illustrations. For example, to add a User's rental car preferences to their profile, follow the procedures shown below:
Procedure 1. In the Rental Car Preferences screen, perform the following actions a.
Steps b.
c. d.
In the Car Type field, select from the drop down boxes the Car Size, Number of Doors, and Transmission Type. In the Special Requests field, select up to three special requests from the drop down boxes. OPTIONAL: In the Special Instructions field, enter Special Requests for car rentals. When finished, select the Save button.
Page 12 of 170

E2 User Guide
This Page intentionally left blank
Page 13 of 170
E2 User Guide
1. Introduction E2 Solutions is a web-based travel management solution that provides end-to-end travel management services to Federal Agencies such as USAID. The E2 Solutions application is capable of travel planning and cost estimating; travel authorization creation; online booking of reservations; the filing, processing, and approval of travel documents, vouchering of travel, and travel and system reports.
1.1 User Role Within E2 Solutions, there are five user roles. E2 Solutions provide each system user with access to features and functions appropriate to a specific user role. The E2 Solutions roles are as follows:
• Traveler and Travel Arranger - As a traveler, you can create, modify, delete, route, and print a travel document for yourself and for any other travelers who have given you permission to arrange their travel. NOTE: Any E2 Solutions user, regardless of user type, can perform traveler or travel arranger functions.
• Approver – As an approver, you can approve, revise, route, and print a travel document. • Auditor – As an auditor, you can approve, revise, and route a travel voucher. • Card Coordinator – As a program coordinator, you can define the status of E2 Solutions users’ charge
cards. You can also view an E2 Solutions users’ card history and restrict charge card usage. • System Administrator – As a customer system administrator, you can modify a wide variety of settings at
the system level that are applied to E2 Solutions users. Any other E2 Solutions user role can be assigned customer system administrator privileges at various levels within the E2 Solutions hierarchy.
Within USAID, E2 Solutions users will either be defined as a traveler or an approver. Some USAID users will have system administrator privileges. Once a user's role has been defined, the functions available to that user become available in the E2 system.
1.2 Travel Arrangement Functions The most common use of E2 will be to create and administer travel arrangements and its documentation by individual users. Examples of travel arrangement functions are the initial creation of a trip for, or by a user. Once the trip is created, the trip originator can route the trip request to the Approver, or any other official that is required to review, verify, and approve the trip. At any point in the trip request process, the Traveler or the Approver can edit the travel plan. Finally, E2 can print the appropriate trip documentation.
1.2.1 Trip-by-trip Travel Arrangement Functions The task available to the Traveler and Travel Arranger in the creation and management of travel arrangements and its corresponding travel documentation are:
• Create - initial travel arrangements and corresponding set of travel documentation and vouchers. • Modify - make changes to existing travel arrangements and documentation. • Route - transmit existing travel documentation to approval and review sources. • Print - print any or all travel documents and vouchers. • Delete - remove any or all travel documents from a selected travel arrangement document.
Page 14 of 170
E2 User Guide
1.2.2 Trip Support Functions These are functions that are not performed by users or Approvers in the direct creation and maintenance of trips. The correspond directly to their user roles. While any E2 User can also be given one or more of these functions/roles, most users will be limited to the role of Traveler or Travel Arranger.
• Credit card maintenance - view, define, and restrict charge card usage • Auditing - approve, revise, and route a travel vouchers • System administration - adds update, and change E2 users; administer passwords and security; perform E2
maintenance.
Page 15 of 170
E2 User Guide
2. Accessing E2 Solutions
2 2 The purpose of this section is to provide the steps necessary to access EP P Solutions. All users of EP P Solutions access the application in the same manner.
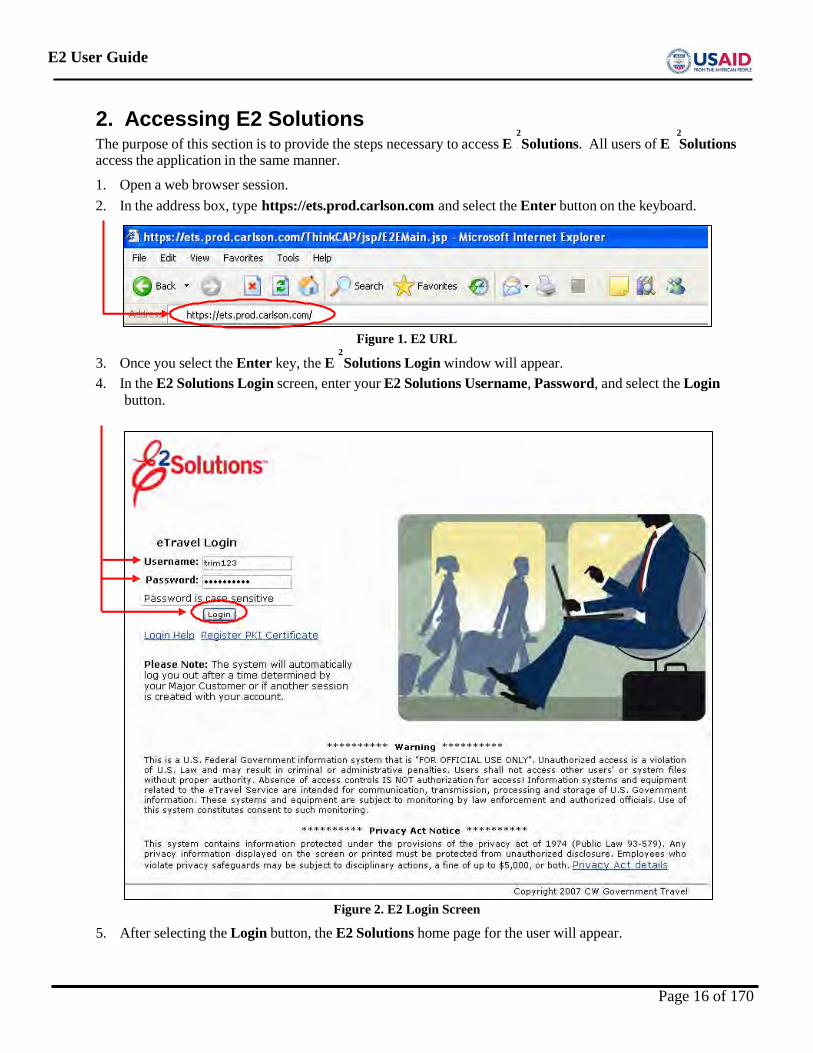
1. Open a web browser session. 2. In the address box, type Uhttps://ets.prod.carlson.comU and select the Enter button on the keyboard.
Figure 1. E2 URL
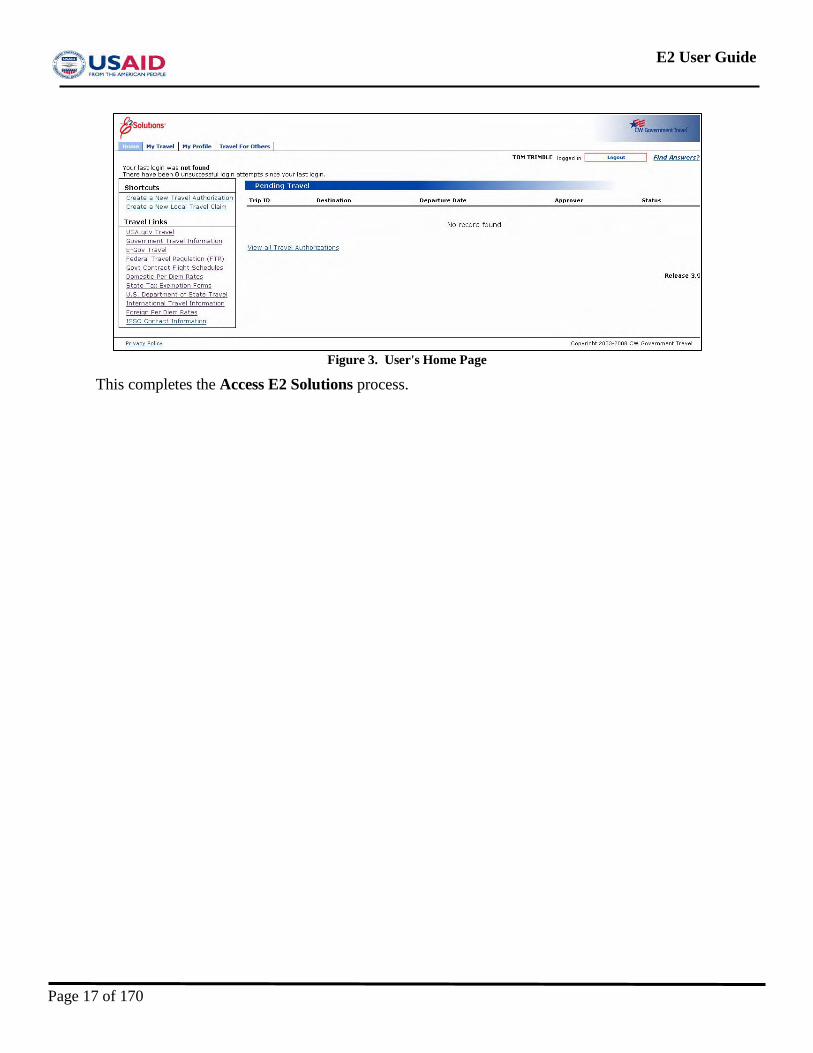
2 3. Once you select the Enter key, the EP P Solutions Login window will appear. 4. In the E2 Solutions Login screen, enter your E2 Solutions Username, Password, and select the Login
button.
Figure 2. E2 Login Screen
5. After selecting the Login button, the E2 Solutions home page for the user will appear.
Page 16 of 170
E2 User Guide
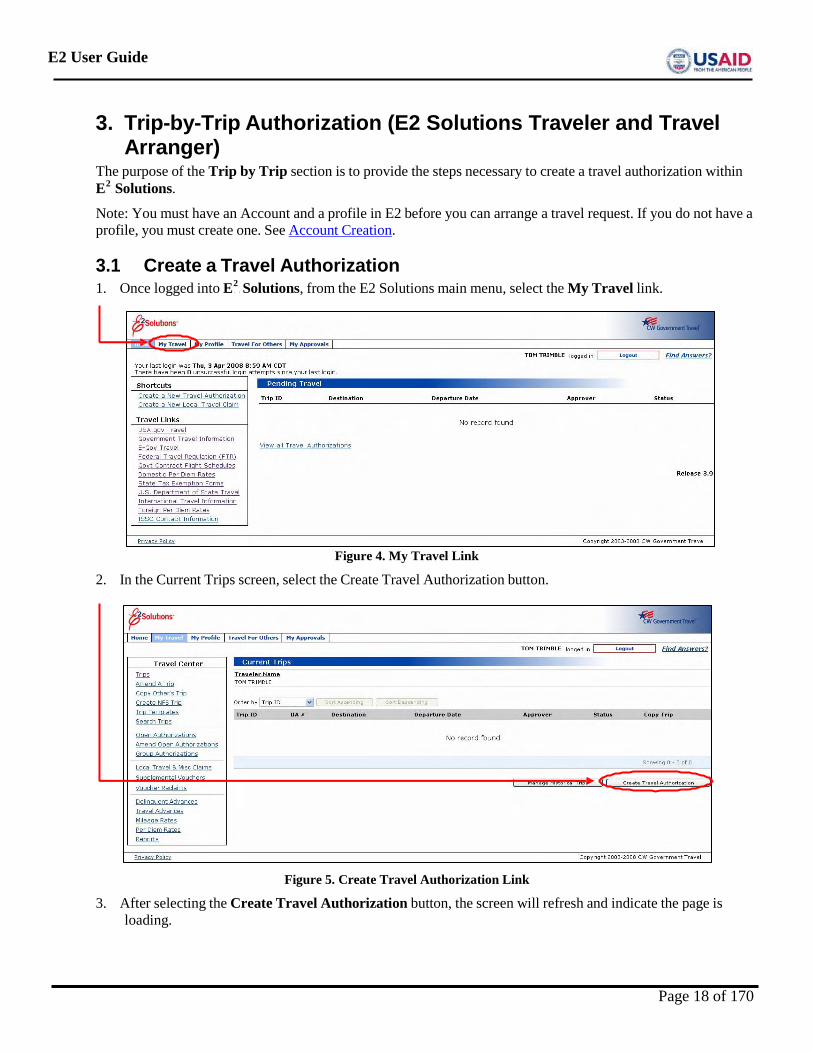
Figure 3. User's Home Page
This completes the Access E2 Solutions process.
Page 17 of 170
E2 User Guide
P P
P P
3. Trip-by-Trip Authorization (E2 Solutions Traveler and Travel Arranger)
The purpose of the Trip by Trip section is to provide the steps necessary to create a travel authorization within E2 Solutions.
Note: You must have an Account and a profile in E2 before you can arrange a travel request. If you do not have a profile, you must create one. See Account Creation.
3.1 Create a Travel Authorization 1. Once logged into E2 Solutions, from the E2 Solutions main menu, select the My Travel link.
Figure 4. My Travel Link
2. In the Current Trips screen, select the Create Travel Authorization button.
Figure 5. Create Travel Authorization Link
3. After selecting the Create Travel Authorization button, the screen will refresh and indicate the page is loading.
Page 18 of 170
E2 User Guide
Figure 6. Loading in Progress Window
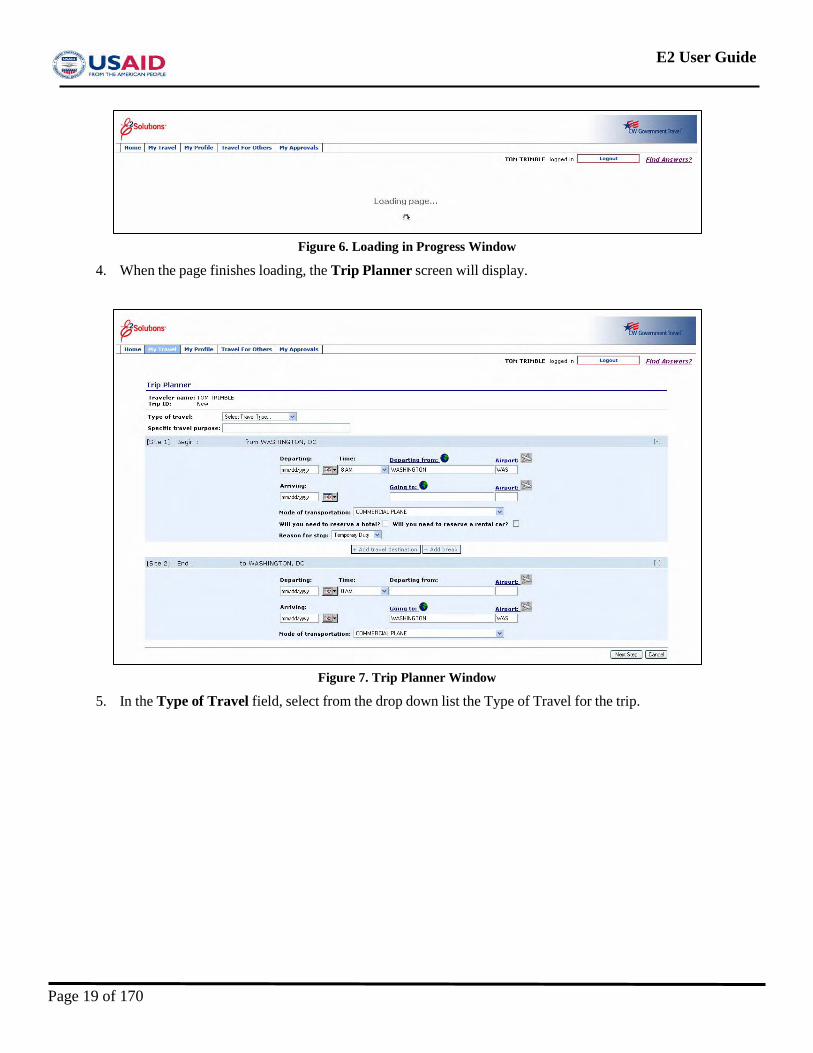
4. When the page finishes loading, the Trip Planner screen will display.
Figure 7. Trip Planner Window
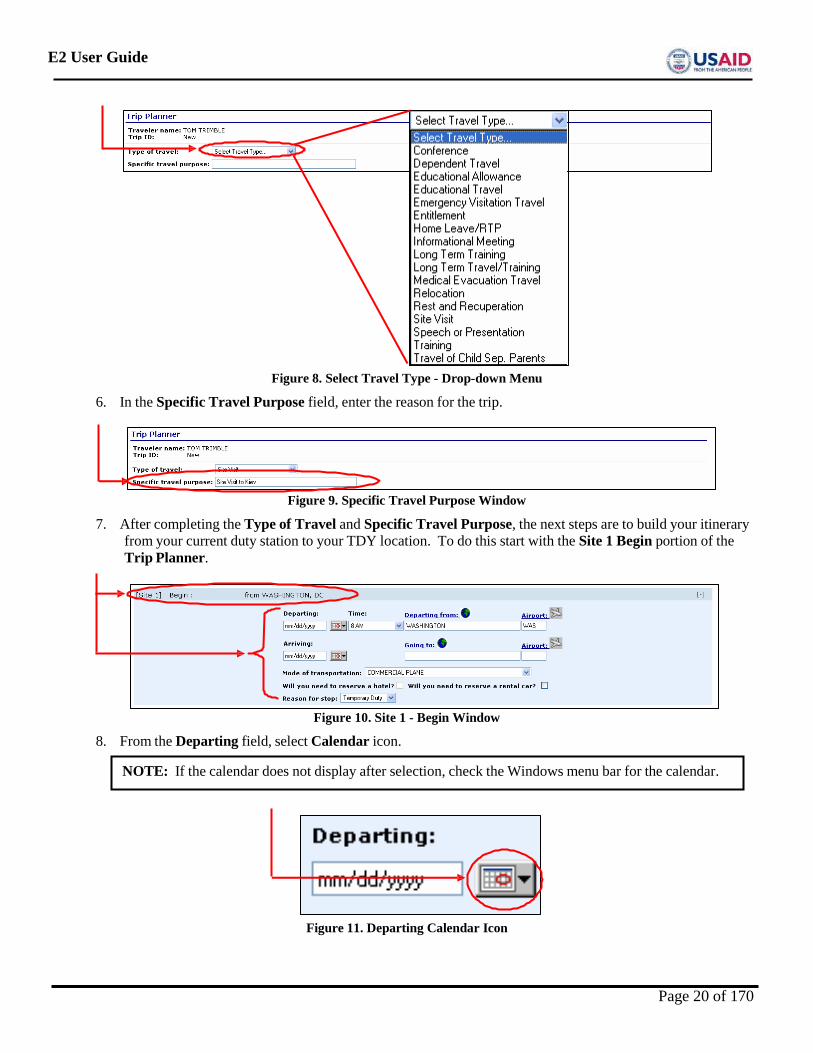
5. In the Type of Travel field, select from the drop down list the Type of Travel for the trip.
Page 19 of 170
E2 User Guide
Figure 8. Select Travel Type - Drop-down Menu
6. In the Specific Travel Purpose field, enter the reason for the trip.
Figure 9. Specific Travel Purpose Window
7. After completing the Type of Travel and Specific Travel Purpose, the next steps are to build your itinerary from your current duty station to your TDY location. To do this start with the Site 1 Begin portion of the Trip Planner.
Figure 10. Site 1 - Begin Window
8. From the Departing field, select Calendar icon.
Figure 11. Departing Calendar Icon
NOTE: If the calendar does not display after selection, check the Windows menu bar for the calendar.
Page 20 of 170
E2 User Guide
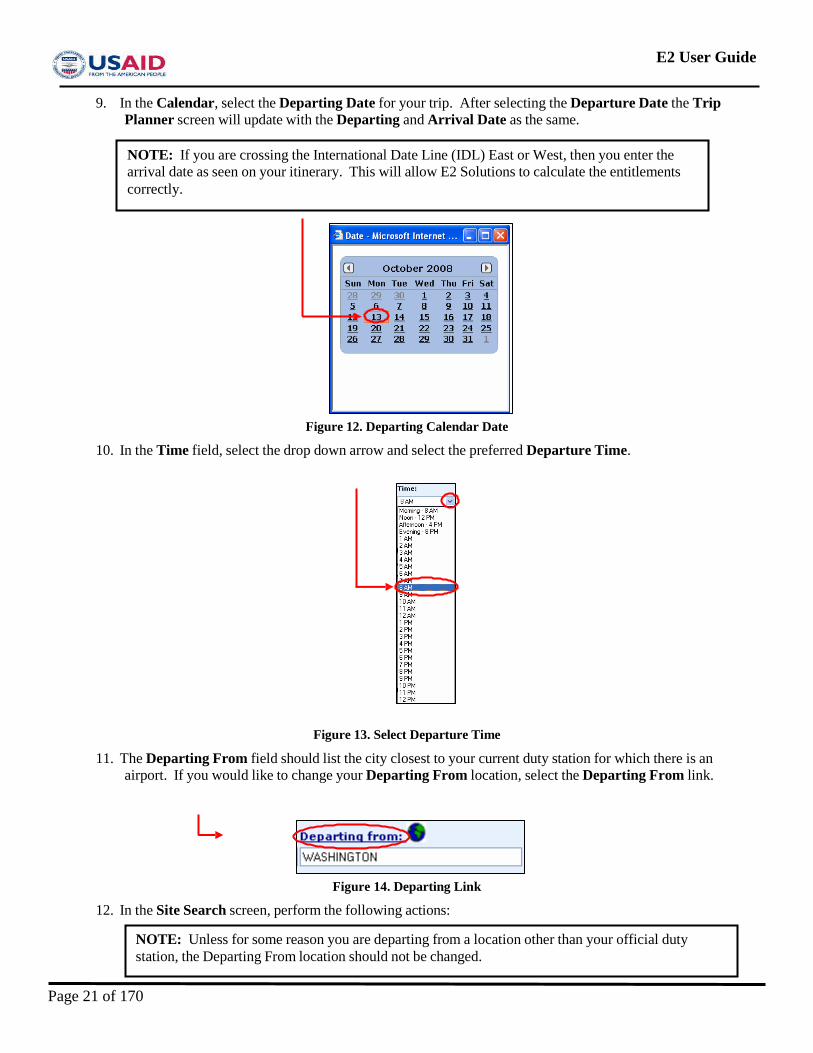
9. In the Calendar, select the Departing Date for your trip. After selecting the Departure Date the Trip Planner screen will update with the Departing and Arrival Date as the same.
Figure 12. Departing Calendar Date
10. In the Time field, select the drop down arrow and select the preferred Departure Time.
Figure 13. Select Departure Time
11. The Departing From field should list the city closest to your current duty station for which there is an airport. If you would like to change your Departing From location, select the Departing From link.
Figure 14. Departing Link
12. In the Site Search screen, perform the following actions:
NOTE: Unless for some reason you are departing from a location other than your official duty station, the Departing From location should not be changed.
NOTE: If you are crossing the International Date Line (IDL) East or West, then you enter the arrival date as seen on your itinerary. This will allow E2 Solutions to calculate the entitlements correctly.
Page 21 of 170
E2 User Guide
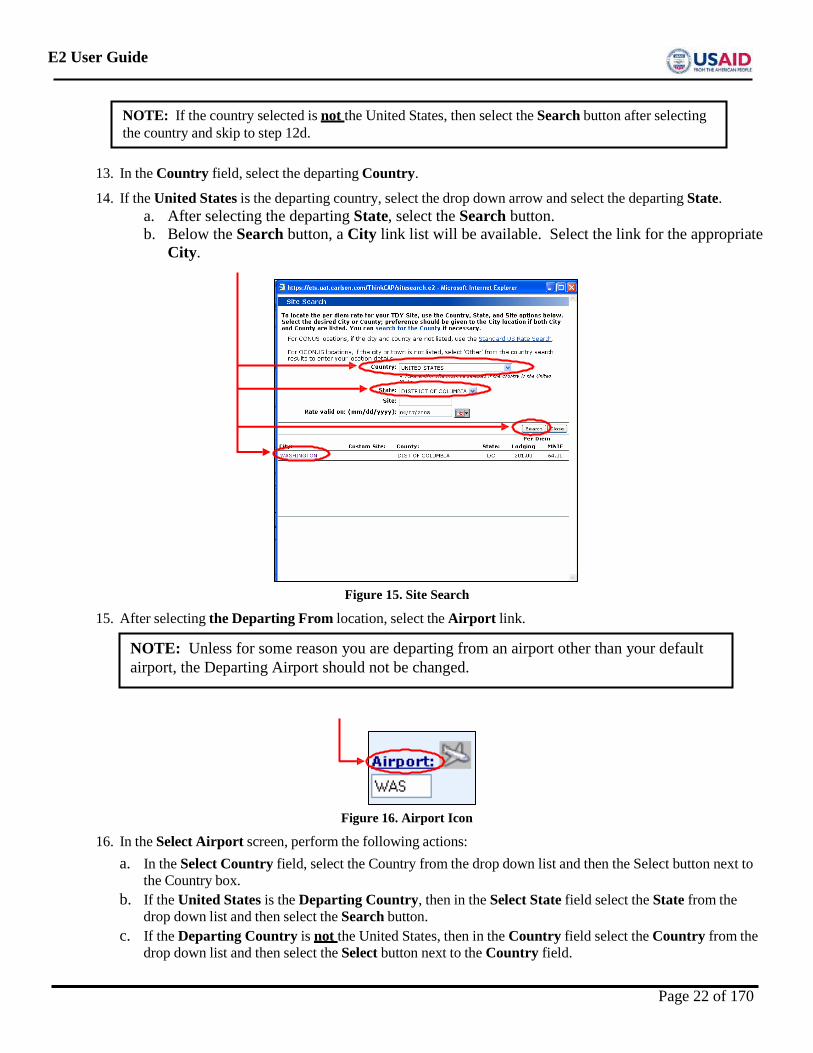
13. In the Country field, select the departing Country.
14. If the United States is the departing country, select the drop down arrow and select the departing State. a. After selecting the departing State, select the Search button. b. Below the Search button, a City link list will be available. Select the link for the appropriate
City.
Figure 15. Site Search
15. After selecting the Departing From location, select the Airport link.
Figure 16. Airport Icon
16. In the Select Airport screen, perform the following actions: a. In the Select Country field, select the Country from the drop down list and then the Select button next to
the Country box. b. If the United States is the Departing Country, then in the Select State field select the State from the
drop down list and then select the Search button. c. If the Departing Country is not the United States, then in the Country field select the Country from the
drop down list and then select the Select button next to the Country field.
NOTE: Unless for some reason you are departing from an airport other than your default airport, the Departing Airport should not be changed.
NOTE: If the country selected is not the United States, then select the Search button after selecting the country and skip to step 12d.
Page 22 of 170
E2 User Guide
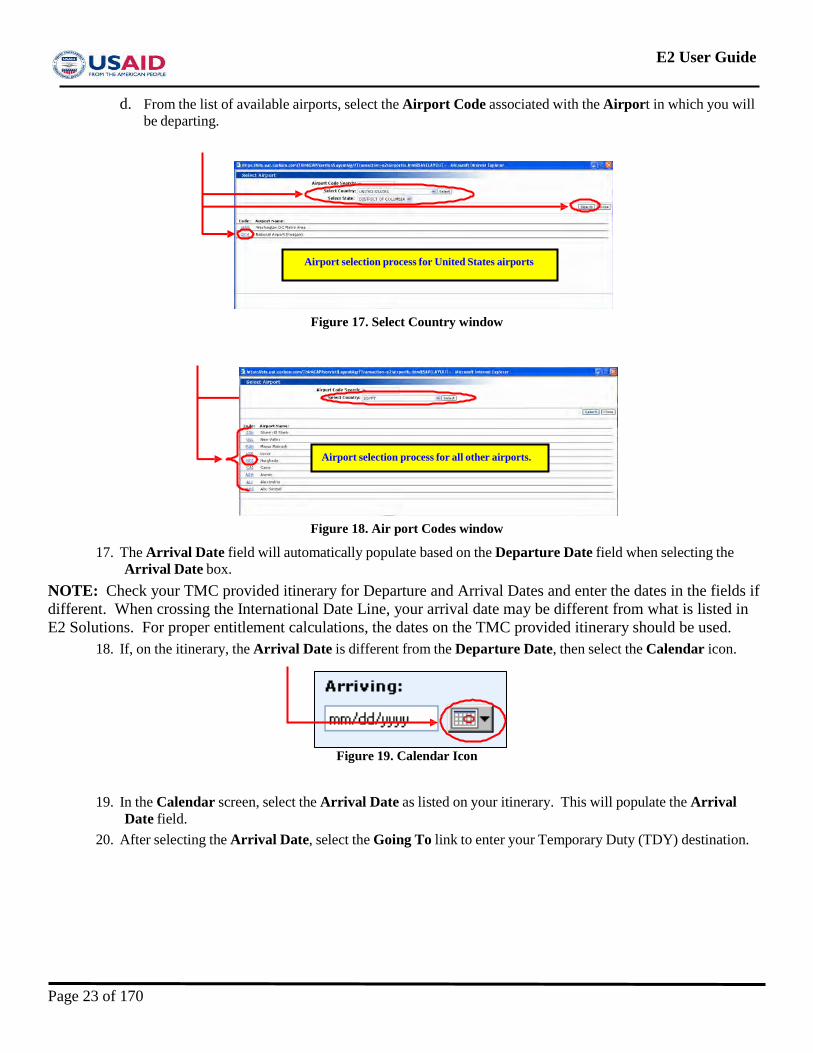
d. From the list of available airports, select the Airport Code associated with the Airport in which you will be departing.
Figure 17. Select Country window
Figure 18. Air port Codes window
17. The Arrival Date field will automatically populate based on the Departure Date field when selecting the Arrival Date box.
NOTE: Check your TMC provided itinerary for Departure and Arrival Dates and enter the dates in the fields if different. When crossing the International Date Line, your arrival date may be different from what is listed in E2 Solutions. For proper entitlement calculations, the dates on the TMC provided itinerary should be used.
18. If, on the itinerary, the Arrival Date is different from the Departure Date, then select the Calendar icon.
Figure 19. Calendar Icon
19. In the Calendar screen, select the Arrival Date as listed on your itinerary. This will populate the Arrival Date field.
20. After selecting the Arrival Date, select the Going To link to enter your Temporary Duty (TDY) destination.
Airport selection process for all other airports.
Airport selection process for United States airports
Page 23 of 170
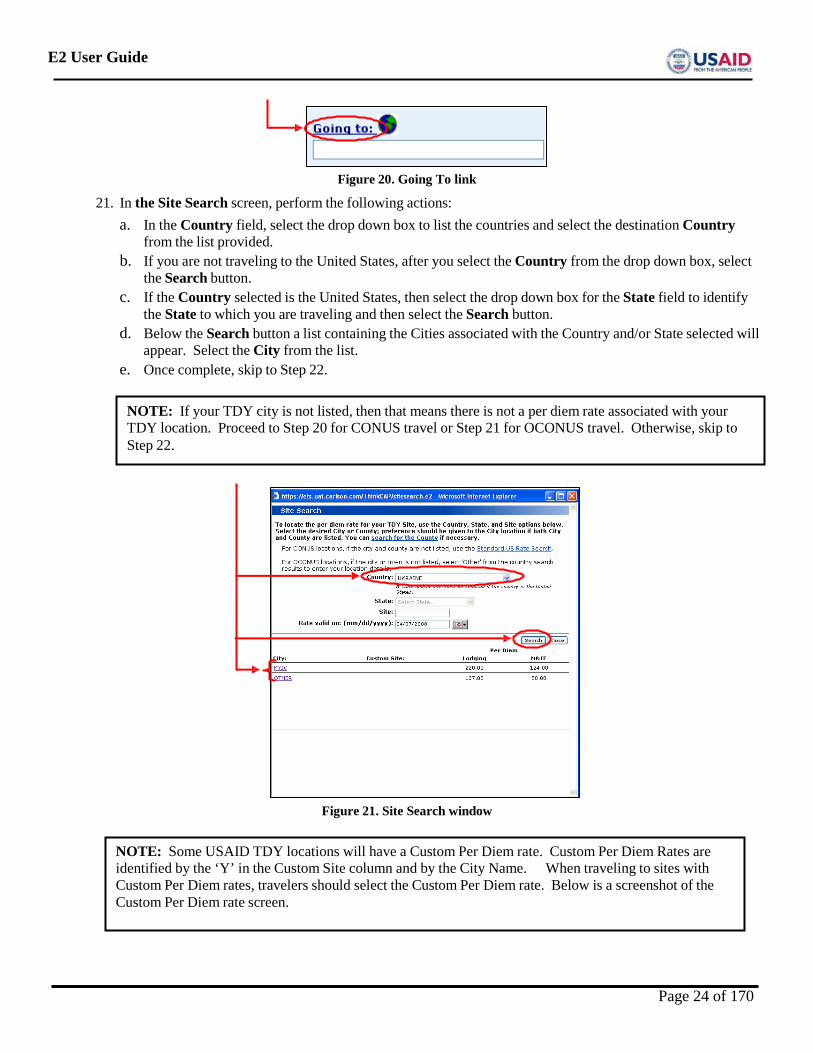
E2 User Guide
Figure 20. Going To link
21. In the Site Search screen, perform the following actions: a. In the Country field, select the drop down box to list the countries and select the destination Country
from the list provided. b. If you are not traveling to the United States, after you select the Country from the drop down box, select
the Search button. c. If the Country selected is the United States, then select the drop down box for the State field to identify
the State to which you are traveling and then select the Search button. d. Below the Search button a list containing the Cities associated with the Country and/or State selected will
appear. Select the City from the list. e. Once complete, skip to Step 22.
Figure 21. Site Search window
NOTE: Some USAID TDY locations will have a Custom Per Diem rate. Custom Per Diem Rates are identified by the ‘Y’ in the Custom Site column and by the City Name. When traveling to sites with Custom Per Diem rates, travelers should select the Custom Per Diem rate. Below is a screenshot of the Custom Per Diem rate screen.
NOTE: If your TDY city is not listed, then that means there is not a per diem rate associated with your TDY location. Proceed to Step 20 for CONUS travel or Step 21 for OCONUS travel. Otherwise, skip to Step 22.
Page 24 of 170
E2 User Guide
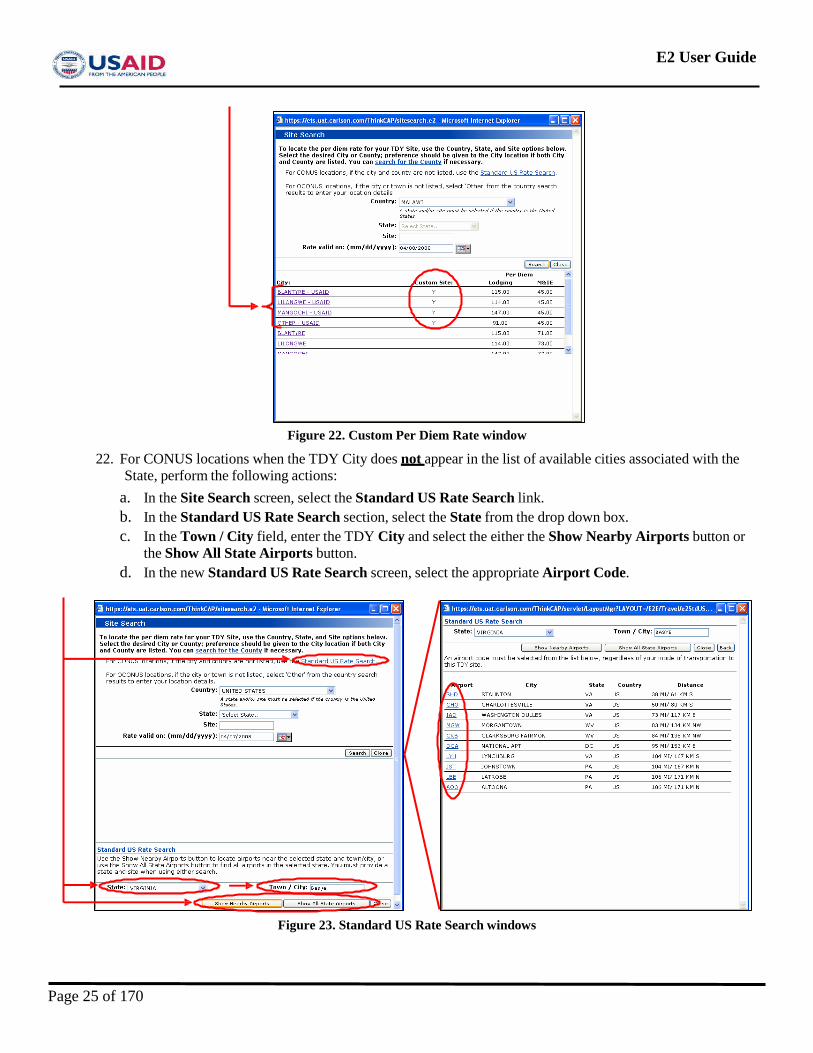
Figure 22. Custom Per Diem Rate window
22. For CONUS locations when the TDY City does not appear in the list of available cities associated with the State, perform the following actions:
a. In the Site Search screen, select the Standard US Rate Search link. b. In the Standard US Rate Search section, select the State from the drop down box. c. In the Town / City field, enter the TDY City and select the either the Show Nearby Airports button or
the Show All State Airports button. d. In the new Standard US Rate Search screen, select the appropriate Airport Code.
Figure 23. Standard US Rate Search windows
Page 25 of 170
E2 User Guide
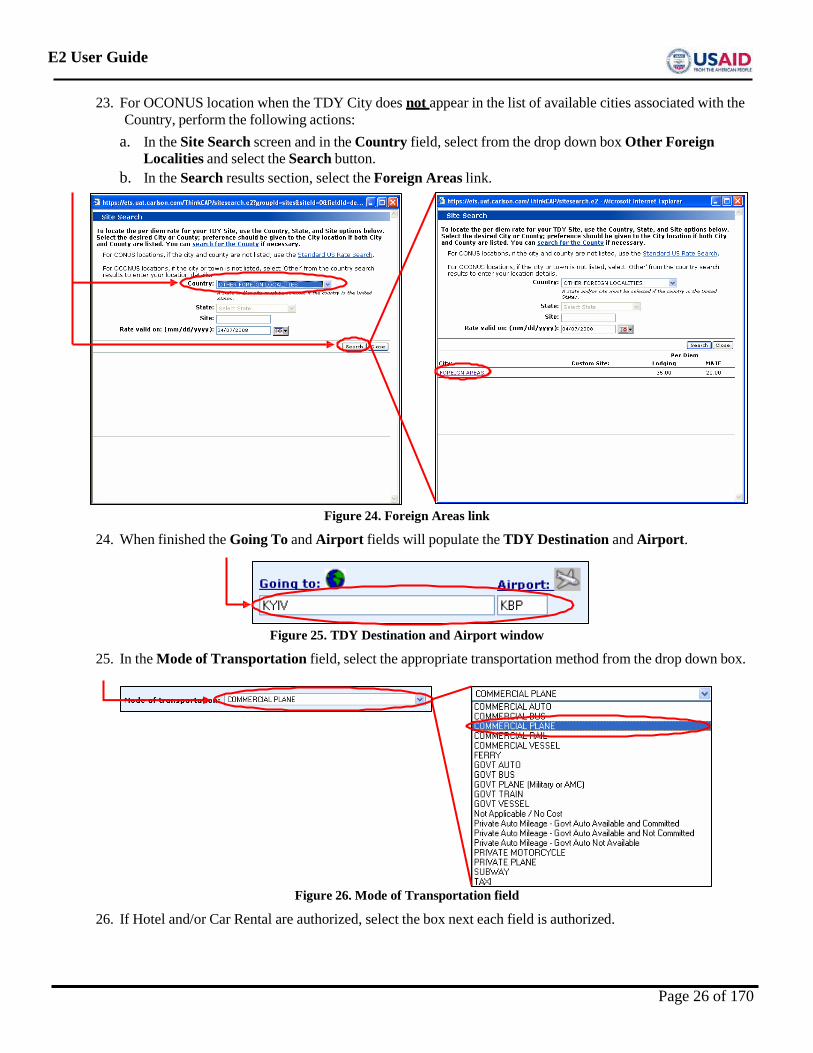
23. For OCONUS location when the TDY City does not appear in the list of available cities associated with the Country, perform the following actions:
a. In the Site Search screen and in the Country field, select from the drop down box Other Foreign Localities and select the Search button.
b. In the Search results section, select the Foreign Areas link.
Figure 24. Foreign Areas link
24. When finished the Going To and Airport fields will populate the TDY Destination and Airport.
Figure 25. TDY Destination and Airport window
25. In the Mode of Transportation field, select the appropriate transportation method from the drop down box.
Figure 26. Mode of Transportation field
26. If Hotel and/or Car Rental are authorized, select the box next each field is authorized.
Page 26 of 170
E2 User Guide
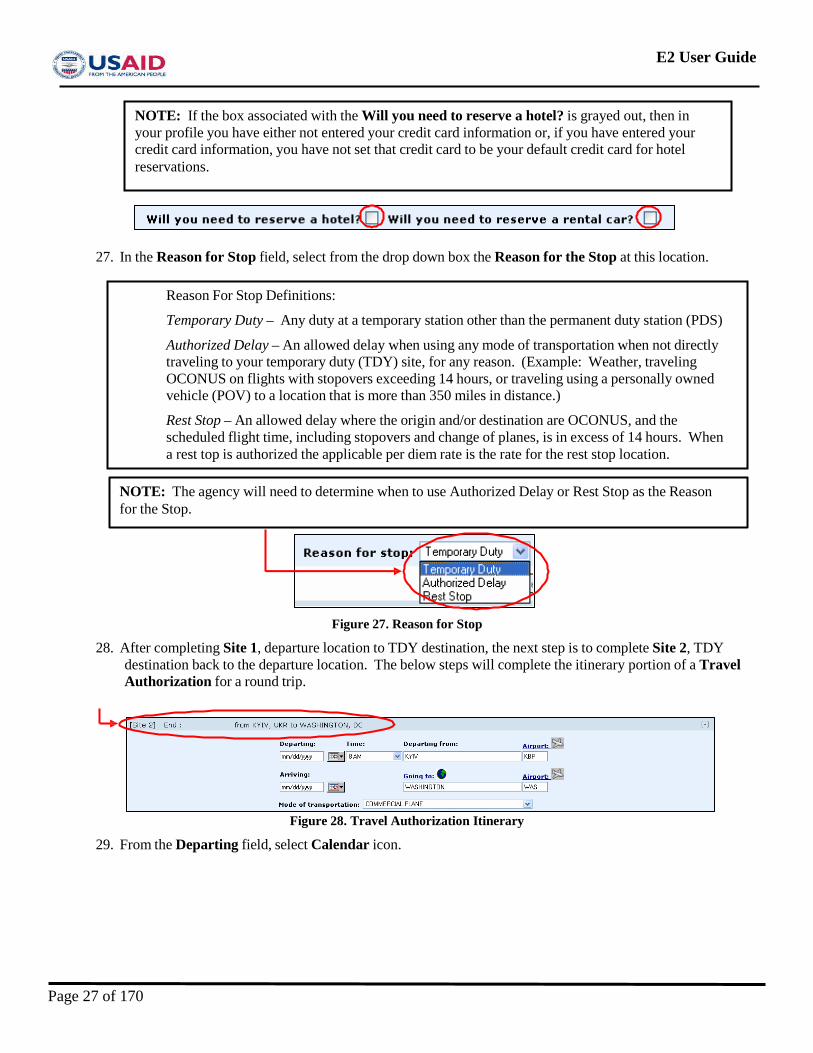
27. In the Reason for Stop field, select from the drop down box the Reason for the Stop at this location.
Figure 27. Reason for Stop
28. After completing Site 1, departure location to TDY destination, the next step is to complete Site 2, TDY destination back to the departure location. The below steps will complete the itinerary portion of a Travel Authorization for a round trip.
Figure 28. Travel Authorization Itinerary
29. From the Departing field, select Calendar icon.
NOTE: The agency will need to determine when to use Authorized Delay or Rest Stop as the Reason for the Stop.
Reason For Stop Definitions:
Temporary Duty – Any duty at a temporary station other than the permanent duty station (PDS)
Authorized Delay – An allowed delay when using any mode of transportation when not directly traveling to your temporary duty (TDY) site, for any reason. (Example: Weather, traveling OCONUS on flights with stopovers exceeding 14 hours, or traveling using a personally owned vehicle (POV) to a location that is more than 350 miles in distance.)
Rest Stop – An allowed delay where the origin and/or destination are OCONUS, and the scheduled flight time, including stopovers and change of planes, is in excess of 14 hours. When a rest top is authorized the applicable per diem rate is the rate for the rest stop location.
NOTE: If the box associated with the Will you need to reserve a hotel? is grayed out, then in your profile you have either not entered your credit card information or, if you have entered your credit card information, you have not set that credit card to be your default credit card for hotel reservations.
Page 27 of 170
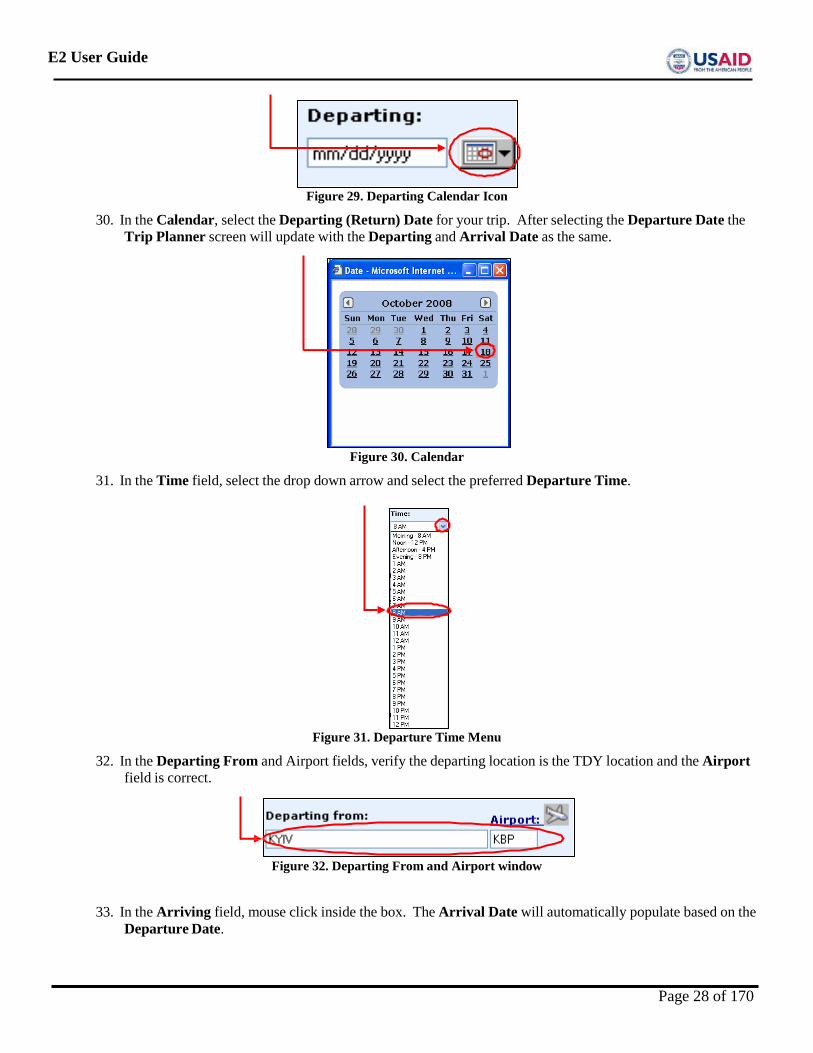
E2 User Guide
Figure 29. Departing Calendar Icon
30. In the Calendar, select the Departing (Return) Date for your trip. After selecting the Departure Date the Trip Planner screen will update with the Departing and Arrival Date as the same.
Figure 30. Calendar
31. In the Time field, select the drop down arrow and select the preferred Departure Time.
Figure 31. Departure Time Menu
32. In the Departing From and Airport fields, verify the departing location is the TDY location and the Airport field is correct.
Figure 32. Departing From and Airport window
33. In the Arriving field, mouse click inside the box. The Arrival Date will automatically populate based on the Departure Date.
Page 28 of 170
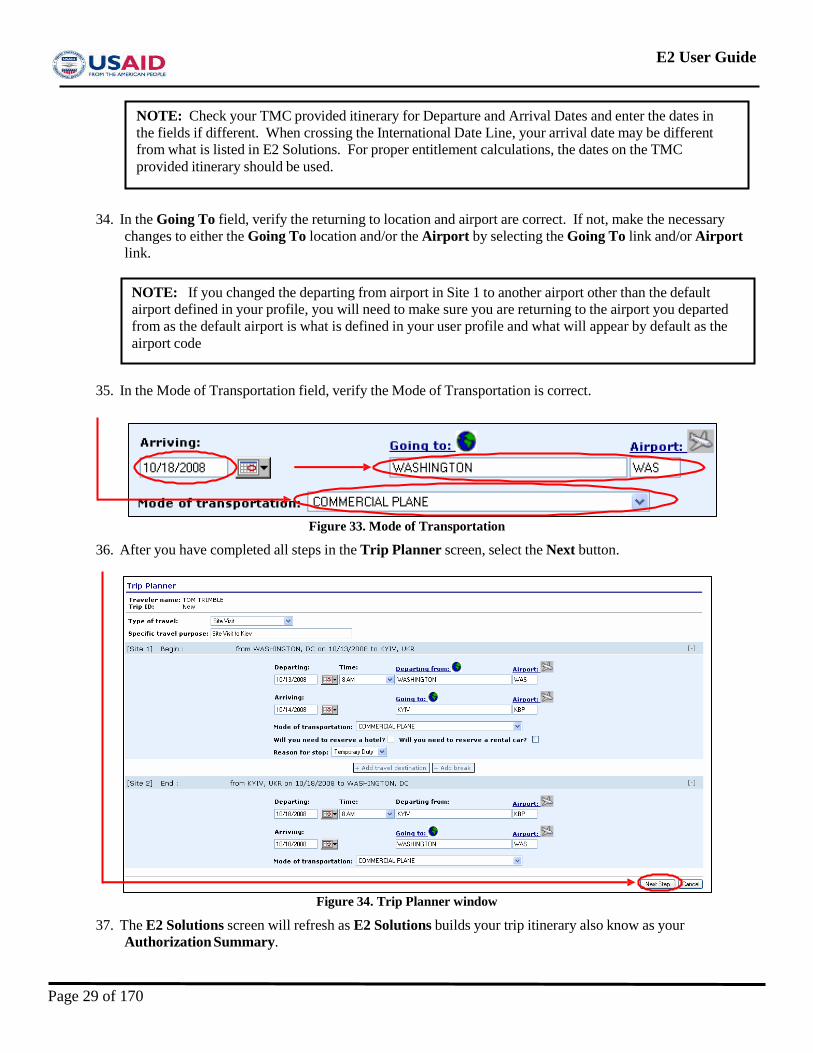
E2 User Guide
34. In the Going To field, verify the returning to location and airport are correct. If not, make the necessary changes to either the Going To location and/or the Airport by selecting the Going To link and/or Airport link.
35. In the Mode of Transportation field, verify the Mode of Transportation is correct.
Figure 33. Mode of Transportation
36. After you have completed all steps in the Trip Planner screen, select the Next button.
Figure 34. Trip Planner window
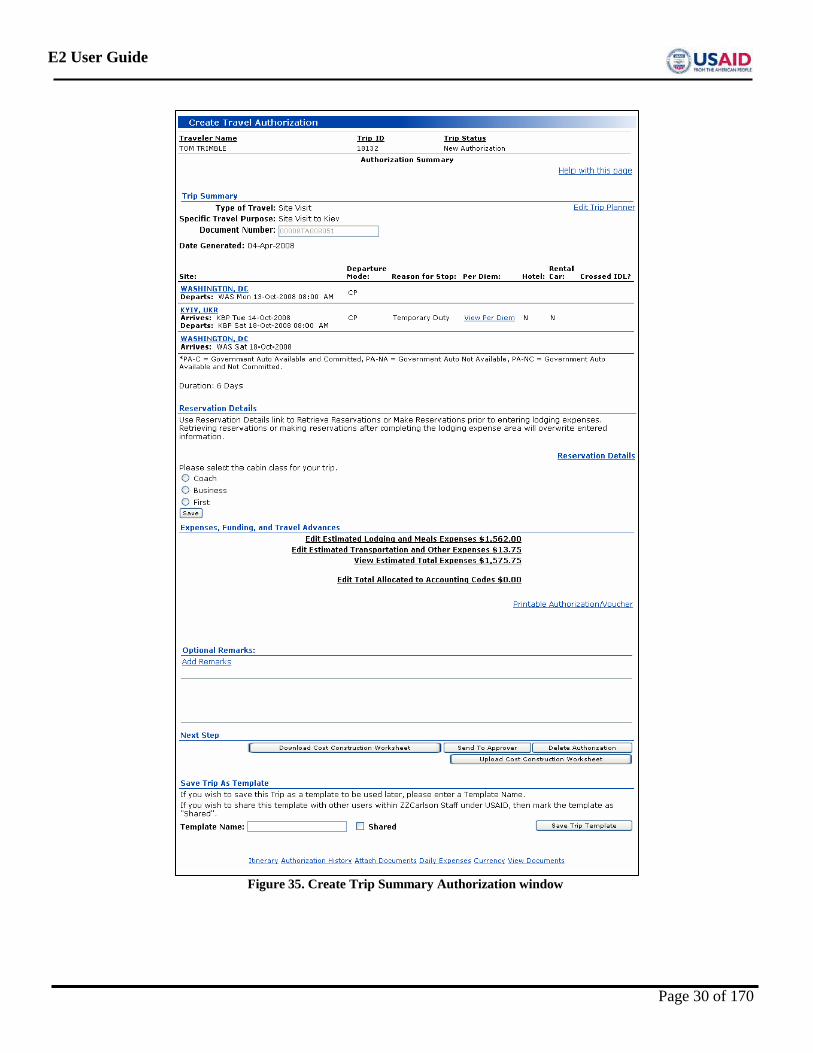
37. The E2 Solutions screen will refresh as E2 Solutions builds your trip itinerary also know as your Authorization Summary.
NOTE: If you changed the departing from airport in Site 1 to another airport other than the default airport defined in your profile, you will need to make sure you are returning to the airport you departed from as the default airport is what is defined in your user profile and what will appear by default as the airport code
NOTE: Check your TMC provided itinerary for Departure and Arrival Dates and enter the dates in the fields if different. When crossing the International Date Line, your arrival date may be different from what is listed in E2 Solutions. For proper entitlement calculations, the dates on the TMC provided itinerary should be used.
Page 29 of 170
E2 User Guide
Figure 35. Create Trip Summary Authorization window
Page 30 of 170
E2 User Guide
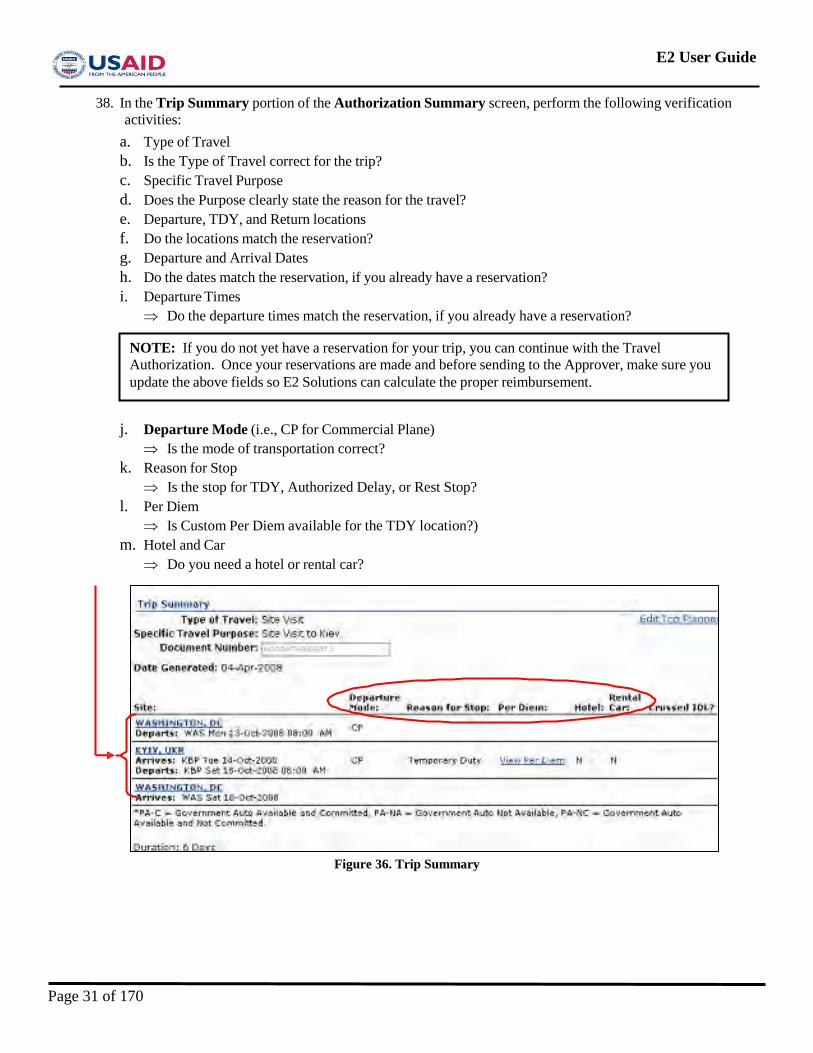
38. In the Trip Summary portion of the Authorization Summary screen, perform the following verification activities:
a. Type of Travel b. Is the Type of Travel correct for the trip? c. Specific Travel Purpose d. Does the Purpose clearly state the reason for the travel? e. Departure, TDY, and Return locations f. Do the locations match the reservation? g. Departure and Arrival Dates h. Do the dates match the reservation, if you already have a reservation? i. Departure Times
⇒ Do the departure times match the reservation, if you already have a reservation?
j. Departure Mode (i.e., CP for Commercial Plane) ⇒ Is the mode of transportation correct?
k. Reason for Stop ⇒ Is the stop for TDY, Authorized Delay, or Rest Stop?
l. Per Diem ⇒ Is Custom Per Diem available for the TDY location?)
m. Hotel and Car ⇒ Do you need a hotel or rental car?
Figure 36. Trip Summary
NOTE: If you do not yet have a reservation for your trip, you can continue with the Travel Authorization. Once your reservations are made and before sending to the Approver, make sure you update the above fields so E2 Solutions can calculate the proper reimbursement.
Page 31 of 170
E2 User Guide
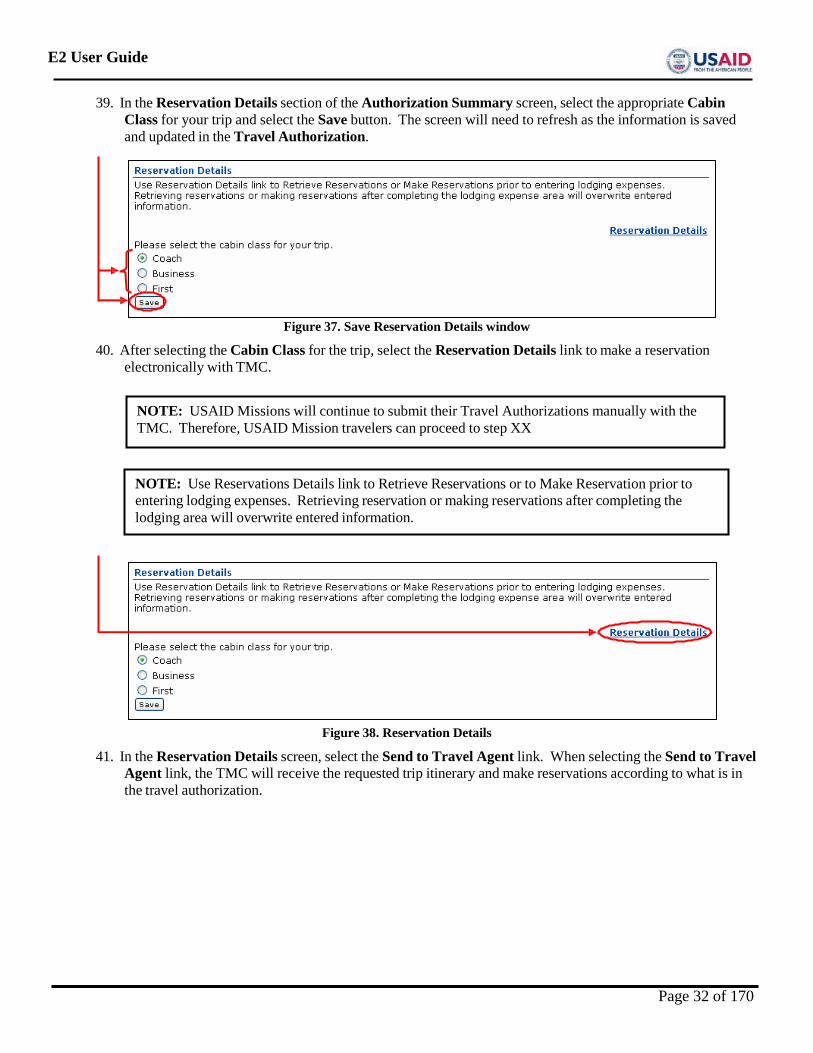
39. In the Reservation Details section of the Authorization Summary screen, select the appropriate Cabin Class for your trip and select the Save button. The screen will need to refresh as the information is saved and updated in the Travel Authorization.
Figure 37. Save Reservation Details window
40. After selecting the Cabin Class for the trip, select the Reservation Details link to make a reservation electronically with TMC.
Figure 38. Reservation Details
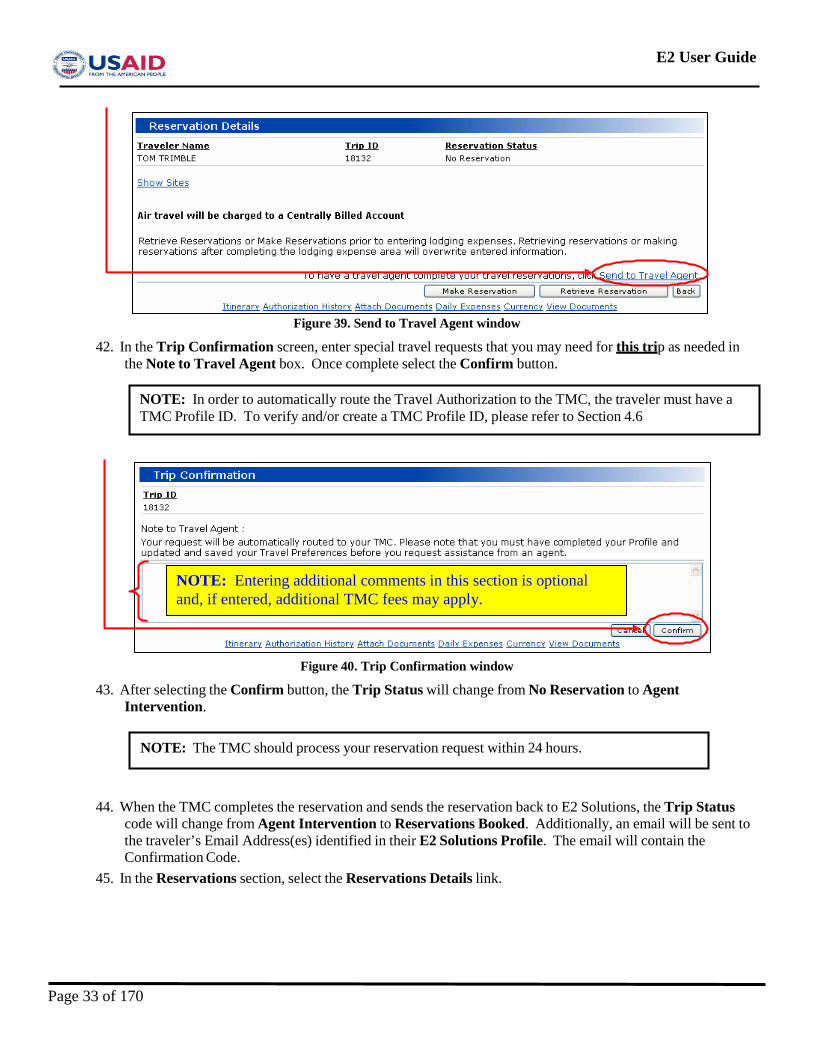
41. In the Reservation Details screen, select the Send to Travel Agent link. When selecting the Send to Travel Agent link, the TMC will receive the requested trip itinerary and make reservations according to what is in the travel authorization.
NOTE: Use Reservations Details link to Retrieve Reservations or to Make Reservation prior to entering lodging expenses. Retrieving reservation or making reservations after completing the lodging area will overwrite entered information.
NOTE: USAID Missions will continue to submit their Travel Authorizations manually with the TMC. Therefore, USAID Mission travelers can proceed to step XX
Page 32 of 170
E2 User Guide
Figure 39. Send to Travel Agent window
42. In the Trip Confirmation screen, enter special travel requests that you may need for this trip as needed in the Note to Travel Agent box. Once complete select the Confirm button.
Figure 40. Trip Confirmation window
43. After selecting the Confirm button, the Trip Status will change from No Reservation to Agent Intervention.
44. When the TMC completes the reservation and sends the reservation back to E2 Solutions, the Trip Status code will change from Agent Intervention to Reservations Booked. Additionally, an email will be sent to the traveler’s Email Address(es) identified in their E2 Solutions Profile. The email will contain the Confirmation Code.
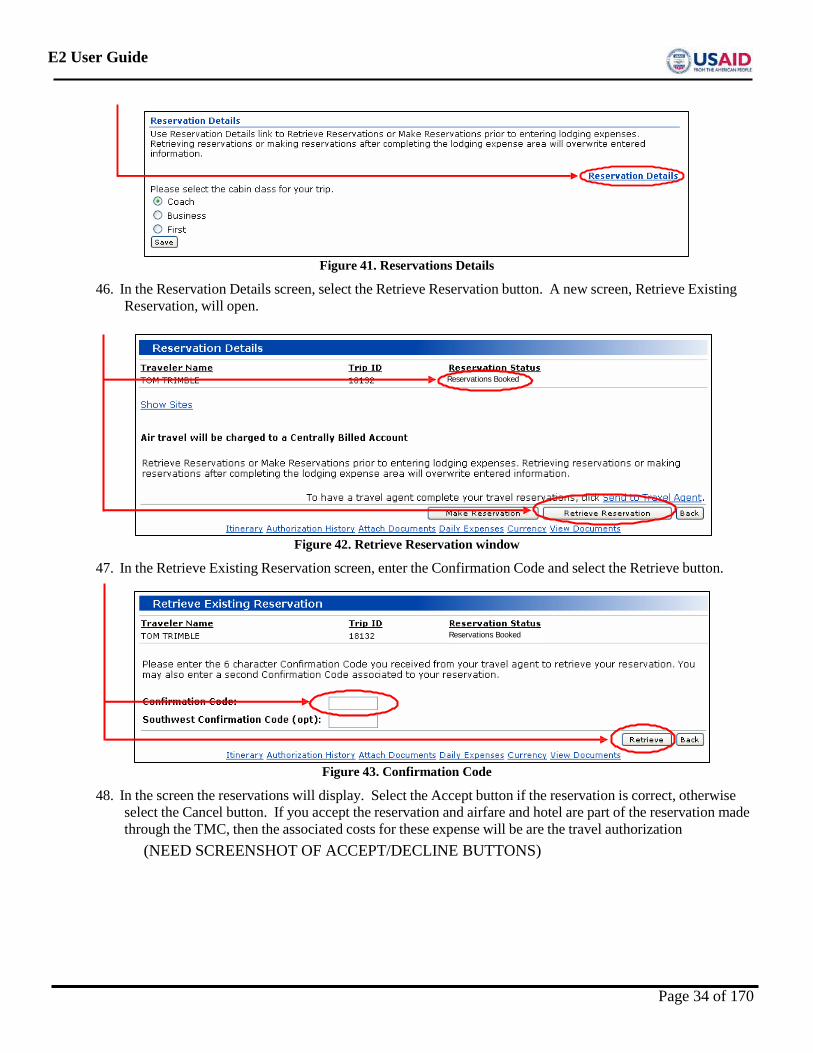
45. In the Reservations section, select the Reservations Details link.
NOTE: The TMC should process your reservation request within 24 hours.
NOTE: Entering additional comments in this section is optional and, if entered, additional TMC fees may apply.
NOTE: In order to automatically route the Travel Authorization to the TMC, the traveler must have a TMC Profile ID. To verify and/or create a TMC Profile ID, please refer to Section 4.6
Page 33 of 170
E2 User Guide
Figure 41. Reservations Details
46. In the Reservation Details screen, select the Retrieve Reservation button. A new screen, Retrieve Existing Reservation, will open.
Figure 42. Retrieve Reservation window
47. In the Retrieve Existing Reservation screen, enter the Confirmation Code and select the Retrieve button.
Figure 43. Confirmation Code
48. In the screen the reservations will display. Select the Accept button if the reservation is correct, otherwise select the Cancel button. If you accept the reservation and airfare and hotel are part of the reservation made through the TMC, then the associated costs for these expense will be are the travel authorization
(NEED SCREENSHOT OF ACCEPT/DECLINE BUTTONS)
Reservations Booked
Reservations Booked
Page 34 of 170
E2 User Guide
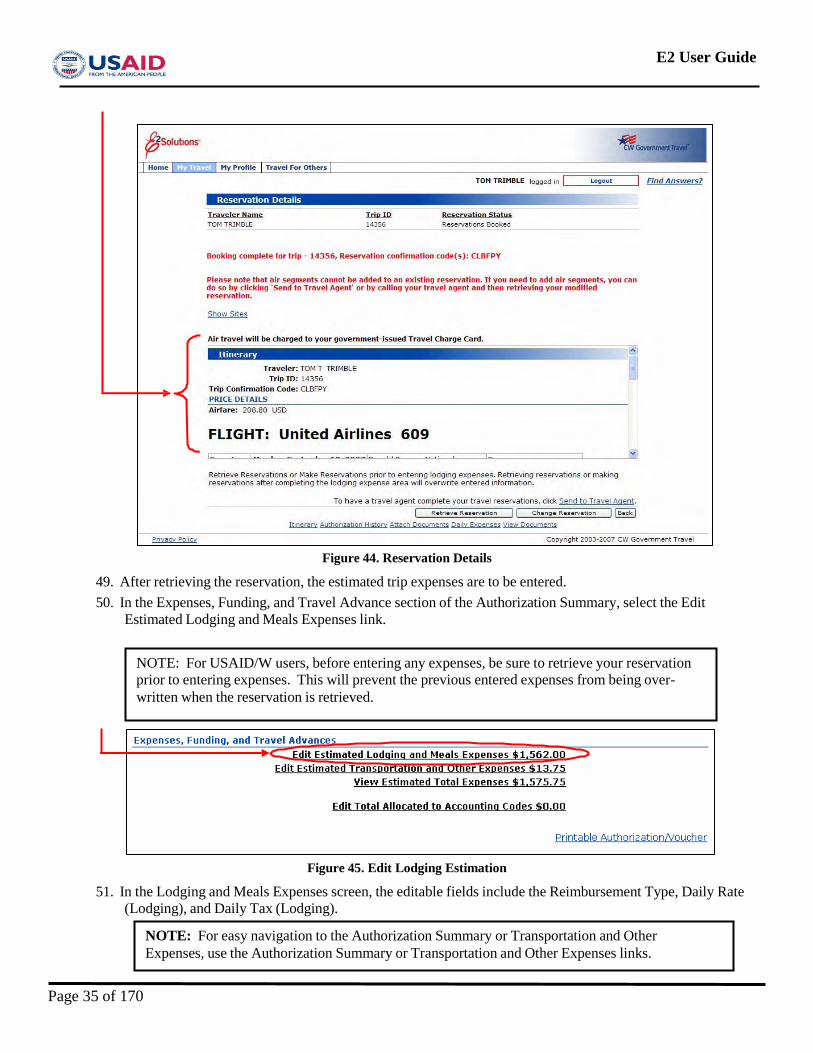
Figure 44. Reservation Details
49. After retrieving the reservation, the estimated trip expenses are to be entered. 50. In the Expenses, Funding, and Travel Advance section of the Authorization Summary, select the Edit
Estimated Lodging and Meals Expenses link.
Figure 45. Edit Lodging Estimation
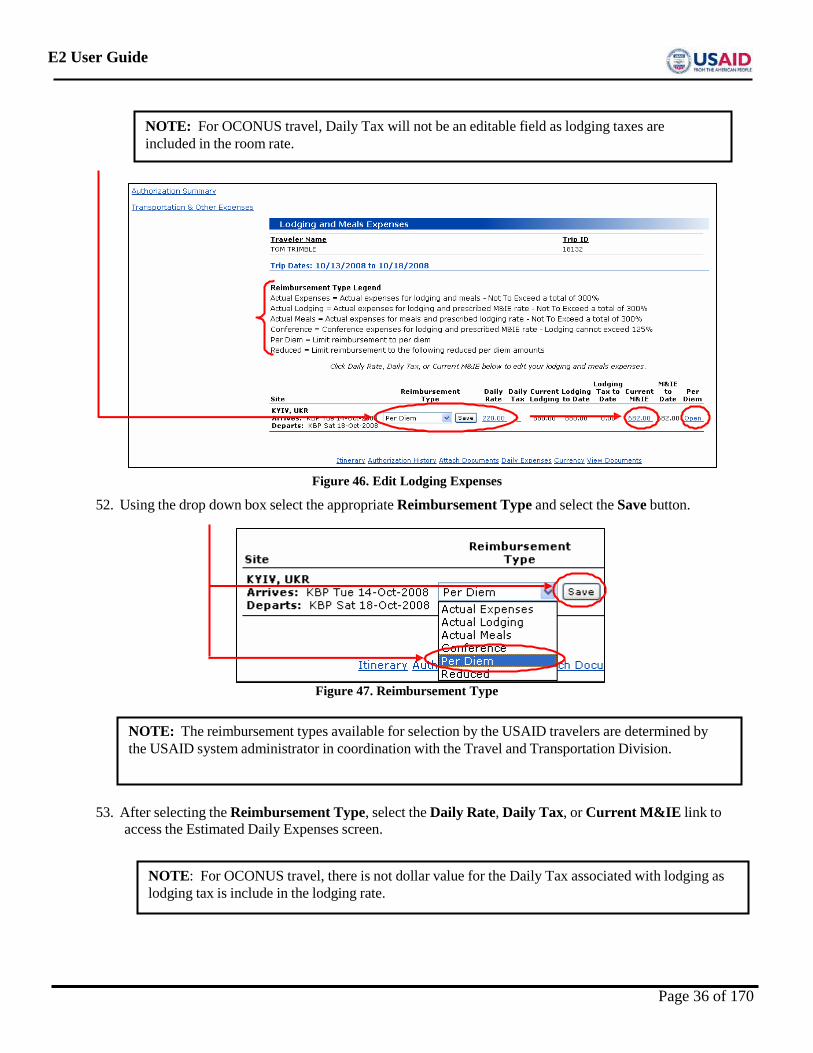
51. In the Lodging and Meals Expenses screen, the editable fields include the Reimbursement Type, Daily Rate (Lodging), and Daily Tax (Lodging).
NOTE: For easy navigation to the Authorization Summary or Transportation and Other Expenses, use the Authorization Summary or Transportation and Other Expenses links.
NOTE: For USAID/W users, before entering any expenses, be sure to retrieve your reservation prior to entering expenses. This will prevent the previous entered expenses from being over- written when the reservation is retrieved.
Page 35 of 170
E2 User Guide
Figure 46. Edit Lodging Expenses
52. Using the drop down box select the appropriate Reimbursement Type and select the Save button.
Figure 47. Reimbursement Type
53. After selecting the Reimbursement Type, select the Daily Rate, Daily Tax, or Current M&IE link to access the Estimated Daily Expenses screen.
NOTE: For OCONUS travel, there is not dollar value for the Daily Tax associated with lodging as lodging tax is include in the lodging rate.
NOTE: The reimbursement types available for selection by the USAID travelers are determined by the USAID system administrator in coordination with the Travel and Transportation Division.
NOTE: For OCONUS travel, Daily Tax will not be an editable field as lodging taxes are included in the room rate.
Page 36 of 170
E2 User Guide
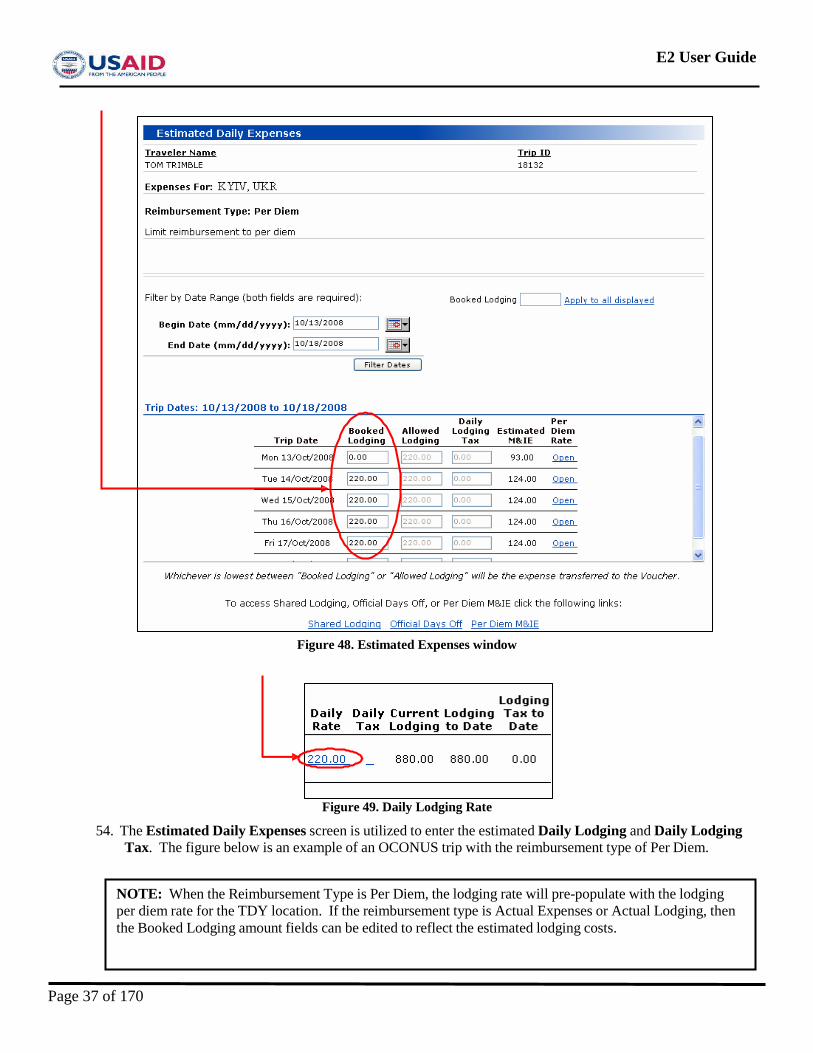
Figure 48. Estimated Expenses window
Figure 49. Daily Lodging Rate
54. The Estimated Daily Expenses screen is utilized to enter the estimated Daily Lodging and Daily Lodging Tax. The figure below is an example of an OCONUS trip with the reimbursement type of Per Diem.
NOTE: When the Reimbursement Type is Per Diem, the lodging rate will pre-populate with the lodging per diem rate for the TDY location. If the reimbursement type is Actual Expenses or Actual Lodging, then the Booked Lodging amount fields can be edited to reflect the estimated lodging costs.
Page 37 of 170
E2 User Guide
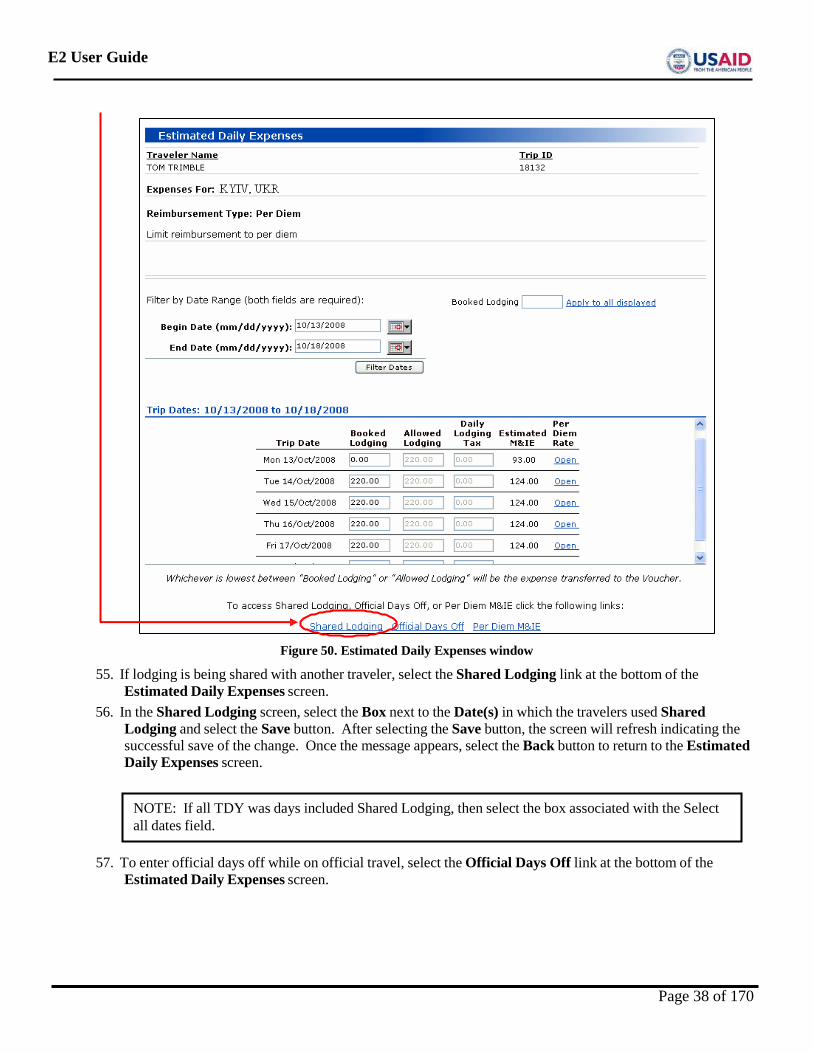
Figure 50. Estimated Daily Expenses window
55. If lodging is being shared with another traveler, select the Shared Lodging link at the bottom of the Estimated Daily Expenses screen.
56. In the Shared Lodging screen, select the Box next to the Date(s) in which the travelers used Shared Lodging and select the Save button. After selecting the Save button, the screen will refresh indicating the successful save of the change. Once the message appears, select the Back button to return to the Estimated Daily Expenses screen.
57. To enter official days off while on official travel, select the Official Days Off link at the bottom of the Estimated Daily Expenses screen.
NOTE: If all TDY was days included Shared Lodging, then select the box associated with the Select all dates field.
Page 38 of 170
E2 User Guide
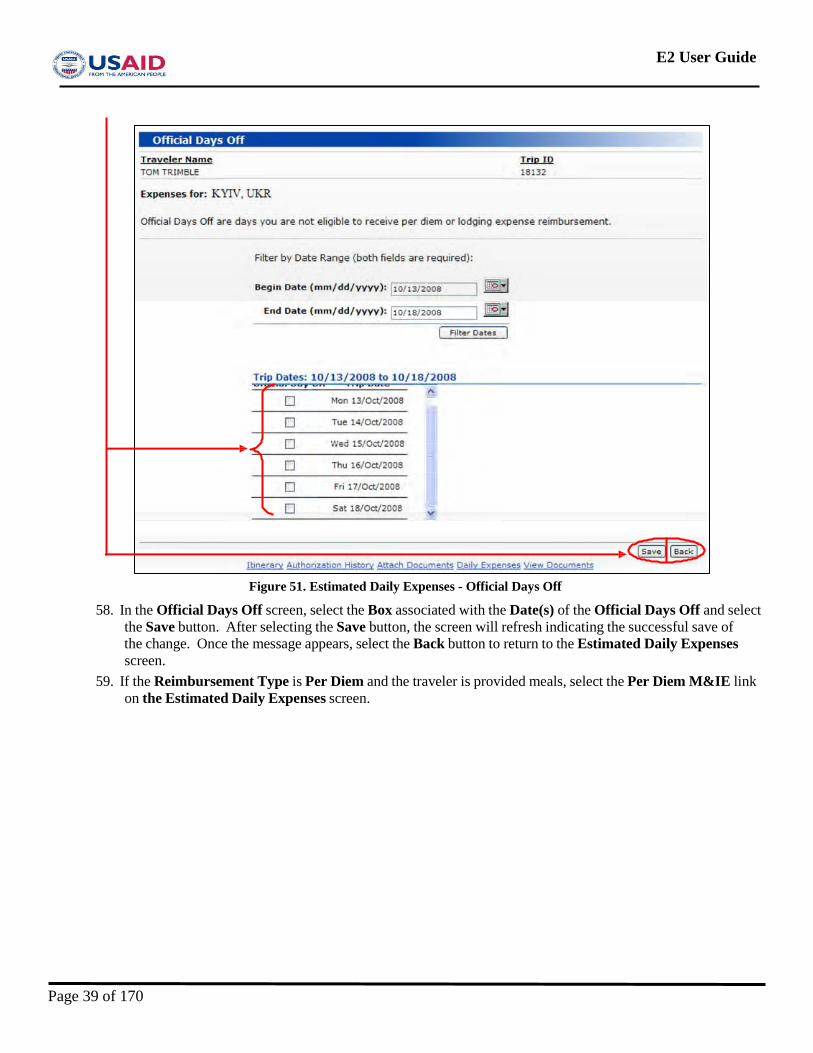
Figure 51. Estimated Daily Expenses - Official Days Off
58. In the Official Days Off screen, select the Box associated with the Date(s) of the Official Days Off and select the Save button. After selecting the Save button, the screen will refresh indicating the successful save of the change. Once the message appears, select the Back button to return to the Estimated Daily Expenses screen.
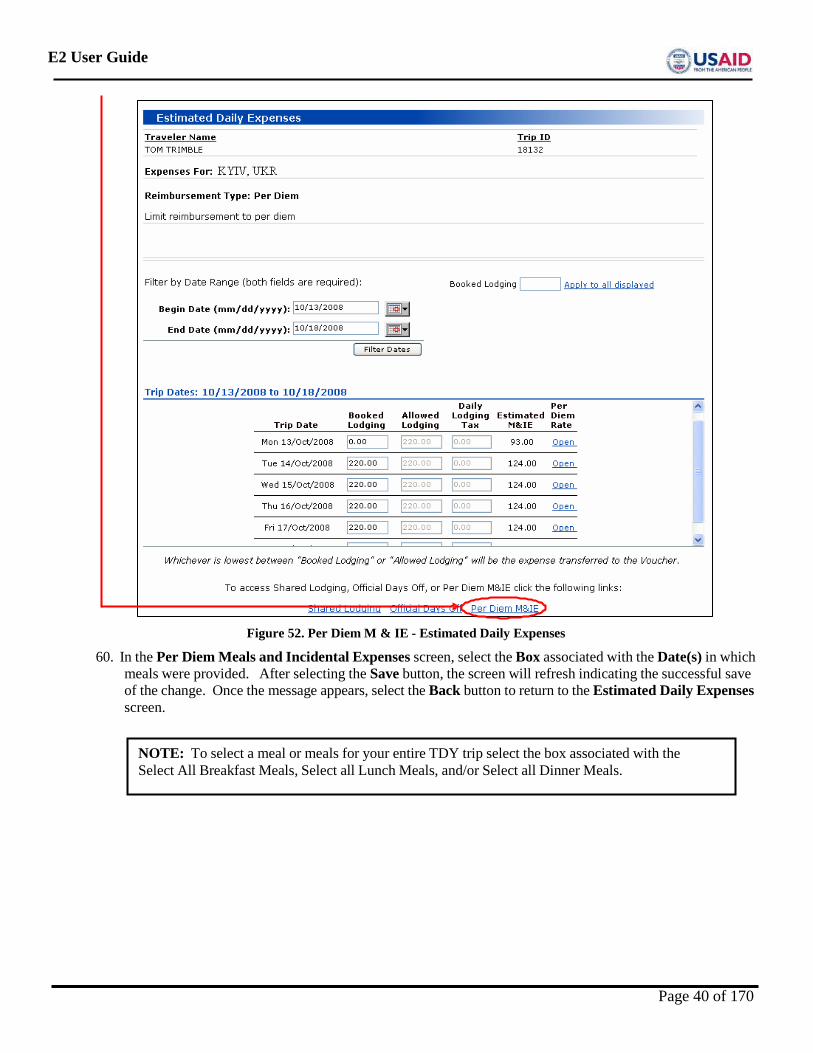
59. If the Reimbursement Type is Per Diem and the traveler is provided meals, select the Per Diem M&IE link on the Estimated Daily Expenses screen.
Page 39 of 170
E2 User Guide
Figure 52. Per Diem M & IE - Estimated Daily Expenses
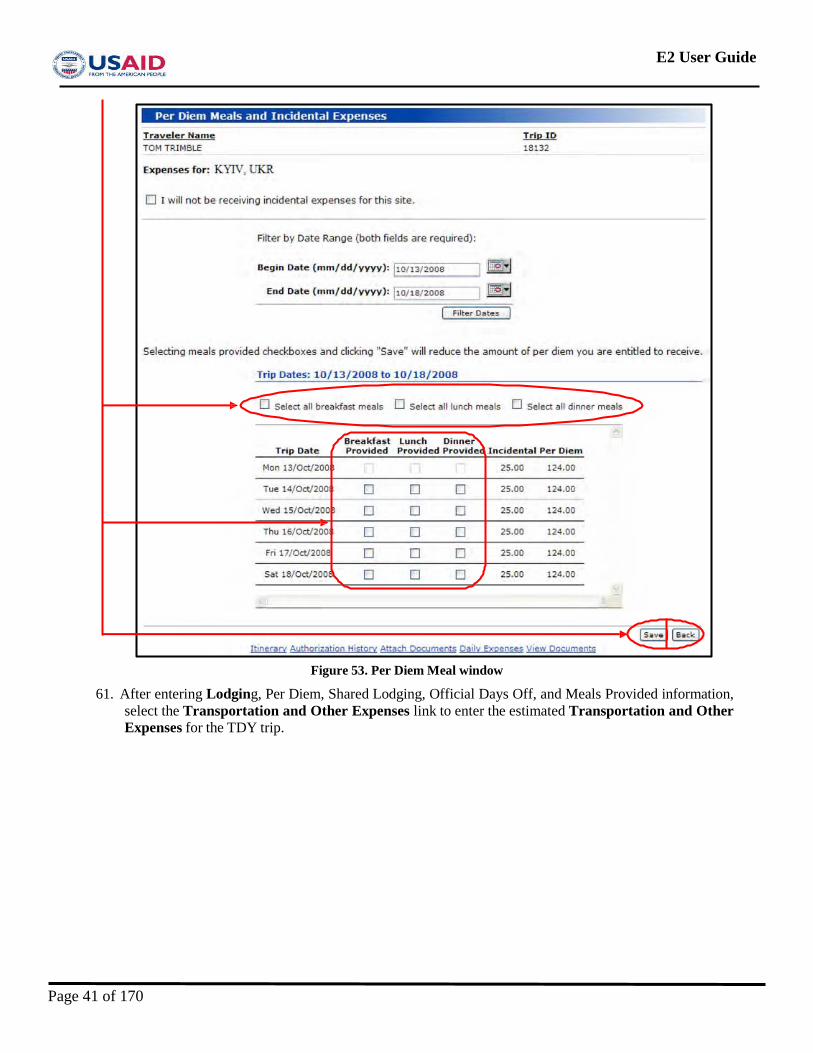
60. In the Per Diem Meals and Incidental Expenses screen, select the Box associated with the Date(s) in which meals were provided. After selecting the Save button, the screen will refresh indicating the successful save of the change. Once the message appears, select the Back button to return to the Estimated Daily Expenses screen.
NOTE: To select a meal or meals for your entire TDY trip select the box associated with the Select All Breakfast Meals, Select all Lunch Meals, and/or Select all Dinner Meals.
Page 40 of 170
E2 User Guide
Figure 53. Per Diem Meal window
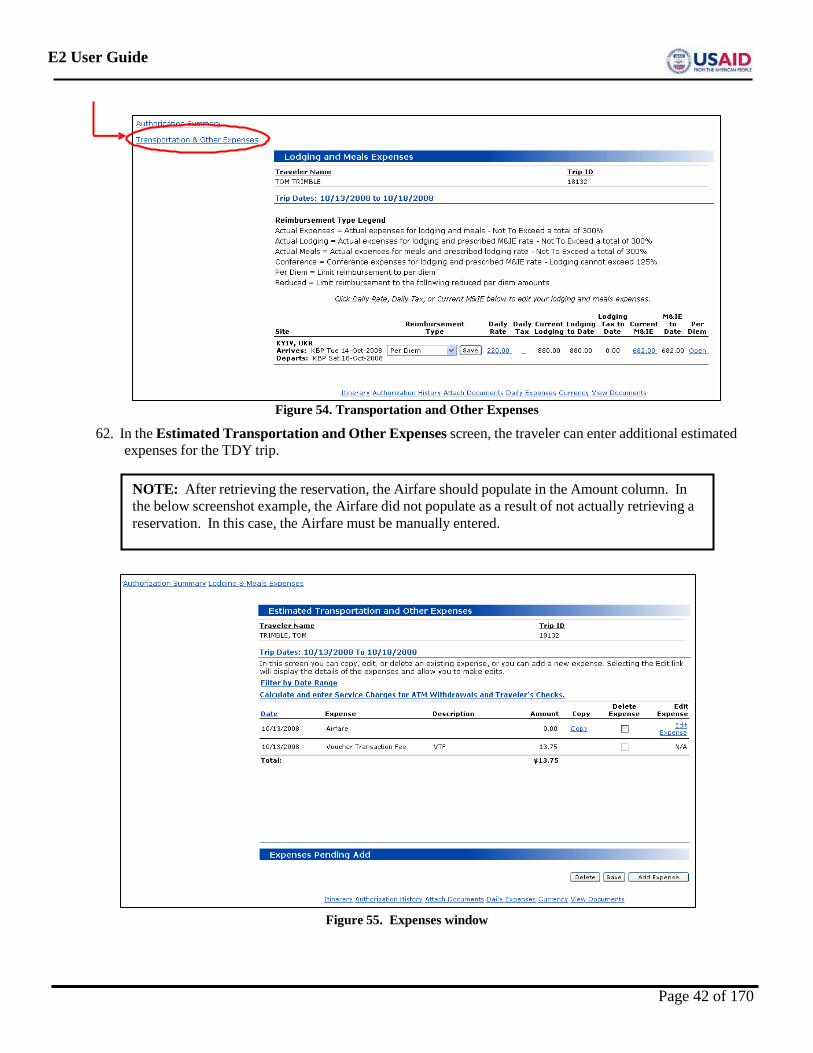
61. After entering Lodging, Per Diem, Shared Lodging, Official Days Off, and Meals Provided information, select the Transportation and Other Expenses link to enter the estimated Transportation and Other Expenses for the TDY trip.
Page 41 of 170
E2 User Guide
Figure 54. Transportation and Other Expenses
62. In the Estimated Transportation and Other Expenses screen, the traveler can enter additional estimated expenses for the TDY trip.
Figure 55. Expenses window
NOTE: After retrieving the reservation, the Airfare should populate in the Amount column. In the below screenshot example, the Airfare did not populate as a result of not actually retrieving a reservation. In this case, the Airfare must be manually entered.
Page 42 of 170
E2 User Guide
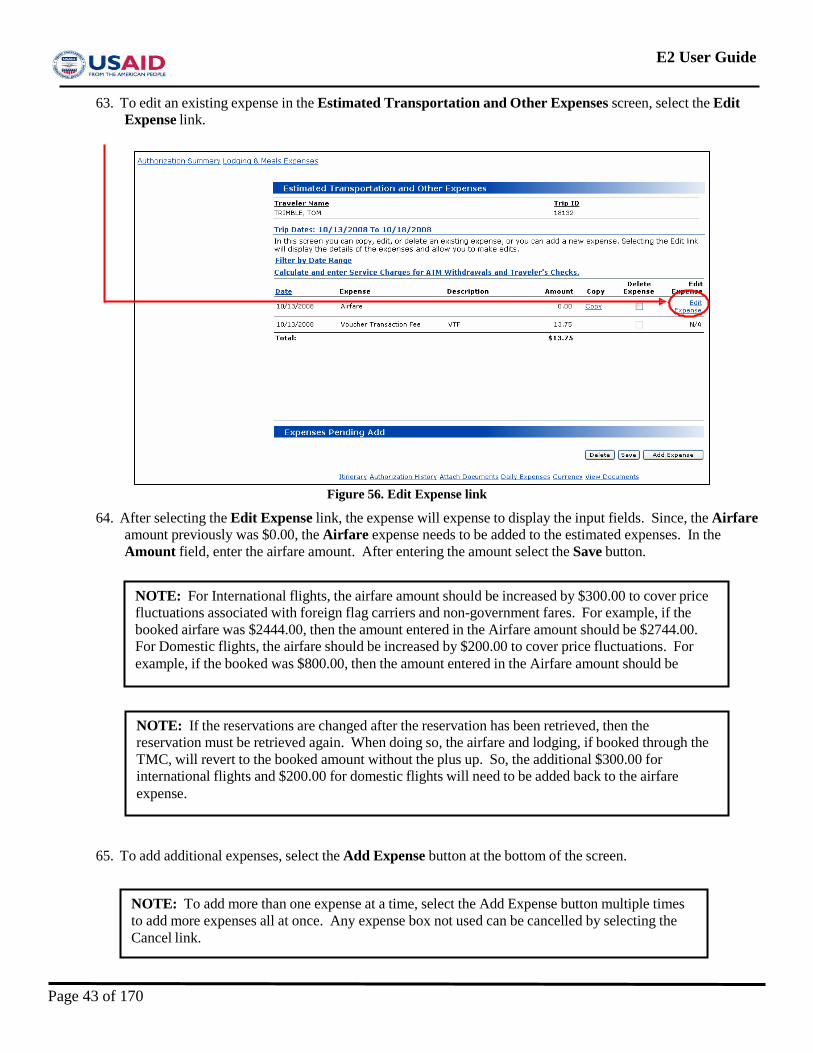
63. To edit an existing expense in the Estimated Transportation and Other Expenses screen, select the Edit Expense link.
Figure 56. Edit Expense link
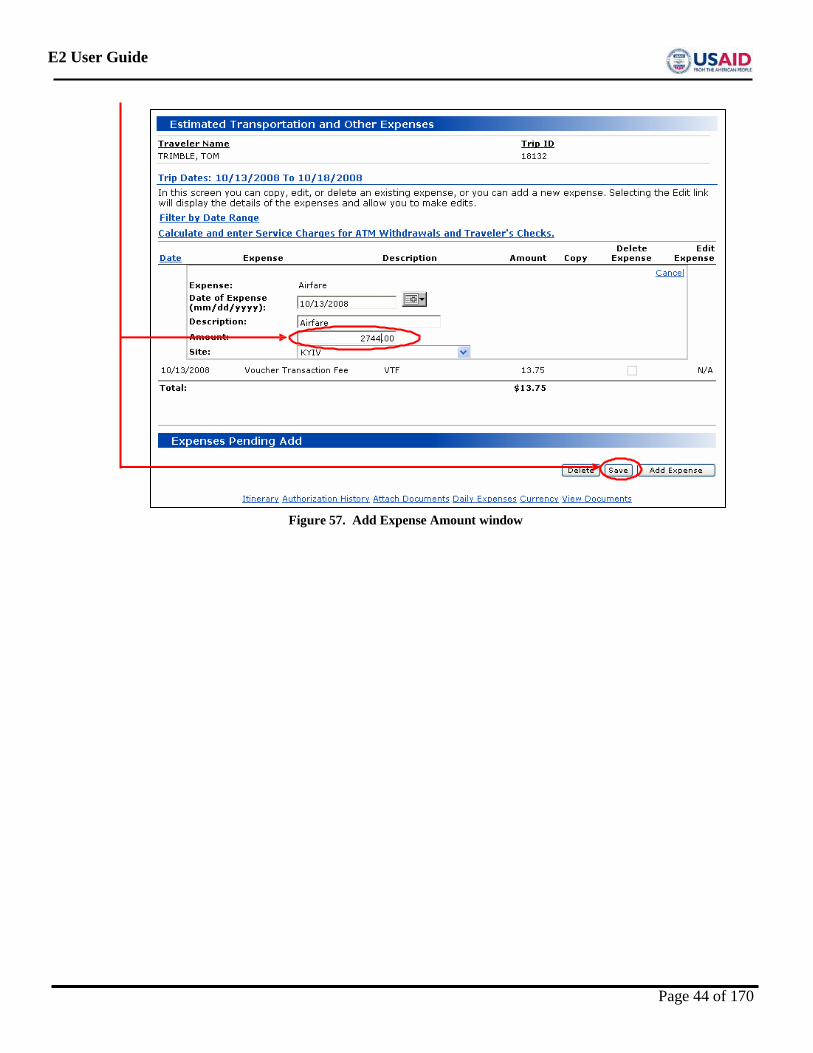
64. After selecting the Edit Expense link, the expense will expense to display the input fields. Since, the Airfare amount previously was $0.00, the Airfare expense needs to be added to the estimated expenses. In the Amount field, enter the airfare amount. After entering the amount select the Save button.
65. To add additional expenses, select the Add Expense button at the bottom of the screen.
NOTE: To add more than one expense at a time, select the Add Expense button multiple times to add more expenses all at once. Any expense box not used can be cancelled by selecting the Cancel link.
NOTE: If the reservations are changed after the reservation has been retrieved, then the reservation must be retrieved again. When doing so, the airfare and lodging, if booked through the TMC, will revert to the booked amount without the plus up. So, the additional $300.00 for international flights and $200.00 for domestic flights will need to be added back to the airfare expense.
NOTE: For International flights, the airfare amount should be increased by $300.00 to cover price fluctuations associated with foreign flag carriers and non-government fares. For example, if the booked airfare was $2444.00, then the amount entered in the Airfare amount should be $2744.00. For Domestic flights, the airfare should be increased by $200.00 to cover price fluctuations. For example, if the booked was $800.00, then the amount entered in the Airfare amount should be
Page 43 of 170
E2 User Guide
Figure 57. Add Expense Amount window
Page 44 of 170
E2 User Guide
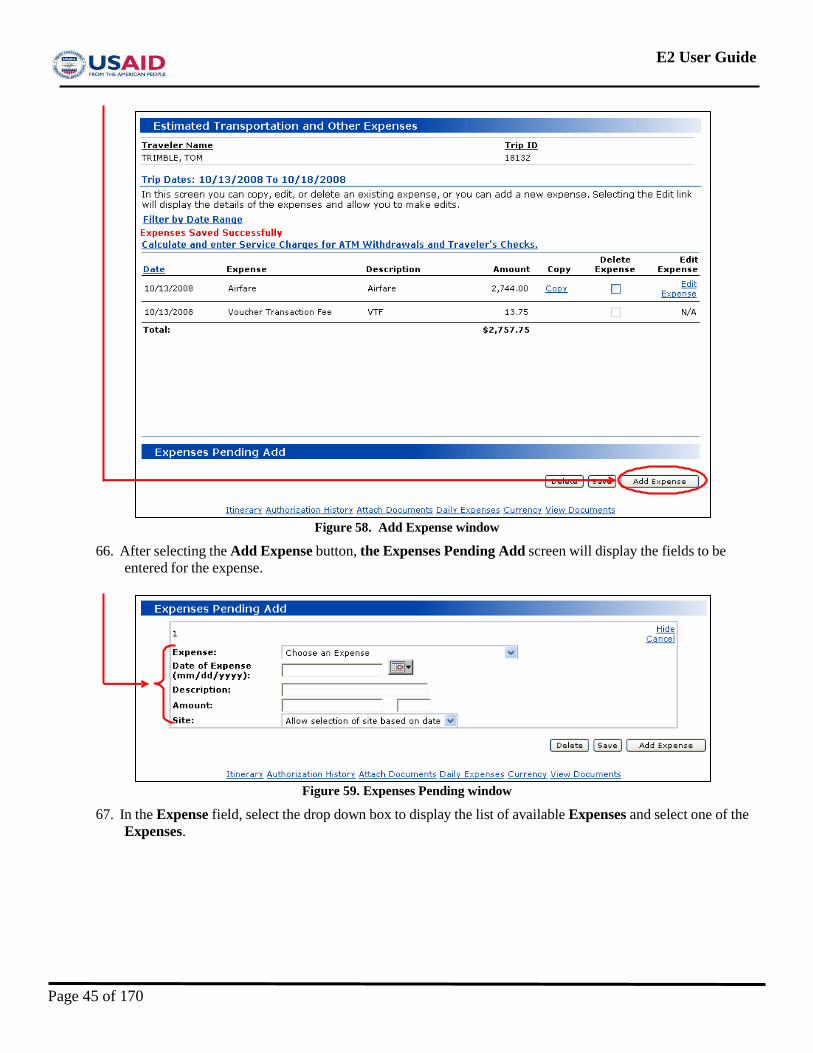
Figure 58. Add Expense window
66. After selecting the Add Expense button, the Expenses Pending Add screen will display the fields to be entered for the expense.
Figure 59. Expenses Pending window
67. In the Expense field, select the drop down box to display the list of available Expenses and select one of the Expenses.
Page 45 of 170
E2 User Guide
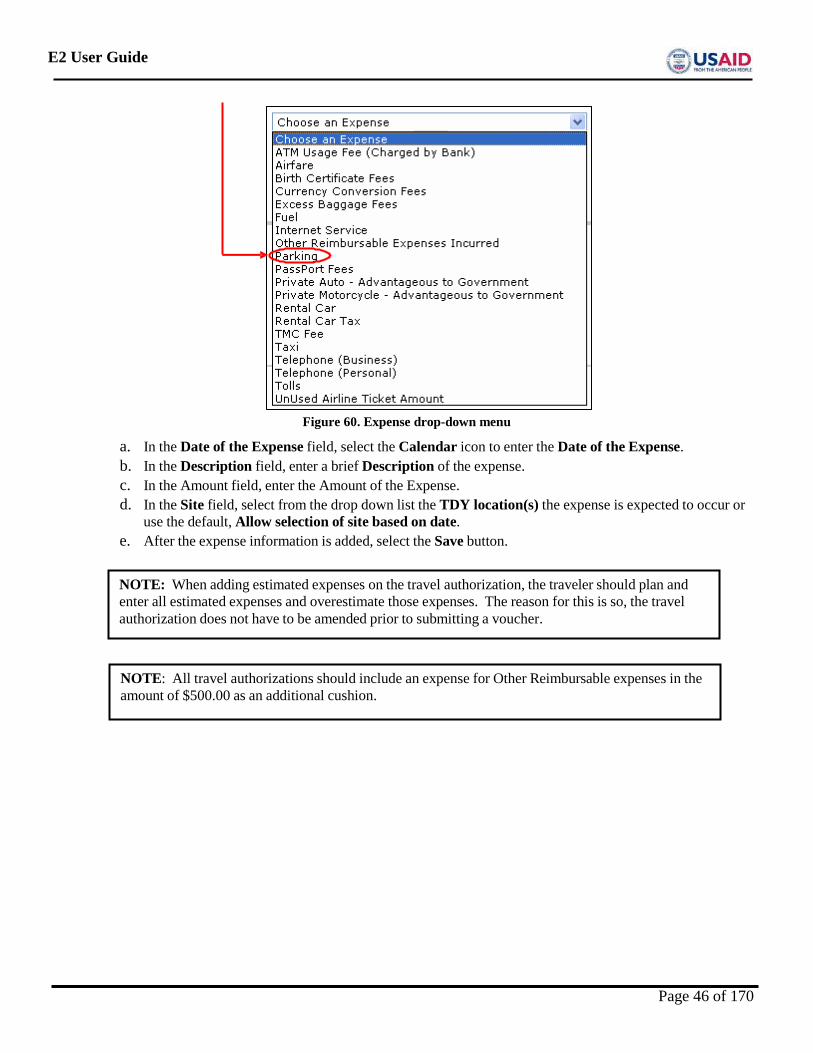
Figure 60. Expense drop-down menu
a. In the Date of the Expense field, select the Calendar icon to enter the Date of the Expense. b. In the Description field, enter a brief Description of the expense. c. In the Amount field, enter the Amount of the Expense. d. In the Site field, select from the drop down list the TDY location(s) the expense is expected to occur or
use the default, Allow selection of site based on date. e. After the expense information is added, select the Save button.
NOTE: All travel authorizations should include an expense for Other Reimbursable expenses in the amount of $500.00 as an additional cushion.
NOTE: When adding estimated expenses on the travel authorization, the traveler should plan and enter all estimated expenses and overestimate those expenses. The reason for this is so, the travel authorization does not have to be amended prior to submitting a voucher.
Page 46 of 170
E2 User Guide
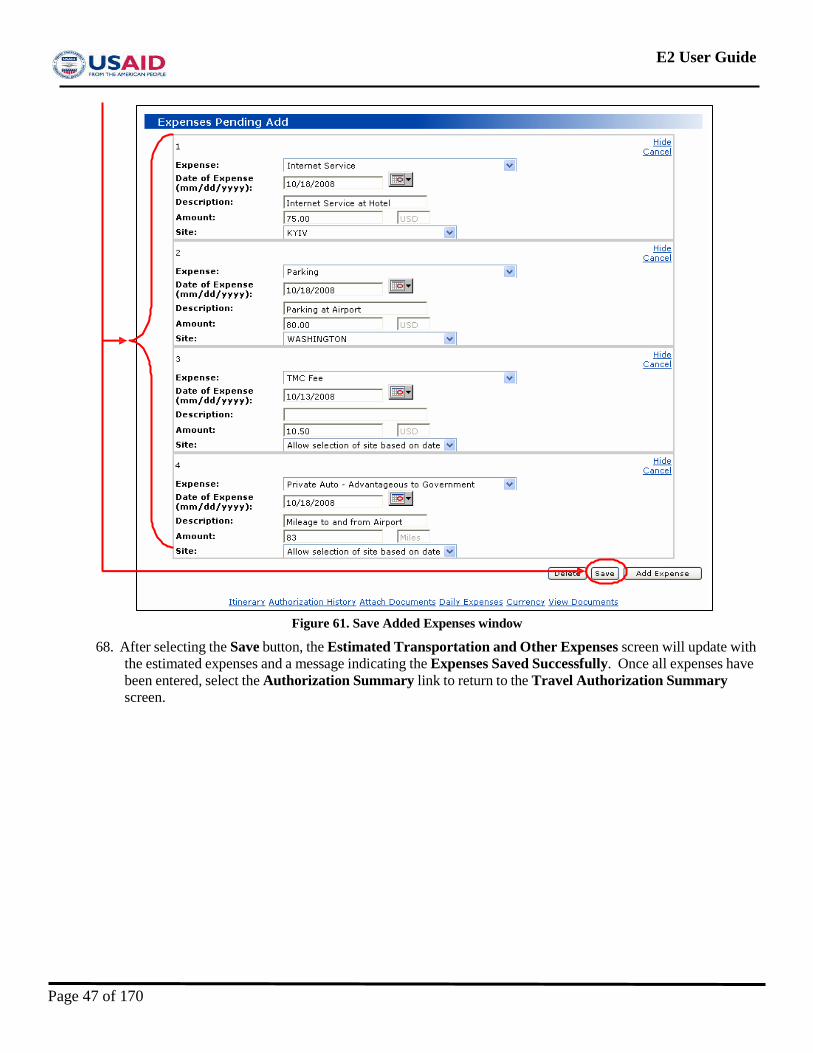
Figure 61. Save Added Expenses window
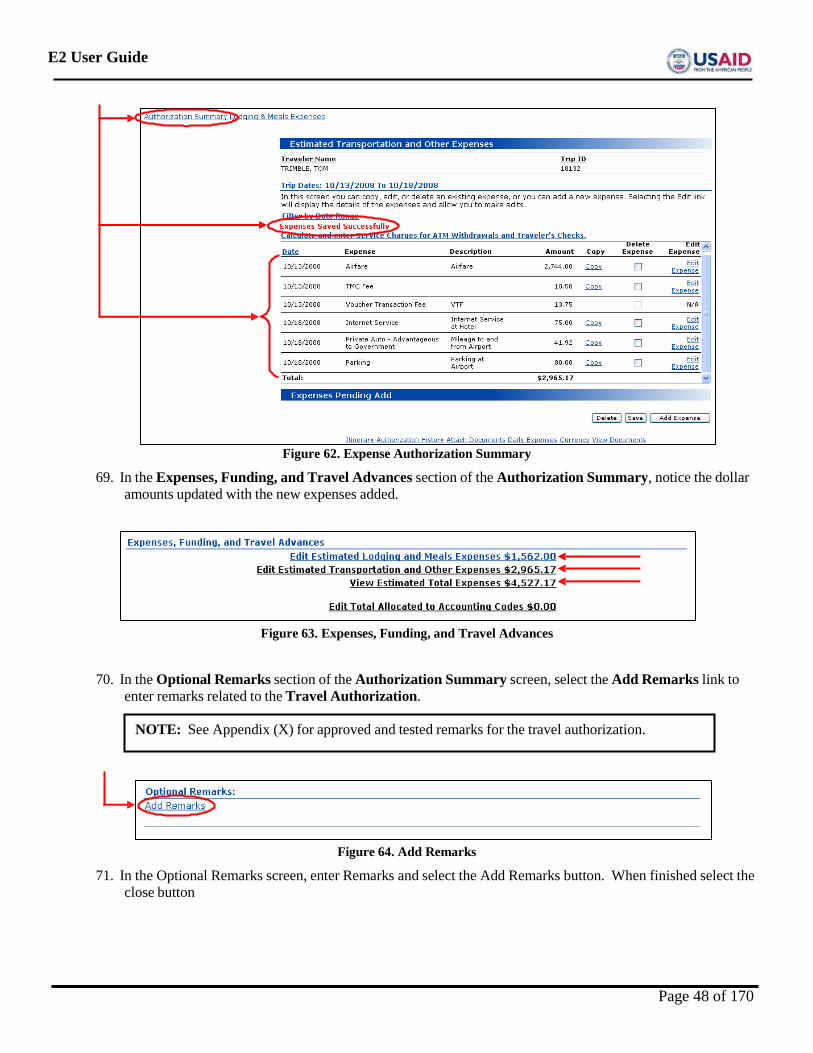
68. After selecting the Save button, the Estimated Transportation and Other Expenses screen will update with the estimated expenses and a message indicating the Expenses Saved Successfully. Once all expenses have been entered, select the Authorization Summary link to return to the Travel Authorization Summary screen.
Page 47 of 170
E2 User Guide
Figure 62. Expense Authorization Summary
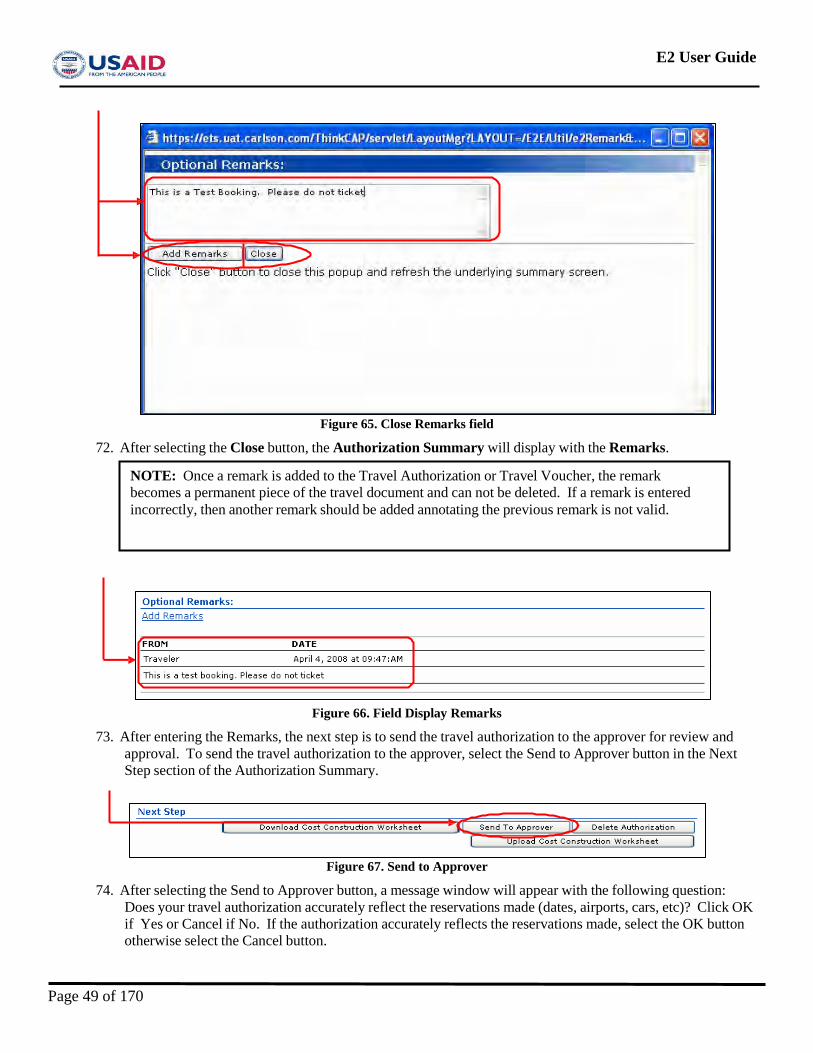
69. In the Expenses, Funding, and Travel Advances section of the Authorization Summary, notice the dollar amounts updated with the new expenses added.
Figure 63. Expenses, Funding, and Travel Advances
70. In the Optional Remarks section of the Authorization Summary screen, select the Add Remarks link to enter remarks related to the Travel Authorization.
Figure 64. Add Remarks
71. In the Optional Remarks screen, enter Remarks and select the Add Remarks button. When finished select the close button
NOTE: See Appendix (X) for approved and tested remarks for the travel authorization.
Page 48 of 170
E2 User Guide
Figure 65. Close Remarks field
72. After selecting the Close button, the Authorization Summary will display with the Remarks.
Figure 66. Field Display Remarks
73. After entering the Remarks, the next step is to send the travel authorization to the approver for review and approval. To send the travel authorization to the approver, select the Send to Approver button in the Next Step section of the Authorization Summary.
Figure 67. Send to Approver
74. After selecting the Send to Approver button, a message window will appear with the following question: Does your travel authorization accurately reflect the reservations made (dates, airports, cars, etc)? Click OK if Yes or Cancel if No. If the authorization accurately reflects the reservations made, select the OK button otherwise select the Cancel button.
NOTE: Once a remark is added to the Travel Authorization or Travel Voucher, the remark becomes a permanent piece of the travel document and can not be deleted. If a remark is entered incorrectly, then another remark should be added annotating the previous remark is not valid.
Page 49 of 170
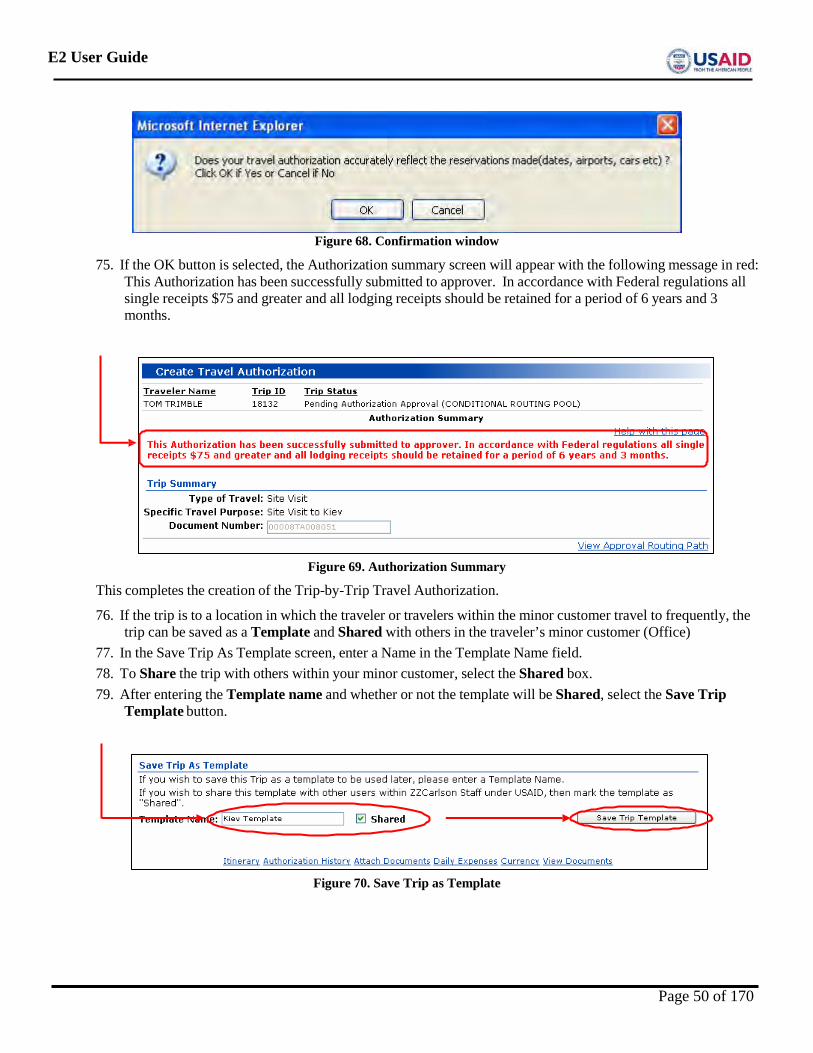
E2 User Guide
Figure 68. Confirmation window
75. If the OK button is selected, the Authorization summary screen will appear with the following message in red: This Authorization has been successfully submitted to approver. In accordance with Federal regulations all single receipts $75 and greater and all lodging receipts should be retained for a period of 6 years and 3 months.
Figure 69. Authorization Summary
This completes the creation of the Trip-by-Trip Travel Authorization.
76. If the trip is to a location in which the traveler or travelers within the minor customer travel to frequently, the trip can be saved as a Template and Shared with others in the traveler’s minor customer (Office)
77. In the Save Trip As Template screen, enter a Name in the Template Name field. 78. To Share the trip with others within your minor customer, select the Shared box. 79. After entering the Template name and whether or not the template will be Shared, select the Save Trip
Template button.
Figure 70. Save Trip as Template
Page 50 of 170

E2 User Guide
This page intentionally left blank
Page 51 of 170
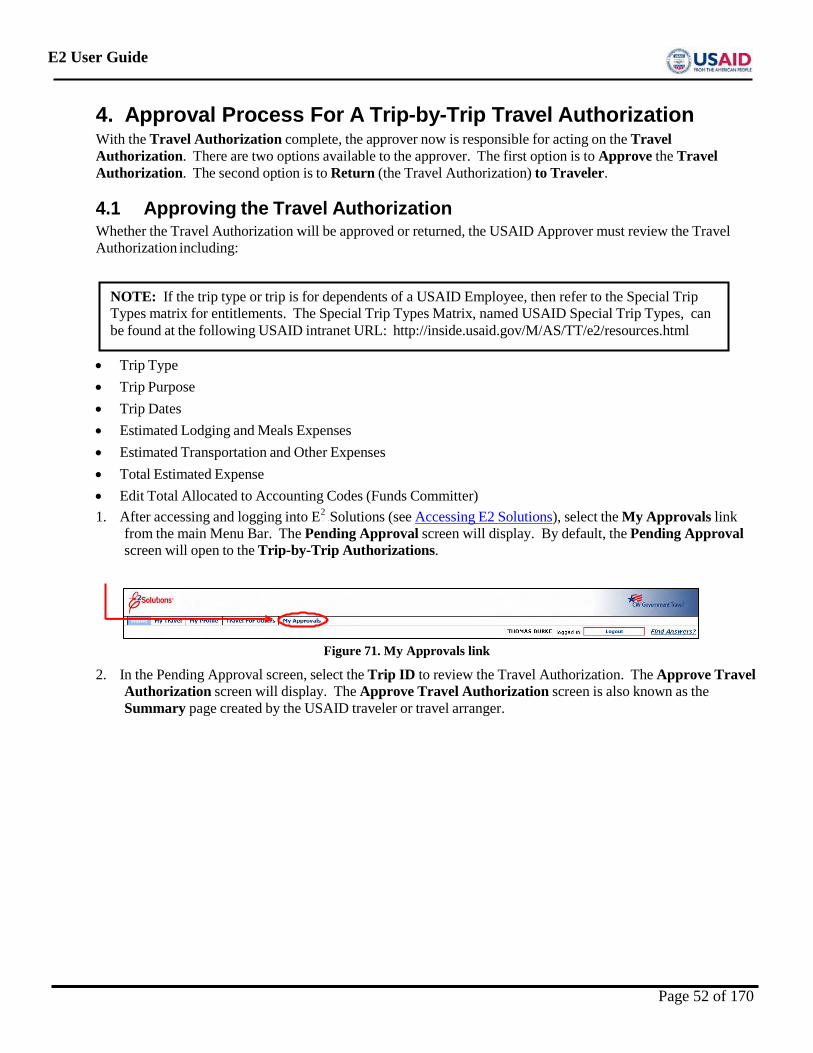
E2 User Guide
P P
4. Approval Process For A Trip-by-Trip Travel Authorization With the Travel Authorization complete, the approver now is responsible for acting on the Travel Authorization. There are two options available to the approver. The first option is to Approve the Travel Authorization. The second option is to Return (the Travel Authorization) to Traveler.
4.1 Approving the Travel Authorization Whether the Travel Authorization will be approved or returned, the USAID Approver must review the Travel Authorization including:
• Trip Type • Trip Purpose • Trip Dates • Estimated Lodging and Meals Expenses • Estimated Transportation and Other Expenses • Total Estimated Expense • Edit Total Allocated to Accounting Codes (Funds Committer) 1. After accessing and logging into E2 Solutions (see Accessing E2 Solutions), select the My Approvals link
from the main Menu Bar. The Pending Approval screen will display. By default, the Pending Approval screen will open to the Trip-by-Trip Authorizations.
Figure 71. My Approvals link
2. In the Pending Approval screen, select the Trip ID to review the Travel Authorization. The Approve Travel Authorization screen will display. The Approve Travel Authorization screen is also known as the Summary page created by the USAID traveler or travel arranger.
NOTE: If the trip type or trip is for dependents of a USAID Employee, then refer to the Special Trip Types matrix for entitlements. The Special Trip Types Matrix, named USAID Special Trip Types, can be found at the following USAID intranet URL: http://inside.usaid.gov/M/AS/TT/e2/resources.html
Page 52 of 170
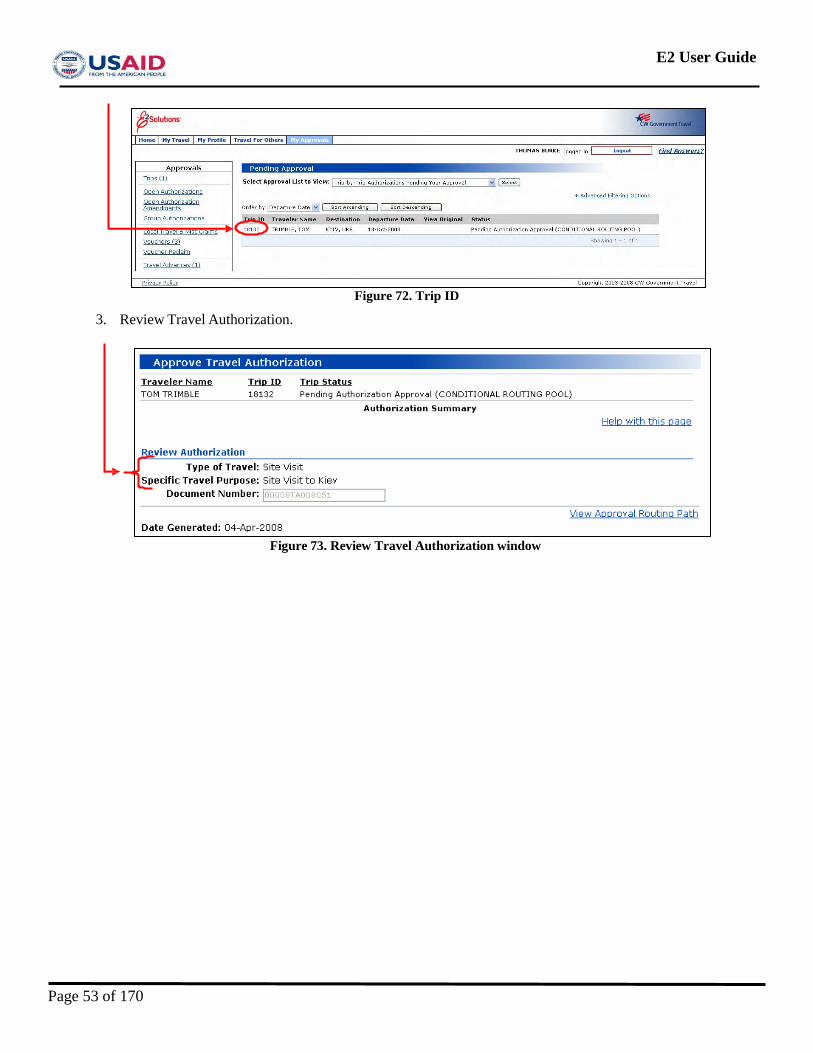
E2 User Guide
3. Review Travel Authorization. Figure 72. Trip ID
Figure 73. Review Travel Authorization window
Page 53 of 170
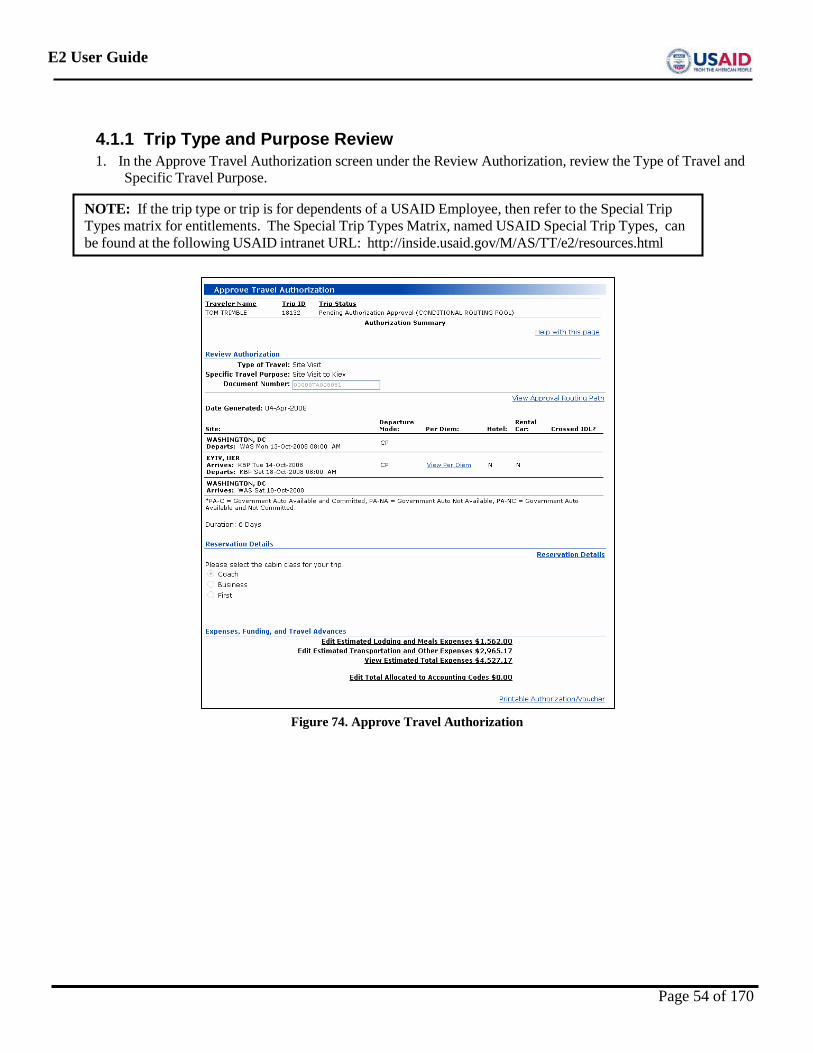
E2 User Guide
4.1.1 Trip Type and Purpose Review 1. In the Approve Travel Authorization screen under the Review Authorization, review the Type of Travel and
Specific Travel Purpose.
Figure 74. Approve Travel Authorization
NOTE: If the trip type or trip is for dependents of a USAID Employee, then refer to the Special Trip Types matrix for entitlements. The Special Trip Types Matrix, named USAID Special Trip Types, can be found at the following USAID intranet URL: http://inside.usaid.gov/M/AS/TT/e2/resources.html
Page 54 of 170
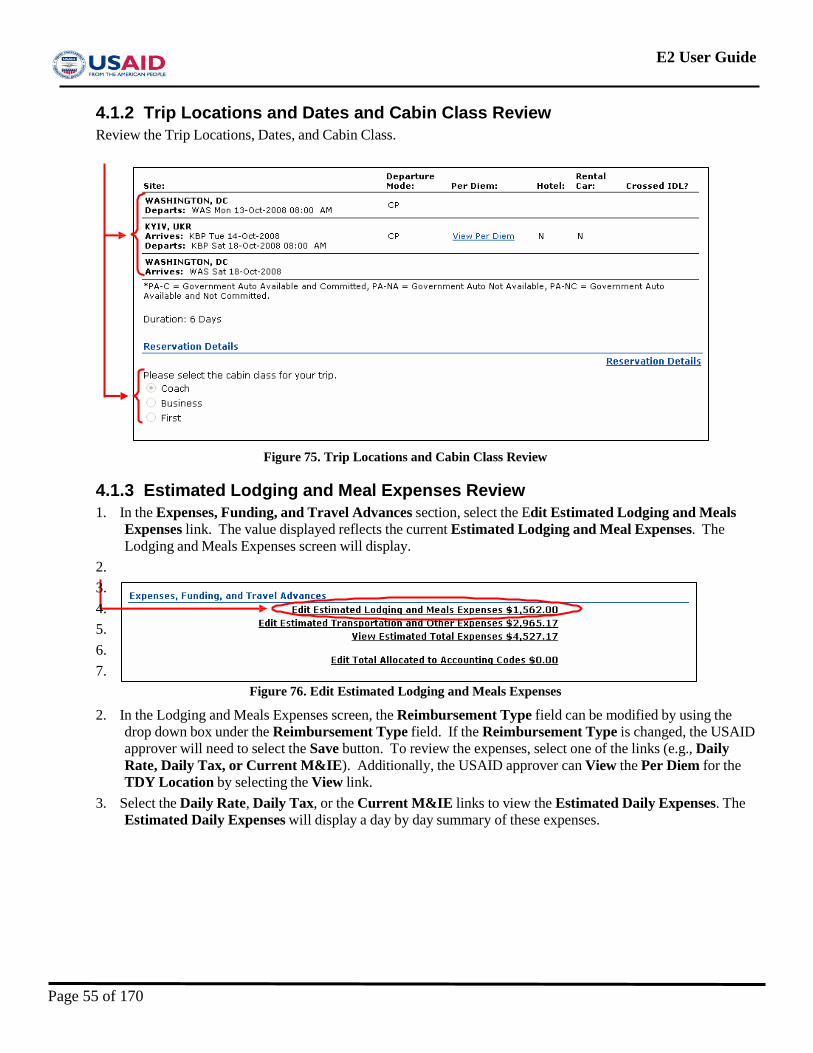
E2 User Guide
4.1.2 Trip Locations and Dates and Cabin Class Review Review the Trip Locations, Dates, and Cabin Class.
Figure 75. Trip Locations and Cabin Class Review
4.1.3 Estimated Lodging and Meal Expenses Review 1. In the Expenses, Funding, and Travel Advances section, select the Edit Estimated Lodging and Meals
Expenses link. The value displayed reflects the current Estimated Lodging and Meal Expenses. The Lodging and Meals Expenses screen will display.
2. 3. 4. 5. 6. 7.
Figure 76. Edit Estimated Lodging and Meals Expenses
2. In the Lodging and Meals Expenses screen, the Reimbursement Type field can be modified by using the drop down box under the Reimbursement Type field. If the Reimbursement Type is changed, the USAID approver will need to select the Save button. To review the expenses, select one of the links (e.g., Daily Rate, Daily Tax, or Current M&IE). Additionally, the USAID approver can View the Per Diem for the TDY Location by selecting the View link.
3. Select the Daily Rate, Daily Tax, or the Current M&IE links to view the Estimated Daily Expenses. The Estimated Daily Expenses will display a day by day summary of these expenses.
Page 55 of 170
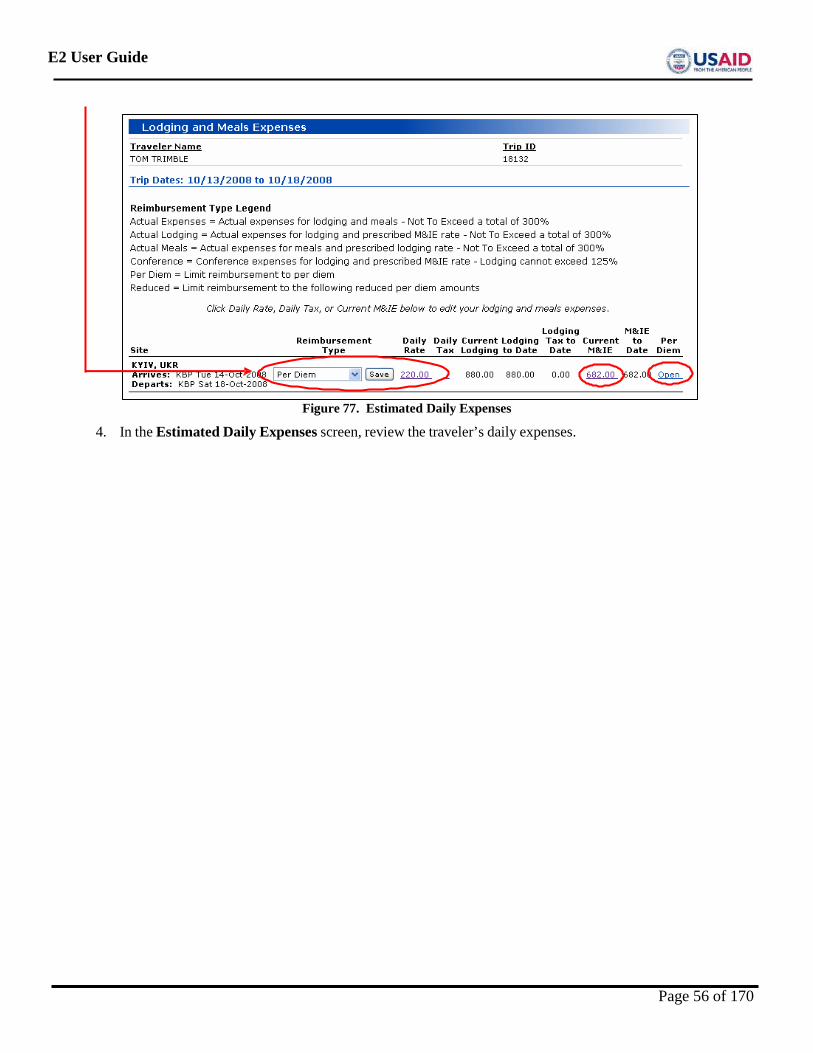
E2 User Guide
Figure 77. Estimated Daily Expenses
4. In the Estimated Daily Expenses screen, review the traveler’s daily expenses.
Page 56 of 170
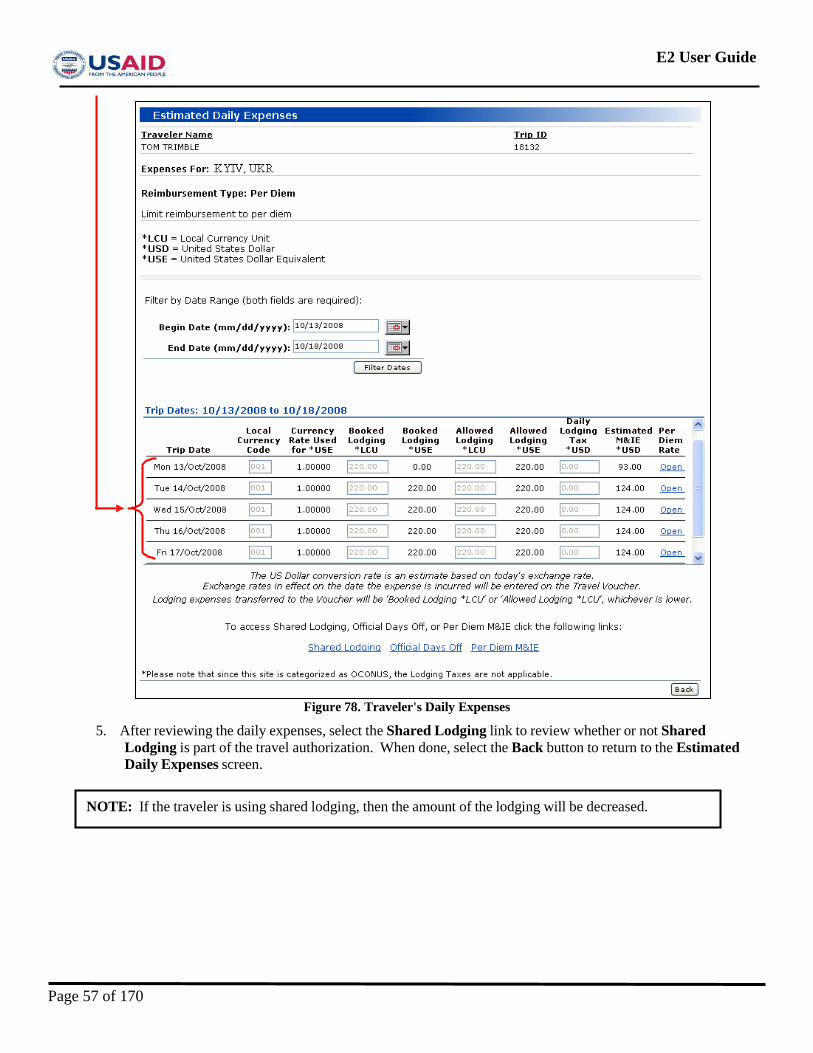
E2 User Guide
Figure 78. Traveler's Daily Expenses
5. After reviewing the daily expenses, select the Shared Lodging link to review whether or not Shared Lodging is part of the travel authorization. When done, select the Back button to return to the Estimated Daily Expenses screen.
NOTE: If the traveler is using shared lodging, then the amount of the lodging will be decreased.
Page 57 of 170
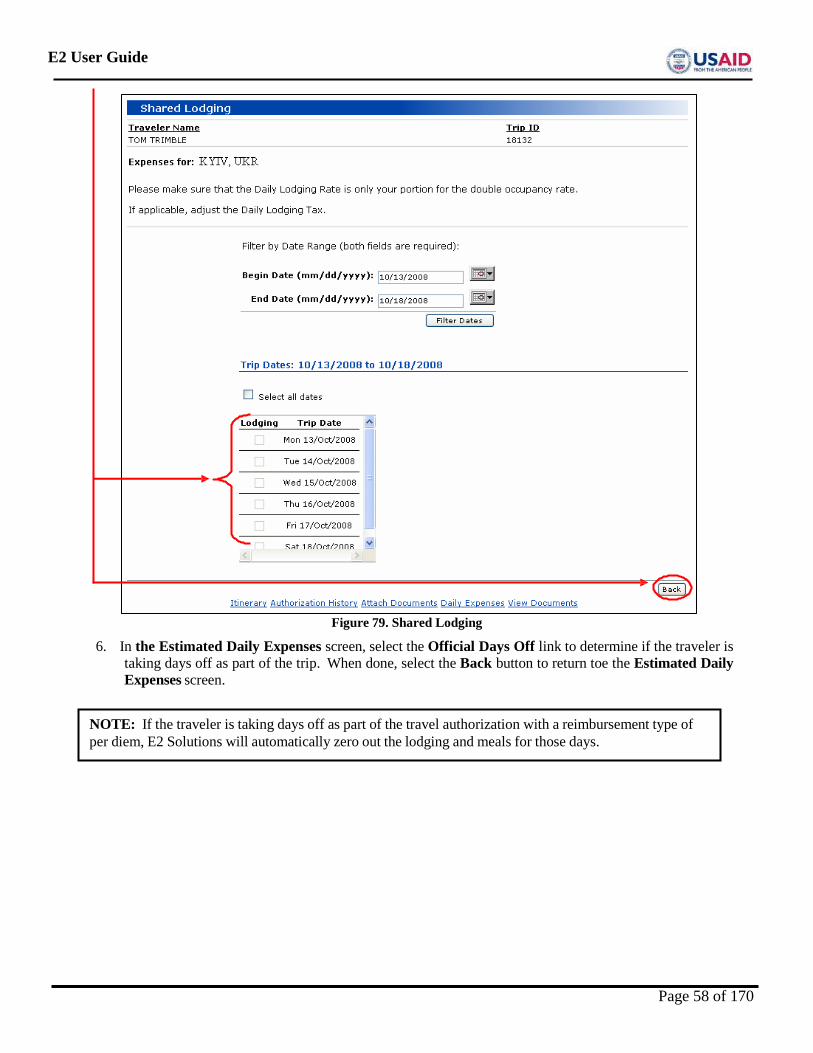
E2 User Guide
Figure 79. Shared Lodging
6. In the Estimated Daily Expenses screen, select the Official Days Off link to determine if the traveler is taking days off as part of the trip. When done, select the Back button to return toe the Estimated Daily Expenses screen.
NOTE: If the traveler is taking days off as part of the travel authorization with a reimbursement type of per diem, E2 Solutions will automatically zero out the lodging and meals for those days.
Page 58 of 170
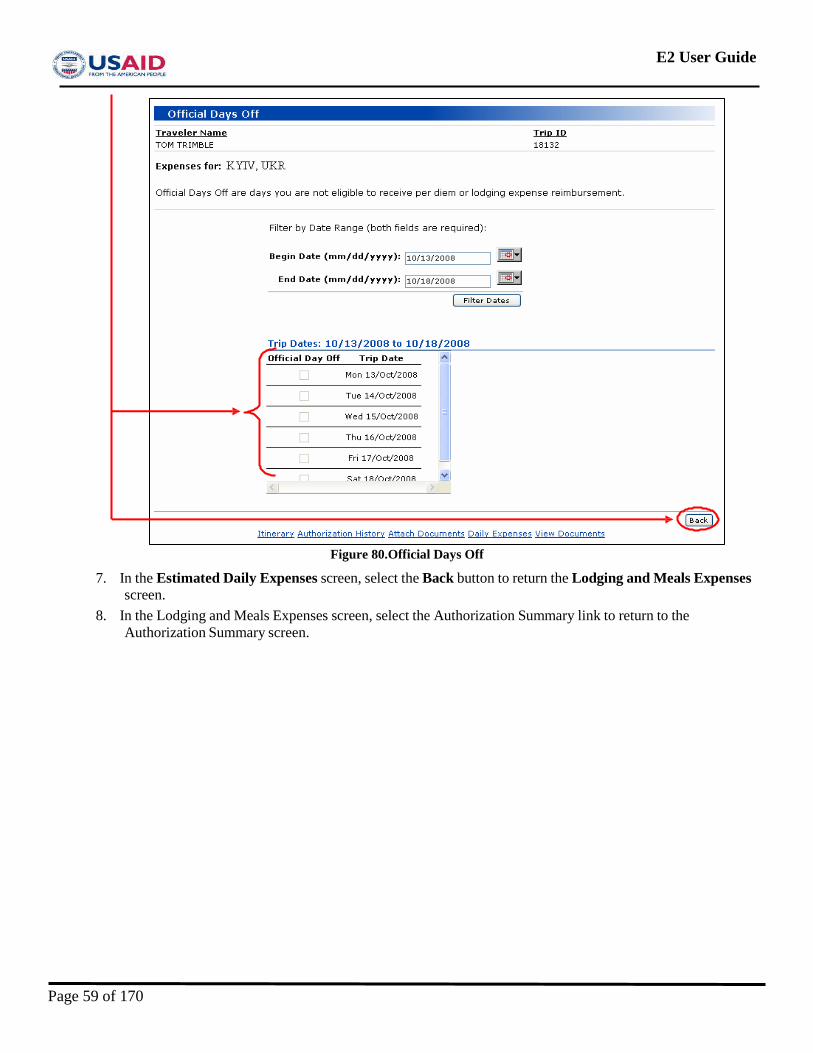
E2 User Guide
Figure 80.Official Days Off
7. In the Estimated Daily Expenses screen, select the Back button to return the Lodging and Meals Expenses screen.
8. In the Lodging and Meals Expenses screen, select the Authorization Summary link to return to the Authorization Summary screen.
Page 59 of 170
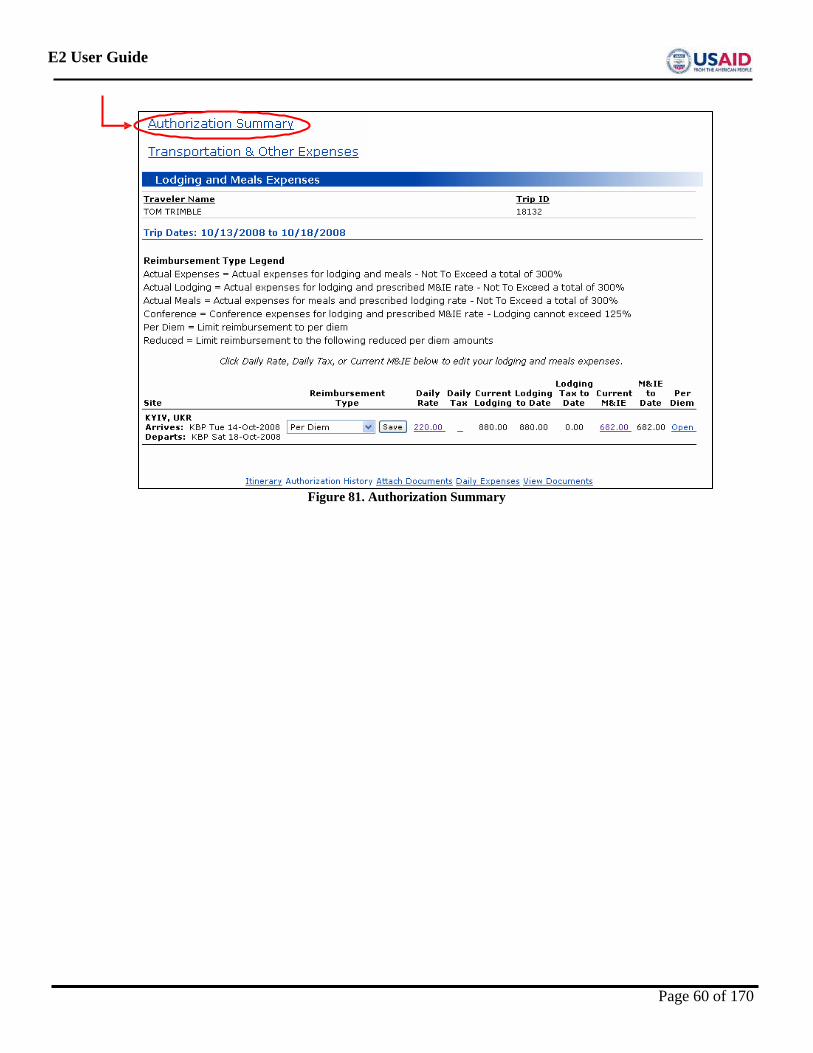
E2 User Guide
Figure 81. Authorization Summary
Page 60 of 170
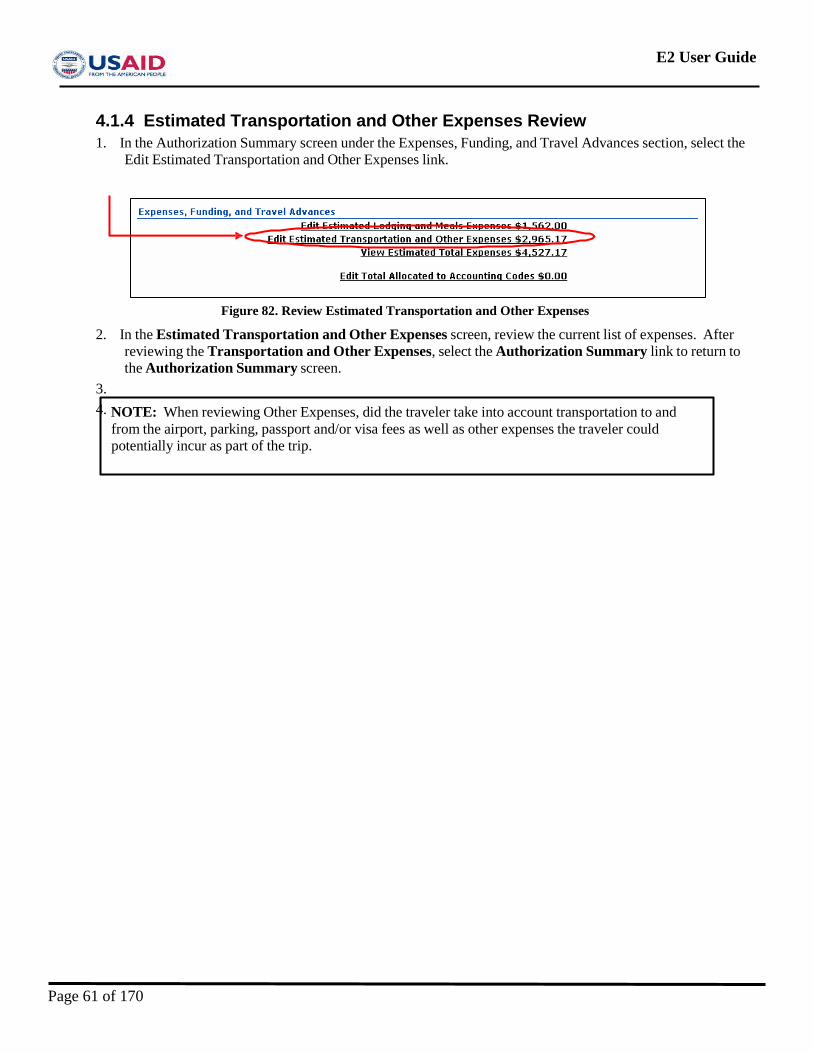
E2 User Guide
4.1.4 Estimated Transportation and Other Expenses Review 1. In the Authorization Summary screen under the Expenses, Funding, and Travel Advances section, select the
Edit Estimated Transportation and Other Expenses link.
Figure 82. Review Estimated Transportation and Other Expenses
2. In the Estimated Transportation and Other Expenses screen, review the current list of expenses. After reviewing the Transportation and Other Expenses, select the Authorization Summary link to return to the Authorization Summary screen.
3. 4. NOTE: When reviewing Other Expenses, did the traveler take into account transportation to and
from the airport, parking, passport and/or visa fees as well as other expenses the traveler could potentially incur as part of the trip.
Page 61 of 170
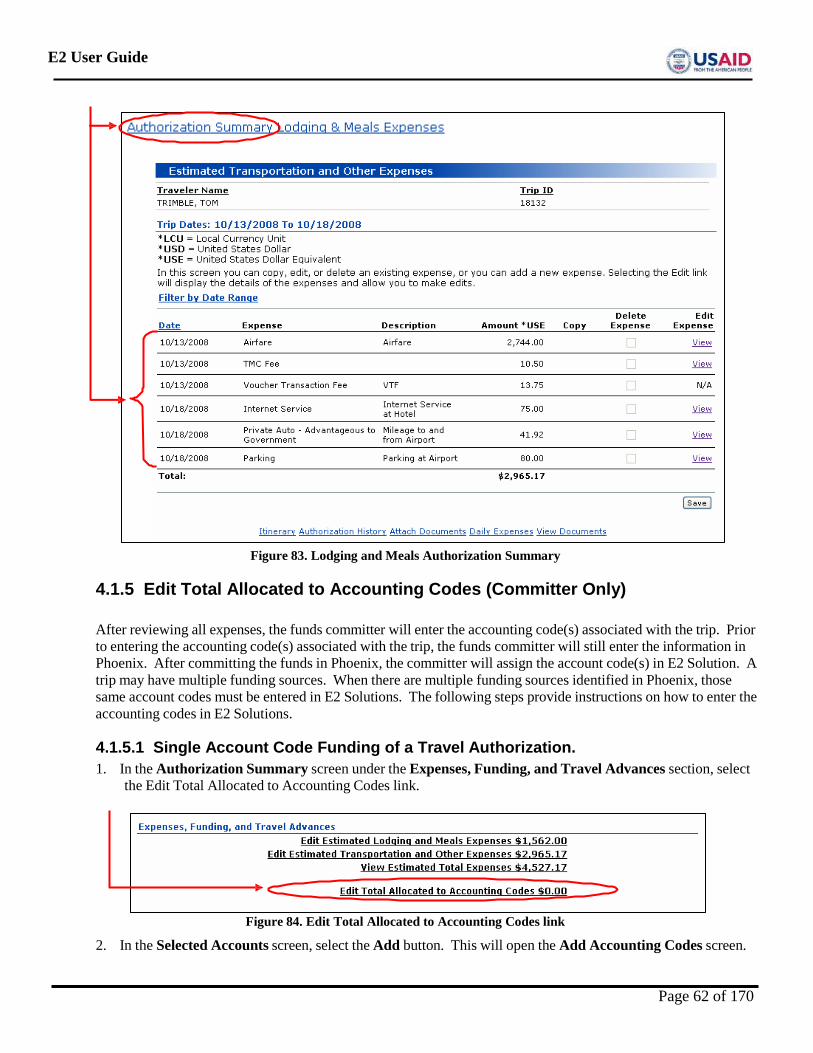
E2 User Guide
Figure 83. Lodging and Meals Authorization Summary
4.1.5 Edit Total Allocated to Accounting Codes (Committer Only)
After reviewing all expenses, the funds committer will enter the accounting code(s) associated with the trip. Prior to entering the accounting code(s) associated with the trip, the funds committer will still enter the information in Phoenix. After committing the funds in Phoenix, the committer will assign the account code(s) in E2 Solution. A trip may have multiple funding sources. When there are multiple funding sources identified in Phoenix, those same account codes must be entered in E2 Solutions. The following steps provide instructions on how to enter the accounting codes in E2 Solutions.
4.1.5.1 Single Account Code Funding of a Travel Authorization. 1. In the Authorization Summary screen under the Expenses, Funding, and Travel Advances section, select
the Edit Total Allocated to Accounting Codes link.
Figure 84. Edit Total Allocated to Accounting Codes link
2. In the Selected Accounts screen, select the Add button. This will open the Add Accounting Codes screen.
Page 62 of 170
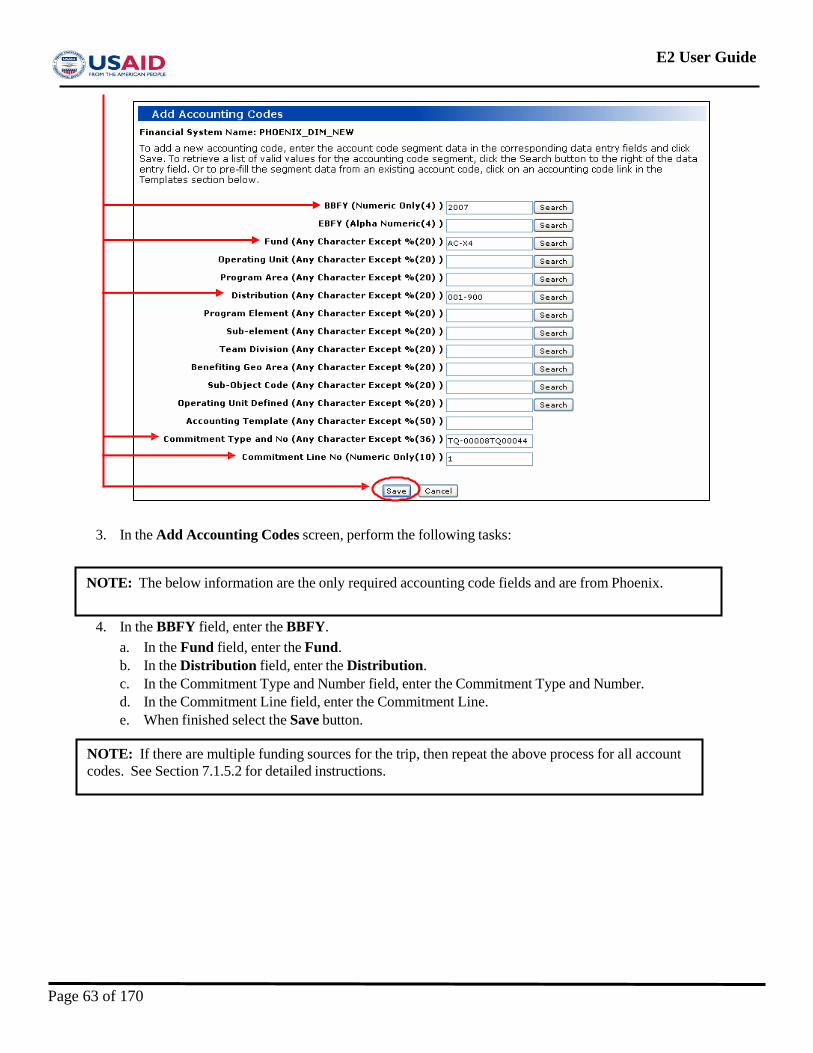
E2 User Guide
3. In the Add Accounting Codes screen, perform the following tasks:
4. In the BBFY field, enter the BBFY.
a. In the Fund field, enter the Fund. b. In the Distribution field, enter the Distribution. c. In the Commitment Type and Number field, enter the Commitment Type and Number. d. In the Commitment Line field, enter the Commitment Line. e. When finished select the Save button.
NOTE: If there are multiple funding sources for the trip, then repeat the above process for all account codes. See Section 7.1.5.2 for detailed instructions.
NOTE: The below information are the only required accounting code fields and are from Phoenix.
Page 63 of 170
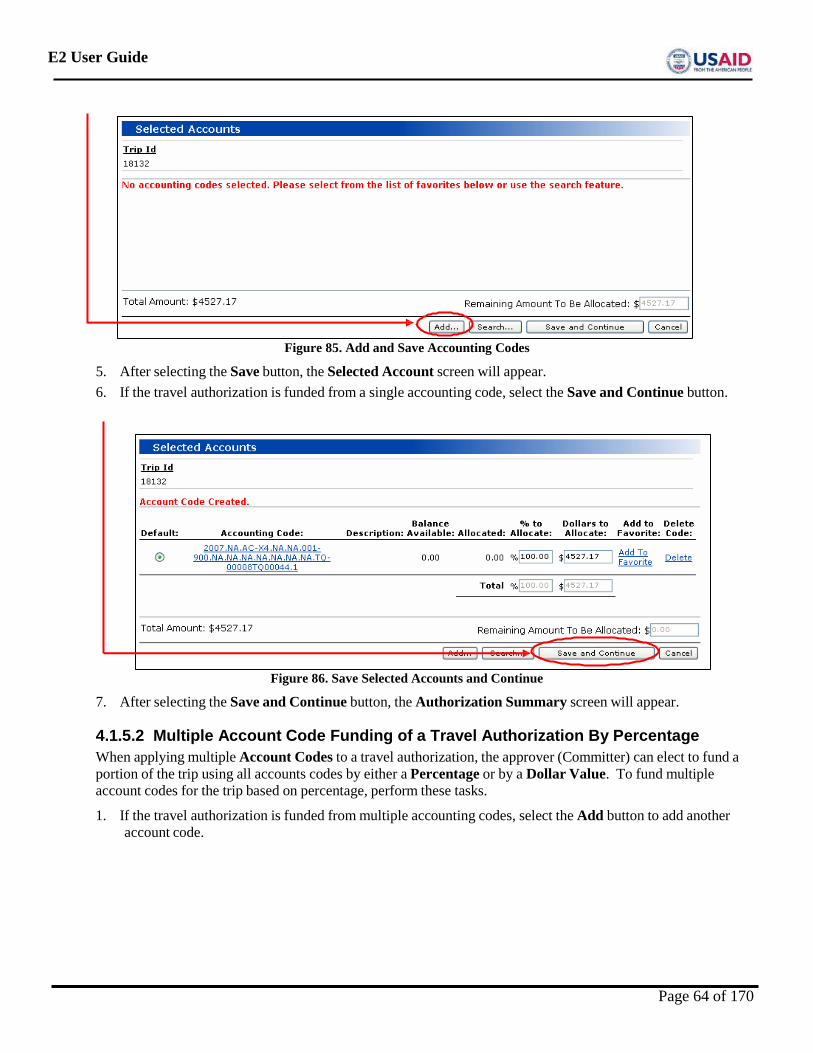
E2 User Guide
Figure 85. Add and Save Accounting Codes
5. After selecting the Save button, the Selected Account screen will appear. 6. If the travel authorization is funded from a single accounting code, select the Save and Continue button.
Figure 86. Save Selected Accounts and Continue
7. After selecting the Save and Continue button, the Authorization Summary screen will appear.
4.1.5.2 Multiple Account Code Funding of a Travel Authorization By Percentage When applying multiple Account Codes to a travel authorization, the approver (Committer) can elect to fund a portion of the trip using all accounts codes by either a Percentage or by a Dollar Value. To fund multiple account codes for the trip based on percentage, perform these tasks.
1. If the travel authorization is funded from multiple accounting codes, select the Add button to add another account code.
Page 64 of 170
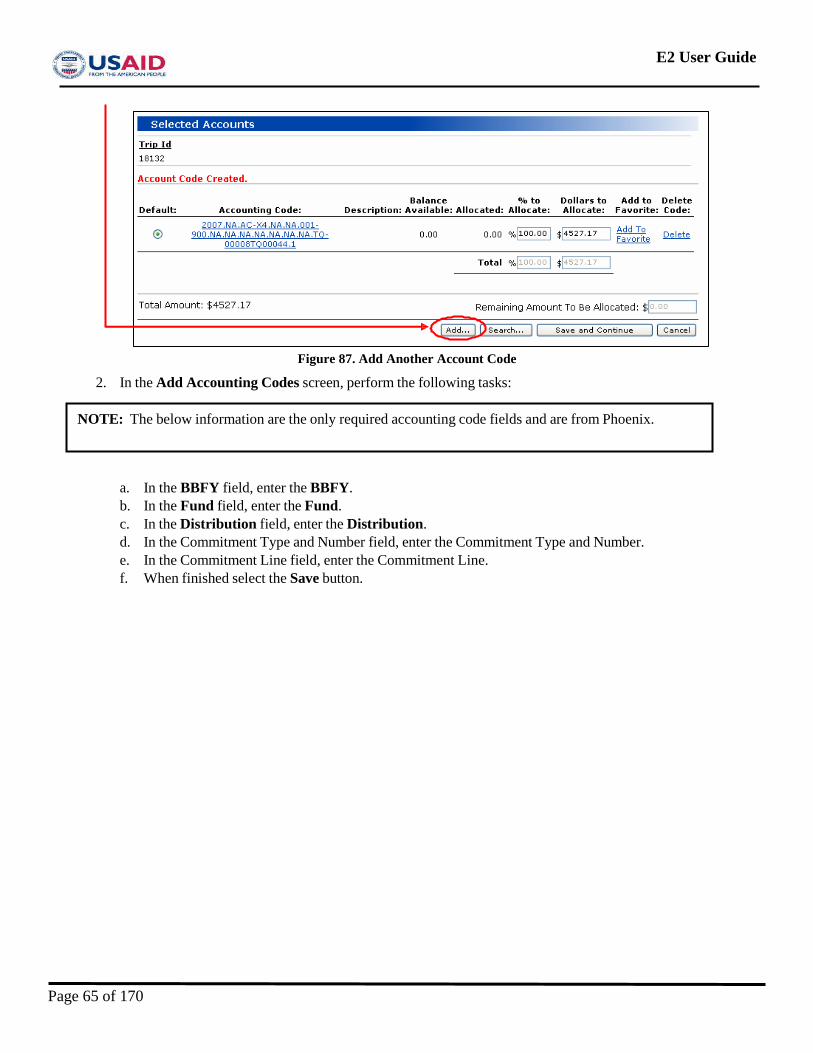
E2 User Guide
Figure 87. Add Another Account Code
2. In the Add Accounting Codes screen, perform the following tasks:
a. In the BBFY field, enter the BBFY. b. In the Fund field, enter the Fund. c. In the Distribution field, enter the Distribution. d. In the Commitment Type and Number field, enter the Commitment Type and Number. e. In the Commitment Line field, enter the Commitment Line. f. When finished select the Save button.
NOTE: The below information are the only required accounting code fields and are from Phoenix.
Page 65 of 170
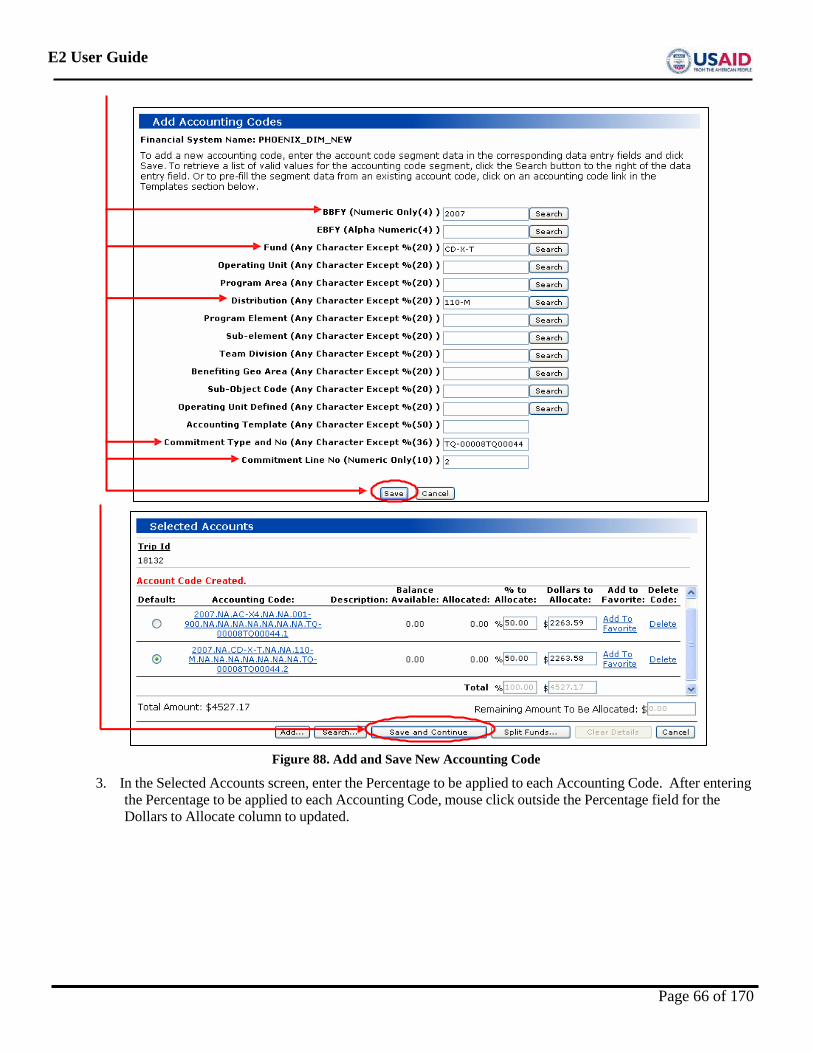
E2 User Guide
Figure 88. Add and Save New Accounting Code
3. In the Selected Accounts screen, enter the Percentage to be applied to each Accounting Code. After entering the Percentage to be applied to each Accounting Code, mouse click outside the Percentage field for the Dollars to Allocate column to updated.
Page 66 of 170
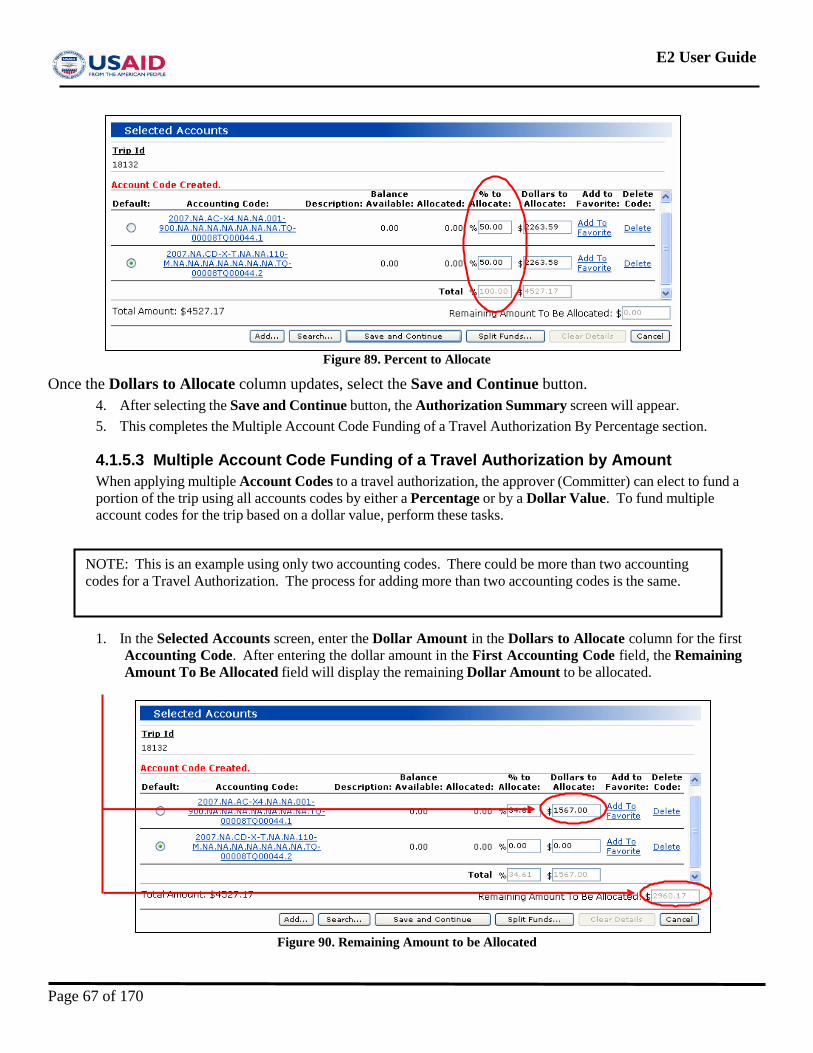
E2 User Guide
Figure 89. Percent to Allocate
Once the Dollars to Allocate column updates, select the Save and Continue button. 4. After selecting the Save and Continue button, the Authorization Summary screen will appear. 5. This completes the Multiple Account Code Funding of a Travel Authorization By Percentage section.
4.1.5.3 Multiple Account Code Funding of a Travel Authorization by Amount When applying multiple Account Codes to a travel authorization, the approver (Committer) can elect to fund a portion of the trip using all accounts codes by either a Percentage or by a Dollar Value. To fund multiple account codes for the trip based on a dollar value, perform these tasks.
1. In the Selected Accounts screen, enter the Dollar Amount in the Dollars to Allocate column for the first Accounting Code. After entering the dollar amount in the First Accounting Code field, the Remaining Amount To Be Allocated field will display the remaining Dollar Amount to be allocated.
Figure 90. Remaining Amount to be Allocated
NOTE: This is an example using only two accounting codes. There could be more than two accounting codes for a Travel Authorization. The process for adding more than two accounting codes is the same.
Page 67 of 170
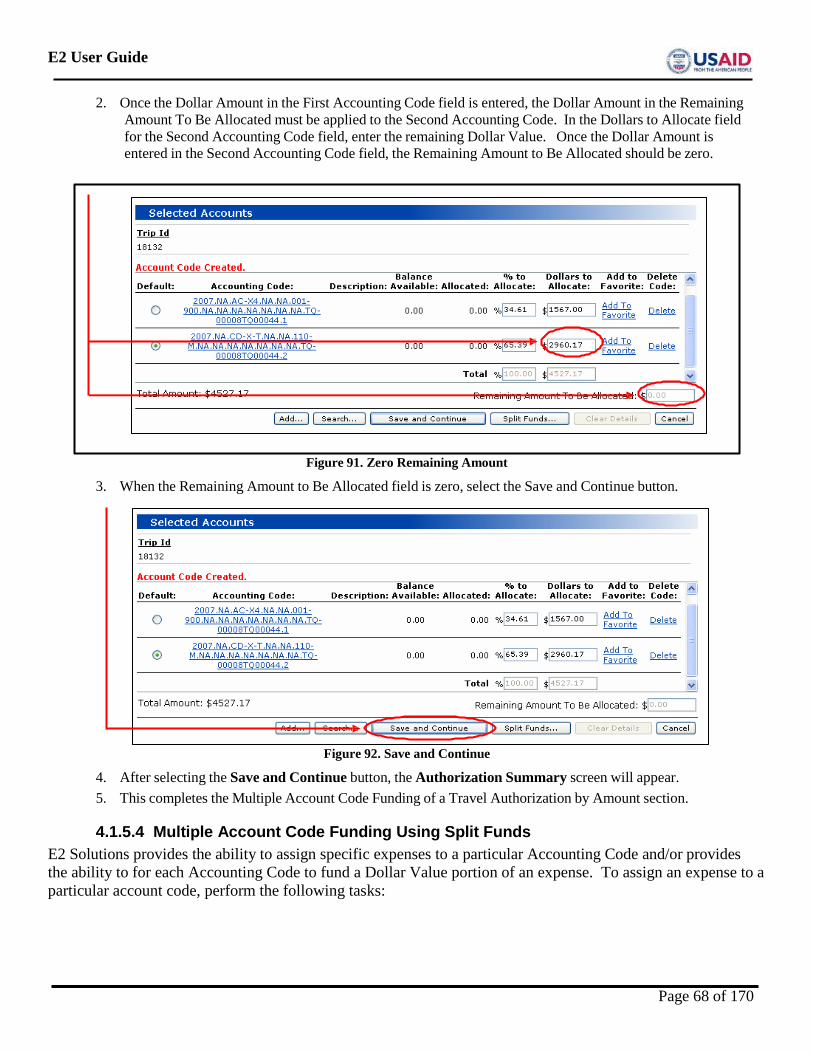
E2 User Guide
2. Once the Dollar Amount in the First Accounting Code field is entered, the Dollar Amount in the Remaining Amount To Be Allocated must be applied to the Second Accounting Code. In the Dollars to Allocate field for the Second Accounting Code field, enter the remaining Dollar Value. Once the Dollar Amount is entered in the Second Accounting Code field, the Remaining Amount to Be Allocated should be zero.
Figure 91. Zero Remaining Amount
3. When the Remaining Amount to Be Allocated field is zero, select the Save and Continue button.
Figure 92. Save and Continue
4. After selecting the Save and Continue button, the Authorization Summary screen will appear. 5. This completes the Multiple Account Code Funding of a Travel Authorization by Amount section.
4.1.5.4 Multiple Account Code Funding Using Split Funds
E2 Solutions provides the ability to assign specific expenses to a particular Accounting Code and/or provides the ability to for each Accounting Code to fund a Dollar Value portion of an expense. To assign an expense to a particular account code, perform the following tasks:
Page 68 of 170
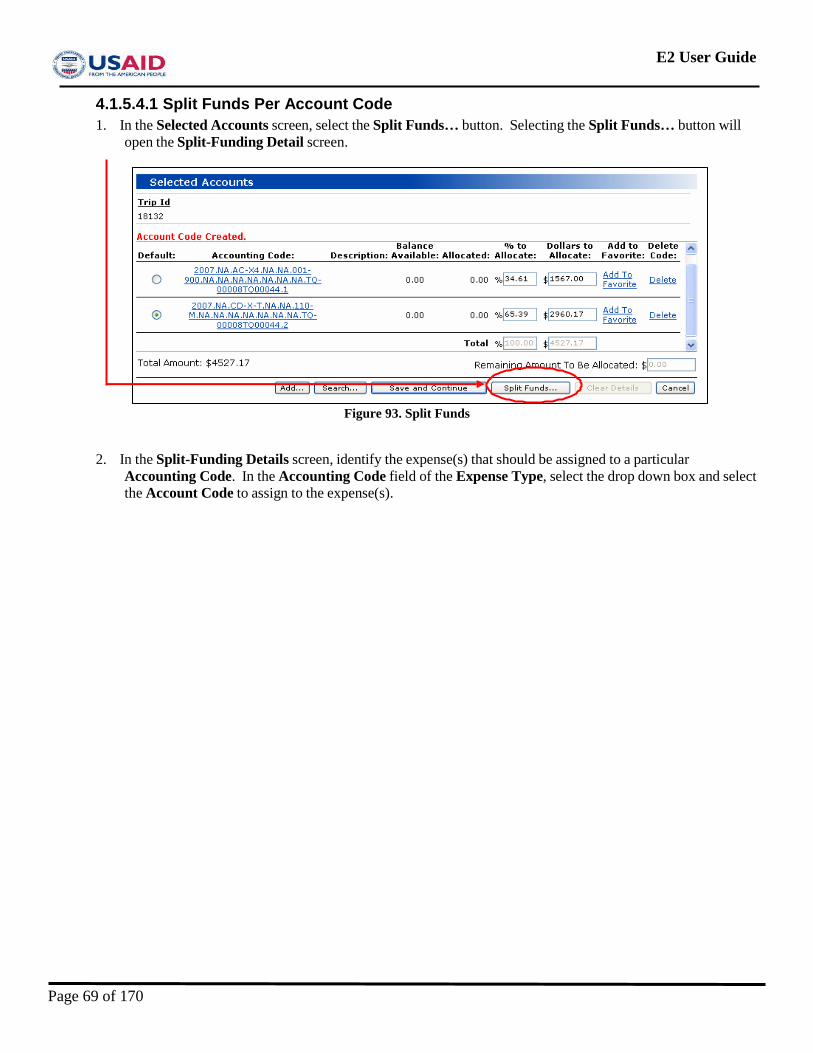
E2 User Guide
4.1.5.4.1 Split Funds Per Account Code 1. In the Selected Accounts screen, select the Split Funds… button. Selecting the Split Funds… button will
open the Split-Funding Detail screen.
Figure 93. Split Funds
2. In the Split-Funding Details screen, identify the expense(s) that should be assigned to a particular Accounting Code. In the Accounting Code field of the Expense Type, select the drop down box and select the Account Code to assign to the expense(s).
Page 69 of 170
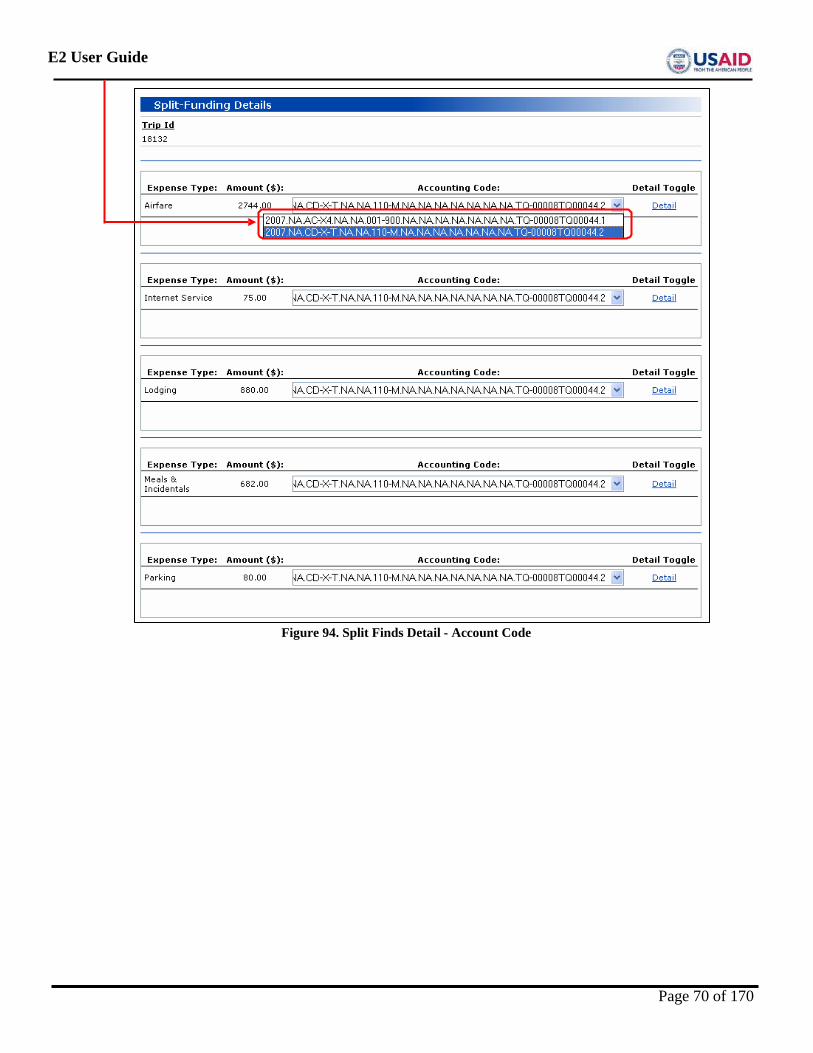
E2 User Guide
Figure 94. Split Finds Detail - Account Code
Page 70 of 170
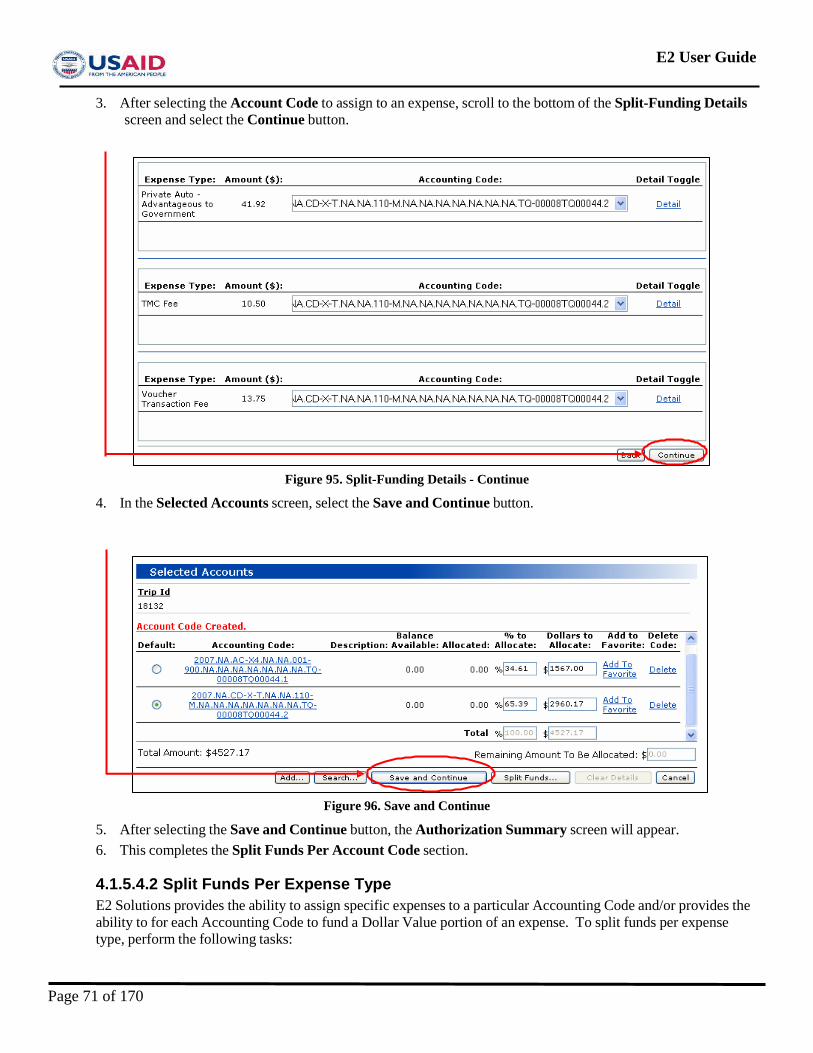
E2 User Guide
3. After selecting the Account Code to assign to an expense, scroll to the bottom of the Split-Funding Details screen and select the Continue button.
Figure 95. Split-Funding Details - Continue
4. In the Selected Accounts screen, select the Save and Continue button.
Figure 96. Save and Continue
5. After selecting the Save and Continue button, the Authorization Summary screen will appear. 6. This completes the Split Funds Per Account Code section.
4.1.5.4.2 Split Funds Per Expense Type E2 Solutions provides the ability to assign specific expenses to a particular Accounting Code and/or provides the ability to for each Accounting Code to fund a Dollar Value portion of an expense. To split funds per expense type, perform the following tasks:
Page 71 of 170
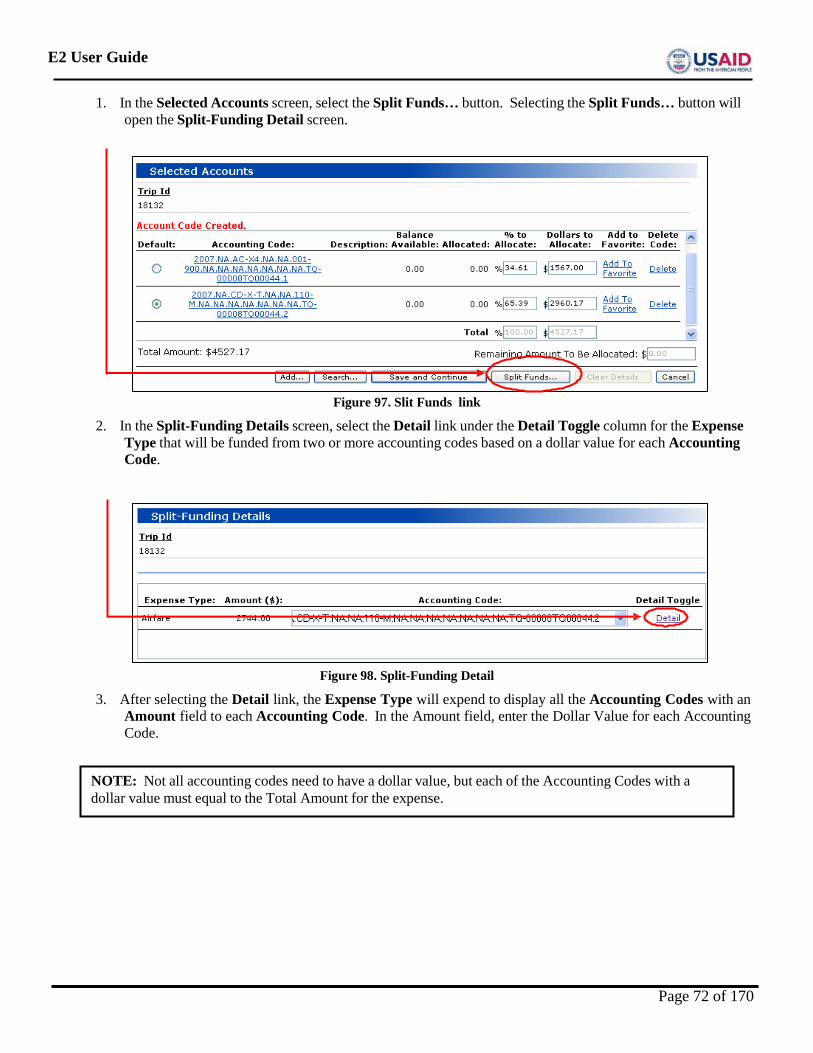
E2 User Guide
1. In the Selected Accounts screen, select the Split Funds… button. Selecting the Split Funds… button will open the Split-Funding Detail screen.
Figure 97. Slit Funds link
2. In the Split-Funding Details screen, select the Detail link under the Detail Toggle column for the Expense Type that will be funded from two or more accounting codes based on a dollar value for each Accounting Code.
Figure 98. Split-Funding Detail
3. After selecting the Detail link, the Expense Type will expend to display all the Accounting Codes with an Amount field to each Accounting Code. In the Amount field, enter the Dollar Value for each Accounting Code.
NOTE: Not all accounting codes need to have a dollar value, but each of the Accounting Codes with a dollar value must equal to the Total Amount for the expense.
Page 72 of 170
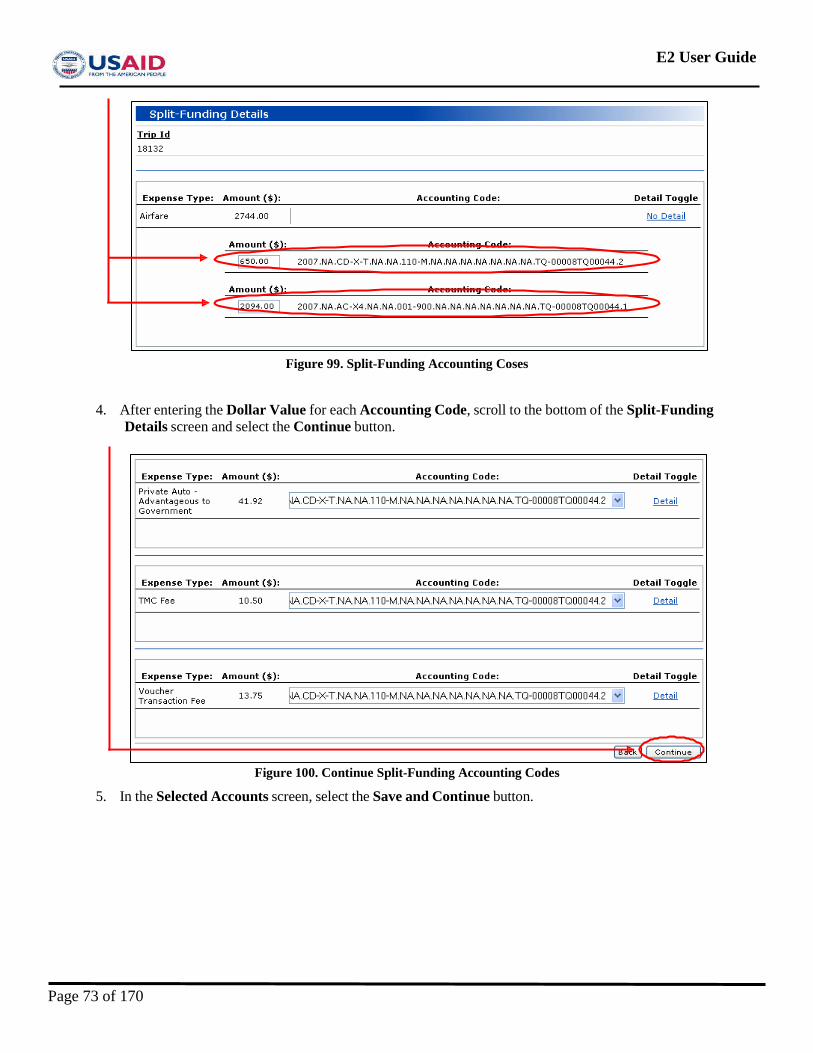
E2 User Guide
Figure 99. Split-Funding Accounting Coses
4. After entering the Dollar Value for each Accounting Code, scroll to the bottom of the Split-Funding Details screen and select the Continue button.
Figure 100. Continue Split-Funding Accounting Codes
5. In the Selected Accounts screen, select the Save and Continue button.
Page 73 of 170
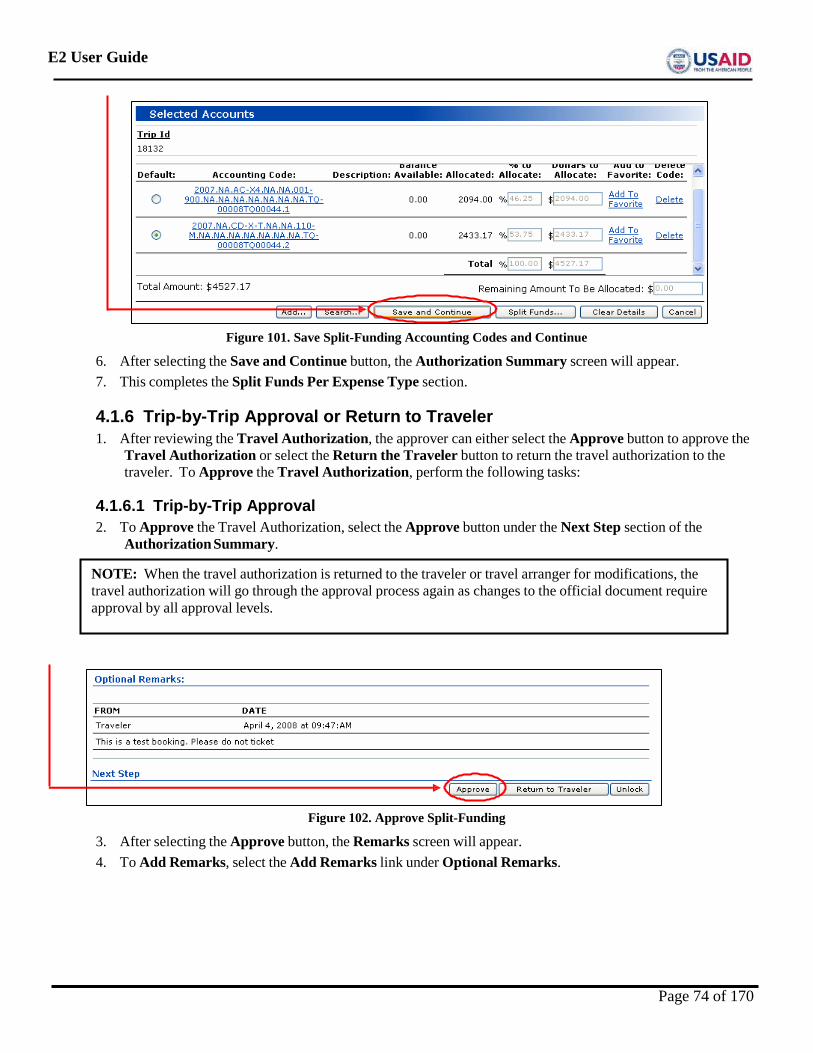
E2 User Guide
Figure 101. Save Split-Funding Accounting Codes and Continue
6. After selecting the Save and Continue button, the Authorization Summary screen will appear. 7. This completes the Split Funds Per Expense Type section.
4.1.6 Trip-by-Trip Approval or Return to Traveler 1. After reviewing the Travel Authorization, the approver can either select the Approve button to approve the
Travel Authorization or select the Return the Traveler button to return the travel authorization to the traveler. To Approve the Travel Authorization, perform the following tasks:
4.1.6.1 Trip-by-Trip Approval 2. To Approve the Travel Authorization, select the Approve button under the Next Step section of the
Authorization Summary.
Figure 102. Approve Split-Funding
3. After selecting the Approve button, the Remarks screen will appear. 4. To Add Remarks, select the Add Remarks link under Optional Remarks.
NOTE: When the travel authorization is returned to the traveler or travel arranger for modifications, the travel authorization will go through the approval process again as changes to the official document require approval by all approval levels.
Page 74 of 170
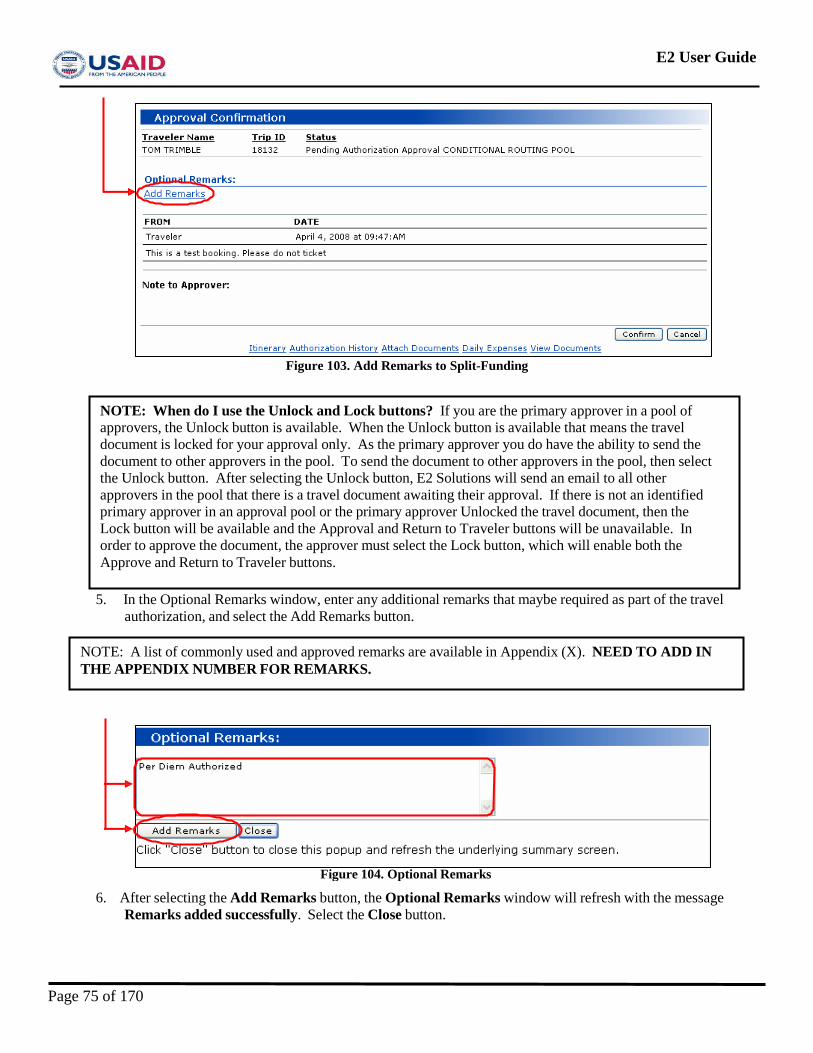
E2 User Guide
Figure 103. Add Remarks to Split-Funding
5. In the Optional Remarks window, enter any additional remarks that maybe required as part of the travel
authorization, and select the Add Remarks button.
6. After selecting the Add Remarks button, the Optional Remarks window will refresh with the message
Remarks added successfully. Select the Close button.
Figure 104. Optional Remarks
NOTE: A list of commonly used and approved remarks are available in Appendix (X). NEED TO ADD IN THE APPENDIX NUMBER FOR REMARKS.
NOTE: When do I use the Unlock and Lock buttons? If you are the primary approver in a pool of approvers, the Unlock button is available. When the Unlock button is available that means the travel document is locked for your approval only. As the primary approver you do have the ability to send the document to other approvers in the pool. To send the document to other approvers in the pool, then select the Unlock button. After selecting the Unlock button, E2 Solutions will send an email to all other approvers in the pool that there is a travel document awaiting their approval. If there is not an identified primary approver in an approval pool or the primary approver Unlocked the travel document, then the Lock button will be available and the Approval and Return to Traveler buttons will be unavailable. In order to approve the document, the approver must select the Lock button, which will enable both the Approve and Return to Traveler buttons.
Page 75 of 170
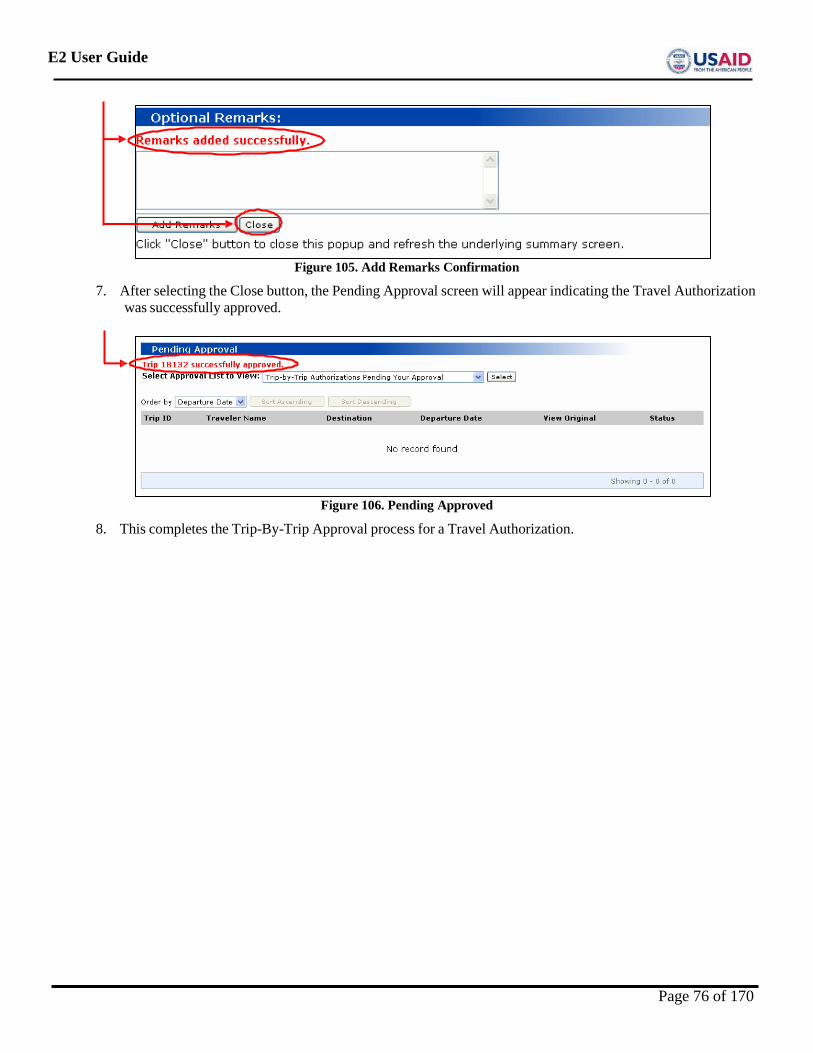
E2 User Guide
Figure 105. Add Remarks Confirmation
7. After selecting the Close button, the Pending Approval screen will appear indicating the Travel Authorization was successfully approved.
Figure 106. Pending Approved
8. This completes the Trip-By-Trip Approval process for a Travel Authorization.
Page 76 of 170
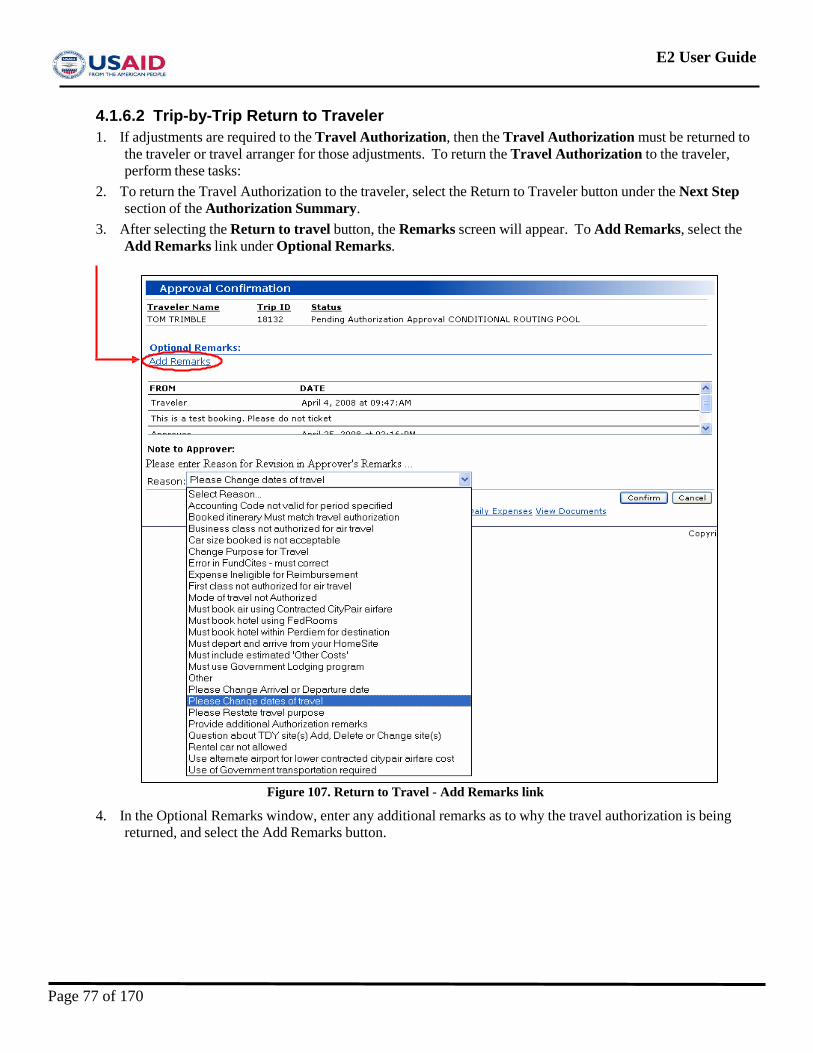
E2 User Guide
4.1.6.2 Trip-by-Trip Return to Traveler 1. If adjustments are required to the Travel Authorization, then the Travel Authorization must be returned to
the traveler or travel arranger for those adjustments. To return the Travel Authorization to the traveler, perform these tasks:
2. To return the Travel Authorization to the traveler, select the Return to Traveler button under the Next Step section of the Authorization Summary.
3. After selecting the Return to travel button, the Remarks screen will appear. To Add Remarks, select the Add Remarks link under Optional Remarks.
Figure 107. Return to Travel - Add Remarks link
4. In the Optional Remarks window, enter any additional remarks as to why the travel authorization is being returned, and select the Add Remarks button.
Page 77 of 170
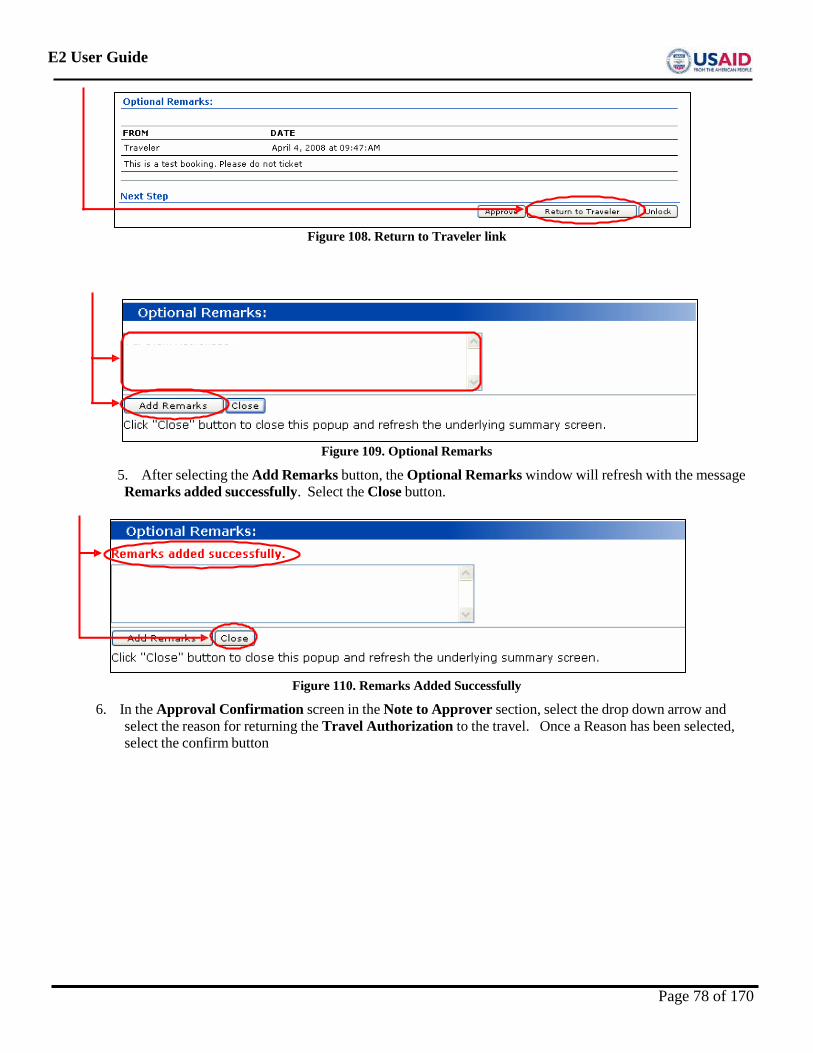
E2 User Guide
Figure 108. Return to Traveler link
Figure 109. Optional Remarks
5. After selecting the Add Remarks button, the Optional Remarks window will refresh with the message Remarks added successfully. Select the Close button.
Figure 110. Remarks Added Successfully
6. In the Approval Confirmation screen in the Note to Approver section, select the drop down arrow and select the reason for returning the Travel Authorization to the travel. Once a Reason has been selected, select the confirm button
Page 78 of 170
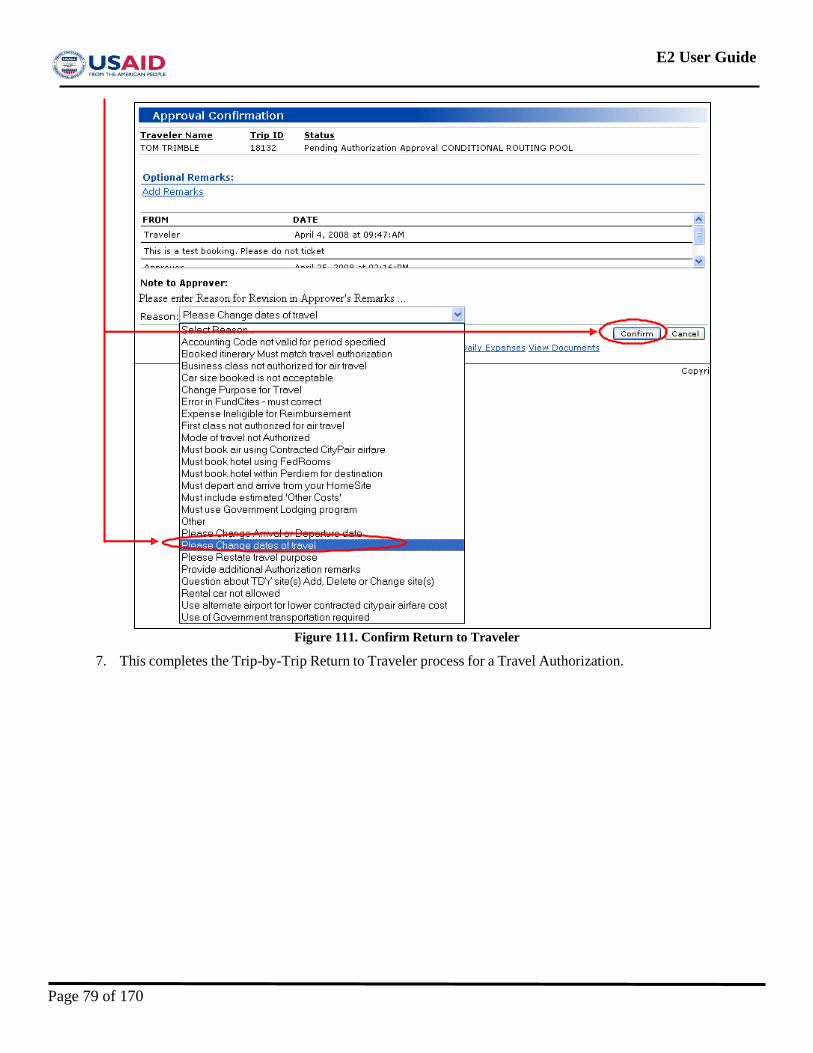
E2 User Guide
Figure 111. Confirm Return to Traveler
7. This completes the Trip-by-Trip Return to Traveler process for a Travel Authorization.
Page 79 of 170
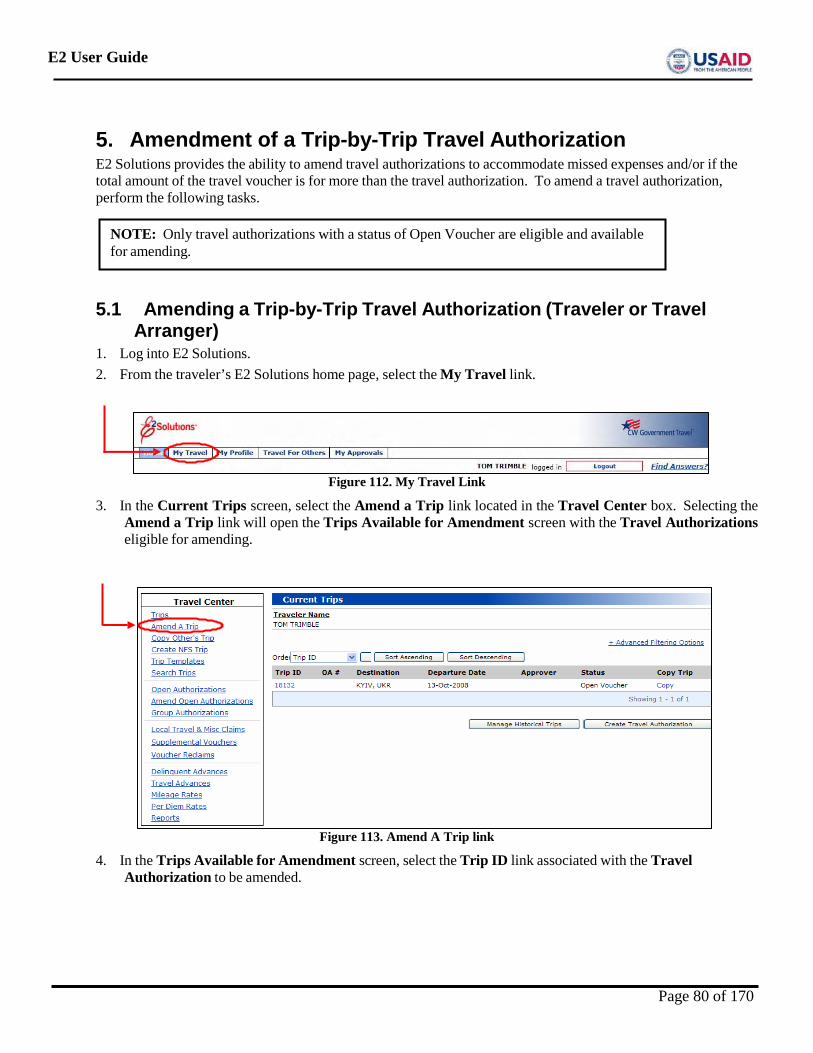
E2 User Guide
5. Amendment of a Trip-by-Trip Travel Authorization E2 Solutions provides the ability to amend travel authorizations to accommodate missed expenses and/or if the total amount of the travel voucher is for more than the travel authorization. To amend a travel authorization, perform the following tasks.
5.1 Amending a Trip-by-Trip Travel Authorization (Traveler or Travel Arranger)
1. Log into E2 Solutions. 2. From the traveler’s E2 Solutions home page, select the My Travel link.
Figure 112. My Travel Link
3. In the Current Trips screen, select the Amend a Trip link located in the Travel Center box. Selecting the Amend a Trip link will open the Trips Available for Amendment screen with the Travel Authorizations eligible for amending.
Figure 113. Amend A Trip link
4. In the Trips Available for Amendment screen, select the Trip ID link associated with the Travel Authorization to be amended.
NOTE: Only travel authorizations with a status of Open Voucher are eligible and available for amending.
Page 80 of 170
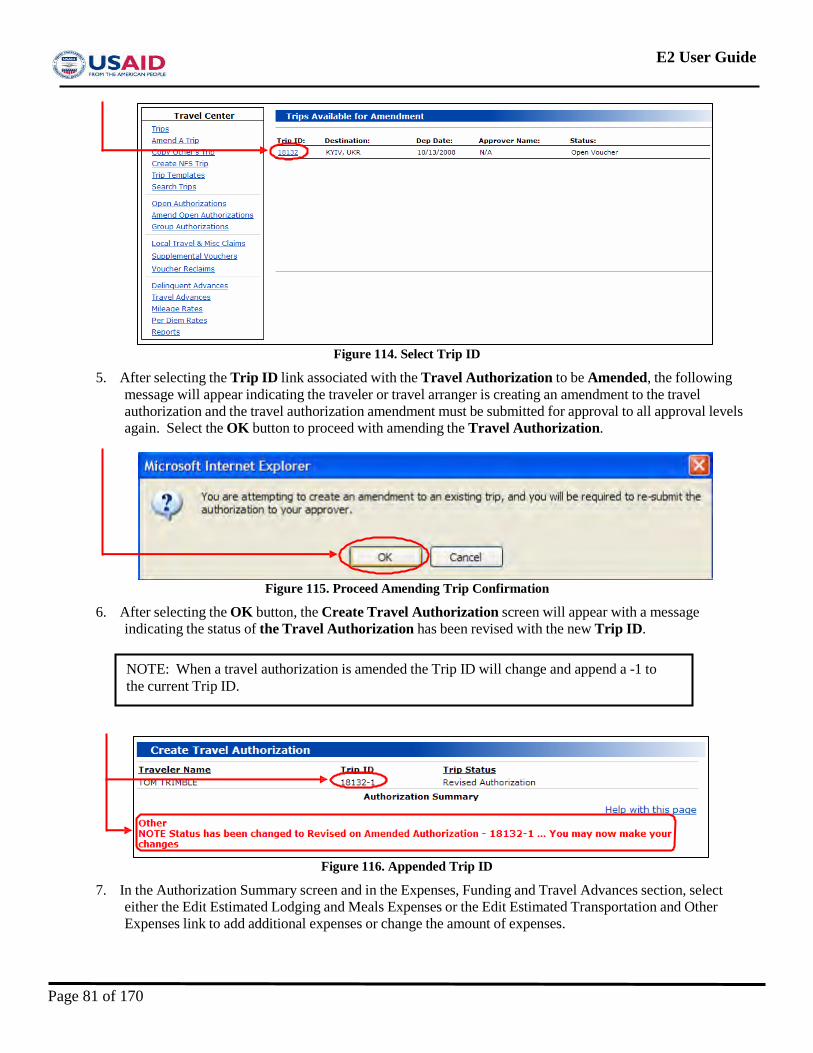
E2 User Guide
Figure 114. Select Trip ID
5. After selecting the Trip ID link associated with the Travel Authorization to be Amended, the following message will appear indicating the traveler or travel arranger is creating an amendment to the travel authorization and the travel authorization amendment must be submitted for approval to all approval levels again. Select the OK button to proceed with amending the Travel Authorization.
Figure 115. Proceed Amending Trip Confirmation
6. After selecting the OK button, the Create Travel Authorization screen will appear with a message indicating the status of the Travel Authorization has been revised with the new Trip ID.
Figure 116. Appended Trip ID
7. In the Authorization Summary screen and in the Expenses, Funding and Travel Advances section, select either the Edit Estimated Lodging and Meals Expenses or the Edit Estimated Transportation and Other Expenses link to add additional expenses or change the amount of expenses.
NOTE: When a travel authorization is amended the Trip ID will change and append a -1 to the current Trip ID.
Page 81 of 170
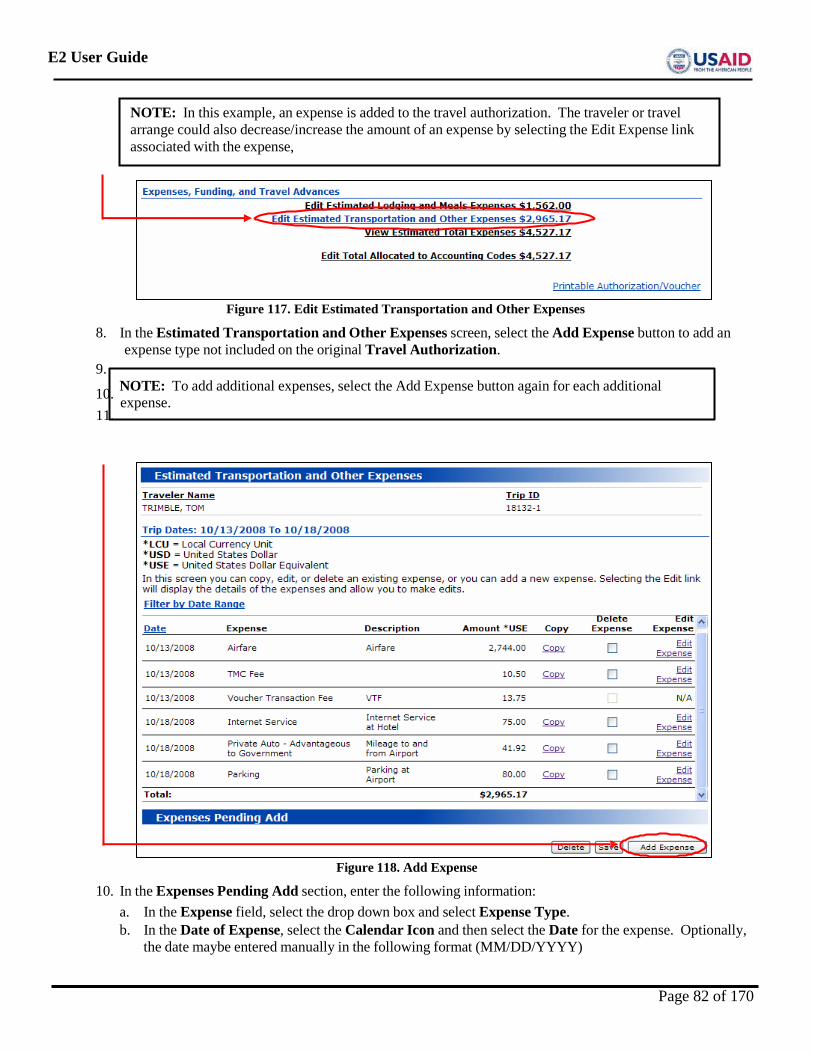
E2 User Guide
Figure 117. Edit Estimated Transportation and Other Expenses
8. In the Estimated Transportation and Other Expenses screen, select the Add Expense button to add an expense type not included on the original Travel Authorization.
9.
10. NOTE: To add additional expenses, select the Add Expense button again for each additional expense.
11.
Figure 118. Add Expense
10. In the Expenses Pending Add section, enter the following information: a. In the Expense field, select the drop down box and select Expense Type. b. In the Date of Expense, select the Calendar Icon and then select the Date for the expense. Optionally,
the date maybe entered manually in the following format (MM/DD/YYYY)
NOTE: In this example, an expense is added to the travel authorization. The traveler or travel arrange could also decrease/increase the amount of an expense by selecting the Edit Expense link associated with the expense,
Page 82 of 170
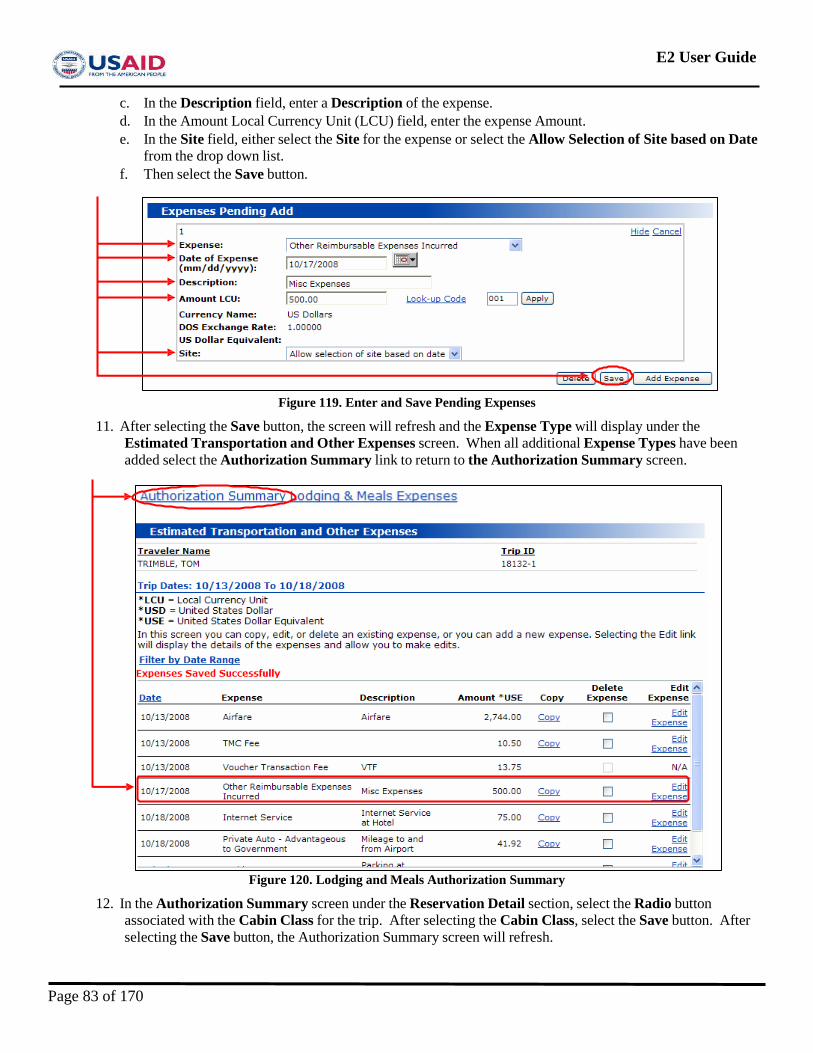
E2 User Guide
c. In the Description field, enter a Description of the expense. d. In the Amount Local Currency Unit (LCU) field, enter the expense Amount. e. In the Site field, either select the Site for the expense or select the Allow Selection of Site based on Date
from the drop down list. f. Then select the Save button.
Figure 119. Enter and Save Pending Expenses
11. After selecting the Save button, the screen will refresh and the Expense Type will display under the Estimated Transportation and Other Expenses screen. When all additional Expense Types have been added select the Authorization Summary link to return to the Authorization Summary screen.
Figure 120. Lodging and Meals Authorization Summary
12. In the Authorization Summary screen under the Reservation Detail section, select the Radio button associated with the Cabin Class for the trip. After selecting the Cabin Class, select the Save button. After selecting the Save button, the Authorization Summary screen will refresh.
Page 83 of 170
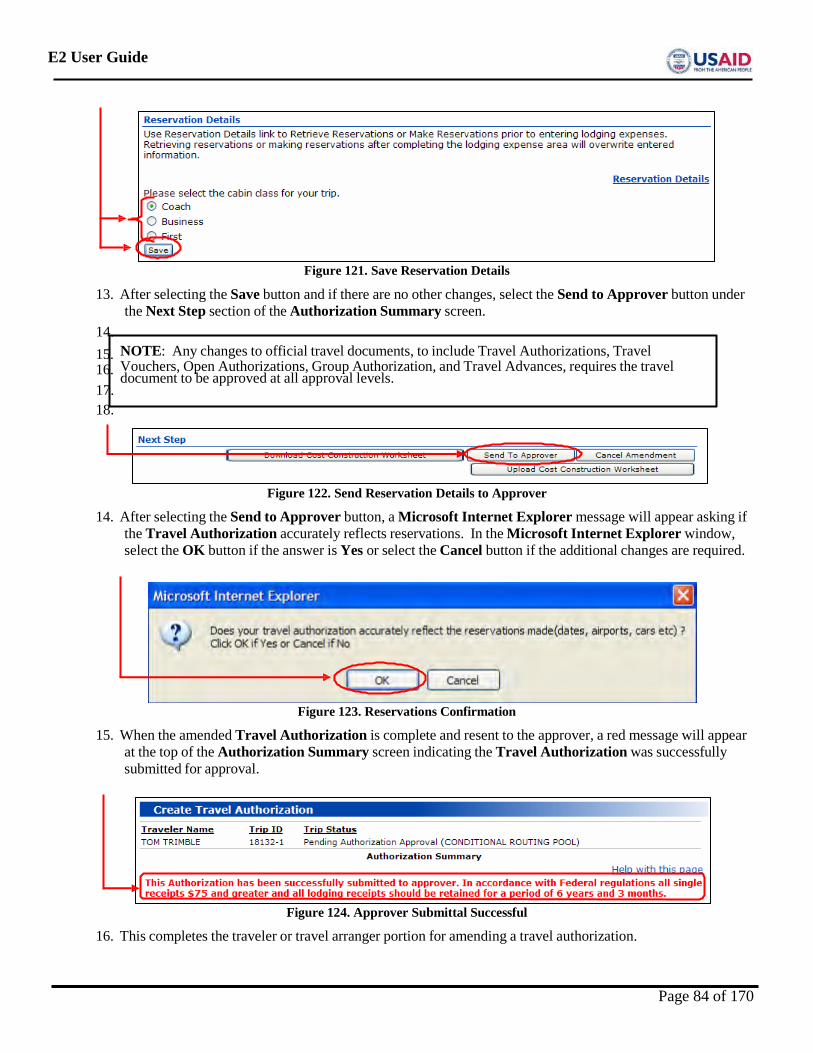
E2 User Guide
Figure 121. Save Reservation Details
13. After selecting the Save button and if there are no other changes, select the Send to Approver button under the Next Step section of the Authorization Summary screen.
14. 15. NOTE: Any changes to official travel documents, to include Travel Authorizations, Travel 16. Vouchers, Open Authorizations, Group Authorization, and Travel Advances, requires the travel
document to be approved at all approval levels. 17. 18.
Figure 122. Send Reservation Details to Approver
14. After selecting the Send to Approver button, a Microsoft Internet Explorer message will appear asking if the Travel Authorization accurately reflects reservations. In the Microsoft Internet Explorer window, select the OK button if the answer is Yes or select the Cancel button if the additional changes are required.
Figure 123. Reservations Confirmation
15. When the amended Travel Authorization is complete and resent to the approver, a red message will appear at the top of the Authorization Summary screen indicating the Travel Authorization was successfully submitted for approval.
Figure 124. Approver Submittal Successful
16. This completes the traveler or travel arranger portion for amending a travel authorization.
Page 84 of 170

E2 User Guide
5.2 Approval of an Amended Travel Authorization (Approver) Once a traveler or travel arranger amends a travel authorization, the travel authorization must be approved again as there were changes to the official travel document. All approvers for the amended travel authorization should review the travel authorization as described in Section 7 of the user guide.
5.2.1 Approval of an Amended Travel Authorization by Funds Committer
(Approver) 1. When a travel authorization is amended and additional expenses are added to the travel authorization or
expenses are deleted or reduced, the funds committer must make the appropriate adjustments in the financial system, Phoenix, as well as in E2 Solutions to ensure the amounts in Estimated Total Expenses and Total Allocated to Accounting Codes match. To adjust the Edit Total Allocated to Accounting Codes in E2 Solutions, perform the following steps:
2. Log into E2 Solutions. 3. From the Main Menu bar, select the My Approvals link.
Figure 125. My Approvals Link
4. In the Pending Approval screen, select the Trip ID to be approved.
Figure 126. Pending Approval
In the Expenses, Funding, and Travel Advances section of the Authorization Summary screen, notice the View Estimated Total Expenses amount is more than the Edit Total Allocated to Accounting Codes amount. The amount in the Edit Total Allocated to Accounting Codes must match the View Estimated Total Expenses amount.
Figure 127. Total Allocated to Accounting Codes
NOTE: Since the travel authorization was amended and the amount of the authorization increased, the commitment in Phoenix must also increase.
Page 85 of 170
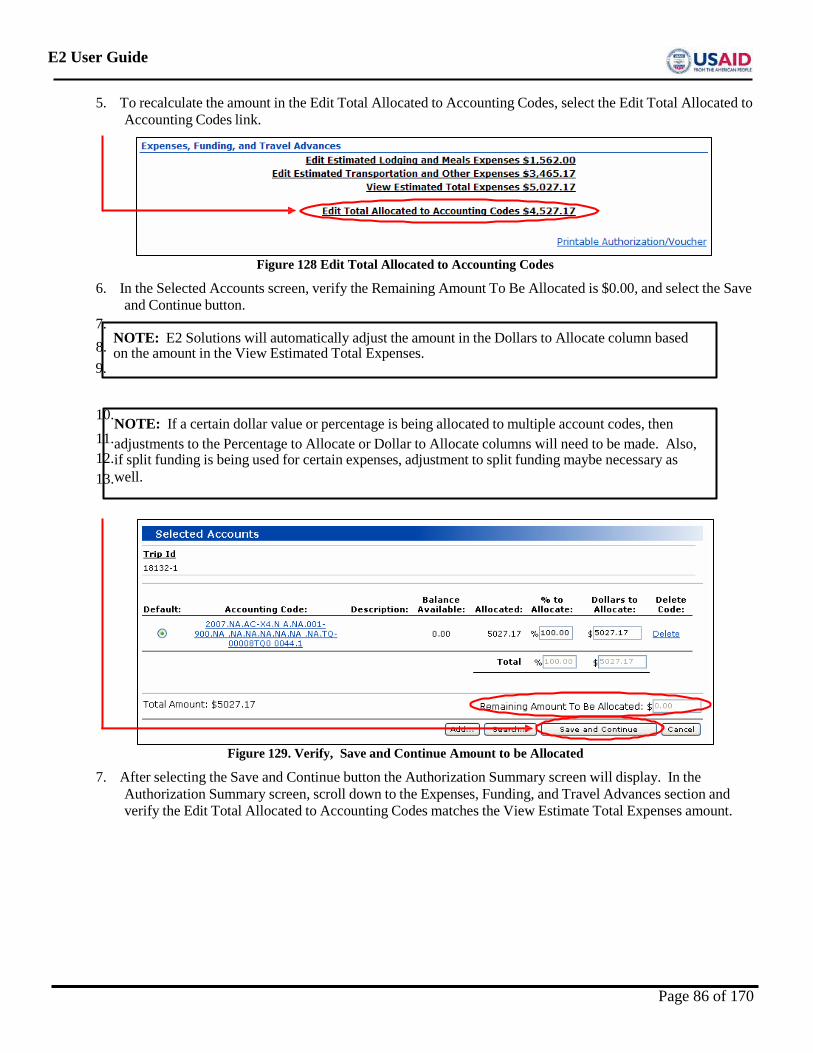
E2 User Guide
5. To recalculate the amount in the Edit Total Allocated to Accounting Codes, select the Edit Total Allocated to Accounting Codes link.
Figure 128 Edit Total Allocated to Accounting Codes
6. In the Selected Accounts screen, verify the Remaining Amount To Be Allocated is $0.00, and select the Save and Continue button.
7. NOTE: E2 Solutions will automatically adjust the amount in the Dollars to Allocate column based on the amount in the View Estimated Total Expenses.
9.
Figure 129. Verify, Save and Continue Amount to be Allocated
7. After selecting the Save and Continue button the Authorization Summary screen will display. In the Authorization Summary screen, scroll down to the Expenses, Funding, and Travel Advances section and verify the Edit Total Allocated to Accounting Codes matches the View Estimate Total Expenses amount.
10.NOTE: If a certain dollar value or percentage is being allocated to multiple account codes, then 11.adjustments to the Percentage to Allocate or Dollar to Allocate columns will need to be made. Also, 12.if split funding is being used for certain expenses, adjustment to split funding maybe necessary as 13.well.
8.
Page 86 of 170
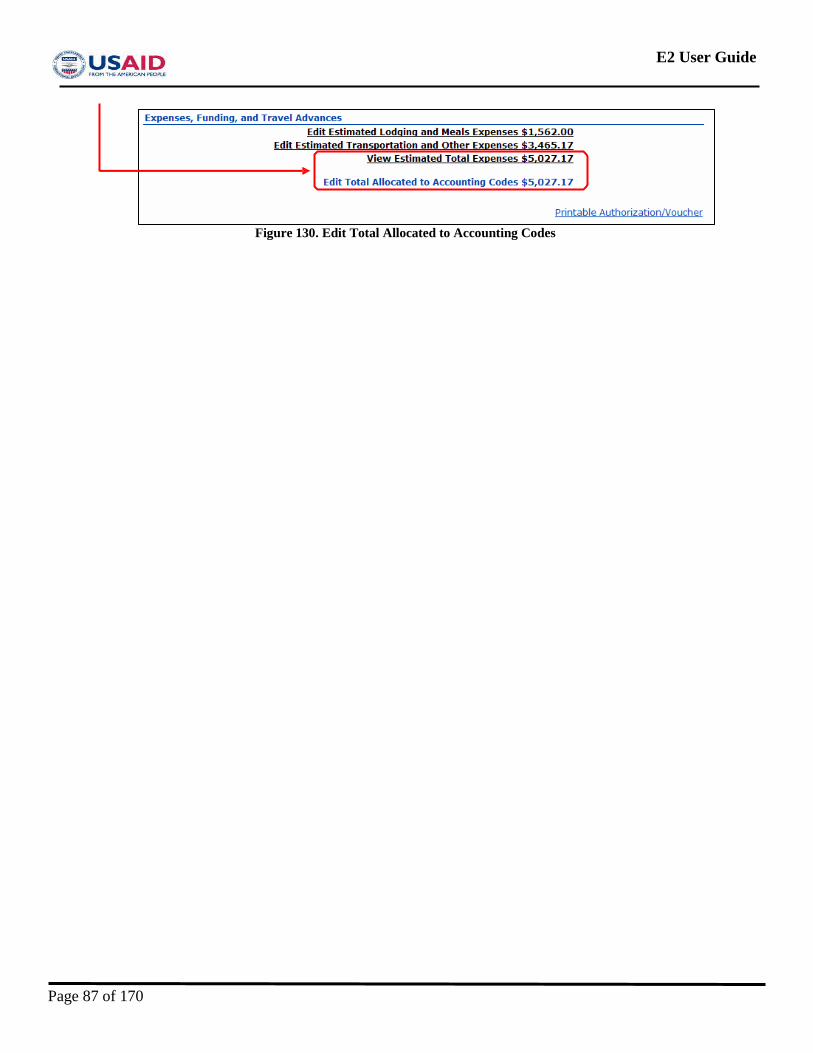
E2 User Guide
Figure 130. Edit Total Allocated to Accounting Codes
Page 87 of 170

E2 User Guide
6. Travel Advance
6.1 Requesting a Travel Advance Travel Advances may only be requested by travelers that do not have a Government Issued Credit Card. To request a Travel Advance, perform the following tasks:
1. From the Main Menu bar of the traveler’s E2 Solutions Home Page, select the My Travel link.
Figure 131. Select MyTravel
2. In the Travel Center box in the Current Trips screen, select the Travel Advances link.
Figure 132. Select Travel Advances
3. In the Current Travel Advance Request screen, select from the drop down list the Trip for which the Travel Advance is being requested. Once the Trip is identified and selected, select the Create Travel Advance button.
Figure 133. Select and Create Travel Advance
4. In the Travel Advance Detail screen, perform the following tasks: a. In the Select an Option field, select from the drop down list either Check or Cash for the Travel
Advance. b. In the Advance Amount field, enter the Advance Amount for the Travel Advance. c. Then, select the Save button.
Page 88 of 170
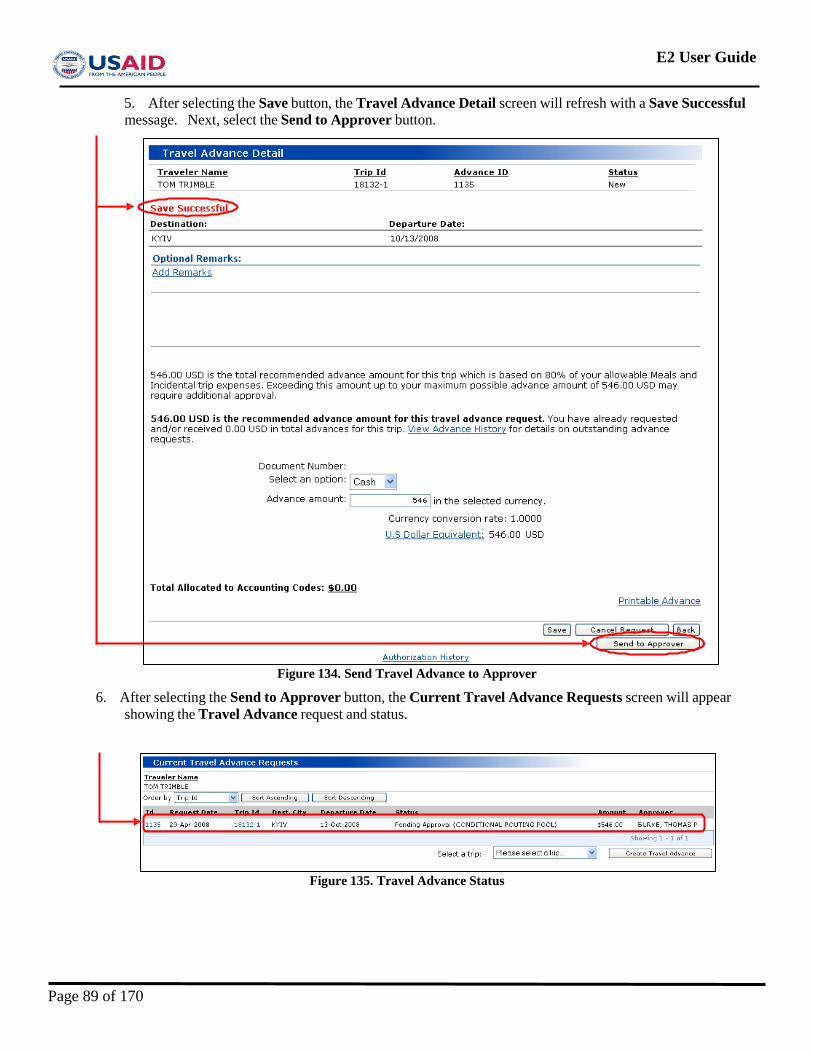
E2 User Guide
5. After selecting the Save button, the Travel Advance Detail screen will refresh with a Save Successful message. Next, select the Send to Approver button.
Figure 134. Send Travel Advance to Approver
6. After selecting the Send to Approver button, the Current Travel Advance Requests screen will appear showing the Travel Advance request and status.
Figure 135. Travel Advance Status
Page 89 of 170
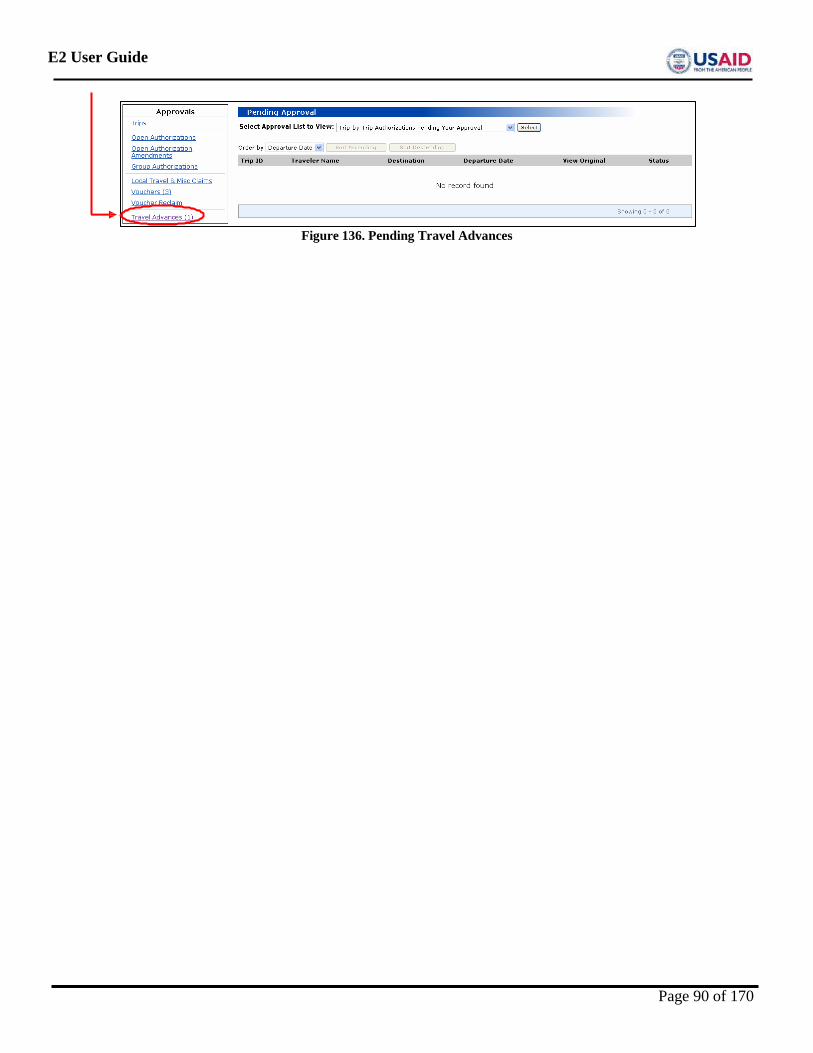
E2 User Guide
Figure 136. Pending Travel Advances
Page 90 of 170
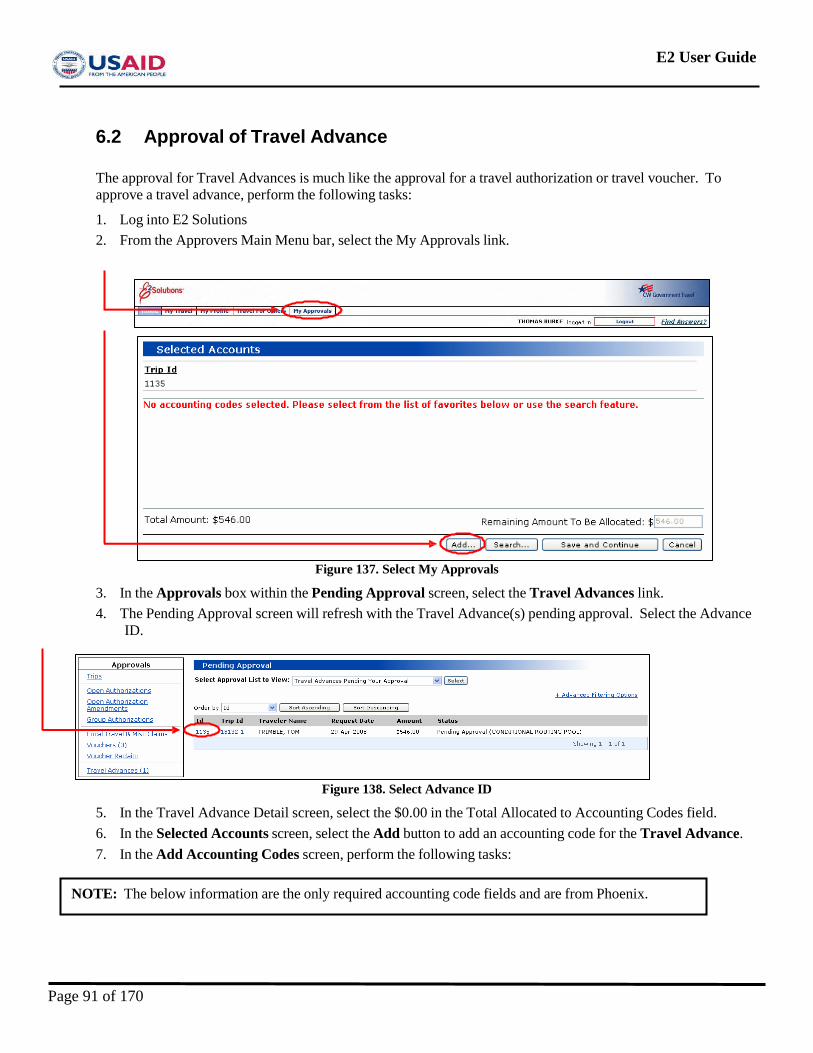
E2 User Guide
6.2 Approval of Travel Advance
The approval for Travel Advances is much like the approval for a travel authorization or travel voucher. To approve a travel advance, perform the following tasks:
1. Log into E2 Solutions 2. From the Approvers Main Menu bar, select the My Approvals link.
Figure 137. Select My Approvals
3. In the Approvals box within the Pending Approval screen, select the Travel Advances link. 4. The Pending Approval screen will refresh with the Travel Advance(s) pending approval. Select the Advance
ID.
Figure 138. Select Advance ID
5. In the Travel Advance Detail screen, select the $0.00 in the Total Allocated to Accounting Codes field. 6. In the Selected Accounts screen, select the Add button to add an accounting code for the Travel Advance. 7. In the Add Accounting Codes screen, perform the following tasks:
NOTE: The below information are the only required accounting code fields and are from Phoenix.
Page 91 of 170
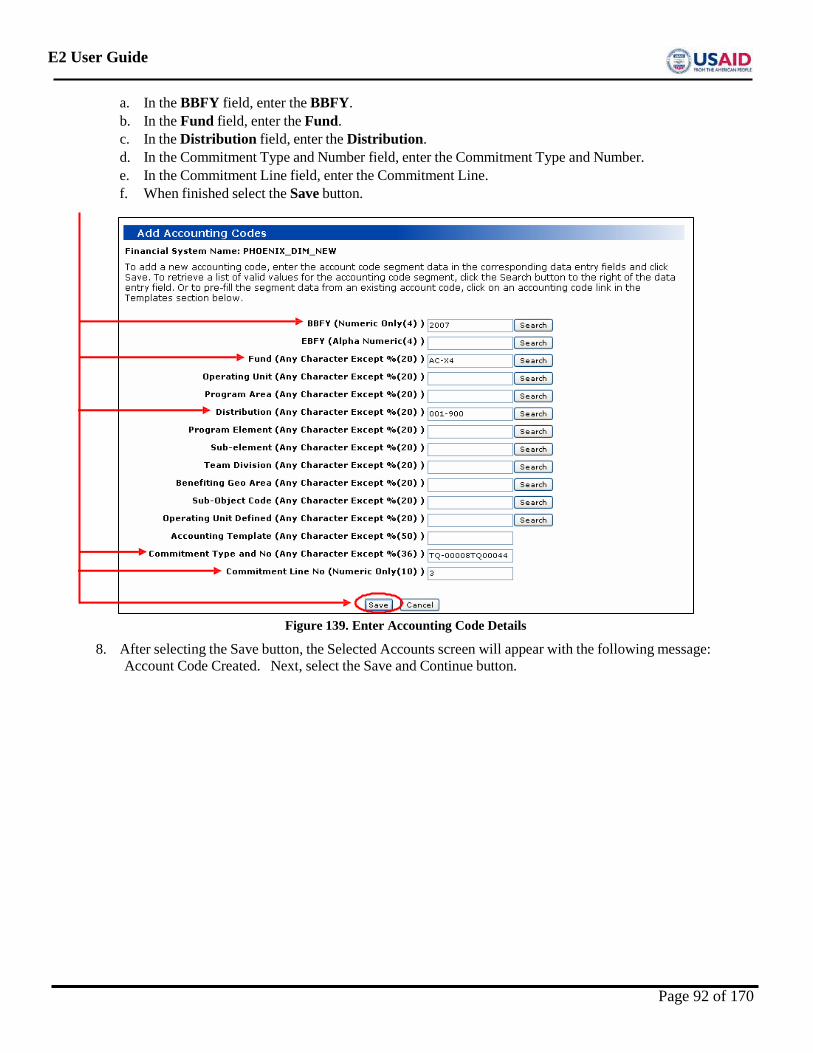
E2 User Guide
a. In the BBFY field, enter the BBFY. b. In the Fund field, enter the Fund. c. In the Distribution field, enter the Distribution. d. In the Commitment Type and Number field, enter the Commitment Type and Number. e. In the Commitment Line field, enter the Commitment Line. f. When finished select the Save button.
Figure 139. Enter Accounting Code Details
8. After selecting the Save button, the Selected Accounts screen will appear with the following message: Account Code Created. Next, select the Save and Continue button.
Page 92 of 170
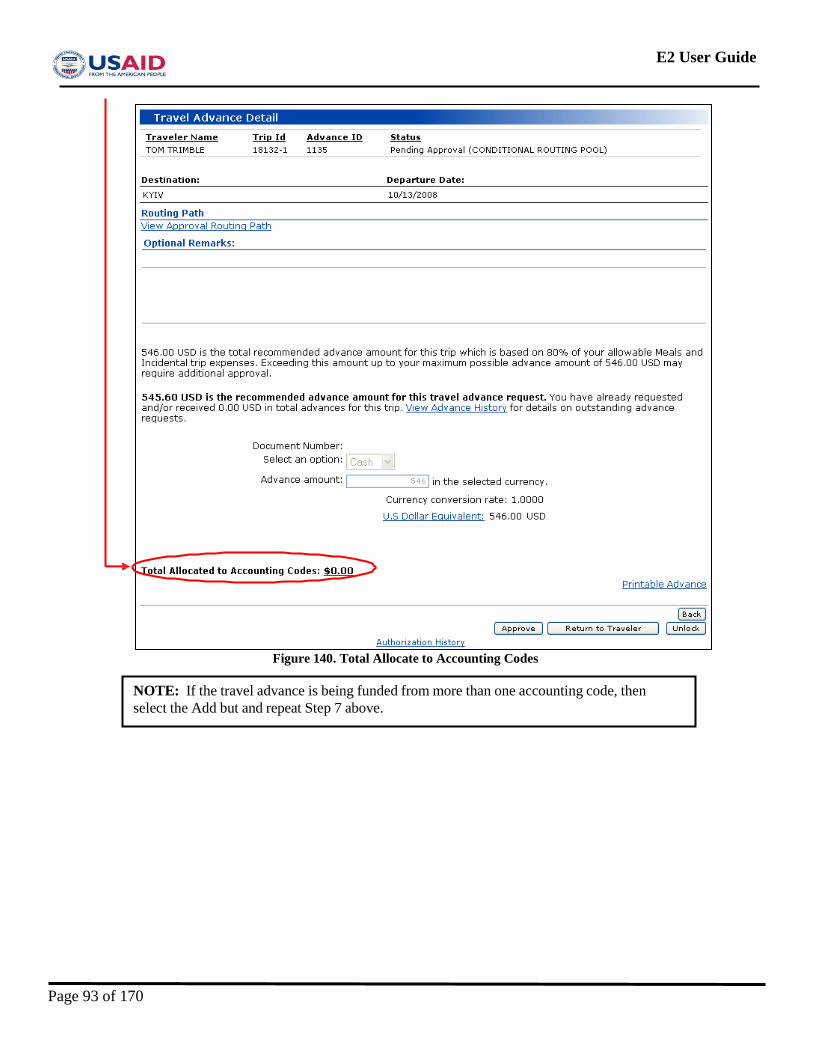
E2 User Guide
Figure 140. Total Allocate to Accounting Codes
NOTE: If the travel advance is being funded from more than one accounting code, then select the Add but and repeat Step 7 above.
Page 93 of 170
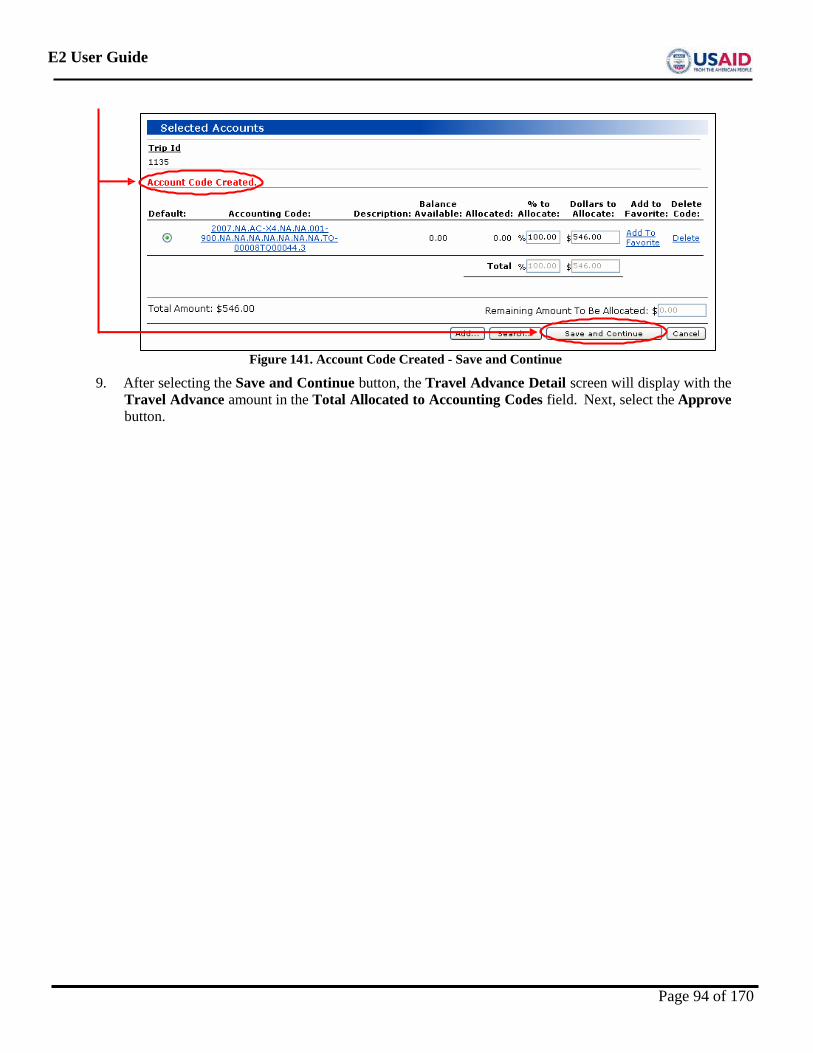
E2 User Guide
Figure 141. Account Code Created - Save and Continue
9. After selecting the Save and Continue button, the Travel Advance Detail screen will display with the Travel Advance amount in the Total Allocated to Accounting Codes field. Next, select the Approve button.
Page 94 of 170
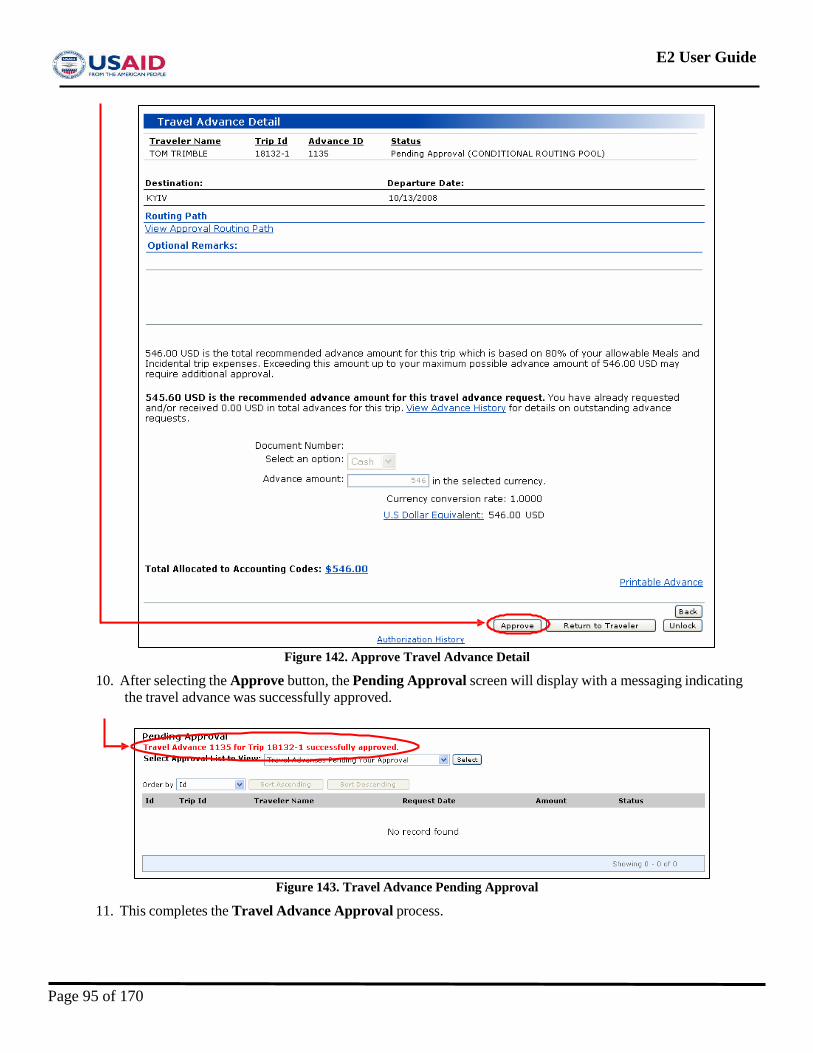
E2 User Guide
Figure 142. Approve Travel Advance Detail
10. After selecting the Approve button, the Pending Approval screen will display with a messaging indicating the travel advance was successfully approved.
Figure 143. Travel Advance Pending Approval
11. This completes the Travel Advance Approval process.
Page 95 of 170
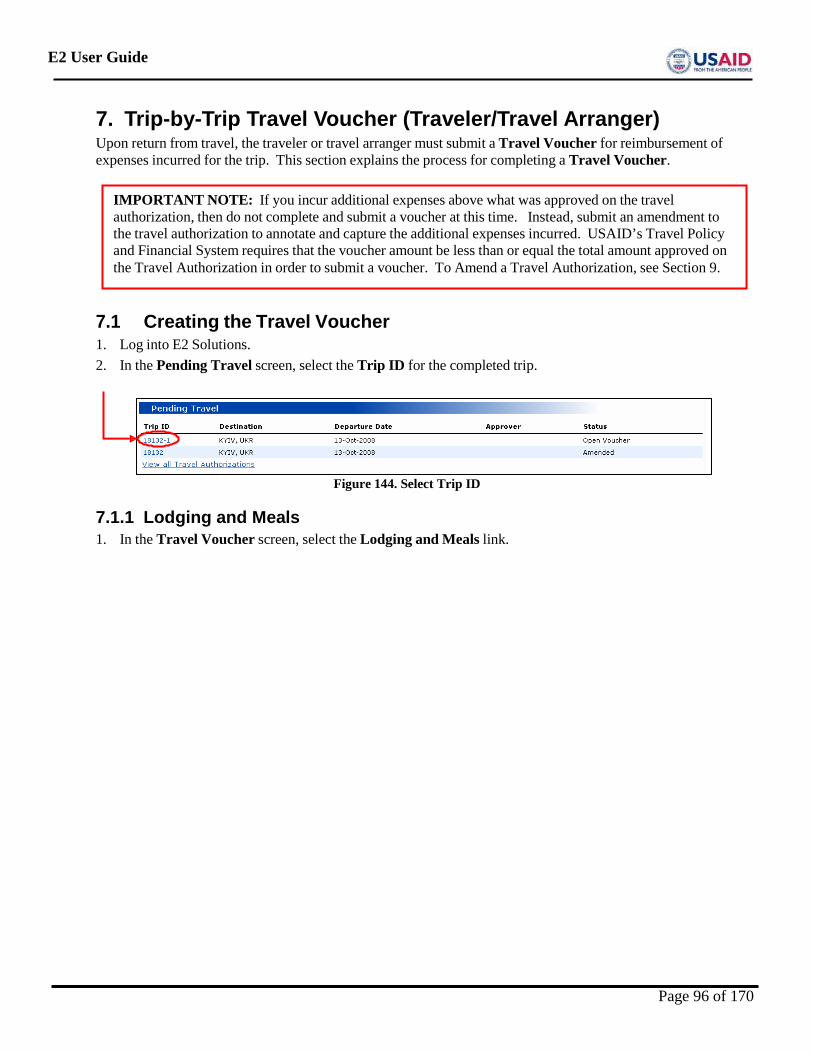
E2 User Guide
7. Trip-by-Trip Travel Voucher (Traveler/Travel Arranger) Upon return from travel, the traveler or travel arranger must submit a Travel Voucher for reimbursement of expenses incurred for the trip. This section explains the process for completing a Travel Voucher.
7.1 Creating the Travel Voucher 1. Log into E2 Solutions. 2. In the Pending Travel screen, select the Trip ID for the completed trip.
Figure 144. Select Trip ID
7.1.1 Lodging and Meals 1. In the Travel Voucher screen, select the Lodging and Meals link.
IMPORTANT NOTE: If you incur additional expenses above what was approved on the travel authorization, then do not complete and submit a voucher at this time. Instead, submit an amendment to the travel authorization to annotate and capture the additional expenses incurred. USAID’s Travel Policy and Financial System requires that the voucher amount be less than or equal the total amount approved on the Travel Authorization in order to submit a voucher. To Amend a Travel Authorization, see Section 9.
Page 96 of 170
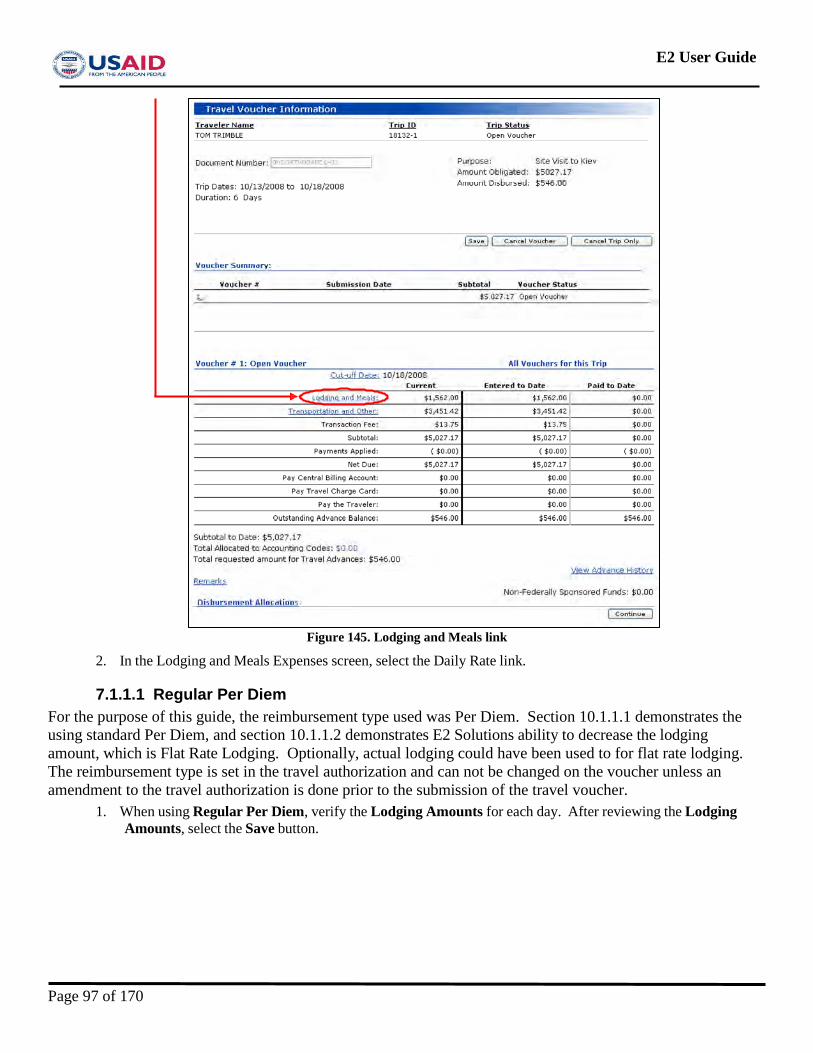
E2 User Guide
Figure 145. Lodging and Meals link
2. In the Lodging and Meals Expenses screen, select the Daily Rate link.
7.1.1.1 Regular Per Diem For the purpose of this guide, the reimbursement type used was Per Diem. Section 10.1.1.1 demonstrates the using standard Per Diem, and section 10.1.1.2 demonstrates E2 Solutions ability to decrease the lodging amount, which is Flat Rate Lodging. Optionally, actual lodging could have been used to for flat rate lodging. The reimbursement type is set in the travel authorization and can not be changed on the voucher unless an amendment to the travel authorization is done prior to the submission of the travel voucher.
1. When using Regular Per Diem, verify the Lodging Amounts for each day. After reviewing the Lodging Amounts, select the Save button.
Page 97 of 170
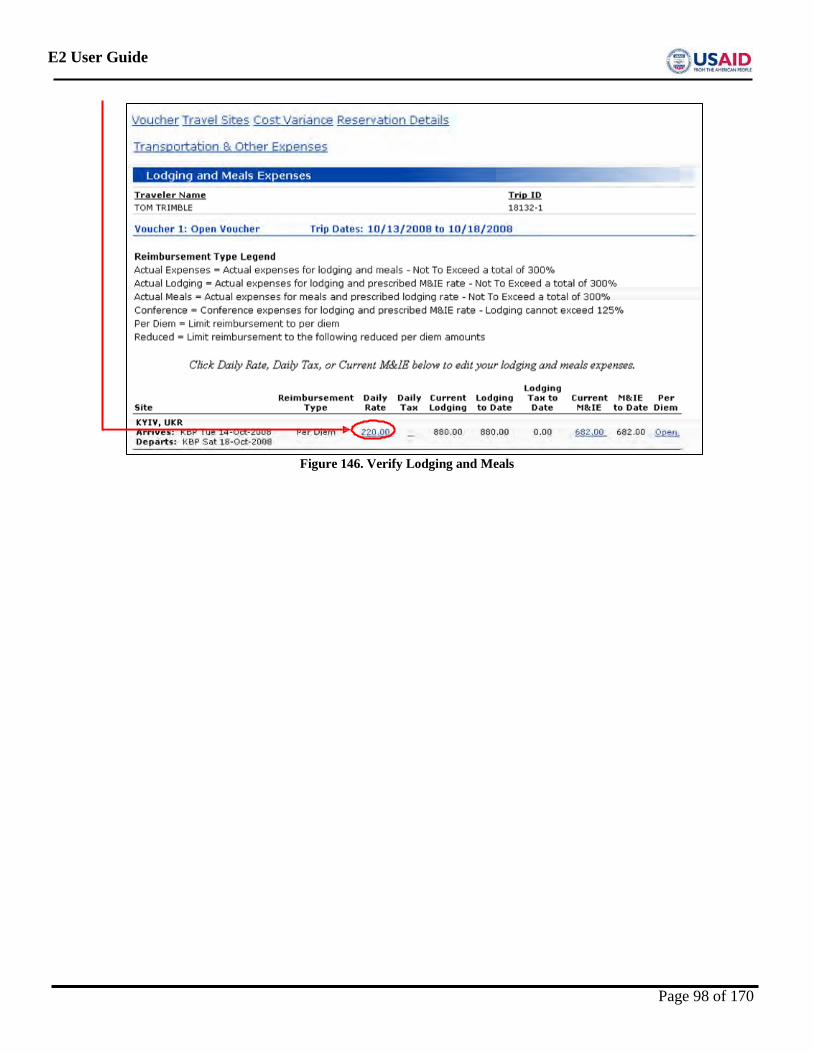
E2 User Guide
Figure 146. Verify Lodging and Meals
Page 98 of 170
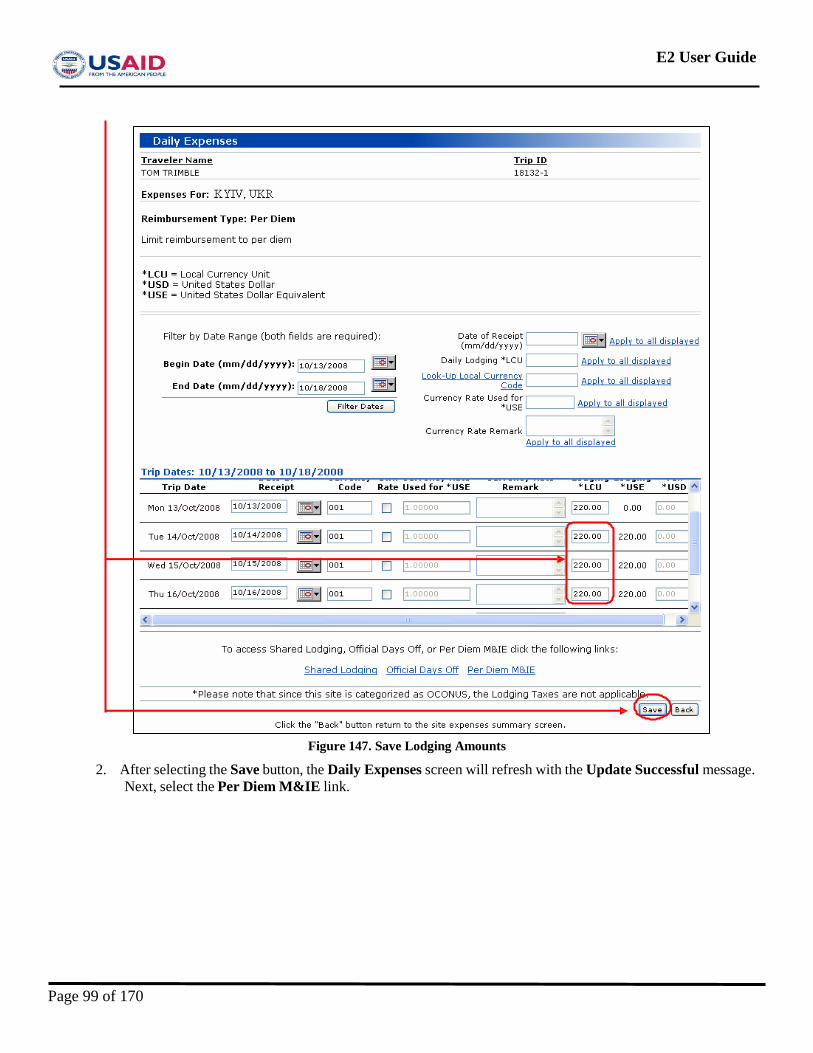
E2 User Guide
Figure 147. Save Lodging Amounts
2. After selecting the Save button, the Daily Expenses screen will refresh with the Update Successful message. Next, select the Per Diem M&IE link.
Page 99 of 170

E2 User Guide
Figure 148. Update Successful
3. Once the Lodging is verified, proceed to Section 10.1.2 Per Diem and Incidental Expenses.
7.1.1.2 Flat Rate Lodging Example 1. The following section describes how to change the Per Diem lodging rate to a flat rate or actual lodging
expenses. 2. If Flat Rate Lodging is used, then in the Daily Expenses screen, enter the Daily Lodging Amount in the
Daily Lodging *LCU field and select the Apply to all displayed link. After selecting the Apply to all display the Daily Lodging column will update with the amount entered in the Daily Lodging *LCU field.
Page 100 of 170
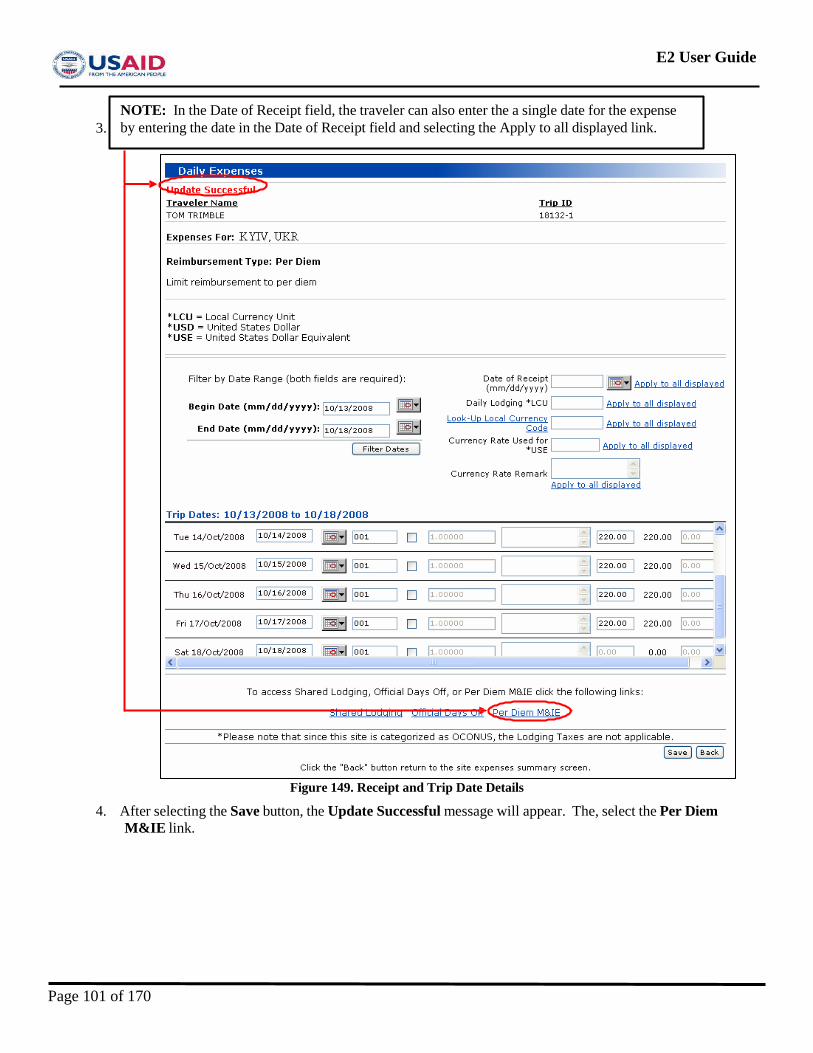
E2 User Guide
Figure 149. Receipt and Trip Date Details
4. After selecting the Save button, the Update Successful message will appear. The, select the Per Diem M&IE link.
NOTE: In the Date of Receipt field, the traveler can also enter the a single date for the expense by entering the date in the Date of Receipt field and selecting the Apply to all displayed link. 3.
Page 101 of 170

E2 User Guide
Figure 150. Daily Expenses Saved
5. Daily Expenses Update Successful.
Page 102 of 170
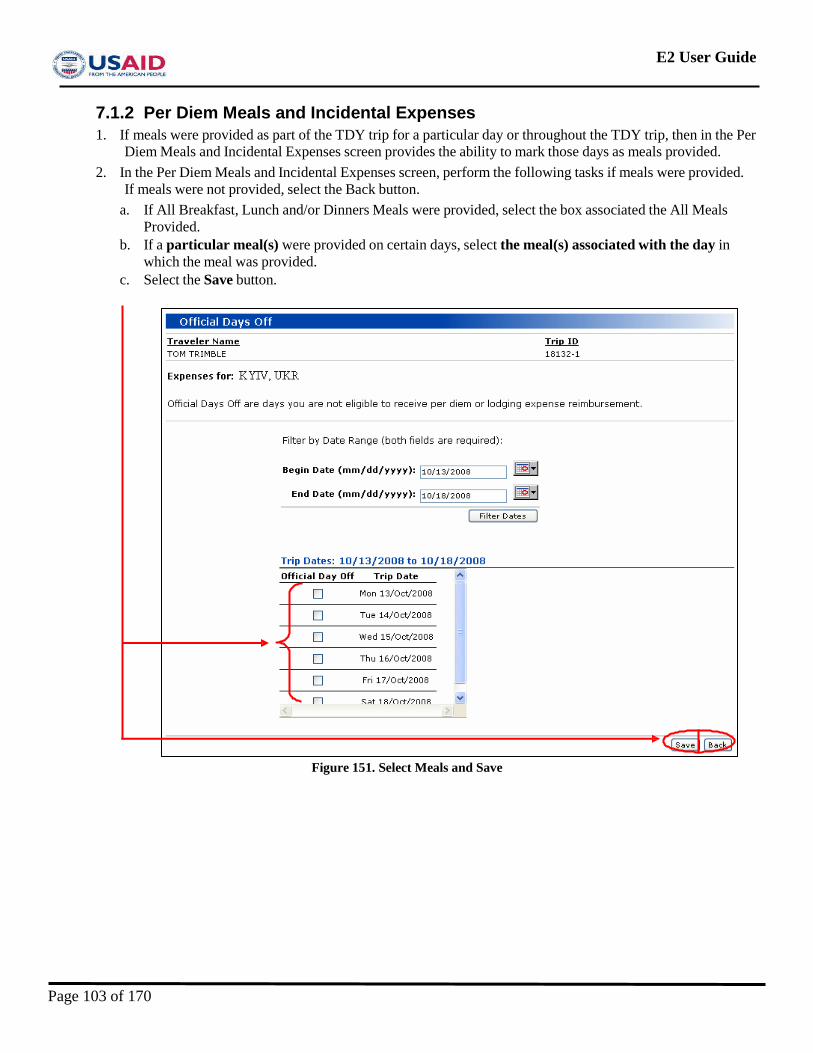
E2 User Guide
7.1.2 Per Diem Meals and Incidental Expenses 1. If meals were provided as part of the TDY trip for a particular day or throughout the TDY trip, then in the Per
Diem Meals and Incidental Expenses screen provides the ability to mark those days as meals provided. 2. In the Per Diem Meals and Incidental Expenses screen, perform the following tasks if meals were provided.
If meals were not provided, select the Back button. a. If All Breakfast, Lunch and/or Dinners Meals were provided, select the box associated the All Meals
Provided. b. If a particular meal(s) were provided on certain days, select the meal(s) associated with the day in
which the meal was provided. c. Select the Save button.
Figure 151. Select Meals and Save
Page 103 of 170
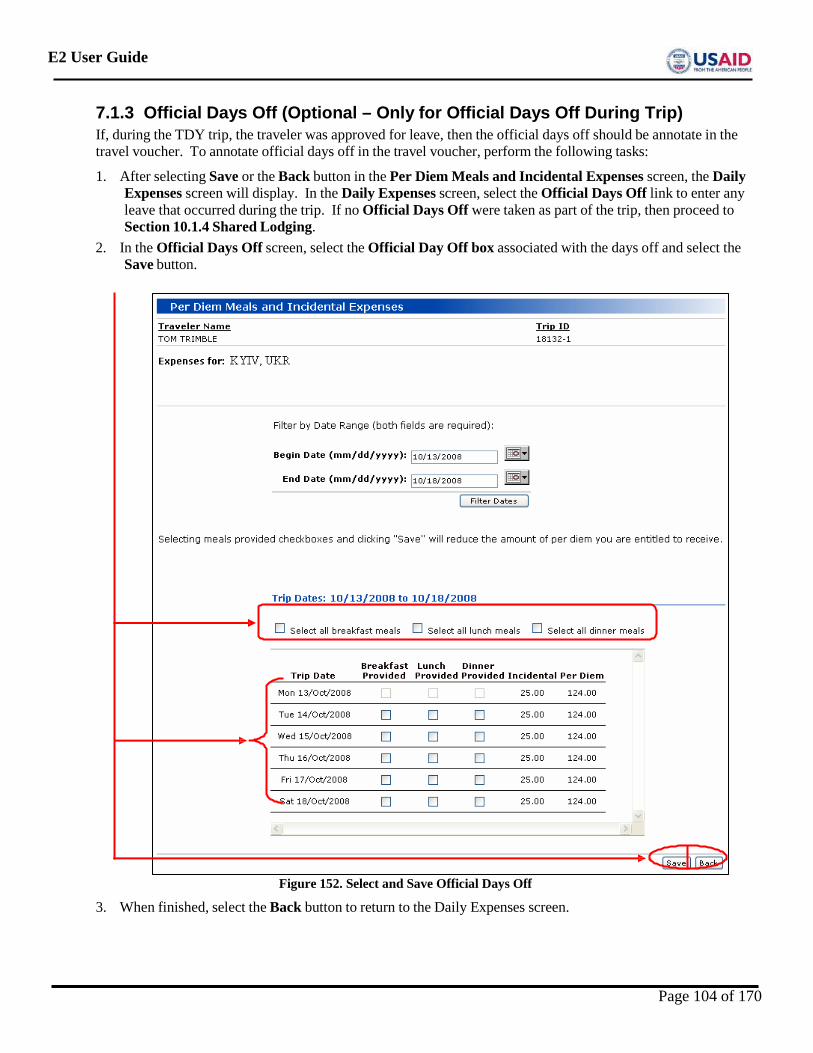
E2 User Guide
7.1.3 Official Days Off (Optional – Only for Official Days Off During Trip) If, during the TDY trip, the traveler was approved for leave, then the official days off should be annotate in the travel voucher. To annotate official days off in the travel voucher, perform the following tasks:
1. After selecting Save or the Back button in the Per Diem Meals and Incidental Expenses screen, the Daily Expenses screen will display. In the Daily Expenses screen, select the Official Days Off link to enter any leave that occurred during the trip. If no Official Days Off were taken as part of the trip, then proceed to Section 10.1.4 Shared Lodging.
2. In the Official Days Off screen, select the Official Day Off box associated with the days off and select the Save button.
Figure 152. Select and Save Official Days Off
3. When finished, select the Back button to return to the Daily Expenses screen.
Page 104 of 170
E2 User Guide
7.1.4 Shared Lodging (Only Required if Traveler Used Shared Lodging) If travelers share lodging during the trip, then perform the following tasks:
1. In the Daily Expenses screen, select the Shared Lodging link. If Shared Lodging was not part of the trip, then proceed to Section 10.1.5.
2. In the Shared Lodging screen, perform the following tasks: a. If all travel dates included Shared Lodging, the select the Select all dates box. b. If Shared Lodging was only used on particular day, select the Date box associated with days Shared
Lodging was used. c. When finished select the Save button to save the days of Shared Lodging, and then select the Back
button to return to the Daily Expenses screen. 3. In the Daily Expenses screen, select the Voucher link to return the voucher. 4. This completes the Lodging and Meals section of the travel voucher.
Page 105 of 170
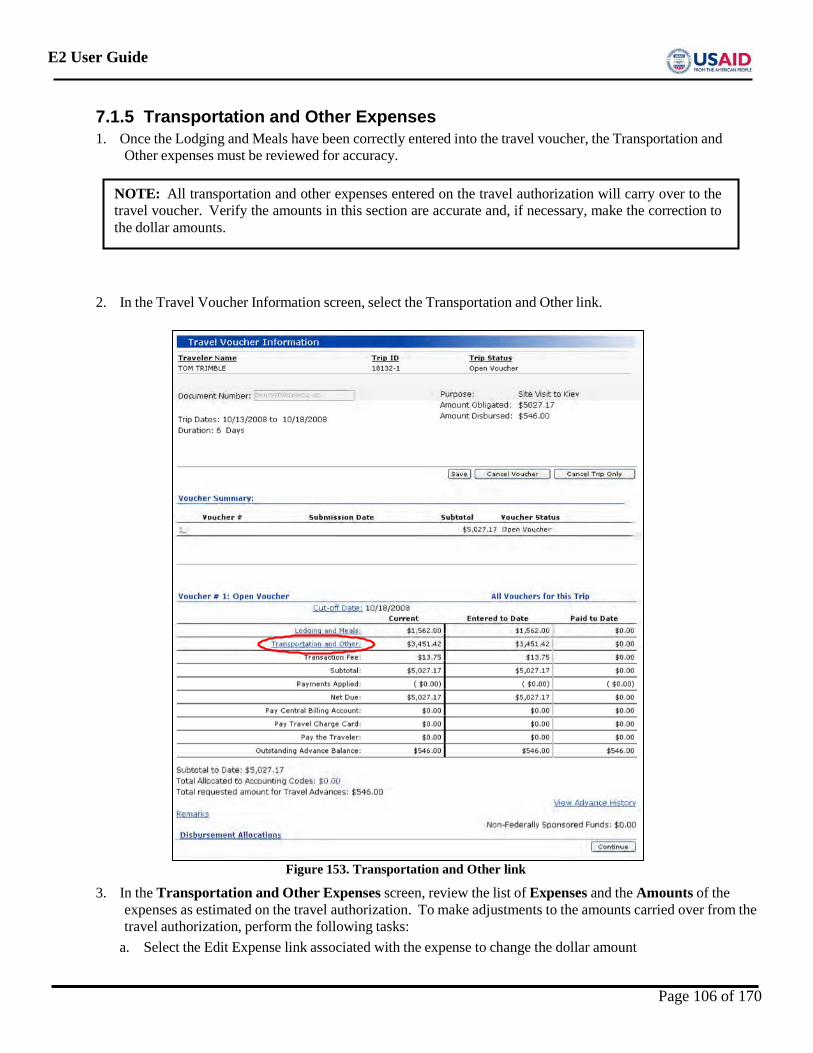
E2 User Guide
7.1.5 Transportation and Other Expenses 1. Once the Lodging and Meals have been correctly entered into the travel voucher, the Transportation and
Other expenses must be reviewed for accuracy.
2. In the Travel Voucher Information screen, select the Transportation and Other link.
Figure 153. Transportation and Other link
3. In the Transportation and Other Expenses screen, review the list of Expenses and the Amounts of the expenses as estimated on the travel authorization. To make adjustments to the amounts carried over from the travel authorization, perform the following tasks:
a. Select the Edit Expense link associated with the expense to change the dollar amount
NOTE: All transportation and other expenses entered on the travel authorization will carry over to the travel voucher. Verify the amounts in this section are accurate and, if necessary, make the correction to the dollar amounts.
Page 106 of 170
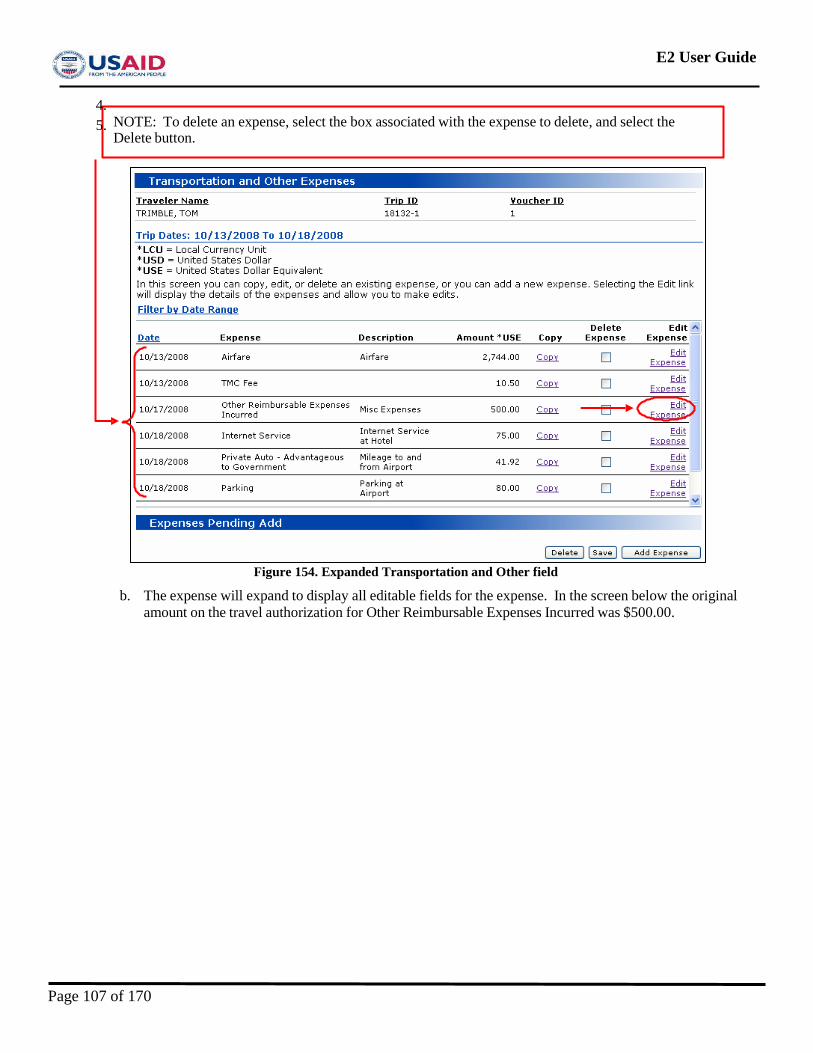
E2 User Guide
Figure 154. Expanded Transportation and Other field
b. The expense will expand to display all editable fields for the expense. In the screen below the original amount on the travel authorization for Other Reimbursable Expenses Incurred was $500.00.
4. 5. NOTE: To delete an expense, select the box associated with the expense to delete, and select the
Delete button.
Page 107 of 170
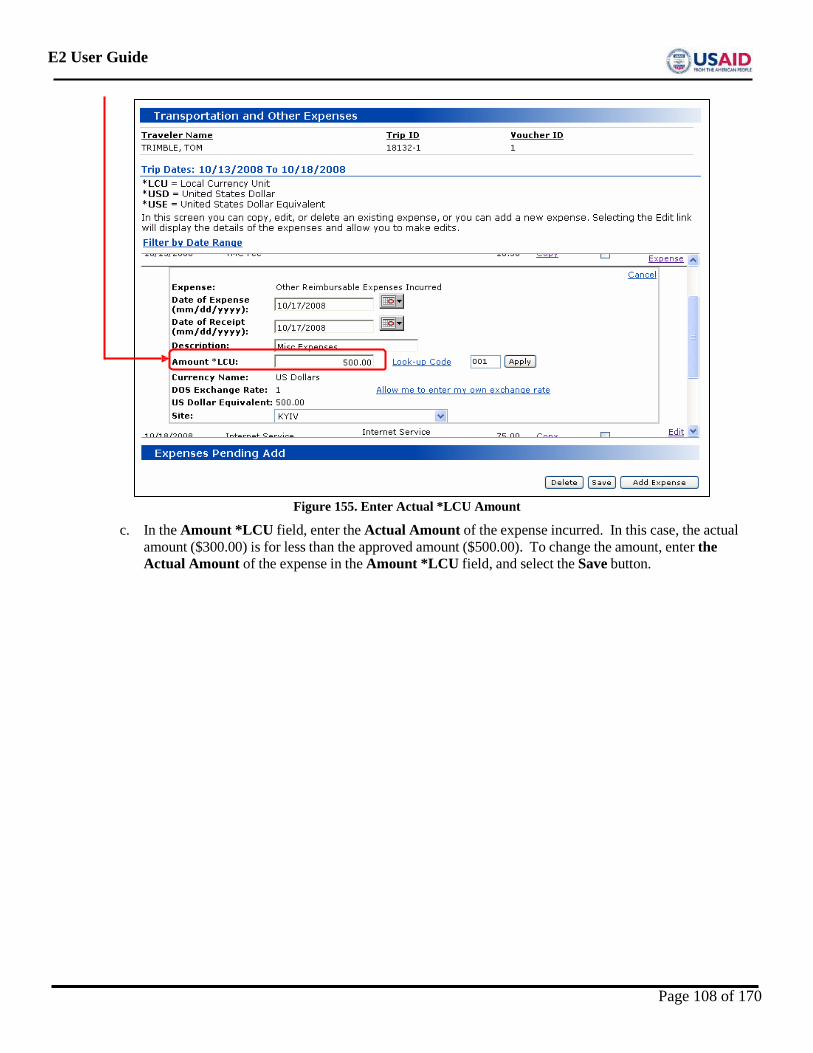
E2 User Guide
Figure 155. Enter Actual *LCU Amount
c. In the Amount *LCU field, enter the Actual Amount of the expense incurred. In this case, the actual amount ($300.00) is for less than the approved amount ($500.00). To change the amount, enter the Actual Amount of the expense in the Amount *LCU field, and select the Save button.
Page 108 of 170
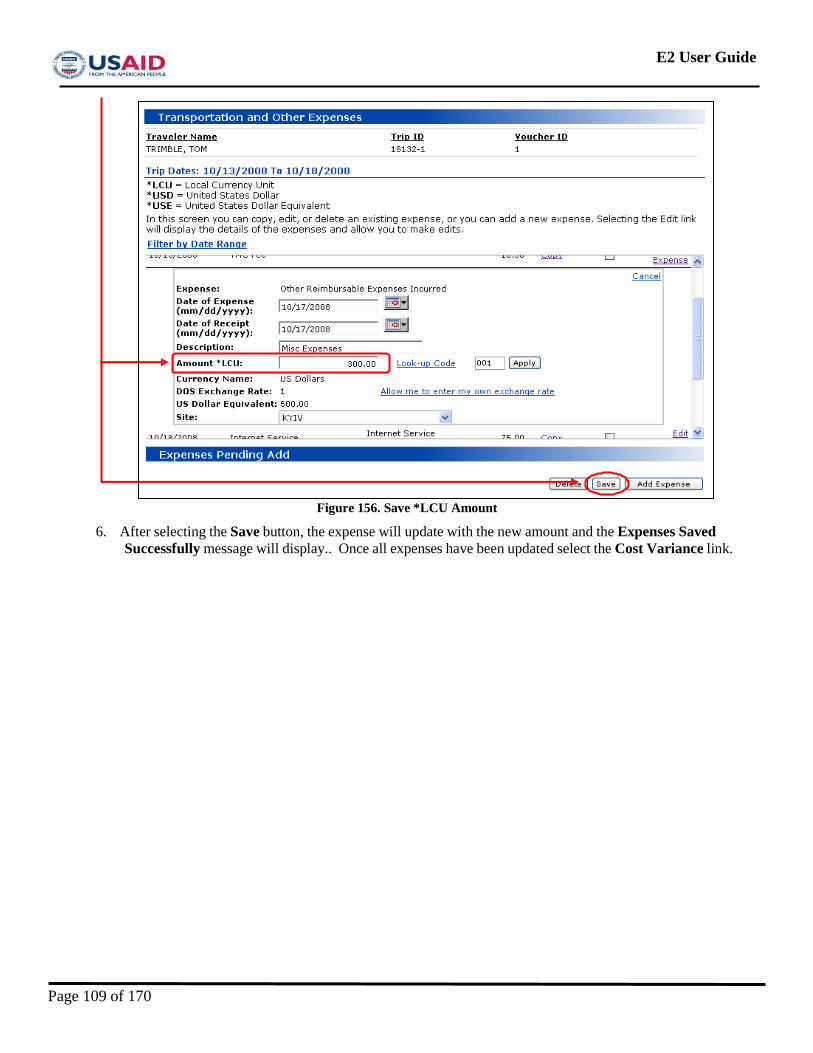
E2 User Guide
Figure 156. Save *LCU Amount
6. After selecting the Save button, the expense will update with the new amount and the Expenses Saved Successfully message will display.. Once all expenses have been updated select the Cost Variance link.
Page 109 of 170
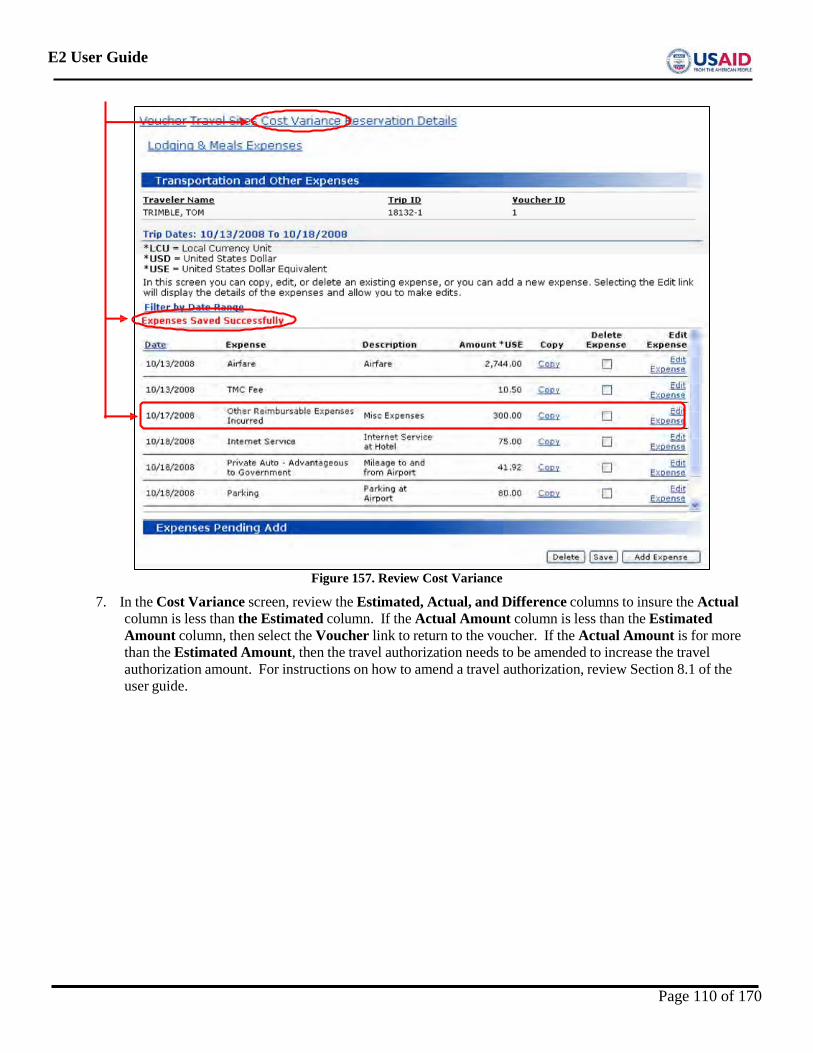
E2 User Guide
Figure 157. Review Cost Variance
7. In the Cost Variance screen, review the Estimated, Actual, and Difference columns to insure the Actual column is less than the Estimated column. If the Actual Amount column is less than the Estimated Amount column, then select the Voucher link to return to the voucher. If the Actual Amount is for more than the Estimated Amount, then the travel authorization needs to be amended to increase the travel authorization amount. For instructions on how to amend a travel authorization, review Section 8.1 of the user guide.
Page 110 of 170
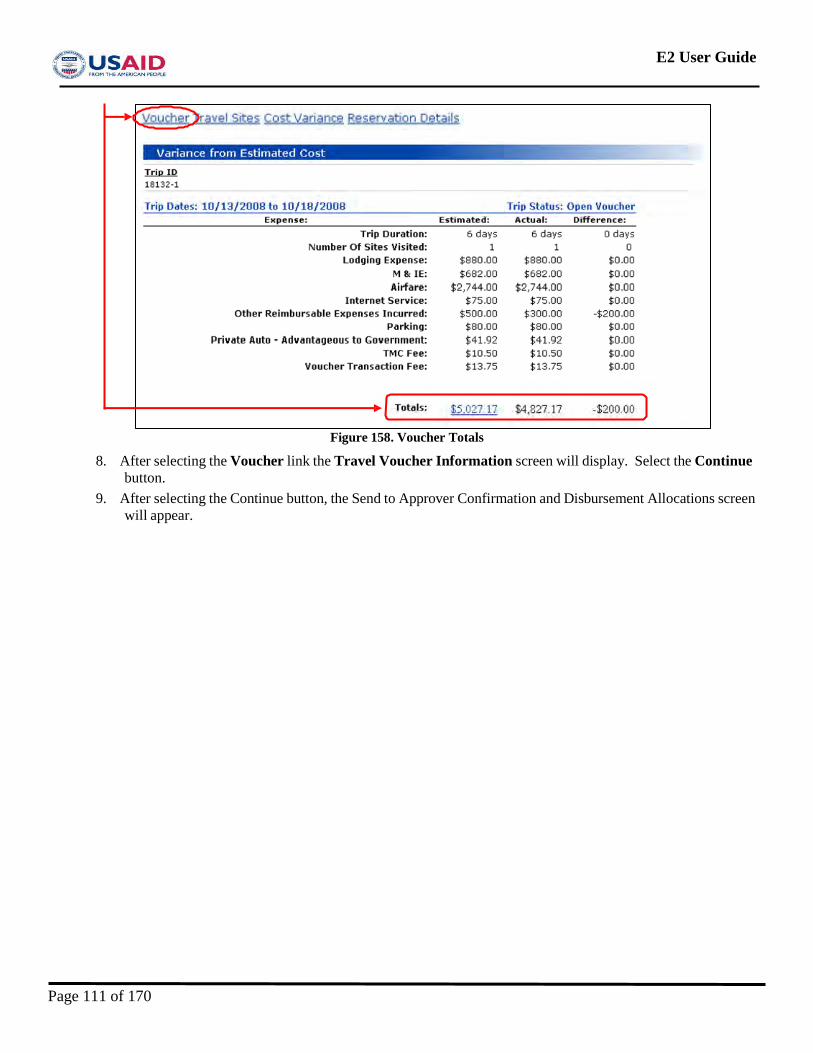
E2 User Guide
Figure 158. Voucher Totals
8. After selecting the Voucher link the Travel Voucher Information screen will display. Select the Continue button.
9. After selecting the Continue button, the Send to Approver Confirmation and Disbursement Allocations screen will appear.
Page 111 of 170
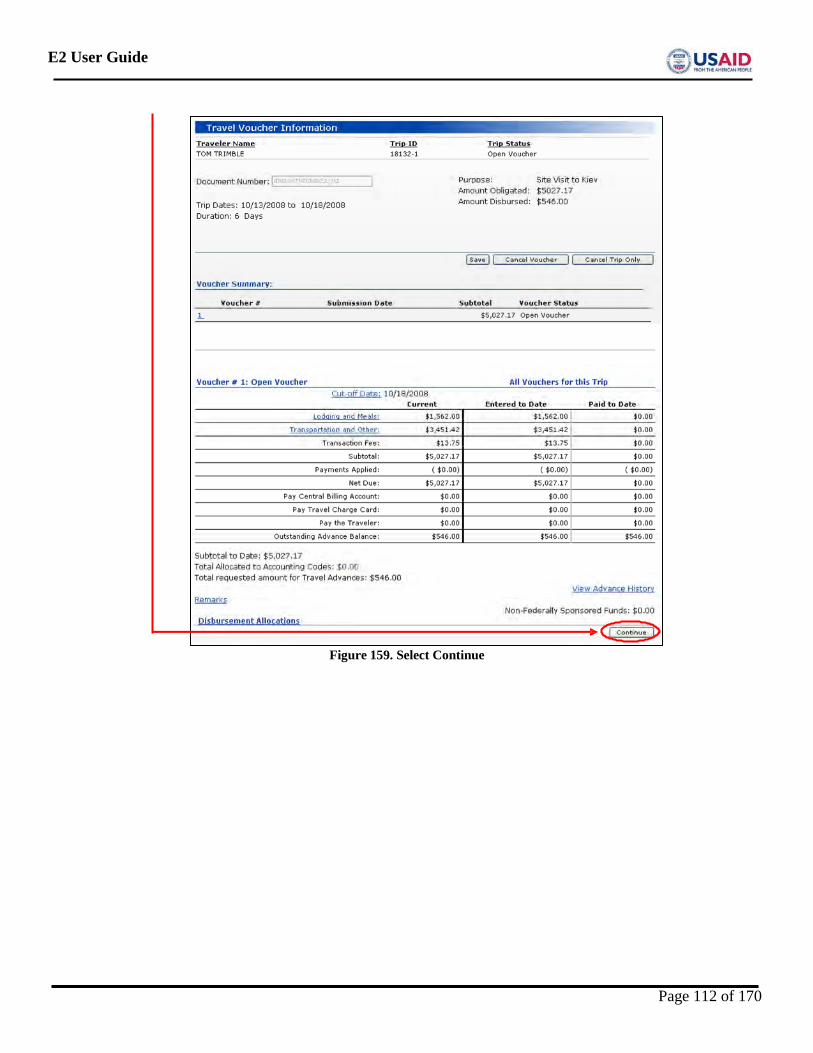
E2 User Guide
Figure 159. Select Continue
Page 112 of 170
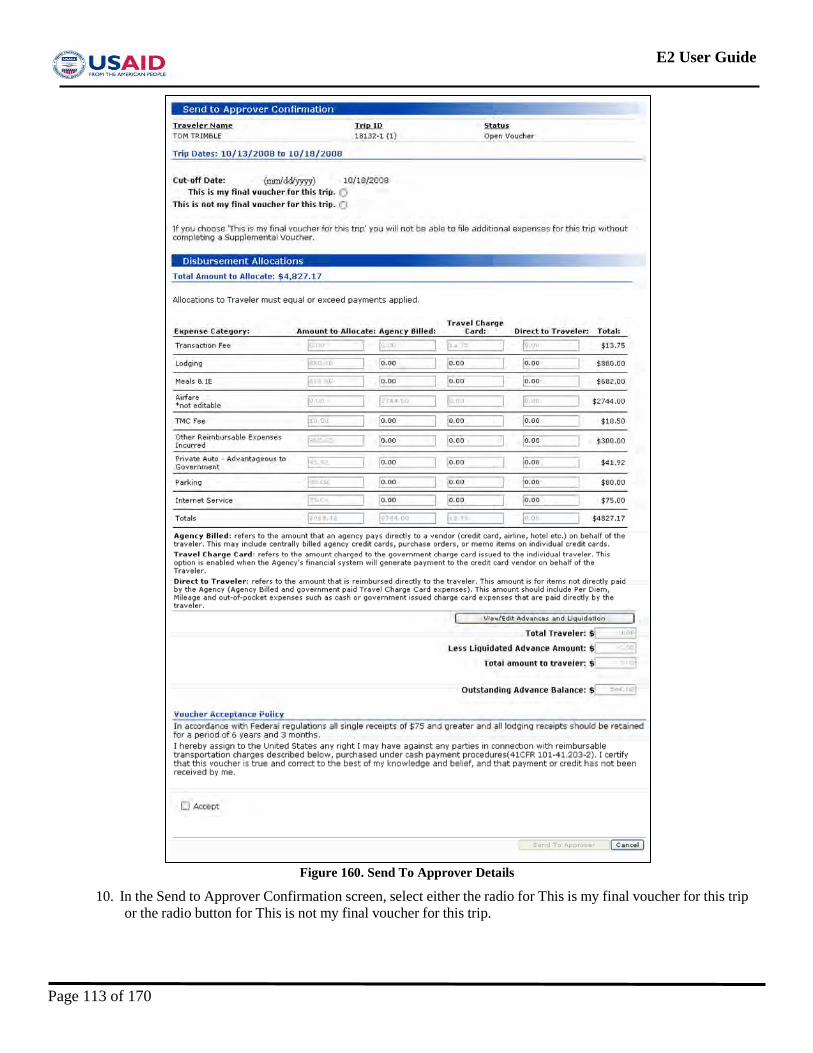
E2 User Guide
Figure 160. Send To Approver Details
10. In the Send to Approver Confirmation screen, select either the radio for This is my final voucher for this trip or the radio button for This is not my final voucher for this trip.
Page 113 of 170
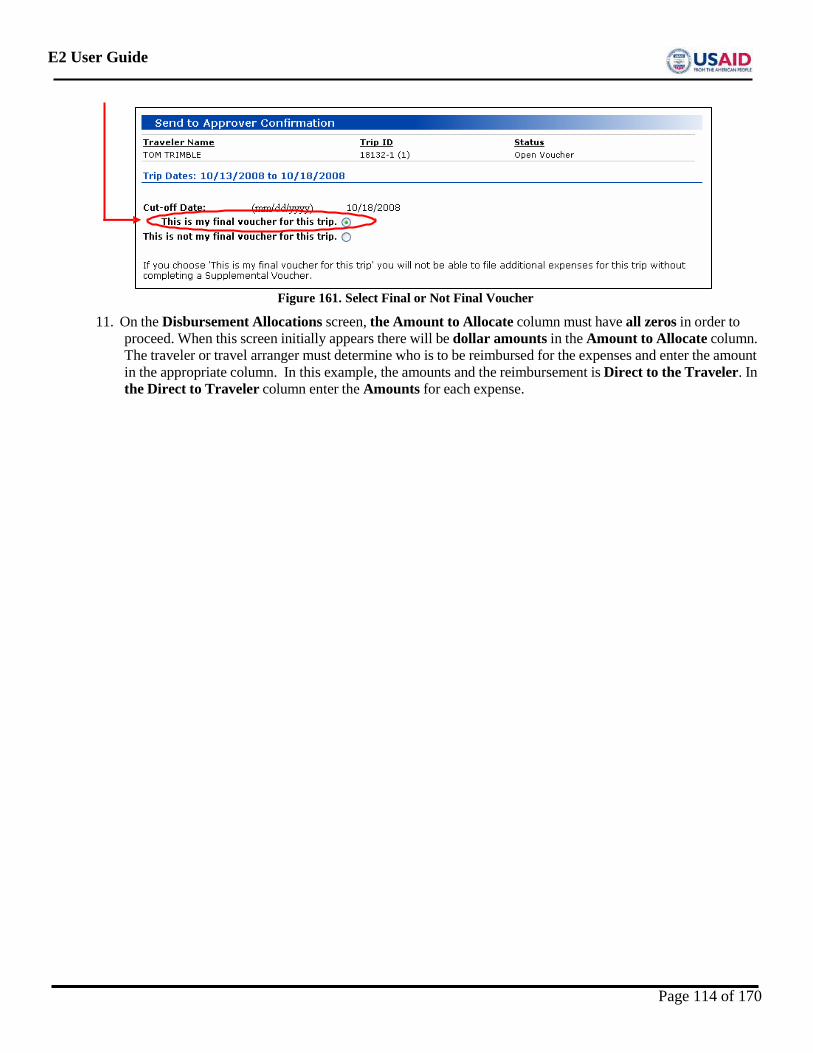
E2 User Guide
Figure 161. Select Final or Not Final Voucher
11. On the Disbursement Allocations screen, the Amount to Allocate column must have all zeros in order to proceed. When this screen initially appears there will be dollar amounts in the Amount to Allocate column. The traveler or travel arranger must determine who is to be reimbursed for the expenses and enter the amount in the appropriate column. In this example, the amounts and the reimbursement is Direct to the Traveler. In the Direct to Traveler column enter the Amounts for each expense.
Page 114 of 170
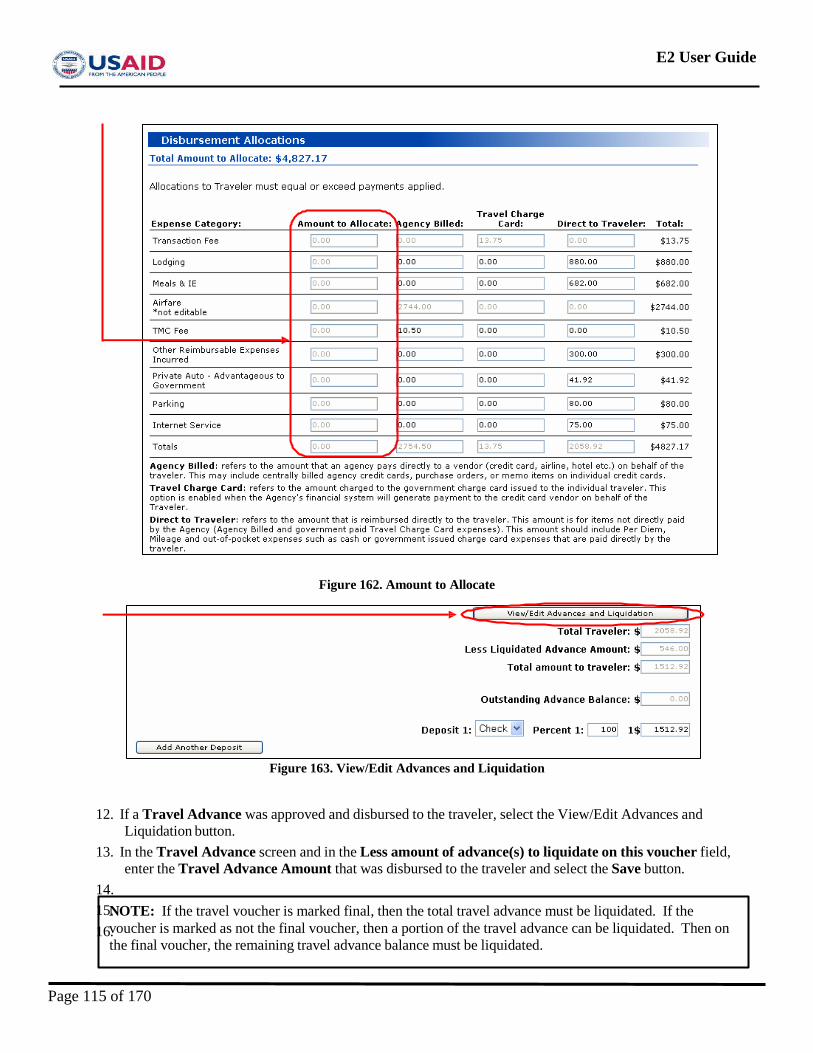
E2 User Guide
Figure 162. Amount to Allocate
Figure 163. View/Edit Advances and Liquidation
12. If a Travel Advance was approved and disbursed to the traveler, select the View/Edit Advances and Liquidation button.
13. In the Travel Advance screen and in the Less amount of advance(s) to liquidate on this voucher field, enter the Travel Advance Amount that was disbursed to the traveler and select the Save button.
14. 15N. OTE: If the travel voucher is marked final, then the total travel advance must be liquidated. If the 16v. oucher is marked as not the final voucher, then a portion of the travel advance can be liquidated. Then on
the final voucher, the remaining travel advance balance must be liquidated.
Page 115 of 170
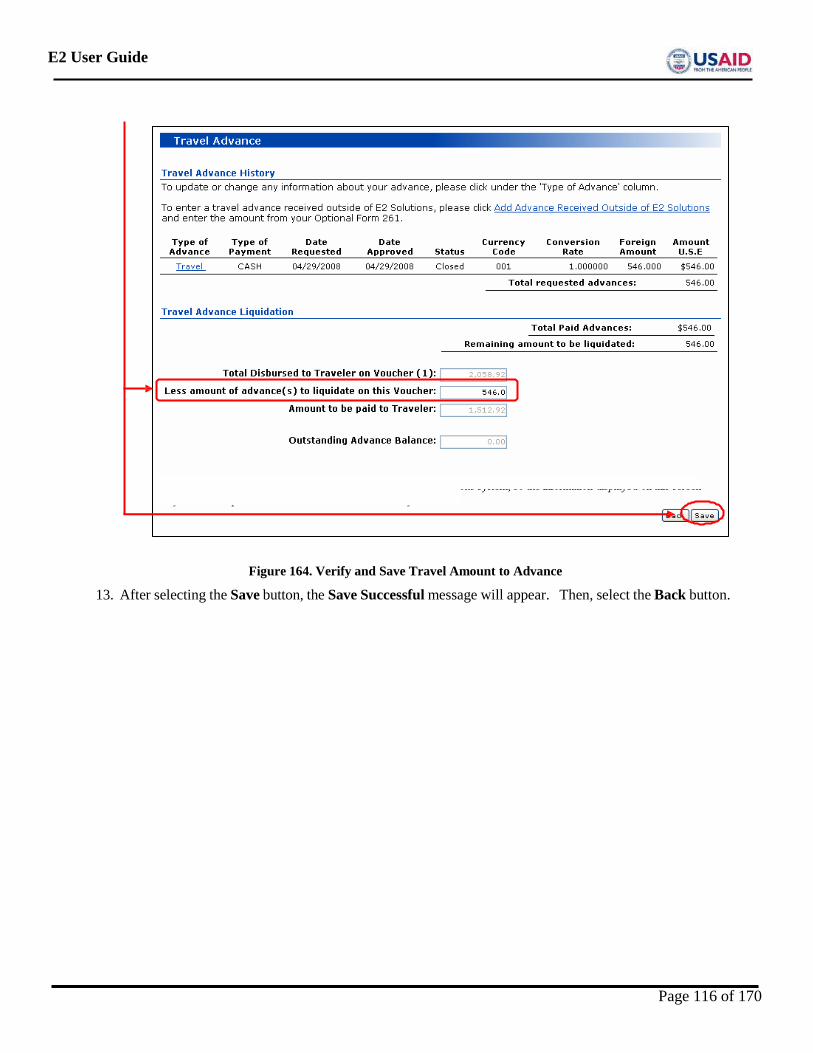
E2 User Guide
Figure 164. Verify and Save Travel Amount to Advance
13. After selecting the Save button, the Save Successful message will appear. Then, select the Back button.
Page 116 of 170
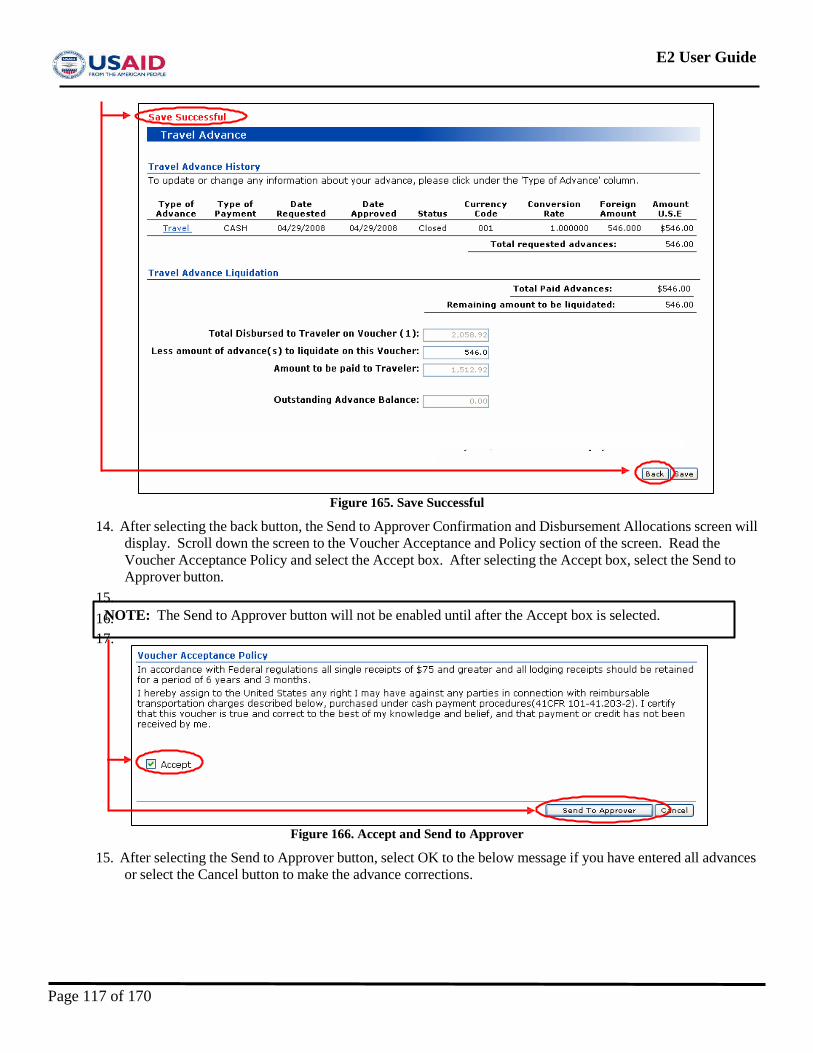
E2 User Guide
Figure 165. Save Successful
14. After selecting the back button, the Send to Approver Confirmation and Disbursement Allocations screen will display. Scroll down the screen to the Voucher Acceptance and Policy section of the screen. Read the Voucher Acceptance Policy and select the Accept box. After selecting the Accept box, select the Send to Approver button.
15. 16N.OTE: The Send to Approver button will not be enabled until after the Accept box is selected. 17.
Figure 166. Accept and Send to Approver
15. After selecting the Send to Approver button, select OK to the below message if you have entered all advances or select the Cancel button to make the advance corrections.
Page 117 of 170
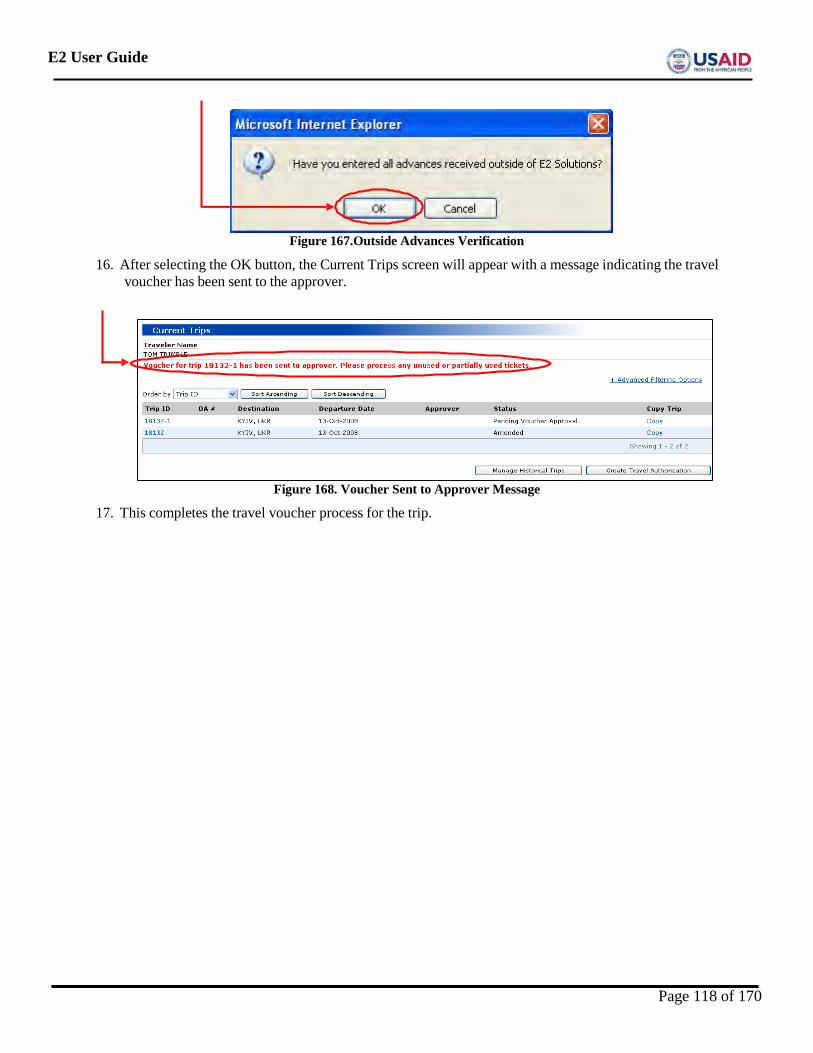
E2 User Guide
Figure 167.Outside Advances Verification
16. After selecting the OK button, the Current Trips screen will appear with a message indicating the travel voucher has been sent to the approver.
Figure 168. Voucher Sent to Approver Message
17. This completes the travel voucher process for the trip.
Page 118 of 170
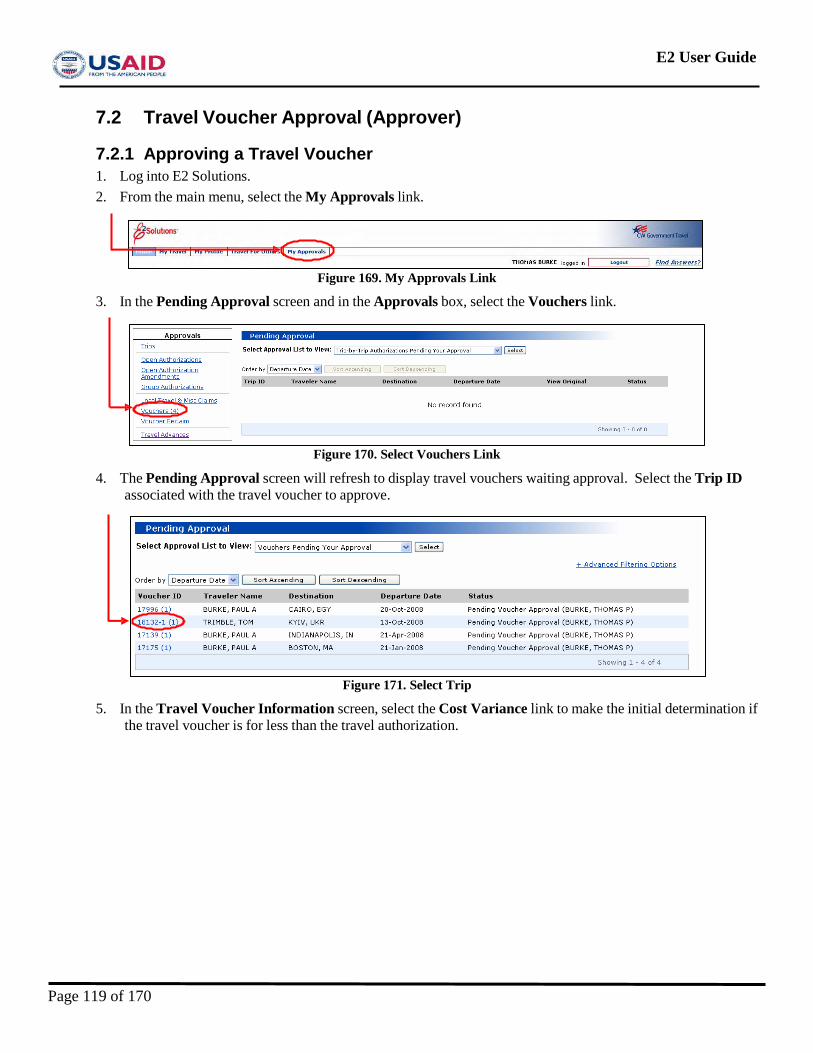
E2 User Guide
7.2 Travel Voucher Approval (Approver)
7.2.1 Approving a Travel Voucher 1. Log into E2 Solutions. 2. From the main menu, select the My Approvals link.
Figure 169. My Approvals Link
3. In the Pending Approval screen and in the Approvals box, select the Vouchers link.
Figure 170. Select Vouchers Link
4. The Pending Approval screen will refresh to display travel vouchers waiting approval. Select the Trip ID associated with the travel voucher to approve.
Figure 171. Select Trip
5. In the Travel Voucher Information screen, select the Cost Variance link to make the initial determination if the travel voucher is for less than the travel authorization.
Page 119 of 170
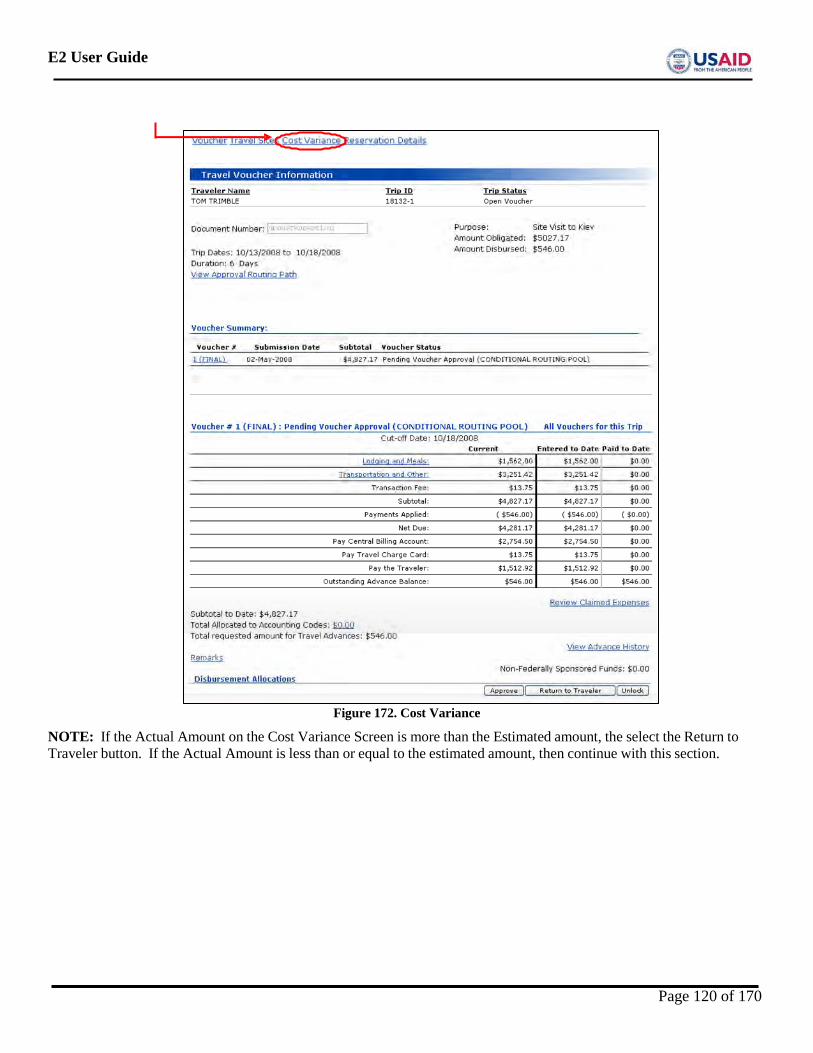
E2 User Guide
Figure 172. Cost Variance
NOTE: If the Actual Amount on the Cost Variance Screen is more than the Estimated amount, the select the Return to Traveler button. If the Actual Amount is less than or equal to the estimated amount, then continue with this section.
Page 120 of 170
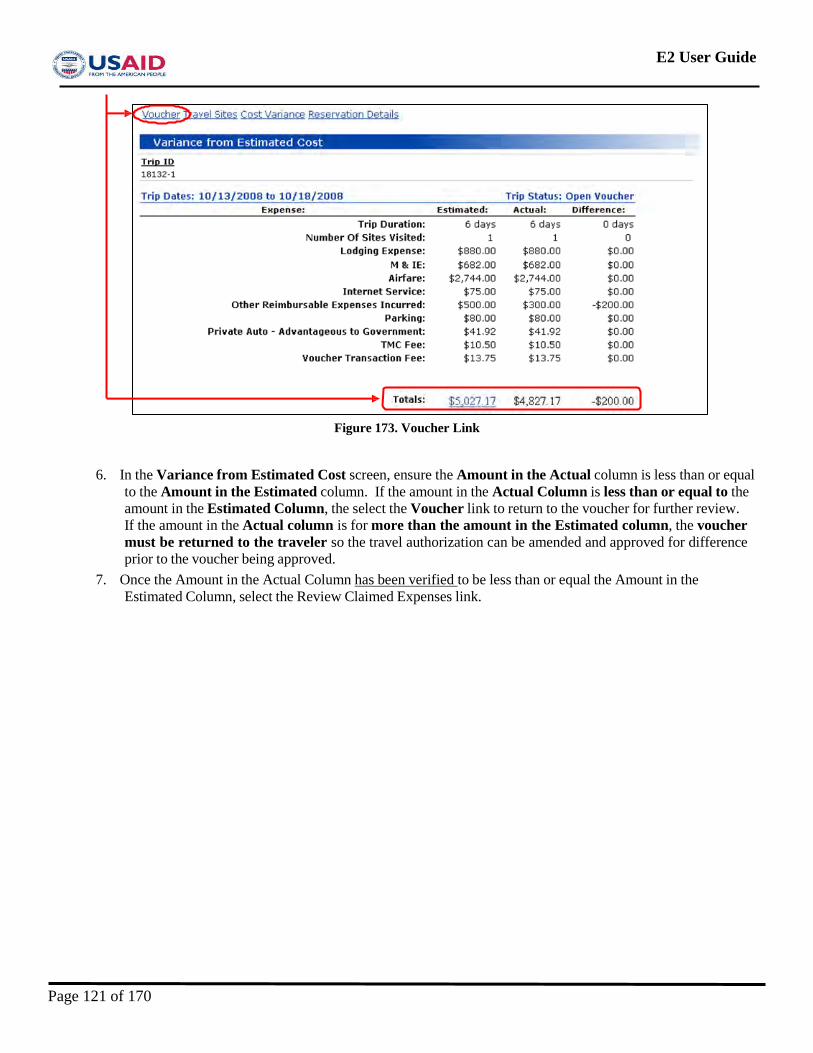
E2 User Guide
Figure 173. Voucher Link
6. In the Variance from Estimated Cost screen, ensure the Amount in the Actual column is less than or equal to the Amount in the Estimated column. If the amount in the Actual Column is less than or equal to the amount in the Estimated Column, the select the Voucher link to return to the voucher for further review. If the amount in the Actual column is for more than the amount in the Estimated column, the voucher must be returned to the traveler so the travel authorization can be amended and approved for difference prior to the voucher being approved.
7. Once the Amount in the Actual Column has been verified to be less than or equal the Amount in the Estimated Column, select the Review Claimed Expenses link.
Page 121 of 170
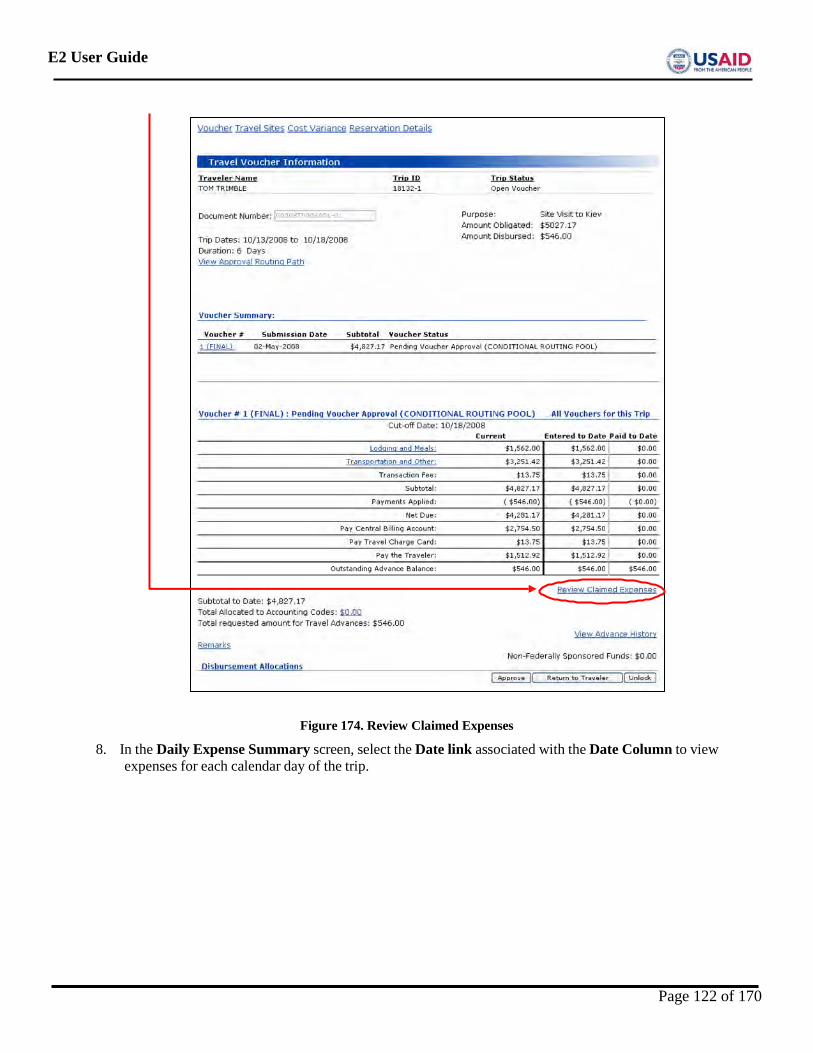
E2 User Guide
Figure 174. Review Claimed Expenses
8. In the Daily Expense Summary screen, select the Date link associated with the Date Column to view expenses for each calendar day of the trip.
Page 122 of 170
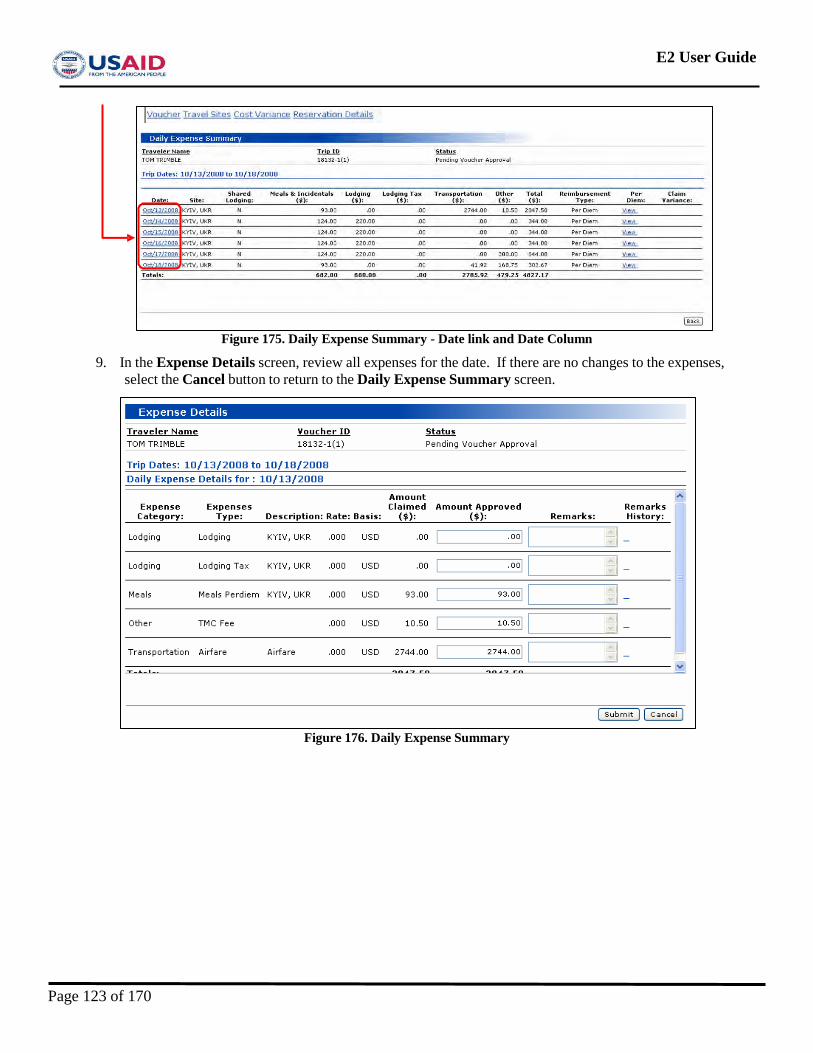
E2 User Guide
Figure 175. Daily Expense Summary - Date link and Date Column
9. In the Expense Details screen, review all expenses for the date. If there are no changes to the expenses, select the Cancel button to return to the Daily Expense Summary screen.
Figure 176. Daily Expense Summary
Page 123 of 170
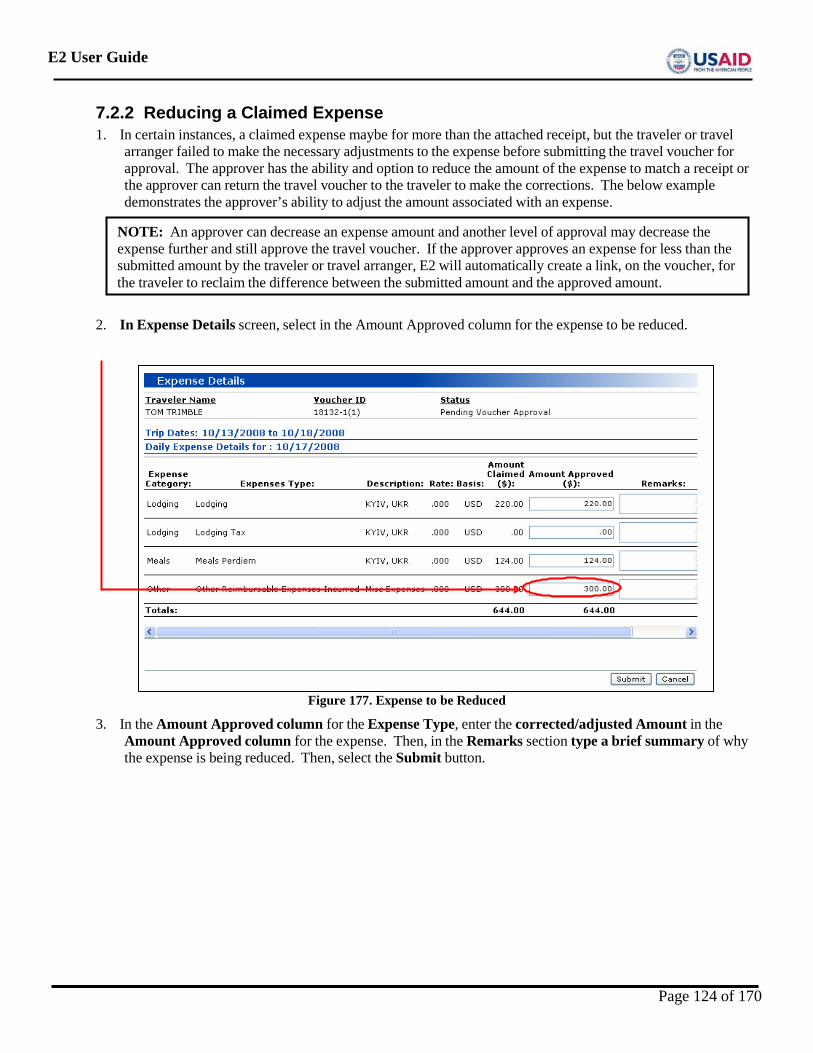
E2 User Guide
7.2.2 Reducing a Claimed Expense 1. In certain instances, a claimed expense maybe for more than the attached receipt, but the traveler or travel
arranger failed to make the necessary adjustments to the expense before submitting the travel voucher for approval. The approver has the ability and option to reduce the amount of the expense to match a receipt or the approver can return the travel voucher to the traveler to make the corrections. The below example demonstrates the approver’s ability to adjust the amount associated with an expense.
2. In Expense Details screen, select in the Amount Approved column for the expense to be reduced.
Figure 177. Expense to be Reduced
3. In the Amount Approved column for the Expense Type, enter the corrected/adjusted Amount in the Amount Approved column for the expense. Then, in the Remarks section type a brief summary of why the expense is being reduced. Then, select the Submit button.
NOTE: An approver can decrease an expense amount and another level of approval may decrease the expense further and still approve the travel voucher. If the approver approves an expense for less than the submitted amount by the traveler or travel arranger, E2 will automatically create a link, on the voucher, for the traveler to reclaim the difference between the submitted amount and the approved amount.
Page 124 of 170

E2 User Guide
Figure 178. Enter Summary and Submit
4. When finished reviewing and correcting all expenses, select the Voucher link.
Figure 179. Select Voucher link
Page 125 of 170
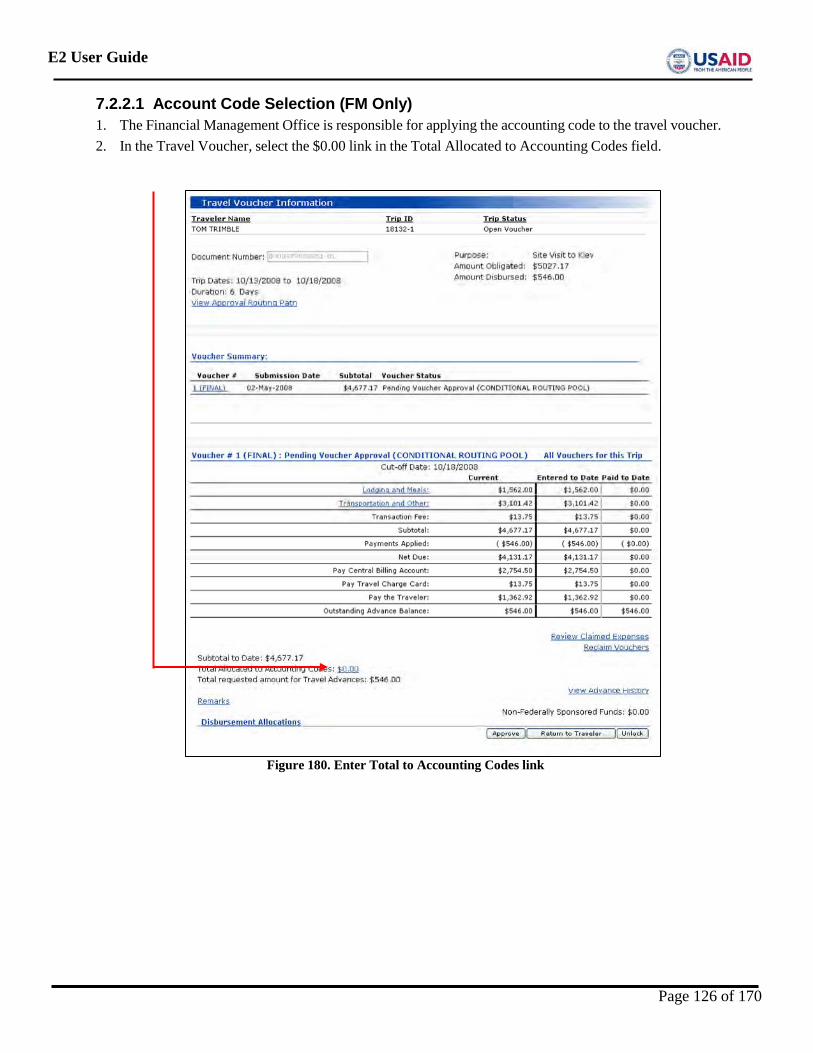
E2 User Guide
7.2.2.1 Account Code Selection (FM Only) 1. The Financial Management Office is responsible for applying the accounting code to the travel voucher. 2. In the Travel Voucher, select the $0.00 link in the Total Allocated to Accounting Codes field.
Figure 180. Enter Total to Accounting Codes link
Page 126 of 170
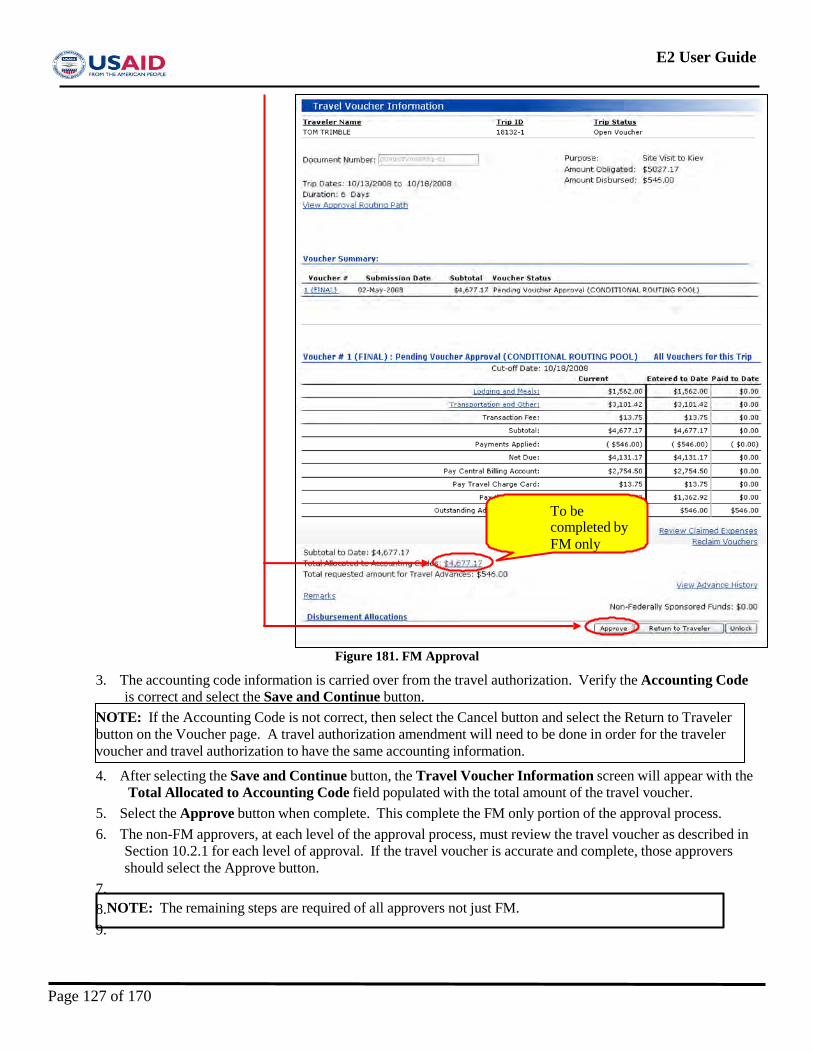
E2 User Guide
Figure 181. FM Approval
3. The accounting code information is carried over from the travel authorization. Verify the Accounting Code is correct and select the Save and Continue button.
NOTE: If the Accounting Code is not correct, then select the Cancel button and select the Return to Traveler button on the Voucher page. A travel authorization amendment will need to be done in order for the traveler voucher and travel authorization to have the same accounting information.
4. After selecting the Save and Continue button, the Travel Voucher Information screen will appear with the Total Allocated to Accounting Code field populated with the total amount of the travel voucher.
5. Select the Approve button when complete. This complete the FM only portion of the approval process. 6. The non-FM approvers, at each level of the approval process, must review the travel voucher as described in
Section 10.2.1 for each level of approval. If the travel voucher is accurate and complete, those approvers should select the Approve button.
7. 8.NOTE: The remaining steps are required of all approvers not just FM. 9.
To be completed by FM only
Page 127 of 170
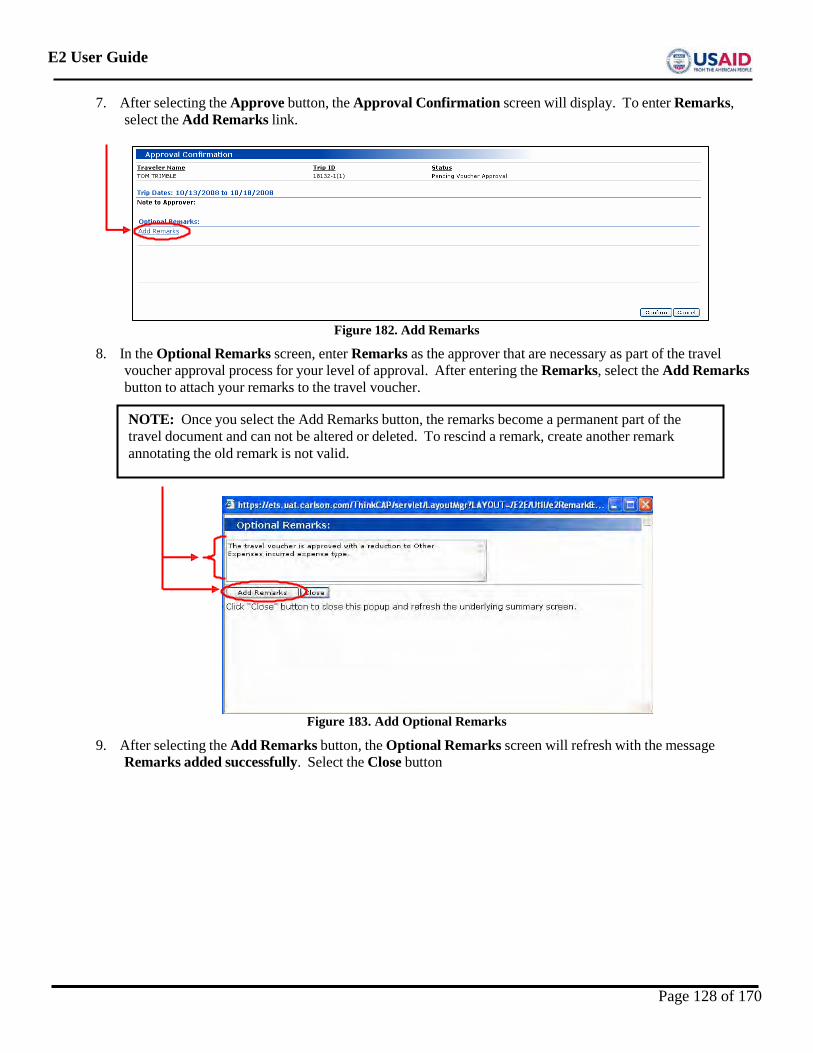
E2 User Guide
7. After selecting the Approve button, the Approval Confirmation screen will display. To enter Remarks, select the Add Remarks link.
Figure 182. Add Remarks
8. In the Optional Remarks screen, enter Remarks as the approver that are necessary as part of the travel voucher approval process for your level of approval. After entering the Remarks, select the Add Remarks button to attach your remarks to the travel voucher.
Figure 183. Add Optional Remarks
9. After selecting the Add Remarks button, the Optional Remarks screen will refresh with the message Remarks added successfully. Select the Close button
NOTE: Once you select the Add Remarks button, the remarks become a permanent part of the travel document and can not be altered or deleted. To rescind a remark, create another remark annotating the old remark is not valid.
Page 128 of 170
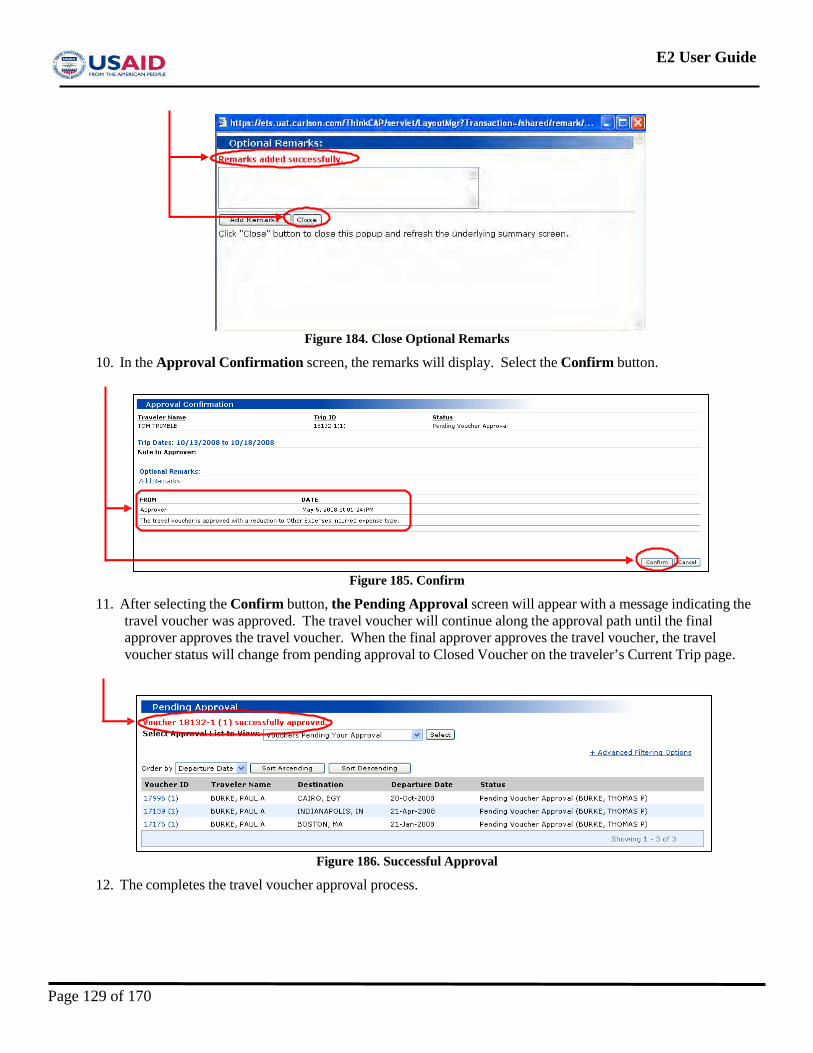
E2 User Guide
Figure 184. Close Optional Remarks
10. In the Approval Confirmation screen, the remarks will display. Select the Confirm button.
Figure 185. Confirm
11. After selecting the Confirm button, the Pending Approval screen will appear with a message indicating the travel voucher was approved. The travel voucher will continue along the approval path until the final approver approves the travel voucher. When the final approver approves the travel voucher, the travel voucher status will change from pending approval to Closed Voucher on the traveler’s Current Trip page.
Figure 186. Successful Approval
12. The completes the travel voucher approval process.
Page 129 of 170
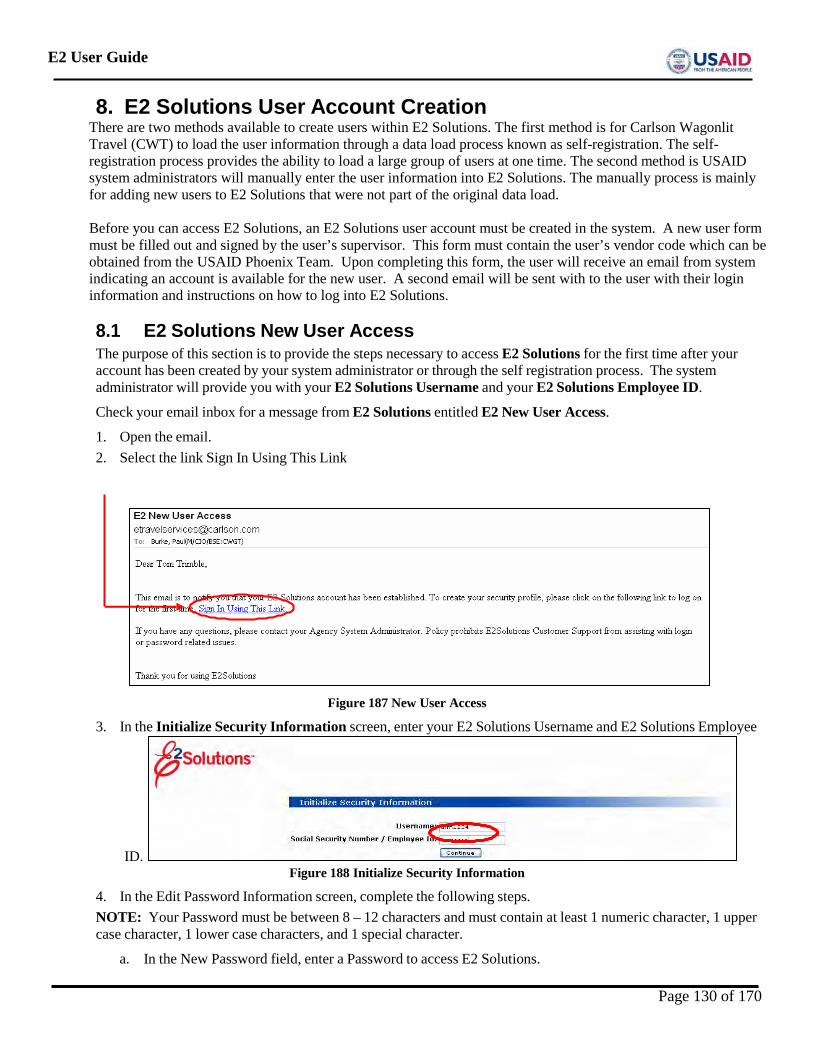
E2 User Guide
8. E2 Solutions User Account Creation There are two methods available to create users within E2 Solutions. The first method is for Carlson Wagonlit Travel (CWT) to load the user information through a data load process known as self-registration. The self-registration process provides the ability to load a large group of users at one time. The second method is USAID system administrators will manually enter the user information into E2 Solutions. The manually process is mainly for adding new users to E2 Solutions that were not part of the original data load.
Before you can access E2 Solutions, an E2 Solutions user account must be created in the system. A new user form must be filled out and signed by the user’s supervisor. This form must contain the user’s vendor code which can be obtained from the USAID Phoenix Team. Upon completing this form, the user will receive an email from system indicating an account is available for the new user. A second email will be sent with to the user with their login information and instructions on how to log into E2 Solutions.
8.1 E2 Solutions New User Access The purpose of this section is to provide the steps necessary to access E2 Solutions for the first time after your account has been created by your system administrator or through the self registration process. The system administrator will provide you with your E2 Solutions Username and your E2 Solutions Employee ID.
Check your email inbox for a message from E2 Solutions entitled E2 New User Access.
1. Open the email. 2. Select the link Sign In Using This Link
Figure 187 New User Access
3. In the Initialize Security Information screen, enter your E2 Solutions Username and E2 Solutions Employee
ID. Figure 188 Initialize Security Information
4. In the Edit Password Information screen, complete the following steps. NOTE: Your Password must be between 8 – 12 characters and must contain at least 1 numeric character, 1 upper case character, 1 lower case characters, and 1 special character.
a. In the New Password field, enter a Password to access E2 Solutions.
Page 130 of 170
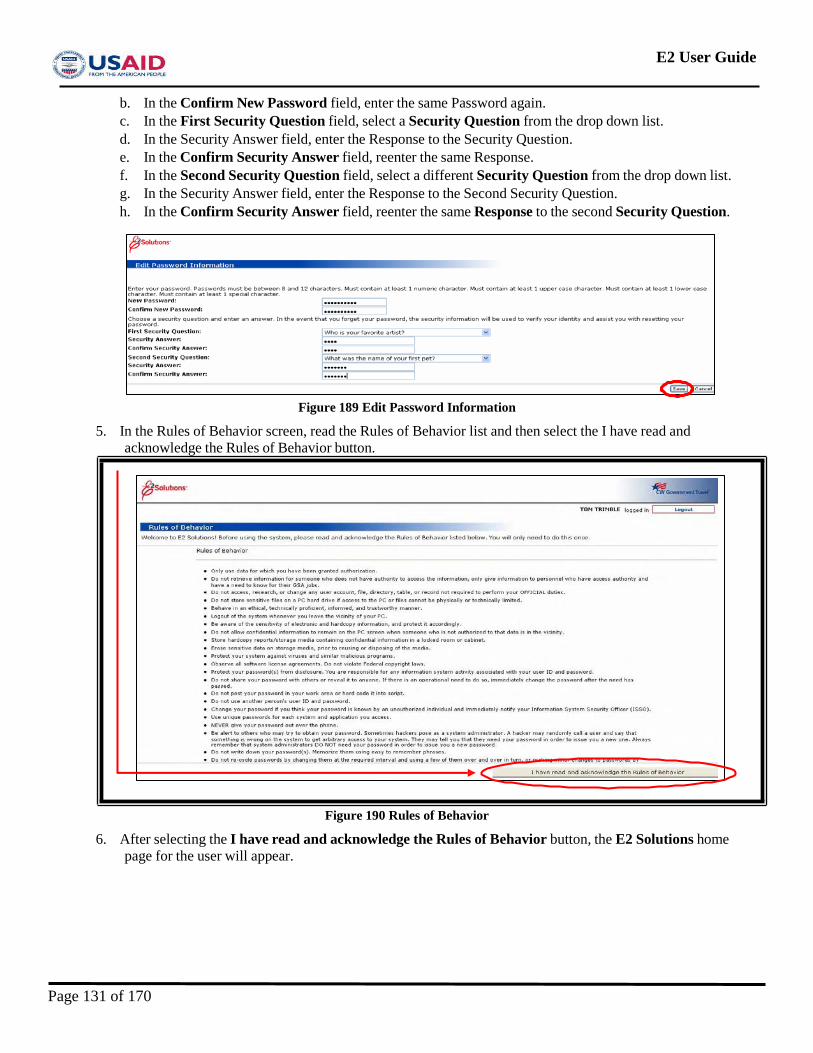
E2 User Guide
b. In the Confirm New Password field, enter the same Password again. c. In the First Security Question field, select a Security Question from the drop down list. d. In the Security Answer field, enter the Response to the Security Question. e. In the Confirm Security Answer field, reenter the same Response. f. In the Second Security Question field, select a different Security Question from the drop down list. g. In the Security Answer field, enter the Response to the Second Security Question. h. In the Confirm Security Answer field, reenter the same Response to the second Security Question.
Figure 189 Edit Password Information
5. In the Rules of Behavior screen, read the Rules of Behavior list and then select the I have read and acknowledge the Rules of Behavior button.
Figure 190 Rules of Behavior
6. After selecting the I have read and acknowledge the Rules of Behavior button, the E2 Solutions home page for the user will appear.
Page 131 of 170
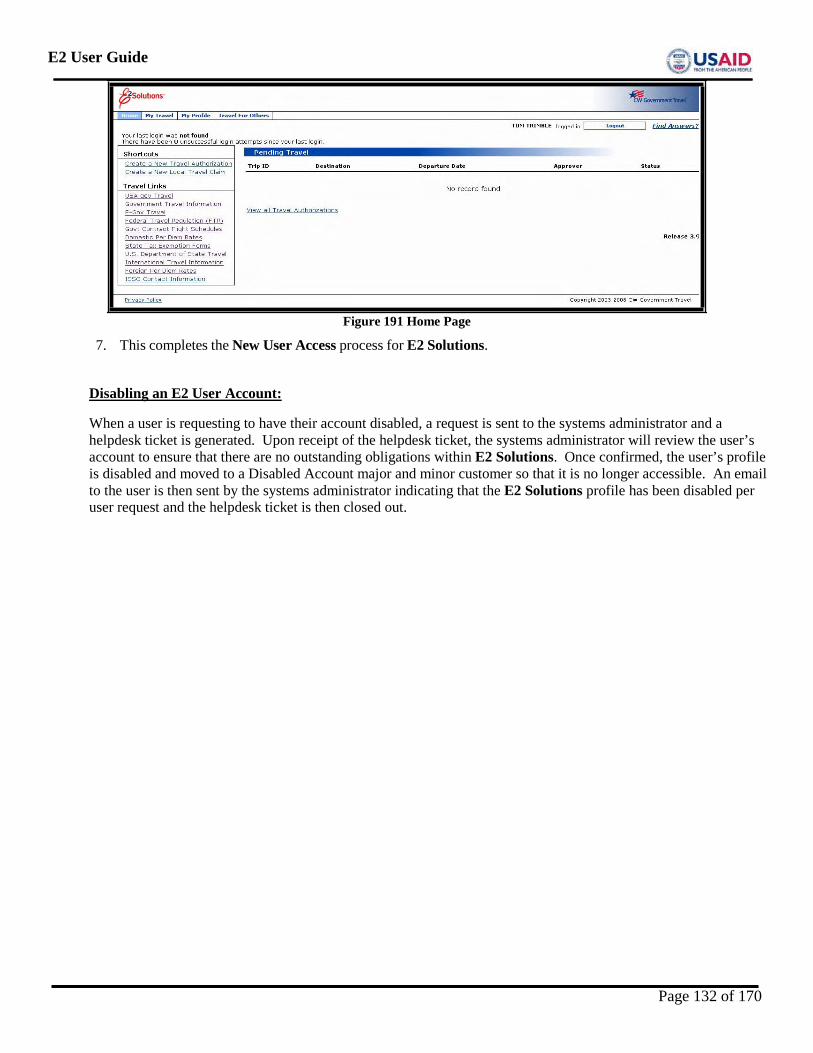
E2 User Guide
Figure 191 Home Page
7. This completes the New User Access process for E2 Solutions.
Disabling an E2 User Account:
When a user is requesting to have their account disabled, a request is sent to the systems administrator and a helpdesk ticket is generated. Upon receipt of the helpdesk ticket, the systems administrator will review the user’s account to ensure that there are no outstanding obligations within E2 Solutions. Once confirmed, the user’s profile is disabled and moved to a Disabled Account major and minor customer so that it is no longer accessible. An email to the user is then sent by the systems administrator indicating that the E2 Solutions profile has been disabled per user request and the helpdesk ticket is then closed out.
Page 132 of 170

E2 User Guide
This page intentionally left blank
Page 133 of 170
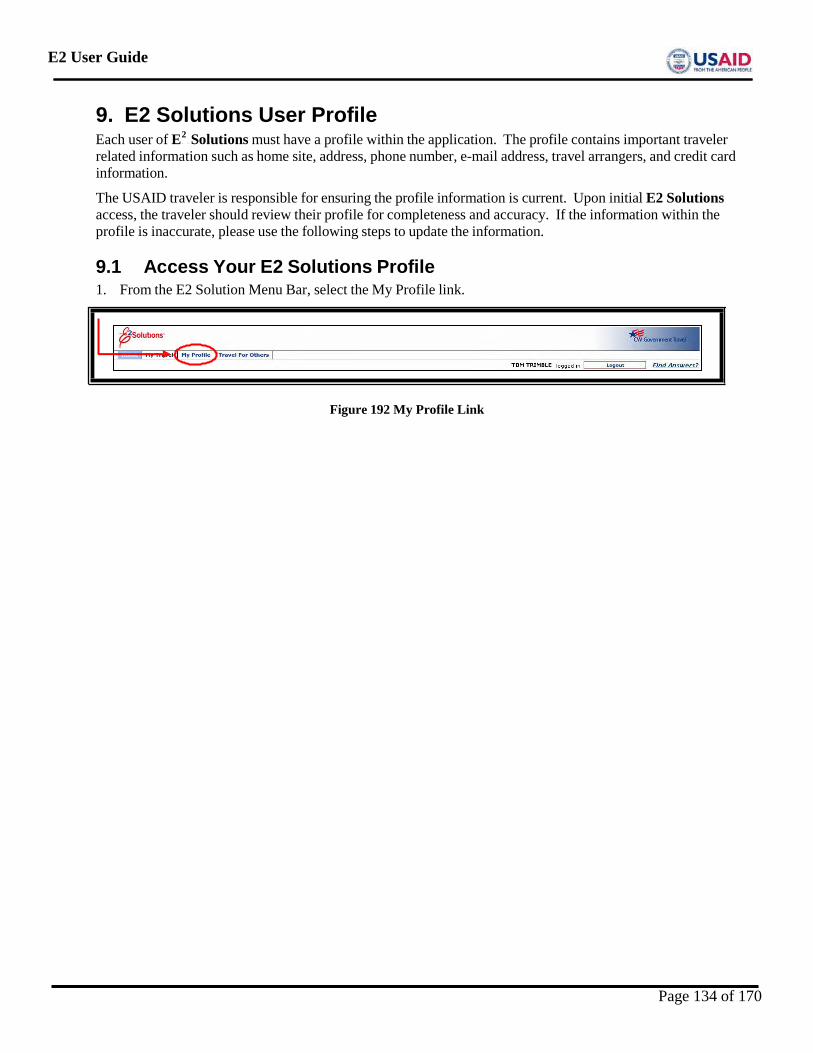
E2 User Guide
P P
9. E2 Solutions User Profile Each user of E2 Solutions must have a profile within the application. The profile contains important traveler related information such as home site, address, phone number, e-mail address, travel arrangers, and credit card information.
The USAID traveler is responsible for ensuring the profile information is current. Upon initial E2 Solutions access, the traveler should review their profile for completeness and accuracy. If the information within the profile is inaccurate, please use the following steps to update the information.
9.1 Access Your E2 Solutions Profile 1. From the E2 Solution Menu Bar, select the My Profile link.
Figure 192 My Profile Link
Page 134 of 170

E2 User Guide
Figure 193 User Profile
2. After selecting the My Profile link, the User Profile screen will appear.
Page 135 of 170
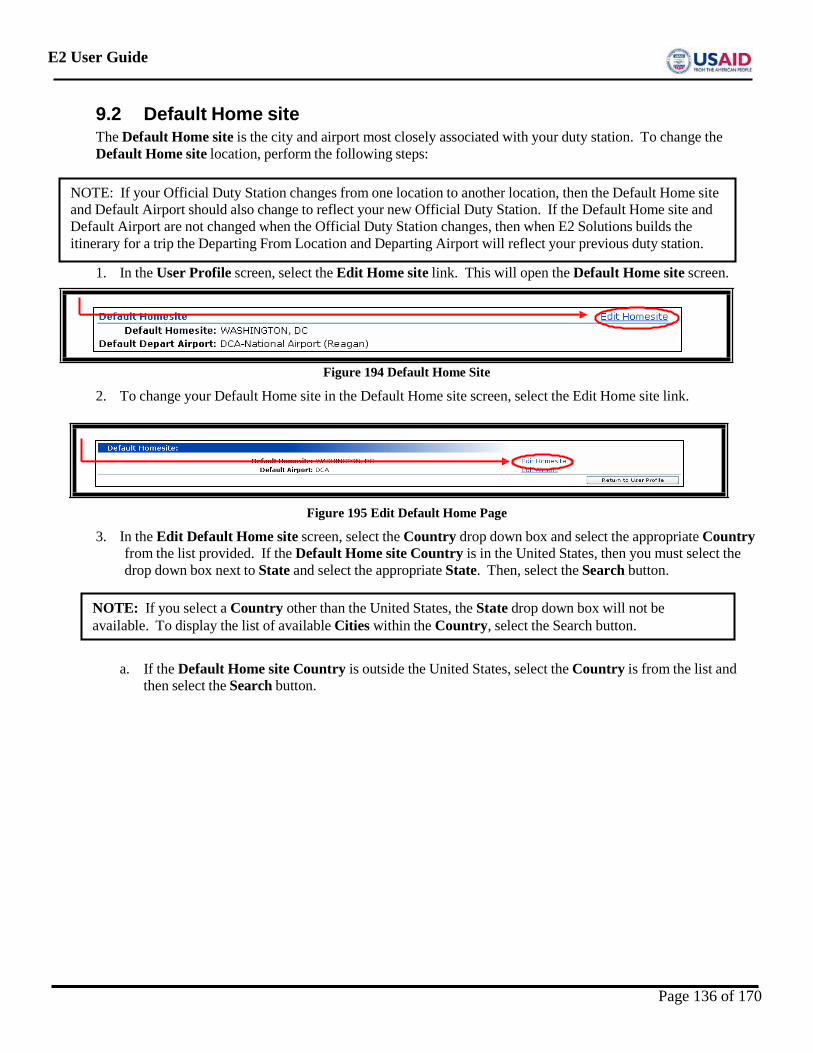
E2 User Guide
9.2 Default Home site The Default Home site is the city and airport most closely associated with your duty station. To change the Default Home site location, perform the following steps:
1. In the User Profile screen, select the Edit Home site link. This will open the Default Home site screen.
Figure 194 Default Home Site
2. To change your Default Home site in the Default Home site screen, select the Edit Home site link.
Figure 195 Edit Default Home Page
3. In the Edit Default Home site screen, select the Country drop down box and select the appropriate Country from the list provided. If the Default Home site Country is in the United States, then you must select the drop down box next to State and select the appropriate State. Then, select the Search button.
a. If the Default Home site Country is outside the United States, select the Country is from the list and then select the Search button.
NOTE: If you select a Country other than the United States, the State drop down box will not be available. To display the list of available Cities within the Country, select the Search button.
NOTE: If your Official Duty Station changes from one location to another location, then the Default Home site and Default Airport should also change to reflect your new Official Duty Station. If the Default Home site and Default Airport are not changed when the Official Duty Station changes, then when E2 Solutions builds the itinerary for a trip the Departing From Location and Departing Airport will reflect your previous duty station.
Page 136 of 170
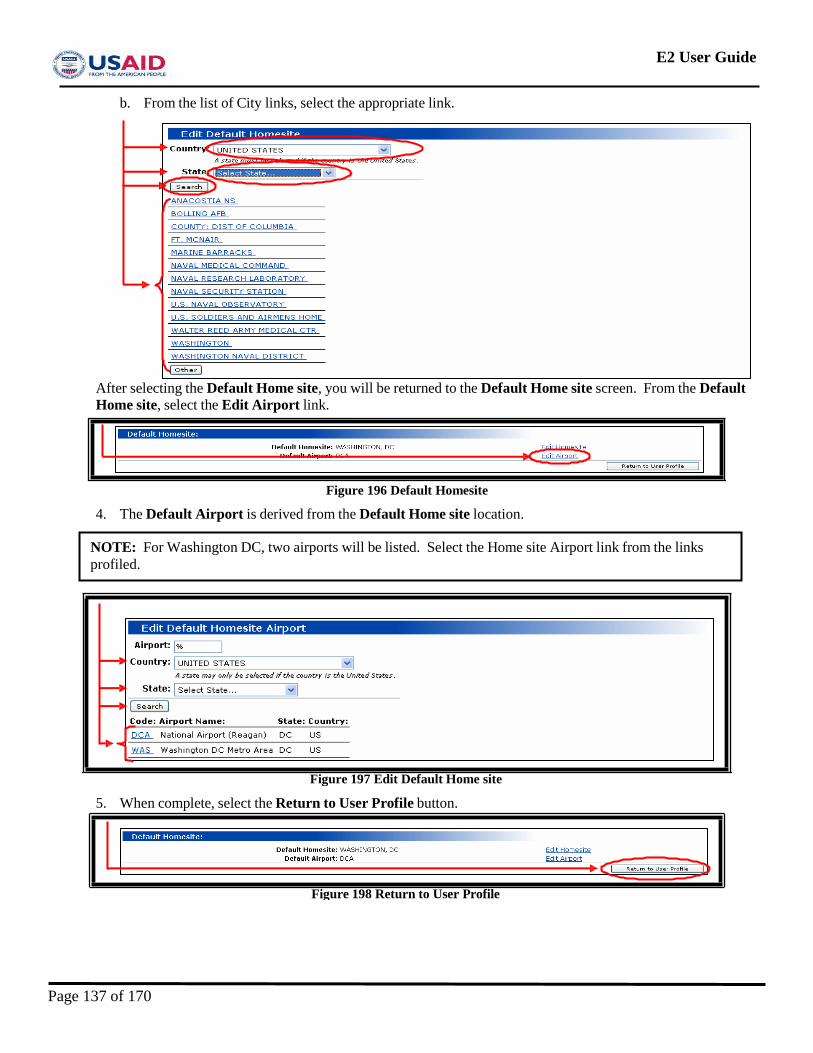
E2 User Guide
b. From the list of City links, select the appropriate link.
After selecting the Default Home site, you will be returned to the Default Home site screen. From the Default Home site, select the Edit Airport link.
Figure 196 Default Homesite
4. The Default Airport is derived from the Default Home site location.
5. When complete, select the Return to User Profile button.
Figure 198 Return to User Profile
Figure 197 Edit Default Home site
NOTE: For Washington DC, two airports will be listed. Select the Home site Airport link from the links profiled.
Page 137 of 170
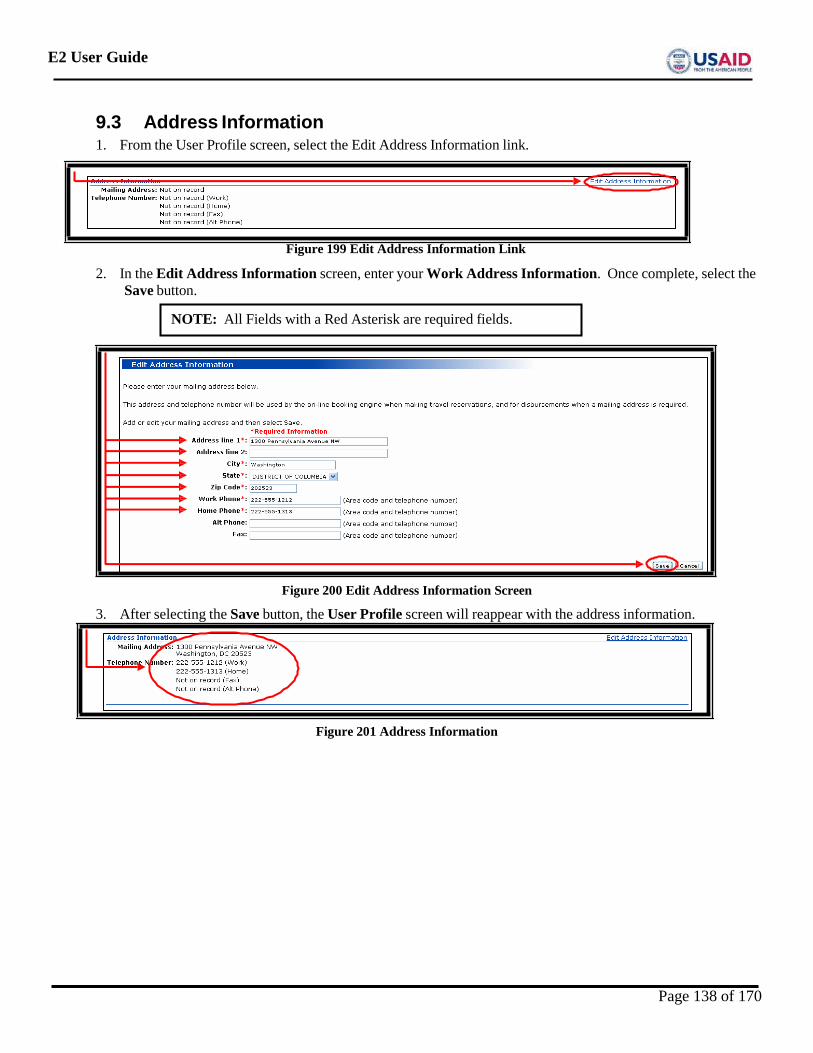
E2 User Guide
9.3 Address Information 1. From the User Profile screen, select the Edit Address Information link.
2. In the Edit Address Information screen, enter your Work Address Information. Once complete, select the
Save button.
Figure 200 Edit Address Information Screen
3. After selecting the Save button, the User Profile screen will reappear with the address information.
Figure 201 Address Information
NOTE: All Fields with a Red Asterisk are required fields.
Figure 199 Edit Address Information Link
Page 138 of 170
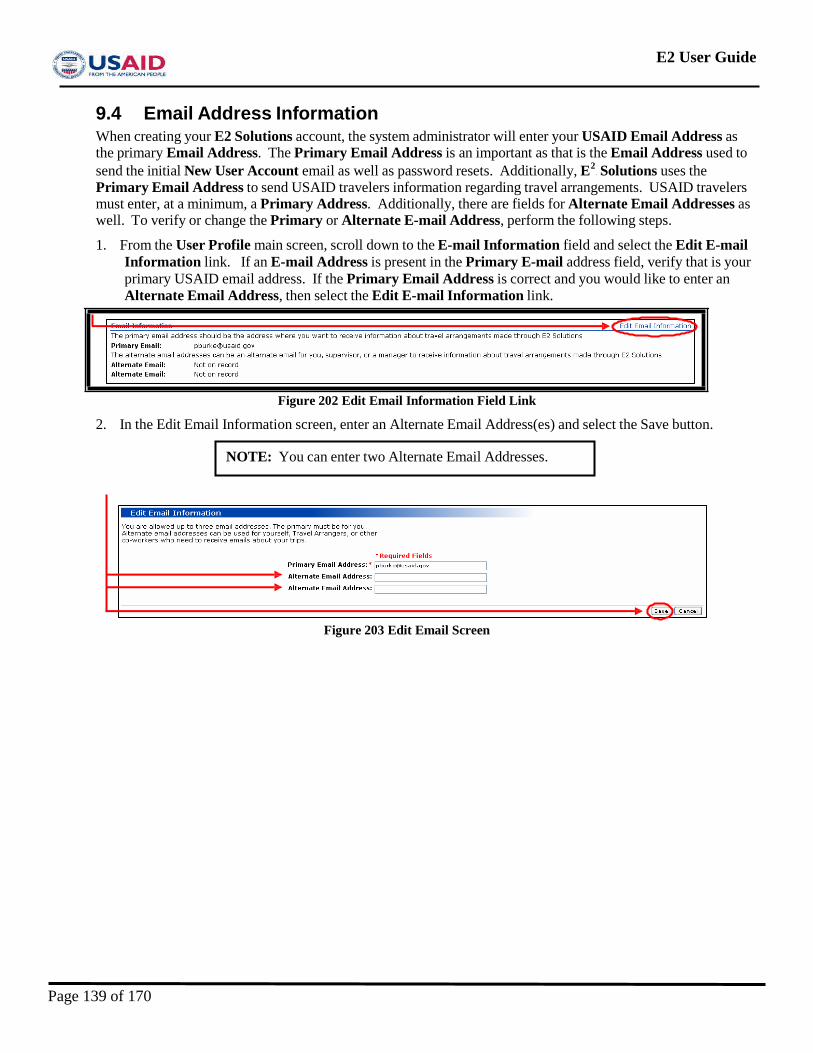
E2 User Guide
P P
9.4 Email Address Information When creating your E2 Solutions account, the system administrator will enter your USAID Email Address as the primary Email Address. The Primary Email Address is an important as that is the Email Address used to send the initial New User Account email as well as password resets. Additionally, E2 Solutions uses the Primary Email Address to send USAID travelers information regarding travel arrangements. USAID travelers must enter, at a minimum, a Primary Address. Additionally, there are fields for Alternate Email Addresses as well. To verify or change the Primary or Alternate E-mail Address, perform the following steps.
1. From the User Profile main screen, scroll down to the E-mail Information field and select the Edit E-mail Information link. If an E-mail Address is present in the Primary E-mail address field, verify that is your primary USAID email address. If the Primary Email Address is correct and you would like to enter an Alternate Email Address, then select the Edit E-mail Information link.
Figure 202 Edit Email Information Field Link
2. In the Edit Email Information screen, enter an Alternate Email Address(es) and select the Save button.
Figure 203 Edit Email Screen
NOTE: You can enter two Alternate Email Addresses.
Page 139 of 170
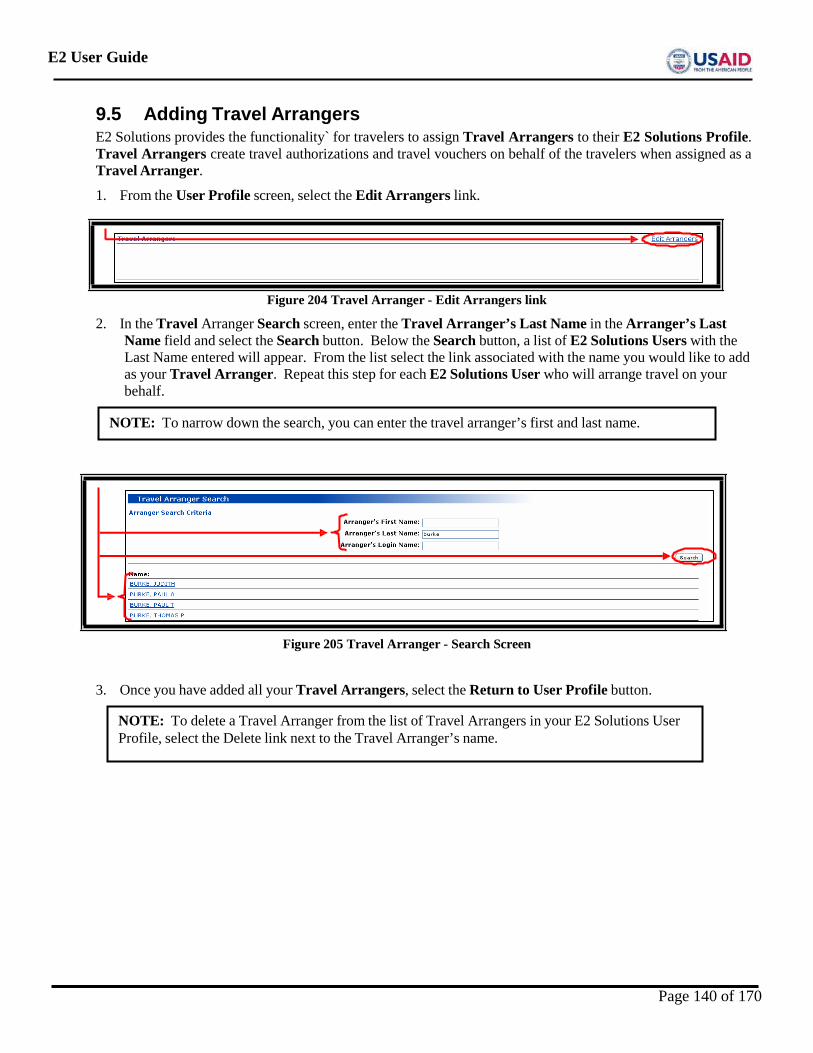
E2 User Guide
9.5 Adding Travel Arrangers E2 Solutions provides the functionality` for travelers to assign Travel Arrangers to their E2 Solutions Profile. Travel Arrangers create travel authorizations and travel vouchers on behalf of the travelers when assigned as a Travel Arranger.
1. From the User Profile screen, select the Edit Arrangers link.
Figure 204 Travel Arranger - Edit Arrangers link
2. In the Travel Arranger Search screen, enter the Travel Arranger’s Last Name in the Arranger’s Last Name field and select the Search button. Below the Search button, a list of E2 Solutions Users with the Last Name entered will appear. From the list select the link associated with the name you would like to add as your Travel Arranger. Repeat this step for each E2 Solutions User who will arrange travel on your behalf.
Figure 205 Travel Arranger - Search Screen
3. Once you have added all your Travel Arrangers, select the Return to User Profile button.
NOTE: To delete a Travel Arranger from the list of Travel Arrangers in your E2 Solutions User Profile, select the Delete link next to the Travel Arranger’s name.
NOTE: To narrow down the search, you can enter the travel arranger’s first and last name.
Page 140 of 170
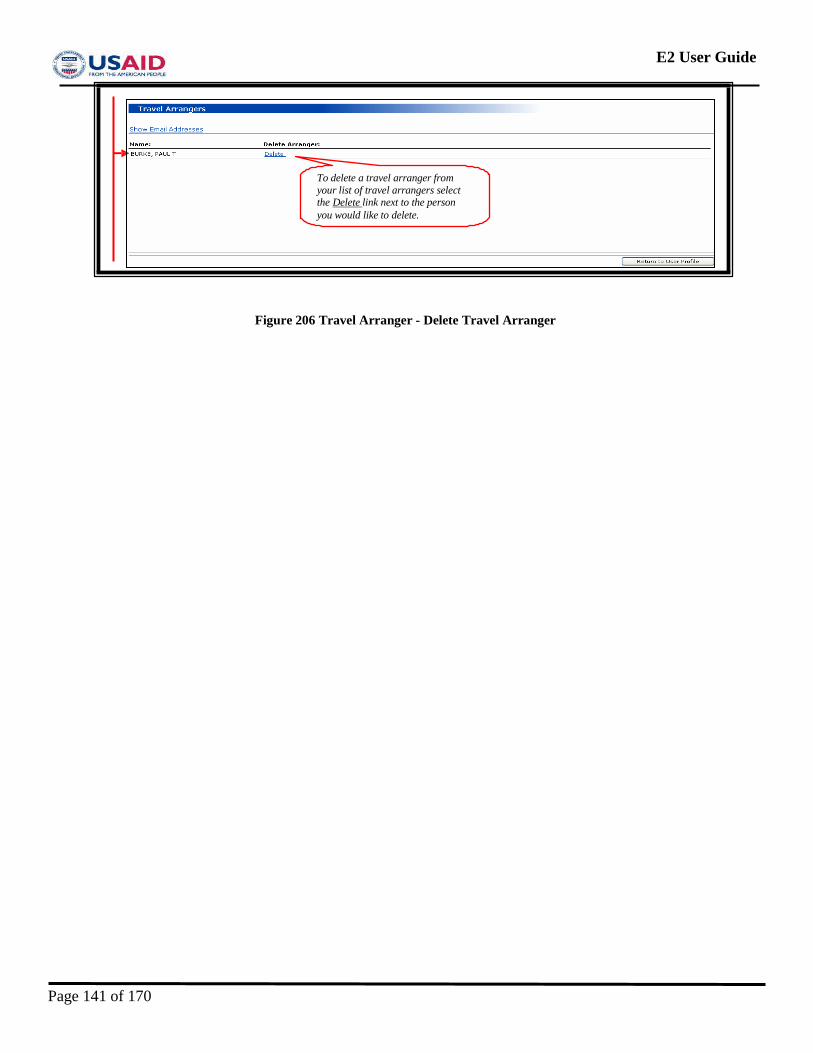
E2 User Guide
Figure 206 Travel Arranger - Delete Travel Arranger
To delete a travel arranger from your list of travel arrangers select the Delete link next to the person you would like to delete.
Page 141 of 170
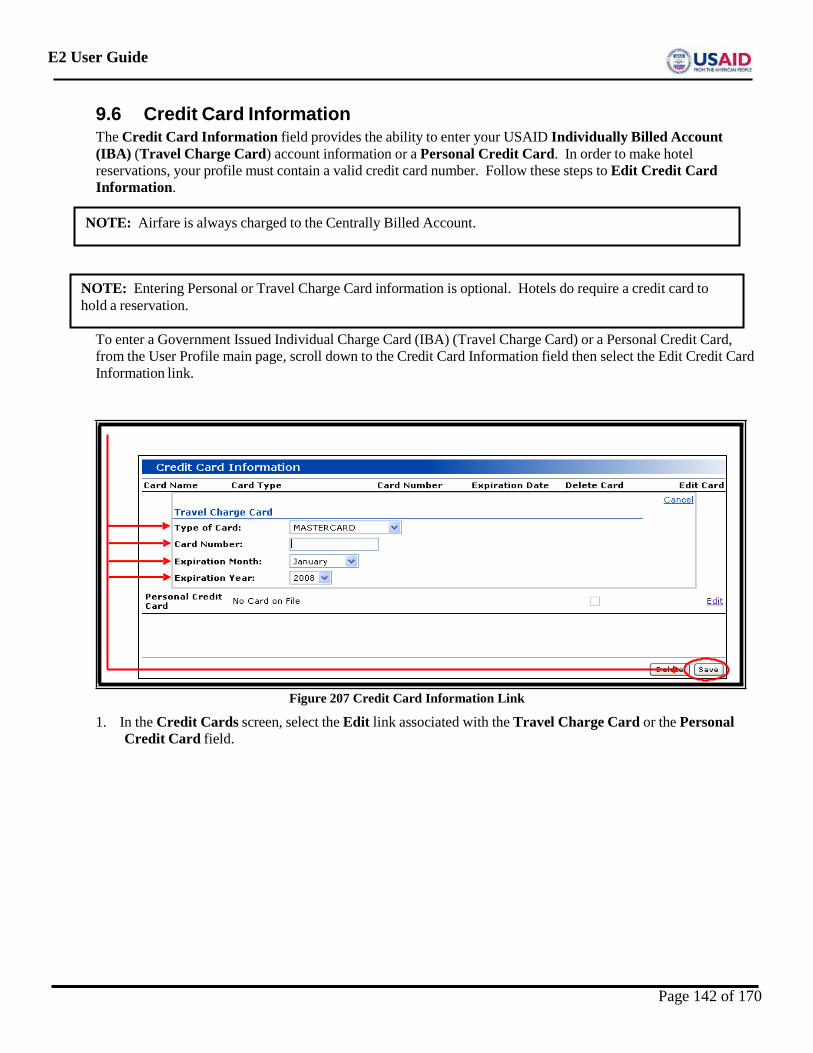
E2 User Guide
9.6 Credit Card Information The Credit Card Information field provides the ability to enter your USAID Individually Billed Account (IBA) (Travel Charge Card) account information or a Personal Credit Card. In order to make hotel reservations, your profile must contain a valid credit card number. Follow these steps to Edit Credit Card Information.
To enter a Government Issued Individual Charge Card (IBA) (Travel Charge Card) or a Personal Credit Card, from the User Profile main page, scroll down to the Credit Card Information field then select the Edit Credit Card Information link.
Figure 207 Credit Card Information Link
1. In the Credit Cards screen, select the Edit link associated with the Travel Charge Card or the Personal Credit Card field.
NOTE: Entering Personal or Travel Charge Card information is optional. Hotels do require a credit card to hold a reservation.
NOTE: Airfare is always charged to the Centrally Billed Account.
Page 142 of 170
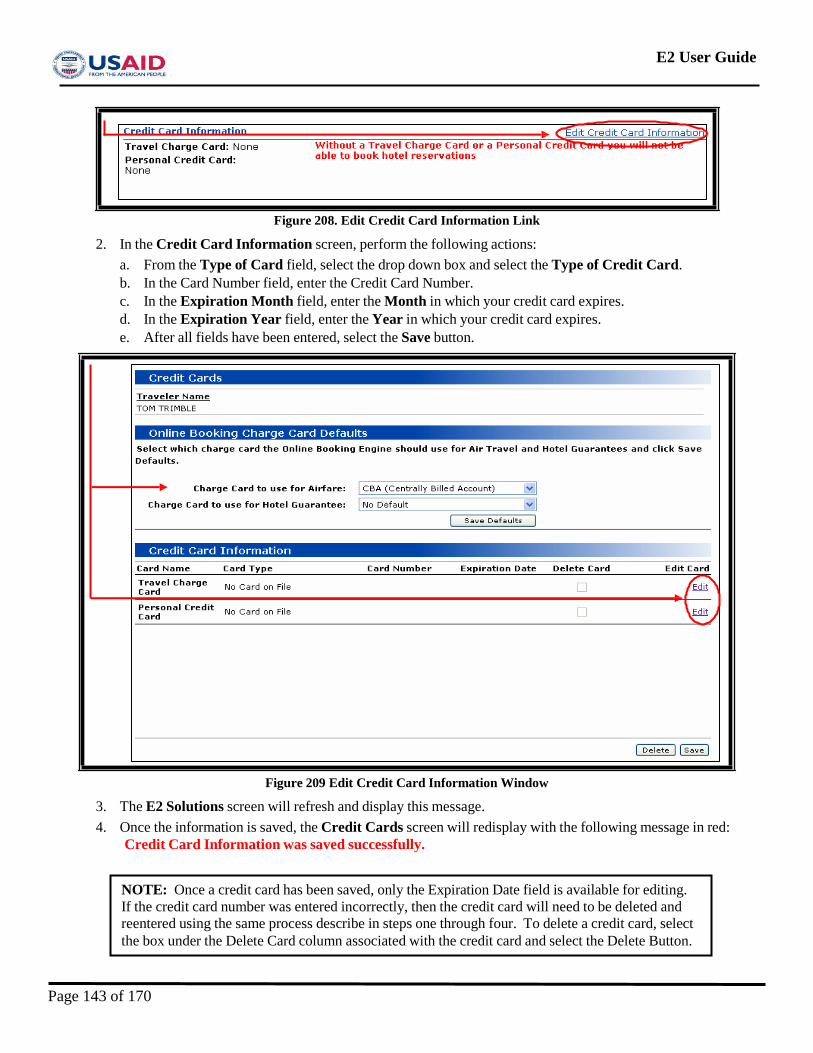
E2 User Guide
Figure 208. Edit Credit Card Information Link
2. In the Credit Card Information screen, perform the following actions: a. From the Type of Card field, select the drop down box and select the Type of Credit Card. b. In the Card Number field, enter the Credit Card Number. c. In the Expiration Month field, enter the Month in which your credit card expires. d. In the Expiration Year field, enter the Year in which your credit card expires. e. After all fields have been entered, select the Save button.
Figure 209 Edit Credit Card Information Window
3. The E2 Solutions screen will refresh and display this message. 4. Once the information is saved, the Credit Cards screen will redisplay with the following message in red:
Credit Card Information was saved successfully.
NOTE: Once a credit card has been saved, only the Expiration Date field is available for editing. If the credit card number was entered incorrectly, then the credit card will need to be deleted and reentered using the same process describe in steps one through four. To delete a credit card, select the box under the Delete Card column associated with the credit card and select the Delete Button.
Page 143 of 170
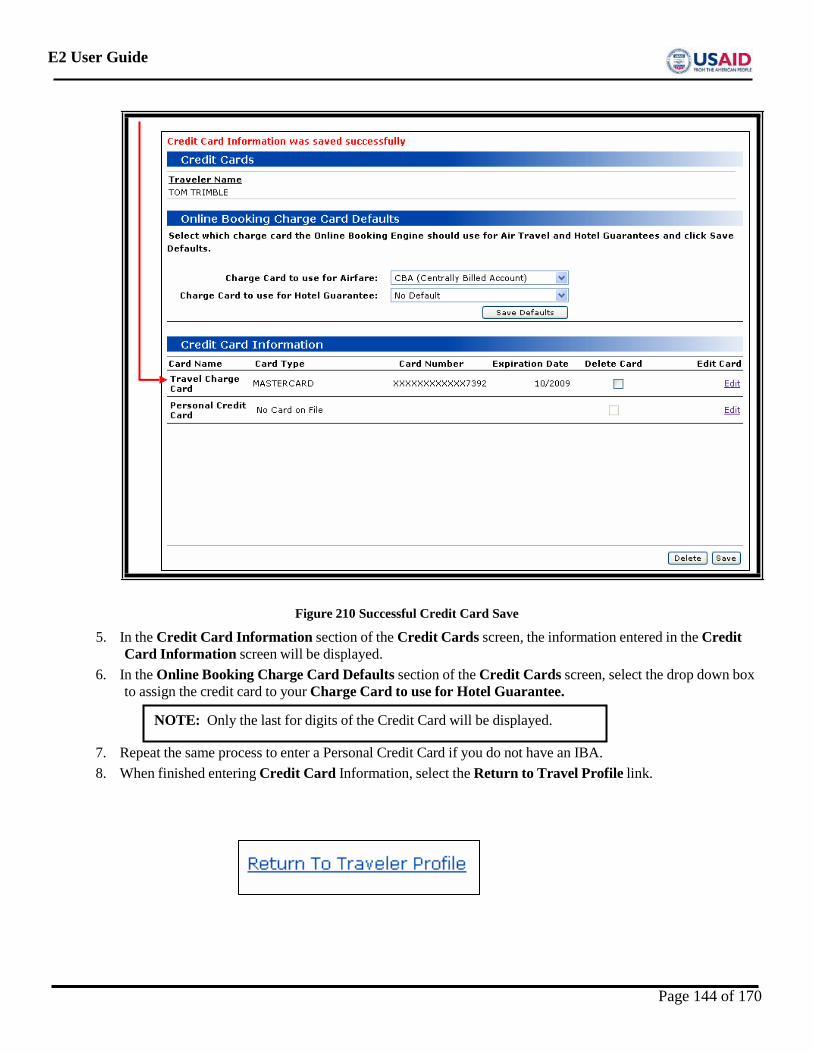
E2 User Guide
Figure 210 Successful Credit Card Save
5. In the Credit Card Information section of the Credit Cards screen, the information entered in the Credit Card Information screen will be displayed.
6. In the Online Booking Charge Card Defaults section of the Credit Cards screen, select the drop down box to assign the credit card to your Charge Card to use for Hotel Guarantee.
7. Repeat the same process to enter a Personal Credit Card if you do not have an IBA. 8. When finished entering Credit Card Information, select the Return to Travel Profile link.
NOTE: Only the last for digits of the Credit Card will be displayed.
Page 144 of 170
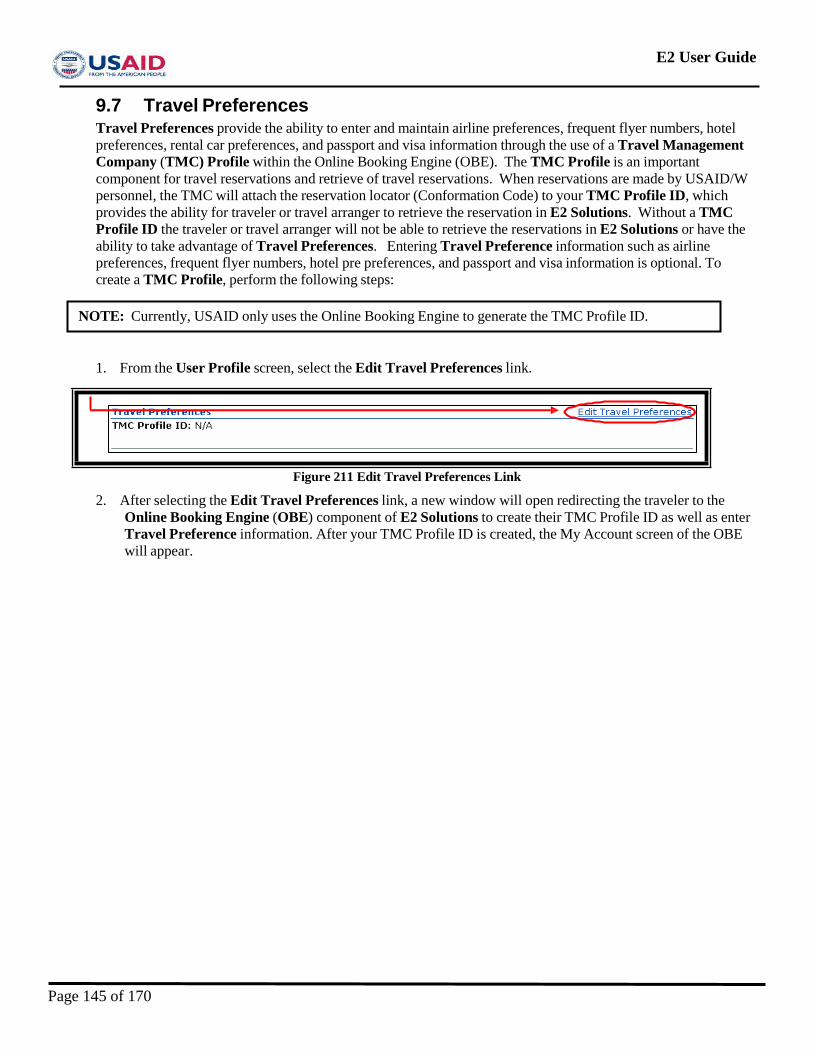
E2 User Guide
9.7 Travel Preferences Travel Preferences provide the ability to enter and maintain airline preferences, frequent flyer numbers, hotel preferences, rental car preferences, and passport and visa information through the use of a Travel Management Company (TMC) Profile within the Online Booking Engine (OBE). The TMC Profile is an important component for travel reservations and retrieve of travel reservations. When reservations are made by USAID/W personnel, the TMC will attach the reservation locator (Conformation Code) to your TMC Profile ID, which provides the ability for traveler or travel arranger to retrieve the reservation in E2 Solutions. Without a TMC Profile ID the traveler or travel arranger will not be able to retrieve the reservations in E2 Solutions or have the ability to take advantage of Travel Preferences. Entering Travel Preference information such as airline preferences, frequent flyer numbers, hotel pre preferences, and passport and visa information is optional. To create a TMC Profile, perform the following steps:
1. From the User Profile screen, select the Edit Travel Preferences link.
Figure 211 Edit Travel Preferences Link
2. After selecting the Edit Travel Preferences link, a new window will open redirecting the traveler to the Online Booking Engine (OBE) component of E2 Solutions to create their TMC Profile ID as well as enter Travel Preference information. After your TMC Profile ID is created, the My Account screen of the OBE will appear.
NOTE: Currently, USAID only uses the Online Booking Engine to generate the TMC Profile ID.
Page 145 of 170
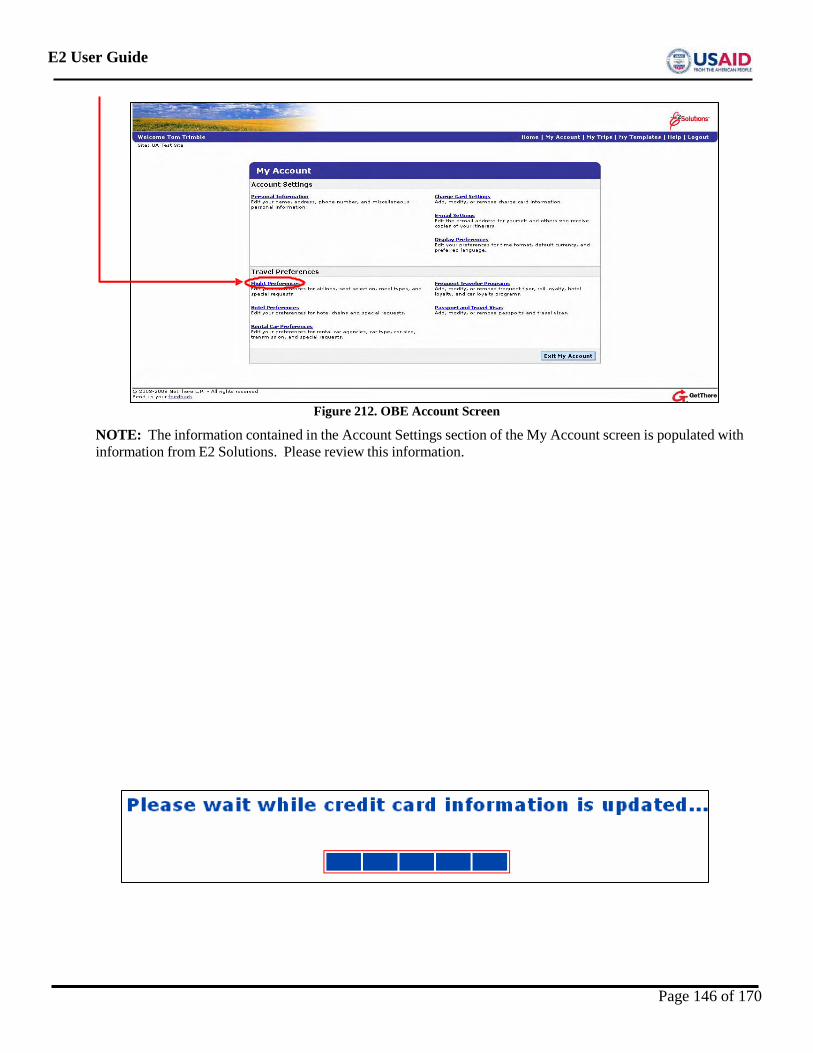
E2 User Guide
Figure 212. OBE Account Screen
NOTE: The information contained in the Account Settings section of the My Account screen is populated with information from E2 Solutions. Please review this information.
Page 146 of 170
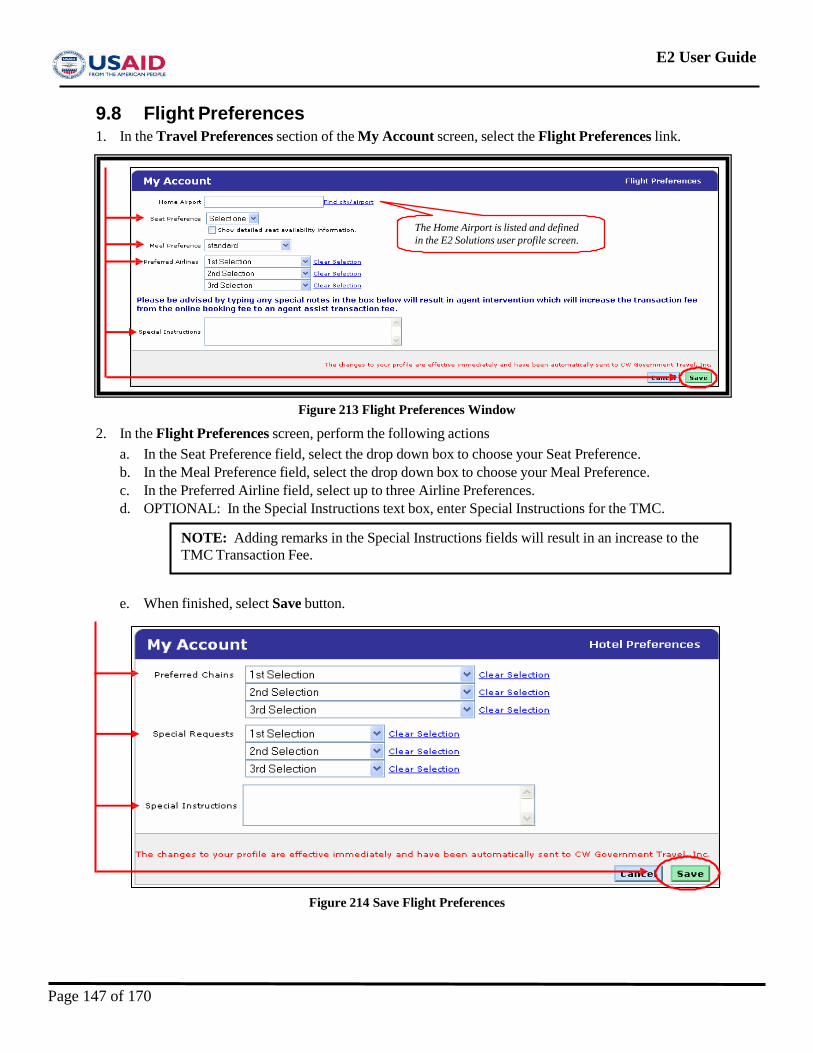
E2 User Guide
9.8 Flight Preferences 1. In the Travel Preferences section of the My Account screen, select the Flight Preferences link.
Figure 213 Flight Preferences Window
2. In the Flight Preferences screen, perform the following actions a. In the Seat Preference field, select the drop down box to choose your Seat Preference. b. In the Meal Preference field, select the drop down box to choose your Meal Preference. c. In the Preferred Airline field, select up to three Airline Preferences. d. OPTIONAL: In the Special Instructions text box, enter Special Instructions for the TMC.
e. When finished, select Save button.
Figure 214 Save Flight Preferences
NOTE: Adding remarks in the Special Instructions fields will result in an increase to the TMC Transaction Fee.
The Home Airport is listed and defined in the E2 Solutions user profile screen.
Page 147 of 170
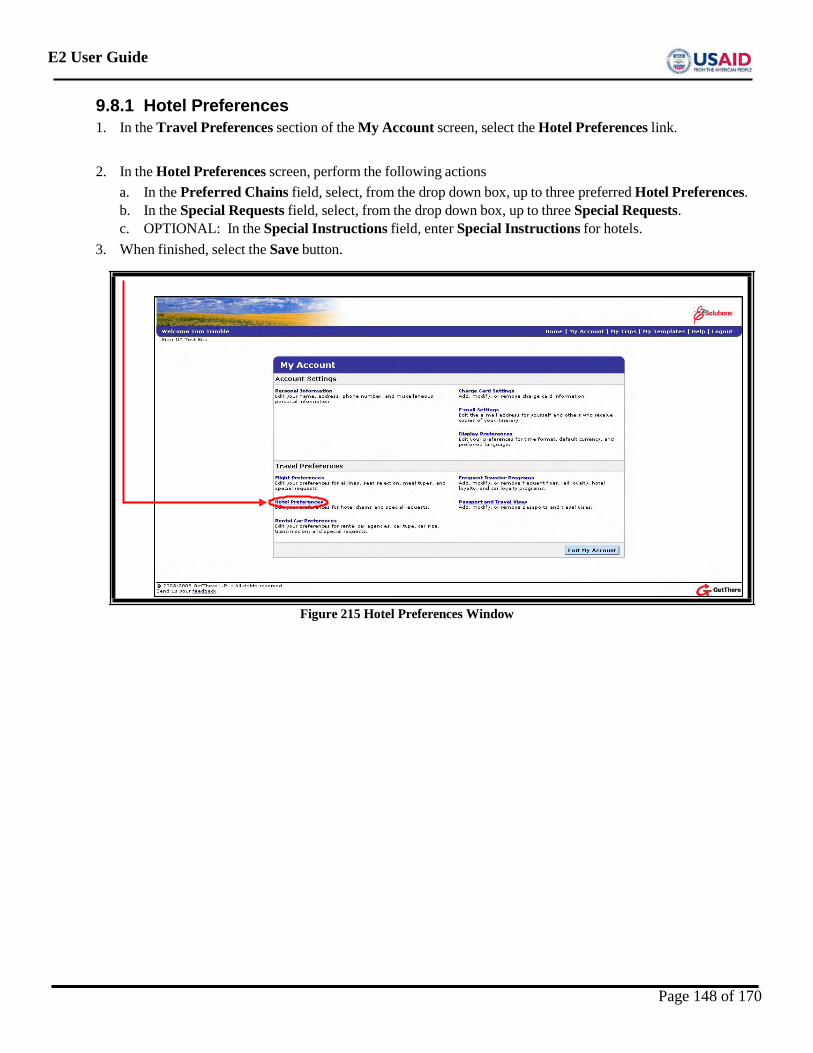
E2 User Guide
9.8.1 Hotel Preferences 1. In the Travel Preferences section of the My Account screen, select the Hotel Preferences link.
2. In the Hotel Preferences screen, perform the following actions a. In the Preferred Chains field, select, from the drop down box, up to three preferred Hotel Preferences. b. In the Special Requests field, select, from the drop down box, up to three Special Requests. c. OPTIONAL: In the Special Instructions field, enter Special Instructions for hotels.
3. When finished, select the Save button.
Figure 215 Hotel Preferences Window
Page 148 of 170
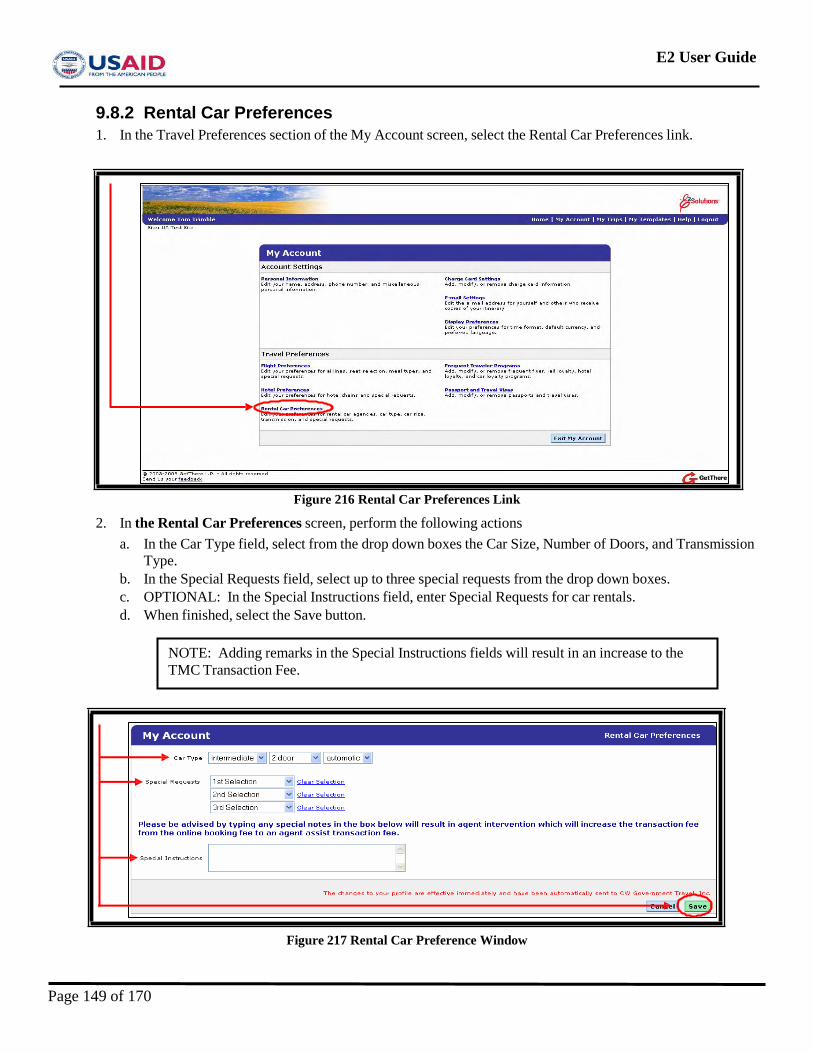
E2 User Guide
9.8.2 Rental Car Preferences 1. In the Travel Preferences section of the My Account screen, select the Rental Car Preferences link.
Figure 216 Rental Car Preferences Link
2. In the Rental Car Preferences screen, perform the following actions a. In the Car Type field, select from the drop down boxes the Car Size, Number of Doors, and Transmission
Type. b. In the Special Requests field, select up to three special requests from the drop down boxes. c. OPTIONAL: In the Special Instructions field, enter Special Requests for car rentals. d. When finished, select the Save button.
Figure 217 Rental Car Preference Window
NOTE: Adding remarks in the Special Instructions fields will result in an increase to the TMC Transaction Fee.
Page 149 of 170
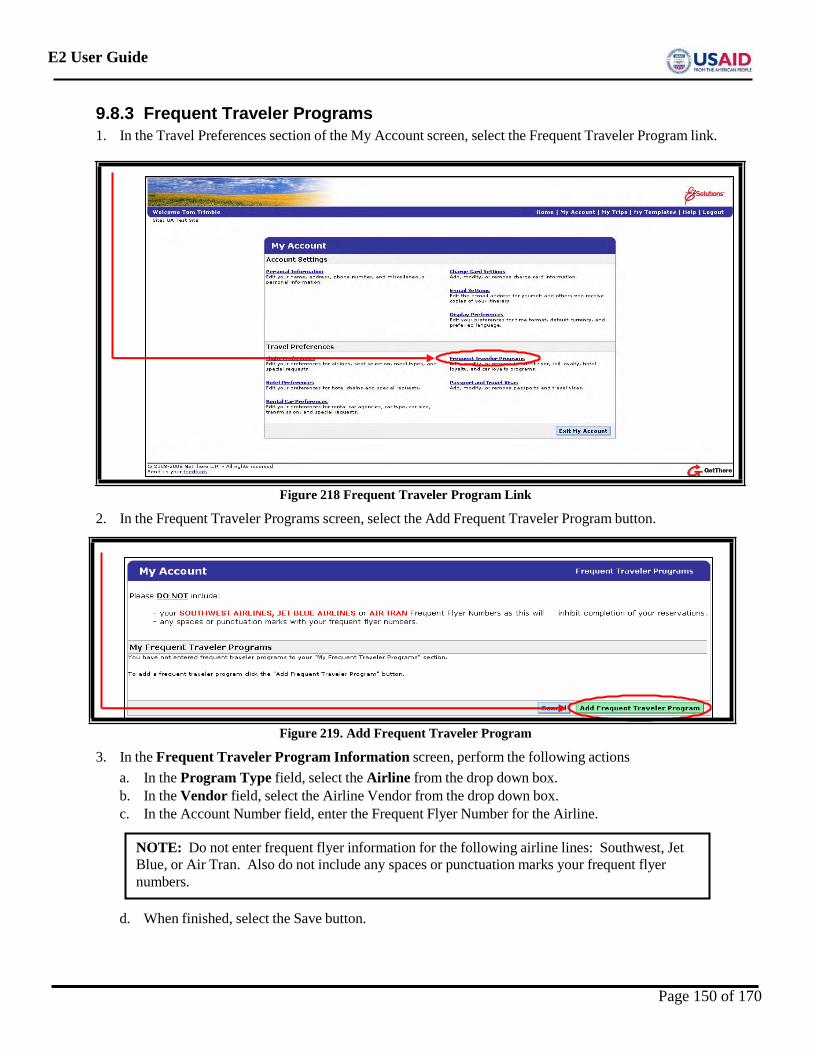
E2 User Guide
9.8.3 Frequent Traveler Programs 1. In the Travel Preferences section of the My Account screen, select the Frequent Traveler Program link.
Figure 218 Frequent Traveler Program Link
2. In the Frequent Traveler Programs screen, select the Add Frequent Traveler Program button.
Figure 219. Add Frequent Traveler Program
3. In the Frequent Traveler Program Information screen, perform the following actions a. In the Program Type field, select the Airline from the drop down box. b. In the Vendor field, select the Airline Vendor from the drop down box. c. In the Account Number field, enter the Frequent Flyer Number for the Airline.
d. When finished, select the Save button.
NOTE: Do not enter frequent flyer information for the following airline lines: Southwest, Jet Blue, or Air Tran. Also do not include any spaces or punctuation marks your frequent flyer numbers.
Page 150 of 170
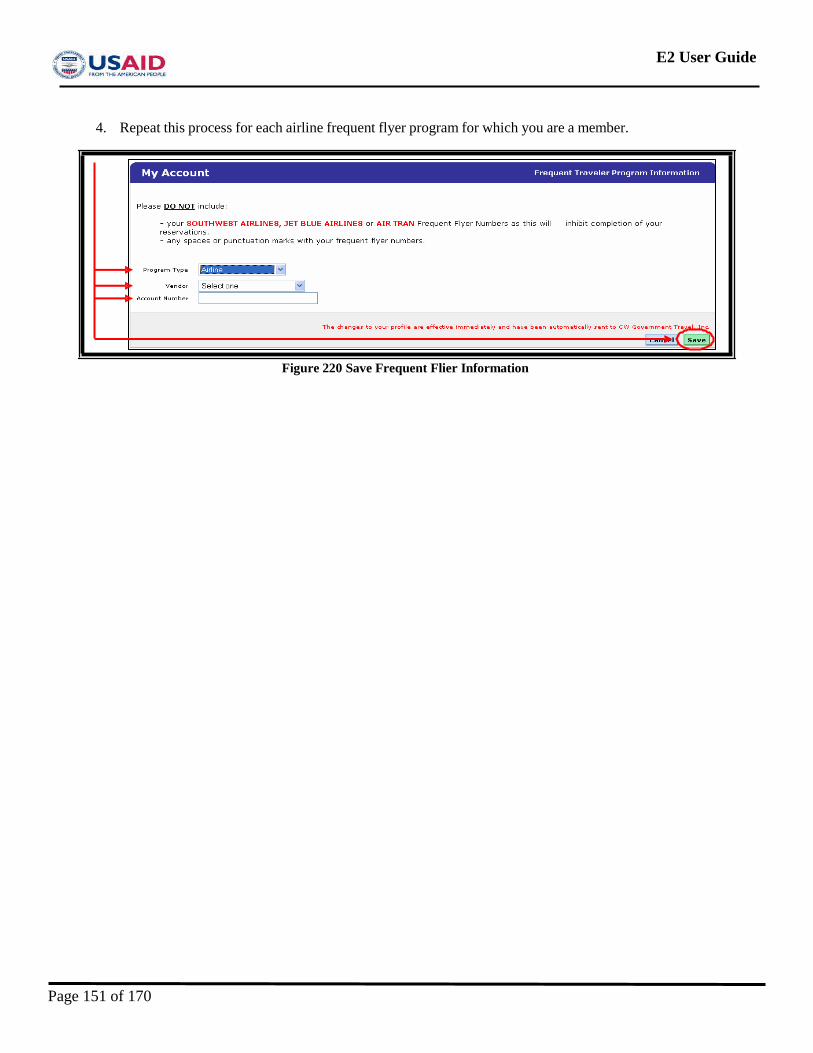
E2 User Guide
4. Repeat this process for each airline frequent flyer program for which you are a member.
Figure 220 Save Frequent Flier Information
Page 151 of 170
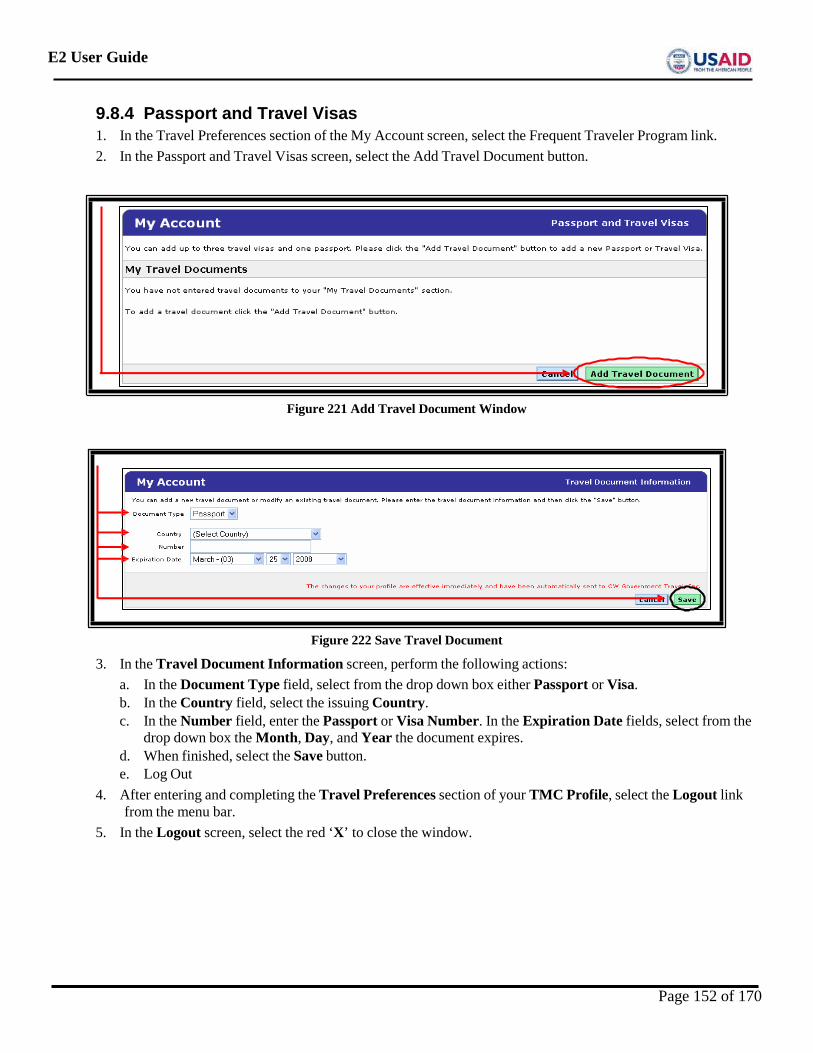
E2 User Guide
9.8.4 Passport and Travel Visas 1. In the Travel Preferences section of the My Account screen, select the Frequent Traveler Program link. 2. In the Passport and Travel Visas screen, select the Add Travel Document button.
Figure 221 Add Travel Document Window
Figure 222 Save Travel Document
3. In the Travel Document Information screen, perform the following actions: a. In the Document Type field, select from the drop down box either Passport or Visa. b. In the Country field, select the issuing Country. c. In the Number field, enter the Passport or Visa Number. In the Expiration Date fields, select from the
drop down box the Month, Day, and Year the document expires. d. When finished, select the Save button. e. Log Out
4. After entering and completing the Travel Preferences section of your TMC Profile, select the Logout link from the menu bar.
5. In the Logout screen, select the red ‘X’ to close the window.
Page 152 of 170
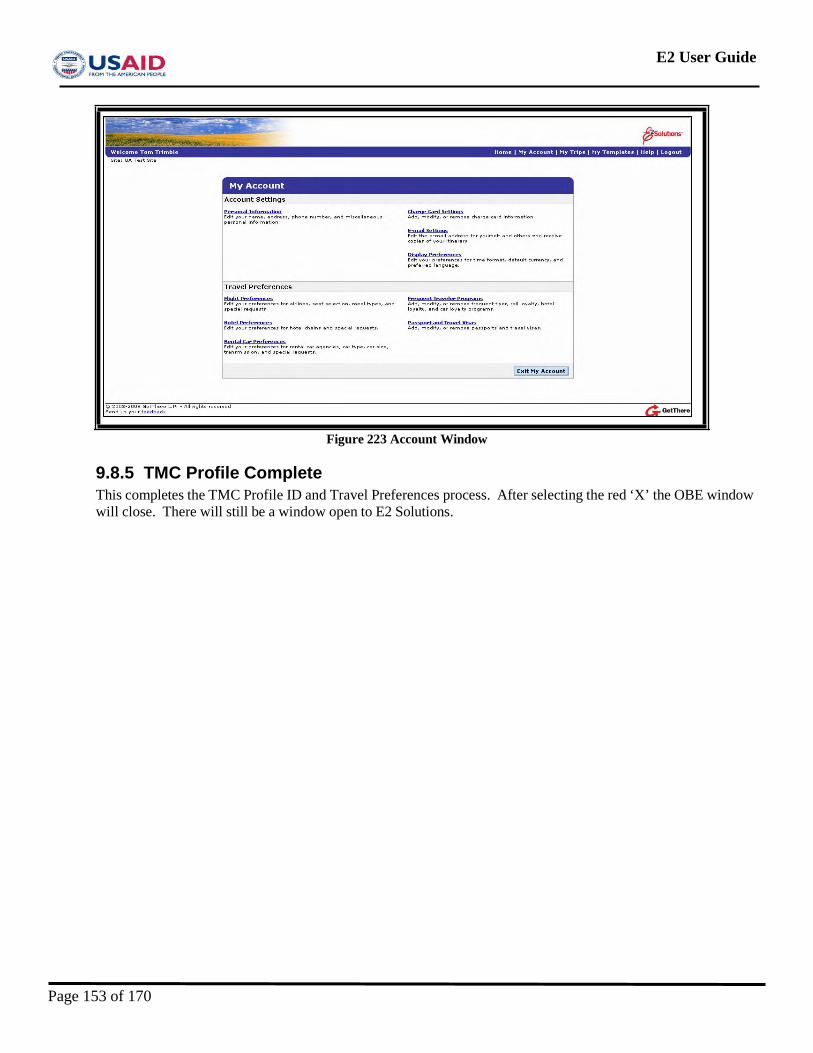
E2 User Guide
Figure 223 Account Window
9.8.5 TMC Profile Complete This completes the TMC Profile ID and Travel Preferences process. After selecting the red ‘X’ the OBE window will close. There will still be a window open to E2 Solutions.
Page 153 of 170
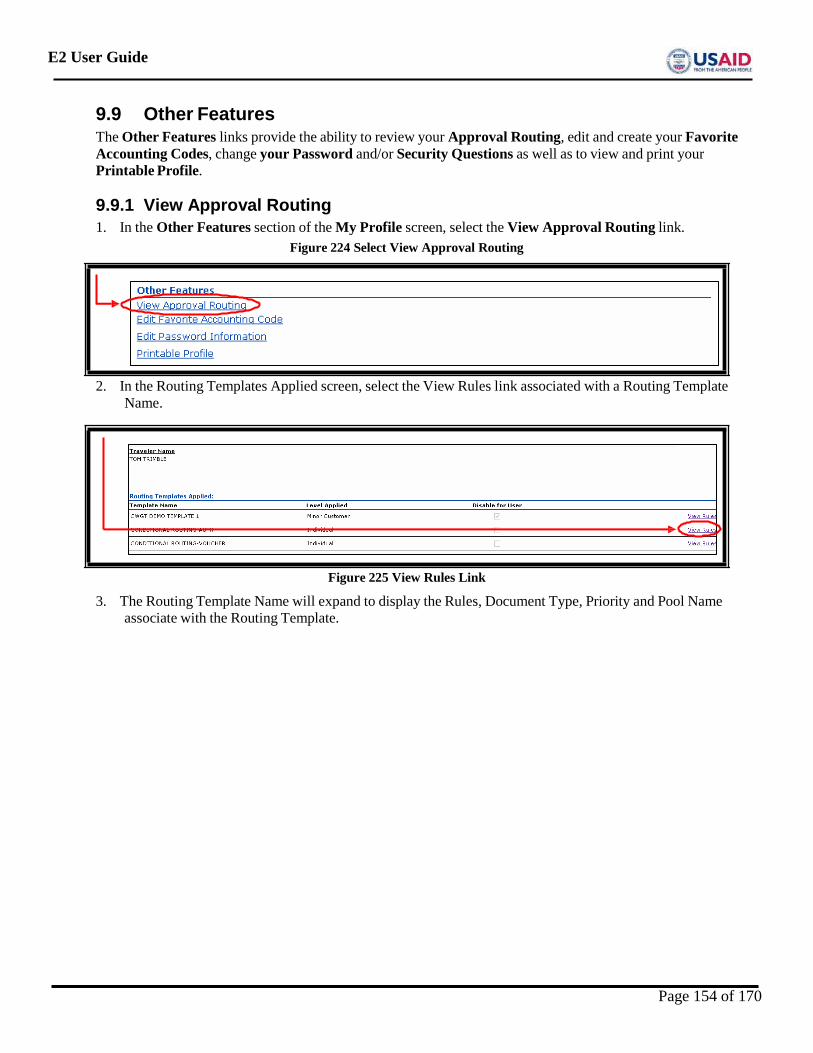
E2 User Guide
9.9 Other Features The Other Features links provide the ability to review your Approval Routing, edit and create your Favorite Accounting Codes, change your Password and/or Security Questions as well as to view and print your Printable Profile.
9.9.1 View Approval Routing 1. In the Other Features section of the My Profile screen, select the View Approval Routing link.
Figure 224 Select View Approval Routing
2. In the Routing Templates Applied screen, select the View Rules link associated with a Routing Template
Name.
Figure 225 View Rules Link
3. The Routing Template Name will expand to display the Rules, Document Type, Priority and Pool Name associate with the Routing Template.
Page 154 of 170
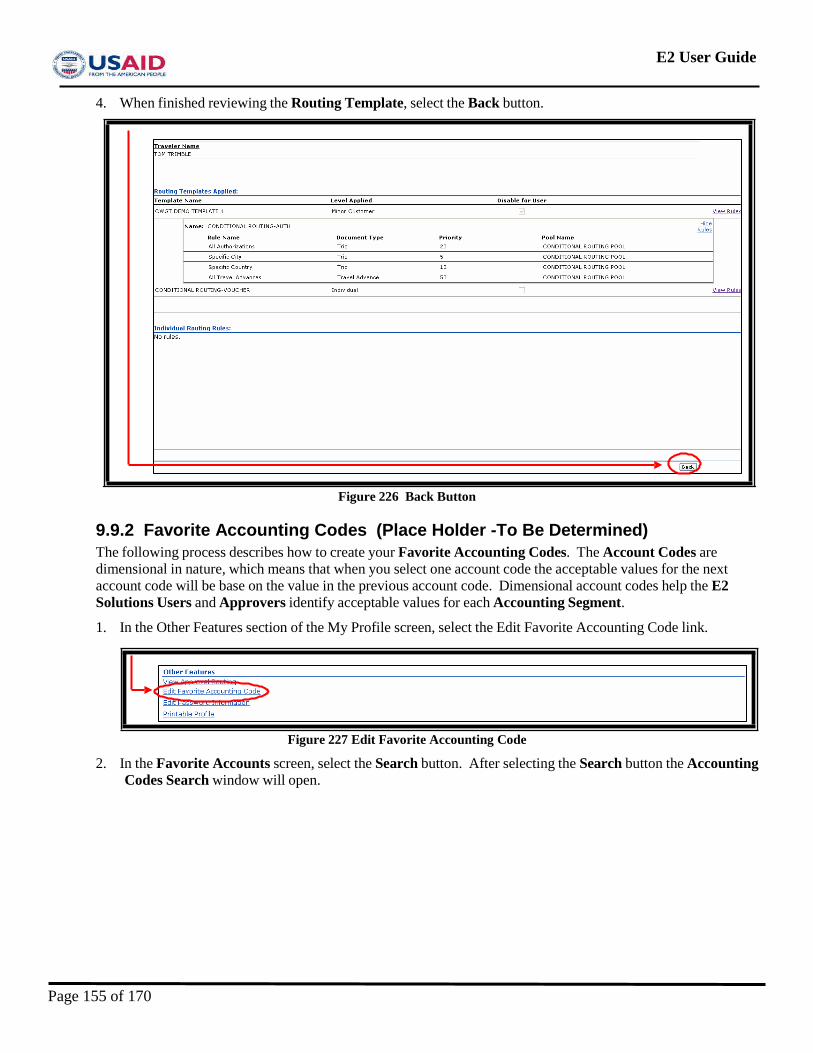
E2 User Guide
4. When finished reviewing the Routing Template, select the Back button.
Figure 226 Back Button
9.9.2 Favorite Accounting Codes (Place Holder -To Be Determined) The following process describes how to create your Favorite Accounting Codes. The Account Codes are dimensional in nature, which means that when you select one account code the acceptable values for the next account code will be base on the value in the previous account code. Dimensional account codes help the E2 Solutions Users and Approvers identify acceptable values for each Accounting Segment.
1. In the Other Features section of the My Profile screen, select the Edit Favorite Accounting Code link.
Figure 227 Edit Favorite Accounting Code
2. In the Favorite Accounts screen, select the Search button. After selecting the Search button the Accounting Codes Search window will open.
Page 155 of 170
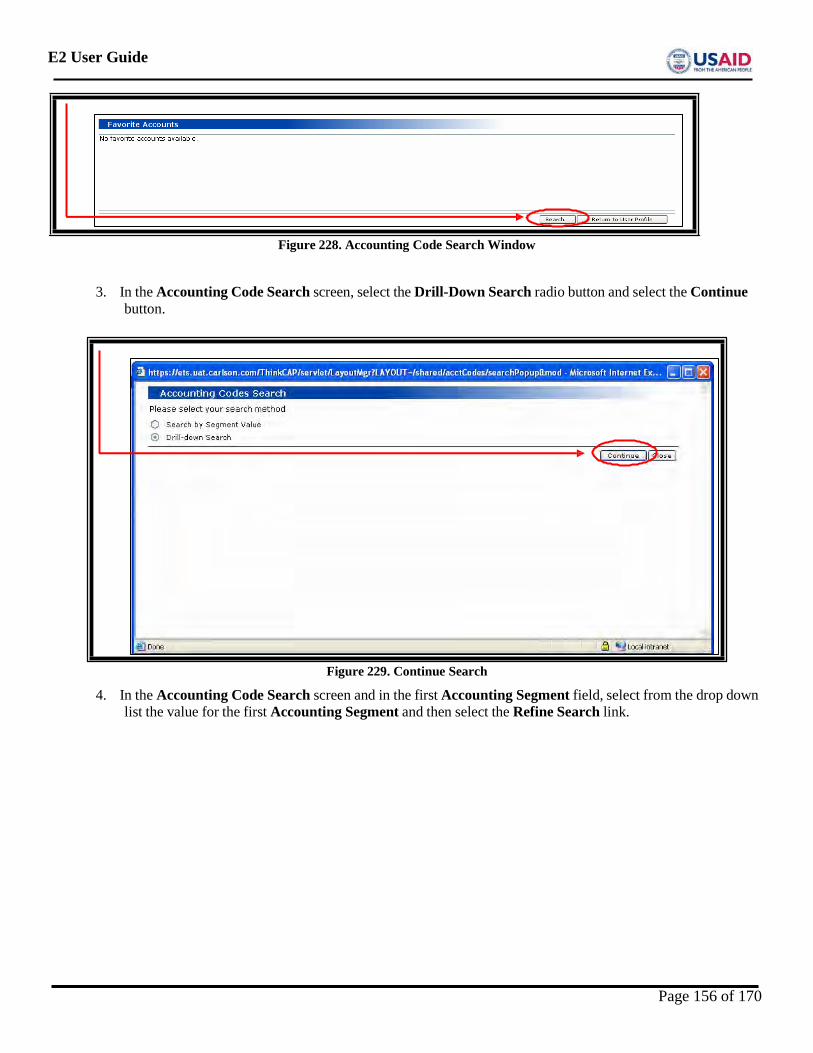
E2 User Guide
Figure 228. Accounting Code Search Window
3. In the Accounting Code Search screen, select the Drill-Down Search radio button and select the Continue button.
Figure 229. Continue Search
4. In the Accounting Code Search screen and in the first Accounting Segment field, select from the drop down list the value for the first Accounting Segment and then select the Refine Search link.
Page 156 of 170
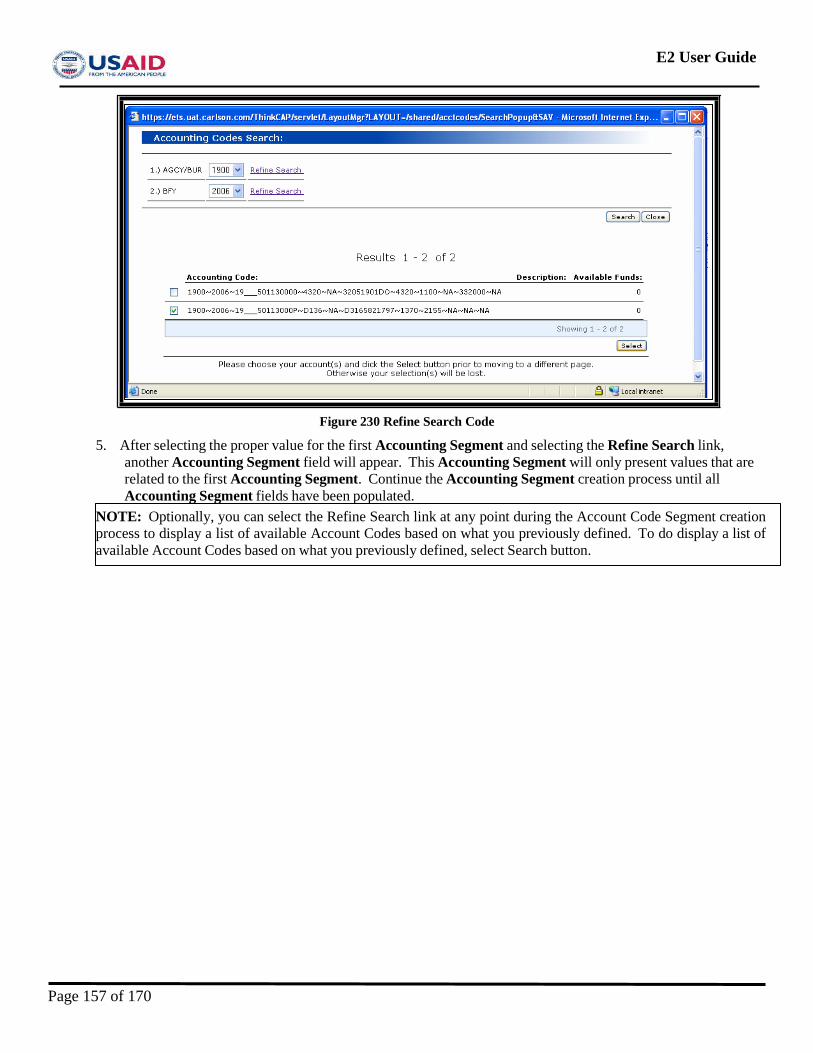
E2 User Guide
Figure 230 Refine Search Code
5. After selecting the proper value for the first Accounting Segment and selecting the Refine Search link, another Accounting Segment field will appear. This Accounting Segment will only present values that are related to the first Accounting Segment. Continue the Accounting Segment creation process until all Accounting Segment fields have been populated.
NOTE: Optionally, you can select the Refine Search link at any point during the Account Code Segment creation process to display a list of available Account Codes based on what you previously defined. To do display a list of available Account Codes based on what you previously defined, select Search button.
Page 157 of 170

E2 User Guide
Figure 231. Display Available Accounting Codes Window
6. When the Search button is selected, the available Account Codes will display below in the Account Codes field. To select an Accounting Segment, select the Box next to the Accounting Segment and, then click the Select button to add the Account Code to your E2 Solutions Profile.
Page 158 of 170
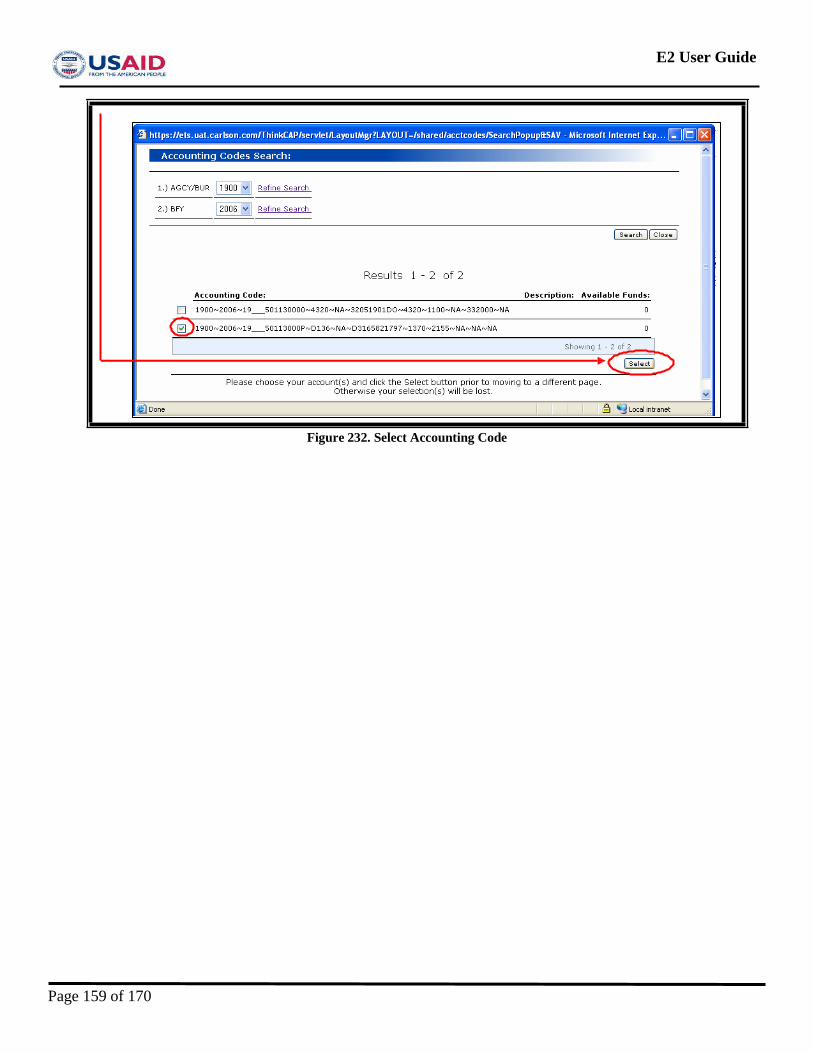
E2 User Guide
Figure 232. Select Accounting Code
Page 159 of 170
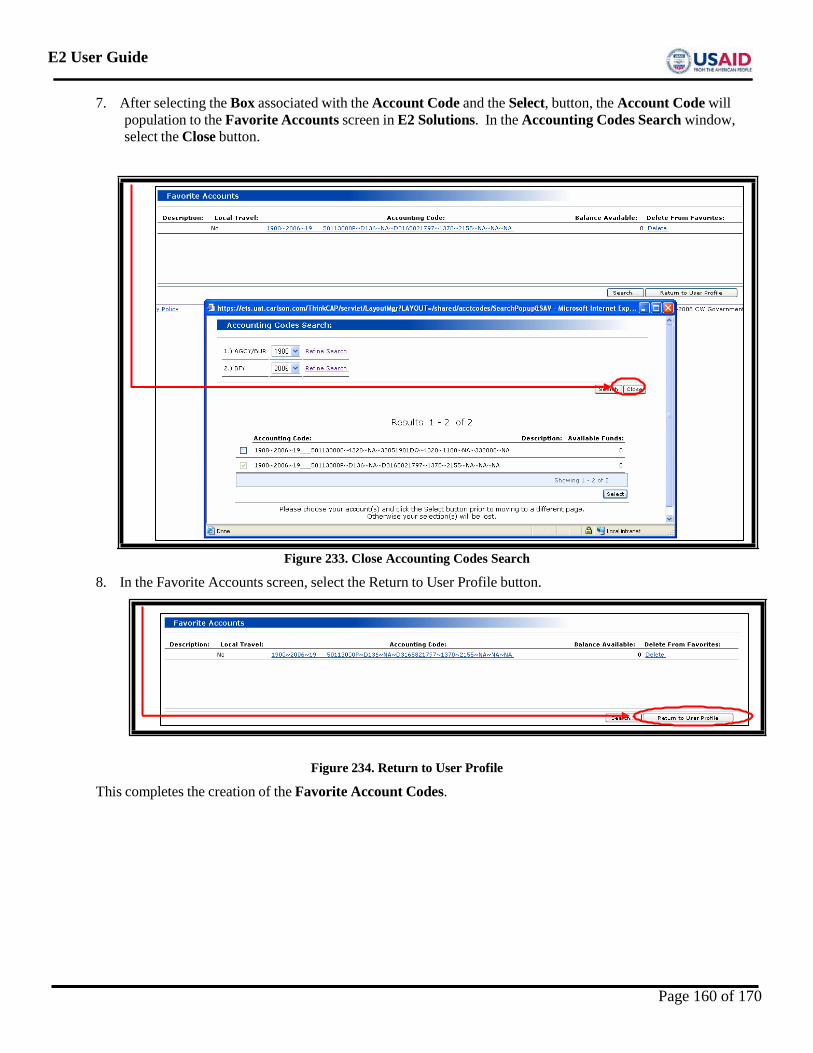
E2 User Guide
7. After selecting the Box associated with the Account Code and the Select, button, the Account Code will population to the Favorite Accounts screen in E2 Solutions. In the Accounting Codes Search window, select the Close button.
Figure 233. Close Accounting Codes Search
8. In the Favorite Accounts screen, select the Return to User Profile button.
Figure 234. Return to User Profile
This completes the creation of the Favorite Account Codes.
Page 160 of 170
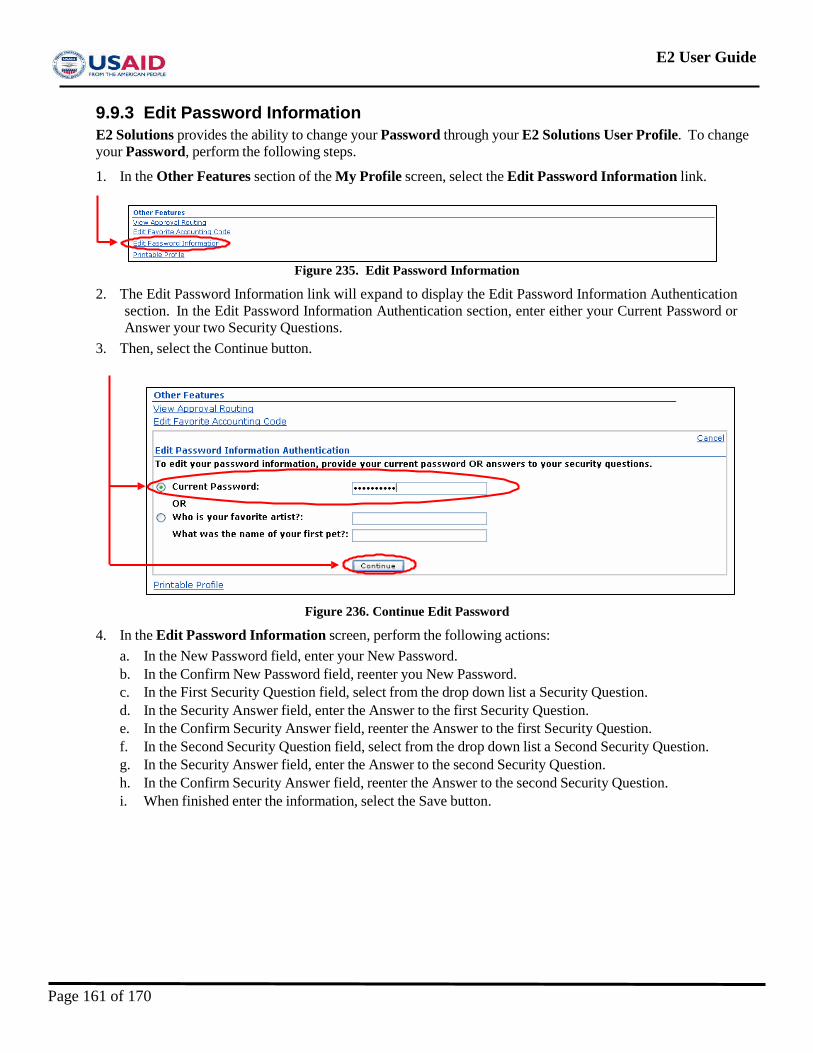
E2 User Guide
9.9.3 Edit Password Information E2 Solutions provides the ability to change your Password through your E2 Solutions User Profile. To change your Password, perform the following steps.
1. In the Other Features section of the My Profile screen, select the Edit Password Information link.
Figure 235. Edit Password Information
2. The Edit Password Information link will expand to display the Edit Password Information Authentication section. In the Edit Password Information Authentication section, enter either your Current Password or Answer your two Security Questions.
3. Then, select the Continue button.
Figure 236. Continue Edit Password
4. In the Edit Password Information screen, perform the following actions: a. In the New Password field, enter your New Password. b. In the Confirm New Password field, reenter you New Password. c. In the First Security Question field, select from the drop down list a Security Question. d. In the Security Answer field, enter the Answer to the first Security Question. e. In the Confirm Security Answer field, reenter the Answer to the first Security Question. f. In the Second Security Question field, select from the drop down list a Second Security Question. g. In the Security Answer field, enter the Answer to the second Security Question. h. In the Confirm Security Answer field, reenter the Answer to the second Security Question. i. When finished enter the information, select the Save button.
Page 161 of 170
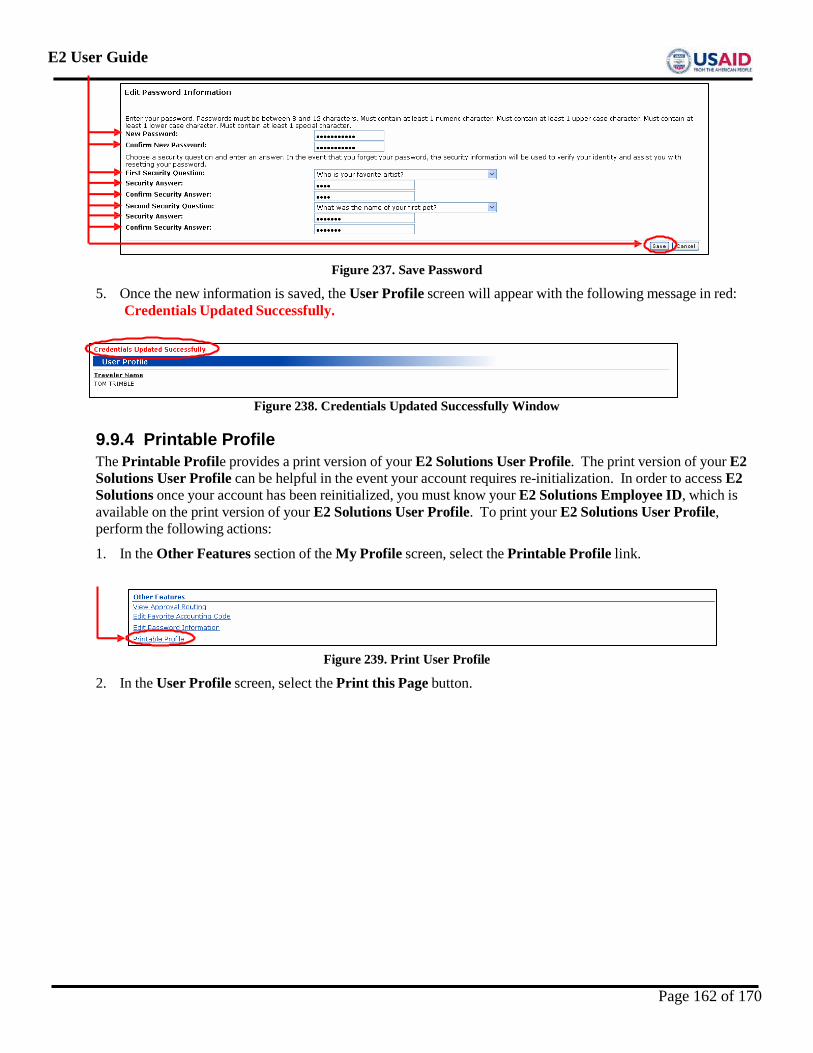
E2 User Guide
Figure 237. Save Password
5. Once the new information is saved, the User Profile screen will appear with the following message in red: Credentials Updated Successfully.
Figure 238. Credentials Updated Successfully Window
9.9.4 Printable Profile The Printable Profile provides a print version of your E2 Solutions User Profile. The print version of your E2 Solutions User Profile can be helpful in the event your account requires re-initialization. In order to access E2 Solutions once your account has been reinitialized, you must know your E2 Solutions Employee ID, which is available on the print version of your E2 Solutions User Profile. To print your E2 Solutions User Profile, perform the following actions:
1. In the Other Features section of the My Profile screen, select the Printable Profile link.
Figure 239. Print User Profile
2. In the User Profile screen, select the Print this Page button.
Page 162 of 170
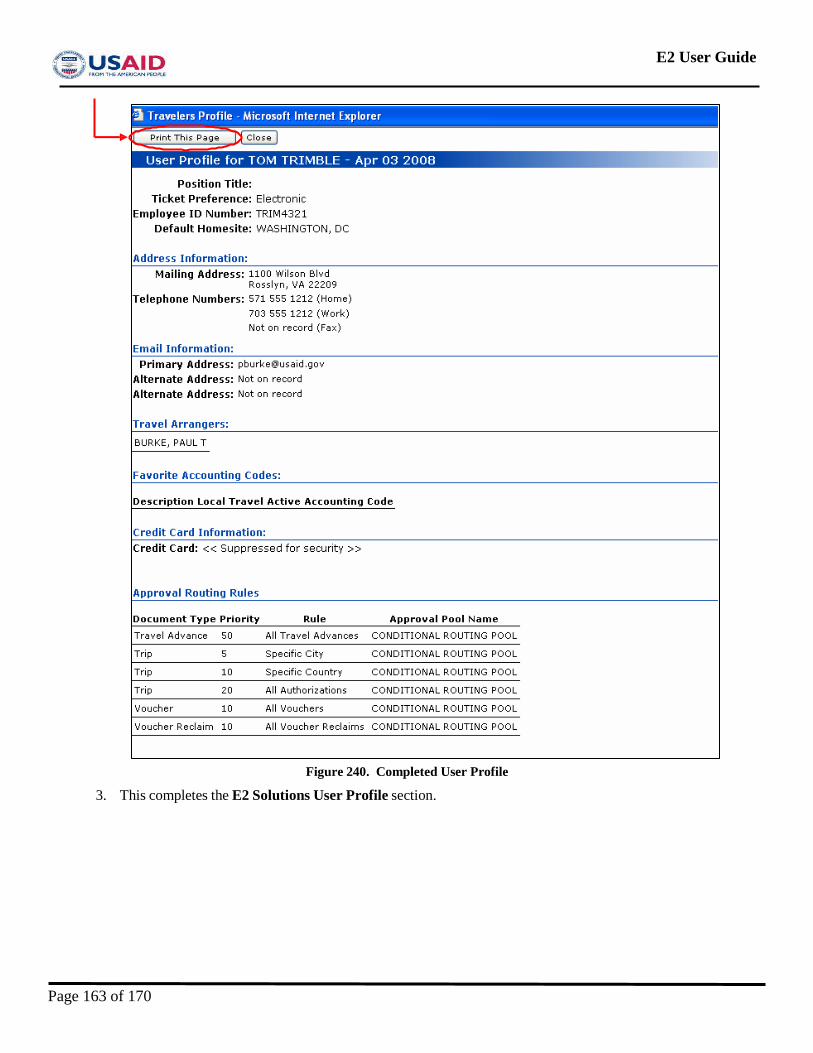
E2 User Guide
Figure 240. Completed User Profile
3. This completes the E2 Solutions User Profile section.
Page 163 of 170
E2 User Guide
10. Open Authorizations An Open Authorization (OA) is a blanket order for a single traveler. The OA acts as the official order, which is approved according to the Bureau or Mission requirements. Once an OA is approved, the traveler or travel arranger creates individual trips under the OA which do not require approval. OAs can be limited, which means constraints can be placed on funding level, trip duration, and/or TDY location, or nay combination of those features. User can also create an Unlimited OA with no funding level, a trip duration of up to 364 days, and TDY to any destination. The duration of either a Limited OA or Unlimited OA can not exceed 364 days. To create an OA perform the following tasks.
Page 164 of 170
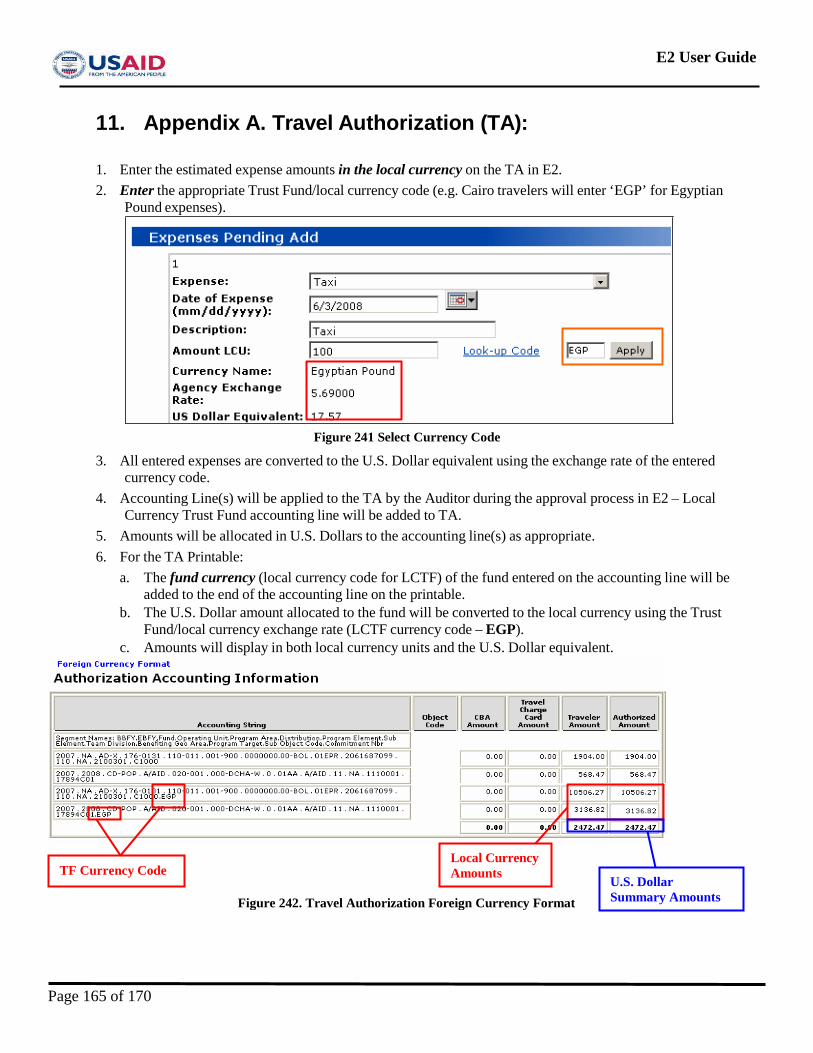
E2 User Guide
11. Appendix A. Travel Authorization (TA):
1. Enter the estimated expense amounts in the local currency on the TA in E2. 2. Enter the appropriate Trust Fund/local currency code (e.g. Cairo travelers will enter ‘EGP’ for Egyptian
Pound expenses).
Figure 241 Select Currency Code
3. All entered expenses are converted to the U.S. Dollar equivalent using the exchange rate of the entered currency code.
4. Accounting Line(s) will be applied to the TA by the Auditor during the approval process in E2 – Local Currency Trust Fund accounting line will be added to TA.
5. Amounts will be allocated in U.S. Dollars to the accounting line(s) as appropriate. 6. For the TA Printable:
a. The fund currency (local currency code for LCTF) of the fund entered on the accounting line will be added to the end of the accounting line on the printable.
b. The U.S. Dollar amount allocated to the fund will be converted to the local currency using the Trust Fund/local currency exchange rate (LCTF currency code – EGP).
c. Amounts will display in both local currency units and the U.S. Dollar equivalent.
Local Currency
Amounts TF Currency Code U.S. Dollar Summary Amounts Figure 242. Travel Authorization Foreign Currency Format
Page 165 of 170
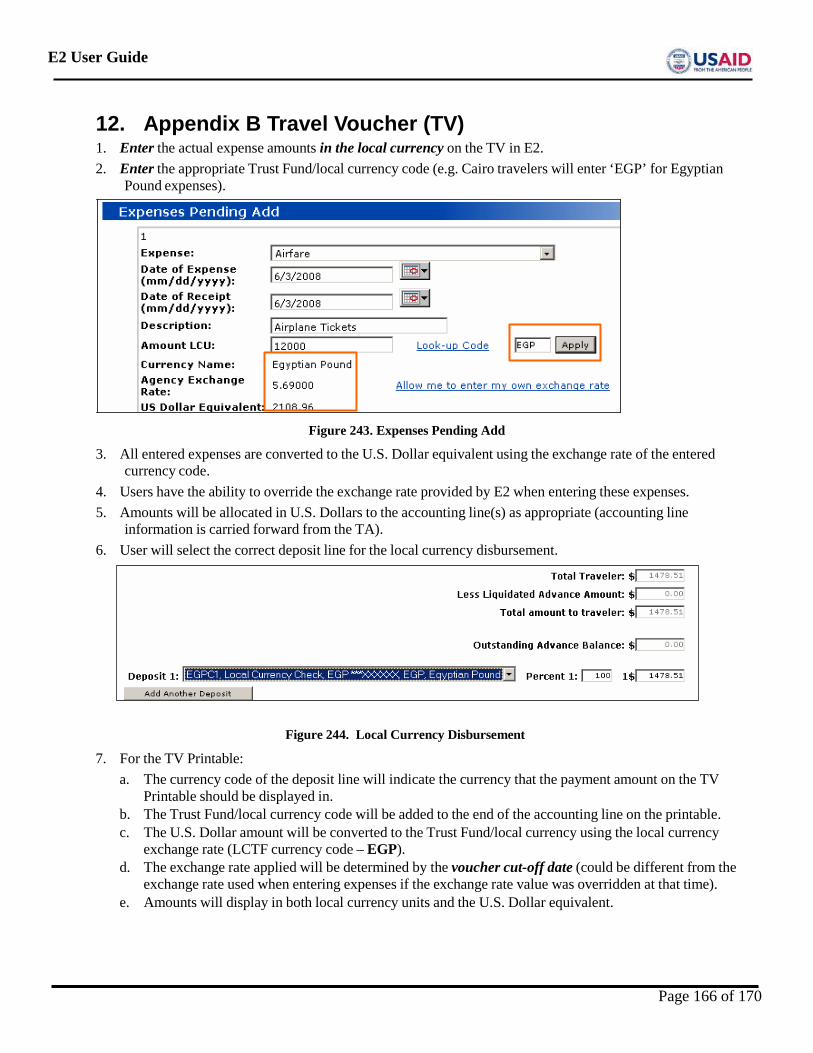
E2 User Guide
12. Appendix B Travel Voucher (TV) 1. Enter the actual expense amounts in the local currency on the TV in E2. 2. Enter the appropriate Trust Fund/local currency code (e.g. Cairo travelers will enter ‘EGP’ for Egyptian
Pound expenses).
Figure 243. Expenses Pending Add
3. All entered expenses are converted to the U.S. Dollar equivalent using the exchange rate of the entered currency code.
4. Users have the ability to override the exchange rate provided by E2 when entering these expenses. 5. Amounts will be allocated in U.S. Dollars to the accounting line(s) as appropriate (accounting line
information is carried forward from the TA). 6. User will select the correct deposit line for the local currency disbursement.
7. For the TV Printable:
Figure 244. Local Currency Disbursement
a. The currency code of the deposit line will indicate the currency that the payment amount on the TV Printable should be displayed in.
b. The Trust Fund/local currency code will be added to the end of the accounting line on the printable. c. The U.S. Dollar amount will be converted to the Trust Fund/local currency using the local currency
exchange rate (LCTF currency code – EGP). d. The exchange rate applied will be determined by the voucher cut-off date (could be different from the
exchange rate used when entering expenses if the exchange rate value was overridden at that time). e. Amounts will display in both local currency units and the U.S. Dollar equivalent.
Page 166 of 170
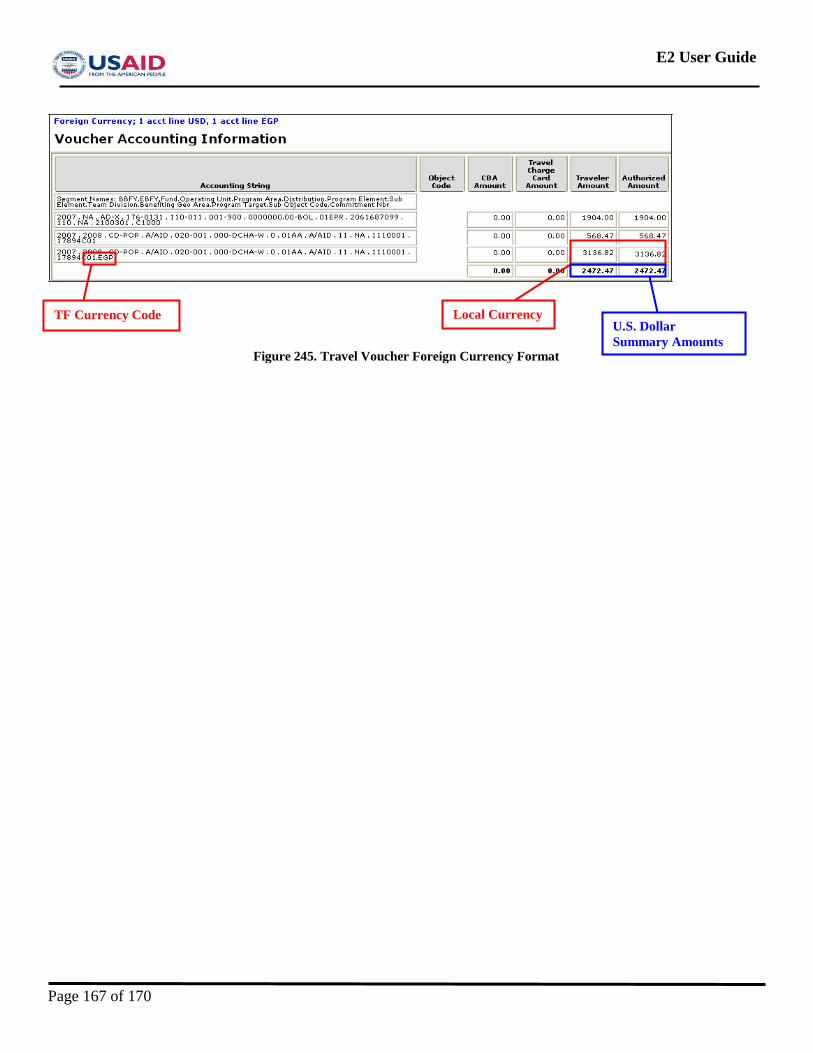
E2 User Guide
TF Currency Code Local Currency
U.S. Dollar Summary Amounts
Figure 245. Travel Voucher Foreign Currency Format
Page 167 of 170
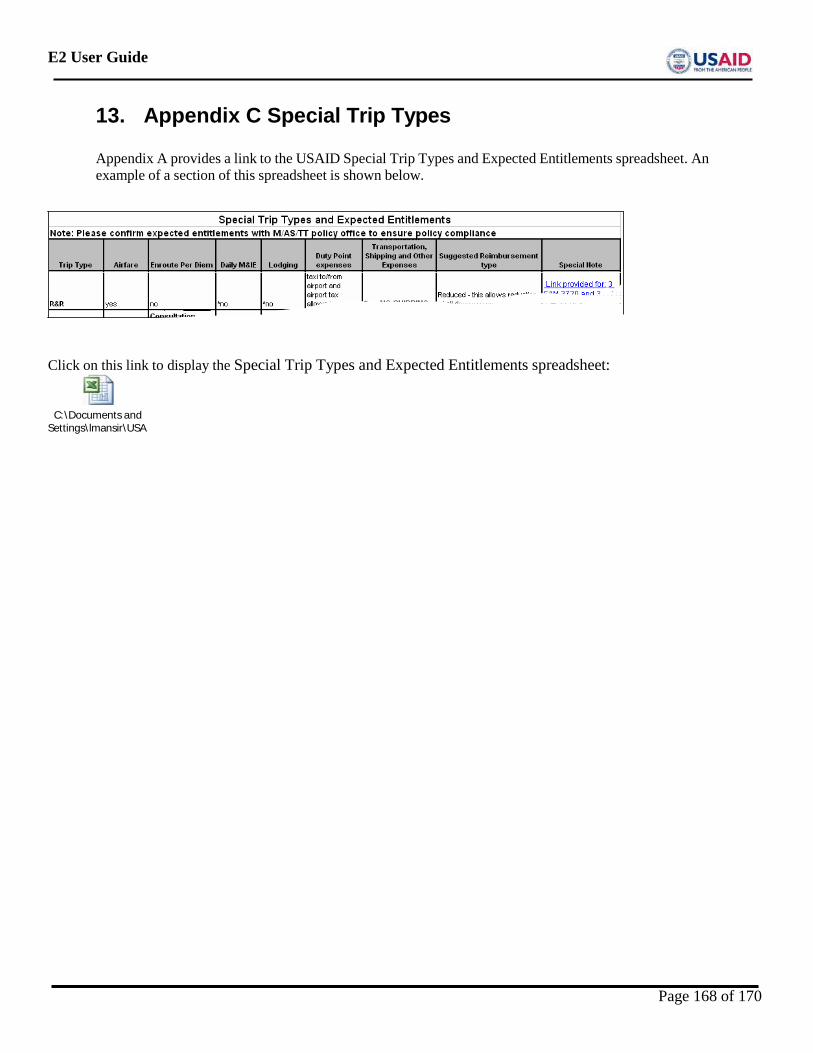
E2 User Guide
13. Appendix C Special Trip Types
Appendix A provides a link to the USAID Special Trip Types and Expected Entitlements spreadsheet. An example of a section of this spreadsheet is shown below.
Click on this link to display the Special Trip Types and Expected Entitlements spreadsheet:
C:\Documents and
Settings\lmansir\USA
Page 168 of 170
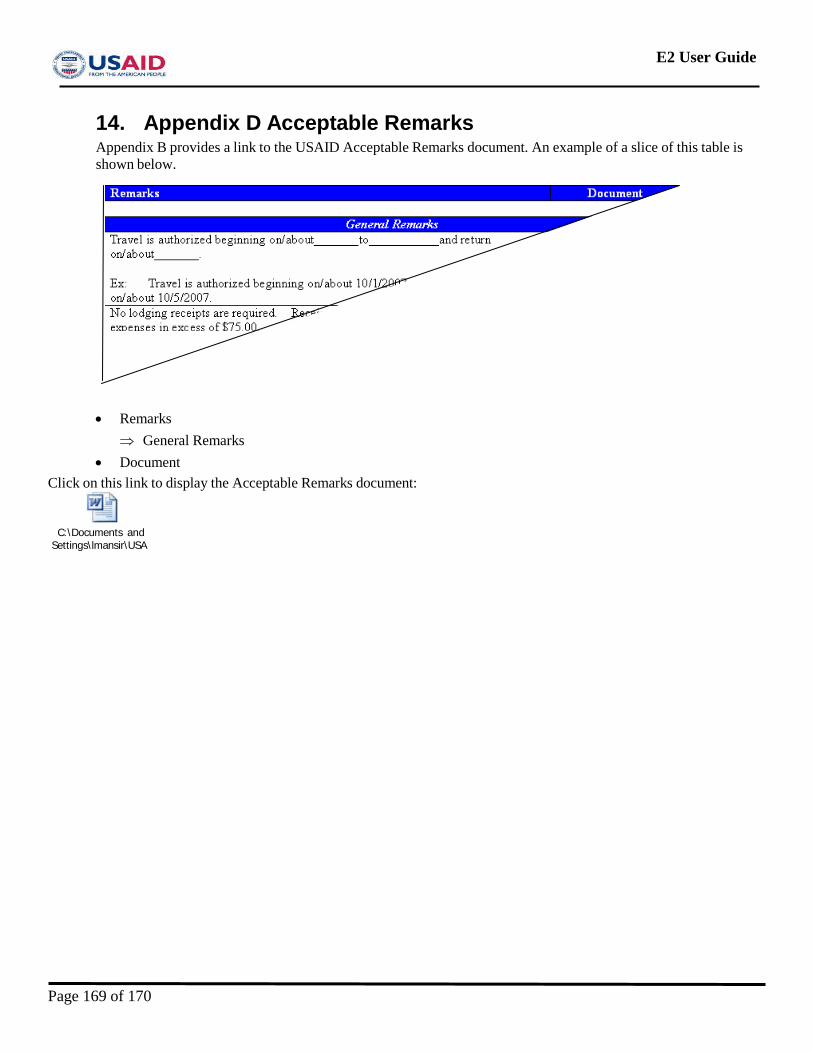
E2 User Guide
14. Appendix D Acceptable Remarks Appendix B provides a link to the USAID Acceptable Remarks document. An example of a slice of this table is shown below.
• Remarks ⇒ General Remarks
• Document Click on this link to display the Acceptable Remarks document:
C:\Documents and
Settings\lmansir\USA
Page 169 of 170
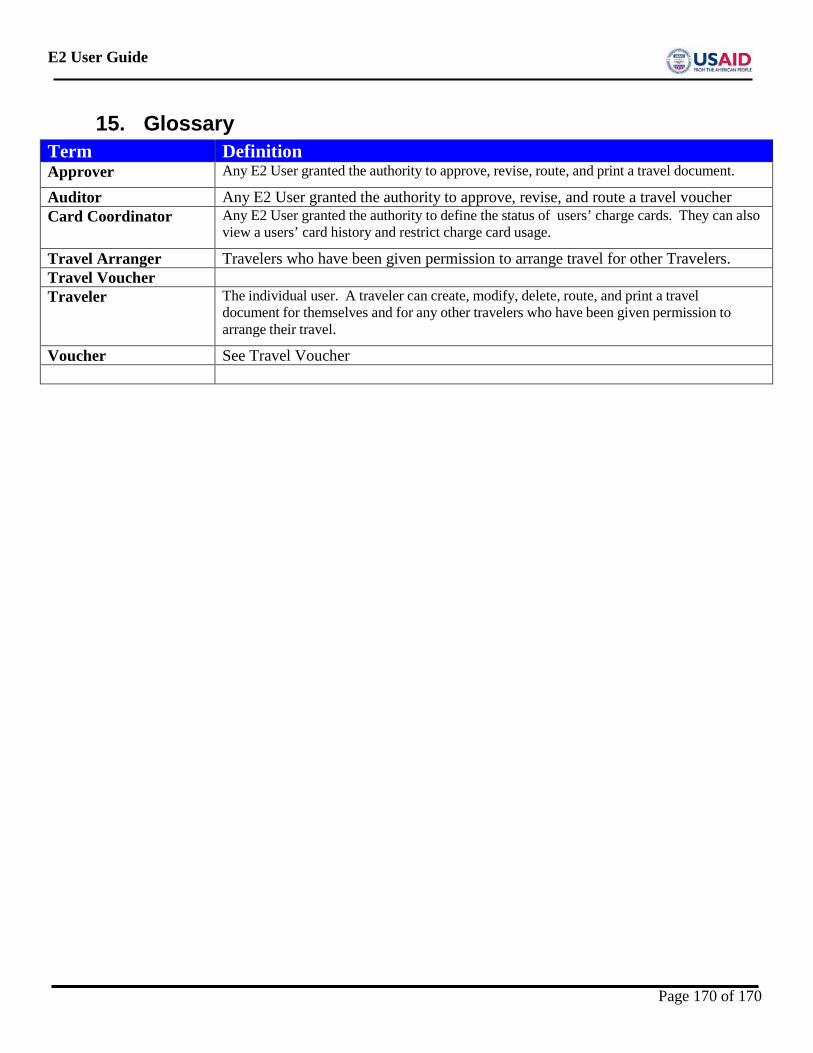
E2 User Guide
15. Glossary
Term Definition Approver Any E2 User granted the authority to approve, revise, route, and print a travel document.
Auditor Any E2 User granted the authority to approve, revise, and route a travel voucher Card Coordinator Any E2 User granted the authority to define the status of users’ charge cards. They can also
view a users’ card history and restrict charge card usage.
Travel Arranger Travelers who have been given permission to arrange travel for other Travelers. Travel Voucher Traveler The individual user. A traveler can create, modify, delete, route, and print a travel
document for themselves and for any other travelers who have been given permission to arrange their travel.
Voucher See Travel Voucher
Page 170 of 170