trakmate lap counter - ncsraslots.com · trakmate lap counter. 1. ... 3.8 sell time relay...
TRANSCRIPT

TrakMate Lap Counter

1. Introduction..................................................................................................................... 3 2. Features ........................................................................................................................... 3 3. Hardware Installation...................................................................................................... 4
3.1 Installing Interface .................................................................................................... 4 3.2 Installing Infrared Sensors ........................................................................................ 5 3.3 Installing Overhead Infrared Kit ............................................................................... 7 3.4 Installing Reed Switches........................................................................................... 7 3.5 Installing Dead Strip ................................................................................................. 8 Color ............................................................................................................................... 8 Lane................................................................................................................................. 8
Blue ..................................................................................................................................... 8 8........................................................................................................................................... 8
TrakMate software setting .............................................................................................. 8 It doesn’t count at all or counts laps all the time ............................................................ 8 3.6 Installing Relay ....................................................................................................... 10 3.7 Installing Track Call Button.................................................................................... 12 3.8 Sell Time Relay Installation.................................................................................... 13
4. Software Installation ..................................................................................................... 13 4.1 Software Installation ............................................................................................... 13 4.2 Installation Settings................................................................................................. 14
5. Getting Started .............................................................................................................. 19 6. Main Screen .................................................................................................................. 19 7. Options.......................................................................................................................... 20
7.1 Sound ...................................................................................................................... 20 7.2 Track Power ............................................................................................................ 21 7.3 Automation ............................................................................................................. 22 7.4 Misc......................................................................................................................... 22
8. Race Formats ................................................................................................................ 23 8.1 Practice.................................................................................................................... 23 8.2 Lap Races................................................................................................................ 23 8.3 Timed Races............................................................................................................ 23 8.4 Championship Race ................................................................................................ 24 8.5 Rotation................................................................................................................... 25 8.6 Round Robin ........................................................................................................... 26 8.7 Custom Rotation ..................................................................................................... 26

1. Introduction
Trackmate Lap counter is an easy to use lap counter that works with any scale slot car track. Laps are timed with 1/1000 second accuracy. The trackmate hardware supports all kinds of sensors, infrared, reed swiches and dead strips. Supports up to 8 lanes and can control track power.
2. Features Features
• 1 to 8 lanes • Any sensor type, Infrared, Reed, Dead strip • 1/1000 second accuracy • Lap races, Timed races • Supports Lap and Timed Races and Lane Rotation • Supports up to 60 racers in round robin format • Works with Desk Tops and laptops • Hardware insures accurate timing to .001 seconds even with background
applications running or with program minimized • Connects to Com port leaving your printer port free • Sound -"Ready GO", "1 Lap remaining" etc. • Supports 1- 8 Lanes • Relay to control track power • Sorts racers according to position during race • Displays - Lap Times, Best Lap, Median, lag/interval time between racers • Print summary and lap times • Enter racers names only once • Change type of data being displayed by clicking on heading. i.e.. MPH or Best Lap • Timer between heats • Championship mode • Powerful Custom Rotation Editor • Auto pop-up race results option to add or subtract laps from racer after heat. • Race Results includes average number of laps per heat • Rotation race supports timed and lap heats • Optional warning sounds on count down timer at 1 min, 30 seconds, 10 seconds • Resizing screen is possible • Two styles of count down, drag racing and Formula 1 • auto save data to text

3. Hardware Installation 3.1 Installing Interface
. Installing Interface
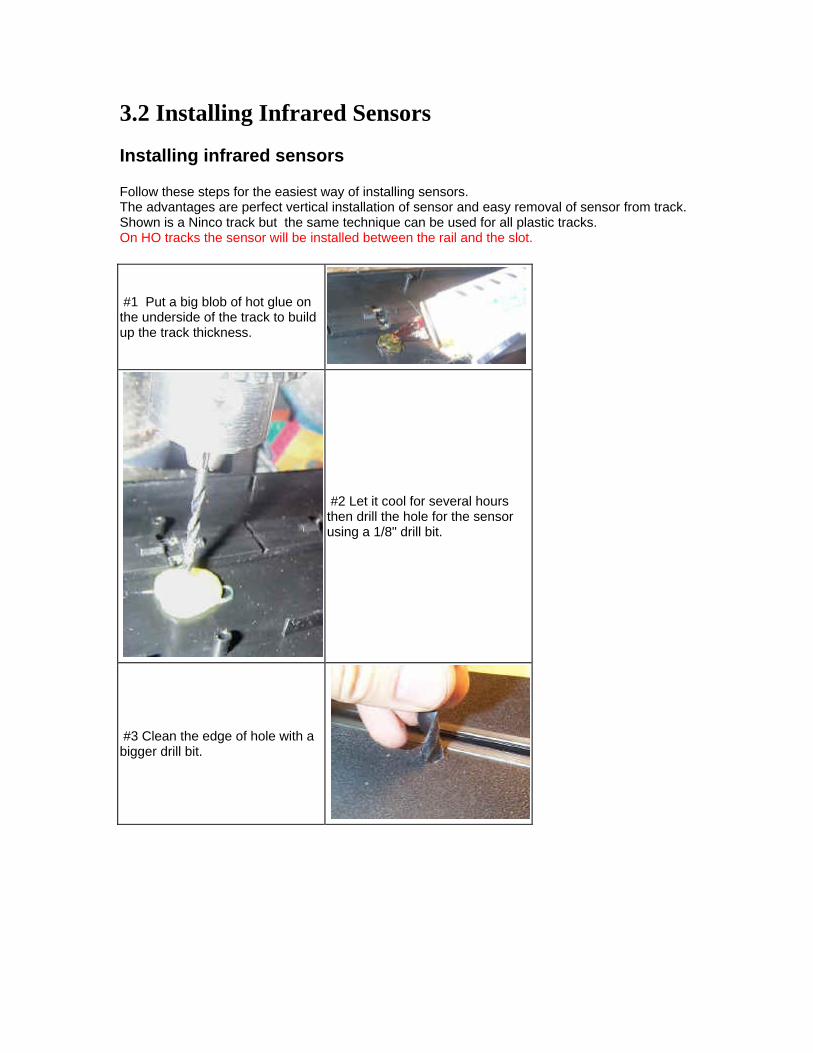
3.2 Installing Infrared Sensors
Installing infrared sensors
Follow these steps for the easiest way of installing sensors. The advantages are perfect vertical installation of sensor and easy removal of sensor from track. Shown is a Ninco track but the same technique can be used for all plastic tracks. On HO tracks the sensor will be installed between the rail and the slot.
#1 Put a big blob of hot glue on the underside of the track to build up the track thickness.
#2 Let it cool for several hours then drill the hole for the sensor using a 1/8" drill bit.
#3 Clean the edge of hole with a bigger drill bit.

#4 It will look like this
On HO tracks the sensor is mounted between the rail and the slot
#5 Insert Sensor. It will fit snugly into the hole
#6 Done!! You don't need to glue it in place.
#7 Completed
Secure the sensor cable under the table so weight of cable does not pull the sensors out of the holes

3.3 Installing Overhead Infrared Kit
Installing Overhead Infrared Kit
The adaptor wire with White stripe is Negative Notice that the LEDs have a short and a long lead. Connect them as shown. If any one is connected backwards none of them will work. Resistors have no polarity and may be connected either way. Note that the LEDs emit light invisible to the human eye but the sensors will see it. The LEDS should have a range of 3 to 5 inches.
3.4 Installing Reed Switches
Installing Reed Switches
Reed switches are small switches activated by the slot cars magnet.
Underside of an HO track. Notice placement of reed switch is in between the rail and the slot. You may use hot glue to hold it in place.

3.5 Installing Dead Strip
DEAD STRIP
Dead strip is two to three inches of isolated track or up to 5 inches on commercial 1/24 scale tracks. Isolate both rails for each lane as shown in diagram
The dead strip works properly in one direction only. If you run your cars in both directions you will need to switch the wires around on the dead strip when you switch directions.
For proper operation the WHITE wire will be connected to the dead strips positive side. HO has the positive on the Drivers side (left side) for 1:32 and 1:24 scale the positive is on the passenger side (right side) Cable Color Code
Color Lane Brown 1 Orange 2 Green 3 Blue 4 Brown (2nd Cable) 5 Orange 6 Green 7
Blue 8 Important Connect a resistor in series with each wire for each lane as shown in the diagram. The resistors were shipped with the cable.
TrakMate software setting In the Installation settings change ‘sensor type’ to Dead Strip / Reed Switch Trouble Shooting IT only counts laps when the car goes very slow over the dead strip This indicates that the wires to the dead strip are reversed.
It doesn’t count at all or counts laps all the time Make sure you selected dead strip version in settings Do not convert an infrared type by removing sensors and connecting it to a Dead Strip. This may damage the computer port because the car generates a voltage.

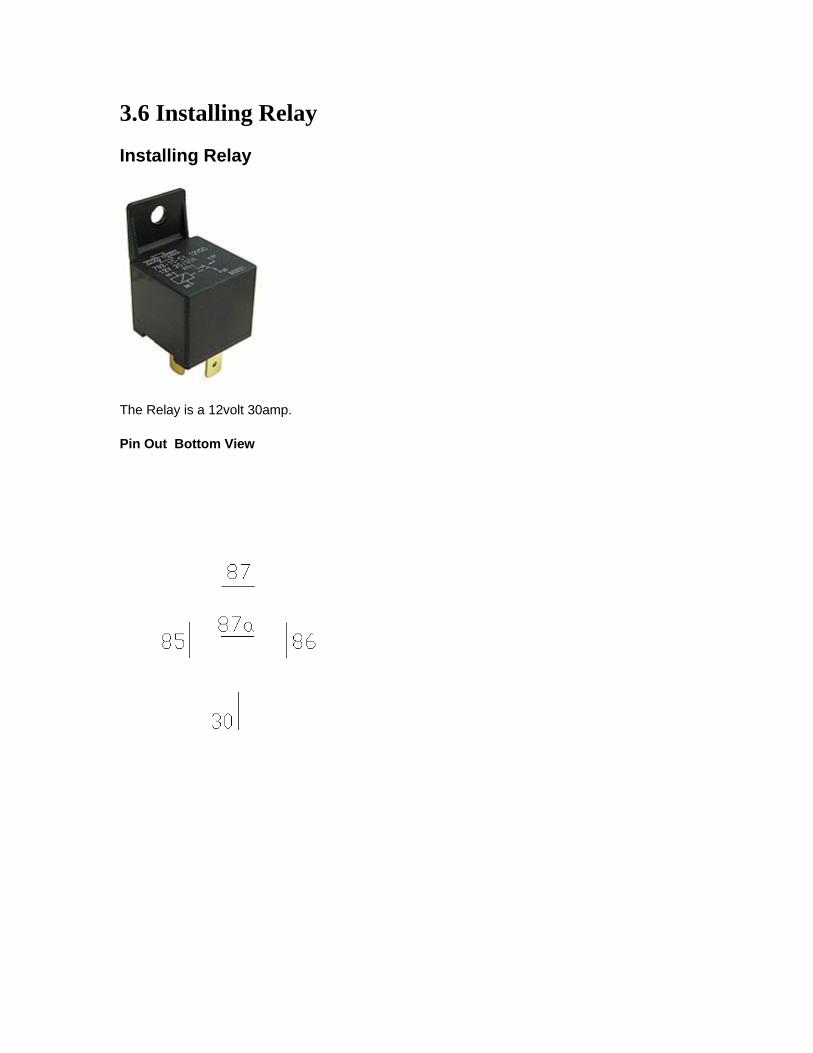
3.6 Installing Relay
Installing Relay
The Relay is a 12volt 30amp.
Pin Out Bottom View

Step 1) Run two Wires from 85 and 86 to the two terminal screws marked RELAY
Step 2) Remove Power Wire from track power supply + Terminal
Step 3) Connect this end to 87a of Relay
Step 4) Add wire between 30 and power supply + Terminal

3.7 Installing Track Call Button
Installing Track Call Button
Buttons like this available at www.trackmateracing.com Product# Jumbo
Install one or more track call buttons can be installed

3.8 Sell Time Relay Installation
Sell Time Relay Installation
Sell Time only available with intergrated sell time modules The 15 pin connector on the module is used to drive the relays. Each pair of wires will drive the relay coil which are pins 85 and 86 on the relay. IT does not matter which of the two wires go to 85 or 86.
Relay cable color code
Lane Wire Color Lane 1 Brown Lane 2 Orange Lane 3 Green Lane 4 Blue Lane 5 Brown (cable 2) Lane 6 Orange (cable 2) Lane 7 Green (cable 2) Lane 8 Blue (cable 2)
4. Software Installation 4.1 Software Installation
Software Installation
Installing Software from CD
Run the setup program on the CD. If the installing on Windows 95 or 98 the dirextx7 drivers used for sound should be installed. The file can be found in the directx7 directory of the CD.

4.2 Installation Settings
Installation Settings
Number of Lanes - Select number of lanes
Track Name - The name here will appear in print outs

These are important settings
Sensor Type - Select correct sensor type, Laps will not count if incorrect sensor type is selected.
Sensor Debounce - Leave it at 1
Relay type - If contacts 87a and 30 are used select Normally Closed Contacts. If track power is On when it should be off and Off when it should be on then you change the setting.
Comm port - Com ports 1 to 8 are supported To find out what com ports are available on your computer click start ->control panel->system->hardware->device manager->ports
Here is a sample screen

Notice com ports 1 and 4 are available

Sell Time Hardware Installed - You must have this checked if you have the time sell hardware installed . It must remain checked even when not selling time.
Sell time by lane - Check this box when you want to sell time by lane. A $ sign will appear in the top left corner of the screen when it time sell mode.

Password protect settings - You can enable password so users can not change installation settings as wrong settings can create problems. You should also enable password if you do time sell.

5. Getting Started Getting Started
Please read Installation Settings before starting to make sure you have everything set correctly
Now that you have all the hardware installed and software installed.
Always have the interface board powered on before starting the program.
Click on racers on the top menu bar to add the names of those that will be racing. You can also remove the names that came with the program. Click Race format, select type of race and disable DEMO mode.
6. Main Screen Main Screen
Lag First, Lag Behind, Median, Best Lap The screen is divided into five columns. You may change what type of data can be displayed in the last two columns. Simply click on the column header before or during the race the race. For example you may change 'Lag First' to 'Lag Behind' or 'Median'. You may also use the F4, F5 function keys. (also see hot keys)
Reset Best Lap You can reset best lap for any racer by clicking on their best lap field.

7. Options 7.1 Sound
Sound
There are many sounds available you can select which sounds to enable or disable. Click on setting->sound to access this form. se the test button to make sure the sound you selected is appropiate

7.2 Track Power
Track Power
With Green Light - Track power comes when green light comes on, which makes it impossible to false start. Before Green Light - Track power comes on a few seconds before Green light, If racer leaves to early his first lap will not count.
Track Call seconds - Normally left at 0, but some racers prefer to penalize a racer for hitting the track call button so .5 to 3 seconds of delay can be added before the track shuts power off
Instant Restart - check this box if you want instant restart with no count down after a track call.

7.3 Automation
Automate Rotation
A very liked feature is the automated rotation. This allows to run a complete race with up to 60 racers with out having to touch the computer. Another huge advantage is the race is completed in a much shorter time as racers know their time is limited between heats.
In the screen shot below Auto print after each heat was selected, a 10 second delay after the heat is over is used to view the screen after each heat, then the screen will automaticaly rotate the racers to their new lanes and wait another 50 seconds before automaticaly powering on the track for the next heat.
7.4 Misc

8. Race Formats 8.1 Practice
Practice
In practice mode up to 3000 laps can be counted. You can also reset your best lap time by clicking on it. New in version 6 is the Voice option. Hear your lap times as you go over the sensor. To toggle voice on/off use the ALT and Lane number. ie ALT1
Practice with rotation
Don't let one racer hog a lane, make them rotate through the lanes
8.2 Lap Races
Lap Race
The most popular race format for casual racing. Like real full scale racing, race ends after leader completes all laps and remaining racers complete their current lap.
If you have the relay option. See options->track power you may want to try the option-track power on before green light .
8.3 Timed Races
Timed Races
Race ends after time ends and all cars finish current lap. If a car takes too long to complete current lap it will time out and end race.

8.4 Championship Race
Championship Race
Championship Race is usually well suited for crash and burn racing, meaning when you crash you are out of the race. It works just like rotation race with lap heats but points are assigned depending on where you finish in the race. Each racer races in each lane once.
click View->Race Results to see points
You can also assign point system click Race Format->Select Championship Race then click Championship Point System

8.5 Rotation
Rotation
There are two types of rotation. Rotation with lap heats and Rotation with timed heats. If you have more racers then number of lanes use Round Robin format.
Rotation Race Lap Heats - Heat ends immediately and power is shut off when car completes number of laps.
Rotation Race Timed Heats - Heat ends immediately and power is shut off when time expires. This is the preferred method for most clubs.
If you have more racers then number of lanes use Round Robin race format.

8.6 Round Robin
Round Robin
Round Robin is identical to rotation races but used when there are more racers then number of lanes. You cannot change name by clicking on it as in Rotation Races, you must change names using the Racers Menu
There are two types of Round Robin. Rotation with lap heats and Rotation with timed heats. If you have more racers then number of lanes use Round Robin format.
Rotation Race Lap Heats - Heat ends immediately and power is shut off when car completes number of laps.
Rotation Race Timed Heats - Heat ends immediately and power is shut off when time expires. This is the preferred method for most clubs.
8.7 Custom Rotation
Custom Rotation Editor
So what's the big deal about the rotation editor?
The rotation editor allows you to go through the lanes in any sequence. Lets say you have a 8 lane track and 16 racers. With custom rotation editor you could create 2 groups of 8 racers but there all in the same race. The first group would race then the next group and so on. I'll show you how.
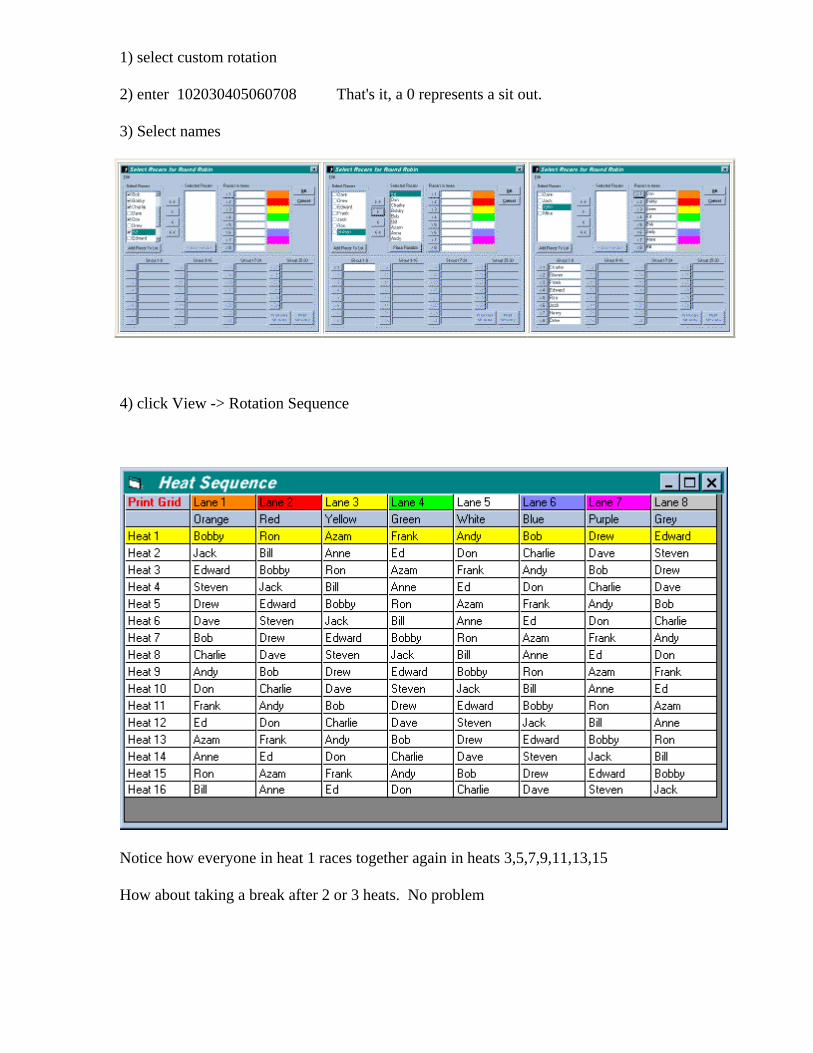
1) select custom rotation
2) enter 102030405060708 That's it, a 0 represents a sit out.
3) Select names
4) click View -> Rotation Sequence
Notice how everyone in heat 1 races together again in heats 3,5,7,9,11,13,15
How about taking a break after 2 or 3 heats. No problem

Tip: Always check view rotation sequence before starting a race. You can also print it, the button is in the top left corner.
Wait you can do more.....
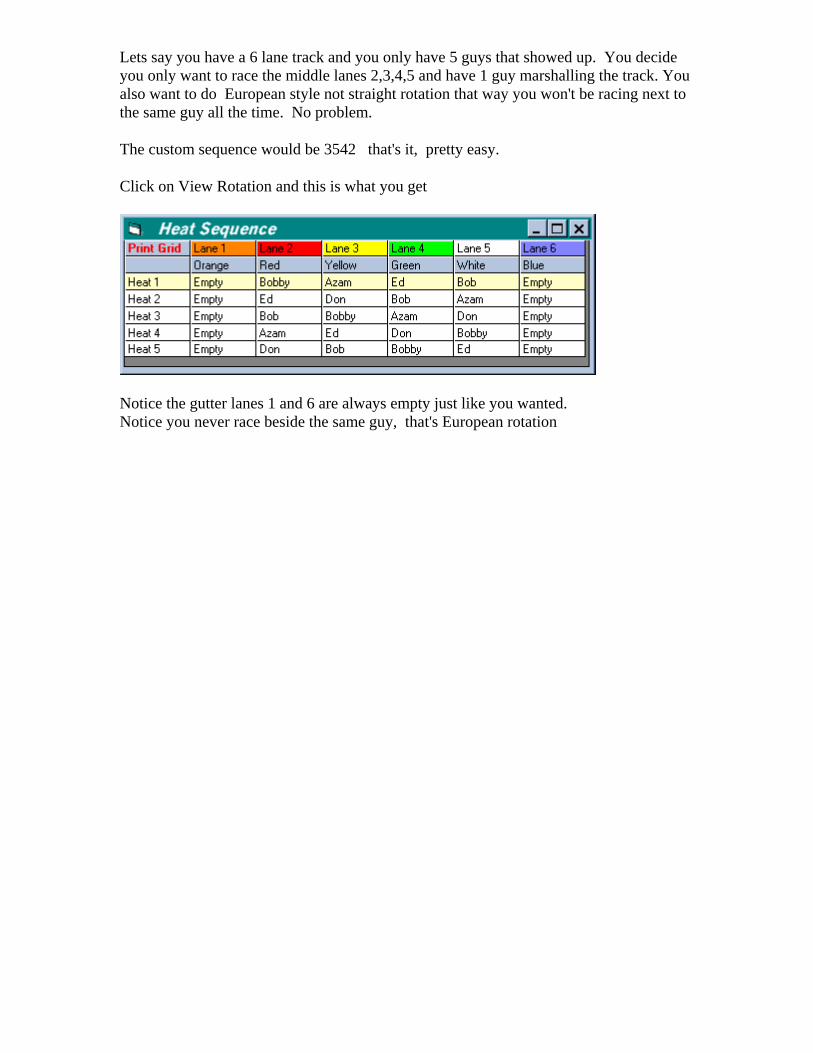
Lets say you have a 6 lane track and you only have 5 guys that showed up. You decide you only want to race the middle lanes 2,3,4,5 and have 1 guy marshalling the track. You also want to do European style not straight rotation that way you won't be racing next to the same guy all the time. No problem.
The custom sequence would be 3542 that's it, pretty easy.
Click on View Rotation and this is what you get
Notice the gutter lanes 1 and 6 are always empty just like you wanted. Notice you never race beside the same guy, that's European rotation