smartcloud notes - lotus documentation
TRANSCRIPT
SmartCloud Notes
Administering SmartCloud Notes:Hybrid EnvironmentMarch 2015
���

SmartCloud Notes
Administering SmartCloud Notes:Hybrid EnvironmentMarch 2015
���

NoteBefore using this information and the product it supports, read the information in Chapter 11, “Notices,” on page 305.
Contents
Chapter 1. Overview of SmartCloudNotes . . . . . . . . . . . . . . . . 1What's new in SmartCloud Notes . . . . . . . 1
What's new for SmartCloud Notes administrators 2Administrators can be notified of directorysynchronization errors . . . . . . . . . 2Administrators can set policies for Notes clientarchiving . . . . . . . . . . . . . 2Administrators can restore deleted useraccounts . . . . . . . . . . . . . . 2
What's new for SmartCloud Notes users . . . . 3Invitee status viewable by meeting chair onNotes Traveler devices . . . . . . . . . 3More Windows devices are supported forTraveler . . . . . . . . . . . . . . 3Notes Traveler 9.0.1.1 features are available . . 3Notes Traveler 9.0.1.2 features are available . . 4Setup improvements for the Notes TravelerAndroid client . . . . . . . . . . . . 5Enhancements to supported email encodingstandards for inbound internet mail . . . . 5
Accessibility . . . . . . . . . . . . . . 5Using SmartCloud Notes in a hybrid environment. . 5
User experience in a hybrid environment . . . . 7Company administrator experience in a hybridenvironment . . . . . . . . . . . . . 8
SmartCloud Notes clients . . . . . . . . . . 9Web client . . . . . . . . . . . . . . 10Traveler devices . . . . . . . . . . . . 10Notes client . . . . . . . . . . . . . 11IMAP client . . . . . . . . . . . . . 12BlackBerry devices with a Hosted BlackBerryServices subscription . . . . . . . . . . 12
Feature differences between Notes and Domino andthe SmartCloud Notes service . . . . . . . . 12Frequently asked questions about administering theservice . . . . . . . . . . . . . . . . 13Information resources . . . . . . . . . . . 15
Chapter 2. Planning to deploy theservice. . . . . . . . . . . . . . . 17Planning security . . . . . . . . . . . . 17Planning network connections . . . . . . . . 19
Network capacity for the web client . . . . . 20Network capacity for the Notes client . . . . 20
Planning directory services . . . . . . . . . 21Requirements for synchronized directories . . . 22How directory synchronization works . . . . 26How the service resolves duplicate Persondocuments. . . . . . . . . . . . . . 28
Planning mail routing and mail settings . . . . . 29Planning calendars and scheduling . . . . . . 31
Planning free-time requests in a hybridenvironment . . . . . . . . . . . . . 35Resource reservations in a hybrid environment 36
Certifier requirements in a hybrid environment . . 37Version requirements for on-premises Dominoservers . . . . . . . . . . . . . . . . 38
Chapter 3. Preparing your environment 39Creating a certifier for your mail servers. . . . . 39Preparing your network . . . . . . . . . . 40
Preparing passthru servers . . . . . . . . 40Preparing the firewall . . . . . . . . . . 41
Configuring the firewall for inboundconnections . . . . . . . . . . . . 41Configuring the firewall for outboundconnections . . . . . . . . . . . . 42
How NRPC connections are made in a hybridenvironment . . . . . . . . . . . . . 44
Preparing for directory synchronization . . . . . 45Setting up directory synchronization servers . . 45Preparing to replicate Domino directories . . . 47Preparing to replicate an extended directorycatalog . . . . . . . . . . . . . . . 48
Preparing Global Domain documents . . . . . . 49Preparing for mail routing . . . . . . . . . 52
Setting up mail hub servers in the on-premiseshub domain . . . . . . . . . . . . . 52Preparing to route mail from service users . . . 53
Preparing to route mail from service users toon-premises users and devices . . . . . . 53Preparing to use a company SMTP server toroute outbound Internet mail . . . . . . 54
Preparing to route mail to service users . . . . 55Preparing to route mail to service usersregistered in the on-premises hub domain . . 55Preparing to route mail to service users in asecondary domain . . . . . . . . . . 57
Examples: Routing internal mail . . . . . . 60Example: Routing mail between users in theon-premises hub domain . . . . . . . . 60Example: Routing mail between users in asecondary domain . . . . . . . . . . 62Example: Routing mail between users indifferent Domino domains . . . . . . . 65
Examples: Routing external mail . . . . . . 68Example: Routing mail from an external userto a service user . . . . . . . . . . . 69Example: Routing mail from a service user toan external user using a service SMTP host . . 70Example: Routing mail from a service user toan external user using a company SMTP host . 71
Preparing for calendars and scheduling . . . . . 73Example: Free-time requests between users in theon-premises hub domain . . . . . . . . . 75Example: Free-time requests between users indifferent domains . . . . . . . . . . . 78
Helping service users connect to application serversin secondary domains . . . . . . . . . . . 81
© Copyright IBM Corp. 2011 iii
Chapter 4. Configuring the service. . . 83Roadmap to configuring a hybrid environment . . 83Logging on as the first company administrator . . 86Completing a checklist to prepare for configuration 87Configuring your hybrid account settings . . . . 89
Configuring directory synchronization . . . . 89Specifying a mail routing server . . . . . . 90Creating a base name for your mail servers. . . 91Specifying one or more passthru servers. . . . 91Providing a certifier ID file . . . . . . . . 92
Using the Pre-configuration Test tool to check yourenvironment . . . . . . . . . . . . . . 93Reviewing your setup and enabling your account 94Downloading and running the DomainConfiguration tool . . . . . . . . . . . . 94Verifying Internet domains . . . . . . . . . 97Activating your account . . . . . . . . . . 99Running configuration tests . . . . . . . . . 99Completing the configuration . . . . . . . . 100
Checking network connections fromon-premises servers to the service . . . . . 100Issuing a Vault Trust Certificate . . . . . . 101
Chapter 5. Customizing servicesettings . . . . . . . . . . . . . . 103Enabling the accessible experience for the webclient . . . . . . . . . . . . . . . . 103Setting up administration notifications . . . . . 103Restricting access to groups . . . . . . . . 104Using administrative policies . . . . . . . . 105
Creating policies for service users . . . . . 105Creating an archiving policy settingsdocument . . . . . . . . . . . . 106
Policy precedence . . . . . . . . . . . 112Policy settings restrictions . . . . . . . . 114
Archiving Settings restrictions . . . . . . 114Desktop Settings restrictions . . . . . . 114Registration Settings restrictions . . . . . 115Mail Settings restrictions. . . . . . . . 115Security Settings restrictions . . . . . . 117Roaming Settings restrictions . . . . . . 118Notes Traveler Settings restrictions . . . . 118
Using Desktop Settings to configure managedmail replicas. . . . . . . . . . . . . 120
Configuring logins . . . . . . . . . . . 124Resetting service login passwords . . . . . 124Setting service login password expiration . . . 124Managing Notes IDs . . . . . . . . . . 125
Resetting passwords for Notes IDs . . . . 125Setting password expiration for Notes IDs 126Enabling password synchronization . . . . 128Notes IDs and passwords . . . . . . . 130Limitations when Notes IDs are not in thevault . . . . . . . . . . . . . . 131
Setting up federated identity management. . . 132SAML federated identity concepts . . . . 133Preparing for federated identity management 135Enabling federated identity management . . 136Configuring the Sametime rich client forSAML and downloading . . . . . . . 136
Restricting the IP address range . . . . . . 138Enabling application passwords . . . . . . 139Authentication methods by client. . . . . . 141Password rules by authentication method . . . 141
Configuring the name finder . . . . . . . . 142Standard and Advanced Name Finder options 145Adding photos to Person documents . . . . 147Basic name finder illustration . . . . . . . 148Basic Quick Search Only name finderillustration . . . . . . . . . . . . . 149Standard name finder illustration. . . . . . 151Advanced name finder illustration . . . . . 152Browse corporate hierarchy name finderillustration . . . . . . . . . . . . . 153
Configuring mail settings . . . . . . . . . 154Changing the size limit for incoming messages 154Prevent automatic forwarding of messages . . 154Specifying how Notes links display in the webclient . . . . . . . . . . . . . . . 155Configuring how long mail remains in the Trashfolder . . . . . . . . . . . . . . . 156Deleting older email and meetings . . . . . 157Enabling the ActiveX control for InternetExplorer users . . . . . . . . . . . . 159Specifying an SMTP server to route mail to theInternet . . . . . . . . . . . . . . 160
Preparing to use custom mail file templates . . . 161Handling execution security alerts caused bycustom templates . . . . . . . . . . . 162
Configuring mail file templates . . . . . . . 164Using extension forms files to customize the lookof the web client . . . . . . . . . . . . 165
Extension forms file requirements . . . . . 167Preparing customized mail file ACLs . . . . . 168Enabling busytime details in calendars . . . . . 170Configuring instant messaging . . . . . . . 171
Configuring the web client to connect to anon-premises Sametime community . . . . . 172Manually configuring Notes clients to connectto the service instant messaging community . . 175Instant messaging features . . . . . . . . 176
Configuring IMAP access . . . . . . . . . 178IMAP client limitations . . . . . . . . . 180
Logging activity in journal files . . . . . . . 180Downloading journal files . . . . . . . . 181Format of the Notes mail journal file . . . . 182Format of the Notes client session journal file 184
Chapter 6. Onboarding users . . . . 187Choosing a client deployment strategy . . . . . 187
Deciding whether to use the Notes client . . . 188Deciding whether to transfer mail files . . . . 189
Preparing for onboarding . . . . . . . . . 191Preparing for the web client . . . . . . . 193Preparing for Notes Traveler devices . . . . 195Preparing for Notes clients . . . . . . . . 196
How the Client Configuration tool configuresthe Notes client. . . . . . . . . . . 199Downloading Notes client software and otherentitled software . . . . . . . . . . 201
iv SmartCloud Notes: Administering SmartCloud Notes: Hybrid Environment March 2015
Connecting to cloud Activities through theNotes client sidebar . . . . . . . . . 202
Preparing for IMAP clients . . . . . . . . 202Preparing to use BlackBerry devices . . . . . 203
Settings enforced for BlackBerry smartphones 205Preparing communications and training . . . 206Adding multiple Internet email addresses toPerson documents . . . . . . . . . . . 207Mail file quota . . . . . . . . . . . . 207Mail file delegation . . . . . . . . . . 208
Transferring mail files . . . . . . . . . . 209Preparing for mail file transfer . . . . . . 209
Preparing the staging server . . . . . . 209Preparing mail file ACLs before mail filetransfer . . . . . . . . . . . . . 212Preventing local database encryption in newmail file replicas . . . . . . . . . . 212Importing IDs into mail files . . . . . . 212Scanning mail files for viruses . . . . . . 213
Transferring mail files with help from an IBMpartner . . . . . . . . . . . . . . 213
How the transfer manager creates a mail filetransfer request. . . . . . . . . . . 214Transferring mail files to the service datacenter . . . . . . . . . . . . . . 215
Provisioning users . . . . . . . . . . . . 218Provisioning users without transferring mailfiles . . . . . . . . . . . . . . . 219
Registering a new user on-premises . . . . 222Provisioning users and mail files . . . . . . 224
Deleting on-premises mail files . . . . . 228Decommissioning on-premises mail servers 228
Checking user provisioning status . . . . . . 229Helping users get started . . . . . . . . . 230
Providing account information to users. . . . 231Getting started with the web client . . . . . 232Getting started with the Notes Traveler devices 233
Adding a Notes Traveler subscription to auser account. . . . . . . . . . . . 234Removing user accounts from on-premisesNotes Traveler servers . . . . . . . . 235
Getting started with the Notes client . . . . 237Getting started with IMAP clients . . . . . 237Getting started with BlackBerry devices . . . 238
Accepting the Research In Motion terms ofuse . . . . . . . . . . . . . . . 238Adding a BlackBerry subscription to a useraccount . . . . . . . . . . . . . 238Removing user accounts from an on-premisesBlackBerry Enterprise Server . . . . . . 239Activating a user's BlackBerry smartphone 239Ensuring that mail encryption is available forBlackBerry smartphone users . . . . . . 241Providing documentation to your BlackBerrysmartphone users . . . . . . . . . . 242
Chapter 7. Administering useraccounts . . . . . . . . . . . . . 243Best practices for maintaining your on-premisesenvironment. . . . . . . . . . . . . . 243Changing user mail file templates . . . . . . 246
Viewing assigned mail file templates . . . . . 247Language versions of the standard mail filetemplate . . . . . . . . . . . . . . 248
Assigning extension forms files to users . . . . 248Setting a default extension forms file . . . . 249Explicitly assigning an extension forms file tomany current users . . . . . . . . . . 250Explicitly assigning an extension forms file toindividual current users . . . . . . . . . 251
Resetting service login passwords . . . . . . 252Resetting passwords for Notes IDs . . . . . . 253Changing a Notes user name . . . . . . . . 255
Rules to follow when you change a Notes name 257Changing an Internet email address . . . . . . 258Removing a SmartCloud Notes subscription from auser account. . . . . . . . . . . . . . 259Suspending a user account . . . . . . . . . 260Deleting a user account . . . . . . . . . . 261Restoring a deleted user account . . . . . . . 263Permanently deleting a user account . . . . . 263Removing the SmartCloud Notes data for a deleteduser account or subscription . . . . . . . . 264Moving users to different Domino directories . . 265Converting a service user to an on-premises user ina hybrid environment . . . . . . . . . . 267Uploading a Notes ID to the vault . . . . . . 269Viewing subscriptions . . . . . . . . . . 271
Viewing assigned subscriptions . . . . . . 271Managing IBM Notes Traveler devices . . . . . 272Managing BlackBerry smartphones . . . . . . 274
Reactivating a user's BlackBerry smartphone 274Wiping a user's BlackBerry smartphone if it islost or stolen . . . . . . . . . . . . 276Setting a device password on a user'sBlackBerry smartphone . . . . . . . . . 277Removing a BlackBerry subscription from a useraccount . . . . . . . . . . . . . . 278Frequently asked questions about BlackBerrysmartphone administration . . . . . . . . 278
Chapter 8. Integrating a single domain(Example) . . . . . . . . . . . . . 281Preparing the on-premises environment (Example) 281
Preparing the on-premises directorysynchronization and mail hub servers (Example) 282Preparing the on-premises passthru serverdomain (Example) . . . . . . . . . . . 282Configuring firewalls (Example) . . . . . . 283Preparing the Global Domain document(Example) . . . . . . . . . . . . . 284Creating the certifier and names for mail servers(Example) . . . . . . . . . . . . . 285
Configuring the service (Example) . . . . . . 286Completing an account settings worksheet(Example) . . . . . . . . . . . . . 286Configuring account settings (Example) . . . 287Downloading and running the DomainConfiguration tool (Example) . . . . . . . 287Verifying the Internet domain name (Example) 288Testing network connections (Example). . . . 289Issuing a Vault Trust Certificate (Example) . . 289
Contents v
Example illustrations . . . . . . . . . . . 290Directory synchronization at Renovations . . . 290Service user sending Notes mail to anon-premises user . . . . . . . . . . . 291On-premises user sending Notes mail to aservice user . . . . . . . . . . . . . 292Service user receiving Internet mail . . . . . 294Service user sending Internet mail . . . . . 294Service user requesting the free time of anon-premises user . . . . . . . . . . . 295On-premises user requesting free time of aservice user . . . . . . . . . . . . . 296Service user requesting the free time of aresource . . . . . . . . . . . . . . 297Service user reserving a resource . . . . . . 299
Chapter 9. Integrating additionaldomains . . . . . . . . . . . . . 301
Chapter 10. Troubleshooting theservice . . . . . . . . . . . . . . 303Using the Configuration Test tool. . . . . . . 303
Finding troubleshooting tips in the Support Portal 303Contacting Support . . . . . . . . . . . 303
Chapter 11. Notices . . . . . . . . . 305Trademarks . . . . . . . . . . . . . . 306Privacy policy considerations . . . . . . . . 307
Index . . . . . . . . . . . . . . . 309
vi SmartCloud Notes: Administering SmartCloud Notes: Hybrid Environment March 2015
Chapter 1. Overview of SmartCloud Notes
IBM SmartCloud® Notes® is a multi-tenant cloud mail service. When you use theservice, administrators at IBM® set up and maintain IBM Domino® mail servers foryou in the cloud on external IBM servers. The service offers you the benefits ofDomino mail server security features and architecture without the mail servermaintenance overhead.
Using the following clients, users connect to the SmartCloud Notes service over theInternet to access their mail:v Web client through a browser interface available at http://www.ibmcloud.com/
social;v Notes;v Mobile devices.
Any combination of these clients can be used.
At least one person at a company is designated as a company administrator. Acompany administrator has a user account with the Administrator role and isresponsible for configuring the service and administering user accounts.
The SmartCloud Notes service provides various options that are designed to helpyou deploy the service in a way that best satisfies your business needs.v You can deploy the service with the assistance of an IBM Software Services for
Collaboration representative or a certified IBM Business Partner. Whether youchoose this option depends on factors such as the type of SmartCloud Notesenvironment you deploy and your in-house IT expertise and priorities.
v You can choose from a list of standard mail file templates that are availablewithin the service by default, or develop a custom template for your company.You can develop a custom template in-house or contract with an IBM or athird-party representative to develop the template. Approval of a customtemplate requires a short service engagement with IBM Software Services forCollaboration.
v A Notes Traveler subscription is available automatically. This subscriptionenables users to access the service through supported mobile handheld devices.Note that the ultra-light mode of the web client supports the use of some mobiledevices for no additional purchase.
v If you purchase a SmartCloud Notes for Hosted BlackBerry® Servicessubscription, users can access the service through BlackBerry® smartphones. Touse BlackBerry® 10 devices, use Notes Traveler instead.
v If you purchase the Connections Archive Essentials subscription, the content ofuser email can be captured and retained for later legal discovery. For moreinformation about this service, see the Using Connections Archive Essentialsdocumentation.
What's new in SmartCloud NotesThe following features and enhancements are new in IBM SmartCloud Notes.
© Copyright IBM Corp. 2011 1
What's new for SmartCloud Notes administratorsThe following features are new for IBM SmartCloud Notes administrators.
Administrators can be notified of directory synchronizationerrorsAdministrators can configure the service to send email notifications if directorysynchronization errors occur.
Administrators specify the addresses of one or more people to receive thenotifications. A notification describes the error and provides a link to informationabout how to resolve it.Related tasks:“Setting up administration notifications” on page 103Set up the service to send email notifications that report when specific types oferrors occur in the service.
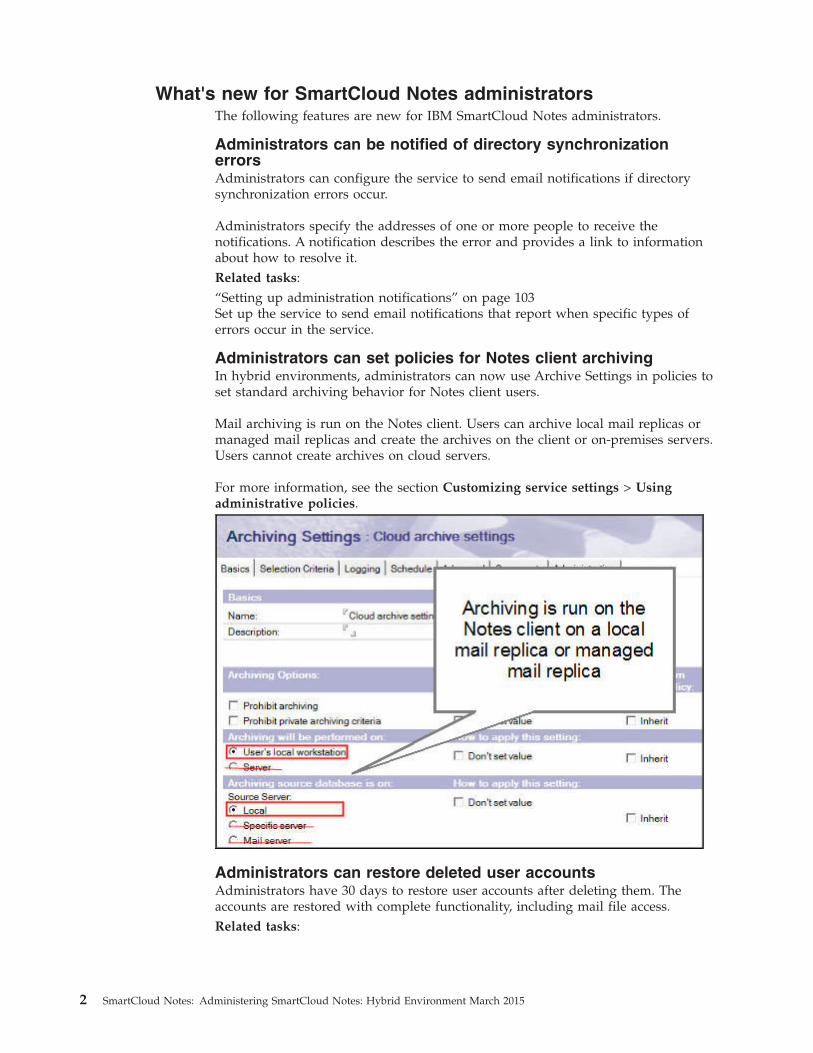
Administrators can set policies for Notes client archivingIn hybrid environments, administrators can now use Archive Settings in policies toset standard archiving behavior for Notes client users.
Mail archiving is run on the Notes client. Users can archive local mail replicas ormanaged mail replicas and create the archives on the client or on-premises servers.Users cannot create archives on cloud servers.
For more information, see the section Customizing service settings > Usingadministrative policies.
Administrators can restore deleted user accountsAdministrators have 30 days to restore user accounts after deleting them. Theaccounts are restored with complete functionality, including mail file access.Related tasks:
2 SmartCloud Notes: Administering SmartCloud Notes: Hybrid Environment March 2015
“Deleting a user account” on page 261When you delete a user's account, the user no longer has access to any cloudservices. If you change your mind about the deletion, you have up to 30 days torestore the account to full functionality.“Restoring a deleted user account” on page 263After you delete a user account, you have up to 30 days to restore it if you changeyour mind. Restoring the account returns it to full functionality, including full mailfile access.
What's new for SmartCloud Notes usersThe following features are new for IBM SmartCloud Notes users.
Invitee status viewable by meeting chair on Notes TravelerdevicesInvitee status display is now supported on Apple, BlackBerry 10, Windows Phone,Windows Tablet, and Android devices. The meeting chair can view the status ofeach invitee's response to the current version of the meeting. Possible statuses areaccepted, tentative, declined, and no response. Additionally, the Android client canshow a status of delegated.
More Windows devices are supported for TravelerIBM SmartCloud Notes Traveler users can now use Windows Phone and WindowsTablet (Windows Pro and Windows RT) devices with the service. There is no needto install client software on these devices to use them with the service.
For device requirements, see the SmartCloud Notes client requirements.Related information:
SmartCloud Notes client requirements
Using Notes Traveler documentation
Notes Traveler 9.0.1.1 features are availableThe IBM Notes Traveler 9.0.1.1 client provides the following new features:
Calendar improvements for Android clients
Local calendar information displays in IBM Notes Traveler calendarYou can now add the information from your local device calendars intoyour IBM Notes Calendar view.
Create calendar events from mail messagesYou can now create a calendar event while viewing mail, using theoverflow menu. Calendar events created from mail messages will formwith the invitees populated with the message recipients, and the eventdetails information pre-filled with the content of the mail.
Interface improvements for Android clients
Action barThe action bar is a mobile feature that identifies your location within IBMNotes Traveler, as well as provides action icons and navigation modes.
Navigation drawer for mailThe navigation drawer is a panel that slides in from the left of the screento display IBM Notes Traveler's main navigation options. For mail, the
Chapter 1. Overview of SmartCloud Notes 3
navigation drawer displays your user account and mail folders (inbox,outbox, sent, and personal). The navigation drawer is only available fromthe parent list view of a mail folder.
Android Contacts applicationIBM Notes Traveler on Android now provides its own dedicated Contactsapplication, rather than utilizing the device Contacts application.
New mail item list layout with thumbnail photosThe mail item list has been redesigned to make it easier to consume thesender, subject, and message body where applicable. If the screen is wideenough, a person thumbnail image displays using the sender's mailaddress to search for available photos, either from local contacts, IBMNotes Traveler contacts, or from the new Sametime® Integration feature.
New mail list selection modeA new selection mode overlays a 'Contextual Action Bar' over the existingaction bar, showing the number of selected items. It also provides batchoperations on the selected items, such as: Move to Folder, Discard, Mark asRead, or Mark as Unread. Only the actions which are applicable to allselected items displays.
Gesture actions for mail and contactsTo quickly act on mail items in a list or take action on a contact, you cannow swipe the item from right to left to display a list of action buttonswithout having to open the mail or contact itself. Available on phones withAndroid 3.0 (Honeycomb) and above.
Add to Contacts from mailWhen viewing a mail item, you can now add the sender to your contacts.
Mail list person actionsYou can now tap a user photo from a mail message and see a list ofpossible actions to take with that person. The actions available depend onthe information available for the person. If there is a mail addressassociated with the person, you can perform the following actions:v View the person's IBM Connections Profile (only if IBM Connections
mobile is installed)v Chat with the person (only if IBM Sametime mobile chat is installed and
connected)v Mail the person (opens the Android mail selection dialog).
If there is at least one phone number associated with the person, and yourdevice is a phone, you can also call and text the person directly.
These options are only available where a person photo displays: mail,calendar and contacts.
Notes Traveler 9.0.1.2 features are availableThe IBM Notes Traveler 9.0.1.2 client provides the following new features.
New reply options for mail messages in Android devices
When replying to a mail message on Android devices, you can now choose toreply with or without message history and attachments.
4 SmartCloud Notes: Administering SmartCloud Notes: Hybrid Environment March 2015
Add Notes Traveler contact from a phone number
On Android phones that support the option, you can now choose to make a newNotes Traveler contact from a phone number.
Setup improvements for the Notes Traveler Android clientWhen setting up a new IBM Notes Traveler Android 9.0.1.3 client, you are nolonger required to type in your datacenter URL to connect to the service. You arenow automatically connected to the correct data center based on your loginidentity.
Enhancements to supported email encoding standards forinbound internet mailIBM SmartCloud Notes web and IBM Notes Traveler clients now support the RFC2231 standard for inbound Internet email.
This standard provides email improvements, including the correct display ofattachment file names that are specified in character sets other than US-ASCII.
The service supports the new standard for incoming messages that are encoded tosupport RFC 2231. The RFC 2231 encoding is retained when a recipient replies toor forwards a message. The service does not use the new encoding in newoutbound messages.
AccessibilityIBM SmartCloud Notes Administration, the interface that is used to administerSmartCloud Notes, is accessible.
The version of this documentation that is in the Knowledge Center is accessible.
All OS level keystrokes for accessibility are recognized. For the best accessibilityexperience, use a version of Mozilla Firefox supported by the service and the latestversion of the JAWS screen reader.
See the IBM Human Ability and Accessibility Center for more information aboutthe commitment that IBM has to accessibility.Related tasks:“Enabling the accessible experience for the web client” on page 103You can submit a request to enable the accessible experience for the web client foreveryone in your organization. Mail, Calendar, Contacts, and Preferences featuresprovided with this experience are all accessible.Related information:
System Requirements
Knowledge Center documentation
Using SmartCloud Notes in a hybrid environmentWhen you deploy the IBM SmartCloud Notes service in a hybrid environment, itfunctions as a virtual extension of your on-premises IBM Domino domainconfiguration. With a hybrid environment, company administrators continue tomanage users and groups using the on-premises tools with which they are familiar.
Chapter 1. Overview of SmartCloud Notes 5
Mail routing and directory synchronization between your on-premises servers andthe SmartCloud Notes service occur through an on-premises hub domain. Youdesignate at least one server in the domain as a directory synchronization server tohandle replication of Domino directories in your environment to the service. Youalso designate at least one mail routing server to handle mail routing betweenon-premises servers and the service.
Note: Routing of incoming Internet mail addressed to users in the service isconfigured and done on-premises. The SmartCloud Notes service performsoutbound Internet mail routing only.
You can have a combination of on-premises users (users with mail servers at thecompany site) and service users who use SmartCloud Notes mail servers. The twogroups of users can communicate by Notes mail, look up each other's free time,reserve shared rooms and resources, and schedule meetings with each other.
If you have Domino application servers on-premises, service users can accessDomino applications in the same way they did before using the service. Acustomer provides a unique organizational unit (OU) certifier ID to be used fortheir SmartCloud Notes mail servers. This OU certifier is within the trust hierarchyof both the service users and the on-premises Domino application servers.Therefore a service user's Notes ID provides access to both the SmartCloud Notesmail servers and the on-premises application servers.
In the following illustration, Dan Misawa is a service user at the fictional companyRenovations. His Notes ID, which is certified under /Renovations, enables him toaccess his SmartCloud Notes mail servers, which are certified under the OU/SMC/Renovations. He can also continue to access an on-premises Dominoapplication server which is certified under /Renovations.
6 SmartCloud Notes: Administering SmartCloud Notes: Hybrid Environment March 2015
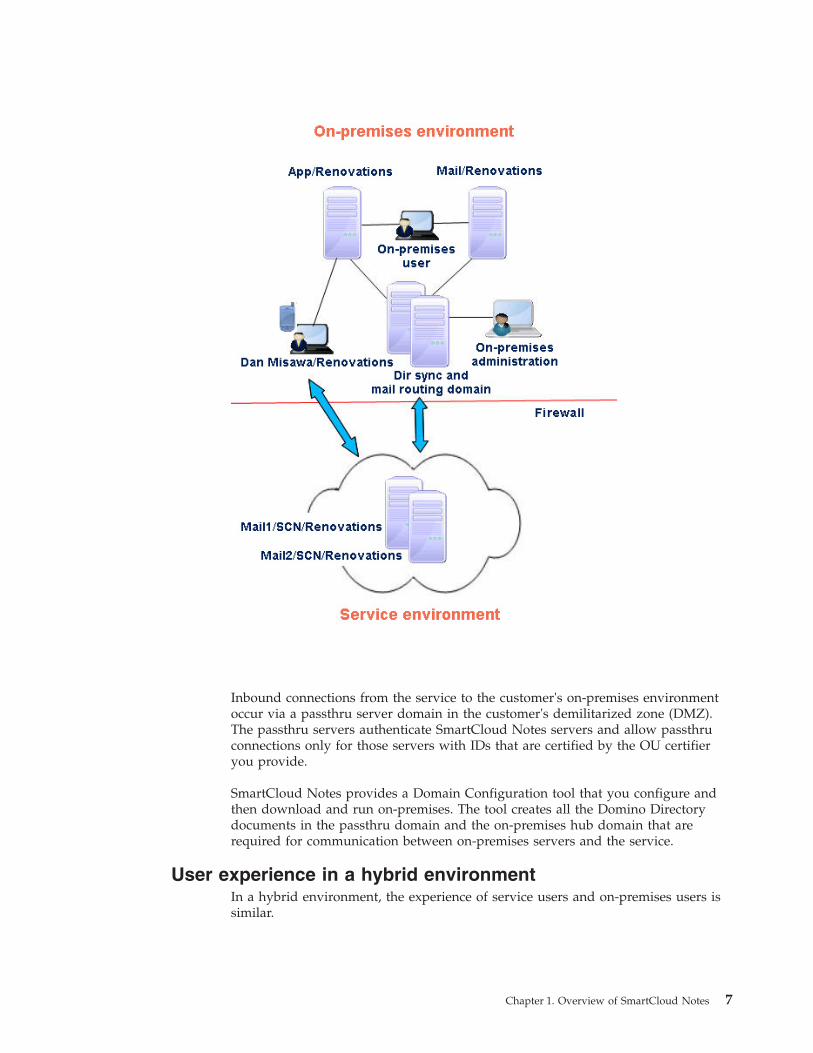
Inbound connections from the service to the customer's on-premises environmentoccur via a passthru server domain in the customer's demilitarized zone (DMZ).The passthru servers authenticate SmartCloud Notes servers and allow passthruconnections only for those servers with IDs that are certified by the OU certifieryou provide.
SmartCloud Notes provides a Domain Configuration tool that you configure andthen download and run on-premises. The tool creates all the Domino Directorydocuments in the passthru domain and the on-premises hub domain that arerequired for communication between on-premises servers and the service.
User experience in a hybrid environmentIn a hybrid environment, the experience of service users and on-premises users issimilar.
Chapter 1. Overview of SmartCloud Notes 7
v A service user's IBM Notes ID provides access to both on-premises IBM Dominoapplication servers and IBM SmartCloud Notes mail servers. A Locationdocument and Connection document added to Notes clients enables the clientsto connect to the mail servers.
v Existing Notes client bookmarks and links to Domino application servers workwithout modification.
v A service user can look up the people, groups, and mail-in databases in anyon-premises Domino directory that has been replicated to the service throughdirectory synchronization.
v A service user can look up names in a Domino directory indirectly, for example,by clicking To in a mail memo. The user cannot use File > IBM NotesApplication > Open to open the directory, however.
Service users who use the Notes client and who have a collaboration subscriptioncan access both service Activities and on-premises Activities through the clientsidebar.
Company administrator experience in a hybrid environmentIBM administrators maintain user mail servers in the service. Companyadministrators administer service users.
Company administrators continue to perform many user administration taskson-premises with familiar tools such as the Domino Administrator client. Sometasks are performed through web administration features in the service athttp://www.ibmcloud.com/social. To use the administration features, a companyadministrator logs on to the service using an account name that is assigned theAdministrator role.
Table 1. Tasks to administer service users in a hybrid environment
Task Where task is performed Additional information
Adding users to the service On-premises and throughhttp://www.ibmcloud.com/social
“Provisioning users” on page218
Deleting users from theservice
On-premises and throughhttp://www.ibmcloud.com/social
v See the topic aboutdeleting a user in theDomino documentation.
v “Removing a SmartCloudNotes subscription from auser account” on page 259
v “Deleting a user account”on page 261
v “Removing theSmartCloud Notes data fora deleted user account orsubscription” on page 264
Adding and managinggroups
On-premises See the topic about usinggroups in the Dominodocumentation.
Changing the Notes namesof service users
On-premises and throughhttp://www.ibmcloud.com/social
“Changing a Notes username” on page 255
Configuring policies On-premises, with a fewrestrictions
“Creating policies for serviceusers” on page 105
8 SmartCloud Notes: Administering SmartCloud Notes: Hybrid Environment March 2015
Table 1. Tasks to administer service users in a hybrid environment (continued)
Task Where task is performed Additional information
Managing Notes IDpasswords.
On-premises through policiesand throughhttp://www.ibmcloud.com/social
v “Resetting passwords forNotes IDs” on page 125
v “Creating policies forservice users” on page 105
v “Setting passwordexpiration for Notes IDs”on page 126
Selecting mail file templatesfor mail files
http://www.ibmcloud.com/social
“Configuring mail filetemplates” on page 164
Configuring service-specificmail settings
http://www.ibmcloud.com/social
v “Configuring mailsettings” on page 154
v “Specifying an SMTPserver to route mail to theInternet” on page 160
Configuring IMAP access http://www.ibmcloud.com/social
“Configuring IMAP access”on page 178
Configuring instantmessaging
http://www.ibmcloud.com/social
“Configuring instantmessaging” on page 171
Managing mobile devices if aNotes Traveler for Notessubscription is purchased
http://www.ibmcloud.com/social
v “Managing IBM NotesTraveler devices” on page272
v “Creating policies forservice users” on page 105
Managing BlackBerry®
smartphones if a SmartCloudNotes for HostedBlackBerry® Servicessubscription is purchased.
http://www.ibmcloud.com/social
“Managing IBM NotesTraveler devices” on page272
Configuring mail archivingto allow email retrieval forlegal purposes if an IBMConnections ArchiveEssentials Cloud subscriptionis purchased
http://www.ibmcloud.com/social
Using Connections ArchiveEssentials
Related tasks:Chapter 4, “Configuring the service,” on page 83After you have prepared your on-premises environment, configure the service towork with your environment.“Completing the configuration” on page 100After you have completed the account setup for your organization, perform thetasks in this section to complete the configuration.
SmartCloud Notes clientsIBM SmartCloud Notes clients provide mail, personal Information Managementfeatures such as calendars, contacts, and to do lists, and with some clients,integrated collaboration features, such as embedded chat.
Chapter 1. Overview of SmartCloud Notes 9
Web clientThe IBM SmartCloud Notes web client provides access to mail servers through abrowser.
The web client is a hosted mail client; there is no client for users to install. Userssimply log on to http://www.ibmcloud.com/social using their service login emailaddress and password. The service authenticates the client and then the client isredirected to the mail file in the service. User can access the web client in either ofthese ways:v On a computer -- after logging on, users click Mail.v On a mobile device -- users point the browser on the device to the service, and
then log on to the ultra-light mode.
Users need a subscription for either SmartCloud Notes or SmartCloud Notes Entryto use the web client. Each subscription provides a full mail client with mail,calendar, and contacts, as well as to do and notebook applications. Eachsubscription provides access to the service through either full or ultra-light mode.v Full mode -- The full mode offers the widest range of features including mail,
contacts, calendar and scheduling, as well as notebook and to do tasks.v Ultra-light mode -- The ultra-light mode is available at no extra cost on a mobile
device, and on a personal computer. There is no additional setup or client installon the mobile device required. Users simply point their device browser tohttps://www.collabserv.com to access their mail. The ultra-light mode supportsAndroid, as well as Apple iPhone, iPod Touch, and iPad devices. See the clientrequirements for details on the supported levels of device operating systems.
Decide which web client subscription best fits your needs. The SmartCloud NotesEntry subscription includes many of the same features that are available with thestandard SmartCloud Notes subscription, but with the following limitations:v Users are provisioned with a new mail file. There is no data migration of an
existing mail file.v Users cannot access mail using either the Notes client or an IMAP client.v Users cannot access mail using Blackberry smartphones.v User mail files have a 1 GB quota.
For a list of browsers supported for use with the web client, see the clientrequirements.Related tasks:“Preparing for the web client” on page 193Before you provision users who will access IBM SmartCloud Notes using the webclient, prepare for the web client.Related information:
SmartCloud Notes client requirements
Using the web client
Traveler devicesA Notes Traveler subscription supports Apple, Android, Windows Phone andWindows Tablets, Windows Mobile, and BlackBerry® 10 devices.
See the device requirements for details on the supported levels of device operatingsystems. To get started, users perform simple steps to install and configure Notes
10 SmartCloud Notes: Administering SmartCloud Notes: Hybrid Environment March 2015
Traveler on their devices using the installation and configuration information in theSmartCloud Notes product documentation for their specific device.Related tasks:“Preparing for Notes Traveler devices” on page 195Before enabling users to use IBM Notes Traveler mobile devices with the service,prepare your environment and the devices.Related information:
Notes Traveler device requirements
Using Notes Traveler
Notes clientUse of the IBM Notes to connect to the service is optional. A IBM SmartCloudNotes subscription entitles you to the Notes client license.
Users who access mail by using a Notes client can take advantage of the manycollaboration features that are available through the client. As with the web client,the Notes client provides mail, calendar, and contacts, as well as to do andnotebook applications. You can manage your Inbox using full-text search,delegation, mail filtering and sorting, conversation views, and flags.
The following features and applications are also available to you when you use theNotes client.v Activities - Beginning with Notes 8.5.2, if your organization has a collaboration
subscription, then the sidebar is automatically configured to access Activities inthe service without further authentication.
v IBM Sametime - Use the embedded Sametime client to manage instantmessaging contacts and initiate chats.
v RSS feeds - Subscribe to RSS feeds that display in the sidebar.v Widgets - Add widgets to the sidebar. Widgets are available only in hybrid
environments in which they are deployed through company servers.v Create and manage IBM Notes applications - Using Notes templates, create and
manage Notes applications, such as teamrooms, or discussion databases. Notesapplications on servers are only available through on-premises company servers.
Keep the following in mind if your users will use the Notes client:v SmartCloud Notes supports only the standard configuration of Notes, and not
the basic configuration.v You should decide which supported version of the client to use in your
environment. See the SmartCloud Notes client requirements for information onsupported versions.
Related tasks:“Preparing for Notes clients” on page 196Use of the IBM Notes client to connect to the service is optional. If you want yourusers to use the Notes client, understand the steps to prepare.Related information:
SmartCloud Notes client requirements
Using Notes
Chapter 1. Overview of SmartCloud Notes 11
IMAP clientIf you enable IMAP access, users can configure third-party email clients to accessmail in the service.
The following IMAP clients are supported:v Apple emailv Microsoft Outlook 2003, 2007v Thunderbird
There is no additional charge or subscription required to use IMAP clients.Related tasks:“Preparing for IMAP clients” on page 202If you plan to use IMAP clients, complete these tasks to prepare.
BlackBerry devices with a Hosted BlackBerry Servicessubscription
If your company has an IBM SmartCloud Notes for Hosted BlackBerry® Servicessubscription, users can use BlackBerry® smartphones to access mail and personalinformation management features.
IBM administrators set up and maintain BlackBerry Enterprise Servers for you onsites that they manage. The Blackberry subscription provides the followingfeatures:v Mail, Calendar, Task, To Do, and Contact applicationsv Corporate directory lookupv Smartphone management through http://www.ibmcloud.com/social.
This subscription does not support BlackBerry® 10 devices. Those devices aresupported by IBM Notes Traveler.Related tasks:“Preparing to use BlackBerry devices” on page 203If you plan to use BlackBerry devices that are supported by a Hosted BlackBerryServices subscription, complete these tasks to prepare.
Feature differences between Notes and Domino and the SmartCloudNotes service
Some features in IBM Notes, IBM iNotes®, and IBM Domino are unavailable orhave limitations within the IBM SmartCloud Notes service.
For an explanation of the differences, see the following article in the IBMConnections Cloud wiki: Feature differences between Notes and Domino and theSmartCloud Notes service.
12 SmartCloud Notes: Administering SmartCloud Notes: Hybrid Environment March 2015
Frequently asked questions about administering the serviceThe following table provides answers to questions frequently asked about the tasksthat company administrators perform in a IBM SmartCloud Notes environment.
Table 2. Frequently asked questions about administering SmartCloud Notes
Question Answer
Do company administrators have access touser mail files?
By default, administrators do not haveaccess to user mail files. However, new userscan be provisioned with mail files that havecustomized access control lists (ACLs). Inaddition, the mail delegation feature can beused to delegate management of a mail fileto an administrator or to a group ofadministrators. For more information, see“Preparing customized mail file ACLs” onpage 168 and “Mail file delegation” on page208.
Do mail files have a size limit? Currently a size limit (quota) of 25 GB isenforced on most mail files. An exception isthe mail files of SmartCloud Notes Entryusers, whose mail files have a 1 GB limit.
For more information, see “Mail file quota”on page 207.
What options are available for managingmail file size?
Company administrators can manage thesize of mail files by setting limits on the sizeof incoming messages. Additionally, they canspecify how long mail remains in mail filesby enabling automatic mail deletion forolder mail. For more information, see“Configuring mail settings” on page 154.
Can we use a customized mail file template? Yes, company administrators can apply acustomized template to user mail files. Thisis done through SmartCloud NotesAdministration. The template must meetspecific design requirements. Arepresentative of IBM Software Services forCollaboration must approve it as part of ashort consulting services engagement. Formore information, see “Preparing to usecustom mail file templates” on page 161.
Chapter 1. Overview of SmartCloud Notes 13

Table 2. Frequently asked questions about administering SmartCloud Notes (continued)
Question Answer
Can users create local replicas of their mailfiles?
In a hybrid environment, administrators canprovide local access by using policies toenable the managed mail replica feature.This feature creates automatically a localcached version of user mail files. For moreinformation, see “Using Desktop Settings toconfigure managed mail replicas” on page120.
Although managed mail replicas arerecommended, as an alternative, users cancreate local replicas of their mail files andschedule replication between the localreplicas and the server replicas. For moreinformation about creating local replicas, seeGetting started with replication in the Notesdocumentation.
Are company administrators responsible formail database maintenance?
No, compacting and other mail databasemaintenance tasks are handled within theservice for you.
In a hybrid environment, do companyadministrators manage service users throughan on-premises IBM Domino Administratorclient and on-premises Domino servers?
Yes, the tasks to administer service usersand on-premises users primarily are thesame. Some differences are:
v You must use explicit policies whenapplying policy settings to service users;
v The ID vault tool in the DominoAdministrator is not used to manage theNotes ID files of service users;
v some administration tasks, for example,Notes ID file password resets, are donethrough the SmartCloud NotesAdministration, which is accessed throughthe IBM Connections Cloud website athttp://www.ibmcloud.com/social.
For more information, see Chapter 7,“Administering user accounts,” on page 243.
How does a company administrator changea user's Notes name?
In a hybrid environment, companyadministrators change the Notes name in theon-premises Domino directory using theDomino Administrator client, as they do foron-premises users. The name changereplicates to the service during directorysynchronization. To change a user's serviceweb login name, company administratorsedit the user account in the service.
For more information, see “Changing aNotes user name” on page 255.
14 SmartCloud Notes: Administering SmartCloud Notes: Hybrid Environment March 2015

Table 2. Frequently asked questions about administering SmartCloud Notes (continued)
Question Answer
How do I reset a user's password? There are two passwords. One is the servicelogin password that is used to log on to theIBM Connections Cloud website athttp://www.ibmcloud.com/social. Another isthe Notes ID password used to log in tomail servers through Notes. Reset the servicelogin password through the service useraccount. Reset the Notes ID passwordthrough the SmartCloud NotesAdministration. For more information, see“Resetting service login passwords” on page124 and “Resetting passwords for NotesIDs” on page 125
Information resourcesThe following information resources are available for IBM SmartCloud Notes. Besure to use these resources to keep up-to-date on technical content, known issues,and product news.
Table 3. Information resources for SmartCloud Notes
Resource Description
IBM Connections Cloud wiki The wiki provides the following information:
v Known issues and troubleshootinginformation
v Getting started information
v Technical articles by IBM employees andother community members
v Links to other resources such ascourseware and multi-media content
SmartCloud Notes known issues This wiki article links to a comprehensive listof SmartCloud Notes technotes on theSupport site. These technotes describe knownissues and workarounds. The article alsolinks to technotes about the Notes client.
SmartCloud Notes Fix List This page shows a chronological list of fixesmade to the SmartCloud Notes service.
SmartCloud Notes Support newsletter This newsletter highlights importanttechnotes and new technical articles andcourseware. To receive automatic notificationwhen a new edition of this newsletter isavailable, add SmartCloud Notes to your������My Notifications subscription������and include the “Product information andpublications” document type in yoursubscription.������
Chapter 1. Overview of SmartCloud Notes 15
Table 3. Information resources for SmartCloud Notes (continued)
Resource Description
My Notifications from SmartCloud NotesSupport
My Notifications enables you to receive dailyor weekly announcements through e-mail,custom Web pages and RSS feeds. Thesecustomizable communications can containimportant news, new or updated supportcontent, such as publications, hints and tips,technical notes, product flashes (alerts).
Support page Click Support > Technical Support from thispage for information about how to contactSmartCloud Notes Support.
16 SmartCloud Notes: Administering SmartCloud Notes: Hybrid Environment March 2015
Chapter 2. Planning to deploy the service
To plan for the IBM SmartCloud Notes service, understand the features it offers,the deployment options that are available, and the planning considerations.
Planning securityBefore you prepare your environment for the service, make decisions aboutimplementing security in the service by answering questions described in thistopic.
About this task
Table 4. Security questions
Question Considerations
Will you use federated identitymanagement?
Federated identity management allows userswho are logged on to your company systemto use the service without logging on again.To enable federated identity management,you register your organization as a trustedidentity provider in the IBM ConnectionsCloud service. Before you register, you mustimplement and test a federated identitymanagement system that uses SecurityAssertion Markup Language (SAML). Whileyou are implementing your system, youmust make some choices and prepareseveral artifacts.
For more information about this option andother login options, see “Configuring logins”on page 124.
© Copyright IBM Corp. 2011 17
Table 4. Security questions (continued)
Question Considerations
Do your company top-level organizationcertifiers comply with service requirements?
There are some restrictions on organizationcertifier names. Your organization certifiersmust be different from certifiers used byother companies in the service. In addition,specific organization certifier names areprohibited for use with the service.
If you use more than one organizationcertifier, decide which one to use for thefollowing servers. All of these servers mustbe certified under the same organizationcertifier.
v Passthru servers that the service uses toconnect to your environment
v Directory synchronization servers andmail hub servers in the on-premises hubdomain
v Your mail servers in the service, which arecreated for you in the service using theOU certifier that you provide
If there will be service users who arecertified under a different organizationcertifier than the one used for these servers,you must create cross-certificates to establishtrust between the two certifiers. Thecross-certificates must be in a Dominodirectory that is synchronized with theservice so that they replicate to the service.The cross-certificates allow the users toaccess their mail servers.
For more information, see “Certifierrequirements in a hybrid environment” onpage 37.
What decisions do you need to make aboutthe OU certifier to use for your mail servers?
Decide on a name for the OU certifier. Ashort name is best. Consider carefully thename you choose; after you upload the OUcertifier ID file to the service during serviceconfiguration, you cannot change to acertifier of a different name.
Decide who will create the OU certifier andwho will upload the certifier ID file to theservice. Uploading the ID file to the servicerequires physical access to the ID file.Companies often allow only specific peopleto create certifiers and to access certifier IDfiles, so account for this possibility in yourplanning.
18 SmartCloud Notes: Administering SmartCloud Notes: Hybrid Environment March 2015
Table 4. Security questions (continued)
Question Considerations
Is public key checking enabled onon-premises servers that the service willconnect to?
If public key checking is enabled on thefollowing servers, it must be disabled.
v Passthru servers that the service uses toconnect to your environment
v Directory synchronization servers andmail hub servers in the on-premises hubdomain
What firewall changes are required? Your firewall must be opened to specificports and host names. For more information,see “Planning network connections.”
Planning network connectionsBefore preparing your environment, answer questions described in this topic tohelp you make decisions related to network connectivity with the service.
About this task
Table 5. Network planning questions
Question Considerations
What process does your company use tomake network changes?
Your company might have a review andapproval process for making the networkchanges required by the service. Ensure thatyou understand the process and allow timeto implement the required changes.
Does your network have sufficientbandwidth and Internet connectivity?
Clients and servers that connect to theservice are likely to increase the amount ofnetwork traffic to the Internet and alsochange the load on particular parts of yournetwork.
It is important to assess whether yourcurrent network has sufficient bandwidthand Internet connectivity to handle thesechanges. You may need to work with yourInternet Service Provider to increase networkbandwidth before you provision users forthe service.
For information, see the topics aboutnetwork capacity for the web and IBMNotes clients.
What firewall changes are required? Port 1352 must be opened for inboundconnections. Ports 1352 and 443 must beopened for outbound connections. Youmight need to open additional ports,depending on which features you use withthe service. For complete information, seethe topics “Configuring the firewall forinbound connections” on page 41 and“Configuring the firewall for outboundconnections” on page 42.
Chapter 2. Planning to deploy the service 19
Table 5. Network planning questions (continued)
Question Considerations
Do you use a forward proxy to control useraccess to the Internet?
If so, you must allow network traffic to passtransparently through the proxy over ports1352 (NRPC) and 443 (HTTPS).
Which servers will function as youron-premises passthru servers?
All connections from the service to youron-premises environment occur through oneor two on-premises Domino passthruservers. For security reasons, these serversmust be set up in a unique Domino domain.Putting them in a network demilitarizedzone (DMZ) between an inner and outerfirewall is recommended. For moreinformation, see “Preparing passthruservers” on page 40
Related tasks:“Preparing your network” on page 40Prepare your network for connections between IBM SmartCloud Notes servers andon-premises servers. Configure inner and outer firewalls. Then set up a dedicatedIBM Domino domain between the firewalls. The domain will function as apassthru server domain through which connections from SmartCloud Notesservers to your on-premises servers occur.
Network capacity for the web clientBefore using the web client, have an understanding of the approximate networkcapacity that your Internet Service Provider will need to provide to supportconnections from the web clients to the service.
Use the following formula as a general guideline only:number_of_clients x 2.5 Kbps
where number_of_clients is the expected number of web clients and 2.5 Kbps is theaverage network kilobits per second required for each client to connect to theservice.
This formula assumes an average level of client activity based on IBM Dominomail benchmarks for server-based mail files. Your actual network capacityrequirements will depend on the client usage patterns in your environment.
Network capacity for the Notes clientBefore configuring Notes clients to connect to the service, have an understandingof the approximate network capacity that your Internet Service Provider mustprovide to support those connections.
Use the following formula as a general guideline only:number_of_clients x 3.1 Kbps
where number_of_clients is the number of Notes clients used and 3.1 Kbps is theaverage network kilobits per second required for each client.
This formula assumes an average level of client activity based on IBM Dominomail benchmarks for server-based mail files. Your actual network capacityrequirements will depend on the client usage patterns in your environment.
20 SmartCloud Notes: Administering SmartCloud Notes: Hybrid Environment March 2015
Planning directory servicesBefore preparing your environment, answer questions described in this topic tohelp you make decisions about directory services.
About this task
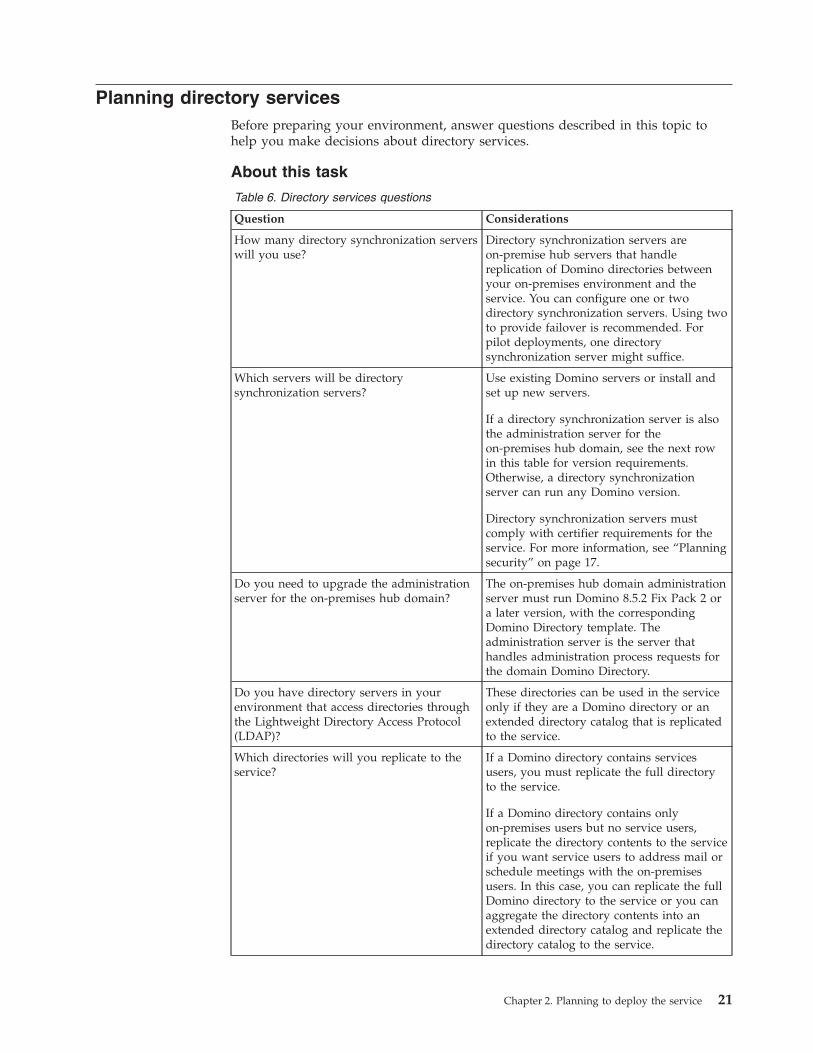
Table 6. Directory services questions
Question Considerations
How many directory synchronization serverswill you use?
Directory synchronization servers areon-premise hub servers that handlereplication of Domino directories betweenyour on-premises environment and theservice. You can configure one or twodirectory synchronization servers. Using twoto provide failover is recommended. Forpilot deployments, one directorysynchronization server might suffice.
Which servers will be directorysynchronization servers?
Use existing Domino servers or install andset up new servers.
If a directory synchronization server is alsothe administration server for theon-premises hub domain, see the next rowin this table for version requirements.Otherwise, a directory synchronizationserver can run any Domino version.
Directory synchronization servers mustcomply with certifier requirements for theservice. For more information, see “Planningsecurity” on page 17.
Do you need to upgrade the administrationserver for the on-premises hub domain?
The on-premises hub domain administrationserver must run Domino 8.5.2 Fix Pack 2 ora later version, with the correspondingDomino Directory template. Theadministration server is the server thathandles administration process requests forthe domain Domino Directory.
Do you have directory servers in yourenvironment that access directories throughthe Lightweight Directory Access Protocol(LDAP)?
These directories can be used in the serviceonly if they are a Domino directory or anextended directory catalog that is replicatedto the service.
Which directories will you replicate to theservice?
If a Domino directory contains servicesusers, you must replicate the full directoryto the service.
If a Domino directory contains onlyon-premises users but no service users,replicate the directory contents to the serviceif you want service users to address mail orschedule meetings with the on-premisesusers. In this case, you can replicate the fullDomino directory to the service or you canaggregate the directory contents into anextended directory catalog and replicate thedirectory catalog to the service.
Chapter 2. Planning to deploy the service 21
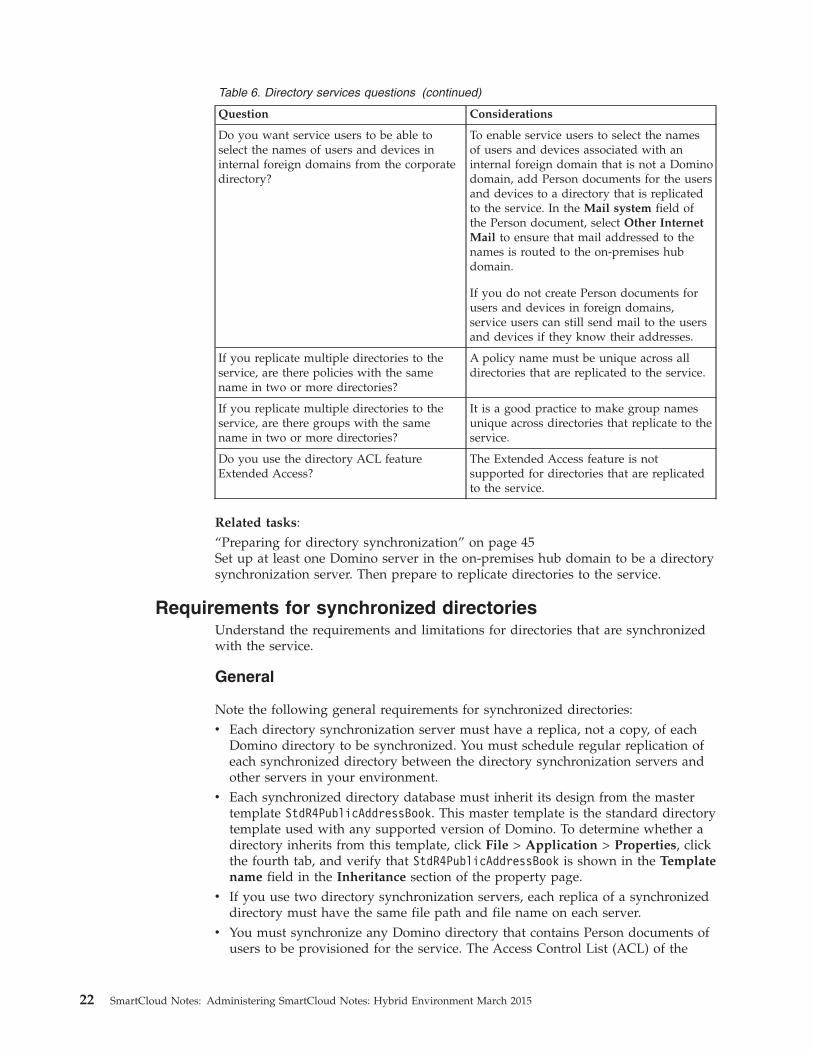
Table 6. Directory services questions (continued)
Question Considerations
Do you want service users to be able toselect the names of users and devices ininternal foreign domains from the corporatedirectory?
To enable service users to select the namesof users and devices associated with aninternal foreign domain that is not a Dominodomain, add Person documents for the usersand devices to a directory that is replicatedto the service. In the Mail system field ofthe Person document, select Other InternetMail to ensure that mail addressed to thenames is routed to the on-premises hubdomain.
If you do not create Person documents forusers and devices in foreign domains,service users can still send mail to the usersand devices if they know their addresses.
If you replicate multiple directories to theservice, are there policies with the samename in two or more directories?
A policy name must be unique across alldirectories that are replicated to the service.
If you replicate multiple directories to theservice, are there groups with the samename in two or more directories?
It is a good practice to make group namesunique across directories that replicate to theservice.
Do you use the directory ACL featureExtended Access?
The Extended Access feature is notsupported for directories that are replicatedto the service.
Related tasks:“Preparing for directory synchronization” on page 45Set up at least one Domino server in the on-premises hub domain to be a directorysynchronization server. Then prepare to replicate directories to the service.
Requirements for synchronized directoriesUnderstand the requirements and limitations for directories that are synchronizedwith the service.
General
Note the following general requirements for synchronized directories:v Each directory synchronization server must have a replica, not a copy, of each
Domino directory to be synchronized. You must schedule regular replication ofeach synchronized directory between the directory synchronization servers andother servers in your environment.
v Each synchronized directory database must inherit its design from the mastertemplate StdR4PublicAddressBook. This master template is the standard directorytemplate used with any supported version of Domino. To determine whether adirectory inherits from this template, click File > Application > Properties, clickthe fourth tab, and verify that StdR4PublicAddressBook is shown in the Templatename field in the Inheritance section of the property page.
v If you use two directory synchronization servers, each replica of a synchronizeddirectory must have the same file path and file name on each server.
v You must synchronize any Domino directory that contains Person documents ofusers to be provisioned for the service. The Access Control List (ACL) of the
22 SmartCloud Notes: Administering SmartCloud Notes: Hybrid Environment March 2015
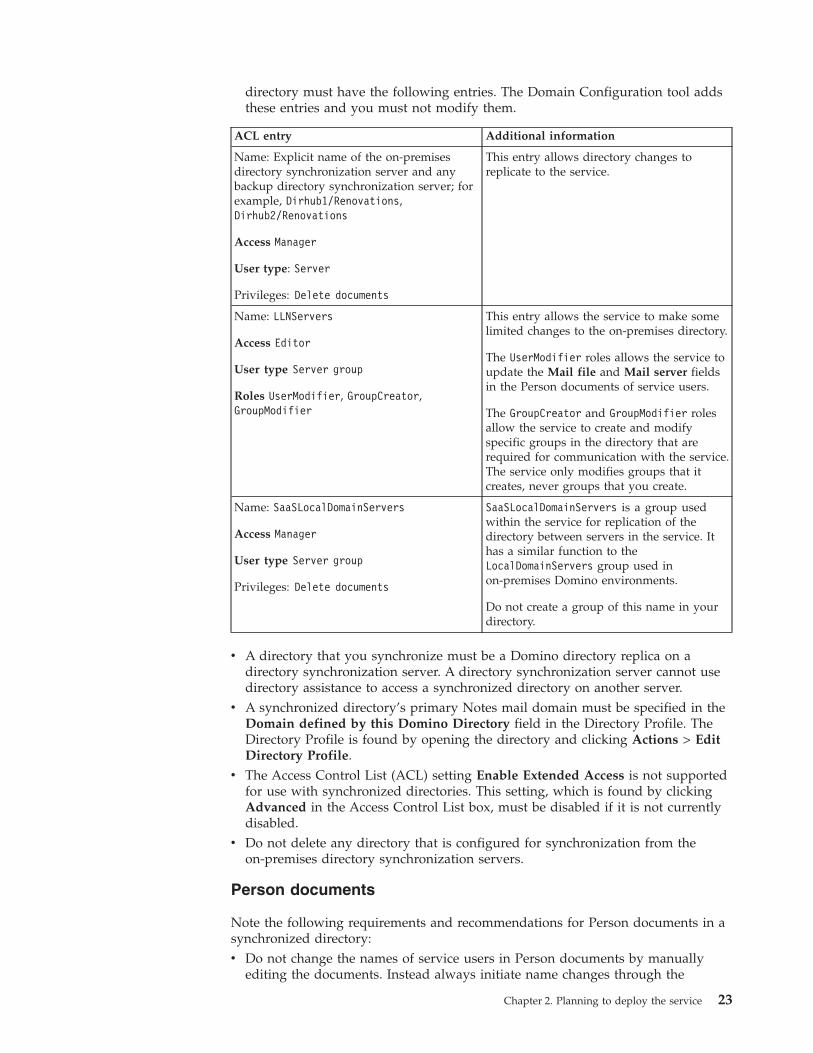
directory must have the following entries. The Domain Configuration tool addsthese entries and you must not modify them.
ACL entry Additional information
Name: Explicit name of the on-premisesdirectory synchronization server and anybackup directory synchronization server; forexample, Dirhub1/Renovations,Dirhub2/Renovations
Access Manager
User type: Server
Privileges: Delete documents
This entry allows directory changes toreplicate to the service.
Name: LLNServers
Access Editor
User type Server group
Roles UserModifier, GroupCreator,GroupModifier
This entry allows the service to make somelimited changes to the on-premises directory.
The UserModifier roles allows the service toupdate the Mail file and Mail server fieldsin the Person documents of service users.
The GroupCreator and GroupModifier rolesallow the service to create and modifyspecific groups in the directory that arerequired for communication with the service.The service only modifies groups that itcreates, never groups that you create.
Name: SaaSLocalDomainServers
Access Manager
User type Server group
Privileges: Delete documents
SaaSLocalDomainServers is a group usedwithin the service for replication of thedirectory between servers in the service. Ithas a similar function to theLocalDomainServers group used inon-premises Domino environments.
Do not create a group of this name in yourdirectory.
v A directory that you synchronize must be a Domino directory replica on adirectory synchronization server. A directory synchronization server cannot usedirectory assistance to access a synchronized directory on another server.
v A synchronized directory’s primary Notes mail domain must be specified in theDomain defined by this Domino Directory field in the Directory Profile. TheDirectory Profile is found by opening the directory and clicking Actions > EditDirectory Profile.
v The Access Control List (ACL) setting Enable Extended Access is not supportedfor use with synchronized directories. This setting, which is found by clickingAdvanced in the Access Control List box, must be disabled if it is not currentlydisabled.
v Do not delete any directory that is configured for synchronization from theon-premises directory synchronization servers.
Person documents
Note the following requirements and recommendations for Person documents in asynchronized directory:v Do not change the names of service users in Person documents by manually
editing the documents. Instead always initiate name changes through the
Chapter 2. Planning to deploy the service 23
Domino Administrator client. When the Domino Administrator client is used,the Administration Process can then make the changes throughout yourenvironment including replicating the change to your on-premises directorysynchronization servers.
v A SmartCloud Notes user does not require a first name if provisioned throughthe SmartCloud Notes Administration interface. If a user is registeredon-premises with a last name only, that one name will be correctly displayed inthe SmartCloud Notes directory and in the mail file after user provisioning. Inthe Connections Cloud account settings and user accounts however, the lastname is also used as the first name. For example, if you register a user with thelast name HelpDesk, when you log on to the service as an administrator andclick User Accounts, the user’s name is HelpDesk HelpDesk.
Note: A user requires both a first name and last name if provisioned throughthe Connections Cloud integration server.
v The first two values in the FullName field (labeled User name) can only be astandard Notes hierarchical or flat name. For example, Samantha Daryn andSamantha Daryn/Renovations are allowed but not [email protected].
v The Internet address field in the Person documents of service users mustcontain a full valid Internet address for a domain that has been verified by theservice. An example of an Internet address is [email protected].
v The Short name/UserID field can also contain a valid Internet address for adomain that has been verified by the service. You cannot specify an Internetaddress in this field during user registration. You can add an Internet address tothis field after user registration is complete. If you do, add it as a secondaryentry in the Short name/UserID field; do not add the Internet address as thefirst entry in this field.
v You can add Person documents for external users at another company to asynchronized Domino directory. Then service users within your company canuse type-ahead and other addressing features to address mail to the externalusers. You can add Person documents for these external users in any way thatyou want. However, service users within your company must always havePerson documents created through the normal Domino Administrator client userregistration.
v Set the field Format preference for incoming mail to Keep in sender’s formatfor best performance and message fidelity.
Group documents
Note the following information about groups:v Do not use the following names for groups that you create. These names are
reserved for the service.– LLNServers
– LLNMailHubs
– Names that begin with Certifiers_ or SAAS
v Do not delete or edit the following groups. These are created and maintained bythe service.– LLNServers
– LLNMailHubs
24 SmartCloud Notes: Administering SmartCloud Notes: Hybrid Environment March 2015
Multiple directories
If you synchronize multiple directories, they are combined into a single directoryon servers in the service. As a result, keep in mind the following requirements andrecommendations:v Each policy name must be unique across directories. If two policies have the
same name, the service uses one only, which can cause unexpected, incorrectresults.
v It is a good practice to make group names unique across synchronizeddirectories. Unique group names are important for security if groups are used inthe ACLs of mail files being transferred to the service. If a name that matchestwo customer-created groups is used in a mail file ACL, the ACL determinesaccess for members of both groups. If there are mail groups that have the samename, users must choose which one to use each time they send mail to thegroup name. Using unique group names avoids this step.
v If you use Resource Reservations as part of calendar scheduling, it is best, butnot required, to make site names unique across Domino domains. If two siteshave the same name, the service lists resources from both sites under one sitename. This situation can lead users to reserve resources at the wrong site. SeeTechnote 1473022 for instructions on making site names unique.
Extended Directory Catalog
Using an extended directory catalog (EDC) in the service in which multipledirectories are aggregated is optional. Note the following important points aboutEDC use:v The content of the following directory fields must be aggregated into the
directory catalog:– FirstName– MiddleInitial– LastName– Location– MailAddress– Shortname– MailDomain– InternetAddress– MessageStorage– Members– AltFullName– AltFullNameLanguage– GroupTypeTo support resource reservations, Mail-in Database documents and the followingfields must also be aggregated– ResourceFlag– ResourceType– ResourceCapacity
v Aggregate all the directories to be used by the service in the EDC, including thedirectories in which service users are registered.
v Only Person, Group, and Mail-in Database documents in an EDC replicate to theservice. To replicate Policy, Policy Settings, Certifier, Cross-certificate, or Domain
Chapter 2. Planning to deploy the service 25
documents to the service, the documents must be in a full Domino directory thatis synchronized with the service and used for provisioning.
v The service has read-only access to an EDC and does not change theon-premises EDC replica during directory synchronization. Any users to beprovisioned for the service must therefore have Person documents in anindividual Domino directory that the service can update.
v The primary Domino directory of your directory synchronization servers cannotbe configured as an EDC. If the primary directory is currently configured thisway, you must remove the EDC configuration from it before configuring yourenvironment to connect to the service. To do so, open the directory, go to theConfiguration > Directory > Extended Directory Catalog view, and delete allthe documents from the view. Then build the EDC in a separate database.
Related tasks:“Downloading and running the Domain Configuration tool” on page 94The Domain Configuration tool configures your on-premises servers to connect toyour hosted IBM SmartCloud Notes servers. The server configuration informationthat you provide in the Account Settings of SmartCloud Notes Administration isthe data that is used to configure the connections.Related information:
Technote 1473022
How directory synchronization worksA server in the service connects regularly to an on-premises directorysynchronization server to replicate on-premises directories.
To provide failover, you can set up two directory synchronization servers in theon-premises hub domain. When you configure the service, you configure one asthe primary directory server and the other as the optional secondary directoryserver. After the service replicates successfully with the primary directory server, itcontinues to use that server as long as it is available. If the server becomesunavailable, the service attempts to replicate with the optional secondary directoryserver. When the primary directory server becomes available, the service switchesback to it.
The frequency of replication varies, depending on server load. The service alwaysinitiates the replication.
When you configure directory synchronization in IBM SmartCloud NotesAdministration, you specify whether a directory is used for provisioning. Adirectory that is used for provisioning is a full Domino directory in which serviceusers are registered on-premises. When the service replicates a directory that isdesignated as used for provisioning, it pulls on-premises information from aspecific set of documents. The service can also push information to the on-premisesdirectory. For example, it pushes the service users' mail server and mail file namesto the on-premises Person documents.
You can select the option Do not use this Domino Directory for user provisioningwhen you configure a directory in SmartCloud Notes Administration. In this case,the service pulls the contents of Person, Group, and Mail-in Database documentsfrom the on-premises directory, but never pushes changes to the directory. AnExtended Directory Catalog is an example of a directory that is not used forprovisioning.
26 SmartCloud Notes: Administering SmartCloud Notes: Hybrid Environment March 2015
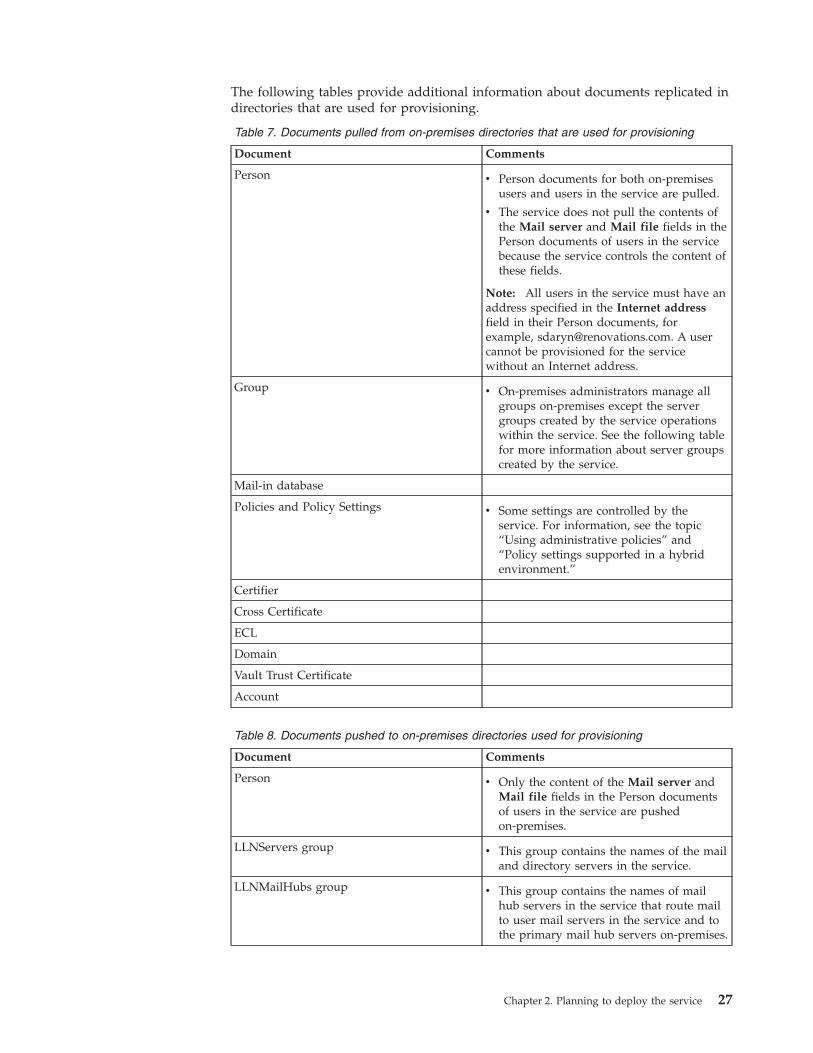
The following tables provide additional information about documents replicated indirectories that are used for provisioning.
Table 7. Documents pulled from on-premises directories that are used for provisioning
Document Comments
Person v Person documents for both on-premisesusers and users in the service are pulled.
v The service does not pull the contents ofthe Mail server and Mail file fields in thePerson documents of users in the servicebecause the service controls the content ofthese fields.
Note: All users in the service must have anaddress specified in the Internet addressfield in their Person documents, forexample, [email protected]. A usercannot be provisioned for the servicewithout an Internet address.
Group v On-premises administrators manage allgroups on-premises except the servergroups created by the service operationswithin the service. See the following tablefor more information about server groupscreated by the service.
Mail-in database
Policies and Policy Settings v Some settings are controlled by theservice. For information, see the topic“Using administrative policies” and“Policy settings supported in a hybridenvironment.”
Certifier
Cross Certificate
ECL
Domain
Vault Trust Certificate
Account
Table 8. Documents pushed to on-premises directories used for provisioning
Document Comments
Person v Only the content of the Mail server andMail file fields in the Person documentsof users in the service are pushedon-premises.
LLNServers group v This group contains the names of the mailand directory servers in the service.
LLNMailHubs group v This group contains the names of mailhub servers in the service that route mailto user mail servers in the service and tothe primary mail hub servers on-premises.
Chapter 2. Planning to deploy the service 27

Table 8. Documents pushed to on-premises directories used for provisioning (continued)
Document Comments
CustomerMailHubs group v This group contains the names of theprimary mail hub servers on-premises.
v If you change a mail hub server, do notedit this group. Instead, change the serverthrough the Account Settings > MailRouting Server administration page. Thendownload and run the DomainConfiguration Tool to update youron-premises configuration.
Vault v This is the document for the ID vault onthe ID vault server in the service. The IDvault is used for ID backup and recovery.
The initial directory synchronization also creates Connection documents in thedirectory of your primary mail hub servers to enable the servers to route mail tomail servers in the service. The Connection documents are not replicated to theservice.
How the service resolves duplicate Person documentsThe service can encounter duplicate Person documents within or acrosssynchronized directories. In this case, the service picks one to be the authoritativeversion.
To determine whether two Person documents are duplicates, the service firstcompares their unique identifier (UNID) values. If their UNID values are the samethe service treats the documents as duplicates. If their UNID values are not thesame but the distinguished name values are the same, the service also treats thedocuments as duplicates.
When duplicate Person documents are found, the service chooses one to be theauthoritative document to use in the service. If a duplicate Person documentoccurs between an extended directory catalog (EDC) and a Domino directory, theservice uses the document in the Domino directory. If the EDC document replicatesto the service first, it is the temporary authoritative version. The Domino directorydocument becomes the authoritative version when it replicates to the service.
If a duplicate Person document occurs within or across Domino directories, theservice chooses the Person document with a Domain field value that matches thedomain in the Directory Profile of its directory. If the Domain field in eachdocument matches its Directory Profile domain, the service uses the first Persondocument that it encounters.
Note: If you aggregate Person documents that contain identical distinguishednames into an EDC, the service uses only the first one it encounters. Thereforeeach Person document in an EDC that represents a distinct user should have aunique distinguished name. Select Yes for the Remove duplicate users setting toprevent the aggregation of duplicate user names into an EDC. For moreinformation, see the topic in the Domino documentation about removing duplicateuser entries from a directory catalog.Related information:
28 SmartCloud Notes: Administering SmartCloud Notes: Hybrid Environment March 2015
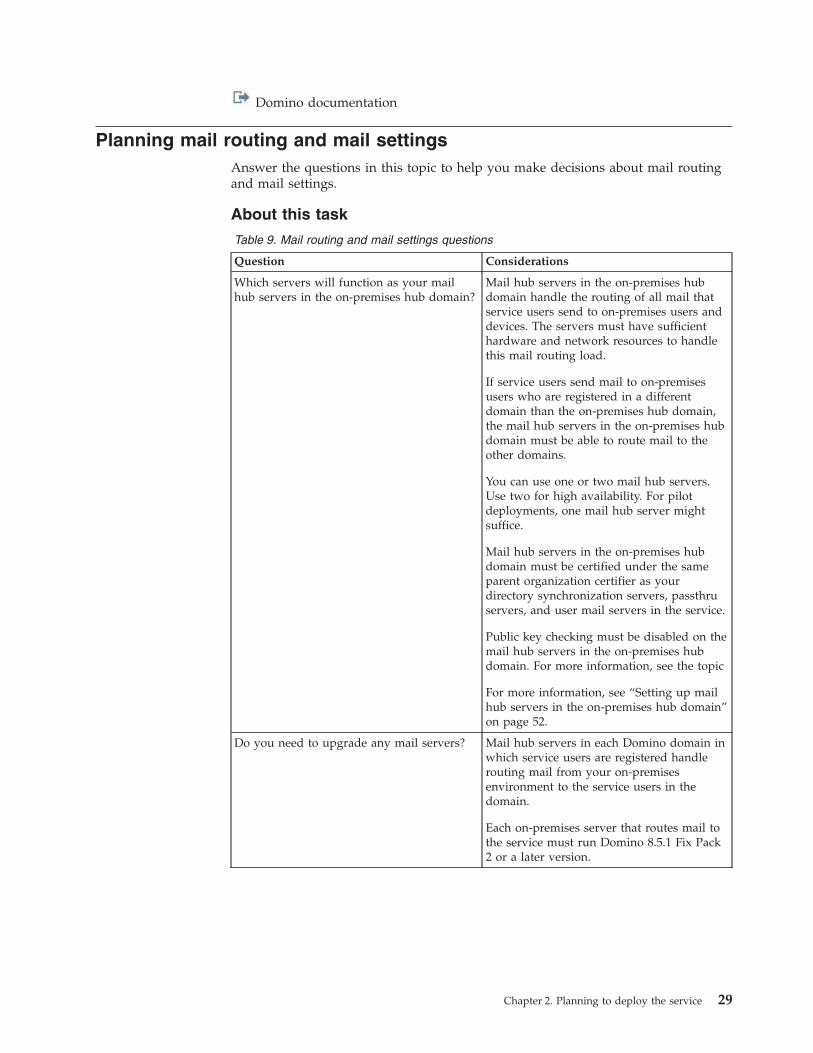
Domino documentation
Planning mail routing and mail settingsAnswer the questions in this topic to help you make decisions about mail routingand mail settings.
About this task
Table 9. Mail routing and mail settings questions
Question Considerations
Which servers will function as your mailhub servers in the on-premises hub domain?
Mail hub servers in the on-premises hubdomain handle the routing of all mail thatservice users send to on-premises users anddevices. The servers must have sufficienthardware and network resources to handlethis mail routing load.
If service users send mail to on-premisesusers who are registered in a differentdomain than the on-premises hub domain,the mail hub servers in the on-premises hubdomain must be able to route mail to theother domains.
You can use one or two mail hub servers.Use two for high availability. For pilotdeployments, one mail hub server mightsuffice.
Mail hub servers in the on-premises hubdomain must be certified under the sameparent organization certifier as yourdirectory synchronization servers, passthruservers, and user mail servers in the service.
Public key checking must be disabled on themail hub servers in the on-premises hubdomain. For more information, see the topic
For more information, see “Setting up mailhub servers in the on-premises hub domain”on page 52.
Do you need to upgrade any mail servers? Mail hub servers in each Domino domain inwhich service users are registered handlerouting mail from your on-premisesenvironment to the service users in thedomain.
Each on-premises server that routes mail tothe service must run Domino 8.5.1 Fix Pack2 or a later version.
Chapter 2. Planning to deploy the service 29

Table 9. Mail routing and mail settings questions (continued)
Question Considerations
What Internet domains do you want todefine in the service?
You use at least one Global Domaindocument to define the Internet domainsthat your company owns and that you wantto use in the service. Global Domaindocuments replicate to the service duringdirectory synchronization. The service usesGlobal Domain documents only todetermine the domains that a companyowns.
As part of service configuration, you willverify ownership of the domains specified inGlobal Domain documents. Verificationinvolves creating a CNAME record in yourdomain DNS record. If you don’t haveaccess to the DNS record, you will need toallow time for your Internet Service Provider(ISP) to create the required CNAME recordfor you
You can route mail between service usersand on-premises users or devices in foreigndomains not associated with Domino mailservers. To define a foreign domain, youmust create a Global Domain document in anew Domino directory that is not theprimary Domino Directory of a Dominodomain.
For more information, see the topics“Preparing Global Domain documents” onpage 49 and “Verifying Internet domains” onpage 97.Note: The service does not support usingForeign Domain documents to route mail toexternal Internet domains through theservice.
Do you use Internet domain aliases inGlobal Domain documents?
Domains specified in the Global Domaindocument field Alternate Internet domainaliases are not handled as alias domains bythe service. Instead, each domain in thisfield is listed and verified in the service as aseparate domain, similar to the domainspecified in the Local primary Internetdomain field. To enable a user to receivemail addressed to a domain in the AlternateInternet domain aliases field, you mustspecify the user’s address for the domain inthe Person document.
For more information, see “Adding multipleInternet email addresses to Persondocuments” on page 207.
30 SmartCloud Notes: Administering SmartCloud Notes: Hybrid Environment March 2015

Table 9. Mail routing and mail settings questions (continued)
Question Considerations
When service users send mail to externalusers on the Internet, do you want to use anon-premises SMTP server to route the mail?
By default, the service routes mail thatservice users address to external users. Youcan use a company-controlled SMTP serverto route the mail, instead. When you useyour own server, you can perform actionssuch as filtering and auditing before routingthe mail. For more information, see the topic“Preparing to use a company SMTP serverto route outbound Internet mail” on page 54
You are responsible for routing inboundSMTP mail that is addressed to serviceusers. The mail must be routed to a mailhub server in the Domino domain in whichthe service user is registered.
Do you want to use any of the optional mailsettings the service provides?
You can limit the size of incoming messages,prevent auto-forwarding of externalmessages, customize the display of IBMNotes document links in web client mail,configure mail retention in the trash folder,and control the deletion of older email. Formore information, see “Configuring mailsettings” on page 154
Related concepts:“Certifier requirements in a hybrid environment” on page 37It is important to understand the following certifier requirements when planning ahybrid environment.“Version requirements for on-premises Domino servers” on page 38This topic describes the IBM Domino version requirements for on-premisesDomino servers.Related tasks:“Preparing for mail routing” on page 52To prepare for mail routing between the service and your on-premisesenvironment, first set up at least one mail hub server in your on-premises hubdomain. Then prepare to route mail from service users and to service users.Related information:
Domino documentation
Planning calendars and schedulingAnswer the questions in this topic to help you understand and plan for the use ofcalendars and scheduling in the service.
Chapter 2. Planning to deploy the service 31
About this task
Table 10. Calendars and scheduling questions
Question Considerations
Do you want on-premises users to look upthe free-time of service users?
When an on-premises user requests thefree-time of a service user, the request is sentto the service user’s mail server. Thefollowing on-premises configuration isrequired:
v The on-premises user’s mail server mustrun the Calendar Connector (CalConn)server task.
v An on-premises server in the serviceuser’s domain must send the request tothe service. This server must be Domino8.5.1 Fix Pack 2 or a later version andmust run the CalConn server task.
v If the on-premises user making therequest is in a different Domino domainthan the service user, the Calendar serverin the on-premises user’s domain must beable to send the request to the Calendarserver in the service user’s domain. TheCalendar server in the service user’sdomain then sends the free-time requestto the service user’s mail server.
v If the service user is not in theon-premises hub domain, you must createa Connection document that enablesservers in the domain to connect to theservice to send the free-time request. Thissame Connection document is alsorequired to connect to the service to routemail. This step is unnecessary for theon-premises hub domain because theDomain Configuration tool creates therequired Connection document.
32 SmartCloud Notes: Administering SmartCloud Notes: Hybrid Environment March 2015
Table 10. Calendars and scheduling questions (continued)
Question Considerations
Do you want service users to look up thefree-time of on-premises users?
When a service user requests the free-time ofan on-premises user, the service user’s mailserver sends the request to a mail hub serverin the on-premises hub domain. Thefollowing on-premises configuration isrequired to process the request:
v The CustomerMailHubs group, whichincludes the names of the on-premisesmail hub servers, must replicate to theservice. This step provides the serviceuser’s mail server with the informationnecessary to connect to the mail hubservers. The Domain Configuration toolcreates the group in the primary directoryof the on-premises hub domain. If you donot synchronize this directory, you mustcopy the group to a directory that you dosynchronize.
v If the on-premises user’s domain is notthe on-premises hub domain, a Calendarserver in the hub domain must be able toconnect to the Calendar server in theon-premises user’s domain to forward therequest.
v If the on-premises user information isavailable in the on-premises hub domainonly through an extended directorycatalog, the mail hub servers in theon-premises hub domain must usedirectory assistance to look up names inthe directory catalog.
Chapter 2. Planning to deploy the service 33
Table 10. Calendars and scheduling questions (continued)
Question Considerations
Do you want service users to reserve roomsand resources when scheduling meetings?
A service user can schedule rooms andresources in on-premises ResourceReservations databases. The followingon-premises configuration is required toprocess the request:
v You must synchronize the directory of thedomain in which a Resource Reservationsdatabase is located. Synchronizationreplicates the Mail-in database documentsthat are required to route the reservationson-premises.
v When a service user reserves a room orresource, the reservation is mailed to amail hub server in the on-premises hubdomain. If the Resource Reservationsdatabase that contains the room orresource is in another domain, you mustconfigure mail routing to the otherdomain. This requirement is similar to therequirement for routing mail to anon-premises user in another domain.
v To enable a service user to look up thefree-time of a room or resource, theservice user’s mail server must be able toconnect to a mail hub server in theon-premises hub domain. An on-premisesserver must be able to look up thefree-time in the Resource Reservationsdatabase and return it to the service.These requirements are similar to therequirements to look up free-time ofon-premises users.
v You can replicate the directory of thedomain that contains a ResourceReservation database to the servicethrough a directory catalog. In this case,specific fields required for resourcereservations must be aggregated in thecatalog.
v Avoid the use of duplicate site names thatare used for rooms and resources. If twosites have the same name, the service listsresources from both sites under one sitename. This situation can lead users toreserve resources at the wrong site.
Related concepts:“Example: Free-time requests between users in the on-premises hub domain” onpage 75This example illustrates how free-time requests occur between a service user andan on-premises user who are both registered in the on-premises hub domain.“Example: Free-time requests between users in different domains” on page 78This example illustrates how free-time requests occur between an on-premises userin a secondary domain and a service user in the on-premises hub domain.Related tasks:
34 SmartCloud Notes: Administering SmartCloud Notes: Hybrid Environment March 2015
“Preparing for calendars and scheduling” on page 73You can prepare for on-premises users and service users to look up each others’free time when scheduling meetings. You can also prepare for service users toreserve resources in on-premises Resource Reservations databases.
Planning free-time requests in a hybrid environmentWhen an on-premises user requests the free time of service user, the on-premisesuser’s mail server makes a free-time request to the service user’s mail server.When a service user requests free time for an on-premises user, the service user’smail server makes a free-time request to an on-premises primary mail hub server.
Steps that occur when a service user looks up free time for anon-premises user
The following steps occur when a service user looks up free time for anon-premises user whose mail server is in the same domain as a primary mail hubserver:1. The service user’s client sends a free-time request to the service users mail
server.2. The service user’s mail server sends the free-time request to a primary mail
hub server on premises.3. The primary mail hub server sends the free-time request to the on-premises
user’s mail server.4. The on-premises user’s mail server looks up the on-premises users free time in
its Free Time database.5. The on-premises user's mail server returns the free time to the service user's
mail server.6. The service user's mail server returns the free time to the service user's client.
The following steps occur when a service user looks up free time for anon-premises user whose mail server is in a different Domino domain than aprimary mail hub server:1. The service user's client sends a free-time request to the service user's mail
server.2. The service user's mail server sends the free-time request to a primary mail hub
server on premises.3. The primary mail hub server sends the free-time request to the Calendar server
for the Domino domain of the on-premises user.4. The Calendar server looks up the on-premises user's free time in its Free Time
database.5. The Calendar server returns the user’s free time to the primary mail hub server.6. The primary mail hub server returns the free time to the service user's mail
server.7. The service user's mail server returns the free time to the service user's client.Related concepts:“Version requirements for on-premises Domino servers” on page 38This topic describes the IBM Domino version requirements for on-premisesDomino servers.“Example: Free-time requests between users in the on-premises hub domain” onpage 75This example illustrates how free-time requests occur between a service user and
Chapter 2. Planning to deploy the service 35
an on-premises user who are both registered in the on-premises hub domain.“Example: Free-time requests between users in different domains” on page 78This example illustrates how free-time requests occur between an on-premises userin a secondary domain and a service user in the on-premises hub domain.Related tasks:“Preparing for calendars and scheduling” on page 73You can prepare for on-premises users and service users to look up each others’free time when scheduling meetings. You can also prepare for service users toreserve resources in on-premises Resource Reservations databases.
Resource reservations in a hybrid environmentRoom and resource Mail-in Database documents replicated to the service allowservice users to reserve rooms and resources in an on-premises ResourceReservations database.
Note: Each site in all the room and resource databases across all domains shouldhave a unique name. If multiple sites have the same name, their resources arelisted together under that name and users may inadvertently reserve a resource atan unintended site. For information on making site names unique, see Technote1473022.
The following steps occur when a service user reserves a room or resource:1. To display sites, and the rooms and resources in each site, the service user's
mail server looks up room and resource Mail-in Database documents in itsdirectory. The Mail-in Database documents have replicated from theon-premises Domino directory during directory synchronization.
2. To display the free time for the rooms and resources, the client submits a freetime request for the period of the meeting to the service mail server.
3. The service mail server sends the free time request to a primary mail hubserver on-premises.
4. The primary mail hub server looks up the available free time for the room orresource in its Resource Reservations database, or if the database is not local,routes the lookup to another server.
5. The available times are returned to the service mail server, which returns themto the client.
6. When the user reserves a room or resource, the service mail server mails thereservation to the corresponding on-premises Mail-in Database document,which creates the reservation in the on-premises Resource Reservationsdatabase.
Related concepts:“Version requirements for on-premises Domino servers” on page 38This topic describes the IBM Domino version requirements for on-premisesDomino servers.“Service user requesting the free time of a resource” on page 297This picture illustrates a service user requesting the free time of a resource atRenovations.“Service user reserving a resource” on page 299This picture illustrates a service user reserving a resource.Related tasks:“Preparing for calendars and scheduling” on page 73You can prepare for on-premises users and service users to look up each others’free time when scheduling meetings. You can also prepare for service users to
36 SmartCloud Notes: Administering SmartCloud Notes: Hybrid Environment March 2015
reserve resources in on-premises Resource Reservations databases.
Certifier requirements in a hybrid environmentIt is important to understand the following certifier requirements when planning ahybrid environment.v The OU certifier you provide for your service mail servers must be under the
same organization certifier as the passthru servers, directory synchronizationservers, and primary mail hub servers. It can be at any level below theorganization certifier. This OU certifier must be unique and used only for theservice mail servers; the OU certifier cannot be used on-premises.
v It is important that you choose and create your service mail server OU certifiercarefully. After you upload the OU certifier ID to the service, you cannot changeto an ID with a different certifier name.
v The certifier used for service users must trust the service mail server OUcertifier, and vice versa. If any users are certified under a different organizationthan the OU certifier, you must create the required cross-certificates to establishtrust. The cross-certificates must be replicated to the directory synchronizationservers.
v The names of organization certifiers must be unique to a company; twocompanies in the service cannot use the same organization certifier namebecause of the multi-tenant messaging architecture of a cloud environment. Theuse of generic organization certifier names is discouraged.
v The names of the on-premises passthru servers, directory synchronizationservers, and primary mail hub servers must all be under one organizationcertifier. Cross-certificates cannot be used to establish trust between theseservers. It is acceptable to name these servers under organizational units (OUs)below the organization certifier.
v Though the passthru servers must be under the same organization certifier asthe directory synchronization and primary mail hub servers, they should be in aseparate Domino domain from those servers. You may be accustomed to usingthe same name for a Domino domain and an organization certifier, but there isno relationship between the two names. So it is acceptable to certify the passthruservers under your main corporate certifier (often the name of your company)but name the domain of the passthru servers something else.
For example, the company Renovations initially has one, top-level organizationcertifier, /Renovations. They create the on-premises passthru servers, directorysynchronization servers, and mail hub servers under this certifier, for example:Passthru/Renovations, Dirhub/Renovations, Mailhub/Renovations. The passthruservers are in a unique Domino domain.
They also create the OU certifier /SCN/Renovations to use as their service mailserver certifier. This OU certifier is under the same organization certifier as thepassthru, directory synchronization, and mailhub servers, as required.
The company then purchases a second company that uses a different top-levelorganization certifier, /Acme. They create cross-certificates to establish trustbetween the two certifiers.
For more information on certifiers and cross-certificates, see the Dominodocumentation.Related information:
Chapter 2. Planning to deploy the service 37
Domino documentation
Version requirements for on-premises Domino serversThis topic describes the IBM Domino version requirements for on-premisesDomino servers.
Table 11. Version requirements for on-premises Domino servers
On-premises server type Supported versions
Mail routing servers that connect directly toservice mail servers for mail routing.
v IBM Domino 8.5.1 Fix Pack 2 or later fixpack
v IBM Domino 8.5.2 or later
v IBM Domino 9 Social Edition
Administration server (used by theAdministration Process) for the Dominodirectory of the on-premises hub domain.
v IBM Domino 8.5.1 Fix Pack 2 or later fixpack
v IBM Domino 8.5.2 or later
v IBM Domino 9 Social Edition
Note: The Domino directory template mustbe at least the version provided with IBMDomino 8.5.1 Fix Pack 2.
Directory synchronization servers (if not theadministration server)
Any version of Domino supported by IBM.
Mail servers that request the free time ofservice users
v IBM Domino 8.5.1 Fix Pack 2 or later fixpack
v IBM Domino 8.5.2 or later
v IBM Domino 9 Social Edition
Passthru domain servers Any version of Domino supported by IBM.Use IBM Domino 8.5.2 or later for fastestresponse time for connections from serversin the service to on-premises servers.
Related tasks:“Preparing passthru servers” on page 40Install and set up at least one Domino server to be used as a passthru serverthrough which the service connects to servers in your on-premises hub domain.“Setting up directory synchronization servers” on page 45In the on-premises hub domain, set up at least one Domino server to be a hubserver for directory synchronization with the service.“Preparing for mail routing” on page 52To prepare for mail routing between the service and your on-premisesenvironment, first set up at least one mail hub server in your on-premises hubdomain. Then prepare to route mail from service users and to service users.
38 SmartCloud Notes: Administering SmartCloud Notes: Hybrid Environment March 2015
Chapter 3. Preparing your environment
Perform the steps in this section to prepare your on-premises servers for a hybridenvironment. Perform these steps after you have planned for the service andbefore you configure the service.Related tasks:Chapter 2, “Planning to deploy the service,” on page 17To plan for the IBM SmartCloud Notes service, understand the features it offers,the deployment options that are available, and the planning considerations.
Creating a certifier for your mail serversCreate an IBM Domino organizational unit (OU) certifier to use for certification ofyour IBM SmartCloud Notes mail servers.
Create an OU certifier that is unique in your company. For example, if you use theorganization certifier /Renovations, you could create the OU certifier/SCN/Renovations. Then your mail servers have names such asMail1/SCN/Renovations and Mail2/SCN/Renovations. The certifier name is part ofthe mail server names that IBM Notes client users see, so keep it short for betterreadability.
Before you begin
To ensure that the certifier you create complies with the general certifierrequirements in a hybrid environment, read the topic Certifier requirements in ahybrid environment.
Procedure1. Create an OU certifier. For information, see the topic about creating an
organizational unit certifier in the Domino documentation.2. The certifiers of your service users must trust the Organization certifier of the
OU certifier you create, and vice versa. If some service users are certified undera different Organization certifier, create each necessary cross certificate on thedirectory synchronization server to establish trust. The cross-certificatesreplicates to the service during directory synchronization.For information, see the topic about creating a cross-certificate from a Notescertifier in the Domino documentation.
Related tasks:“Providing a certifier ID file” on page 92As a part of preparing your on-premises environment for a hybrid deployment,you create an IBM Domino organizational unit (OU) certifier for your IBMSmartCloud Notes servers. In this task, you provide an OU certifier ID file andpassword when you set up the hybrid environment.Related information:
Domino documentation
© Copyright IBM Corp. 2011 39
Preparing your networkPrepare your network for connections between IBM SmartCloud Notes servers andon-premises servers. Configure inner and outer firewalls. Then set up a dedicatedIBM Domino domain between the firewalls. The domain will function as apassthru server domain through which connections from SmartCloud Notesservers to your on-premises servers occur.
Preparing passthru serversInstall and set up at least one Domino server to be used as a passthru serverthrough which the service connects to servers in your on-premises hub domain.
About this taskv To provide failover, install and set up two servers. If the service is unable to
connect to one server, it tries the other. After the service is successful inconnecting to one server, it continues to use it as long as it remains available. Ifa server becomes unavailable, the service attempts to connect to the other server,and if successful, then continues to use that server as long as it is available. Theservice does not use Domino cluster failover.
v Passthru servers handle the transfer of network packets and do not perform mailrouting or replication. As such, they do not require significant disk space orprocessing speed.
v For security reasons, do not set up passthru servers in the on-premises hubdomain that holds your directory synchronization servers and mail hub servers.Instead, install and set up the servers in a new unique Domino domain. Theservers can be in separate unique domains.
v For optimum security, configure your corporate firewalls so that connections tothe passthru servers occur in your corporate demilitarized zone.
v A passthru server must be certified under the same parent organization certifieras the following servers:– Directory synchronization servers in the on-premises hub domain– Mail hub servers in the on-premises hub domain– Your mail servers in the service
v For the fastest response time for connections from the service, install Domino8.5.2 or later servers. To optimize passthru server performance, Domino 8.5.2provides the notes.ini setting passthru_connect_wait=1. This setting is useful forimproving the response time when service users request the free time ofon-premises users. The Domain Configuration tool enables this setting on theDomino 8.5.2 passthru servers for you.
v Public key checking should not be enforced on the passthru servers. Public keychecking, which is controlled through the Compare public keys field in theSecurity tab of the Server document, is disabled on Domino servers by default.
Procedure1. Install and set up at least one IBM Domino server.
v Set up the server as the first server in the domain.v During server setup, select the option I want to use an existing certifier ID
file. Then certify the new server under the same organization certifier that isused to certify the directory synchronization servers and the mail hub serversin the on-premises hub domain. A certifier name is independent of a Dominodomain name. In this case, the certifier name and the domain name are likelyto be different.
40 SmartCloud Notes: Administering SmartCloud Notes: Hybrid Environment March 2015
v For more information on installing and setting up servers, see the Dominodocumentation,
2. If required, create LAN Connection documents that enable the passthru serverto connect to the directory synchronization servers and mail hub servers in theon–premises hub domain. For more information, see the topic on creating LANConnection documents in the Domino documentation.
What to do next
Test that each passthru server can resolve the host name of each directorysynchronization server and mail hub server in the on-premises hub domain. If apassthru server cannot resolve a host name, verify that required Connectiondocuments are in place. Also verify that your firewall rules allow the passthruserver to access the servers.
Record the Domino hierarchical name, DNS host name (recommended) or IPaddress, and Domino domain name of each passthru server. You provide thisinformation later when you configure the service.Related concepts:“Certifier requirements in a hybrid environment” on page 37It is important to understand the following certifier requirements when planning ahybrid environment.Related tasks:“Planning network connections” on page 19Before preparing your environment, answer questions described in this topic tohelp you make decisions related to network connectivity with the service.Related information:
Domino documentation
Preparing the firewallConfigure the corporate firewall to allow connections to and from the service.
About this task
When configuring the firewall, specify the host names as described to minimize therisk of network attacks from the Internet. The risk of attack increases if you relaxthe host name rules.
Configuring the firewall for inbound connectionsConfigure the firewall to allow inbound connections from the service to servers inyour on-premises environment.
About this task
Table 12. Firewall settings for inbound connections
Protocol Port Source Target
NRPC 1352 The IBM SmartCloud Notesaddresses generated by the outerfirewall of the service.
Contact your IBM Customer ServiceRepresentative for this information.
Passthru server host names,for example:pthru1.renovations.compthru2.renovations.com
Chapter 3. Preparing your environment 41

Table 12. Firewall settings for inbound connections (continued)
Protocol Port Source Target
NRPC 1352 Passthru server host names,for example:pthru1.renovations.compthru2.renovations.com
Host names of the on-premisesdirectory synchronization serversand mail hub servers,for example:dirhub.renovations.commailhub.renovations.com
SMTP 25 The IBM SmartCloud Notesaddresses generated by the outerfirewall of the service.
Contact your IBM Customer ServiceRepresentative for this information.
Optional SMTP host that routesmail to the Internet. The host isspecified in SmartCloud NotesAdministration at AccountSettings > Email Management >Manage Routing to ExternalInternet Domains.
Related tasks:“Preparing to use a company SMTP server to route outbound Internet mail” onpage 54You can configure a company SMTP host server to route mail that service userssend to external users.
Configuring the firewall for outbound connectionsConfigure the firewall to allow outbound connections to the service.
About this task
The following table describes the firewall settings required to allow connectionsfrom on-premises servers and clients to specific hosts in the service. You cansubstitute *.collabserv.com for the host names to represent all hosts in the service.
If your current firewall settings reference the original service domain name,lotuslive.com, retain those settings and add the settings described in the table.
In addition to allowing connections over HTTPS port 443, you can allowconnections over HTTP 80. If you do, connections over HTTP are redirected toHTTPS.
Table 13. Firewall settings for outbound connections
Protocol Port Host nameApplicableserver or client
NRPC 1352 North American data center:notes.na.collabserv.com
Asia Pacific data center:notes.ap.collabserv.com
European data center:notes.ce.collabserv.com
Domino servers
IBM Notesclients
HTTPS 443 North American data center:notes.na.collabserv.commail.notes.na.collabserv.com
Asia Pacific data center:notes.ap.collabserv.commail.notes.ap.collabserv.com
European data center:notes.ce.collabserv.commail.notes.ce.collabserv.com
IBMSmartCloudNotes web
42 SmartCloud Notes: Administering SmartCloud Notes: Hybrid Environment March 2015

Table 13. Firewall settings for outbound connections (continued)
Protocol Port Host nameApplicableserver or client
HTTPS 443 North American data center:admin.notes.na.collabserv.com
Asia Pacific data center:admin.notes.ap.collabserv.com
European data center:admin.notes.ce.collabserv.com
Web browseraccess toSmartCloudNotesAdministration
HTTPS 443 North American data center:traveler.notes.na.collabserv.comapps.na.collabserv.com
Asia Pacific data center :traveler.notes.ap.collabserv.comapps.ap.collabserv.com
European data center:traveler.notes.ce.collabserv.comapps.ce.collabserv.com
IBM NotesTravelerdevicesaccessing theservice viaWiFi
IMAP 993 North American data center:imap.notes.na.collabserv.com
Asia Pacific data center:imap.notes.ap.collabserv.com
European data center:imap.notes.ce.collabserv.com
IMAP clients(receiving mail)
IMAP 465 North American data center:submit.notes.na.collabserv.com
Asia Pacific data center:submit.notes.ap.collabserv.com
European data center:submit.notes.ce.collabserv.com
IMAP clients(sending mail)
VP (VirtualPlaces -used forinstantmessaging)
1533 North American data center:im.na.collabserv.com
Asia Pacific data center:im.ap.collabserv.com
European data center:im.ce.collabserv.com
IBM Notesclients thatconnect to theinstantmessagingcommunity inthe service
VP (VirtualPlaces -used forinstantmessaging)
1533 North American data center:webchat.na.collabserv.com
Asia Pacific data center:webchat.ap.collabserv.com
European data center:webchat.ce.collabserv.com
IBMSmartCloudNotes webclients thatconnect to theinstantmessagingcommunity inthe service
SMTP 25 North American data center:smtp.notes.na.collabserv.com
Asia Pacific data center:smtp.notes.ap.collabserv.com
European data center:smtp.notes.ce.collabserv.com
SMTP serversthat routeInternet mail toservice users
Chapter 3. Preparing your environment 43
Table 13. Firewall settings for outbound connections (continued)
Protocol Port Host nameApplicableserver or client
FTPPASV (FTP)
99060000 - 61000
North American data center:ftp.notes.na.collabserv.com
Asia Pacific data center:ftp.notes.ap.collabserv.com
European data center:ftp.notes.ce.collabserv.com
Temporaryrequirement forclients thattransfer mailfiles to theservice overFTP
Hybridenvironmentsonly
FTPPASV (FTP)
99060000 - 61000
North American data center:ftp.na.collabserv.com
Asia Pacific data center:ftp.ap.collabserv.com
European data center:ftp.ce.collabserv.com
Client thatdownloadsjournal files
How NRPC connections are made in a hybrid environmentConnections from on-premises Notes clients and Domino servers to IBMSmartCloud Notes mail servers occur via a proxy server in the service.Connections from SmartCloud Notes servers to on-premises servers occur via apassthru server in the on-premises passthru server domain.
For information on on-premises server version requirements, see Versionrequirements for on-premises Domino servers.
How on-premises servers and clients connect to the service
All Notes Remote Procedure Call (NRPC) connection requests that on-premisesclients and servers make to servers in the service occur over TCP/IP port 1352. Therequests are made via a proxy server in the service, notes.na.collabserv.com ornotes.ap.collabserv.com, depending on the data center your company uses. Theproxy server authenticates the requesting on-premises users and servers and then"proxies" the connection requests to the target mail servers in the service. Theproxy server authenticates using the organizational unit (OU) certifier that youhave provided for certification of your mail servers.
When you run the Domain Configuration tool on-premises, the tool creates aConnection document in the Domino directory of the on-premises hub domain thatenables connections to the proxy server. The Connection document contains thefollowing values for the Source and Destination fields:v Source server: *v Source domain On-premises hub domain, for example, Renovations
v Destination server: mail servers in the service, for example, */SCN/Renovations.v Optional network address: notes.na.collabserv.com or
notes.ap.collabserv.com (proxy)
44 SmartCloud Notes: Administering SmartCloud Notes: Hybrid Environment March 2015
How servers in the service connect to on-premises servers
All connection requests that servers in the service make to on-premises servers arehandled by servers in the on-premises passthru server domain. The passthru serverdomain is a dedicated domain with its own Domino directory situated inside yourcorporate network demilitarized zone (DMZ). The passthru servers authenticateservers in the service and allow passthru connections only for those servers withIDs that are certified by the OU certifier you provide.
To optimize the speed of connections from the service to on-premises servers,running Domino 8.5.2 or later on the server or servers in the passthru serverdomain is recommended. Domino 8.5.2 provides the notes.ini settingpassthru_connect_wait=1 to optimize passthru server performance. This setting isparticularly useful for improving the response time of freetime requests from usersin the service to on-premises users. The Domain Configuration tool enables thissetting on the passthru servers for you.
When the Domain Configuration tool is run on-premises, the tool adds thefollowing field values to the Server document of each passthru server in thepassthru server domain Domino Directory. These values enable connections fromauthenticated mail servers in the service to pass through to directorysynchronization servers and mail hub servers on-premises.v Security - Passthru Use - Route through: mail servers in the service, for example,
*/SCN/Renovations.v Security - Passthru Use / Destinations allowed: On-premises directory
synchronization servers and primary mail hub servers, for example,Directory1/Renovations; Mail1/Renovations
The Domain Configuration tool also creates a Connection document in the Dominodirectory to each on-premises directory synchronization and primary mail hubservers follows:v Source server: Passthru servers, for example, Passthru1/Renovations;
Passthru2/Renovations
v Source domain Passthru server domain, for example, SCNPassthru
v Destination server: Directory synchronization server or primary mai hub server, forexample, Directory1/Renovations or Mail1/Renovations
All tasks and schedules are disabled in each Connection document.
Preparing for directory synchronizationSet up at least one Domino server in the on-premises hub domain to be a directorysynchronization server. Then prepare to replicate directories to the service.
Before you begin
Before you prepare for directory synchronization, make the directory servicesdecisions described in the topic “Planning directory services” on page 21.
Setting up directory synchronization serversIn the on-premises hub domain, set up at least one Domino server to be a hubserver for directory synchronization with the service.
Chapter 3. Preparing your environment 45

About this task
To provide failover, you can set up two directory synchronization servers in theon-premises hub domain. When you configure the service, you configure one asthe primary directory server and the other as the optional secondary directoryserver. After the service replicates successfully with the primary directory server, itcontinues to use that server as long as it is available. If the server becomesunavailable, the service attempts to replicate with the optional secondary directoryserver. When the primary directory server becomes available, the service switchesback to it.
Perform this procedure for each directory synchronization server you plan to use.
Procedure1. Install and set up a Domino server in the on-premises hub domain, or use an
existing server. The server must comply with the following requirements:v If the server is the administration server for the domain, the server must be
Domino 8.5.1 Fix Pack 2 or a later version with the corresponding DominoDirectory template. If the server is not the administration server, anysupported version of Domino is allowed.
v The server must be certified under the same top-level Notes certifier as themail hub servers in the on-premises hub domain, the passthru servers, andthe mail servers in the service.
2. Perform the following steps to disable public key checking on the server and togive the server access to the LLNServers group:a. Open the Server document in the Domino Directory in edit mode.b. Click the Security tab.c. In the Compare public keys field in the Security Settings section, select Do
not enforce key checking and click OK.d. Perform one of the following steps to give the server access to the
LLNServers group:v Add LLNServers to the Access server field.v Clear the users listed in all trusted directories check box and make sure
that the Not access server does not prevent access to LLNServers.When you configure the service, the LLNServers group is created in theDomino Directory of the on-premises hub domain when you run theDomain Configuration tool.
e. Click Save & Close.Related concepts:“Version requirements for on-premises Domino servers” on page 38This topic describes the IBM Domino version requirements for on-premisesDomino servers.“Certifier requirements in a hybrid environment” on page 37It is important to understand the following certifier requirements when planning ahybrid environment.Related tasks:“Configuring directory synchronization” on page 89A directory server in the service has a replica of one or more on-premises IBMDomino directories. To support directory synchronization, provide the name of theprimary server and file path of at least one on-premises directory that you want tosynchronize. The directory server performs a regular pull and push replication ofthe directories to keep the contents of both the service and the on-premises replicas
46 SmartCloud Notes: Administering SmartCloud Notes: Hybrid Environment March 2015
synchronized.“Using the Pre-configuration Test tool to check your environment” on page 93After you prepare your on-premises environment but before you run the DomainConfiguration tool to configure it to connect to the IBM SmartCloud Notes service,download and run the SmartCloud Notes Hybrid Pre-configuration tool. This toolruns a series of tests to determine if the servers in your environment are set upcorrectly. The tool provides a report that identifies any issues that might preventcommunication between your environment and the service. The tool does notchange your configuration.
Preparing to replicate Domino directoriesPrepare to replicate Domino directories in which service users are registered. Youmight also want to replicate other Domino directories.
Before you begin
Read the topics “Planning directory services” on page 21 and “Requirements forsynchronized directories” on page 22
About this task
You must replicate to the service Domino directories in which users are registeredwhom you plan to provision for the service.
You can also replicate Domino directories that contain only Person documents ofnon-service users. When you replicate these directories, service users can look upthe names and addresses of the non-service users in the service directory. Thenon-service users can be:v On-premises users registered in a Domino domainv On-premises users in a foreign mail domain for whom you manually create
Person documentsv External users in an external Internet domain for whom you manually create
Person documents
To define an internal foreign mail domain in the service, you must create a GlobalDomain document. The document must be in a directory that is not the primarydirectory of the on-premises hub domain, and you must replicate this directory tothe service.
If there are multiple directories of non-service users, you might want to aggregatethe directories into an extended directory catalog. Then you can replicate thedirectory catalog rather than each directory.
To prepare to replicate a Domino directory to the service, perform the steps in thisprocedure on each directory synchronization server.
Procedure1. If the directory is not the primary directory of the on-premises hub domain,
perform the following steps:a. Create a replica of the directory on each directory synchronization server.
Each replica of the directory must use the same path and file name on bothdirectory synchronization servers.
Chapter 3. Preparing your environment 47
b. If you created the replica from a source replica on another server, scheduleregular replication of the directory between each directory synchronizationserver and the source server.v If the directory contains users to be provisioned for the service, schedule
two-way replication.v If the directory does not contain users to be provisioned for the service,
schedule one-way replication from the source server to the directorysynchronization server. Scheduling replication from the directorysynchronization server to the source server is optional.
2. Verify that a unique Domino domain is specified in the directory profile:a. Open the Domino Directory.b. Click Actions > Edit Directory Profile.c. Verify that the Domain defined by this Domino Directory field specifies a
Domino domain that is unique within your company.
Note: The Pre-configuration Test tool that you run to check youron-premises environment during service configuration also verifies thedomain name.
3. If a directory contains users to be provisioned for the service, make sure thatthe Internet address field in their Person documents has a valid address, forexample, sdaryn@renovations. A valid Internet address contains the name of anInternet domain that is owned by your company, defined in a Global Domaindocument, and validated by the service.
4. If a directory contains users or devices from an internal foreign domain, makesure that Other Internet Mail is selected in the Mail system field of theirPerson documents. This setting is required for the service to route messagesaddressed to these users to the on-premises mail hub servers.
Related tasks:“Preparing Global Domain documents” on page 49Prepare at least one Global Domain document to define the Internet domains thatyour company owns.
Preparing to replicate an extended directory catalogAn extended directory catalog (EDC) can be used to aggregate entries frommultiple Domino directories and replicate the entries to the service. An EDC issupported for read-only use in the service. This procedure is useful only forcompanies that have more than one Domino directory.
About this task
In an environment with multiple Domino directories, aggregating the directoriesinto an EDC improves directory lookup performance.
Aggregating a Domino directory that contains service users into an EDC isrecommended for directory lookup performance. However, you must also replicatethe full Domino directory to the service, separately.
Although the use of multiple EDCs is supported, for ease of management, use one.
To prepare to replicate an EDC to the service during directory synchronization,perform the following steps.
48 SmartCloud Notes: Administering SmartCloud Notes: Hybrid Environment March 2015
Procedure1. Set up the EDC to aggregate all the directories that you want to make available
in the service. For more information, see the topic on setting up an extendeddirectory catalog in the Domino documentation.
Note: The EDC must comply with the requirements specific to the service. Forexample, specific fields must be aggregated into an EDC. For information, seethe information about the EDC described in the topic “Requirements forsynchronized directories” on page 22.
2. Create a replica of the EDC on each directory synchronization server and oneach mail hub server in the on-premises hub domain. Also make sure that thedirectories aggregated in it are kept up-to-date by the Dircat task.
3. Verify that a unique Domino domain is specified in the directory profile:a. Open the EDC.b. Click Actions > Edit Directory Profile.c. Verify that the Domain defined by this Domino Directory field specifies a
unique Domino domain for the directory. If necessary, add a domain namethat is unique in your environment to this field.
Note: The Pre-configuration Test tool that you run to check youron-premises environment during service configuration also verifies thedomain name.
4. To enable the EDC to be used for free-time lookups, set up your mail hubservers in the on-premises hub domain to use directory assistance to find theEDC. Directory assistance is not required on the directory synchronizationservers or passthru servers. For information on directory assistance, see theDomino documentation.a. Create a directory assistance database on one primary mail hub server.b. Create a directory assistance document in that database for the extended
directory catalog. Configure the document to point to at least one replica ofthe EDC on a directory synchronization server or primary mail hub server.Configure the document to point to additional EDC replicas to providefailover.
c. If you use an additional primary mail hub server, replicate the directoryassistance database to that server. Schedule regular replication of thedirectory assistance database between the two mail hub servers.
Related information:
Domino documentation
Preparing Global Domain documentsPrepare at least one Global Domain document to define the Internet domains thatyour company owns.
About this task
The Global Domain documents must be in synchronized Domino directories thatreplicate to the service. When you configure the service, you verify ownership ofthe domains that are defined in the replicated Global Domain documents. GlobalDomain documents are used in the service only to define your Internet domainsand not to route mail.
Chapter 3. Preparing your environment 49
Usually you can use Global Domain documents that already exist in productionDomino directories. Follow the procedure in this topic to verify that they areconfigured correctly for the service.
In some situations, you must create a new Domino Directory manually from thepubnames.ntf template, add a new Global Domain document to it, and replicatethe new directory to the service. Otherwise, if you put the Global Domaindocument in the primary Domino directory for a domain, it can prevent properon-premises mail routing in the domain.
Put a Global Domain document in a manually-created Domino directory to definea Foreign Domain that includes devices, such as printers or faxes. Typically, aForeign Domain document is used on-premises to route requests to the devices.
Also put a Global Domain document in a manually-created Domino directory ifyou want to use an asterisk (*) wildcard to define multiple subdomains below oneroot domain. The root domain is defined in a separate Global Domain document.When you verify the root domain during service configuration, the subdomains areautomatically verified, too. This approach is useful if there are many subdomainsthat do not include service users.
Note: If service users are in a subdomain, you must specify the completesubdomain name in a Global Domain document. The subdomain can also bedefined through a wildcard entry.
Domains specified in the Global Domain document field Alternate Internetdomain aliases are not handled as alias domains by the service. Instead, eachdomain in this field is listed and verified in the service as a separate domain,similar to the domain specified in the Local primary Internet domain field. Toenable a user to receive mail addressed to a domain in the Alternate Internetdomain aliases field, you must specify the user’s address for the domain in thePerson document.
If multiple Global Domain documents specify the same domain, the serviceremoves the duplicate domain occurrences.
Perform the following steps to create or verify at least one Global Domaindocument.
Procedure1. Open the Domino directory in which you want to add or verify a Global
Domain document.2. Click Configuration and then expand the Messaging section.3. Click Domains and perform one of the following steps:
v To verify an existing Global Domain document, select the document andclick Edit Domain.
v To create a new Global Domain document, click Add Domain.4. Specify the following fields on the Basics tab.
Table 14. Basics tab of Global Domain document
Field Step
Domain type Select Global Domain.
Global domain name Type any descriptive name.
50 SmartCloud Notes: Administering SmartCloud Notes: Hybrid Environment March 2015
Table 14. Basics tab of Global Domain document (continued)
Field Step
Global domain role Select R5/R6/R7/R8.
Use as default Global Domain Select if you use more than one GlobalDomain document and you want thisdomain to be the default.
5. Ignore the Restrictions tab. The service does not use information in this tab.6. Verify that the following fields on the Conversions tab correctly define an
Internet domain. Ignore the other fields in this tab; the service does not usethem.
Table 15. Conversions tab of Global Domain document
Field Step
Local primary Internet domain Type a domain name, for example,renovations.com.
To specify multiple subdomains at once, usean asterisk (*) as a wildcard. For example, ifyour company owns these subdomains:
west.renovations.comeast.renovations.comnorth.renovations.com
type:
*.renovations.com
If you use a wildcard, you must specify theroot domain in a separate Global Domaindocument.Note: If a service user is in a subdomain,you must specify the complete subdomainname in a separate Global Domaindocument.
Alternate Internet domain aliases Type any additional domain names,separated by a comma (,). For example, typerenovations.org, renovations.net.Note: When you configure the service, eachdomain in this field is listed as a separatedomain to be verified.
7. Click Save & Close.8. Restart the server. This step is not necessary if the Global Domain document is
in a new directory created only for use with the service.
What to do next
Prepare to replicate the directory that contains the Global Domain document to theservice.Related tasks:“Adding multiple Internet email addresses to Person documents” on page 207You can include multiple Internet email addresses in a Person document.
Chapter 3. Preparing your environment 51
Preparing for mail routingTo prepare for mail routing between the service and your on-premisesenvironment, first set up at least one mail hub server in your on-premises hubdomain. Then prepare to route mail from service users and to service users.
No configuration is required to route mail sent between service users at yourcompany. This mail is routed automatically within the service.
Setting up mail hub servers in the on-premises hub domainIn the on-premises hub domain, set up at least one IBM Domino server to be a hubserver for mail routing with the service.
Before you begin
Make the mail routing decisions described in the topic “Planning mail routing andmail settings” on page 29.
About this task
When any service user sends mail to any on-premises user or device, the serviceroutes the mail to a mail hub server in the on-premises hub domain. The mail hubserver then routes the mail to the final destination or next hop to the finaldestination, if required.
To provide failover, set up two mail hub servers in the on-premises hub domain.The service attempts to route to the primary mail hub server first, which is theserver with the name that comes first in alpha-numeric order. For example, if thetwo server names are MailA/Renovations and MailB/Renovations, the primaryserver is MailA/Renovations. If the two servers are Mail1/Renovations andMail2/Renovations, the primary server is Mail1/Renovations.
If the service is unable to route to the primary mail hub server due to network orserver unavailability, it attempts to use the secondary server. When the primarymail hub server becomes available, the service begins using it again after a periodof time. The service may use both servers simultaneously for brief intervals.
If there are service users registered in the on-premises hub domain, the mail hubserver handles routing their mail to the service.
For information on installing and setting up Domino servers, see the Dominodocumentation.
Procedure1. Install and set up a Domino server in the on-premises hub domain, or use an
existing server. The server must comply with the following requirements:v Domino version requirement: 8.5.1 Fix Pack 2 or later version.v Notes certifier requirement: The same top-level organization certifier as the
directory synchronization servers, passthru servers, and mail servers in theservice.
2. Perform the following steps to disable public key checking on the server and togive the server access to the LLNServers group:a. Open the Server document in the Domino directory in edit mode.b. Click the Security tab.
52 SmartCloud Notes: Administering SmartCloud Notes: Hybrid Environment March 2015
c. In the Compare public keys field in the Security Settings section, select Donot enforce key checking and click OK.
d. Perform one of the following steps to give the server access to theLLNServers group:v Add LLNServers to the Access server field.v Clear the users listed in all trusted directories check box and make sure
that the Not access server does not prevent access to LLNServers.When you configure the service, LLNServers group is created in the Dominodirectory of the on-premises hub domain when you run the DomainConfiguration tool.
e. Click Save & Close.
What to do next
Prepare for mail routing.Related concepts:“Version requirements for on-premises Domino servers” on page 38This topic describes the IBM Domino version requirements for on-premisesDomino servers.“Certifier requirements in a hybrid environment” on page 37It is important to understand the following certifier requirements when planning ahybrid environment.Related information:
Domino documentation
Preparing to route mail from service usersPrepare to route mail from service users to on-premises users and devices or toexternal users.
Preparing to route mail from service users to on-premises usersand devicesWhen service users send mail to on-premises users or devices, the mail is routed toa mail hub server in the on-premises hub domain. If recipients are in a differentdomain, you configure the routing to the final destination.
Before you begin
Make sure that you have set up at least one mail hub server in the on-premiseshub domain.
About this task
When service users address mail to any on-premises user or device, the serviceroutes the mail to a mail hub server in the on-premises hub domain. This routingis done automatically using Connection documents created when the DomainConfiguration tool is run during service configuration.
If recipients are in a different domain, you are responsible for configuring routingto that domain. Recipients might be:v On-premises users in other Domino domains.v On-premises users in foreign domains who do not use Domino mail servers.v On-premises devices in foreign domains, such as printers and faxes.
Chapter 3. Preparing your environment 53
For more information, see the topic “Setting up Notes routing” in the Dominodocumentation.Related concepts:“Examples: Routing internal mail” on page 60These examples illustrate mail routing between service users and on-premisesusers and devices.Related tasks:“Preparing Global Domain documents” on page 49Prepare at least one Global Domain document to define the Internet domains thatyour company owns.Related information:
Domino documentation
Preparing to use a company SMTP server to route outboundInternet mailYou can configure a company SMTP host server to route mail that service userssend to external users.
About this task
Skip this procedure if you want the service to handle routing the mail that is sentto external users. In this case (default behavior), the service filters the messages forvirus and spam before routing them to the Internet.
By using a company SMTP host server for external routing, you can act onmessages before routing them, for example, filter or audit messages. When you usethis feature, the service filters messages for viruses and spam and then routes themdirectly to your designated SMTP host server. Messages addressed to any domainthat is not an internal, service-verified domain are routed to the SMTP host server.
The service uses Transport Layer Security (TLS) to route mail to the SMTP hostserver if the host server uses TLS. The connection is made using STARTTLS overSSL TCP/IP port 25.
Procedure1. Configure your SMTP host server to accept mail from one of the following
SMTP host servers in the service:v If you use the United States data center: smtp.notes.na.collabserv.comv If you use the Asia Pacific data center: smtp.notes.ap.collabserv.comv If you use the European data center: smtp.notes.ce.collabserv.com
For more information on this step if you use a Domino SMTP server, see thetopic about enabling a server to receive mail sent over SMTP routing in theDomino documentation.
2. Configure the corporate firewall to allow inbound connections over port 25from the service SMTP host server specified in the previous step. For moreinformation, see the topic Configuring the firewall for inbound connections.
3. If specifying a maximum message size, configure your SMTP host server toaccept messages up to 100 MB in size, the maximum message size allowed bythe service. For more information on this step if you use a Domino SMTPserver, see the topic about restricting mail routing based on message size in theDomino documentation.
54 SmartCloud Notes: Administering SmartCloud Notes: Hybrid Environment March 2015

4. Configure your SMTP host server to relay mail to external Internet domains.For more information on this step if you use a Domino SMTP server, see thetopic about setting inbound relay controls in the Domino documentation.
5. Configure your SMTP host server to route mail to the Internet. For moreinformation on this step if you use a Domino SMTP server, see the topic aboutsetting up SMTP routing to external Internet domains in the Dominodocumentation.
What to do next
When you complete the service configuration, perform the procedure “Specifyingan SMTP server to route mail to the Internet” on page 160.Related concepts:“Example: Routing mail from a service user to an external user using a serviceSMTP host” on page 70This example illustrates how mail is routed from a service user to an external useron the Internet when the service manages the routing.“Example: Routing mail from a service user to an external user using a companySMTP host” on page 71This example illustrates how mail is routed from a service user to an external useron the Internet when a company SMTP server routes the mail.Related information:
Domino documentation
Preparing to route mail to service usersPrepare mail servers in the Domino domains in which service users are registeredto route mail to the users.
Preparing to route mail to service users registered in theon-premises hub domainIf service users are registered in the on-premises hub domain, prepare to routemail to those users through the mail hub servers in the domain.
Before you begin
Prepare your on-premises mail hub servers.
About this task
If there are no service users in the hub domain, skip this procedure.
The mail hub servers in the hub domain route mail to service users who areregistered in the domain. Connection documents that the Domain Configurationtool creates when you configure the service are used to route the mail. You specifysettings for the mail hub servers to optimize mail routing performance.
Mail sent from on-premises users in the on-premises hub domain to service usersin the domain is routed automatically. To route mail from on-premises users inother domains to the service users in the on-premises hub domain, configure mailrouting from the other domains to the on-premises hub domain. You can routemail from other Domino domains or foreign domains that do not include Dominomail servers. For more information, see the topic “Setting up Notes routing” in theDomino documentation.
Chapter 3. Preparing your environment 55
To route mail from external users on the Internet to the service users in theon-premises hub domain, configure an SMTP server to accept the mail. Then routethe mail to a mail hub server in the on-premises hub domain. You are responsiblefor configuring virus scanning and spam filtering on mail received from theInternet. For more information, see the topic “Configuring Domino to send andreceive mail over SMTP” in the Domino documentation.
Perform the steps in this procedure to optimize mail routing for each mail hubserver in the on-premises hub domain.
Procedure1. Customize the routing retry interval by performing the following steps on each
mail hub server:a. From the Domino Administrator client, open a server in the domain.b. Click Configuration > Server > Configurations.c. Create or edit a Configuration Settings document that applies to the mail
hub server.d. Click Router/SMTP > Restrictions and Controls > Transfer Controls.e. In the Initial transfer retry interval field, specify 1 minutes.
2. To allow the use of multiple transfer threads for mail routing, perform thefollowing steps on each mail hub server:a. Add the following setting to the server notes.ini file:
RouterAllowConcurrentXferToAll=1
b. Perform the following steps to limit the number of transfer threads used forrouting to any single destination. This setting reduces the chance thatrouting to one destination over a slow connection will monopolize transferthreads and prevent routing to other destinations.1) From the Domino Administrator, click Configuration > Server >
Configurations
2) Add or edit a Configuration Settings document that applies to the mailserver.
3) Click Router/SMTP > Restrictions and Controls > Transfer Controls.4) In the Maximum concurrent transfer threads field, specify 4.
Note: These steps allow the use of multiple transfer threads when routingmail to any destination, not only to the service. After users are provisionedfor the service, monitor mail routing. Ensure that the setting does notnegatively affect the performance of routing to destinations other than theservice.
Related concepts:“Examples: Routing internal mail” on page 60These examples illustrate mail routing between service users and on-premisesusers and devices.“Examples: Routing external mail” on page 68These examples illustrate routing mail between service users and external usersover the Internet.Related information:
Domino documentation
56 SmartCloud Notes: Administering SmartCloud Notes: Hybrid Environment March 2015
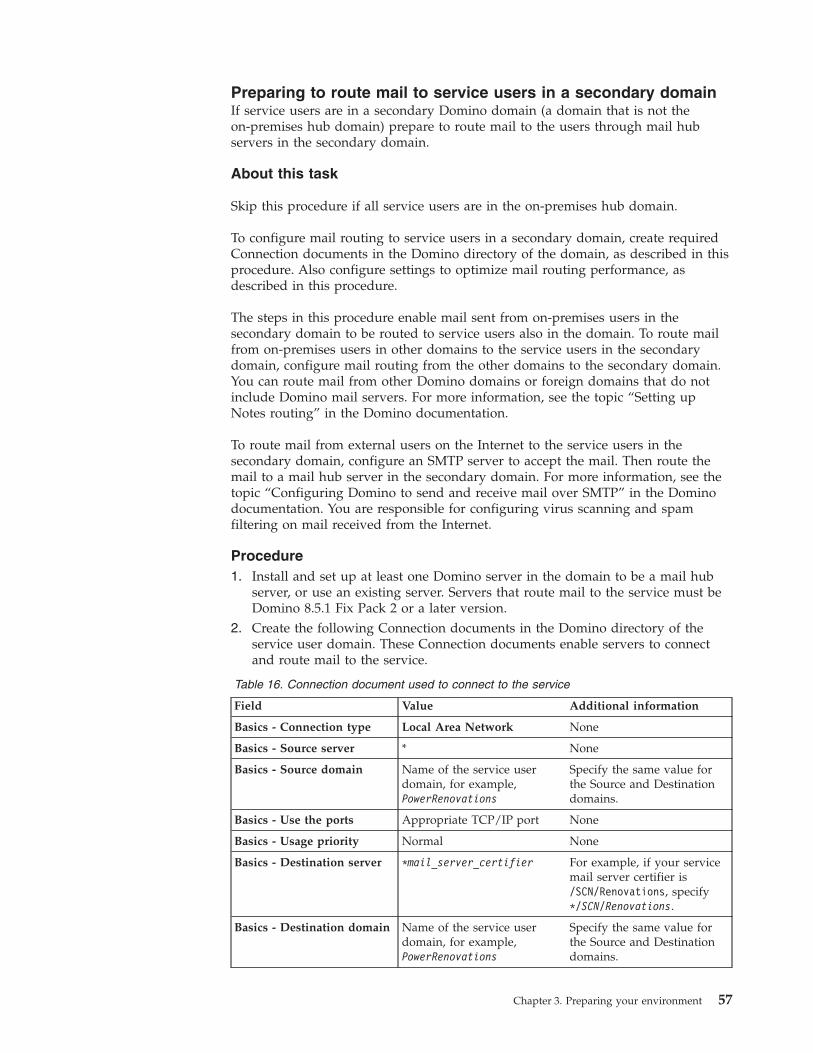
Preparing to route mail to service users in a secondary domainIf service users are in a secondary Domino domain (a domain that is not theon-premises hub domain) prepare to route mail to the users through mail hubservers in the secondary domain.
About this task
Skip this procedure if all service users are in the on-premises hub domain.
To configure mail routing to service users in a secondary domain, create requiredConnection documents in the Domino directory of the domain, as described in thisprocedure. Also configure settings to optimize mail routing performance, asdescribed in this procedure.
The steps in this procedure enable mail sent from on-premises users in thesecondary domain to be routed to service users also in the domain. To route mailfrom on-premises users in other domains to the service users in the secondarydomain, configure mail routing from the other domains to the secondary domain.You can route mail from other Domino domains or foreign domains that do notinclude Domino mail servers. For more information, see the topic “Setting upNotes routing” in the Domino documentation.
To route mail from external users on the Internet to the service users in thesecondary domain, configure an SMTP server to accept the mail. Then route themail to a mail hub server in the secondary domain. For more information, see thetopic “Configuring Domino to send and receive mail over SMTP” in the Dominodocumentation. You are responsible for configuring virus scanning and spamfiltering on mail received from the Internet.
Procedure1. Install and set up at least one Domino server in the domain to be a mail hub
server, or use an existing server. Servers that route mail to the service must beDomino 8.5.1 Fix Pack 2 or a later version.
2. Create the following Connection documents in the Domino directory of theservice user domain. These Connection documents enable servers to connectand route mail to the service.
Table 16. Connection document used to connect to the service
Field Value Additional information
Basics - Connection type Local Area Network None
Basics - Source server * None
Basics - Source domain Name of the service userdomain, for example,PowerRenovations
Specify the same value forthe Source and Destinationdomains.
Basics - Use the ports Appropriate TCP/IP port None
Basics - Usage priority Normal None
Basics - Destination server *mail_server_certifier For example, if your servicemail server certifier is/SCN/Renovations, specify*/SCN/Renovations.
Basics - Destination domain Name of the service userdomain, for example,PowerRenovations
Specify the same value forthe Source and Destinationdomains.
Chapter 3. Preparing your environment 57
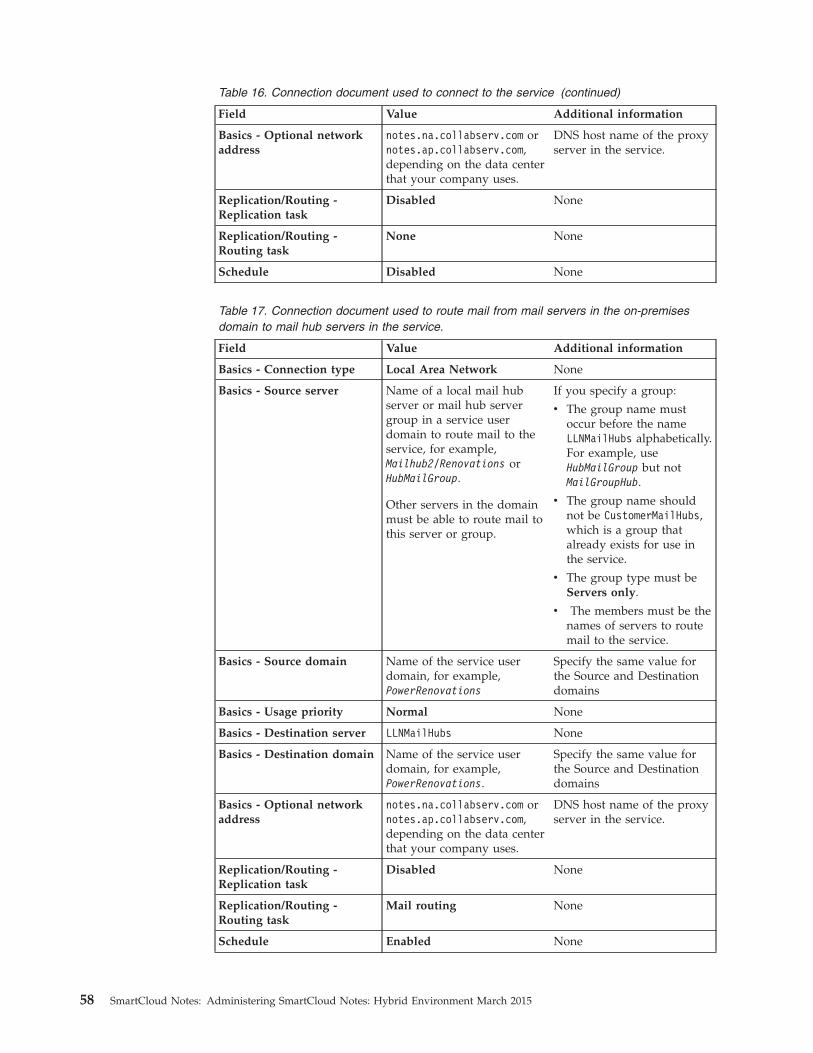
Table 16. Connection document used to connect to the service (continued)
Field Value Additional information
Basics - Optional networkaddress
notes.na.collabserv.com ornotes.ap.collabserv.com,depending on the data centerthat your company uses.
DNS host name of the proxyserver in the service.
Replication/Routing -Replication task
Disabled None
Replication/Routing -Routing task
None None
Schedule Disabled None
Table 17. Connection document used to route mail from mail servers in the on-premisesdomain to mail hub servers in the service.
Field Value Additional information
Basics - Connection type Local Area Network None
Basics - Source server Name of a local mail hubserver or mail hub servergroup in a service userdomain to route mail to theservice, for example,Mailhub2/Renovations orHubMailGroup.
Other servers in the domainmust be able to route mail tothis server or group.
If you specify a group:
v The group name mustoccur before the nameLLNMailHubs alphabetically.For example, useHubMailGroup but notMailGroupHub.
v The group name shouldnot be CustomerMailHubs,which is a group thatalready exists for use inthe service.
v The group type must beServers only.
v The members must be thenames of servers to routemail to the service.
Basics - Source domain Name of the service userdomain, for example,PowerRenovations
Specify the same value forthe Source and Destinationdomains
Basics - Usage priority Normal None
Basics - Destination server LLNMailHubs None
Basics - Destination domain Name of the service userdomain, for example,PowerRenovations.
Specify the same value forthe Source and Destinationdomains
Basics - Optional networkaddress
notes.na.collabserv.com ornotes.ap.collabserv.com,depending on the data centerthat your company uses.
DNS host name of the proxyserver in the service.
Replication/Routing -Replication task
Disabled None
Replication/Routing -Routing task
Mail routing None
Schedule Enabled None
58 SmartCloud Notes: Administering SmartCloud Notes: Hybrid Environment March 2015
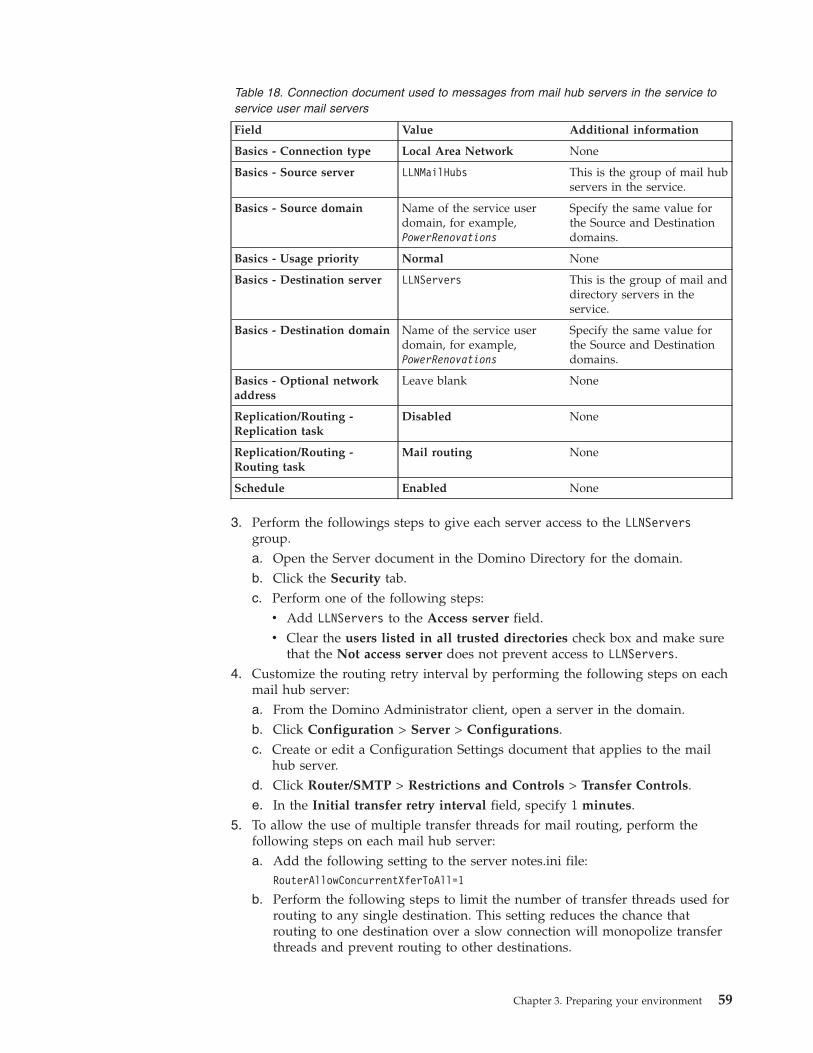
Table 18. Connection document used to messages from mail hub servers in the service toservice user mail servers
Field Value Additional information
Basics - Connection type Local Area Network None
Basics - Source server LLNMailHubs This is the group of mail hubservers in the service.
Basics - Source domain Name of the service userdomain, for example,PowerRenovations
Specify the same value forthe Source and Destinationdomains.
Basics - Usage priority Normal None
Basics - Destination server LLNServers This is the group of mail anddirectory servers in theservice.
Basics - Destination domain Name of the service userdomain, for example,PowerRenovations
Specify the same value forthe Source and Destinationdomains.
Basics - Optional networkaddress
Leave blank None
Replication/Routing -Replication task
Disabled None
Replication/Routing -Routing task
Mail routing None
Schedule Enabled None
3. Perform the followings steps to give each server access to the LLNServersgroup.a. Open the Server document in the Domino Directory for the domain.b. Click the Security tab.c. Perform one of the following steps:
v Add LLNServers to the Access server field.v Clear the users listed in all trusted directories check box and make sure
that the Not access server does not prevent access to LLNServers.4. Customize the routing retry interval by performing the following steps on each
mail hub server:a. From the Domino Administrator client, open a server in the domain.b. Click Configuration > Server > Configurations.c. Create or edit a Configuration Settings document that applies to the mail
hub server.d. Click Router/SMTP > Restrictions and Controls > Transfer Controls.e. In the Initial transfer retry interval field, specify 1 minutes.
5. To allow the use of multiple transfer threads for mail routing, perform thefollowing steps on each mail hub server:a. Add the following setting to the server notes.ini file:
RouterAllowConcurrentXferToAll=1
b. Perform the following steps to limit the number of transfer threads used forrouting to any single destination. This setting reduces the chance thatrouting to one destination over a slow connection will monopolize transferthreads and prevent routing to other destinations.
Chapter 3. Preparing your environment 59
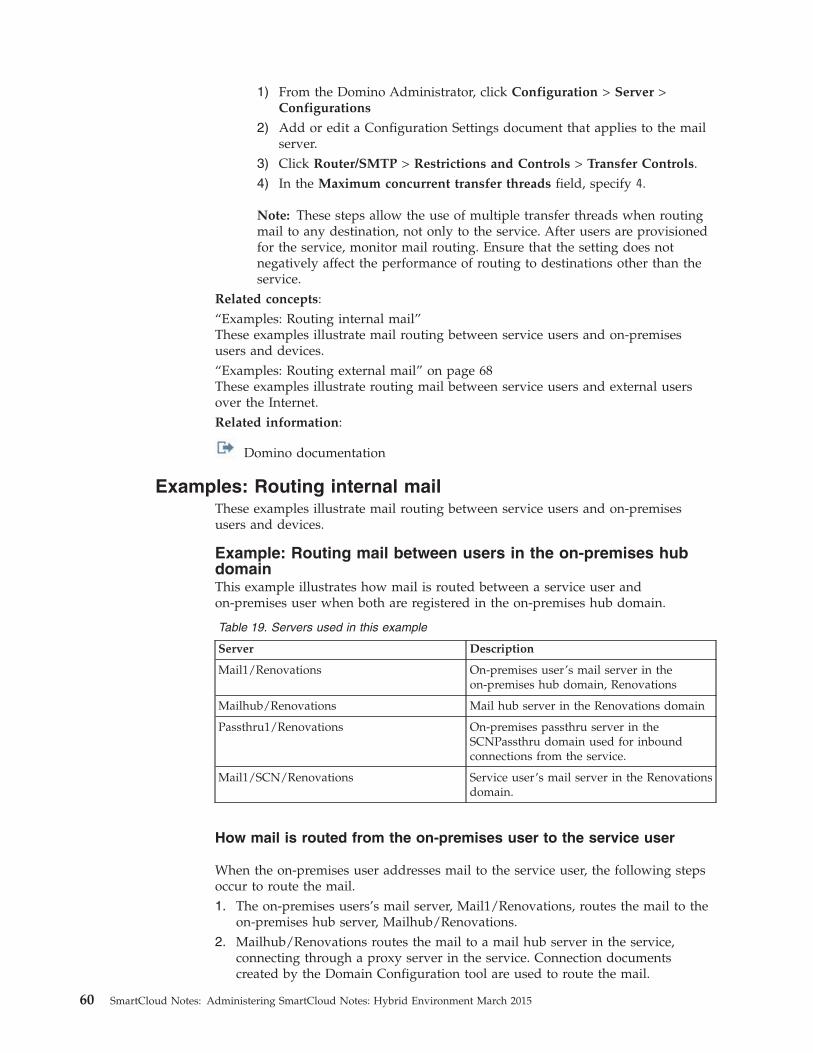
1) From the Domino Administrator, click Configuration > Server >Configurations
2) Add or edit a Configuration Settings document that applies to the mailserver.
3) Click Router/SMTP > Restrictions and Controls > Transfer Controls.4) In the Maximum concurrent transfer threads field, specify 4.
Note: These steps allow the use of multiple transfer threads when routingmail to any destination, not only to the service. After users are provisionedfor the service, monitor mail routing. Ensure that the setting does notnegatively affect the performance of routing to destinations other than theservice.
Related concepts:“Examples: Routing internal mail”These examples illustrate mail routing between service users and on-premisesusers and devices.“Examples: Routing external mail” on page 68These examples illustrate routing mail between service users and external usersover the Internet.Related information:
Domino documentation
Examples: Routing internal mailThese examples illustrate mail routing between service users and on-premisesusers and devices.
Example: Routing mail between users in the on-premises hubdomainThis example illustrates how mail is routed between a service user andon-premises user when both are registered in the on-premises hub domain.
Table 19. Servers used in this example
Server Description
Mail1/Renovations On-premises user’s mail server in theon-premises hub domain, Renovations
Mailhub/Renovations Mail hub server in the Renovations domain
Passthru1/Renovations On-premises passthru server in theSCNPassthru domain used for inboundconnections from the service.
Mail1/SCN/Renovations Service user’s mail server in the Renovationsdomain.
How mail is routed from the on-premises user to the service user
When the on-premises user addresses mail to the service user, the following stepsoccur to route the mail.1. The on-premises users’s mail server, Mail1/Renovations, routes the mail to the
on-premises hub server, Mailhub/Renovations.2. Mailhub/Renovations routes the mail to a mail hub server in the service,
connecting through a proxy server in the service. Connection documentscreated by the Domain Configuration tool are used to route the mail.
60 SmartCloud Notes: Administering SmartCloud Notes: Hybrid Environment March 2015
3. The mail hub server in the service routes the mail to the service user’s mailserver, Mail1/SCN/Renovations. A Connection document created by theDomain Configuration tool is used to route the mail.
How mail is routed from the service user to the on-premises user
When the service user sends mail to the on-premises user, the following stepsoccur to route the mail.1. The service user’s mail server, Mail1/SCN/Renovations, routes the mail to a
mail hub server in the service.2. The mail hub server in the service routes the mail to the on-premises mail hub
server, Mailhub/Renovations. The mail hub server connects through theon-premises passthru server, Passthru1/Renovations, in the SCNPassthrudomain.
3. The on-premises mail hub server, Mailhub/Renovations, routes the mail to theon-premises user’s mail server, Mail1/Renovations.
.
Routing mail from an on-premises user to a service user when both users are in the on-premises hub domain
Chapter 3. Preparing your environment 61

Example: Routing mail between users in a secondary domainThis example illustrates how mail is routed between a service user and anon-premises user when both users are registered in a Domino domain that is notthe on-premises hub domain.
Table 20. Servers used in this example
Server Description
Mail2/Renovations On-premises user’s mail server in thePowerRenovations domain
Mailhub2/Renovations Mail hub server in the PowerRenovationsdomain
Mailhub/Renovations Mail hub server in the on-premises hubdomain, Renovations
Passthru1/Renovations On-premises passthru server in theSCNPassthru domain used for inboundconnections from the service
.
Routing mail from a service user to an on-premises user when both users are in the on-premises hub domain
62 SmartCloud Notes: Administering SmartCloud Notes: Hybrid Environment March 2015
Table 20. Servers used in this example (continued)
Server Description
Mail2/SCN/Renovations Service user’s mail server in thePowerRenovations domain
How mail is routed from the on-premises user to the service user
When the on-premises user sends mail to the service user, the following stepsoccur to route the mail.1. The on-premises users’s mail server, Mail2/Renovations, routes the mail to the
mail hub server in the PowerRenovations domain, Mailhub2/Renovations.2. Mailhub2/Renovations routes the mail to a mail hub server in the service.
v Mailhub2/Renovations connects through a proxy server in the service.v Connection documents that a company administrator creates in the
PowerRenovations directory are used to route the mail.3. The mail hub server in the service routes the mail to the service user’s mail
server, Mail2/SCN/Renovations.v A Connection document that a company administrator creates in the
PowerRenovations directory is used to route the mail.
Chapter 3. Preparing your environment 63
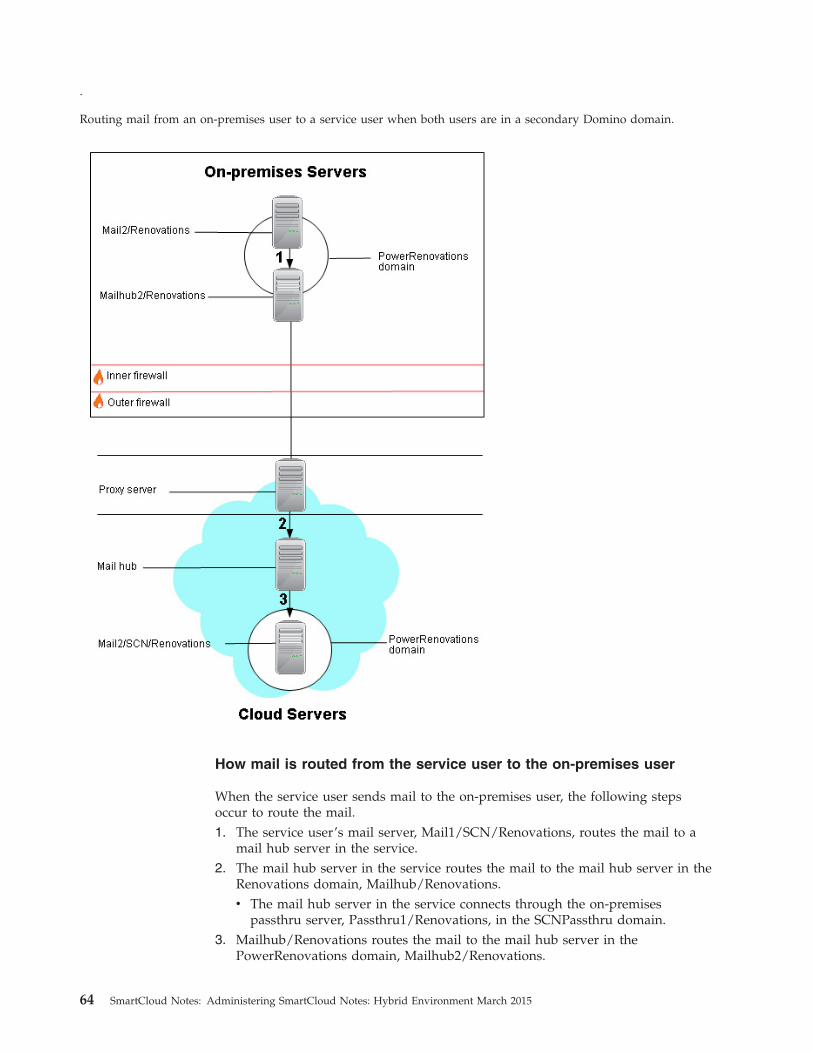
How mail is routed from the service user to the on-premises user
When the service user sends mail to the on-premises user, the following stepsoccur to route the mail.1. The service user’s mail server, Mail1/SCN/Renovations, routes the mail to a
mail hub server in the service.2. The mail hub server in the service routes the mail to the mail hub server in the
Renovations domain, Mailhub/Renovations.v The mail hub server in the service connects through the on-premises
passthru server, Passthru1/Renovations, in the SCNPassthru domain.3. Mailhub/Renovations routes the mail to the mail hub server in the
PowerRenovations domain, Mailhub2/Renovations.
.
Routing mail from an on-premises user to a service user when both users are in a secondary Domino domain.
64 SmartCloud Notes: Administering SmartCloud Notes: Hybrid Environment March 2015
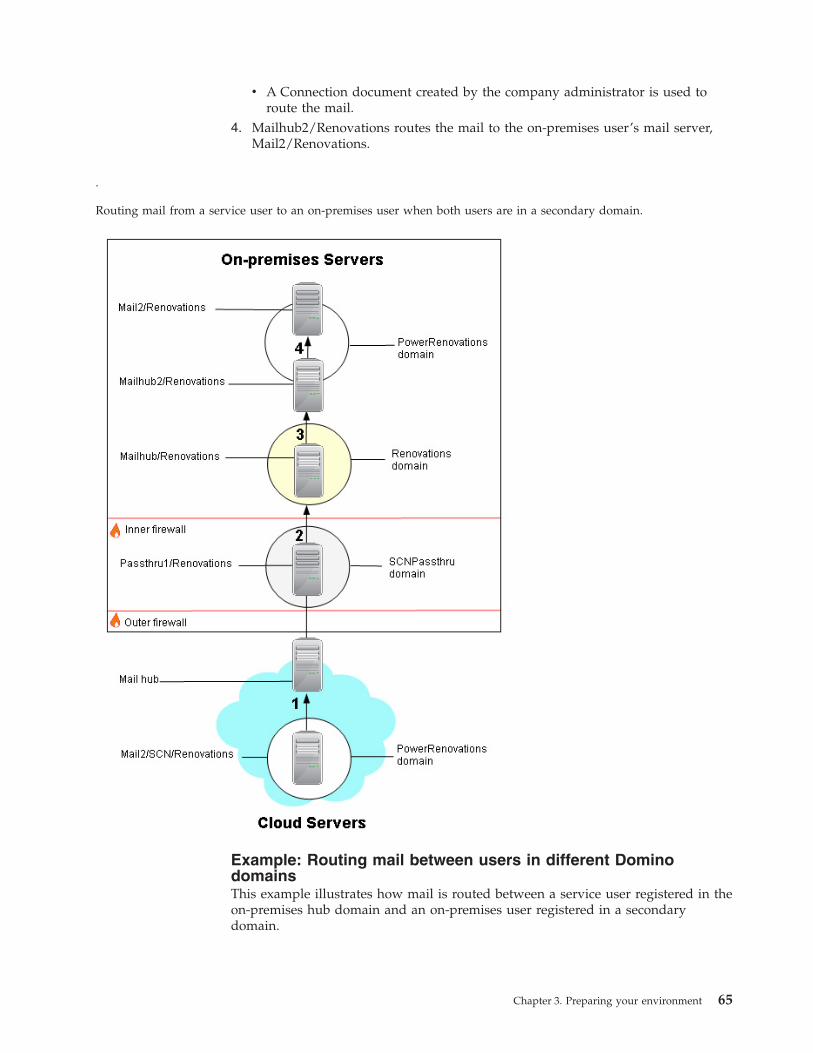
v A Connection document created by the company administrator is used toroute the mail.
4. Mailhub2/Renovations routes the mail to the on-premises user’s mail server,Mail2/Renovations.
Example: Routing mail between users in different DominodomainsThis example illustrates how mail is routed between a service user registered in theon-premises hub domain and an on-premises user registered in a secondarydomain.
.
Routing mail from a service user to an on-premises user when both users are in a secondary domain.
Chapter 3. Preparing your environment 65
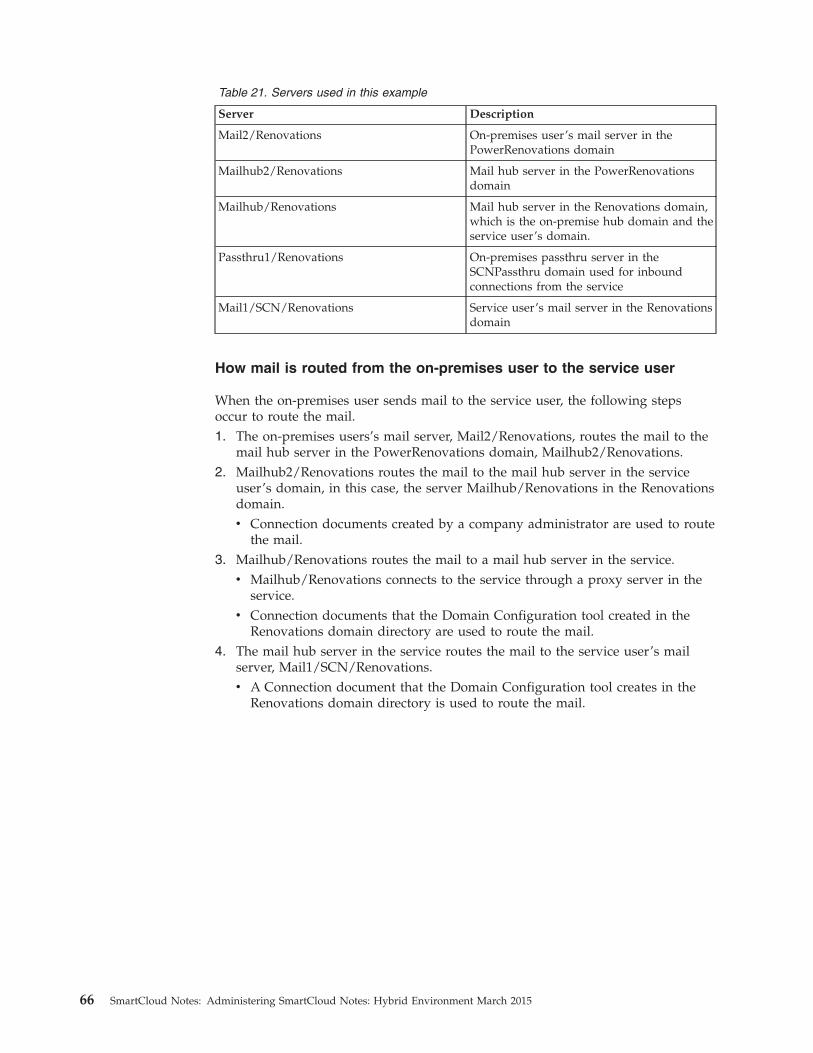
Table 21. Servers used in this example
Server Description
Mail2/Renovations On-premises user’s mail server in thePowerRenovations domain
Mailhub2/Renovations Mail hub server in the PowerRenovationsdomain
Mailhub/Renovations Mail hub server in the Renovations domain,which is the on-premise hub domain and theservice user’s domain.
Passthru1/Renovations On-premises passthru server in theSCNPassthru domain used for inboundconnections from the service
Mail1/SCN/Renovations Service user’s mail server in the Renovationsdomain
How mail is routed from the on-premises user to the service user
When the on-premises user sends mail to the service user, the following stepsoccur to route the mail.1. The on-premises users’s mail server, Mail2/Renovations, routes the mail to the
mail hub server in the PowerRenovations domain, Mailhub2/Renovations.2. Mailhub2/Renovations routes the mail to the mail hub server in the service
user’s domain, in this case, the server Mailhub/Renovations in the Renovationsdomain.v Connection documents created by a company administrator are used to route
the mail.3. Mailhub/Renovations routes the mail to a mail hub server in the service.
v Mailhub/Renovations connects to the service through a proxy server in theservice.
v Connection documents that the Domain Configuration tool created in theRenovations domain directory are used to route the mail.
4. The mail hub server in the service routes the mail to the service user’s mailserver, Mail1/SCN/Renovations.v A Connection document that the Domain Configuration tool creates in the
Renovations domain directory is used to route the mail.
66 SmartCloud Notes: Administering SmartCloud Notes: Hybrid Environment March 2015

How mail is routed from the service user to the on-premises user
When the service user sends mail to the on-premises user, the following stepsoccur to route the mail.1. The service user’s mail server, Mail1/SCN/Renovations, routes the mail to a
mail hub server in the service.2. The mail hub server in the service routes the mail to the on-premises mail hub
server in the Renovations domain, Mailhub/Renovations.v The mail hub server in the service connects through the on-premises
passthru server, Passthru1/Renovations, in the SCNPassthru domain.
.
Routing mail from an on-premises user in a secondary domain to a service user in the on-premises hub domain.
Chapter 3. Preparing your environment 67
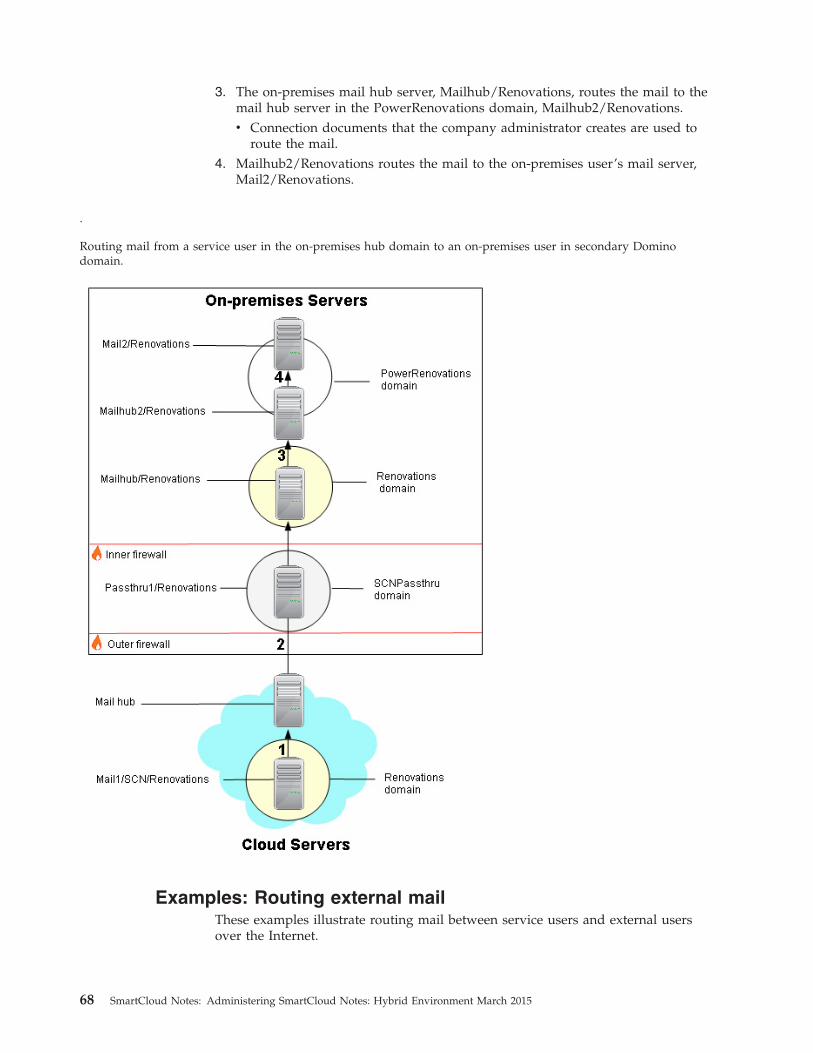
3. The on-premises mail hub server, Mailhub/Renovations, routes the mail to themail hub server in the PowerRenovations domain, Mailhub2/Renovations.v Connection documents that the company administrator creates are used to
route the mail.4. Mailhub2/Renovations routes the mail to the on-premises user’s mail server,
Mail2/Renovations.
Examples: Routing external mailThese examples illustrate routing mail between service users and external usersover the Internet.
.
Routing mail from a service user in the on-premises hub domain to an on-premises user in secondary Dominodomain.
68 SmartCloud Notes: Administering SmartCloud Notes: Hybrid Environment March 2015
Example: Routing mail from an external user to a service userThis example illustrates how mail is routed from an external user on the Internetto a service user.
In this example:v The external user is in the zetabank.com domain.v The external SMTP server is smtp.zetabank.com.v The on-premises SMTP server is smtp.renovations.com.v The service user is in the renovations.com Internet domain and in the
Renovations Domino domain.v The on-premises hub domain is Renovations.v The on-premises mail hub server is Mailhub/Renovations.v The service user’s mail server is Mail1/SCN/Renovations.
When the external user from the zetabank.com domain sends mail to the serviceuser in the internal domain renovations.com, the following steps occur to route themail.1. The external SMTP server, smtp.zetabank.com, routes the mail to the
on-premises SMTP server, smtp.renovations.com, over the Internet.2. smtp.renovations.com receives the mail, scans it for viruses and spam, and then
routes the mail to the on-premises mail hub server, Mailhub/Renovations, inthe Renovations Domino domain.v A company administrator configures the routing to Mailhub/Renovations.
3. Mailhub/Renovations routes the mail to a mail hub server in the service overNRPC.v Mailhub/Renovations connects through a proxy server in the service.v Connection documents created by the Domain Configuration tool are used to
route the mail.4. The mail hub server in the service routes the mail to the service user’s mail
server, Mail1/SCN/Renovations.v A Connection document created by the Domain Configuration tool is used to
route the mail.
Chapter 3. Preparing your environment 69
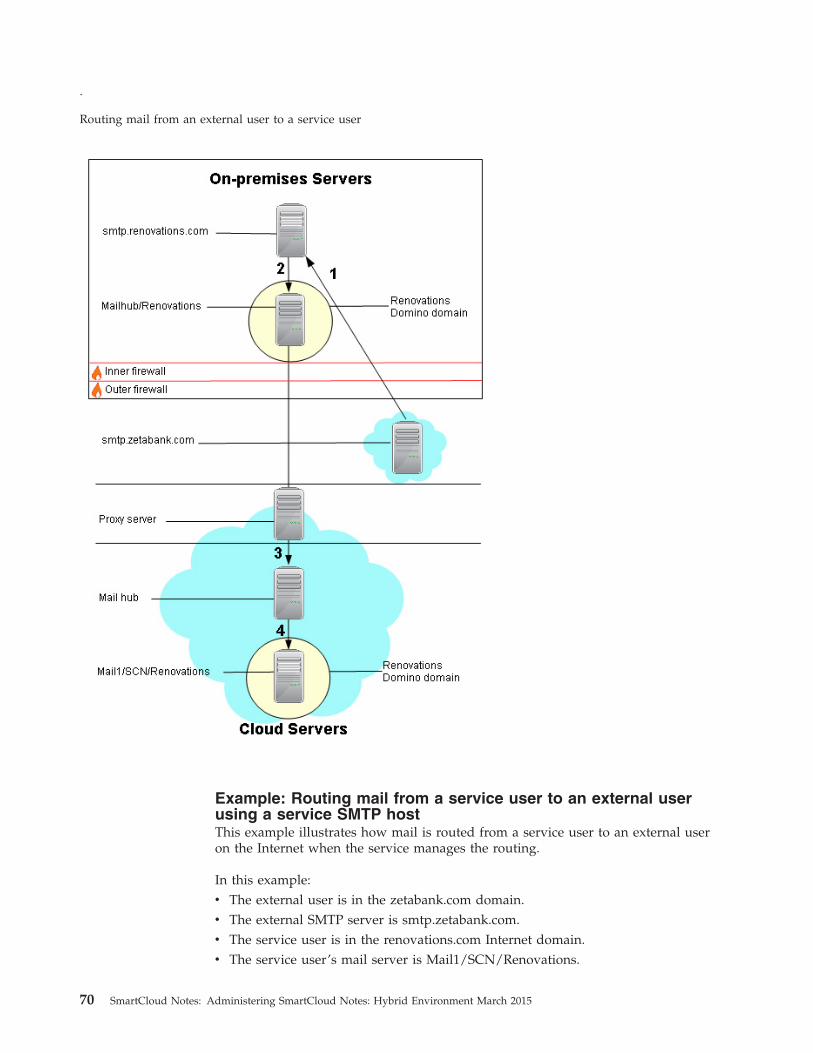
Example: Routing mail from a service user to an external userusing a service SMTP hostThis example illustrates how mail is routed from a service user to an external useron the Internet when the service manages the routing.
In this example:v The external user is in the zetabank.com domain.v The external SMTP server is smtp.zetabank.com.v The service user is in the renovations.com Internet domain.v The service user’s mail server is Mail1/SCN/Renovations.
.
Routing mail from an external user to a service user
70 SmartCloud Notes: Administering SmartCloud Notes: Hybrid Environment March 2015
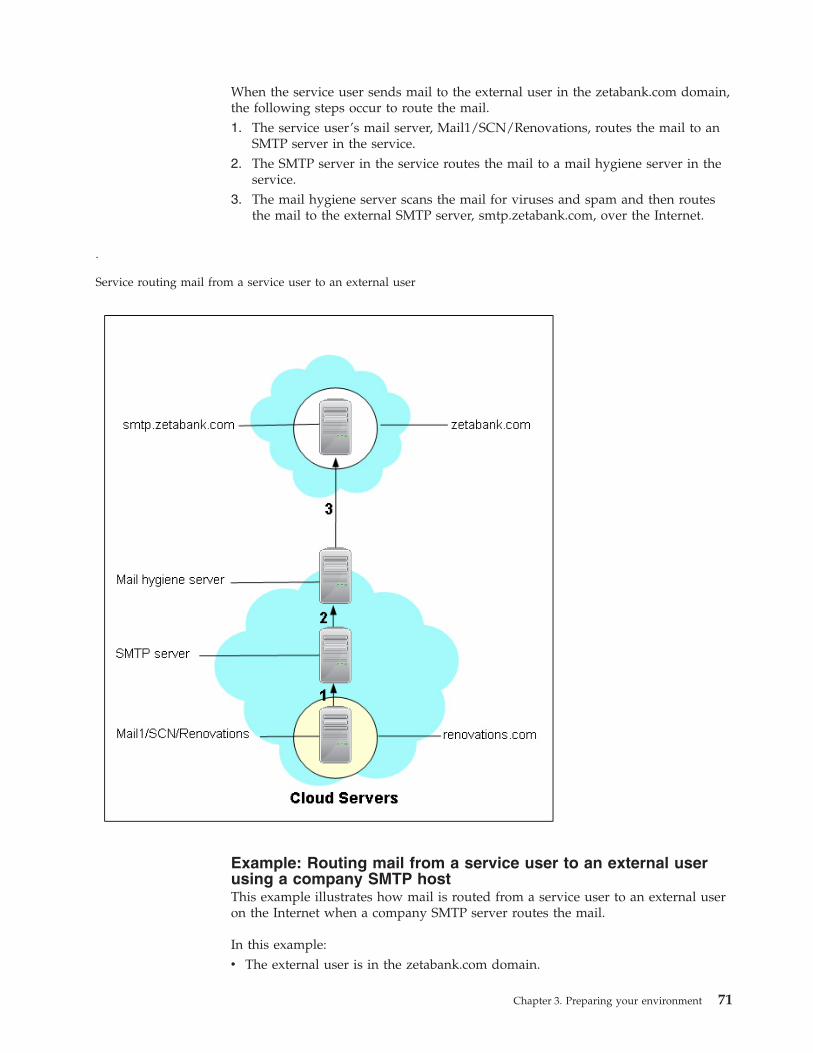
When the service user sends mail to the external user in the zetabank.com domain,the following steps occur to route the mail.1. The service user’s mail server, Mail1/SCN/Renovations, routes the mail to an
SMTP server in the service.2. The SMTP server in the service routes the mail to a mail hygiene server in the
service.3. The mail hygiene server scans the mail for viruses and spam and then routes
the mail to the external SMTP server, smtp.zetabank.com, over the Internet.
Example: Routing mail from a service user to an external userusing a company SMTP hostThis example illustrates how mail is routed from a service user to an external useron the Internet when a company SMTP server routes the mail.
In this example:v The external user is in the zetabank.com domain.
.
Service routing mail from a service user to an external user
Chapter 3. Preparing your environment 71
v The external SMTP server is smtp.zetabank.com.v The on-premises SMTP server is smtp.renovations.com.v The service user is in the renovations.com domain.v The service user’s mail server is Mail1/SCN/Renovations.
When the service user addresses mail to the external user in the zetabank.comdomain, the following steps are taken to route the mail.1. The service user’s mail server, Mail1/SCN/Renovations, routes the mail to an
SMTP server in the service.2. The SMTP server in the service routes the mail to a mail hygiene server in the
service.3. The mail hygiene server in the service scans the mail for viruses and spam and
then routes the mail to the on-premises SMTP server, smtp.renovations.com.4. The on-premises SMTP server, smtp.renovations.com, filters and audits the
mail, and then routes the mail to the external SMTP server, smtp.zetabank.com.
72 SmartCloud Notes: Administering SmartCloud Notes: Hybrid Environment March 2015
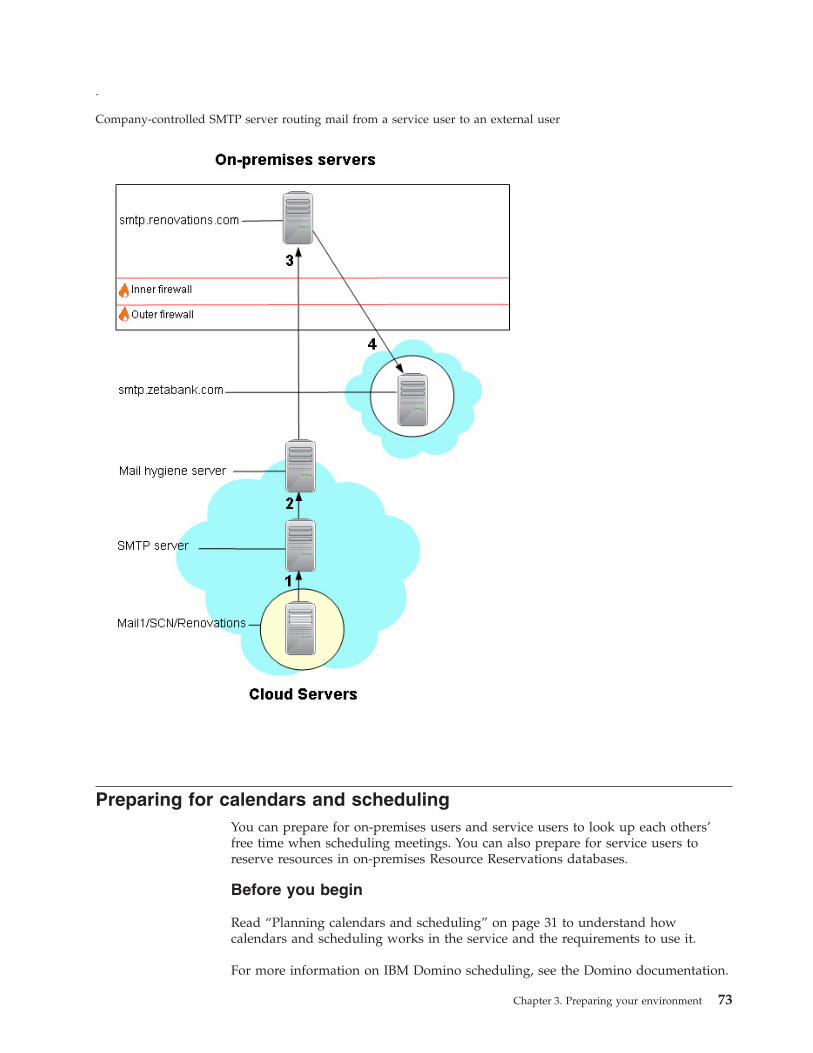
Preparing for calendars and schedulingYou can prepare for on-premises users and service users to look up each others’free time when scheduling meetings. You can also prepare for service users toreserve resources in on-premises Resource Reservations databases.
Before you begin
Read “Planning calendars and scheduling” on page 31 to understand howcalendars and scheduling works in the service and the requirements to use it.
For more information on IBM Domino scheduling, see the Domino documentation.
.
Company-controlled SMTP server routing mail from a service user to an external user
Chapter 3. Preparing your environment 73
Procedure1. Perform the following tasks to prepare for free-time requests between service
users and on-premises users:v Make sure that any on-premises server that will request free-time of service
users runs Domino 8.5.1 Fix Pack 2 or a later version.v Disable public key checking on any on-premises server that will request
free-time of service users. On the Security tab of the Server document, in theCompare public keys field, select Do not enforce key checking.
v Verify that the CalConn server task is specified in the ServerTasks line in thenotes.ini file of each on-premises mail server and Calendar server that willrequest free time of service users. The task uses CPU or memory resourcesonly when handling free-time requests.
v In a multi-domain environment, perform the following additional steps toenable service users to request free-time of on-premises users:– If on-premises users are not in the on-premises hub domain, make sure
the primary directory of the on-premises hub domain has a domaindocument that specifies a Calendar server for the domain of theon-premises users.
– If a directory catalog is used in the on-premises hub domain, make surethat mail hub servers in the domain are configured to use directoryassistance to look up names in it.
– If you do not synchronize the primary Domino directory of theon-premises hub domain, copy the CustomerMailHubs group in it to asynchronized directory. Keep the group type as Servers only. This stepmust be done after you configure the service and run the DomainConfiguration tool, because the tool creates the group initially.
v In a multi-domain environment, perform the following additional steps toenable on-premises users to request the free-time of service users:– If the service users are not in the on-premises hub domain, create a
Connection document in the primary directory of the service users’domain that enables mail servers in the domain to connect to the serviceto send the free-time request. If you configure mail routing from theservice user domain to the service, this step is complete as part of thatconfiguration.
– If the on-premises users are in a different domain than the service users,make sure the primary directory of the on-premises user domain has adomain document that specifies the Calendar server for the domain of theservice users.
2. Perform the following steps to prepare for service users to reserve rooms andresource in an on-premises Resource Reservations database:v Synchronize the directory of the domain in which a Resource Reservations
database is located.v If a Resource Reservations database is not in the on-premises hub domain,
configure mail routing from the on-premises hub domain to the otherdomain.
v To enable a service user to look up the free-time of a room or resource, makesure a server in the on-premises hub domain can look up free-time in theResource Reservations database or can connect to a server that can.
v If the directory of the domain that contains the Resource Reservationsdatabase is aggregated in a directory catalog, specify the following settings inthe Extended Directory Catalog configuration document:
74 SmartCloud Notes: Administering SmartCloud Notes: Hybrid Environment March 2015
– Include the following field names in the Additional fields to includefield: ResourceFlag, ResourceType, and ResourceCapacity
– In the Include Mail-In Databases field, select Yes.v Remove duplicate site names that are used for rooms and resources across
directories. If two sites have the same name, the service lists resources fromboth sites under one site name. This situation can lead users to reserveresources at the wrong site. See Technote 1473022 for instructions on makingsite names unique.
What to do nextRelated tasks:“Preparing to replicate an extended directory catalog” on page 48An extended directory catalog (EDC) can be used to aggregate entries frommultiple Domino directories and replicate the entries to the service. An EDC issupported for read-only use in the service. This procedure is useful only forcompanies that have more than one Domino directory.“Downloading and running the Domain Configuration tool” on page 94The Domain Configuration tool configures your on-premises servers to connect toyour hosted IBM SmartCloud Notes servers. The server configuration informationthat you provide in the Account Settings of SmartCloud Notes Administration isthe data that is used to configure the connections.Related information:
Domino documentation
Technote 1473022
Example of integrating a secondary domain with the service
Example: Free-time requests between users in theon-premises hub domain
This example illustrates how free-time requests occur between a service user andan on-premises user who are both registered in the on-premises hub domain.
Table 22. Servers used in this example
Server Description
Mail1/Renovations On-premises user’s mail server in theon-premises hub domain, Renovations
Mailhub/Renovations Mail hub server in the Renovations domain
Passthru1/Renovations On-premises passthru server in theSCNPassthru domain used for inboundconnections from the service.
Mail1/SCN/Renovations Service user’s mail server in the Renovationsdomain.
On-premises user requesting free time of service user
When the on-premises user requests the free-time of the service user, the followingsteps occur to process the request:1. The on-premises user’s mail server, Mail1/Renovations, looks up the name of
the service user’s mail server, Mail1/SCN/Renovations, in the Renovationsdirectory.
Chapter 3. Preparing your environment 75

2. Mail1/Renovations sends the free-time request to Mail1/SCN/Renovations.v Mail1/Renovations runs the CalConn server task.v A Connection document created by the Domain Configuration tool in the
Renovations domain directory enables Mail1/Renovations to send therequest through the proxy server in the service.
3. Mail1/SCN/Renovations looks up the user’s free time in its Free Time databaseand returns it to Mail1/Renovations.
Service user requesting free time of on-premises user
When the service user requests the free-time of the on-premises user, the followingsteps occur to process the request:1. The service user’s mail server, Mail1/SCN/Renovations, looks up the name of
the on-premises user in the service directory and determines that the user’smail server is on-premises.
2. Mail1/SCN/Renovations sends a free-time request to the mail hub server,Mailhub/Renovations, in the on-premises hub domain.
.
On-premises user requesting free-time of service user when both are in the on-premises hub domain.
76 SmartCloud Notes: Administering SmartCloud Notes: Hybrid Environment March 2015

v Mail1/SCN/Renovations finds the names of all servers in theCustomerMailHubs and attempts to fetch free-time for each one until itsucceeds when trying Mailhub/Renovations. The Domain Configuration toolcreates the group in the directory of the on-premises hub domain and thegroup replicates to the service during directory synchronization.
v Connection documents created in the service at time of customer creationenable Mail1/SCN/Renovations to connect to Mailhub/Renovations throughthe server Passthru1/Renovations.
3. Mailhub/Renovations sends the request to the on-premises user’s mail server,Mail1/Renovations.
4. Mail1/Renovations looks up the user’s free time in its Free Time database andreturns it to Mailhub/Renovations.
5. Mailhub/Renovations returns the free time to Mail1/SCN/Renovations.
.
Service user requesting free-time of on-premises user when both are in the on-premises hub domain.
Chapter 3. Preparing your environment 77

Example: Free-time requests between users in differentdomains
This example illustrates how free-time requests occur between an on-premises userin a secondary domain and a service user in the on-premises hub domain.
Table 23. Servers used in this example
Server Description
Mail2/Renovations On-premises user’s mail server in thePowerRenovations domain
Mailhub2/Renovations Calendar server for the PowerRenovationsdomain
Mailhub/Renovations Mail hub server and Calendar Server for theon-premises hub domain, Renovations
Passthru1/Renovations On-premises passthru server in theSCNPassthru domain used for inboundconnections from the service
Mail2/SCN/Renovations Service user’s mail server in the Renovationsdomain
On-premises user requesting free time of service user
When the on-premises user requests the free-time of the service user, the followingsteps occur to process the request:1. The on-premises user’s mail server, Mail2/Renovations, looks up the service
user’s mail server in a local directory catalog.2. Mail2/Renovations sends a free-time request to Mailhub2/Renovations, the
Calendar Server for the PowerRenovations domain.v Both servers run the CalConn server task.
3. Mailhub2/Renovations sends the request to Mailhub/Renovations, theCalendar Server for the Renovations domain.v Mailhub/Renovations runs the CalConn server task.
4. Mailhub/Renovations sends the requests to the service user’s mail server,Mail1/SCN/Renovations.v A Connection document created by the Domain Configuration tool in the
Renovations domain directory enables Mailhub/Renovations to send therequest through the proxy server in the service.
5. Mail1/SCN/Renovations looks up the user’s free time in its Free Time databaseand returns it to Mailhub/Renovations.
6. Mailhub/Renovations returns the free time to Mailhub2/Renovations.7. Mailhub2/Renovations returns the free time to Mail2/Renovations.
78 SmartCloud Notes: Administering SmartCloud Notes: Hybrid Environment March 2015

Service user requesting free time of on-premises user
When the service user requests the free-time of the on-premises user, the followingsteps occur to process the request:1. The service user’s mail server, Mail1/SCN/Renovations, looks up the name of
the on-premises user in the service directory and determines that the user’smail server is on-premises.
2. The service user’s mail server, Mail1/SCN/Renovations, sends a free-timerequest to the mail hub server, Mailhub/Renovations, in the on-premises hubdomain.v Mail1/SCN/Renovations finds the names of all servers in the
CustomerMailHubs and attempts to fetch free-time for each one until itsucceeds when trying Mailhub/Renovations. The Domain Configuration tool
.
On-premises user in secondary domain requesting free-time of service user in on-premises hub domain
Chapter 3. Preparing your environment 79
creates the group in the directory of the on-premises hub domain and thegroup replicates to the service during directory synchronization.
v Connection documents created in the service at time of customer creationenable Mail1/SCN/Renovations to connect to Mailhub/Renovations throughthe server Passthru1/Renovations.
3. Mailhub/Renovations, the Calendar Server for the Renovations domain, sendsthe request to Mailhub2/Renovations, the Calendar Server for thePowerRenovations domain.
4. Mailhub2/Renovations sends the request to Mail2/Renovations, theon-premises user’s mail server.
5. Mail2/Renovations looks up the user’s free time in its Free Time database andreturns it to Mailhub2/Renovations.
6. Mailhub2/Renovations returns the free time to Mailhub/Renovations.7. Mailhub/Renovations returns the free time to Mail1/SCN/Renovations.
80 SmartCloud Notes: Administering SmartCloud Notes: Hybrid Environment March 2015
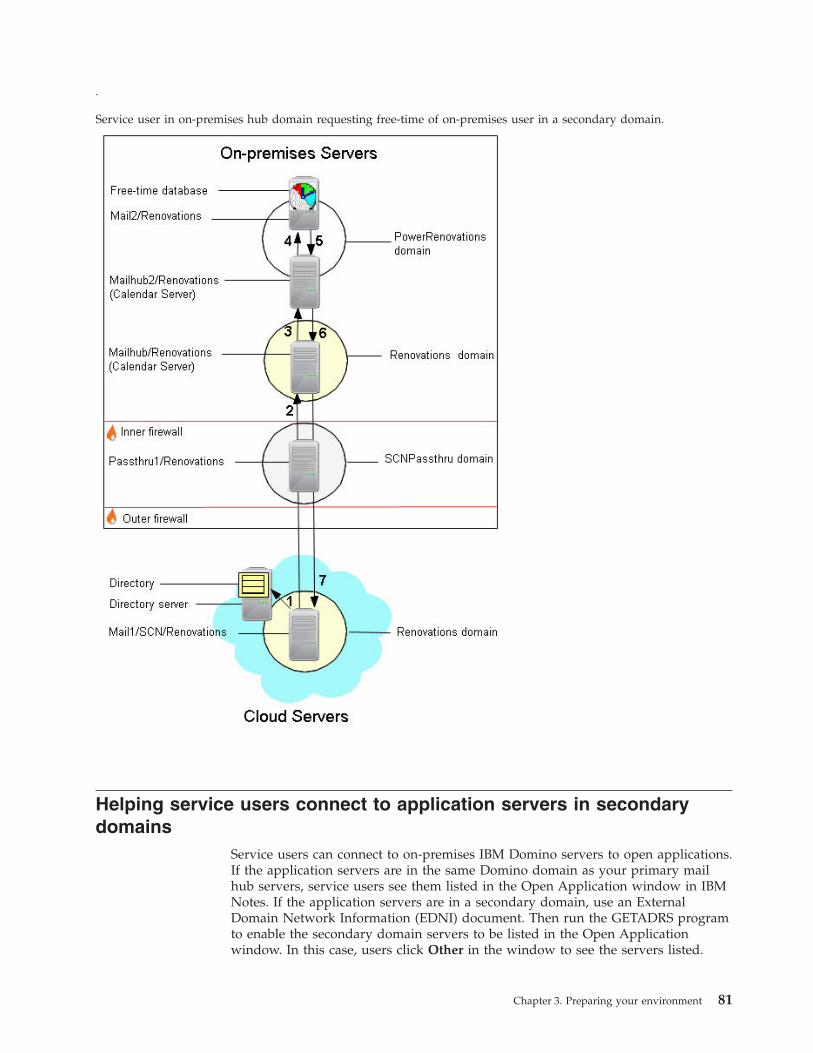
Helping service users connect to application servers in secondarydomains
Service users can connect to on-premises IBM Domino servers to open applications.If the application servers are in the same Domino domain as your primary mailhub servers, service users see them listed in the Open Application window in IBMNotes. If the application servers are in a secondary domain, use an ExternalDomain Network Information (EDNI) document. Then run the GETADRS programto enable the secondary domain servers to be listed in the Open Applicationwindow. In this case, users click Other in the window to see the servers listed.
.
Service user in on-premises hub domain requesting free-time of on-premises user in a secondary domain.
Chapter 3. Preparing your environment 81
Create an EDNI document for each secondary domain in the Domino directory ofthe primary mail hub server domain. Then schedule the GETADRS program to runregularly on one server in the primary mail hub server domain. GETADRS pullsthe names and addresses of each server from the secondary domain into Responsedocuments to the EDNI document. To determine how to connect to a server in thesecondary domain, a server in the service uses the Response document for thatserver. The EDNI document and Response documents do not replicate to the mailservers in the service. Rather, the servers in the service look them up on one ofyour primary mail hub servers.
EDNI documents make it easier for users to connect to application servers, butthey are not required. If you do not use EDNI documents, Connection documentsand bookmarks used previously to connect to the servers still work after users areprovisioned for the service. Users can also connect to the servers by typing theserver names in the Open Application window.
For more information, see the topic on setting up external domain lookups in theDomino documentation.Related information:
Domino documentation
82 SmartCloud Notes: Administering SmartCloud Notes: Hybrid Environment March 2015

Chapter 4. Configuring the service
After you have prepared your on-premises environment, configure the service towork with your environment.Related tasks:Chapter 3, “Preparing your environment,” on page 39Perform the steps in this section to prepare your on-premises servers for a hybridenvironment. Perform these steps after you have planned for the service andbefore you configure the service.
Roadmap to configuring a hybrid environmentWhen you configure a hybrid environment, you establish connections betweenyour on-premises IBM Domino servers and IBM SmartCloud Notes servers. Tohelp you accomplish this task, a Domain Configuration tool is provided for youthat makes the necessary configuration changes to your environment, based oninformation you provide. During configuration you also provide a certifier ID foryour SmartCloud Notes mail servers and you enable the service to verifyownership of at least one Internet domain.
Before you begin
Before you configure a hybrid environment, perform the procedures in Preparingyour environment. Also make sure that IBM has created the SmartCloud Notesaccount for your company, and that you have completed the task Logging on asthe first company administrator.
The following table describes the tasks required to configure a hybrid environmentand includes links to topics that describe the corresponding procedures.
Table 24. Tasks to configure a hybrid environment
Task Estimated time to complete How to confirm completion
Complete a checklist to makesure all prerequisite tasks aredone and to recordinformation you will provideto configure accountsesttings. For moreinformation, see “Completinga checklist to prepare forconfiguration” on page 87.
Varies, depending how manyrequired tasks are complete.
Review the worksheet foraccuracy and completeness.
© Copyright IBM Corp. 2011 83
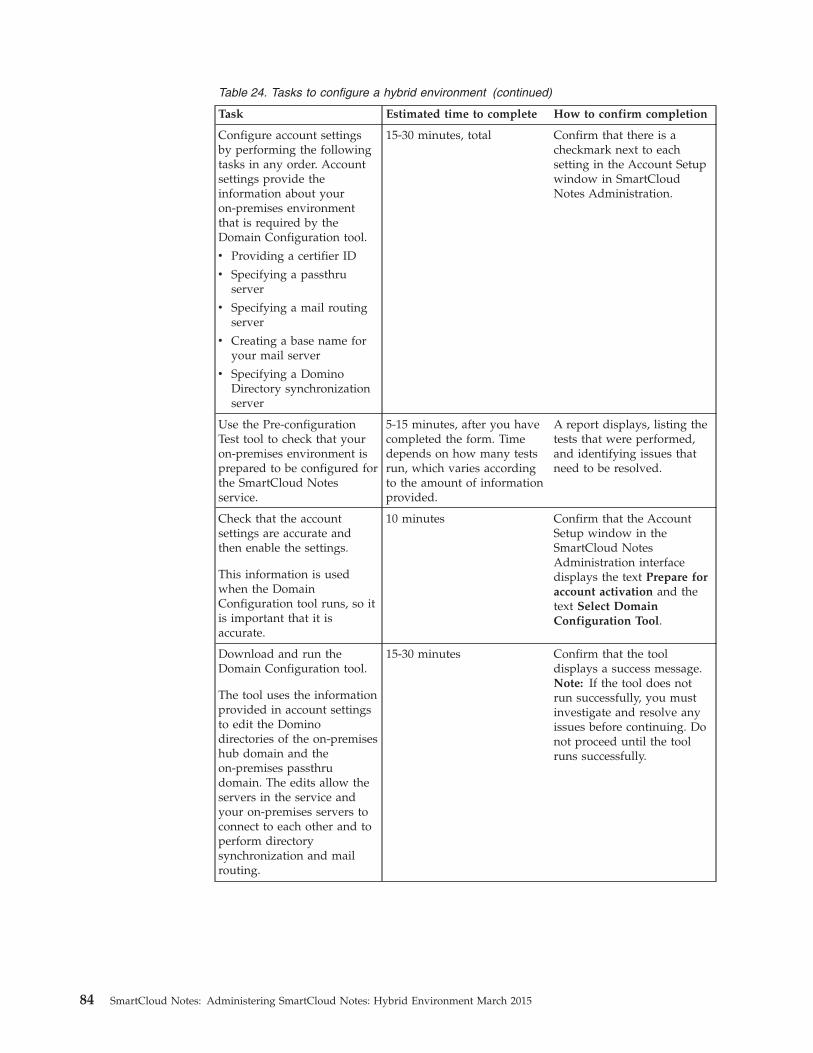
Table 24. Tasks to configure a hybrid environment (continued)
Task Estimated time to complete How to confirm completion
Configure account settingsby performing the followingtasks in any order. Accountsettings provide theinformation about youron-premises environmentthat is required by theDomain Configuration tool.
v Providing a certifier ID
v Specifying a passthruserver
v Specifying a mail routingserver
v Creating a base name foryour mail server
v Specifying a DominoDirectory synchronizationserver
15-30 minutes, total Confirm that there is acheckmark next to eachsetting in the Account Setupwindow in SmartCloudNotes Administration.
Use the Pre-configurationTest tool to check that youron-premises environment isprepared to be configured forthe SmartCloud Notesservice.
5-15 minutes, after you havecompleted the form. Timedepends on how many testsrun, which varies accordingto the amount of informationprovided.
A report displays, listing thetests that were performed,and identifying issues thatneed to be resolved.
Check that the accountsettings are accurate andthen enable the settings.
This information is usedwhen the DomainConfiguration tool runs, so itis important that it isaccurate.
10 minutes Confirm that the AccountSetup window in theSmartCloud NotesAdministration interfacedisplays the text Prepare foraccount activation and thetext Select DomainConfiguration Tool.
Download and run theDomain Configuration tool.
The tool uses the informationprovided in account settingsto edit the Dominodirectories of the on-premiseshub domain and theon-premises passthrudomain. The edits allow theservers in the service andyour on-premises servers toconnect to each other and toperform directorysynchronization and mailrouting.
15-30 minutes Confirm that the tooldisplays a success message.Note: If the tool does notrun successfully, you mustinvestigate and resolve anyissues before continuing. Donot proceed until the toolruns successfully.
84 SmartCloud Notes: Administering SmartCloud Notes: Hybrid Environment March 2015
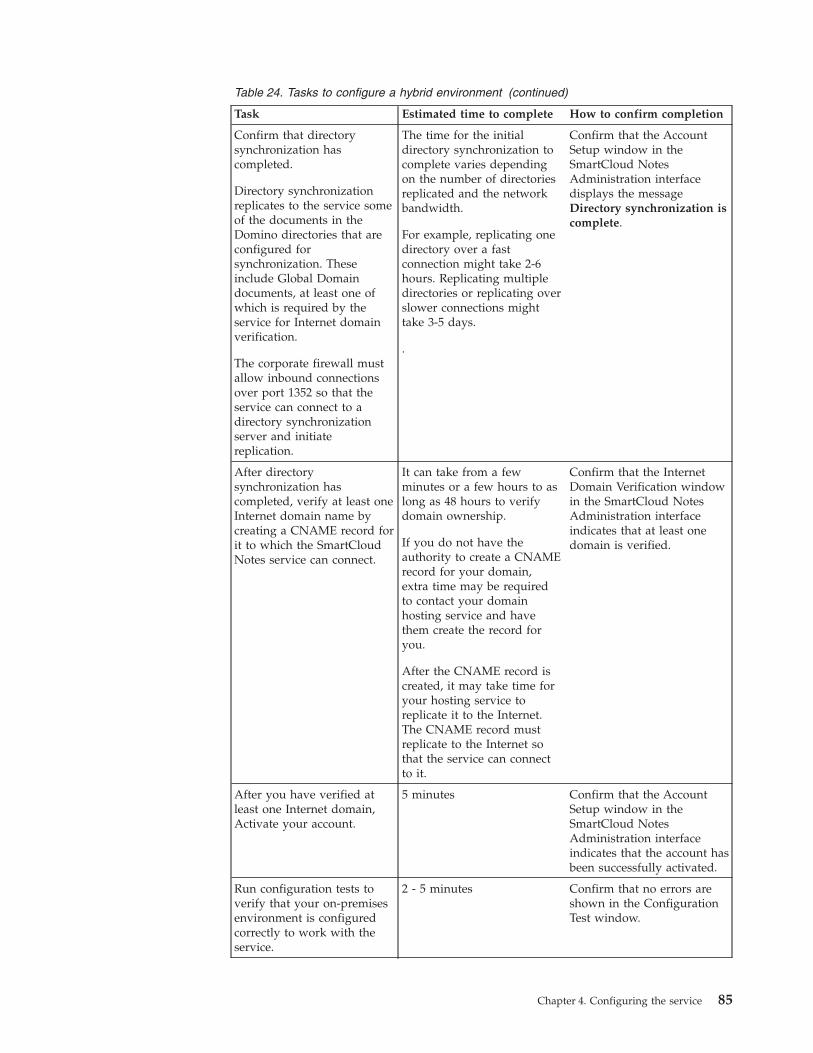
Table 24. Tasks to configure a hybrid environment (continued)
Task Estimated time to complete How to confirm completion
Confirm that directorysynchronization hascompleted.
Directory synchronizationreplicates to the service someof the documents in theDomino directories that areconfigured forsynchronization. Theseinclude Global Domaindocuments, at least one ofwhich is required by theservice for Internet domainverification.
The corporate firewall mustallow inbound connectionsover port 1352 so that theservice can connect to adirectory synchronizationserver and initiatereplication.
The time for the initialdirectory synchronization tocomplete varies dependingon the number of directoriesreplicated and the networkbandwidth.
For example, replicating onedirectory over a fastconnection might take 2-6hours. Replicating multipledirectories or replicating overslower connections mighttake 3-5 days.
.
Confirm that the AccountSetup window in theSmartCloud NotesAdministration interfacedisplays the messageDirectory synchronization iscomplete.
After directorysynchronization hascompleted, verify at least oneInternet domain name bycreating a CNAME record forit to which the SmartCloudNotes service can connect.
It can take from a fewminutes or a few hours to aslong as 48 hours to verifydomain ownership.
If you do not have theauthority to create a CNAMErecord for your domain,extra time may be requiredto contact your domainhosting service and havethem create the record foryou.
After the CNAME record iscreated, it may take time foryour hosting service toreplicate it to the Internet.The CNAME record mustreplicate to the Internet sothat the service can connectto it.
Confirm that the InternetDomain Verification windowin the SmartCloud NotesAdministration interfaceindicates that at least onedomain is verified.
After you have verified atleast one Internet domain,Activate your account.
5 minutes Confirm that the AccountSetup window in theSmartCloud NotesAdministration interfaceindicates that the account hasbeen successfully activated.
Run configuration tests toverify that your on-premisesenvironment is configuredcorrectly to work with theservice.
2 - 5 minutes Confirm that no errors areshown in the ConfigurationTest window.
Chapter 4. Configuring the service 85

Table 24. Tasks to configure a hybrid environment (continued)
Task Estimated time to complete How to confirm completion
Check network connectionsfrom on-premises servers toSmartCloud Notes servers.
The corporate firewall mustallow outbound connectionsover TCP/IP port 1352.
5 - 10 minutes Confirm a successfulauthenticated connection to amail server.
Issue a Vault Trust Certificateto enable the Notes IDs ofprovisioned users to beuploaded to a SmartCloudNotes ID vault.
5 - 10 minutes After a user is provisionedfor SmartCloud Notes,confirm that the Notes ID ofthe user is uploaded to theID vault.
Logging on as the first company administratorAn IBM Customer Service Representative creates the IBM SmartCloud Notesaccount for your company. This step creates a company administrator accountunder a name and email address provided by your company. IBM sends an emailto the address confirming your purchase. To activate the account for yourcompany, follow the URL link in this email and log on to the IBM ConnectionsCloud website as the company administrator.
About this task
Perform the following steps to activate the account for your company and log onas the first company administrator.
Procedure1. Open the email that was sent to the company administrator email address
confirming your purchase.2. Click the URL link in the email, to open the Registration page.3. Perform the following steps on the Registration page:
a. Create and confirm a service logon password.
Important: The email address that is shown is the logon name for thecompany administrator account. Be sure to remember it and the newpassword.
b. Select a country, language, and time zone.c. Read the terms of use and privacy practices information, and if you agree to
them, click I accept the Terms of Use.d. Click Submit.e. Log on using the company administrator email logon and new password.
Results
You are now logged on to your home page. To log on in the future, go tohttp://www.ibmcloud.com/social.
What to do next
Configure the SmartCloud Notes service, if IBM is not configuring it for you.
86 SmartCloud Notes: Administering SmartCloud Notes: Hybrid Environment March 2015
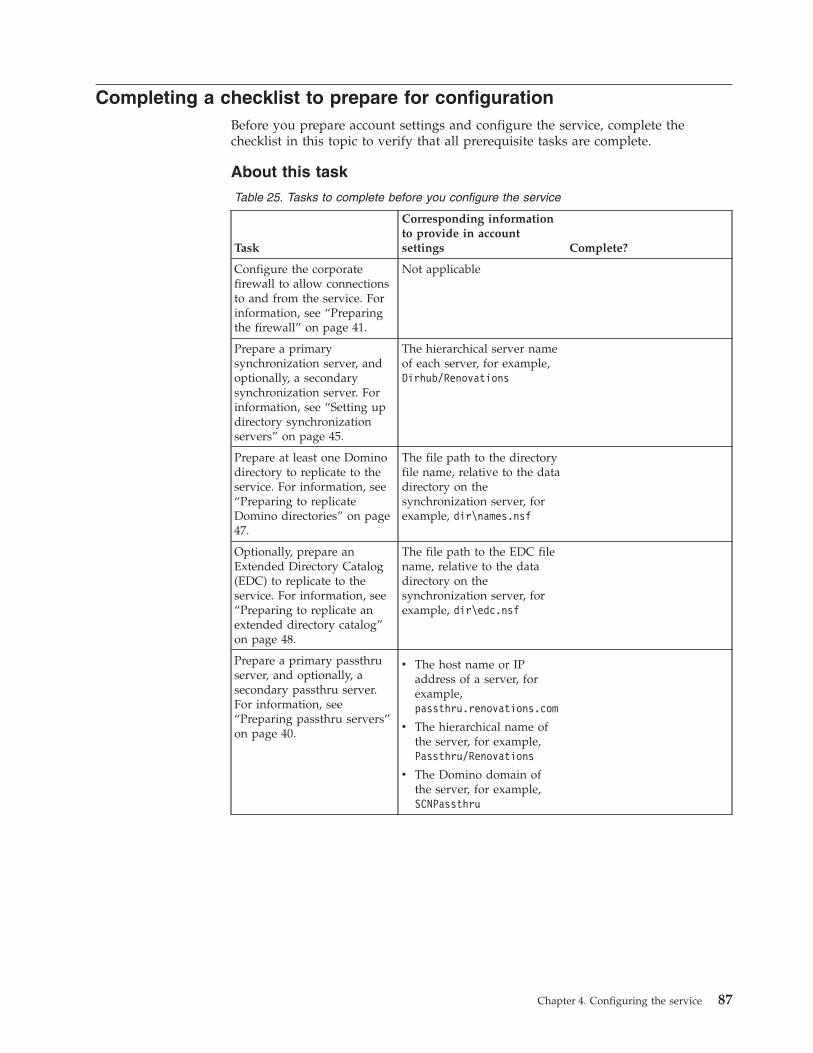
Completing a checklist to prepare for configurationBefore you prepare account settings and configure the service, complete thechecklist in this topic to verify that all prerequisite tasks are complete.
About this task
Table 25. Tasks to complete before you configure the service
Task
Corresponding informationto provide in accountsettings Complete?
Configure the corporatefirewall to allow connectionsto and from the service. Forinformation, see “Preparingthe firewall” on page 41.
Not applicable
Prepare a primarysynchronization server, andoptionally, a secondarysynchronization server. Forinformation, see “Setting updirectory synchronizationservers” on page 45.
The hierarchical server nameof each server, for example,Dirhub/Renovations
Prepare at least one Dominodirectory to replicate to theservice. For information, see“Preparing to replicateDomino directories” on page47.
The file path to the directoryfile name, relative to the datadirectory on thesynchronization server, forexample, dir\names.nsf
Optionally, prepare anExtended Directory Catalog(EDC) to replicate to theservice. For information, see“Preparing to replicate anextended directory catalog”on page 48.
The file path to the EDC filename, relative to the datadirectory on thesynchronization server, forexample, dir\edc.nsf
Prepare a primary passthruserver, and optionally, asecondary passthru server.For information, see“Preparing passthru servers”on page 40.
v The host name or IPaddress of a server, forexample,passthru.renovations.com
v The hierarchical name ofthe server, for example,Passthru/Renovations
v The Domino domain ofthe server, for example,SCNPassthru
Chapter 4. Configuring the service 87
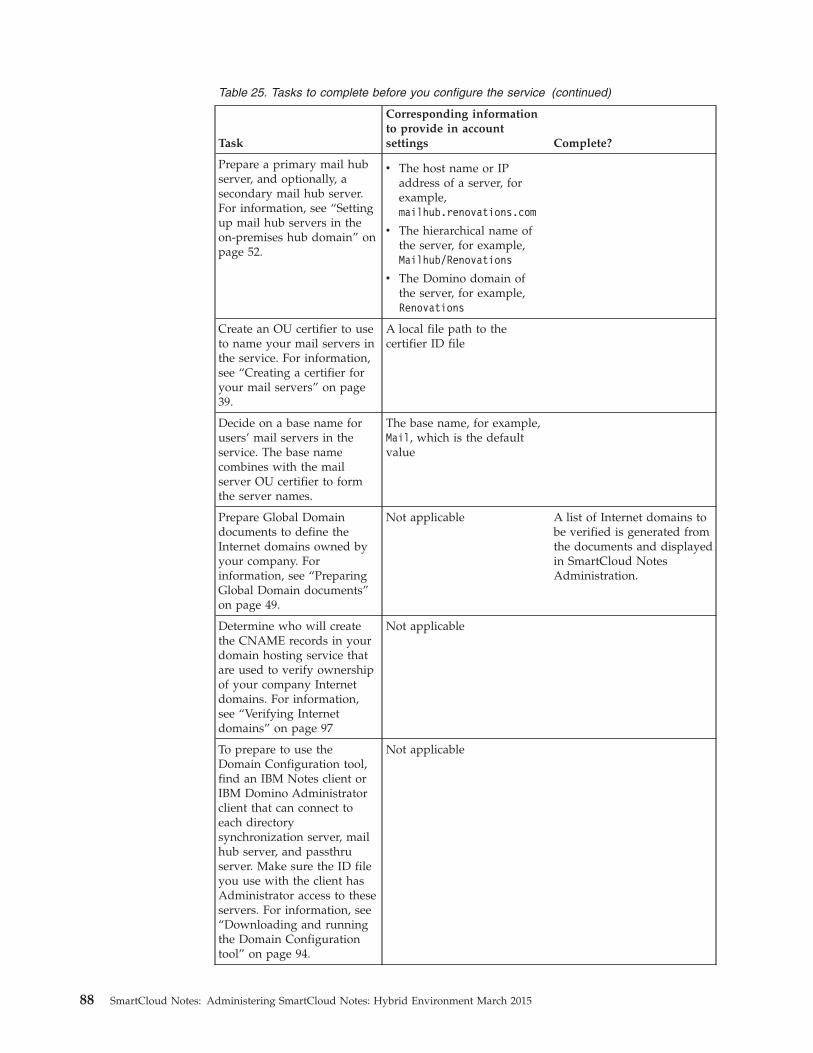
Table 25. Tasks to complete before you configure the service (continued)
Task
Corresponding informationto provide in accountsettings Complete?
Prepare a primary mail hubserver, and optionally, asecondary mail hub server.For information, see “Settingup mail hub servers in theon-premises hub domain” onpage 52.
v The host name or IPaddress of a server, forexample,mailhub.renovations.com
v The hierarchical name ofthe server, for example,Mailhub/Renovations
v The Domino domain ofthe server, for example,Renovations
Create an OU certifier to useto name your mail servers inthe service. For information,see “Creating a certifier foryour mail servers” on page39.
A local file path to thecertifier ID file
Decide on a base name forusers’ mail servers in theservice. The base namecombines with the mailserver OU certifier to formthe server names.
The base name, for example,Mail, which is the defaultvalue
Prepare Global Domaindocuments to define theInternet domains owned byyour company. Forinformation, see “PreparingGlobal Domain documents”on page 49.
Not applicable A list of Internet domains tobe verified is generated fromthe documents and displayedin SmartCloud NotesAdministration.
Determine who will createthe CNAME records in yourdomain hosting service thatare used to verify ownershipof your company Internetdomains. For information,see “Verifying Internetdomains” on page 97
Not applicable
To prepare to use theDomain Configuration tool,find an IBM Notes client orIBM Domino Administratorclient that can connect toeach directorysynchronization server, mailhub server, and passthruserver. Make sure the ID fileyou use with the client hasAdministrator access to theseservers. For information, see“Downloading and runningthe Domain Configurationtool” on page 94.
Not applicable
88 SmartCloud Notes: Administering SmartCloud Notes: Hybrid Environment March 2015
Configuring your hybrid account settingsPerform the tasks in this section to configure a hybrid environment, one in whichthe IBM SmartCloud Notes service is integrated with IBM Domino servers at yourcompany site.
About this task
Make sure that IBM has created the SmartCloud Notes account for your companyand that you have activated it by logging on to the service as the first companyadministrator.
Procedure1. Log on to the service as an administrator.2. If your account also has the User role, click Admin > Manage Organization.3. In the System Settings section of the navigation pane, click IBM SmartCloud
Notes and then click Account Settings.4. In the "Welcome to SmartCloud Notes!" window, select Hybrid Environment,
and then click Set Up My Account.5. In the next window, click Continue.
Results
You are now ready to begin completing the information in the hybrid AccountSettings.
Configuring directory synchronizationA directory server in the service has a replica of one or more on-premises IBMDomino directories. To support directory synchronization, provide the name of theprimary server and file path of at least one on-premises directory that you want tosynchronize. The directory server performs a regular pull and push replication ofthe directories to keep the contents of both the service and the on-premises replicassynchronized.
About this task
In addition to specifying a primary server, you can specify a secondary server thatyou synchronize for high availability purposes. Each directory synchronizationserver must have a local replica of each Domino directory that you provide.
You can also specify an extended directory catalog (EDC) to be synchronized.However, if you do, make sure to select the option Do not use this directory foruser provisioning. The EDC is a read-only composite of information from yourother directories; the service receives information from it but does not update it.
For additional information about how Domino directories remain synchronized ina hybrid environment, read Planning directory synchronization.
Procedure1. Log on to the service as an administrator.2. If your account also has the User role, click Admin > Manage Organization.3. In the System Settings section of the navigation pane, click IBM SmartCloud
Notes and then click Account Settings.
Chapter 4. Configuring the service 89
4. In the navigation pane, click Directory Sync Server.5. Click Add Domino Directory. The name of the directory is displayed in the
Directory server column.6. In the field Primary directory server name, specify the name of the server on
which your Domino directory resides, such as Directory1/Renovations. If youare adding a secondary server, specify the name of the server in the fieldOptional: Secondary directory server name instead.
7. In the field Domino Directory database file name, specify the file path of theDomino directory or EDC.
8. If the directory is an EDC or any other directory that is not used for userprovisioning, select Do not use this Domino Directory for user provisioning.
9. Repeat steps 5 through 8 for each additional Domino directory that you wantto synchronize with hosted directory servers. You can return to this windowto add subsequent directories after you have saved this information.
10. Click Save.11. Optional: To edit the name of a directory server, return to this window and
click the server link.
What to do next
Complete the task Specifying a mail routing server.
Specifying a mail routing serverIBM SmartCloud Notes servers and on-premises IBM Domino servers route mail toeach other. Provide the name of one or more Domino servers to use as theon-premises mail routing server. You can use the same servers to perform mailrouting and directory synchronization or use separate servers for each function.Although only one server is required, for high availability designate two servers.Both the primary and the secondary mail servers must be in the same domain.
About this task
To provide failover, set up two mail hub servers in the on-premises hub domain.The service attempts to route to the primary mail hub server first, which is theserver with the name that comes first in alpha-numeric order. For example, if thetwo server names are MailA/Renovations and MailB/Renovations, the primaryserver is MailA/Renovations. If the two servers are Mail1/Renovations andMail2/Renovations, the primary server is Mail1/Renovations.
If the service is unable to route to the primary mail hub server due to network orserver unavailability, it attempts to use the secondary server. When the primarymail hub server becomes available, the service begins using it again after a periodof time. The service may use both servers simultaneously for brief intervals.
Procedure1. Log on to the service as an administrator.2. If your account also has the User role, click Admin > Manage Organization.3. In the System Settings section of the navigation pane, click IBM SmartCloud
Notes and then click Account Settings.4. From the navigation pane, click Mail Routing Server.5. In the field Primary Domino mail server name, specify the name of your
on-premises Domino mail server, such as Mail1/Renovations.
90 SmartCloud Notes: Administering SmartCloud Notes: Hybrid Environment March 2015
6. Optional: In the field Optional Secondary Domino mail server name, providethe name of a second mail server, such as Mail2/Renovations.
7. In the field Domino domain name, specify the name of the on-premisesDomino domain. Remember, both the primary and the secondary mail serversmust be in the same domain.
8. Click Save.
What to do next
Complete the task Creating a base name for your mail server.
Creating a base name for your mail serversIBM SmartCloud Notes server names are created with a name that you provide asa base name, and are then numbered sequentially. For example, if your base nameis Mail, and your organizational unit (OU) certifier is SCN/Renovations, then yourSmartCloud Notes server names are Mail1/SCN/Renovations,Mail2/SCN/Renovations, and so on.
Procedure1. Log on to the service as an administrator.2. If your account also has the User role, click Admin > Manage Organization.3. In the System Settings section of the navigation pane, click IBM SmartCloud
Notes and then click Account Settings.4. From the navigation pane, click Mail Server Base Name.5. Enter a base name for your mail servers.6. Click Save.
What to do next
Complete the task Specifying a passthru server.
Specifying one or more passthru serversAll connections from the service to on-premises servers are directed through anIBM Domino passthru server. For high availability, set up at least two passthruservers for failover to prevent mail routing delays if a server is unavailable.
Before you begin
Make sure that you have installed and set up one or more passthru servers byfollowing the steps in the topic Preparing the passthru server domain.
Procedure1. Log on to the service as an administrator.2. If your account also has the User role, click Admin > Manage Organization.3. In the System Settings section of the navigation pane, click IBM SmartCloud
Notes and then click Account Settings.4. From the navigation pane, click Passthru Server.5. In the Primary passthru server name field, specify the passthru server, such
as PassthruMain/Renovations.
Chapter 4. Configuring the service 91
6. In the Internet host name or IP address field, specify the Internet host name,such as pthru1.renovations.com. Specify a host name rather than an IPaddress, if possible. Then if the IP address changes, you do not need toreconfigure this setting.
7. In the Domino domain name field, specify the name of the Domino domain,such as RenovationsFirewall.
8. Optional: In the Optional secondary passthru server name field, provide thename of a server to use in the case of failover.
9. Optional: Provide the Internet host name or IP address for the secondaryserver.
10. Click Save.
What to do next
Complete the task Providing a certifier ID.
Providing a certifier ID fileAs a part of preparing your on-premises environment for a hybrid deployment,you create an IBM Domino organizational unit (OU) certifier for your IBMSmartCloud Notes servers. In this task, you provide an OU certifier ID file andpassword when you set up the hybrid environment.
Before you begin
Make sure that you have created a unique first-level organization unit (OU)certifier using the steps in Creating a certifier for your mail servers.
Before you upload an ID file, make sure that you have selected the correct file.After you upload the ID file, you cannot switch to an ID with a different certifiername.
Make sure that you have read the topic Certifier requirements in a hybridenvironment.
Procedure1. Log on to the service as an administrator.2. If your account also has the User role, click Admin > Manage Organization.3. In the System Settings section of the navigation pane, click IBM SmartCloud
Notes and then click Account Settings.4. From the navigation pane, click Certifier ID File.5. Browse to the certifier ID file you created for your hybrid environment.6. If this file has a password, type the password in the Certifier password field.7. Click Upload.
What to do next
Complete the task “Using the Pre-configuration Test tool to check yourenvironment” on page 93.
92 SmartCloud Notes: Administering SmartCloud Notes: Hybrid Environment March 2015
Using the Pre-configuration Test tool to check your environmentAfter you prepare your on-premises environment but before you run the DomainConfiguration tool to configure it to connect to the IBM SmartCloud Notes service,download and run the SmartCloud Notes Hybrid Pre-configuration tool. This toolruns a series of tests to determine if the servers in your environment are set upcorrectly. The tool provides a report that identifies any issues that might preventcommunication between your environment and the service. The tool does notchange your configuration.
Before you beginv To perform this task you must have Administrator access and Full Remote
Console access to the servers you are testing.v The thoroughness of this test depends on the completeness of the information
you provide. However, if you do not know the answer, you can leave fieldsblank .
v Do not use a virtual private network (VPN) connection. This tool performsfirewall tests, so you must run it from an IBM Notes client computer inside yourfirewall.
About this task
When you download this tool, it contains the information that you have entered inyour Hybrid Account Setup up to this point. For instance, it might list your mailhubs, but not your passthru servers, if you have not yet entered that information.You can update the information using the IBM Notes client. However, if youupdate the information this way, the information is used only when you run thetest; it is not passed back to the SmartCloud Notes servers. You will have to returnto the Hybrid Account Setup to enter the information there as well. Alternatively,you can update the information in the Hybrid Account Setup and then download afresh copy of the tool that includes all of the updated information.
The more information you provide, the more complete your test results are.However, you can leave a field blank if you do not know the correct information.Run the tool as many times as needed, resolving issues identified before running itagain.
Procedure1. Log on to the service as an administrator.2. If your account also has the User role, click Admin > Manage Organization.3. In the System Settings section of the navigation pane, click IBM SmartCloud
Notes and then click Account Settings.4. From the navigation pane, click Pre-configuration Test Tool.5. Click Download to download the file.6. Agree to the terms and conditions for the pre-configuration test application,
and then click Continue.7. Follow the steps in the resulting screen to download the file
liveservercheck.nsf and save it in your local Notes data directory.8. From the Notes client, open the tool by clicking File > Open > IBM Notes
Application, and then selecting liveservercheck.nsf.9. Follow the on-screen instructions that the tool displays, including checking the
information displayed there.10. Click Run Test.
Chapter 4. Configuring the service 93
11. Review the report and address any on-premises issues reported by the tool.12. Optional: If you change your environment, rerun the test.13. Optional: Make any necessary changes to the information in the tool, and then
click Run Test.
What to do next
After you are satisfied that your environment is prepared, complete the task“Reviewing your setup and enabling your account.”
Reviewing your setup and enabling your accountBefore you can download and run the Domain Configuration tool, all of therequired hybrid account setup information must be complete. When you check thestatus of the information you provided, any incomplete items are identified.
Before you begin
Complete these tasks in any order.v Specifying the Domino directory serverv Specifying a mail routing serverv Creating a base name for your mail serverv Specifying a passthru serverv Providing a certifier ID
Procedure1. Log on to the service as an administrator.2. If your account also has the User role, click Admin > Manage Organization.3. In the System Settings section of the navigation pane, click IBM SmartCloud
Notes and then click Account Settings.4. In the navigation pane, click Account Setup.5. For any items that have not been configured, click the corresponding task in
the navigation pane, and provide the information that is requested.6. When the status of all items shows successful completion, click Enable my
account.
What to do next
Complete the task “Downloading and running the Domain Configuration tool.”
Downloading and running the Domain Configuration toolThe Domain Configuration tool configures your on-premises servers to connect toyour hosted IBM SmartCloud Notes servers. The server configuration informationthat you provide in the Account Settings of SmartCloud Notes Administration isthe data that is used to configure the connections.
Before you begin
Before you can download and run the Domain Configuration tool for the first time,all of the required Account Settings information must be complete. To confirm that
94 SmartCloud Notes: Administering SmartCloud Notes: Hybrid Environment March 2015
all of the required information is available, complete the task Checking the statusof your hybrid account setup. If any information is incomplete, provide themissing information.
The IBM Notes client from which the tool is run must be able to connect to thepassthru servers in the passthru domain. The client must also be able to connect tothe directory synchronization and mail hub servers in the on-premises hubdomain. Firewall rules at your company might prevent connections from systemsinside the firewall to the passthru servers. In this case, use a Notes client runningon a system connected outside the firewall. Allow a direct connection to thepassthru servers, and through them, connect to the servers in the on-premises hubdomain.
If you are configuring the service for the first time, to make sure your on-premisesenvironment is prepared, complete the task Using the pre-configuration tool tocheck your environment.
About this task
You run the Domain Configuration tool when you first configure the service tointeroperate with your on-premises environment.
You also run the tool after the initial configuration. Run the tool again if youchange a server configuration in Account Settings or if you correct a configurationproblem in your on-premises environment.
If you are performing the initial service configuration, the Domain Configurationtool includes pre-configuration options you can use to test your on-premisesenvironment before you actually configure it. No changes are made to yourenvironment as a result of these tests.v Pre-configuration Test - Runs the same series of pre-configuration tests as the
SmartCloud Notes Hybrid Pre-configuration tool (liveservercheck.nsf). If youdid not complete the task Using the pre-configuration tool to check the status ofyour hybrid account setup, you can run those tests now. The tool then providesa report that identifies configuration issues that you can address beforeconfiguration.
v Pre-configuration Report - Simulates the configuration, and provides a report ofthe configuration changes that would be made to your environment during theactual configuration process.
After you run the Domain Configuration tool, a detailed report lists the changesthat were made to your on-premises server configuration. Typical changes include:v Allowing SmartCloud Notes servers sufficient access to your Domino directories
to perform directory synchronizationv Creating connection documents to support server passthrough and mail routing
to SmartCloud Notes serversv Modifying server configuration documents to allow passthrough access to these
serversv Setting a server environment variable
Note: Do not edit the directory content added by the tool. For example, do notedit changes to the ACL or to Connection documents. Doing so prevents properoperation of the service. Refer to the report generated by the tool to see the exactdirectory changes the tool makes
Chapter 4. Configuring the service 95
Procedure1. Log on to the service as an administrator.2. If your account also has the User role, click Admin > Manage Organization.3. In the System Settings section of the navigation pane, click IBM SmartCloud
Notes and then click Account Settings.4. In the navigation pane, click Domain Configuration Tool.5. Follow the steps in the window that opens to download the file
liveserverconfig.nsf, and save it in your local Notes data directory.If you are trying to overwrite a previously downloaded copy, and you get theerror message File is in use from your browser, it means that the IBMNotes client has the old copy of liveserverconfig.nsf open. If that does notseem to be the case, close Notes or use a different filename.
6. From the Notes client using an ID that has Manager access to your Dominodirectory, click File > Open > IBM Notes Application, and then select theliveserverconfig.nsf file.
7. Optional: Select Pre-configuration Test to run a series of pre-configurationtests based on information provided in the Hybrid Account Settings.a. Make any changes to your configuration environment, based on
information in the report.b. To correct any account settings information, return to the SmartCloud
Notes Administration windows where you first entered the hybrid accountsetup information, and make the corrections.
c. Repeat steps 4 and 5 to download a new copy of liveserverconfig.nsf.8. Optional: Select Run a Pre-configuration Report to simulate the configuration
that will occur. No changes are made to your environment.9. If all of the information is correct, select Configure Servers, and then click
Begin.10. Review the resulting detailed report so that you know the changes that the
tool made to your on-premises server configuration. Optionally, print thereport for reference later.
Note: If you failed to save the original report, the file liveserverconfig.login your Notes data directory contains the same information. This log file is inEnglish only. Running the tool again does not produce an identical reportbecause the report lists the changes that were made when the tool runs.During a second run no changes are made.
11. Allow time for the Domino directory changes to replicate to other servers inyour environment.
What to do next
If you must run the tool again to make sure that your setup is still correct, performsteps 1-5 to get a new copy of liveserverconfig.nsf. When troubleshooting anycommunication issues with the service, running the tool is a good way to checkwhether anything has been changed, and whether you must return to the previoussettings.
When you are satisfied that your environment is set up correctly after the initialservice configuration, complete the task Verifying Internet domain names in ahybrid environment.
96 SmartCloud Notes: Administering SmartCloud Notes: Hybrid Environment March 2015

Verifying Internet domainsInternet domain name verification is a standard industry practice among domainhosting services to confirm domain name ownership and to prevent abuse of useraccounts. You need to verify only the domain names that correspond to Internetaddresses of users that you are provisioning.
Before you begin
Complete the tasks Downloading and running the Domain Configuration tool andPreparing Global Domain documents. Also make sure that directory synchronizationhas completed to replicate the Global Domain documents to the service.
About this task
There are different methods to verify domain names. The service uses a CNAMErecord for this purpose by requiring you to create a CNAME record to proveownership. Your domain hosting service should provide instructions for creating aCNAME record; however, if they do not, contact them directly.
A CNAME record is an entry in the Domain Name System that is used to define ahost name alias for an Internet domain. To prove ownership of a domain, you signin to your domain hosting service and use the DNS Management settings to createa temporary CNAME record for the domain. Then the service uses the alias in theCNAME record to query your domain. A successful query proves that you wereable to create the CNAME record and therefore that you own the domain.
If you do not have the authority to create a CNAME record for your domain, extratime may be required to contact your domain hosting service and have them createthe record for you.
Verifying a root domain also verifies any subdomains of it that are listed. Forexample, verifying renovations.com verifies west.renovations.com if listed in theInternet Domain Verification window. After you verify a root domain, no othercompany can use it or any subdomain of it.
You can perform this procedure even if you are in the process of switching domainhosting services.
The list of Internet domain names that populate the Internet Domain Verificationwindow is derived from your on-premises Global Domain documents. Thesedocuments replicate during directory synchronization of your on-premises serverwith the service servers. If the list is incomplete or includes unwanted Internetdomains, edit your Global Domain documents on premises to include the correctdomain name information. After directory synchronization has completed, returnto this window and verify that the correct domain names are listed.
Procedure1. Log on to http://www.ibmcloud.com/social using the email address and
password of a user with the Administrator role.2. If your account also has the User role, click Admin > Manage Organization.3. In the System Settings section of the navigation pane, click IBM SmartCloud
Notes and then click Account Settings.4. In the navigation pane, click Internet Domain Verification.
Chapter 4. Configuring the service 97
5. In the Internet Domain Verification window, click Verify Ownership next to thedomain to verify.
6. Sign in to your domain hosting service and use the DNS management settingsto create a new CNAME record. Use the information that is shown in theInternet Domain Verification window to create the CNAME record.v Put the unique key that is shown into the first field of the CNAME record.
The name of this field varies by vendor, but it is sometimes named prefix oralias.
v Put collabserv.com into the second field of the CNAME record. This field issometimes named destination or target host.
7. After you create the CNAME record, click Begin Verification to beginverification of the domain.The unique key continues to be shown in the Internet Domain Verificationwindow until verification completes successfully.
Results
To verify domain ownership, the service uses the alias in the CNAME record toquery your domain. For example, if the CNAME key is domino-1jkkiaojd-rulesand your domain name is renovations.com, the service queriesdomino-1jkkiaojd-rules.renovations.com.
If verification is not successful, check that the unique key shown exactly matchesthe one added to the CNAME record. If the values are different, do not restartverification. Rather, update the CNAME record with the correct key and simplywait again for verification to complete.
Domain verification can take up to 48 hours, although usually it takes much lesstime. If after 48 hours domain verification has not completed, click RestartVerification. Restarting verification generates a new unique key and you mustthen replace the old key with the new key in the CNAME record. Only restartverification if 48 hours have passed since you clicked Begin Verification.
After a domain is verified, you can remove the CNAME record you created.
What to do next
Perform the task “Activating your account” on page 99.Related tasks:“Downloading and running the Domain Configuration tool” on page 94The Domain Configuration tool configures your on-premises servers to connect toyour hosted IBM SmartCloud Notes servers. The server configuration informationthat you provide in the Account Settings of SmartCloud Notes Administration isthe data that is used to configure the connections.“Preparing Global Domain documents” on page 49Prepare at least one Global Domain document to define the Internet domains thatyour company owns.
98 SmartCloud Notes: Administering SmartCloud Notes: Hybrid Environment March 2015
Activating your accountAfter you have set up and configured your on-premises environment bydownloading and running the Domain Configuration tool, you must activate youraccount. When your account is activated, your on-premises servers can connect tothe IBM SmartCloud Notes servers, and the SmartCloud Notes servers can connectto your on-premises servers.
Before you begin
Ensure that you have completed the task Verifying Internet domain names.
Procedure1. Log on to http://www.ibmcloud.com/social using the email address and
password of a user with the Administrator role.2. If your account also has the User role, click Admin > Manage Organization.3. In the System Settings section of the navigation pane, click IBM SmartCloud
Notes and then click Account Settings.4. Click Activate My Account.
What to do next
Make sure that the servers in the service can connect to your on-premises serversby completing the task Checking network connections from the service toon-premises servers.
Running configuration testsAfter you run the Domain Configuration tool, verify that servers in the service canconnect to your on-premises servers.
Before you begin
Make sure that you have completed Downloading and running the DomainConfiguration tool and Activating your account.
Procedure1. Log on to the service as an administrator.2. If your account also has the User role, click Admin > Manage Organization.3. In the System Settings section of the navigation pane, click IBM SmartCloud
Notes and then click Account Settings.4. In the navigation pane, click Configuration Test, and then click Run Tests.5. Correct any problems that are reported and click Run Tests again.
What to do next
If your network connections are not working:v Make sure that the information that you provided in the Account Settings is
correct, and that there are no typographical errors.v Make sure that you completed all of the preparation tasks in the section
Preparing your environment for a hybrid deployment.v Make sure that all of your on-premises servers are running.
Chapter 4. Configuring the service 99
Completing the configurationAfter you have completed the account setup for your organization, perform thetasks in this section to complete the configuration.
Checking network connections from on-premises servers tothe service
After you run the Domain Configuration tool, check that your on-premises serversare reaching the IBM SmartCloud Notes servers by using the trace command.
Before you begin
Make sure that you have completed these tasks:v Downloading and running the Domain Configuration toolv Checking network connections from the service to on-premises servers
About this task
To determine the name of your SmartCloud Notes servers, use the formatbasename1/ou/o, using the base name you provided when you completed theaccount settings. Remember that if you used Mail (the default) as the base name,then your mail servers are named Mail1, Mail 2, and so on. When you run thistrace, you get an authentication error, which is an expected error. Review the linesthat follow the error to determine if the connection was successful.
Procedure1. From an on-premises primary mail hub server, type the following command
into the Domino server console, based on the mail base name, yourorganizational unit, and organization name:trace basename1/ou/o
For example: trace Mail1/scn/renov
2. Review the results of the trace command to make sure that they include theconfirmation Connected to server basename1/ou/o.
Results
The following sample output shows a successful trace.> trace Mail1/scn/renovDetermining path to server MAIL1/SCN/RENOVAvailable Ports: TCPChecking normal priority connection documents only...Allowing wild card connection documents...Local network connection document found for */scn/renov
Verifying address ’9.12.123.456’ for LMAIL1/SCN/RENOV on TCPConnected to server MAIL1/SCN/RENOV
Connecting to MAIL1/SCN/RENOV over TCPUsing address ’9.12.123.456’ for MAIL1/SCN/RENOV on TCP
Error connecting to server MAIL1/SCN/RENOV: Server error:You are not authorized to use the server
Connected to server MAIL1/SCN/RENOVAttempting Authenticated ConnectionCompression is DisabledEncryption is Enabled
In the sample output, the error received when attempting to connect toMAIL1/SCN/RENOV is the expected response because SmartCloud Notes servers
100 SmartCloud Notes: Administering SmartCloud Notes: Hybrid Environment March 2015
do not allow unauthenticated connections. However, these lines show that thesubsequent authenticated connection was successful and indicates that theon-premises servers are successfully communicating with SmartCloud Notes:Connected to server MAIL1/SCN/RENOVAttempting Authenticated ConnectionCompression is DisabledEncryption is Enabled
Issuing a Vault Trust CertificateYou must issue a Vault Trust Certificate from a parent certifier of service users’Notes ID files to the certifier of the service ID vault. This step is a prerequisite foruser provisioning.
Before you begin
After you have configured your company account settings, wait for directorysynchronization to replicate the service ID vault document to your on-premisesdirectory. You can confirm that replication has completed in SmartCloud NotesAdministration. Click Account Settings, and then click Directory Sync Server.Under Sync Status, the status should be OK.
Make sure you have a local copy of the certifier ID file of the parent certifier thatyou will use to create the Vault Trust Certificate. For example, to issue a VaultTrust Certificate that applies to the user Samantha Daryn/Renovations, make sureyou have a local copy of the certifier ID file for the /Renovations certifier.
About this task
If users are certified under an organizational unit (OU) certifier, you can use eitherthe OU certifier or the top-level certifier to issue the Vault Trust Certificate. Forexample, if users are certified under the OU /North/Renovations, issue a VaultTrust Certificate from either /North/Renovations or /Renovations.
If your service users are certified under different top-level organization certifiers,you must issue a Vault Trust Certificate for each organization. For example, if someservice users are certified under the organization /Renovations and others arecertified under the organization certifier /ZetaBank, issue a Vault Trust Certificatefrom both organizations.
The Vault Trust Certificate certifies that the parent certifier of Notes user ID filestrusts the service ID vault to store the ID files. ID files must be in the vault foradministrators to reset the ID passwords for Notes client users. ID files must alsobe in the vault for web client users and mobile client users to be able to sign,encrypt, and decrypt messages.
Although all user IDs under the parent certifier that issues the Vault TrustCertificate are authorized for storage in the service ID vault, only the IDs of serviceusers can be uploaded to the vault.
For more information about Vault Trust Certificates, see the information about IDvault trust in the IBM Domino documentation.
Perform the following steps to issue a Vault Trust Certificate.
Chapter 4. Configuring the service 101
Procedure1. Log on to a Domino Administrator client that you use for on-premises
Domino server administration.2. Open an on-premises hub server that you use for directory synchronization.3. Click the Configuration tab and then click Security > ID Vaults.
Note: If you do not see the ID Vaults view, you must upgrade the Dominodirectory on the server to the template version for 8.5.1 fix pack 2 or later.
4. Select the ID Vault document for the service ID vault. The format of thedocument name is /IDVault_customernumber, for example /IDVault_15679841.
5. Click Tools > ID Vaults > Manage. If a window that describes the ID vault isshown, click Next.
6. Select the task Add or remove organizations that trust the vault and thenclick Next.
7. Click Add or Remove.8. Under Available organizations, select a certifier of your service users.9. Click Add to add the certifier to Organizations that trust the ID vault, and
click OK.The certifier is now shown under Organizations.
10. Click Next and click Configure to confirm the change.11. At the Choose a Certifier prompt, browse for and select the certifier ID file of
the certifier, for example cert.id, and click OK.12. Provide the certifier password and click OK.13. In the You have successfully completed the management of the Notes ID
vault window, click Done.14. From the Configuration tab, click Security > Certificates > Certificates.
Expand Vault Trust Certificates and verify that there is a Vault TrustCertificate issued by the parent certifier to the ID vault.
Note: The Vault Trust Certificate is created on the administration server forthe directory. If you issued the certificate on a server that is not theadministration server, the certificate will be visible on that server after itreplicates from the administration server.
Results
The Vault Trust Certificate replicates to the service during directorysynchronization.Related information:
Domino documentation
102 SmartCloud Notes: Administering SmartCloud Notes: Hybrid Environment March 2015
Chapter 5. Customizing service settings
After you configure the service to integrate with your on-premises environment,optionally customize service settings to suit your needs.
About this task
You can customize settings before or after you onboard users.
Enabling the accessible experience for the web clientYou can submit a request to enable the accessible experience for the web client foreveryone in your organization. Mail, Calendar, Contacts, and Preferences featuresprovided with this experience are all accessible.
About this task
Accessibility features help users who have a disability, such as restricted mobilityor limited vision, to use information technology products successfully.
Another accessible experience for the web client is the desktop ultra-light mode.For more information on this mode, see the topic about web client accessibilityfeatures in the user documentation.
Both accessible experiences are supported on a computer using Mozilla Firefox 24+ESR or higher.
See the IBM Human Ability and Accessibility Center for more information aboutthe commitment that IBM has to accessibility.
Procedure
To enable the accessible experience for the web client for all users in yourorganization, contact Support.Related information:
Web client accessibility features
Support
Setting up administration notificationsSet up the service to send email notifications that report when specific types oferrors occur in the service.
About this task
Directory synchronization errors are the types of errors that are reported, currently.
Procedure1. Log on to the service as an administrator.2. If your account also has the User role, click Admin > Manage Organization.
© Copyright IBM Corp. 2011 103
3. In the System Settings section of the navigation pane, click IBM SmartCloudNotes.
4. Click Account Settings.5. Click Email Notifications.6. In the Send administrator notifications to these addresses box, type each
address to send notifications to. Specify any Internet-formatted address, eitherinternal or external to the service. For example, [email protected].
7. Optional: To send a test notification to each new or changed address, selectSend test notification to newly added addresses.
8. Select the language to use in the notifications.9. In the Reminder interval field, specify how frequently to resend notifications
that are related to the same error. Acceptable values are 1 - 7 days.10. Click Save.
Results
If a directory synchronization error occurs in the service, an email that is formattedas follows is sent:
Sender: SmartCloud
Subject: message summary[SCN-dirsyncNotify]
Body: message details
The body of the email provides a link to a page in SmartCloud NotesAdministration Account Settings that provides more information about the error.
Note: If you select the Send test notification to newly added addresses, a testemail with the subject New administration email address added [SCN-admintest]is sent to each new or changed address. If an expected test notification is notreceived, verify that the address is specified correctly. No error message is shown ifthe email cannot be delivered.
Restricting access to groupsAdd a Readers list to a group to restrict access to it. For example, a Readers listcomes in handy if you have a large mailing group that you want to allow only afew users to send mail to.
About this task1. Right-click the group in the directory and then click Document Properties.2. Click the Security tab (fourth tab).3. In the Who can read this document field, clear the All readers and above box.4. Add the names that you want to allow access to the group.5. Add the following groups to the access list:
v (Required) SaaSLocalDomainServers. Granting access to this group allows thegroup to replicate to replicas of the directory in the service.
v (Recommended) LocalDomainServersv (Recommended) LocalDomainAdmins
104 SmartCloud Notes: Administering SmartCloud Notes: Hybrid Environment March 2015
6. Make a minor edit to the group. This step ensures that the change to the groupreplicates to the service.
Using administrative policiesIf you use administrative policies on premises, you can apply many of those samepolicy settings to service users as well. Administrative policies enable all users tohave the same working experience.
There are two types of policies, organizational and explicit. An organizationalpolicy automatically assigns settings to all people within an organization ororganizational unit. You cannot use this type of policy for service users because anorganizational policy with a few pre-defined settings is already used within theservice.
To assign policies to service users, use an explicit policy. In this type of policy, youuse the Policy Assignment field to assign users to the policy.
If you use an organizational policy on premises and want to apply the settings tousers in the service, create an explicit policy that mirrors the on-premisesorganizational policy. For example, the fictitious Renovations Corporation has anorganizational policy on-premises that applies to anyone in the Renovationsorganization. Because it is an organizational policy, anyone whose hierarchicalname includes */Renovation, such as Samantha Daryn/Renovations, is assigned thispolicy. The Renovations organizational policy cannot be used for users in theservice. Therefore, the administrator creates an explicit policy, namedRenov-Explicit, that includes policy settings identical to the settings that are in theon-premises Renovations organizational policy. Next, the administrator adds thename */Renovations as a name in the Policy Assignment field. This way, userswho have /Renovations in their name are automatically assigned this policy.
Note: The service does not support assigning policies by specifying the policyname in a user's Person record in the Domino directory. If you are using this kindof policy model, you must switch to a direct assignment in the Policy documentitself.
Although most settings in policies are supported in the service, there are a fewrestrictions. If you plan to use explicit policies for your service users, read aboutpolicy settings restrictions before you do.
If you are unfamiliar with administrative policies, see the topics on policies in theConfiguring users and servers section of the IBM Domino documentation.Related information:
IBM Domino documentation
Creating policies for service usersTo ensure that users in the service have the same experience as on-premises users,you can create explicit policies. Any organizational policies that you might beusing on premises are not supported.
Before you begin
Read the following topics:v “Using administrative policies”
Chapter 5. Customizing service settings 105

v “Policy settings restrictions” on page 114
About this task
Use these general steps to create explicit policies that mirror your on-premisespolicies. If you include policy settings that are pre-defined for all users in theservice, or that are not supported, the service ignores the settings.
Important: If you plan to support multiple domains in your organization, use anaming convention that includes the domain name when you create any of yourpolicy documents. Supporting multiple domains essentially means that multiplenames.nsf files from different company domains are synced to the service.Therefore, it is critical that all Policy Settings documents and all master Policydocuments have unique names.
For more information about creating policies, see the IBM Domino 9documentation. Refer to the topics on policies in the section on configuring usersand servers.
For information about IBM Notes Traveler policy settings, see the topic on creatinga Notes Traveler policy settings document in the Notes Traveler documentation.
Procedure1. Identify the policies that you are currently using in your on-premises policies.2. Note any settings in the current policy that have restrictions when used in the
service.3. Use the information that you identified in the previous steps to create an
explicit policy.4. To assign the policy, add the names of users or groups from the directory to the
Policy Assignment field of the Policy document. Or, type a wildcard entry torepresent all names in an organization, for example, */Renovations.
Note: The service does not support assigning policies by specifying the policyname in a user's Person record in the Domino directory. If you are using thiskind of policy model, you must switch to a direct assignment in the Policydocument itself.
What to do next
You cannot open a service policy to view the settings. However, to view a detailedsummary of the effective policy settings, use the Policy Viewer in the DominoAdministrator client. You can view a policy synopsis for a selected user or group.Related information:
IBM Domino documentation
Creating an IBM Notes Traveler policy settings document
Creating an archiving policy settings documentTo use policies to set up mail file archiving for IBM Notes clients, you use bothArchiving Policy Settings documents and Archive Criteria Settings documents.
106 SmartCloud Notes: Administering SmartCloud Notes: Hybrid Environment March 2015
Before you beginv Create an explicit policy to use with the service. For more information, see the
topics “Using administrative policies” on page 105 and “Creating policies forservice users” on page 105.
v Make sure that you have at least Editor access to the Domino Directory and oneof these roles: PolicyCreator role to create a settings document; PolicyModifierrole to modify a settings document.
About this task
In the cloud, mail archiving is always run on the Notes client. The source mail fileto archive must be a local mail replica or managed mail replica on the client. Thedestination archive database can be created on the client or on an on-premisesserver. Users cannot create archives on the cloud servers.
When Archive Settings are configured, Notes users can select File > Application >Archive to archive local replicas of their mail files. If you do not configure ArchiveSettings, users can still click Archive Settings in the application properties box toarchive a mail file.
The information provided here applies only to Notes clients. Archive Settings donot apply to web client users.
Note the following additional information:v This procedure applies to archiving mail that is in the cloud. To preserve an
archive of an on-premises mail file, you must archive the contents before theuser moves to cloud mail.
v Users in the cloud cannot create local archives of on-premises mail files. As abest practice, remove on-premises mail files after users move to the cloud.
v Archiving policy settings do not apply to non-mail databases.
Procedure1. Open the explicit policy that you created in the Domino Directory.2. In the Setting Type section, next to Archiving, click New.3. On the Basics tab, complete these fields:
v Name. Enter a name that identifies the users or the settings themselves.v Description. Enter a description of the settings.
4. Optional: Under Archiving Options, choose one of the following options ifyou want to prohibit archiving. The default is to allow both.v Prohibit archiving. Use this option to prohibit all archiving. The Allow
Calendar Cleanup check box displays. It is selected by default but you candeselect if you choose to prevent users from performing calendar cleanupfunctions. Save the document.
v Prohibit private archiving criteria. Use this option to prohibit users fromcreating private archive settings or modifying the archive settings that aredefined in this settings document.
5. Under Archiving will be performed on, choose User's local workstation.Archiving cannot be performed on a server.
6. Under Archiving source database is on, choose Local. The mail file to bearchived must be a local replica or managed mail replica on the client.
7. Under Destination database is on, choose one of the following options:
Chapter 5. Customizing service settings 107
v Local. Use this option to create the mail archive database on the user's localclient.
v Specific server Use this option to create the mail archive database on anon-premises server. Specify the name of the on-premises server. You mustgive users Create access to this server.
Do not select Mail server. The destination database cannot be on the cloudmail server.
8. On the Selection Criteria tab, do one or more of the following steps:v Click New Criteria to create a new Archive Criteria Settings document.
Then, click Add Criteria and select your newly-defined criteria document.See the topic “Creating an archive criteria settings document” on page 110for instructions on specifying details of the criteria in the new document.
v Click Add Criteria, and then choose one or more Archive Criteria Settingsdocuments to add to your archiving settings. These settings must complywith the information in the topic Creating an archive criteria settingsdocument.
v Click Remove Criteria, and then choose one or more Archive CriteriaSettings document to remove from your archiving settings.
9. Click the Logging tab. Under Archive Logging, enable the field Log allarchiving activity into a log database to log archiving activity to a logdatabase (the default).
10. Optional: Change any of the following fields if you want to change thelocation of the log directory and log file name.
Table 26. Fields used to specify the log directory and file name
Field Action
Log Directory The default is archive. Enter a new name if you want tochange it.
Log Prefix The default is the letter l, followed by an underscore (_).Enter a new prefix if you want to change it.
Log Suffix The default is .NSF. Enter any other suffix that youwould like to use.
Number of characters fromoriginal file name
The default is 50. To change the default, enter thenumber of characters you want to use from the user'smail file name to create the archive log name.
11. In the field Include document links to archived documents, choose one of thefollowing options:v Enable this field to include links to archived documents in the log (default).
If you include links, users can open archived documents from within thelog database.
v Disable the field to exclude links to archived documents in the log. If youexclude links, users must open the archive database to view archiveddocuments.
12. On the Schedule tab, for the field Specify a client-based scheduled archive,choose one of the following options:v Enable this field to set up a schedule for client-based archiving, and then
specify the schedule by completing Step 13.v Disable this field and continue to Step 14. No archiving schedule is set for
the users; however, users can still set their own archiving schedule.
108 SmartCloud Notes: Administering SmartCloud Notes: Hybrid Environment March 2015

13. Optional: If you enabled Specify a client-based scheduled archive, completeone or more of these fields.
Table 27. Fields used to define an archive schedule for an end user
Field Action
Allow users to modify schedule Users modify the default schedule to set their ownschedule.
Frequency Choose one:
v Daily – and then select the days of the week onwhich to archive.
v Weekly – (default) and then choose the day of theweek on which to archive.
Run at Specify the time. The default is 12:00 PM.Note: The Notes client must be running for scheduledarchiving to occur.
Every week on When Weekly is set, specify the day. The default isTuesday.
14. Also on the Schedule tab, under Location, specify the Locations from whichto archive.v Any Location -- to archive from any Location.v Specific Location -- and then specify one or more Locations.
15. On the Advanced tab, complete these fields:
Table 28. Advanced tab fields
Field Action
Delete a document only when the criteriacan delete all responses as well
Do one of these:
v Enable (default) to ensure that adocument is deleted only when thedocument's response documents meetarchiving criteria and can also be deleted.Use this option to prevent orphaneddocuments in hierarchical views.
v Disable the field to delete documentswithout prior checking of responsedocuments.
Note: This setting does not apply toCalendaring and Scheduling documentswhich are always enabled to preventaccidental "orphaning."
Chapter 5. Customizing service settings 109

Table 28. Advanced tab fields (continued)
Field Action
Maximum document retention selection is: Specify for all users to whom the policyapplies, the number of days, months, oryears that comprise the maximum retentionperiod for deleting and archivingdocuments. If private archiving is enabled,and a maximum retention setting is in effect,users cannot define criteria with a scope thatis larger than the maximum retentionsetting.
For example, assume the maximumretention is set to two years. Users candefine criteria that selects documentscreated, modified, accessed, or expired up to24 months. An error is generated if users tryto save criteria whose scope is greater than24 months (two years).
Use customer-generated expiration field: Click to enable administrators to define theirown field name for an archive documentexpiration date.
Customer generated expiration field name: Specify a field name for the expiration dateof archived documents. Any archive criteriathat selects documents based on expirationdate now uses the field name specified here.
16. Save the document.
Creating an archive criteria settings document:
Use an archive criteria settings document to define a set of criteria to be used byan archiving policy settings document when you archive an IBM Notes user's maildocuments.
Before you begin
v See the task “Creating an archiving policy settings document” on page 106. Thisprocedure is part of that task.
v Make sure that you have at least Editor access to the Domino directory and oneof these roles: PolicyCreator role to create a settings document; PolicyModifierrole to modify a settings document.
Procedure
1. Open the Settings view in the Domino Directory.2. Select the Archive policy settings document for which you want to create
archive criteria settings, and then click Edit Settings.3. Click the Selection Criteria tab, and then click New Criteria.4. Provide the following information on the Basics tab.
110 SmartCloud Notes: Administering SmartCloud Notes: Hybrid Environment March 2015
Table 29. Basics tab fields
Field Action
Name Enter a name that identifies the archivecriteria. When you add criteria to an archivepolicy settings document, this name appearsin the selection box. This name also appearsin the user's mail folder outline underActions > Archive.
Description Enter a description of the criteria.
Enable archive criteria Choose one of the following options:
v Enable the check box to use this archivecriteria.
v Disable the check box if you are creatingarchive criteria to use later.
5. For How should documents be archived? choose one:v Copy old documents into archive database; then clean up database. Use
this option to archive (copy) documents to the archive database and thenclean up (delete or reduce those documents) from the user's mail database.
v Clean up database without archiving. Use this option to delete documentsfrom the user's mail database without copying them into an archivedatabase. Use this setting to enforce document-retention policies that deleteall documents after a specified time.
6. If you chose to copy old documents for How should documents be cleanedup? choose one:v Delete older documents from the database. Use this option to delete copies
of archived documents that remain in the user's mail database.v Reduce the size of the documents in the database. Use this option to
truncate copies of the archived documents that remain in the user's maildatabase.
7. For Which documents should be cleaned up? specify the criteria thatdetermines which documents are candidates for archiving. Choose one of thefollowing options:v Older than. Use this option to specify the date the archive criteria settings
document was created as the start date for the document retention period.Documents that are created before this date are eligible for archiving.
v Not accessed in more than. Use this option to specify documents notopened in the specified time frame. Do not use this option unless thedatabase property Maintain Last Accessed is set. If this property is not set,the criteria does not find any documents to archive. Specify a time period.
v Not modified in more than. Use this option to specify documents that havenot been modified in the specified time frame (default). Then specify a timeperiod. This setting is recommended.
v With expiration date older than. Use to specify documents that are markedas expired. A document is eligible for archiving if it has an expiration dateearlier than the specified date.
8. Do not complete the fields in the Archive By View/Folder section of thedocument.
9. Optional: Click the Destination tab and change any of these fields.
Chapter 5. Customizing service settings 111
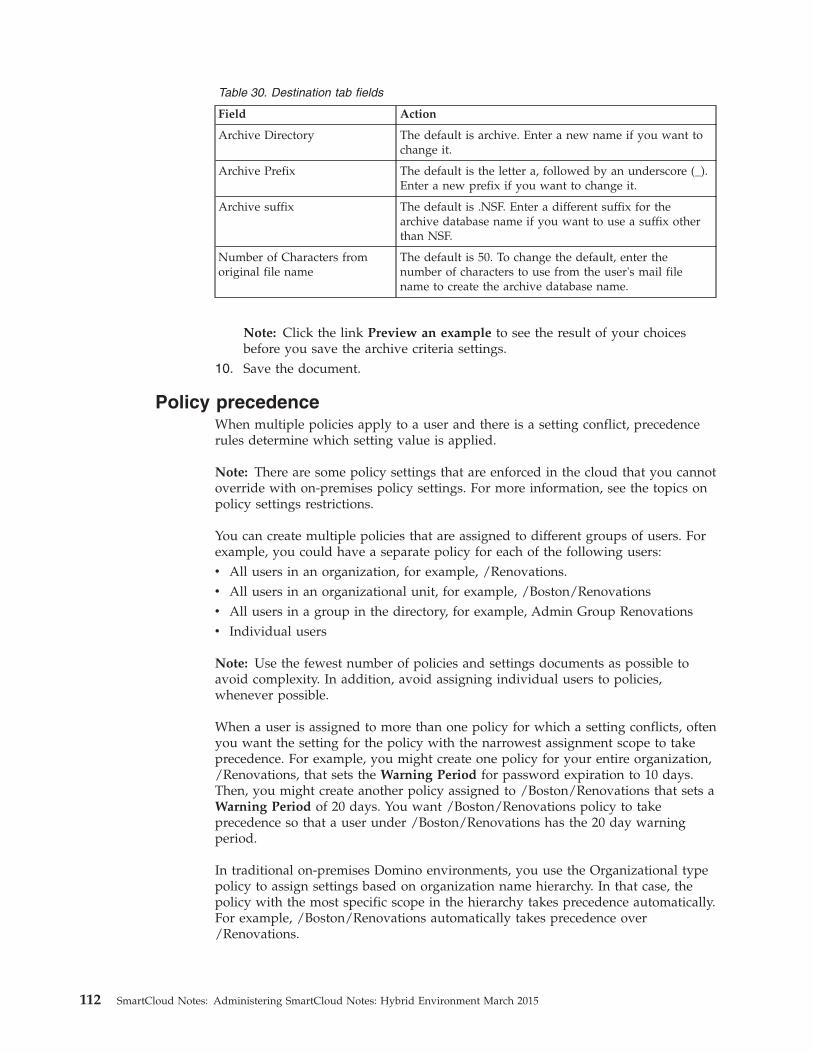
Table 30. Destination tab fields
Field Action
Archive Directory The default is archive. Enter a new name if you want tochange it.
Archive Prefix The default is the letter a, followed by an underscore (_).Enter a new prefix if you want to change it.
Archive suffix The default is .NSF. Enter a different suffix for thearchive database name if you want to use a suffix otherthan NSF.
Number of Characters fromoriginal file name
The default is 50. To change the default, enter thenumber of characters to use from the user's mail filename to create the archive database name.
Note: Click the link Preview an example to see the result of your choicesbefore you save the archive criteria settings.
10. Save the document.
Policy precedenceWhen multiple policies apply to a user and there is a setting conflict, precedencerules determine which setting value is applied.
Note: There are some policy settings that are enforced in the cloud that you cannotoverride with on-premises policy settings. For more information, see the topics onpolicy settings restrictions.
You can create multiple policies that are assigned to different groups of users. Forexample, you could have a separate policy for each of the following users:v All users in an organization, for example, /Renovations.v All users in an organizational unit, for example, /Boston/Renovationsv All users in a group in the directory, for example, Admin Group Renovationsv Individual users
Note: Use the fewest number of policies and settings documents as possible toavoid complexity. In addition, avoid assigning individual users to policies,whenever possible.
When a user is assigned to more than one policy for which a setting conflicts, oftenyou want the setting for the policy with the narrowest assignment scope to takeprecedence. For example, you might create one policy for your entire organization,/Renovations, that sets the Warning Period for password expiration to 10 days.Then, you might create another policy assigned to /Boston/Renovations that sets aWarning Period of 20 days. You want /Boston/Renovations policy to takeprecedence so that a user under /Boston/Renovations has the 20 day warningperiod.
In traditional on-premises Domino environments, you use the Organizational typepolicy to assign settings based on organization name hierarchy. In that case, thepolicy with the most specific scope in the hierarchy takes precedence automatically.For example, /Boston/Renovations automatically takes precedence over/Renovations.
112 SmartCloud Notes: Administering SmartCloud Notes: Hybrid Environment March 2015

In the cloud, only Explicit policies (sometimes referred to as dynamic policies) aresupported. You can use them to create the equivalent of Organizational policies,however. To do so, create an Explicit policy and give it a hierarchical name, forexample, /Renovations or /Boston/Renovations. Assign users to it by specifying awildcard hierarchical name in the Policy Assignment field, for example,*/Renovations or */Boston/Renovations.
In the cloud, the hierarchically named policy with the narrowest scope does notautomatically have precedence. Instead, it is important to use the PolicyPrecedence value to specify that order of precedence. To specify precedence, usethe Policies > Dynamic Policies view in the directory . The lower the precedencevalue, the higher the precedence.
For example, assume the policies in the following table, each with a differentWarning Period for password expiration specified in Security Settings.
Table 31. Policies with a different password expiration warning period
Policy name Policy assignment Policy precedence Warning period
/RenovationsAdmins Group
Renovations AdminGroup
1 5 days
/Boston/Renovations */Boston/Renovations
2 20 days
/Renovations */Renovations 3 10 days
Someone who is assigned to all three policies has a warning period of 5 daysbecause the /Renovations Admins Group policy has the lowest Policy Precedencevalue, 1. Someone who is under /Renovations and /Boston/Renovations but is nota member of the Renovations Admins Group, has a warning period of 20 days,because the Policy Precedence value 2 is lower than 3.
Inherit and Enforce settings. Each field in a policy settings document has Inheritand Enforce fields that are not selected, by default. These two settings can be usedwith hierarchically named policies to override policy precedence for specificsettings. For example, assume the following policy configuration:
Table 32. Policies with Inherit and Enforce settings
Policy namePolicyassignment
Policyprecedence Warning period
RequiredPasswordquality
/RenovationsAdmins Group
RenovationsAdmin Group
1 5 days 7
/Boston/Renovations
*/Boston/Renovations
2 20 days 7 (Inherit)
/Renovations */Renovations 3 10 days 8 (Enforce)
A user who is assigned to the /Boston/Renovations and /Renovations policies butnot the /Renovations Admins Group policy, gets a Required Password Quality of8. The Inherit value (from the Security Settings document for /Boston/Renovations) and the Enforce value from the (Security Settings document for/Renovations) cause the password quality to be derived from the /Renovationspolicy, even though /Boston/Renovations is listed with precedence. The WarningPeriod is still determined by the precedence of the /Boston/Renovations policyand so is 20 days.
Chapter 5. Customizing service settings 113

The Inherit and Enforce values are evaluated only for multiple,hierarchically-named policies within one hierarchy. So, a user who belongs to allthree policies, gets the Required Password Quality 7 because the /RenovationsAdmins Group policy has precedence and the Enforce value on the /Renovationspolicy does not apply.
Don't set value field. Select Don't set value next to a setting to cause it to beignored during precedence evaluation. This field is used to prevent an unintendeddefault setting from taking precedence over a customized setting in a policy withless precedence. For example, in a Security Settings document, the defaultRequired Password Quality is 8. Assume you want to enforce a higher value foryour entire organization. You would set the higher value in the Security Settingsdocument that is associated with a policy assigned to the organization. Then, forSecurity Settings documents that are associated with all other policies that havehigher precedence, select Don't set value for Required Password Quality. Then,the default value, 8, is ignored in those documents.
Use Don't set value as a general rule for all settings that you want to derive froma policy with lower precedence.Related concepts:“Policy settings restrictions”Most policy settings are supported for service users. However, there are a fewrestrictions to be aware of before you assign service users to an explicit policy.
Policy settings restrictionsMost policy settings are supported for service users. However, there are a fewrestrictions to be aware of before you assign service users to an explicit policy.
Archiving Settings restrictionsArchive Settings policies are used to set standard archiving behavior for IBM Notesclient users.
In the cloud, mail archiving is always run on the Notes client. The source mail fileto archive must be a local mail replica or managed mail replica on the client. Thedestination archive database can be created on the client or on an on-premisesserver. Users cannot create archives on the cloud servers.Related tasks:“Creating an archiving policy settings document” on page 106To use policies to set up mail file archiving for IBM Notes clients, you use bothArchiving Policy Settings documents and Archive Criteria Settings documents.
Desktop Settings restrictionsDesktop Settings are supported in on-premises policies for service users, but with afew restrictions.
The service enforces the following settings, found on the Mail tab, for all users inthe service. The service ignores these settings in an on-premises policy.
Note: For information on using Desktop Settings to enable managed mail replicas,see “Using Desktop Settings to configure managed mail replicas” on page 120.
114 SmartCloud Notes: Administering SmartCloud Notes: Hybrid Environment March 2015

Table 33. Desktop Settings that apply to all users in the service
Settings in the Mail tab Value Description
Use local mail.box to sendmessages (faster)
1 The client uses a local outgoing mailbox for sending mail from the userinterface. The client replicator transfersthe sent messages from the local mailbox to the mail box on the server. Thevalue indicates how many messagesneed to be queued in the local mailbox before triggering the replicator totransfer them to the server.
Enable upgrade of all local NSFsto latest ODS version
Disable(default)
Local replicas are not updatedautomatically
Enable server to poll for newmail and trigger replication onnotification of new mail
Enable Provides the fastest performance.
Registration Settings restrictionsYou can use Registration Settings in a policy for registering users on-premises.These settings are not used in the service, however.
Mail Settings restrictionsMail Settings are supported in on-premises policies for service users, but with afew restrictions.
Chapter 5. Customizing service settings 115
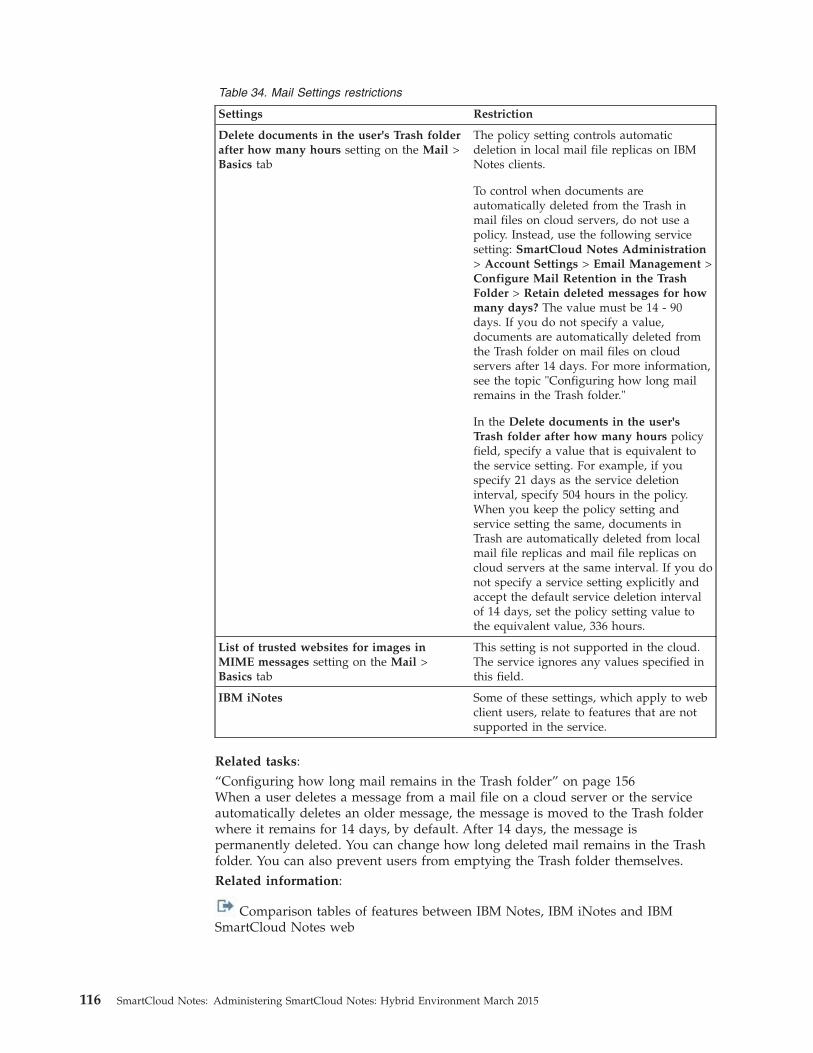
Table 34. Mail Settings restrictions
Settings Restriction
Delete documents in the user's Trash folderafter how many hours setting on the Mail >Basics tab
The policy setting controls automaticdeletion in local mail file replicas on IBMNotes clients.
To control when documents areautomatically deleted from the Trash inmail files on cloud servers, do not use apolicy. Instead, use the following servicesetting: SmartCloud Notes Administration> Account Settings > Email Management >Configure Mail Retention in the TrashFolder > Retain deleted messages for howmany days? The value must be 14 - 90days. If you do not specify a value,documents are automatically deleted fromthe Trash folder on mail files on cloudservers after 14 days. For more information,see the topic "Configuring how long mailremains in the Trash folder."
In the Delete documents in the user'sTrash folder after how many hours policyfield, specify a value that is equivalent tothe service setting. For example, if youspecify 21 days as the service deletioninterval, specify 504 hours in the policy.When you keep the policy setting andservice setting the same, documents inTrash are automatically deleted from localmail file replicas and mail file replicas oncloud servers at the same interval. If you donot specify a service setting explicitly andaccept the default service deletion intervalof 14 days, set the policy setting value tothe equivalent value, 336 hours.
List of trusted websites for images inMIME messages setting on the Mail >Basics tab
This setting is not supported in the cloud.The service ignores any values specified inthis field.
IBM iNotes Some of these settings, which apply to webclient users, relate to features that are notsupported in the service.
Related tasks:“Configuring how long mail remains in the Trash folder” on page 156When a user deletes a message from a mail file on a cloud server or the serviceautomatically deletes an older message, the message is moved to the Trash folderwhere it remains for 14 days, by default. After 14 days, the message ispermanently deleted. You can change how long deleted mail remains in the Trashfolder. You can also prevent users from emptying the Trash folder themselves.Related information:
Comparison tables of features between IBM Notes, IBM iNotes and IBMSmartCloud Notes web
116 SmartCloud Notes: Administering SmartCloud Notes: Hybrid Environment March 2015

Security Settings restrictionsSecurity Settings are supported in on-premises policies for service users, but withthe restrictions described in the following table.
Table 35. Security Settings restrictions
Settings Restrictions
ID Vault tab The ID vault settings are enforced by theservice and ignored in on-premises policies.
The services enforces the following settingsfor the ID vault in the service:
v Assigned Vault: A name derived fromcustomerID
v Forgotten password help text: Contactyour administrator for help (default)
v Enforce password change after passwordhas been reset: Yes
v Allow automatic ID downloads: No
v Allow ID downloads for: 5 days
Password Management > PasswordManagement Basics tab, PasswordExpiration Settings
If you want to enable Notes ID passwordexpiration, you must do so throughSmartCloud Notes Administration. Anon-premises Security Settings policy can beused only to enable password expirationwarnings that notify users when passwordexpiration approaches. For important detailson how to use Security Settings to enablepassword expiration warnings, see the topicSetting password expiration for Notes IDs.
Password Management > Custom PasswordPolicy tab
You can use SmartCloud NotesAdministration to enable passwordsynchronization. When service loginpasswords change, this feature allows NotesID passwords to change to match. If youenable this feature, do not make custompassword requirements in a policy morerestrictive than the service login passwordrequirements. For more information, see thetopic Enabling password synchronization.
Keys and Certificates tab The service does not support key rollover forNotes IDs. The service therefore ignores thevalues of fields in the Default Public KeyRequirements and User Public KeyRequirements sections of Security Settings.
Related tasks:“Setting password expiration for Notes IDs” on page 126For users who access the service with the IBM Notes client, you can specify whenNotes ID passwords expire. This password expiration does not apply to web usersbecause they log in using their web login password rather than a Notes IDpassword.“Enabling password synchronization” on page 128When users change their service login passwords, password synchronizationenables the users to use the new passwords when they log in to the IBM Notesclient.
Chapter 5. Customizing service settings 117
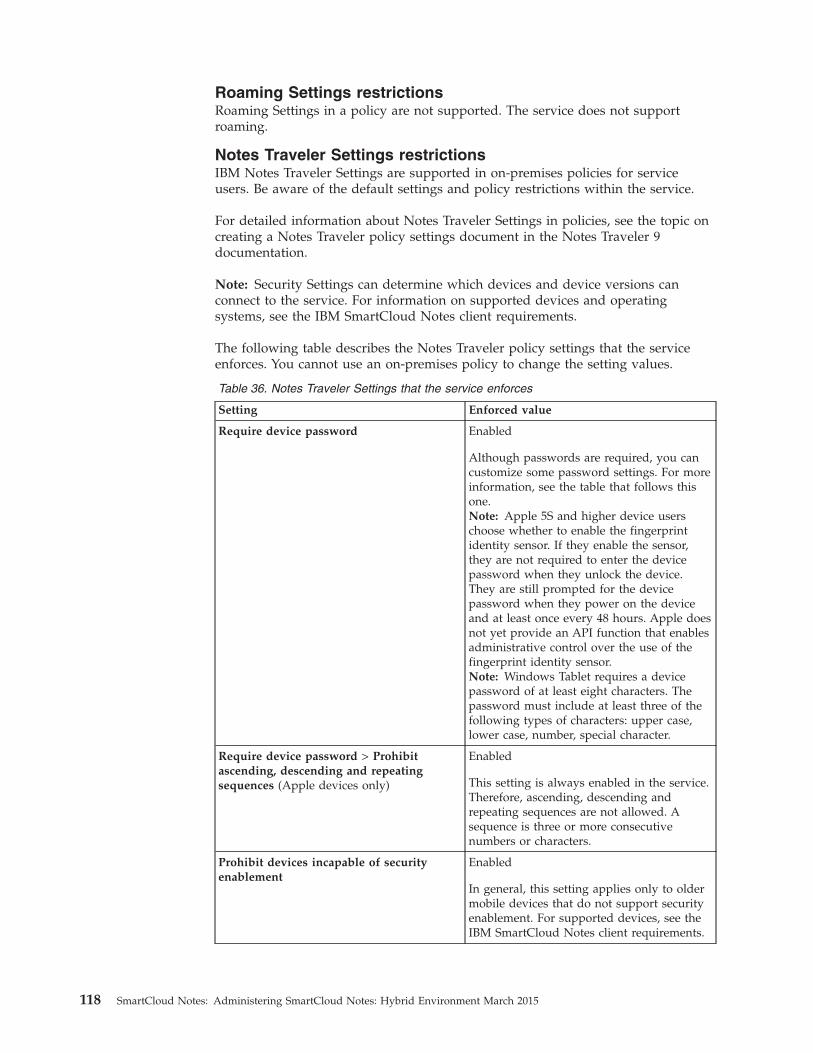
Roaming Settings restrictionsRoaming Settings in a policy are not supported. The service does not supportroaming.
Notes Traveler Settings restrictionsIBM Notes Traveler Settings are supported in on-premises policies for serviceusers. Be aware of the default settings and policy restrictions within the service.
For detailed information about Notes Traveler Settings in policies, see the topic oncreating a Notes Traveler policy settings document in the Notes Traveler 9documentation.
Note: Security Settings can determine which devices and device versions canconnect to the service. For information on supported devices and operatingsystems, see the IBM SmartCloud Notes client requirements.
The following table describes the Notes Traveler policy settings that the serviceenforces. You cannot use an on-premises policy to change the setting values.
Table 36. Notes Traveler Settings that the service enforces
Setting Enforced value
Require device password Enabled
Although passwords are required, you cancustomize some password settings. For moreinformation, see the table that follows thisone.Note: Apple 5S and higher device userschoose whether to enable the fingerprintidentity sensor. If they enable the sensor,they are not required to enter the devicepassword when they unlock the device.They are still prompted for the devicepassword when they power on the deviceand at least once every 48 hours. Apple doesnot yet provide an API function that enablesadministrative control over the use of thefingerprint identity sensor.Note: Windows Tablet requires a devicepassword of at least eight characters. Thepassword must include at least three of thefollowing types of characters: upper case,lower case, number, special character.
Require device password > Prohibitascending, descending and repeatingsequences (Apple devices only)
Enabled
This setting is always enabled in the service.Therefore, ascending, descending andrepeating sequences are not allowed. Asequence is three or more consecutivenumbers or characters.
Prohibit devices incapable of securityenablement
Enabled
In general, this setting applies only to oldermobile devices that do not support securityenablement. For supported devices, see theIBM SmartCloud Notes client requirements.
118 SmartCloud Notes: Administering SmartCloud Notes: Hybrid Environment March 2015
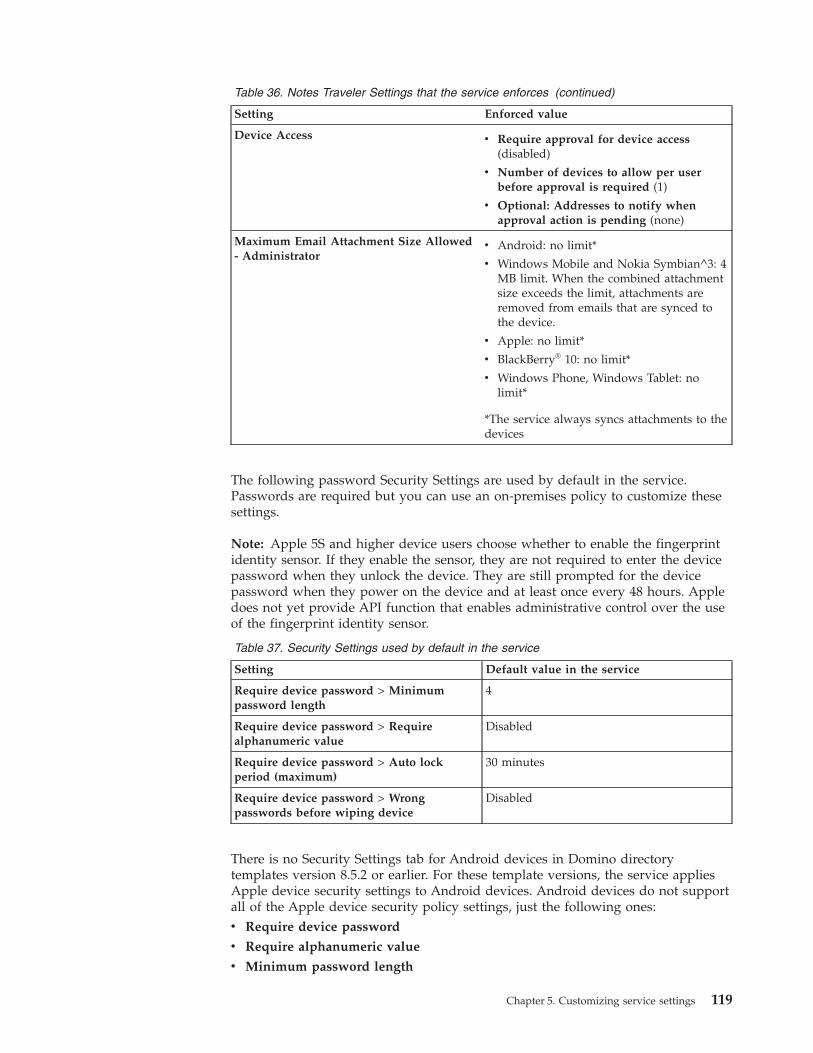
Table 36. Notes Traveler Settings that the service enforces (continued)
Setting Enforced value
Device Access v Require approval for device access(disabled)
v Number of devices to allow per userbefore approval is required (1)
v Optional: Addresses to notify whenapproval action is pending (none)
Maximum Email Attachment Size Allowed- Administrator
v Android: no limit*
v Windows Mobile and Nokia Symbian^3: 4MB limit. When the combined attachmentsize exceeds the limit, attachments areremoved from emails that are synced tothe device.
v Apple: no limit*
v BlackBerry® 10: no limit*
v Windows Phone, Windows Tablet: nolimit*
*The service always syncs attachments to thedevices
The following password Security Settings are used by default in the service.Passwords are required but you can use an on-premises policy to customize thesesettings.
Note: Apple 5S and higher device users choose whether to enable the fingerprintidentity sensor. If they enable the sensor, they are not required to enter the devicepassword when they unlock the device. They are still prompted for the devicepassword when they power on the device and at least once every 48 hours. Appledoes not yet provide API function that enables administrative control over the useof the fingerprint identity sensor.
Table 37. Security Settings used by default in the service
Setting Default value in the service
Require device password > Minimumpassword length
4
Require device password > Requirealphanumeric value
Disabled
Require device password > Auto lockperiod (maximum)
30 minutes
Require device password > Wrongpasswords before wiping device
Disabled
There is no Security Settings tab for Android devices in Domino directorytemplates version 8.5.2 or earlier. For these template versions, the service appliesApple device security settings to Android devices. Android devices do not supportall of the Apple device security policy settings, just the following ones:v Require device password
v Require alphanumeric value
v Minimum password length
Chapter 5. Customizing service settings 119
v Auto lock period (maximum)
v Wrong passwords before wiping device
v Prohibit devices incapable of security enablement *
* Compliance requires Android OS 2.2 or later with the Notes Traveler DeviceAdministrator feature enabled by the user. The Device Administrator feature wasadded in Android 2.2.
There is no Security Settings tab for BlackBerry®, Windows Phone, and WindowsTablet devices in Domino directory templates version 9.0 or earlier. For thesetemplate versions, the service applies the following Apple device security settingsto BlackBerry®, Windows Phone, and Windows Tablet devices:v Require device password
v Require alphanumeric value
v Minimum password length
v Auto lock period (maximum)
v Wrong passwords before wiping device
Related tasks:“Managing IBM Notes Traveler devices” on page 272For each user with an IBM Notes Traveler subscription, you can view informationabout the user's mobile device. You can also wipe the device to remove sensitivedata from it, for example, if the device is lost or stolen.Related information:
Creating an IBM Notes Traveler policy settings document
Client requirements
Using Desktop Settings to configure managed mail replicasIn a hybrid environment, use Desktop Policy settings to enable managed mailreplicas. Managed mail replicas helps ensure that IBM Notes users in the servicehave quick, local access to their mail when connected or disconnected from thenetwork.
Before you begin
Enable managed mail replicas through a Desktop Settings document that isassigned to a policy. Read about using administrative policies to understand therequirements for assigning policies to users in the service.
Note: Best practice is to configure managed mail replicas before you provisionusers. If you use this approach, you can resolve any managed mail replica issuesahead of user provisioning.
About this task
Managed mail replicas are available beginning with Notes 8.5.2. They provide thefollowing advantages to Notes users in the service and are recommended:v They are created automatically on the clients.v They are used automatically when the client Location is configured to connect to
the mail server.v Replication between managed mail replicas and server-based mail replicas
occurs automatically and in the background.
120 SmartCloud Notes: Administering SmartCloud Notes: Hybrid Environment March 2015
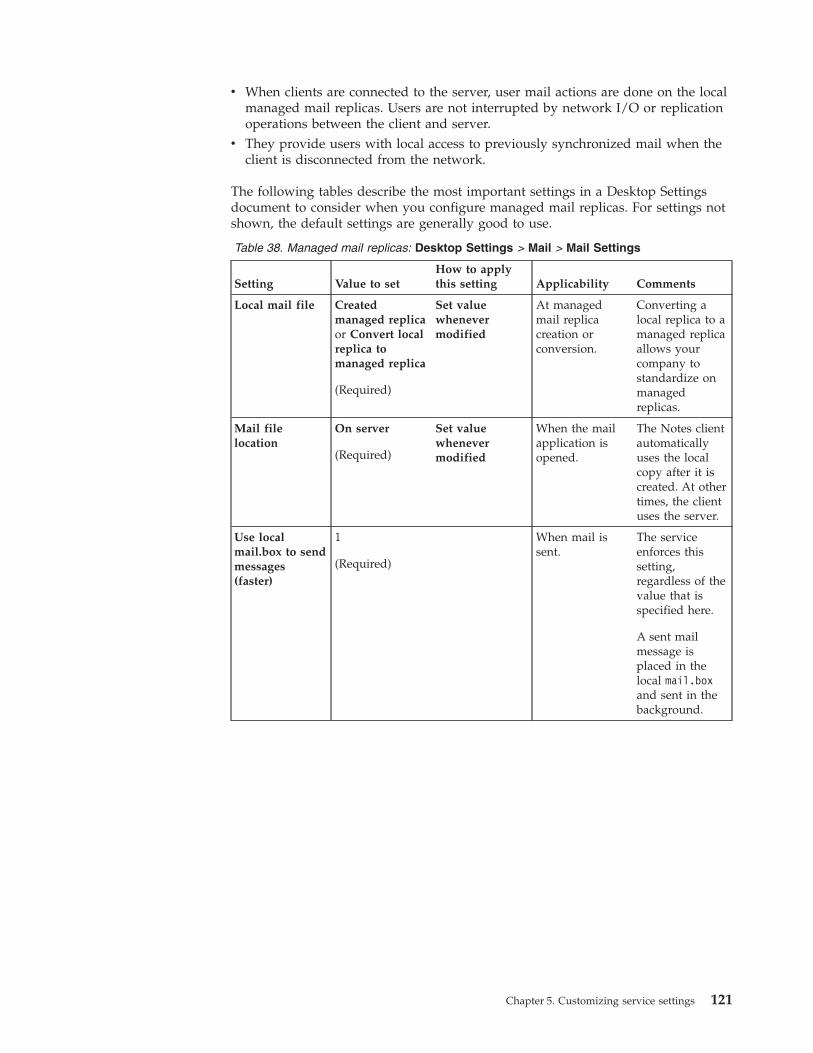
v When clients are connected to the server, user mail actions are done on the localmanaged mail replicas. Users are not interrupted by network I/O or replicationoperations between the client and server.
v They provide users with local access to previously synchronized mail when theclient is disconnected from the network.
The following tables describe the most important settings in a Desktop Settingsdocument to consider when you configure managed mail replicas. For settings notshown, the default settings are generally good to use.
Table 38. Managed mail replicas: Desktop Settings > Mail > Mail Settings
Setting Value to setHow to applythis setting Applicability Comments
Local mail file Createdmanaged replicaor Convert localreplica tomanaged replica
(Required)
Set valuewhenevermodified
At managedmail replicacreation orconversion.
Converting alocal replica to amanaged replicaallows yourcompany tostandardize onmanagedreplicas.
Mail filelocation
On server
(Required)
Set valuewhenevermodified
When the mailapplication isopened.
The Notes clientautomaticallyuses the localcopy after it iscreated. At othertimes, the clientuses the server.
Use localmail.box to sendmessages(faster)
1
(Required)
When mail issent.
The serviceenforces thissetting,regardless of thevalue that isspecified here.
A sent mailmessage isplaced in thelocal mail.boxand sent in thebackground.
Chapter 5. Customizing service settings 121
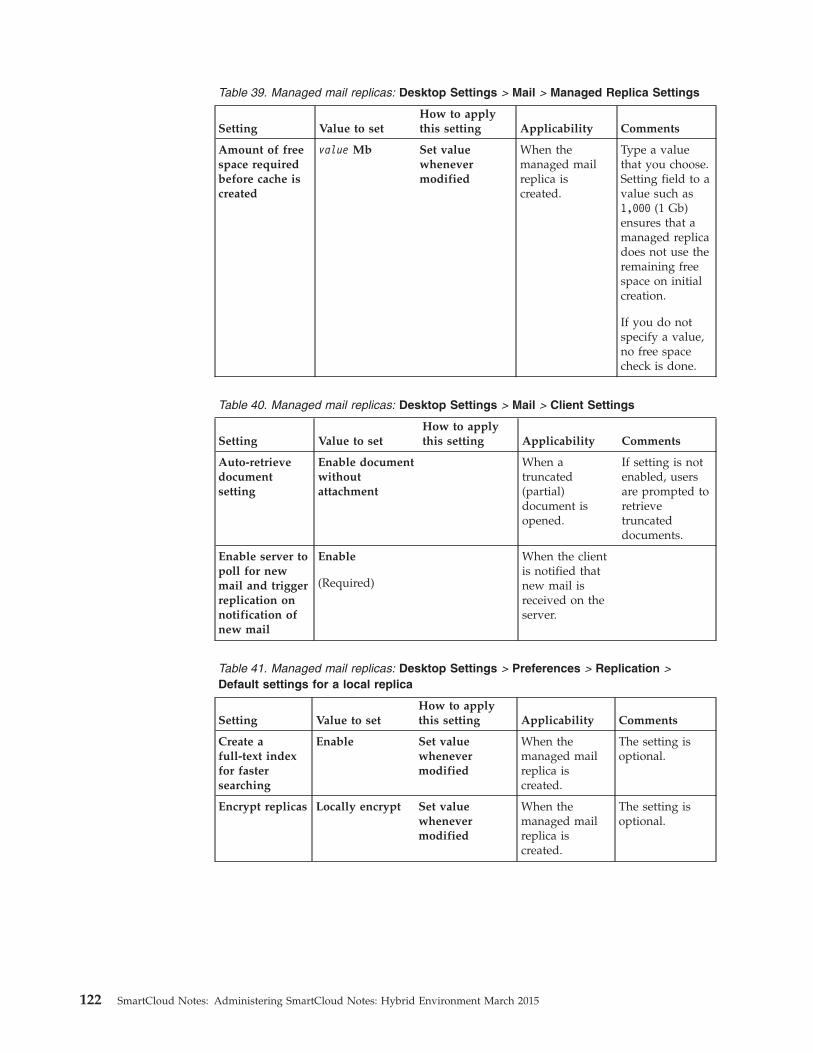
Table 39. Managed mail replicas: Desktop Settings > Mail > Managed Replica Settings
Setting Value to setHow to applythis setting Applicability Comments
Amount of freespace requiredbefore cache iscreated
value Mb Set valuewhenevermodified
When themanaged mailreplica iscreated.
Type a valuethat you choose.Setting field to avalue such as1,000 (1 Gb)ensures that amanaged replicadoes not use theremaining freespace on initialcreation.
If you do notspecify a value,no free spacecheck is done.
Table 40. Managed mail replicas: Desktop Settings > Mail > Client Settings
Setting Value to setHow to applythis setting Applicability Comments
Auto-retrievedocumentsetting
Enable documentwithoutattachment
When atruncated(partial)document isopened.
If setting is notenabled, usersare prompted toretrievetruncateddocuments.
Enable server topoll for newmail and triggerreplication onnotification ofnew mail
Enable
(Required)
When the clientis notified thatnew mail isreceived on theserver.
Table 41. Managed mail replicas: Desktop Settings > Preferences > Replication >Default settings for a local replica
Setting Value to setHow to applythis setting Applicability Comments
Create afull-text indexfor fastersearching
Enable Set valuewhenevermodified
When themanaged mailreplica iscreated.
The setting isoptional.
Encrypt replicas Locally encrypt Set valuewhenevermodified
When themanaged mailreplica iscreated.
The setting isoptional.
122 SmartCloud Notes: Administering SmartCloud Notes: Hybrid Environment March 2015

Table 42. Managed mail replicas: Desktop Settings > Preferences > Replication >Default replication schedule
Setting Value to setHow to applythis setting Applicability Comments
All settings Schedule as younormally do.
When the NotesClient is open
Table 43. Managed mail replicas: Desktop Settings > Preferences > Mail
Setting Value to setHow to applythis setting Applicability Comments
Check for newmail
Not necessary The Enableserver to poll fornew mail andtriggerreplication onnotification ofnew mail settingenables thisbehavior.
Mail checkinginternal
Any value Specify anyvalue. TheEnable server topoll for newmail and triggerreplication onnotification ofnew mailcontrols thisbehavior.
Results
It is possible for users to see the following message after they are provisionedwhen managed mail replicas are enabled:Access to this server has been restricted due to excessive load.
Creating many managed mail replicas simultaneously can degrade serverperformance. For this reason, the service controls the number of managed mailreplicas that can be created simultaneously on a mail server in the cloud. If a mailserver in the cloud reaches the limit, a user can see this error on the Replicationand Sync page during initial replication of the managed mail replica.
This error reflects a temporary condition. If the mail server cannot create the initialmanaged mail replica, it tries to create it again automatically at the next replicationschedule interval or when the client is restarted.
A user who sees this error can open and use the server-based mail file in themeantime. One way to open the mail file is to click File > Open > IBM NotesApplication and browse to the server and mail file replica.Related concepts:“Using administrative policies” on page 105If you use administrative policies on premises, you can apply many of those samepolicy settings to service users as well. Administrative policies enable all users tohave the same working experience.
Chapter 5. Customizing service settings 123
Related information:
Managed mail replicas explained
Configuring loginsReset passwords, manage password expiration periods, set up federated identitymanagement, restrict logins to an IP range, and enable application passwords.
Resetting service login passwordsUsers can reset their own service login passwords once within a 24 hour period byclicking Forgot password?. An administrator or administrator assistant can resetservice login passwords for any user at any time.
About this task
Reset passwords when userd forget their passwords, or when the password mightbe compromised. Users that log in by clicking Use My Organization's Login areusing a federated identity and can reset their passwords only by following theircompany's process.
If administrators enable password synchronization, when users change theirservice login passwords, they can also use the new passwords to log in to the IBMNotes client.
Follow these steps to reset any user's password:
Procedure1. Click Administration > Manage Organization.2. Click User Accounts.3. Select the arrow next to the user that needs the password changed.4. Select Reset password and enter the new password. This password is a
temporary password that the user enters the next time that they log in. At thattime, the user is asked to create a password.You can also reset the password by editing the user account. Click theappropriate user name in User Accounts and enter a new password in theAccount Login tab.
5. Notify the user of the password change. The user is not automatically notifiedthat the password was reset. Make sure to communicate this change to the user,along with the new password if needed.
What to do next
Administrators can enable security settings to enforce password expiration throughSystem Settings > Security. When s user logs in with an expired password, theuser is prompted to reset that password.
Setting service login password expirationBy default, service login passwords do not expire. Enforcing a password expirationperiod helps ensure that passwords are changed frequently. Administrators can seta password expiration interval for all users.
124 SmartCloud Notes: Administering SmartCloud Notes: Hybrid Environment March 2015
Procedure1. Click Administration > Manage Organization
2. Click Security.3. Click Edit Settings in the Password Settings section. Select the number of days
before a password expires, how the password can be reset, and add passwordreset support for your users.
Managing Notes IDsYou can reset Notes ID passwords, set Notes ID password expiration, andsynchronize Notes ID passwords with service login passwords.
Resetting passwords for Notes IDsReset the password on an IBM Notes ID file to change the current password.Typically you do this because a user has forgotten the current password.
About this task
This procedure applies only to passwords associated with Notes ID files used withNotes clients, and not to service login passwords.
Procedure1. Log on to http://www.ibmcloud.com/social using the e-mail address and
password of a SmartCloud Notes user with the Administrator role.2. If your account also has the User role, click Admin > Manage Organization.3. In the System Settings section of the navigation pane, click IBM SmartCloud
Notes.4. Click Users.5. In the Search box, type the beginning characters of any of the following user
values to display the user's name:v Distinguished name, for example, Samantha Daryn/Renovations.v Internet email address, for example, [email protected] Last name, for example, Daryn.
Note: You cannot use the wildcard character (*) when you search.A “starts with” search is done and the names of any users with matchingvalues in the directory are displayed. For example, the results of a search on mainclude the names of users with the following values in the directory:v Madison Armond/Renovations
v masmith@renovations
v Kristin MacGyver
This search does not match the following values:v Emarie Klein/Renovations
v tamado@renovations
v Ted Amado
Search results can include a maximum of 1000 names.6. Click the user's name in the search results.7. Under Available actions for this user, click Reset IBM Notes Password.8. Enter a new password, and then click Save Changes. The password must be at
least eight characters in length.
Chapter 5. Customizing service settings 125
9. Provide the new password to the user in a way that complies with yourcompany security policies.
Results
After you complete this procedure, the user can log on to a SmartCloud Notesserver from an IBM Notes client using the new password. After logging on withthe new password, the user is prompted to change the password.
Note: If the Wrong Password prompt is displayed, tell the user to re-enter the newpassword that you provided. If that step does not solve the problem, tell the userto delete the local ID file and then re-enter the password.
The user has five days from the time you reset a password to use the password tolog on to a SmartCloud Notes mail server and download the new password to theNotes client. If the 5-day limit is exceeded, the user sees the following messageand you must reset the password again:
Contact your company administrator to have your Notes ID password reset.
Related concepts:“Notes IDs and passwords” on page 130When users connect to their mail servers in the cloud with IBM Notes clients andNotes IDs, they are authenticated using Notes Remote Procedure Call (NRPC)authentication.Related tasks:“Resetting service login passwords” on page 124Users can reset their own service login passwords once within a 24 hour period byclicking Forgot password?. An administrator or administrator assistant can resetservice login passwords for any user at any time.“Setting password expiration for Notes IDs”For users who access the service with the IBM Notes client, you can specify whenNotes ID passwords expire. This password expiration does not apply to web usersbecause they log in using their web login password rather than a Notes IDpassword.“Enabling password synchronization” on page 128When users change their service login passwords, password synchronizationenables the users to use the new passwords when they log in to the IBM Notesclient.
Setting password expiration for Notes IDsFor users who access the service with the IBM Notes client, you can specify whenNotes ID passwords expire. This password expiration does not apply to web usersbecause they log in using their web login password rather than a Notes IDpassword.
Before you begin
For information on how this feature interacts with the password synchronizationfeature, see “Enabling password synchronization” on page 128.
About this task
You must enable password expiration through SmartCloud Notes Administration.An on-premises Security Settings policy can be used only to enable passwordexpiration warnings that notify users when password expiration approaches.
126 SmartCloud Notes: Administering SmartCloud Notes: Hybrid Environment March 2015
If users click File > Security > User Security, the Password must be changed byfield does not show the password expiration date.
Perform the following procedure to set password expiration for Notes IDs.
Procedure1. Log on to the service as an administrator.2. If your account also has the User role, click Admin > Manage Organization.3. In the System Settings section of the navigation pane, click IBM SmartCloud
Notes and then click Account Settings.4. Click Password Management
5. Click Enable password expiration for IBM Notes clients.6. Enter the number of days a password can be used before it expires. The
minimum value for this setting is 30 days; the maximum is 3650 days.7. Optional: To warn users when password expiration approaches in a hybrid
environment:
Note: Perform these steps only if you complete the previous steps to enablepassword expiration in the service. Enabling a warning period for service userswithout enabling password expiration in the service produces unexpectedresults and is not supported.a. Create an explicit group policy for service users. For more information, see
“Creating policies for service users” on page 105. Note that if the policy isalso assigned to any on-premises users who are not in the cloud, passwordexpiration will be enabled for those users as well, with the specified changeinterval and warning period.
b. In a Security Settings document that is assigned to the group policy, specifythe following settings in the Password Management > PasswordManagement Basics tab.
Table 44. Security settings required for password expiration warnings
Setting Value
Enforce Password Expiration Notes Only
Required Change Interval The expiration period that you specified inStep 6.
Warning Period The number of days before passwordexpiration at which the user receives anexpiration warning message.
Resultsv When password expiration is first enabled, the passwords of all current users
expire on a random basis after the expiration period, regardless of when thepasswords were last changed. For example, if the expiration period is 90 days,all current users are prompted to change their passwords on a random basiswhen first authenticating after the 90-day expiration period.
v The passwords of new users also expire on a random basis after the expirationperiod.
v If you configured a warning period through policy settings, users receivepassword expiration warnings.
v Users who are logged in when this setting becomes effective are not promptedto change the password during the current login session.
Chapter 5. Customizing service settings 127

v Users might experience a lag time of a few seconds between the time theychange their password and authentication. This lag occurs while the updated IDis synchronizing with the vault. If the synchronization does not complete,authentication can fail. In that case, users can wait a few minutes, and then tryagain. If the synchronization continues to fail and the user cannot access theclient, reset the Notes ID using SmartCloud Notes Administration.
What to do next
You might want to communicate the following information to your users:v How often they will be prompted to reset their passwords.v What to do if authentication fails after they change their passwords.Related concepts:“Using administrative policies” on page 105If you use administrative policies on premises, you can apply many of those samepolicy settings to service users as well. Administrative policies enable all users tohave the same working experience.Related tasks:“Resetting passwords for Notes IDs” on page 125Reset the password on an IBM Notes ID file to change the current password.Typically you do this because a user has forgotten the current password.
Enabling password synchronizationWhen users change their service login passwords, password synchronizationenables the users to use the new passwords when they log in to the IBM Notesclient.
About this task
Password synchronization benefits users who are active users of both the web andNotes clients by allowing them to use one password for both clients.
After you enable password synchronization, when users change their service loginpasswords, the new passwords are added to the Notes ID files in the ID vault.Users can then use the new passwords the next time they log in to the service fromthe Notes client.
Password synchronization occurs whenever users change their service loginpasswords. Users can change the service login passwords at any time throughConnections Cloud My Account Settings. They also change the passwords:v After they log in to the service for the first time with temporary passwords;v After they log in to the service after an administrator resets their service login
passwords;v After they log in to the service when service login password expiration is
enabled and their passwords expire.
Before you enable password synchronization, be aware of the followinginformation:v The feature does not apply to users who log in to the service with a federated
identity that your organization defines.v Synchronization occurs in one direction: from the service login password to the
Notes ID password. Changing the Notes ID password does not change theservice login password.
128 SmartCloud Notes: Administering SmartCloud Notes: Hybrid Environment March 2015
v When service login passwords change, Notes client users are not required to usethe new passwords. Their old passwords remain valid until they use the newpasswords to log in to the service from the Notes client. Because the continueduse of the old password prevents ID synchronization with the ID vault, as a bestpractice, recommend to users that they use the new passwords on the Notesclient.
v Synchronization occurs after Notes clients are connected to the service.v Notes client users can change their Notes ID passwords, either by choice or
because you enable the Password Expiration setting in SmartCloud NotesAdministration and their passwords expire. When Notes users change the NotesID passwords, the service login passwords do not change automatically.However, users can use Connections Cloud My Account Settings to change theservice login passwords to match the new Notes ID passwords.
v If you enable password expiration for Notes IDs, a Notes ID password mightexpire before a user logs in to Notes with a new service login password. In thiscase, the user can log in to the Notes client with the old Notes ID password butthe user is prompted to change the password when opening mail or anotherapplication. At this point the user can provide the new service login password.
v If you use an on-premises policy to specify Notes ID password requirements forservice users, as a best practice, do not make the requirements more restrictivethan the service login password requirements. If the Notes ID passwordrequirements are more restrictive, a password that is acceptable for the servicepassword can be unacceptable for Notes. For example, if the policy requires thatpasswords be 10 characters and a user's service login password is only 8characters, the service login password cannot be used for Notes. Service loginpasswords must:– Include at least eight characters– Include at least one non-alphabetic character and four alphabetic characters– Include no more than two repeated characters– Be different from the previous eight passwords– Not include the user's given name, surname, or email address– Not include the space character
Note: Although service login passwords can be any length, Notes ID passwordsmust be 63 or fewer characters. If you use password synchronization, tell usersto use service login passwords that are within the 63 character limit so they canbe used for the Notes ID, too.
To enable password synchronization, complete the following procedure.
Procedure1. Log on to the service as an administrator.2. If your account also has the User role, click Admin > Manage Organization.3. In the System Settings section of the navigation pane, click IBM SmartCloud
Notes and then click Account Settings.4. Click Password Management.5. In the Password Synchronization section of the page, select Enable password
synchronization.6. Click Save.
Chapter 5. Customizing service settings 129
Results
When users change their service login passwords, they can use the new passwordsto log in to the Notes client.
If users change the Notes ID password, the service login password does notchange automatically.
What to do next
Notify users that the feature is enabled. Recommend that when they change theservice login passwords that they use the new passwords to log in to the Notesclient.Related tasks:“Resetting service login passwords” on page 124Users can reset their own service login passwords once within a 24 hour period byclicking Forgot password?. An administrator or administrator assistant can resetservice login passwords for any user at any time.“Setting service login password expiration” on page 124By default, service login passwords do not expire. Enforcing a password expirationperiod helps ensure that passwords are changed frequently. Administrators can seta password expiration interval for all users.Related information:
Federated identity management
Notes IDs and passwordsWhen users connect to their mail servers in the cloud with IBM Notes clients andNotes IDs, they are authenticated using Notes Remote Procedure Call (NRPC)authentication.
In service-only environments, and in hybrid environments that do not useon-premises security policy settings to configure password requirements, Notes IDpasswords must be at least eight characters. Passwords must also have a passwordquality of 8, on a quality scale of 0 (weakest) to 16 (strongest). Password qualityrefers to the required character complexity of passwords. In hybrid environments,you can use on-premises security policy settings to control password requirements.
By default, Notes ID passwords do not expire and keeping this default behavior isrecommended. Nevertheless, you can configure a password expiration interval offrom 30 to 3650 days through the SmartCloud Notes Administration interface. Inhybrid environments, you do not control password expiration through anon-premises policy, but you can use a policy to enable a warning to be displayedto users when their passwords are due to expire.
If users forget their Notes ID passwords, company administrators can use theSmartCloud Notes Administration interface to reset the passwords to temporaryvalues. The users use the temporary passwords to log in to the service from aNotes client and then are prompted to change the passwords.
The Notes shared login feature is supported in hybrid environments. This featureallows users to log in to Microsoft Windows and then use the Notes client withoutproviding a Notes ID password. A benefit of this feature is there are no Notes IDpasswords to use or remember.
130 SmartCloud Notes: Administering SmartCloud Notes: Hybrid Environment March 2015

The Notes client can connect automatically to the cloud service instant messagingcommunity and to cloud service Activities through the client sidebar. (Access toservice Activities requires a collaboration subscription). After users log on to theservice mail server from the Notes client, a single-sign on capability enables themto access these cloud services during the session without providing their cloudservice account login credentials. A Notes client can be configured to connect toboth on-premises and cloud instant messaging servers or Activities servers throughthe sidebar. In this case, users must provide their cloud service login credentials toaccess the cloud servers.Related tasks:“Resetting passwords for Notes IDs” on page 125Reset the password on an IBM Notes ID file to change the current password.Typically you do this because a user has forgotten the current password.“Setting password expiration for Notes IDs” on page 126For users who access the service with the IBM Notes client, you can specify whenNotes ID passwords expire. This password expiration does not apply to web usersbecause they log in using their web login password rather than a Notes IDpassword.
Limitations when Notes IDs are not in the vaultThere are advantages to using and storing IBM Notes ID files in a vault in theservice. All Notes client users have a Notes ID, which is automatically uploaded tothe vault at some point after the client connects to the service. Users who will notuse a Notes client to access the service are not a required to have a Notes ID.However, these users are limited if they do not have a Notes ID in the servicevault.
Service users who will use only the web client, and who do not have a Notes IDstored in the vault, cannot perform secure mail operations (signing mail, andreading or sending encrypted mail). These limitations also apply to IBM NotesTraveler and BlackBerry® smartphone users. If your users do not now and neverhave had a Notes ID, and they do not need to perform secure operations, thenthey do not require Notes IDs.
If, however, they previously had a Notes ID, but it will not be stored in the servicevault, then these additional limitations apply:v If the mail file is transferred to the service without an imported Notes ID, then
users cannot read old encrypted messages if there are any.v Administrators cannot reset the Notes passwordv Notes ID password resets and ID recovery are not available.v If the user's name changes, the user's Notes name cannot be changed.
If you are transferring mail files of users who currently have a Notes ID, users canimport their Notes ID into the mail file before you transfer mail files. The Notes IDis uploaded to the vault the first time a user performs a secure mail operation,such as sending signed mail or reading encrypted mail. Alternatively, users can usethe web client to upload the ID file to the service after they have been provisioned,or administrators can upload ID files.
If a user has a Notes ID, but the Notes ID is not stored in the vault in the service,you cannot rename the user. If however, you want to be able to rename a user, butdo not want to store the user's Notes ID in the vault, you can modify the user'sPerson document to reflect that the user will not use a Notes ID file again. Then,you can rename the user on premises using the Rename feature in the Domino
Chapter 5. Customizing service settings 131
Administrator client. To allow renames to succeed, remove the following itemsfrom the user's Person document in the Domino Directory on a server that yousynchronize with the service:v Certificatev CertificateExpirationv CertificateIssuerRelated tasks:“Uploading a Notes ID to the vault” on page 269In a hybrid environment, if a service user has an IBM Notes ID file, the ID must bestored in the ID vault in the service. In some cases, for users who have a Notes ID,but who will not use the Notes client, you might need to upload the Notes ID tothe vault manually. If it is not stored in the vault, web client, Notes Traveler, andBlackBerry® smartphone users cannot perform secure mail operations. Otherlimitations also apply, as outlined in this topic.
Setting up federated identity managementWhen you set up federated identity management, users log on to the service usingyour on-premises authentication mechanism.
About this task
Federated identity management provides the following benefits:v It allows your company to control the type of authentication and authentication
options. For example, you might restrict access to specific networks, use VPNconnections, define custom password strength or password expiration periods,use smartcards, or require two-factor authentication.
v Users can use their familiar, on-premises credentials to access the cloud service.v While users are logged on to the on-premises identity provider, they can access a
cloud service without being re-prompted for credentials.
After you implement federated identity management, you must accommodateusers of mobile apps. If all of your mobile users have one or more IBM mobileapps such as Connections, Chat, Meetings, or most versions of IBM Notes Traveler,you have the following options:v Set up an additional, separate federated identity management endpoint for the
IBM mobile apps. For more information about this, see the Flow models section of“SAML federated identity concepts” on page 133.
v Use the partial authentication type when setting up federated identitymanagement, which allows you to specify a group of users to whom federatedidentity management does not apply. In this case, you would specify yourmobile device users. For more information about the partial authentication type,see the Authentication types section of “SAML federated identity concepts” onpage 133.
v Use application passwords. For information about application passwords, see“Enabling application passwords” on page 139.
All other mobile apps must use application passwords when federated identitymanagement is implemented.
Notes Traveler version 9.0.1.3 or greater for Android is an exception to the rule. Itcan connect to the same federated identity management system that non-mobileapps use.
132 SmartCloud Notes: Administering SmartCloud Notes: Hybrid Environment March 2015
Note: Users to whom federated identity management applies cannot connect to theservice with IMAP clients or FTP clients.
SAML federated identity conceptsLearn about the federated identity process as implemented in the cloud service, theflow models that are supported, and the authentication types.
Overview of the process using SAML
Cloud services rely on SAML to provide the SSO services. In this implementation,your organization is the identity provider, and the cloud service is the serviceprovider. You can use either SAML 1.1 or SAML 2.0.
As the identity provider, your organization authenticates users. The authenticationcan be by a login with a user name and password, or by some other method. Formobile apps, the authentication must be by a login with user name and password.
When a user gains access to your intranet and attempts to use a cloud service, aSAML assertion is sent from your organization to the SAML endpoint in the cloudservice. The SAML assertion securely identifies the user. The cloud service uses theSAML assertion to decide whether the user can access it.
Flow models
Two flow models exist in federated identity management. One model is theidentity provider initiated model (IdP-initiated), and the other is the serviceprovider initiated model (SP-initiated). Mobile apps use the SP-initiated model.
Normally, the SP-initiated flow model is not available in SAML 1.1 because SAML1.1 does not support Identity Provider Discovery Profile. However, the cloudservices use a hybrid version of SP-initiated that allows both SAML 1.1 and SAML2.0. As a result, Identity Provider Discovery Profile is not required by cloudservices, and is not implemented.
The cloud services implement the Browser/POST profile that is used in SAML 1.1and is compatible with the Web Browser SSO profile in SAML 2.0. Other profilesare not supported at this time.
The following outlines describe the two flows:
IdP-initiated
1. The user gains access to your intranet via your organization'sauthentication mechanism.
2. The user navigates to a web page on your intranet that contains a linkto a cloud product such as Connections Cloud or SmartCloud Notesweb.
3. The user clicks the link.4. The SSO process is initiated. A SAML assertion is sent to the cloud
endpoint via HTTP POST. If the user has a valid account, access isgranted.
5. The user interacts with the cloud product.
SP-initiated hybrid
1. The user navigates to the cloud service login page.2. The user clicks Use My Organization's Login.
Chapter 5. Customizing service settings 133
3. The user enters the email address that is associated with the user’saccount.
4. The cloud service looks up the email address and then redirects theuser to your organization’s authentication mechanism.
5. The flow continues from Step 4 of the IdP-initiated model.
The SP-initiated hybrid flow model also applies to mobile apps. Before using amobile app, the user must do a one-time setup of the mobile app to use a cloudserver. The setup process is different for each mobile app; instructions are includedin the documentation of each app.
The following outline describes the flow for mobile apps:
SP-initiated hybrid for mobile apps
1. A mobile app initiates a connection to a cloud service.2. The cloud server looks up the email address and then responds with
the mobile login URL of your organization’s mobile authenticationmechanism.
3. The mobile client issues a basic authentication request to the mobilelogin URL with the user's email address and password.
4. If the basic authentication is successful, a SAML assertion is returned tothe mobile app.
5. The mobile app sends the SAML assertion to the cloud endpoint viaHTTP POST. If the user has a valid account, access is granted.
6. The mobile user interacts with the cloud product.
Authentication types
Four types of federated identity management are available: Federated, Modified,Partial, and Non-federated. By default, all users in your organization are assignedthe Non-federated type unless you enable one of the other types.
Federated
Users must authenticate with your organization before they can accesscloud services. Users do not have a user name or password in the clouduser account. If they go to the service login page, they must click Use MyOrganization's Login. The Federated type applies to all users in yourorganization.
The Federated type is convenient for your users who normally work fromthe office. They can log on to your system and use cloud services withoutneeding a separate user name and password combination. However, if anyof your users work from home or work while traveling, your directoryservers must be accessible from the Internet. Also, because your userscannot log in with a name and password that is defined in the service,services such as chat and IMAP are not available.
If you choose the Federated type, you must implement the SP-initiatedflow model.
Modified
Users have the option of authenticating with your organization beforeaccessing the cloud-based services, or using a name and password definedin the service to log on. The Modified type applies to all users in yourorganization.
134 SmartCloud Notes: Administering SmartCloud Notes: Hybrid Environment March 2015
The Modified type allows your users to access cloud services from theInternet, but you do not need to make your directory servers accessiblefrom the Internet. Your users can use the single sign-on services when theyare in the office, and the cloud service login when they are outside theoffice.
Partial
Each user in your organization is assigned one of the previously listedtypes: Non-federated, Federated, or Modified. If you do not specify a typefor a particular user, the user is assigned the Non-federated type.
Use the Partial type if you have one group of users who normally work inthe office, and another group of users who normally work from home orwho travel frequently. For example, the office workers can be assigned theFederated type, and the traveling sales team can be assigned the Modifiedtype.
You can also use the Partial type to group users by the services that areavailable to them. Users with the Federated type do not have access to chator POP/IMAP, but users of the Modified type do have access to chat andPOP/IMAP.
If you choose the Partial type, you must implement the SP-initiated flowmodel to support users with the Federated type.
Non-federated
The login for the cloud service is independent of, and separate from, yourorganization's login procedure. Users must log on using the name andpassword defined in the service to use the cloud-based services.
The Non-federated type is the default type, and is the simplest and easiesttype to set up because it requires no action on your part.
After one of the federation types is implemented, you can change to one of theother types by contacting your customer services representative. The customerservices representative will advise you on the process. If you are using the Partialtype, you can change individual users from one type to another without the needto contact your customer services representative.
Preparing for federated identity managementThe difficulty of getting your system ready for federated identity managementdepends on both the state of your system, and on your knowledge and experiencewith SAML, SSO, LDAP, and related technologies.
Before contacting your IBM customer service representative to enable federatedidentity management, review the following checklist:v Choose the version of SAML that you want to use. You can use either SAML 1.1
or SAML 2.0.v Choose the type of federation that you want to employ: Federated, Modified, or
Partial. See the topic SAML federated identity concepts for more information.v Review the IdP-initiated flow model and the SP-initiated hybrid flow model. See
the topic SAML federated identity concepts for more information.v Implement SAML on your web server. You can use Tivoli® Federated Identity
Manger, OpenSAML, Active Directory Federation, or some other federatedidentity manager.
Chapter 5. Customizing service settings 135

v If you are setting up federated identity for users of mobile apps, create a secondendpoint that accepts basic authorization. The mobile apps work with theSP-initiated flow model only.
v Retrieve or create the private/public key pair that will be used in digitalsignatures.
v Integrate your directory server with your SAML service. Administration is easierif all of your users are on the same directory server.
v Implement and test the SAML Browser/POST profile in either SAML 1.1 orSAML 2.0.
v Create a dummy service provider and conduct an IdP-initiated single sign-ontest to make sure that everything is working correctly.
v Create a SAML metadata file to transmit your identity provider metadata to theIBM customer service representative. If you are using SAML 1.1, you have theoption of transmitting most of the information in an email or by some othermeans that you negotiate with the IBM customer service representative.However, in this case you must transmit the public key inside a Java™ keystore.
Enabling federated identity managementWhen your system is ready for testing with the cloud system, contact an IBMcustomer services representative.
Before you begin
Before you start the enablement process, review the following list:1. Implement and test a federated identity management system that uses SAML.
Make sure that your system is configured to send the user’s email address asthe subject in a SAML assertion.
2. Test your system to make sure that it is configured for the type and flow modelthat you have chosen. See the topic SAML federated identity concepts for moreinformation.
3. Complete the checklist in the topic Preparing for federated identity management
Procedure
To enable federated identity management:
Send an email to [email protected]. In the email, request to have federatedidentity management enabled for your organization. An IBM customer servicesrepresentative will contact you with instructions and provide details of the process.
What to do next
After federated identity management is enabled, notify users of IBM mobile appssuch as Traveler, Chat, or Meetings that they must generate application passwords.Users enter the application password instead of their regular login passwordswhen logging in with a mobile app. In the notification, include the following link,which has instructions for generating application passwords: https://apps.na.collabserv.com/help/topic/com.ibm.cloud.welcome.doc/logins_application_passwords.html
Configuring the Sametime rich client for SAML and downloadingYour users can chat using the IBM Sametime Connect rich client.
136 SmartCloud Notes: Administering SmartCloud Notes: Hybrid Environment March 2015
About this task
If your organization uses a standard login, your users can use any standaloneSametime Connect client at version 8.5.1 or later. They can also use the embeddedversion in Notes 9.0 or later.
If your users log in with your organization's authentication credentials and useSAML token authentication for federated identity management, you can create apre-configured installation package for Sametime Connect or for Notes. SAMLsupport in Sametime and in Notes uses the Form based user/password login type.
Alternatively, Users can download the SAML-enabled Sametime client that isavailable in SmartCloud and configure it themselves. Instructions to do this are inthe user help https://apps.na.collabserv.com/help/topic/com.ibm.cloud.chat.doc/imb_download_saml.html. However, users will need SAML IDP information fromyou to complete the configuration.
Procedure
To create a pre-configured installation package:1. Locate the plugin_customization.ini file.
The file is in one of the following locations, depending on the operatingsystem:
WindowsInside the deploy folder of the package root.
RedHat LinuxInside the RedHat .rpm package at one of the following locations:
For Sametime Connect: \opt\ibm\Sametime\framework\rcp\deployFor Notes: \opt\ibm\notes\framework\rcp\deploy
MacOSInside sametime-*.pkg\Contents\deploy.
2. Add the following configuration lines in the plugin_customization.ini file,based on your company's Sametime community and SAML IDP information.
Note: To fit the width of this page, some records are shown on more than oneline. In the plugin_customization.ini file, each record is a single line.# ";" is used to separate multiple communitiescom.ibm.collaboration.realtime.community/saml_communities=<Sametime community server host name># IDP server urlcom.ibm.collaboration.realtime.community/<Sametime community server host name>.idp=
<SAML authentication login URL># login type of IDP servercom.ibm.collaboration.realtime.community/<Sametime community server host name>.idp.type=form# html tag id or tag name of the user name field in IDP web page.com.ibm.collaboration.realtime.community/<Sametime community server host name>.idp.form.username.tag=
<form_username_field_id> | <form_username_field_name># html tag id or tag name of the user password field in IDP web page.com.ibm.collaboration.realtime.community/<Sametime community server host name>.idp.form.password.tag=
<form_password_field_id> | <form_password_field_name># html tag id or tag name of the submit field in IDP web page.com.ibm.collaboration.realtime.community/<Sametime community server host name>.idp.form.submit.tag=
<form_submit_field_id> | <form_submit_field_name># Optional. The default value is "false". If "true", all on-premises communities are deletedcom.ibm.collaboration.realtime.community/<Sametime community server host name>.primary=false
Chapter 5. Customizing service settings 137

# Optional. The default value is "false". if "true", the SmartCloud community can be# removed from the communities preference pagecom.ibm.collaboration.realtime.community/<Sametime community server host name>.editable=false
Sample:
Note: To fit the width of this page, some records are shown on more than oneline. In the plugin_customization.ini file, each record is a single line.com.ibm.collaboration.realtime.community/saml_communities=im.na.collabserv.comcom.ibm.collaboration.realtime.community/
im.na.collabserv.com.idp=https://www.example.com/FIM/sps/SAML20/logininitial?PartnerId=https://apps.na.collabserv.com/sps/sp/saml/v2_0&TARGET=https://apps.na.collabserv.com&PROTOCOL=POST
com.ibm.collaboration.realtime.community/im.na.collabserv.com.idp.type=formcom.ibm.collaboration.realtime.community/im.na.collabserv.com.idp.form.username.tag=Intranet_IDcom.ibm.collaboration.realtime.community/im.na.collabserv.com.idp.form.password.tag=passwordcom.ibm.collaboration.realtime.community/im.na.collabserv.com.idp.form.submit.tag=ibm-submit
3. Replace the existing plugin_customization.ini file in the Sametime installationpackage or in the Notes installation package with the file that you updated.
4. Distribute the updated Sametime installation package or Notes installationpackage to your users. The SAML configuration information is automaticallypopulated when your users install the client.
Note: The installation package that you distribute to Mac users must bedigitally signed by IBM. Before distributing the installation package to Macusers, email your modified plugin_customization.ini file [email protected]. A signed installation package will be created andreturned to you.
Restricting the IP address rangeTo ensure that users log in from an approved network connection, administratorscan define an approved range of IP addresses.
About this task
By restricting the IP addresses that have access to your organization, you provide alevel of protection against user's credentials being stolen or phished. If IP rangesare restricted to your network, an attacker would need to authenticate to the serverfrom within your network to access any stolen credentials.
If your company uses SMTP, POP or iMAP protocols, restrictions are not applied.Also, restrictions are not applied to SmartCloud Notes Notes Remote ProcedureCalls (NRPC).
Procedure1. Click Administration > Manage Organization
2. Click Security.3. Click Add Range in the IP Address Ranges section to enter the beginning and
ending IP addresses. You must specify the IP address at which you arecurrently logged in.
Results
Enabling IP address restrictions might block mobile user access to yourorganization. For example, Blackberry users must authenticate through aBlackberry Enterprise Server (BES) which authenticates both the mobile device andthe user. Because the IP address for the authenticated user is that of the BES server,
138 SmartCloud Notes: Administering SmartCloud Notes: Hybrid Environment March 2015
IP address restrictions can block access, depending on the range specified. UseVPN tools on the mobile device to route traffic to your organization using yournetwork
What to do next
You can use IP address restrictions as a secondary authentication mechanism incombination with SAML single sign-on authentication.
Enabling application passwordsApplication passwords can be used to provide a secure login for applications thatdo not support forms-based authentication. For example, they can be used toaccess applications that require passwords on a mobile device or for organizationsthat use federated identity and service login passwords are not used. When youenable application passwords, you also have the option of requiring the use ofapplication passwords, and of allowing mobile users to bypass IP restrictions.
About this task
If you require an application password, then the service login password is disabledfor the application, and users must log in using the application password. Forexample, users would be required to use the application password to log in to theservice on a mobile device or in a browser. However, they could still use theservice login password to log in to the service web site and for other applications.If you do not require an application password, then users can continue to log infrom a browser, for example, using their service login password.
If you allow mobile users to bypass IP restrictions, application passwords providean additional layer of password strength. This is due in part to their length (16characters) and because they are generated using a strong random numbergenerator. If a mobile device is lost or stolen, you can then disable the IP restrictionbypass which prevents access to the application outside your organization'sdesignated IP range.
Note: If you enable application passwords and select the Ignore IP rangerestrictions for applications setting to allow users to bypass IP restrictions, thesetting does not apply to Windows Phone or Windows Tablet users. If you restrictlogin to a specific IP range, Windows Phone and Windows Tablet users must log infrom network locations within the range.
You can also disable the use of application passwords at any time. Then, if usershave created an application password, the application cannot be accessed becausethe password is no longer effective.
Tip: Users can also prevent access to the application by revoking their applicationpassword, which they can do at any time.
Organizations that do not use federated identity can disable the use of thestandard service password for mobile applications.
Procedure1. Select Administration > Manage Organization.2. In the navigation pane, under System Settings, click Security.3. Under Password Settings, click Edit Settings.
Chapter 5. Customizing service settings 139
4. Select Allow users to generate application passwords.5. Select any of the following options that apply, and then click Save Changes.
Table 45. Application Password Options
Option Result
Expiration Select a password expiration interval orselect No expiration if you do not wantapplication passwords to expire.
Ignore IP range restrictions for applications Users will be able to access applicationsfrom outside the organization's designatedIP range. However, they cannot access itusing the service login, they must use anapplication password instead. For moreinformation about specifying IP addressranges, refer to “Restricting the IP addressrange” on page 138
Require applications to use applicationpasswords to access this site
This option restricts the supportedauthentication flow to applicationpasswords. It prevents users from logging tothis site using their service login password.
This option does not display fororganizations that use federated identity.
Results
After you enable this feature, users can create and manage application passwordsin My Account Settings in the service. General information about how usersmanage their application passwords is listed here.v If enabled, users can generate an application password for the IBM Notes
Traveler.v Application passwords can be shared across mobile products, including IBM
Traveler, IBM Sametime, and Connections Cloud.v If you did not select the option Require applications to use application
passwords to access this site, then using an application password is optional forusers. However, if you have IP range restrictions enabled, they will not be ableto log in using their service password unless they are within the IP range.
v Application passwords are generated by the service when requested by users.The generated passwords displays to the user only once, and cannot berecovered.
v Users can revoke and generate a new application password at any time. There isno limit to the number that can be generated.
v Passwords are generated using cryptographically strong random numbergenerator. They are 16 characters long, and not case sensitive. Users should enterthe password once into their device and allow the device to save the password.
v If there are ten failed login attempts, the account is locked for three minutes.
What to do next
If you selected Applications must use the generated password to access this site,or if you allowed users to bypass the specified IP range, instruct them to generateapplication passwords. For information on how users generate applicationpasswords see Application passwords for mobile access.
140 SmartCloud Notes: Administering SmartCloud Notes: Hybrid Environment March 2015

Authentication methods by clientThe following table lists the authentication methods supported for each type ofIBM SmartCloud Notesclient.
Table 46. Authentication methods by SmartCloud Notes client
Authentication method Supported clients
Cloud service account identity andpassword
v SmartCloud Notes web
v IMAP clients
v IBM Notes Traveler devices
v FTP client that is used to connect to theintegration server to download journalfiles or to upload change files to manageuser accounts
SAML Federated Identity v SmartCloud Notes web
v Notes Traveler Android 9.0.1.3 and higherclient
Cloud service account identity withapplication password
Notes Traveler devices
NRPC IBM Notes
Research in Motion data centerauthentication
BlackBerry® devices that access the servicethrough Hosted BlackBerry subscriptions
Password rules by authentication methodThe following table summarizes the password rules and settings for eachsupported IBM SmartCloud Notes client.
Table 47. Password rules and settings by authentication method
Authenticationmethod Password rules Password expiration1 Password changes
Cloud serviceaccount identity andpassword
v At least eightcharacters
v At least fouralphabeticcharacters
v At least onenon-alphabeticcharacter
v No spaces
v No more than twoconsecutivecharacters
v No match of anyof the eightpreviouspasswords
v Cannot containuser name or emailaddress
v Disabled bydefault
v Administrators canenable a passwordexpiration intervalof 30, 60, 90, 180,or 365 days.
v By administrator
v By user
SAML FederatedIdentity
Controlled bycompany
Controlled bycompany
Controlled bycompany
Chapter 5. Customizing service settings 141
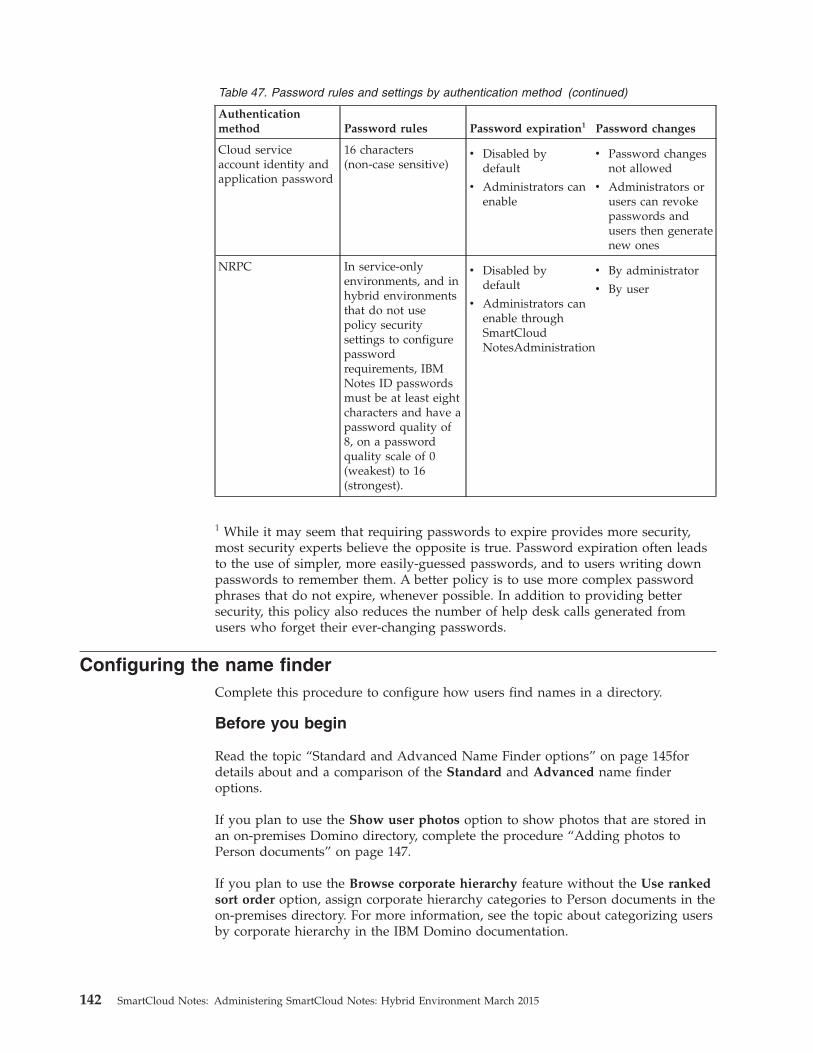
Table 47. Password rules and settings by authentication method (continued)
Authenticationmethod Password rules Password expiration1 Password changes
Cloud serviceaccount identity andapplication password
16 characters(non-case sensitive)
v Disabled bydefault
v Administrators canenable
v Password changesnot allowed
v Administrators orusers can revokepasswords andusers then generatenew ones
NRPC In service-onlyenvironments, and inhybrid environmentsthat do not usepolicy securitysettings to configurepasswordrequirements, IBMNotes ID passwordsmust be at least eightcharacters and have apassword quality of8, on a passwordquality scale of 0(weakest) to 16(strongest).
v Disabled bydefault
v Administrators canenable throughSmartCloudNotesAdministration
v By administrator
v By user
1 While it may seem that requiring passwords to expire provides more security,most security experts believe the opposite is true. Password expiration often leadsto the use of simpler, more easily-guessed passwords, and to users writing downpasswords to remember them. A better policy is to use more complex passwordphrases that do not expire, whenever possible. In addition to providing bettersecurity, this policy also reduces the number of help desk calls generated fromusers who forget their ever-changing passwords.
Configuring the name finderComplete this procedure to configure how users find names in a directory.
Before you begin
Read the topic “Standard and Advanced Name Finder options” on page 145fordetails about and a comparison of the Standard and Advanced name finderoptions.
If you plan to use the Show user photos option to show photos that are stored inan on-premises Domino directory, complete the procedure “Adding photos toPerson documents” on page 147.
If you plan to use the Browse corporate hierarchy feature without the Use rankedsort order option, assign corporate hierarchy categories to Person documents in theon-premises directory. For more information, see the topic about categorizing usersby corporate hierarchy in the IBM Domino documentation.
142 SmartCloud Notes: Administering SmartCloud Notes: Hybrid Environment March 2015

If you plan to use the Use ranked sort order option, use the Domino JapaneseExtension (DJX) tool to customize the on-premises directory to support it.
About this task
The name finder settings control how users find names in a directory. For example,the settings are used when users find names by clicking the To link in a new mailmessage or the Required link in a new meeting invitation.
Name Finder settings are not related to type ahead addressing, the feature thatautomatically finds matches to names that users type in address fields.
Procedure1. Log on to the service as an administrator.2. If your account also has the User role, click Admin > Manage Organization.3. In the System Settings section of the navigation pane, click IBM SmartCloud
Notes.4. Click Account Settings.5. Click Name Finder.6. Select options, as described in the following table:
Option Description
Basic The name finder lists all names in adirectory, in alphabetical order by surname.Users type the first few characters of thesurname they are looking for, and the cursormoves to the first matching name. Fromthere, users can use the scroll bar to find thename.
This setting is the default and it applies toNotes users and web client users.
Basic Quick Search Only The name finder shows no names in adirectory, initially. Users type the first fewcharacters of a given name or surname andclick Search. The name finder then showsdirectory entries whose surnames or givennames begin with the characters searchedfor.
For example, a search for Jack can returnthe names Jackie Roberts or Tony Jacksonbut not Tony Blackjack.
This setting provides more flexibility forfinding names in large directories.
This setting applies to Notes users and webclient users.
Chapter 5. Customizing service settings 143
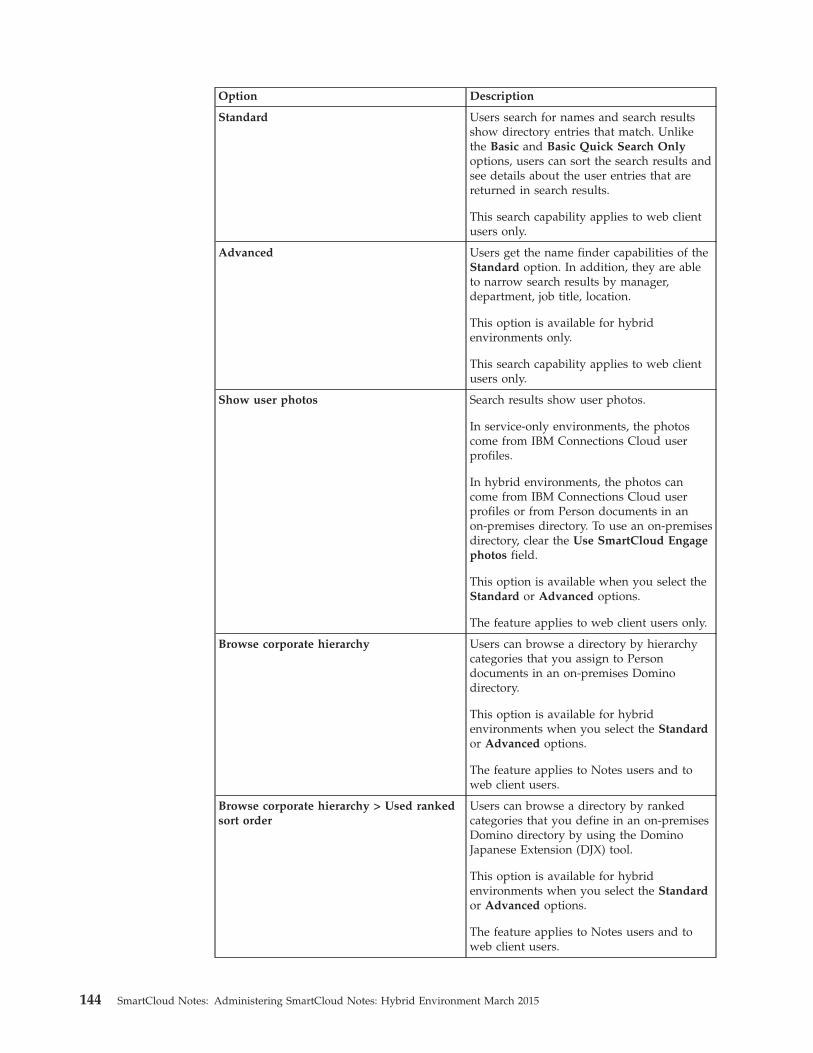
Option Description
Standard Users search for names and search resultsshow directory entries that match. Unlikethe Basic and Basic Quick Search Onlyoptions, users can sort the search results andsee details about the user entries that arereturned in search results.
This search capability applies to web clientusers only.
Advanced Users get the name finder capabilities of theStandard option. In addition, they are ableto narrow search results by manager,department, job title, location.
This option is available for hybridenvironments only.
This search capability applies to web clientusers only.
Show user photos Search results show user photos.
In service-only environments, the photoscome from IBM Connections Cloud userprofiles.
In hybrid environments, the photos cancome from IBM Connections Cloud userprofiles or from Person documents in anon-premises directory. To use an on-premisesdirectory, clear the Use SmartCloud Engagephotos field.
This option is available when you select theStandard or Advanced options.
The feature applies to web client users only.
Browse corporate hierarchy Users can browse a directory by hierarchycategories that you assign to Persondocuments in an on-premises Dominodirectory.
This option is available for hybridenvironments when you select the Standardor Advanced options.
The feature applies to Notes users and toweb client users.
Browse corporate hierarchy > Used rankedsort order
Users can browse a directory by rankedcategories that you define in an on-premisesDomino directory by using the DominoJapanese Extension (DJX) tool.
This option is available for hybridenvironments when you select the Standardor Advanced options.
The feature applies to Notes users and toweb client users.
144 SmartCloud Notes: Administering SmartCloud Notes: Hybrid Environment March 2015
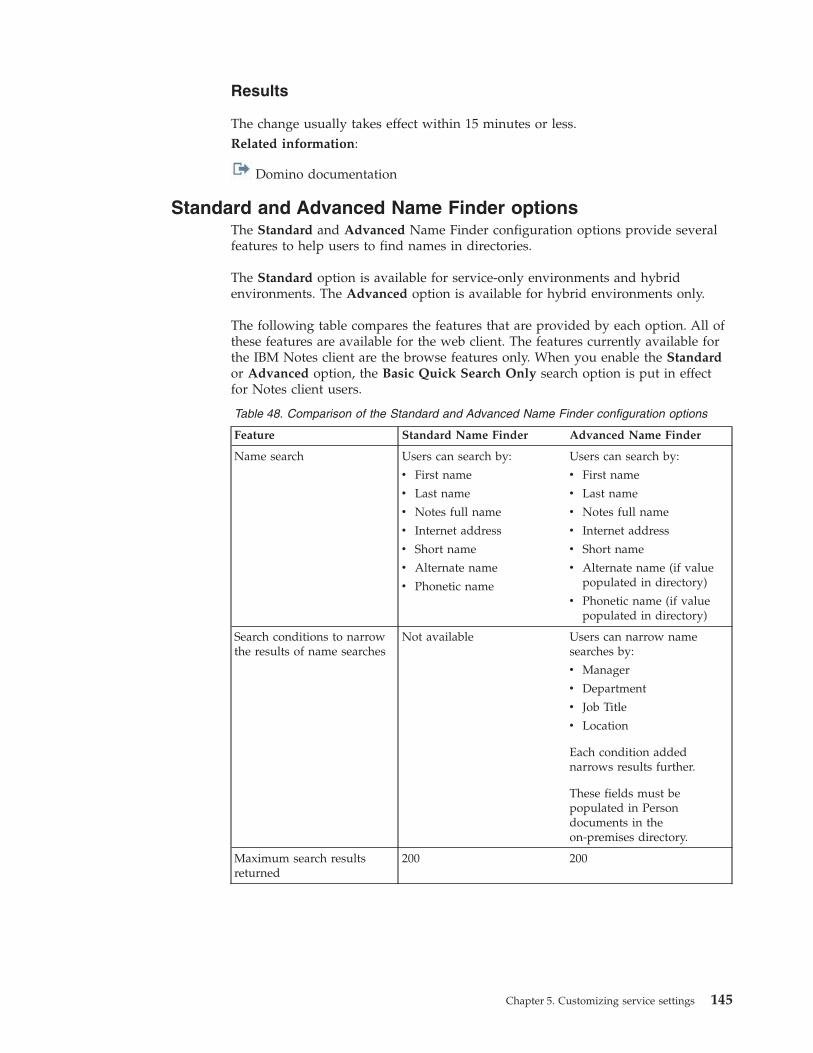
Results
The change usually takes effect within 15 minutes or less.Related information:
Domino documentation
Standard and Advanced Name Finder optionsThe Standard and Advanced Name Finder configuration options provide severalfeatures to help users to find names in directories.
The Standard option is available for service-only environments and hybridenvironments. The Advanced option is available for hybrid environments only.
The following table compares the features that are provided by each option. All ofthese features are available for the web client. The features currently available forthe IBM Notes client are the browse features only. When you enable the Standardor Advanced option, the Basic Quick Search Only search option is put in effectfor Notes client users.
Table 48. Comparison of the Standard and Advanced Name Finder configuration options
Feature Standard Name Finder Advanced Name Finder
Name search Users can search by:
v First name
v Last name
v Notes full name
v Internet address
v Short name
v Alternate name
v Phonetic name
Users can search by:
v First name
v Last name
v Notes full name
v Internet address
v Short name
v Alternate name (if valuepopulated in directory)
v Phonetic name (if valuepopulated in directory)
Search conditions to narrowthe results of name searches
Not available Users can narrow namesearches by:
v Manager
v Department
v Job Title
v Location
Each condition addednarrows results further.
These fields must bepopulated in Persondocuments in theon-premises directory.
Maximum search resultsreturned
200 200
Chapter 5. Customizing service settings 145
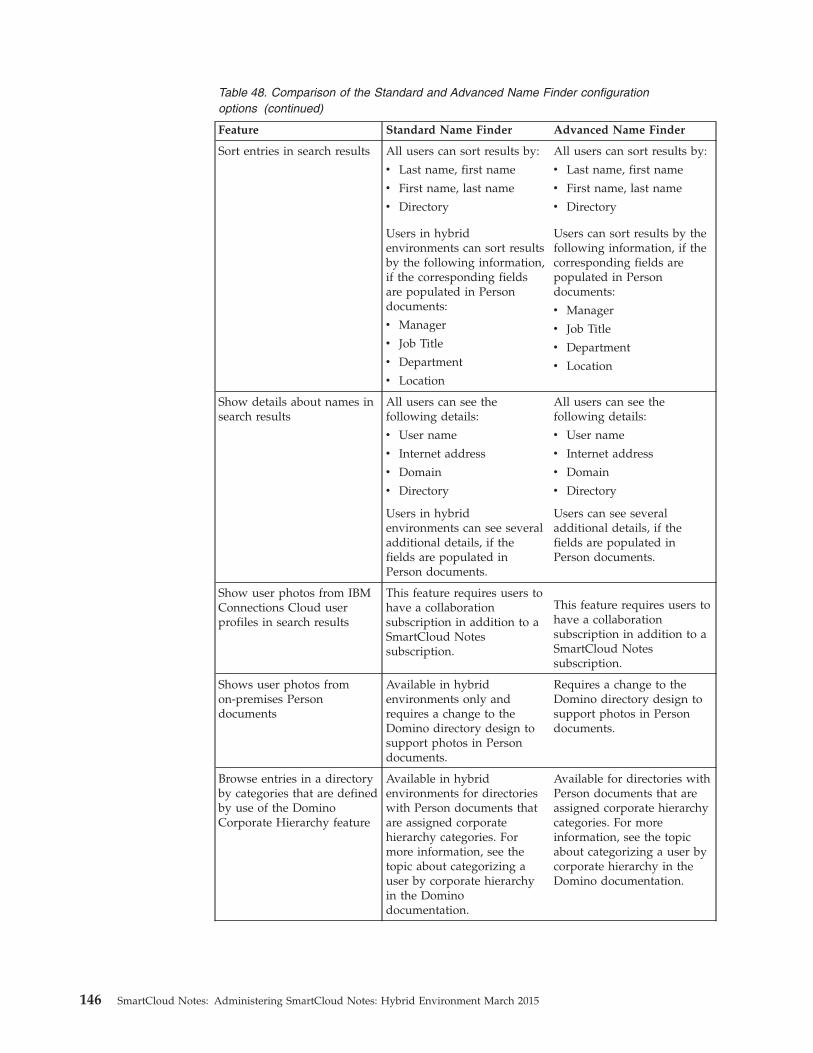
Table 48. Comparison of the Standard and Advanced Name Finder configurationoptions (continued)
Feature Standard Name Finder Advanced Name Finder
Sort entries in search results All users can sort results by:
v Last name, first name
v First name, last name
v Directory
Users in hybridenvironments can sort resultsby the following information,if the corresponding fieldsare populated in Persondocuments:
v Manager
v Job Title
v Department
v Location
All users can sort results by:
v Last name, first name
v First name, last name
v Directory
Users can sort results by thefollowing information, if thecorresponding fields arepopulated in Persondocuments:
v Manager
v Job Title
v Department
v Location
Show details about names insearch results
All users can see thefollowing details:
v User name
v Internet address
v Domain
v Directory
Users in hybridenvironments can see severaladditional details, if thefields are populated inPerson documents.
All users can see thefollowing details:
v User name
v Internet address
v Domain
v Directory
Users can see severaladditional details, if thefields are populated inPerson documents.
Show user photos from IBMConnections Cloud userprofiles in search results
This feature requires users tohave a collaborationsubscription in addition to aSmartCloud Notessubscription.
This feature requires users tohave a collaborationsubscription in addition to aSmartCloud Notessubscription.
Shows user photos fromon-premises Persondocuments
Available in hybridenvironments only andrequires a change to theDomino directory design tosupport photos in Persondocuments.
Requires a change to theDomino directory design tosupport photos in Persondocuments.
Browse entries in a directoryby categories that are definedby use of the DominoCorporate Hierarchy feature
Available in hybridenvironments for directorieswith Person documents thatare assigned corporatehierarchy categories. Formore information, see thetopic about categorizing auser by corporate hierarchyin the Dominodocumentation.
Available for directories withPerson documents that areassigned corporate hierarchycategories. For moreinformation, see the topicabout categorizing a user bycorporate hierarchy in theDomino documentation.
146 SmartCloud Notes: Administering SmartCloud Notes: Hybrid Environment March 2015
Table 48. Comparison of the Standard and Advanced Name Finder configurationoptions (continued)
Feature Standard Name Finder Advanced Name Finder
Browse entries in a directoryby ranking
Available in hybridenvironments. You use theDomino Japanese Extensiontool (DJX) to configure thedirectory to support thisoption.
You use the DominoJapanese Extension tool(DJX) to configure thedirectory to support thisoption.
Related information:
Domino documentation
Adding photos to Person documentsIn a hybrid environment, you can enable the Name Finder Show user photooption to use photos in the IBM Domino directory. Before you do, add photo fieldsto the directory design and then add photo image files to the directory.
About this task
Make the changes described in this procedure to a synchronized directory thatreplicates to the service.
Procedure1. Make a backup copy of your pubnames.ntf file.2. From IBM Domino Designer, open pubnames.ntf.3. Click Shared Elements > Subforms.4. Double-click the $PersonInheritableSchema subform.5. Create a field called Photo:
a. In the Basics tab, click Create > Field.b. In the Name field of the properties box, type Photo. In the Type field, select
RichTextLite.c. Click the second tab of the properties box and complete the following fields:
v In the Only allow field, select Thumbnail.v Select Resize Thumbnail Image, in pixels.v In the Width field, select 85.v In the Height field, select 74.v In the Image attachment name field, type ContactPhoto.
d. Click the sixth tab of the properties box. Clear the following Hideparagraph from fields to ensure they are not selected so that the field isvisible:v Notes R4.6 or later
v Web browsers
v Mobile
e. Select the new Photo field. In the Objects panel, click the onChange eventand add the following code to it:Sub Onchange(Source As Field)Dim ws As New NotesUIWorkspaceDim uidoc As NotesUIDocumentDim doc As NotesDocument
Chapter 5. Customizing service settings 147
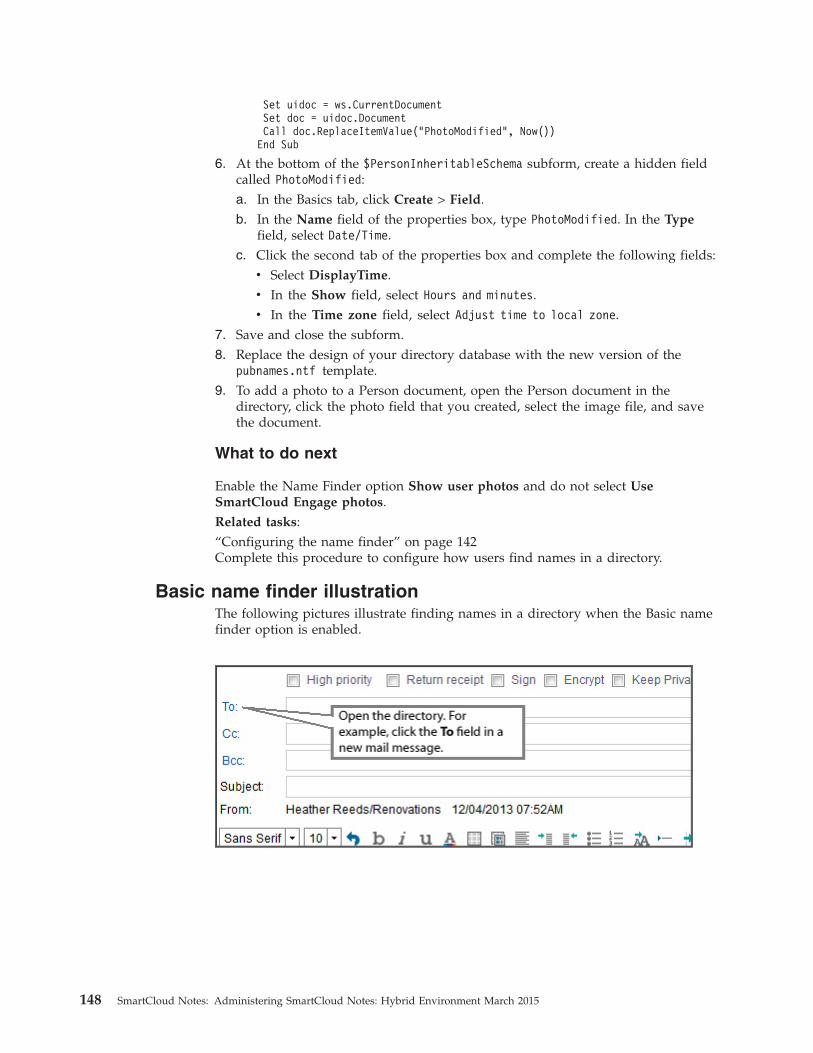
Set uidoc = ws.CurrentDocumentSet doc = uidoc.DocumentCall doc.ReplaceItemValue("PhotoModified", Now())End Sub
6. At the bottom of the $PersonInheritableSchema subform, create a hidden fieldcalled PhotoModified:a. In the Basics tab, click Create > Field.b. In the Name field of the properties box, type PhotoModified. In the Type
field, select Date/Time.c. Click the second tab of the properties box and complete the following fields:
v Select DisplayTime.v In the Show field, select Hours and minutes.v In the Time zone field, select Adjust time to local zone.
7. Save and close the subform.8. Replace the design of your directory database with the new version of the
pubnames.ntf template.9. To add a photo to a Person document, open the Person document in the
directory, click the photo field that you created, select the image file, and savethe document.
What to do next
Enable the Name Finder option Show user photos and do not select UseSmartCloud Engage photos.Related tasks:“Configuring the name finder” on page 142Complete this procedure to configure how users find names in a directory.
Basic name finder illustrationThe following pictures illustrate finding names in a directory when the Basic namefinder option is enabled.
148 SmartCloud Notes: Administering SmartCloud Notes: Hybrid Environment March 2015
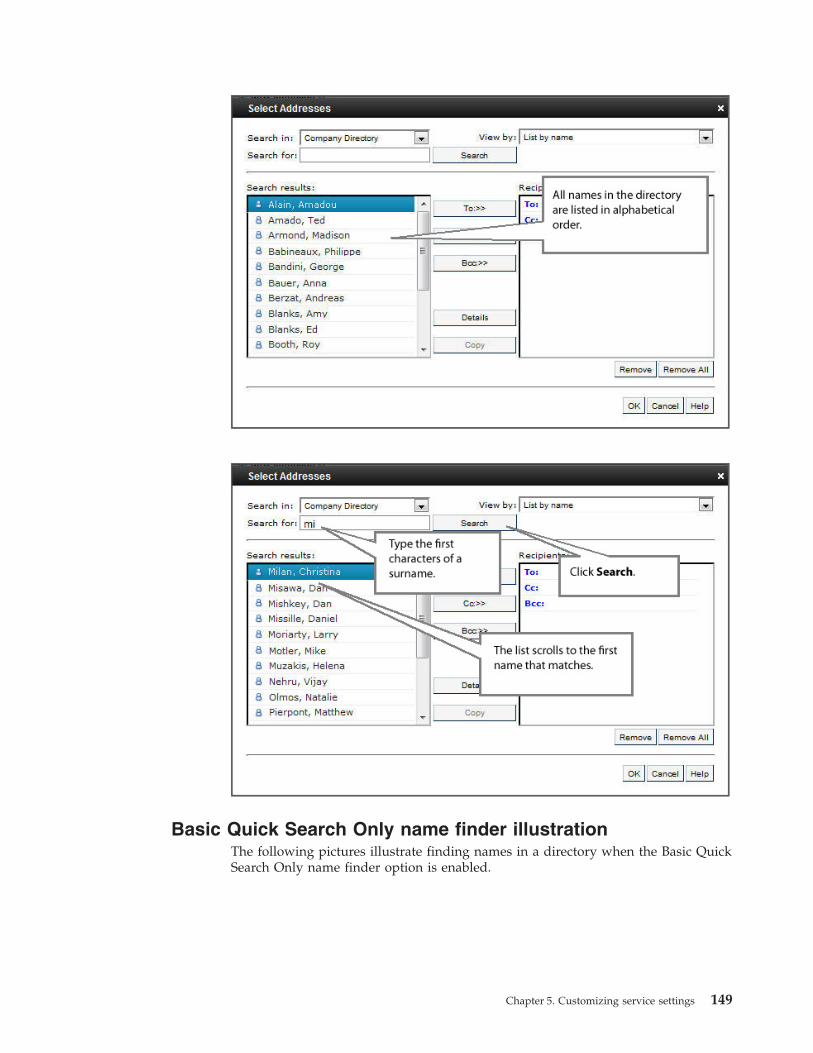
Basic Quick Search Only name finder illustrationThe following pictures illustrate finding names in a directory when the Basic QuickSearch Only name finder option is enabled.
Chapter 5. Customizing service settings 149
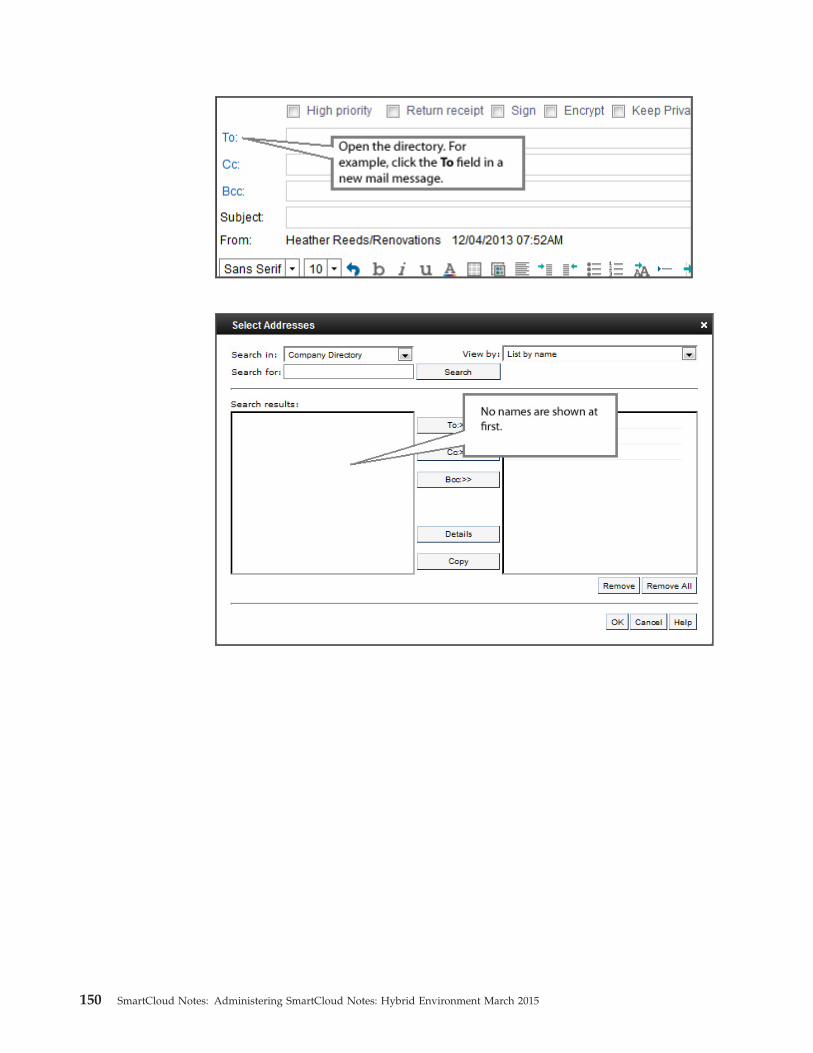
150 SmartCloud Notes: Administering SmartCloud Notes: Hybrid Environment March 2015

Standard name finder illustrationThe following pictures illustrate finding names in a directory when the Standardname finder option is enabled.
Chapter 5. Customizing service settings 151
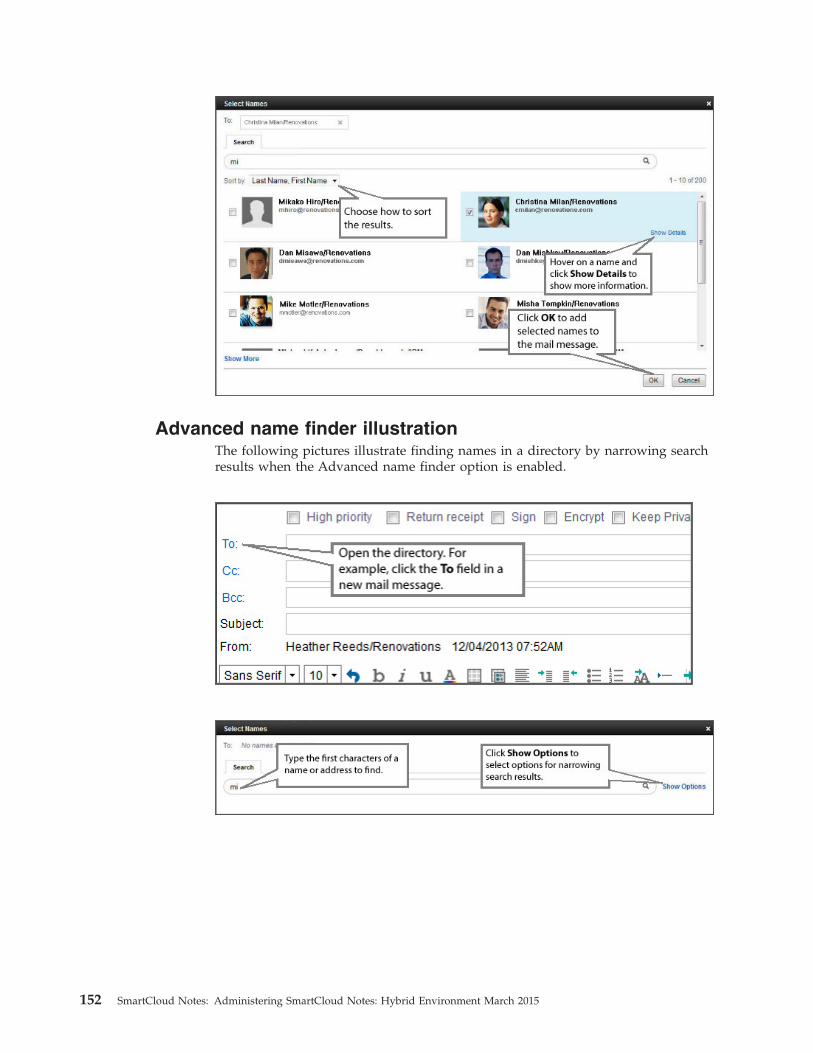
Advanced name finder illustrationThe following pictures illustrate finding names in a directory by narrowing searchresults when the Advanced name finder option is enabled.
152 SmartCloud Notes: Administering SmartCloud Notes: Hybrid Environment March 2015

Browse corporate hierarchy name finder illustrationThe following pictures illustrate browsing a directory to find names when theBrowse corporate hierarchy option is used with the Standard or Advanced namefinder.
Chapter 5. Customizing service settings 153
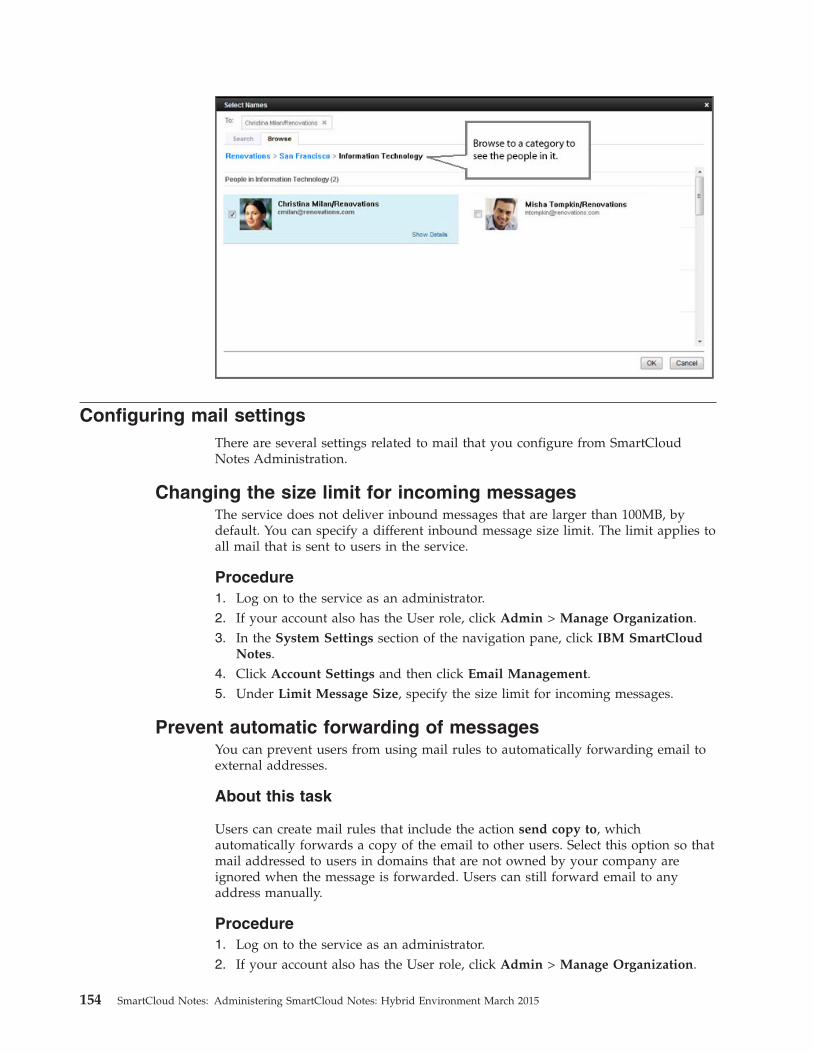
Configuring mail settingsThere are several settings related to mail that you configure from SmartCloudNotes Administration.
Changing the size limit for incoming messagesThe service does not deliver inbound messages that are larger than 100MB, bydefault. You can specify a different inbound message size limit. The limit applies toall mail that is sent to users in the service.
Procedure1. Log on to the service as an administrator.2. If your account also has the User role, click Admin > Manage Organization.3. In the System Settings section of the navigation pane, click IBM SmartCloud
Notes.4. Click Account Settings and then click Email Management.5. Under Limit Message Size, specify the size limit for incoming messages.
Prevent automatic forwarding of messagesYou can prevent users from using mail rules to automatically forwarding email toexternal addresses.
About this task
Users can create mail rules that include the action send copy to, whichautomatically forwards a copy of the email to other users. Select this option so thatmail addressed to users in domains that are not owned by your company areignored when the message is forwarded. Users can still forward email to anyaddress manually.
Procedure1. Log on to the service as an administrator.2. If your account also has the User role, click Admin > Manage Organization.
154 SmartCloud Notes: Administering SmartCloud Notes: Hybrid Environment March 2015
3. In the System Settings section of the navigation pane, click IBM SmartCloudNotes.
4. Click Account Settings and then click Email Management.5. Under External Forwarding, select Do not allow automatic forwarding to
external addresses.
Specifying how Notes links display in the web clientYou can specify how IBM Notes links, such as doc links, application links, andview links, display in web client email.
Procedure1. Log on to the service as an administrator.2. If your account also has the User role, click Admin > Manage Organization.3. In the System Settings section of the navigation pane, click IBM SmartCloud
Notes.4. Click Account Settings and then click Email Management.5. Under Link Style, select how Notes document, view, and application links
display when users read mail in a browser:
Table 49. Link Style Options and Icons
Style Description
Web links only The default. Uses web addresses(https://...). In email, the address displaysas an Internet icon:
Document link
View link
Application link
Notes links only Uses Notes URLs (notes://...). In email, theaddress displays as a Notes icon:
Document link
View link
Application linksNote: A web client user can open this styleof link only if the target is located in theservice. For example, a web client usercannot open a link to an application on anon-premises server.
Notes and web links Uses both web and Notes addresses, andincludes both icons to represent each link.Example of a link to a document:
Chapter 5. Customizing service settings 155
Configuring how long mail remains in the Trash folderWhen a user deletes a message from a mail file on a cloud server or the serviceautomatically deletes an older message, the message is moved to the Trash folderwhere it remains for 14 days, by default. After 14 days, the message ispermanently deleted. You can change how long deleted mail remains in the Trashfolder. You can also prevent users from emptying the Trash folder themselves.
Before you begin
In a hybrid environment that includes IBM Notes clients, you can use anon-premises Mail Settings policy to specify automatic deletion from the Trashfolder on local mail file replicas. For more information, see the topic “Mail Settingsrestrictions” on page 115.
About this task
Documents that are deleted from the Trash folder cannot be recovered. Whiledeleted mail is in the Trash folder, users can restore it to its original folder.
The Trash folder can contain a maximum of 32,768 messages. If this limit isreached, each message added to the Trash folder causes a message that has been inthe Trash folder the longest to be permanently deleted. This deletion occurs even ifa message has been in the Trash folder less time than the specified deletioninterval. Premature deletion from Trash stops when either manual or automaticdeletion of messages causes the number of messages in the Trash folder to fallbelow the limit. This behavior is not common but can occur in mail files wheremany messages are frequently received and deleted.
Procedure1. Log on to the service as an administrator.2. If your account also has the User role, click Admin > Manage Organization.3. In the System Settings section of the navigation pane, click IBM SmartCloud
Notes.4. Click Account Settings and then click Email Management.5. Under Configure Mail Retention in the Trash Folder, complete these fields to
manage mail in the Trash folder.
Table 50. Trash Folder Mail Retention Settings
Option Description
Retain deleted messages for how manydays?
Enter a number from 14 - 90. The defaultvalue is 14.
If you decrease an interval that waspreviously set, then all messages that meetthe new criteria are deleted. For example, ifyou decrease the interval from 20 days to 16days, then mail in the Trash folder olderthan 16 days is deleted.
156 SmartCloud Notes: Administering SmartCloud Notes: Hybrid Environment March 2015
Table 50. Trash Folder Mail Retention Settings (continued)
Option Description
Allow users to empty the Trash folder When this option is selected, users canpermanently delete messages from the Trashfolder by clicking Empty Trash or byselecting a message and deleting it.
This option is enabled by default. To preventusers from deleting mail from the Trashfolder, deselect the option. Then, mailremains in the Trash folder for the durationspecified in Retain deleted messages forhow many days? before being permanentlydeleted.Note: If you prevent users from deletingmail in the Trash, IBM Notes client users canstill delete mail from the Trash on local mailreplicas. However, the deletion does notcarry over to the server mail file replicas.
Deleting older email and meetingsYou can reduce the size of mail files and improve email usability by automaticallydeleting older email messages and meetings. By default, email messages andmeetings remain indefinitely unless users delete them.
About this task
When you enable email deletion, you can:v Control how many days messages and meetings remain before they are
processed for deletion.v Exclude messages in user-created folders from automatic message deletion.v Send reports of automatically deleted messages and meetings to specific user
addresses.v Exclude the mail files of specific users from the automatic deletion.
Non-mail documents added by web client users, such as Person documents, arenot deleted.
Messages that are flagged for follow-up are not deleted, except for messages thatare flagged by the sender before being sent, which are deleted.
When email deletion is enabled, the service takes the following steps to deleteolder messages and meetings:1. Messages that are older than the Delete email after how many days? value are
moved temporarily to a folder created by the service. Meetings are moved tothe temporary folder when it is longer than the specified number of days sincethe meetings occurred. Repeat meetings are processed based on the date of thelast meeting.
2. The default name of the folder to which deleted messages and meetings aremoved temporarily is *To Be Deleted*. You can specify a different name. Userscan prevent messages in this folder from being deleted by moving them to afolder that is exempted from automatic deletion.
3. Messages and meetings are moved weekly from the temporary folder locationto the Trash folder. The service staggers this processing so that not all mail files
Chapter 5. Customizing service settings 157
are processed at the same time. Users can prevent messages and meetings inthe Trash folder from being deleted by moving them to a folder that isexempted from automatic deletion.
4. Messages and meetings are deleted from the Trash folder after 14 days, bydefault. You can use the Retain deleted messages for how many days? settingin the Configure Mail Retention in the Trash Folder section of the EmailManagement window to change the number of days messages remain in theTrash folder. After messages are deleted from the Trash folder, they cannot berecovered.
The value of Delete email after how many days? plus the value of Retain deletedmessages for how many days? determine when messages are deleted from mailfiles. For example, if the value of Delete email after how many days? is 365 andthe value of Retain deleted messages for how many days? is 90, messages arepermanently deleted from mail files after one year and three months (455 days).
Perform the following steps to enable and configure automatic deletion of olderemail.
Procedure1. Log on to the service as an administrator.2. If your account also has the User role, click Admin > Manage Organization.3. In the System Settings section of the navigation pane, click IBM SmartCloud
Notes.4. Click Account Settings and then click Email Management.5. Under Delete Older Email, select Enable email deletion.6. Use the following settings to specify how to manage older email deletion:
Table 51. Mail Deletion Settings
Option Description
Delete email after how many days? Specify the number of days email messagesremain before being processed for deletion.If no value is specified, 14 days is thedefault value.
Keep email that is filed in folders. Select this option to prevent mail that isstored in all user-created folders from beingdeleted.
Keep email only if it is in one of thesefolders or their subfolders
Select this option to keep mail onlymessages in specific folders or subfoldersfrom being deleted. In the Exempt Foldersbox, specify the folder names, one name perline.
To specify a single subfolder, enterparentfolder\subfolder. For example, enterSuppliers\Tools to prevent messages in the\Tools subfolder from being automaticallydeleted, but to allow messages in theSuppliers parent folder and any other of itssubfolders to be deleted.
158 SmartCloud Notes: Administering SmartCloud Notes: Hybrid Environment March 2015

Table 51. Mail Deletion Settings (continued)
Option Description
Folder name Specify the name of a folder to temporarilystore messages that are targeted for deletion.If the folder does not exist, the servicecreates it. Messages remain in this folder fora week and then are moved to the Trashfolder.
If you do not specify a folder name, thename *To Be Deleted* is used.
Send email report of the number of emailsdeleted to the following addresses
List the addresses of users you want toreceive email deletion reports.
Do not delete the email of the followingusers
List the names of users you want to exemptfrom mail deletion.
Enabling the ActiveX control for Internet Explorer usersThe Internet Explorer ActiveX control provides mail enhancements to IBMSmartCloud Notes web users who use Internet Explorer.
About this task
You enable use of the ActiveX control through SmartCloud Notes AdministrationAccount Settings. ActiveX is disabled by default to allow and encourage moresecure web browser configurations. If you enable ActiveX to provide additionalmail features to Internet Explorer users, be aware that doing so might result in lesssecure browser configurations.
If you enable ActiveX, when users who use Internet Explorer log in to theSmartCloud Notes service, they see prompts that allow them to install the ActiveXcontrol. The prompts refer to the ActiveX control as the IBM iNotes control.
After users install the control, they can do the following tasks:v Make SmartCloud Notes web the default email client through Preferences.v Send email from Windows Explorer, the desktop, or the Start menu.v Create new email messages by clicking a Mailto:// link from external web
pages.v Select multiple files to attach to an email, detach and save multiple attachments,
open attachments by double-clicking without having to save them first, and dragmultiple attachments to Windows Explorer or the desktop.
v Copy an image to the clipboard and then press Ctrl+V or click the image icon inthe message toolbar to paste the image into an email.
Note: Running Internet Explorer in Protected Mode can prevent users from beingable to save attachments, drag attachments from mail to the desktop, or set thedefault mail client. For information about options to resolve this issue and aboutProtected Mode, see IBM Technote 1655831. One option is to resolve the issue byadding the mail server or domain as a trusted site. If you use this option, as thetrusted site, specify notes.<dc>.collabserv.com (where dc is your data center) or*.collabserv.com.
Users might occasionally be prompted to install updates to the ActiveX controlwhen enhancements to the control are deployed in the service. If users do not
Chapter 5. Customizing service settings 159

install an update, features that require the control are no longer available duringthe current session. Users are prompted again to install the update when they nextlog in to the service.
Complete the following steps to enable all web users who use Internet Explorer todownload and use the ActiveX control.
Procedure1. Log on to the service as an administrator.2. If your account also has the User role, click Admin > Manage Organization.3. In the System Settings section of the navigation pane, click IBM SmartCloud
Notes.4. Click Account Settings.5. Click Email & Calendar Options.6. Select Enable ActiveX attachment control.Related information:
IBM Technote 1655831
Specifying an SMTP server to route mail to the InternetBy default, the service routes mail that service users send to external users over theInternet. You have the option to route this mail through a company-controlledSMTP host server instead.
Before you begin
Prepare your on-premises environment. For more information, see “Preparing touse a company SMTP server to route outbound Internet mail” on page 54.
About this task
Skip this procedure if you want the service to handle routing the mail that is sentto external users. In this case (default behavior), the service filters the messages forvirus and spam before routing them to the Internet.
By using a company SMTP host server for external routing, you can act onmessages before routing them, for example, filter or audit messages. When you usethis feature, the service filters messages for viruses and spam and then routes themdirectly to your designated SMTP host server. Messages addressed to any domainthat is not an internal, service-verified domain are routed to the SMTP host server.
The service uses Transport Layer Security (TLS) to route mail to the SMTP hostserver if the host server uses TLS. The connection is made using STARTTLS overSSL TCP/IP port 25.
Perform the following steps to specify the name of your SMTP host server inAccount Settings.
Procedure1. Log on to the service as an administrator.2. If your account also has the User role, click Admin > Manage Organization.3. In the System Settings section of the navigation pane, click IBM SmartCloud
Notes.
160 SmartCloud Notes: Administering SmartCloud Notes: Hybrid Environment March 2015
4. Click Account Settings > Email Management.5. In the SMTP server field under Manage Routing to External Internet
Domains, enter an SMTP host name to use for routing.6. Click Save.
Preparing to use custom mail file templatesYou can apply a custom mail file template to mail files of service users. Thetemplate must meet design requirements that minimize the risk and impact to yourusers and to the service. You submit the template for approval to an IBM SoftwareServices for Collaboration representative.
About this task
The template design development can be done in-house or through a contract witha third-party developer or an IBM representative. A short professional servicesengagement with IBM Software Services for Collaboration is required to approve acustom template.
A custom mail file template allows you to customize the design of user mail files.It is also used to customize the mail file access of new mail files to enableadministrators or server-based agents to access them. Customized mail file accessis strongly recommended; without it only mail file owners and mail file delegatescan access mail files.
The following steps outline the high-level tasks and identify who is responsible fordeveloping and applying a custom template.
Procedure1. Customer Contacts an IBM Software Services for Collaboration representative
to procure a statement of work.This step should be done as soon as it is determined that the business requiresa custom mail template. This prior notice ensures that they are prepared tovalidate the template soon after receiving it
2. Developer Reviews the design requirements for custom mail templates.To be approved for use with the service, a custom mail template must meetspecific design requirements. For example, a custom template must containspecific design elements from the standard mail template of a IBM Notesversion supported by the service. For information about template designrequirements, see the wiki article SmartCloud Notes Template ValidationRequirements.
3. Developer Designs and implements the template changes in the on-premisesenvironment. When preparing a custom template that is already in use, thedeveloper should:v Assess and document the current customizations.v Compare each customization to the standard mail template. Determine
whether each is still needed or if it can be deleted. If a customization is stillneeded, determine whether it requires modification.
v Document the requirements for the new version of the custom template.4. Customer Tests the template in the on-premises environment.
You are responsible for testing the template in your company environment toensure that it functions as intended.
Chapter 5. Customizing service settings 161
5. Customer Emails a request to [email protected] to beset up for the Mail Analyzer application.The email should include the Customer ID and also be sent to the IBMSoftware Services for Collaboration representative. The customer receives aconfirmation email when setup is complete. The Mail Analyzer application isused to do preliminary checks of the custom template.
6. Customer After receiving notification that the Mail Analyzer application setupis complete, the customer emails the custom template [email protected] to perform an automated analysis.The customer receives an email summary of the results. This step can berepeated as often as needed during the development and testing cycle.
7. Customer Submits the template to an IBM representative for a final manualvalidation.Template validation requires a short professional services engagement withIBM Software Services for Collaboration.
8. IBM representative Validates the template and report results to the customer.This step ensures that the template meets the template validationrequirements. The IBM representative sends the customer a short, writtenreport summarizing the assessment, and indicating approval or rejection.
9. IBM representative Loads the template to the service, after approval of thetemplate.
10. Company administrator Applies the template to user accounts.When the template is approved, a company administrator for the service usesSmartCloud Notes Administration to apply the template to the accounts ofnew or existing users.Alternatively, the template can be applied through the integration server and auser provisioning change file. For more information, see the topic on creatinguser provisioning change files in the integration server documentation.
Related tasks:“Preparing customized mail file ACLs” on page 168An important reason to customize mail file access is to allow administrators orserver-based agents to access mail files. Without customized mail file access, onlymail file owners and mail file delegates can access mail files.“Configuring mail file templates” on page 164Configure which mail file templates can be applied to user mail files and configurea mail file template to use by default.“Changing user mail file templates” on page 246You can change the mail file template assigned to a user. For example, change themail template if the IBM Notes client of a user is upgraded to a new version.Related information:
Integration server documentation
Handling execution security alerts caused by customtemplates
The service signs a custom mail file template with a unique customer signature.IBM Notes users that use a custom mail file template see an execution securityalert if the Execution Control List (ECL) on the client does not allow access to thesignature.
162 SmartCloud Notes: Administering SmartCloud Notes: Hybrid Environment March 2015
About this task
The first time Notes users authenticate with the service after the application of acustom template, they see an execution security alert. The alert states that thetemplate signer, customerID LotusLive Template Signer/customercertifier, isattempting to perform an ECL update action. Selecting Start trusting the signerprevents all future alerts for the template signature.
For more information about execution security alerts, see the topic about theexecution control list in the Domino documentation.
In a hybrid environment, you can prevent the security alerts by using a SecuritySettings document that is assigned to an explicit policy. To do so, perform thefollowing steps before you deploy the custom template:
Procedure1. Read the topic on using administrative policies to understand the
requirements for using policies with the service.2. From the Domino Administrator, open a server with the directory in which
you want to configure the policy.3. Select the People & Groups tab, and then open the Settings view.4. Choose one of the following options:
v To add a Security Settings document, click Add Settings > Security, andtype a name for the new document.
v To edit an existing Security Settings document, click Edit Settings.5. Click the Execution Control List tab.6. In the Admin ECL field, click Edit.7. Click Add.8. Type */customercertifier, where customercertifier is the name of the certifier
that you uploaded to the service and that is used to name your mail serversin the service.For example, type */SCN/Renovations.
9. Select the certifier name that you added, select the allowed access levels, andclick OK.You must select Workstation security and then select Access to WorkstationSecurity ECL. If you are unsure which other access levels to allow, select thesame access levels that are specified for Notes Template Development.
10. In the Update Mode field, select Refresh.11. In the Update Frequency field, select When Admin ECL Changes.12. Click Save & Close.13. Make sure that the Security Settings document is assigned to an explicit policy
that is used for users in the service.14. Before you deploy the custom template, allow time for the policy change to
replicate to the service.Related concepts:“Using administrative policies” on page 105If you use administrative policies on premises, you can apply many of those samepolicy settings to service users as well. Administrative policies enable all users tohave the same working experience.Related information:
Chapter 5. Customizing service settings 163
Domino documentation
Configuring mail file templatesConfigure which mail file templates can be applied to user mail files and configurea mail file template to use by default.
About this task
The service provides standard mail file templates to apply to user mail files.Custom mail file templates that are designed for your company and approved byan IBM Software Services for Collaboration representative might also be availablefor use. Apply the mail file template after user provisioning.
Procedure1. Log on to http://www.ibmcloud.com/social as a user with the Administrator
role.2. If your account also has the User role, click Admin > Manage Organization.3. In the System Settings section of the navigation pane, click IBM SmartCloud
Notes.4. From SmartCloud Notes Administration, click Mail Templates.5. Perform any of the following template management tasks.
Table 52. Mail template management tasks
Task Steps Additional information
Select a mail templateto apply to new useraccounts by default.
1. Click Custom Mail Templatesor Standard Mail Templates.
2. Select a template.
3. Click Set as default
If you do not select adefault template, the mostrecent English version of thestandard template is used asthe default.
You can change the mailtemplate after you add anew user, as necessary.
Download a template tomake design changes toit.
1. Click Custom Mail Templatesor Standard Mail Templates.
2. Select a template.
3. Click Download.
When the design changesare complete, you mustsubmit the template to anIBM Software Services forCollaboration representativefor approval before it can beapplied to user mail files.
Remove a customtemplate from the list ofavailable templates.
1. Click Custom Mail Templates.
2. Select a template.
3. Click Delete Selected.
Remove a template if it isno longer used. If youremove a template that iscurrently assigned to a user,you should assign a newone.
Be careful when removing atemplate. If you changeyour mind, you mustcontract the services of IBMSoftware Services forCollaboration to add it back.
164 SmartCloud Notes: Administering SmartCloud Notes: Hybrid Environment March 2015
Related tasks:“Changing user mail file templates” on page 246You can change the mail file template assigned to a user. For example, change themail template if the IBM Notes client of a user is upgraded to a new version.“Preparing to use custom mail file templates” on page 161You can apply a custom mail file template to mail files of service users. Thetemplate must meet design requirements that minimize the risk and impact to yourusers and to the service. You submit the template for approval to an IBM SoftwareServices for Collaboration representative.“Viewing assigned mail file templates” on page 247You can view the mail file template that is assigned to a service user.
Using extension forms files to customize the look of the web clientYou can use an extension forms file to customize the visual theme, fonts, the actionbar, and other aspects of the web client. For example, you can add graphics,change colors, and add new menu items.
Before you begin
Read the topic “Extension forms file requirements” on page 167.
Note: IBM reserves the right to disable any extension forms file that causes adegradation in the service.
About this task
Deploying an extension forms file in the service requires a brief service contractwith an IBM Software Services for Collaboration representative. The representativevalidates extension forms files to ensure that they comply with requirements thatreduce risk to your users and to the service. Once approved, the IBMrepresentative uploads the extension forms file to the service for your use. You candeploy more than one extension forms file and apply each to different users.
Extension forms files must be based on the IBM iNotes 9.0 Social Editionforms9_x.ntf template that is downloaded from the service.
To deploy an extension forms file in the service, perform the following steps.
Procedure1. Download the extension forms template or a currently deployed extension
forms file from the service:a. Log in to the service as an administrator.b. If your account has the user role, click Admin > Manage Organization.c. In the System Settings section of the navigation pane, click IBM
SmartCloud Notes.d. Click Extension Forms Files.e. Perform one of the following steps:
v To use the default design as a starting point, click Extension FormsTemplates and download the template file.
v To download an extensions forms file that is already deployed, select thefile in the Extension Forms File page and click Download.
Chapter 5. Customizing service settings 165
2. If you download the extension forms template in the previous step, use thetemplate to create the extension forms file.
3. To transfer changes in an extension forms file currently used at your companyto the extension forms file used in the service:v Assess and document the design changes in the on-premises extension forms
file.v Note any design changes that are no longer needed and can be deleted.v Determine whether the remaining design changes in the on-premises
extension forms file are supported in the service or need modification.v Document the changes to the new extension forms file that are required.
4. Make the design changes to the extension forms file to be used in the service.5. Test the design changes on an IBM Domino iNotes server in the on-premises
environment:
Note: You might want to install and set up a test server for this purpose.a. In a Mail Settings document applied to a policy, click IBM iNotes and in
the Basics tab, add the name of the extension forms file to the ExtensionForms File Name field.This step is needed only if the extension forms file name is notForms9_x.nsf, or if you want to use a policy to enable the forms file forspecific users.
b. Use the following server command to flush the server database cache:dbcache flush
c. Copy the extension forms file to the iNotes directory under the server datadirectory.
d. Use the following server command to stop and restart the HTTP task:tell http restart
e. Start a web browser and clear the browser cache.f. Test the changes from the browser.
6. Submit the extension forms file to an IBM Software Services for Collaborationrepresentative for validation.The IBM representative validates the extension forms file and sends you asummary report that indicates whether the extension forms file is approved.After it is approved, the IBM representative uploads the extension forms file tothe service.
What to do next
Assign the extension forms file to users.Related tasks:“Assigning extension forms files to users” on page 248After an IBM representative uploads an approved extension forms file to theservice, you can assign the forms file to users. Extension forms file enable you tocustomize the visual theme, fonts, the action bar, and other aspects of the webclient.“Preparing to use custom mail file templates” on page 161You can apply a custom mail file template to mail files of service users. Thetemplate must meet design requirements that minimize the risk and impact to yourusers and to the service. You submit the template for approval to an IBM SoftwareServices for Collaboration representative.
166 SmartCloud Notes: Administering SmartCloud Notes: Hybrid Environment March 2015
Extension forms file requirementsBefore you develop an extension forms file to customize the web client, be awareof the requirements. You can use multiple extension forms files, each applied todifferent sets of users.v Extension forms files must be based on the IBM iNotes 9.0 Social Edition
forms9_x.ntf template that you download from the service.v Extension forms files can reference only mail files within the IBM SmartCloud
Notes service. In particular, they cannot reference IBM Notes databases onon-premises servers or images on web servers outside the service.
v Customization must be self-contained. Any resources, such as images, stylesheets and JavaScript, must be included in the Extension Forms File. Referencesto external sources are not allowed. Customization such as ActiveX controls orJava classes where the source code cannot be inspected are also not allowed.
v Local encryption must be disabled on extension forms file databases:1. From Notes, open the extension forms file database.2. Click File > Application > Properties.3. Click Encryption Settings. If the text Current encryption strength :
None is shown in the dialog box, the database is not encrypted. If thedatabase is encrypted, complete the remaining steps.
4. Click Do not locally encrypt this database.5. Close the extension forms file database.6. Open the database. A progress bar is shown as the database is unencrypted.7. Repeat steps 2 and 3 to verify that the database is unencrypted.
You can use an extension forms file to make the following types of changes to theweb client:v Modify the visual theme in the following ways:
– Override CSS styles.– Override gradient fill color specifications.– Replace images. New images must be in the extension forms file.
v Add fonts to the rich text editor that is used when users create email messages,calendar entries, and so forth.
v Add fields to documents such as mail messages and calendar entries.v Add, remove, or modify items in the action bar menu.v Use global settings to extend the session information, for example, override a
preference setting or read a profile note field.v Add JavaScript code to the document save function to verify items when
documents are saved or sent.
You can customize the following subforms in an extension forms file:
Table 53. Subforms that can be customized
Subform Purpose
Custom_Common_Utils Adds functions that are called fromCustom_JS.
Custom_CSS Adds new CSS styles.
Chapter 5. Customizing service settings 167

Table 53. Subforms that can be customized (continued)
Subform Purpose
Custom_JS Contains callback functions to use to add orremove action bar items, add code whenpages are displayed or submitted. Thissubform is used for forms that use an olderarchitecture. Most of the code uses thenewer forms, however a few older formsremain.
Custom_JS_Edit Adds fonts to the rich text editor.
Custom_Name_Lite The code to display names in Koreanformat.
Custom_Page_Dictionary Adds new variable values for use with theCustom_CSS subform.
Custom_WelcomePage Adds choices for the Welcome Page.
Custom_Page_Dictionary Adds variable values that are available foruse in the Custom_CSS subform.
Custom_xxx_Dictionary These custom dictionary subforms areincluded with each main area form, Mail,Calendar, ToDo, and so forth, to allow easierinclusion of new NotesFields and NotesVars.
Custom_LazyLoad_Subforms Adds custom code to the lazy load table.
Custom_Logout Adds custom code that runs on logout.
Custom_About Displays the forms file version and auser-specified file version number in theclient console log when the client starts.
Custom_SessionInfo Add items to the iNotes session info object.
Preparing customized mail file ACLsAn important reason to customize mail file access is to allow administrators orserver-based agents to access mail files. Without customized mail file access, onlymail file owners and mail file delegates can access mail files.
About this task
To customize mail file access, modify the access control list (ACL) in a custom IBMNotes mail file template. Then, apply the custom template to the new mail fileswhen you provision users for the service. Using a custom mail file templaterequires a short service contract with IBM Software Services for Collaboration toapprove and upload the template to the service.
Note: If you transfer mail files to the service, you must modify the ACLs on theindividual mail files before you transfer the files. When you provision users whosemail files are transferred, the ACL in a custom mail file template is ignored. Foradditional ACL requirements specific to transferring mail files, see the topic aboutpreparing mail file ACLs before mail file transfer.
Important: It is important to customize mail file ACLs before users areprovisioned. After users are provisioned, you can no longer use the ACL to changeaccess to their mail files. At that point, the mail file ACL is changed only indirectlyin the following circumstances:
168 SmartCloud Notes: Administering SmartCloud Notes: Hybrid Environment March 2015
v A user is given access to a mail file through mail file delegation.v A user's name changes, which causes the name to change in the mail file ACL.
(Renaming a group does not update a group name in the ACL.)
Note the following additional restrictions to ACLs of mail files in the service:v You cannot use the following ACL group entries that are seen in traditional IBM
Domino environments: LocalDomainAdmins, LocalDomainServers, andOtherDomainServers. If you add these entries, they are stripped from ACLs.
v To allow administrators to access mail files, add a group to the directory thatincludes their names, and then add the group to mail file ACLs.
v Editor access is the highest level of access that is allowed for any ACL entry. Ifyou give a user or group Manager or Designer access, the access is lowered toEditor. The user or group does not become a mail file delegate.
v The mail file owner always has Editor access and you cannot change this access.You can give another user or group Editor access. In this case, they become mailfile delegates, by default. You can prevent people with Editor access frombecoming delegates. To do so, assign them the [ExcludeDelegate] role in theACL.
v You can use the following types of ACL entries: Person, Person group, Servergroup, Mixed group, or Unspecified.
v Server type entries are not allowed. If you add them, they are stripped fromACLs.
v You can allow an on-premises server-based agent to run on mail files. Doing sorequires that you add the server that runs the agent to a group in your directory,then add the group to mail file ACLs as type Server group or Mixed group. Foradditional requirements, see the wiki article on using server-based agents in aSmartCloud Notes hybrid environment.
v You cannot customize the -Default- and Anonymous entries. These entries arealways set to No Access.
To use a custom mail file template to modify mail file ACLs, add entries that areenclosed in brackets [ ] to the ACL of the custom mail file template. The ACLs ofthe new mail files in the service inherit the entries in brackets. For example, to giveEditor access to the group SCN Administrators, add [SCN Administrators] to theACL, select Editor access and the type Person group or Mixed group . If youapply the custom mail file template when you provision SamanthaDaryn/Renovations with a brand new mail file in the service, her mail file ACLincludes the following entries:-Default- (No Access)Anonymous (No Access)Samantha Daryn/Renovations (Editor)SCN Administrators (Editor)SaaSLocalDomainServers1
Mail1/SCN/Renovations2
1This group is reserved for use in the service. Do not create a group by this nameon-premises, or a group that begins with the characters SaaS.
2 This entry is the name of a user's home mail server in the service.Related tasks:“Preparing mail file ACLs before mail file transfer” on page 212Before mail files are replicated to the staging server, prepare the mail file ACLs toset mail file access.
Chapter 5. Customizing service settings 169
“Configuring mail file templates” on page 164Configure which mail file templates can be applied to user mail files and configurea mail file template to use by default.“Preparing to use custom mail file templates” on page 161You can apply a custom mail file template to mail files of service users. Thetemplate must meet design requirements that minimize the risk and impact to yourusers and to the service. You submit the template for approval to an IBM SoftwareServices for Collaboration representative.Related information:
Using server-based agents in a SmartCloud Notes hybrid environment
SmartCloud Notes Template Validation Requirements
Enabling busytime details in calendarsYou can enable IBM Notes users and web client users to see busytime details incalendars.
About this task
If you enable this feature, when users schedule a meeting or use a group calendar,they can click a block of busytime in someone's calendar to see details about thecalendar entry. Users can see calendar details only if users grant them this accessto their calendars. The following types of detailed information can be seen:v Type of calendar entry, for example, meeting or appointmentv Optionally assigned calendar categoryv Meeting chairv Locationv Room
This feature is disabled, by default. When it is disabled, users can still see theblocks of time when users are busy, they just cannot see details about those blocksof time.
Complete the following steps to enable busytime details.
Procedure1. Log on to the service as an administrator.2. If your account also has the User role, click Admin > Manage Organization.3. In the System Settings section of the navigation pane, click IBM SmartCloud
Notes.4. Click Account Settings.5. Click Email & Calendar Options.6. In the Calendar Details section, select Enable calendar detail collection.
Results
When Notes client users and web client users schedule a meeting or use a groupcalendar, they can click a block of busytime in a calendar to see details if they aregiven the access to do so. Users control who can see their calendar informationand whether detailed calendar information is visible or only users' availability. Tocontrol access to their calendars, web client users click Preferences > Delegation >
170 SmartCloud Notes: Administering SmartCloud Notes: Hybrid Environment March 2015

Schedule. Notes users click More > Preferences then Access and Delegation >Access to Your Schedule.
Configuring instant messagingUse the Instant Messaging settings in IBM SmartCloud Notes Administration tospecify whether to enable an instant messaging community in clients automatically.Instant messaging enables users to chat with and see the availability of other usersin the service. You can automatically enable use of the service instant messagingcommunity. For web users, you can automatically enable an on-premises IBMSametime community managed by your company.
About this task
By default, web users automatically connect to the instant messaging communityin the service if the Enable instant messaging preference is selected on the client.By default, IBM Notes 8.5.2 or later clients automatically connect to the instantmessaging community in the service if the clients are installed with the Sametime(integrated) option. Users are also logged on to the community automatically.
You can change the default setting and allow web users to instead connectautomatically to an on-premises Sametime community at your company site. Youmust use a Sametime Proxy Server 8.5.2 (IFR1 or later) and configure it to supportthis capability. Notes clients can also connect to an on-premises community if youconfigure the clients to connect to the community yourself.
Procedure1. Log on to the service as an administrator.2. If your account also has the User role, click Admin > Manage Organization.3. In the System Settings section of the navigation pane, click IBM SmartCloud
Notes.4. Click Account Settings
5. Click Instant Messaging.6. In the Instant Messaging Integration window, select an option described in the
following table and then click Save.If you switch from one option to another, the service pushes the change to theclients immediately.
Chapter 5. Customizing service settings 171

Table 54. Instant messaging configuration options
Option Result - web users Result - Notes
Enable the service instantmessaging community forIBM Notes and SmartCloudNotes web users
Web users are logged on tothe service instant messagingcommunity if they performthe following steps from theInbox:
1. Click More > Preferences
2. Under Instantmessaging, select Enableinstant messaging.
Multiple communities arenot supported.
Notes users who use Notes8.5.2 or later installed withthe Sametime (integrated)option are logged on to theservice instant messagingcommunity.
The connection to the servicecommunity overwrites anypre-existing embeddedconnection to an on-premisesSametime community.
Notes 8.5.1 clients are notaffected by this option. Toenable them to access theservice instant messagingcommunity, manuallyconfigure the clients toconnect to the community.
Enable an on-premises IBMSametime community forSmartCloud Notes web users
Web users can connect to anon-premises Sametimecommunity managed byyour company after youconfigure the on-premisesenvironment.
Notes users can use instantmessaging, but you mustconfigure the clientsmanually to connect tocommunities.
Disable instant messagingintegration
Web users cannot use instantmessaging.
Notes users can use instantmessaging, but you mustconfigure the clientsmanually to connect tocommunities.
Configuring the web client to connect to an on-premisesSametime community
Complete this procedure to configure IBM SmartCloud Notes web clients toconnect to an IBM Sametime community at your company site.
Before you begin
The following Sametime server components must be installed on-premises. Forinstructions, see the Sametime documentation.v Sametime Server 8.0.2, or Sametime Community Server 8.5 or later. For
installation instructions, see the Sametime documentation.v Sametime Proxy Server 8.5.2IFR1. For installation instructions, see the Sametime
documentation.v The Sametime Proxy Server requires the latest hot fix, which is available on IBM
Fix Central. The hot fix includes installation instructions. This link retrieves thelist of fixes for Sametime 8.5.2 IFR1 for all operating systems; find the latest fixfor the Sametime Proxy Server on the operating system you use.
Note: The Sametime System Console is not used in this deployment.
172 SmartCloud Notes: Administering SmartCloud Notes: Hybrid Environment March 2015
About this task
Allowing the web client to connect to the on-premises Sametime communityrequires that users be able to access the Sametime Proxy Server from the samelocation where they access SmartCloud Notes. If your organization chooses torestrict access to the Sametime Proxy Server to users inside the corporate network,then all users must connect to that corporate network in order to access Sametimefunctionality in SmartCloud Notes.
If your organization wants to allow users to access Sametime functionality inSmartCloud Notes from locations outside the corporate network, you must ensurethat requests to https://Server_name:Port_number/ are correctly forwarded to theSametime Proxy Server, regardless of where they originate. To support externalconnections, the following requirements must be satisfied:v Server_name must be listed in the public DNS (domain name server).v The firewall must allow connections to Server_name on Port_number.v You must create network routes that allow connections to reach the Sametime
Proxy Server.
Procedure1. Configure the on-premises Sametime Proxy Server to allow connections from
the SmartCloud Notes domain by completing the following steps:a. On the computer where the Sametime Proxy Server is installed, open the
stproxyconfig.xml file that is stored in the deployment manager's profile:The deployment manager's stproxyconfig.xml file is typically located in thefollowing directory:WebSphere_AppServer_install_root/profiles/Deployment_Manager_Profile_Name/config/cells/Cell_Name/nodes/Node_Name/servers/STProxyServer/
For example, on IBM AIX® or Linux:/opt/IBM/WebSphere/AppServer/profiles/dmgr/config/cells/STProxyCell1/nodes/STProxyNode1/servers/STProxyServer
On Microsoft Windows:C:\Program Files\IBM\WebSphere\AppServer\profiles\dmgr\config\cells\STProxyCell1\nodes\STProxyNode1\servers\STProxyServer
b. In the stproxyconfig.xml file, look for the closing </server> tag and addthe following statement immediately after it:<domainList>Your_organization_domain_name,SmartCloud_Notes_domain_name</domainList>
Specify your own organization's domain name forYour_organization_domain_name. To determine the SmartCloud Notes domainyour company uses, open the Inbox and look at the domain name that isshown in the browser URL. For example, in the following browser URL, theSmartCloud Notes domain is notes.na.collabserv.com:https://mail.notes.na.collabserv.com/livemail/iNotes/Mail/?OpenDocument
Note: The server, mail, is not part of the domain name.Specify one of the following values for the SmartCloud_Notes_domain_name:v If you use the North America data center: notes.na.collabserv.comv If you use the Asia Pacific data center: notes.ap.collabserv.comFor example, if the Renovations company uses the North America datacenter, the statement looks like the following line:<domainlist>renovations.com,notes.na.collabserv.com</domainlist>
Chapter 5. Customizing service settings 173
c. Copy the new statement so you can use it again, and then save and closethe file.
d. On the same computer, open the copy of the stproxyconfig.xml file that isstored in the Sametime Proxy Server's profile:The Sametime Proxy Server node's copy of stproxyconfig.xml file istypically located in the following directory:WebSphere_AppServer_install_root/profiles/Sametime_Proxy_Profile_Name/config/cells/Cell_Name/nodes/Node_Name/servers/STProxyServer/
For example, on IBM AIX or Linux:/opt/IBM/WebSphere/AppServer/profiles/STPAppProfile/config/cells/STProxyCell1/nodes/STProxyNode1/servers/STProxyServer
On Microsoft Windows:C:\Program Files\IBM\WebSphere\AppServer\profiles\STPAppProfile\config\cells\STProxyCell1\nodes\STProxyNode1\servers\STProxyServer
The Sametime Proxy Server's path looks very similar to the deploymentmanager's path, but references the Sametime_Proxy_Profile_Name instead ofthe Deployment_Manager_Profile_Name.
e. Add the same new statement to the Sametime Proxy Server's copy of thestproxyconfig.xml file (after the closing </server> tag as before), and thensave and close the file.
f. Restart the Sametime Proxy Server.2. If web clients do not have VPN access to the Sametime Proxy Server, provide
external access to the server.3. If your Sametime server restricts access to certain types of clients, allow access
to web clients by adding the following value to the VPS_ALLOWED_LOGIN_TYPESsetting in the [Config] section of the sametime.ini file:14A4
For more information, see Technote 1114318.4. Complete the following steps to enable the service to connect to the
on-premises community:a. Log on to the service as an administrator.b. Click Administration > Manage Organization.c. In the System Settings section of the navigation pane, click IBM
SmartCloud Notes.d. Click Account Settings.e. Click Instant Messaging.f. Click Enable an on-premises IBM Sametime community for SmartCloud
Notes web users.g. Provide the Sametime Proxy Server URL, for example, https://
stproxy01.renovations.com.5. Instruct Internet Explorer users to modify the browser trusted sites list as
follows:a. Click Tools > Internet Options
b. Click Security.c. In the Select a Zone to view or change security settings section, click
Trusted sites and then click Sites.d. Add the following sites to the Websites box:
*.lotuslive.com*.collabserv.com
174 SmartCloud Notes: Administering SmartCloud Notes: Hybrid Environment March 2015
In addition, add the Sametime Proxy Server URL, for example:https://stproxy01.renovations.com.
6. Instruct users to complete the following steps from their SmartCloud Notesweb Inbox:a. Click More > Preferences
b. Click Instant messaging > Enable instant messaging.Related information:
Sametime documentation
Manually configuring Notes clients to connect to the serviceinstant messaging community
If you performed the procedure “Configuring instant messaging” and selected theoption Enable an on-premises IBM Sametime community for SmartCloud Notesweb users or the option Disable instant messaging integration, IBM Notes clientsare not configured automatically to connect to the instant messaging community inthe service. This topic describes how to configure Notes clients to connect to theservice instant messaging community yourself if you selected either of theseoptions.
Before you begin
Notes must be installed with the Sametime (integrated) option selected.
About this task
Perform this procedure for any of the following reasons.v You want to allow Notes 8.5.1 clients to connect to the service instant messaging
community.v You want to allow Notes clients to connect to an on-premises Sametime
community and to the service instant messaging community. You will configurethe service instant messaging community as a secondary community.
Note: To provide dual-community enablement, the on-premises IBM Sametimeserver must be configured to support IBM Sametime Standard clients. You mustpurchase the Sametime Standard license separately, as the SmartCloud Notesentitlement supports IBM Sametime Entry only.
v You want to allow some, but not all, Notes 8.5.2 or later clients to connect to theservice community as the primary community. If you want all Notes 8.5.2 orlater clients to connect to the service instant messaging community as theprimary community, instead perform the procedure “Configuring instantmessaging” and select the option Enable the service instant messagingcommunity for IBM Notes and SmartCloud Notes web users.
Perform the following steps to configure a Notes client to connect to the serviceinstant messaging community.
Procedure1. Start Notes.2. Click File > Preferences.3. Click Sametime.4. Click Server Communities.
Chapter 5. Customizing service settings 175
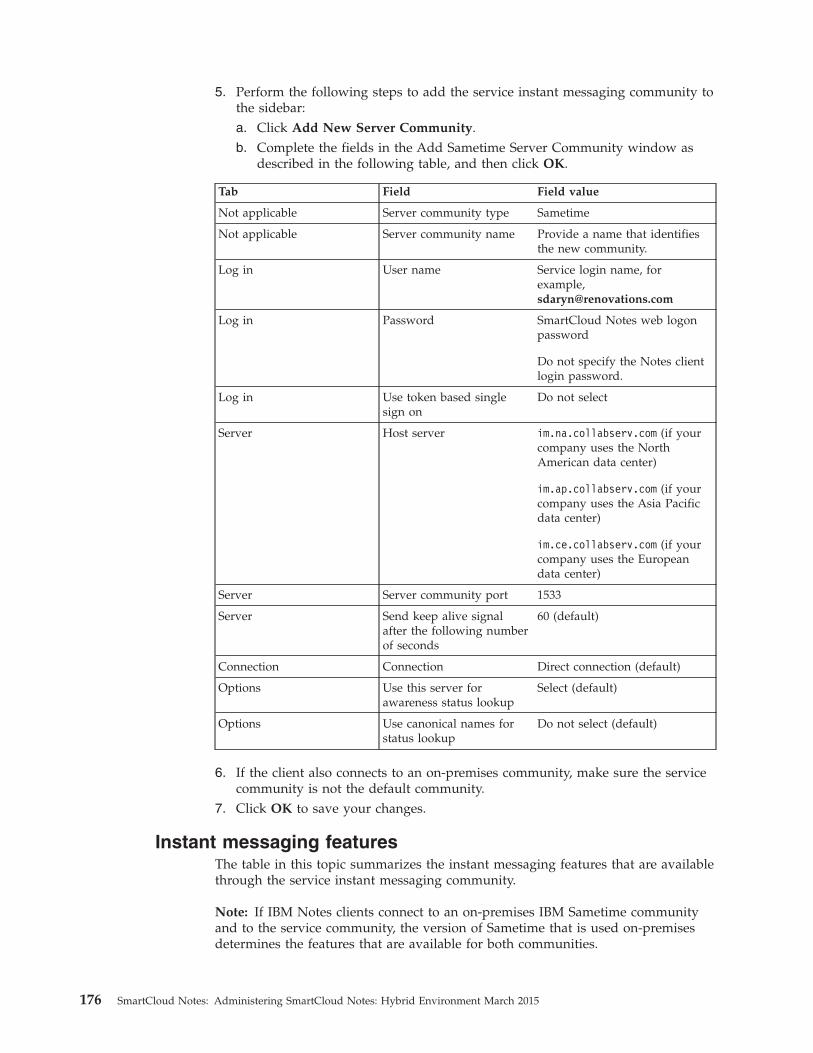
5. Perform the following steps to add the service instant messaging community tothe sidebar:a. Click Add New Server Community.b. Complete the fields in the Add Sametime Server Community window as
described in the following table, and then click OK.
Tab Field Field value
Not applicable Server community type Sametime
Not applicable Server community name Provide a name that identifiesthe new community.
Log in User name Service login name, forexample,[email protected]
Log in Password SmartCloud Notes web logonpassword
Do not specify the Notes clientlogin password.
Log in Use token based singlesign on
Do not select
Server Host server im.na.collabserv.com (if yourcompany uses the NorthAmerican data center)
im.ap.collabserv.com (if yourcompany uses the Asia Pacificdata center)
im.ce.collabserv.com (if yourcompany uses the Europeandata center)
Server Server community port 1533
Server Send keep alive signalafter the following numberof seconds
60 (default)
Connection Connection Direct connection (default)
Options Use this server forawareness status lookup
Select (default)
Options Use canonical names forstatus lookup
Do not select (default)
6. If the client also connects to an on-premises community, make sure the servicecommunity is not the default community.
7. Click OK to save your changes.
Instant messaging featuresThe table in this topic summarizes the instant messaging features that are availablethrough the service instant messaging community.
Note: If IBM Notes clients connect to an on-premises IBM Sametime communityand to the service community, the version of Sametime that is used on-premisesdetermines the features that are available for both communities.
176 SmartCloud Notes: Administering SmartCloud Notes: Hybrid Environment March 2015

Table 55. Features supported by the service instant messaging community
Feature Available Not available
Online presence status;availability status icons;custom status message
X
The web client shows onlinepresence status for names inthe sidebar but not fornames in documents orviews. This limitation doesnot apply if an on-premisesSametime community isused.
Automated geographicawareness
X
Telephony status X
Set alerts when users areavailable; privacy lists,selective do not disturb
X
Business card display X
The name and email addressare displayed but not otherinformation, such as title andtelephone number.
In a hybrid environment, thename and email address aretaken from the service useraccount rather than from thecustomer Domino directory.
Primary, frequent, and recentcontact list views
X
There is a 500-contact limit.
Public groups are notsupported.
The web client supports onlythe primary contact list.
Initiate chats with users notin your contact list
X
Security-rich one-on-one textchat and multi-way text chat.
X
Rich text formatting; spellcheck; emoticons andemoticon palettes
X
Time and date stamps; chathistory
X
The web client does notsupport chat history.
Log in to multiplecommunities
X
Supported by Notes clientsonly.
Chapter 5. Customizing service settings 177
Table 55. Features supported by the service instant messaging community (continued)
Feature Available Not available
Screen capture tool; filetransfers
X
Supported by Notes clientsonly.Note: To providedual-community enablement,the on-premises IBMSametime server must beconfigured to support IBMSametime Standard clients.You must purchase theSametime Standard licenseseparately, as theSmartCloud Notesentitlement supports IBMSametime Entry only.
Instant screen share X
Zero-download browser chatclient
X
Supported by web clientsonly.
Online meetings X
Voice and video X
Community collaborationfeatures, such as instantpolls, broadcast chats, andpersistent group chat
X
Mobile use X
Telephony integration X
Configuring IMAP accessYou can allow users to access IBM SmartCloud Notes from third-party emailclients using IMAP. IMAP access is disabled by default, but you can enable it forall users or only for specific users.
Before you begin
To allow IMAP access on a per user basis, you add the text itemSaaSAllowIMAP=value to the user's Person document in the Domino Directory on aserver that you synchronize with the service. There are a number of ways you cando this. For example, you can add a field to the Person document, or you can addan item element to a note.
If you are unfamiliar with the methods used to add a text item to a form in theDomino Directory, see the information about customizing the Domino Directorytemplate in the Reference section of the Domino 8.5.3 documentation.
Note: Users who have Author rights to their Person document can enable IMAPfor themselves by setting the field SaaSAllowIMAP to 2. To prevent this, on theAdvanced tab of the Field Properties dialog for the SaaSAllowIMAP field, set theSecurity Options to Must have at least Editor access to use.
178 SmartCloud Notes: Administering SmartCloud Notes: Hybrid Environment March 2015

About this task
After you enable IMAP access, service users can configure their mail clients forIMAP access using information provided by the service. The following IMAPclients are supported:v Apple emailv Microsoft Outlook 2003, 2007v Thunderbird
Procedure1. Log on to the service as an administrator.2. If your account also has the User role, click Admin > Manage Organization.3. In the System Settings section of the navigation pane, click IBM SmartCloud
Notes.4. Click Account Settings and then click IMAP Email Access.5. Select one of the following, and then click Save:
v Enable IMAP for all users. If you select this option, you do not need tocomplete any further steps.
v Enable IMAP for specific users only. If you select this option, you haveenabled IMAP access for your organization. Continue to the next step tocustomize your on-premises Domino Directory so that you can specify IMAPaccess for individual users.
v Disable IMAP for all users. If you select this option, no users have IMAPaccess and you do not need to complete any further steps.
6. From the Domino Administrator client, open the Domino Directory, on anon-premises Domino server whose directory you synchronize with the service.
7. For each user you want to specify IMAP access, add a TYPE_TEXT item namedSaaSAllowIMAP to their Person document with either of the following values:v "2" -- to allow IMAP access. If you later change access from specific users to
all users, no additional steps are needed to allow these users to continue tohave access.
v "3" -- to deny IMAP access. A user who is denied access using this value willbe denied access under all circumstances. If you later change access fromspecific users to all users, this user will continue to have no access.
An example of an agent that assigns the value "2" is FIELD SaaSAllowIMAP :="2"
Note: If you have enabled IMAP access for all users, any value other than "2"or "3" defaults to allowing access.
Results
If you enabled IMAP for all users, then service users can set up their IMAP clientsfor IMAP access to SmartCloud Notes mail.
If you added the text item to the Domino Directory, during directorysynchronization, the servers in the service are updated with the new information.Users cannot enable IMAP access and set up their IMAP mail clients until thesynchronization is complete.Related reference:
Chapter 5. Customizing service settings 179
“IMAP client limitations”There are a few limitations when using an IMAP client to access IBM SmartCloudNotes.Related information:
Domino documentation
Setting up IMAP clients
IMAP client limitationsThere are a few limitations when using an IMAP client to access IBM SmartCloudNotes.
Folder limitations
The following restrictions apply to folders used with IMAP:v A single folder name cannot exceed 64 bytes.v An unlimited number of nested folders is allowed, but the combined length of
all nested folder names (including delimiters) cannot exceed 129 bytes.
View limitations
The service provides IMAP clients access to folders in user mail files but not toviews. The Drafts, Sent, and Trash views in mail files therefore are not availablethrough IMAP clients. To work around this limitation, IMAP client users can createfolders that correspond to these views and put messages in the folders instead.IBM Notes or web client users must open these folders to see the messages inthem.
Return receipt
The service does not support the use of return receipts with IMAP clients. If yourequest a return receipt and the recipient opens the message using the IBM Notesor web client, no return receipt is generated.
Logging activity in journal filesYou can log different types of activity in journal files that you then download fromthe service.
Before you begin
Before you complete this procedure, you must request integration serverenablement from an IBM Connections Cloud customer services representative(CSR). When you do so, you provide an account identity to use to connect to theFTP site to download the journal files. You are notified when your enablementrequest is complete. For more information, see Requesting integration serverenablement in the Connections Cloud integration server documentation.
About this task
The following types of journal files are available for Notes:v Notes mail delivery, which records each email message that service users send.
180 SmartCloud Notes: Administering SmartCloud Notes: Hybrid Environment March 2015
v Notes client session, which records each attempt to log in to the service from aNotes client to access an application such as mail or the company directory.
The journal service produces gzip-compressed journal files about every 24 hours.You use an FTP client to download the journal files from the IBM ConnectionsCloud integration site. Files are removed from the integration site after seven days.
Journal files are available for other Connections Cloud services, as well. For moreinformation, see the Connections Cloud journaling documentation.
After you are notified that your request for integration server enablement iscomplete, complete the following steps to enable journaling through SmartCloudNotes Administration.
Procedure1. Log on to the service as an administrator.2. In the System Settings section of the navigation pane, click IBM SmartCloud
Notes.3. Click Account Settings.4. Click Journaling Options.5. Select any of the following options to specify the type of journal files to
generate:v Notes mail delivery
v Notes client sessions
6. Click Save.
What to do next
You can begin downloading journal files in about 24 hours.Related information:
Connections Cloud journaling documentation
Downloading journal filesYou can begin to download journal files about 24 hours after you enablejournaling.
Before you begin
Request integration server enablement, then enable journaling options inSmartCloud Notes administration. For more information, see “Logging activity injournal files” on page 180.
Make sure that your corporate firewall allows outbound connections to thefollowing hosts over FTP port 990 and FTP PASV port range 60000 - 61000:v North America data center: ftp.na.collabserv.comv Asia Pacific data center: ftp.ap.collabserv.comv European data center: ftp.ce.collabserv.com
Chapter 5. Customizing service settings 181
Procedure1. From an FTP client, specify the following connections settings:
Setting Value
Host If you use the United States data center:ftp.na.collabserv.comIf you use the Asia Pacific data center:ftp.ap.collabserv.comIf you use the European data center:ftp.ce.collabserv.com
Protocol FTP
Port 990
Encryption Implicit FTP over TLS
User and password Account name and password that is used toconnect to the FTP site.
2. Connect to the FTP host.3. Change to the journal directory.4. Select and download the following files:
v If you enabled Notes mail journaling, download files named<date>.NOTESMAIL.txt.gz
v If you enabled Notes client session journaling, download filesnamed<date>.NOTES_NRPC_SESSION.txt.gz.
<date> is the file creation date.Related tasks:“Configuring the firewall for outbound connections” on page 42Configure the firewall to allow outbound connections to the service.Related information:
Integration server documentation
Format of the Notes mail journal fileA Notes mail journal file records each message that users send.
File name
The name of the compressed file that you download is <date>.NOTESMAIL.txt.gz,where <date> is the file creation date , in YYYY-MM-DD format. For example:2012-12-23.NOTESMAIL.txt.gz.
Syntax
Each record in a Notes mail journal file conforms to the following syntax:date user name (id=customerId, customerId=customerId) performed ACTION[on object (type=TYPE, id=OBJECTID, name=name, customerId=customerId)][targeted at (type=TYPE, id=TARGETID, name=name, customerId=customerId)]with outcome OUTCOME [REASON][(EXTRA)]
Each record in a journal file is contained in a single line.
Parameters
date
182 SmartCloud Notes: Administering SmartCloud Notes: Hybrid Environment March 2015

A date and time, for example, 2012-12-18T13:23:47+0000. One of thefollowing values is logged:v The date and time that a user sends a message to another user at the
companyv The date and time that a message failed to be delivered to a user at the
companyv The date and time that a user sends a message to an external user at
another company
name
The user’s Notes name, if an internal user sends the message, for example,CN=Samantha Daryn/O=Renovations. An Internet email address, if anexternal user sends the message.
customerId
The unique number that identifies the company subscription in the service.
ACTION
SENT_MAIL
TYPE
The type of object or target. The object type is always MAIL_MESSAGE. Thetarget type is always RECIPIENT.
OBJECTID
The unique identifier of the mail message that is sent.
name
The name of the OBJECTID or the TARGETID. The name for theOBJECTID is always MAIL. The name for the TARGETID is the emailaddress of the recipient.
TARGETID
The unique identifier for the recipient. This value is always null becausethe email address specified in the name parameter uniquely identifies therecipient.
OUTCOME
The result of the action, either SUCCESS or FAILURE. If the outcome of anevent is FAILURE, the reason is given. The reason is in uppercase and canbe multiple words separated by underscores. For example: FAILURE“USER_NOT_FOUND”.
EXTRA
Contains the size of the message in kilobytes.
Examples
Note: The following example records are shown on multiple lines. In the journalfile, each record is a single line.1. Samantha Daryn sends a message to another internal user at the company, Allie
Singh. Allie receives the message.2012-12-30T19:03:01+0000 user CN=Samantha Daryn/O=Renovations(id=20076547, customerId=20076547) performed SENT_MAILon object (type=MAIL_MESSAGE, id=<OFF0EBF61D.5CAAD94F-ON85257A
Chapter 5. Customizing service settings 183

78.005C2BF7-85257A78.005C3063@LocalDomain>, name=“MAIL”,customerId=20076547) targeted at (type=RECIPIENT, id=,name=“CN=allie singh/[email protected]”, customerId=20076547)with outcome SUCCESS (size=“1”)
2. Samantha Daryn sends a message to another internal user at the company, AllieSingh. Allie’s name is not found in the directory and the message is notdelivered.2012-12-28T15:02:01+0000 user CN=Samantha Daryn/O=Renovations(id=20076547, customerId=20076547) performed SENT_MAILon object (type=MAIL_MESSAGE,id=<OF0645EB2C.8B339FE8-ON00257A9B.0054F723-00257A9B.0054F726@LocalDomain>,name=“MAIL”, customerId=20076547) targeted at (type=RECIPIENT, id=,name=“CN=allie singh/[email protected]”, customerId=20076547)with outcome “FAILURE RECIPIENT NOT FOUND IN COMPANY DIRECTORY” (size=“2”)
3. Samantha Daryn sends a message over the Internet to an external user,[email protected]:02:01+0000 user CN=Samantha Daryn/O=Renovations(id=20076547, customerId=20076547) performed SENT_MAILon object (type=MAIL_MESSAGE, id=<OF8E758E11.39C4D326-ON00257A9B.00550042-00257A9B.00550046@LocalDomain>, name=“MAIL”,customerId=20076547) targeted at (type=RECIPIENT, id=,name=“[email protected]”, customerId=20076547)with outcome SUCCESS (size=“1”)
Format of the Notes client session journal fileA Notes client session journal file records information about each IBM Notes clientlogin session within the service.
File name
The name of the compressed file that you download is<date>.NOTES_NRPC_SESSION.txt.gz, where <date> is the file creation date, inYYYY-MM-DD format. For example: 2012-12-23.NOTES_NRPC_SESSION.txt.gz.
Syntax
Each record in a Notes client session journal file conforms to the following syntax:date user name (id=customerId, customerId=customerId) performed ACTION[on object (type=TYPE, id=OBJECTID, name=name, customerId=customerId)][targeted at (type=TYPE, id=TARGETID, name=name, customerId=customerId)]with outcome OUTCOME [REASON][(EXTRA)]
Each record in a journal file is contained in a single line.
Parameters
date
The date and time a Notes client user logs in to the service or attempts tolog in, for example, 2012-12-18T13:23:47+0000.
name
The user’s Notes name, for example, CN=Samantha Daryn/O=Renovations
customerId
The unique number that identifies the company subscription in the service.
ACTION
NRPC_SESSION
184 SmartCloud Notes: Administering SmartCloud Notes: Hybrid Environment March 2015

TYPE
The type of object or target. The object type is always NRPC_SESSION. Thetarget type is always USER.
OBJECTID
A unique session ID
name
The name of the OBJECTID or the TARGETID. The name for theOBJECTID is always NRPC_SESSION. The name for the TARGETID is theuser’s Notes name, for example, CN=Samantha Daryn/O=Renovations.
TARGETID
The unique identifier for the user. This value is always null because thename parameter uniquely identifies the user.
OUTCOME
The result of the action, which is always SUCCESS.
EXTRA
The following information is provided:v Number of databases accessedv Number of documents that are read and writtenv Time to connect to the service, in secondsv The client versions being used
Examples
Note: The following example records are shown on multiple lines. In the journalfile, each record is a single line.1. Samantha Daryn logs in to the mail server in the service successfully from
Notes.2013-04-09T14:35:12+0000 user CN=Samantha Daryn/O=Renovations(id=20076547,customerId=20076547) performed NRPC_SESSION on object (type=NRPC_SESSION,id=02E31600, name=“NRPC_SESSION”, customerId=20076547) targeted at (type=USER,id=, name=“CN=Samantha Daryn/O=Renovations”, customerId=20076547) with outcomeSUCCESS (DBs accessed=“1”, docs read=“0”, docs written=“0”, connect time=“302”,client version=“90010”,)
Chapter 5. Customizing service settings 185

186 SmartCloud Notes: Administering SmartCloud Notes: Hybrid Environment March 2015
Chapter 6. Onboarding users
Onboarding refers to all the steps that are done to get users up and running withmail files and mail servers in the cloud.
Before you begin
Before you onboard users, configure the service and, optionally, customize servicesettings.
Choosing a client deployment strategyChoose a strategy for deploying clients in the service.
Before you begin
Complete the following tasks: “Deciding whether to use the Notes client” on page188 and “Deciding whether to transfer mail files” on page 189.
About this task
The following table describes common client deployment strategies.
Table 56. Common strategies for deploying clients
Strategy Additional information
New mail files
SmartCloud Notes web and mobile clientsonly
v This option is the quickest and leastexpensive.
v All users can quickly use the web clientand mobile clients to access their mail.
v Users who decide that they want to usethe IBM Notes client can do so when it isconvenient, and can continue to use cloudmail in the meantime.
New mail files
Notes, SmartCloud Notes web, and mobileclients
v This option causes the least disruption forusers and is typically less time consumingthan transferring mail files.
v This option might be a good one tochoose if current Notes clients meet theservice requirements and do not need tobe upgraded.
v Notes client users can export contactsfrom current mail files and import theminto new mail files.
v Notes client users can access on-premisesarchives of their original mail files.
v The use of managed mail replicas canboost performance for Notes client users.
© Copyright IBM Corp. 2011 187
Table 56. Common strategies for deploying clients (continued)
Strategy Additional information
Transferred mail files and Notes clients forsome users
New mail files and SmartCloud Notes weband mobile clients for other users
v This option allows some critical userssuch as executives and managers tocontinue to use the Notes client and tocontinue to work with current and pastmail file content.
v This option can be more time consumingto deploy, depending on the quantity andsize of the mail files that are transferred.
v Your company sets up a IBM Dominostaging server and uses IT resources toprepare mail files.
Transferred mail files for all users
A mixture of Notes, SmartCloud Notes web,and mobile clients
v This option is the most expensive andtime consuming but can be the leastdisruptive for users, especially if Notesclient upgrades are not required.
Deciding whether to use the Notes clientIBM SmartCloud Notes web is the mail client that is available automatically to allIBM SmartCloud Notes users through a browser. Before you prepare to onboardusers, decide whether you want them to use the optional IBM Notes client inaddition to or instead of SmartCloud Notes web.
About this task
For the following reasons, many companies decide to use SmartCloud Notes weband not the Notes client:v Users get access to new features automatically as they are available in the
service.v IT departments save money by avoiding the need to upgrade and maintain
Notes clients.v SmartCloud Notes web is easy to use and the interface is similar to that of
recent versions of IBM iNotes and Notes. There might be little or no trainingneeded.
v Most Notes clients features are available in SmartCloud Notes web.
A recommended approach is to start all users in the service with SmartCloudNotes web. After users become familiar with it, you have a better sense of whichusers, if any, still need the Notes client. The following table describes some reasonsto use the Notes client, as well as alternative options.
Table 57. Reasons you might use the Notes client
Reason Considerations and alternatives
Users need access to IBM Dominoapplications on-premises.
The Notes Browser Plug-in is an alternativeoption to the Notes client. This plug-inprovides access to on-premises Notesapplications through a browser.
188 SmartCloud Notes: Administering SmartCloud Notes: Hybrid Environment March 2015
Table 57. Reasons you might use the Notes client (continued)
Reason Considerations and alternatives
Users need access to mail whendisconnected from the network.
Currently, only the Notes client supportslocal, disconnected access to mail. Local mailfile access is provided through managedmail replicas (in hybrid environments) orstandard local mail file replicas (inservice-only environments).
Before you choose the Notes client for thisreason, consider that with the increased useof mobile devices, some users might nolonger require offline access throughnotebooks or desktops.
Internet connections are slow. In hybrid environments, users with slowInternet connections, for example, users withlimited bandwidth connections, see betterperformance if they use managed mailreplicas on Notes clients. In service-onlyenvironments, these users benefit from usingstandard local mail file replicas on Notesclients.
Users are starting with new mail files in theservice and want access to old mail archivedon-premises.
Currently, accessing mail that is archivedon-premises requires a Notes client.
Users want features that are available onlywith the Notes client.
For a feature comparison, see the technote“Comparison tables of features between IBMNotes, IBM iNotes, and IBM SmartCloudNotes web”.
In hybrid environments, users want tomanage (be delegates for) the mail files ofon-premises users.
Managing on-premises mail files of userswho are not provisioned for the servicerequires the Notes client.
Related tasks:“Using Desktop Settings to configure managed mail replicas” on page 120In a hybrid environment, use Desktop Policy settings to enable managed mailreplicas. Managed mail replicas helps ensure that IBM Notes users in the servicehave quick, local access to their mail when connected or disconnected from thenetwork.Related information:
Technote: Comparison tables of features between IBM Notes, IBM iNotes &IBM SmartCloud Notes web
Notes Browser Plug-in
IBM SmartCloud Notes client requirements
Deciding whether to transfer mail filesAn important aspect of planning to move to the service is deciding whether tostart with new IBM Notes mail files or to transfer current mail files.
Chapter 6. Onboarding users 189
About this task
You can combine approaches. For example, you might create new mail files for amajority of users and transfer the mail files of remaining users.
There are a several advantages to starting users with brand new mail files in theservice:v Users can begin to use the service quickly because the steps to prepare and
transfer mail files are unnecessary.v No company IT resources are required to prepare mail files for transfer.v If you have users who infrequently use past mail and calendar entries, or if your
company mail retention policy is to retain mail for only a short period, a newmail file might not be an inconvenience.
v Notes client users can export contacts and selected calendar entries from theiroriginal mail files to a Calendar (.ics) file, and then import the entries into theirnew mail files after they are provisioned.
In some cases, it might be important to transfer mail files. For example, you mightwant to transfer the mail files of users such as company executives or managerswho work heavily with past and current mail messages and calendar events.
You can pay for the services of a professional transfer manager to work with yourcompany to transfer mail files. The transfer manager can be an IBM SoftwareServices for Collaboration representative or an IBM Certified Business Partner. Thetransfer manager performs tasks such as helping you to prepare mail files and todevelop a transfer schedule. The transfer manager also sets up an on-premises IBMDomino server that is provided by your company to use as a staging server for thetransfer.
When you transfer mail files, you can choose whether to transfer full mail files orto selectively transfer just some of the content. Selective transfer is helpful forexpediting the transfer of large mail files and also for preventing large mail filesfrom exceeding the mail file quota in the service.
When you use selective transfer, you specify which of the following types ofcontent to transfer:v Contacts (Requires Preferences > Contacts > Enable Synchronize Contacts on
the Replication and Sync tab to be selected in the mail file before the transfer.)v Mail rulesv Group calendarsv Draft documentsv Calendar events, optionally including events up to 365 days in the pastv Messages, optionally including messages sent and received up to 365 days in the
past.v To Do's, optionally including To Do's with due dates up to 365 days in the past
The following content is always transferred:v Preferences settingsv Embedded Notes IDsv Folders, which can be empty after the transfer if content is older than the
transfer criteria
190 SmartCloud Notes: Administering SmartCloud Notes: Hybrid Environment March 2015
You decide whether and how to preserve data that is not transferred. For example,you might retain the original on-premises mail files. The original files andtransferred files have different replica IDs and do not replicate.Related tasks:“Preparing for mail file transfer” on page 209If you configure the service as a hybrid environment, as part of onboarding, youhave the option to transfer users’ on-premises mail files to the service. Before youtransfer mail files, complete the tasks to prepare.
Preparing for onboardingTo prepare for onboarding, complete these tasks to prepare users, clients, and mailfiles.
Before you begin
Before you prepare for onboarding, complete the following tasks:v Chapter 4, “Configuring the service,” on page 83v “Choosing a client deployment strategy” on page 187
About this task
Table 58. Tasks to prepare for onboarding
TaskWhy the task isimportant
Additionalinformation Complete?
Create a detailedprovisioningschedule and requireyour project team tosign off on it.
This step ensures thatprovisioning happensin planned stagesthat take into accountfactors such as pilotusers, workschedules,geographic locations,and clients used.
Delegates of mailfiles mustprovisioned tomanage mail files ofprovisioned users.For more informationsee “Mail filedelegation” on page208.
Preparecommunications andtraining.
This step allows for asmooth transition tothe service andreduces help deskcalls.
“Preparingcommunications andtraining” on page 206
Develop a method totrack provisioning.
This step helps youunderstand at whatstage users are at inthe transition to thecloud and is alsouseful for providingstatus reports toexecutivemanagement.
Request removal oftrial accounts.
Provisioning can failfor users who havetrial accounts.
Contact Support todetermine whetherusers at yourcompany have trialaccounts.
Chapter 6. Onboarding users 191
Table 58. Tasks to prepare for onboarding (continued)
TaskWhy the task isimportant
Additionalinformation Complete?
In hybridenvironments, ifusers will not use theIBM Notes clientwith the service,verify that the usershave Notes ID files towhich they oradministrators havelocal access.
Though notrequired,Notes IDfiles enable users tosign email, readencrypted email, andto recall mailmessages. ID files aretypically required toenable administratorsto change users'Notes names.
v “Limitations whenNotes IDs are notin the vault” onpage 131
v Importing yourNotes ID
v “Uploading aNotes ID to thevault” on page 269
Customize mail fileaccess.
This step is requiredif you want to allowpeople who are notthe owners of mailfiles to access mailfiles without beingdelegates. Typicallythis access isprovided by adding acustomer-specificadministrator groupto mail file ACLs.
“Preparingcustomized mail fileACLs” on page 168
Familiarize yourselfwith passwordrequirements forlogging in to theservice
The passwordrequirements mightbe different fromones that arecurrently used inyour on-premisesenvironment.
“Password rules byauthenticationmethod” on page 141
In hybridenvironments only,verify that users’Person documentscomply with servicerequirements.
This step helps toensure a smoothtransition to theservice.
See the section aboutPerson documents inthe topic“Requirements forsynchronizeddirectories” on page22.
(Optional) In hybridenvironments only,configure multipleInternet addresses forusers
This step appliesonly if users havemore than oneInternet emailaddress, for example,if users have twoemail addresses as aresult of a companymerger.
“Adding multipleInternet emailaddresses to Persondocuments” on page207
(Optional) Ensurethat a custom mailtemplate is uploadedto the service, if youplan to use one.
You can apply thecustom templateduring userprovisioning so thatusers see the customdesign when theyfirst use the service.
See “Preparing to usecustom mail filetemplates” on page161.
192 SmartCloud Notes: Administering SmartCloud Notes: Hybrid Environment March 2015

Table 58. Tasks to prepare for onboarding (continued)
TaskWhy the task isimportant
Additionalinformation Complete?
(Optional) Set upbatch userprovisioning with theintegration server.
This step allows youto usecomma-separated-value (CSV) files toprovision batches ofusers.
See the section onuser provisioningand identitymanagement in theIntegration serverdocumentation.
Prepare for specificclients.
There are specialconsiderations foreach type of clientthat can be used withthe service.
v “Preparing for theweb client”
v “Preparing forNotes Travelerdevices” on page195
v “Preparing forNotes clients” onpage 196
v “Preparing forIMAP clients” onpage 202
Preparing for the web clientBefore you provision users who will access IBM SmartCloud Notes using the webclient, prepare for the web client.
Before you begin
Read about the web client.
About this task
Table 59. Tasks to prepare for the web client
TaskWhy the task isimportant
Additionalinformation Complete?
Prepare foronboarding.
There are tasks toprepare that apply toall or most clients.
“Preparing foronboarding” on page191
Review thesupported browsersand browserversions, decidewhich to use, andupgrade browsers ifnecessary.
Using a supportedbrowser versionensures the bestexperience for yourusers.
SmartCloud Notesweb requirements
Chapter 6. Onboarding users 193
Table 59. Tasks to prepare for the web client (continued)
TaskWhy the task isimportant
Additionalinformation Complete?
If users currently useIBM iNotes, comparethe features that aresupported forSmartCloud Notesweb.
Most IBM iNotesfeatures aresupported in thecloud. Making yourusers aware of thefew differences canreduces help deskcalls and improveuser satisfaction.
Technote:Comparison tables offeatures betweenIBM Notes, IBMiNotes & IBMSmartCloud Notesweb
Assess networkcapacity.
This step ensuresthat your site has thenetwork capacity tosupport the numberof web client usersyou plan to have
“Network capacityfor the web client”on page 20
If the Notes client isused with sharedlogin enabled, butthe client won't beused in the cloud,disable the sharedlogin feature beforeyou provision users.
This step enablesadministrators orweb client users toupload Notes ID filesto the vault in theservice manuallyafter provisioning.
An ID enabled forshared login cannotbe uploaded to theservice ID vaultmanually by a webclient user or anadministrator. It canonly be uploadedautomaticallythrough the use of aNotes client. Formore information onshared login, see theSecuring section ofthe Dominodocumentation.
(Optional) Deploy anextension forms fileto customize the webclient
Use an extensionforms file if youwant to customizethe visual theme,fonts, the action bar,and other aspects ofthe web client.
“Using extensionforms files tocustomize the look ofthe web client” onpage 165
Disable on-premisesIBM iNotes loginredirection, if used.
This step ensuresthat users are notredirected to theiron-premises mailservers after themove to the cloud.
For information onUsing iNotes IBMiNotes redirect, seethe Dominodocumentation.
An IBM SoftwareServices forCollaborationrepresentative canprovide a customredirector for cloudlogin.
194 SmartCloud Notes: Administering SmartCloud Notes: Hybrid Environment March 2015
Preparing for Notes Traveler devicesBefore enabling users to use IBM Notes Traveler mobile devices with the service,prepare your environment and the devices.
Before you begin
Read about Notes Traveler devices.
About this task
Before you provision users with a Notes Traveler subscription, complete the tasksin the following table to prepare.
Table 60. Tasks to prepare for Notes Traveler devices
TaskWhy the task isimportant
Additionalinformation Complete?
Prepare foronboarding.
There are tasks toprepare that are notclient-specific.
“Preparing foronboarding” on page191
Ensure that yourfirewall configurationallows devices toaccess the serviceover WiFi.
Connections to hostsin the service overPort 443 are requiredfor WiFi access.
“Configuring thefirewall for outboundconnections” on page42
Review the NotesTraveler devicememory andoperating systemrequirements.
Using a mobiledevice that complieswith theserequirements ensuresthe best experiencefor your users.
Notes Travelerrequirements for thecloud.
If you plan to useBlackBerry 10devices, first verifythat your wirelesscarrier supports theminimum operatingsystem level that isrequired in thecloud.
Some carriers mightnot support theminimum requiredBlackberry 10operating systemlevel.
Notes Travelerrequirements for thecloud.
Enable cookies indevice browsers.
Cookies must beenabled to connect tothe service and tosync mail on devices.
Review NotesTraveler devicepolicy settings.
Be aware of policysettings that theservice enforces thatmight be differentthan your currentsettings. Also,optionally customizesettings.
v “Notes TravelerSettingsrestrictions” onpage 118
v “Usingadministrativepolicies” on page105
Chapter 6. Onboarding users 195
Table 60. Tasks to prepare for Notes Traveler devices (continued)
TaskWhy the task isimportant
Additionalinformation Complete?
Review devicelimitations in thecloud.
This step makes youaware of anychanges that usersmight see after themove to the cloud.
Notes TravelerTroubleshooting,known limitations,and restrictions.
(Optional) Enableapplicationpasswords.
This step is requiredonly if yourcompany enables fullfederated identityauthentication andAndroid devices thatrun Notes Traveler9.0.1.3 or a higherare not used.
v “Enablingapplicationpasswords” onpage 139
v “Setting upfederated identitymanagement” onpage 132
Preparing for Notes clientsUse of the IBM Notes client to connect to the service is optional. If you want yourusers to use the Notes client, understand the steps to prepare.
Before you begin
Read about the “Notes client” on page 11 and decide whether to use it.
About this task
Skip this task is you do not plan to use the Notes client.
Table 61. Tasks to prepare for the Notes client
TaskWhy the task isimportant
Additionalinformation Complete?
Prepare foronboarding.
There are tasks toprepare that apply toall or most clients.
“Preparing foronboarding” on page191
Compare the featuresthat are supportedfor the on-premisesclient to the featuredthat are supported inthe cloud.
Most features arealso supported in thecloud, but there aresome differences tobe aware of.
Technote:Comparison tables offeatures betweenIBM Notes, IBMiNotes & IBMSmartCloud Notesweb
196 SmartCloud Notes: Administering SmartCloud Notes: Hybrid Environment March 2015
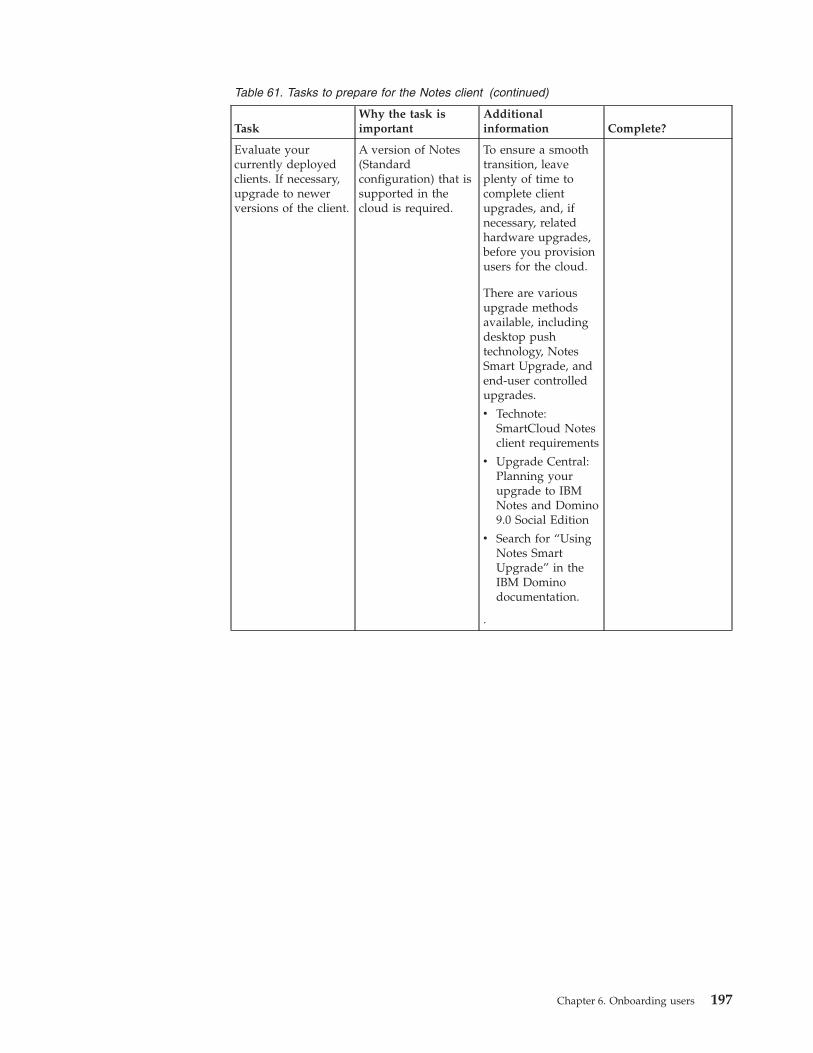
Table 61. Tasks to prepare for the Notes client (continued)
TaskWhy the task isimportant
Additionalinformation Complete?
Evaluate yourcurrently deployedclients. If necessary,upgrade to newerversions of the client.
A version of Notes(Standardconfiguration) that issupported in thecloud is required.
To ensure a smoothtransition, leaveplenty of time tocomplete clientupgrades, and, ifnecessary, relatedhardware upgrades,before you provisionusers for the cloud.
There are variousupgrade methodsavailable, includingdesktop pushtechnology, NotesSmart Upgrade, andend-user controlledupgrades.
v Technote:SmartCloud Notesclient requirements
v Upgrade Central:Planning yourupgrade to IBMNotes and Domino9.0 Social Edition
v Search for “UsingNotes SmartUpgrade” in theIBM Dominodocumentation.
.
Chapter 6. Onboarding users 197
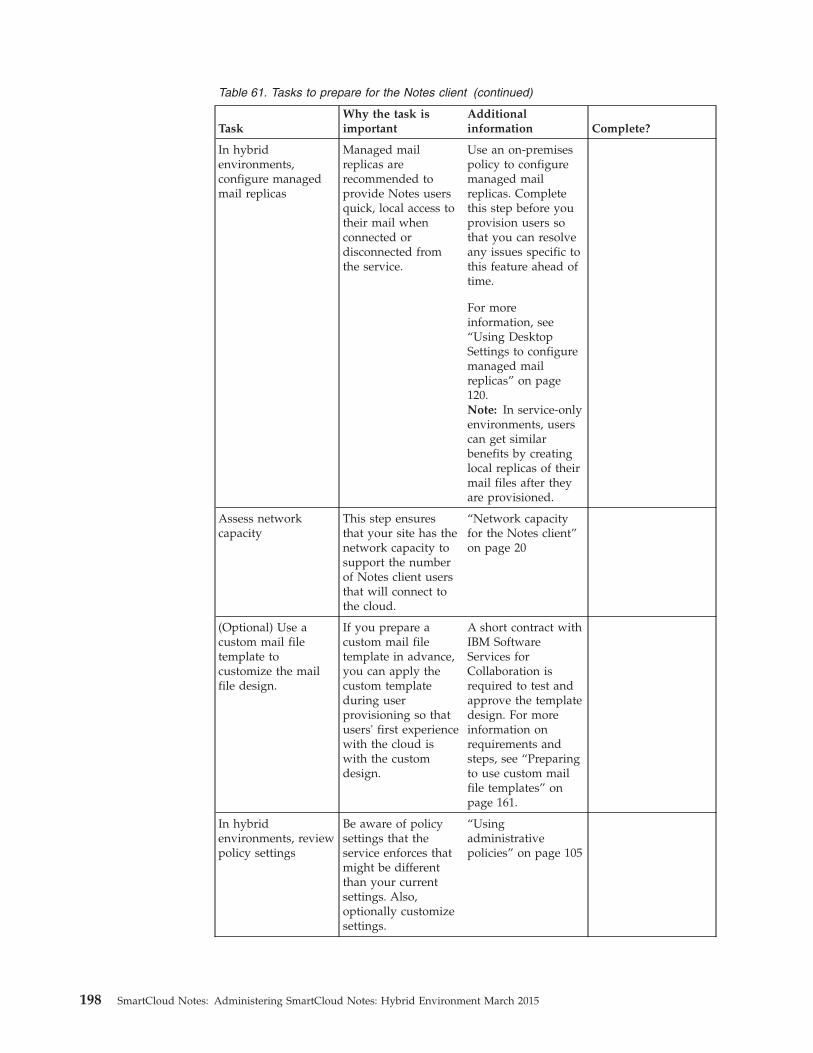
Table 61. Tasks to prepare for the Notes client (continued)
TaskWhy the task isimportant
Additionalinformation Complete?
In hybridenvironments,configure managedmail replicas
Managed mailreplicas arerecommended toprovide Notes usersquick, local access totheir mail whenconnected ordisconnected fromthe service.
Use an on-premisespolicy to configuremanaged mailreplicas. Completethis step before youprovision users sothat you can resolveany issues specific tothis feature ahead oftime.
For moreinformation, see“Using DesktopSettings to configuremanaged mailreplicas” on page120.Note: In service-onlyenvironments, userscan get similarbenefits by creatinglocal replicas of theirmail files after theyare provisioned.
Assess networkcapacity
This step ensuresthat your site has thenetwork capacity tosupport the numberof Notes client usersthat will connect tothe cloud.
“Network capacityfor the Notes client”on page 20
(Optional) Use acustom mail filetemplate tocustomize the mailfile design.
If you prepare acustom mail filetemplate in advance,you can apply thecustom templateduring userprovisioning so thatusers' first experiencewith the cloud iswith the customdesign.
A short contract withIBM SoftwareServices forCollaboration isrequired to test andapprove the templatedesign. For moreinformation onrequirements andsteps, see “Preparingto use custom mailfile templates” onpage 161.
In hybridenvironments, reviewpolicy settings
Be aware of policysettings that theservice enforces thatmight be differentthan your currentsettings. Also,optionally customizesettings.
“Usingadministrativepolicies” on page 105
198 SmartCloud Notes: Administering SmartCloud Notes: Hybrid Environment March 2015
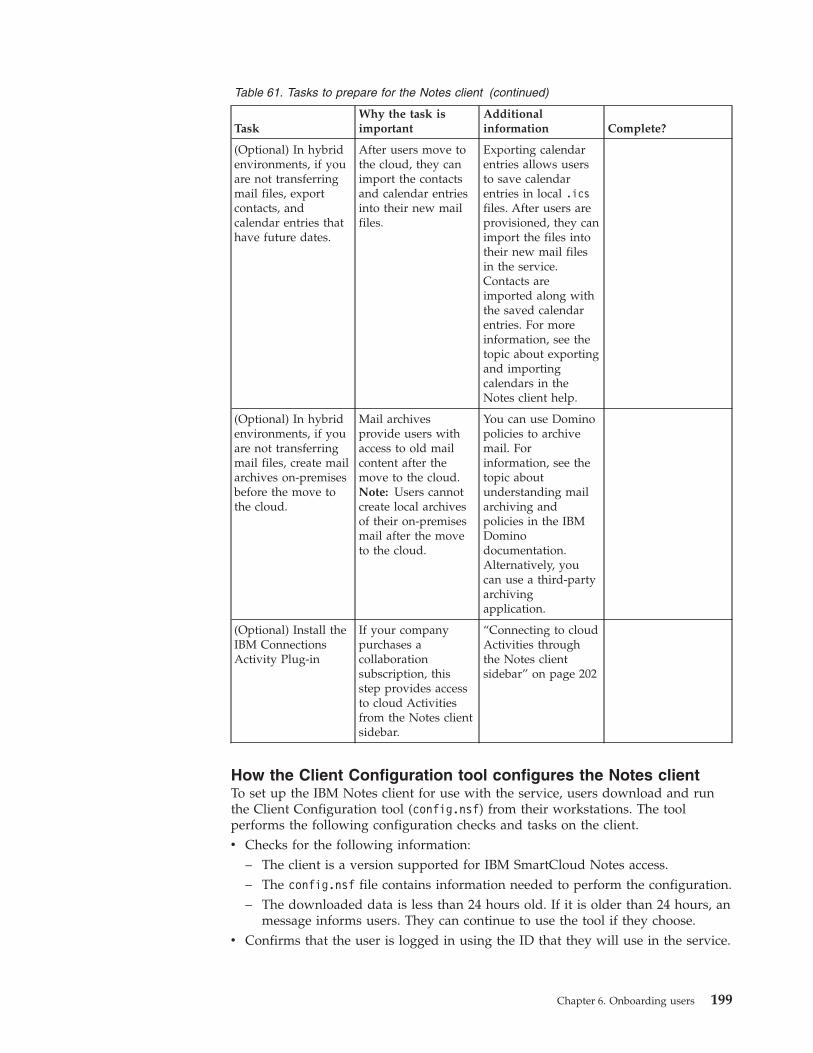
Table 61. Tasks to prepare for the Notes client (continued)
TaskWhy the task isimportant
Additionalinformation Complete?
(Optional) In hybridenvironments, if youare not transferringmail files, exportcontacts, andcalendar entries thathave future dates.
After users move tothe cloud, they canimport the contactsand calendar entriesinto their new mailfiles.
Exporting calendarentries allows usersto save calendarentries in local .icsfiles. After users areprovisioned, they canimport the files intotheir new mail filesin the service.Contacts areimported along withthe saved calendarentries. For moreinformation, see thetopic about exportingand importingcalendars in theNotes client help.
(Optional) In hybridenvironments, if youare not transferringmail files, create mailarchives on-premisesbefore the move tothe cloud.
Mail archivesprovide users withaccess to old mailcontent after themove to the cloud.Note: Users cannotcreate local archivesof their on-premisesmail after the moveto the cloud.
You can use Dominopolicies to archivemail. Forinformation, see thetopic aboutunderstanding mailarchiving andpolicies in the IBMDominodocumentation.Alternatively, youcan use a third-partyarchivingapplication.
(Optional) Install theIBM ConnectionsActivity Plug-in
If your companypurchases acollaborationsubscription, thisstep provides accessto cloud Activitiesfrom the Notes clientsidebar.
“Connecting to cloudActivities throughthe Notes clientsidebar” on page 202
How the Client Configuration tool configures the Notes clientTo set up the IBM Notes client for use with the service, users download and runthe Client Configuration tool (config.nsf) from their workstations. The toolperforms the following configuration checks and tasks on the client.v Checks for the following information:
– The client is a version supported for IBM SmartCloud Notes access.– The config.nsf file contains information needed to perform the configuration.– The downloaded data is less than 24 hours old. If it is older than 24 hours, an
message informs users. They can continue to use the tool if they choose.v Confirms that the user is logged in using the ID that they will use in the service.
Chapter 6. Onboarding users 199
v Performs other small consistency tests, such as checking that the currentLocation document can be located.
v Creates a wildcard Connection document that the client will use to connect to amail server in the service through the proxy server in the service. The servername in the Connection is */your_certifier, where your_certifier is the nameof the OU certifier you provided for your mail servers during serviceconfiguration.
v If the user is already using the Notes ID that they will use in the service, testsconnectivity to their new mail server on port 1352.
v If the user has a mail file that is being transferred, confirms that their old andnew mail files can be located.
Note: If the tests confirm that the user's mail file has already been transferredsuccessfully using replication, then the tool does not attempt to find the old mailfile, which might have already been deleted.
v If the tool needs to close the Notes client to force a download of the user ID file,it attempts to find an Offline location:– If an Offline location is found, the tool switches to it to prevent the client
from doing a final replication when it closes.– If no Offline location is found, the tool creates an Offline location (named
Offline) for this purpose.– If a location named Offline already exists, but is not suitable for configuration
purposes, a the tool creates a location named “Temporary location for cloudmail setup - safe to delete”.
Note: If the tool closes the Notes client for reasons other than to downloadthe Notes ID an Offline location is not needed.
v Creates a Location document called SmartCloud for username, or updatesit if it already exists and is incorrect.
v If the user has an existing mail file that is being transferred, the tool locatesexisting bookmarks that point to the on-premises mail file and changes them topoint to the replica of the mail file in the service.
v If the user has Location documents that point to the on-premises mail file, thetool updates the location documents to point to the new SmartCloud Notes mailfile. For example, if the user has a working Office Location document, it changesto a virtual duplicate of the cloud Location document.
v If the user has Connection documents (Contacts > Advanced view) that restrictwhich locations can be used, and the list includes the current location, then thetool updates those connections to allow the cloud location document. This isnecessary so that users can continue to access on-premises application serversusing the new cloud location.
v If the user has Account documents (Contacts > Advanced view) that restrictwhich locations can be used, and one of the locations is the current location, thetool updates the Account documents so that they can be used from the cloudlocation.
v If the user has an existing mail file that will be transferred, but the transfer hasnot yet taken place, the tool replicates the existing on-premises mail file withservice mail file. If this succeeds, the field LLNMigrated=1 is set in the CalendarProfile document, which signals that another replication is not needed. The toolthen sends email to LLNStatusUpdates advising of the successful transfer.LLNStatusUpdates is a mail-in database that can be used by IBM support or theadministrator who is managing the on-premises deployment.
200 SmartCloud Notes: Administering SmartCloud Notes: Hybrid Environment March 2015
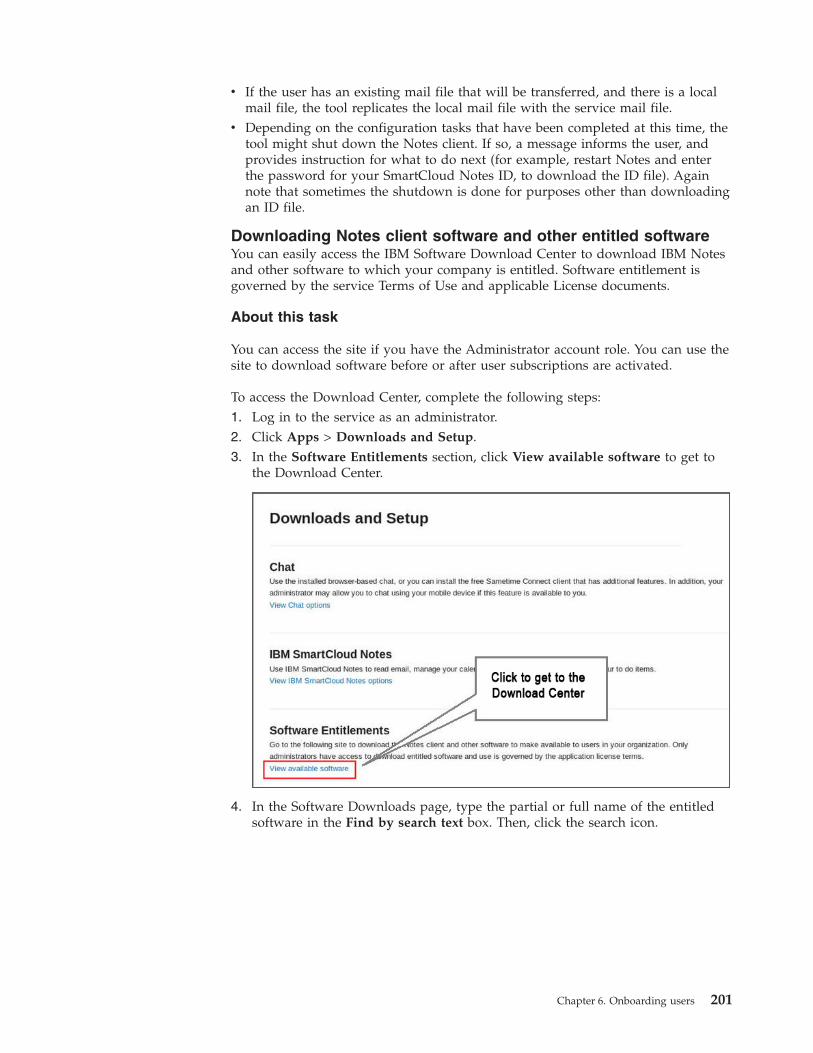
v If the user has an existing mail file that will be transferred, and there is a localmail file, the tool replicates the local mail file with the service mail file.
v Depending on the configuration tasks that have been completed at this time, thetool might shut down the Notes client. If so, a message informs the user, andprovides instruction for what to do next (for example, restart Notes and enterthe password for your SmartCloud Notes ID, to download the ID file). Againnote that sometimes the shutdown is done for purposes other than downloadingan ID file.
Downloading Notes client software and other entitled softwareYou can easily access the IBM Software Download Center to download IBM Notesand other software to which your company is entitled. Software entitlement isgoverned by the service Terms of Use and applicable License documents.
About this task
You can access the site if you have the Administrator account role. You can use thesite to download software before or after user subscriptions are activated.
To access the Download Center, complete the following steps:1. Log in to the service as an administrator.2. Click Apps > Downloads and Setup.3. In the Software Entitlements section, click View available software to get to
the Download Center.
4. In the Software Downloads page, type the partial or full name of the entitledsoftware in the Find by search text box. Then, click the search icon.
Chapter 6. Onboarding users 201
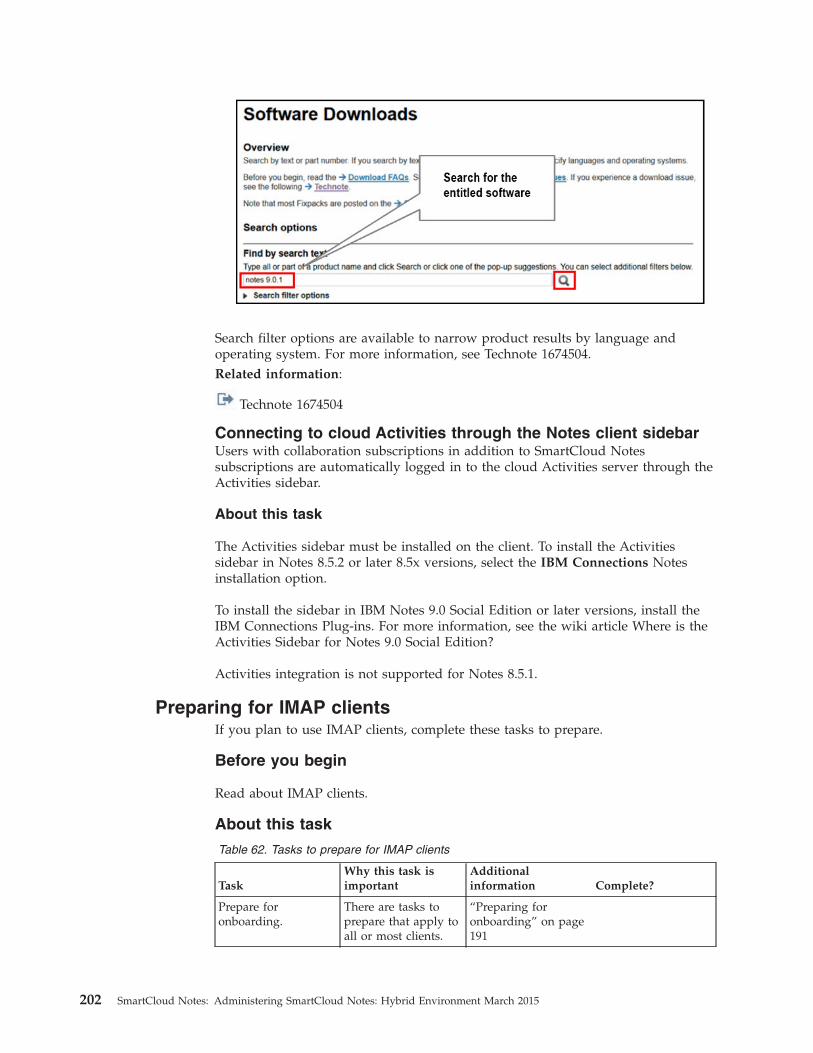
Search filter options are available to narrow product results by language andoperating system. For more information, see Technote 1674504.Related information:
Technote 1674504
Connecting to cloud Activities through the Notes client sidebarUsers with collaboration subscriptions in addition to SmartCloud Notessubscriptions are automatically logged in to the cloud Activities server through theActivities sidebar.
About this task
The Activities sidebar must be installed on the client. To install the Activitiessidebar in Notes 8.5.2 or later 8.5x versions, select the IBM Connections Notesinstallation option.
To install the sidebar in IBM Notes 9.0 Social Edition or later versions, install theIBM Connections Plug-ins. For more information, see the wiki article Where is theActivities Sidebar for Notes 9.0 Social Edition?
Activities integration is not supported for Notes 8.5.1.
Preparing for IMAP clientsIf you plan to use IMAP clients, complete these tasks to prepare.
Before you begin
Read about IMAP clients.
About this task
Table 62. Tasks to prepare for IMAP clients
TaskWhy this task isimportant
Additionalinformation Complete?
Prepare foronboarding.
There are tasks toprepare that apply toall or most clients.
“Preparing foronboarding” on page191
202 SmartCloud Notes: Administering SmartCloud Notes: Hybrid Environment March 2015

Table 62. Tasks to prepare for IMAP clients (continued)
TaskWhy this task isimportant
Additionalinformation Complete?
Verify that users havea supported IMAPclient installed.
Using a supportedclient is requiredbecause it providesthe best experiencefor users.
IMAP clientrequirements
Be aware of theIMAP clientlimitations.
This information canhelp withtroubleshooting.
IMAP clientlimitations
Open the firewallports that arerequired for IMAPaccess.
Ports 993 and 465must be open toallow connections tothe service via IMAP.
“Configuring thefirewall for outboundconnections” on page42
Enable IMAP accessin IBM SmartCloudNotesAdministration.
IMAP access is notenabled by default.
Decide whether toenable IMAP accessfor all users or forspecific users. Toenable IMAP accessfor specific usersrequires time to makenecessary edits to theon-premisesdirectory. For moreinformation, see“Configuring IMAPaccess” on page 178.
Preparing to use BlackBerry devicesIf you plan to use BlackBerry devices that are supported by a Hosted BlackBerryServices subscription, complete these tasks to prepare.
Before you begin
Read about “BlackBerry devices with a Hosted BlackBerry Services subscription”on page 12.
About this task
Table 63. Tasks to prepare for BlackBerry devices
TaskWhy this task isimportant
Additionalinformation Complete?
Prepare foronboarding.
There are tasks toprepare that apply toall or most clients.
“Preparing foronboarding” on page191
Chapter 6. Onboarding users 203
Table 63. Tasks to prepare for BlackBerry devices (continued)
TaskWhy this task isimportant
Additionalinformation Complete?
Verify that thissubscription supportsthe BlackBerrydevices that youwant to use.
The HostedBlackBerry Servicessubscription does notsupport BlackBerry10.
An IBM SmartCloudNotes for HostedBlackBerry Servicessubscription enablesusers to access theservice throughBlackBerry devicesthat run operatingsystem versions 4.0through 7.x. Userswho use BlackBerry10 devices requireSmartCloud Travelerfor Notessubscriptions instead.For more informationabout devicerequirements for eachof thesesubscriptions, see theclient requirements.
Plan for time that isrequired to acceptand process theResearch in Motionterms of useagreement.
This step must becomplete before youcan provision usersand can take three tofour weeks.
After your companypurchases a HostedBlackBerry Servicessubscription, youmust accept theResearch in Motionterms of useagreement. Then,wait for an IBMrepresentative toindicate that yoursubscription setup iscomplete.
204 SmartCloud Notes: Administering SmartCloud Notes: Hybrid Environment March 2015
Table 63. Tasks to prepare for BlackBerry devices (continued)
TaskWhy this task isimportant
Additionalinformation Complete?
Ensure that devicesare set up to use anEnterprise data plan.
An enterprise dataplan is required toactivate theBlackBerry devicesfor the service.
If users currently usepersonal plans suchas BlackBerryInternet Service, theymust convert toenterprise data plans.Allow time for usersto contact the phonecompany to make thechange and to set upthe new plans ontheir devices. Usersshould know thatthey can no longeruse personal accountsin the cloud. Whenusers switch frompersonal plans toenterprise plans, youare likely to seeincreased costs thatare associated withpurchasing the newplans and with datausage.
Be aware of theBlackBerry devicesettings that areenforced in theservice, such aspasswordrequirements.
These settingrequirements mightbe different fromones that arecurrentlyimplemented at yourcompany.
If your currentpolicies are differentfrom the cloudpolicies,communicate thischange to users. Formore information, see“Settings enforced forBlackBerrysmartphones.”
BlackBerry browser isnot supported
You can notify usersif this behavior isdifferent from whatthey are accustomedto.
Access to webapplications in yourcorporate intranet oron the Internetthrough the device isnot supported.
Settings enforced for BlackBerry smartphonesThis topic describes the settings that the service currently enforces for BlackBerry®
smartphones.
Table 64. Settings enforced for BlackBerry smartphones
Policy Value
Allow users to send outbound messagesthrough services other than IBM SmartCloudNotes
No
Chapter 6. Onboarding users 205

Table 64. Settings enforced for BlackBerry smartphones (continued)
Policy Value
The maximum size of a single nativeattachment that can be downloaded to asmartphone
10240 (KB)
The total size of all native attachments thatcan be uploaded from a smartphone
5242880 (Bytes)
The maximum size of a single nativeattachment that can be uploaded from asmartphone
3145728 (Bytes)
Allow users to disable smartphonepasswords
No
Password pattern checks At least 1 alphabetic character and 1numeric character
Number of days after which a smartphonepassword expires and the smartphoneprompts the user to set a new password
90
The number of minutes of inactivity allowedbefore the smartphone is locked and theuser must provide a password to unlock it.
30
Minimum smartphone password length 8 characters
Smartphone password required Yes
The number of previous passwords that areprevented from being used as newpasswords
8
Reset smartphone to factory default settingswhen smartphone is wiped
Yes
Allow users to place calls while thesmartphone is locked
Yes
Preparing communications and trainingPrepare a communications and training plan to help your users, administrators,and help desk personnel make the transition to the service.
About this task
Prepare to communicate to your users the benefits of the service, the changes toexpect, and the steps to take to make the transition. Ensure that your help deskpersonnel are aware of the communications plan and are prepared to help usersfollow instructions that are provided in it. For several client-specific samplecommunications to use as a starting point, see the wiki article Preparingcommunications about the transition to SmartCloud Notes.
Consider use of the following training resources to help users, help desk personnel,and administrators become familiar with the clients and features available with theservice:v Preparing training for IBM SmartCloud Notes wiki articlev Technote 7040248: Comparison tables of features between IBM Notes, IBM
iNotes & IBM SmartCloud Notes webv IBM Multimedia Library for IBM Notes, affordable and proven resource for
Notes client training
206 SmartCloud Notes: Administering SmartCloud Notes: Hybrid Environment March 2015
v Getting started with SmartCloud Notes clients, getting started resources that areprovided through the wiki
Adding multiple Internet email addresses to Persondocuments
You can include multiple Internet email addresses in a Person document.
About this task
Domains specified in the Global Domain document field Alternate Internetdomain aliases are not handled as alias domains by the service. Instead, eachdomain in this field is listed and verified in the service as a separate domain,similar to the domain specified in the Local primary Internet domain field. Toenable a user to receive mail addressed to a domain in the Alternate Internetdomain aliases field, you must specify the user’s address for the domain in thePerson document.
Specify one Internet email address when you register the user. This address isadded to the Internet address field of the Person document in the directory. Afterregistration, add any additional addresses as secondary values in the Shortname/User ID field in the Person document.
You can use the Alternate Internet domain aliases field in a Global Domaindocument to define an Internet domain. If you do, a user can only receive emailaddressed to the domain if the domain address is added to the Person document,either during or after user registration.Related tasks:“Preparing Global Domain documents” on page 49Prepare at least one Global Domain document to define the Internet domains thatyour company owns.
Mail file quotaCurrently a size limit (quota) of 25 GB is enforced on the mail files of users whowere provisioned before November 22, 2014; the mail file size limit of users whoare provisioned after this date is 50 GB. An exception is the mail files ofSmartCloud Notes Entry users, whose mail files have a 1 GB limit.
The sizes of the following mail file elements are factored into the quota calculation:v design elementsv documentsv view indexv Domino Attachment and Object Store (DAOS) elementv white spacev attachments
Full-text index size is not a factor in the quota calculation.
Users do not receive warning notifications if they are approaching their mail quota.However, web client users and Notes client users can see how close they are toquota by clicking the quota status bar that is shown near their name in the mailfile.
Chapter 6. Onboarding users 207

When a user’s mail file quota is reached, the user cannot receive mail and thesender of a message receives a delivery failure notification.
Some clients continue to allow mail to be sent when quota is reached, as describedin the following table. When a user with an over-quota mail file sends a messagethat cannot be delivered, the user does not receive a delivery notification failure.The service retries sending the delivery failure notification for about a day, and ifnot successful, deletes the notification.
Table 65. Send mail behavior when quota is reached
ClientSending mail withoutsaving a copy
Sending mail and saving acopy
Notes Mail is sent. Mail is sent but not saved.
web client Mail is sent. Mail is not sent or saved.
Notes Traveler Not supported. Mail is not sent. Mail staysin the Outbox and the clienttries to resend.
BlackBerry® smartphone Mail is sent. Mail is not sent. Mail staysin the Sent folder and can beresent later.
Mail file delegationUsing delegation preferences, users can allow other users to manage their mail,calendar, contacts, and to do items. Depending on which client is used, there aresome differences in how delegation works with IBM SmartCloud Notes.
Notes client
Delegation works in the following way for users who access their mail using theIBM Notes client:v To set up delegation, users set a Mail > Access & Delegation preference. Once
set, this preference applies to both the Notes client and the web client.v In the Notes client, users can also delegate management of their Calendar,
Contacts, and To Do tasks.v A delegate cannot assign other delegates to a mail file.v In a hybrid environment, delegates must be provisioned for the service to
manage a mail file in the service. After delegates are provisioned, they canmanage mail for both provisioned users with mail files in the service andon-premises users who have mail files on company servers. Users whose mailfiles are on company servers cannot manage a mail file in the service.
If your on-premises environment includes delegates who manage mail for otherusers, consider provisioning the delegates first. After delegates are provisioned,they can manage mail for both provisioned users and for on-premises users whohave mail files on company servers.
Web client
Delegation works in the following way for users who access mail using the webclient:v To set up delegation, users set a Delegation user preference. Once set, this
preference applies to both the Notes client and the web client.
208 SmartCloud Notes: Administering SmartCloud Notes: Hybrid Environment March 2015
v In the web client, users can also delegate management of their Calendar,Contacts, To Do tasks, and Notebook.
v A delegate cannot assign other delegates to a mail file.v In a hybrid environment, delegates who are provisioned for the service can only
manage the mail files of other provisioned users; once provisioned, they cannotmanage an on-premises mail file. Conversely, a person whose mail file is on acompany IBM Domino server cannot manage the mail file of a provisioned user.
Reassigning delegation after a user name change
If a delegate’s Notes user name changes, then the owner of the mail file mustreassign delegation to the new name. Doing so updates the mail file ACL (accesscontrol list) with the new name, which allows the user access to the database.Related tasks:“Changing a Notes user name” on page 255In a hybrid environment, you use the Domino Administrator client on-premises tochange a user's Notes name. The steps initiate a series of administration processrequests.
Transferring mail filesAs a convenience to your users, their current mail files can be transferred to theservice before they are provisioned. Transferring mail files is optional.
Before you begin
Complete the tasks “Deciding whether to transfer mail files” on page 189 and“Choosing a client deployment strategy” on page 187
About this task
Transfer mail files before you provision users. Essentially, the transfer processmoves the current on-premises mail files to new mail servers in the cloud. If youtransfer mail files, users continue to have access to their original mail after they areprovisioned for the service. Users continue to use their existing Notes IDs afterswitching to the service. As a result, they can continue to access private contentsuch as encrypted mail data.
Note: Mail file folders with a type set to private rather than shared (the defaulttype) are not transferred to the service. This limitation applies only to the privatefolders themselves. The messages within the folders are transferred, and they arevisible in the All Documents view in the mail file.
Preparing for mail file transferIf you configure the service as a hybrid environment, as part of onboarding, youhave the option to transfer users’ on-premises mail files to the service. Before youtransfer mail files, complete the tasks to prepare.
Preparing the staging serverTo prepare for mail file transfer, mail files are replicated to an on-premises IBMDomino server, referred to as the staging server. You must perform steps toprepare and set up the staging server.
Chapter 6. Onboarding users 209
Setting up a Domino staging server:
You provide an IBM Domino server on-premises to use as a staging server for themail file transfer.
About this task
To avoid the risk of impacting production systems during user provisioning, use adedicated server that is not used in your production environment. If you choose touse a production server, the following requirements are in addition to anyresources required by production workloads. If you do choose an existing server touse as the staging server, select one that does not have any mail file replicas.
The minimum requirements for the staging server are as follows:v A 32-bit Domino server version 8.5.3 or later on any supported version of
Microsoft Windows.v Dual Core Intel / AMD CPUv 2 GB RAMv Available local storage of up to double the data volume for users that are being
processed at any one time. Space is required for the mail files as well asencrypted copies of the mail files.
For information about installing and setting up Domino servers, see the Dominodocumentation.
Mail files can be transferred via FTP or removable storage. Removable storage canbe a Network Attached Storage (NAS) device or a USB device. Your transfermanager indicates which type is available to you.
Note the following requirements for removable storage:v For NAS transfers, the staging server requires an available Gigabit Ethernet
network port, for optimum performance.v For USB device transfer, see the USB device hardware requirements that are
described in the web page What is Media Data Transfer Service?Related information:
What is Media Data Transfer Service?
Domino documentation
Register a server ID for the staging server:
Register a server ID, and optionally an administrator ID, for the staging server.Give mail servers access to the staging server.
About this task
The staging server requires access to your mail servers. To avoid the need forcross-certification, register the server ID under a certifier that your mail serverstrust.
If access to mail servers in your environment is granted through a server-specificorganizational unit (OU) wildcard, register the staging server under that OU. Then,the staging server has access to the mail servers automatically. For example, if your
210 SmartCloud Notes: Administering SmartCloud Notes: Hybrid Environment March 2015
mail servers are registered under /SERVER/RENOVATIONS and access to them iscontrolled through the wildcard entry */SERVER/RENOVATIONS, you might registerthe staging server ID as SCNSTAGING1/SERVER/RENOVATIONS.
For more information, see the topic on registering a server in the Dominodocumentation.
Procedure
1. Register the server ID with a common name of your choice, for example,SCNSTAGING1.
2. Optional: To use a dedicated ID to administer the staging server rather thanone used in your production environment, register a new ID file within thetrust hierarchy of the staging server ID.
3. Open the Server document of each mail server in the Domino directory inwhich the mail server is registered. Click the Security tab.v Make sure that the Access server field allows the staging server at least
Reader access.v Add the staging server to the Trusted servers field. This access allows the
scheduled agents in the onboarding tools to access the mail servers.4. Delete the Server document for the newly created staging server from the
directory. The new server will be set up in its own domain.Related information:
Domino documentation
Enabling the staging server to receive client configuration status reports:
The transfer manager creates documents in the Domino directory that allow theNotes client configuration tool to mail status messages to the staging server.
About this task
Users run the Notes client configuration tool to configure a Notes client to connectto the service. The tool mails a status message to the staging server. To enablerouting of these messages, the transfer manager completes the following steps.
Procedure
1. Open the Domino Directory of your on-premises mail hub domain.2. Perform the following steps to create a Mail-In Database document:
a. Click Configuration > Messaging > Mail-In Databases and Resources.b. Click Add Mail-In Database.c. In the Mail-in name field, type the required name, LLNStatusUpdates.d. In the Description field, type a description, for example, OTT.e. Leave the Internet Address field blank.f. In the Internet message storage field, select No Preference.g. In the Domain field, type the Domino domain of the staging server, for
example, SCNStaging.h. In the Server field, type the name of the staging server, for example
SCNSTAGING1/SERVER/RENOVATIONS.i. In the File name field, type the file name of your OTT database, for example
ott.nsf.
Chapter 6. Onboarding users 211
j. In the Encrypt incoming mail field, select No.k. Click Save & Close.
3. Click Connections > Add Connection, and create a Connection document toroute mail from this domain to the domain SCNStaging.
Preparing mail file ACLs before mail file transferBefore mail files are replicated to the staging server, prepare the mail file ACLs toset mail file access.
Procedure1. Make sure that the staging server has Author access to each mail file that will
be transferred.Server access to mail files is often controlled through a wildcard ACL entry, forexample, */SERVER/RENOVATIONS, or a group, for example, LocalDomainServers.
2. Make sure that the mail file access is set as you want it to be for use in theservice. For important information about ACL requirements, see “Preparingcustomized mail file ACLs” on page 168.
3. Make sure that each mail file ACL has no more than 74 customer-defined roles.To see the roles in an ACL, click File > Application > Access Control > Roles.
4. Disable the Enforce a consistent ACL across all replicas of this databasesetting in the ACL of each mail file. To do so, you can use the Manage ACLtool available in the Domino Administrator, as described in the following steps.Or you can use a procedure that has been established in your environment.a. From the Domino Administrator, click the Files tab.b. Select multiple mail databases to be provisioned.c. Click Database > Manage ACL.d. In the Manage Multiple ACLs dialog box, click Advanced.e. Select Modify Consistent ACL setting > Do not enforce a consistent ACL.
Preventing local database encryption in new mail file replicasPrevent sending the local database encryption setting to new replicas.
About this task
The transfer manager copies replicas of mail files to the import server in theservice. Use of local database encryption on the staging server replicas preventsthis step. Perform the following steps on each mail file to prevent propagation oflocal database encryption to the replicas on the staging server.
Procedure1. From IBM Notes, click File > Replication > Options for this Application.2. Click Send.3. To disable propagation of database encryption to new replicas, clear the field
Send changes in local security property to other replicas.
Importing IDs into mail filesIf users will not use the IBM Notes client with the service and their Notes ID filesare not embedded in their mail files, you might want to have them import the IDfiles into their mail files before the mail files are transferred to the service.
212 SmartCloud Notes: Administering SmartCloud Notes: Hybrid Environment March 2015
About this task
This step enables user ID files to be uploaded to the ID vault in the service easilyafter user provisioning. Users require an ID in the vault to perform such actions asreading encrypted mail and to enable administrators to change their Notes names.Users might already have ID files that are embedded in their mail files, in whichcase this procedure is not necessary.
Importing the ID file before you transfer mail files is not required. Alternatively,users can import their ID files themselves after they begin to usethe service. Inaddition, administrators can upload user ID files to the service vault after users areprovisioned.
If you want to import ID files before you transfer mail files, tell users to completethe following steps.
Note: Users who use the Notes shared login feature cannot perform this procedurebecause they do not have the required passwords that are associated with their IDfiles.
Procedure1. Log on to IBM iNotes2. Make sure that your ID is not smart card enabled.3. Click Preferences, and then click Security.4. Click Import Notes ID.5. Locate your ID file and type your password as prompted.
ResultsRelated tasks:“Provisioning users and mail files” on page 224If you are transferring user mail files to the service with the assistance of an IBMpartner, after the transfer manager imports a batch of users and mail files into theservice, you can provision the users for IBM SmartCloud Notes.“Uploading a Notes ID to the vault” on page 269In a hybrid environment, if a service user has an IBM Notes ID file, the ID must bestored in the ID vault in the service. In some cases, for users who have a Notes ID,but who will not use the Notes client, you might need to upload the Notes ID tothe vault manually. If it is not stored in the vault, web client, Notes Traveler, andBlackBerry® smartphone users cannot perform secure mail operations. Otherlimitations also apply, as outlined in this topic.
Scanning mail files for virusesBefore you replicate mail files to the staging server, scan them for viruses using avirus program that is compatible with the service. This step is optional but givesyou control over how to handle and communicate any issues with viruses. Theservice also scans for viruses as part of preparing for mail file provisioning.
Transferring mail files with help from an IBM partnerYou can hire a certified IBM partner or IBM Software Services for Collaboration tohelp you transfer IBM Notes mail files to the cloud.
Before you begin
Complete the tasks in the section “Preparing for mail file transfer” on page 209.
Chapter 6. Onboarding users 213
About this task
The person who helps you is known as the transfer manager. A companyadministrator and the transfer manager work together to complete the followingsteps. Contact an IBM representative directly for in-depth information.1. Establish a transfer schedule.2. Prepare for mail file transfer. Preparing includes setting up a IBM Domino
staging server, to which mail files are replicated prior to being transferred tothe cloud.
3. Use the Onboarding Planning Tool (OPT) to do quality checks that validate thaton-premises mail files and Person documents comply with cloud requirements.
4. Replicate mail files to the staging server.5. Create a mail file transfer request. The transfer manager performs this step. The
request specifies a transfer method (NAS/USB or FTP) and downloads anencryption key to the staging server that is used to encrypt the mail files beforetransfer. If FTP is the transfer method, the request also generates and FTP useraccount and password to be used to upload files to the IBM data center.
6. Transfer mail files to a data center. If NAS/USB is the transfer method, ship thefiles to the data center. Otherwise, use an FTP client to upload the files to thedata center.
7. Import the mail files into the service so that they are ready for provisioning.The transfer manager performs the step.
8. Provision users. The company administrator performs this step.Related information:
IBM software services for collaboration
How the transfer manager creates a mail file transfer requestAfter the mail files are replicated to the staging server, the transfer manager createsa Control document to initiate a mail file transfer request.
Before you begin
A Customer Service Representative must create a user account for the transfermanager, and assign the account a role that is required specifically to perform thisprocedure.
About this task
The transfer manager performs the following steps to create a Control document.
Procedure1. In SmartCloud Notes Administration, click User Provisioning with Mail File
Transfer.2. Click New Control Document.3. Enter the required information, including Transfer Method, which is either
NAS (Network Attached Storage) or FTP (File Transport Protocol).4. If you select FTP as the transfer method:
a. In the Transfer Size field, specify the total size of the files to be transferredin this batch.The size must be no greater than the size shown in the FTP Available field,which is the space available for new requests. Do not underestimate the
214 SmartCloud Notes: Administering SmartCloud Notes: Hybrid Environment March 2015
size. It is better to overestimate the size to ensure that there is enough spaceallocated on the server for this request.The FTP Reserved fields shows the space reserved for all active requests.
b. Specify a password for the FTP account.5. Click Submit.6. Click Download Key.
Results
An encryption key is downloaded to the on-premises staging server. If FTP is thetransfer method, an account name is displayed, for example,20103212_0000409801002. An account is created on the FTP server in the serviceand assigned that account name and the specified password.
What to do next
The transfer manager uses the downloaded key to encrypt the mail files on thestaging server.
Transferring mail files to the service data centerAfter the transfer manager creates the mail file transfer request and encrypts themail files, the company administrator transfers the mail files to the service datacenter. The customer uses the transfer method that is specified in the transferrequest.
Transferring mail files using a removable storage device:
If the transfer manager specifies NAS/USB as the transfer method in the transferrequest, a removable storage device is used to transfer the batch of mail files. Thistransfer method is required if the total size of the files being transferred is greaterthan 250 GB. To transfer using this method, the transfer manager copies the mailfiles from the staging server to the removable storage device. The files areencrypted during the process. The company administrator is then responsible forsecurely shipping the device to the designated service data center.
What to do next
After the transfer manager imports the mail files into the service, provision theusers.Related tasks:“Provisioning users and mail files” on page 224If you are transferring user mail files to the service with the assistance of an IBMpartner, after the transfer manager imports a batch of users and mail files into theservice, you can provision the users for IBM SmartCloud Notes.
Uploading mail files to an FTP server:
The transfer manager can specify FTP as the transfer method in the transferrequest. If so, you use an FTP client to upload the mail files to an FTP server in theservice.
Before you begin
Uploading the mail files to the FTP server requires an FTP client. This proceduredescribes how to use FileZilla Client version 3 to upload the files. FileZilla is a free
Chapter 6. Onboarding users 215
FTP client that is subject to the terms and conditions of the GNU General PublicLicense agreement. If you use a different FTP client, it must support implicitSSL/TLS over FTP, passive data transfer, and SSL session reuse.
Make sure that the firewall used by your FTP client computer allows outboundconnections over port 990 and over the port range 60000 - 61000. You can restrictthese firewall rules to the client computer and the FTP server.
The transfer manager must complete the following steps before you upload themail files:v Use an encryption key downloaded from the service to encrypt the mail files.v Give you the host name of the FTP server in the service, and the account name
and password to use to connect to the server.
Note: Your transfer manager might complete these steps for you.
About this task
The FTP server accepts only encrypted connections using implicit SSL/TLS overFTP and it supports only the passive transfer mode. Use of the passive transfermode allows the FTP client to initiate both the control and data connections. TheFTP server does not support active transfer.
Procedure
1. Perform the following steps to create a site entry for the FTP server on FileZillaClient:a. Start FileZilla.b. Click File > Site Manager.c. In the Site Manager window, click New Site and enter a name for the site,
for example, Mail transfer.d. In the General tab of the Site Manager window, complete the fields as
described in the following table.
Field Value
Host Host name of the FTP server that thetransfer manager gave you
Port Blank
Protocol FTP - File Transfer Protocol
Encryption Require implicit FTP over TLS
Login Type Normal
User FTP server account name that your transfermanager gave you, for example,20103212_00004098010002
Password Account password that your transfermanager gave you
e. In the Transfer Settings tab of the Site Manager window, select Passive asthe Transfer mode.
f. Click OK.2. Performs the following steps to upload the encrypted batch of mail files to the
FTP server:a. From FileZilla, click File > Site Manager.
216 SmartCloud Notes: Administering SmartCloud Notes: Hybrid Environment March 2015

b. Select the site you created.c. Click Connect.
If you see errors indicating that the login is incorrect and that the clientcannot connect to the server, ask your transfer manager to reset the FTPpassword for your account. After you receive the new password from themigration manager, in the site entry you created, replace the originalpassword with the new password. Then try uploading the batch of mailfiles again.
d. In the "Unknown certificate" window, examine the certificate that is shown.If you trust that the certificate is valid, select Always trust certificate infuture sessions, and click OK. If you select this option, in the future you donot see the "Unknown certificate" window when connecting to the server.
e. In the Local site panel, go to the folder on the staging server in which theencrypted mail files are stored.
f. Select the files that you want to upload and then drag or copy them to theRemote site panel. The files can be placed only in the top-level directory.Space in this directory is allocated specifically for your company.
g. In the bottom of the FileZilla window, click Successful Transfers andconfirm that the transfer was successful.
h. To disconnect from the FTP server, at the top of the FileZilla window, clickServer > Disconnect.
Note: If there is a period of inactivity after connecting FileZilla to the FTPserver, FileZilla is disconnected. In this case, you might see the error messagesA record packet with illegal version was received and Disconnected fromserver: Connection aborted. These messages do not indicate a problem. Usethe Site Manager menu option again to reconnect to the server.
Results
The following steps occur to establish the connection between FTP client andserver:1. The client initiates a connection to the FTP server over port 990.2. The server validates the client credentials.3. The client switches to passive mode (PASV).4. The server selects a port in the 60000 - 61000 range and returns the port to the
client to use for secure data transfer.5. The client initiates a second secure connection to the port returned by the
server.
The following sample output provides an example of messages seen on the FTPclient when connecting to the FTP server. You might see different outputdepending on the FTP client you use. See the table that follows the sample outputfor an explanation of the more important messages.Status: Resolving address of ftp.notes.na.collabserv.comStatus: Connecting to 74.220.123.77:990... (See table)Status: Connection established, initializing TLS...Status: Verifying certificate...Status: TLS/SSL connection established, waiting for welcome message...Response: 220 LotusLive FTP upload serverCommand: USER 20745886_0054824112001Response: 331 Please specify the password.Command: PASS ********Response: 230 Login successful.
Chapter 6. Onboarding users 217

Command: SYSTResponse: 215 UNIX Type: L8Command: OPTS UTF8 ONResponse: 200 Always in UTF8 mode.Command: PBSZ 0Response: 200 PBSZ set to 0.Command: PROT PResponse: 200 PROT now Private.Status: ConnectedStatus: Retrieving directory listing...Command: PWDResponse: 257 "/"Command: TYPE IResponse: 200 Switching to Binary mode.Command: PASV (See table)Response: 227 Entering Passive Mode (74,220,123,77,235,42).(See table)Command: LIST (See table)Response: 150 Here comes the directory listing.Response: 226 Directory send OK.Status: Directory listing successful
Table 66. Explanation of important messages in the example FTP connection output
Message Explanation
Status: Connecting to74.220.123.77:990...
The initial connection using port 990 isestablished.
If you see an error here, verify that port 990is open on the firewall for outboundconnections.
Command: PASV Client switches to passive mode to preparethe data channel.
Response: 227 Entering Passive Mode(74,220,123,77,235,42).
Server returns the IP address for the FTPserver (74.220.123.77) and the port(235*256+42=60202)
Command: LIST The directory listing is initiated.
If you see an error here, verify that portrange 60000 - 61000 is open on the firewallfor outbound connections.
What to do next
The transfer manager must click Upload Complete in the Control documentassociated with this transfer.
After the transfer manager imports the mail files into the service, provision theusers.Related tasks:“Provisioning users and mail files” on page 224If you are transferring user mail files to the service with the assistance of an IBMpartner, after the transfer manager imports a batch of users and mail files into theservice, you can provision the users for IBM SmartCloud Notes.
Provisioning usersProvisioning users adds IBM SmartCloud Notes subscriptions to user accounts inthe service. After users are provisioned, they can begin to access their mail in thecloud.
218 SmartCloud Notes: Administering SmartCloud Notes: Hybrid Environment March 2015
Before you begin
Before you provision users, Prepare for onboarding. Optionally, transfer mail files.
Provisioning users without transferring mail filesThis procedure adds an IBM SmartCloud Notes subscription to a user account andcreates a new mail file for the user on a mail server in the cloud. You can also addoptional subscriptions purchased by your company.
Before you begin
Prepare for onboarding to ensure that all required preparation is complete. If youare provisioning a new user at your company, make sure that you first register theuser on-premises.
Your company might purchase a bundled subscription that allows you to enableservices independently. For example, you might be able to enable Connections andMeetings services for users before you enable the IBM SmartCloud Notes (Email)service. To enable other services separately, create the user accounts through theIBM Connections Cloud User Accounts page. When you complete the procedure inthis topic, all bundled services are enabled.
About this task
If your on-premises environment includes delegates who manage mail for otherusers, consider provisioning the delegates first. After delegates are provisioned,they can manage mail for both service users and on-premises users whose mailfiles are still on company servers. Users whose mail files are on company serverscannot manage the mail of a service user.
The first step in provisioning users is searching the service directory for the namesof the users that you want to provision. To provision users, you select their namesfrom the search results. If you are provisioning many users, it is likely that youwill repeat this search-then-provision step.
As an alternative to this procedure, you can use the Connections Cloud integrationserver to provision many users at once.
Note: If you are transferring mail files to the service during user provisioning, donot perform this procedure. Instead, refer to the procedure “Provisioning users andmail files” on page 224.
Procedure1. Log on to the service as an administrator.2. If your account also has the User role, click Admin > Manage Organization.3. In the System Settings section of the navigation pane, click IBM SmartCloud
Notes.4. In the Provisioning section of the SmartCloud Notes Administration window,
click User Provisioning.
Note: Do not click User Provisioning with Mail File Transfer.5. Display the names of the users to provision. In the Search box, type the
beginning characters of any of the following user values:v Distinguished name, for example, Samantha Daryn/Renovations.
Chapter 6. Onboarding users 219
v Internet email address, for example, [email protected] Last name, for example, Daryn.
Note: You cannot use the wildcard character (*) when you search.A “starts with” search is done and the names of any users with matchingvalues in the directory are displayed. For example, the results of a search onma include the names of users with the following values in the directory:v Madison Armond/Renovations
v masmith@renovations
v Kristin MacGyver
This search does not match the following values:v Emarie Klein/Renovations
v tamado@renovations
v Ted Amado
Search results can include a maximum of 1000 names.6. Select one user or multiple users to whom you want to assign the same
subscription settings. Optionally, search again and select additional names.The previously selected names remain selected.
7. Click Provision Selected.8. In the Provisioning Options window, select subscriptions for the user. You
must select a SmartCloud Notes subscription. Other optional subscriptionsmay be available. When you are done, click Next.
Table 67. Subscription fields
Subscription field Description
Mail Select a SmartCloud Notes subscription.Alternatively, select a bundled subscription,if available.
Collaboration If available, optionally select a collaborationsubscription . Alternatively, select a bundledsubscription, if available.
Bundled If available, select a bundled subscriptionthat includes both a SmartCloud Notessubscription and a collaborationsubscription.
Other If available, optionally select add-onsubscriptions.
9. Select an optional extension forms file for the web client and a mail templatefor the IBM Notes client:a. Optional: If an extension forms file is available for your company, you see
the Select Extension Forms File option. To apply an extension forms file toweb clients, select a forms file.An extension forms files provides a customized experience for the webclient. Extension form files are available only if your company implementsthem.
b. In the Select Mail Template section, the default mail template is selected.If you want to apply a different template to the user mail files, click Selectnext to the template name.
220 SmartCloud Notes: Administering SmartCloud Notes: Hybrid Environment March 2015
v If the Notes client is used, select a template version that is compatiblewith the Notes client version that is used. Click Next to scroll throughthe list of available templates until you find the correct one.
v If the Notes client is not used, select the latest template version in thelanguage that you want to use.
v To see only custom mail templates developed for your company, clickHide Standard Mail Templates. If you select a custom mail filetemplate, after provisioning is complete, the design of the Inbox folder isapplied to any custom mail folders created by your company.
c. Click Next.10. In the Provide an initial password section, provide a temporary password
that complies with the requirements that are shown.Users provide this password when they log in to the service for the first timewith a web browser. After logging in, they are prompted to create newpasswords. This password is a different password than the one associatedwith a Notes client ID file or any on-premises HTTP password.If users you are provisioning already use the service through anothersubscription, they continue to use their current passwords, and do not use thispassword.If your company uses federated identity management, users do not providethis password. Instead, they use the Use My Organization's Login page toprovide a password that allows them to authenticate using a companysecurity application.
11. Click Next and review your selections. Note the password that is shown in theInitial Password field because you must provide it to each user who is new tothe service.
12. Click Confirm to open the User Provisioning Requests page. Review the list ofusers again, and when you are ready to provision them, click RequestProvisioning.v As users are added to the provisioning queue, the User Provisioning
Requests page removes their names from the list.v The page shows the percentage of requests that are complete because they
are added to the provisioning queue and the number that remain to beprocessed.
v The names of any users who cannot be added to the provisioning queue arelisted with error messages. Resolve errors and repeat the steps to provisionthe users. Missing user Internet addresses and directory synchronizationproblems are examples of errors that can prevent a user from being addedto the provisioning queue.
To cancel provisioning of any users that are not yet processed, click Cancel.13. When the provisioning request is complete, click Return to User Provisioning.
What to do next
After users are successfully added to the provisioning queue, check userprovisioning status to determine when provisioning is complete or if anyprovisioning errors occur.
When users are listed in the Provisioning Status page as Done and in the Pendingstate, help users get started with the service.Related tasks:
Chapter 6. Onboarding users 221
“Checking user provisioning status” on page 229After you provision users, check the status of their IBM SmartCloud Notessubscriptions.“Helping users get started” on page 230After user provisioning is complete, help users get started with their mail in thecloud.Related information:
Integration server and subscription provisioning for Smartcloud Notes hybridusers
Registering a new user on-premisesTo provision a user in a hybrid environment, the user must be registered in anon-premises IBM Domino directory. If a user you are provisioning is new at yourcompany, perform this procedure to register the user on-premises.
Before you begin
You can apply a policy to the user so that the policy is in effect when the user isprovisioned for IBM SmartCloud Notes. To do so, create an explicit policy beforeyou continue. Then, select the policy during this procedure. If you do not apply apolicy during user registration, you can apply it later. For more information, see“Using administrative policies” on page 105.
The Domino directory in which you register the user must be configured as asynchronized directory that is used for user provisioning. For more information,see “Configuring directory synchronization” on page 89.
Procedure1. From an on-premises Domino Administrator client, open a server that is in the
Domino domain in which you want to register the user.2. Click the tab People & Groups.3. Click Tools and click People > Register.4. Use any of the following methods to specify the certifier to use to certify the
new user ID.v If you are prompted to provide a password for the certifier that you want
to use, enter the password. Otherwise, click Cancel.v Click Certifier ID, select the certifier ID, and click OK.v Click Use the CA Process and select the certifier.
Note: There must be a trust relationship between this certifier and the OUcertifier you uploaded to the service to certify your mail servers. For example,if your mail server OU certifier is /SCN/Renovations, there is an automatictrust relationship if the user ID certifier is /Renovations. However, if the userID certifier is /Zetabank, you must create cross-certificates to establish trust.
5. Complete the following fields in the Basics tab of the Register Person window.
Field Value
Registration Server The name of the server to use to registerthe user. The domain Domino directory forthis server must be configured as asynchronized directory that is used for userprovisioning.
222 SmartCloud Notes: Administering SmartCloud Notes: Hybrid Environment March 2015

Field Value
First name, Middle name, Last name The user's name.
If you plan to use the integration server toprovision users, a first name and a lastname are required. Otherwise, only a lastname is required.
If you specify a last name only, after theuser is provisioned, the one name isdisplayed in the SmartCloud Notesdirectory and in the mail file. However, inConnections Cloud account settings anduser accounts, the name is also the firstname. For example, if you register a userwith the last name HelpDesk, when you logon to the service as an administrator andclick User Accounts, the name is shown asHelpDesk HelpDesk.
Short name A short version of the name that isgenerated automatically. You can changethe default value.
You cannot enter an email address here.
Password A password for the Notes ID.
Password Options v Password Quality Scale
v Encryption Strength
v Set internet password (optional). Theservice does not use the Internetpassword. However, it might be requiredfor access to on-premises webapplications.
Mail system IBM Notes
Select this option regardless of the type ofclient you plan to use with the service.
Explicit policy (Optional) Select an explicit policy to applyto the user. Organizational policies are notsupported.
Enable roaming for this person Do not select this option. Roaming is notsupported.
Create a Notes ID for this person Select.
6. Select the Advanced box in the Register Person window.7. Click Mail and complete the fields that are displayed to create a required,
temporary on-premises mail file. When the user is provisioned for the service,a new mail file is created in the service. Make a note of the location of thetemporary mail file; after user provisioning is complete you can delete it.
8. Click Address and complete the fields that are described in the followingtable.
Field Value to specify
Internet address The user's Internet mail address, forexample, [email protected].
Chapter 6. Onboarding users 223
Field Value to specify
Internet domain The domain portion of the user's Internetaddress, for example, renovations.com. Thedomain must be one that is verified by theservice.
Address name format; Separator Select options to determine the format of theInternet address.
9. Click ID info and complete the fields that are described in the following table.
Field Value to specify
Create a Notes ID for this person Select this option.
Certifier ID Confirm the certifier to use to create the ID.There must be a trust relationship betweenthis certifier and the certifier you providedto certify your mail servers in the service.
Public key specification Select one of the listed specifications.
License type Select North American or International.The license type determines the type of IDfile that is created. It affects encryption ofsent and received mail and of data. NorthAmerican is the stronger type.
Location for storing user ID Select any of the following options:
v In Domino directory to store the ID fileas an attachment in the Persondocument.
v In file to store the ID in a file that youprovide to the user.
v In Notes ID vault to store in anon-premises ID vault. This option isuseful only to retrieve the ID duringinitial setup of a Notes clienton-premises. After the client connects tothe service, the ID is uploaded to the IDvault in the service. Then, theon-premises ID vault is no longer used.
10. Optional: Click Groups and assign the user to groups in the Dominodirectory.
11. Click the green check mark to add the user to the registration queue.12. Select the Registration Queue and click Register.
Results
A Person document for the user is added to the Domino directory of theregistration server. After the Person document replicates to the service duringdirectory synchronization, a company administrator can provision the user fromthe User Provisioning window of SmartCloud Notes Administration. To provisionthe user, the administrator first searches for the user name.
Provisioning users and mail filesIf you are transferring user mail files to the service with the assistance of an IBMpartner, after the transfer manager imports a batch of users and mail files into theservice, you can provision the users for IBM SmartCloud Notes.
224 SmartCloud Notes: Administering SmartCloud Notes: Hybrid Environment March 2015
Before you begin
Prepare for onboarding and transfer mail files.
Your company might purchase a bundled subscription that allows you to enableservices independently. For example, you might be able to enable Connections andMeetings services for users before you enable the IBM SmartCloud Notes (Email)service. To enable other services separately, create the user accounts through theIBM Connections Cloud User Accounts page. When you complete the procedure inthis topic, all bundled services are enabled.
About this task
As an alternative to this procedure, you can use the Connections Cloud integrationserver to provision many users at once.
You must provision users within 60 days from the time their status shows Readyto Provision. After 60 days the status changes to Cancelled and the users and theirmail files must be transferred to the service again in a new batch.
If your on-premises environment includes delegates who manage mail for otherusers, consider provisioning the delegates first. After delegates are provisioned,they can manage mail for both service users and on-premises users whose mailfiles are still on company servers. Users whose mail files are on company serverscannot manage the mail of a service user.
After provisioning is complete, the design of the Inbox folder is applied to custommail file folders. Custom folders are user-created folders or company-createdfolders from a custom template that is used in the service.
The mail template specified during user provisioning controls the design of themail file in the service.
Tip: After you provision users who will use only the web client and whose IBMNotes ID files were attached to the transferred mail files, tell the users to sign orencrypt a mail message after logging on to the service for the first time. That steptriggers the upload of their ID files to the ID vault in the service. When doing so,they may need to provide the Notes ID password. After the ID is uploaded to theID vault, they are no longer prompted for that password when signing orencrypting mail.
Perform the following steps to provision users and mail files:
Procedure1. Log on to the service as an administrator.2. If your account also has the User role, click Admin > Manage Organization.3. In the System Settings section of the navigation pane, click IBM SmartCloud
Notes.4. Click User Provisioning with Mail File Transfer.
A Control Document created by the transfer manager, who has the DataTransfer Manager role, is shown for each batch of users. Each ControlDocument shows the status for that batch of users. When all provisioning ofusers in a batch is either completed or cancelled, the Control Document showsthe status Complete.
Chapter 6. Onboarding users 225

5. When any Control document shows the status Ready, click the Users tab tosee a list of user names that are ready to be provisioned.
Note: Each user's Internet mail address is shown. If a user is new to IBMConnections Cloud, the address is also the identity used to log in to theservice from a browser at http://www.ibmcloud.com/social. If a user alreadyhas another Connections Cloud subscription, the log in identity is the currentvalue of the Email field in the Account Login tab of the Connections Clouduser account.
6. Select one or more users whose status shows Ready to Provision
Note: If a user status shows Error, work with your transfer manager toresolve the problem, and then wait for the status to change to Ready toProvision.
7. Optional: Click Provisioning Estimate to see an estimate of the time it willtake to provision the selected users. The estimate is based on the size of themail files in this request and on the number of requests in the queue.
8. Click Provision Selected.9. In the Provisioning Options window, select subscriptions for the user. You
must select a SmartCloud Notes subscription. Other optional subscriptionsmay be available. When you are done, click Next.
Table 68. Subscription fields
Subscription field Description
Mail Select a SmartCloud Notes subscription.Alternatively, select a bundled subscription,if available.
Collaboration If available, optionally select a collaborationsubscription . Alternatively, select a bundledsubscription, if available.
Bundled If available, select a bundled subscriptionthat includes both a SmartCloud Notessubscription and a collaborationsubscription.
Other If available, optionally select add-onsubscriptions.
10. Select an optional extension forms file for the web client and a mail templatefor the IBM Notes client:a. Optional: If an extension forms file is available for your company, you see
the Select Extension Forms File option. To apply an extension forms file toweb clients, select a forms file.An extension forms files provides a customized experience for the webclient. Extension form files are available only if your company implementsthem.
b. In the Select Mail Template section, the default mail template is selected.If you want to apply a different template to the user mail files, click Selectnext to the template name.v If the Notes client is used, select a template version that is compatible
with the Notes client version that is used. Click Next to scroll throughthe list of available templates until you find the correct one.
v If the Notes client is not used, select the latest template version in thelanguage that you want to use.
226 SmartCloud Notes: Administering SmartCloud Notes: Hybrid Environment March 2015
v To see only custom mail templates developed for your company, clickHide Standard Mail Templates. If you select a custom mail filetemplate, after provisioning is complete, the design of the Inbox folder isapplied to any custom mail folders created by your company.
c. Click Next.11. In the Provide an initial password section, provide a temporary password
that complies with the requirements that are shown.Users provide this password when they log in to the service for the first timewith a web browser. After logging in, they are prompted to create newpasswords. This password is a different password than the one associatedwith a Notes client ID file or any on-premises HTTP password.If users you are provisioning already use the service through anothersubscription, they continue to use their current passwords, and do not use thispassword.If your company uses federated identity management, users do not providethis password. Instead, they use the Use My Organization's Login page toprovide a password that allows them to authenticate using a company securityapplication.
12. Click Next and review your selections. Note the password that is shown inthe Initial Password field because you must provide it to each user who isnew to the service.
13. Click Confirm to open the User Provisioning Requests page. Review the list ofusers again, and when you are ready to provision them, click RequestProvisioning.v As users are added to the provisioning queue, the User Provisioning
Requests page removes their names from the list.v The page shows the percentage of requests that are complete because they
are added to the provisioning queue and the number that remain to beprocessed.
v The names of any users who cannot be added to the provisioning queue arelisted with error messages. Resolve errors and repeat the steps to provisionthe users. Missing user Internet addresses and directory synchronizationproblems are examples of errors that can prevent a user from being addedto the provisioning queue.
To cancel provisioning of any users that are not yet processed, click Cancel.
Results
User provisioning with mail file transfer creates replicas of user mail files on themail servers in the service. At the next directory synchronization with on-premisesservers after user provisioning is complete, the Person documents in theon-premises Domino directory are updated to show the new mail server namesand mail file path.
When the staging server application detects the name of the new SmartCloudNotes mail server in the Person document, it deposits a welcome email in a user'soriginal, on-premises mail file. You can customize the content of this notification.The notification should include suitable links for your users to use to log on to theservice for the first time. For example, you might include http://www.ibmcloud.com/social or a link to a logon page used by your company.
Chapter 6. Onboarding users 227
A user can run the Notes client configuration tool to configure a Notes client toconnect to the service. In this case, the tool initiates a final replication between theon-premises mail file replica and the replica in the service after client configurationis complete.
If a user does not use the Notes client, the staging server application initiates thefinal replication when it detects the name of the new SmartCloud Notes mailserver in the Person document.
What to do next
After users are successfully added to the provisioning queue:v Track the status of mail file provisioning by returning to the Users tab in the
Control Document and refreshing the page or using the Status field filter.v Check user provisioning status to determine when provisioning is complete or if
any provisioning errors occur.Related concepts:“Mail file delegation” on page 208Using delegation preferences, users can allow other users to manage their mail,calendar, contacts, and to do items. Depending on which client is used, there aresome differences in how delegation works with IBM SmartCloud Notes.Related tasks:“Managing IBM Notes Traveler devices” on page 272For each user with an IBM Notes Traveler subscription, you can view informationabout the user's mobile device. You can also wipe the device to remove sensitivedata from it, for example, if the device is lost or stolen.“Managing BlackBerry smartphones” on page 274After activating a user’s BlackBerry® smartphone, perform any of the followingtasks to manage it.“Checking user provisioning status” on page 229After you provision users, check the status of their IBM SmartCloud Notessubscriptions.Related information:
Using Connections Archive Essentials
Integration server
Deleting on-premises mail filesAfter users have set up clients to complete the provisioning process, the stagingserver application creates Administration Process requests to delete on-premisesmail files.
About this task
The requests, called "Approve File Deletion," are put in the Pending AdministratorApproval view in your on-premises Administration Requests database where theyawait your approval. Do not approve a deletion request immediately. Instead, waitat least a few days to ensure that the user provisioning is complete beforeapproving the deletion.
Decommissioning on-premises mail serversOnce an on-premises IBM Domino mail server is no longer providing mail serviceto users, you can decommission the server using your standard processes.
228 SmartCloud Notes: Administering SmartCloud Notes: Hybrid Environment March 2015
Checking user provisioning statusAfter you provision users, check the status of their IBM SmartCloud Notessubscriptions.
Before you begin
Complete one of the following procedures:v “Provisioning users without transferring mail files” on page 219v “Provisioning users and mail files” on page 224
Procedure1. Log on to the service as an administrator.2. If your account also has the User role, click Admin > Manage Organization.3. In the System Settings section of the navigation pane, click IBM SmartCloud
Notes.4. In the Provisioning section of the SmartCloud Notes Administration window,
click Provisioning Status.5. Display the names of the users whose status you want to check. In the Search
box, type the beginning characters of any of the following user values:v Distinguished name, for example, Samantha Daryn/Renovations.v Internet email address, for example, [email protected] Last name, for example, Daryn.
Note: You cannot use the wildcard character (*) when you search.A “starts with” search is done and the names of any users with matchingvalues in the directory are displayed. For example, the results of a search on mainclude the names of users with the following values in the directory:v Madison Armond/Renovations
v masmith@renovations
v Kristin MacGyver
This search does not match the following values:v Emarie Klein/Renovations
v tamado@renovations
v Ted Amado
Search results can include a maximum of 1000 names.6. In the Status field, select one of the following options:
Chapter 6. Onboarding users 229
Option Description
In Progress Show all users in the search results who arein the process of being provisioned. Theservice is setting up mail files and doingother steps to prepare user accounts. Usersthat are shown in this view cannot use theSmartCloud Notes service yet.Note: It is possible for user accounts to bein a Held state. This state can be seen onlyin IBM Connections Cloud user accounts byclicking Home and then User Accounts. TheHeld state indicates that service isperforming routine checks. It does notindicate that there is a problem. Do notdelete and then re-add the account.Resolution often takes a few hours or less;however, on some occasions it can take afew days. If you are concerned that the Heldstate is not changing, contact customersupport.
Done Show all users in the search results who aresuccessfully provisioned. The service hasfinished preparing the mail files andaccounts of these users, and the users canuse the service.
One of the following states is shown foreach user:
v Pending: This state indicates that a userhas not yet logged in to the SmartCloudNotes service and accepted the terms ofuse.
v Active: this state indicates that a user haslogged in to the service and accepted theterms of use.
Error Show all users in the search results whocannot be provisioned because of an error. Ifyou see a user in this state, contact supportto help you resolve the error.
What to do next
When users are listed in the Provisioning Status page as Done and in the Pendingstate, help users get started with the service.Related tasks:“Helping users get started”After user provisioning is complete, help users get started with their mail in thecloud.
Helping users get startedAfter user provisioning is complete, help users get started with their mail in thecloud.
230 SmartCloud Notes: Administering SmartCloud Notes: Hybrid Environment March 2015

Before you begin
Check user provisioning status; users in the Pending state are ready to begin touse the service.
Providing account information to usersAfter you add a IBM SmartCloud Notes subscription to user account, provide theuser with the information that is required to log in to the service.
Before you begin
Complete the procedure “Checking user provisioning status” on page 229 andverify that users are listed in the provisioning status page as Done and in thePending state.
About this task
Users must log in to the service from a browser within 30 days after beingassigned a SmartCloud Notes subscription. After logging in, users can begin to usethe web client immediately.
Users who want to use the IBM Notes client must download and run theSmartCloud Notes client configuration tool to connect the client to the mail serverin the service. This tool is available within the service after logging in from abrowser. A version of the Notes client that is supported by the service must beinstalled and set up. The Notes client is available for download from the IBMNotes product page. A SmartCloud Notes subscription includes a license for theclient.
Note: If a user sees the error ID in vault has expired download time whenattempting to connect to the service for the first time from a Notes client, reset theNotes ID password and instruct users to log in again with the new password.
Users whose on-premises mail files are transferred to the service receive a welcomeemail in their original, on-premises mail file. The welcome email contains contentthat is customized for your company.
Procedure1. Provide the following information to each user:
v The login URL – http://www.ibmcloud.com/social.v The web login name – The value of the Email field in the Account Login tab
of the user's Connections Cloud user account. To see user accounts, log in tothe service as an administrator, click Administration > ManageOrganization, and click User Accounts.
v The temporary password -- The first time users log on, they use a temporarypassword that is created for them at the time their account is created. Theyare asked to change this password the first time they log on.
2. If you use a hybrid environment, you may also need to provide the Notes IDfile to a user who is using the Notes client for the first time.
Chapter 6. Onboarding users 231

Results
When users log in from the browser, they are presented with the Account Updatesform. They must click Submit to complete the user registration and activate theiraccount.
What to do next
Help users get started with the clients they will use in the cloud.Related tasks:“Getting started with the web client”Complete the following tasks to help users get started with the web client.“Getting started with the Notes Traveler devices” on page 233Complete the following tasks to help users get started in the cloud with IBM NotesTraveler devices.“Getting started with the Notes client” on page 237If the IBM Notes client is used with the service, complete the following tasks tohelp users get started.“Getting started with IMAP clients” on page 237If IMAP clients are used, complete the following tasks to help users get startedwith them.
Getting started with the web clientComplete the following tasks to help users get started with the web client.
Before you begin
Complete the procedures “Providing account information to users” on page 231and “Preparing for the web client” on page 193.
About this task
Table 69. Getting started with the web client
TaskWhy this task isimportant
Additionalinformation Complete?
Point users to theweb clientdocumentation.
Users can refer to thedocumentation asthey begin using theclient.
SmartCloud Notesweb documentation
Prepare totroubleshoot anylogin problems.
If any user hastrouble logging in tothe service, you canquickly resolve theproblem.
See Technote 1496881:SmartCloud Notesuser cannot log on
232 SmartCloud Notes: Administering SmartCloud Notes: Hybrid Environment March 2015
Table 69. Getting started with the web client (continued)
TaskWhy this task isimportant
Additionalinformation Complete?
(Optional) If instantmessaging is enabledfor your company,make sure that usersalso enable it inclient preferences.
Instant messagingmust be enabled inclient preferences andin SmartCloud NotesAdministration.
To enable instantmessaging in the webclient, users clickMore > Preferences> Instant Messagingand select Enableinstant messaging.
For information onconfiguring instantmessaging inSmartCloud NotesAdministration, see“Configuring instantmessaging” on page171.
(Optional) In hybridenvironments, installand configure theIBM Notes BrowserPlug-in
The plug-in allowsweb client users toaccess Notesapplications onon-premises Dominoservers.
v Notes BrowserPlug-inrequirements
v Notes BrowserPlug-indocumentation forthe service
Getting started with the Notes Traveler devicesComplete the following tasks to help users get started in the cloud with IBM NotesTraveler devices.
Before you begin
Complete the procedures “Providing account information to users” on page 231and “Preparing for Notes Traveler devices” on page 195.
About this task
Table 70. Getting started with Notes Traveler devices
TaskWhy this task isimportant
Additionalinformation Complete?
If you did not addthe Notes Traveleradd-on subscriptionduring userprovisioning, add itnow.
This subscriptionmust be added forusers to access theirmail in the cloudthrough mobiledevices that aresupported by theNotes Travelerservice.
“Adding a NotesTraveler subscriptionto a user account” onpage 234
Chapter 6. Onboarding users 233
Table 70. Getting started with Notes Traveler devices (continued)
TaskWhy this task isimportant
Additionalinformation Complete?
Uninstall anyprevious NotesTraveler accountsfrom devices.
This step preventsdevices fromattempting tocontinue to get mailfrom an on-premisesserver.
Remove useraccounts from anyon-premises NotesTraveler servers.
This step preventsthe on-premisesservers fromattempting to connectto mail files in theservice to which theyno longer haveaccess.
“Removing useraccounts fromon-premises NotesTraveler servers” onpage 235
Point users to theNotes Travelerdocumentation.
The documentationdescribes how to getstarted with each ofthe supporteddevices.
Notes Travelerdocumentation
(Optional) On theApple iPhone,recommend thatusers enable the AskBefore Deletingsetting.
This setting helpsprevent users fromdeleting messages bymistake.
On the phone, selectSettings > Mail,Contacts, Calendars> Ask BeforeDeleting
Prepare totroubleshoot.
You can quicklyresolve anyproblems.
Refer to thefollowing section ofthe Notes Travelerdocumentation:Troubleshooting,known limitations,and restrictions
Related tasks:“Managing IBM Notes Traveler devices” on page 272For each user with an IBM Notes Traveler subscription, you can view informationabout the user's mobile device. You can also wipe the device to remove sensitivedata from it, for example, if the device is lost or stolen.
Adding a Notes Traveler subscription to a user accountTo enable a user to connect to the service through a mobile device supported byIBM Notes Traveler, add the subscription to the user’s account.
About this task
The following steps describe how to add a subscription to the account of a userwho already has a Notes Traveler subscription. You can also add the subscriptionwhen you first add the user account. For information about adding user accounts,see the topic Administering user accounts.
234 SmartCloud Notes: Administering SmartCloud Notes: Hybrid Environment March 2015
Procedure1. Log on to the service as an administrator.2. If your account also has the User role, click Admin > Manage Organization.3. In the navigation pane, click User Accounts.4. Click the arrow next to a user's name and select Edit User Account.5. Click Next.6. In the Subscription Add-ons section, select the Notes Traveler subscription.7. Click Save.
What to do next
The user can now set up the mobile device to connect to the service. Forinformation, see theNotes Traveler documentation.
After the user sets up the device to connect to the service, if you use a hybridenvironment, remove the user’s account from any on-premises Notes Travelerservers.Related tasks:Chapter 7, “Administering user accounts,” on page 243Though IBM is responsible for the administration and maintenance of the mailservers, there are tasks that you perform through an administration interface athttp://www.ibmcloud.com/social.Related information:
Notes Traveler
Removing user accounts from on-premises Notes TravelerserversAfter a user sets up a device to connect to the service, if you use a hybridenvironment, remove all accounts the user has on on-premises IBM Notes Travelerservers.
About this task
To remove users’ on-premises Notes Traveler accounts, deny users access to theon-premises Notes Traveler server as described in the topic "“Restricting accessusing server document access fields”." Then delete the users from the NotesTraveler server.
In addition, remove any previous on-premises Notes Traveler client software oraccount from mobile devices.
Restricting access using server document access fields:
Deny service users access to on-premises IBM Notes Traveler servers.
Procedure
1. From the Domino Administrator client, select the IBM Notes Traveler Serverdocument.
2. Click Edit Server.3. Click the IBM Notes Traveler tab.4. Populate either the Access Server or Not Access Server field with the names of
users and groups.
Chapter 6. Onboarding users 235
Users defined as Domino 'Full Access Administrators' have access regardless ofhow the Not Access Server or Access Server fields are configured. Usersdenied access to Domino through the Domino Not Access Server or AccessServer fields under the Security tab of the server document cannot access NotesTraveler.
Table 71. Server access fields
Field Description
Access Server Select the option users listed in all trusteddirectories to allow access to Notes Traveleronly to people that have person documentsin either the primary directory of this serveror any secondary directories that trustedcredentials using Domino directoryassistance.
You can also select individual names ofusers and groups to allow access to thisNotes Traveler server. A blank entry meansthat all users can access Notes Travelerexcept any who are listed in the Not AccessServer field.
Not Access Server Select the names of users and groups thatshould be denied access to this NotesTraveler server. A blank entry means that nousers are denied access.Note: Entering names in the Access Serverfield automatically denies access to thosenames not listed.
5. Click Save & Close.
What to do next
Delete users from on-premises Notes Traveler servers.
Deleting a user from Notes Traveler servers:
Remove service users from all on-premises IBM Notes Traveler servers.
Procedure
1. Run the following command:tell traveler delete * <username>
2. Run the following command:tell traveler security delete * <username>
Note: If the user has already been deleted from the Domino directory, then thefull user name must be specified. For example:tell traveler delete * "CN=John Doe/OU=Raleigh/O=IBM"
The previous two steps should completely remove the user, but you can verifywith these additional steps:
3. Open the Notes Traveler administration application and verify that there are noentries for the user.
4. Open ntsclcache.nsf and verify that there are no entries for the user.
236 SmartCloud Notes: Administering SmartCloud Notes: Hybrid Environment March 2015
Getting started with the Notes clientIf the IBM Notes client is used with the service, complete the following tasks tohelp users get started.
Before you begin
Complete the procedures “Providing account information to users” on page 231and “Preparing for Notes clients” on page 196.
About this task
Table 72. Getting started with the Notes client
TaskWhy this task isimportant
Additionalinformation Complete?
Point users to thedocumentation.
Users requireinstructions todownload and runthe clientconfiguration tool toconnect to a mailserver in the cloud.
For moreinformation, see theNotes section of theIBM SmartCloudNotes userdocumentation.
For completedocumentation onusing Notes, see thehelp that comes withthe client.
Prepare totroubleshoot anyproblems.
If a user has troubleconnecting the Notesclient to the cloudmail server, you canquickly resolve theproblem.
Technote: Could notconnect to serverwhen running IBMSmartCloud NotesliveConfigapplication(config.nsf)
(Optional) If usersexported contactsand calendar entriesfrom their originalmail files, import theentries into the newmail files in thecloud.
If mail files are nottransferred to theservice, this stepenables users topreserve theirexisting calendar andcontacts.
For moreinformation, see thetopic about exportingand importingcalendars in theNotes client help.
(Optional) Manuallyconfigure the clientto connect to theservice instantmessagingcommunity.
One reason to do thisis if you want usersto be able to connectto both anon-premisescommunity and theservice community.
“Manuallyconfiguring Notesclients to connect tothe service instantmessagingcommunity” on page175
Getting started with IMAP clientsIf IMAP clients are used, complete the following tasks to help users get startedwith them.
Chapter 6. Onboarding users 237

Before you begin
Complete the procedures “Provisioning users” on page 218 and “ConfiguringIMAP access” on page 178.
About this task
Table 73. Getting started with IMAP clients
TaskWhy this task isimportant
Additionalinformation Complete?
Point users to thedocumentation.
The documentationdescribes how to getstarted with eachsupported IMAPclient.
Enabling IMAPaccess
Read thedocumentation onIMAP clientlimitations.
This information canbe helpful withtroubleshooting.
IMAP clientlimitations
Getting started with BlackBerry devicesIf BlackBerry devices supported by a Hosted BlackBerry Services subscription areused, complete the following tasks to begin using the devices with the service.
Before you begin
Complete the procedures “Providing account information to users” on page 231and “Preparing to use BlackBerry devices” on page 203.
About this task
Note: If BlackBerry 10 devices are used, see “Getting started with the NotesTraveler devices” on page 233, instead.
Accepting the Research In Motion terms of useAn authorized person from your company must accept the Research In Motion®
terms of use. This person receives an email notification with instructions thatinclude a link to the terms of use document.
About this task
After you accept the Research in Motion terms of use, you must wait to receive anotification from an IBM Customer Service Representative indicating that yourcompany’s BlackBerry® subscription setup is complete. You must receive thisnotification before you can add BlackBerry subscriptions to user accounts.Related tasks:“Preparing to use BlackBerry devices” on page 203If you plan to use BlackBerry devices that are supported by a Hosted BlackBerryServices subscription, complete these tasks to prepare.
Adding a BlackBerry subscription to a user accountTo enable a user to connect to the service through a BlackBerry® smartphone, adda SmartCloud Notes for Hosted BlackBerry® Services subscription to the useraccount.
238 SmartCloud Notes: Administering SmartCloud Notes: Hybrid Environment March 2015
Before you begin
Before you can add BlackBerry® subscriptions to user accounts, you must receive anotification from an IBM Customer Service Representative that the subscription foryour company has been set up.
About this task
The following steps describe how to add the subscription to the account of a userthat is already provisioned for SmartCloud Notes. You can also add thesubscription during user provisioning.
Procedure1. Log on to the service as an administrator.2. If your account also has the User role, click Admin > Manage Organization.3. In the navigation pane, click User Accounts.4. Click the arrow next to a user's name and select Edit User Account.5. Click Next.6. Under Subscription Add-ons, select SmartCloud Notes for Hosted BlackBerry
Services.7. Click Next and then Finish.Related tasks:“Provisioning users” on page 218Provisioning users adds IBM SmartCloud Notes subscriptions to user accounts inthe service. After users are provisioned, they can begin to access their mail in thecloud.
Removing user accounts from an on-premises BlackBerryEnterprise ServerIf your company uses a hybrid environment and you have transferred user mailfiles to the service, before you activate devices for the service, remove all accountsusers have from any on-premises BlackBerry® Enterprise Servers, and then wipethe user devices. If you do not complete these steps, obsolete on-premisesinformation can be provided to the service. Completing these steps is alsoimportant to prevent on-premises servers from consuming resources by repeatedlyattempting to access mail files in the service to which they no longer have access.
About this task
For information on removing accounts, see BlackBerry Knowledge Base documentKB04169.Related information:
BlackBerry Knowledge Base document KB04169
Activating a user's BlackBerry smartphoneAfter you add a BlackBerry® subscription to a user account, the user's smartphonemust be activated to enable it to be used with the service.
Before you begin
The user's wireless carrier plan must be an Enterprise plan rather than a Personalplan. A smartphone cannot be activated for the service when a Personal plan isused.
Chapter 6. Onboarding users 239
Complete the procedures “Adding a BlackBerry subscription to a user account” onpage 238 and “Removing user accounts from an on-premises BlackBerry EnterpriseServer” on page 239.
About this task
To begin the activation process, a one-time activation password is created in theservice. You can create this activation password, or the user can create it.
After creation of the activation password, the user's smartphone is ready to beactivated. To activate the smartphone, the activation password and the user'sservice Internet email address are entered on the smartphone using the EnterpriseActivation option.
The following steps are performed to activate a user's smartphone. You canperform these steps, or the user can perform them as described in Using yourBlackBerry smartphone with SmartCloud Notes.
Procedure1. If the smartphone has been used before, perform the following steps.
a. Back up any existing data. For instructions, see the BlackBerry KnowledgeBase article How to back up the data on a BlackBerry smartphone.
b. Wipe the smartphone. For instructions, see the BlackBerry Knowledge Basearticle How to delete all data and applications from the BlackBerrysmartphone using the Wipe Handheld option.
2. To begin the activation process, perform the following steps to create anactivation password:a. Log on to the service as an administrator.b. If your account has the user role, click Admin > Manage Organization.c. In the System Settings section of the navigation pane, click IBM
SmartCloud Notes.d. Under User and Groups, click Users.e. In the Search box, type the beginning characters of any of the following
user values to display the user's name:v Distinguished name, for example, Samantha Daryn/Renovations.v Internet email address, for example, [email protected] Last name, for example, Daryn.
Note: You cannot use the wildcard character (*) when you search.A “starts with” search is done and the names of any users with matchingvalues in the directory are displayed. For example, the results of a search onma include the names of users with the following values in the directory:v Madison Armond/Renovations
v masmith@renovations
v Kristin MacGyver
This search does not match the following values:v Emarie Klein/Renovations
v tamado@renovations
v Ted Amado
Search results can include a maximum of 1000 names.
240 SmartCloud Notes: Administering SmartCloud Notes: Hybrid Environment March 2015
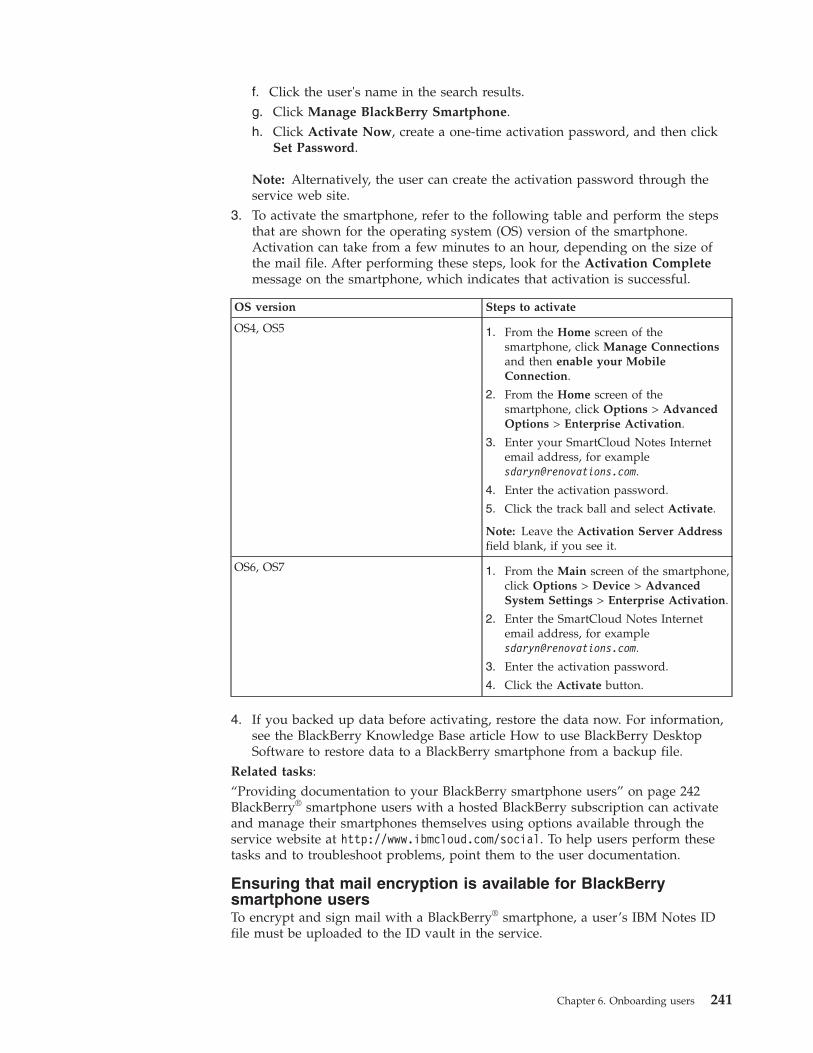
f. Click the user's name in the search results.g. Click Manage BlackBerry Smartphone.h. Click Activate Now, create a one-time activation password, and then click
Set Password.
Note: Alternatively, the user can create the activation password through theservice web site.
3. To activate the smartphone, refer to the following table and perform the stepsthat are shown for the operating system (OS) version of the smartphone.Activation can take from a few minutes to an hour, depending on the size ofthe mail file. After performing these steps, look for the Activation Completemessage on the smartphone, which indicates that activation is successful.
OS version Steps to activate
OS4, OS5 1. From the Home screen of thesmartphone, click Manage Connectionsand then enable your MobileConnection.
2. From the Home screen of thesmartphone, click Options > AdvancedOptions > Enterprise Activation.
3. Enter your SmartCloud Notes Internetemail address, for [email protected].
4. Enter the activation password.
5. Click the track ball and select Activate.
Note: Leave the Activation Server Addressfield blank, if you see it.
OS6, OS7 1. From the Main screen of the smartphone,click Options > Device > AdvancedSystem Settings > Enterprise Activation.
2. Enter the SmartCloud Notes Internetemail address, for [email protected].
3. Enter the activation password.
4. Click the Activate button.
4. If you backed up data before activating, restore the data now. For information,see the BlackBerry Knowledge Base article How to use BlackBerry DesktopSoftware to restore data to a BlackBerry smartphone from a backup file.
Related tasks:“Providing documentation to your BlackBerry smartphone users” on page 242BlackBerry® smartphone users with a hosted BlackBerry subscription can activateand manage their smartphones themselves using options available through theservice website at http://www.ibmcloud.com/social. To help users perform thesetasks and to troubleshoot problems, point them to the user documentation.
Ensuring that mail encryption is available for BlackBerrysmartphone usersTo encrypt and sign mail with a BlackBerry® smartphone, a user’s IBM Notes IDfile must be uploaded to the ID vault in the service.
Chapter 6. Onboarding users 241
About this task
A Notes ID file is uploaded to the ID vault automatically under the followingcircumstances:v A user connects to the service with a Notes client. The ID is uploaded to the
vault at some point afterward.v An ID is imported in the user’s mail file and the mail file is transferred to the
service. The ID is uploaded to the vault during user provisioning.
If neither circumstance applies, administrators can use SmartCloud NotesAdministration to upload an ID file to the vault. After the ID file is uploaded, thesmartphone prompts the user for the password. After that point, the user no longerprovides a Notes password. The user provides only the smartphone password.Related tasks:“Uploading a Notes ID to the vault” on page 269In a hybrid environment, if a service user has an IBM Notes ID file, the ID must bestored in the ID vault in the service. In some cases, for users who have a Notes ID,but who will not use the Notes client, you might need to upload the Notes ID tothe vault manually. If it is not stored in the vault, web client, Notes Traveler, andBlackBerry® smartphone users cannot perform secure mail operations. Otherlimitations also apply, as outlined in this topic.
Providing documentation to your BlackBerry smartphone usersBlackBerry® smartphone users with a hosted BlackBerry subscription can activateand manage their smartphones themselves using options available through theservice website at http://www.ibmcloud.com/social. To help users perform thesetasks and to troubleshoot problems, point them to the user documentation.
About this task
BlackBerry smartphone users can perform the following tasks themselves:v Activate a smartphonev Reactivate a smartphone to correct a problemv Activate a different smartphonev Wipe a smartphone
Instructions for performing these tasks can be found in the “Using your BlackBerrysmartphone with SmartCloud Notes ” section of the user documentation.
Note: For information on using a BlackBerry® 10 device, see the Notes Travelerdocumentation for SmartCloud Notes.Related information:
Using your BlackBerry smartphone with SmartCloud Notes
Notes Traveler documentation
242 SmartCloud Notes: Administering SmartCloud Notes: Hybrid Environment March 2015
Chapter 7. Administering user accounts
Though IBM is responsible for the administration and maintenance of the mailservers, there are tasks that you perform through an administration interface athttp://www.ibmcloud.com/social.
About this task
You must have the Administrator role assigned in a user account to perform mostadministration tasks. An exception is resetting the service login password for auser account, which can also be performed by someone with the Admin Assistantrole.
Best practices for maintaining your on-premises environmentFollow these best practices to help ensure that your on-premises environmentremains properly configured to work with the service.
Table 74. Best practices for maintaining your on-premises environment
Best practice More information
Run the Configuration Test tool about once amonth.
This tool detects problems with youron-premises configuration that can preventproper operation of the service.
If an error in your on-premises configurationis reported, after you fix the problem thatcaused the error, download and run a newcopy of the Domain Configuration toolon-premises. Running the tool can fix manyproblems with your on-premisesconfiguration.
For more information, see the topics“Running configuration tests” on page 99and “Downloading and running the DomainConfiguration tool” on page 94.
Follow the guidelines for maintainingon-premises Domino servers.
For more information, see the servermaintenance checklist topic in the Dominodocumentation.
Do not delete or modify the followingentries in the ACL of any synchronizeddirectory:
v Entries for your on-premises directorysynchronization servers
v The LLNServers group entry
v The SaaSLocalDomainServers group entry.
The Domain Configuration tool creates theseACL entries. Download and run the tool toensure that these ACL entries are correct.
If these ACL entries are missing or modified,directory synchronization fails and userprovisioning fails.
Do not edit the CustomerMailHubs groupChange on-premises hub servers throughadministration Account Settings. Forexample, change a mail hub server throughthe Account Settings > Mail Routing Serveradministration page. Then download andrun the Domain Configuration Tool toupdate your on-premises configuration.
© Copyright IBM Corp. 2011 243
Table 74. Best practices for maintaining your on-premises environment (continued)
Best practice More information
Do not delete or edit the following groupsthat the service creates in a synchronizeddirectory:
LLNServersLLNMailHubsCustomerMailHubs
These groups are created and maintained bythe service.
Do not create groups with the followingnames:
LLNServersLLNMailHubsCustomerMailHubs
Do not create groups with names that beginwith Certifiers_ or SAAS.
These names are reserved for use in theservice.
Disable the advanced ACL setting EnableExtended Access in any synchronizedDomino directory.
If this setting is enabled, directorysynchronization fails. If the directory is usedfor provisioning, user provisioning fails.
To move a synchronized directory to anotherserver or to change the file name of asynchronized directory, follow the correctprocedure.
Follow these steps:
1. Move the directory or change the filename on-premises.
If you are moving the directory, fromNotes select File > Replication > NewReplica to create a replica at the newlocation.
2. In the Directory Sync ServerConfiguration page of SmartCloudNotes Administration, update theexisting entry for the directory to matchthe new on-premises server location orfile name.Important: Do not delete the existingentry and create a new one. If you do, alldirectory documents are deleted andthen re-created, a process that can takemultiple days to complete.
3. Download and run the DomainConfiguration tool.
To delete a synchronized directory, followthe correct procedure.
To delete a synchronized directory, followthese steps:Note: If you are moving a directory, do notdelete it.
1. In the Directory Sync ServerConfiguration page of SmartCloudNotes Administration, open the entry forthe directory and click Remove.
2. Download and run the DomainConfiguration tool.
3. Delete the directory on-premises.
244 SmartCloud Notes: Administering SmartCloud Notes: Hybrid Environment March 2015

Table 74. Best practices for maintaining your on-premises environment (continued)
Best practice More information
In environments with multiple Dominodomains that use policies, do not use thesame policy name in more than one domaindirectory.
If two policies have the same name, theservice uses one only, which can causeunexpected, incorrect results.
The Domain Configuration tool warns youwhen duplicate policy names are found.
In environments with multiple Dominodomains, do not a use the same group namein more than one synchronized directory.
If a group name in a mail file ACL matchestwo on-premises groups, the one ACL entrycontrols access for members of both groups.
If mail groups have the same name, usersmust choose which one to use each timethey send mail to the group name. Usingunique group names avoids this step.
The Domain Configuration tool warns youwhen duplicate group names are found.
In environments with multiple Dominodomains that use Resource Reservations, donot use the same site name in more than onedomain.
If sites in two domains have the same name,the service lists resources from both sitesunder one site name. This situation can leadusers to reserve resources at the wrong site.See Technote 1473022 for instructions onmaking site names unique.
The Domain Configuration tool warns youwhen duplicate site names are found.
Keep public key checking disabled on thefollowing on-premises servers:
v Mail hub servers that route mail directlyto the service
v Mail servers of on-premises users thatlook up the free-time of service users
If public key checking is not disabled, mailrouting and free-time lookups fail. Todisable public key checking on a server:
1. Open the Server document in theDomino directory in edit mode.
2. Click the Security tab.
3. In the Compare public keys field in theSecurity Settings section, select Do notenforce key checking then click OK.
Continue to use your on-premises SMTPgateway server to route incoming mail.
When users on the Internet send mail toservice users, the mail is sent to anon-premises SMTP server. From there it isrouted to the service over NRPC. If theSMTP server is not available, service userscannot receive mail from the Internet.
For more information, see the topic“Preparing to route mail to service users” onpage 55
For mail hub servers that route directly tothe service, configure the retry interval andmultiple transfer threads for optimum mailrouting performance.
For more information, see “Preparing toroute mail to service users registered in theon-premises hub domain” on page 55 and“Preparing to route mail to service users in asecondary domain” on page 57.
Chapter 7. Administering user accounts 245
Changing user mail file templatesYou can change the mail file template assigned to a user. For example, change themail template if the IBM Notes client of a user is upgraded to a new version.
Before you begin
Make sure that users are offline when you change their templates.
About this task
When you change a user's mail file template, custom folders in the mail file inheritthe design of the Inbox folder. Custom folders are user-created folders orcompany-created folders from a custom template that is used in the service.
Note: If you change the languages of a user's IBM SmartCloud Notes subscription,you then also need to change the language of the mail file template.
Procedure1. Log on to http://www.ibmcloud.com/social using the email address and
password of a SmartCloud Notes user with the Administrator role.2. If your account also has the User role, click Admin > Manage Organization.3. In the System Settings section of the navigation pane, click IBM SmartCloud
Notes.4. Click Users.5. In the Search box, type the beginning characters of any of the following user
values to display the user's name:v Distinguished name, for example, Samantha Daryn/Renovations.v Internet email address, for example, [email protected] Last name, for example, Daryn.
Note: You cannot use the wildcard character (*) when you search.A “starts with” search is done and the names of any users with matchingvalues in the directory are displayed. For example, the results of a search onma include the names of users with the following values in the directory:v Madison Armond/Renovations
v masmith@renovations
v Kristin MacGyver
This search does not match the following values:v Emarie Klein/Renovations
v tamado@renovations
v Ted Amado
Search results can include a maximum of 1000 names.6. Select the name of each user to change to a specific template. You can search
for and select more names; previously selected names remain selected.7. Click Apply Mail Template.8. Select the template to use.9. Click Apply Mail Template.
10. Click Confirm.11. Click Continue.
246 SmartCloud Notes: Administering SmartCloud Notes: Hybrid Environment March 2015
Related information:
Integration server and user provisioning change files
Viewing assigned mail file templatesYou can view the mail file template that is assigned to a service user.
About this task
If only the template ID displays in the field, the template assigned to the user hasbeen removed from the template repository. Although the user's mail file is notaffected, you should assign a new template.
Procedure1. Log on to the service as an administrator.2. If your account also has the User role, click Admin > Manage Organization.3. In the System Settings section of the navigation pane, click IBM SmartCloud
Notes.4. Click Users.5. In the Search box, type the beginning characters of any of the following user
values to display the user's name:v Distinguished name, for example, Samantha Daryn/Renovations.v Internet email address, for example, [email protected] Last name, for example, Daryn.
Note: You cannot use the wildcard character (*) when you search.A “starts with” search is done and the names of any users with matchingvalues in the directory are displayed. For example, the results of a search on mainclude the names of users with the following values in the directory:v Madison Armond/Renovations
v masmith@renovations
v Kristin MacGyver
This search does not match the following values:v Emarie Klein/Renovations
v tamado@renovations
v Ted Amado
Search results can include a maximum of 1000 names.6. Click the user's name in the search results.7. Look in the Mail Template field, which includes the following information:
v Namev Versionv Languagev Template ID number
Related concepts:“Language versions of the standard mail file template” on page 248The mail file template supported in the service is the IBM Notes Standard 8.5template (STDR85Mail). This topic lists the languages in which this template isprovided.
Chapter 7. Administering user accounts 247
Related tasks:“Configuring mail file templates” on page 164Configure which mail file templates can be applied to user mail files and configurea mail file template to use by default.
Language versions of the standard mail file templateThe mail file template supported in the service is the IBM Notes Standard 8.5template (STDR85Mail). This topic lists the languages in which this template isprovided.v English (en)v Arabic (ar)v Catalan (ca)v Czech (cs)v Danish (da)v German (de)v Greek (el)v Finnish (fi)v French (fr)v Hebrew (he)v Hungarian (hu)v Italian (it)v Japanese (ja)v Korean (ko)v Dutch (nl)v Norwegian (no)v Polish (pl)v Portuguese (pt)v Portuguese, Brazil) (pt_BR)v Russian (ru)v Slovak (sk)v Slovenian (sl)v Swedish (sv)v Thai (th)v Turkish (tr)v Chinese, China (zh_CN)v Chinese, Taiwan (zh_TW)v Spanish (es)
Assigning extension forms files to usersAfter an IBM representative uploads an approved extension forms file to theservice, you can assign the forms file to users. Extension forms file enable you tocustomize the visual theme, fonts, the action bar, and other aspects of the webclient.
248 SmartCloud Notes: Administering SmartCloud Notes: Hybrid Environment March 2015
About this task
You can assign extension forms files to users explicitly. You can also assignextension forms files to users implicitly by setting a default extension forms file.
The following topics describe how to use IBM SmartCloud Notes Administration toassign extension forms files. You can also use user provisioning change files andthe IBM Connections Cloud integration server. For more information, see theintegration server section of the Connections Cloud documentation.Related tasks:“Using extension forms files to customize the look of the web client” on page 165You can use an extension forms file to customize the visual theme, fonts, the actionbar, and other aspects of the web client. For example, you can add graphics,change colors, and add new menu items.Related information:
IBM Connections Cloud documentation
Setting a default extension forms fileOptionally set a default extension forms file that applies to all current and futureweb client users who are not explicitly assigned an extension forms file.
Before you begin
An IBM representative must upload the approved extension forms file to theservice.
About this task
If you do not specify a default extension forms file, users without an explicitextension forms file see the default service behavior. The default service behavior issimilar to IBM iNotes 9.0.
Procedure1. Log on to the service as an administrator.2. If your account also has the User role, click Admin > Manage Organization.3. In the System Settings section of the navigation pane, click IBM SmartCloud
Notes.4. Click Extension Forms Files.5. Select the forms file and click Set as Default.
Results
The change takes effect the next time web client users log in to the service.
In the list of files in the Extension Forms Files page, the text [default] is shownafter the file name. The file is also shown in the Defaults page, in the DefaultExtension Forms File section.
To see whether a user uses the default forms file, from SmartCloud NotesAdministration, click Users and select the name of the user. If the user uses thedefault extension forms file, the value of the Forms extension field is Default(forms file), where forms file is the name of the default extension forms file.
Chapter 7. Administering user accounts 249

You can disable a default extension forms file and revert to the default servicebehavior. To do so, perform this procedure and in the last step select None in thefiles list and click Set as Default. The extension forms file remains available andyou can re-enable it as the default at any time.
Explicitly assigning an extension forms file to many currentusers
You can assign a forms file to all current users, to users who are explicitly assigneda different extension forms file, or to users who are not explicitly assigned anextension forms file who use the default behavior.
Before you begin
An IBM representative must upload the extension forms file to the service.
About this task
To apply an extension forms file during user provisioning, see the userprovisioning topics, instead.
Procedure1. Log on to the service as an administrator.2. If your account also has the User role, click Admin > Manage Organization.3. In the System Settings section of the navigation pane, click IBM SmartCloud
Notes.4. Click Extension Forms Files.5. Select the extension forms file to assign and click Apply to Users.
Note: To remove an explicit forms file assignment and revert to the defaultforms file or the default service behavior, select None [default].
6. Perform the steps in the following table that correspond to your objective.
Table 75. Steps to assign an extension forms file to many users
Objective Steps
Assign to all users in the service.Note: An alternative approach is to set adefault extension forms file. A default file isused by all current and future users who arenot assigned an extension forms fileexplicitly.
Click Apply to > All users.
Assign to all users who are not currentlyassigned to the selected forms file.
1. Click Apply to > Users of a differentextension forms file.
2. Select the current extension forms file ofthe users.
Assign to all users who are not explicitlyassigned an extension forms file.
1. Click Apply to > Users of a differentextension forms file.
2. Select None (default).
7. Click Apply.
250 SmartCloud Notes: Administering SmartCloud Notes: Hybrid Environment March 2015

Results
If you click Cancel or close the window before the changes are complete, thechange is cancelled only for users not yet processed.
The extension forms file changes take effect the next time the web client users login to the service.
If you click Users from SmartCloud Notes Administration and select the name of auser, the Forms extension field shows the extension forms file.Related tasks:“Provisioning users without transferring mail files” on page 219This procedure adds an IBM SmartCloud Notes subscription to a user account andcreates a new mail file for the user on a mail server in the cloud. You can also addoptional subscriptions purchased by your company.“Provisioning users and mail files” on page 224If you are transferring user mail files to the service with the assistance of an IBMpartner, after the transfer manager imports a batch of users and mail files into theservice, you can provision the users for IBM SmartCloud Notes.
Explicitly assigning an extension forms file to individualcurrent users
You can explicitly assign an extension forms file to individual current users. Theexplicit assignment overrides the default behavior for your company.
Before you begin
An IBM representative must upload the extension forms file to the service.
About this task
To apply an extension forms file during user provisioning, see the userprovisioning topics, instead.
Procedure1. Log on to the service as an administrator.2. If your account also has the User role, click Admin > Manage Organization.3. In the System Settings section of the navigation pane, click IBM SmartCloud
Notes.4. Click Users.5. Display the names of the users to whom you want to assign the forms file. In
the Search box, type the beginning characters of any of the following uservalues:v Distinguished name, for example, Samantha Daryn/Renovations.v Internet email address, for example, [email protected] Last name, for example, Daryn.
Note: You cannot use the wildcard character (*) when you search.A “starts with” search is done and the names of any users with matchingvalues in the directory are displayed. For example, the results of a search on mainclude the names of users with the following values in the directory:v Madison Armond/Renovations
Chapter 7. Administering user accounts 251
v masmith@renovations
v Kristin MacGyver
This search does not match the following values:v Emarie Klein/Renovations
v tamado@renovations
v Ted Amado
Search results can include a maximum of 1000 names.6. Select the names of the users from the search results.7. Click Apply Extension Forms File.8. Select the file and click Apply.
Results
If you click Cancel or close the window before the changes are complete, thechange is cancelled only for users not yet processed.
The extension forms file changes are visible the next time the user uses the webclient to log in to the service.
If you click Users from SmartCloud Notes Administration and click a user name tosee details about the user, the Forms extension field shows the extension formsfile.
To remove an explicit extension forms file assignment, repeat the procedure and inthe last step select None in the list of file names and click Apply. Users then usethe default extension forms file, if specified, or the default service behavior.Related tasks:“Provisioning users without transferring mail files” on page 219This procedure adds an IBM SmartCloud Notes subscription to a user account andcreates a new mail file for the user on a mail server in the cloud. You can also addoptional subscriptions purchased by your company.“Provisioning users and mail files” on page 224If you are transferring user mail files to the service with the assistance of an IBMpartner, after the transfer manager imports a batch of users and mail files into theservice, you can provision the users for IBM SmartCloud Notes.
Resetting service login passwordsUsers can reset their own service login passwords once within a 24 hour period byclicking Forgot password?. An administrator or administrator assistant can resetservice login passwords for any user at any time.
About this task
Reset passwords when userd forget their passwords, or when the password mightbe compromised. Users that log in by clicking Use My Organization's Login areusing a federated identity and can reset their passwords only by following theircompany's process.
If administrators enable password synchronization, when users change theirservice login passwords, they can also use the new passwords to log in to the IBMNotes client.
252 SmartCloud Notes: Administering SmartCloud Notes: Hybrid Environment March 2015
Follow these steps to reset any user's password:
Procedure1. Click Administration > Manage Organization.2. Click User Accounts.3. Select the arrow next to the user that needs the password changed.4. Select Reset password and enter the new password. This password is a
temporary password that the user enters the next time that they log in. At thattime, the user is asked to create a password.You can also reset the password by editing the user account. Click theappropriate user name in User Accounts and enter a new password in theAccount Login tab.
5. Notify the user of the password change. The user is not automatically notifiedthat the password was reset. Make sure to communicate this change to the user,along with the new password if needed.
What to do next
Administrators can enable security settings to enforce password expiration throughSystem Settings > Security. When s user logs in with an expired password, theuser is prompted to reset that password.
Resetting passwords for Notes IDsReset the password on an IBM Notes ID file to change the current password.Typically you do this because a user has forgotten the current password.
About this task
This procedure applies only to passwords associated with Notes ID files used withNotes clients, and not to service login passwords.
Procedure1. Log on to http://www.ibmcloud.com/social using the e-mail address and
password of a SmartCloud Notes user with the Administrator role.2. If your account also has the User role, click Admin > Manage Organization.3. In the System Settings section of the navigation pane, click IBM SmartCloud
Notes.4. Click Users.5. In the Search box, type the beginning characters of any of the following user
values to display the user's name:v Distinguished name, for example, Samantha Daryn/Renovations.v Internet email address, for example, [email protected] Last name, for example, Daryn.
Note: You cannot use the wildcard character (*) when you search.A “starts with” search is done and the names of any users with matchingvalues in the directory are displayed. For example, the results of a search on mainclude the names of users with the following values in the directory:v Madison Armond/Renovations
v masmith@renovations
v Kristin MacGyver
Chapter 7. Administering user accounts 253
This search does not match the following values:v Emarie Klein/Renovations
v tamado@renovations
v Ted Amado
Search results can include a maximum of 1000 names.6. Click the user's name in the search results.7. Under Available actions for this user, click Reset IBM Notes Password.8. Enter a new password, and then click Save Changes. The password must be at
least eight characters in length.9. Provide the new password to the user in a way that complies with your
company security policies.
Results
After you complete this procedure, the user can log on to a SmartCloud Notesserver from an IBM Notes client using the new password. After logging on withthe new password, the user is prompted to change the password.
Note: If the Wrong Password prompt is displayed, tell the user to re-enter the newpassword that you provided. If that step does not solve the problem, tell the userto delete the local ID file and then re-enter the password.
The user has five days from the time you reset a password to use the password tolog on to a SmartCloud Notes mail server and download the new password to theNotes client. If the 5-day limit is exceeded, the user sees the following messageand you must reset the password again:
Contact your company administrator to have your Notes ID password reset.
Related concepts:“Notes IDs and passwords” on page 130When users connect to their mail servers in the cloud with IBM Notes clients andNotes IDs, they are authenticated using Notes Remote Procedure Call (NRPC)authentication.Related tasks:“Resetting service login passwords” on page 124Users can reset their own service login passwords once within a 24 hour period byclicking Forgot password?. An administrator or administrator assistant can resetservice login passwords for any user at any time.“Setting password expiration for Notes IDs” on page 126For users who access the service with the IBM Notes client, you can specify whenNotes ID passwords expire. This password expiration does not apply to web usersbecause they log in using their web login password rather than a Notes IDpassword.“Enabling password synchronization” on page 128When users change their service login passwords, password synchronizationenables the users to use the new passwords when they log in to the IBM Notesclient.
254 SmartCloud Notes: Administering SmartCloud Notes: Hybrid Environment March 2015

Changing a Notes user nameIn a hybrid environment, you use the Domino Administrator client on-premises tochange a user's Notes name. The steps initiate a series of administration processrequests.
Before you begin
Important: Read the topic “Rules to follow when you change a Notes name” onpage 257. It is important to understand these rules before you continue.
About this task
After you initiate a rename on-premises, the change replicates to the service. Then,the rename is initiated for the servers in the service as well. This process changesthe Notes user name, but does not change the name in the Connections Cloud useraccount. You or the user change the name in the user account.
Procedure1. From the IBM Domino Administrator client, on a server whose directory you
synchronize with servers in the service, perform the steps that correspond toyour goal.
Table 76. Steps to change a user's names
Goal Steps
You want to change any of the followingnames:
v Common name, for example, changeSamantha Daryn/Renovations to SamanthaBrown/Renovations
v Alternate name
v Short name
Important: If you want to change multiplenames for one user, do so in one renameoperation. If you want to change a name andthe Internet address, do so as part of onerename operation.
Tools > People > Rename > ChangeCommon Name
For more information, see the topic aboutrenaming a Notes user's common oralternate name in the Dominodocumentation.
You want to change the certifier portion ofthe name. For example, change SamanthaDaryn/Renovations to SamanthaDaryn/PowerRenovations. Optionally, youalso want to change any of the followingvalues:
v Common name
v Alternate name
v Short name
v Internet address
Important: If you want to change thecertifier name and other names or theInternet address for one user, do so as partof one rename operation.
Tools > People > Rename > Request Moveto New Certifier
For more information, see the topic aboutmoving a user name in the name hierarchyin the Domino documentation.
2. Optional: If you changed the common name or Internet address, optionally editthe user account to match:
Chapter 7. Administering user accounts 255
Note: Users can change their common names themselves by editing the MyAccount Settings page. Users cannot change their own login email addresses.a. Log on to the service as an administrator.b. If your account has the user role, click Admin > Manage Organization.c. Click User Accounts, click the arrow next to the account to edit, and select
Edit User Account.d. In the User Information tab, update one or both of the name fields.e. If you changed the Internet address, in the Account Login tab, optionally
update the Email field to match the new address. The Email field servesonly as the identity used to log in to the service from a browser; theSmartCloud Notes service uses the Internet address field in the Persondocument to determine the Internet address for mail routing.
Results
The following table provides an estimate of the time required to complete eachtype of name change and how to determine whether the change is complete.
Table 77. Rename time estimate and verification
Type of name change Rename completion
Notes name change The Notes name change is usually completein about a day. However, because renamingis a multi-step sequential process, a delay inany step can cause the rename to takelonger. While the name is being changed, thecurrent user name remains valid.
When a rename is complete, the change isvisible in the following places:
v Directories1,2, database ACLs, and groupsthat include the name on servers in theservice and on-premises servers.
v Web client navigation pane and new mailmessages.
v The User name field in the Notes clientlogin window.
v The user's mail file ACL.
v The Users page in SmartCloud NotesAdministration.2
1 New short name or alternate name isvisible here.
2 New Internet address is visible here.
User account name change The change occurs immediately after anadministrator or user edits the user account.A new name and email login addressdisplay the next time that the user logs infrom a browser.
What to do next
If the name of a mail file delegate changes, the mail file owner must reassigndelegation to the new name. Doing so updates the mail file ACL to allow thedelegate access under the new name.
256 SmartCloud Notes: Administering SmartCloud Notes: Hybrid Environment March 2015

Related information:
Domino documentation
Rules to follow when you change a Notes nameWhen you change a user’s Notes name, you must follow these rules.v If you want to change multiple parts of a user's name, do so in one rename
request. Do not issue one request to change a common name and then a separaterequest to change a certifier name. For example, change SamanthaDaryn/Renovations to Samantha Brown/Power Renovations with one renamerequest.
v To change both a user's name and Internet address, change the Internet addressas part of the rename request. Do not issue a rename request for the namechange and then edit the Person document separately to change the Internetaddress.
v Never start a second rename until the first rename is complete, for example, ifyou make a mistake in a rename request. Wait until the first rename is completeand the user accesses the service under the first changed name before yourename the user again. If the first rename is not complete, fields with names thatbegin with AdminpOld remain in the Person document.
v Never change the Notes name by editing the name manually in the Persondocument. Instead, always initiate the name change through the DominoAdministrator client. When you use the Domino Administrator client, theAdministration Process makes the changes throughout your environment andrequired directory changes can replicate to the service during directorysynchronization.
v Never rename a user who is being provisioned or whose mail is beingtransferred to the service. Wait until the user accesses the SmartCloud Notesservice at least one time under the current name before you rename the user.
v If a rename does not complete within a reasonable amount of time, contactSmartCloud Notes Support. Do not remove the user account, the SmartCloudNotes subscription, or the Person document and attempt to re-create a user.
v After you start a rename of a Notes client user, tell the user not to switch to aLocation document that refers to an on-premises mail server. Doing so can causethe user to accept the new name on-premises rather than in the service, which isnot allowed.
v Never rename a user at the same time that you change the user’s Dominodomain.
v If the user has a Notes ID file and uses it in the service, the ID file must bestored in the service ID vault before you rename the user. To determine whethera user ID is stored in the vault, open SmartCloud Notes Administration, clickUsers, search for the user page, and look at the Notes ID file field. If the ID isnot in the vault, an administrator can upload the ID file to the vault manuallyfrom the user page in SmartCloud Notes Administration.
v If the rename includes a move to a different certifier, verify that the directorycontains a Vault Trust Certificate issued from the new certifier (or an ancester ofthe certifier) to the service ID vault. If such a certificate does not exist, create oneand wait for directory synchronization to replicate it to the service before yourename the user.
v A web client user, Notes Traveler user, or BlackBerry® user can have a Notes IDfile that is never used in the service and that is not stored in the service ID
Chapter 7. Administering user accounts 257
vault. Before you rename a user such as this, either upload the ID to the vault ordelete the public key information from the following fields in the user’s Persondocument:– Certificate
– CertificateExpiration
– CertificateIssuer
v If the name of a mail file delegate changes, the mail file owner must reassigndelegation to the new name. Doing so updates the mail file ACL to allow thedelegate access under the new name.
Related tasks:“Uploading a Notes ID to the vault” on page 269In a hybrid environment, if a service user has an IBM Notes ID file, the ID must bestored in the ID vault in the service. In some cases, for users who have a Notes ID,but who will not use the Notes client, you might need to upload the Notes ID tothe vault manually. If it is not stored in the vault, web client, Notes Traveler, andBlackBerry® smartphone users cannot perform secure mail operations. Otherlimitations also apply, as outlined in this topic.“Issuing a Vault Trust Certificate” on page 101You must issue a Vault Trust Certificate from a parent certifier of service users’Notes ID files to the certifier of the service ID vault. This step is a prerequisite foruser provisioning.
Changing an Internet email addressUse this procedure to change a user's Internet email address if you are not alsochanging the user's Notes name.
About this task
There are two places that an Internet address is used. The SmartCloud Notesservice uses the Internet address in the Person document for Internet emailaddressing and delivery. In addition, there is an Internet address in the Email fieldin the service user account. This address is the account identity used to log in tothe service with any subscription from a browser. Changing the value of the Emailfield to match the new Internet email address in the Person document provides aconsistent experience for the user.
Important: If you are changing both the Notes name and Internet address,complete the steps for changing a Notes user name, instead.
Procedure1. To change the Internet email address in the on-premises Domino directory if
you are not also changing the Notes name:a. From an on-premises Domino Administrator, open the Domino directory in
which the user is registered.b. From the People view, select the user's Person document.c. Click Edit Person.d. In the Basics tab, in the Mail section, change the address in the Internet
address field.e. Click Save & Close.f. Wait for the change to replicate to the service during directory
synchronization.
258 SmartCloud Notes: Administering SmartCloud Notes: Hybrid Environment March 2015
Tip: To verify that the change has been made in the service, open the Userspage in SmartCloud Notes Administration, search for the user, and in theuser page look at the Internet address field.
2. To change the account login identity to match the new Internet email address:a. Log in to the service as an administrator.b. If your account has the user role, click Admin > Manage Organization.c. Click User Accounts.d. Click the arrow next to the user account to change and select Edit User
Account.e. Click Account Login.f. In the Email field, click change.g. In the New email address field, provide the new address and click Finish.
What to do next
Provide the user with their new address and account login identity.Related tasks:“Changing a Notes user name” on page 255In a hybrid environment, you use the Domino Administrator client on-premises tochange a user's Notes name. The steps initiate a series of administration processrequests.
Removing a SmartCloud Notes subscription from a user accountWhen you remove a SmartCloud Notes subscription from a user's account, thesubscription is available for another user. The account identity still exists, unlessyou delete the user account, and is still active, unless you suspend the user. Theuser can still log in to the cloud service, but the user no longer has access toSmartCloud Notes.
Procedure1. Log on to the service as an administrator.2. If your account also has the User role, click Admin > Manage Organization.3. In the navigation pane, click User Accounts.4. Click the name of the user to edit the user account settings.5. Click Next to select the Subscriptions tab.6. Perform one of the following steps:
v If the user has more than one subscription, select Customize thesubscriptions for this user and in the Mail field select None selected.
v If the user has only a SmartCloud Notes subscription, select None.7. Click Next and then Finish.8. The Edit User Summary window indicates that subscription removal is in
progress. When you click Back to User Accounts, SmartCloud Notes isremoved from the Subscription column for the user.
Resultsv The subscription is no longer assigned and is available for another user.v The mail file becomes inactive. The owner, or a user who has delegation access,
cannot open it. Mail is no longer delivered to the mail file.
Chapter 7. Administering user accounts 259

v User data (including the mail file and vaulted Notes ID) remains on the serversin the service for 30 days. To see whether a user's data is still in the service,from SmartCloud Notes Administration, click Users and then Deleted Users. Ifthe user's name is listed, the data is still in the service. You can force the data tobe deleted by clicking Delete Data.
What to do next
If you want to add the subscription to the user account once again, be aware of thefollowing considerations:v If you removed the user's SmartCloud Notes subscription and the user name is
still shown in the Users > Deleted Users page of SmartCloud NotesAdministration, the user data is still in the service. In this case, to add back thesubscription, you edit the Connections Cloud user account. The user regainsaccess to the mail file and the name is removed from the Deleted Users page.
v If you removed the user's SmartCloud Notes subscription and the user name isno longer shown in the Users > Deleted Users page, the user data has beenremoved from the service. In this case, to add back the subscription, you mustprovision the user again through SmartCloud Notes Administration. The userstarts with a new mail file, unless you transfer the mail file to the service beforeyou provision the user.
Related tasks:“Deleting a user account” on page 261When you delete a user's account, the user no longer has access to any cloudservices. If you change your mind about the deletion, you have up to 30 days torestore the account to full functionality.“Suspending a user account”You can suspend a user account. When an account is suspended, the user cannotlog in to the service. If the user is logged in at the time the account is suspended,the user can continue working, but cannot log in again after logging out. Nosubscriptions are available to the user, but they remain assigned to the user. Also,the user identity and user data remain on servers in the service.Related information:
Integration server
Suspending a user accountYou can suspend a user account. When an account is suspended, the user cannotlog in to the service. If the user is logged in at the time the account is suspended,the user can continue working, but cannot log in again after logging out. Nosubscriptions are available to the user, but they remain assigned to the user. Also,the user identity and user data remain on servers in the service.
About this task
Use these steps to suspend a user account, which affects all subscriptions assignedto a user.
If a user has other subscriptions that you want to remain available to the user, aCustomer Service Representative can suspend a subscription, rather thansuspending an entire account. In that case, the user can log in to the service andthere is no interruption to other subscriptions.
260 SmartCloud Notes: Administering SmartCloud Notes: Hybrid Environment March 2015
Procedure1. Log on to the service as an administrator.2. If your account also has the User role, click Admin > Manage Organization.3. In the navigation pane, click User Accounts.4. Click the arrow next to a user name and then click Suspend.
Results
The following results occur when a user account is suspended:v Subscriptions remain assigned, and cannot be assigned to other users.v The user cannot log in and is not listed in the company directory.v The mailbox becomes inactive and the owner cannot open it. However, someone
who has delegation access to the mail file can open it.v Mail is not delivered to the mailbox.v You can reset the user account password.
Note: To return a suspended account to active status, edit the user account usingthe previous steps, and in Step 4, click Unsuspend Account. When the account isreturned to active status, the mail file is once again available to the user.Related information:
Integration server
Deleting a user accountWhen you delete a user's account, the user no longer has access to any cloudservices. If you change your mind about the deletion, you have up to 30 days torestore the account to full functionality.
Procedure1. Log on to the service as an administrator.2. If your account also has the User role, click Admin > Manage Organization.3. In the navigation pane, click User Accounts.4. Click the arrow next to a user name and then select Delete User.5. Optional: Enter the email address of a user in your organization to whom you
want to transfer the deleted user's collaboration resources, such as files.
Note: You cannot transfer ownership of the mail file.6. Click Trash.
Results
The user whose account is deleted can no longer log in to the service. If the user islogged in at the time of account deletion, he or she can continue to use the serviceuntil the session expires.
Up to 30 days from the initial account deletion, the following conditions exist:v The user account has the status Trash in the User Accounts page.v The mail file is inactive and cannot be opened by the owner, or by another user
who has delegation access to the mail file. Mail is not delivered to the mail file.
Chapter 7. Administering user accounts 261
v The subscriptions associated with the deleted account cannot yet be assigned toother users.
v The user data remains in the service. If you deleted the account by mistake, youcan restore the account to full functionality, including mail.
v You can permanently delete the account to remove the user data and free thesubscriptions to be assigned to other users.
31 to 90 days from the initial account deletion, the following conditions exist if youdid not permanently delete the account:v The account is no longer visible and you cannot restore it or permanently delete
it.v An IBM customer service representative can restore the account.v The subscriptions associated with the deleted account cannot yet be assigned to
other users.
After 90 days from the initial account deletion, the account is permanently deletedand the following conditions exist:v The account subscriptions can be assigned to other users.v The user data for collaboration subscriptions is permanently deleted.v The SmartCloud Notes user data, such as the mail file, remains for 30 more
days. You can permanently delete this data yourself, if you do not want to waitthe 30 days.
Note: While the SmartCloud Notes data remains, you cannot create a useraccount with the same common name and email address as that of the deletedaccount.
After 120 days from the initial account deletion, SmartCloud Notes user data ispermanently deleted, if it was not deleted previously.Related tasks:“Restoring a deleted user account” on page 263After you delete a user account, you have up to 30 days to restore it if you changeyour mind. Restoring the account returns it to full functionality, including full mailfile access.“Permanently deleting a user account” on page 263After you delete an account, it remains inactive in the service, and you have 30days to restore it. If you are sure that you will not need to restore the account, youcan permanently delete it within 30 days of the initial account deletion.Permanently deleting an account frees its subscriptions for other users.“Removing the SmartCloud Notes data for a deleted user account or subscription”on page 264After a user account is permanently deleted or an IBM SmartCloud Notessubscription is removed from a user account, the SmartCloud Notes data such asthe mail file remains for 30 days. Use this procedure to force the deletion of theuser data from the service, if you do not want to wait the 30 days.Related information:
Integration server
262 SmartCloud Notes: Administering SmartCloud Notes: Hybrid Environment March 2015
Restoring a deleted user accountAfter you delete a user account, you have up to 30 days to restore it if you changeyour mind. Restoring the account returns it to full functionality, including full mailfile access.
About this task
An IBM customer service representative can restore a user account up to 90 daysafter the account deletion.
Procedure1. Log on to the service as an administrator.2. If your account also has the User role, click Admin > Manage Organization.3. In the navigation pane, click User Accounts.4. Select Status in the drop-down box and then select Trash to show the deleted
user accounts that can be restored.5. Click the arrow next to the user name and select Restore User.6. In the window that is shown, click Restore.Related tasks:“Deleting a user account” on page 261When you delete a user's account, the user no longer has access to any cloudservices. If you change your mind about the deletion, you have up to 30 days torestore the account to full functionality.
Permanently deleting a user accountAfter you delete an account, it remains inactive in the service, and you have 30days to restore it. If you are sure that you will not need to restore the account, youcan permanently delete it within 30 days of the initial account deletion.Permanently deleting an account frees its subscriptions for other users.
About this task
You cannot restore an account after you permanently delete it. If there is a chanceyou might need to restore the account, do not complete this procedure.
A user account is permanently deleted automatically 90 days after the initialaccount deletion.
Procedure1. Log on to the service as an administrator.2. If your account also has the User role, click Admin > Manage Organization.3. In the navigation pane, click User Accounts.4. Select Status in the drop-down box and then select Trash.5. Click the arrow next to the user name and then select Delete User.6. Optional: Enter the email address of a user in your organization to whom you
want to transfer the deleted user's collaboration resources, such as files.
Note: You cannot transfer ownership of the mail file.7. Click Delete.
Chapter 7. Administering user accounts 263
Resultsv The account cannot be restored.v The subscriptions associated with the account are free to be assigned to other
users.v The SmartCloud Notes data such as the mail file remains for 30 more days and
is automatically deleted after that period. You can delete this data before thenyourself. While this data remains, you cannot create a user account with thesame common name and email address as that of the deleted account.
What to do next
If you want to permanently delete the SmartCloud Notes data immediately,complete the procedure “Removing the SmartCloud Notes data for a deleted useraccount or subscription.”Related tasks:“Deleting a user account” on page 261When you delete a user's account, the user no longer has access to any cloudservices. If you change your mind about the deletion, you have up to 30 days torestore the account to full functionality.“Restoring a deleted user account” on page 263After you delete a user account, you have up to 30 days to restore it if you changeyour mind. Restoring the account returns it to full functionality, including full mailfile access.
Removing the SmartCloud Notes data for a deleted user account orsubscription
After a user account is permanently deleted or an IBM SmartCloud Notessubscription is removed from a user account, the SmartCloud Notes data such asthe mail file remains for 30 days. Use this procedure to force the deletion of theuser data from the service, if you do not want to wait the 30 days.
About this task
In most situations, there is no need to force the deletion of the SmartCloud Notesdata. However, if an account is permanently deleted and you want to create a newaccount that uses the same email address and common name, the SmartCloudNotes data must first be deleted.
You can delete the data of a user whose SmartCloud Notes subscription wasremoved but who still has a user account. However, do so with caution; to addback the SmartCloud Notes subscription, you must provision the user againthrough SmartCloud Notes Administration. In this case, the user starts with a newmail file, unless you transfer an on-premises mail file before you provision the useragain.
Procedure1. Log on to the service as an administrator.2. If your account also has the User role, click Admin > Manage Organization.3. In the System Settings section of the navigation pane, click IBM SmartCloud
Notes.4. In SmartCloud Notes Administration, under Users and Groups, click Users.5. In the navigation pane, click Deleted Users.
264 SmartCloud Notes: Administering SmartCloud Notes: Hybrid Environment March 2015
6. Optional: To search for a name if many users are listed, type the beginningcharacters of any of the following user values:v Distinguished name, for example, Samantha Daryn/Renovations.v Internet email address, for example, [email protected] Last name, for example, Daryn.
Note: You cannot use the wildcard character (*) when you search.A “starts with” search is done and the names of any users with matchingvalues in the directory are displayed. For example, the results of a search on mainclude the names of users with the following values in the directory:v Madison Armond/Renovations
v masmith@renovations
v Kristin MacGyver
This search does not match the following values:v Emarie Klein/Renovations
v tamado@renovations
v Ted Amado
Search results can include a maximum of 1000 names.7. Click Delete Data next to the name of the user whose data you want to
remove, and then confirm the deletion.
Results
The user data is removed from the service and the user name is removed from theDeleted Users page.Related tasks:“Deleting a user account” on page 261When you delete a user's account, the user no longer has access to any cloudservices. If you change your mind about the deletion, you have up to 30 days torestore the account to full functionality.“Permanently deleting a user account” on page 263After you delete an account, it remains inactive in the service, and you have 30days to restore it. If you are sure that you will not need to restore the account, youcan permanently delete it within 30 days of the initial account deletion.Permanently deleting an account frees its subscriptions for other users.“Removing a SmartCloud Notes subscription from a user account” on page 259When you remove a SmartCloud Notes subscription from a user's account, thesubscription is available for another user. The account identity still exists, unlessyou delete the user account, and is still active, unless you suspend the user. Theuser can still log in to the cloud service, but the user no longer has access toSmartCloud Notes.
Moving users to different Domino directoriesYou can move the Person document of a user who is currently provisioned in theservice to a different Domino directory.
About this task
If an on-premises Notes rename request is underway for a user, wait until therequest is complete before moving the user’s Person document.
Chapter 7. Administering user accounts 265

Procedure
Copy the Person document to the new Domino directory and then delete theoriginal Person document. Follow these guidelines:v Move a Person document only to a Domino directory that is used for
provisioning. In other words, move a Person document to a full Dominodirectory that is listed in the Directory Sync Server Configuration window ofSmartCloud Notes Administration. The Do not use this Domino Directory foruser provisioning must not be selected for the directory.
v If you want to change the values of the following fields in the new Persondocument, do not do so yet. These values must be the same as in the originalPerson document while the move of the Person document is underway. You canchange the value of any other field.– First name (FirstName)– Middle name (MiddleInitial)– Last name (LastName)– User name (FullName)– Internet address (InternetAddress)– Domain (MailDomain)
v The deletion of the original Person document can replicate to the service beforethe addition of the new Person document, or vice versa. The replication order isnot important.
v The document identifier value of the new Person document will be differentfrom the one in the original Person document. A document identifier, forexample Notes:///632576F5004E65D4/85255E01001356A8852554C200753106/14BD98F6358E2E818525785C0041046, is displayed in Notes document properties.
What to do next
If you want to change the user name, Internet address, or Domino domain name,contact Support before you do so. Support must verify that the Person documentchange is complete in the service before you make these changes. After Supportconfirms that the Person document change is complete, make the additionalchanges.v If you want to change the Domino domain name, do so before you change the
user name or Internet address. To change the domain, edit the Domain(MailDomain) field.
v To change the user name, follow the documented procedure for changing aNotes user name. Do not edit name fields directly in the Person document.
Related tasks:“Changing a Notes user name” on page 255In a hybrid environment, you use the Domino Administrator client on-premises tochange a user's Notes name. The steps initiate a series of administration processrequests.“Configuring directory synchronization” on page 89A directory server in the service has a replica of one or more on-premises IBMDomino directories. To support directory synchronization, provide the name of theprimary server and file path of at least one on-premises directory that you want tosynchronize. The directory server performs a regular pull and push replication ofthe directories to keep the contents of both the service and the on-premises replicassynchronized.
266 SmartCloud Notes: Administering SmartCloud Notes: Hybrid Environment March 2015

“Contacting Support” on page 303If you are unable to resolve a problem, contact Support.
Converting a service user to an on-premises user in a hybridenvironment
If you use a hybrid environment, you can convert a service user to an on-premisesuser. Conversion removes the SmartCloud Notes subscription from the useraccount. You then switch the user to a Domino mail server at your company site.
About this task
Steps 1 - 5 in this procedure assume that you want to create a replica of the currentSmartCloud Notes mail file on your on-premises server. By creating a replica, youpreserve the current content of the mail file. However, replicating the mail file isnot required. You can instead convert the user to a new mail file or to an existingmail file that you have on-premises. In this case, substitute Steps 1 - 5 with yourown procedure to create the user mail file on your server.
After users are converted to on-premises mail servers, they cannot be delegates forthe mail files of service users.
Perform the following steps to convert a service user to an on-premises user.
Procedure1. Perform the following steps to create a local replica of the service mail file on
an IBM Notes client that can connect to the service:
Note: The owner of a mail file who uses a managed mail replica already has alocal mail file replica and can skip this step.a. Make sure that you have a SmartCloud Notes subscription with the User
role.b. From the Notes client, log on to the service using a Notes ID that has access
to the mail file in the service. The IDs of the following users have access tothe mail file:v The owner of the mail filev Someone who the owner gives delegate accessv Someone who has access through an entry in a customized mail file ACL.
c. Open the mail file on the SmartCloud Notes server, following theappropriate procedure in the following table:
Table 78. Opening a mail file in the service
Person Steps
Owner Open your mail file as you normally do. Forexample, from the home page, click Mail.
Delegate Open your mail file as you normally do,then complete the following steps:
1. In the navigation pane, expand OtherMail.
2. Click Open Other Mail.
3. Select the name of the mail file ownerfrom the company directory.
Chapter 7. Administering user accounts 267

Table 78. Opening a mail file in the service (continued)
Person Steps
Administrator with access to the mail filethrough a custom ACL
Determine the mail server name and mailfile name in the service:
1. From SmartCloud Notes Administration,click Users.
2. Click the name of the mail file owner.
3. In the Mail servers field, note the nameof the first server that is listed, forexample, MAIL16/SCN/RENOVATIONS.
4. In the Mail databases field, note thename of the first database that is listed,for example, data0/20559530/20892244.nsf.
Open the mail file:
1. From Notes, click File > Open > IBMNotes application.
2. In the Look in field, type the mail servername.
3. In the File name field, type the mail filename.
4. Click Open.
d. From the open mail file, click File > Replication > New Replica.e. Make selections in the Create Replica dialog box:
v In the Server field, be sure to select Local.v If you plan to use an operating system command to create the replica on
the on-premises server in Step 3, do not select Encrypt the replica using.2. (Optional) To minimize message loss during the conversion process, perform
the following steps to suspend the account for the user. Suspending the accountstops mail delivery to the Notes mail file.a. Perform a final replication between the mail file replica on the SmartCloud
Notes server and the replica on the Notes client.b. Log on to the service as an administrator.c. If your account has the user role, click Admin > Manage Organization.d. From the navigation pane, click User Accounts.e. Click the arrow next to the name of the user being converted and select
Suspend Account.
Note: This step suspends all of the subscriptions that the user has.3. Replicate the mail file on the client to the on-premises mail server the user is
switching to.4. Adjust the mail file ACL as necessary, for example, to allow access by
on-premises servers.5. Apply an on-premises mail file template to replace the template from the
service.6. Perform the following steps to remove the SmartCloud Notes subscription from
the account of the user.a. Log on to the service as an administrator.b. If your account has the user role, click Admin > Manage Organization.
268 SmartCloud Notes: Administering SmartCloud Notes: Hybrid Environment March 2015

c. From the navigation pane, click User Accounts.d. If you completed Step 2, click the arrow next to the name of the user to
convert and select Unsuspend Account.e. Click the arrow next to the name of the user and select Edit User Account.
Note: If the user has only a SmartCloud Notes subscription, you caninstead select Delete user to delete the account. In this case, skip theremaining substeps.
f. Click Next to move to the Subscriptions tab.g. Perform one of the following steps:
v If the user has more than one subscription, select Customize thesubscriptions for this user and in the Mail field select None selected.
v If the user has only a SmartCloud Notes subscription, select None.h. Click Next and then Finish.
Note: You can reinstate the account for up to 30 days. To reinstate, add theSmartCloud Notes back to the account, or restore the account, if you deletedit. If you continue to step 7, the 30-day period does not apply; the user isreturned to being an on-premises user, and the account cannot be reinstated.
7. To switch the user to an on-premises mail server and mail file, edit the Dominodirectory Person document of the user as follows:v Change the Mail server field to refer to the on-premises mail serverv Change the Mail file field to refer to the on-premises mail file
Results
After Step 7 is completed and directory synchronization occurs between the serviceand the on-premises environment, the user can no longer access the mail file onthe SmartCloud Notes server.
Uploading a Notes ID to the vaultIn a hybrid environment, if a service user has an IBM Notes ID file, the ID must bestored in the ID vault in the service. In some cases, for users who have a Notes ID,but who will not use the Notes client, you might need to upload the Notes ID tothe vault manually. If it is not stored in the vault, web client, Notes Traveler, andBlackBerry® smartphone users cannot perform secure mail operations. Otherlimitations also apply, as outlined in this topic.
Before you begin
Make sure that you have a copy of the user's Notes ID file and password.
If you are unsure whether to store a Notes ID in the vault for web client users,read Planning for Notes IDs.
About this task
Upload a Notes ID to the ID vault for users who have an ID file, but who do notuse the Notes client:v If they are starting with new mail files.
Chapter 7. Administering user accounts 269
v If the mail file was transferred to the service without an imported Notes ID. Inthis case, if you do not store the ID in the vault, the user cannot read oldencrypted messages if there are any.
Note: Alternatively, web client users can upload Notes IDs themselves. For moreinformation, see the topic about importing a Notes ID in the SmartCloud Notesweb section of the SmartCloud Notes user documentation.
Typically, this procedure is not necessary in these situations:v For Notes client users, because the ID is automatically uploaded to the vault at
some point after the client connects to the service.v For web client users whose existing on-premises mail files were transferred to
the service, and whose Notes ID was imported into the mail file before thetransfer. In this case, the Notes ID is uploaded to the vault the first time a userperforms a secure mail operation, such as signing mail, or reading or sendingencrypted mail.
v For web client users who never had a Notes ID and who do not want toperform secure operations.
For users who have a Notes ID, if the ID is not stored in the service vault, thefollowing limitations apply:v Web client, IBM Notes Traveler, and BlackBerry® smartphone users cannot
perform secure operations, which include signing mail, and reading or sendingencrypted mail.
v Notes ID password resets and ID recovery are not available.v If a user's name changes, the user's Notes name cannot be changed.
You can also use this procedure to replace a Notes ID in the vault.
Note: You cannot use this procedure to upload an ID file that is enabled for Notesshared login (NSL). To allow the ID to be uploaded manually, disable NSL. Or, usethe Notes client with the service, so that the ID file can be uploaded to the vaultautomatically. For more information about Notes shared login, see the securitysection of the IBM Domino documentation.
Procedure1. Log on to the service as an administrator.2. If your account also has the User role, click Admin > Manage Organization.3. In the System Settings section of the navigation pane, click IBM SmartCloud
Notes.4. Click Users.5. In the Search box, type the beginning characters of any of the following user
values to display the user's name:v Distinguished name, for example, Samantha Daryn/Renovations.v Internet email address, for example, [email protected] Last name, for example, Daryn.
Note: You cannot use the wildcard character (*) when you search.A “starts with” search is done and the names of any users with matchingvalues in the directory are displayed. For example, the results of a search on mainclude the names of users with the following values in the directory:v Madison Armond/Renovations
270 SmartCloud Notes: Administering SmartCloud Notes: Hybrid Environment March 2015

v masmith@renovations
v Kristin MacGyver
This search does not match the following values:v Emarie Klein/Renovations
v tamado@renovations
v Ted Amado
Search results can include a maximum of 1000 names.6. Click the user's name in the search results.7. Under Available actions for this user, click Upload Notes ID File.8. Browse for the Notes ID file, and optionally provide the password if one exists.
Results
The Notes ID is stored in the vault. Note, however, that the password for the ID isnot stored in the vault.Related information:
SmartCloud Notes user documentation
IBM Domino documentation
Viewing subscriptionsYou can view the subscriptions assigned to existing users, or view thesubscriptions that are available to assign to new service users. In addition to themail service, other subscriptions can include collaboration services. Third-partyintegrated applications may also display if your organization has enabled them.
About this task
Use these steps to view the available subscriptions, and find out how many useraccounts are available for each subscription.
Procedure1. Log on to the service as an administrator.2. If your account also has the User role, click Admin > Manage Organization.3. In the navigation pane, click Subscriptions.
Viewing assigned subscriptionsAbout this task
To view the subscriptions that are assigned to an existing user, perform thefollowing steps.
Procedure1. Log on to the service as an administrator.2. If your account also has the User role, click Admin > Manage Organization.3. In the navigation pane, click User Accounts.4. Locate the user name. The assigned subscriptions are listed in the Subscription
column.
Chapter 7. Administering user accounts 271
Managing IBM Notes Traveler devicesFor each user with an IBM Notes Traveler subscription, you can view informationabout the user's mobile device. You can also wipe the device to remove sensitivedata from it, for example, if the device is lost or stolen.
About this task
Note the following information about wiping a device:v After you issue a wipe request, the device cannot be used with the service again
unless you cancel a pending wipe or reactivate the device.v If you remove a user's IBM Notes Traveler subscription, the device information
is no longer available in the service and you cannot perform this procedure. Inthis case, the user can request a device reset through the mobile carrier.
v If you cancel a pending wipe, the data is not wiped from the device.v Wipe options can be shown for devices that do not support them. If you select
a wipe option, the status field indicates if a device does not support it.v If a wipe is done outside the IBM Notes Traveler service, for example, if a user
resets a device, the status is not shown.
Procedure1. Log on to the service as an administrator.2. If your account also has the User role, click Admin > Manage Organization.3. In the System Settings section of the navigation pane, click IBM SmartCloud
Notes.4. Click Users in SmartCloud Notes Administration.5. In the Search box, type the beginning characters of any of the following user
values to display the user's name:v Distinguished name, for example, Samantha Daryn/Renovations.v Internet email address, for example, [email protected] Last name, for example, Daryn.
Note: You cannot use the wildcard character (*) when you search.A “starts with” search is done and the names of any users with matchingvalues in the directory are displayed. For example, the results of a search on mainclude the names of users with the following values in the directory:v Madison Armond/Renovations
v masmith@renovations
v Kristin MacGyver
This search does not match the following values:v Emarie Klein/Renovations
v tamado@renovations
v Ted Amado
Search results can include a maximum of 1000 names.6. Click the user's name in the search results.7. Click Manage IBM Notes Traveler Devices to see information about the user's
device such as the name, the time it was last synchronized, and the status of awipe request.
272 SmartCloud Notes: Administering SmartCloud Notes: Hybrid Environment March 2015
If you do not see this option, the selected user does not have a IBM NotesTraveler subscription.
8. To remove data from the device, click one of the following options:
Option Description
Wipe Device Select this option to remove the IBM NotesTraveler application and all personal dataand settings from the device. After deviceconfirmation, the device is reset to thefactory default settings. This option affectsall users of the device.
Wipe Traveler Data Select this option to remove only the IBMNotes Traveler application and its data, butleave personal data on the device. Thisoption affects only the selected user.
9. If you issue a wipe request, the following options are available:
Option Description
Refresh Device List Shows the status of a wipe request.
Cancel Wipe Cancels a wipe request that shows the statusWipe pending.
Reactivate Reactivates a device in the service after awipe request is complete or fails with anerror.
Results
The following table describes the messages that you might see in the Wipe statusfield after you issue a wipe request and click Refresh Device List.
Table 79. Wipe status messages
Wipe status message Description
Wipe pending Wipe Device or Wipe Traveler Data wasselected. The request will be processed whenthe device is turned on.
Deactivated The device was wiped successfully and is nolonger connected to IBM Notes Traveler. IfWipe Traveler Data was selected, WipeDevice can still be selected.
Hard reset failed Wipe Device was selected but the devicecannot be reset to factory default settings.This error usually indicates that the device isan older model that does not support hardresets.
Hard reset confirmed Wipe Device was selected and the deviceconfirmed the request.
Application wipe failed A Wipe Traveler Data request failed. Thiserror can occur for older device models.
Application wipe confirmed Wipe Traveler Data was selected and thedevice confirmed the request.
Not requested No wipe has been requested.
Chapter 7. Administering user accounts 273

Related tasks:“Enabling application passwords” on page 139Application passwords can be used to provide a secure login for applications thatdo not support forms-based authentication. For example, they can be used toaccess applications that require passwords on a mobile device or for organizationsthat use federated identity and service login passwords are not used. When youenable application passwords, you also have the option of requiring the use ofapplication passwords, and of allowing mobile users to bypass IP restrictions.“Preparing for Notes Traveler devices” on page 195Before enabling users to use IBM Notes Traveler mobile devices with the service,prepare your environment and the devices.
Managing BlackBerry smartphonesAfter activating a user’s BlackBerry® smartphone, perform any of the followingtasks to manage it.Related concepts:“Settings enforced for BlackBerry smartphones” on page 205This topic describes the settings that the service currently enforces for BlackBerry®
smartphones.Related tasks:“Getting started with BlackBerry devices” on page 238If BlackBerry devices supported by a Hosted BlackBerry Services subscription areused, complete the following tasks to begin using the devices with the service.
Reactivating a user's BlackBerry smartphoneIf a user experiences a problem using a BlackBerry® smartphone, activating it againoften resolves the problem. Before activating again, back up the smartphone andthen wipe it. Wiping removes all data and prevents duplicate Contacts andCalendar entries from occurring when you activate it again.
About this task
Alternatively, the user can reactivate the BlackBerry.
Procedure1. Back up the smartphone. For instructions, see the BlackBerry Knowledge Base
article How to back up the data on a BlackBerry smartphone.2. Log on to the service as an administrator.3. If your account also has the User role, click Admin > Manage Organization.4. In the System Settings section of the navigation pane, click IBM SmartCloud
Notes.5. Under User and Groups, click Users.6. In the Search box, type the beginning characters of any of the following user
values to display the user's name:v Distinguished name, for example, Samantha Daryn/Renovations.v Internet email address, for example, [email protected] Last name, for example, Daryn.
Note: You cannot use the wildcard character (*) when you search.A “starts with” search is done and the names of any users with matching
274 SmartCloud Notes: Administering SmartCloud Notes: Hybrid Environment March 2015
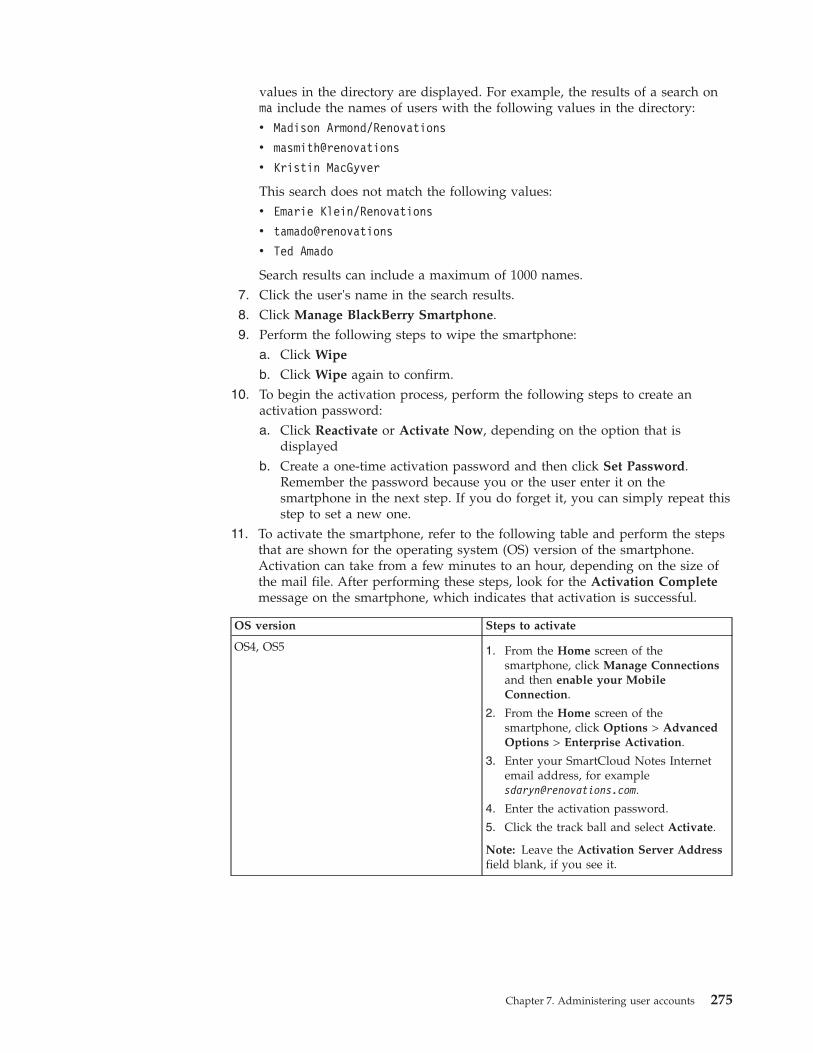
values in the directory are displayed. For example, the results of a search onma include the names of users with the following values in the directory:v Madison Armond/Renovations
v masmith@renovations
v Kristin MacGyver
This search does not match the following values:v Emarie Klein/Renovations
v tamado@renovations
v Ted Amado
Search results can include a maximum of 1000 names.7. Click the user's name in the search results.8. Click Manage BlackBerry Smartphone.9. Perform the following steps to wipe the smartphone:
a. Click Wipe
b. Click Wipe again to confirm.10. To begin the activation process, perform the following steps to create an
activation password:a. Click Reactivate or Activate Now, depending on the option that is
displayedb. Create a one-time activation password and then click Set Password.
Remember the password because you or the user enter it on thesmartphone in the next step. If you do forget it, you can simply repeat thisstep to set a new one.
11. To activate the smartphone, refer to the following table and perform the stepsthat are shown for the operating system (OS) version of the smartphone.Activation can take from a few minutes to an hour, depending on the size ofthe mail file. After performing these steps, look for the Activation Completemessage on the smartphone, which indicates that activation is successful.
OS version Steps to activate
OS4, OS5 1. From the Home screen of thesmartphone, click Manage Connectionsand then enable your MobileConnection.
2. From the Home screen of thesmartphone, click Options > AdvancedOptions > Enterprise Activation.
3. Enter your SmartCloud Notes Internetemail address, for [email protected].
4. Enter the activation password.
5. Click the track ball and select Activate.
Note: Leave the Activation Server Addressfield blank, if you see it.
Chapter 7. Administering user accounts 275
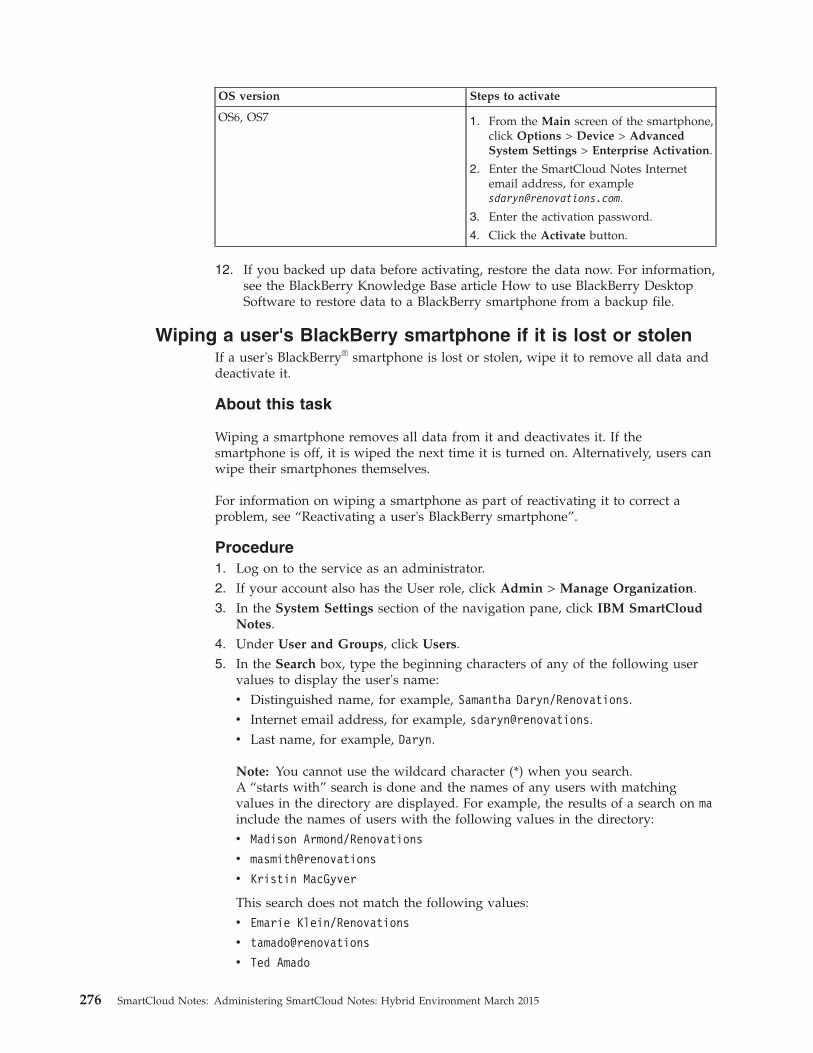
OS version Steps to activate
OS6, OS7 1. From the Main screen of the smartphone,click Options > Device > AdvancedSystem Settings > Enterprise Activation.
2. Enter the SmartCloud Notes Internetemail address, for [email protected].
3. Enter the activation password.
4. Click the Activate button.
12. If you backed up data before activating, restore the data now. For information,see the BlackBerry Knowledge Base article How to use BlackBerry DesktopSoftware to restore data to a BlackBerry smartphone from a backup file.
Wiping a user's BlackBerry smartphone if it is lost or stolenIf a user's BlackBerry® smartphone is lost or stolen, wipe it to remove all data anddeactivate it.
About this task
Wiping a smartphone removes all data from it and deactivates it. If thesmartphone is off, it is wiped the next time it is turned on. Alternatively, users canwipe their smartphones themselves.
For information on wiping a smartphone as part of reactivating it to correct aproblem, see “Reactivating a user's BlackBerry smartphone”.
Procedure1. Log on to the service as an administrator.2. If your account also has the User role, click Admin > Manage Organization.3. In the System Settings section of the navigation pane, click IBM SmartCloud
Notes.4. Under User and Groups, click Users.5. In the Search box, type the beginning characters of any of the following user
values to display the user's name:v Distinguished name, for example, Samantha Daryn/Renovations.v Internet email address, for example, [email protected] Last name, for example, Daryn.
Note: You cannot use the wildcard character (*) when you search.A “starts with” search is done and the names of any users with matchingvalues in the directory are displayed. For example, the results of a search on mainclude the names of users with the following values in the directory:v Madison Armond/Renovations
v masmith@renovations
v Kristin MacGyver
This search does not match the following values:v Emarie Klein/Renovations
v tamado@renovations
v Ted Amado
276 SmartCloud Notes: Administering SmartCloud Notes: Hybrid Environment March 2015
Search results can include a maximum of 1000 names.6. Click the user's name in the search results.7. Click Manage BlackBerry Smartphone.8. Click Wipe
9. Click Wipe again to confirm.
Setting a device password on a user's BlackBerry smartphoneA device password helps to prevent unauthorized access to a user's BlackBerry®
smartphone. Use this procedure to set an initial device password on a user'ssmartphone or to set a new device password if a user has forgotten the currentone.
About this task
The device password is a different password than the one-time activationpassword used to activate the smartphone.
Procedure1. Log on to the service as an administrator.2. If your account also has the User role, click Admin > Manage Organization.3. In the System Settings section of the navigation pane, click IBM SmartCloud
Notes.4. Under User and Groups, click Users.5. In the Search box, type the beginning characters of any of the following user
values to display the user's name:v Distinguished name, for example, Samantha Daryn/Renovations.v Internet email address, for example, [email protected] Last name, for example, Daryn.
Note: You cannot use the wildcard character (*) when you search.A “starts with” search is done and the names of any users with matchingvalues in the directory are displayed. For example, the results of a search on mainclude the names of users with the following values in the directory:v Madison Armond/Renovations
v masmith@renovations
v Kristin MacGyver
This search does not match the following values:v Emarie Klein/Renovations
v tamado@renovations
v Ted Amado
Search results can include a maximum of 1000 names.6. Click the user's name in the search results.7. Click Manage BlackBerry Smartphone.8. Click Set Device Password.9. Enter a password and then click Set Password. The password must be at least
eight characters, including at least one numeric character and at least onealphabetic character.
Chapter 7. Administering user accounts 277
Results
A message indicating that you have changed the password is displayed on thesmartphone.
What to do next
Provide the password to the user.Related concepts:“Settings enforced for BlackBerry smartphones” on page 205This topic describes the settings that the service currently enforces for BlackBerry®
smartphones.
Removing a BlackBerry subscription from a user accountYou can remove a BlackBerry® subscription from a user account.
Procedure1. Log on to the service as an administrator.2. If your account also has the User role, click Admin > Manage Organization.3. In the navigation pane, click User Accounts.4. Click the arrow next to a user's name, select Edit User Account, and click Next.5. In the Subscription Add-ons section, clear SmartCloud Notes for Hosted
BlackBerry Services.6. Click Next and Finish.
Results
The user can no longer use a BlackBerry smartphone with SmartCloud Notes.
Frequently asked questions about BlackBerry smartphoneadministration
Table 80. Frequently asked questions about BlackBerry® smartphone administration
Question Answer
How do I know if a user has a BlackBerrysmartphone subscription?
1. From SmartCloud Notes Administration,click Users.
2. Search for the user's name and thenselect it.
3. Do either of the following steps:
v Select Show BlackBerry only to showonly users with BlackBerrysmartphone subscriptions and see ifthe user's name is listed.
v Click the user's name and see if thevalue of the BES subscription fieldhas been set to Enabled.
278 SmartCloud Notes: Administering SmartCloud Notes: Hybrid Environment March 2015
Table 80. Frequently asked questions about BlackBerry® smartphoneadministration (continued)
Question Answer
How do I know if a user's smartphone isactivated?
1. From SmartCloud Notes Administration,click Users.
2. Search for the user's name and thenselect it.
3. Click Manage BlackBerry Smartphone.
4. If the user's smartphone is not activated,a message is displayed indicating that itneeds to be activated.
What do I do if BlackBerry activations fails? Perform these steps:
1. If the BlackBerry smartphone is an OS5or earlier version, from the Home screenclick Manage Connections and thenenable your Mobile Connection.
2. Make sure that the user has anEnterprise plan with the wireless carrierrather than a Personal plan. If there isno Enterprise Activation option on thesmartphone, the user has a Personalplan and needs to change to anEnterprise Plan. After changing to theEnterprise Plan, reactivate theBlackBerry.
3. Reactivate the BlackBerry smartphone.
If I set an activation password, can a useroverride it?
Yes, the activation password is the last oneset by either the administrator or the user.
What do I do if there are duplicate Calendaror Contact entries on a smartphone?
Wipe the smartphone and then reactivate it.
How do I tell which operating system (OS)version a BlackBerry smartphone uses?
See the BlackBerry Knowledge Base articleHow to check the model number andversion of installed BlackBerry devicesoftware on a BlackBerry smartphone.
How can I display a user's BlackBerrysmartphone device model and other deviceinformation?
1. From SmartCloud Notes Administration,click Users.
2. Search for the user's name and thenselect it.
3. Click Manage BlackBerry Smartphone.
Chapter 7. Administering user accounts 279

280 SmartCloud Notes: Administering SmartCloud Notes: Hybrid Environment March 2015
Chapter 8. Integrating a single domain (Example)
This example illustrates how a fictitious company, Renovations, integrates serversin a single IBM Domino domain with the IBM SmartCloud Notes service.
About this task
Renovations plans to move the mail files of 500 of its 1000 users to mail servers inthe service. The mail files of the other 500 users will remain on-premises on thecompany mail servers. The service users and the on-premises users willcommunicate by mail, look up free time for each other, schedule meetings witheach other, and reserve shared meeting resources.
The current Domino deployment at Renovations consists of a single Dominodomain, Renovations. This domain includes the servers described in the followingtable.
Table 81. Servers in the Renovations domain
Domino server name Current Domino version Current server function
Dirhub1/Renovations 8.0 Directory hub that replicatesto the other servers in thedomain
Mailhub1/Renovations 8.0 Mail routing hub that routesmail to and from otherservers in the domain
Mail1/Renovations 8.0 User mail server that is alsoused to look up the free timeof users
Mail2/Renovations 8.0 User mail server that is alsoused to look up the free timeof users
To integrate these on-premises servers with the service, Bill Ranney, the leadDomino administrator at Renovations, performs the following steps.1. Preparing the on-premises environment.2. Configuring the service.
Note: This example does not illustrate the process of provisioning users, whichoccurs after the service is configured.
Preparing the on-premises environment (Example)To prepare the on-premises environment, Bill Ranney prepares the on-premisesdirectory synchronization and mail hub servers, prepares the on-premises passthruserver domain, configures firewalls, prepares the Global Domain document, andcreates the certifier and names for mail servers.
© Copyright IBM Corp. 2011 281

Preparing the on-premises directory synchronization and mailhub servers (Example)
Bill Ranney prepares a directory synchronization server and a mail hub server inthe Renovations domain.
About this task
A directory synchronization server is an on-premises server with which the serviceconnects to replicate Domino directories. The service regularly initiates a Pull andPush replication operation to synchronize the on-premises Domino directories withreplicas on servers in the service.
A mail hub server is an on-premises server used to route mail between serviceusers and on-premises users.
After getting input from other members of the Renovations IT staff, Bill decides touse one directory synchronization server, the existing server, Dirhub1/Renovations.He also decides to use one mail hub server, the existing server,Mailhub1/Renovations.
Bill upgrades all of the servers in the domain from Lotus® Domino 8.0 to the latestversion available, Lotus Domino 8.5.2. He also upgrades the user mail servers,Mail1/Renovations and Mail2/Renovations, so that on-premises users who usethose mail servers can look up free time for service users.
The following information about this task is important to remember.v On-premises mail hub servers must run Lotus Domino 8.5.1 Fix Pack 2 or
higher.v Mail servers of on-premises users that look up free time for service users must
run Lotus Domino 8.5.1 Fix Pack 2 or higher.v One or two on-premises directory synchronization servers are allowed.v One or two on-premises mail hub servers are allowed.v One server can function as both a directory synchronization server and as a mail
hub server.
Preparing the on-premises passthru server domain (Example)Bill Ranney prepares the on-premises passthru servers, placing them in their ownDomino domain. The service uses the servers in the domain as passthru serversthrough which it connects to the on-premises directory synchronization servers andmail hub servers.
About this task
Bill installs and sets up two new Domino 8.5.2 servers, Passthru1/Renovations andPassthru2/Renovations, in a new Domino domain, SCNPassthru.
During server setup, he selects the option "I want to use an existing certifier IDfile" so that he can certify the new servers under the existing /Renovations
282 SmartCloud Notes: Administering SmartCloud Notes: Hybrid Environment March 2015
organization certifier. Although an organization certifier and Domino domain oftenshare the same name, they are independent entities. In this case, the passthrudomain name and the certifier name are different.
When Bill runs the Domain Configuration tool later, connection documents arecreated that enable the passthru connections to Dirhub1/Renovations andMailhub1/Renovations in the Renovations domain.
The following information about this task is important to remember.v For optimum security, a on-premises passthru server domain should be in a
dedicated Domino domain that is located in the corporate demilitarized zone(DMZ) between an inner and outer firewall.
v Servers in an on-premises passthru server domain must be certified under thesame organization certifier as the directory synchronization servers and mail hubservers.
v One or two servers passthru servers are allowed. In this example, they are inone Domino domain, but they can be in separate domains.
v A passthru server domain manages only incoming connections from the service.Connections from on-premises clients and servers to the service do not use thepassthru domain.
v Install Domino 8.5.2 or later on servers in a passthru domain for fastest responsetime for freetime requests from service users to on-premises users
Configuring firewalls (Example)Bill works with the Renovations IT staff to configure inner and outer firewalls.
About this task
The following tables summarizes the configuration. Note that this exampleillustrates just one approach to firewall configuration; others are possible.
Table 82. Outer firewall - inbound connections
Setting Value
Port TCP/IP port 1352
Source addresses Unpublished IP addresses that the servicefirewall generates. The IBM CustomerService Representative provided these to thecompany.
Destination addresses passthru1.renovations.com
passthru2.renovations.com
Table 83. Outer firewall - outbound connections at Renovations
Setting Value
Port TCP/IP port 1352
Source addresses All
Chapter 8. Integrating a single domain (Example) 283
Table 83. Outer firewall - outbound connections at Renovations (continued)
Setting Value
Destination addresses notes.na.collabserv.com
Table 84. Inner firewall - inbound connections at Renovations
Setting Value
Port TCP/IP 1352
Source addresses passthru1.renovations.com
passthru2.renovations.com
Destination addresses dirhub1.renovations.com
mailhub1.renovations.com
Table 85. Inner firewall - outbound connections
Setting Value
Port TCP/IP 1352
Source addresses All
Destination addresses notes.na.collabserv.com
Preparing the Global Domain document (Example)Bill Ranney ensures that the Internet domain, renovations.com, is correctly definedin a Global Domain document.
About this task
Renovations owns the Internet domain renovations.com. The domain is used toform the Internet address of users in the Renovations Domino Directory, forexample, [email protected].
Bill performs the following steps to verify that the domain has a Global Domaindocument that is correctly configured.1. Open the Renovations Domino Directory.2. Select Configuration > Messaging > Domains.3. Open the Global Domain document for renovations.com.4. Verify that the document is correctly configured.
The following table shows the verified Global Domain document forrenovations.com
Table 86. Verified Global Domain document for renovations.com
Tab Field Value
Basics Domain type Global Domain
Basics Global domain name renovations.com
Basics Global domain role R5/R6/R7/R8
Basics Use as default GlobalDomain
Not applicable because thereis only one Global Domaindocument in the RenovationsDomino Directory.
284 SmartCloud Notes: Administering SmartCloud Notes: Hybrid Environment March 2015
Table 86. Verified Global Domain document for renovations.com (continued)
Tab Field Value
Restrictions Domino domains and aliases Not applicable because theservice does not use Dominodomain information forrouting.
Conversions - SMTP AddressConversions
Local primary Internetdomain
renovations.com
Conversions - SMTP AddressConversions
Alternate Internet domainaliases
None
The following information about this task is important to remember.v Each Internet domain that a company owns and uses for Internet mail requires a
corresponding valid Global Domain document. The document must be in aDomino Directory that replicates to the service during directory synchronization.During account setup, the Global Domain document is used to show the domainin a list of domains to be verified.
v Routing of incoming Internet mail addressed to service users is configured anddone on-premises. The service performs outbound Internet mail routing only.
v Only two fields in the Conversions > SMTP Address Conversions section of aGlobal Domain document are used by the service: Local primary Internetdomain and Alternate Internet domain aliases. The remaining fields in theSMTP Address Conversions section apply to incoming Internet mail and aretherefore ignored by the service.
Creating the certifier and names for mail servers (Example)Bill Ranney creates the OU certifier used to certify and name the Renovations mailservers in the service.
About this task
Bill decides to use Mail as the base name for the company mail servers in theservice. He provides the base name later when configuring account settings. Thebase name and OU certifier combine to form mail server namesMail1/SCN/Renovations, Mail2/SCN/Renovations, and so on.
Bill creates the OU certifier /SCN/Renovations to use to certify and name theRenovations service mail servers. He saves the password-protected certifier ID file,scn_renovations.id, to a local, secure location so that he can easily select it whenuploading it to the service when configuring account settings later.
The following information about this task is important to remember.
Chapter 8. Integrating a single domain (Example) 285
v It is important that you choose and create your service mail server OU certifiercarefully. After you upload the OU certifier ID to the service, you cannot changeto an ID with a different certifier name.
v The OU certifier you provide for your service mail servers must be under thesame organization certifier as the passthru servers, directory synchronizationservers, and primary mail hub servers. It can be at any level below theorganization certifier. This OU certifier must be unique and used only for theservice mail servers; the OU certifier cannot be used on-premises.
v The certifier used for service users must trust the service mail server OUcertifier, and vice versa. If any users are certified under a different organizationthan the OU certifier, you must create the required cross-certificates to establishtrust. The cross-certificates must be replicated to the directory synchronizationservers.
Configuring the service (Example)After preparing the on-premises environment, Bill Ranney perform the stepsrequired to configure the service to integrate with on-premises servers.
Completing an account settings worksheet (Example)Bill Ranney completes the following worksheet to gather the information requiredto configure account settings.
About this task
Table 87. Account settings worksheet
Information required to configure accountsettings Value
Local file path of the OU certifier ID fileused to certify the mail servers of serviceusers
C:\scn_renovations.id (password-protected)
(Certifier name: /SCN/Renovations
Domino passthru server domain SCNPassthru
Primary Domino passthru server Passthru1/Renovations
Primary passthru server hostname or IPaddress
passthru1.renovations.com
Secondary Domino passthru server Passthru2/Renovations
Secondary passthru server hostname or IPaddress
passthru2.renovations.com
Primary Domino on-premises mail hubserver
Mailhub1/Renovations
Secondary on-premises mail hub server None
Base name for mail servers of service users Mail
Primary on-premises directorysynchronization server
Dirhub1/Renovations
Local file path of each Domino Directory onthe primary directory synchronization serverto replicate to the service
C:\syncdir\names.nsf
Secondary directory synchronization server None
286 SmartCloud Notes: Administering SmartCloud Notes: Hybrid Environment March 2015
Configuring account settings (Example)Bill Ranney uses IBM SmartCloud Notes Administration on http://www.ibmcloud.com/social to configure account settings for the company.
About this task
Bill logs on to http://www.ibmcloud.com/social as the first company administrator.He uses the completed account settings worksheet to configure account settings.He performs the following tasks to configure account settings, as described in thetopic Roadmap to configuring a hybrid environment.v Providing a certifier ID filev Specifying one or more passthru serversv Specifying a mail routing serverv Creating a base name for your mail serversv Specifying a Domino Directory synchronization server
The following information about this task is important to remember.v An IBM Customer Service Representative must add the SmartCloud Notes
subscription for a company before account settings can be configured.v Adding the company subscription creates the first company administrator
account for the company. The first company administrator receives an emailinvitation with a URL to use to log on to the Connections Cloud website for thefirst time.
v When configuring account settings, the company administrator uploads theorganizational unit certifier ID file to use for certification of the mail servers ofservice users. It is important that the administrator verifies that the selectedCertifier ID file is correct before clicking the Upload button. After the certifier IDfile is uploaded, it cannot be changed to an ID with a different certifier name.
v When configuring account settings, you can provide the host name or the IPaddress of a passthru server. Best practice is to provide a host name. If youprovide an IP address and the IP address changes in the future, you mustconfigure account settings and run the Domain Configuration tool again.
Downloading and running the Domain Configuration tool(Example)
After Bill Ranney configures account settings, he downloads and runs the DomainConfiguration tool. The tool takes the information Bill provides in account settingsand makes required changes to the Domino directories of the SCNPassthru domainand Renovations domain.
About this task
The directory changes made by the tool configure connections, routing, andreplication between the servers in the service and the on-premises servers.
Chapter 8. Integrating a single domain (Example) 287
The following information about this task is important to remember.v Do not edit the directory content added by the tool. For example, do not edit
changes to the ACL or to Connection documents. Doing so prevents properoperation of the service. Refer to the report generated by the tool to see the exactdirectory changes the tool makes
v The IBM Notes client from which the tool is run must be able to connect to thepassthru servers in the passthru domain. The client must also be able to connectto the directory synchronization and mail hub servers in the on-premises hubdomain. Firewall rules at your company might prevent connections fromsystems inside the firewall to the passthru servers. In this case, use a Notesclient running on a system connected outside the firewall. Allow a directconnection to the passthru servers, and through them, connect to the servers inthe on-premises hub domain.
v The person who runs the tool must have Full Remote Console access to thepassthru servers, directory synchronization servers, and mail hub servers. Thisaccess is granted through the Full Remote Console Administrators field in eachServer document.
Verifying the Internet domain name (Example)After Bill Ranney tests network connections, he verifies ownership of the Internetdomain, renovations.com.
About this task
This step confirms that the service is allowed to use renovations.com for theInternet mail address of users at Renovations. To verify ownership, Bill creates aCNAME record for renovations.com through the domain hosting service that thecompany uses. A CNAME record is a type of resource record for a domain. Thefact that Bill can access DNS settings to create a CNAME record forrenovations.com is what proves ownership of the domain to the service.
To verify domain ownership, Bill follows instructions in the topic "VerifyingInternet domain names in a hybrid environment." When he clicks VerifyOwnership in the Internet Domain Verification window, he is given the followinginformation just for his company to use to add to a new CNAME record:v The unique key, domino-3ktteaarn-rules
v The domain to point to, collabserv.com
He clicks Begin Verification and then creates the CNAME record on the hostingservice with the required information. To verify ownership, the LotusLive Notes™
service connects to domino-3ktteaarn-rules.renovations.com.
The following information about this task is important to remember.
288 SmartCloud Notes: Administering SmartCloud Notes: Hybrid Environment March 2015
v The list of domain names to be verified that is shown in the Internet DomainVerification window is derived from on-premises Global Domain documents.These documents replicate to the service during directory synchronization.
v The key that is provided in the Internet Domain Verification window mustexactly match the key used to create the CNAME record. If there is a mismatch,domain verification fails.
v The service can take up to 48 hours to verify ownership, but it usually takes lesstime.
Testing network connections (Example)After Bill Ranney runs the Domain Configuration tool, he waits for directorysynchronization to complete, and then tests network connections betweenon-premises servers and the service.
About this task
To test network connections, Bill first performs the task described in "Checkingnetwork connections from the service to on-premises servers." After doing so, hesees the following pair of messages listed for the server Dirhub1/Renovations andfor the server Mailhub1/Renovations. These messages indicate that the service canconnect to the on-premises servers.
"Successfully accessed mail.box"
"Successfully accessed Domino Directory"
Next, Bill performs the task, "Checking network connections from on-premisesservers to the service." He tests that the on-premises mail hub serverMailhub1/Renovations can connect to the service mail server Mail1/SCN/Renovations. To do so, he enters the command trace Mail1/SCN/Renovations fromthe Domino server console of the Mailhub1/Renovations server. He sees themessage Connected to server Mail1/SCN/Renovations in the output, whichindicates a successful connection.
When using the trace command, Bill ignores the message Error connecting toserver_name: Server error: You are not authorized to use the server. Thismessage indicates only that an attempt to connect anonymously failed.Anonymous connections are not allowed, so this is expected behavior.
The following information about this task is important to remember.v The on-premises directory synchronization servers and mail hub servers in the
on-premises hub domain must be running.
Issuing a Vault Trust Certificate (Example)Bill Ranney issues a Vault Trust Certificate to the ID vault in the service. The VaultTrust Certificate establishes that the vault is trusted to store user IDs that arecertified under the certifier that issues the certificate.
Chapter 8. Integrating a single domain (Example) 289
About this task
All the service users at Renovations are certified under the /Renovations certifier,so just one Vault Trust Certificate is required, issued from /Renovations. Billfollows the steps described in Issuing a Vault Trust Certificate. From anon-premises Domino Administrator client, he issues a Vault Trust Certificate in theDomino Directory of the Renovations domain. He sees the vault document/IDVault_97656623 for Renovations in the Configuration > Security > ID Vaultsview of the Domino Directory. He issues the trust certificate from the certifier/Renovations to /IDVault_97656623.
The following information about this task is important to remember.v After the Vault Trust Certificate is created, it replicates to the service during
directory synchronization.
Example illustrationsThe following topics provide pictures to illustrate the operation of the service atRenovations with single-domain integration.
Directory synchronization at RenovationsThis picture illustrates directory synchronization of the Renovations domainDomino Directory.
290 SmartCloud Notes: Administering SmartCloud Notes: Hybrid Environment March 2015
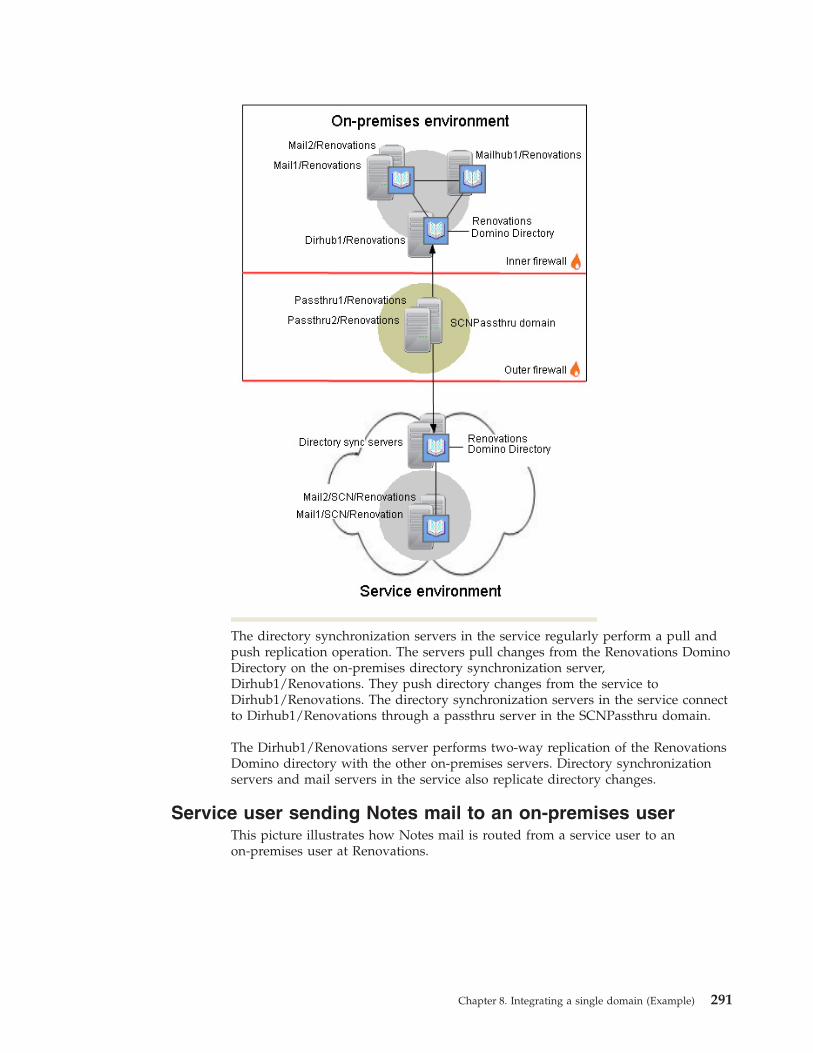
The directory synchronization servers in the service regularly perform a pull andpush replication operation. The servers pull changes from the Renovations DominoDirectory on the on-premises directory synchronization server,Dirhub1/Renovations. They push directory changes from the service toDirhub1/Renovations. The directory synchronization servers in the service connectto Dirhub1/Renovations through a passthru server in the SCNPassthru domain.
The Dirhub1/Renovations server performs two-way replication of the RenovationsDomino directory with the other on-premises servers. Directory synchronizationservers and mail servers in the service also replicate directory changes.
Service user sending Notes mail to an on-premises userThis picture illustrates how Notes mail is routed from a service user to anon-premises user at Renovations.
Chapter 8. Integrating a single domain (Example) 291
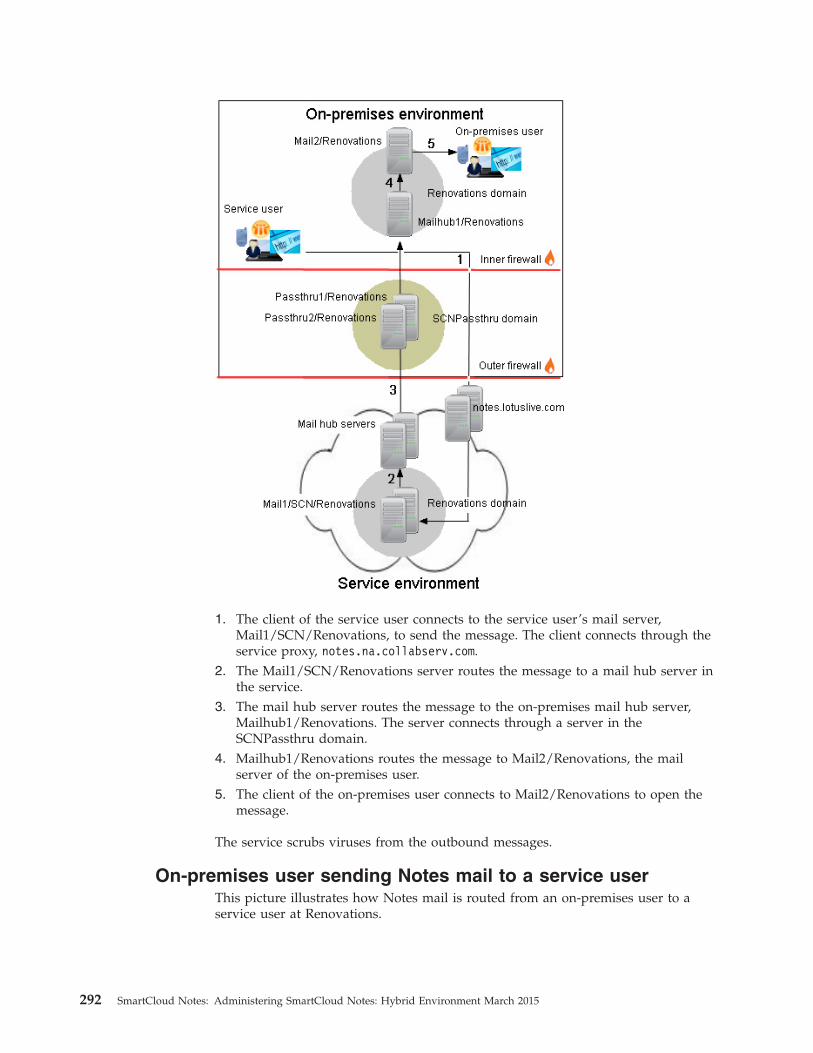
1. The client of the service user connects to the service user’s mail server,Mail1/SCN/Renovations, to send the message. The client connects through theservice proxy, notes.na.collabserv.com.
2. The Mail1/SCN/Renovations server routes the message to a mail hub server inthe service.
3. The mail hub server routes the message to the on-premises mail hub server,Mailhub1/Renovations. The server connects through a server in theSCNPassthru domain.
4. Mailhub1/Renovations routes the message to Mail2/Renovations, the mailserver of the on-premises user.
5. The client of the on-premises user connects to Mail2/Renovations to open themessage.
The service scrubs viruses from the outbound messages.
On-premises user sending Notes mail to a service userThis picture illustrates how Notes mail is routed from an on-premises user to aservice user at Renovations.
292 SmartCloud Notes: Administering SmartCloud Notes: Hybrid Environment March 2015
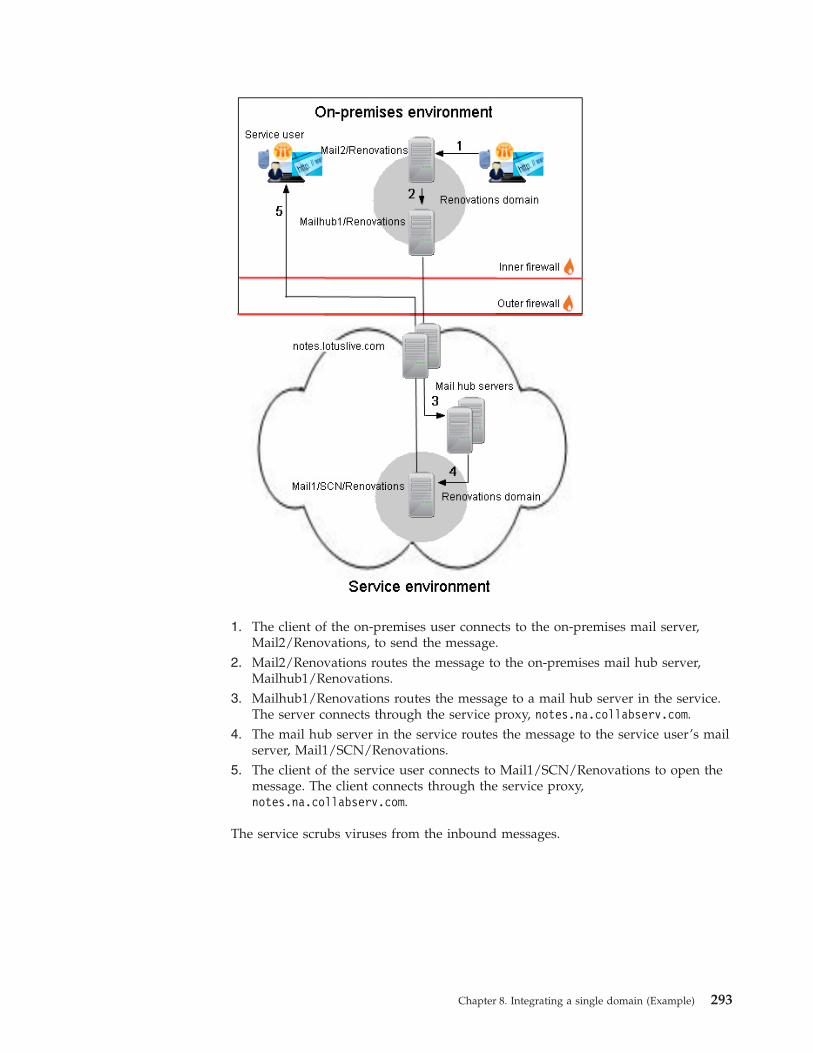
1. The client of the on-premises user connects to the on-premises mail server,Mail2/Renovations, to send the message.
2. Mail2/Renovations routes the message to the on-premises mail hub server,Mailhub1/Renovations.
3. Mailhub1/Renovations routes the message to a mail hub server in the service.The server connects through the service proxy, notes.na.collabserv.com.
4. The mail hub server in the service routes the message to the service user’s mailserver, Mail1/SCN/Renovations.
5. The client of the service user connects to Mail1/SCN/Renovations to open themessage. The client connects through the service proxy,notes.na.collabserv.com.
The service scrubs viruses from the inbound messages.
Chapter 8. Integrating a single domain (Example) 293

Service user receiving Internet mailThis picture illustrates how Internet mail is routed to a service user at Renovations.
1. A client on the Internet addresses mail to the service user at renovations.com.The mail is sent to the on-premises SMTP router on Mailhub1/Renovations,which is configured to route incoming mail for users in the renovations.comdomain.
2. Mailhub1/Renovations routes the message to a mail hub server in the service.Malhub1/Renovations connects to the hub server through the service proxy,notes.na.collabserv.com. An SMTP server in the on-premises DMZ performsmail hygiene on the message beforehand.
3. The mail hub server routes the message to Mail1/SCN/Renovations, theservice user’s mail server.
4. The service user client connects to Mail1/SCN/Renovations to open themessage. The client connects to the server through the service proxy,notes.na.collabserv.com
Service user sending Internet mailThis picture illustrates how Internet mail is routed from a service user atRenovations. The service manages the routing; a company-controlled SMTP host isnot used in this example.
294 SmartCloud Notes: Administering SmartCloud Notes: Hybrid Environment March 2015
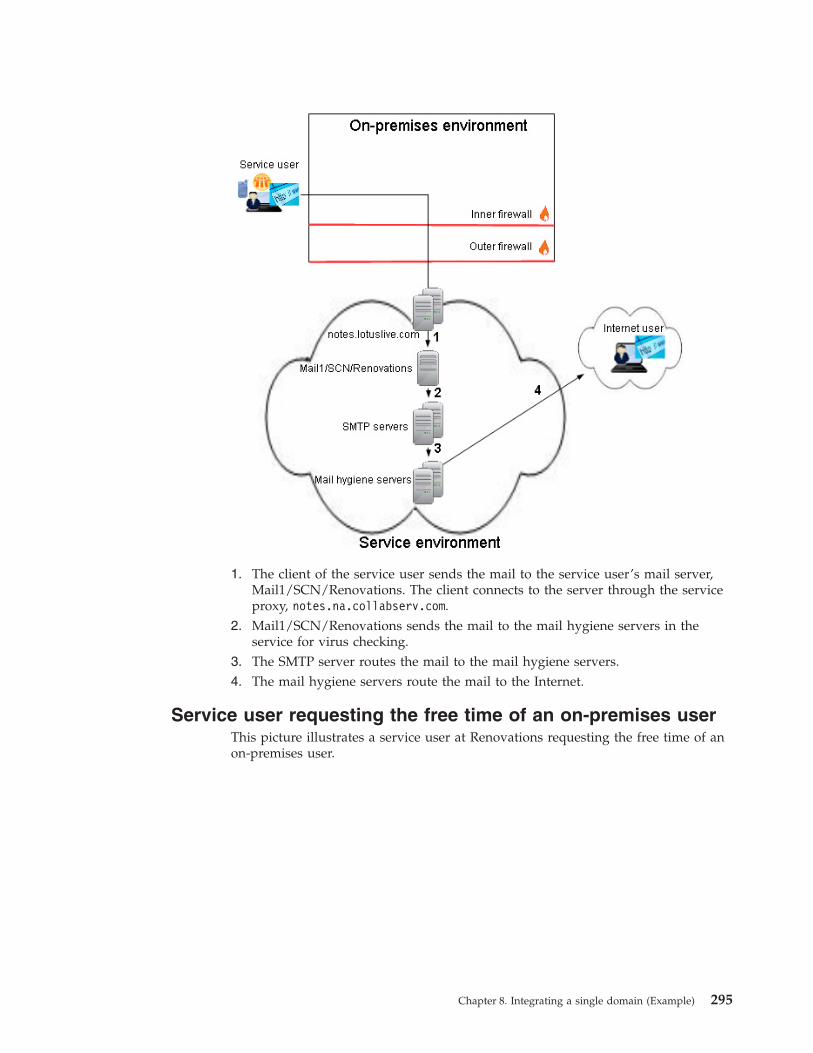
1. The client of the service user sends the mail to the service user’s mail server,Mail1/SCN/Renovations. The client connects to the server through the serviceproxy, notes.na.collabserv.com.
2. Mail1/SCN/Renovations sends the mail to the mail hygiene servers in theservice for virus checking.
3. The SMTP server routes the mail to the mail hygiene servers.4. The mail hygiene servers route the mail to the Internet.
Service user requesting the free time of an on-premises userThis picture illustrates a service user at Renovations requesting the free time of anon-premises user.
Chapter 8. Integrating a single domain (Example) 295

1. The client of the service user sends a free-time request to the server user’s mailserver, Mail1/SCN/Renovations. The client connects to the server through theservice proxy, notes.na.collabserv.com.
2. Mail1/SCN/Renovations sends the free-time request to the on-premises mailhub server, Mailhub1/Renovations. It connects to Mailhub1/Renovationsthrough a passthru server in the SCNPassthru domain.
3. Mailhub1/Renovations sends the free-time request to Mail2/Renovations, themail server of the on-premises user.
4. Mail2/Renovations looks up the free time of the on-premises user in its FreeTime database and returns the free time to Mailhub1/Renovations.
5. Mailhub1/Renovations returns the free time to Mail1/SCN/Renovations.6. Mail1/SCN/Renovations returns the free time of the on-premises user to the
client of the service user.
On-premises user requesting free time of a service userThis picture illustrates an on-premises user at Renovations requesting the free timeof a service user.
296 SmartCloud Notes: Administering SmartCloud Notes: Hybrid Environment March 2015
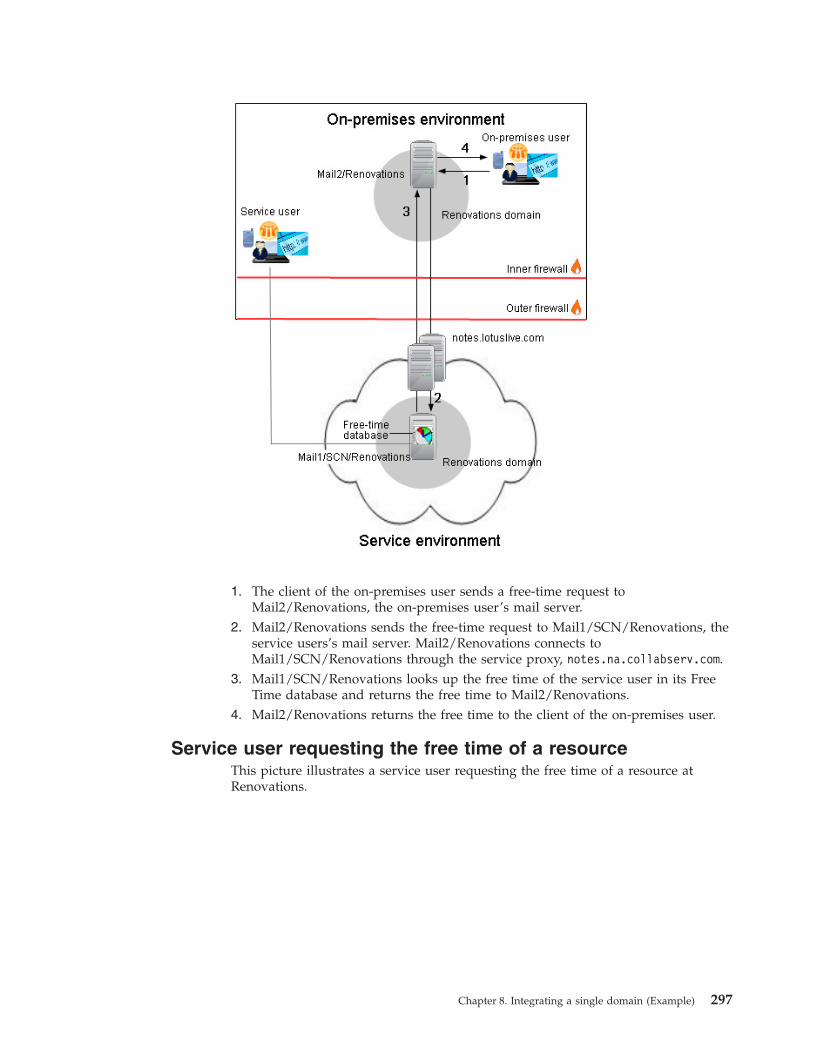
1. The client of the on-premises user sends a free-time request toMail2/Renovations, the on-premises user’s mail server.
2. Mail2/Renovations sends the free-time request to Mail1/SCN/Renovations, theservice users’s mail server. Mail2/Renovations connects toMail1/SCN/Renovations through the service proxy, notes.na.collabserv.com.
3. Mail1/SCN/Renovations looks up the free time of the service user in its FreeTime database and returns the free time to Mail2/Renovations.
4. Mail2/Renovations returns the free time to the client of the on-premises user.
Service user requesting the free time of a resourceThis picture illustrates a service user requesting the free time of a resource atRenovations.
Chapter 8. Integrating a single domain (Example) 297
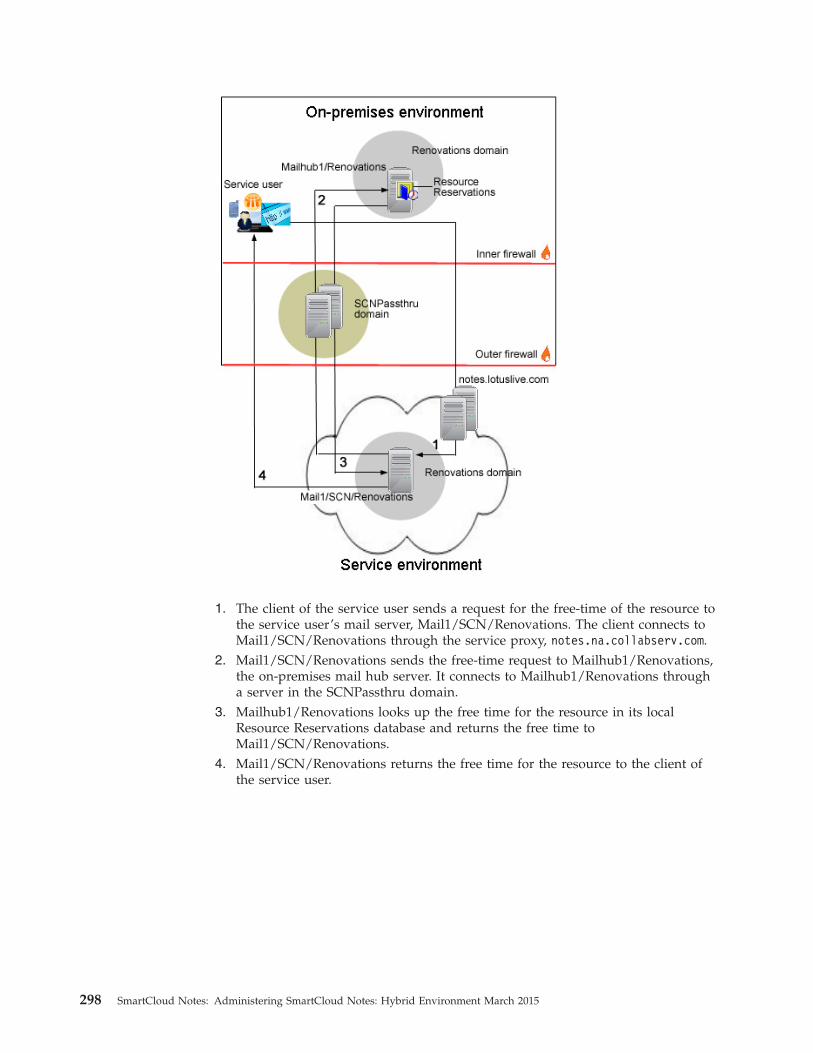
1. The client of the service user sends a request for the free-time of the resource tothe service user’s mail server, Mail1/SCN/Renovations. The client connects toMail1/SCN/Renovations through the service proxy, notes.na.collabserv.com.
2. Mail1/SCN/Renovations sends the free-time request to Mailhub1/Renovations,the on-premises mail hub server. It connects to Mailhub1/Renovations througha server in the SCNPassthru domain.
3. Mailhub1/Renovations looks up the free time for the resource in its localResource Reservations database and returns the free time toMail1/SCN/Renovations.
4. Mail1/SCN/Renovations returns the free time for the resource to the client ofthe service user.
298 SmartCloud Notes: Administering SmartCloud Notes: Hybrid Environment March 2015

Service user reserving a resourceThis picture illustrates a service user reserving a resource.
1. The client of the service user sends the resource reservation to the serviceuser’s mail server, Mail1/SCN/Renovations. The client connects to the serverthrough the service proxy, notes.na.collabserv.com.
2. Mail1/SCN/Renovations mails the reservation to a mail hub server in theservice.
3. The mail hub server mails the reservation to the Mail-in Resource document forthe resource on Mailhub1/Renovations, the on-premises mail hub server. Themail hub server connects to Mailhub1/Renovations through a server in theSCNPassthru domain.
4. Mailhub1/Renovations creates the reservation in its local Resource Reservationsdatabase.
Chapter 8. Integrating a single domain (Example) 299

300 SmartCloud Notes: Administering SmartCloud Notes: Hybrid Environment March 2015

Chapter 9. Integrating additional domains
You can integrate additional domains in a hybrid environment.
About this task
For an example of integrating a secondary Domino domain in a hybridenvironment, see the wiki article Integrating additional domains with theSmartCloud Notes service.
© Copyright IBM Corp. 2011 301

302 SmartCloud Notes: Administering SmartCloud Notes: Hybrid Environment March 2015
Chapter 10. Troubleshooting the service
Use the following tools and resources to help you troubleshoot a problem with theservice.
Using the Configuration Test toolIn a hybrid environment, you can use the Configuration Test tool inIBMSmartCloud Notes Administration Account Settings on an ongoing basis. The toolchecks for problems with your on-premises server environment that can preventproper operation of the service.
About this task
If you change Account Settings, for example, add a new directory to besynchronized or change a mail hub server, you must download and run theDomain Configuration tool to enable the change in the service. After running theDomain Configuration tool, run the Configuration Test tool to ensure that thechange has not introduced any problems.
It can be useful to run the Configuration Test tool even if you have not changedAccount Settings. The tool can detect inadvertent changes in your environmentthat cause problems in the service. For example, it can detect directory changesmade on-premises that prevent directory synchronization.Related tasks:“Running configuration tests” on page 99After you run the Domain Configuration tool, verify that servers in the service canconnect to your on-premises servers.
Finding troubleshooting tips in the Support PortalIf you need additional troubleshooting information, go to the IBM SmartCloudNotes Support Portal. There you can find troubleshooting information authored byIBM specifically for SmartCloud Notes..Related information:
SmartCloud Notes Support Portal
Contacting SupportIf you are unable to resolve a problem, contact Support.
About this task
For information, go to http://www.ibmcloud.com/social and select Support >Technical Support.
© Copyright IBM Corp. 2011 303

304 SmartCloud Notes: Administering SmartCloud Notes: Hybrid Environment March 2015
Chapter 11. Notices
This information was developed for products and services offered in the U.S.A.
IBM may not offer the products, services, or features discussed in this document inother countries. Consult your local IBM representative for information on theproducts and services currently available in your area. Any reference to an IBMproduct, program, or service is not intended to state or imply that only that IBMproduct, program, or service may be used. Any functionally equivalent product,program, or service that does not infringe any IBM intellectual property right maybe used instead. However, it is the user's responsibility to evaluate and verify theoperation of any non-IBM product, program, or service.
IBM may have patents or pending patent applications covering subject matterdescribed in this document. The furnishing of this document does not grant youany license to these patents. You can send license inquiries, in writing, to:
IBM Director of LicensingIBM CorporationNorth Castle DriveArmonk, NY 10504-1785U.S.A.
For license inquiries regarding double-byte (DBCS) information, contact the IBMIntellectual Property Department in your country or send inquiries, in writing, to:
Intellectual Property LicensingLegal and Intellectual Property LawIBM Japan Ltd.19-21, Nihonbashi-Hakozakicho, Chuo-kuTokyo 103-8510 Japan
The following paragraph does not apply to the United Kingdom or any othercountry where such provisions are inconsistent with local law: INTERNATIONALBUSINESS MACHINES CORPORATION PROVIDES THIS PUBLICATION "AS IS"WITHOUT WARRANTY OF ANY KIND, EITHER EXPRESS OR IMPLIED,INCLUDING, BUT NOT LIMITED TO, THE IMPLIED WARRANTIES OFNON-INFRINGEMENT, MERCHANTABILITY OR FITNESS FOR A PARTICULARPURPOSE. Some states do not allow disclaimer of express or implied warranties incertain transactions, therefore, this statement may not apply to you.
This information could include technical inaccuracies or typographical errors.Changes are periodically made to the information herein; these changes will beincorporated in new editions of the publication. IBM may make improvementsand/or changes in the product(s) and/or the program(s) described in thispublication at any time without notice.
Any references in this information to non-IBM Web sites are provided forconvenience only and do not in any manner serve as an endorsement of those Websites. The materials at those Web sites are not part of the materials for this IBMproduct and use of those Web sites is at your own risk.
© Copyright IBM Corp. 2011 305

IBM may use or distribute any of the information you supply in any way itbelieves appropriate without incurring any obligation to you.
Licensees of this program who wish to have information about it for the purposeof enabling: (i) the exchange of information between independently createdprograms and other programs (including this one) and (ii) the mutual use of theinformation which has been exchanged, should contact:
IBM Director of LicensingIBM CorporationNorth Castle DriveArmonk, NY 10504-1785U.S.A.
Such information may be available, subject to appropriate terms and conditions,including in some cases, payment of a fee.
The licensed program described in this document and all licensed materialavailable for it are provided by IBM under terms of the IBM Customer Agreement,IBM International Program License Agreement or any equivalent agreementbetween us.
Any performance data contained herein was determined in a controlledenvironment. Therefore, the results obtained in other operating environments mayvary significantly. Some measurements may have been made on development-levelsystems and there is no guarantee that these measurements will be the same ongenerally available systems. Furthermore, some measurements may have beenestimated through extrapolation. Actual results may vary. Users of this documentshould verify the applicable data for their specific environment.
Information concerning non-IBM products was obtained from the suppliers ofthose products, their published announcements or other publicly available sources.IBM has not tested those products and cannot confirm the accuracy ofperformance, compatibility or any other claims related to non-IBM products.Questions on the capabilities of non-IBM products should be addressed to thesuppliers of those products.
All statements regarding IBM's future direction or intent are subject to change orwithdrawal without notice, and represent goals and objectives only.
This information contains examples of data and reports used in daily businessoperations. To illustrate them as completely as possible, the examples include thenames of individuals, companies, brands, and products. All of these names arefictitious and any similarity to the names and addresses used by an actual businessenterprise is entirely coincidental.
TrademarksIBM, the IBM logo, and ibm.com are trademarks or registered trademarks ofInternational Business Machines Corp., registered in many jurisdictions worldwide.Other product and service names might be trademarks of IBM or other companies.A current list of IBM trademarks is available on the Web at “Copyright andtrademark information” at www.ibm.com/legal/copytrade.shtml.
Intel is a registered trademark of Intel Corporation or its subsidiaries in the UnitedStates and other countries.
306 SmartCloud Notes: Administering SmartCloud Notes: Hybrid Environment March 2015
Linux is a registered trademark of Linus Torvalds in the United States, othercountries, or both.
Microsoft and Windows are trademarks of Microsoft Corporation in the UnitedStates, other countries, or both.
Java and all Java-based trademarks and logos are trademarks or registeredtrademarks of Oracle and/or its affiliates.
The RIM and BlackBerry families of related marks, images and symbols are theexclusive properties and trademarks of Research In Motion Limited — used bypermission. Research In Motion, RIM, BlackBerry, BlackBerry Enterprise Server and“Always On, Always Connected” are registered with the U.S. Patent andTrademark Office and may be pending or registered in other countries.
UNIX is a registered trademark of The Open Group in the United States and othercountries.
Privacy policy considerationsIBM Software products, including software as a service solutions, (“SoftwareOfferings”) may use cookies or other technologies to collect product usageinformation, to help improve the end user experience, to tailor interactions withthe end user or for other purposes. In many cases no personally identifiableinformation is collected by the Software Offerings. Some of our Software Offeringscan help enable you to collect personally identifiable information. If this SoftwareOffering uses cookies to collect personally identifiable information, specificinformation about this offering’s use of cookies is set forth below.
Depending upon the configurations deployed, this Software Offering may usesession cookies that collect each user's user name, session ID, or otherapplication-specific state information for purposes of session management,authentication, or enhanced usability. These cookies cannot be disabled.
If the configurations deployed for this Software Offering provide you as customerthe ability to collect personally identifiable information from end users via cookiesand other technologies, you should seek your own legal advice about any lawsapplicable to such data collection, including any requirements for notice andconsent.
For more information about the use of various technologies, including cookies, forthese purposes, See IBM’s Privacy Policy at http://www.ibm.com/privacy andIBM’s Online Privacy Statement at http://www.ibm.com/privacy/details thesection entitled “Cookies, Web Beacons and Other Technologies” and the “IBMSoftware Products and Software-as-a-Service Privacy Statement” athttp://www.ibm.com/software/info/product-privacy.
Chapter 11. Notices 307

308 SmartCloud Notes: Administering SmartCloud Notes: Hybrid Environment March 2015

Index
Aaccess
restricting to on-premises servers 235access control lists
see ACL 168accessibility
described 5account
activating 99enabling 94
account identitydeleting 261removing 263, 264restoring 263
account settingsconfiguration example 287in a hybrid environment 89
ACLcustomizing for mail files 168preparing for mail file transfer 212
ActiveXenabling 159
administration tasksbest practices 243described 13in a hybrid environment 8
administrative policiesSee also policiesfor user registration 222Notes Traveler 118overview 105preparing 105restrictions 114
administrator rolerequirement 243
administratorsfirst logon 86
Alias domainsaddresses for 207
application passwordsenabling for mobile applications 139
application serversconnecting to 82
attachment size limitsTraveler devices 118
Bbandwidth
Notes client 196web client 193
base namecreating 91
best practicesmaintaining on-premises
environment 243BlackBerry devices
activating 239reactivating 274
BlackBerry documentationproviding to users 242
BlackBerry on-premises serversremoving accounts 239
BlackBerry smartphonesbacking up data 274encrypted mail 242frequently asked questions 278management tasks 274resetting passwords 277wiping 276
BlackBerry subscriptionsadding a subscription 239removing a subscription 278
Ccalendar details
enabling 170calendar scheduling
planning 32preparing for 73
certifiercreating for organizational units 39mail server example 285organization 37
certifier ID fileproviding 92
certifier requirementsin a hybrid environment 37
chatSee also instant messagingsee instant messaging 176
checklistsfor configuration preparation 87
client configuration toolchanges made to Notes client 199
Client Configuration toolfor Notes client 199
CNAME recordsin Internet domain verification 97
comparisonservice and on-premises 12
configurationConfiguration Test tool 303hybrid environment roadmap 83inbound connections 41testing hybrid setup 93, 99troubleshooting 303
configuration taskshybrid environment 83
control documentsfor mail file transfers 214
custom templatesexecution security alerts 163preparing 161
Ddelegation
planning for mail files 208deployment
planning 17Desktop Settings
restrictions 114device passwords
resetting for BlackBerry devices 277device wipe
for SmartCloud Traveler devices 272differences
between service and on-premisesdeployments 12
dir syncsee directory synchronization 89
directoriesadding photos 147finding names in 142preparing for synchronization 45replicating 21
directory synchronizationconfiguring 89example 291explanation 26planning 21preparing for 45requirements and limitations 22setting up servers 46
directory synchronization serverexample 282
Domain Configuration tooldownloading and using 94example 287
domain documentsGlobal Domain documents 49
domainsaliases 207integrating additional 301verifying Internet domains 97
Domino directoriespreparing for replication 47
Domino versionsrequired 38
EECLs
custom templates 163EDC
see extended directory catalog 48EDNI
see External Domain Networkdocument 82
enabling federated identitymanagement 136
encrypted mailon BlackBerry smartphones 242
© Copyright IBM Corp. 2011 309
examplesaccount settings
completing a worksheet 286configuring 287
creating mail server certifier 285directory synchronization 282, 291firewall configuration 283free time request
of a resource 298of on-premises user 296of service user 297
Global Domain document 284integrating a secondary domain 301integrating single domain 281internal mail routing
between Domino domains 66between users in a secondary
domain 62from on-premises to service 293from service to on-premises 292
Internet mail routingfrom external user 69inbound 294using company SMTP host 71using service SMTP host 70
issuing Vault Trust Certificate 290preparing a passthru server
domain 282preparing your environment 282testing network connections 289using the Domain Configuration
tool 287verifying Internet domains 288
execution security alertscustom templates 163
extended directory catalogpreparing for replication 48synchronizing 89
extension forms filesassigning 249assigning with integration server 249overview 165requirements 167using as default 249
External Domain Network documentcreating 82
FFAQs
administering the service 13BlackBerry administration 278
FAStransfer method 214
federated identity checklist 135file deletion
on-premises 228firewalls
configuration example 283configuring inbound connections 41configuring outbound 42preparing 41
folderstrash folder management 156
free timeexample of request 296, 297
FTPdownloading journal files 181transfer method 214using for mail file transfer 215
Ggetting started
preparing a communicationsplan 206
Global Domain documentsexample 284preparing 49
groups 104
Hhybrid account setup
checking status 94hybrid environment
account activation 99administration 8best practices 243configuring 89, 94overview 6preparing 39testing the configuration 99
IIBM iNotes control
enabling 159IBM Notes clients
described 11preparing for deployment 196
ID filesfor certifier ID 92Notes IDs 131uploading 213
ID vaultstoring a Notes ID 213
IMAPconfiguring access 178folder names 180
informationavailable resources 15
instant messagingconfiguring 171configuring communities 175described 176on-premises 172
integration serverjournal files 180
Internet domainsverification example 288verifying 97
Internet email addresseschanging 258multiple 207
IP rangebypassing in mobile applications 139
Jjournal files
downloading 181Notes client sessions 184Notes mail 182overview 180
LLicenses
Notes 11logon
first time by administrator 86
MMail
archiving policy settingsdocument 107, 110
mail filereducing size of file 157
mail file templateschanging 246configuring 164language versions 248preparing custom 161viewing assigned template 247
mail file transfer 210mail file transfers
control documents 214initiating a request 214preparing 209preparing ACL 212preparing for 209using FTP 215using NAS 215using removable storage device 215
mail fileschanging templates 246configuring mail settings 154configuring trash retention 156customizing access 168deleting on-premises files 228planning delegation 208preparing the staging server 210quotas 207scanning for viruses 213viewing templates 247
mail hub serversexample 282setting up 52
mail routingbetween Domino domains 66example 294examples 62external mail routing examples 69from external to service user 69internal examples 60planning 29preparing
from service to on-premises 53from service users 53to service users 55to service users in a secondary
domain 57
310 SmartCloud Notes: Administering SmartCloud Notes: Hybrid Environment March 2015
mail routing (continued)preparing (continued)
to service users in on-premises hubdomain 55
using SMTP 54specifying server 90using SMTP 70, 71, 160
mail ruleslimiting use 154
mail serversbase name 91certifier 39decommissioning 229preparing for routing 55
mail settingsconfiguring 154configuring Notes links 155deleting older mail 157limiting incoming message size 154preventing automatic forward 154
Mail Settingsrestrictions 116
mail transfersprovisioning users 225
mail-in databasecreating 211
meetingscalendar scheduling 32
messageslimiting size 154
mobile applicationsenabling passwords for 139
Nname finder
configuring 142Name finder
Standard and Advanced options 145names
changing 255NAS
using to transfer mail files 215network bandwidth
Notes client 196web client 193
network connectionsplanning 19testing 289testing using the trace command 100
networkspreparing 40
new user accountsproviding information to users 231registering on-premises 222
Notes clientdeciding whether to use 188
Notes clientsauthentication 130changes made by Client Configuration
tool 199Notes ID
importing 213on BlackBerry smartphones 242resetting passwords 125, 253uploading to the vault 269
Notes linkssetting style 155
Notes Traveleradding subscriptions 234deleting users from on-premises
servers 236policies 118preparing devices 195removing accounts from on-premises
servers 235restricting access to on-premises
servers 235NRPC
authentication 130NRPC connections
in a hybrid environment 44
Oon-premises accounts
removing Notes Traveler 235on-premises environment
preparing 39on-premises servers
decommissioning 229organizational unit
certifier 92OU
See also see organizational unitsee organizational unit 92
Ppassthru servers
preparing 40preparing on-premises domain
example 282see pass thru servers 40specifying 91
password rulesby authentication method 141
passwordsenabling for mobile applications 139resetting
for Notes ID 125, 253set expiration dates 125setting expiration for Notes
clients 126setting for BlackBerry
smartphones 277synchronizing 128
Person documentsalias domains 207resolving duplicate documents 28
photosadding to directories 147
policiessee administrative policies 105
Pre-configuration Test toolusing to test configuration 93
preparing federated identitymanagement 135
Provisioningchecking status 229described 219
proxy serversusing 44
Qquotas
for mail files 207
Rreactivation
for BlackBerry smartphonedevices 274
for Traveler devices 272references
information resources 15Registration Settings
restrictions 115replication
preparing extended directorycatalog 48
preparing for 47Research In Motion
accepting terms of use 238reservations
for resources 36resource databases
in a hybrid environment 36restricting access 104RIM
see Research In Motion 238roadmap
hybrid configuration tasks 83Roaming Settings
restrictions 118
SSametime
configuring 171feature comparison 176on-premises 172, 175
schedulingpreparing for 73
securityplanning 17
Security Settingsrestrictions 117
server IDregistering 210
server requirementsDomino version 38
serversconnecting to on-premises 82connecting to the service 44directory synchronization 46mail routing 90passthru 91
service userconverting to on-premises user 267
settingsfor BlackBerry smartphones 205
size limitsmail files 207
SmartCloud Notesoverview 1
Index 311
SmartCloud Notes (continued)what's new 2
SmartCloud Notes entrydescribed 10
SmartCloud Notes webdescribed 10
SmartCloud Travelermanaging devices 272
SMTP serverusing to route mail 160
software versionsfor Domino servers 38
staging server 210enabling for status reports 211preparing 210server ID 210
statushybrid account setup 94
status reportsfrom client configuration tool 211
subscriptionsactivating BlackBerry service 239adding
BlackBerry services 239Notes Traveler 234
convertingfrom service to on-premises
user 267in suspended account 260removing
BlackBerry services 278SmartCloud Notes 259
status of new 229viewing 271
supporttroubleshooting tips 303
suspended accountstatus 260
synchronizationdirectory synchronization 26requirements and limitations 22
Ttemplates
changing 246configuring 164language versions 248using custom 246viewing assigned 247
third-party emailusing IMAP 178
trace commandusing to test network
connections 100transfer method
FTP and FAS 214transfer requests
initiating 214troubleshooting
contacting support 303execution security alerts 163hybrid configuration 93, 94lost BlackBerry smartphone 276tools and resources 303using the Configuration Test tool 303
TroubleshootingResetting Notes ID passwords 125,
253troubleshooting tips
in the Support Portal 303
Uuser accounts
administering 243converting from service to
on-premises 267deleting 261provisioning 225provisioning without mail file
transfer 219registering on-premises 222removing from BlackBerry
on-premises servers 239restoring 263revoking 263, 264suspending 260
user experiencein a hybrid environment 8
user nameschanging in a hybrid
environment 255
VVault Trust Certificate
example of issuing 290issuing 101
virusesscanning for 213
Wweb client
customizing 165description 10preparing for 193
what's new 2
312 SmartCloud Notes: Administering SmartCloud Notes: Hybrid Environment March 2015

����
Printed in USA