review of the failed e2 embedded anchor rod...
TRANSCRIPT

D R A F T R E P O R T
Review of the Failed E2 Embedded
Anchor Rod Boroscope Investigation
Rev. 3: April 17, 2014
For:
San Francisco-Oakland Bay Bridge (SFOBB)
SAS Pier E2 Anchor Bolts Study
By:
Bay Area Management Consultants (BAMC) for the Bay Area Toll
Authority (BATA) Oakland Bay Bridge
SAS pier E2 Anchor Bolts Study
By the Bay Area Management Consultants (BAMC) For the Bay Area Toll

Report Background
Bay Area Management Consultants (BAMC):
BAMC is a joint venture of URS Corporation and Hatch Mott MacDonald (HMM) Corporations.
BAMC was retained by BATA (Bay Area Toll Authority) to provide program management oversight
services for the State of California’s Toll Bridge Seismic Retrofit Program. BAMC was selected
through a public competitively based Request for Proposal (RFP) process in 2005 pursuant to services
required by the 2005 California Law AB144. In the performance of those services, BAMC was
requested by BATA to conduct a review of the Caltrans boroscope investigation which focused on all
the boroscope videos taken of the anchor rods that had been installed in 2008, specifically, the E2
S1/S2 rods that failed in March of 2013 on the San Francisco-Oakland Bay Bridge’s Self-Anchored
Suspension span.
The following report summarizes the findings of the review and observations from the boroscope
videos taken by Jason Gramlick of Caltrans during March 2013.
Authors:
Alan Cavendish-Tribe, Hatch Mott MacDonald
Stephen Christoffersen, URS Corporation
Contributors:
Ted S Hall - Hatch Mott MacDonald
Alan Cavendish-Tribe - Hatch Mott MacDonald
Steven Matty - URS Corporation
Stephen Christoffersen - URS Corporation
Dr. Jeff Gorman - Dominion Engineering, Inc. (sub-consultant to BAMC)
Mark Lisin - Lisin Metallurgical Services (sub-consultant to BAMC)
Melissa Pedersen - Hatch Mott MacDonald
Cover Photograph:
The cover photo is of the fractured surfaces of two of the nine failed rod ends recovered from the shear
keys S1 & S2 ducts for testing and analysis. The S2-H6 exhibit on the right demonstrates a 360 degree
uniform exposure to hydrogen embrittlement and axisymmetric loading. Whereas S2-A8 fracture
displays a local exposure to hydrogen embrittlement (100 degree), which may be due to the initial
localized stress corrosion crack dominating the fracture or possible asymmetric loading.


3-AUG-16 i
TABLE OF CONTENTS
1. Introduction ..................................................................................................................................... 1
2. Background ..................................................................................................................................... 2
3. Inspection Results .......................................................................................................................... 4
4. Discussion ...................................................................................................................................... 7
5. Conclusion .................................................................................................................................... 11
6. Appendices ................................................................................................................................... 13
6.1 Boroscope Photographs
6.2 Lisin Metallurgical Services Report
6.3 Dr. J. Gorman Paper
6.4 Cover of Caltrans "Rainwater Chronology in the S1/S2 Shear Key GR 354BD Anchor Rods"
List of Tables:
Table 1: S1 and S2 Fractured Anchor Rod Summary .................................................................... 3 Table 2: Boroscope Test Results/Physical Observations ................................................................ 6
Table 3: Water Test ......................................................................................................................... 8
List of Figures:
Figure 1: Embedded Anchor Rods .................................................................................................. 1
Figure 2: S1 and S2 Anchor Rod Layout ........................................................................................ 2 Figure 3: Top Hat Detail ................................................................................................................. 5

3-AUG-16 ii
Review of the Boroscope Investigation for the Failed E2 Embedded Anchor Rods
9-Apr-14 1
BAMC
1. Introduction
In March 2013, 32 of the 96 San Francisco-Oakland Bay Bridge’s (SFOBB) Self-
Anchored Suspension span’s (SAS) S1 & S2 shear key anchor rods failed near the
bottom nut within days after being tensioned to 0.75Fu and seated at .70Fu
(Fu=140ksi). The rods fabricated during 2008 in accordance with ASTM A-354 BD ,
were 3-inch diameter, 9 or 17-feet in length, and hot-dipped galvanized. The rods were
assembled in 2008 into 7-inch diameter pipe sleeves. These were grouted five years
later on January 22nd-24th 2013. Tensioning was done on March 2nd 2013. Nine (9) of
the 32 failed rods were extracted from their sleeves in order to assess the possible cause
of failure. Once these rods were removed, boroscope examinations were successfully
performed down the length of four rod cavities and recorded by video. Two of the four
revealed sections of the fractured rod had dropped further into the top-hat cavity and
were submerged in water. The area of the entombed, severed end of the rods was the
primary focus of this review. This report describes the results of the boroscope
examination as well as a discussion of other relevant findings and observations noted as
the review proceeded.
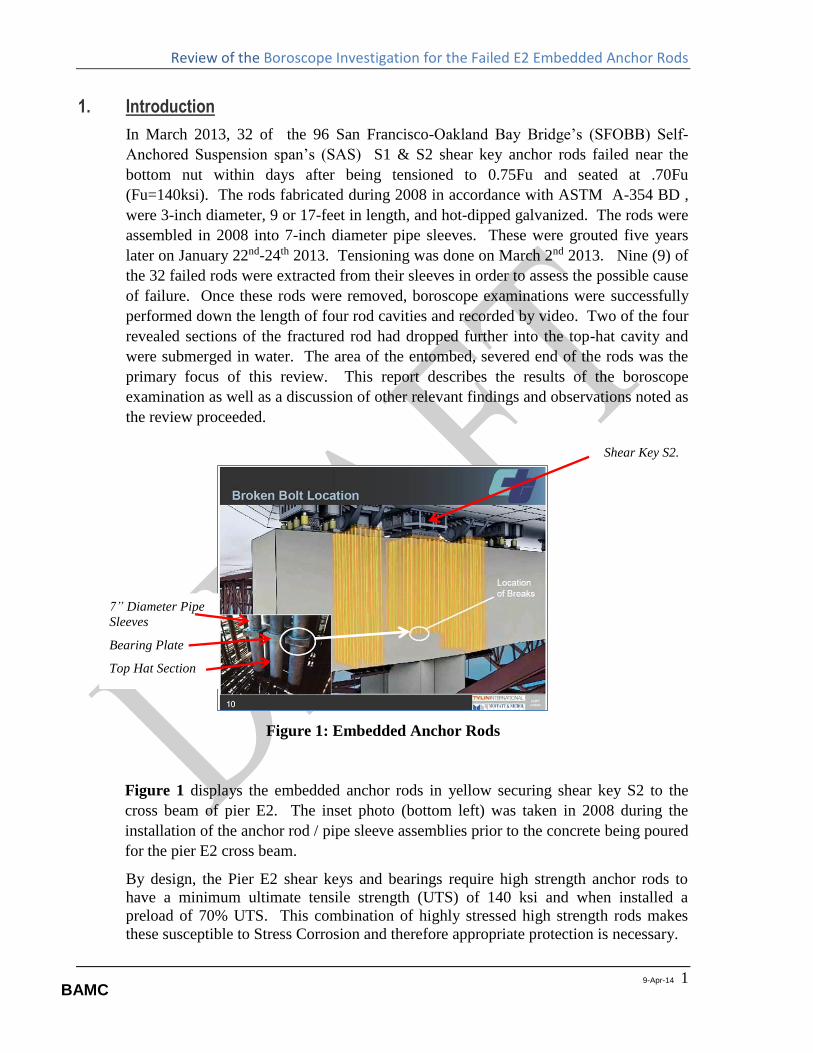
Figure 1: Embedded Anchor Rods
Figure 1 displays the embedded anchor rods in yellow securing shear key S2 to the
cross beam of pier E2. The inset photo (bottom left) was taken in 2008 during the
installation of the anchor rod / pipe sleeve assemblies prior to the concrete being poured
for the pier E2 cross beam.
By design, the Pier E2 shear keys and bearings require high strength anchor rods to
have a minimum ultimate tensile strength (UTS) of 140 ksi and when installed a
preload of 70% UTS. This combination of highly stressed high strength rods makes
these susceptible to Stress Corrosion and therefore appropriate protection is necessary.
Shear Key S2.
7” Diameter Pipe
Sleeves
Bearing Plate
Top Hat Section

Review of the Boroscope Investigation for the Failed E2 Embedded Anchor Rods
9-Apr-14 2
BAMC
2. Background
On March 8, 2013, several days after being tensioned, the nuts on nine shear key rods
were observed to be ‘lifted’ approximately 2 inches off the top of the base plate of
shear keys S1 and S2. Within the next four days, another 20 nuts were found in a
similar condition. The decision was made to reduce the tension on the remaining rods
to 0.45Fu. During that process three more rods failed, bringing a total of 32 broken
anchor rods. Figure 2 identifies which rods failed and their location (layout). Table 1
shows what dates the broken rods were found and their respective lengths and shear key
(summary).
Figure 2: S1 and S2 Anchor Rod Layout

Review of the Boroscope Investigation for the Failed E2 Embedded Anchor Rods
9-Apr-14 3
BAMC
Date of Discovery # of Failures by Location Total # of Failures by Date
S1 Shear Keys S2 Shear Keys
9 Feet 1.5 Inches 17 Feet 2.125 Inches
9 Feet 1.5 Inches
17 Feet 2.125 Inches
3/8/2013 0 B7, G1, G2, H7 B4, B6 A6, H6, H8 9
3/9/2013 B4 C8, E7 0 H3 4
3/11/2013 0 A6, A8, B3, C1, E8, H2
0 A2, G1 8
3/12/2013 H4 H3 0 0 2
3/13/2013 0 A1, A7, G7, H1 H4 A3 6
3/14/2013 0 A2, B2 0 0 2*
3/15/2013 0 0 0 A8 1*
Total Failures by Location
2 19 3 8 32
Notes:
1. There are 2 different length rods-9'1.5" and 17'2.125"
2. *=failed when jacking to reduce load from .7Fu to .45Fu
3. Shear keys 3 & 4 and Bearing Rods were not tensioned at this time
4. 9 Rods were removed for examination
5. 4 Rod cavities were examined by video boroscope
6. March 10, 2013 was a Sunday and may be why no report of a failure
7. S2-A8 is location of water sample
Table 1 - S1 and S2 Fractured Anchor Rod Summary
The decision was made to extract nine of the broken rods as part of a root-cause analysis effort
and to help determine whether the embedded remains could be utilized in the remedial works.
The rods had to be pulled and cut every few feet due to overhead restrictions. It became
obvious that all rods had failed near the bottom nut and the removed sections appeared to be
undamaged. A boroscope examination was conducted on March 12th, 13th, 14th and 17th to
observe the rod cavity and lower nut area. This inspection was conducted by Caltrans. The
inspector was Jason Gramlick, Associate Steel Inspector at Caltrans, Vallejo office, using a GE
Inspection Technologies XLGO Video boroscope with a standard field of view tip and no
applied magnification.

Review of the Boroscope Investigation for the Failed E2 Embedded Anchor Rods
9-Apr-14 4
BAMC
3. Inspection Results
For orientation purposes, Figure 2 shows the design of the rod, nut and pipe sleeve assembly.
The 7-inch diameter galvanized sleeve connects from the top of the Pier cap to a bottom
bearing plate. Beneath this plate is welded an 8-inch sleeve, approximately 2.5-feet long,
referred to as a ‘top hat’. Before the shear keys were set in place, the anchor rods rested on the
bottom of the top hat. Once the shear keys were aligned over the rods, the rods were lifted,
grouted, cured for 28 days and then tensioned. The grout injection line connected to the
bottom of the top hat with the pumping supply originally designed as coming up from
underside of the cross beam. There are two (2), 25 mm (1 inch) grout holes in the bottom
bearing plate which allow the grout to flow up through the rod sleeve to the shear key base
plate on top of the Pier. However, these grout holes are shown to be half covered on the
bottom by the nut-washer assembly and half covered on the top side by the smaller 7-inch
diameter sleeve.
To assist in the interpretation of the boroscope videos, the review began with an examination
of the fractured rod ends that had been removed from shear keys S1 & S2. Appendix 1
contains image clips taken from the videos and a summary of the findings are in Table 2 of
this report. Due to the findings this review also considered other construction information,
including the laboratory analysis of the water sample that had been extracted from one of the
failed anchor-rod ducts.

Boroscope Investigation of the SFOBB Failed E2 Embedded Anchor Rods
9-Apr-14 5
BAMC
Figure 3: Top Hat Detail

Boroscope Investigation of the SFOBB Failed E2 Embedded Anchor Rods
9-Apr-14 6
BAMC
Table 2 - Boroscope Test Results/Physical Observations
Date Rod
Length
LOCATION
Examination of the Fractured Rod
End
Boroscope Examination OTHER COMMENTS
2013 Arc of Hydrogen
Embrittlement*
HE as % of
cross
section*
Did Anchor
Rod drop into
Top Hat
Water
evidence in
Sleeve/Top Hat
Rust
deposits
4-17 17 S1-G1 210 30 no yes Yes From Boroscope video failed anchor rod end is close (tight ?) to
the bearing plate, not submerged in water but beads of water can
be seen in the thread, so the rod end may be sitting in water.
17 S1-H3 200 30
3-14 17 S1-A7 360 40 yes yes From Boroscope video the failed anchor rod end has dropped
away from the bearing plate and is submerged in water.
17 S2-A3 160 30
3-13 17 S2-A6
no no Yes From Boroscope video failed anchor rod end is close (tight ?) to
the bearing plate, not submerged in water and no evidence of
water. The fracture surface is corroded and partially covered with
debris.
17 S2-A8 105 15 yes ? yes – water
sample
extracted
Water sample was extracted for analysis, not examined by
borescope. (In order to extract water it is anticipated there was a
grout void that allowed the failed anchor rod end to drop away
from the bearing plate, exposing the trapped water)
3-12 9 S2-H4 310 30 Boroscope inspection was not successful.
3-12 17 S2-H6 360 50 yes yes From Boroscope video Failed anchor rod end has dropped away
from the bearing plate and is submerged in water. (Look carefully
at the surface of the water, you can see the washer, nut and
fractured face of the rod through the water)
17 S2-A2 180 20
Notes:
*= crack morphology observed on removed mating fracture surfaces
8 of the 9 removed rods were available for visual examination in February 2014

Boroscope Investigation of the SFOBB Failed E2 Embedded Anchor Rods
3-AUG-16 7
BAMC
4. Discussion
The most significant boroscope finding was that of standing water being seen in the bottom of
the sleeves and in some cases the failed end of the rod and nut assembly not being tight up
against the bottom bearing plate. Inquiries were made as to how these conditions could exist.
The following describes what was discovered.
The shear key S1 & S2 embedded anchor rods were fabricated in 2008, delivered to the site and
assembled in their sleeves and installed in Pier E2 that same year immediately prior to the
concrete pour. As previously noted the rods sat un-tensioned on the bottom of the top hat and
squarely covering the grout injection port. The sleeves were specified to be covered and
protected from the environment. This was not done for the complete time. There was very
limited access to this area, as the Pier was not connected to any decking. There are photographs
which show no covering over the totally exposed and isolated shear key anchor sleeves.
Furthermore, there are documented records of an airtight fitting being used to lift the rod
sufficiently to uncover the injection port, and the application of compressed air to blow water
that had accumulated during the layup period, out through the bottom grout injection port and
connected plumbing. (Pumping water out by suction was not feasible due to the access
restriction at the bottom bearing plate between the top hat and rod sleeve, as well as the spherical
washer restricting access to the very bottom of the top hat). Note: This is a draft report and
includes the information provided by Bill Casey on April 16, 2014 entitled “Rainwater
Chronology” in the S1/S2 Shear Key GR 354BD Anchor Rods” (see appendices for cover of
presentation), which does not show the actual grouting operation about which information has
been requested. The “Rainwater Chronology” slide presentation documents repeated exposure of
the 2008 rods to rainwater for extended periods of time during construction.
A water sample was gathered once the rods were removed and sent to a laboratory for analysis to
determine the source of the water. The results were that the pH level was extremely caustic with
a level greater than 13. The high pH combined together with the chemical analysis of the
sample, it was determined that the grout had contaminated the water in the bottom of the
sleeve/top hat prior to and during curing. This would therefore indicate the water was present
prior to the grouting operation. If the grout had been injected from the bottom of the top hat, the
water should have been displaced upwards by the grout pushing it up the duct.
There is well established data which indicate that zinc coating will aggressively corrode in such a
caustic environment. This corrosion would result in generating high concentrations of hydrogen
that could be absorbed into the steel in both the stressed and un-stressed condition. Refer to
Dominion Engineering Inc report in Appendix 3.The results of the water analysis, supplied by
Rami Boundouki of METS, are shown in Table 3.

Boroscope Investigation of the SFOBB Failed E2 Embedded Anchor Rods
3-AUG-16 8
BAMC
Table 3: Water Test
Table 1. Water
Test Results Parameter
Result
pH 13.04
Conductivity 31 mS
Chloride 44 mg Cl-/L
Sulfate 128 mg SO42-/L
Nitrate 1.5 mg NO32-/L
Nitrite 293 mg NO2-/L
Sodium 3940mg Na+/L
Potassium 990 mg K+/L
Magnesium ND
Calcium 96 mg Ca2+/L
Carbonate 2,040 mg/L as CaCO3
Bicarbonate ND
Organic compounds ND
Chromium <1 mg Cr/L
Iron ND
Aluminum 29.2 mg Al/L
Zinc 32.8 mg Zn/L
Total dissolved solids 11,200 mg/L
A contributing factor that lead to the water accumulation was a field modification where the
grout injection line was rerouted from under the bottom of the cross beam, in accordance with
the approved-for construction- plan shown in Figure 2, to a longer and more circuitous path
where the injection port was now on the top of the Pier. This essentially removed a natural
gravity drain that would have prevented the accumulation of water in the top hat.
The question of how/why the fractured section of the rod and nut weren’t tight against the
bottom bearing plate arose. The expectation for the boroscope examination was for the grout to
support the fractured end of the rod, complete with nut and washer, up against the bearing plate.
However it appears that beneath the bearing plate, there were cavities in the grout and that in
some instances the entombed piece had ‘dropped’ down in the top hat following the fracture,
which could only occur if the top hat was not filled with grout. The probable cause for this is
that the rerouted grout injection line was not allowing grout to flow effectively, thus enabling the
grout to displace the water – pushing it up the anchor rod sleeve. It is also understood that in
order to complete the grout operation, in a number of instances it was necessary to pour/gravity
fed grout into the rod sleeve from above, i.e., not using the grout injection pipe. If the top hat
was filled with water and grout was poured down the sleeve, the water would not have been
displaced, causing it to be trapped below the bearing plate. This would explain the existence of
the water-filled voids and the presence of water observed in the boroscope videos.

Boroscope Investigation of the SFOBB Failed E2 Embedded Anchor Rods
3-AUG-16 9
BAMC
The following photographs were taken during construction of the Pier E2 cross beam in 2008.
The photograph above shows the pipe sleeves, containing the anchor rods. The white 19mm
PVC grout injection pipes are visible adjacent to their respective sleeve assemblies.
The photograph above shows the bearing plate, the top hat and the 19mm grout injection pipe.
The photograph above shows the finishing work to the grout injection plumbing to bring the
injection port to above the concrete cross beam and outside the footprint of the shear key.
Pipe sleeve containing an anchor
rod
Grout injection pipe
Pipe sleeve
Bearing plate
Top hat
Grout injection pipe
19mm pipe fittings for the
finishing works to the
grout injection pipes

Boroscope Investigation of the SFOBB Failed E2 Embedded Anchor Rods
3-AUG-16 10
BAMC
The photograph above (courtesy of Caltrans) shows the 19mm grout injection pipes for each of
the pipe sleeves positioned outside of the shear key footprint.
While examining the fracture surfaces of the failed rod ends that had been removed from shear
keys S1 & S2, it was noted that some exhibited symmetrical hydrogen embrittlement cracking
and that others exhibited a non-uniform pattern, where crack propagation was dominant in a
localized area. This is characterized by a visual crack path that leads to a point of origin on the
circumference. Please refer to Lisin Metallurgical Services report in Appendix 2 for a detailed
explanation.
In all instances, the nine failed rods fractured at the first full thread engagement with the lower
nut. The possible reasons for this are two fold; 1) the highest stress intensity due to the thread
geometry will be at that first thread; 2) the volume of water trapped below the bearing plate will
vary, but provided the bottom of the nut is submerged in water, capillary action would ensure the
threaded contact area between the nut and rod is wet, therefore the location of highest stress
intensity will always be subjected to stress corrosion. Therefore, capillary action may still have
facilitated stress corrosion at the first thread anchor rod S2-A6, even though it appeared dry
during the boroscope examination. Note: This is a draft report and some further consideration is
being given to the grout process in respect of the plumbing and possible effect of head loss
during the grout operation.
Two rows of grout injection pipes
Boroscope Investigation of the SFOBB Failed E2 Embedded Anchor Rods
3-AUG-16 11
BAMC
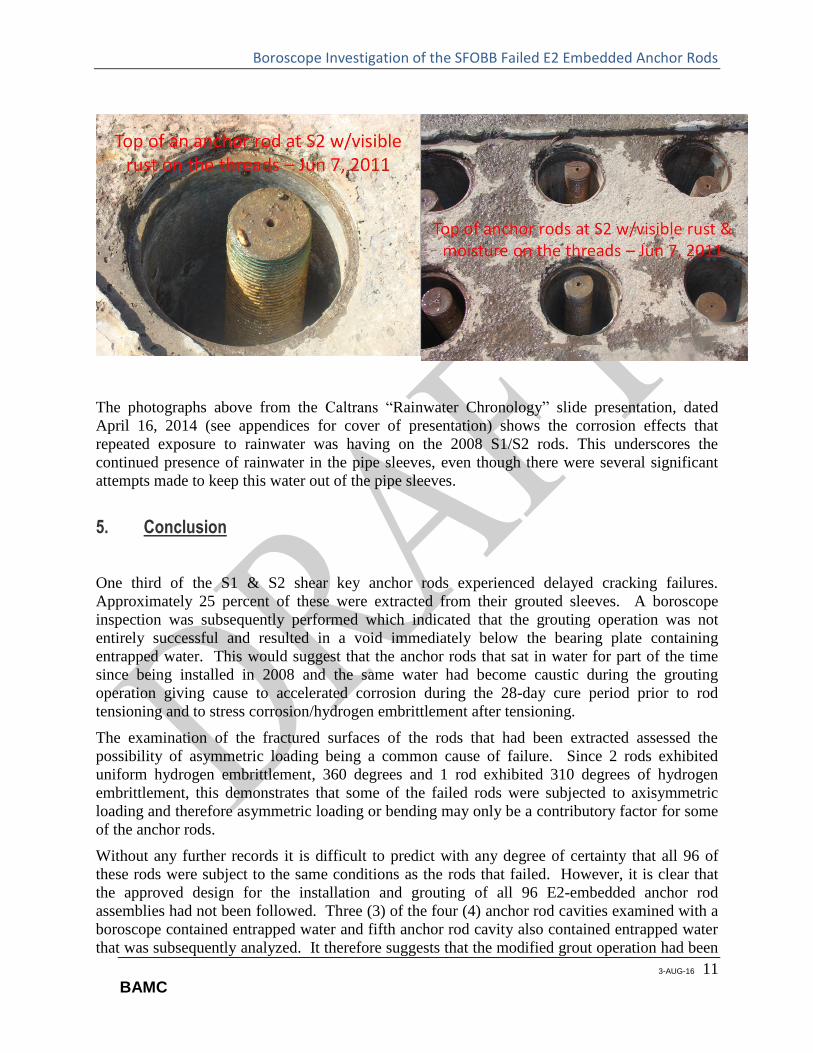
The photographs above from the Caltrans “Rainwater Chronology” slide presentation, dated
April 16, 2014 (see appendices for cover of presentation) shows the corrosion effects that
repeated exposure to rainwater was having on the 2008 S1/S2 rods. This underscores the
continued presence of rainwater in the pipe sleeves, even though there were several significant
attempts made to keep this water out of the pipe sleeves.
5. Conclusion
One third of the S1 & S2 shear key anchor rods experienced delayed cracking failures.
Approximately 25 percent of these were extracted from their grouted sleeves. A boroscope
inspection was subsequently performed which indicated that the grouting operation was not
entirely successful and resulted in a void immediately below the bearing plate containing
entrapped water. This would suggest that the anchor rods that sat in water for part of the time
since being installed in 2008 and the same water had become caustic during the grouting
operation giving cause to accelerated corrosion during the 28-day cure period prior to rod
tensioning and to stress corrosion/hydrogen embrittlement after tensioning.
The examination of the fractured surfaces of the rods that had been extracted assessed the
possibility of asymmetric loading being a common cause of failure. Since 2 rods exhibited
uniform hydrogen embrittlement, 360 degrees and 1 rod exhibited 310 degrees of hydrogen
embrittlement, this demonstrates that some of the failed rods were subjected to axisymmetric
loading and therefore asymmetric loading or bending may only be a contributory factor for some
of the anchor rods.
Without any further records it is difficult to predict with any degree of certainty that all 96 of
these rods were subject to the same conditions as the rods that failed. However, it is clear that
the approved design for the installation and grouting of all 96 E2-embedded anchor rod
assemblies had not been followed. Three (3) of the four (4) anchor rod cavities examined with a
boroscope contained entrapped water and fifth anchor rod cavity also contained entrapped water
that was subsequently analyzed. It therefore suggests that the modified grout operation had been
Boroscope Investigation of the SFOBB Failed E2 Embedded Anchor Rods
3-AUG-16 12
BAMC
ineffective, resulting in water-filled voids existing immediately below the bearing plate in the
same vicinity as the hydrogen embrittlement fracture location. The laboratory analysis of the
water taken at this same location also confirmed that the entrapped water had become highly
corrosive as a result of the caustic materials that leeched from the grout.
Note: With regard to the anchoring of the Pier E2 shear keys, all 96 embedded rods that are the subject of this
report were abandoned, since it was not feasible to rework this detail. An alternative design was engineered and
constructed in late 2013.

3-AUG-16 13
BAMC
6. Appendices
Appendices: Boroscope Investigation of the SFOBB Failed E2 Embedded Anchor Rods
3-AUG-16 14
BAMC
Appendices: Boroscope Investigation of the SFOBB Failed E2 Embedded Anchor Rods
3-AUG-16 15
BAMC
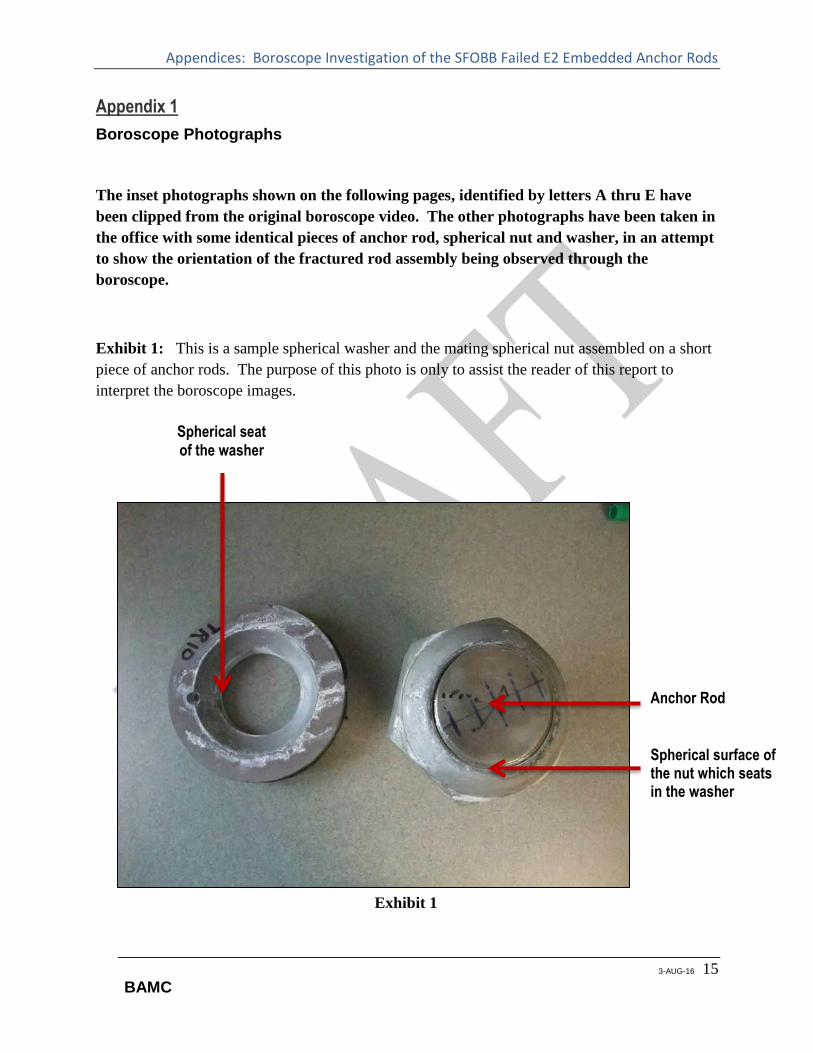
Appendix 1
Boroscope Photographs
The inset photographs shown on the following pages, identified by letters A thru E have
been clipped from the original boroscope video. The other photographs have been taken in
the office with some identical pieces of anchor rod, spherical nut and washer, in an attempt
to show the orientation of the fractured rod assembly being observed through the
boroscope.
Exhibit 1: This is a sample spherical washer and the mating spherical nut assembled on a short
piece of anchor rods. The purpose of this photo is only to assist the reader of this report to
interpret the boroscope images.
Anchor Rod
Spherical surface of the nut which seats in the washer
Spherical seat of the washer
Exhibit 1

Appendices: Boroscope Investigation of the SFOBB Failed E2 Embedded Anchor Rods
EXHIBIT 2 3-AUG-16 16
BAMC
Shear Key 1 Video Captures Anchor Rod S1 – G1
Video recorded on April 17, 2013 (video of S1-G1 but filed as S1 – XX). Failed anchor rod end is close (tight ?) to the bearing plate. It is not submerged in water, but beads of water can be seen in the thread, so the rod end may be sitting in water.
Though the fracture surface is not submerged in water, the surface appears wet with evidence of water beads in the thread.
Washer
Nut
Fracture surface of anchor rod
Mock-up photo to show orientation of rod end which is square and central to the washer
Appendices: Boroscope Investigation of the SFOBB Failed E2 Embedded Anchor Rods
3-AUG-16 17
BAMC EXHIBIT 3
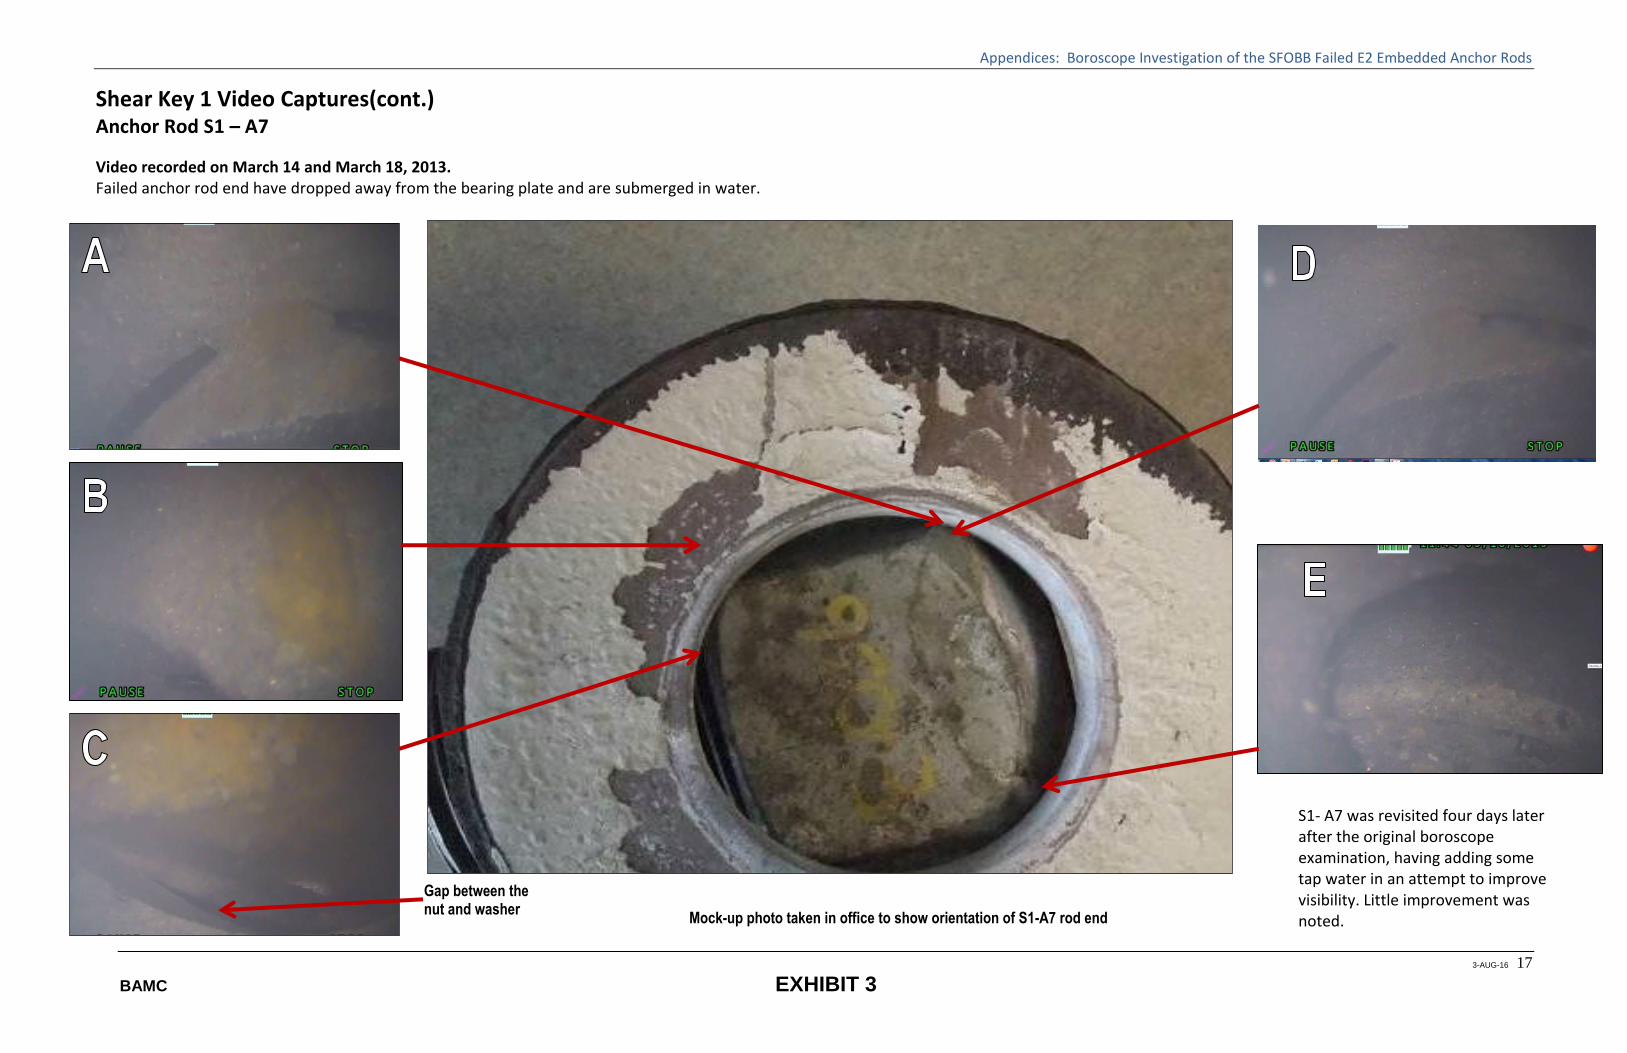
Shear Key 1 Video Captures(cont.) Anchor Rod S1 – A7
Video recorded on March 14 and March 18, 2013. Failed anchor rod end have dropped away from the bearing plate and are submerged in water.
This shows the face of the washer which was bearing on the bearing plate s the failed rod end has dropped in the water,
Gap between the nut and washer
Spherical face of the nut.
Mock-up photo taken in office to show orientation of S1-A7 rod end
S1- A7 was revisited four days later after the original boroscope examination, having adding some tap water in an attempt to improve visibility. Little improvement was noted.

Appendices: Boroscope Investigation of the SFOBB Failed E2 Embedded Anchor Rods
EXHIBIT 4 3-AUG-16 18
BAMC
Shear Key 2 Video Captures Anchor Rod S2 – A6
Video recorded on March 13, 2013. Failed anchor rod end is close (tight ?) to the bearing plate, not submerged in water and no evidence of water. The fracture surface is corroded and partially covered with debris.
Fracture surface of the anchor rod
Nut
Even though water is not visible, significant corrosion has occurred to the thread and nut.
Washer
Exposed end of the thread
A
B
Mock-up photo to show orientation of S2 –A6 rod end

Appendices: Boroscope Investigation of the SFOBB Failed E2 Embedded Anchor Rods
3-AUG-16 19 BAMC
Shear Key 2 Video Captures (cont.) Anchor Rod S2 – A8
Boroscope inspection was performed at this location.
Water sample was extracted at this location for analysis, refer to Table 3 for test results.
Anchor Rod S2 – H4
Boroscope inspection at this location was unsuccessful.
Appendices: Boroscope Investigation of the SFOBB Failed E2 Embedded Anchor Rods
3-AUG-16 20
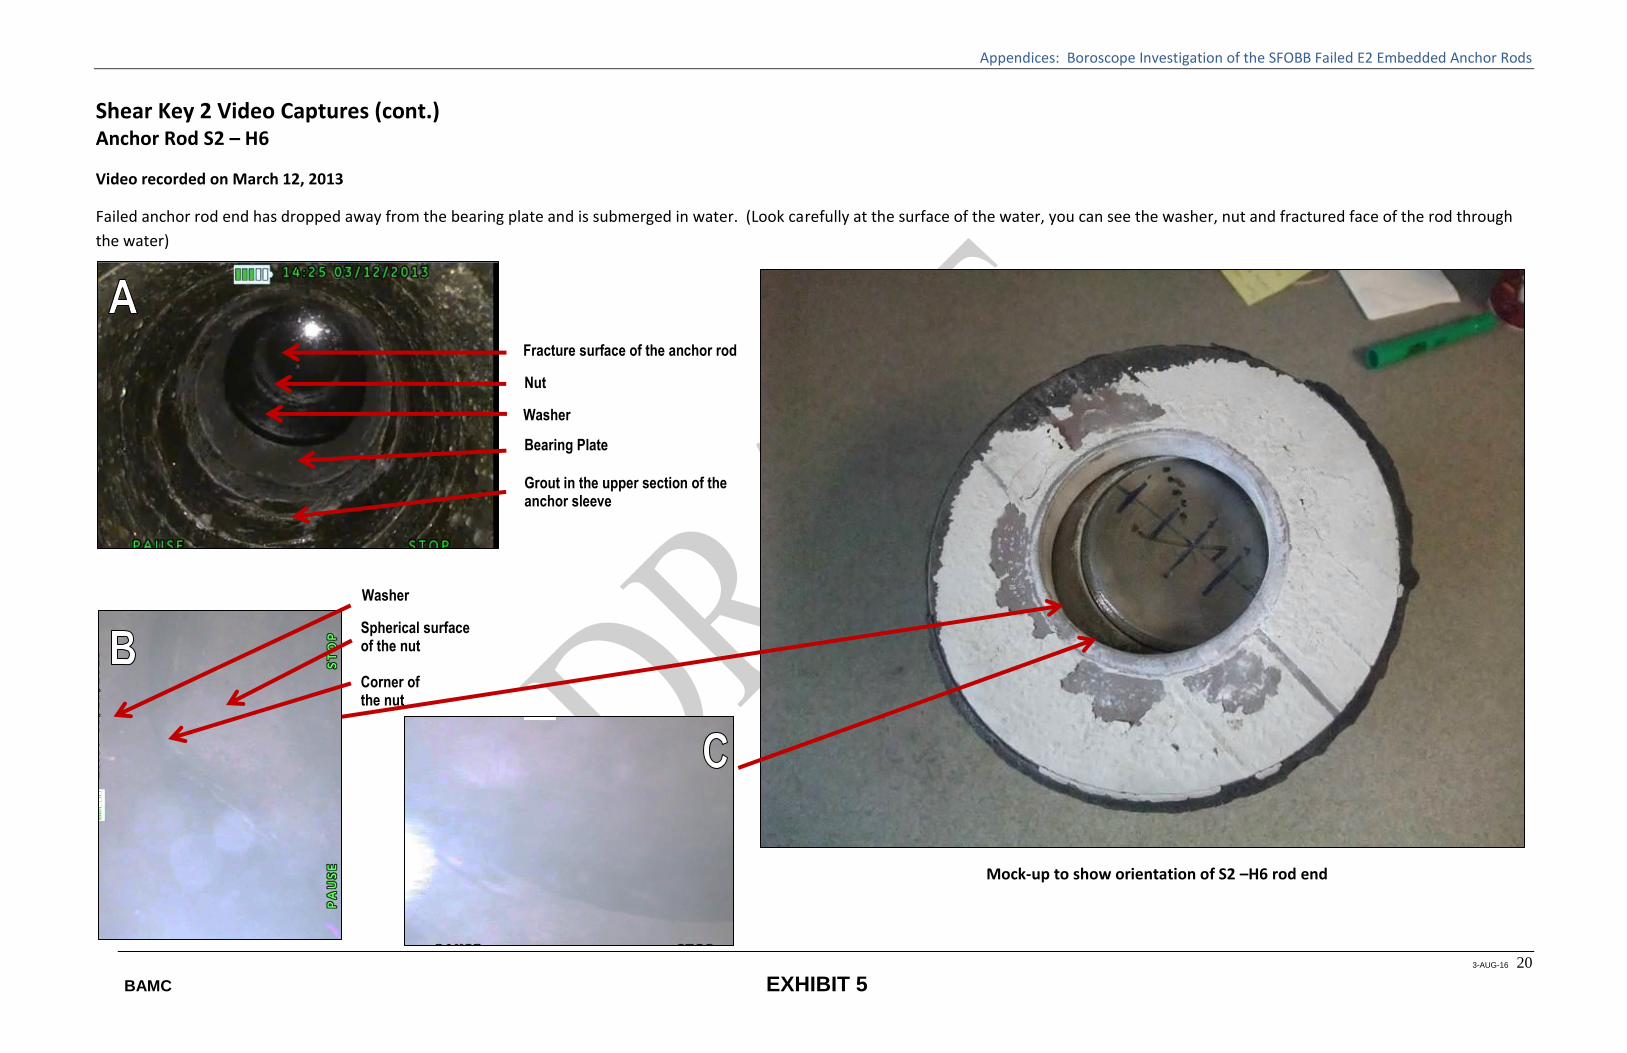
BAMC EXHIBIT 5
Shear Key 2 Video Captures (cont.) Anchor Rod S2 – H6
Video recorded on March 12, 2013
Failed anchor rod end has dropped away from the bearing plate and is submerged in water. (Look carefully at the surface of the water, you can see the washer, nut and fractured face of the rod through
the water)
Mock-up to show orientation of S2 –H6 rod end
Fracture surface of the anchor rod
Nut
Washer
Bearing Plate
Grout in the upper section of the anchor sleeve
A
Washer
Corner of the nut
Spherical surface of the nut

Appendices: Lisen Metallurgical Services Report
Appendix 2
Lisin Metallurgical Services Report


Appendices: Jeff Gorman Report
Appendix 3
Dr. Jeff Gorman Report

Appendices: Jeff Gorman Report
Appendix 4
Rainwater Chronology in the S1/S2 Shear Key GR 354BD Anchor Rod
Blockouts and Shear Key/Bearing Erection/Construction