podcast microphone
TRANSCRIPT

MV7Podcast Microphone
The Shure podcast microphone, MV7, user guide.Version: 2.0 (2021-F)
Shure Incorporated
2/18
Table of Contents
MV7 Podcast Microphone 3
General Description 3
Features 3
Connect Your MV7 3
Quick Setup 4
Touch Panel Interface 4
Controls 5
LED Behavior 5
The MV7 Microphone 5
MV7 Outputs 5
Mounting Instructions 6
Windscreen 6
Auto Level Mode 6
Near 7
Far 7
Additional Tips 7
The Shure MOTIV Desktop App 8
Mic Setup: Auto Level 8
Mic Setup: Manual 9
Monitor Mix Blend 10
EQ Modes 10
Advanced Mic Settings 11
MV7 Tips 11
Control your Levels 11
Use Lock Mode to Lock In Your Sound 11
Monitor Your Sound 11
Troubleshooting 11
Firmware Update 12
Keep equipment connected during updates 12
System Requirements 12
System Requirements and Compatibility: Mac 12
System Requirements and Compatibility: Windows 12
System Requirements and Compatibility: iOS 13
System Requirements and Compatibility: Android 13
Specifications 13
MV7 Yoke Assembly 16
Accessories 17
Furnished Accessories 17
Replacement Parts 17
Optional Accessories 17
Certifications 17
Information to the user 17
Shure Incorporated
3/18
•••
•••
1.2.3.
MV7 Podcast Microphone
General DescriptionThe Shure MV7 is a professional-quality USB dynamic microphone, ideal for close mic applications that require vocal intelligi-bility with a balanced tone. The attractive and durable all-metal design features an adjustable yoke that can be mounted onto a variety of microphone stands for flexible placement options. A touch panel user interface provides control of microphone gain, headphone level, monitor mix blend and muting.
Features
Convenient Plug-and-Play OperationCompatible with Windows and Mac computers. Also compatible with iOS and Android devices with applicable cables. (Cables not provided.)
Note: See https://www.shure.com/MOTIVcompatibility for information on recommended Android devices.
Voice Isolation TechnologyHighly directional cardioid pattern isolates your voice and removes unwanted background noise
Durable, Versatile DesignHybrid USB/cardioid microphone can be used for digital or analog recordingAdjust settings with the intuitive touch panel interfaceRugged, all-metal construction and excellent cartridge protection for outstanding reliability
Flexible Sound Control with the ShurePlus MOTIV Desktop ApplicationThe MOTIV Desktop Application offers control over microphone settings and includes the following additional features:
Auto Level Mode Automatically adjusts microphone settings to take the guesswork out of gain and compression settingsCustom user presetsSwitchable EQ filters High-pass filter and voice boost emphasis (presence boost) options in Manual mode
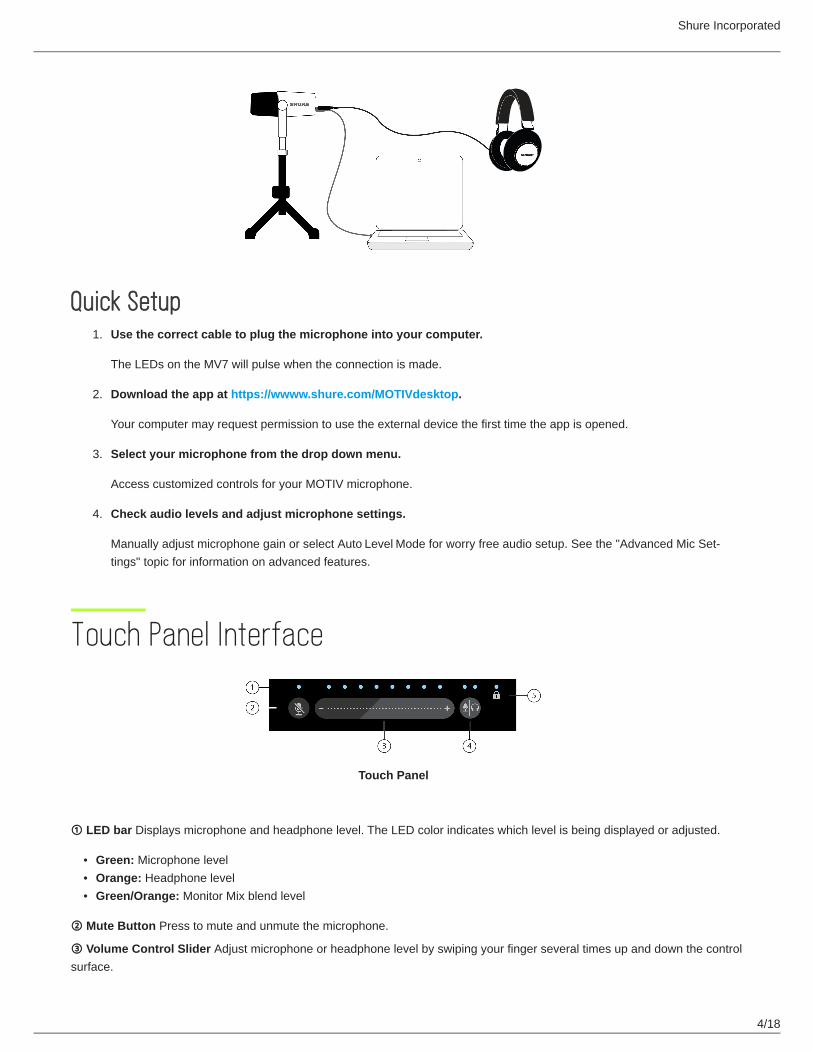
Connect Your MV7Plug the included Micro-B USB cable into your MV7.Connect the other end of the Micro-B USB cable to your laptop.Plug your headphones into the monitor output.
™
Shure Incorporated
4/18
1.
2.
3.
4.
•••
Quick SetupUse the correct cable to plug the microphone into your computer.
The LEDs on the MV7 will pulse when the connection is made.
Download the app at https://wwww.shure.com/MOTIVdesktop.
Your computer may request permission to use the external device the first time the app is opened.
Select your microphone from the drop down menu.
Access customized controls for your MOTIV microphone.
Check audio levels and adjust microphone settings.
Manually adjust microphone gain or select Auto Level Mode for worry free audio setup. See the "Advanced Mic Set-tings" topic for information on advanced features.
Touch Panel Interface
Touch Panel
① LED bar Displays microphone and headphone level. The LED color indicates which level is being displayed or adjusted.
Green: Microphone levelOrange: Headphone levelGreen/Orange: Monitor Mix blend level
② Mute Button Press to mute and unmute the microphone.
③ Volume Control Slider Adjust microphone or headphone level by swiping your finger several times up and down the control surface.
Shure Incorporated
5/18
•
••
④ Monitor Toggle Press the mode/headphone button to toggle between microphone (green) and headphone (orange) volume controls. Long press to activate monitor mix controls (both green and orange). Another long press to return to separate micro-phone and headphone volume controls.
⑤ Lock Indicator Displays whether the settings lock is on or off. Settings lock prevents changes to microphone settings from accidental touches. When Lock mode is on, the microphone settings screen is grayed out on the desktop application.
ControlsAdjust monitor mix: Press and hold Monitor Toggle for 2 seconds to access monitor mix controls. Swipe left to hear more mic audio (green) or swipe right to hear more playback audio (orange). Press and hold Monitor Toggle to return to separate micro-phone and headphone volume controls.
Settings lock: Press and hold both Mute and Monitor Toggle for 2 seconds to lock and unlock settings.
Exit Auto Level Mode: Press and hold Mute for 2 seconds
Note: Auto Level Mode can only be enabled through the MOTIV Desktop Application.
LED BehaviorLive meters: Turn your Touch Panel LEDs into a visual volume meter for easy monitoring. If are using Manual mode and no-tice the level reaches the input meter peak, switch to Auto Level or lower the mic gain.
Night mode: Select the Night mode to lower the brightness of the Touch Panel LEDs from a bright display (Normal) to less bright (Dim). The Night mode display option is ideal for discreet recording in low-light situations.
Access the Live meters and Night mode toggles by going to Settings > LED Behavior in the MOTIV app settings tab.
Note: For information on dB values related to the Touch Panel slider, see the Touch Panel Values table in the Specifications appendix.
The MV7 MicrophoneThe MV7 features a dynamic capsule with a cardioid pattern, which uses Voice Isolation Technology to pick up sound directly in front of the microphone.
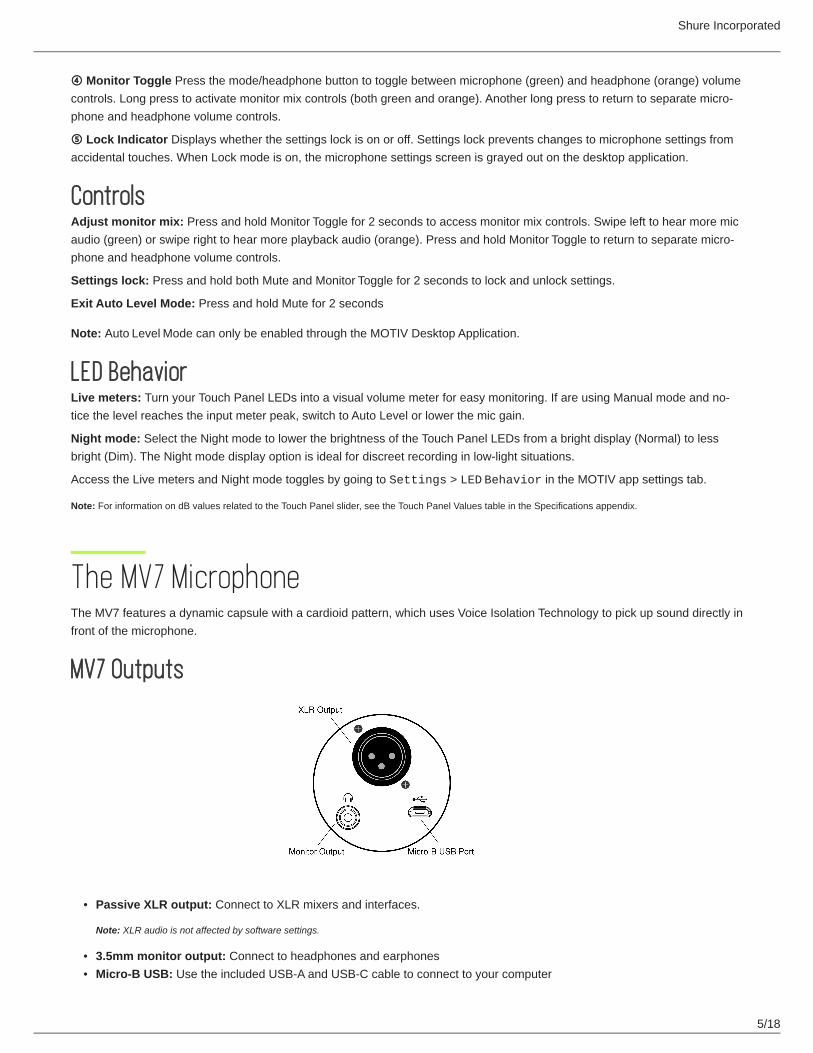
MV7 Outputs
Passive XLR output: Connect to XLR mixers and interfaces.
Note: XLR audio is not affected by software settings.
3.5mm monitor output: Connect to headphones and earphonesMicro-B USB: Use the included USB-A and USB-C cable to connect to your computer
Shure Incorporated
6/18
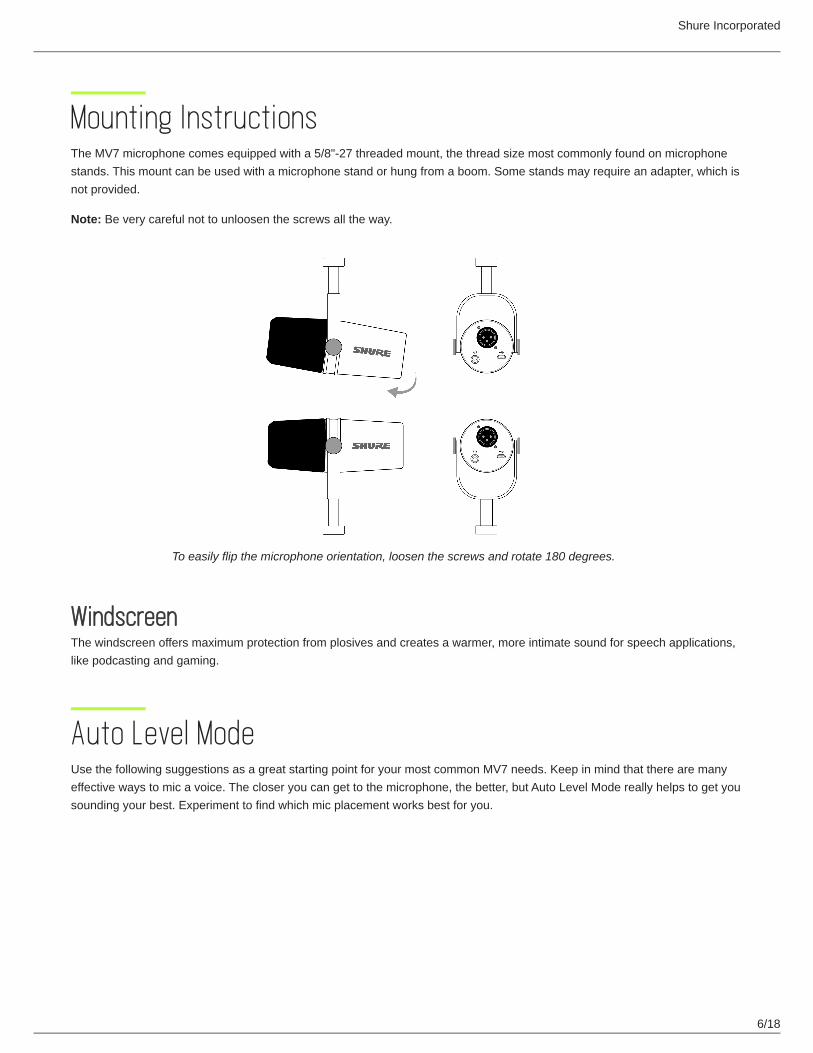
Mounting InstructionsThe MV7 microphone comes equipped with a 5/8"-27 threaded mount, the thread size most commonly found on microphone stands. This mount can be used with a microphone stand or hung from a boom. Some stands may require an adapter, which is not provided.
Note: Be very careful not to unloosen the screws all the way.
To easily flip the microphone orientation, loosen the screws and rotate 180 degrees.
WindscreenThe windscreen offers maximum protection from plosives and creates a warmer, more intimate sound for speech applications, like podcasting and gaming.
Auto Level ModeUse the following suggestions as a great starting point for your most common MV7 needs. Keep in mind that there are many effective ways to mic a voice. The closer you can get to the microphone, the better, but Auto Level Mode really helps to get you sounding your best. Experiment to find which mic placement works best for you.
Shure Incorporated
7/18
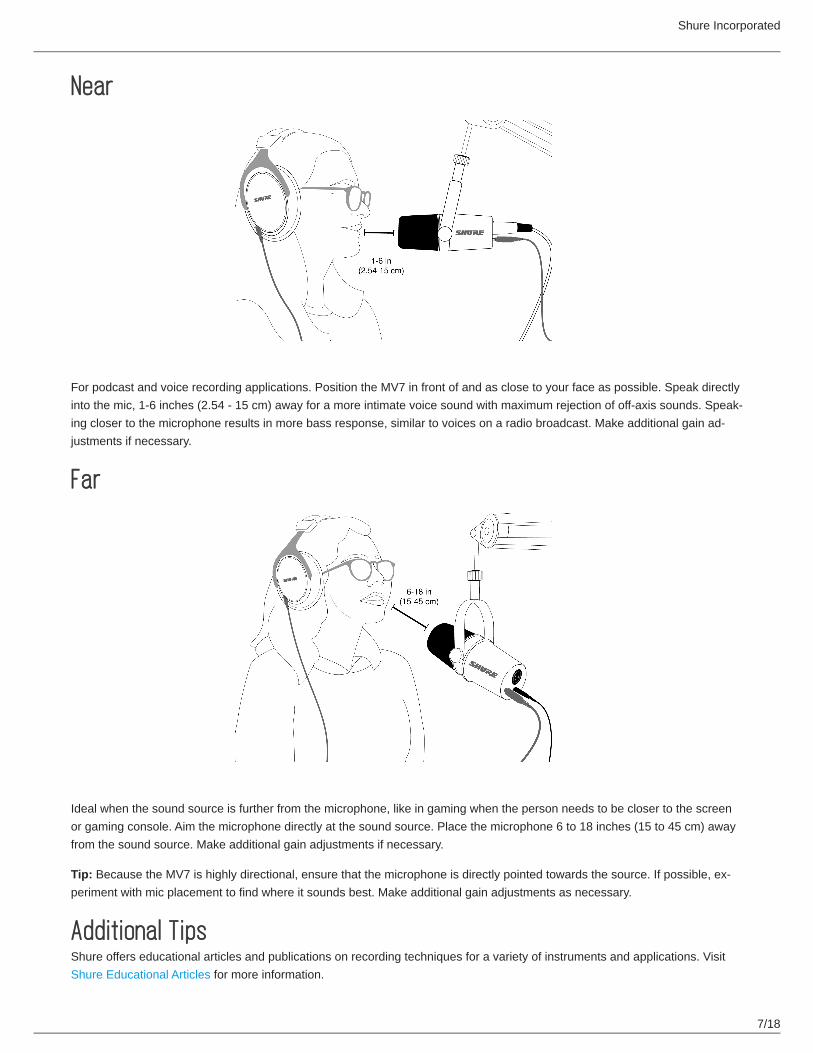
Near
For podcast and voice recording applications. Position the MV7 in front of and as close to your face as possible. Speak directly into the mic, 1-6 inches (2.54 - 15 cm) away for a more intimate voice sound with maximum rejection of off-axis sounds. Speak-ing closer to the microphone results in more bass response, similar to voices on a radio broadcast. Make additional gain ad-justments if necessary.
Far
Ideal when the sound source is further from the microphone, like in gaming when the person needs to be closer to the screen or gaming console. Aim the microphone directly at the sound source. Place the microphone 6 to 18 inches (15 to 45 cm) away from the sound source. Make additional gain adjustments if necessary.
Tip: Because the MV7 is highly directional, ensure that the microphone is directly pointed towards the source. If possible, ex-periment with mic placement to find where it sounds best. Make additional gain adjustments as necessary.
Additional TipsShure offers educational articles and publications on recording techniques for a variety of instruments and applications. Visit Shure Educational Articles for more information.
Shure Incorporated
8/18
The Shure MOTIV Desktop AppUse the Shure MOTIV desktop app to quickly adjust microphone settings. The device stores the most recently used settings for quick setup.
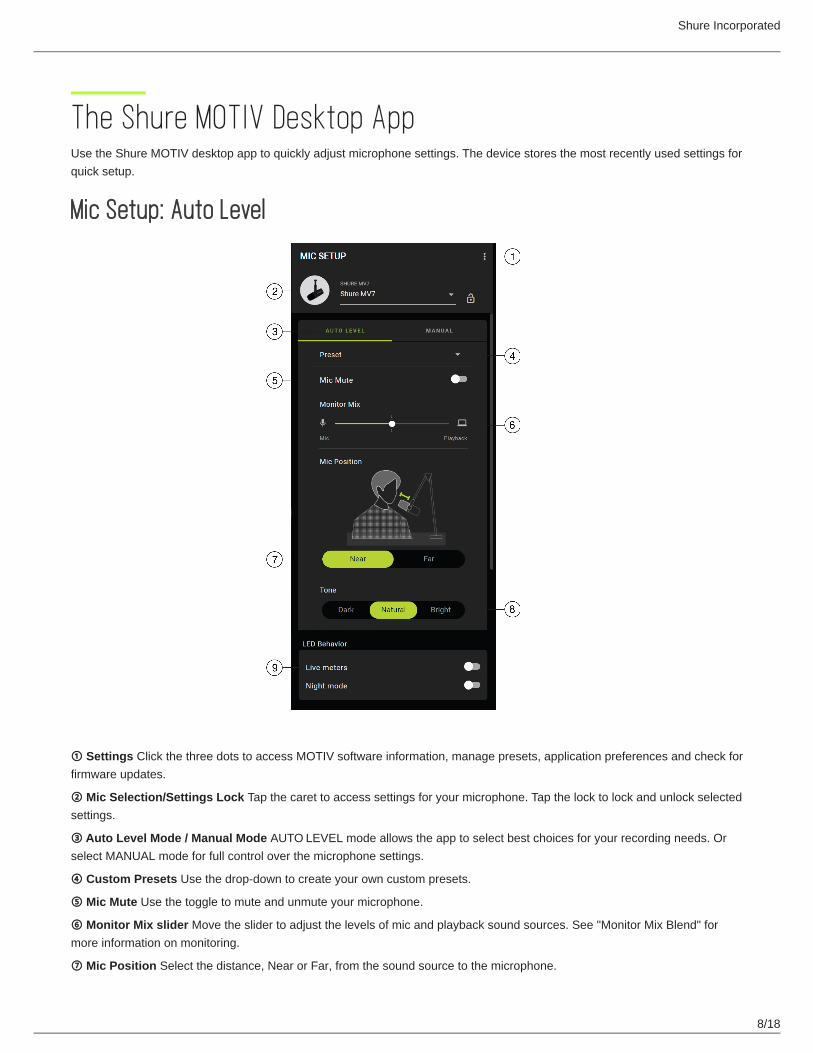
Mic Setup: Auto Level
① Settings Click the three dots to access MOTIV software information, manage presets, application preferences and check for firmware updates.
② Mic Selection/Settings Lock Tap the caret to access settings for your microphone. Tap the lock to lock and unlock selected settings.
③ Auto Level Mode / Manual Mode AUTO LEVEL mode allows the app to select best choices for your recording needs. Or select MANUAL mode for full control over the microphone settings.
④ Custom Presets Use the drop-down to create your own custom presets.
⑤ Mic Mute Use the toggle to mute and unmute your microphone.
⑥ Monitor Mix slider Move the slider to adjust the levels of mic and playback sound sources. See "Monitor Mix Blend" for more information on monitoring.
⑦ Mic Position Select the distance, Near or Far, from the sound source to the microphone.
Shure Incorporated
9/18
⑧ Tone Adjust the tonal qualities of your audio by selecting Dark, Natural or Bright tone. Tone controls a variety of settings to quickly dial in the sound that works best for your voice.
⑨ LED Behavior Turn on Live meters to use your Touch Panel for mic gain metering. Use Night mode to lower the brightness of your Touch Panel. See "LED Behavior" for more information on using these features for metering and dimming.
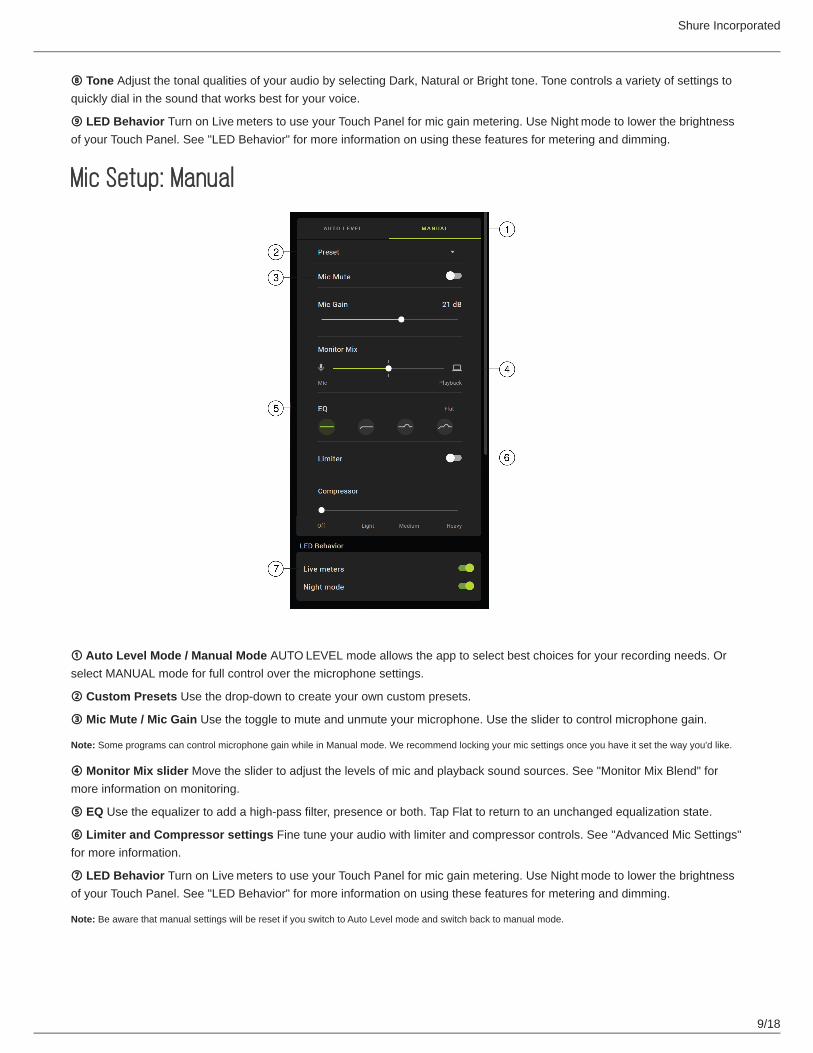
Mic Setup: Manual
① Auto Level Mode / Manual Mode AUTO LEVEL mode allows the app to select best choices for your recording needs. Or select MANUAL mode for full control over the microphone settings.
② Custom Presets Use the drop-down to create your own custom presets.
③ Mic Mute / Mic Gain Use the toggle to mute and unmute your microphone. Use the slider to control microphone gain.
Note: Some programs can control microphone gain while in Manual mode. We recommend locking your mic settings once you have it set the way you'd like.
④ Monitor Mix slider Move the slider to adjust the levels of mic and playback sound sources. See "Monitor Mix Blend" for more information on monitoring.
⑤ EQ Use the equalizer to add a high-pass filter, presence or both. Tap Flat to return to an unchanged equalization state.
⑥ Limiter and Compressor settings Fine tune your audio with limiter and compressor controls. See "Advanced Mic Settings" for more information.
⑦ LED Behavior Turn on Live meters to use your Touch Panel for mic gain metering. Use Night mode to lower the brightness of your Touch Panel. See "LED Behavior" for more information on using these features for metering and dimming.
Note: Be aware that manual settings will be reset if you switch to Auto Level mode and switch back to manual mode.
Shure Incorporated
10/18
•
•
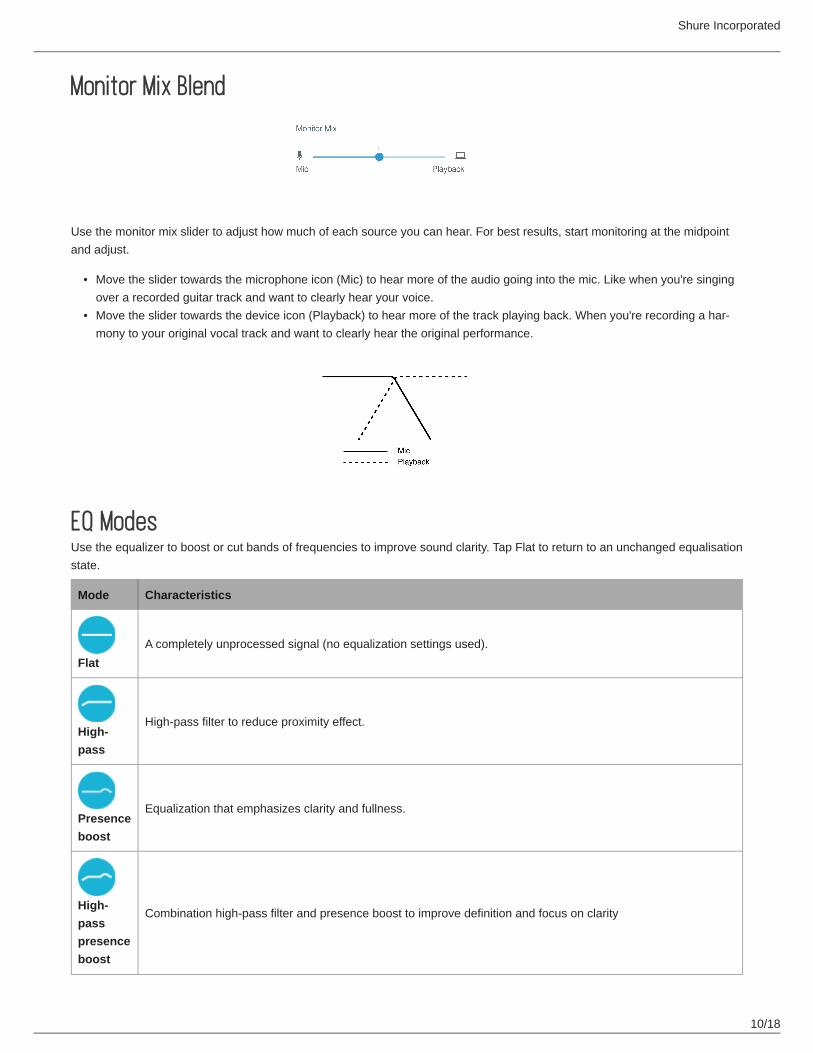
Monitor Mix Blend
Use the monitor mix slider to adjust how much of each source you can hear. For best results, start monitoring at the midpoint and adjust.
Move the slider towards the microphone icon (Mic) to hear more of the audio going into the mic. Like when you're singing over a recorded guitar track and want to clearly hear your voice.Move the slider towards the device icon (Playback) to hear more of the track playing back. When you're recording a har-mony to your original vocal track and want to clearly hear the original performance.
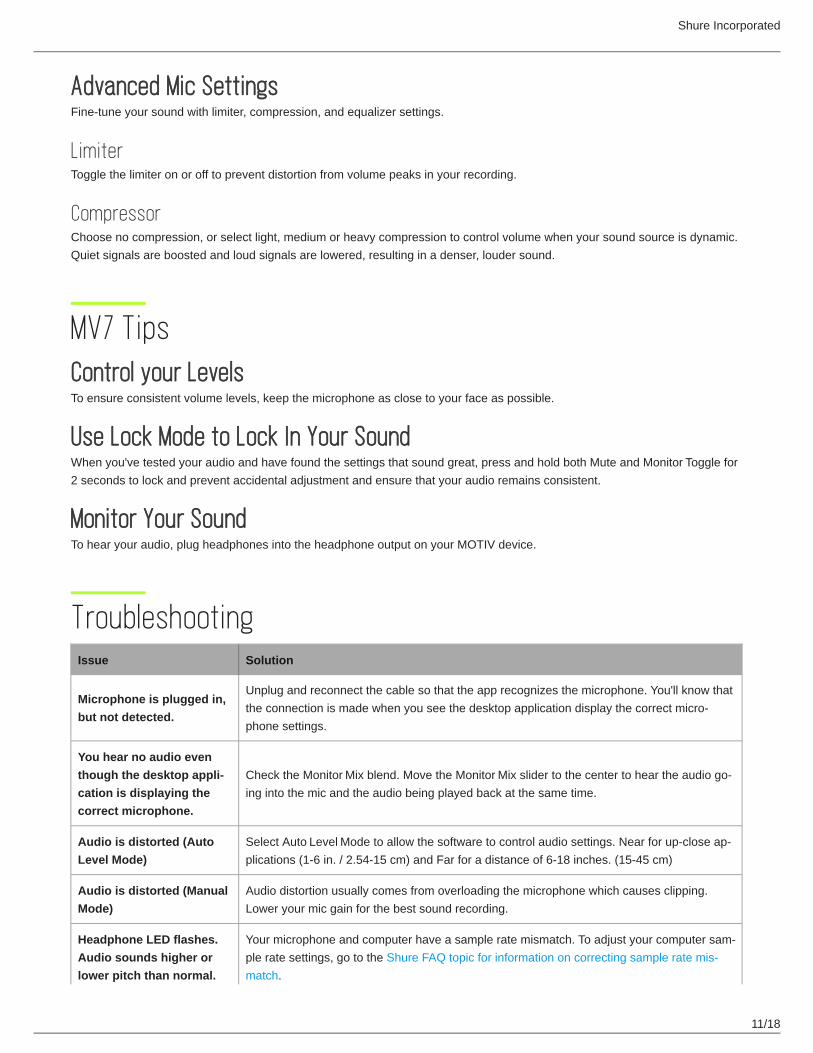
EQ ModesUse the equalizer to boost or cut bands of frequencies to improve sound clarity. Tap Flat to return to an unchanged equalisation state.
Mode Characteristics
FlatA completely unprocessed signal (no equalization settings used).
High-pass
High-pass filter to reduce proximity effect.
Presence boost
Equalization that emphasizes clarity and fullness.
High-pass presence boost
Combination high-pass filter and presence boost to improve definition and focus on clarity
Shure Incorporated
11/18
Advanced Mic SettingsFine-tune your sound with limiter, compression, and equalizer settings.
LimiterToggle the limiter on or off to prevent distortion from volume peaks in your recording.
CompressorChoose no compression, or select light, medium or heavy compression to control volume when your sound source is dynamic. Quiet signals are boosted and loud signals are lowered, resulting in a denser, louder sound.
MV7 TipsControl your LevelsTo ensure consistent volume levels, keep the microphone as close to your face as possible.
Use Lock Mode to Lock In Your SoundWhen you've tested your audio and have found the settings that sound great, press and hold both Mute and Monitor Toggle for 2 seconds to lock and prevent accidental adjustment and ensure that your audio remains consistent.
Monitor Your SoundTo hear your audio, plug headphones into the headphone output on your MOTIV device.
TroubleshootingIssue Solution
Microphone is plugged in, but not detected.
Unplug and reconnect the cable so that the app recognizes the microphone. You'll know that the connection is made when you see the desktop application display the correct micro-phone settings.
You hear no audio even though the desktop application is displaying the correct microphone.
Check the Monitor Mix blend. Move the Monitor Mix slider to the center to hear the audio go-ing into the mic and the audio being played back at the same time.
Audio is distorted (Auto Level Mode)
Select Auto Level Mode to allow the software to control audio settings. Near for up-close ap-plications (1-6 in. / 2.54-15 cm) and Far for a distance of 6-18 inches. (15-45 cm)
Audio is distorted (Manual Mode)
Audio distortion usually comes from overloading the microphone which causes clipping. Lower your mic gain for the best sound recording.
Headphone LED flashes. Audio sounds higher or lower pitch than normal.
Your microphone and computer have a sample rate mismatch. To adjust your computer sam-ple rate settings, go to the Shure FAQ topic for information on correcting sample rate mis-match.
Shure Incorporated
12/18
••••
•
Issue Solution
Note: Windows update 10 v2004 (April 2020) solves this problem.
Microphone has become detached from the yoke.
See the MV7 Yoke Assembly topic for step by step instructions for re-assembling your yoke and assorted washers. Correct washer assembly is crucial to ensure that your microphone is securely in place.
Miscellaneous issuesIt may be useful to reset the app to restore functionality. Perform a hard reset by unplugging and re-plugging the microphone.
General troubleshooting
Quit and re-start the app.Reboot the computer.Check for firmware update. Tap the three dots in the top right corner and select About MOTIV > Check for Update
Note: Contact Shure Service and Repair if you continue to experience any issues.
Firmware UpdateTake advantage of additional features and design enhancements by updating the firmware on your MOTIV Desktop Application when prompted. A notification will appear when a firmware update is available. You have the option to download the update im-mediately or at a later time.
Tip: For best results, before updating the application, make sure that the microphone is connected to your computer. Do not disconnect until the update is complete.
To access firmware update at a later time, tap the three dots > About > Check for Update. Tap the caret icon and if the available firmware package is newer than the current version, tap Send to device. Contact Shure Service and Repair if you ex-perience any issues.
Keep equipment connected during updatesKeep the MOTIV device connected to your mobile device when updating to ensure that there are no update issues.
System RequirementsSystem Requirements and Compatibility: Mac
MacOS 10.13 to 10.1564 bitMinimum 2 GB of RAMMinimum 500 MB of hard disk space
System Requirements and Compatibility: WindowsWindows 10
Shure Incorporated
13/18
•••
•••
•••
64 bitMinimum 2 GB of RAMMinimum 500 MB of hard disk space
System Requirements and Compatibility: iOSiOS: iOS 12 and higheriPhone: iPhone 6 and higheriPod Touch: 6th gen
Note: iPad Pro (USB-C) is not supported.
System Requirements and Compatibility: AndroidWill work with any Android device that has:
Android Oreo 8.0 and higherUSB Host Power Requirement of ≥100 mAUSB Audio Class 1.1 support and higher
Android is a trademark of Google Inc.
Note: See https://www.shure.com/MOTIVcompatibility for information on supportive Android devices.
SpecificationsMFi Certified
Yes
DSP Modes (Presets)Near/Far, Dark/Natural/Bright
Transducer TypeDynamic (moving coil)
Polar PatternUnidirectional (Cardioid)
Output Impedance314 Ω
Frequency Response20 Hz to 20,000 Hz
Adjustable Gain Range0 to +36 dB
Sensitivity(@ 1 kHz, open circuit voltage)
-55 dBV/Pa [1] (1.78 mV), -47 dBFS/Pa [1] [2]
Shure Incorporated
14/18
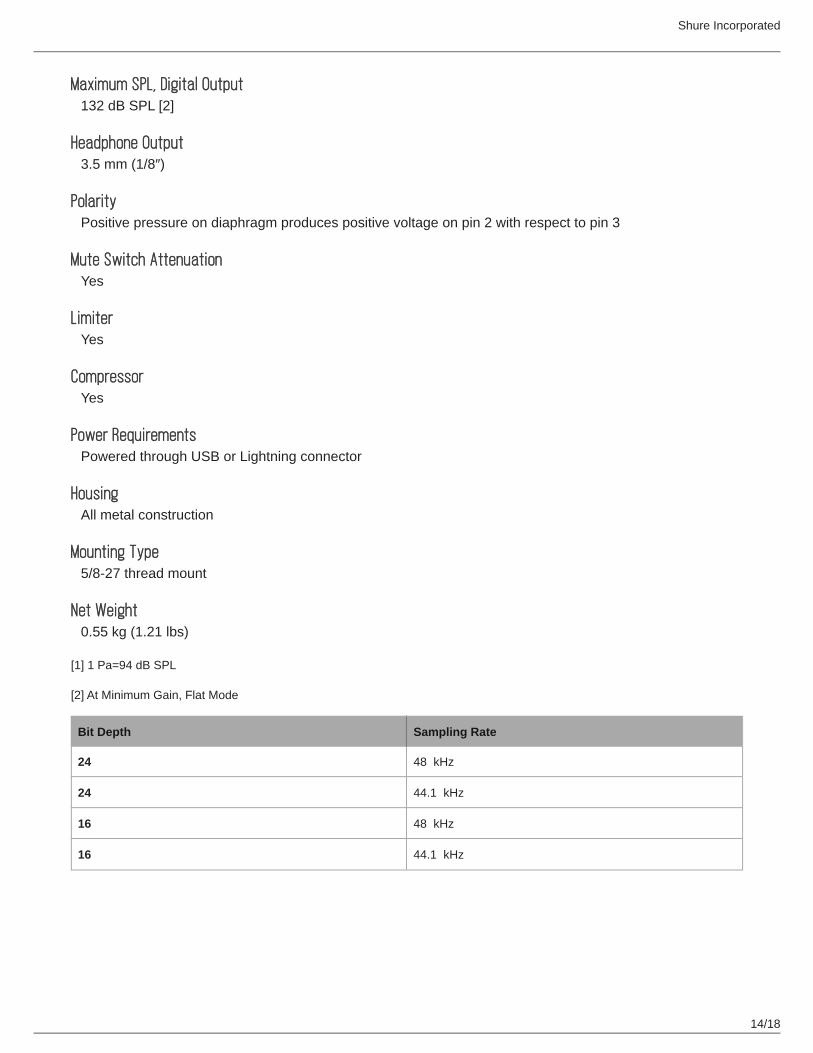
Maximum SPL, Digital Output132 dB SPL [2]
Headphone Output3.5 mm (1/8″)
PolarityPositive pressure on diaphragm produces positive voltage on pin 2 with respect to pin 3
Mute Switch AttenuationYes
LimiterYes
CompressorYes
Power RequirementsPowered through USB or Lightning connector
HousingAll metal construction
Mounting Type5/8-27 thread mount
Net Weight0.55 kg (1.21 lbs)
[1] 1 Pa=94 dB SPL
[2] At Minimum Gain, Flat Mode
Bit Depth Sampling Rate
24 48 kHz
24 44.1 kHz
16 48 kHz
16 44.1 kHz
Shure Incorporated
15/18
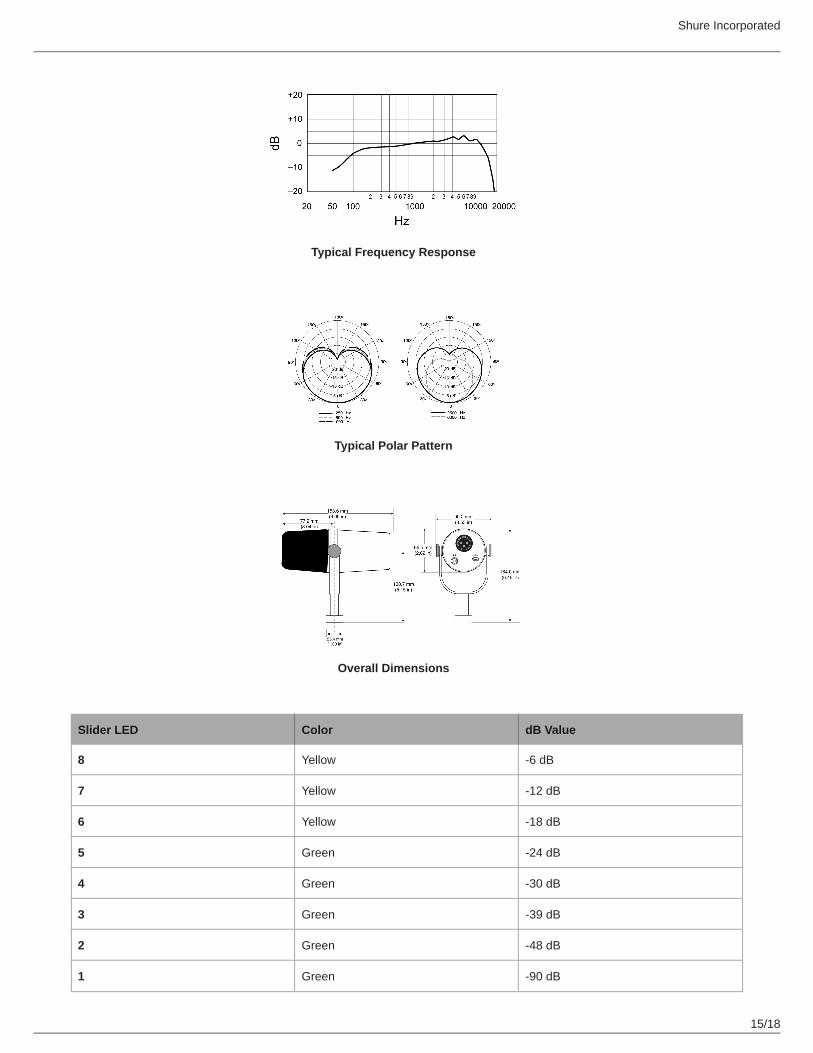
Typical Frequency Response
Typical Polar Pattern
Overall Dimensions
Slider LED Color dB Value
8 Yellow -6 dB
7 Yellow -12 dB
6 Yellow -18 dB
5 Green -24 dB
4 Green -30 dB
3 Green -39 dB
2 Green -48 dB
1 Green -90 dB

Shure Incorporated
16/18
1.
2.◦◦◦◦
3.
4.
5.
6.7.
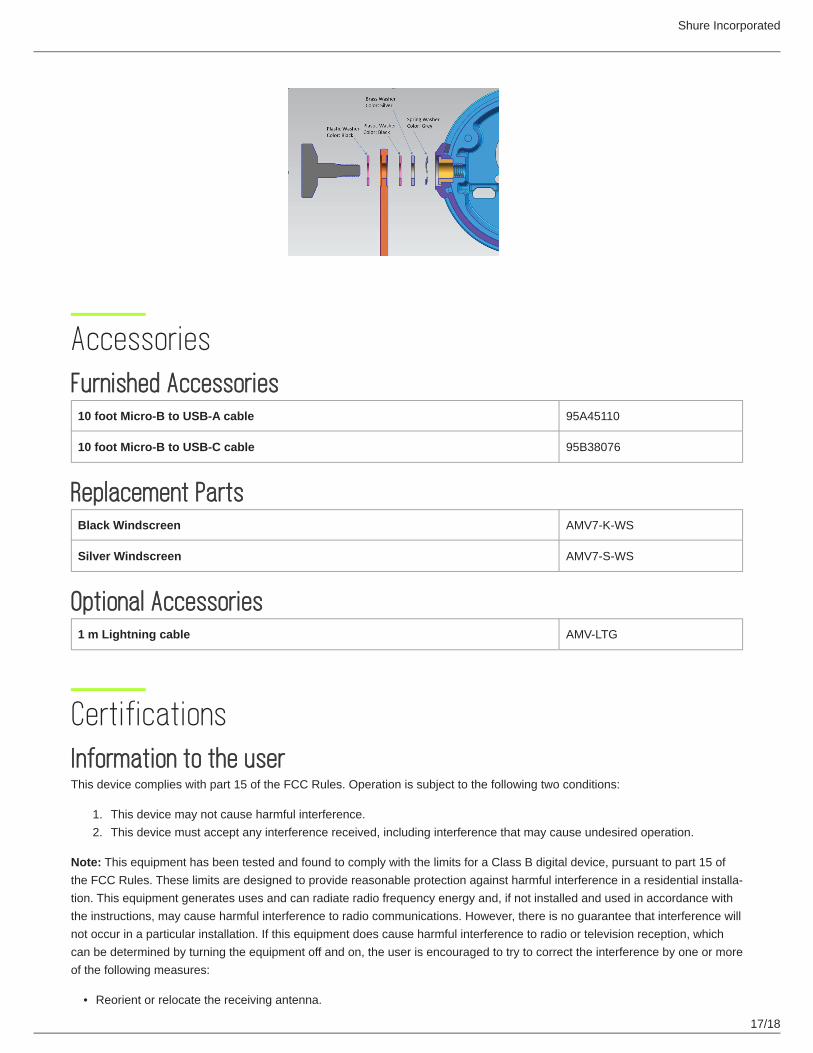
MV7 Yoke AssemblyThe MV7 yoke allows a podcaster to be flexible with mic placement. Loosen the yoke knobs and you can adjust the micro-phone in a variety angles. If the microphone becomes detached from the yoke, these are the steps to put it together in the cor-rect order to ensure that your microphone is secure. Each side uses one thin gray spring washer, one shiny silver brass wash-er, two black plastic washers and the yoke and threaded yoke knob.
Start with the threaded knob flat side down on your tabletop.
Stack the washers on the threaded knob.Place a black plastic washer on the knob.Place one side of the yoke on next.Then put the second black plastic washer on.Place the flat silver washer and then the thin spring washer on the threaded knob.
Using your finger to hold the screw assembly in place, slide the MV7 onto the threaded screw and turn the knob to keep washers in place.
Note: Be sure to keep this side on but loose so that you have room to easily move the yoke and assemble the washers on the opposite side.
On the opposite yoke arm, place the washers into the side of the MV7 in reverse order. Thin spring washer > Flat silver washer > Black plastic washer > Yoke armThe yoke arm needs to be placed directly onto the stack of washers. To ensure that the washers are aligned, put a pen through the yoke and washers to make sure that everything is properly centered. Leave pen in place.Place the second black plastic washer onto the remaining threaded knob.Remove the pen. Insert the threaded knob and black plastic washer into the stacked washers and tighten both sides to ensure that your microphone is stable.
Shure Incorporated
17/18
1.2.
•
AccessoriesFurnished Accessories
10 foot Micro-B to USB-A cable 95A45110
10 foot Micro-B to USB-C cable 95B38076
Replacement PartsBlack Windscreen AMV7-K-WS
Silver Windscreen AMV7-S-WS
Optional Accessories1 m Lightning cable AMV-LTG
CertificationsInformation to the userThis device complies with part 15 of the FCC Rules. Operation is subject to the following two conditions:
This device may not cause harmful interference.This device must accept any interference received, including interference that may cause undesired operation.
Note: This equipment has been tested and found to comply with the limits for a Class B digital device, pursuant to part 15 of the FCC Rules. These limits are designed to provide reasonable protection against harmful interference in a residential installa-tion. This equipment generates uses and can radiate radio frequency energy and, if not installed and used in accordance with the instructions, may cause harmful interference to radio communications. However, there is no guarantee that interference will not occur in a particular installation. If this equipment does cause harmful interference to radio or television reception, which can be determined by turning the equipment off and on, the user is encouraged to try to correct the interference by one or more of the following measures:
Reorient or relocate the receiving antenna.
Shure Incorporated
18/18
•••
Increase the separation between the equipment and the receiver.Connect the equipment to an outlet on a circuit different from that to which the receiver is connected.Consult the dealer or an experienced radio/TV technician for help.
This Class B digital apparatus complies with Canadian ICES-003. Cet appareil numérique de la classe B est conforme à la norme NMB-003 du Canada.
Industry Canada ICES-003 Compliance Label: CAN ICES-3 (B)/NMB-3(B)
This microphone for use with any microphone stand with a 5/8" threaded adapter.
Note: Testing is based on the use of supplied and recommended cable types. The use of other than shielded (screened) cable types may degrade EMC per-formance.
This product meets the Essential Requirements of all relevant European directives and is eligible for CE marking.
The CE Declaration of Conformity can be obtained from: www.shure.com/europe/compliance
Authorized European representative:Shure Europe GmbHGlobal ComplianceJakob-Dieffenbacher-Str. 1275031 Eppingen, GermanyPhone: +49-7262-92 49 0Email: [email protected]
Made for iPhone Xs Max, iPhone Xs, iPhone XR, iPhone X, iPhone 8 Plus, iPhone 8, iPhone 7 Plus, iPhone 7, iPhone SE, iPhone 6s Plus, iPhone 6s, iPhone 6 Plus, iPhone 6, iPhone 5s, iPhone 5c, iPhone 5, iPad Pro (10.5-inch), iPad Pro (12.9-inch) 2nd generation, iPad Pro (12.9-inch) 1st generation, iPad Pro (9.7-inch), iPad mini 4, iPad mini 3, iPad mini 2, iPad Air 2, iPad Air, iPad (6th generation), iPad (5th generation), iPad (4th generation), iPod touch.
iPad, iPhone, iPod, and iPod touch are trademarks of Apple Inc.,registered in the U.S. and other countries. iPad Air, iPad mini, and Lightning are trademarks of Apple Inc. The trademark “iPhone” is used in Japan with a license from Aiphone K.K.
Android CompatibilityThis equipment is compatible with Android devices that support USB Audio Class 2.0 and USB-C connectivity. Not all Android devices are compatible. Android is a trademark of Google Inc.