owner's manual - c.searspartsdirect.com · please read this manual carefully before operating...
TRANSCRIPT
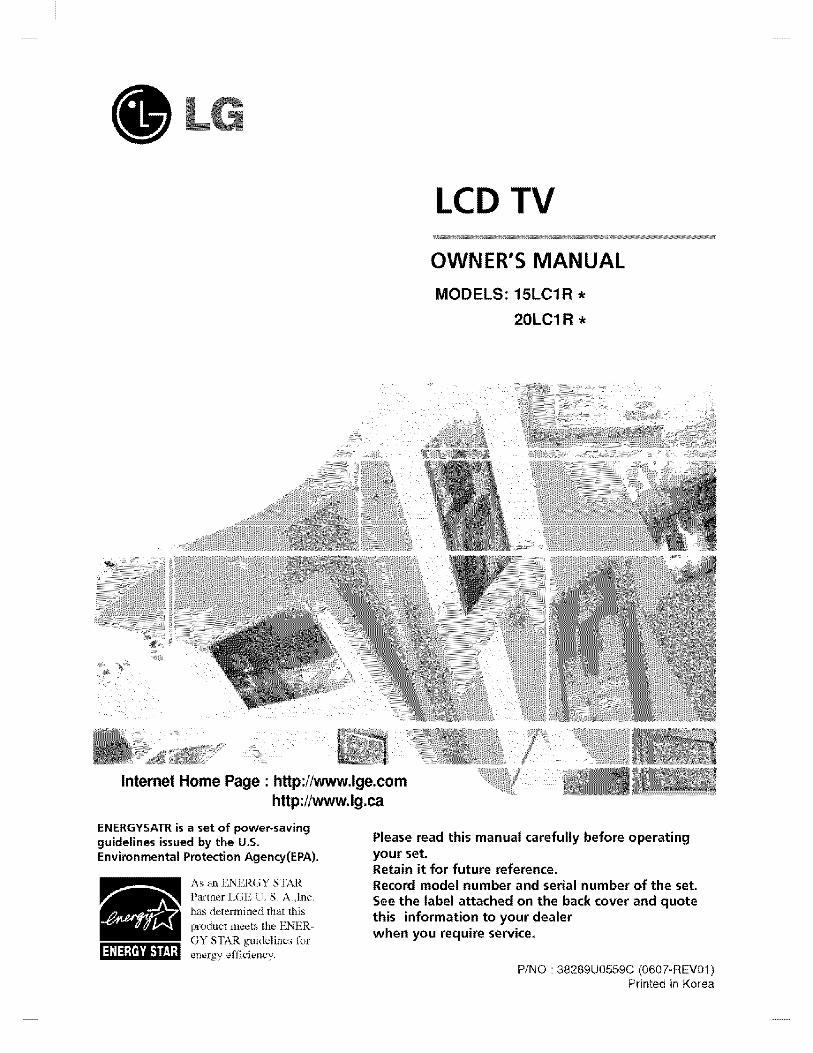
OWNER'S MANUAL
MODELS: 15LCIR *
20LC1 R *
Internet Home Page • http://www.lge.com
ENERGYSATR is a set of power-saving
guidelines issued by the U.S,
Environmental Protection Agency(£PA).
As an ENERGY S'IAR
Partner !.GE U S+ A,,Inc,
has determined lhat this
product meets the F.NTR
GY STAR guidelines _i_r
energy efl_ciency,
Please read this manual carefully before operatingyour set.Retain it for future reference.Record model number and serial number of the set.
See the label attached on the back cover and quotethis information to your dealerwhen you require service.
P/NO : 38289U0559C (0607-REV01)Printed in Korea
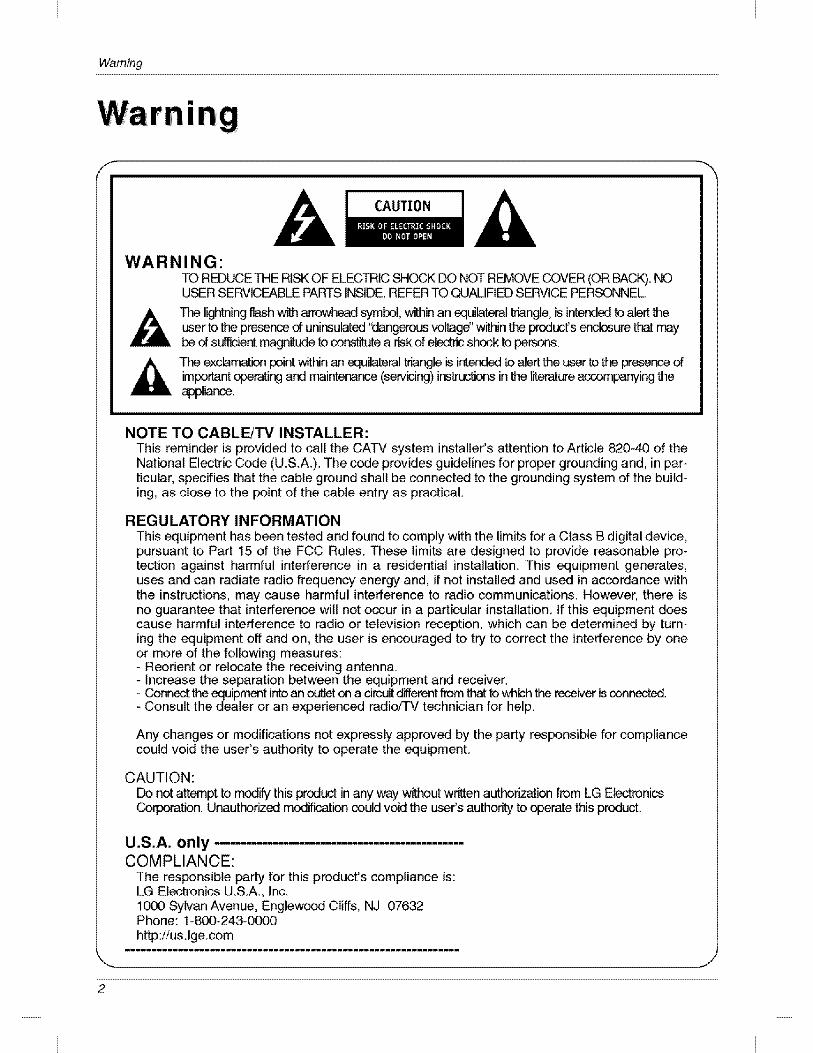
Waming
rnlngf
WARNING:TO R_E THE RISKOF _EC_IC _K _ _T REI'_VE COVER ('ORBACK).USER SEF_J_LE PARTSI_DE+ REFBq TO QUALIFI_ SERVICE PERSONNEL
The I_htning l+_shv_th sy'm_, with_ an equilateral _ngle, B intended to alert the_er to _e prese_ d uninsulated '_n_Js wltage" within the _L_fs enclosu_ that maybe d s_ magn_ to a _k d _dc shock to _rsons+
The exclamat_ point v_hin an equilaterall_ngle is intended to a_rt _ _ to _ preserl(_ ofim_nt _r_ &qdrr_ainter_.e (ser,,_) instructJor_sin _ literat_e acx_ompa,qyir_the@1_.
NOTE TO CABL_TV INSTALLER:This reminder is provided to call the CA_ system installer's attention to Article 820+40 of theNational El_tric Code (U.S.A.). The code provides guidelines for proper grounding and, in par-ticular, specifies that the cable ground shall be conn_t_ to the grounding system of the build-ing, as close to the point of the cable entry as practical.
REGULATORY INFORMATIONThis _uipment has been tested and found to comply with the limits for a Class B digital device,pursuant to Part 15 of the FCC Rules. These limits are designed to provide reasonable pro-tection against harmful interference in a residential installation. "[his equipment generates,uses and can radiate radio frequency energy and, if not install_ and used in accordance withthe instructions, may cause harmful interference to radio communications. However, there isno guarantee that interference will not occur in a particular installation, if this _uipment doescause harmful interference to radio or television reception, which can be determined by turn-ing the _uipment off and on, the user is encouraged to t_ to correct the interference by oneor more of the following measures:- Reorient or relocate the receiving antenna.+ Increase the se_ration between the _uipment and receiver.- C_"t tt'.eequipm_t intoan o__+1__ a dm_ dilfemnt _ tt-_t to wh_h _ rece_er is _nected.- Consult the dealer or an experienced radioiTV technician for help.
Any changes or modifications not expressly approved by the party responsible for compliancecould void the user's authority' to operate the equipment.
CAUTION:_t attempt to _ify this _cd_ in any way witho_ w_tten aut_#_<_n from LG E_,oni_
n+Up_authonzedn_,dificati_ _uld v_ _e user's authority to _erate _is product
U.S,A, onlyCOMPLIANCE:
The res_nsible party for this product's compliance is:LG Electronics U.S.A., Inc+1_O Sylvan Avenue, Englew_ Cliffs, NJ 07632Phone: 1-&00-243-0C_0ht+4p://usJge.com
2
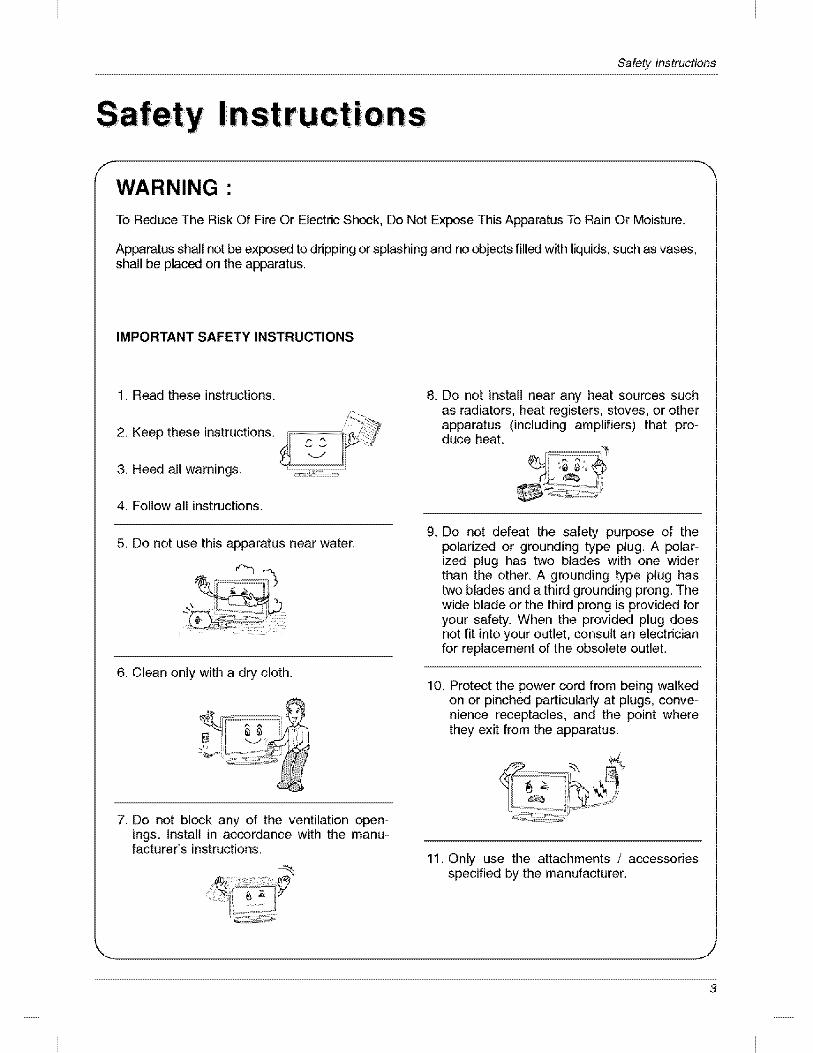
SafetyInstructions
I i....ons
f
To Red_e The Risk Of Fire Or Electric Shock, Do Not _pose This A_ratus To Rain Or Moisture.
Apparat_ shah _t _ ex_sed to dripping or splashing and no _ects filled w_h i_uids, such as vases,shah be placed on _e apparatus.
IMPORTANT SAFETY INSTRUCTIONS
1. Read these instructions.
2. Keep these instructions.
3. Heed all warnings.
8. Do not instaJl near any heat sources suchas radiators, heat registers, stoves, or otherapparatus (including amplifiers) that pro-duce heat.
4. Follow all instructions.
5. Do not use this ap_ratus near water.
6. Clean only with a dry cloth.
9_ Do not defeat the safety" purpose of thepolarized or grounding type plug. A polar-ized plug has two blades with one widerthan the other. A grounding type plug hastwo blades and a third grounding prong. Thewide blade or the third prong is provided foryour safety. When the provided plug doesnot fit into your outlet, consult an electricianfor replacement of the obsolete out{et.
10. Protect the power cord from being walkedon or pinch_ particularly at plugs, conve-nience receptacles, and the point wherethey exit from the apparatus.
7. Do not block any of the ventilation open-ings, lnstal_ in accordance with the manu-facturer's instructions.
11. Only use the attachments / accessoriesspecified by the manufacturer.
3
Safety Instructions
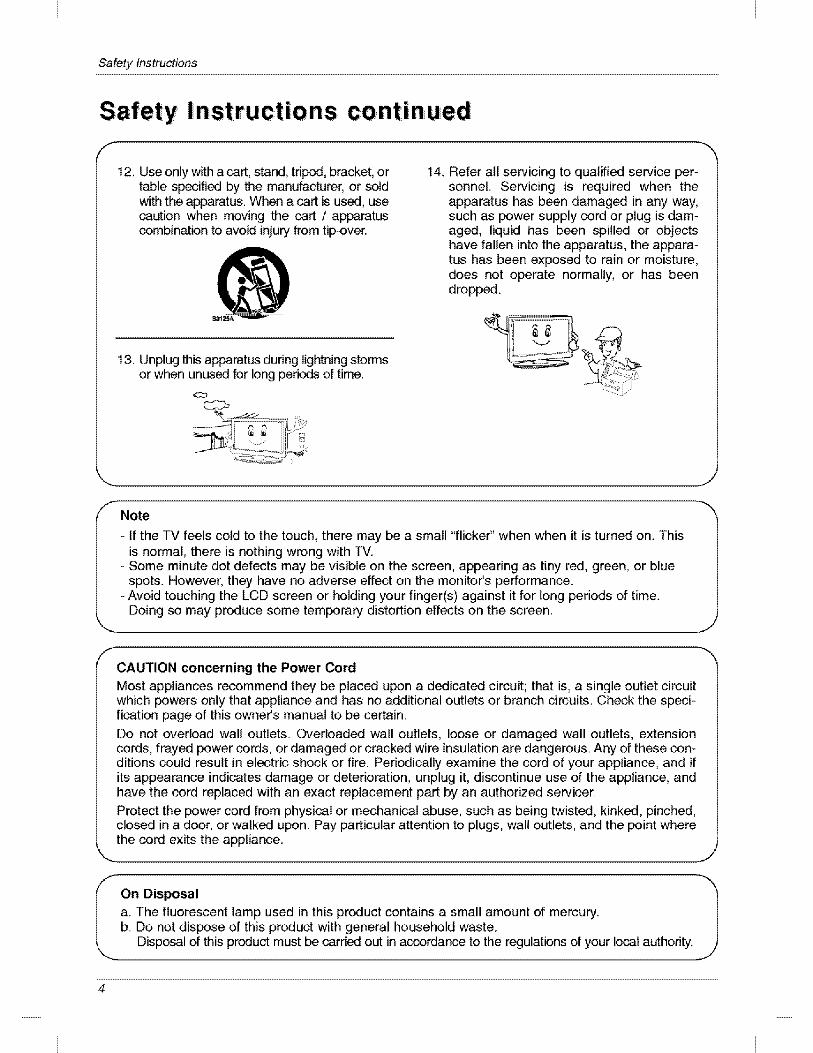
Safety Instruct:ions continued
12. Use only w_h a art, stand, tripod, bracket, ortable s_:ified by Me manufacturer, or _ldwi_ the _aratu_s. When a art is used, use_ulion when moving the art / a_ratuscombinat_n to avo_ i_ury from tip-over.
14. Refer aH servicing to qualified service per-sonneL Servicing is required when theapparatus has been damaged in any way,such as power supply cord or plug is dam-aged, liquid has been spilled or o_ectshave fallen into the apparatus, the appara-tus has been exposed to rain or moisture,does not operate normally, or has beendropped,,
13. Unplug this apparatus during lightning stormsor when unused for long perils of time.
Note
- If the TV feels cold to the touch, there may be a small "flicker" when when it is tumeq on. Thisis normal, there is nothing wrong with TV_
- Some minute dot defects may' be visible on the screen, appearing as tiny red, green, or bluespots. However, they have no adverse effect on the monitor's performance.
- Avoid touching the LCD screen or holding your finger(s) against it for long perils of time.Doing so may produce some temporaw distortion effects on the screen.
CAUTION concerning the Power _rd
Most appliances recommend they be placed upon a dedicated circuit; that is, a single outlet circuitwhich powers only that appliance and has no additional outlets or branch circuits. Check the speci-fiction page of this owner's manual to be certain.
Do not overlc_d wall outlets. Overloaded wall outlets, loose or damaged wall outlets, extensioncords, frayed power cords, or damaged or cracked wire insulation are dangerous. Any of these con-ditions could result in electric sh_k or fire. Peri_ically examine the cord of your applian_, and ifits appearance indicates damage or deterioration, unplug it, discontinue use of the appliance, andhave the cord replaced with an exact replacement part by an authorized serJicer.Protect the power cord from physi_l or mechanical abuse, such as being twisted, kinked, pinched,closed in a door, or walked upon. Pay particular attention to plugs, wall outlets, and the point wherethe cord exits the appliance.
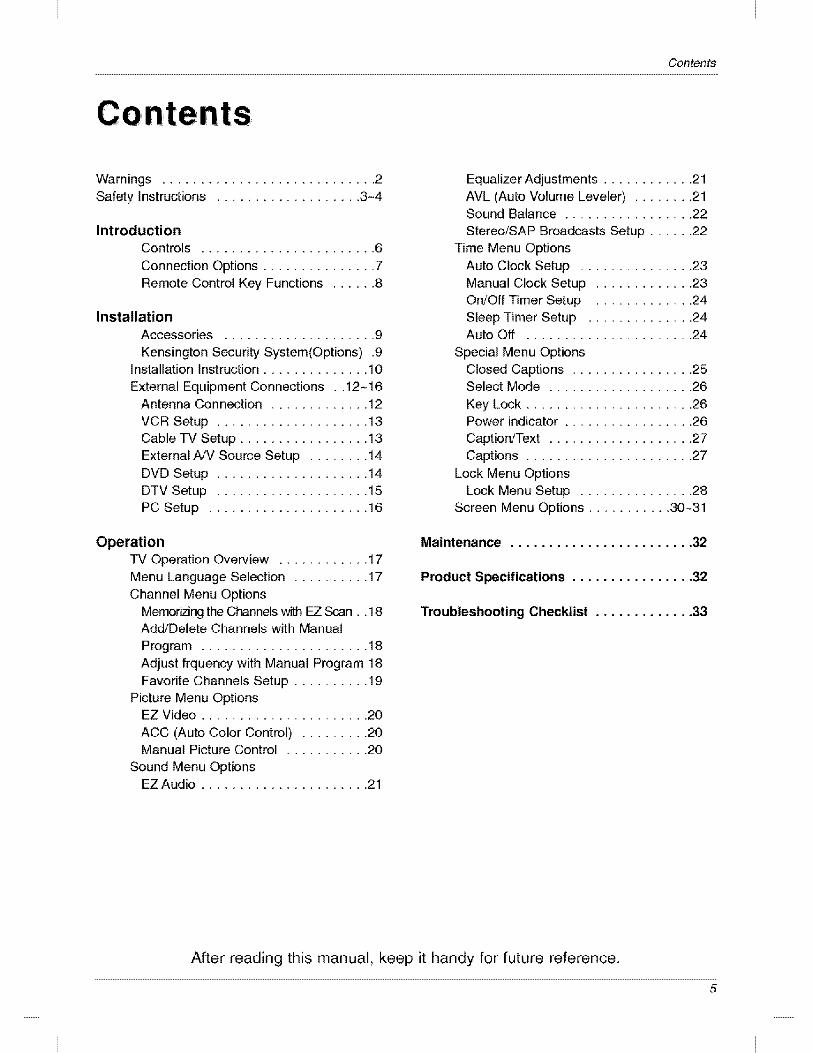
Contents
Warnings ............................ 2Safety Instructions ............................. 3-4
IntroductionControls ....................... 6
Connection Options ............... 7Remote Control Key Functions ...... 8
InstallationAccessories .................... 9
Kensington S_urity System(Options) .9Installation Instruction .............. 10
External Equipment Connections . .12-16Antenna Connection ................... 12
VCR Setup .............................. 13Cable TV Setup ................. 13External A/V Source Setup ........ 14DVD Setup .................... 14DTV Setup .................... 15PC Setup ............................... 16
TV Operation Overview ................. 17Menu Language Selection .......... 17Channel Menu Options
Metaling the Channe_ _ EZ _n.. 18Add/Delete Channels with Manual
Program ...................... 18Adjust frquency with Manual Program 18Favorite Channels Setup .......... 19
Picture Menu OptionsEZ Video ................................ 20
ACC (Auto Color Control) ......... 20Manual Picture Control ........... 20
Sound Menu OptionsEZ Audio ...................... 21
Equalizer Adjustments ............ 21AVL (Auto Volume Leveler) ........ 21Sound Balance ................. 22
Stereo/SAP Broadcasts Setup ...... 22Time Menu Options
Auto Clock Setup ............... 23Manual Clock Setup ............. 23Ord'Off Timer Setup ............. 24Sleep Timer Setup .............. 24Auto Off ...................... 24
Special Menu OptionsClosod Captions ................ 25Select Mode ................... 26
Key Lock ...................... 26Power indicator ................. 26
CaptionJText ................... 27Captions ...................... 27
Lock Menu OptionsLock Menu Setup ............... 28
Screen Menu Options ........... 30~31
Maintenance ........................ 32
Product Specifications ................ 32
Troubleshooting Ch_klist ............. 33
After reading this manual, keep it handy for future reference.
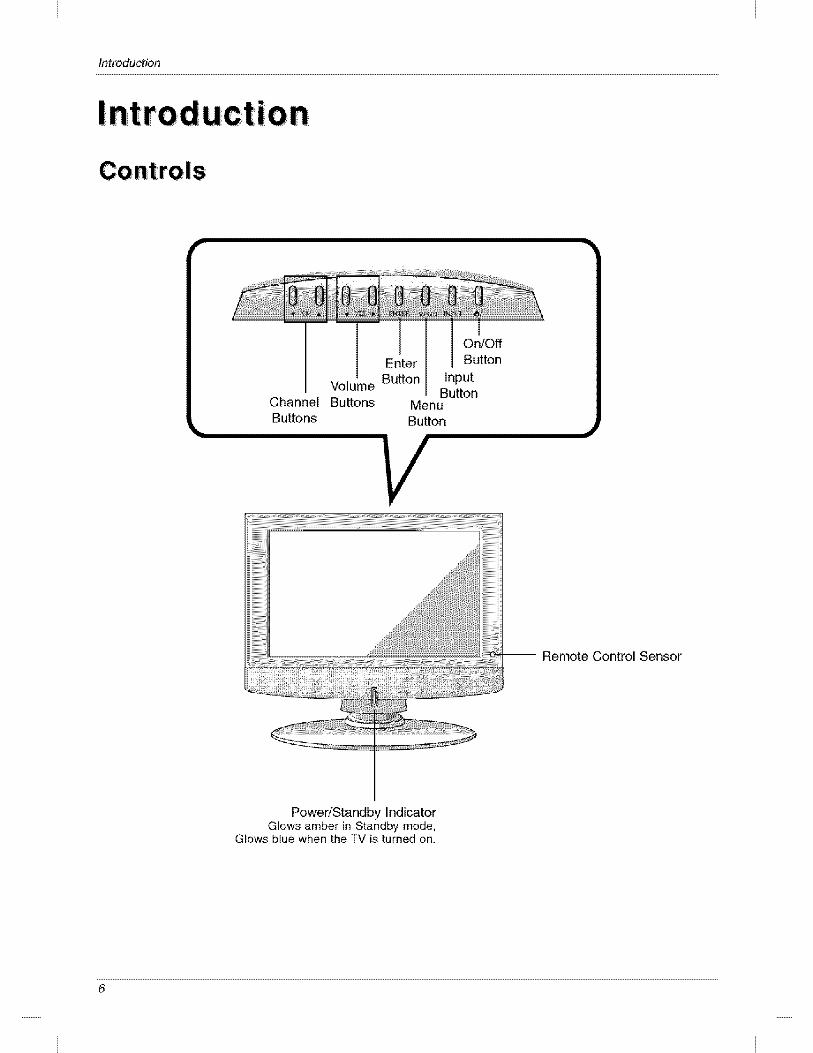
Introduction
ion
OpJOff
Enter Button
Volume Button InputButton
Channel Buttons MenuButtons Button
-- Remote Control Sensor
Power/Standby IndicatorGlows amber in Standby mode,
Glows blue when the TV is turned on.
6
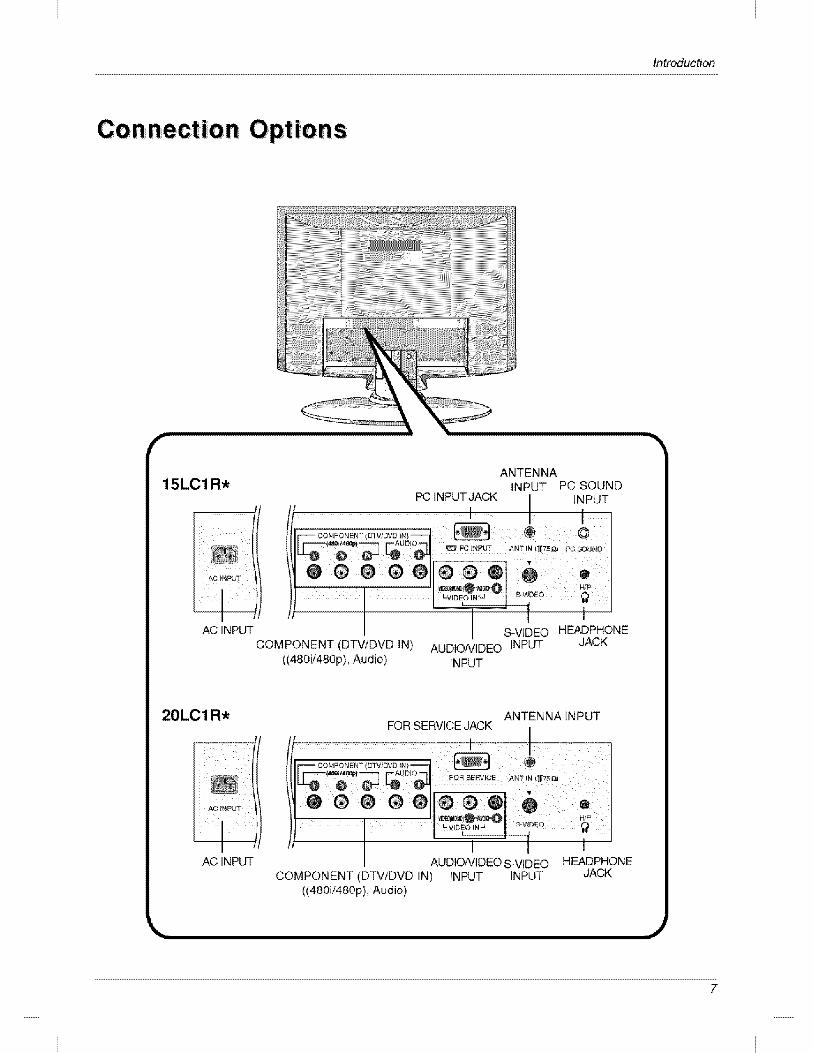
Introduction
Con nect on
15L01 R*
AC INP_
ANTENNAINPUT PC SOUND
INPUT JACK INPUT
I
CO#PONENT _v_'r._vD IN} --
COMPONENT (DTV/DVD IN) AUDIONIDEO INPUT((480b_480p), Audio) INPUT
JACK
20L01 R* ANTENNA iNPUTFOR SERVICE JACK
AC INPUT AUDIONIDEO S-VIDEO HEADPHONECOMPONENT DTV/DVD IN) INPUT INPUT JA_
((480i/480p), Audio)

Introduction
o When using the remote control, aim it at the remote control sensor on the TV,
MUTESwitches the sound on or off.
Returns to the TV mode.
FAV(Refer to p.19)
EXI1
NUMBER buttons
AUDIO(Refer to p,21)
CC(Reler to p.25)
INPUTSelects the remote operatingmode.(Refer to p.26)POWER
MTS(Refer to p.22)
MENU
ENTER
CH _i, / V (Channel button)
VOL "91/ _ (Volume button)
VIDEO(Refer to p20)
SLEEP(Refer to p.24)
FLASHBKPress the FLASHBK buttonto return to the last channelyou were watching.
• Open the battery com_rtment cover on the back side and insertthe batteries with correct _larity,
° Use two 1.5V batteries of AAA _pe. Don't mix used batteries withnew batteries.
8
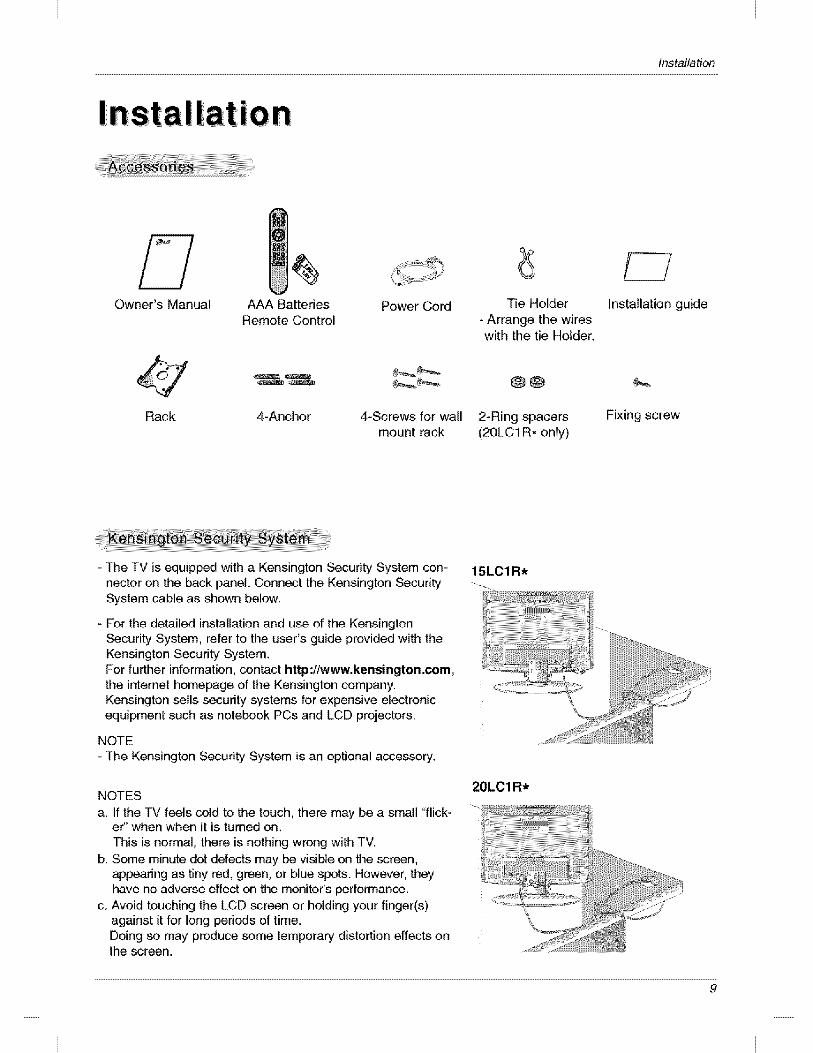
Installation
I
Owner's Manual AAA Batteries
Remote ControlPower Cord Tie Holder
- Arrange the wireswith the tie Holder.
installation guide
Rack 4oAnchor 4oScrews for wallmount rack
@@
2-Ring spacers
(20LC1 R* only)
Fixing screw
- The TV is _uip_ with a Kensington Security System con-
n_tor on the back panel. Connect the Kensington Security
System cable as shown below,
For the detailed installation and use of the KensingtonSecurity System, refer to the user's guide provided with theKensington Security System.For further information, contact h_p:flwww.kensington.com,the internet homepage of the Kensington company.Kensington sells security systems for expensive electronic_uipment such as note_ok PCs and LCD projectors.
NOTE
- The Kensington Secunty System is an optional accessory.
NOTES
a. If the _,/feels cold to the touch, there may be a small "flick-eY' when when it is turned on.
This is normal, there is nothing wrong with TV.
b. Some minute dot defects may _ visiNe on the _reen,_pearing as tiny red, green, or blue spots. However, theyhave no adverse effect on t_ monitor's Ferformance.
c. Avoid touching the LCD screen or holding your finger(s)against it for long _ri_s of time.Doing so may produce some temporary distortion effects onthe _reen.
15LC1R*
20L01 R*
Installation
i i .....I nsta! ation I instruct on
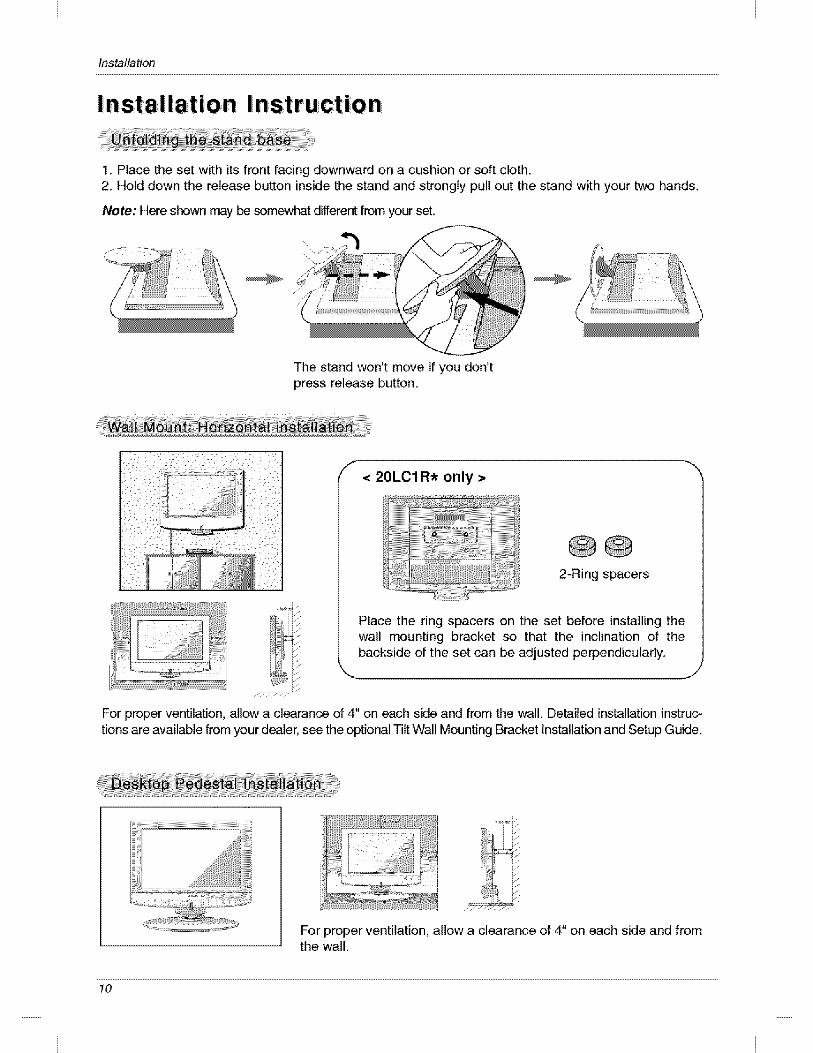
1,,Place the set with its front facing downward on a cushion or soft cloth,2,, Hold down the release button inside the stand and strongly pull out the stand with your two hands,
Note: Here shown may _ somewhat d_erent from your seL
The stand won't move if you don'tpress release button,
F< 20LCl R* only >
O@2°Ring spacers
Place the ring spacers on the set before installing thewall mounting bracket so that the inclination of the_ckside of the set can be adjusted perpendicularly,
For proper ventilation, allow a clearan_ of 4" on each side aM from the wall. Del_iled installation instruc-tior.s are available from your dealer, s_ the op_onal -NitWall Moun_ng Bracket Ins_llat_n and Setup Gu_e.
For proper ventilation, allow a clearance of 4" on each side and fromthe wall.
10

Installation
Insta!!ation !nstruction Continued
1. Connect the aerial cable to the _cket mark_ 175 g_on the back. For the best reception anoutd_r aerial should be us_,.
2. To connect an additional _uipment, see the External Equipment Connections section.3. Connect the power cord.
Note: Here shown may be somewhat different from your seL
Adjust the position of the panel in vadous ways for maximum comfort.
• _lt range
ii // /
Be careful that your h.ands are notpress_ down when tilting the screen.
1I

Installation
External Eq uipment Con nect,iions
- For optimum picture quality, adjust antenna direction.
Connecting to an inside Antenna _tup
- Typical wall antenna jack used in apa_ment bui!dings, _nnect the antenna cable as shown below.
Turn CloCkwise t° tightenl
Converter
- If you have a 75_ round cable, insert the bronze wire and then tighten the conn_tion nut ff you havea 300.Q flat wire, connect the twisted wire to the antenna converter and then connect the converter tothe antenna jack on the TV.
- ff using 7&Q round cable, do not bend the bronze wire. It may cause _or picture quality.
Connecting to an Outdoor Antenna Setup
This type of antenna is commonly used in single family dwellings
UHFAntenna
VHF Antenna
Turn c_ockwise to tighten.
75_. Round Cable Co
300£_Flat Wire
Single Family Home Antenna Antenna JackConverter
- In _or signal areas, to get better picture qual-ity, install a signal amplifier to the antenna ass_wn to the righL
- if sigr,al n_s to be split for two TVs, use anantenna signal splitter for connection,,
12
Installation
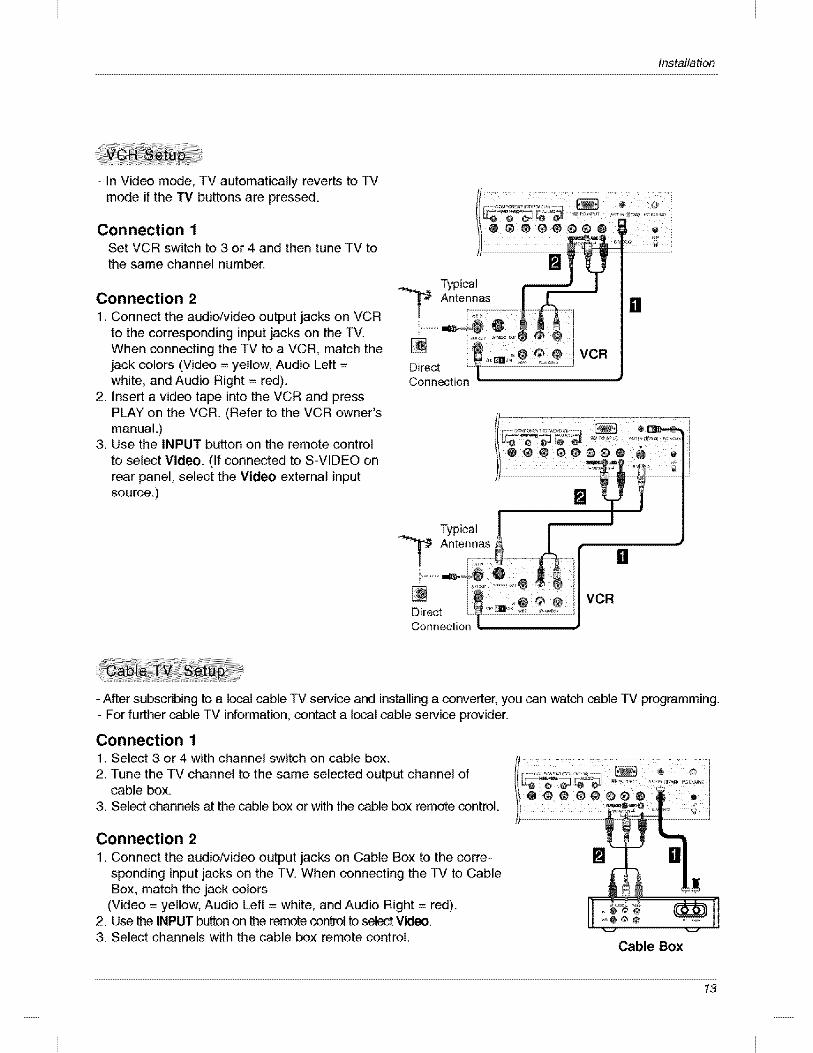
- In Vid_ mede, TV automatically reverts to TVmede if the TV buttons are press_,
Connection 1Set VCR switch to 3 or 4 and then tune TV tothe same channel number,
Connection 2
1, Connect the audio/vid_ output jacks on VCRto the corresponding input jacks on the TVIWhen connecting the TV to a VCR, match thejack colors (Video = yellow, Audio Left =white, and Audio Right = red),
2. Insert a video tape into the VCR and pressPLAY on the VCR. (Refer to the VCR owner'smanual,,)
3, Use the iNPUT button on the remote control
to sel_t Video. (If connected to S-VIDEO onrear panel, select the Video external inputsource,,)
Typical / I I
"_ Antennas _ A ! a _,'
Connection "
- After subscribing to a _1 cable TV sewi_ and installing a converter, you can watch _ble TV programming.- For further cable TV information, contact a I_1 cable service prov_er,
Connection 11. Select 3 or 4 with channeJ switch on cable box.
2. Tune the TV channel to the same selected output channel ofcable box
3, Select cb,anne_ at the c_le box or with the c_le box remote control,,
Connection 21, Connect the audio!vid_ output jacks on Cable Box to the corre-
s_nding input jacks on the TV, When connoting the TV to CableBox, match the jack colors
(Video = yellow, Audio Left = white, and Audio Right = red).2, Use _ INPUT b_ on _ retake con_ to select Vi_,3, Select channels with the cable box remote control,,
Cable Box
13
Installation
External EQuipment Connections Continued
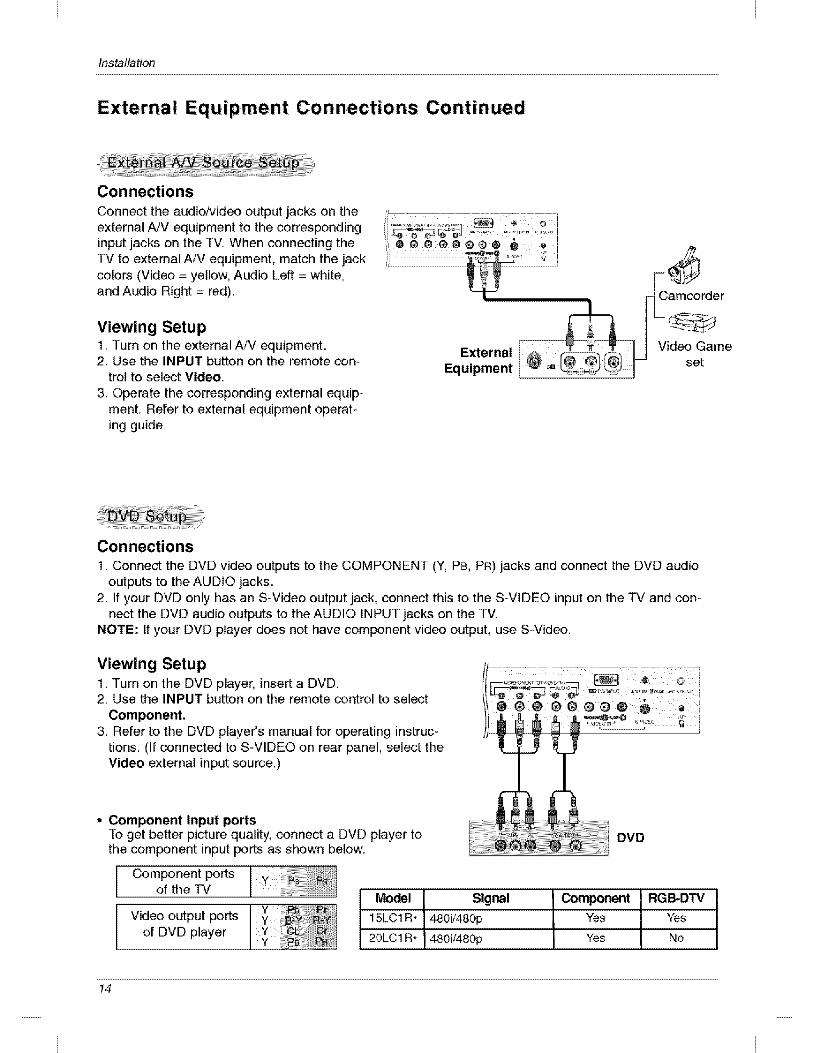
Connect the audio/video output jacks on theexternal A/V _uipment to the correspondinginput jacks on the TV. When connecting theTV to external A/V equipment, match the jackcolors (Video = yellow, Audio Left = white,and Audio Right = red)..
Viewing Setup1. Turn on the external A/V equipment.2. Use the INPUT button on the remote con-
trol to sel_t Video.
3. Operate the corresponding external quip-ment. Refer to external equipment operat-ing guide.
1. Connect the DVD video ou_uts to the COMPONENT (Y, PB, PR) jacks and connect the DVD audiooutputs to the AUDIO jacks.
2. If your DVD only has an SoVideo output jack, connect this to the S-ViDEO input on the TV and con-n_t the DVD audio ou_uts to the AUDIO INPUT jacks on the TV.
NOTE: If your DVD player does not have component video output, use S-Video.
Viewing Setup1. Turn on the DVD player, insert a DVD.2. Use the INPUT button on the remote control to select
3. Refer to the DVD player's manual for operating instruc-tions. (If connected to SoVIDEO on rear panel, select theVideo external input source.)
• Component Input _rtsTo get better picture quality, connect a DVD player tothe component input ports as shown below.
Component portsof the TV
DVD
Video output portsof DVD player
_.._el RG_DTV
!5LC1 R* 480i/480p Yes Yes
20LC1 R* 480i/480p Yes No
14
Installation
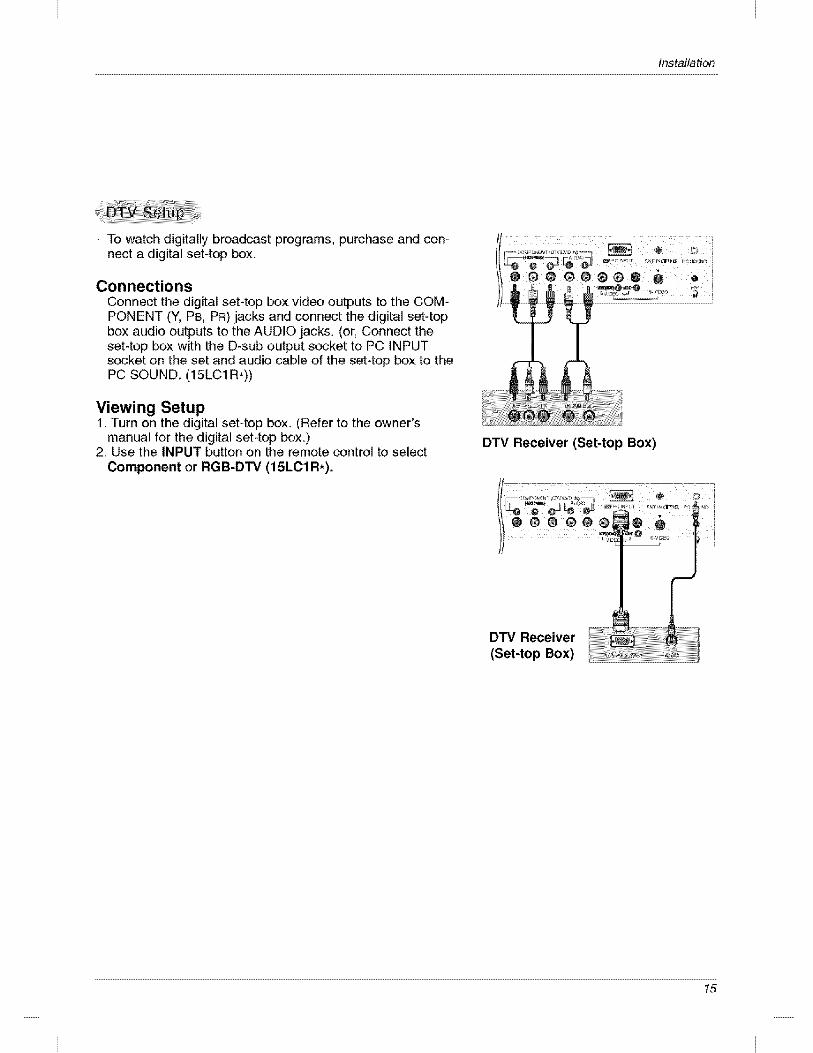
- To watch digitally broadcast programs, purchase and con-n_t a digital set-top box.
Connect the digital set-top box vid_ outputs to the COM-PONENT (Y, P8, Pn) jacks and conn_t the digital set-topbox audio outputs to the AUDIO jacks (or, Connect theset-top box with the D-sub output s_ket to PC iNPUTs_ket on the set and audio cable of the set-top box to thePC SOUND,, (15LC1R*))
Viewing Setup1. Turn on the digital set-top box. (Refer to the owner's
manual for the digital sebtop box,)2. Use the INPUT button on the remote control to select
_m_nent or RGB-D_ (15LC1R*).
DTV Receiver (Set-top Box)
DTV R_eiver(Set-top Box)
15

Installation
- After setup, be sure to select RGBoPC source on TV.
1. _ the _it_ o_J_ resign on the PC before conn_J_ to the T'v:2. Connect the TV to the PC with the PC cable.3, Connect the PC audio output to the TV's PC SOUND input,
Viewing Setup1. Turn on the PC.2. Use the INPUT button on the remote control to sel_t RGB-PC.
Monitor Display Specifications
_DE Resolut_n _r_ntal Vertical
VGA _x480 31.4 60
800X600 3& 1 56SVGA
800x600 37_8 60
XGA 1024x768 48.3 60
NOTESa_For optimum picture_ity, _ s_'d 1024x768@_Hz _puter outputat a _Hz refreshrate Usir_ o_
0J'_ SV_ etc) _ refresh r'-_esmay result in _ _re qLality,('Tochange the_put_- vid__J_ t__at, _se refer to the _rati_ _n_ for _ _puL,=r _u are _i_).
b. If the message "Out ot t_ge" appears on the screen, adjust the PC output to a format list_ in the'Monitor Display Sp_ifications' chart above,
c.. The synchronization input form for Horizontal and Vertical frequencies is separate.
DPM (Display Power Management) modeIf the PC goes to power saving mode, the monitor automatically switches to DPM mode.If you don't use the PC cable provided, DPM m_e may not work.
16
Operation
I 0 n
TV Operation Overview
1. First, make all equipment _nnections. Plug the AC Adapter into the TV, then plug the AC Adapter intoa power outlet. At this time, the TV is switchod to standby mode.
• in standby' mode, press the POWER, TV, CH (&,V), INPUT or number button on the remote con-trol or ON/OFF, CH (A,V), _ button located on the TV to turn the TV on.
2. Select the viewing source by pressing INPII_.
• Note: See page 18 if you have not auto programmed the _ to receive channeJs in your local broad-cast area,
3. After viewing, press the POWER button on the remote control or ON/OFF Iocatod on the TV. The TVreverts to standby m_e,
NOTE• If you want to turn the TV off, press the on/off button I_ated on the TV. If you intend to be away on
vacation, di_onn_t the power plug from the wall power outleL
Menu La ng uage Se le ct io n
- The menus can be shown on the screen in the sel_tod language. First select your language.
1. Press the MENU button and then use A / V button to sel_t the SPECIAL menu.
2_.Press the I_ _J_ton and then we & / V b_ton to select _uage,
3_.Press the I_ _ton and then _e A / V button to select your desired language.From this point on, the on-screen menus will be shown in the language of your choice.
4. Press the ENTER button to save.
17
Operation
Cha nne!
- For Auto program to work, the programming _urce must be connected to the TV and the TV mustreceiving programming signals either over-the-air or from a cable-type service providen
1. Press the MENU bu_tonand then use A / T button to se{ectt_ __ menu.
2,,Press the i_ button and then use & / T button to select
3. Press the I_ button to begin the channel search.
* Wait for auto program to complete the channel searchcycle before chasing a channel. The TV scans forover-the-air channels and then channels provided by acable ser,,ice.
NOTES• When the channel search is complete, use the A / T buttons to review the memorized channels.• If you press the MENU or EXIT button in auto programming, the function will stop and only c_nnels pro-
gramming up to that time will remain.• Auto program function can memorize only the channels which are being received at that time.
- You can manually include or erase individual channels.
1. Press the MENU button and then we A / T button to select theCHA,NN1_ menu.
2. Press the I_ button and then use ,k / V button to select
3. Press the I_ button and then use < / I_ button to sel_t a
channel you want to add to memory or erase.
4. Press the T button and then use < / I_ button to selectMemo_ (add) or Er_ (delete).
5. Press the ENTER button to save. The current channel isadded to Memory or Erased from the channel list.
The current channel number _ dispAyed.
1. Press the MENU button and then me ,L / T button to select themenu.
2. Press the I_ button and then use A / T button to select
3. Press the T button to select rme and then use <1 / I_ but-ton to adjust frequency from -50 to 50.
4. Press the ENTER button to save.
18
The current frequency is dispiayed.
Operation
- Favorite Channel lets you quickly tune in up to 8 channels of your choice without having to wait for theTV to _an through all the in-between channels,
1. Press the MENU button and then use A / T button to select the _'I_81, menu.
2, Press the I_ button and then use A / T button to select ¥_otite ch_nel.
3. Press the I_ button and then use A / T button to select the first favorite channel position.
4. Use the <1 / I_ button to set the desired channel number for first favorite channel.
5, Repeat steps 3 to 4 to memorize other channels,6. Press the ENTER button to ave.
• To tune to a favorite channel, press the FAY button repeatedly, The 8 favorite channels appear onthe screen one-by-one.
19
Operation
Menu Options
- This function adjusts the TV for the best picture appearance,
1. Press the VIDEO button repeat_ly to sel_t the picture appearance setup option as shown below.
Clear 1--------_ [ Optimum 1------_ [ _,t ]------_l User lq
• You can also adjust EZ Video in the PICTURE menu.• Cle_, Optimum and _ are preset for g_d picture quality at the factory and cannot be changed,
- Selecting a factory setting colour set.
1. Press the MENU button aM then use A / V button to select thePZCTURE menu,
2, Press the I_ button and then use A / T button to selectACC
3. Press the I_ button and then use A / T button to selectUser
4. Press the I_ button and then A / V button to sel_t a colorsetting on the ACC menu: Cool, Nodal, Warm or User(Red, Grin, Blue).
5. Press the ENTER buttonto save.
- You can adjust picture contrast, brightness, color, sharpness and tint to the levels you prefer,
1. Press the MENU button a_J then use A / V button to sel_t tileMCTURE menu.
2, Press the I_ button and then use A / V button to select EZVideo.
3. Press the I_ button and then use A _T button to select User
and then press the < button.4, Use A /T button to select the desired picture option
(Contx_t, BJ_me__-_, Color, Sh_ess, Tint).
5. Use the <1 / I_ button to make appropriate adjustments.
• Contrast, Brightness, Color, and Sharpness are adjustablefrom 0 to 100,
° Tint is adiustable from R 50 to G 50.6. Press the ENTER button to save.
20
Menu Options
Operation
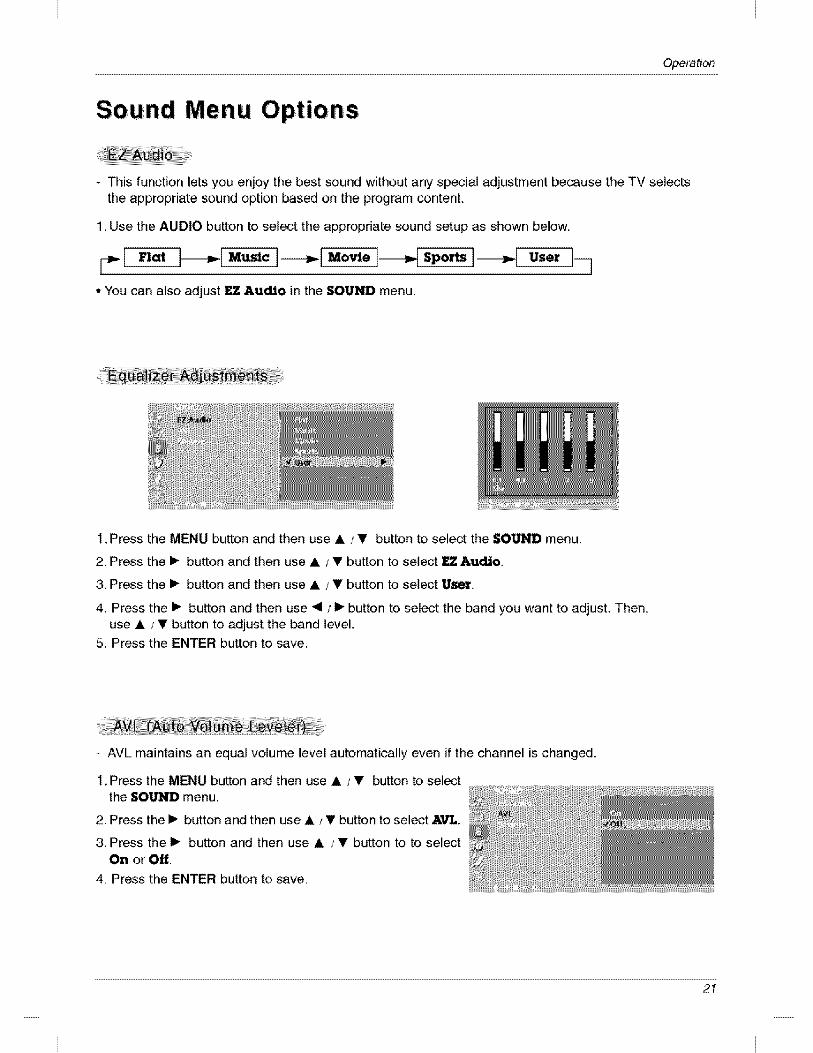
- This function lets you enjoy the best sound without any special adjustment because the TV selectsthe appropriate sound option based on the program content.
1. Use the AUDIO button to select the appropriate sound setup as shown below.
_ ]_ Music ]----_ Mode 1_ Spor_ _ User ---]
• You can also adjust EZ Audio in the SOUND menu.
1. Press the MENU button and then use A / T button to select the SO_'D menu,
2. Press the I_ button and then use A / V button to select _ Audio.
3. Press the I_ button and then use A / V button to select User.
4. Press the I_ button and then use < / I_ button to select the band you want to adjust. Then,use A / V button to adjust the band level.
5. Press the ENTER button to save.
- AVL maintains an equal volume level automatically even if the channel is changed.
1. Press the MENU button aM then we A / T button to selectthe SO_ menu.
2. Press the !_ button and then use A / V button to select AVL.
3, Press the I_ button and then use A / T button to to selectOn or Off.
4, Press the ENTER button to _ve,
2I
Operation
Sound Menu Options continued
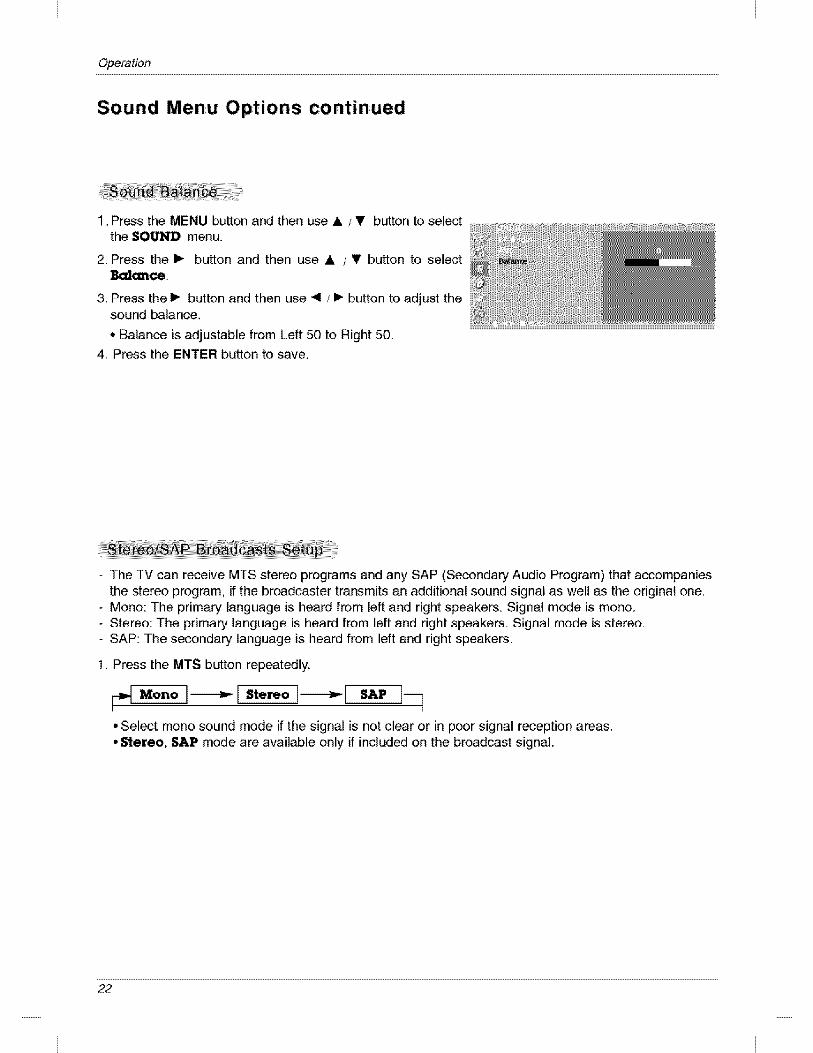
1. Press the MENU button aM then we A / T button to selectthe SO_ menu.
2. Press the I_ button and then use A / T button to selectIBcdo_ce.
3. Press the IP- button and then use 4 / I_ button to adjust thesound balance.
• Balance is adjustable from Left 50 to Right 50.4. Press the ENTER button to save..
1.
The TV can receive MTS stereo programs and any SAP (Secondary Audio Program) that accompaniesthe s;tereo program, if the broadcaster transmits an additional sound signal as well as the original one.M,no: The primary language is heard from left and right speakers. Signal m_e is m,no.Stereo The primary language is heard from left and right speakers. Signal mode is stereo.SAP: The secondary language is heard from left and right speakers.
Press the MTS button repeat_ly.
M.no I-----i_ [Stereo ]_[ SAP I|
•Selectmono sound mode ifthesignalisnotclearorinpoorsignalreceptionareas.
• Stereo, SAP mode are available only if included on the broadcast signal
22
Operation
Timer Menu Options
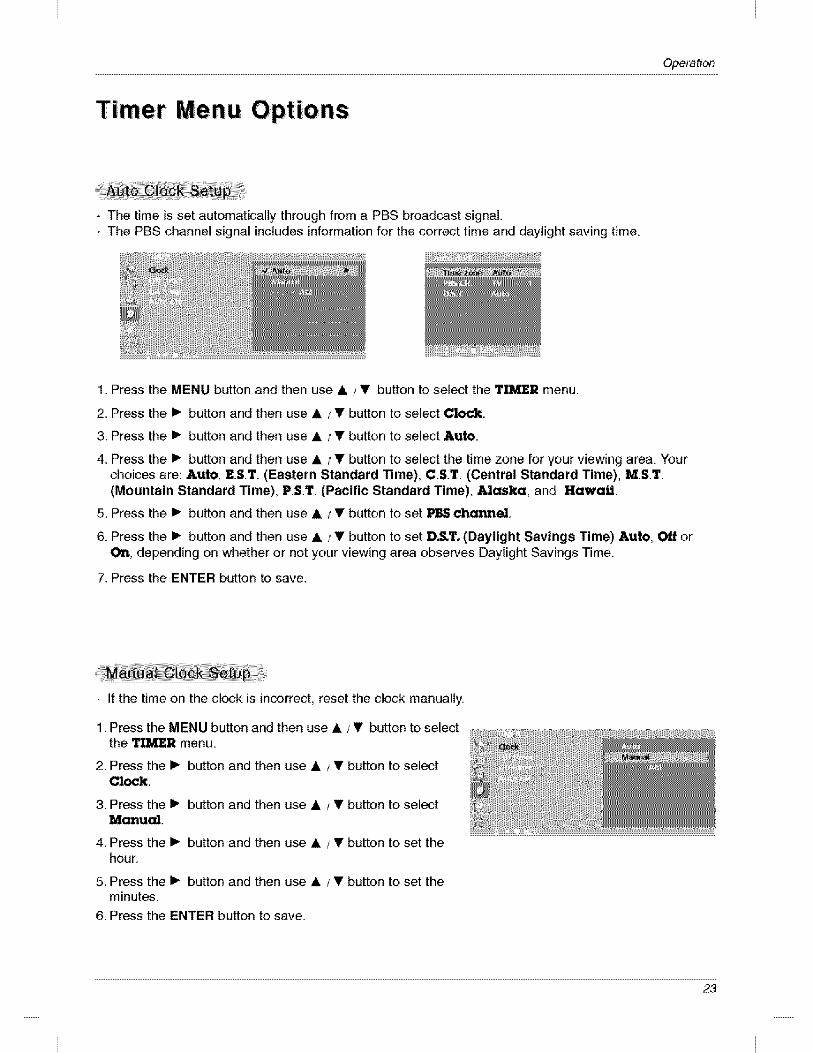
- The time is set automatically through from a PBS broad_st signal......The PSS channel signal includes information for the corr_t time and daylight saving time,
1. Press the MENU button and then use A / V button to select the T_R menu.
2. Press the I_ button and then use A / V button to select _k.
3_.Press the I_ button and then use A / V button to select Auto.
4. Press the I_ button and then use A / V button to select the time zone for your viewing area. "fourchoices are: Auto, ES.T. (Eastern Standard Time), CST. (Central Standard Time), MST.(Mountain Standard Time), PS.T. (Pacific Standard Time), Al_a, and Hawaii.
5,.Press the I_ button and then use A / V button to set _ che_nel.
6. Press the I_ button and then use A / V button to set D.S.T. (Daylight Savings Time) Auto, _ or_, depending on whether or not your viewing area observes Daylight Savings Time.
7. Press the ENTER button to save.
- If the time on the clock is incorrect, reset the clock manually..
1. Press the MENU button and then use A / V button to selectthe _R menu_.
2. Press the I_ button and then use A / V button to select
3. Press the I_ button and then use A / V button to select
4_ Press the I_ button and then use A / V button to set thehour.
5. Press the I_ button and then use A / V button to set theminutes.
6. Press the ENTER button to save.
23
Operation
Timer Menu Options continued
=
=
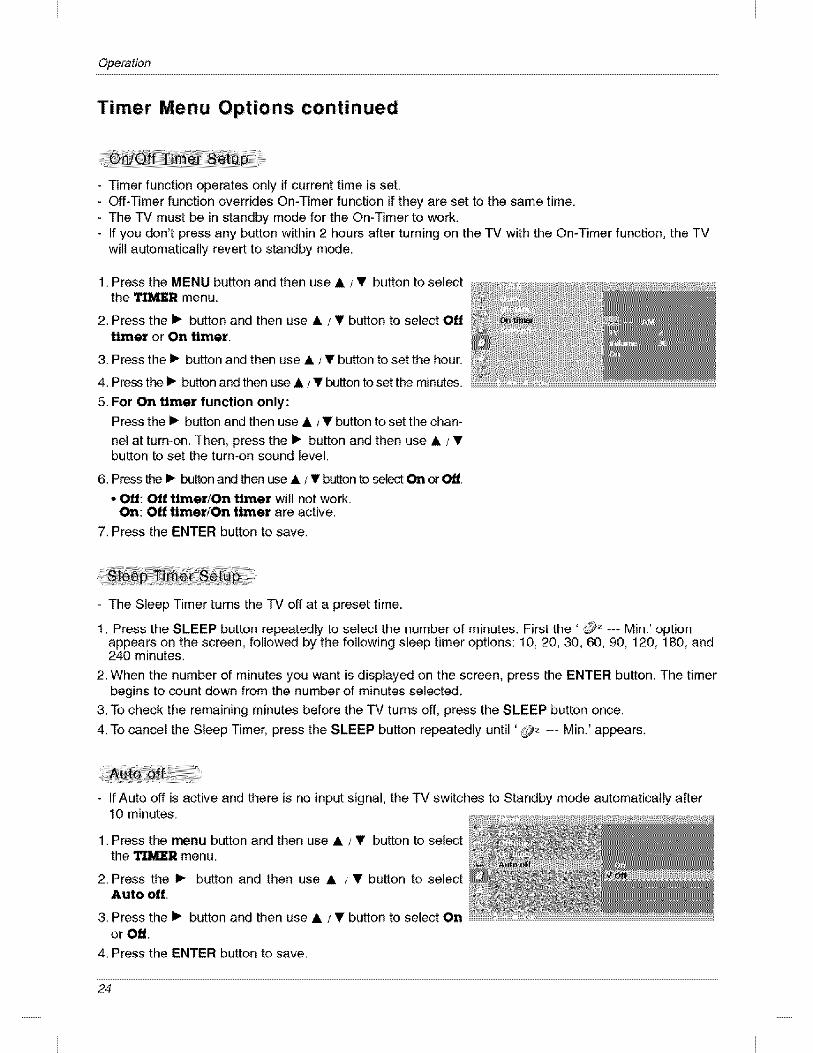
Timer function operates only if current time is set.Off-_mer function overrides On-Timer function if they are set to the same time.The TV must be in standby' mode for the On-Timer to work.If you don't press any button within 2 hours after turning on the TV with the On-Timer function, the TVwill automatically revert to s_ndby mode.
1. Press the MENU button and then use & / T button to selectthe _R menu.
2. Press the I_ button and then use A / V button to select Offtimer or On Umer.
3. Press the I_ button and then use & / V button to set the hour.
4. Press t_ I_ button aM then _ A / T button to set t_ minutes ..............................................................................................................................................................................................................................................................................................................................................................................................................................................................................................................................................................................................................................................................................................
5. For On Umer function only:
Press the I_ button and then use A / V button to set the chan-
nel at turn-on. Then, press the I_ button and then use & / _!'button to set the turn-on sound level.
6. Press _ I_ button and then use A / V _Jlton to _t On _ _.
• Oil: Off timer/On timer will not work.On: Off Umer/On timer are active.
7. Press the ENTER button to save.
- The Sleep Timer turns the TV off at a preset time.
. ' :_ --- Min.' option1 Press the SLEEP button repeatedly to select the number o{ minutes. Firs[ the .:2,appears on the screen, followed by the following sleep timer options: 10, 20,. _, 60, 90, 120, 180, and24,0 minutes.
2. When the number of minutes you want is displayed on the screen, press the ENTER button. The timerbegins to count down from the number of minutes selected,.
3. To check the remaining minutes before the TV turns off, press the SLEEP button once.
4. To cancel the Sleep Timer, press the SLEEP button repeatedly until ' @= --- Min.' appear&
If Auto off is active and there is no input signal, the TV switches to Standby mode automatically after10 minutes.
1. Press the menu button and then use A V button to selectthe TIMER menu.
2. Press the I_ button and then use A T button to selectAuto off,
3, Press the I_ button and then use A / _' button to select Onor Off.
4. Press the ENTER button to save.
24
Operation
Men u Options
Closed Captions
Closed captioning is a process which converts the audio portion of a television program into written wordswhich then appear as subtitles on the television screen. Clued captions allow viewers to read the dia-logue and narration of television programs.
Using Closed Captions
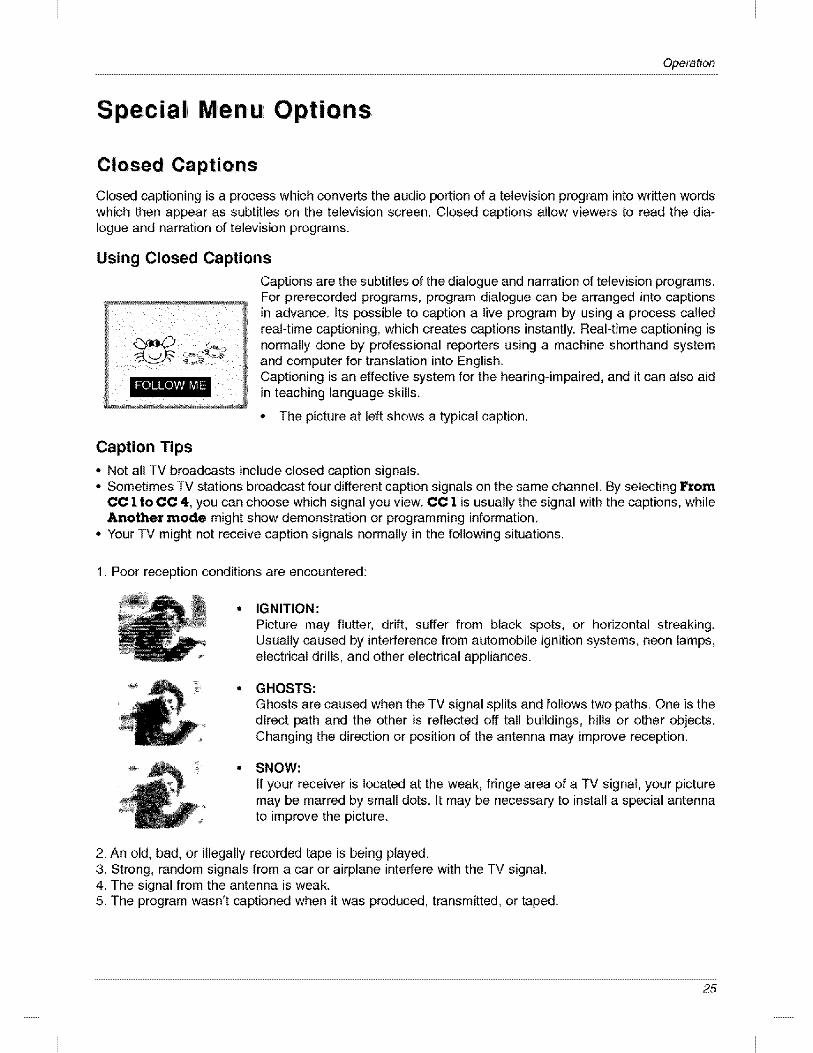
Captions are the subtitles of the dialogue and narration of television programs.For prerecorded programs, program dialogue can be arranged into captionsin advance, its _ssible to caption a live program by using a process calledreal-time _ptioning, which creates captions instantly. Real-time captioning isnormally done by professional re_rters using a machine shorthand systemand computer for translation into EnglishCaptioning is an effective system for the hearing-impaired, and it can also aidin teaching language skills.
• The picture at left shows a typical caption.
Caption Tips
• Not all TV broadcasts include closed _ption signals.• Sometimes _ stations broadcast four different caption signals on the same channel. By selecting Yrom
CC 1 |o CC 4, you can choose which signal you view. CC 1 is usually the signal with the captions, whileAnohher mode might show demonstration or programming information.
° Your TV might not receive caption signals normally in the following situations.
1. Poor reception conditions are encountered:
IGNITION:
Picture may flutter, drift, suffer from black spots, or horizontal streakingUsually _used by interference from automobile ignition systems, neon lamps,electrical drills, and other electrical appliances.
GHOSTS:Ghats are caused when the TV signal splits and follows two paths. One is thedirect path and the other is reflected off tal! buildings, hills or other o_ects,Changing the direction or _sition of the antenna may improve reception.
SNOW:
If your receiver is located at the weak, fringe area of a TV signal, your picturemay be marred by small dots. It may be neces_ry to install a special antennato improve the picture.
2. An old, bad, or illegally recorded tape is being played.3. Strong, random signals from a car or airplane interfere with the TV signal.4. The signal from the antenna is weak.5. The program wasn't captioned when it was produced, transmitted, or taped.
25
Operation
Special Menu Options continued
Inputs can be set for TV, Video or RGB-PC mode, Video mode is used when a video cassette recorder(VCR), or other _uipment is connected to the set.
1. Press the MENU button and then A / V button to selectthe _L menu,
2. Press the I_ button aM then A / V button to select Input.3. Press the I_ button and then A / V button to select 'IV,
Video, Componen_ RGB-DTV or RGB-PC
• Video: VCR connected to the VIDEO IN socket of theset,
• Component: DVD connect_ to the COMPONENTs_kets on the _ck of set.
• _B-D_: SET TOP connected to the PC INPUT and PCSOUND s_ket of the set, (15LC1R*)
• _B-_: PERSONAL COMPUTER connected to the PCs_ket of the set, (15LC1R*)
4. Press the ENTER button to save.
=
2.
3,
4.
The TV can be set up so that it can only be used with the remote control.This feature can prevent unauthorized viewing,
Press Me MENU button and then use & / V button to selectMe Sa-_C_L menu.
Press the Ip button and then use A / T button to sel_t ]Keylock.
Press the I_ button and then use & / T button to select Onor Off.
Press the ENTER button to save.
• in Key lock 'On', if the set is turned off, press the On/Off, CH ,i, / V, INPUT button on the set orPOWER, OH A /V, TV, INPUT or NUMBER button on the remote control.
26
Operation
- Use this function to set the power indicator on the front side of the product to On or Off. If you setat any time, the _wer indicator will automatically be turn_ on. Although you select _, set front lightturns on for a moment when the set turns on.
1. Press the MENU button and then use A / V button to selectthe SP_t- menu.
2. Press the I_ button and then use A /T button to selectPower in_c_or.
3. Press the I_ button and then use A / V button to select Onor Off.
4. Press the ENTER button to save,
1,,Press the MENU button and then use A / T button to selectthe SPE_Lki menu,
2. Press the I_ button aM then use A /V button to select
3. Press Me I_ button and Men use A / V button to sel_t cap-tion: CCI, CC2, CC3, CC4, Te_l, Te_2, Text3, orText4.
• CAPTIONThe term for the words that scroll across the bottom of theTV screen; usually the audio _rtion of the program pro-vided for the hearing impaired.
• _XTThe term for the words that appear in a large black frameand aJmost cover the entire screen; usually messagesprovided by the broadcaster.
4. Press the ENTER button to save,
° Use the CC button repeat_ly to sel_t Caption.
- Select On from Captions menu in order to adjust the C_tion/Te_ menu,
1. Press the MENU button and then use A / V button to selectthe S,1P_t- menu.
2. Press the I_ button and then use & /T button to select
3. Press the I_ button and then use A / V button to select Onor Off.
4. Press the ENTER button to save_,
27
Operation
Lock Menu
Paren_l Control can be used to bl_k sp_ific channels, ratings and other viewing sources.
The Parental Control Function (V-Chip) is used to block program viewing based on the ratings sent by the broadcaststation. The default setting is to allow all programs to be viewed. Viewing can be blocked by the type of programand by the categories chosen to be blocked, It is also possible to block all program viewing for a time period, To usethis function, the following must be set :
1, Ratings and categories to be blocked,2, Set a password3, Enable the lock
V-Chip rating and categoriesRating guidelines are provided by broadcast stations Most television programs and television movies can bebilked by TV Rating and/or Individual Categories, Movies that have been shown at the theaters or direct-to-videomovies use the Movie Rating System (MPAA) only
For Movies previously shown in theaters :
Movie Ratings :. G and Above* PG and Above- PG-I 3 and Above. R and above- NC-17 and Above°X° Unblocked
(general audience)(parental guidance suggested)
(13 years and older)(restricted)(18 years and older)(adult)
If you set PG-13 and Above : G and PG movies will be available, PG-13, R, NC-17 and X wili be blocked.
For Television programs including made-for-TV movies:
General TV Ratings:• TV-G and Above• TV-PG and Above• TV-14 and Above• TV-MA• Unblocked
(general audience) (individual categories do not apply)(parental guidance suggested)(14 years and older)mature audience)
Children TV Ratings:. TV-Y and Above,*TV-Y7• Unblocked
(youth) (individual content categories do not apply)(youth, 7 years and up)
Content Categories:. Dialog - sexual dialogue (applies to TV-PG and Above, TV-14)* Language - adult language (applies to TV-PG and Above, TV-14 and Above, TV-MA)° Sex scenes - sexual situations (applies to TV-PG and Above, TV-14 and Above, TV-MA), Violence (applies to TV-PG and Above, _J-14 and Above, TV-MA)° F Violence - fantasy violence (applies only to TV-Y7)
For Canadian English/French language rating system:
Canadian English language rating system:• C and Above, C8+• G and Above, PG and Above,14+-18+° Unblocked
(Children)(8 years and older)(General programming Suitable for all audiences}
(Parental guidance suggested)(Viewer 14 years and older)(Adult programming)
Canadian French language rating system:* G and Above (General)* 8 ans+ (8 years and older)° 13 ans+ (13 years and older)* 16 ans+ (16 years and older)- 18 ans+ (Adults only)° Unblocked
28
Operation
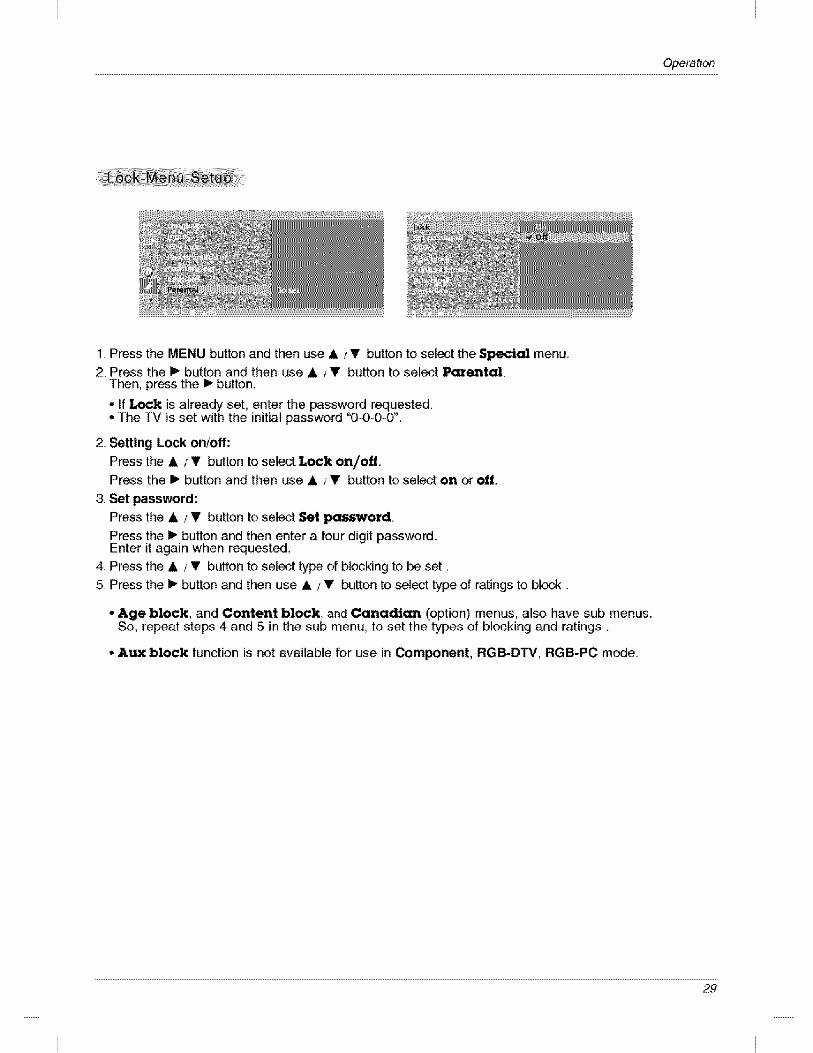
1. Press the MENU button and then we A / V button to select the Special menu.2. Press the I_ button and then use A /V button to select P_ent_.
Then, press the I_ button.
• If _ is already set, enter the password requested.° The TV is set with the initial password _343-0-0.
2. Setting Lock on/off:
Press the A/V button to select _k on/off.Press the I_ button and then use A / V button to select on or off.
3. Set password:
Press the A / V button to select Set _ssword,
Press the I_ button and then enter a four digit password.Enter it again when requested.
4. Press the A / V button to select _ of b_cking to be set.
5. Press the I_ button and then use A / V button to select _pe of ratings to bl_k.
• Age block, and Content block, and Canad.ian (option) menus, also have sub menus.So, repeat steps 4 and 5 in the sub menu, to set the types of blocking and ratings.
• _._ block function is not available for use in _m_nent, RGB-DTV, RGB-PC mode.
29
Operation
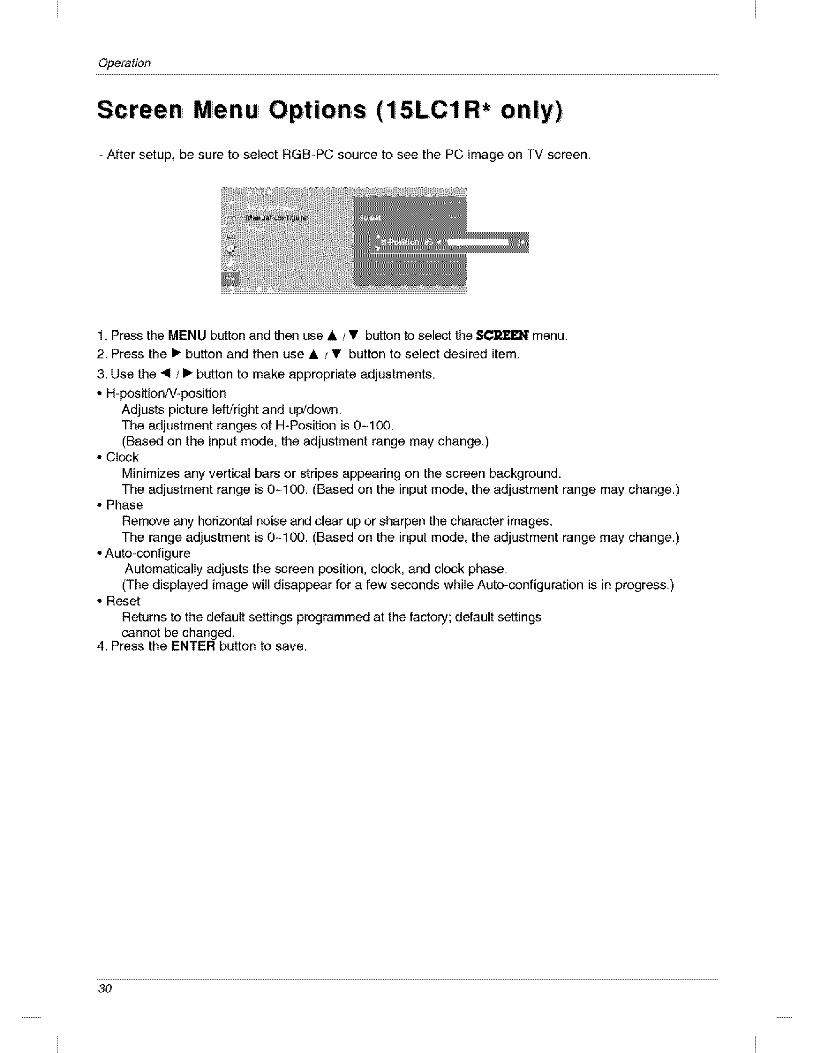
Menu Options (15L01 R* only)
- After setup, be sure to select RGB-PC source to see the PC image on TV screen.
1. Press the MENU button and then use A / T button to select the _N menu.
2. Press the I_ button and then use A / T button to select desired item.
3. Use the < / I_ button to make appropriate adjustments.
• H-positionJV-positionAdjusts picture left/right and u_down.The adjustment ranges of H-Position is 0-1_.(Based on the input mode, the adjustment range may change..)
• Cl_k
Minimiz_ any vertical bars or stripes appearing on the screen background.The adjustment range is 0-100. (Based on the input mode, the adjustment range may change.)
• Phase
Ren_ve any horizontal _ise and cl_r up or sharpen the character images.The range adjustment is 0-100. (Based on the input mode, the adjustment range may' change.)
° Auto-_nfigureAutomati_lly adjusts the screen position, cl_k, and clock phase.(The displayed image will disappear for a few seconds while Auto-configuration is in progress_)
° Reset
Returns to the default settings pr_rammed at the factory; default se_ingscannot be changed.
4. Press the ENTER button to save..
30
Maintenance& ProductSpecifications
Maintenance
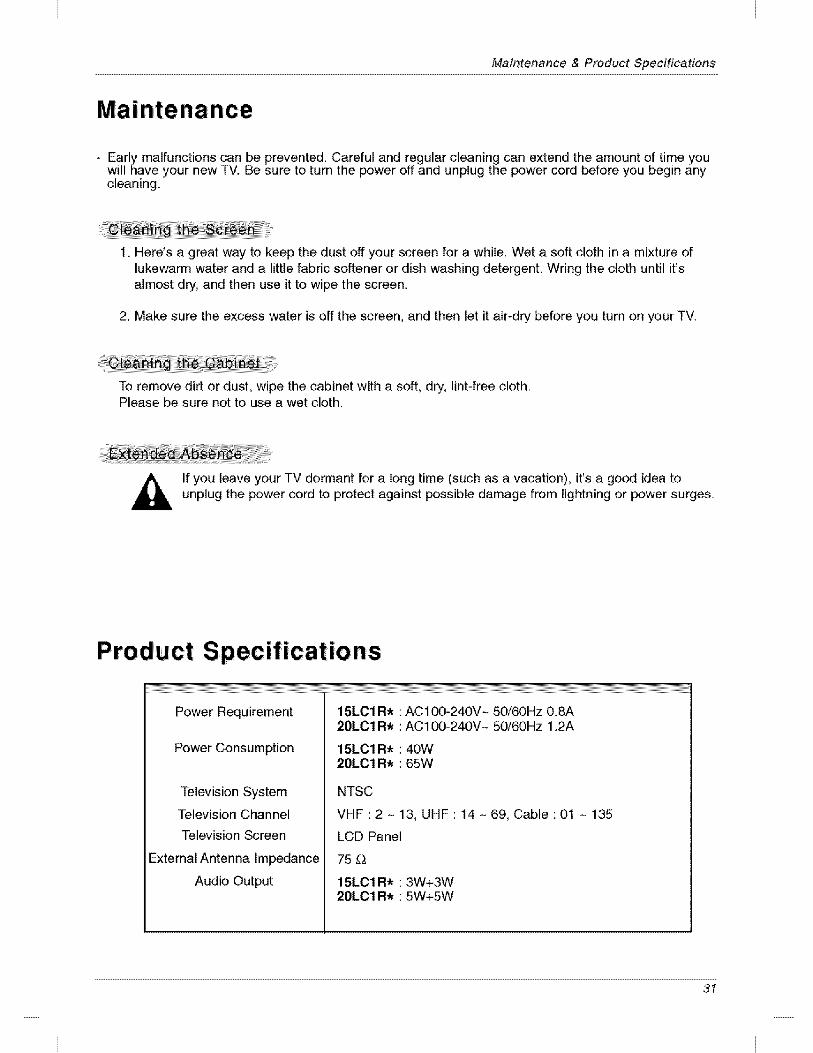
- Early malfunctions can be prevented. Careful and regular cleaning can extend the amount of time youwill have your new #,/. Be sure to turn the power off and unplug the power cord before you begin anycleaning.
1,.Here's a great way to keep the dust off your screen for a while. Wet a soft cloth in a mixture oflukewarm water and a little fabric softener or dish washing detergent. Wring the cloth until it'salmost dry, and then use it to wipe the screen.
2 Make sure the excess water is off the screen, and then let it air-dry before you turn on your TV.
To remove dirt or dust, wipe the cabinet with a soft, dry, lint-free cloth.Please be sure not to use a wet cloth.
If you leave your TV dormant for a long time (such as a vacation), it's a go_ idea tounplug the _wer cord to protect against _ssible damage from lightning or power surges.
Specifications
Power R_uirement
Power Consumption
Television System
Television Channel
Television Screen
External Antenna imp_ance
Audio Output
15LCIR*20LCl R*
15LCIR*20LC1 R*
NTSC
AC1 _-240V- 50/@OHz0.8AAC1 _-240V- 50/60Hz 1.2A
40W65W
VHF : 2 - 13, UHF : 14 - 69, Cable : 01 - 135
LCD Panel
75 (_
15LCl R_ : 3W+3W20LCl R_ : 5W+5W
31

TroubleshootingCh_klist
Tr oub Ies hooting C heck I ist
_ r_ _nti-ol_='ft w_
Power is suddenlyturned off
• Check to see if there is any object between the product and theremote control causing obstruction.
° Are batteries ins_llod with correct _larity (+ to +, -to -)?° Correct remote operating mode set: TV, VCR etc.?• Install new batteries.
* Is the sleep timer set?° Check the power control settings. Power interrupted. No broadcast on station tunod with Auto off activatod.
J
The video function does not worko
No picture &No sound
Picture ap_arsslowly afterswitching on
No or poorcolor
or poor picture
Horizontal/verticalbars or picture
P_r r_tion onsome channels
Lines or streaksin pictures
• Check whether the product is turned on.• Try another channel. The problem may be with the broadcast.° Is the _wer cord insertod into wall power outlet?° Check your antenna direction and/or location,° Test the wall power outlet, plug another product's _wer cord into the
outlet where the product's power cord was pluggod in.
• This is normal the image is mutod during the product startuppr_ess. Please contact your service center, if the picture has notappeared after five minutes.
• Adjust Color in menu option.• Keep a sufficient distance between the product and the VCR.° Try another channeL. The problem may' be with the broadcasL° Are the vid_ cables installed properly?• Activate any function to restore the brightness of the picture.
• Check for I_al interference such as an electrical applianceor power tool..
° Station or cable product experiencing problems, tune to another station.- Station signal is weak, reorient antenna to receive weaker s_tion.• Check for sources of possible interference.
° Ch_k antenna (Change the direction of the antenna).

Troubleshooting Checklist
Picture OK &No sound
No output fromone of the
Unusual soundfrom inside the
• Press the VOL (or Volume) button.• Sound muted? Press MUTE button.° Try another channel. The problem may be with the broadcast,° Are the audio cables installed properly?
° Adjust Balance in menu option.
• A change in ambient humidity or temperature may result in anunusual noise when the product is turn_ on or off and does notindicate a fault with the product,
J
....................................There is a problem in PC m_e,
The signal is outof range.
Vertical bar orstripe on
background &Horizontal Noise
& Incorrect
Scr_n color isunstable orsingle color
• Adjust resolution, horizontal frequency, or vertical frequency:• Check it whether the signal cable is connected or loose.• Check the input source,
• Work the Auto configure or adjust cl_k, phase, or HA/position. (option)
. Check the signal cable.
. Reinstall the PC video card.
J

Note
34

Note
Note
35