owner’s guide - precision design & manufacturing...
TRANSCRIPT

03/18/15 1
Part # 500028 – 120V Part # 500029 – 240V
Series: 0015
OWNER’S GUIDE MODEL: PWS 5-3 AUTOMATIC COUNTERTOP WATER DISTILLER
Manufactured By:
PRECISION DESIGN & MANUFACTURING INC. 9024-100 Street Westlock, Alberta, Canada T7P 2L4 Email: [email protected]
IMPORTANT:
Read through this owner’s manual carefully before using your new distiller. Pay close attention to all INSTRUCTIONS and IMPORTANT FACTS. Use your distiller properly and only for its intended use.

03/18/15 2
This Page Left Intentionally Blank

03/18/15 3
CONTENTS
Page 1. Introduction 2 2. Warranty 3 3. Important Facts 3 4. Important Safety Precautions 4 5. Assembly Instructions 4 6. Principal Components 5 7. Storage Tank Faucet 6 8. Impurities Drain Tube Extension 6 9. Set Up 7 10. Switches 8 11. Steam Sterilization 8 12. Charcoal Filter 9 13. Let’s Make Water 10 14. Manual Fill Operation 10 15. Trouble Shooting 11 16. Maintenance 12 17. Optional Accessories 12 18. Warranty Registration 13 Congratulations! You have made an outstanding choice in purchasing the PWS 5-3 Water Distiller. We take pride in our product quality. This product has been carefully inspected to meet rigid factory quality standards. We are confident that, with reasonable care, the PWS 5-3 Water Distiller will provide you with years of reliable product performance.
Model Name: eg PWS 5-3 Serial Number: eg 0001234 Series Number: eg 0001 Purchase Date: Purchased from: Name of Company: Address: Phone #

03/18/15 4
PRECISION DESIGN & MFG. PWS 5-3 DISTILLER WARRANTY
Precision Design & Manufacturing Inc. offers a limited warranty against defects in material and workmanship to the original purchaser. The warranty includes full replacement on defective electrical components, other parts and labor for a period of two full years. A 15 year limited warranty applies to all stainless steel parts. Pro-rated as follows: Year 1-5 - 100% Year 11 - 25% Year 6 - 50% Year 12 - 20% Year 7 - 45% Year 13 - 15% Year 8 - 40% Year 14 - 10% Year 9 - 35% Year 15 - 5% Year 10 - 30% Precision Design & Manufacturing Inc. is not responsible for or obligated to pay costs of removal, installation or any shipping charges in relation to the claimed warranty. Warranty is invalid if damage is caused by: product misuse, improper installation, signs of alteration, product neglect, shipping damage, mishandling, vandalism or act of God. This warranty is the only expressed warranty. Any other warranty is not valid. Precision Design & Manufacturing Inc. believes that the information contained in this manual is accurate. Parts, instructions and specifications are subject to change without notice.
IMPORTANT FACTS
Please take the time to fill out and return the warranty information form found at the back of this manual. Please remove warranty registration form and send to the following address: Precision Design & Manufacturing Inc. 9024 - 100 Street Westlock, Alberta T7P 2L4 Or Fax To: (780)349-4957 Your new distiller is tested for leaks and proper operation at the factory prior to shipment. As a result of this test your distiller will likely have a visible water ring inside the boiling tank.
Proper cleaning of the boiling tank is important. This is necessary to produce the purest water possible and assure trouble free operation of your equipment.
The boiling tank is TIG (Tungsten Inert Gas) welded. As water is boiled, minerals may cling to the weld, appearing as rust. This does not affect the quality of the water!
Cool air is required to operate your distiller. Do not restrict airflow by placing objects around or tightly against the distiller. This appliance is intended for household use. The distiller must be plugged directly into a wall outlet, which should be on a dedicated circuit.

03/18/15 5
IMPORTANT SAFETY PRECAUTIONS When using electrical appliances, basic safety precautions should always be followed including the following:
1. Read all instructions. 2. Do not touch hot surfaces. Use handles or knobs. 3.To protect against electrical shock do not immerse cords or plugs in water or other liquid. 4. Close supervision is necessary when any appliance is used near children. 5. Do not allow children to operate this appliance. 6. Unplug from outlet when not in use and before cleaning. Allow to cool before putting on or taking off parts. 7. Do not operate any appliance with a damaged cord or plug or after the appliance malfunctions or has been damaged in any manner. Return appliance to the nearest authorized service facility or examination, repair or adjustment. 8. The use of accessory attachments not recommended by the appliance manufacturer may cause injuries. 9. Do not use out doors. 10. Do not let cord hang over edge of table or counter, or touch hot surfaces. 11. Do not place on or near a hot gas or electric burner, or in a heated oven. 12. Extreme caution must be used when moving an appliance containing hot water. 13. Always attach plug to appliance first, then plug cord into the wall outlet. To disconnect, turn any controls to “off”, then remove plug from wall outlet. 14. Do not use appliance for other than intended use.
15. Save these instructions.
ASSEMBLY INSTRUCTIONS The PWS 5-3 Water Distiller has been shipped in one box that is comprised of the following: 1. Distillation Head 2. Storage Tank 3. Owner’s Guide 4. Parts bag which includes the following: water faucet with sight gauge; boiling tank lid; 16 ft. of ¼” water line; faucet adapter kit; impurities drain tube, sterilization drip tube and filter cap. 5. Packed into the Boiling Tank: sample jar of Descaler and Filter Cup. Remove all of the pieces from the box. Set the distiller head and the storage tank off to one side. Open the parts bag to view components. Please place your hand inside the boiling tank and remove all paper packaging and sample jar of descaler. Strip off any protective clear plastic from distiller, water storage tank, both boilers and holding tank lids.

03/18/15 6
PWS 5-3 PRINCIPAL COMPONENTS
18
24
23
25
26
27
29
1 2
7
16
15
12
10
9
8
6
5
3
4
14
13
28
17
11
15. Storage Tank Lid
4. Boiler Tank Lid
5. Boiler Tank Lid Gasket
6. Boiler Tank
8. Drain Valve
9. Compression Nut
10. Impurities Drain Tube
11. Heating Element
12. Water Switch
13. Main Distiller Body
14. Brass Solenoid Valve
3. Lid Knob
18. Distiller Water Faucet
17. Water Sight Gauge
20. Charcoal Filter Cap
22. Power Switch
23. Fan Switch
24. Compression Fitting Coil Mount
27. Reset Switch
28. Micro Switch (power)
29. Micro Switch (water)
25. Fan Motor
26. Fan Blade
2. Gas Vent
16. Water Storage Tank
21. 5/8"Ø BUSHING
1. Cooling Coil
7. Adapter
22
21
20
19
19. Charcoal Filter Cup
03/18/15 7
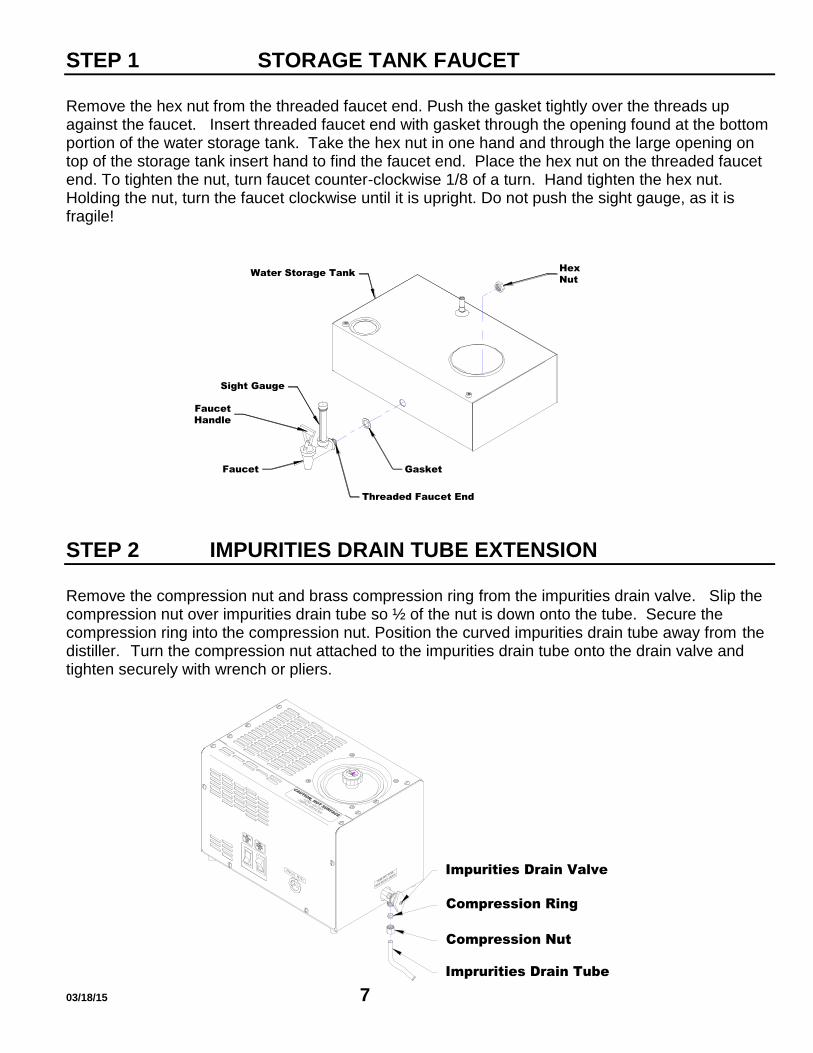
STEP 1 STORAGE TANK FAUCET
Remove the hex nut from the threaded faucet end. Push the gasket tightly over the threads up against the faucet. Insert threaded faucet end with gasket through the opening found at the bottom portion of the water storage tank. Take the hex nut in one hand and through the large opening on top of the storage tank insert hand to find the faucet end. Place the hex nut on the threaded faucet end. To tighten the nut, turn faucet counter-clockwise 1/8 of a turn. Hand tighten the hex nut. Holding the nut, turn the faucet clockwise until it is upright. Do not push the sight gauge, as it is fragile!
STEP 2 IMPURITIES DRAIN TUBE EXTENSION
Remove the compression nut and brass compression ring from the impurities drain valve. Slip the compression nut over impurities drain tube so ½ of the nut is down onto the tube. Secure the compression ring into the compression nut. Position the curved impurities drain tube away from the distiller. Turn the compression nut attached to the impurities drain tube onto the drain valve and tighten securely with wrench or pliers.
Impurities Drain Valve
Compression Ring
Compression Nut
Imprurities Drain Tube
Hex
Nut
Water Storage Tank
Gasket
Threaded Faucet End
Faucet
Faucet
Handle
Sight Gauge

03/18/15 8
STEP 3 SET UP
Place the distiller head on the storage tank. Place the head over the feet on the top of the storage tank and position the back of the distiller over the storage tank float post. Be sure that the sight gauge faucet and the distiller control switches are facing the same direction.
STEP 4 Remove the ¼” feed line and the faucet adapter kit and install onto the household water faucet. Run the feed line to the distiller. Before inserting the line into the distiller’s ¼” plastic fitting, remove the red locking clip, push the line into the fitting and reinstall the locking clip. Please Note: Saddle Valve Kit is optional, see optional accessories on page 12.
Turn the water supply on. Plug the distiller into a proper-grounded wall receptacle. Turn the distiller Power and Fan Switch on by pushing on top of the switches. Please note the water switch is located at the rear of the distiller. You will turn this switch on as well. At this time, your distiller will start to fill with water until the water level is above the heating element. At this point you should get ready for steam sterilization. See step 5.
Or
Ferrule, 1/4"
Faucet Adapter, 1/4" HB
Copper Tube-No Driiling
*Steel Tube-Drill 1/8"Ø
*Brass Tube-Drill 1/8"Ø
*Shut Off Water Supply
Nuts
Saddle Valve Lower Clamp
Kitchen Faucet
Optional Saddle Valve Kit
Water Supply Tube
Saddle Valve
Rubber Seal
Insert
Compression Nut
Bolts
Ferrule
1/4"O.D. Water Feedline
Distiller Body
Locking Clip, 1/4"JG
Elbow 90° 1/8MPT X 1/4"JG
Solenoid Valve
Gas Release Vent (hidden)
Water Switch (hidden)
Condensing Coil (inside)
Fan (inside)
Charcoal Filter Cup
(inside the storage tank)
Fan Switch
Power Switch
Sight Gauge and Drain Valve Storage Tank
Impurities Drain Valve
Boiling Tank (inside)
Water Fill Connection (hidden)
Boiling Tank Knob
Boiling Tank Lid
Reset Switch Storage Tank Lid (hidden)
03/18/15 9
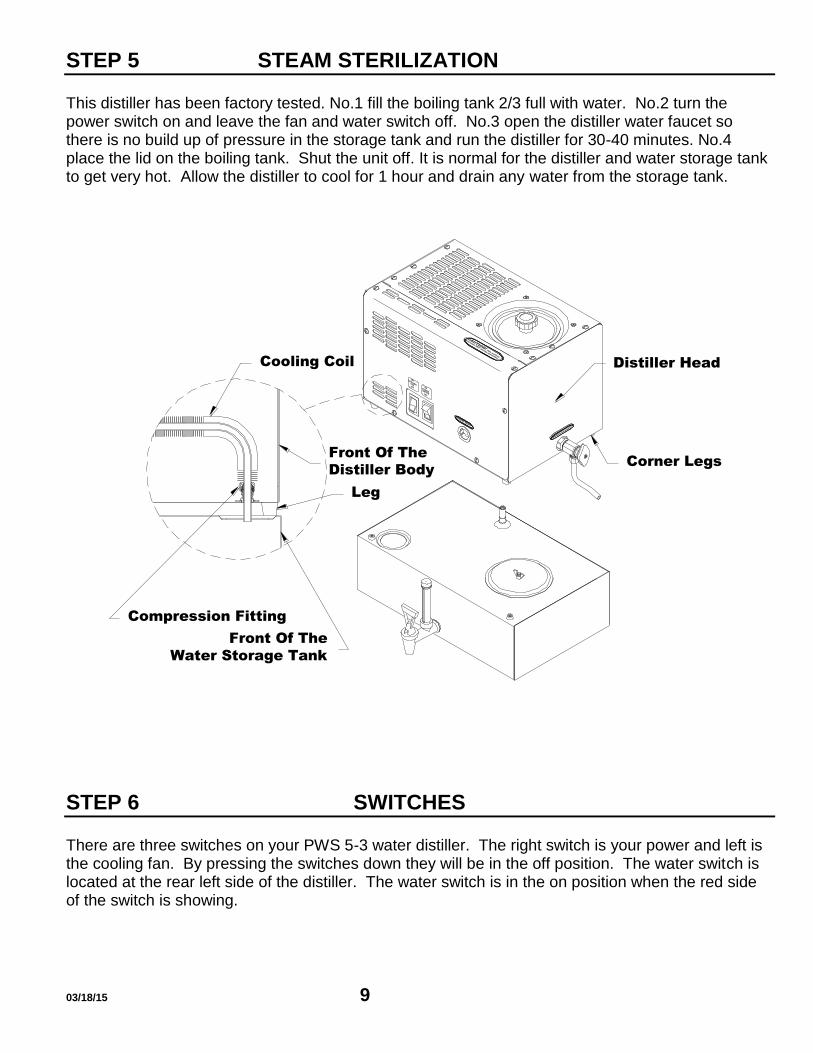
STEP 5 STEAM STERILIZATION This distiller has been factory tested. No.1 fill the boiling tank 2/3 full with water. No.2 turn the power switch on and leave the fan and water switch off. No.3 open the distiller water faucet so there is no build up of pressure in the storage tank and run the distiller for 30-40 minutes. No.4 place the lid on the boiling tank. Shut the unit off. It is normal for the distiller and water storage tank to get very hot. Allow the distiller to cool for 1 hour and drain any water from the storage tank.
STEP 6 SWITCHES There are three switches on your PWS 5-3 water distiller. The right switch is your power and left is the cooling fan. By pressing the switches down they will be in the off position. The water switch is located at the rear left side of the distiller. The water switch is in the on position when the red side of the switch is showing.
Corner Legs
Distiller Head
Compression Fitting
Front Of The
Water Storage Tank
Leg
Front Of The
Distiller Body
Cooling Coil
03/18/15 10
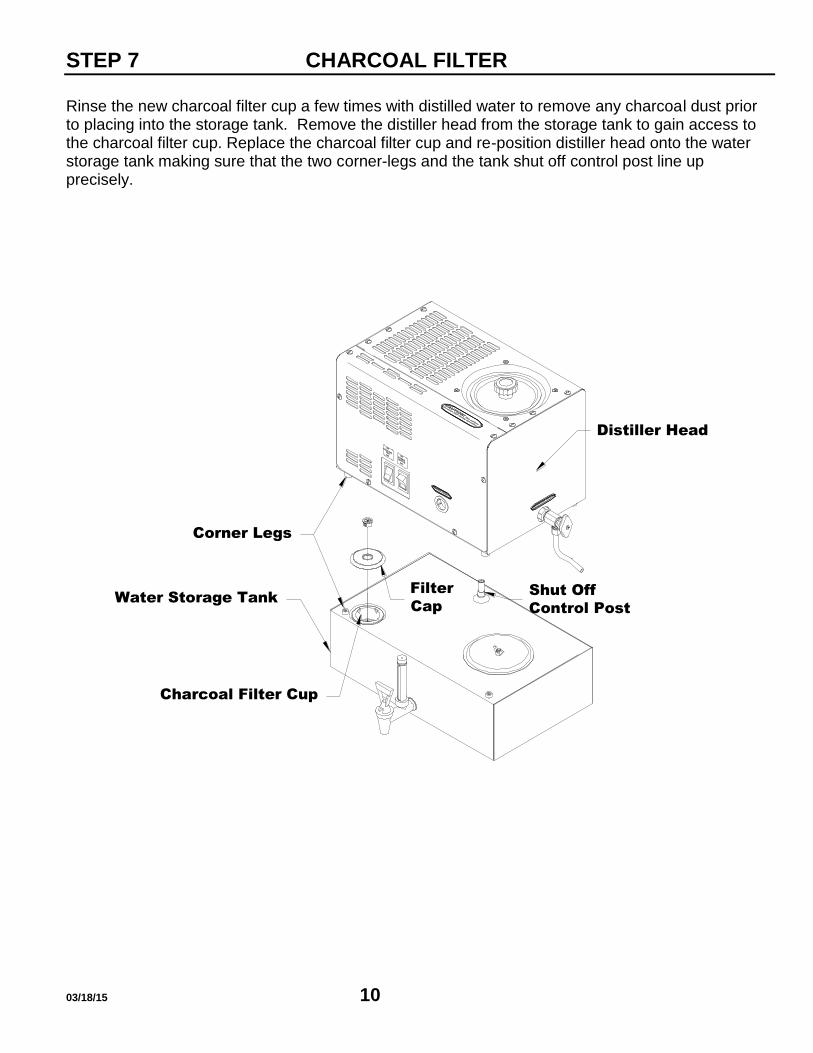
STEP 7 CHARCOAL FILTER
Rinse the new charcoal filter cup a few times with distilled water to remove any charcoal dust prior to placing into the storage tank. Remove the distiller head from the storage tank to gain access to the charcoal filter cup. Replace the charcoal filter cup and re-position distiller head onto the water storage tank making sure that the two corner-legs and the tank shut off control post line up precisely.
Distiller Head
Water Storage Tank
Corner Legs
Charcoal Filter Cup
Filter
Cap
Shut Off
Control Post
03/18/15 11
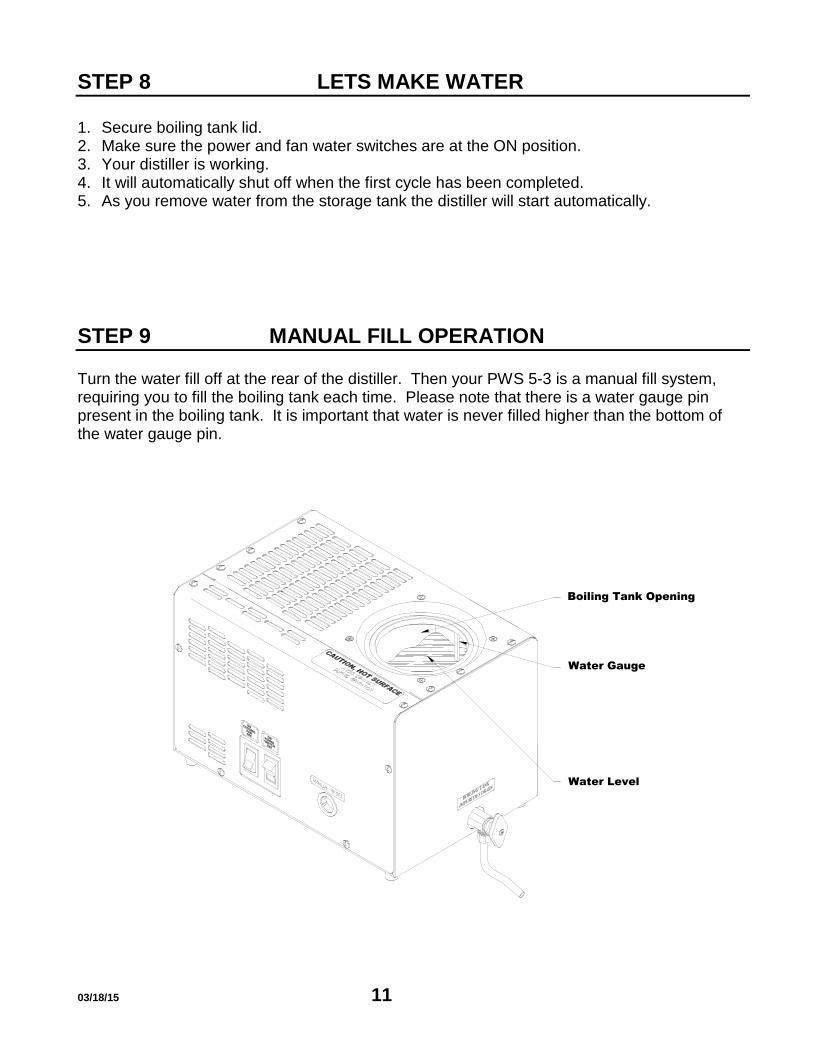
STEP 8 LETS MAKE WATER
1. Secure boiling tank lid. 2. Make sure the power and fan water switches are at the ON position. 3. Your distiller is working. 4. It will automatically shut off when the first cycle has been completed. 5. As you remove water from the storage tank the distiller will start automatically.
STEP 9 MANUAL FILL OPERATION Turn the water fill off at the rear of the distiller. Then your PWS 5-3 is a manual fill system, requiring you to fill the boiling tank each time. Please note that there is a water gauge pin present in the boiling tank. It is important that water is never filled higher than the bottom of the water gauge pin.
Water Level
Water Gauge
Boiling Tank Opening

03/18/15 12
TROUBLE SHOOTING
Problem: Distiller does not operate. Causes: 1. Distiller in not plugged in securely or the circuit breaker is off.
2. Power switch on the distiller is turned off. 3. Reset button has shut the unit off. The reset button will shut the unit off if the distiller has overheated, you may reset once the distiller is cooled off. This may also indicated a problem and should be looked at by a service center. The reset button is a safety feature and is designed to shut the distiller down should it overheat. 4. The storage tank is full of water. From a full storage tank you have to drain approximately ½ the water from the storage tank.
Problem: Water is coming out from the top of the charcoal filter. Causes: 1. Charcoal is old and compacted. Replace charcoal filter cup. 2. Water solenoid valve has malfunctioned and is stuck open. Problem: Steam or water is escaping from the top of the cooling coil. Causes: 1. The cooling coil is equipped with a gas release vent, a very small hole in the
top of the coil, this is to release certain volatile gases. Steam may escape from this hole which is normal.
Problem: Charcoal filter is very hot and steam is escaping from cover washer. Causes: 1. The fan switch is turned off.
2. Fan motor is not running properly, check to make certain the fan is not obstructed.
3. Cooling coil fins are plugged. Problem: Boiling tank will not fill with water. Causes: 1. The water supply is turned off. 2. The direct water feed line may be obstructed or kinked. 3. The water switch and / or the power switch is off. 4. The float in the boiling tank may be stuck. 5. Opening for water feed line inside the boiling tank may be scaled up. Problem: Strange taste in the distilled water. Causes: 1. Boiling tank may require cleaning, see section on maintenance and cleaning. 2. Storage tank or container may require cleaning.
3. Boiling tank has overfilled, float system or water solenoid valve has failed and allowed un-distilled water to overflow into the cooling coil.
4. Requires new charcoal filter cup. Contact any Precision Water System Service Center to correct any problems with your distiller that is not covered in this guide. Your may contact the factory at the address on the front cover of this Owner’s Guide for a Service Center in your area.

03/18/15 13
MAINTENANCE
CLEANING THE BOILING TANK Drain the boiling tank following each 10 gallons of water distilled. Simply place a bucket under the impurities drain tube and turn the valve to release impurities. Every two weeks take a good look inside the boiling tank. If there is a build up of scale on the sides of the boiling tank, then use the descaler provided to clean the tank as follows: 1. Unplug distiller from the wall. 2. Fill the boiling tank half full with hot tap water. 3. Slowly add 3 tablespoons of descaler. 4. Mix well to dissolve the descaler. 5. Fill up the remaining portion of the boiling tank with hot water to bottom of water gauge pin. 6. Let solution stand overnight. 7. The next morning or when mineral content is soft, drain the boiling tank. 8. Repeat cleaning if necessary. 9. If all scale has been removed, rinse boiler several times with warm tap water. Now in
preparation to produce pure water again, repeat the steam sterilization process as instructed earlier.
NOTE: Descaler is a corrosive and poisonous substance. Read safety precautions on package. As you place descaler in your tank it will produce a bubbling foam substance. Do not overfill. Always leave boiling lid off when ever the boiling tank is being descaled to reduce fumes travelling through the cooling coil. Dispose of 1st batch of distilled water following descaling procedure.
CHARCOAL REPLACEMENT Replace charcoal filter cup every two months or following every 100 gallons of distilled water. Discard the used charcoal filter cup. Rinse the new charcoal filter cup a few times with distilled water to remove any charcoal dust and reinstall.
OPTIONAL ACCESSORIES
DESCRIPTION PART NUMBER Descaler Cleaner - 600 gr. Jar 500102 - 1.6 kg. Jar 500103 Replacement Sediment Filter Cartridge 080073 Sediment Filter Head, With Mounting Brackets 080075 Replacement Charcoal Filter Cup 410054 Optional Saddle Valve Kit 036005

03/18/15 14
This Page Left Intentionally Blank
03/18/15 15
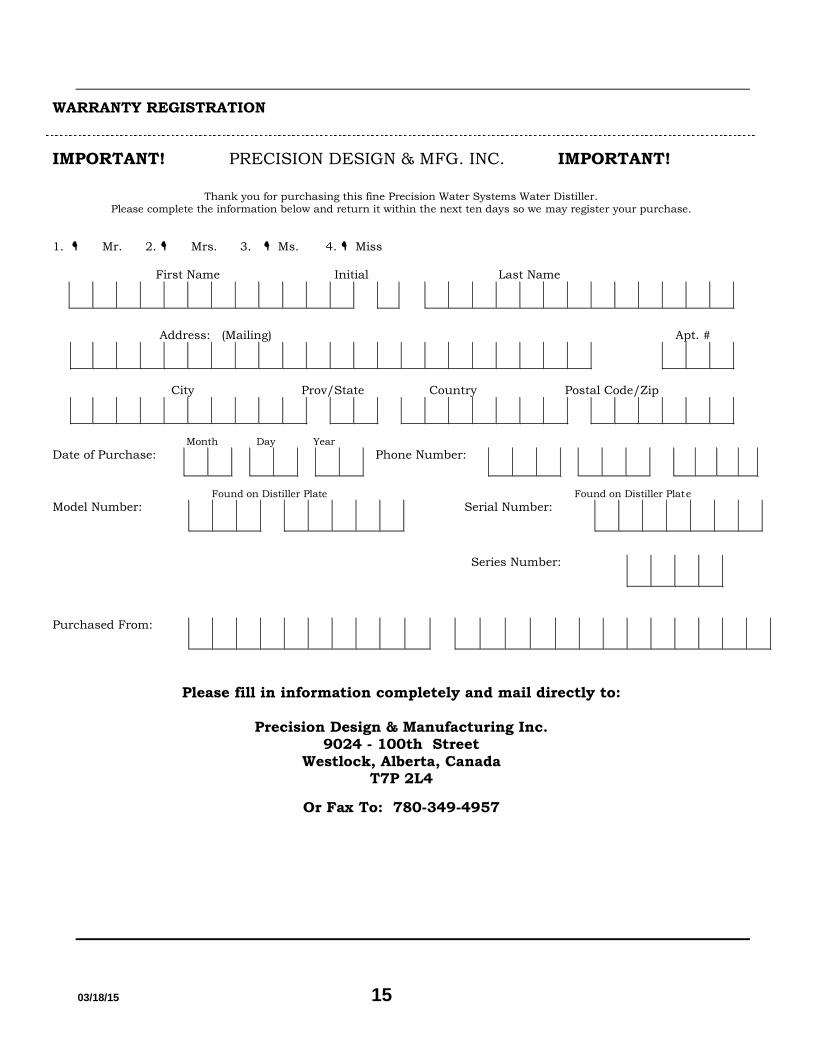
WARRANTY REGISTRATION
IMPORTANT! PRECISION DESIGN & MFG. INC. IMPORTANT!
Thank you for purchasing this fine Precision Water Systems Water Distiller. Please complete the information below and return it within the next ten days so we may register your purchase.
1. Mr. 2. Mrs. 3. Ms. 4. Miss First Name Initial Last Name
Address: (Mailing) Apt. #
City Prov/State Country Postal Code/Zip
Month Day Year
Date of Purchase: Phone Number:
Found on Distiller Plate Found on Distiller Plate
Model Number: Serial Number:
Series Number:
Purchased From:
Please fill in information completely and mail directly to:
Precision Design & Manufacturing Inc. 9024 - 100th Street
Westlock, Alberta, Canada T7P 2L4
Or Fax To: 780-349-4957