ou educate manual - el camino college
TRANSCRIPT

OU EDUCATE TRAINING MANUAL
OmniUpdate Web Content
Management System
El Camino College Staff Development
310-660-3868

Updated February 2009 1
Course Topics: Section 1: OU Educate Overview and Login
Section 2: The OmniUpdate Interface
Section 3: Tutorials: How to Upload Files, Insert Images, Insert Links, and more.
Section 4: FAQs and Troubleshooting
Section 1 – OU Educate Overview OmniUpdate is a powerful browser-based web page updater that's as easy to use as a word processor. View any of your site's web pages in your browser and, with one click, update it then and there, with WYSIWYG ease. Edit web pages anytime, anywhere in the world: at home, in the office -- anywhere that you have Internet access. And you do it right in a Browser using OmniUpdate! Correct a typo, update a headline, jot down today's happenings and even fix a broken link, on the fly, right in the browser.
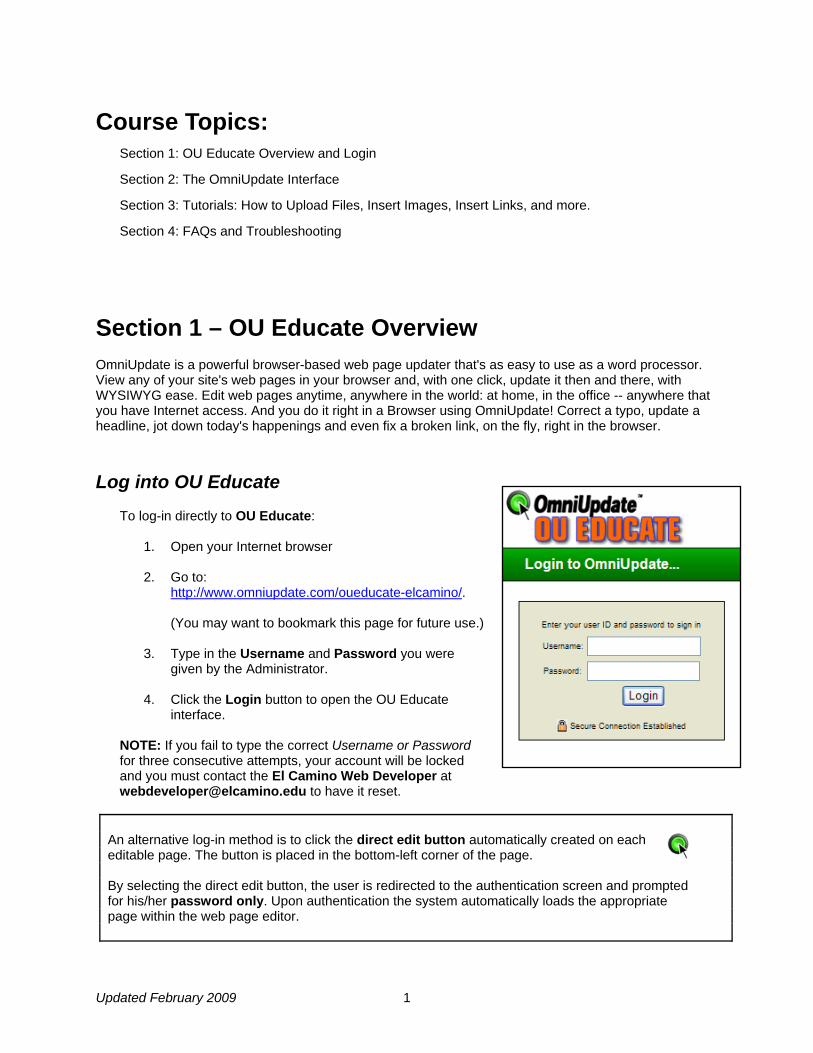
Log into OU Educate
To log-in directly to OU Educate:
1. Open your Internet browser 2. Go to:
http://www.omniupdate.com/oueducate-elcamino/.
(You may want to bookmark this page for future use.)
3. Type in the Username and Password you were given by the Administrator.
4. Click the Login button to open the OU Educate
interface. NOTE: If you fail to type the correct Username or Password for three consecutive attempts, your account will be locked and you must contact the El Camino Web Developer at [email protected] to have it reset.
An alternative log-in method is to click the direct edit button automatically created on each editable page. The button is placed in the bottom-left corner of the page. By selecting the direct edit button, the user is redirected to the authentication screen and prompted for his/her password only. Upon authentication the system automatically loads the appropriate page within the web page editor.
Updated February 2009 2
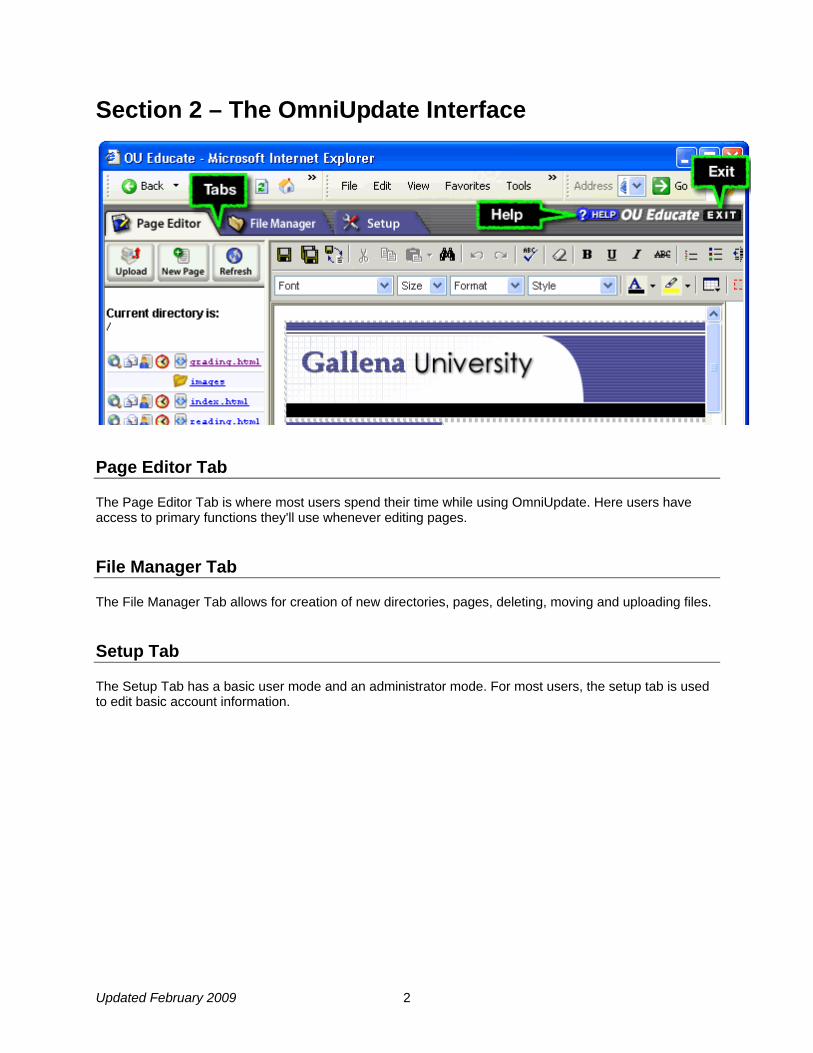
Section 2 – The OmniUpdate Interface
Page Editor Tab
The Page Editor Tab is where most users spend their time while using OmniUpdate. Here users have access to primary functions they'll use whenever editing pages.
File Manager Tab
The File Manager Tab allows for creation of new directories, pages, deleting, moving and uploading files.
Setup Tab
The Setup Tab has a basic user mode and an administrator mode. For most users, the setup tab is used to edit basic account information.

Updated February 2009 3
The Web Page Editor Tab The Page Editor Tab is where users can edit web pages and upload files.
Functions
Preview web page (without editing areas)
Email a backup of this file
Edit HTML or Page Areas in HTML code
Edit web page
File Size
Date of last save for this page

Updated February 2009 4
Web Page Editor The Web Page Editor is a what-you-see-is-what-you-get (WYSIWYG) frame that offers full page editing. Page editing functions are represented as buttons in the toolbar. Editing is performed with the same basic methods used to edit pages in a word processor. Simply typing text into the frame is all that's necessary to add new copy to a web page. Highlight existing text before applying functions such as Bold, Italic, or Insert Hyperlink. The same keyboard shortcuts users are accustomed to using in most word processors also apply to the OmniUpdate Web Page Editor. The Web Page Editor is accessed after a user has logged in to OmniUpdate and selected a page for editing.
To complete editing and save a page, simply click the Save icon in the top left corner of the toolbar.

Updated February 2009 5
The Toolbar
OVERVIEW The Toolbar (shown above) offers many of the standard formatting commands used in word processors and standard web page editing products. In OmniUpdate, you are not limited to just these formatting commands. If you are familiar with HTML, you can switch to OmniUpdate's HTML editor to enter more precise commands, edit META tags, page titles, JavaScript and more. Note: It is a good idea to save your changes often! The following is a description of each formatting command available in the Toolbar. File Functions
Save Click the Save button to save your current file.
Save as Click the Save As button to save your current file back to the server, with
the option to rename the file
Revert Click the Revert button to return your file back to its condition before you
last saved it.
Cut, Copy, Paste Functions
Cut
Click the Cut button to cut the highlighted selection. To cut a portion of the document, highlight the desired portion and click the 'Cut' icon (keyboard shortcut - Ctrl+X).
Copy
Click the copy button to copy your selection. To copy a portion of the document, highlight the desired portion and click the 'Copy' icon (keyboard shortcut - Ctrl+C).
Paste
Paste To paste a portion that has already been cut (or copied), click where you want to place the desired portion on the page and click the 'Paste' icon (keyboard shortcut - Ctrl+V).
Paste from MS Word
With your desired text copied from Microsoft Word, click the drop down icon next to the Paste Icon and select 'Paste From MS Word' (keyboard shortcut - Ctrl+D). This will remove the tags that Microsoft Word automatically places around your text. It will also remove most text formatting as well.
Paste Clean
In addition to what 'Paste from MS Word' does, 'Paste Clean' removes Text Formatting tags (<font>, <em>, <strong>, <b>, <sup>, <sub>, <strike>, <u>) and pastes as Plain Text (keyboard shortcut - Ctrl+E).

Updated February 2009 6
Find & Replace
Find & Replace
To find and replace words or phrases within the text: Select the search and replace feature. Enter the word or phrase you wish to replace and type it in the 'Find what' field Select the new word or phrase you wish to replace the searched text with in the 'Replace with' field. You can choose to 'find next' which allows you to manually replace instances of the searched text, or you can choose 'replace all' which allows you to replace all instances of the selected text. Selecting the optional 'Match Case' tab allows you to search for a word or phrase with exactly the same upper or lower-case spelling of the word or phrase entered in 'Find What'. Not selecting this option means that a word entered in the 'Find what' field with upper case characters will return a search of upper and lower case matches of the same word. Selecting the optional 'Match whole word only' tab allows the search to only display the words that are an exact match of the word or phrase entered in the 'Find What' field.
Text Functions
Check Spelling
To check spelling, click on the spell checker icon or right click on the mouse and scroll down to 'Check spelling'. You will be taken to the first incorrectly spelled word. You can then choose to - Change the incorrectly spelled word with the suggested words provided - Ignore the incorrectly spelled word (i.e. not make any changes to it).
Remove Text Formatting
This command allows you to select a specific portion of text and remove any of the formatting which it contains. To remove any text formatting select the desired portion of text and Click the 'Remove Text Formatting' button.
Undo & Redo Functions
Undo
To undo the last change, click the 'Undo' icon (keyboard shortcut - CTRL+Z). Each consecutive click will undo the previous change to the document.
Redo
To redo the last change, click the 'Redo' icon (keyboard shortcut - CTRL+Y). Each consecutive click will repeat the last change to the document.
Basic Font Properties
Bold Turns selected text into bold text.
Italicize Turns selected text into italicized text.

Updated February 2009 7
Underline
Turns selected text into underlined text. Please note that underlined text usually means that a word or phrase is a link to another web page. In this case however, the underline formatting does not create a link (to create a link, see "Link Button" below).
Strike Through Turns selected text into strikethrough text.
List Functions
Numbered List
Turns the selected text into a numbered list. Example:
1. The first subject is... 2. Next I'd like to point out that... 3. Finally we can see that…
Bulleted List
Turns the selected text into a bulleted list. Example:
• Eggs • Milk • Watermelon
Indent Functions
Indent Add To increase indent of a paragraph, click the 'Increase Indent' icon. Each
consecutive click will move text further to the right.
Indent Minus To decrease indent of a paragraph, click the 'Decrease Indent' icon. Each
consecutive click will move text further to the left.
Alignment Functions
Left Align Moves all selected text to the left.
Center Align Centers all selected text.
Right Align Moves all selected text to the right.
Justify Justifies the selected text from left to right.
Script Text
Superscript
To convert text to superscript (vertically aligned higher): Select the desired portion of text and click the 'Superscript' icon. Each consecutive click will toggle this function on and off.
Subscript
To convert text to subscript (vertically aligned lower): Select the desired portion of text and click the 'Subscript' icon. Each consecutive click will toggle this function on and off.

Updated February 2009 8
Link Tools
Insert Link
To create a hyperlink, select the text or image to create the link on, then click the 'Create or Modify Link' icon. If applicable, the pop-up window will contain existing link information. You can use the link manager to navigate to the page you want to link to. You can also type the full URL of the page you want to link to in the URL text box. You can also enter the target window information (optional) and an anchor name (if linking to an anchor - optional). When finished, click the 'Insert Link' button to insert the hyperLink you just created, or click 'Remove Link' to remove an existing link. Clicking 'Cancel' will close the window and take you back to the editor.
Insert Mail To Link
To create an e-mail link, select text or an image on the web page you are editing where you would like the link to appear. Click the 'Create Amyl Link' icon. In the dialogue box, type the amyl address for the link and the subject of the amyl When finished, click the 'OK' button to insert the amyl link, or 'Cancel' to close the box.
Insert Anchor
To insert an anchor, select a desired spot on the web page you are editing and click the 'Insert / Modify Anchor' icon. In the dialogue box, type the name for the anchor. When finished, click the 'OK' button to insert the anchor, or 'Cancel' to close the box. To modify an anchor select the anchor (displayed as an anchor icon when guidelines are switched on) and click the 'Insert / Modify Anchor' icon. Make your changes and hit the 'OK' button or click 'Cancel' to close the window.
Help Tool
Open Help Page To access the help for the toolbar simply click the help icon.
Font Properties
Font Family
This button gives you a drop-down list of the standard fonts recognized by most web browsers. To change the font of existing text, select the text and choose a font from the drop-down list. To start typing new text with a specific font, click the cursor where you wish to begin typing, select a font from the drop-down list, then begin typing. To use a font that is not available in the list, choose "Custom..." and a pop-up screen will ask you to enter the new font's name. Keep in mind that custom fonts may not be available for display in all browsers.
Font Size
This button lets you change the size of any selected text. Size 1 is the largest, 3 is in the middle, and 7 is the smallest. To start typing new text with a specific font size, click the cursor at the position where you wish to begin typing, select a size from the drop-down list, then begin typing.

Updated February 2009 9
Font Paragraph
The Paragraph button is a drop-down list of several actions that can be used to change the formatting of a selected paragraph. To select a paragraph, simply click the cursor once anywhere inside the paragraph. The following functions can be then be used:
Normal <p> - Sets the selected paragraph to normal. Headings <H1> through Heading 6 <H6> - Sets the selected paragraph to a specific heading size between 1 (the largest) and 6 (the smallest). Pre <PRE> - Sets the selected paragraph format to no text wrap.
Font Paragraph
To apply a class simply select a span class from the drop down menu. Please note that the page must include a list of CSS files to populate the drop down list.
Font Color
This button lets you pick the color of any selected text. There are 18 color choices and a custom option to let you enter any standard HTML color value. To start typing new text with a specific font color, click the cursor where you wish to begin typing, select a color from the drop-down list, then begin typing.
Font Background Color
This button lets you pick the background color of any selected text. There are a range of color choices and a custom option to let you enter any standard HTML color value. To start typing new text with a specific font color, click the cursor at the position where you wish to begin typing, select a color from the drop-down list, then begin typing.
Table Tools
Table Functions
To insert or modify a table or cell, select the 'Table Functions' icon to display a list of available Table Functions. If a Table Function is NOT available, you will need to select, or place your cursor inside the table you wish to modify.
Insert Table
To insert a table, select the desired location, then click the 'Insert Table' icon. A new window will pop-up with the following fields: Rows - number of rows in table; Columns - number of columns in table; Width - width of table; BgColor - background color of table; Cell Padding - padding around cells; Cell Spacing - spacing between cells and Border - border around cells. Fill in table details then click the 'OK' button to insert table, or click 'Cancel' to go back to the editor.
Modify Table Properties
To modify table properties, select a table or click anywhere inside the table to modify, then click the 'Modify Table Properties' icon. A pop-up window will appear with the table's properties. Click the 'OK' button to save your changes, or click 'Cancel' to go back to the editor. Note: this function will not work if a table has not been selected.

Updated February 2009 10
Modify Cell Properties
To modify cell properties, click inside the cell to modify, then click the 'Modify Cell Properties' icon. A pop-up window will appear with the cells' properties. Click the 'OK' button to save your changes, or click 'Cancel' to go back to the editor. Note: this function will not work if a cell has not been selected and does not work across multiple cells.
Insert Column to the Right
To insert a column to the right of your cursor, click inside cell after which to insert a column, then click the 'Insert Column to the Right' icon. Each consecutive click will insert another column after the selected cell. Note: this function will not work if a cell has not been selected.
Insert Column to the Left
To insert column to the left of your cursor, click inside cell before which to insert a column, then click the 'Insert Column to the Left' icon. Each consecutive click will insert another column before the selected cell. Note: this function will not work if a cell has not been selected.
Insert Row Above
To insert row above, click inside cell above which to insert a row, then click the 'Insert Row Above' icon. Each consecutive click will insert another row above the selected cell. Note: this function will not work if a cell has not been selected.
Insert Row Below
To insert row below, click inside cell below which to insert a row, then click the 'Insert Row Below' icon. Each consecutive click will insert another row below the selected cell. Note: this function will not work if a cell has not been selected.
Delete Row To delete a row, click inside cell which is in the row to be deleted, then click the 'Delete Row' icon. Note: this function will not work if a cell has not been selected.
Delete Column
To delete a column, click inside cell which is in the column to be deleted, then click the 'Delete Column' icon. Note: this function will not work if a cell has not been selected.
Insert Column
To insert a column, click inside cell which is in the column to be inserted, then click the 'Insert Column' icon. Note: this function will not work if a cell has not been selected.
Decrease Column Span
To decrease column span, click inside cell who's span is to be decreased, then click the 'Decrease Column Span' icon. Each consecutive click will further decrease the column span of the selected cell. Note: this function will not work if a cell has not been selected.

Updated February 2009 11
Form Tools
Form Functions
To insert or modify a form, select the 'Form Functions' icon to display a list of available form functions. If a form function is NOT available, you will need to place your cursor inside the form you wish to modify.
Insert Form
To insert a form, select desired position then click the 'Insert Form' icon. A new window will pop-up with the following fields: Name - name of form; Action - location of script that processes the form and Method - post, get or none. Fill in form details or leave blank for a blank form. When finished, click the 'OK' button to insert form, or click 'Cancel' to go back to the editor.
Modify Form Properties
To modify form properties, click anywhere inside the form to modify, then click the 'Modify Form Properties' icon. A pop-up window will appear with the form's properties. Click the 'OK' button to save your changes, or click 'Cancel' to go back to the editor. Note: this function will not work if a form has not been selected.
Insert / Modify Text Field
To insert a text field, select the desired position then click the 'Insert/Modify Text Field' icon. A pop-up window will appear with the following attributes: Name - name of text field; Character width - the width of the text field, in characters; Type - type of text field (Text or Password); Initial value - initial text in field and Maximum characters - maximum number of characters allowed. Set the attributes then click the 'OK' button to insert text field, or click 'Cancel' to go back to the editor. To modify a text field's properties, select desired text field and click the 'Insert/Modify Text Field' icon. A pop-up window will appear with the text field's attributes. Modify any attributes desired, then click the 'OK' button to save changes, or click 'Cancel' to go back to the editor.
Insert / Modify Text Area
To insert a text area, select the desired position then click the 'Insert/Modify Text Area' icon A pop-up window will appear with the following attributes: Name - name of text area; Character width - the width of the text area, in characters; Initial value - initial text in area and Lines - number of lines allowed in the text area. Set the attributes then click the 'OK' button to insert the text area, or click 'Cancel' to go back to the editor. To modify a text area's properties, select desired text area and click the 'Insert/Modify Text Area' icon. A pop-up window will appear with the text area's attributes. Modify any attributes desired, then click the 'OK' button to save changes, or click 'Cancel' to go back to the editor.
Updated February 2009 12
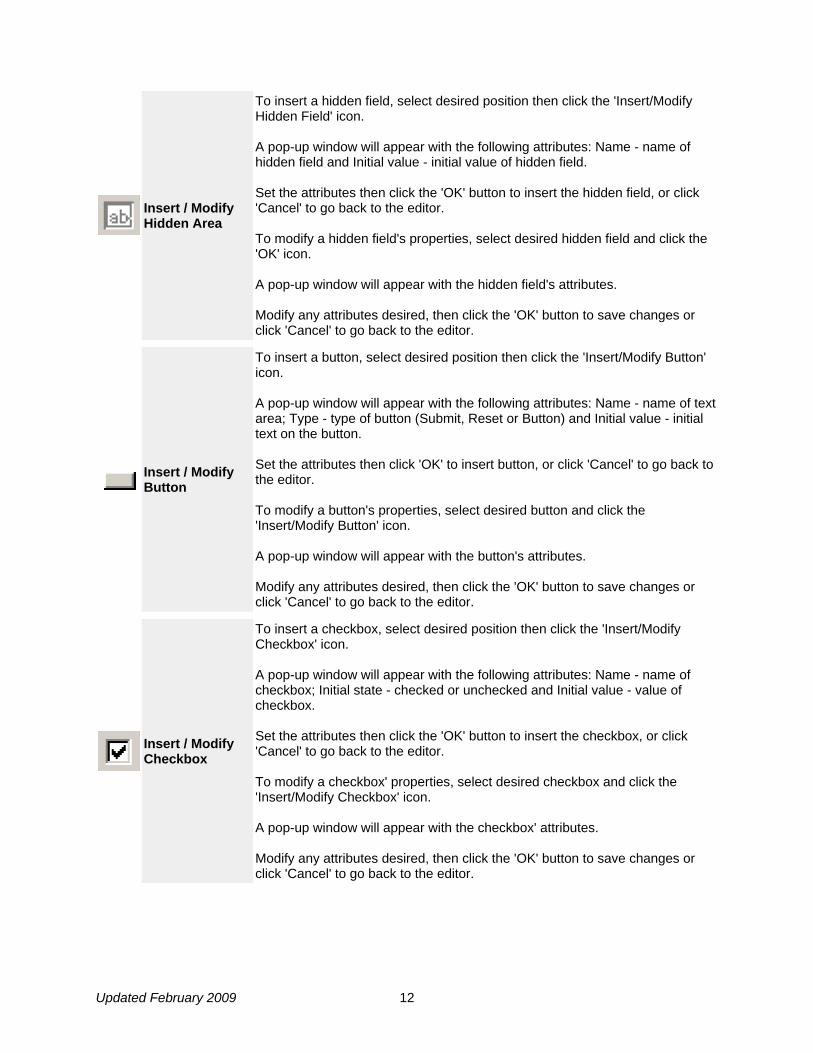
Insert / Modify Hidden Area
To insert a hidden field, select desired position then click the 'Insert/Modify Hidden Field' icon. A pop-up window will appear with the following attributes: Name - name of hidden field and Initial value - initial value of hidden field. Set the attributes then click the 'OK' button to insert the hidden field, or click 'Cancel' to go back to the editor. To modify a hidden field's properties, select desired hidden field and click the 'OK' icon. A pop-up window will appear with the hidden field's attributes. Modify any attributes desired, then click the 'OK' button to save changes or click 'Cancel' to go back to the editor.
Insert / Modify Button
To insert a button, select desired position then click the 'Insert/Modify Button' icon. A pop-up window will appear with the following attributes: Name - name of text area; Type - type of button (Submit, Reset or Button) and Initial value - initial text on the button. Set the attributes then click 'OK' to insert button, or click 'Cancel' to go back to the editor. To modify a button's properties, select desired button and click the 'Insert/Modify Button' icon. A pop-up window will appear with the button's attributes. Modify any attributes desired, then click the 'OK' button to save changes or click 'Cancel' to go back to the editor.
Insert / Modify Checkbox
To insert a checkbox, select desired position then click the 'Insert/Modify Checkbox' icon. A pop-up window will appear with the following attributes: Name - name of checkbox; Initial state - checked or unchecked and Initial value - value of checkbox. Set the attributes then click the 'OK' button to insert the checkbox, or click 'Cancel' to go back to the editor. To modify a checkbox' properties, select desired checkbox and click the 'Insert/Modify Checkbox' icon. A pop-up window will appear with the checkbox' attributes. Modify any attributes desired, then click the 'OK' button to save changes or click 'Cancel' to go back to the editor.

Updated February 2009 13
Insert / Modify Radio Button
To insert a radio button, select desired position then click the 'Insert/Modify Radio Button' icon. A pop-up window will appear with the following attributes: Name - name of radio button; Initial state - checked or unchecked and Initial value - value of radio button. Set the attributes then click 'OK' to insert the radio button, or click 'Cancel' to go back to the editor. To modify a checkbox' properties, select desired checkbox and click the 'Insert/Modify Radio Button' icon. A pop-up window will appear with the checkbox' attributes. Modify any attributes desired, then click the 'OK' button to save changes or click 'Cancel' to go back to the editor.
Insert / Modify Select Field
To insert a select field, select the desired position then click the 'Insert/Modify Select Field' icon. A pop-up window will appear with the following attributes: Name - name of the select list; Current Options - The options available for selection in the list; Type - how the list will be displayed (a single option, or multiple options); Size - how many list items will be shown; Style - The style to be applied to this select field, if any. To add options to the select list, use the text, value and selected boxes under the 'Maintain Options' heading. To modify a select lists properties, select the desired list and click the 'Insert/Modify Select List' button. A pop-up window will appear with the select lists attributes. Modify the desired attributes, then click the 'OK' button to save changes or click 'Cancel' to go back to the editor.
Misc. Graphics Tools
Insert / Modify Image
If an image is NOT selected, clicking this icon will open the Image Manager. If an image IS selected, then clicking this icon will open the 'Modify Image Properties' pop-up window. To modify the image properties of the selected image, set the required attributes and click the 'Modify' button.
Horizontal Line
Horizontal Line is clicked to create a horizontal line break with a relative size (100%). To change the horizontal line break to a fixed width, simply click and drag either end of the line.
Break Insert Break - Same as hitting the keys shift and return at the same time. This
creates a single line return.

Updated February 2009 14
Special Character
To insert a special character, click the 'Insert Special Character' icon. A pop-up window will appear with a list of special characters. Click the icon of the character to insert into your web page.
Clean HTML Code
To clean HTML code, click the 'Clean HTML Code' icon. This will remove any empty span and paragraph tags, all xml tags, all tags that have a colon in the tag name (i.e. ) and remove style and class attributes. This is useful when copying and pasting from Microsoft Word documents to remove unnecessary HTML code.
Show Borders
To show or hide guidelines, click the 'Show/Hide Guidelines' icon. This will toggle between displaying table and form guidelines and not showing any guidelines at all. Tables and cells will have a broken gray line around them, forms will have a broken red line around them, while hidden fields will be a pink square when showing guidelines. Note that the status bar (at the bottom of the window) will reflect the guidelines mode currently in use.
Zoom To zoom the page in or out you can use the zoom button.
Show HTML Code To Edit HTML code click the HTML Button.
Updated February 2009 15
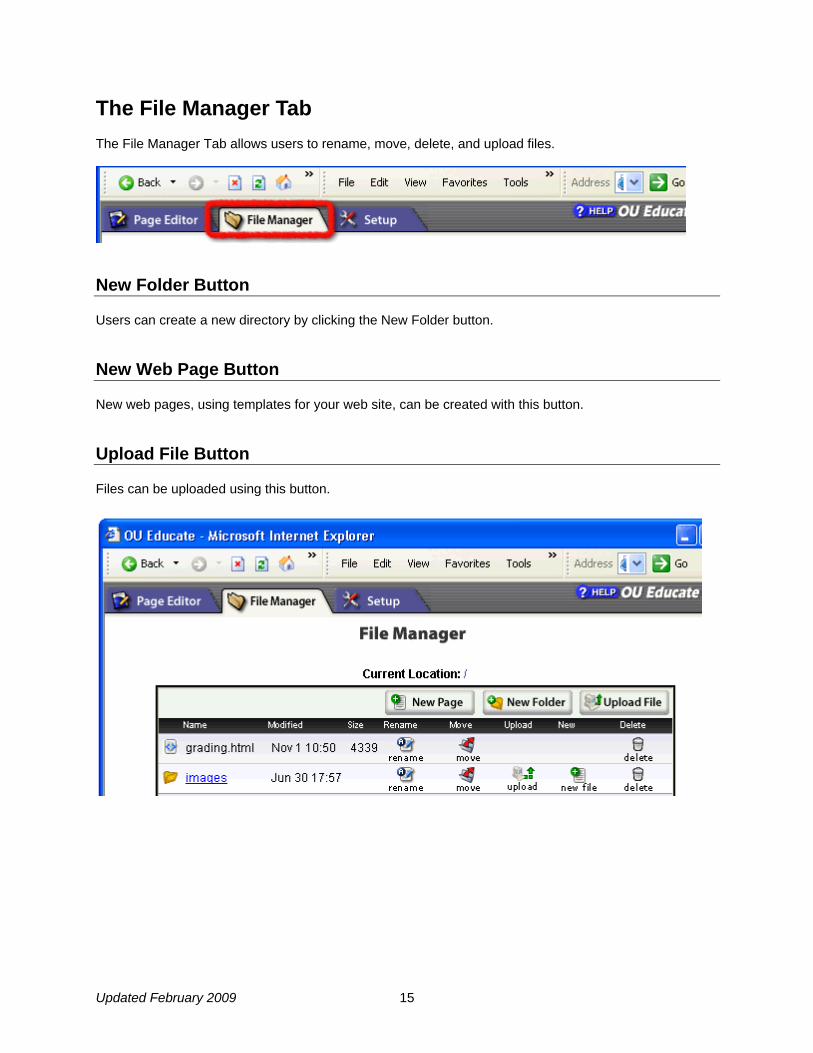
The File Manager Tab The File Manager Tab allows users to rename, move, delete, and upload files.
New Folder Button
Users can create a new directory by clicking the New Folder button.
New Web Page Button
New web pages, using templates for your web site, can be created with this button.
Upload File Button
Files can be uploaded using this button.

Updated February 2009 16
The File Manager The File Manager shows a list of files.
The Delete Function
The delete function allows you to delete files or empty folders.
The Rename Function
The rename function allows you to change the actual file name for a given file.
The Move Function
By clicking the move function you simply navigate to the new location you wish the file that you have selected to be moved to.
Updated February 2009 17
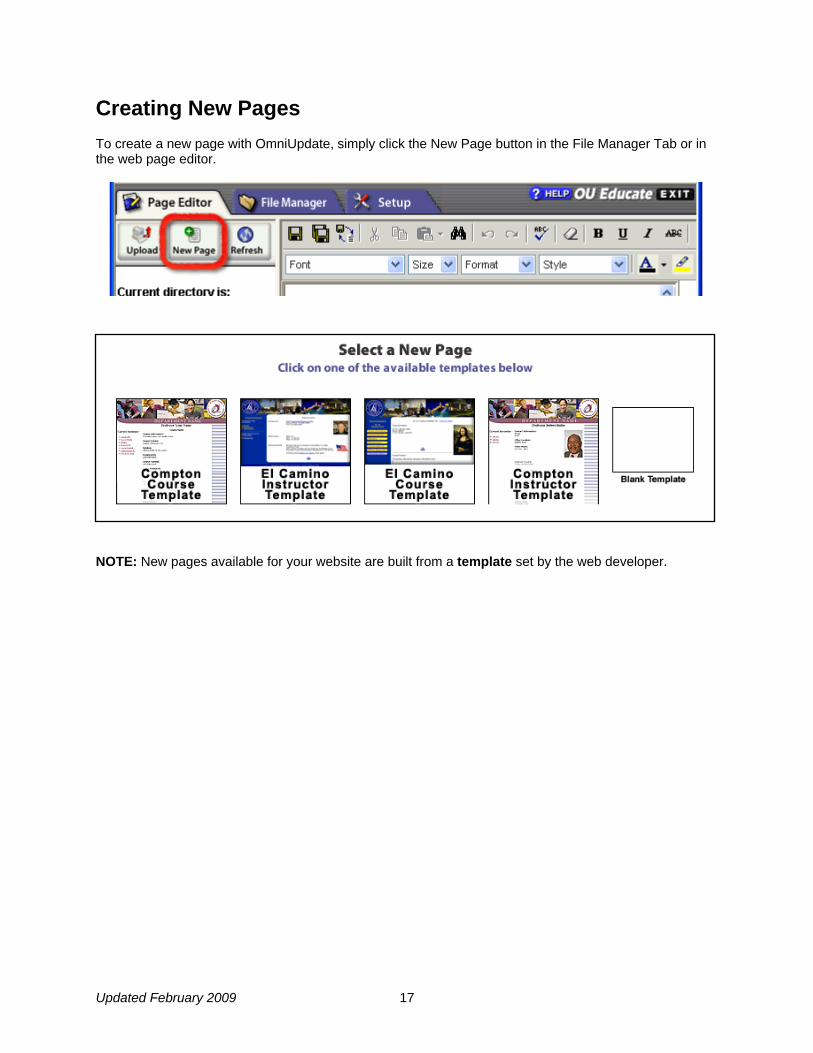
Creating New Pages To create a new page with OmniUpdate, simply click the New Page button in the File Manager Tab or in the web page editor.
NOTE: New pages available for your website are built from a template set by the web developer.

Updated February 2009 18
Uploading Files To upload a file within OmniUpdate simply click on the upload file button in the File Manager tab.
Files can be uploaded using this button.
To rename the file using a name that does not include spaces or unusual characters or an overly generic name simply fill in the optional file name.

Updated February 2009 19
The Setup Tab The Setup Tab is used to edit basic account information.
Account Information
This button allows you to change your password, external e-mail address, and contact phone number.
Password: up to 32 characters (case sensitive) Last Name: Last name of this user. First Name: First name of this user.
Phone: Optional, but useful for administrators to contact you. E-mail: Necessary for backing up files and for contact information.

Updated February 2009 20
Section 3 – Tutorials
Inserting Text Revising text is as simple as typing on the screen! Assuming you've followed the preceding steps for editing, simply place your cursor on the page where you'd like to type (or select any existing text by highlighting it), and begin typing. Formatting text is as simple as using your favorite word processor -- simply choose from any of the formatting buttons in the toolbar at the top of the page. Note that hitting Shift+Return will create a break, where hitting Return will create a <p> tag which on a web page will look like a double line space.
Inserting Links OmniUpdate makes it easy to create links to other web pages within the existing web site, as well as links to page on other web sites. Links can be created using either of the following two methods:
1. While editing a web page, simply type a URL and press the Enter (or Return) key on your keyboard. The URL can be to any page on your web site, or to another web site.
2. While editing a web page, highlight any text (or graphic) then click the Create or Modify Link
button on the WYSIWYG toolbar. Within the Link Manager pop-up window, select any page on your web site, or type in a URL to another web site.
Create or Modify Link Tool
To create a hyperlink, select the text or image to create the link on, then click the 'Create or Modify Link' icon. If applicable, the pop-up window will contain existing link information. You can use the Link Manager to navigate to the page you want to link to. You can also type the full URL of the page you want to link to in the URL text box. You can also enter the target window information (optional) and an anchor name (if linking to an anchor - optional). When finished, click the 'Insert Link' button to insert the hyperlink you just created, or click 'Remove Link' to remove an existing link. Clicking 'Cancel' will close the window and take you back to the editor. First highlight the link:
Second, Click the Link Icon in the toolbar:

Updated February 2009 21
Third, Insert the link in the Link Manager:
Inserting Images There are two ways to upload and insert pictures on pages. One or more pictures can be uploaded first then placed on a page, or a single picture can be uploaded as it is being placed on a page.
Upload and Place a Single Picture
1. Open the page you'd like to place the image, put your cursor on the page, then click the Insert/Modify Image button on the toolbar.
2. Click the button "Upload Image From My Computer" and select the image for placement.

Updated February 2009 22
3. Enter appropriate "Alternate Text" for Sec 508 compliance, and click the "Insert" button.
Upload One or More Pictures Prior to Placement
1. Click the "File Manager" tab at the top of the screen, and navigate to the directory where you'd like the image(s) uploaded.
Updated February 2009 23
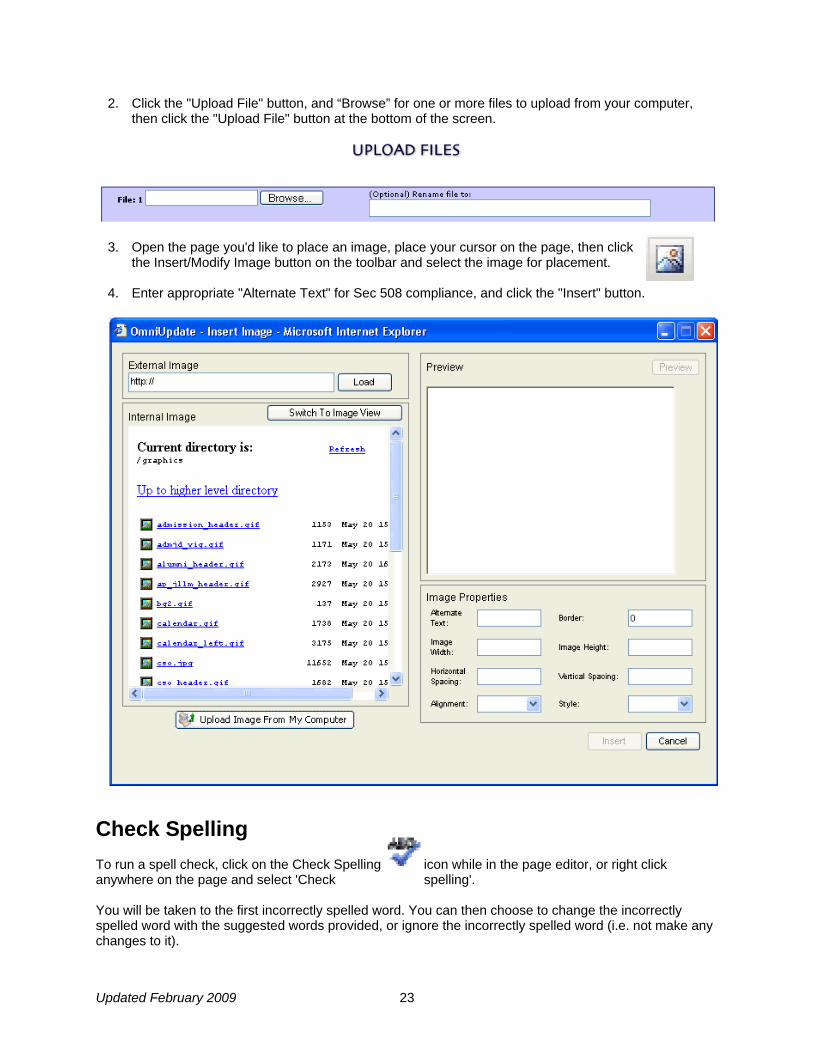
2. Click the "Upload File" button, and “Browse” for one or more files to upload from your computer, then click the "Upload File" button at the bottom of the screen.
3. Open the page you'd like to place an image, place your cursor on the page, then click the Insert/Modify Image button on the toolbar and select the image for placement.
4. Enter appropriate "Alternate Text" for Sec 508 compliance, and click the "Insert" button.
Check Spelling To run a spell check, click on the Check Spelling icon while in the page editor, or right click anywhere on the page and select 'Check spelling'. You will be taken to the first incorrectly spelled word. You can then choose to change the incorrectly spelled word with the suggested words provided, or ignore the incorrectly spelled word (i.e. not make any changes to it).
Updated February 2009 24
Tables Create a New Table
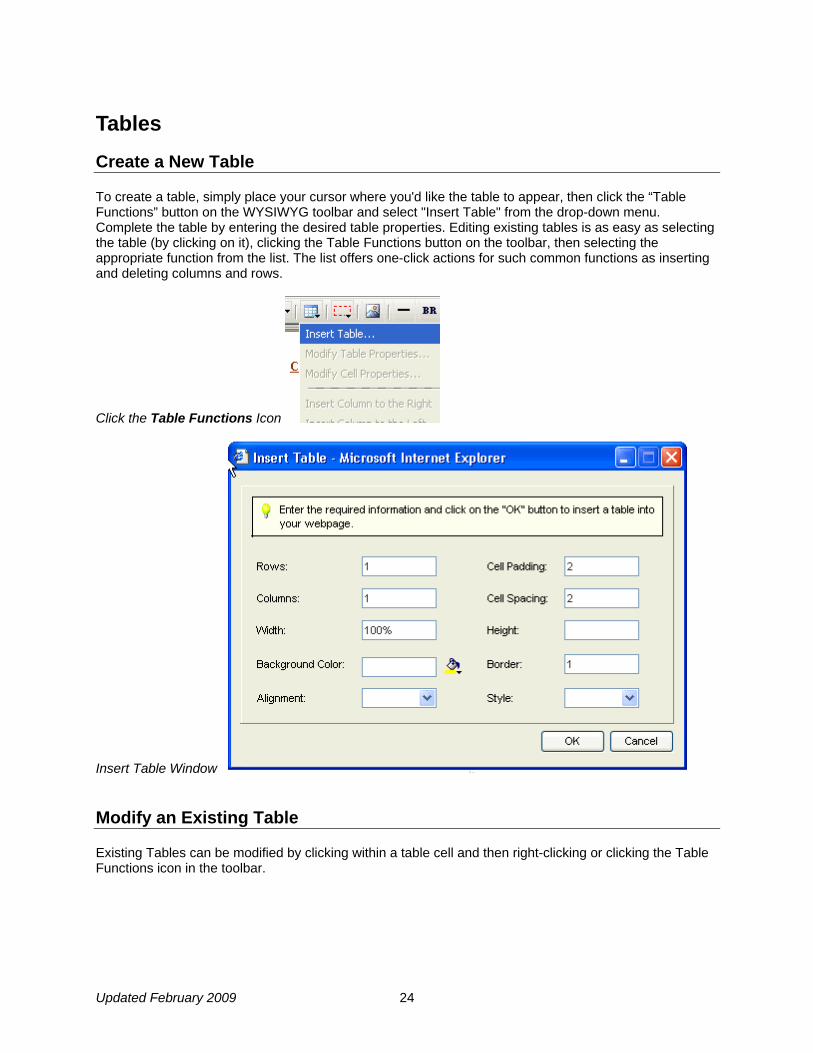
To create a table, simply place your cursor where you'd like the table to appear, then click the “Table Functions” button on the WYSIWYG toolbar and select "Insert Table" from the drop-down menu. Complete the table by entering the desired table properties. Editing existing tables is as easy as selecting the table (by clicking on it), clicking the Table Functions button on the toolbar, then selecting the appropriate function from the list. The list offers one-click actions for such common functions as inserting and deleting columns and rows.
Click the Table Functions Icon
Insert Table Window
Modify an Existing Table
Existing Tables can be modified by clicking within a table cell and then right-clicking or clicking the Table Functions icon in the toolbar.

Updated February 2009 25
Right-click within a table cell or use the Table Functions drop-down menu while within a table
Please note that since the "Tab" key will take you to another frame, using the arrow keys is desirable.
Table Functions
A full explanation of Table Functions in the editor can be found on pages 9-10 of this manual.
Paste From Word When pasting into your web page from formatted text and tables copied from a Microsoft Word document, you have several options to choose from. The important thing to understand is that a normal paste command (Ctrl+V) will paste everything on the Windows clipboard, including unwanted XML code generated by MS Word. This Microsoft-specific XML code is not needed in the web page, and often causes display problems in some browsers. Therefore, it's best to use one of the following two Paste functions when pasting text copied from an MS Word document:
Paste from Microsoft Word (Ctrl + D)
To Paste from Microsoft Word: Copy your desired text from Microsoft Word and click the drop-down icon next to the paste icon. Select the 'Paste from MS Word Option'. This will remove the tags that Microsoft Word automatically places around your text.
Paste Clean (Ctrl + E)
In addition to doing what 'Paste from Microsoft Word' does, 'Paste Clean' also removes Text Formatting tags (<font>, <em>, <strong>, <b>, <sup>, <sub>, <strike>, <u>).

Updated February 2009 26
Uploading Files The process begins by selecting the ‘File Manager’ tab and performing the following procedure:
1. Navigate to the destination directory.
2. Select the ‘Upload File’ button. 3. Select the ‘Browse’ button. 4. Select the file or files that are to
be uploaded.
5. Rename the files to be uploaded (Optional), making sure to use web appropriate file names.
6. Select ‘Upload File’ button.
Users can also upload from the page editor tab:
Log Out of OU Educate To log out of OU Educate, click the “EXIT” button in the upper-right hand corner of your browser window. You will be taken to a Site List page displaying sites available for editing. Click “My Website” to return to your site directory (i.e. go back to OU Educate) or click “Finish Logout” to complete the log-out process. You may then close the browser window.
Updated February 2009 27
Section 4 – FAQ's and Troubleshooting How do I insert images from other sites?
While in the WYSIWYG editor mode, click on the ‘Insert/Modify Image’ icon. A dialogue window will appear with a field label of ‘External Image’ type or paste the image URL and click the ‘Load’ button. The image will appear in the preview window. Complete the ‘Alternate Text’ field and click the ‘Insert’ button.
How do I link to pages on other sites?
While in the WYSIWYG editor mode, select an image or text that you wish to create as a link. Click on the ‘Create or Modify Link’ icon. The Link Manager window will appear with a field label called ‘URL’. Type or paste the page URL and click the ‘Insert Link’ button.
How do I insert special characters?
While in the WYSIWYG editor mode, place the cursor where the special character should be inserted. Click on the ‘Insert Special Characters’ icon. A dialogue window will appear with the available options. Click on the desired special character and it will be automatically inserted on the page.
How do I back up files?
From the ‘Page Editor’ tab, navigate to the file that you wish to create a back-up. Click on the ‘Backup’ icon. The selected file will be sent to you via e-mail as a file attachment. It's a good practice to send yourself a backup before and after you make an update.
What is the OmniUpdate button in the bottom-left corner of my web page?
Simply click this button at the bottom of your page to login and have the page directly displayed in the editor window. This saves you the time of finding the page in a directory.
I use a browser other than Internet Explorer (i.e. Mozilla Firefox, Google Chrome) or a Macintosh computer with Safari. Will this work for me?
Yes, albeit with less functionality than the traditional WYSIWYG editor. It is strongly recommended that you use the latest version of Internet Explorer when performing tasks in Omni.
Updated February 2009 28
I noticed that OmniUpdate is setting up a cookie. How is this being used?
OmniUpdate is session-based and sets up a cookie only to enable the session. The cookie is automatically destroyed when you quit your Browser or Logout. The cookie is not used for tracking or statistical purposes. For more information regarding the OU Educate system, please visit the OmniUpdate Help Pages at http://help.omniupdate.com/ou/oueducate/__home.html and for assistance with web pages please contact the ECC Web Developer at [email protected].