national locksmith automobile association™ 1989...
TRANSCRIPT
2. There are a few variations of the Mercedes 4-track key. You have themaster plastic bow key with an alarm indicator, and the master plastic bowkey without an indicator. There is a wallet key with an alarm indicator anda valet key. The valet key is missing the center groove cut on the blade.The red dot alarm indicator is for models with a factory alarm. The red dotis plastic and has no other purpose except to indicate that the vehicle leftthe factory with an alarm, nothing else.
IssueNo.30
The Official Publication of the
NATIONAL LOCKSMITHAUTOMOBILE ASSOCIATION™
™
12.01
www.TheNationalLocksmith.comChat, Forums, Editorial,
Online Store, Tech Support
www.Laserkey.comProduct & Technology Sales,
Transponder Information Resources
Here are the two best websites for Automotive Locksmiths:
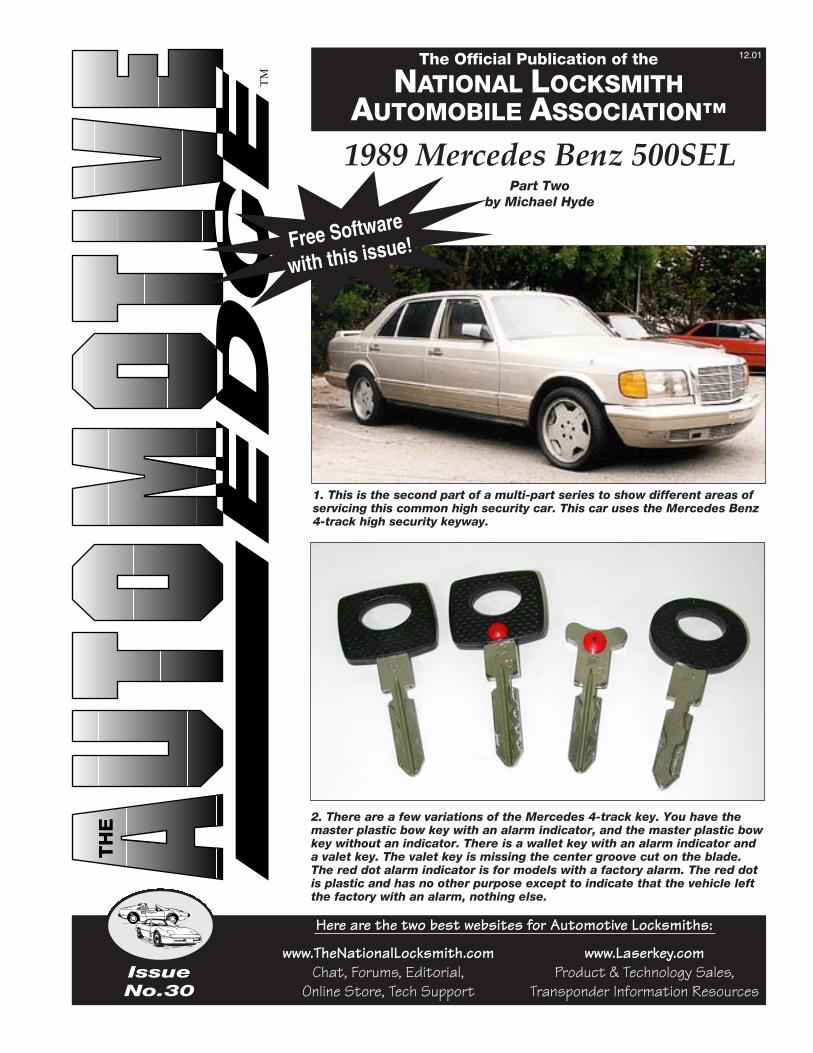
1. This is the second part of a multi-part series to show different areas ofservicing this common high security car. This car uses the Mercedes Benz4-track high security keyway.
Free Software
with this issue!
1989 Mercedes Benz 500SELPart Two
by Michael Hyde
2 • Automotive Edge National Locksmith Automobile Association
National LocksmithAutomobile Association™
PublisherMarc Goldberg
DirectorGreg Mango
Printed in the U.S.A.NLAA, a division of the National
Publishing CompanyPublishers of
THE NATIONAL LOCKSMITH
1533 Burgundy ParkwayStreamwood, Illinois 60107
Phone 630-837-2044Fax 630-837-1210
E-mail address:[email protected]
Unsolicited manuscripts areaccepted, but must include SASE.
©2001 National Publishing Co.All rights reserved.
Issue No. 30
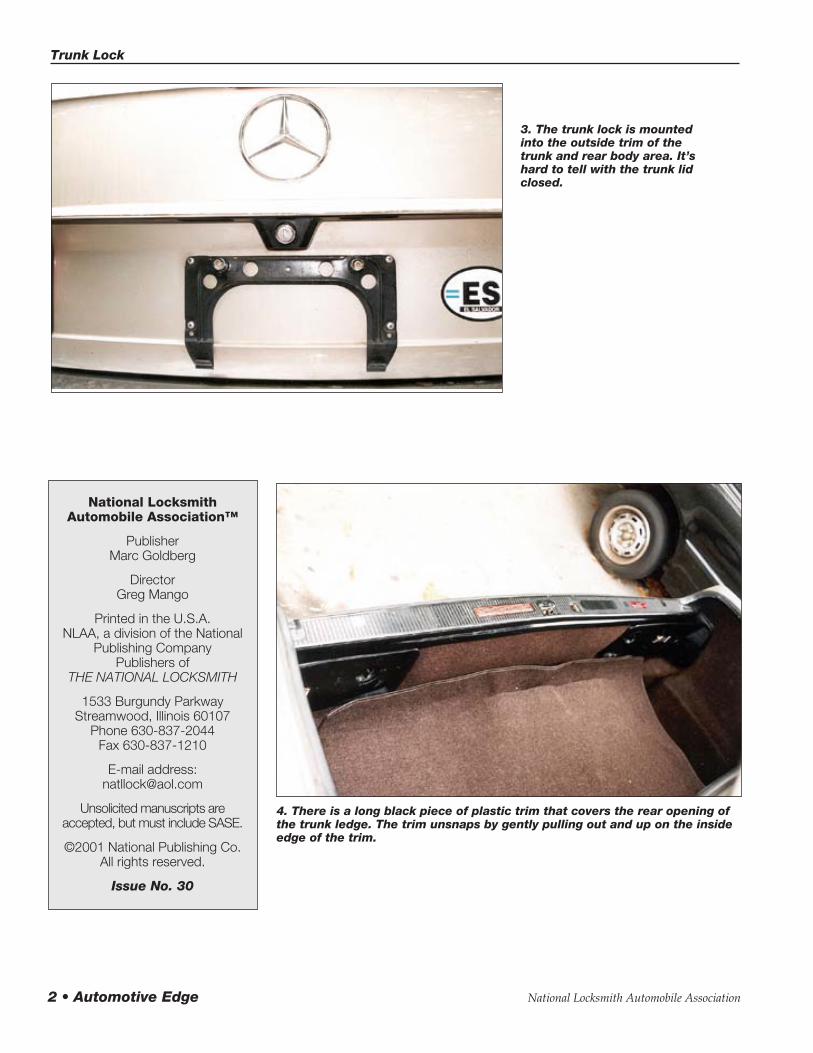
3. The trunk lock is mountedinto the outside trim of thetrunk and rear body area. It’shard to tell with the trunk lidclosed.
4. There is a long black piece of plastic trim that covers the rear opening ofthe trunk ledge. The trim unsnaps by gently pulling out and up on the insideedge of the trim.
Trunk Lock
National Locksmith Automobile Association Issue No. 30 • 3
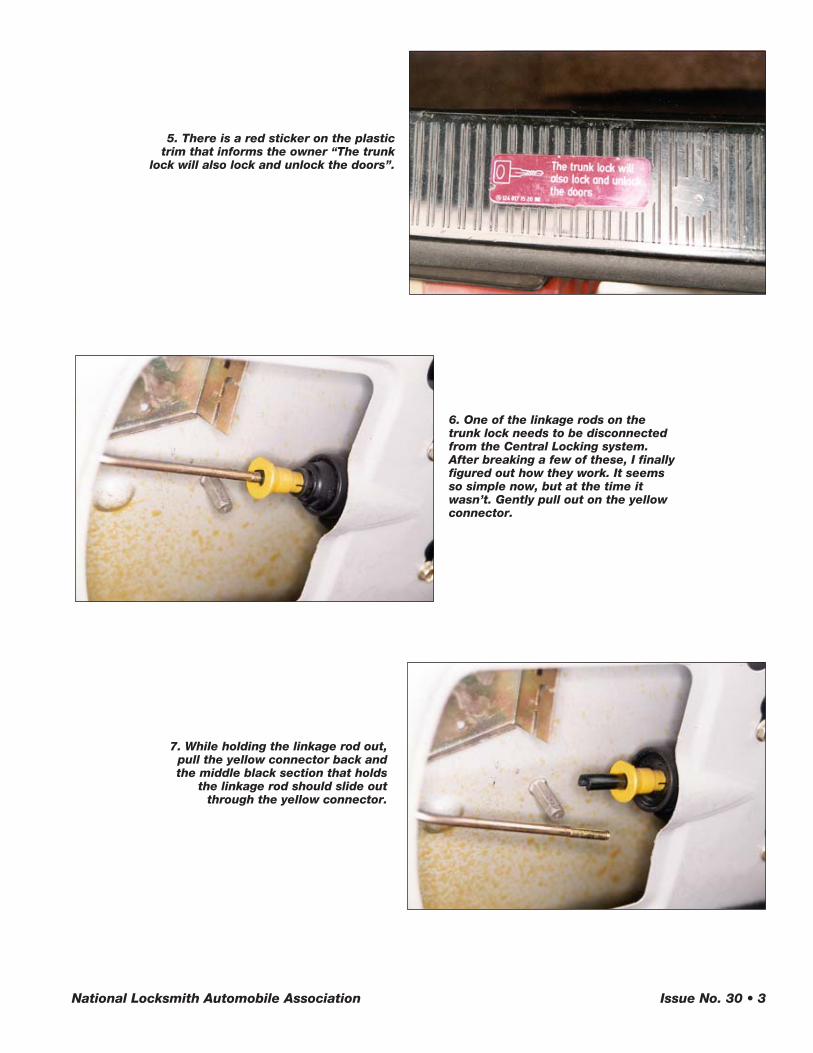
6. One of the linkage rods on thetrunk lock needs to be disconnectedfrom the Central Locking system.After breaking a few of these, I finallyfigured out how they work. It seemsso simple now, but at the time itwasn’t. Gently pull out on the yellowconnector.
7. While holding the linkage rod out,pull the yellow connector back andthe middle black section that holds
the linkage rod should slide outthrough the yellow connector.
5. There is a red sticker on the plastictrim that informs the owner “The trunk
lock will also lock and unlock the doors”.

4 • Automotive Edge National Locksmith Automobile Association
9. Now the whole trim with the lock can be removed.
8. The outside trim has six nuts that will need to be removed, two on each side and there are two inthe center.
National Locksmith Automobile Association Issue No. 30 • 5
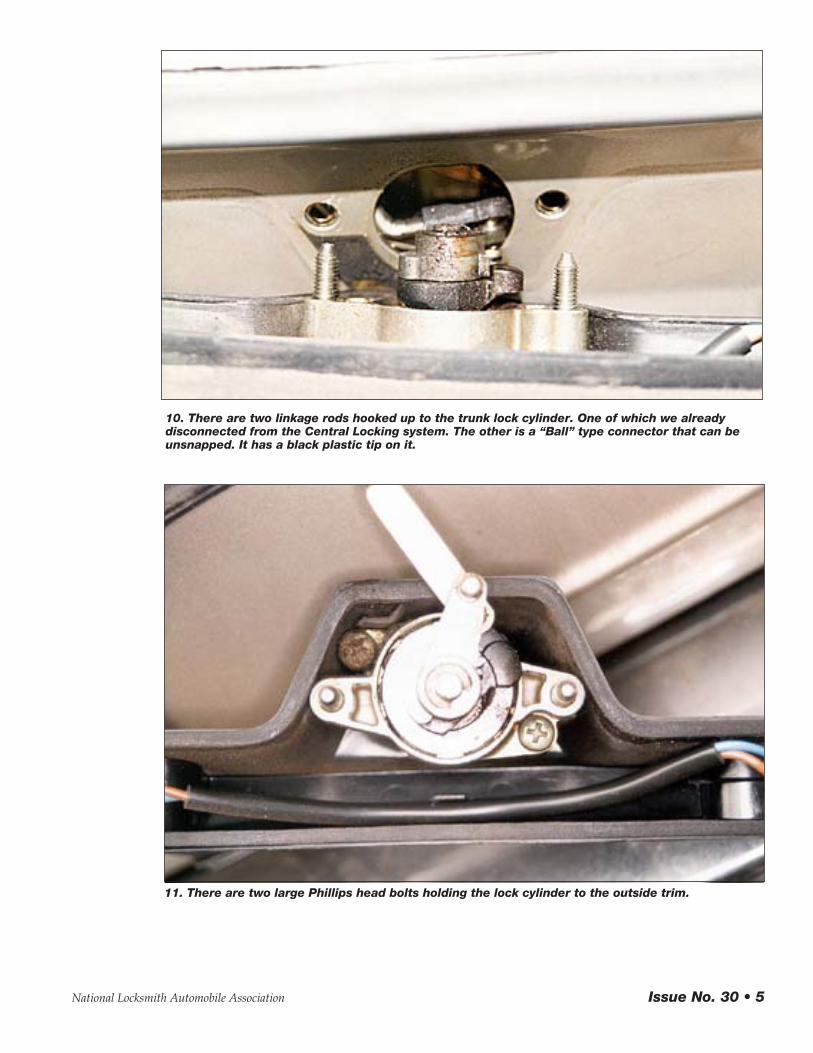
10. There are two linkage rods hooked up to the trunk lock cylinder. One of which we alreadydisconnected from the Central Locking system. The other is a “Ball” type connector that can beunsnapped. It has a black plastic tip on it.
11. There are two large Phillips head bolts holding the lock cylinder to the outside trim.
6 • Automotive Edge National Locksmith Automobile Association
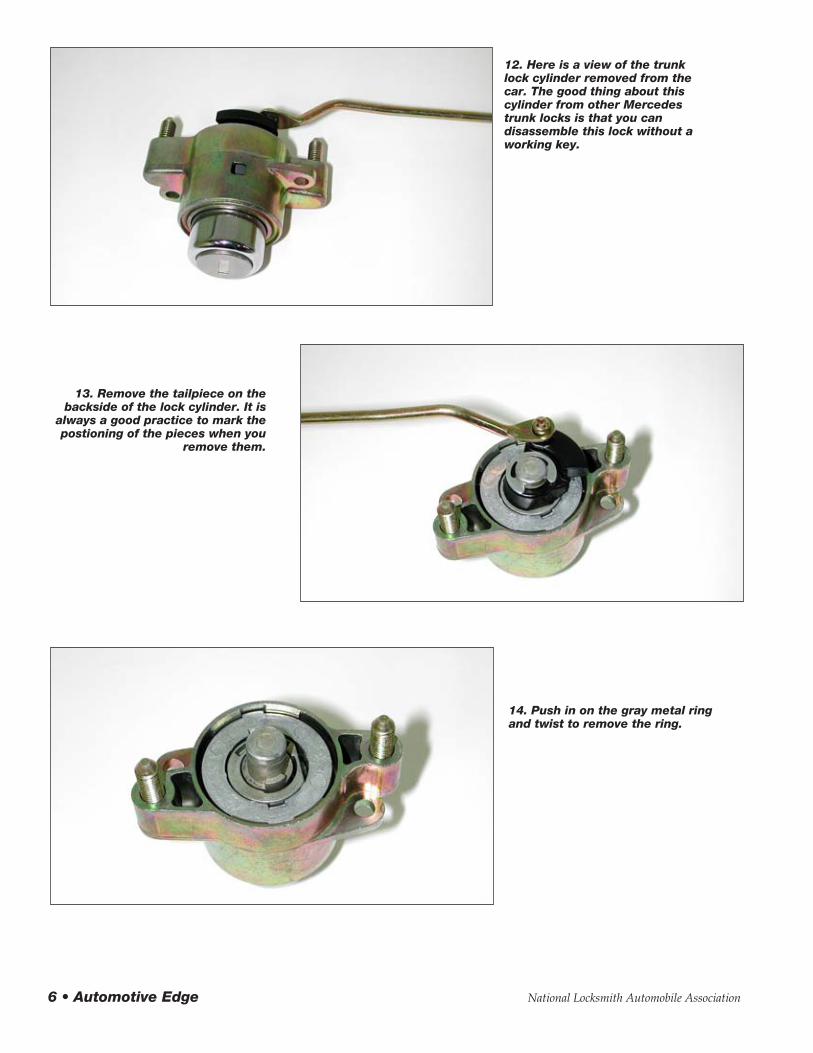
13. Remove the tailpiece on thebackside of the lock cylinder. It is
always a good practice to mark thepostioning of the pieces when you
remove them.
12. Here is a view of the trunklock cylinder removed from thecar. The good thing about thiscylinder from other Mercedestrunk locks is that you candisassemble this lock without aworking key.
14. Push in on the gray metal ringand twist to remove the ring.
National Locksmith Automobile Association Issue No. 30 • 7
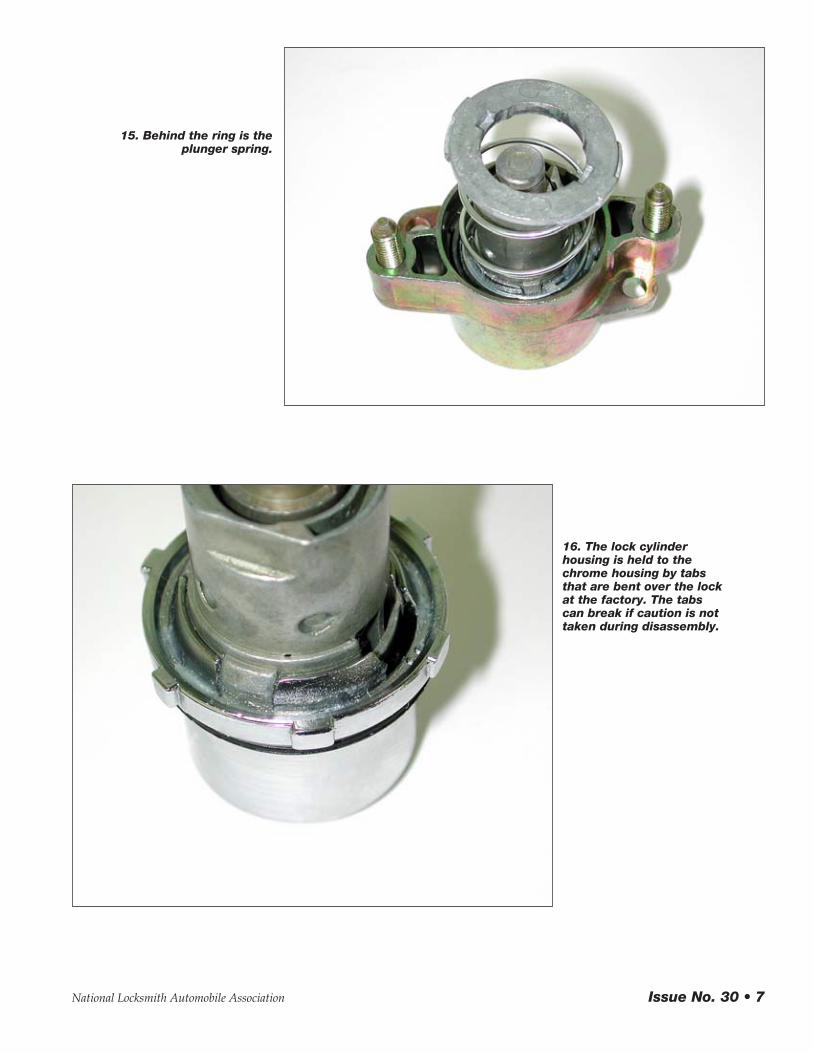
15. Behind the ring is theplunger spring.
16. The lock cylinderhousing is held to thechrome housing by tabsthat are bent over the lockat the factory. The tabscan break if caution is nottaken during disassembly.
8 • Automotive Edge National Locksmith Automobile Association
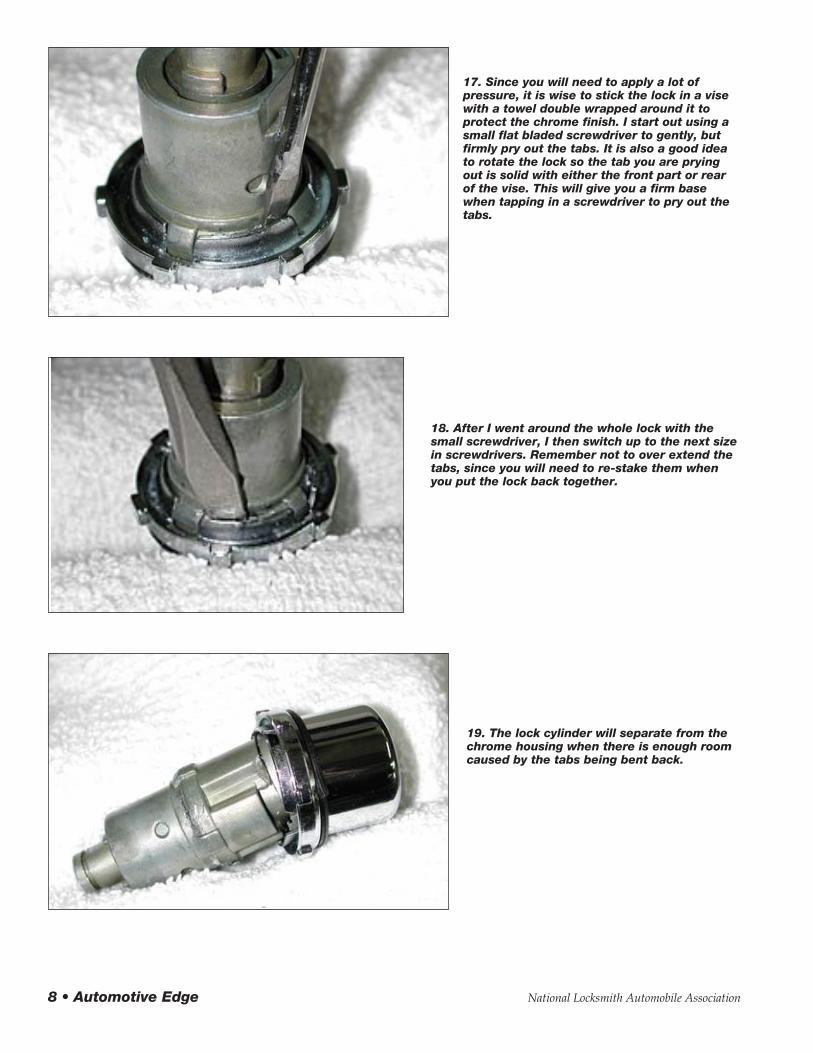
17. Since you will need to apply a lot ofpressure, it is wise to stick the lock in a visewith a towel double wrapped around it toprotect the chrome finish. I start out using asmall flat bladed screwdriver to gently, butfirmly pry out the tabs. It is also a good ideato rotate the lock so the tab you are pryingout is solid with either the front part or rearof the vise. This will give you a firm basewhen tapping in a screwdriver to pry out thetabs.
18. After I went around the whole lock with thesmall screwdriver, I then switch up to the next sizein screwdrivers. Remember not to over extend thetabs, since you will need to re-stake them whenyou put the lock back together.
19. The lock cylinder will separate from thechrome housing when there is enough roomcaused by the tabs being bent back.
2001 AutoSmart™Full Version Price: $95.00
2001 AutoSmart™Update Price: $45.00
All the new information on vehicles is here, current up to2001. Don't hesitate and lose car car jobs unnecessarily. Getyour 2001 AutoSmart™ now and you'll be in the driver'sseat for automotive locksmithing!
What's new for the 2001 book?• FREE Mid-Year updates due out in Summer '01.• Updated airbag info grid for EZ reference.• All the latest transponder information.• All new Strattec info: ignitions, door locks, trunk cylinders
and more.• All new ASP lock part info with EZ to read footnotes.• Jet key applications now integrated
throughout the keyblank charts.• Gives you every new spec and
method to make the first key.
The Autosmart™ alsocontains…• Manufacturer divider tabs for EZ reference.• The most accurate keyblank application guide
in the world.• EZ to read and use• Making the first key to almost all cars and trucks, even
high security.• Code locations, spacing and depths, tumbler charts.• Data and specs for almost every car on the road, foreign
and domestic.
OID
: 02/
01
A Must ForEvery
Locksmith!
2001AutoSmart
Is Here!
Copy or clip this coupon and send with payment to:The National Locksmith • P.O. Box 77-97592 • Chicago, IL 60678-7592
CHECK PAYMENT METHOD:Check Money Order
Charge My…VISA MasterCardDiscover American Express
Card # ____________________________________________________________Exp. Date ____________________
Signature (Required)_____________________________________________________________________________
Your Name ______________________________________________________________________________________
Shop Name ______________________________________________________________________________________
Address (No P.O. Boxes) _________________________________________________________________________
City _____________________________________________________________________________________________
State ____________________________________Zip Code_______________________________________________
Phone # ( ________________) ______________________________________________________________________
Buy it in the online store!
TheNationalLocksmith.com
Now with FREEMid-YearUpdates!
Foreign &Canada $20 s/h
Yes!Send me a new
2001AutoSmart™($95) plus $5 s/h.Order total is $100.
Yes!Send me the
2001AutoSmart™ Update($45) plus $5 s/h.Order total is $50.* Updates the 1999-2000 AutoSmart
or the 2000 AutoSmart only.
10 • Automotive Edge National Locksmith Automobile Association
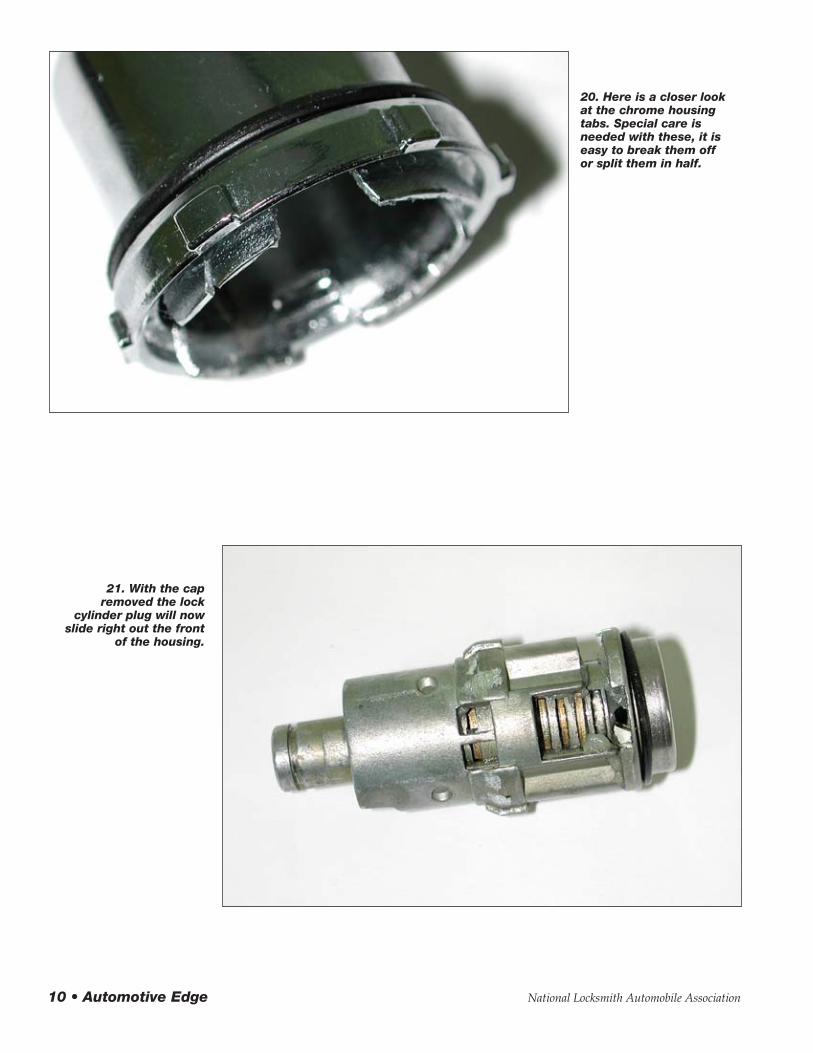
20. Here is a closer lookat the chrome housingtabs. Special care isneeded with these, it iseasy to break them offor split them in half.
21. With the capremoved the lock
cylinder plug will nowslide right out the front
of the housing.
National Locksmith Automobile Association Issue No. 30 • 11
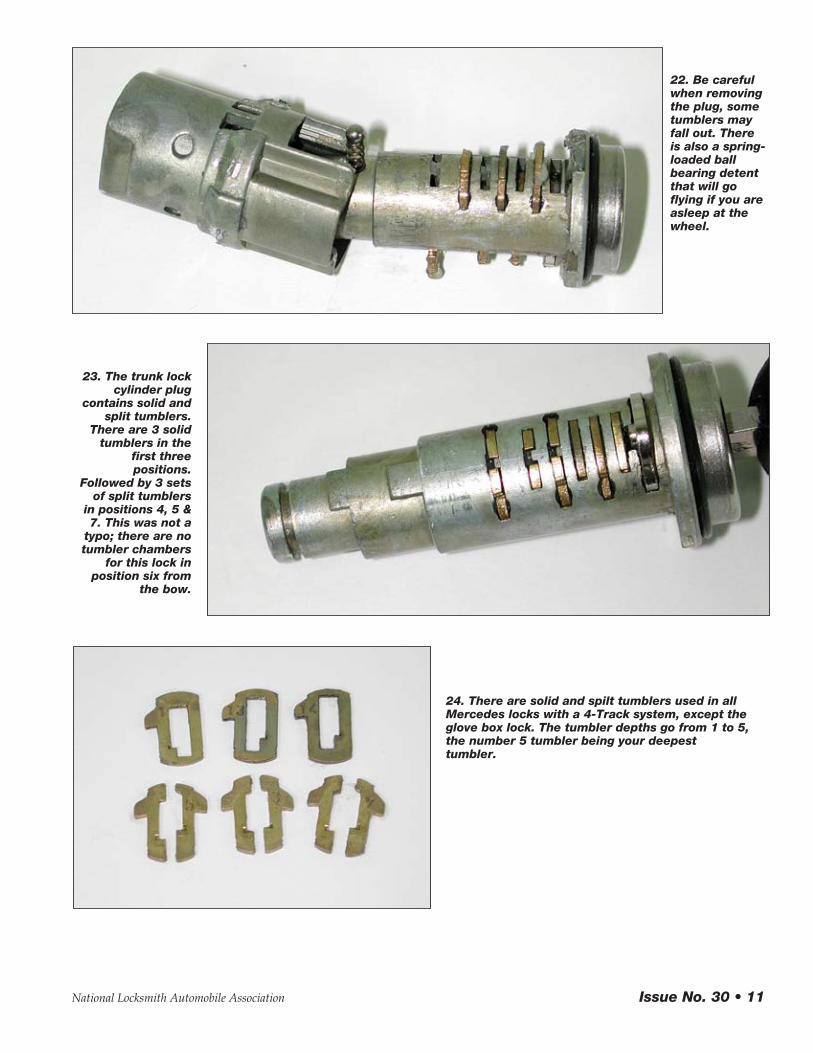
22. Be carefulwhen removingthe plug, sometumblers mayfall out. Thereis also a spring-loaded ballbearing detentthat will goflying if you areasleep at thewheel.
23. The trunk lockcylinder plug
contains solid andsplit tumblers.
There are 3 solidtumblers in the
first threepositions.
Followed by 3 setsof split tumblers
in positions 4, 5 &7. This was not a
typo; there are notumbler chambers
for this lock inposition six from
the bow.
24. There are solid and spilt tumblers used in allMercedes locks with a 4-Track system, except theglove box lock. The tumbler depths go from 1 to 5,the number 5 tumbler being your deepesttumbler.
12 • Automotive Edge National Locksmith Automobile Association
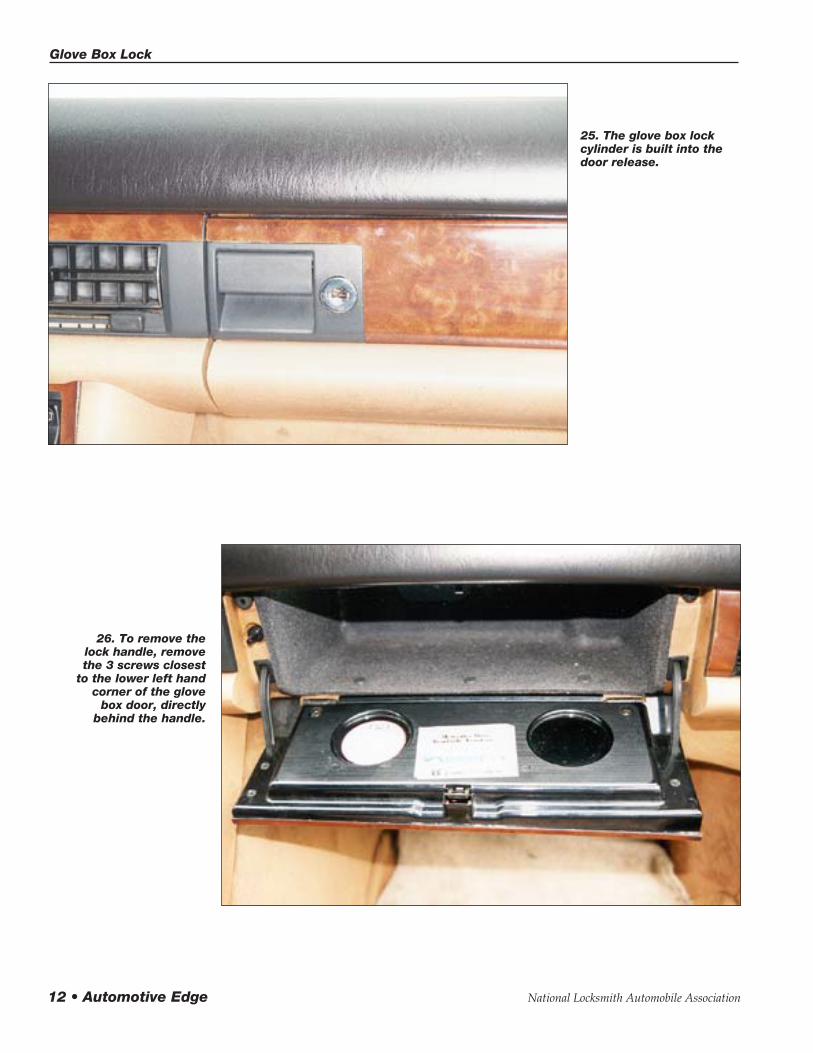
26. To remove thelock handle, removethe 3 screws closest
to the lower left handcorner of the glove
box door, directlybehind the handle.
25. The glove box lockcylinder is built into thedoor release.
Glove Box Lock
National Locksmith Automobile Association Issue No. 30 • 13
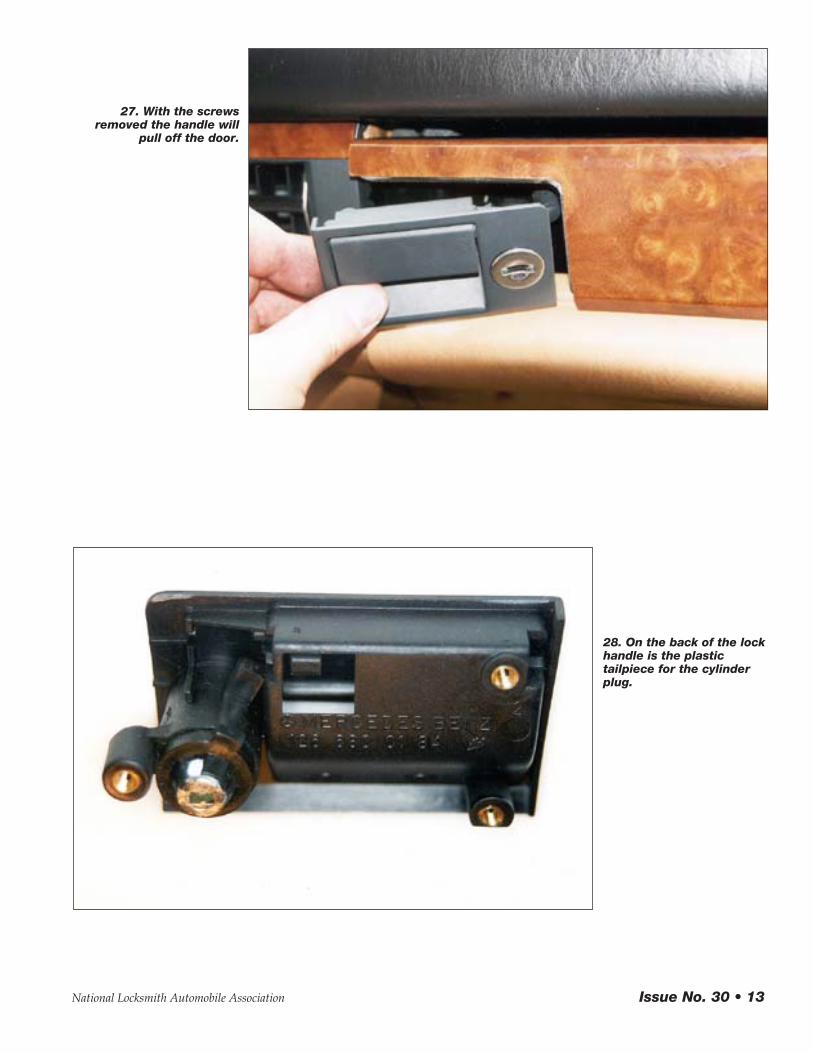
27. With the screwsremoved the handle will
pull off the door.
28. On the back of the lockhandle is the plastictailpiece for the cylinderplug.

14 • Automotive Edge National Locksmith Automobile Association
29. The plug cannot beremoved until you takethe tailpiece off, which isa little bit of work.
31. There are 4 tabs on the tailpiece. Theplug will stay in with three tabs in caseyou break one. If you break 2 tabs it willstill work, but it won’t stay on with just 1tab.
30. Use a small screwdriver and/or a lock pick to gentlypry underneath the 4 plastic tabs so you can slide the
plug out. Take your time to get up underneath the tabs,as they are very brittle.
National Locksmith Automobile Association Issue No. 30 • 15
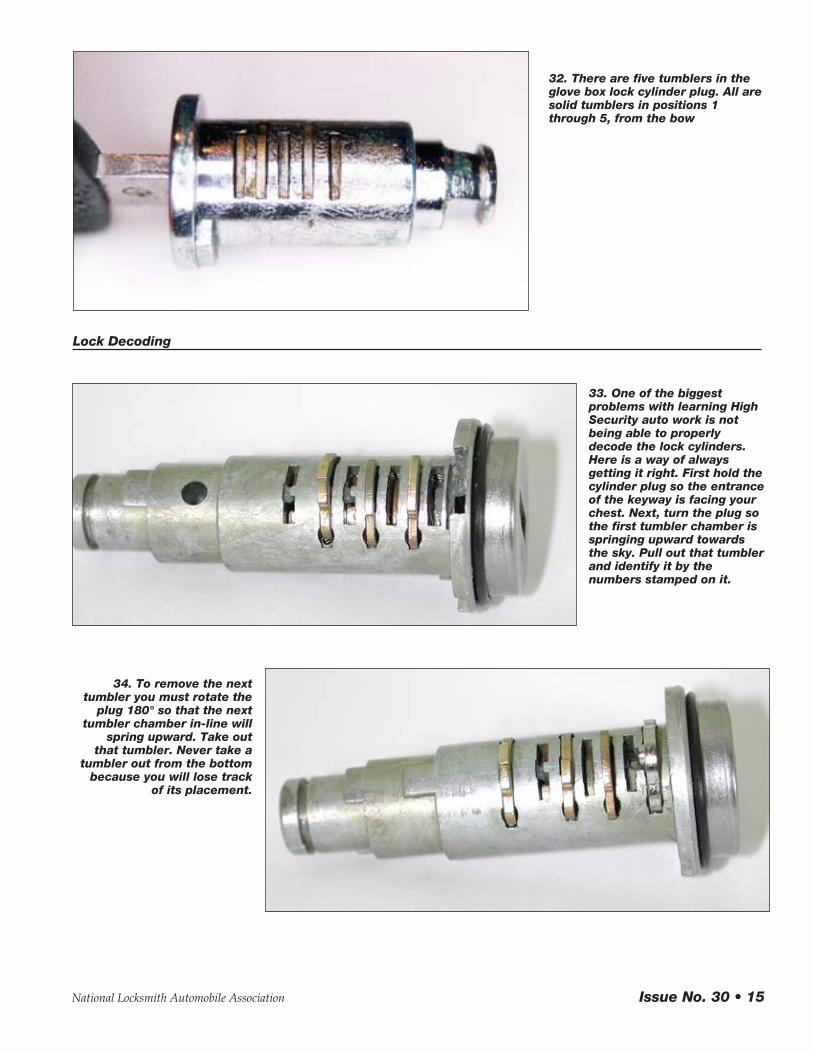
32. There are five tumblers in theglove box lock cylinder plug. All aresolid tumblers in positions 1through 5, from the bow
33. One of the biggestproblems with learning HighSecurity auto work is notbeing able to properlydecode the lock cylinders.Here is a way of alwaysgetting it right. First hold thecylinder plug so the entranceof the keyway is facing yourchest. Next, turn the plug sothe first tumbler chamber isspringing upward towardsthe sky. Pull out that tumblerand identify it by thenumbers stamped on it.
Lock Decoding
34. To remove the nexttumbler you must rotate the
plug 180° so that the nexttumbler chamber in-line will
spring upward. Take outthat tumbler. Never take a
tumbler out from the bottombecause you will lose track
of its placement.
16 • Automotive Edge National Locksmith Automobile Association
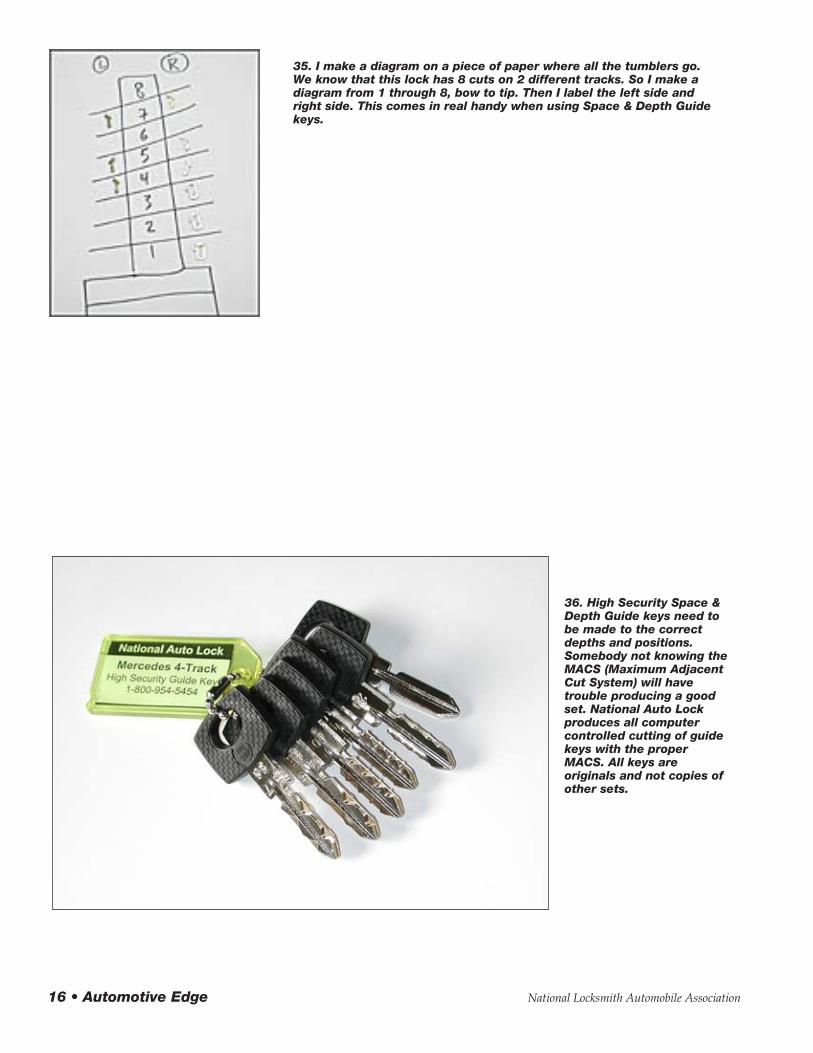
35. I make a diagram on a piece of paper where all the tumblers go.We know that this lock has 8 cuts on 2 different tracks. So I make adiagram from 1 through 8, bow to tip. Then I label the left side andright side. This comes in real handy when using Space & Depth Guidekeys.
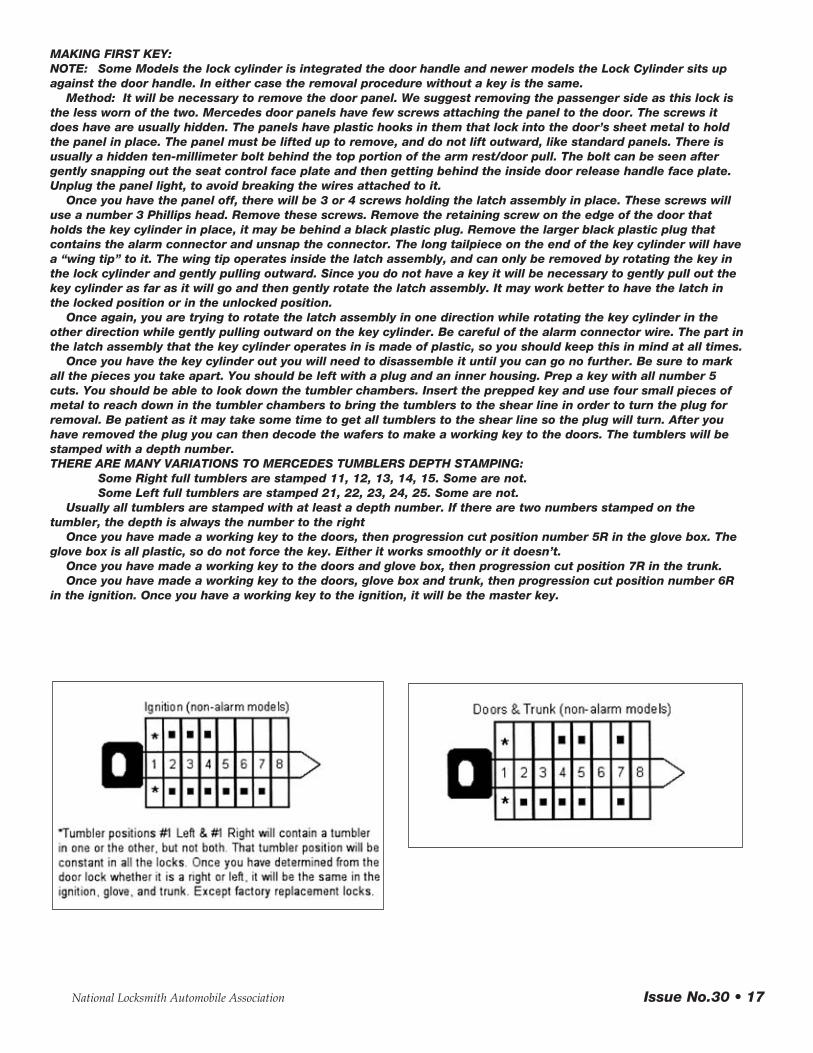
36. High Security Space &Depth Guide keys need tobe made to the correctdepths and positions.Somebody not knowing theMACS (Maximum AdjacentCut System) will havetrouble producing a goodset. National Auto Lockproduces all computercontrolled cutting of guidekeys with the properMACS. All keys areoriginals and not copies ofother sets.
National Locksmith Automobile Association Issue No.30 • 17
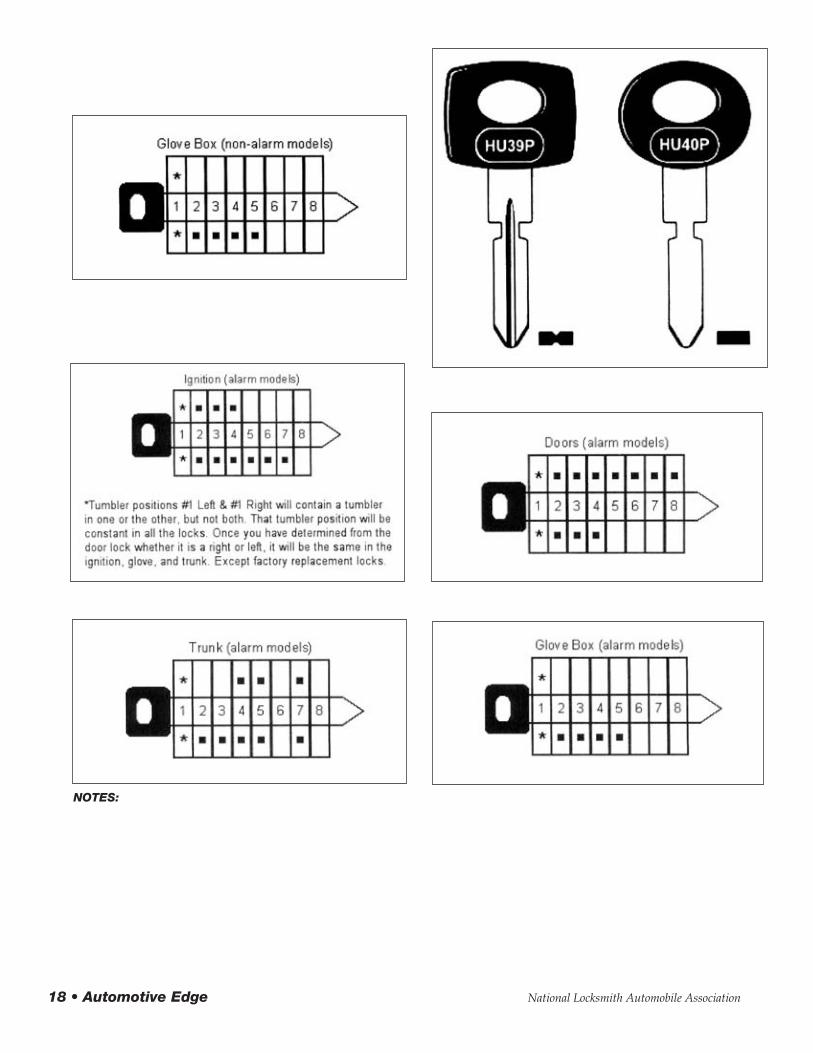
MAKING FIRST KEY:NOTE: Some Models the lock cylinder is integrated the door handle and newer models the Lock Cylinder sits upagainst the door handle. In either case the removal procedure without a key is the same.
Method: It will be necessary to remove the door panel. We suggest removing the passenger side as this lock isthe less worn of the two. Mercedes door panels have few screws attaching the panel to the door. The screws itdoes have are usually hidden. The panels have plastic hooks in them that lock into the door’s sheet metal to holdthe panel in place. The panel must be lifted up to remove, and do not lift outward, like standard panels. There isusually a hidden ten-millimeter bolt behind the top portion of the arm rest/door pull. The bolt can be seen aftergently snapping out the seat control face plate and then getting behind the inside door release handle face plate.Unplug the panel light, to avoid breaking the wires attached to it.
Once you have the panel off, there will be 3 or 4 screws holding the latch assembly in place. These screws willuse a number 3 Phillips head. Remove these screws. Remove the retaining screw on the edge of the door thatholds the key cylinder in place, it may be behind a black plastic plug. Remove the larger black plastic plug thatcontains the alarm connector and unsnap the connector. The long tailpiece on the end of the key cylinder will havea “wing tip” to it. The wing tip operates inside the latch assembly, and can only be removed by rotating the key inthe lock cylinder and gently pulling outward. Since you do not have a key it will be necessary to gently pull out thekey cylinder as far as it will go and then gently rotate the latch assembly. It may work better to have the latch inthe locked position or in the unlocked position.
Once again, you are trying to rotate the latch assembly in one direction while rotating the key cylinder in theother direction while gently pulling outward on the key cylinder. Be careful of the alarm connector wire. The part inthe latch assembly that the key cylinder operates in is made of plastic, so you should keep this in mind at all times.
Once you have the key cylinder out you will need to disassemble it until you can go no further. Be sure to markall the pieces you take apart. You should be left with a plug and an inner housing. Prep a key with all number 5cuts. You should be able to look down the tumbler chambers. Insert the prepped key and use four small pieces ofmetal to reach down in the tumbler chambers to bring the tumblers to the shear line in order to turn the plug forremoval. Be patient as it may take some time to get all tumblers to the shear line so the plug will turn. After youhave removed the plug you can then decode the wafers to make a working key to the doors. The tumblers will bestamped with a depth number. THERE ARE MANY VARIATIONS TO MERCEDES TUMBLERS DEPTH STAMPING:
Some Right full tumblers are stamped 11, 12, 13, 14, 15. Some are not.Some Left full tumblers are stamped 21, 22, 23, 24, 25. Some are not.
Usually all tumblers are stamped with at least a depth number. If there are two numbers stamped on thetumbler, the depth is always the number to the right
Once you have made a working key to the doors, then progression cut position number 5R in the glove box. Theglove box is all plastic, so do not force the key. Either it works smoothly or it doesn’t.
Once you have made a working key to the doors and glove box, then progression cut position 7R in the trunk.Once you have made a working key to the doors, glove box and trunk, then progression cut position number 6R
in the ignition. Once you have a working key to the ignition, it will be the master key.
18 • Automotive Edge National Locksmith Automobile Association
NOTES:
National Locksmith Automobile Association Issue No.30 • 19