napoleonic brigade series: series rules, version 2 · initial napoleonic concepts: david a. powell...
TRANSCRIPT
The Gamers, Inc.
Page 1
Napoleonic Brigade Series:
Series Rules, version 2.1©1999. The Gamers, Inc. All Rights Reserved.
Series Design: Dean N. EssigInitial Napoleonic Concepts: David A.PowellPlaytesting, Proofing, and HelpfulCommentary: Nigel Ashcroft, Steve Bean,James Best, John Best, Simon Breese,Daniel P. Brown, SSgt Ronald Chacon,David Combs, Dave Demko, Sara Essig,Anders Fager, Don Gilbertson, MikeHaggett, Chris Heizer, Paul Herkes, NolanHudgens, Chuck Kennedy, John Kincaid,John Lynch, Rod Miller, Don Nesbitt, CarlParadis, Peter Pariseau, Jack Polonka,Vernon Robinson, Rod Schmisseur, BoydSchorzman, Ellis Simpson, Sal Vasta
Table of Contents
IntroductionThe Napoleonic Brigade Series
games are playable tactical portrayals ofNapoleonic battles.
The series’ intent is to show howcommand operates on the Napoleonicbattlefield using the weapons systems ofthe period.
These rules occasionally rely oncommon sense and honesty. Some functionsoccur outside the enemy’s observation andrequire some trust and expect that eachplayer will apply the spirit of the rules.
We do not claim infallibility. Playersshould feel free to call or write forclarification if needed. We support ourproducts fully and will be delighted toanswer your questions.
Write:The Gamers, Inc.500 W. Fourth StreetHomer, IL 61849Phone (217) 896-2145Fax (217) 896-2880
v2.1 Rules: These rules are almost thesame as those presented with Marengo.Known errata has been corrected andchanges have been made to 15.1b, 17.0,24.1 (see step H), and 25.3c.
1.0 GameComponents1.1 The Game Map
The map depicts the area in which thebattle or campaign was fought.
1.1a The Hex Numbering System.Every hex on the game map is identified bya hex number (e.g. 29.17). The digits beforethe decimal point (29.xx) indicate thevertical hex column, reading along the mapfrom left to right. The digits after the decimalpoint (xx.17) identify the exact hex in thecolumn, reading from bottom to top. Toreduce map clutter, hex numbers are printedonly on every fifth row of hexes (xx.05,
xx.10, xx.15). To find hex 29.17, forexample, follow the xx.15 row until youfind the 29.xx column, then count up twohexes to 29.17. If the game uses more thanone map, any reference to a hex numberwill include the appropriate map letter, asin B29.17.
1.1b Map Edge Hexes. Edge hexeswith at least half of the hex showing areplayable. Tiny hex slivers are not.
1.1c Off Map Movement. Units cannotexit the game map. Destroy units forced offthe map.
1.1d Turn Record Track. This trackindicates the passage of time. The first andlast daylight turns have one number in thetime box to indicate the visibility (in hexes)for that turn. The shading on the TurnRecord Track indicates night turns.Advance the Turn Record Marker one boxduring the Turn End Phase; advance theDay Marker at the end of the midnight turn.
1.1e Entry Hexes. These hexes showwhere reinforcements arrive. If enemy unitsblock a reinforcement’s entry hex, thenthat unit is free to enter at any hex free ofenemy units at or within 10 hexes of thescheduled entry hex along any map edge.
1.1f Casualty Tracks. These use threemarkers each to record casualties (notstragglers or artillery losses). The markers(x100, x10, x1) record the current losses ineach army. Revise this track each time aninfantry or cavalry strength point is lost.
1.2 The RulesEvery Gamers’ Brand game contains
separate Series and Game rulebooks. TheSeries rulebook contains the rules generallyapplicable to all the games in the series.The Game rulebook gives the details neededfor a specific game, including any specialrules, scenarios, and set up information.
1.2a Organization. Section and Casenumbers outline the rules. Each major rulesgrouping is a section; a paragraph within arules section is a case. The number 4.2would, for example, refer to section 4, case
Page Item1 Introduction
1.0 Game Components2 2.0 Beginner’s Note3 3.0 Notes on Play
4.0 Scale5.0 General Game Concepts6.0 Units
4 7.0 General Course of Play8.0 Turn Sequence
5 9.0 Fog of War10.0 Command and Control
10 11.0 Formations12 12.0 Stacking
13.0 Facing13 14.0 Zones of Control
15.0 Op. Fire & Reaction Charges14 16.0 Movement15 17.0 Extensions
18.0 Forced March19.0 Line of Sight
16 20.0 Fire Combat17 21.0 Stragglers18 22.0 Wrecked Brigades & Div’s
23.0 Close Combat19 24.0 Cavalry20 25.0 Morale21 26.0 Leaders22 27.0 Artillery
28.0 Night23 2nd ed Designer’s Notes
Napoleonic Brigade Series v2.1
Page 2
2. A specific case can contain a number of related statements.Statements within a case are numbered as in 4.2a, 4.2b, etc.
1.2b Repetition. Once stated, a rule is repeated only if neededfor clarification.
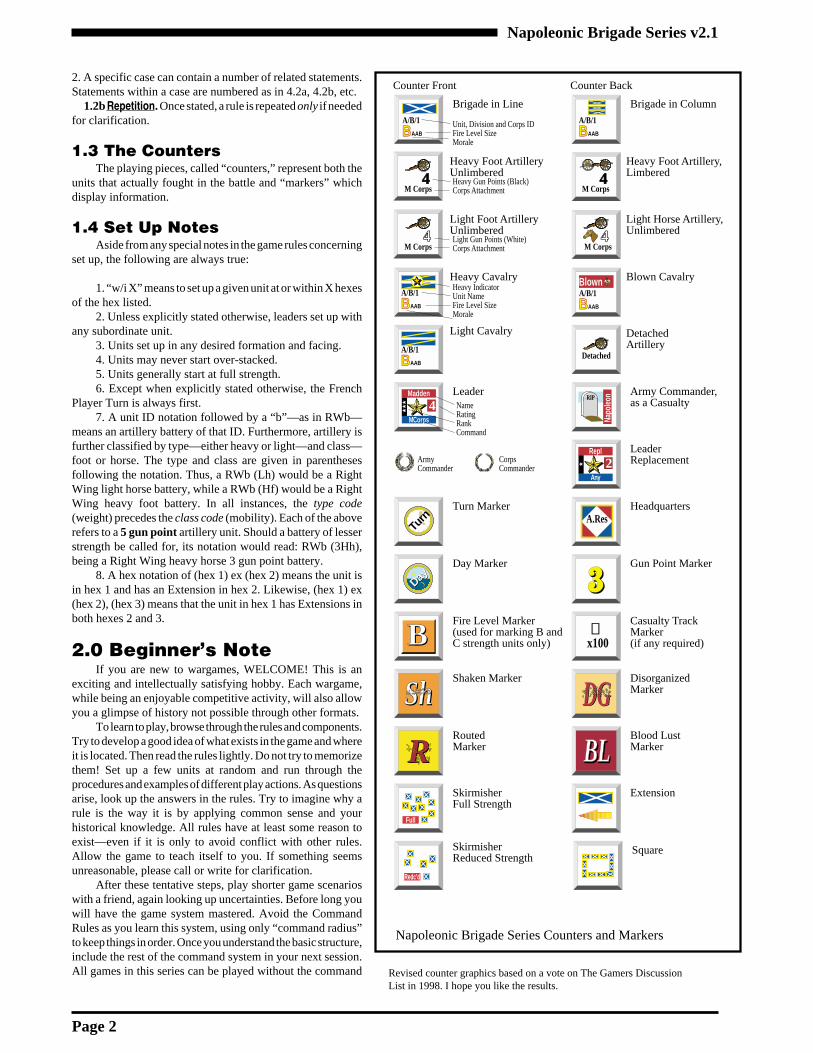
1.3 The CountersThe playing pieces, called “counters,” represent both the
units that actually fought in the battle and “markers” whichdisplay information.
1.4 Set Up NotesAside from any special notes in the game rules concerning
set up, the following are always true:
1. “w/i X” means to set up a given unit at or within X hexesof the hex listed.
2. Unless explicitly stated otherwise, leaders set up withany subordinate unit.
3. Units set up in any desired formation and facing.4. Units may never start over-stacked.5. Units generally start at full strength.6. Except when explicitly stated otherwise, the French
Player Turn is always first.7. A unit ID notation followed by a “b”—as in RWb—
means an artillery battery of that ID. Furthermore, artillery isfurther classified by type—either heavy or light—and class—foot or horse. The type and class are given in parenthesesfollowing the notation. Thus, a RWb (Lh) would be a RightWing light horse battery, while a RWb (Hf) would be a RightWing heavy foot battery. In all instances, the type code(weight) precedes the class code (mobility). Each of the aboverefers to a 5 gun point artillery unit. Should a battery of lesserstrength be called for, its notation would read: RWb (3Hh),being a Right Wing heavy horse 3 gun point battery.
8. A hex notation of (hex 1) ex (hex 2) means the unit isin hex 1 and has an Extension in hex 2. Likewise, (hex 1) ex(hex 2), (hex 3) means that the unit in hex 1 has Extensions inboth hexes 2 and 3.
2.0 Beginner’s NoteIf you are new to wargames, WELCOME! This is an
exciting and intellectually satisfying hobby. Each wargame,while being an enjoyable competitive activity, will also allowyou a glimpse of history not possible through other formats.
To learn to play, browse through the rules and components.Try to develop a good idea of what exists in the game and whereit is located. Then read the rules lightly. Do not try to memorizethem! Set up a few units at random and run through theprocedures and examples of different play actions. As questionsarise, look up the answers in the rules. Try to imagine why arule is the way it is by applying common sense and yourhistorical knowledge. All rules have at least some reason toexist—even if it is only to avoid conflict with other rules.Allow the game to teach itself to you. If something seemsunreasonable, please call or write for clarification.
After these tentative steps, play shorter game scenarioswith a friend, again looking up uncertainties. Before long youwill have the game system mastered. Avoid the CommandRules as you learn this system, using only “command radius”to keep things in order. Once you understand the basic structure,include the rest of the command system in your next session.All games in this series can be played without the command
Brigade in Line Brigade in Column
Heavy Foot ArtilleryUnlimbered
Heavy Foot Artillery,Limbered
Leader Army Commander,as a Casualty
LeaderReplacement
Turn Marker Headquarters
Day Marker Gun Point Marker
Fire Level Marker(used for marking B andC strength units only)
Casualty TrackMarker(if any required)
Shaken Marker DisorganizedMarker
RoutedMarker
Blood LustMarker
SkirmisherFull Strength
Napoleonic Brigade Series Counters and Markers
Unit, Division and Corps IDFire Level SizeMorale
Turn
Turn
DayDay
Counter Front Counter Back
NameRatingRankCommand
Heavy Gun Points (Black)Corps Attachment
x100✝
Extension
Heavy Cavalry Blown Cavalry
Light Foot ArtilleryUnlimbered
Light Horse Artillery,Unlimbered
Light Gun Points (White)Corps Attachment
Heavy IndicatorUnit NameFire Level SizeMorale
Light Cavalry
ArmyCommander
CorpsCommander
BB
ShSh
BLBL
33
A.Res
DetachedArtillery
RIPMay1864
RIP
Nap
oleon
2★
Repl
Any
RR
DGDG
A/B/1
BAAB
M Corps4
M Corps4
A/B/1
BAAB
M Corps4
M Corps4
A/B/1
BAAB
A/B/1
BAAB
A/B/1
BAAB
Detached
4★★★
Madden
MCorps
SquareSkirmisherReduced Strength
Full
Redc’d
Blown
Revised counter graphics based on a vote on The Gamers DiscussionList in 1998. I hope you like the results.
The Gamers, Inc.
Page 3
rules, so, if you do not find them to yourtaste, feel free to play without them.However, by imposing significantconstraints on a player’s freedom of actionwith his forces, they do add a degree ofrealism.
By the time you have mastered thisgame, you will be able to play any game inthis series with little or no additional ruleslearning. Good Luck and Good Fighting!
3.0 Notes on Play3.1 Use of Loss Charts
I recommend the encasing of LossCharts in clear plastic report covers. Writeon them with overhead projection markers.
3.2 Playing SolitaireThe Command System lends itself
readily to solitaire play. In fact, its usegenerates a more interesting and enjoyablesolitaire game. The following section givesa few guidelines for playing this systemsolitaire.
Players who are reluctant to try thecommand rules in a solitaire situation canplay the game completely without them.But, these players will not know what funthey are missing!
3.2a Gaming by Remote Control.Playing this system solitaire has the feelingof setting the armies into action by remotecontrol and then letting the game play outfor you—in other words, you set them intomotion and enjoy the show. Since the playerhas little idea of when orders will takeeffect, for how long, or in what futurecontext they will be set against, theinteraction between the orders issued in thegame will be impossible to predict and canlead to numerous interesting situations—such as when your attack is almost ready totake an objective and it fails its CorpsAttack Stoppage check.
3.2b Commanding Both Sides and theOrders You Send. Send the orders to eachside separately and do the best you can witheach. There is no requirement to try toforget what you did with the other side—the goal of the command system isn’t limitedintelligence; it is limited flexibility. Theonly thing you should do (for each order) isto ask yourself one question: “Did I writethis order because of, or to take advantageof, an order I wrote for the other side?” Ifthe answer is yes, do not send the order. Ifthe answer is no, send it. An example of thisis: During side A’s turn, the player orders amajor flank movement. The incorrect actionwould be, during side B’s turn, to issueorders to counteract that flank move.
It is much more fun to use only the
knowledge you would expect your forcesto have at any given time and issue ordersaccordingly. Once you master this skill,solitaire game play can be much likewatching a movie or book plot unfold beforeyou—except that you direct the action.
3.2c Order Interpretation. As a solitaireplayer, you have a big advantage overplayers who must suffer a live opponent(who has the gall to want to win!)—youknow exactly what you intended to do witheach order you wrote and know for surethat both sides are playing that way. Alwaysfollow your orders exactly the way theywere intended.
3.2d Comments on the Workload andNumber of Orders per Turn. Some playersreact to every change on the battlefield byissuing new orders (which indicates aninability to make comprehensive plans or adesire to retain the god-like ability givenplayers in other games). These players endup with a huge mess of conflicting ordersand writer’s cramp. There are also thosewho seem to think they need to record thefunctions of every unit in the game. Bothgroups are quite wrong. In most cases, oneorder, per side, per turn, should be morethan enough. In fact, one-every-other-turnmight be more like it. Your plans should bedesigned to last more than a few turns andto withstand a degree of situational change.In other words, make plans that areoperational in level, not in the realm ofminor tactics!
3.2e Minor Decisions. The handling ofthings like rally, fire combat, stragglerrecovery and the actions of units withintheir orders and command radii should bedone in a manner that is “equivalentlyeffective.” This means that you should playeach side without bias and according to thebest tactics you know. Do not endeavor to‘set up mistakes’ to take advantage of, orplay a side with less than effective play. Atthe lower levels, play occurs in the samemanner as in most board wargames whenplaying solitaire—let the command systemset up the ‘odd’ circumstances; handle unitsin a straight-forward manner.
4.0 ScaleEach hex equals 200 yards. Each day-
time turn represents 30 minutes, each nightturn one hour. The vertical scale betweencontours is 30 feet.
Infantry and cavalry units are brigadesor regiments. Regiments will be used asmuch as possible to give infantry units ofaround 2,000 men each. Artillery units areusually 16 gun battalions. A strength pointof infantry is 150 men. A cavalry point is
100 men. A gun point of artillery is roughly3 cannons.
This game system makes somesimplifications in terms of artillery.Cannons are differentiated by only twofactors, size and speed. The “battalion”represents the maximum number of cannonwhich can deploy and fire from one hex—even if during the battle portrayed suchartillery organizations did not exist.
Note: Throughout these rules, the terms“Brigade” and “Regiment” can be usedinterchangeably. The design uses bothregimental and brigade sized unitsdepending on the raw numbers of menavailable in each battle simulated.
5.0 General GameConcepts5.1 The Word “Unit”
For simplicity, the word “unit” in theserules refers to any leader, infantry, cavalry,or artillery combat unit, includingExtensions and detached batteries. A “unit”represents anything which is real on thebattlefield—as opposed to gameinformational markers which are not.
5.2 Retreat RuleAny time a combat result calls for a
retreat, the owning player must executethe retreat in a relatively straight line in alocally “to the rear” direction. Doublingback and other “game tricks” are notallowed.
5.3 11..66 Dice RollsThese rules use “sequential” dice rolls
frequently. These require two differentlycolored dice. Roll them and read the resultas follows: The red die is the first digit, thewhite one the second (a red six and a whitefour would be 64).
6.0 Units6.1 Troop Units
These units are combatformations of infantry, cavalry,and artillery. They have afacing and one or moreformations available. They are
subject to the stacking and morale rules.
6.2 LeadersThese units represent individualleaders (named on the counter)and a small staff escort. Leadersfulfill important command andmorale functions. They have no
Cnslr GdAB
Gd
A/B/1
BAAB
4
1 C
onsu
lNapoleon
A.Res
Napoleonic Brigade Series v2.1
Page 4
facing or formation and do not count forstacking in any way. They do not add to firecombat in any way, but might becomecasualties if their hex receives certain fireresults.
6.3 MarkersNote that markers do not have facing,
formation, or stacking restriction. Markersonly indicate specific unit conditions anddo not suffer fire combat or morale resultsthemselves.
6.4 Extension andDetached ArtilleryMarkers
These represent the expansion of troopunits to take up more ground space. Theysuffer fire combat and morale results in thesame way as their parent units.
Detached artillery markers allowplayers to divide their artillery units up intosmaller gun units for specialized tasks.
6.5 Fire LevelsInfantry and cavalry units measure
strength in fire levels. Use fire level markersto mark fire levels under the unit counteronly when the unit is below an A firelevel—any unit without a fire level markeris assumed to be at least an A fire level. Thefire level markers, marked B and C, servea function similar to numeric step markersused in other games.
Artillery units use the different “gunpoint” system described later.
6.5a Fire levels range in order (fromsmallest to largest) C, B, A, AB, AA, AAB,and AAA. A unit’s starting full strengthappears on its counter. In some games,specific scenarios may call for units to startwith reduced strengths. In those cases, findthe unit’s starting strength on the loss chartsafter marking off its casualties.
6.5b When deploying into Extensions,remember that one A=2Bs, one B=2Cs andone A=4Cs. Therefore, an AB that extendsline into two different hexes would have aB in each of the three occupied hexes.
6.5c The lack of a marker representsthe A or larger fire level. Since this is themaximum fire level which can effectivelyfire out of a hex, that is all the informationneeded for most play purposes. Check theloss charts to get exact strengths when FireLevels are a concern (such as for stacking,and Close Combat Odds calculation, etc.).
6.6 Loss Charts andFire Level Markers
Each player uses his Loss Charts tokeep track of losses. To the left of each set
of squares is the unit’s current fire level.Keep the markers (if any) under the unitcurrent as the Loss Chart requires changes.To indicate the Fire Levels applied toExtensions, place the appropriate B or CMarker under the Extension marker, unlessthe parent is capable of supporting A-sized(or larger) extensions (in which case, nomarker is needed).
6.7 Morale MarkersThese represent a stack’s current
morale state (not to be confused with theunit’s permanent morale, as printed on thecounter). Place the Morale Marker atop allthe units in a hex. All of the stack’s unitshave that marker’s morale state. A hex canhave only one morale marker.
6.8 Gun Point MarkersThese are numeric markers that
represent the number of gun points inartillery units. Place these markers underthe appropriate unit.
7.0 General Courseof Play
A “game turn” is a sequence of stepsoutlined in “the sequence of play” (See8.1). Each step can involve one player orthe other according to the terminology“phasing” and “non-phasing.” The“phasing” player is the one whose playerturn it is; the “non-phasing” player is theother. Each player has his own distinctportion of a turn, and the roles of phasingand non-phasing player switch accordingto the present player turn. At the sequenceof play’s end, advance the turn marker. Allactions must take place according to thesequence of play.
In the roughest sense, play proceedsas follows: The first (phasing) player—generally the French—conducts hisCommand Phase. There he issues any neworders, checks orders for acceptance, andmakes any initiative attempts. Next, thephasing player moves his units and canengage in “Close Combat” (infantrycharges) or Cavalry Charges. After theMovement Phase ends, the Fire Phaseoccurs. This is divided into a Non-PhasingPlayer Fire Segment and a Phasing PlayerFire Segment. First the non-phasing playerconducts his fire combats; then the phasingplayer does the same. Upon the completionof the fire combats for both players, thephasing player checks his units for rallyand cavalry recovery. The second playerthen becomes the phasing player and repeatsthe above. At the end of this process, theturn ends and another begins.
8.0 Turn Sequence8.1 Outline Sequence ofPlayFirst Player TurnCommand Phase
Order IssueCorps Attack Stoppage ChecksInitiative Order DeterminationDelay ReductionNew Order Acceptance
Movement Phase
Fire Phase
Cavalry Withdrawal Segment(Non-phasing player only)
Non-Phasing Player Fire Combat
Phasing Player Fire Combat
Rally PhaseStraggler RecoveryRallyCavalry Recovery
Second Player TurnThe Second Player Repeats the above for
his units.
Game Turn End PhaseGame Turn Marker Advance
8.2 Narrative Sequenceof Play
First Player TurnCommand Phase
❑ Order IssueThe phasing player generates orders, paying foreach with his available Command Points. Hethen logs these orders on the Order Log Sheetand notes their arrival times. See 10.1.
❑ Corps Attack Stoppage ChecksAny of the phasing player’s corps that receivedsmall arms fire or artillery fire from a range oftwo hexes or less or were charged by cavalry inthe previous turn, while carrying out an attackorder, must check to see if the attack continues.See 10.3.
❑ Initiative Order Determination, ifdesired.The phasing player can roll for any of his leadersto obtain initiative. Leaders who successfullyobtain initiative accept orders as desired. See10.2.
❑ Delay ReductionCheck any orders in delay status to see if theirdelay ends. See 10.1f.
The Gamers, Inc.
Page 5
❑ New Order AcceptanceRoll to see if orders delivered this turn areaccepted, delayed or distorted.
Movement Phase❑ Movement
The phasing player checks his units for correctcommand radius. Phasing units can now moveand conduct Close Combats based on theirmovement abilities, formations, and orderrestrictions. Skirmishers can be released andreattached. Cavalry Charges are resolved. See11.0, 16.0, 23.0, and 24.0.
Fire Phase See 20.0. ❑ Cavalry Withdrawal Segment (Non-
phasing player only)Non-phasing, non-Blown, cavalry adjacent toenemy units can withdraw. Withdraw thecavalry 6 hexes. The cavalry is not Blownbecause it performs this action. To do this, theCavalry must be adjacent to enemy units.
Design Note: The purpose of this phase is sothat cavalry can retreat away from enemyinfantry formations prior to being destroyedby fire.
❑ Non-Phasing Player Fire Combat(Defensive Fire Phase)The non-phasing player can fire all of hiseligible units.
❑ Phasing Player Fire Combat(Offensive Fire Phase)The phasing player repeats the above for hisunits.
Rally Phase❑ Straggler Recovery
Units can attempt to recover stragglers as per21.2. Erase recovered stragglers from the LossChart.
❑ RallyThe phasing player converts all Shaken (Sh)units to normal, Disorganized (DG) units toShaken, and checks to see if Routed (R) unitsrecover to DG or if Blood Lusted (BL) unitsrevert to normal. The player can choose to notrally routed units if he desires. See 25.5.
❑ Cavalry Recovery SegmentThe Phasing player can attempt to recovercavalry which has become “blown.” “Blown”Cavalry has charged in an earlier phase andmust take time to recover both its formationsand horses. See 24.2c.
Second Player TurnThe Second Player repeats the above for hisunits.
Game Turn End Phase❑ Game Turn Marker Advance
8.3 Close CombatSubsequence
A) Attacker enters the enemy occupiedhex at the cost of movement into the hexplus an additional 2 MP cost.
B) Defender Fires, apply losses andstragglers to the attacking units.
C) Attacker Fires, apply losses andstragglers to the defending units.
D) Attacker Checks Morale, if requiredto retreat combat ends.
E) Defender checks morale, if requiredto retreat combat ends.
F) Use the Odds Table if the abovedoes not end the combat. The loser fromthis table must retreat one hex.
8.4 Cavalry ChargeSubsequence
A) Attacker announces charging stackand target hex.
B) Square formation attempts.C) Recall Attempt (if desired)D) Move the charging cavalry toward
and into the combat hex (execute a ReactionCharge if it triggers one along the way)
E) First the defender rolls for firecombat or cavalry attack. Apply losses.Then the Attacker does the same againstthe defender.
F) The Defending hex checks morale,if forced to retreat, execute the retreat andthe charge continues with step H .Otherwise, go to step G.
G) The Attacking stack checks morale,if forced to retreat, the charge ends. Go tostep I .
H) Follow-on Attack, if any. (See24.1, step H)
I) Cavalry units involved in a CavalryCharge (as attacker (in any case) or defender(if a DG or worse morale result occurs))must become blown and withdraw 6 to 12hexes (owning player’s choice of distance).
8.5 Square CheckSubsequence
The hex’s top infantry unit makes amorale check applying all appropriatemorale modifiers. If the unit passes thecheck (i.e. the result is normal or BloodLust), all the eligible units in the hex entersquare formation. If the check fails, executethe Morale Table result. If the Morale Tableresult is Blood Lust, the stack forms squareand is also Blood Lusted.
9.0 Fog of WarTo increase the simulation’s reality,
keep the following secret:
a. Casualties, stragglers and wreckedconditions.
b. Orders, order delivery, or plans.
Players can examine enemy stacks. OR,
Optional: Players can only examine enemystacks at or within 12 hexes of a friendly leaderand within that leader’s LOS.
10.0 Command andControl
These rules strive to be realistic but notoverpowering. They embody simple conceptsand make the game play in a way that simulatesreality. Players can play these games withoutthe command rules (Exception: always useCommand Radius, see 10.5a).
10.0a HQ Units and Leader Positioning.Corps HQ units are corps’ administrative hubs.More specific HQ rules follow, but a few pointsmust be given first. Divisional leaders must bestacked with a unit of their division at the end ofevery friendly Movement Phase. Corps leadershave no such requirement. To implement anewly accepted order (even those frominitiative), the corps leader must at leastmomentarily enter his corps HQ’s hex. Theinstant the leader “touches base,” implementthe order—in other words a leader with a neworder could “touch base” as the first thing inmovement and this would allow the corps tofunction on its new orders in that turn. Note:Upon accepting an order, the leader must makehis way to his HQ to implement it. Armycommanders send orders from themselves tothe Corps HQ unit , not to the leader, exceptwhen the sender and receiver are in the samehex. The receiver can accept such “In-PersonVerbal” orders (using the Acceptance Table)right away, but that leader’s units cannot beginacting on the order until the leader enters the hexof his own HQ. The army commander is, ofcourse, completely free to do what he wants (heis in charge, after all!). The army HQ has no realfunction other than to mark its location.
Example: Council of WarTo illustrate the above rule, let’s say that theplayer moves all of his corps commanders to thehex containing the army commander. This actiondoes not require any orders. Once hissubordinates are there (i.e. in the player’s nextCommand Phase), the army commander beginsbelting out orders as fast as his CommandPoints allow. These orders are all “in-person,verbal” in nature and subject to the best chanceat acceptance (given the order type). The ordersare delivered at the instant they are written. Inthe subsequent New Order Acceptance Phase,the corps commanders attempt to accept theirorders. For the sake of argument, assume all of

Napoleonic Brigade Series v2.1
Page 6
them but one do so. The commanders whohave accepted their orders then ride backto their commands. Even though the ordershave been accepted, each corps will notfunction until the corps commander entershis HQ’s hex. Note that he need not staylonger than move through the HQ’s hex.
What about the guy who got a delay?As he rides back to his corps HQ, assumingit takes a turn or more to make the trip, hecan attempt to reduce the delay. Even if hereduces it while en route, the orders still donot take effect until he enters the HQ’s hex.
10.0b Command Methods. In general,the command system works as follows:The army commander uses his CommandPoints to generate orders. The player writesthese on scratch paper and records them onthe Order Log. The orders take time toarrive at the receiving corps HQ. Uponarrival, the player checks for theiracceptance. The orders could be delayed,distorted, or accepted. Once accepted theymust be acted on in good faith, even if gameconditions change. At the corps anddivisional levels, leaders can cancel or self-issue orders using Initiative. Over-use ofinitiative invites the “loose cannon” rulewhich could cause a disaster, so useinitiative sparingly, and never as a substitutefor the regular order system.
10.0c HQ Units. HQ units sharecharacteristics of markers and combat units.They have the same movementcharacteristics as leaders, do not count forstacking, have no combat ability (they arenot capable of being fired upon or in takingstep losses), and remain unaffected bymorale results (HQs in a stack which retreatscan do so with it at the owning player’sdiscretion). They never check morale ontheir own. HQs which are overrun (haveenemy units enter their hex) are notdestroyed, but displace to the nearestfriendly stack. In the following turn, thedisplaced HQ’s entire command mustexecute an Emergency Corps Retreat anddo a Straggler Check. (Emergency CorpsRetreat does not apply to Army HQ units.)HQ movement is dependent on their corps’orders. HQs cannot move without orders tomove. If a corps has orders, the HQ canmove freely within them—orders coveringthe HQ itself are not necessary. Army HQsare not constrained by orders.
10.1 OrdersOrders are the command system’s
heart. Players prepare orders as instructionsto the corps as to what they are to do. Anorder is not a hex by hex movement record.Its wording is the same as that of historicalorders.
The general sequence of events is asfollows: The player has a number ofCommand Points available based upon hisArmy Commander’s Leader Rating. Theplayer uses these points to pay for orders heproduces. Orders cost points depending ontheir structure and delivery method. Writethe order on scratch paper (the order sheet)and record it on the order log (a sheet oflined notebook paper). The player calculatesthe arrival turn, according to the distancefrom the army commander to the receivingcorps HQ, and records it on the order log.On the arrival turn, he checks the order foracceptance. Once accepted, the order isimplemented the instant the corpscommander re-enters his HQ’s hex. Leaderswithout HQs (such as divisional leaders)implement orders instantly uponacceptance.
10.1a Order Structure—Type andMethod. Each order must be classified aseither Attack or Non-Attack. An Attackorder is one requiring movement to, into, oraround areas of enemy control or tacitcontrol (e.g. a gap) EVEN IF it will NOTrequire combat. An Attack order allowsoffensive combat. A Non-Attack order isone that does not fit the conditions of anAttack order and does not allow foroffensive combat. Be sure to remember10.1h: Actions which do not require orders.Method refers to the order’s physicalstructure, i.e. either written or oral and to bedelivered either by an aide or in person. Allgame orders are written on paper, but theplayer can choose to issue “oral” orders soas to expend fewer Command Points.Players can assemble their orders as desired,as long as they assign each of the above
elements. In person orders are always oral.Aides can deliver oral or written orders. Inaddition to affecting the order’s cost, thesefactors also influence the speed ofacceptance.
10.1b Order Costs. Players writeorders using Command Points. Each armycommander possess a certain number ofCommand Points based on his leader ratingwhich are given on the Command PointTable. Order costs appear on the OrderCosts Chart. Determine an order’s cost bythe point total of its selections from the twocategories (Method and Type). Eachcategory must have only one selection. Thefull allocation of Command Points isavailable each turn. Command Pointscannot be saved from turn to turn and arewasted if unused. Order costs must bepayable with the player’s remainingCommand Points. A player can write anynumber of orders in a turn provided he hassufficient Command Points available.
10.1c Order Format and Writing. Writeyour orders in any manner with which youare comfortable and understand. The order’swritten content can be as detailed, or asbrief, as desired provided the player caninterpret his own orders. On the order log,all orders must have an order number (theirline on the order log) and information givingthe sender, receiver, order type and timesent. Attack orders also require a start timeor signal, a general movement direction orpath, and a reasonable limit to the operation.The player can skip writing the start time orsignal for such orders—if no such specificdetail exists in the order, the order mustbegin immediately upon acceptance andimplementation. “Open-ended orders”(Attack west!) are not allowed: they are toovague.
Example: Order WritingThe following are acceptable orders. Each was written with the minimum required detail:
“Take your corps and move down the Battery Road to the Walled Farm. Then set up adefensive line facing north.” (Non-Attack)
“Move via the Chateau on the Green Road to attack the enemy in the vicinity of the Big Hill.Attack to capture the Big Hill.” (Attack)
“Move across the ford to the area south of the Big Hill, report to 2nd Corps HQ and awaitfurther orders.” (Non-Attack)
“Attack along the Red Road toward the Big Hill. Assist 3rd Corps in capturing the Big Hill.”(Attack)
“Move into position alongside 3rd Corps, advance with them to cover their flank.” (Attack)
“When 2nd Corps attacks, attack to capture the Blue House and cut the Big Road fromenemy use. When you get there, set up a defense straddling the Big Road facing north.”(Attack)
The Gamers, Inc.
Page 7
10.1d Order Records. Record orderson the Order Log (lined notebook paper).The Order Log’s function is to remind theplayer when to check for acceptance and togive a concise listing of that order’sacceptance variables. The order log shouldbe a well-organized and efficient orderrecord which can tell at a glance whatorders are accepted, delayed, canceled, orare on the way.
10.1e Order Delivery. Orders can bedelivered by an aide or in person. In-persondelivery can only occur if the sender andreceiver are in the same hex. In-personorders are received the same turn they aresent. For orders to be delivered by an aide,do the following. Calculate the number ofmovement points a leader would expendtraveling between the sender and thereceiver’s corps HQ. Divide this numberby 10 and round up any fractions. Theresult is the number of turns the order willtake in transit. Add this number of turns tothe current turn to determine the time theorder will arrive and record it on the orderlog.
10.1f Order Acceptance. Acceptanceis a measure of how quickly the receivingleader reacts to the new orders. Uponreceipt, orders may be accepted, delayedfor a period, or distorted.
The Acceptance process is as follows:Using the Acceptance Table, calculate theAcceptance Number according to the lineabove the table. Use this AcceptanceNumber to determine the table columnused. Roll two dice as an 11..66 roll. Theresult is the order’s acceptance state; recordthis on the order log. Note that even if theorder is instantly accepted, it does notbecome implemented and usable until thereceiving corps commander touches basein his HQ’s hex.
Do not make the Acceptance Table diceroll for an order until the order is delivered.
Delay. A delayed order is subject tosome foot-dragging or preparation beforeaction. Once delayed, an order becomesaccepted by rolling one die per turn. Thephasing player makes this “Delay ReductionRoll” during subsequent Command Phasesstarting on the turn after the AcceptanceTable produces the delay result.Alternatively, initiative or the receipt ofanother, different order can cancel a delayedorder. The receipt of any new order(accepted or delayed) automaticallycancels any pending orders (D4, D5, D6),but leaves a previously accepted order inplace until the new one is accepted. Threetypes of delay are possible: D4, D5, and
D6. Each requires a successful roll on onedie to remove. Remove the delay on a rollequal to or greater than the number of thedelay. Once the delay is lifted, the order isaccepted.
Distortion. Distorted orders arecompletely misunderstood and areeliminated.
10.1g Following Orders. It cannot beoverstated that orders must be followed asoriginally intended, even though gamecircumstances may change. These representwartime orders in a society influenced bynotions of glory and honor which seemquaint today. Players should never rethinktheir orders to find loopholes which allowthem to “get away with” something. Orderscan be followed with a modified degree ofenthusiasm (so as to avoid disaster), buttheir intention, scope, or original purposeshould not be altered. Players unable tocope with the responsibility and honestythis rule requires should play without thesecommand rules.
10.1h Actions which do not requireorders. Many game functions do not require,or need be mentioned in, orders. These are:
1. Officer movement and functions2. Fire, Close Combat, Straggler
Recovery, and Rally3. Artillery functions4. Movement, facing and formation
functions not requiring the movement of acorps HQ
5. Cavalry Charges (regular orReaction)
6. Skirmisher release, movement, andreattachment.
Note: Once a corps HQ is in position,it is literally “bolted to the ground” andcannot be moved without new orders,initiative, or an emergency retreat. HQscan move along freely during the executionof an attack order or other orders whichrequire movement—but are again bolted tothe ground when those orders are fulfilled.
10.1i Pre-Set Orders. These ordersrepresent the commander’s initial plan ofaction for the battle. They are not required,but an excellent player could win the battlewith these orders alone. The player writesand logs these orders before the game beginsand can make any number of them withoutregard to Command Points. These ordersare accepted before the game begins. Mostscenarios give historical pre-set ordersplayers can use to recreate the actualbattle—these can be used as is or modifiedbefore play as players desire.
10.2 InitiativeUnless specifically prohibited, leaders
can use initiative to cancel existing ordersand/or acquire new orders. The playerhandles initiative orders like any other,except that they do not cost CommandPoints to create, do not need to be delivered,and are automatically accepted. Corpsleaders must make a trip to their HQ toimplement these orders as well. In the caseof loose cannon, the enemy player movesthe corps leader into the HQ’s hex, so thatno foot dragging occurs.
10.2a A leader’s successful initiativeroll simultaneously cancels old orders andissues new ones.
10.2b Initiative orders must befollowed like any other order.
10.2c Only Wing, Corps, andDivisional leaders can use initiative. TheArmy Commander can only issue formalorders. Furthermore, in one turn, only oneleader can attempt to get initiative for agiven formation. Therefore, if a divisionalleader rolls for initiative, the corpscommander can roll only for his otherdivisions. If the Corps Commander rollsfirst, divisional commanders under himcannot roll at all.
10.2d Getting Initiative. First,determine the number of Initiative Points aleader has available. IPs equal the Leader’sRating + any Anti-Initiative Ratings whichaffect that leader. Use this total to determinewhich column to use on the Initiative Table.Roll two dice as an 11..66 roll. The tableresult will classify the roll as No Effect,Initiative or Loose Cannon. If a leaderbecomes a “loose cannon,” see 10.2g below.
10.2e Anti-initiative. Corps and armyleaders can be given anti-initiative ratingsin the game rules to limit initiative use. Ifnone are given, the assumed value for allleaders is 0. A leader’s anti-initiativesremain in effect even if he becomes acasualty (his replacement “inheriets” it) oris off map.
10.2f Initiative-Based Orders. Initiativeonly bypasses the normal acceptanceprocedure. Players must still record andfaithfully follow initiative-based orders.Leaders can assign themselves DivisionalGoals in this way. Initiative cannot be usedto issue orders which have not yet arrivedor which are in a delay status—only fordifferent orders. An “iron-clad” rule tocover all potential variations on this themewould be impossible to write, and playersare advised to look into the rule’s “spirit” asopposed to its literal interpretation. A playermust sometimes look into himself todetermine the purpose of the order hedesires.
Napoleonic Brigade Series v2.1
Page 8
10.2g Loose Cannon. The “LooseCannon” concept recreates the historicaltendency to avoid excessive initiative.Whenever a leader rolls for initiative andthe result falls into the Loose Cannon range,he becomes a Loose Cannon. Upon theleader’s becoming a loose cannon, theowning player must notify his opponent ofthe fact. The opposing player now issues anorder to the affected force for them to movefor one turn in the direction of his choosing.The owning player conducts the actualmovement, but must follow the order issuedby the enemy. This order cancels any ordersthe force might have had. The movementcan be an attack, retreat, or any other typeof activity. The owning player must followthis order with a reasonable amount ofgusto. This does not mean the commandmust wreck itself in futile Close Combats,etc., only that a reasonable amount of forcebe applied in execution. The opposingplayer cannot order the unit to attack otherfriendly units.
Example: Getting InitiativeLet’s say Ney wants to get initiative. He hasa rating of 2 which gives him 2 initiativepoints. Napoleon has an anti-initiative of -1 which reduces the initiative points to a 1.To get initiative, Ney must roll an 65 or 66on two dice. If he manages to roll a 21 orless, he becomes a loose cannon.
In another situation, assume Ney blows hisroll (he rolls a 63). St. Hilaire, one of hisdivision commanders, now wants to getinitiative for his division. However,according to 10.2c, St. Hilaire is unable totry this turn (since Ney tried for the entirecorps) and must wait until next turn. If weassume the player tries St. Hilaire on thatturn, and he blows it, the player would beunable to use Ney to get initiative for St.Hilaire’s division.
10.3 Corps AttackStoppage
Corps Attack Stoppage represents anattack’s failure in the attackingcommander’s mind. He is, much more thanthe player, reluctant to push the attack tothe last man.
10.3a For any command executing anAttack order, beginning with the CommandPhase following the first turn in which anyattacking units were fired on by infantry orartillery from two hexes or less, or chargedby cavalry; the command must make aCorps Attack Stoppage check. A playercan never voluntarily fail a Corps AttackStoppage roll.
Procedure:Make this check on the Corps Attack
Stoppage Table. Cross index the number ofwrecked divisions in the corps against thetotal number of divisions currently in it(i.e., count attached divisions). The originalcorps commander, if killed, wounded, orreassigned to a higher command during thegame, counts as an additional wreckeddivision. This number indicates the nexttable column. Cross index this numberwith the current corps leader’s rating. Thenumber then found is the minimum roll ontwo dice needed to pass the check.
Example: Corps Attack StoppageProcedureAfter its first turn in combat with infantryor artillery at two hexes, an attacking corpsmust check for stoppage. The corps has 3divisions and none of them are wrecked.The corps commander is fine. He is ratedas a 3.
Checking the Corps Attack Stoppage Table,the player determines that he must roll on
the 1 column of the second table by cross-indexing 3 divisions in corps with 0 wreckeddivisions. Since the leader is a 3, the secondtable tells him that he must roll a 3 or moreto pass. He does this handily.
Several turns of blood bath later, we findthe same corps with all three of its divisionswrecked and the corps commander on hisway to discover the miracles of Napoleonicmedicine. This time the first table generatesa column 4 for the corps (3 wreckeddivisions, plus 1 for the commander, cross-indexed with 3 divisions in the corps).
The second table generates a required diceroll of 11 or more (Column 4, the new corpscommander is a 1), which the player fails.Had this roll been required at night, hewould have had to roll no less than a 14 ontwo dice—in other words, he wouldn’t standa chance.
10.3b Results of Corps AttackStoppage Checks. If its commander passesthe check, the corps continues to attack. Ifhe fails, the corps must stop the attack andawait new orders. The owning player mustretreat the corps HQ a minimum of 6 hexesfrom its current location. After this retreat,the corps HQ cannot move again until itreceives new orders or executes anemergency retreat. Regardless of whetherthe corps HQ retreats, all the corps’ unitsmust move to at least three hexes from allenemy units at the end of the turn duringwhich the Attack Stoppage occurs. TheCorps units begin to function normallyafter these initial conditions are met.
10.3c If wing formations exist in thegame, check the game rules for any specialconditions which apply Corps AttackStoppage to these command structures.
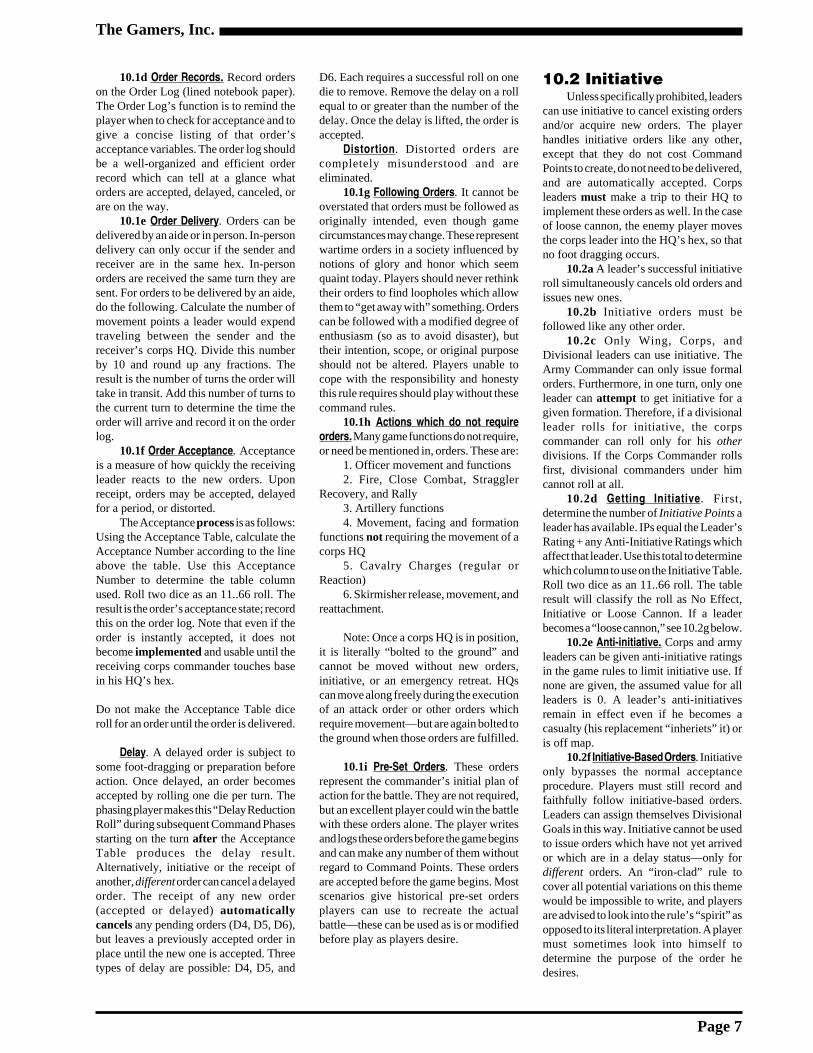
Example: Order Logging and AcceptanceThe player made the following entry into his Order Log:
Order Number Arrival Time ReceiverSender Type Method Status1 10:00 Davout Grouchy Attack AW
This order will arrive at Davout’s HQ at 10:00, from Grouchy, and is an aide-written Attack order. Such an order costs 10 Command Pointsto write.
In the New Order Acceptance Segment of the 10:00 turn, the player notes that order number one arrives and can be checked for acceptance.Davout is rated a 4 and Grouchy is a 1. The dice roll on the Acceptance Table will be made on the 3 column. Two dice are rolled. The rollof 25 gives a result of D5. The player marks “D5” under the status column for order number 1.
In the next turn’s Delay Reduction Phase, the player rolls one die for this order. He rolls a 6 which means the delay has been reduced andthe order is accepted. The “D5” under status is erased and an “A” for accepted is written in. As the first thing during movement, Davoutmakes a quick trip to move through his HQ’s hex and implements the newly accepted order. Davout’s command can now execute this order.
The Gamers, Inc.
Page 9
10.3d Divisions of a corps operatingon the map before the arrival of their corpsHQ make Corps Attack Stoppage checksnormally except that corps size isdetermined using only those divisionsactually on the map.
10.3e Divisions acting on DivisionalGoals or which do not have corps affiliationmust roll as outlined in 10.3d, as a corpsconsisting of one wrecked or not wreckeddivision. Any Corps Attack Stoppage bythe parent corps has no effect on divisionsacting on Divisional Goals—they continuetheir attack and roll separately.
10.4 EmergencyRetreat
Without orders or initiative, a corps orwing can execute an “emergency retreat.”The formation must be under a threat ofbeing surrounded or destroyed, or acommand might have an emergency retreatforced on it by having its HQ overrun. Thejudgment of when this is appropriate is inthe owning player’s hands (except in thelatter case). Units doing so immediatelyaccept orders to retreat one turn’s movementto the rear—that is, the corps HQ mustretreat from 6 to 14 MPs, with other unitsfollowing as they are able. The exact numberof MPs retreated by the HQ is in the owningplayer’s hands; other units need only moveso as to remain within command radius—which might mean little or no retreat forsome units. The player can use (or not use)roads, etc. as he wishes. Remember, thisretreat is a controlled command event, nota rout. Upon completion of this one turn’smovement, the formation is without orders:any it had (accepted or in delay) when theretreat was called are lost. FurtherEmergency Retreats can be conducted ifthe formation’s safety is again threatened.The same emergency corps retreat rulesand conditions also apply to independentunits or those under Divisional Goals.
All infantry units within the retreatingformation must roll on the Straggler Tableat the conclusion of the move. Cavalryunits are exempt from this requirement.
The direction of an emergency corpsretreat is not affected by the standard retreatrule (5.2) since it is a voluntary movement.
Army HQs are exempt from EmergencyRetreat.
10.5 Below CorpsCommand and Control
Two methods exist for controllingunits below the corps level. First, unitsmust generally remain within the command
radius of their division commander and/orcorps HQ, in which case they can move andfight as desired as long as they do notviolate the spirit of the current corps orders.The second is the use of Divisional Goalswhich frees units from command radius.
10.5a Command Radius. Checkcommand radius at the beginning of theMovement Phase. No unit can moveintentionally (with the exceptions notedbelow) outside this range. Calculatecommand radius distances in leadermovement points. In counting movementpoints, use only those hexes a friendlyleader could move through. The pointsinvolved depend on the echelon ofcommand involved. Units that are expectedto be within command radius, but are not,must expend all their available movementpoints to reenter radius each turn until theydo so.
A. Brigade to Division Radius. Brigadesmust always be at or within 4 MPs of theirdivision commander. For a brigade withExtensions, only one hex of the brigadeline need be within range.
B. Division Leaders, Artillery Units toCorps HQ Radius. At a range of 8 MPs orless from their corps HQ, these units andtheir subordinates function normally. Thecommand radius can extend a maximumdistance of 8 MPs between a corps HQ to adivisional leader and then a further 4 MPsto a brigade from that division leader—thisalso applies to artillery units of the samecorps as the division commander. Unitsneed not be within any required range fromthe army HQ.
Important: Artillery units in a corps are inthe proper command radius if they cantrace 8 MPs back to the Corps HQ OR ifthey can trace the 4 MPs back to one of the
division commanders of their corps—evenif on a Divisional Goal. If the artillerymeets one or both of these requirements, itis within command radius and functionsnormally.
C. Command Radius and OrderAcceptance. When a corps implementsorders, divisions and other corps unitswithin the HQ’s radius must immediatelyact upon the orders which the corps received.If a division is out on a Divisional Goal oris coming on as a reinforcement, it mustmaintain its current orders until it is withinthe Command Radius of its Corps HQ—unless the orders are changed usinginitiative or an order is accepted from theArmy Commander.
10.5b Divisional Goals. A DivisionalGoal is an order to conduct a task or missiongiven a division (or cavalry brigade) whichallows it to function beyond normalcommand radius.
A unit following a Divisional Goal isexempt from normal command radius(distance to corps HQ for divisions, distanceto division commander for cavalrybrigades).
Division, corps, wing, and armycommanders can assign Divisional Goals.Commanders can assign goals to theircavalry brigades or artillery units. You canassign goals when the appropriate leader(i.e. one that is in the unit’s chain ofcommand) stacks with the divisioncommander (or actual unit, in the case of acavalry brigade or artillery unit). DivisionalGoals are usually assigned using initiative.The army commander, however, can sendthem directly to a division commander likeany other order. A division’s owncommander can “self-assign” a Divisional
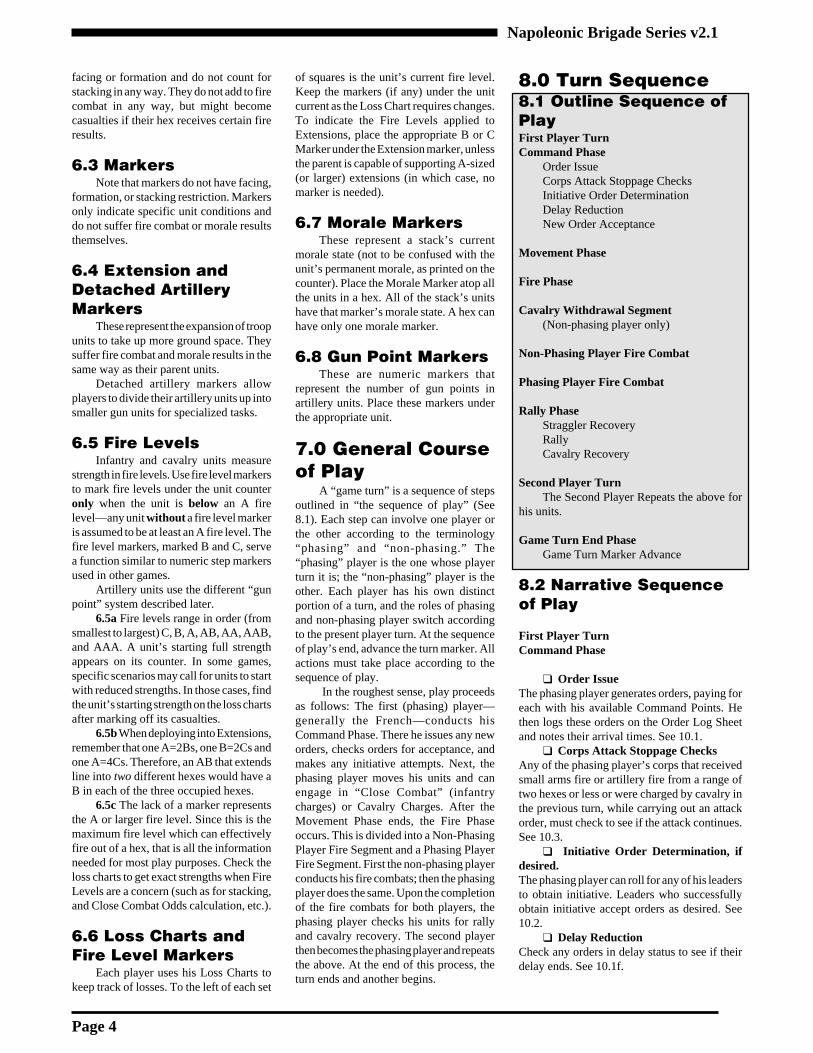
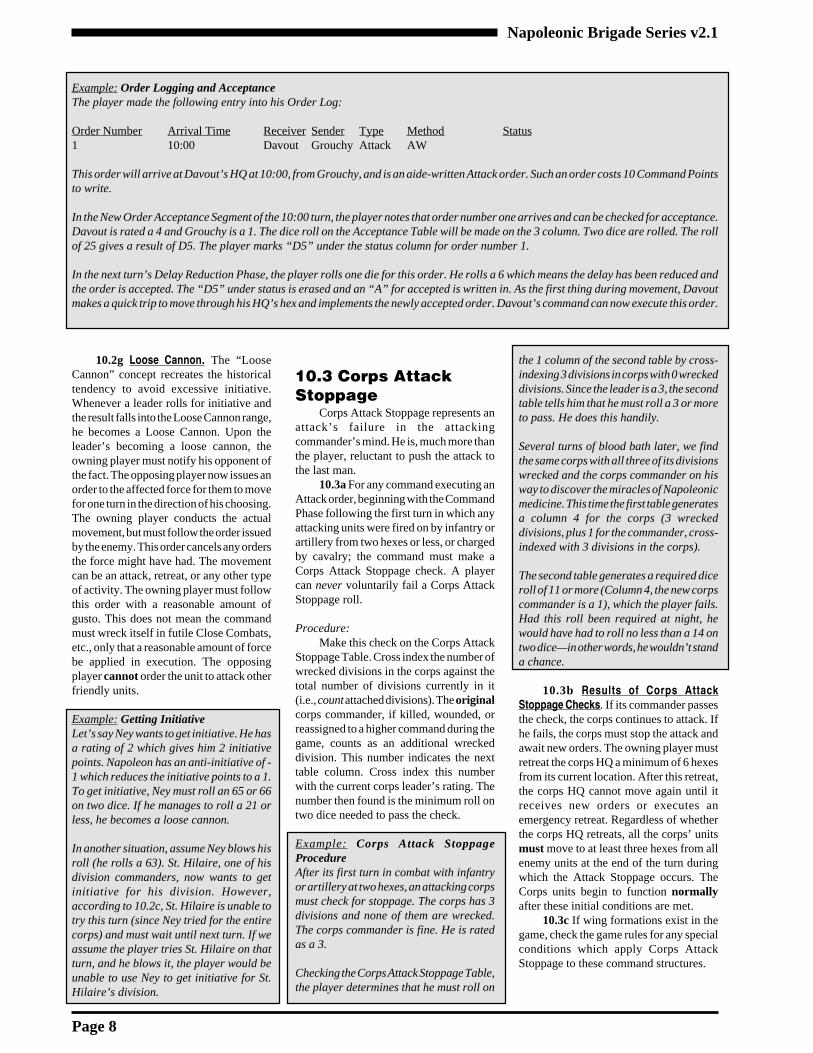
Command Radii—This is the correct way to interpretthe relationships between the parts
ArmyCommander
CorpsHQ
CorpsCommander Division
Commander A
DivisionCommander B
2 BrigadeDiv B
1 BrigadeDiv B
3 BrigadeDiv A
2 BrigadeDiv A
1 BrigadeDiv A
3 BrigadeDiv B
CorpsArty
CorpsArty
Orders(Stacked with one of his brigades)
(Stacked with one of his brigades)Commander may be anywhere on the map,but he must enter his HQ’s hex before anynewly accepted orders (incl. initiative) canbe implemented.
At or within 8 MP’s of Corps HQ.
At or within 4 MP’s ofDivision Commander.
Note that a given brigademay be up to 12 MP’saway from the corps HQ.
Note orders are not issuedfrom corps HQ. Once ordersare accepted by the corps,units within radii may beginto function.
Napoleonic Brigade Series v2.1
Page 10
Goal using initiative. Lastly, DivisionalGoals can be assigned as a part of ordersaccepted by the corps from the armycommander.
Divisional Goals created by initiativeare automatically accepted when given andcan be acted on immediately. Those sent asorders from the army commander mustundergo normal order acceptance. Goalssent as orders to individual cavalry brigadesor artillery units use a receiver rating of 2.
Jot down Divisional Goals so they canbe properly followed.
A Divisional Goal must be followeduntil:
A) the division reenters commandradius and the player wishes to remove theDivisional Goal and revert back to normalcorps orders,
B) the Divisional Goal is changed byinitiative,
C) the division is issued anotherDivisional Goal by an appropriate source,OR
D) the division fails an attack stoppagecheck.
Units attacking under DivisionalGoals must always check for CorpsAttack Stoppage as “corps of onedivision” with the divisional commandercounting as a corps commander would ifhe becomes a casualty.
Artillery units can be givenindependent Divisional Goals OR they can“tag along” with any division of their corpswhich has Divisional Goals of its own.
10.5c Independent and Detached Units.Certain units in the game are listed as“independent.” Independent units are neverbound by radius restrictions, and neverneed orders. Detached units, on the otherhand, have their status determined by theplayer. A player can detach divisions to thecontrol of other corps. The armycommander must issue an order to theowning corps commander to detach adivision (with instructions about whichcorps the division will become assignedto). Once detached, these units functionnormally as part of the new corps to whichthey are assigned. Generally, only divisionscan be detached and they must be detachedas a whole. Cavalry brigades can bedetached from their parent divisions andreassigned.
10.5d Cavalry Charges and CommandRadii. Cavalry Charges are exempt fromcommand radius restrictions. Note that thisis a difference from infantry Close Combat,where attacking units are required to remainwithin radius restrictions at all times.
Cavalry units can exit command radiusduring their movement to a charge.
11.0 FormationsCombat units can adopt one of several
formations, each with its own uniqueadvantages and drawbacks. Infantry hasthree different formations of its own andcan also detach Skirmishers. Artillery hastwo. Cavalry has one voluntary formation,but is also subject to an involuntaryformation—Blown. Leaders and HQs haveno particular formation. No unit can everhave more than one formation at a time.Voluntary formation change occurs onlyduring the Movement Phase.
11.0a Formation change costs,movement allowances, and terrainmovement costs are different for variousformations. The Movement Chart gives thespecifics. When units have differentmovement allowances in differentformations, count expended pointsproportionally.
Example: Proportional Movement Costs.An infantry unit moves along in columnformation (which has an MA of 8) expendingfive MPs as it does so. It then changes toLine (which costs another MP). This unithas expended 6 MPs of its 8 (leaving 2 or25%). In its new formation, it has a MA of5. 25% of 5 is 1.25 which rounds to 1, so theunit has one MP remaining in its newformation.
11.0b Most formations are shown bythe side of the unit counter facing up(Column vs. Line, Limbered vs.Unlimbered, Cavalry Combat Formationvs. Blown, etc.). Some formations requirean additional marker to designate them. Allunits under such a marker (such as Square)are in that formation.
11.0c National Effects. There are anumber of “National effects” listed amongthe various Charts & Tables. Specifically,these are the French and Non-Frenchversions of Skirmisher and Columnformations. These are meant to bring outthe superiority of French tactical doctrine.A further increase in this detail is listed in17.0b, regarding the mixing of formationsbetween a parent and its Extensions, and in11.5h, where French Skirmisher doctrinegives some advantages.
11.1 AvailableFormations
Infantry units can adopt Line, Column,and Square formations. Infantry can detachSkirmishers. Skirmish units are always in
“Skirmish” formation.Cavalry has one voluntary formation,
their “Combat” formation. Cavalry also hasan involuntary Blown status.
Artillery can be limbered or unlimbered.Routed units have no formation at all.Columns: Note that French Infantry
always uses Mixed Column Formation as itscolumn and other nations always use regularcolumn. This difference affects Firepowerand target mods only, both types of columnmove the same.
11.2 Effects onMovement & Facing
Each formation type has its ownMovement Allowance on the MovementChart. Line formations cannot use bridges,but can use fords. Units in Column, Skirmish,or Limbered formations and all cavalry canuse bridges at no additional cost. Unlimberedbatteries and units in Square cannot move,and can expend MPs only to change formationor facing.
When a unit changes formation, it mustdo so with the same facing (Exceptions,Limbering and Unlimbering Artillery canfreely rotate facing 180 degrees at no additionalMP cost, also see 11.6e).
11.3 Effects on FireCombat
Certain formations cannot conduct firecombat and others are limited in their abilitiesto do so. These restrictions are given on theFormation Effects Chart.
11.4 Effects on MoraleAs recorded on the Morale Table, certain
formations receive morale modifiers.
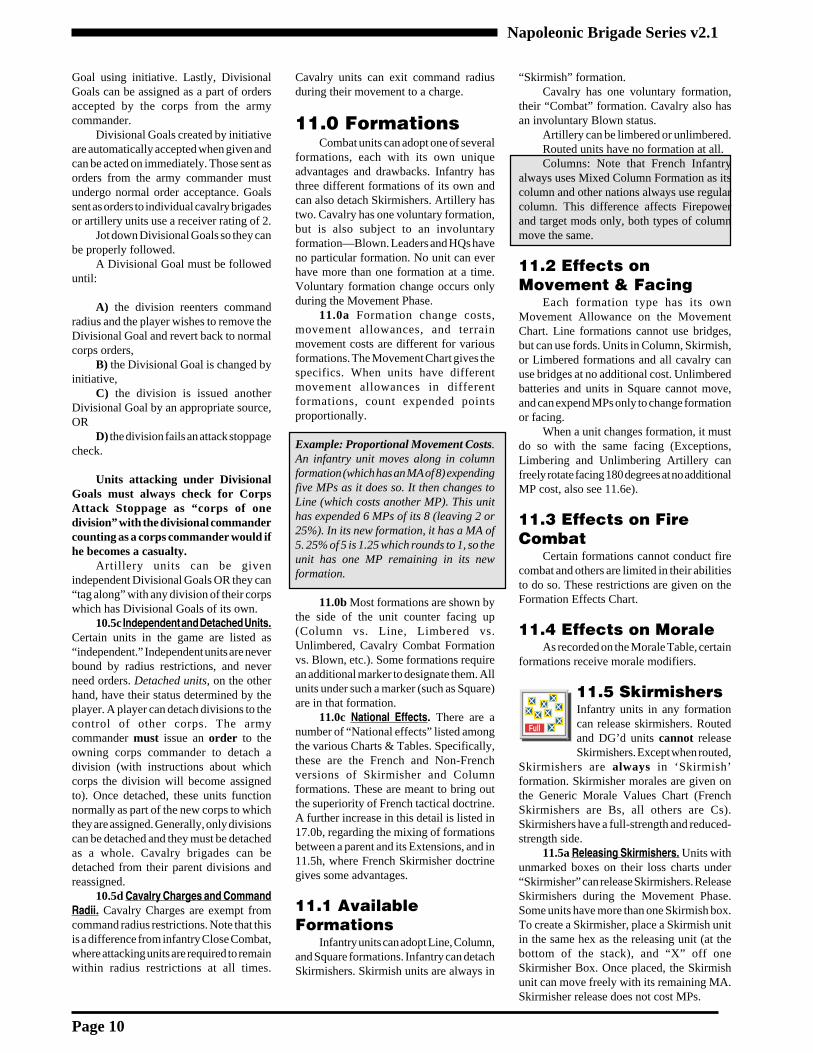
11.5 SkirmishersInfantry units in any formationcan release skirmishers. Routedand DG’d units cannot releaseSkirmishers. Except when routed,
Skirmishers are always in ‘Skirmish’formation. Skirmisher morales are given onthe Generic Morale Values Chart (FrenchSkirmishers are Bs, all others are Cs).Skirmishers have a full-strength and reduced-strength side.
11.5a Releasing Skirmishers. Units withunmarked boxes on their loss charts under“Skirmisher” can release Skirmishers. ReleaseSkirmishers during the Movement Phase.Some units have more than one Skirmish box.To create a Skirmisher, place a Skirmish unitin the same hex as the releasing unit (at thebottom of the stack), and “X” off oneSkirmisher Box. Once placed, the Skirmishunit can move freely with its remaining MA.Skirmisher release does not cost MPs.
Skirmisher
Full
Full
The Gamers, Inc.
Page 11
Design Note. The strength of a unit devotedto skirmishers has already been taken outof it. Essentially, the skirmisher box itselfrepresents these men. That way, release ofa units skirmishers does not move a unitcloser to becoming wrecked simply becauseit exercised its training.
11.5b Skirmisher Restrictions.Skirmish units can never move further than2 hexes away from a friendly unit (whichneed not be the Skirmisher’s originalparent). Should a Skirmisher end up outsidethis range (through morale results), it mustmove back within range during the nextfriendly Movement Phase. Skirmishers areunhindered by Command Radius limits.Skirmishers can never conduct a CloseCombat attack unless stacked with a non-Skirmish infantry unit. (See also 11.5h forSpecialized Skirmisher restrictions.)
Important: Skirmisher fires cannot generatethe flank/rear fire and morale modifiersthemselves. In other words, to acquire thebenefits of a “flank shot,” a non-Skirmishunit must provide the actual flank fires.
11.5c Skirmisher Losses. Skirmisherstake only casualty losses from the FireTable. They never suffer stragglers. If aSkirmisher takes a step loss, flip the counterover to its reduced strength side. If alreadyreduced, eliminate it.
11.5d Recovering Skirmishers. At theend of any friendly Movement Phase, aunit can recover any Full-StrengthSkirmisher stacked with it, provided therecovering unit has at least one markedSkirmisher box. Reduced StrengthSkirmishers cannot be recovered directly—they must combine with another ReducedStrength Skirmisher first (so as to becomeFull Strength).
On recovery, remove the Skirmishunit and erase the mark in the unit’sSkirmisher box.
11.5e Retreat Before Close Combat orCavalry Charge. Skirmish units which arenot stacked with other unit types can retreatbefore Close Combat. Retreat is notrequired. When the Phasing player movesadjacent to a Skirmisher, he announces hisintention to Close Combat and enters theSkirmisher’s hex normally, paying the +2MP cost. The Skirmisher can then retreat 1hex. The Skirmisher can retreat into anyadjacent hex which is neither enemyoccupied, nor the one from which the enemyunit entered. A Skirmisher can make anynumber of these retreats in a phase.
Skirmishers can also retreat one hexto escape from a Cavalry Charge (regularor Reaction: see 15.2g for Reaction
Charges)—the charging cavalry must thenchange its target hex to that hex (it dose notmatter if this hex is further than the normalcharge limits (three hexes) but it doesmatter if the terrain precludes cavalrycharges—in that case, the charging playercan select any hex adjacent to the originaltarget hex as the target of the charge). Sucha retreat ends the Skirmish unit’s movementif it occurs during the players MovementPhase.
Design Note: The ability of Skirmishers toretreat one hex in an attempt to “out run”a cavalry charge allows them the chance todive into a hex protected by terrain or unitscapable of forming square. They need thisability if safety is close—otherwise it is tooeasy to dice them up.
If a Skirmisher is not alone in the hex,but is stacked with other unit types, alldefending units must accept the CloseCombat or Cavalry Charge normally.
11.5f Skirmishers on top of a stack ofnon-Skirmish units. If a player places anySkirmishers atop a stack of other units, thefollowing apply:
A hex containing Skirmishers neverreceive the Fire Table column shift modifierfor Skirmishers unless the hex containsonly Skirmishers.
The top non-Skirmisher, non-artilleryunit in the hex takes any required stragglerlosses and makes the hex’s morale check.The owning player distributes the requiredcasualties between the units present in thehex. (See also 11.5h for SpecializedSkirmisher stacking rules.)
11.5g Combining Skirmisher Units.Skirmishers can freely combine and breakdown at any time during the MovementPhase, with no movement point penalty.Two reduced Skirmishers combine into afull strength unit, and one full strengthSkirmisher breaks down into two reducedstrength Skirmishers. In all cases, theaffected units must be in the same hex.
11.5h Special Skirmisher Restrictions.The following special restrictions controlthe use of Skirmishers with respect tostacking:
A) Stack Positioning. A Skirmishercan only be at the very top of its stack ORthe very bottom. When released,Skirmishers begin stacked at the bottom oftheir stack. While moving, Skirmishersalways enter each new hex as the bottomunit and can only restack if rule B allowsthem. (The concepts of top and bottomapply only in hexes that contain other, non-skirmisher units.) Optional: Players canrefine the “always go to the bottom”
movement requirement to be “bottom whenadvancing” or “top when retreating” if theydesire and feel comfortable with thedefinitions.
B) Changing Stack Position.Skirmishers can freely change their stackingposition from the top to the bottom of theirstack during the friendly Movement Phase,but are restricted in their ability to movefrom the bottom to the top. A Skirmishercannot change from the bottom of its stackto the top when adjacent to one or moreenemy units.
C) Effect of Position on Fires. OnlySkirmishers at the top of their stack can usetheir Fire Points. Skirmishers at the bottomof a hex can only fire if there is no non-Skirmisher infantry units in their hex ORthe infantry which is there has only a C FireLevel to use. While occupying the topposition of their stack, the Skirmishers canbe the only infantry to fire from theirstack. EXCEPTIONS: French infantry inColumn can fire in addition to anySkirmishers in their hex. Also, Skirmisherscan fire in addition to other infantry unitsin their hex if they occupy a walled farm,town, or Redoubt hex.
D) Position and Close Combats orCavalry Charges. At the instant a CloseCombat’s or Cavalry Charge’s target hexcombat is to be resolved, move anySkirmishers in either the attacking ordefending stacks to the bottom of theirrespective stacks. While Skirmishers mightnot be able to fire (according to rule C),they do count for Odds Table strengthdetermination regardless of their positionin their stack.
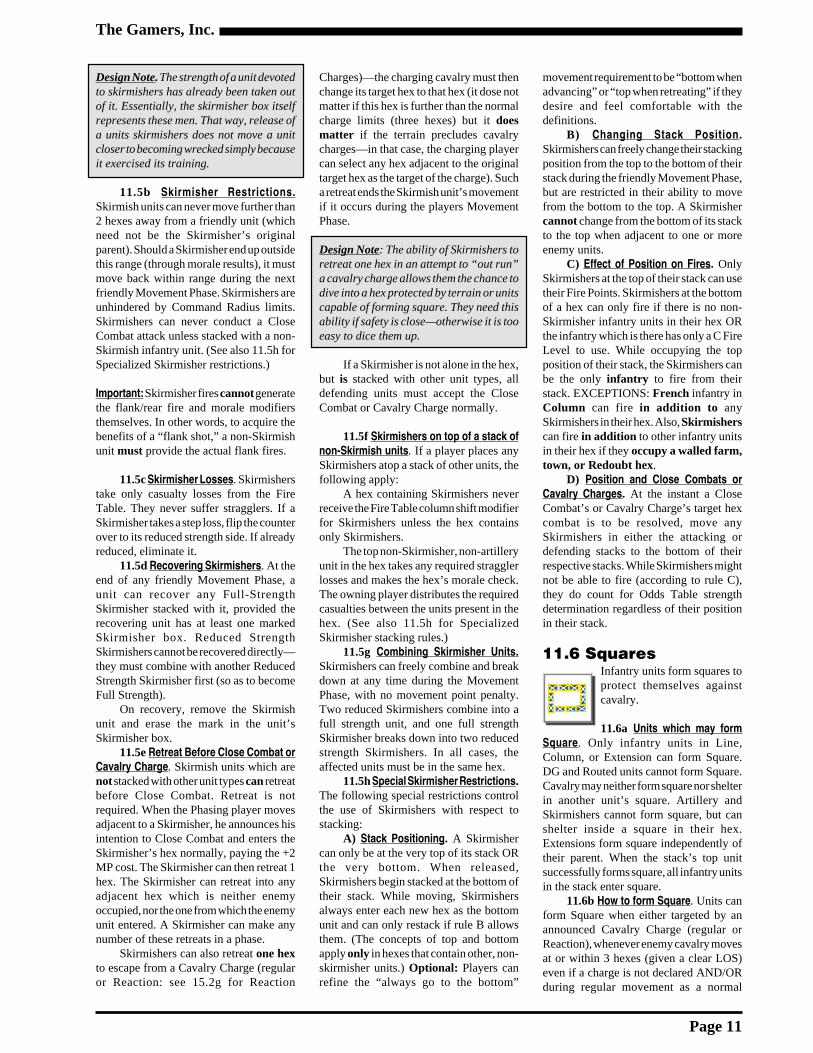
11.6 SquaresInfantry units form squares toprotect themselves againstcavalry.
11.6a Units which may formSquare. Only infantry units in Line,Column, or Extension can form Square.DG and Routed units cannot form Square.Cavalry may neither form square nor shelterin another unit’s square. Artillery andSkirmishers cannot form square, but canshelter inside a square in their hex.Extensions form square independently oftheir parent. When the stack’s top unitsuccessfully forms square, all infantry unitsin the stack enter square.
11.6b How to form Square. Units canform Square when either targeted by anannounced Cavalry Charge (regular orReaction), whenever enemy cavalry movesat or within 3 hexes (given a clear LOS)even if a charge is not declared AND/ORduring regular movement as a normal
Square
Napoleonic Brigade Series v2.1
Page 12
formation change. In the case of Squareformation changes not during regularmovement, each hex makes a Square Checkindependently—the top “Square capable”unit makes a check according to 8.5. Squareformation changes occurring as part of aunit’s regular movement do not require aSquare Check, but are instead handled likeany other normal formation change.
11.6c Squares and Morale Results.Squares ignore any one-hex retreat resultapplied to them. Squares must execute two-hex retreats normally, and must changefrom Square to Column formation whenthey do so. If an Extension is forced toretreat, it “drags” its parent normally (orvice-versa.) Any unit so “dragged” leavesSquare, enters Column, and becomes DG.
11.6d Units protected in Squares.When a hex forms square, all Skirmisherand artillery units in the hex are protectedby that square. Skirmishers drop to thebottom of the hex’s stack. Protected artilleryfires normally, but is considered to be in theSquare. Skirmishers fire as per therestrictions in 11.5h.
11.6e Changing Back from Square.When a unit returns to Line or Columnformation from Square, it can be placed inany facing position after the formationchange cost is paid—with no additionalfacing change MP costs to do so.
12.0 StackingStacking is placing more than one unit
in a hex. Stacking limits are enforced at theend of any phase containing movement orretreats and at the instant of a Close Combator Cavalry Charge resolution. Units maytemporarily over-stack during theirmovement. Stacking is enforced for eachside independently during the conduct ofClose Combat and Cavalry Charges, i.e.each side can stack up to the stacking limitsin the hex.
12.1 Restrictions onStacking
No more than three A fire levels and10 gun points, plus one full strengthSkirmisher can be in a hex at one time. (Seealso 11.5h for Specialized Skirmisherhandling rules.)
12.2 Effects onMovement
Units may move as a stack as long aseach unit’s movement allowance and pointsspent remain independent of others in thestack. Stacking and unstacking have noeffect on movement or MP costs. Stackscan be rearranged at any time during aplayer’s Movement Phase.
12.3 Effects onCombat
One A fire level OR one full strength(or two reduced strength) Skirmish unitAND 5 Gun Points can fire out of one hex(given the additional rules aboutSkirmishers in 11.5h part C). Also, themaximum number of Fire Points that canbe generated by infantry from a single hexis the value given for an A fire level (inotherwords, B+C cannot be greater than Adue to unit frontage). This total includes allhexsides through which fire takes place.The same limit applies to Close Combats.Only the hex’s top unit is the target of firecombat (Exception: artillery units canengage enemy artillery selectivelyregardless of the target’s position in a stack.)The top target unit provides any applicablemodifiers to the fire combat for the targetstack.
Cavalry can affect combat with up toan AB strength.
12.4 Effects on MoraleThe top non-artillery, non-Skirmisher
unit (if any) in a stack provides the moralefor that stack’s Morale Checks. If no suchunit occupies the hex, use the actual topunit. The top unit is also the basis for theassorted morale modifiers affecting thestack. Stacks can have but one morale statemarked with a morale marker atop it. Whenunits in different morale states stack at theend of movement, or anytime during aretreat, they adopt the worst morale state ofthe new stack—this rule does not apply tomomentary stacks created duringmovement.
12.5 Effects of Over-Stacking
When discovered, an over-stacked hexis treated as follows: The stackautomatically becomes DG’d. If alreadyDG’d, it is routed. Overstacked hexes mustbe broken up in the next available friendlyMovement Phase. Routed units may moveone hex to accomplish this. Repeat asneeded.
13.0 FacingAll units must be aligned so as to
“face” a hexside or hex corner. All units ina hex must face the same hexside. Facingdefines the stack’s front and Flank/Rear.
13.0a Formation affects facing in thefollowing ways:
❑ The following have the standardfacing:
Line, Column, Skirmishers (when stacked withother unit types), Cavalry (Combat Formationand Blown), and Unlimbered artillery .
❑ The following have all around frontalfacing (facing of counter still shows center hexsidefor movement purposes):
Skirmishers (when not stacked with other unittypes), Any units (not routed) in a walled farm,town, or Redoubt hex, and Squares.
❑ The following have all around flank/rearfacing (facing of counter still shows center hexsidefor movement purposes):
Limbered artillery , and Routed units.
❑ The following have no facing and do notpay the facing change MP costs:
Leaders (including HQs), and All Markers
13.0b Apply the flank fire modifiers to theFire and Morale Tables if at least one non-Skirmisher attacking unit has its fire entering viaa flank or rear hex or along the hexside dividingfront from the flank/rear hexes.
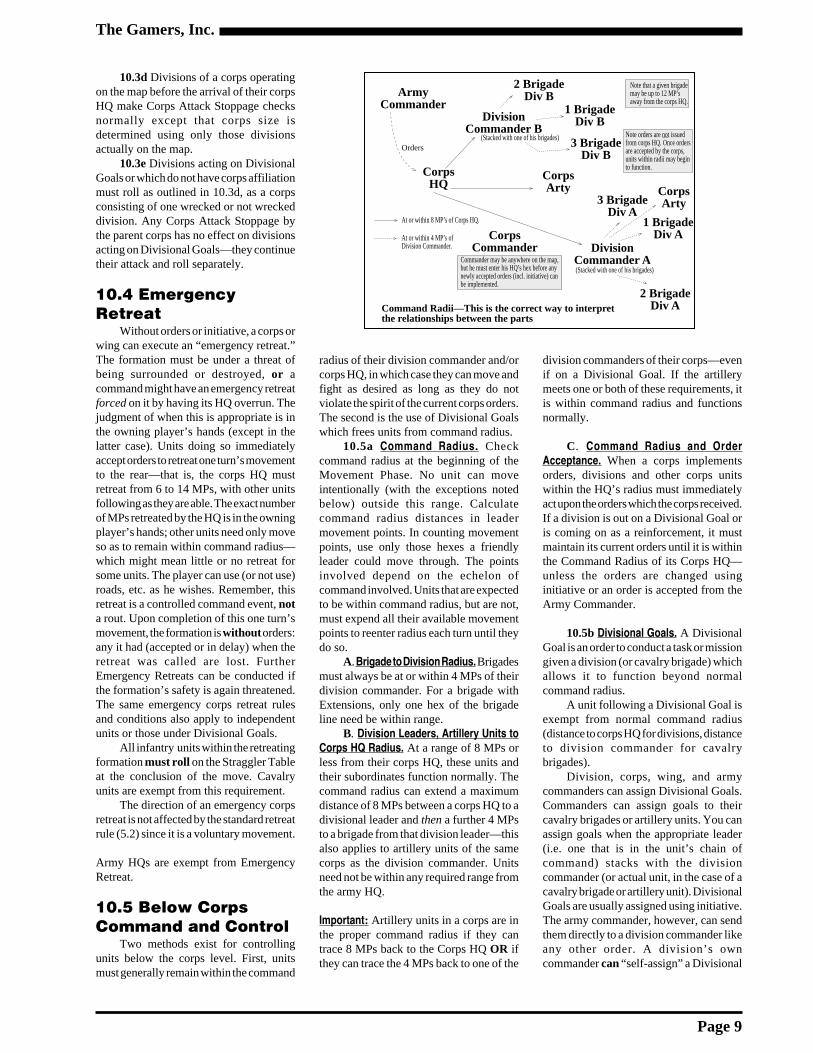
13.1 Changing Facing13.1a General. All units (even Skirmishers)
must pay 1 MP per hexside of facing change (seeexceptions in 13.1b and 13.1d). Facing can bealtered at will at the end of any required retreatwith no MP cost. Otherwise, facing can only bechanged by expending the necessary number ofMPs (EXCEPTION: See the Road Movementrule in 13.2c) during the friendly Movement Phase.
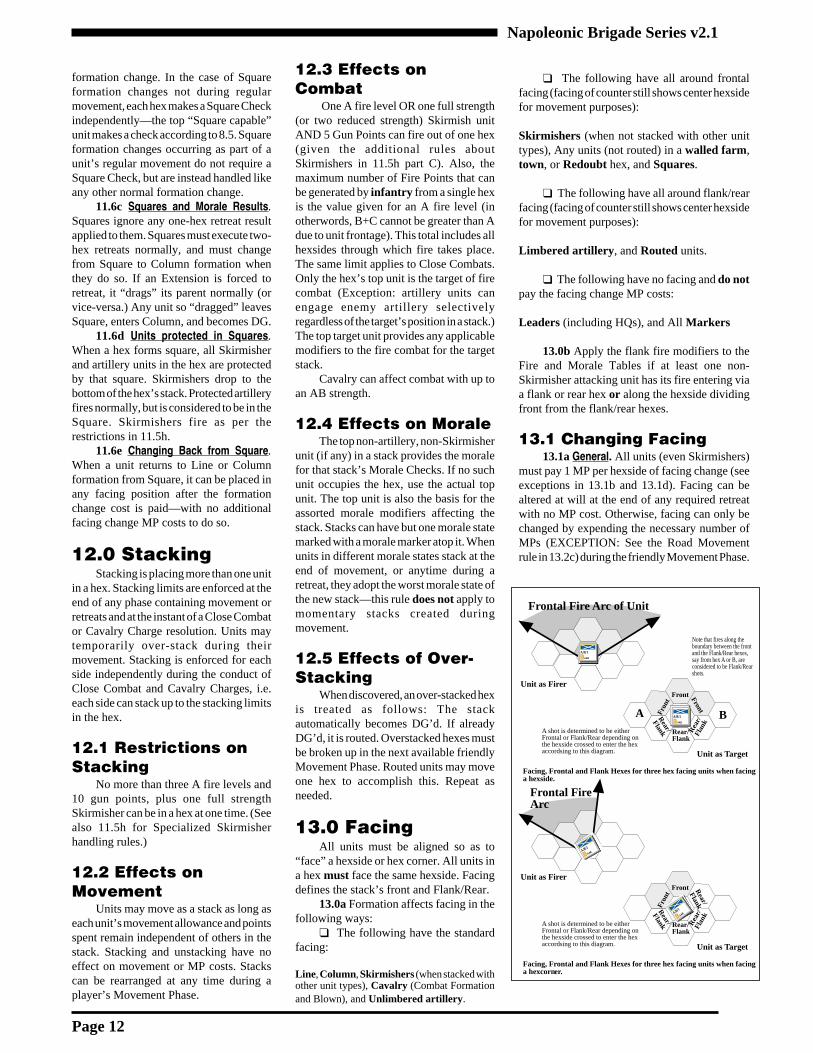
Facing, Frontal and Flank Hexes for three hex facing units when facinga hexside.
Unit as Firer
Frontal Fire Arc of Unit
A shot is determined to be eitherFrontal or Flank/Rear depending onthe hexside crossed to enter the hexaccordsing to this diagram.
Note that fires along theboundary between the frontand the Flank/Rear hexes,say from hex A or B, areconsidered to be Flank/Rearshots.
Fron
t
Front Front
Rear/
Flank Rear/Flank
Rea
r/Fl
ank
Unit as Target
A B
Unit as Firer
Frontal FireArc
Fron
t
Front
Rear/
Flank Rear/Flank
Rea
r/Fl
ank
Unit as Target
A shot is determined to be eitherFrontal or Flank/Rear depending onthe hexside crossed to enter the hexaccordsing to this diagram.
Facing, Frontal and Flank Hexes for three hex facing units when facinga hexcorner.
Rear/
Flank
24 LightAAB
C-V
24 LightAAB
C-V
24 LightAAB
C-V
24 LightAAB
C-V
Cnslr GdAB
Gd
A/B/1
BAAB
Cnslr GdAB
Gd
A/B/1
BAAB
Cnslr GdAB
Gd
A/B/1
BAAB
Cnslr GdAB
Gd
A/B/1
BAAB

The Gamers, Inc.
Page 13
Given the needed MPs, a stack can re-face anynumber of hexsides in one hex. EXCEPTION:Units of both players executing a Close Combator a Cavalry Charge can readjust facing freelyat the end of that action.
13.1b Artillery Special Rules. At themoment of formation change, Artillery canfreely change facing 180 degrees withoutadditional MP costs. Furthermore, unlimberedartillery can expend MPs to change facing.
13.1c Hexside vs. Hex Corner. A unit canchange from a hexside to a hex corner facing atno Movement Point cost (provided the hexcorner is at one of the two ends of the hexsidethe unit is currently facing). It costs 1 MP toswitch from a hex corner facing to either hexsidefacing attached to that hex corner.
13.1d About Face. A unit (any type orformation) can rotate 180 degrees at the cost of1 MP. See also 13.1b which allows artillery, atthe instant of formation change, to do this forfree.
13.2 Effects onMovement and Combat
13.2a Units can normally move only intohexes through their center-front hexside (i.e.the hex directly above the counter’s top sidewhen it faces a hexside). A unit facing a hexcorner can move into either frontal hex asdesired. A stack could move into a non-center-front hexside (no facing change is allowedwhen doing this) but the hex’s MP cost isdoubled (e.g. a hex normally costing 1 MPwould cost 2 MPs to enter). Retreats are notaffected by the facing of the stack and a stackcan freely reface at the end of a retreat.
13.2b A unit or stack cannot move into ahex in which it does not have the MPs neededto reface the same direction as the rest of theunits there. Either the player must reface thefinal stack so as to make sure all units face thesame way, or he cannot finish building thestack in one phase—he will have to wait untilhe has enough MPs to move into the hex andreface properly.
13.2c When moving along a road, ignorefacing change costs. When the unit finishesmoving along a road (either because it is finishedmoving or it is to beginning off-roadmovement), automatically face the unit directlyforward along the road down which it wasmoving with its center frontal hexside beingthe next road hex it would be able to move intowhile moving along the road. In the case ofroad junctions, this may mean the player hashis choice of facings. This automatic facingchange occurs without cost and the unit canthen expend MPs to change facing further or tocontinue to move as the player desires. When astack first enters a road hex, it must spend MPsto reface along the road in the direction it wantsto move to take advantage of the above, if notalready facing along the road.
Units can never start or end roadmovement when facing a hex corner, suchunits must face a hexside.
13.2d Except in the case where combatis occurring within a hex (as in CloseCombat or Cavalry Charge resolution), unitscan only fire through their frontal hexsides.
14.0 Zones ofControl
No unit in this series has a Zone ofControl. There are no effects, special fires,or restrictions of any type for being adjacentto enemy units. See also Opportunity Fire,15.0.
15.0 OpportunityFire & ReactionCharges15.1 Opportunity Fire
15.1a Each artillery unit has a “CloseFire Zone” that consists of those hexes inthe unit’s fire arc which are at or within 3hexes. Naturally, the establishment of aClose Fire Zone hex requires that facing,formation and Line of Sight allow fires.
15.1b Whenever a moving or chargingunit attempts to exit a “Close Fire Zone”OR attempts to change formation within aClose Fire Zone, the artillery units makingup that Zone can fire at the violating unit orstack.
Important: These fires occur when a unitattempts to move (or charge) out of a CloseFire Zone—NOT movement from one hexto another within a given Close Fire Zone.Formation change attempts within a CloseFire Zone incur Opportunity Fire.Involuntary retreats are exempt from thesefires entirely. Movement out of LOS withina Close Fire Zone is also counted as“exiting” the zone for this purpose.
Resolve these fires as they happen.Resolve the fires before the stack is allowedto leave the Close Fire Zone or before theformation change is completed. Fires aregenerated normally even if the moving
units are trying to enter a Close Combat ora Cavalry Charge target hex. The movementor formation change activities of a unit andits Extensions generate Opportunity fireseparately.
15.1c Units are fired upon with thefacing and formation they have at the instantthe fire is generated—before OR afterformation change whichever the firerprefers. Furthermore, a withdrawing unitcan avoid presenting its rear as a targetwhen pulling back out of a zone by applyingthe “double the MPs” cost to move via anon-center front hexside (see 13.2a).Otherwise, the exit attempt will cause aflank-shot as well!
15.1d Only those guns whose CloseFire Zone is being violated can fire—but agun can fire any number of times based onwhat zone violations occur. Resolve thefire normally—to include Morale Checks.Moving stacks which become DG’d orRouted execute their required retreat andmust cease movement for the phase—evenif they had MPs remaining. If these unitswere attempting to change formation, theformation change still occurs.
15.1e Opportunity Fire has no effecton a unit’s ability to fire in a later FirePhase.
15.1f Units executing required retreatsnever trigger opportunity fire. Onlyvoluntary movement out of a Close FireZone (etc.) generates these fires.
15.1g Square formation during aCavalry Charge or Reaction Chargesequence will generate Opportunity fires.If this occurs, momentarily interrupt thecharge sequence, execute the Opportunityfire, then follow through with the charge’scompletion.
Design Note: If you set all this up so that itworks right, the poor slobs trying to formSquare will get sliced by artillery fires(with the Square target modifiers...) andthen be shattered by the coming cavalry—welcome to the world of Napoleoniccombined arms!
15.1h Facing change, alone, nevergenerates Opportunity fires.
15.2 Reaction Charges15.2a Reaction Charges occur when
units (including moving units, chargingcavalry, retreating units, etc.) attempt toleave the “Reaction Charge Zone” of un-Blown enemy Cavalry. The ReactionCharge Zone of a cavalry unit includes allhexes 1 to 3 hexes from the unit which arein any direction AND in the LOS of thecavalry’s hex. A reaction charge can occur(at the charging player’s discretion)whenever an enemy unit attempts to exit
Reaction Charge Zone of a Cavalry Unit.
In the White hexes, a MoraleCheck must be passed before aReaction Charge can occur.
In the Shaded hexes, no MoraleCheck is required to launch aReaction Charge.
Cav
Napoleonic Brigade Series v2.1
Page 14
any of these hexes (whether to leave thezone OR to move from hex to hex withinit). Execute the Reaction Charge in the hexthe unit is attempting to leave—not in itsdestination. However, regardless of thenumber of applicable hexes triggeringReaction Charges exited during a CavalryCharge execution, only one hex of thecharge which fulfills the above can triggera Reaction Charge. (In other words, aCavalry Charge can only have one ReactionCharge made against it during its run in.) AReaction Charge cannot be launchedagainst an enemy Reaction Charge.
15.2b Units and leaders which wish toconduct a Reaction Charge together mustbe stacked together when the trigger occurs.The Reaction Charging stack must pass aMorale Check (normal result or better,using the top Reaction Charging unit’smorale) if it is to conduct a Reaction Chargeoutside its frontal arc. No such MoraleCheck is required if the Reaction Charge isin the stack’s frontal arc.
15.2c All other regular Cavalry Chargerules apply to Reaction Charges as well—including the full Cavalry Charge Procedure(24.1) (with the exception of Recallattempts—Reaction charges cannot berecalled). The facing restrictions for chargesare loosened up so that every hex in theNormal Charge Zone can have a ReactionCharge applied against it.
15.2d Opportunity Fires (15.1) canbe applied against a Reaction Charge.
15.2e After resolving a ReactionCharge, the originally moving unit cancontinue to move or charge (if able to doso) with any remaining MPs it might have.The resolution of the charge does not expendany of the moving unit’s MA—except thatpoints might need to be expended to changeformation back from Square...
Important: While the execution of aReaction Charge uses the full CavalryCharge Procedure (as per 15.2c), thefollowing is true: The Reaction ChargingCavalry must become blown at the end ofthe procedure, but if the target is regularlycharging cavalry, the target becomes blownonly if it has a morale result of DG (orworse) applied to it because of the ReactionCharge—otherwise, the original chargecontinues. Note that even during theresolution of a Reaction Charge against acharging cavalry target, the ReactionCavalry is the “attacker.” The originalcharging cavalry becomes the “attacker”once more after the conclusion of theReaction Charge—provided the charge didnot end.
15.2f Facing change, alone, nevergenerates a Reaction Charge.
15.2g Cavalry which conducts aReaction Charge vs. a Skirmisher unit whichretreats as per 11.5e is placed back into itsoriginal hex and is not blown. A cavalryunit can execute any number of ReactionCharges of this sort in a single phase andnever become blown because of them.
16.0 MovementDuring each Movement Phase, the
phasing player can move his units. Eachunit can move as many or as few hexes asdesired within the unit’s movementallowance and other restrictions.
Procedure:Move each unit individually or as part
of a stack maintaining its running movementpoint allowance as it expends movementpoints. Movement must follow a contiguouspath through the hex grid. Units may movein any direction or set of directions, butmust always be in only one hex at a time.
16.1 How to Move Units16.1a During his Movement Phase, a
player can move all, some, or none of hisunits as desired.
16.1b Use Movement Points tocalculate movement. Each unit expendsmovement points for each hex entered orhexside crossed according to the MovementChart. Keep a running total of movementpoints a unit expends while moving. If aunit’s movement allowance changesaccording to formation, calculate movementpoint expenditures proportionally and roundfractions of .5 or more up, round fractionsof .49 or less down.
16.1c Each unit has a MovementAllowance (MA), based on unit type andformation, given on the Movement Chart.This is the number of movement pointsavailable to the unit in one phase.EXCEPTION: Cavalry units can expendtheir entire MA and still complete a threehex Cavalry Charge.
16.1d Movement allowances arecompletely independent of each other andexpenditures of one unit do not affect others.Movement points and allowances cannotbe transferred from unit to unit or saved forfuture use.
16.1e A unit starting the movementphase with movement points but havinginsufficient MPs to enter any adjacent hexcan always move one hex. This move mustnot be into or through prohibitive terrain,or into a Close Combat.
16.2 Terrain Effects onMovement
As per the Movement Chart, each hexand hexside feature in the game costs avarying number of movement points. Amoving unit must pay the total cost unlessusing the “one hex movement” exceptionin 16.1e.
16.2a A moving unit can use roadsonly when following the road’s path. Theunit pays the road movement cost andignores other features in the hex or hexsidecrossed.
16.2b A hexside feature that must becrossed adds its cost to that of the hex beingentered.
16.2c Units cannot enter or crossprohibited hexes or hexsides. Units forcedto do so are destroyed.
16.2d Forest hexes affect movementif they contain forest symbols any part ofthe hex.
16.2e A unit crossing a hexside whichis both an elevation change and a slope orextreme slope pays the movement pointcost of the most expensive of these features.They are not cumulative.
16.2f Tree Borders have no effect onmovement costs. They exist only for LOSpurposes.
16.3 Restrictions onMovement
16.3a Units may not enter enemy-occupied hexes except to resolve CloseCombats or Cavalry Charges.
16.3b Only friendly units may moveduring the friendly Movement Phase.Enemy units could be forced to retreat as acombat result or might conduct a ReactionCharge; this is not movement per se and isresolved immediately.
16.3c See 13.2 for the effects of Facingon Movement.
16.4 ReinforcementsReinforcements arrive at the time and
entry area listed in the arrival scheduleduring the player’s Movement Phase.Players cannot delay, ignore, or redirectreinforcements in any way. They can arrivein any formation.
Move reinforcements onto the map asif they were in a long column extending offthe map from the entry hex out.
Should an entry hex be blocked byenemy units, reinforcements enteraccording to 1.1e.

The Gamers, Inc.
Page 15
17.0 Extensions“Extension” enables large infantry units
to bring more firepower to bear by deployingbattalions into adjacent hexes. Extensionmarkers literally move out from their parentunit (or back again). Extensions behave exactlyas any other combat unit except that at the endof every phase they must be adjacent to theirparent with their arrow identifying the parent.
17.0a Extensions have the samefacing, formation, movement,morale, rally, combat ability andtarget characteristics of any otherunit. An Extension has the same
Morale Rating and Wrecked status as its parent.As long as both players understand whichExtension belongs to which parent, the “arrowrestriction” does not affect the facing of anExtension in any way.
17.0b Extensions must have the sameformation as the parent (exception: each partof a multiple hex unit can indpendently be inSquare). Extensions are created with the samefacing and remaining MA as the parent, butthereafter keep track of these itemsindependently.
17.0c Generate Extensions at any timeduring the Movement Phase and do so withinthe parent’s hex—it is up to the Extension tohave enough MPs remaining to be able tomove out from that hex.
17.1 Restrictions onExtensions
Only infantry units with at least a B firelevel can generate Extensions. Skirmish,Cavalry, and Artillery units cannot do so.Large units can generate two Extensions. Nounit can ever have more than two. Extensionmarkers can never extend or stack with otherExtensions. Fire levels must be evenly dividedbetween the parent and any Extensions—withany excess in the parent’s hex. No Extensionmarker may ever exist without at least a C firelevel. With the exception of Squares,Extensions must have the same formation asthe parent.
17.2 Effects ofExtensions
17.2a Morale results affect only the unitor Extension actually checking morale. If anypart of an extended unit is routed, the entireunit must collapse into the parent’s hex and theentire stack is routed. When Extensions arereabsorbed, follow the usual rules regardingstacking of units with different morale states(see 12.4).
17.2b When two-hex retreat resultsseparate an Extension from its parent, theunit’s non-retreating portion (to include allunits in that stack) must also displace farenough (usually one hex) to maintaincontact with the retreating part. Thedisplaced unit has its morale state worsenedby one level. The Extension cannot “circle”the parent to avoid causing displacement.Artillery under the unit forced to displacehas no effect on this requirement. Artilleryin the displacing unit’s original hex mustLimber and displace with the rest of thestack.
17.2c After subtracting losses, applyany required reduction in fire levels to theunit as a whole, and divide remaining firelevels evenly among the parent and itsExtensions. If the unit no longer has enoughstrength to support the Extensions it has,eliminate one or more Extensions until theunit can support the remainder.
18.0 Forced MarchForced March is a method of
increasing unit speeds; the cost is inadditional stragglers.
18.0a Only infantry in column and notDG’d or Routed can Force March. Unitsmust follow roads for the entire MovementPhase in which they use this rule.
18.0b For one set of three (3) extramovement points, make one roll on theStraggler Table. After taking any straggler
losses, the brigade can use the extra MPs.18.0c To gain a second set of three
MPs, roll on the Straggler Table again. Nounit may gain more than this total of sixMPs by Forced Marching.
19.0 Line of Sight(LOS)
Line of Sight (LOS) determineswhether two units can see one another. Inresponse to player feedback, the LOS rulespresented here are both very simple andvery abstract. For that reason, if you prefera more detailed LOS rule, feel free toembellish these rules as desired.
19.1 General RuleThe map’s hexes are color coded by
elevation level. A hex’s level representsthe hex’s center elevation. Determine LOSfrom one hex’s center to that of another.Features under this line could block LOS;features not under it will not. The elevationof a hexside is midway between that of thehexes it connects, if they are different.
19.2 Determining LOS—Three Cases
19.2a Case 1: Always UnBlocked. If allterrain between the firer and target hexes isat the same or lower elevations than thehigher of the two—and the qualificationsfor Shadows (19.2c) are not met—then theLOS is UnBlocked.
19.2b Case 2: Always Blocked. If anyterrain between the firer and target hexes isat a higher elevation than the higher of thetwo, then the LOS is Blocked.
19.2c Case 3: LOS Shadows. This caseonly exists when the conditions in thediagram on page 16 are met. It is the casewhich occurs when a high endpoint attemptsto pear over an intervening obstacle inorder to see a lower hex (or the inverse).Note that the elevation level must drop toa lower level (than the obstacle, that is)between the obstacle and the high end pointfor these conditions to exist. If theseconditions exist, use the effects listed in19.2d. Otherwise the LOS is UnBlocked.
19.2d Effects of Shadows. Eachobstacle gives a LOS Shadow of threehexes. If the lower end point hex is at orwithin three hexes of the obstacle (counthexes begining with the first hex after theobstacle which would be the first hex ofelevation drop connected to the obstacle—as per the Shadows Diagram, below), thenthat hex is within the Shadow and the LOSis Blocked (regardless of the direction ofthe LOS).
A few extended line possibilities—all of these are legal.These are not all the possible ones, only some food for thought.
➟➟
IronWadsworth
1/1/1
➟
➟Iron
Wadsworth1/1/1
➟➟Iron
Wadsworth1/1/1
➟
➟
Iron
Wadsworth
1/1/1
➟➟Iron
Wadsworth1/1/1
A/B/1
BAAB
A/B/1
BAAB
A/B/1BAAB
A/B/1
BAAB
A/B/1
BAAB
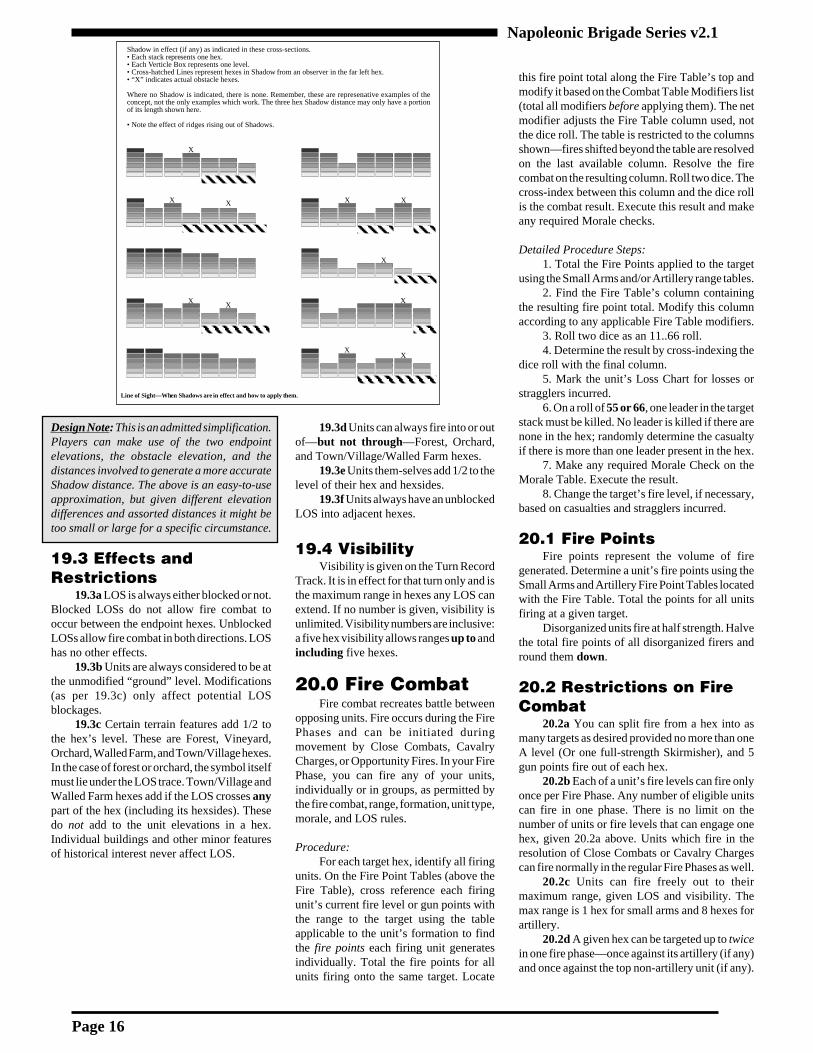
Napoleonic Brigade Series v2.1
Page 16
Design Note: This is an admitted simplification.Players can make use of the two endpointelevations, the obstacle elevation, and thedistances involved to generate a more accurateShadow distance. The above is an easy-to-useapproximation, but given different elevationdifferences and assorted distances it might betoo small or large for a specific circumstance.
19.3 Effects andRestrictions
19.3a LOS is always either blocked or not.Blocked LOSs do not allow fire combat tooccur between the endpoint hexes. UnblockedLOSs allow fire combat in both directions. LOShas no other effects.
19.3b Units are always considered to be atthe unmodified “ground” level. Modifications(as per 19.3c) only affect potential LOSblockages.
19.3c Certain terrain features add 1/2 tothe hex’s level. These are Forest, Vineyard,Orchard, Walled Farm, and Town/Village hexes.In the case of forest or orchard, the symbol itselfmust lie under the LOS trace. Town/Village andWalled Farm hexes add if the LOS crosses anypart of the hex (including its hexsides). Thesedo not add to the unit elevations in a hex.Individual buildings and other minor featuresof historical interest never affect LOS.
19.3d Units can always fire into or outof—but not through—Forest, Orchard,and Town/Village/Walled Farm hexes.
19.3e Units them-selves add 1/2 to thelevel of their hex and hexsides.
19.3f Units always have an unblockedLOS into adjacent hexes.
19.4 VisibilityVisibility is given on the Turn Record
Track. It is in effect for that turn only and isthe maximum range in hexes any LOS canextend. If no number is given, visibility isunlimited. Visibility numbers are inclusive:a five hex visibility allows ranges up to andincluding five hexes.
20.0 Fire CombatFire combat recreates battle between
opposing units. Fire occurs during the FirePhases and can be initiated duringmovement by Close Combats, CavalryCharges, or Opportunity Fires. In your FirePhase, you can fire any of your units,individually or in groups, as permitted bythe fire combat, range, formation, unit type,morale, and LOS rules.
Procedure:For each target hex, identify all firing
units. On the Fire Point Tables (above theFire Table), cross reference each firingunit’s current fire level or gun points withthe range to the target using the tableapplicable to the unit’s formation to findthe fire points each firing unit generatesindividually. Total the fire points for allunits firing onto the same target. Locate
this fire point total along the Fire Table’s top andmodify it based on the Combat Table Modifiers list(total all modifiers before applying them). The netmodifier adjusts the Fire Table column used, notthe dice roll. The table is restricted to the columnsshown—fires shifted beyond the table are resolvedon the last available column. Resolve the firecombat on the resulting column. Roll two dice. Thecross-index between this column and the dice rollis the combat result. Execute this result and makeany required Morale checks.
Detailed Procedure Steps:1. Total the Fire Points applied to the target
using the Small Arms and/or Artillery range tables.2. Find the Fire Table’s column containing
the resulting fire point total. Modify this columnaccording to any applicable Fire Table modifiers.
3. Roll two dice as an 11..66 roll.4. Determine the result by cross-indexing the
dice roll with the final column.5. Mark the unit’s Loss Chart for losses or
stragglers incurred.6. On a roll of 55 or 66, one leader in the target
stack must be killed. No leader is killed if there arenone in the hex; randomly determine the casualtyif there is more than one leader present in the hex.
7. Make any required Morale Check on theMorale Table. Execute the result.
8. Change the target’s fire level, if necessary,based on casualties and stragglers incurred.
20.1 Fire PointsFire points represent the volume of fire
generated. Determine a unit’s fire points using theSmall Arms and Artillery Fire Point Tables locatedwith the Fire Table. Total the points for all unitsfiring at a given target.
Disorganized units fire at half strength. Halvethe total fire points of all disorganized firers andround them down.
20.2 Restrictions on FireCombat
20.2a You can split fire from a hex into asmany targets as desired provided no more than oneA level (Or one full-strength Skirmisher), and 5gun points fire out of each hex.
20.2b Each of a unit’s fire levels can fire onlyonce per Fire Phase. Any number of eligible unitscan fire in one phase. There is no limit on thenumber of units or fire levels that can engage onehex, given 20.2a above. Units which fire in theresolution of Close Combats or Cavalry Chargescan fire normally in the regular Fire Phases as well.
20.2c Units can fire freely out to theirmaximum range, given LOS and visibility. Themax range is 1 hex for small arms and 8 hexes forartillery.
20.2d A given hex can be targeted up to twicein one fire phase—once against its artillery (if any)and once against the top non-artillery unit (if any).
Line of Sight—When Shadows are in effect and how to apply them.
Shadow in effect (if any) as indicated in these cross-sections.• Each stack represents one hex.• Each Verticle Box represents one level.• Cross-hatched Lines represent hexes in Shadow from an observer in the far left hex.• “X” indicates actual obstacle hexes.
Where no Shadow is indicated, there is none. Remember, these are represenative examples of theconcept, not the only examples which work. The three hex Shadow distance may only have a portionof its length shown here.
• Note the effect of ridges rising out of Shadows.
X
X X
X X
XX
X
X
X X
The Gamers, Inc.
Page 17
20.2e Units can split their fires intomore than one combat, but splitting mustoccur along fire level and gun point lines.For instance, an A could split fire as twoB’s.
20.2f Resolve fractional fire pointvalues on the “Less than 1” column even ifthey would technically round to zero. Firesof zero fire points (before rounding) haveno effect.
20.2g Artillery units can selectivelytarget artillery units regardless of thetarget’s position in its stack.
Important: Artillery which selectively firesupon enemy artillery (which is not on thetop of its stack) has its fire points halved.
20.3 Terrain Effects onFire Combat
20.3a Those terrain types affectingcombat are shown on the Combat TableModifiers list.
20.3b A single line of the CombatTable Modifiers list can apply only onceper combat.
20.3c A slope affects a combat if allfires in that combat cross slope hexsides. Ifany fire comes into the target hex via a non-slope hexside, do not apply the slope benefit.This rule also applies to extreme slopes,sunken road hexsides, and redoubts.
20.4 Combat ResultsAfter determining the fire points and
applying modifiers, roll two dice (11..66roll) to determine the combat result.
20.4a Morale Checks. Certain resultscall for a Morale Check only (no casualtiesor stragglers). Roll on the Morale Table forthe top unit. “Up One” or “Up Two”specifies additional Morale Table shiftsrequired.
20.4b Straggler Losses. Some combatresults give step losses due to stragglers.Apply these only to units which can incurstragglers (namely infantry units). Recordthese on the Loss Charts.
20.4c Step Losses. Some combatresults give hard casualty step losses. Theselosses are permanent and (except forartillery losses) must be recorded on theLoss Charts.
20.4d Leader Losses. On a roll of 55or 66, one leader in the target hex (if any)must become a casualty. If more than oneleader is present in the target hex, select theunlucky one at random.
Example: Use of Fire Points and the FireTable
In this first example, two Infantrybrigades in line are firing from two separatehexes at the same target at range 1. Allinfantry brigades have a strength greaterthan the A fire level, so the fire can becalculated as two As firing at range 1.
The Small Arms Chart tells us that anA at range 1 provides 2 fire points, or atotal of 4 for the two firers. Identify the 4fire point column on the Fire Table. Readdown the list of Fire Table Modifiers—Regular Firers and determine if any apply.None of the modifiers apply. On the 4column, the firing player rolls two dice andgets a 46 which gives a “1, (1)” result. Herecords one casualty and one straggler onhis Loss Chart, and makes a Morale Check.That ends this fire combat.
In the second example, a French playeris firing the following: From hex #1, an Ain line formation at range one; from hex #2,an A in column and 4 gun points (any type)at range 1; from hex #3, a battery of 5 heavygun points at range 6; and from hex #4 abattery of 5 light gun points at range 8. Theplayer gets the following fire points foreach of these: 2, 6, 1, and 1/2 respectivelyfor a total of 9 1/2 or 10 (after rounding).This places the initial Fire Table column atthe 10 column.
In this case, however, one of the firershas a flank shot. This adds +3 to the firecombat. The combat is resolved on the 13column.
The player rolls 2 dice getting an 65.The result is a “3, (2)”, giving threecasualties and 2 stragglers. The playerthen moves on to conduct the Morale Checkagainst the stack, ending this fire combat.
20.5 Step LossesRecord infantry and cavalry step losses
on the Loss Charts. Mark off these losses asthey occur and adjust fire levels accordingly.Artillery units have no loss charts, butinstead use gun point markers under theunit counter. For artillery, a given casualtyloss is the number of gun points destroyed.
20.6 Marking Lossesand Stragglers
Each brigade has a row on the LossChart. Mark casualties with X’s andstragglers with /’s. Keep casualties to theleft of stragglers. Remember, only infantryunits lose steps to stragglers—other unittypes ignore these losses.
20.6a When all the squares to the leftof the “wrecked mark” are filled with
casualties and stragglers, the unit iswrecked. Mark a line through the unit’sidentification on the Loss Chart and markone of the Division’s squares.
20.6b When all the squares to the leftof a division’s wrecked line are marked,the division is wrecked. Circle the division’sidentification on the chart.
Example: Use of Loss ChartsThe following example shows the use ofLoss charts. Below is an example brigadeand division set of Loss Chart boxes. At fullstrength, the brigade is an A fire level unit.
Brigade A ❏ B ❏❏✓❏ C❏❏❏Division ❏✓❏
After a turn of combat, the brigade takesone casualty and one straggler. This ismarked as:
Brigade A ✚ B ❚ ❏✓❏ C❏❏❏Division ❏✓❏
Note that the casualty (the cross) is placedto the left, the straggler (the bar) is placedto the right. The brigade is now a B firelevel unit and should be marked as such onthe game map. In the following turn, thebrigade suffers another casualty. This ismarked as:
Brigade A ✚ B ✚ ❚ ✓❏ C❏❏❏Division ❏✓❏
Note that the casualty forces the stragglerto shift to the right. The combination ofcasualties and stragglers touches thebrigade’s wrecked mark. The brigade isnow wrecked and a box is to be marked offthe division’s set, which causes the divisionto become wrecked as well. This is shownas:
Brigade A ✚ B ✚ ❚✓❏ C❏❏❏Division ✚ ✓❏
The additional marks are made to alert theplayer as to the wrecked condition of thisunit.
21.0 StragglersStragglers are troops temporarily lost
from their units through combat stress andexertion. Unlike permanent battlecasualties, stragglers can be recovered torebuild a unit’s strength.
21.0a IMPORTANT: Only Infantryunits suffer straggler losses. Artillery,Cavalry, and Skirmisher units never sufferloss due to stragglers. When a stack uses a
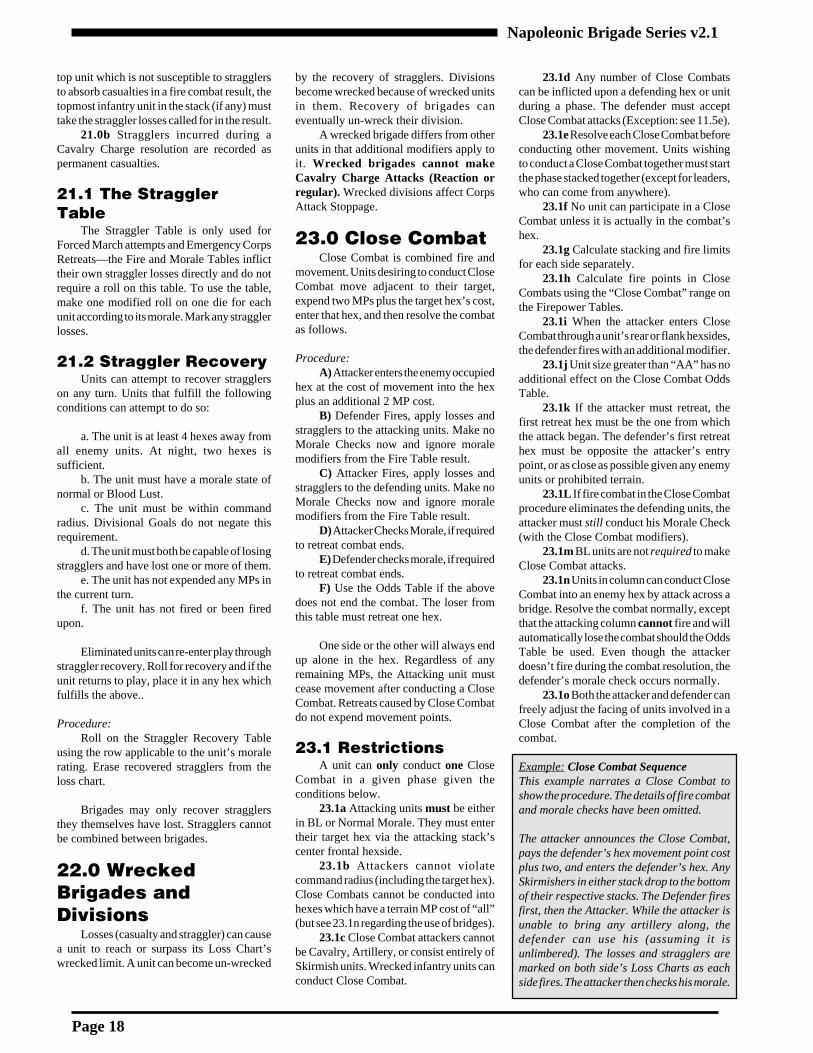
Napoleonic Brigade Series v2.1
Page 18
top unit which is not susceptible to stragglersto absorb casualties in a fire combat result, thetopmost infantry unit in the stack (if any) musttake the straggler losses called for in the result.
21.0b Stragglers incurred during aCavalry Charge resolution are recorded aspermanent casualties.
21.1 The StragglerTable
The Straggler Table is only used forForced March attempts and Emergency CorpsRetreats—the Fire and Morale Tables inflicttheir own straggler losses directly and do notrequire a roll on this table. To use the table,make one modified roll on one die for eachunit according to its morale. Mark any stragglerlosses.
21.2 Straggler RecoveryUnits can attempt to recover stragglers
on any turn. Units that fulfill the followingconditions can attempt to do so:
a. The unit is at least 4 hexes away fromall enemy units. At night, two hexes issufficient.
b. The unit must have a morale state ofnormal or Blood Lust.
c. The unit must be within commandradius. Divisional Goals do not negate thisrequirement.
d. The unit must both be capable of losingstragglers and have lost one or more of them.
e. The unit has not expended any MPs inthe current turn.
f. The unit has not fired or been firedupon.
Eliminated units can re-enter play throughstraggler recovery. Roll for recovery and if theunit returns to play, place it in any hex whichfulfills the above..
Procedure:Roll on the Straggler Recovery Table
using the row applicable to the unit’s moralerating. Erase recovered stragglers from theloss chart.
Brigades may only recover stragglersthey themselves have lost. Stragglers cannotbe combined between brigades.
22.0 WreckedBrigades andDivisions
Losses (casualty and straggler) can causea unit to reach or surpass its Loss Chart’swrecked limit. A unit can become un-wrecked
by the recovery of stragglers. Divisionsbecome wrecked because of wrecked unitsin them. Recovery of brigades caneventually un-wreck their division.
A wrecked brigade differs from otherunits in that additional modifiers apply toit. Wrecked brigades cannot makeCavalry Charge Attacks (Reaction orregular). Wrecked divisions affect CorpsAttack Stoppage.
23.0 Close CombatClose Combat is combined fire and
movement. Units desiring to conduct CloseCombat move adjacent to their target,expend two MPs plus the target hex’s cost,enter that hex, and then resolve the combatas follows.
Procedure:A) Attacker enters the enemy occupied
hex at the cost of movement into the hexplus an additional 2 MP cost.
B) Defender Fires, apply losses andstragglers to the attacking units. Make noMorale Checks now and ignore moralemodifiers from the Fire Table result.
C) Attacker Fires, apply losses andstragglers to the defending units. Make noMorale Checks now and ignore moralemodifiers from the Fire Table result.
D) Attacker Checks Morale, if requiredto retreat combat ends.
E) Defender checks morale, if requiredto retreat combat ends.
F) Use the Odds Table if the abovedoes not end the combat. The loser fromthis table must retreat one hex.
One side or the other will always endup alone in the hex. Regardless of anyremaining MPs, the Attacking unit mustcease movement after conducting a CloseCombat. Retreats caused by Close Combatdo not expend movement points.
23.1 RestrictionsA unit can only conduct one Close
Combat in a given phase given theconditions below.
23.1a Attacking units must be eitherin BL or Normal Morale. They must entertheir target hex via the attacking stack’scenter frontal hexside.
23.1b Attackers cannot violatecommand radius (including the target hex).Close Combats cannot be conducted intohexes which have a terrain MP cost of “all”(but see 23.1n regarding the use of bridges).
23.1c Close Combat attackers cannotbe Cavalry, Artillery, or consist entirely ofSkirmish units. Wrecked infantry units canconduct Close Combat.
23.1d Any number of Close Combatscan be inflicted upon a defending hex or unitduring a phase. The defender must acceptClose Combat attacks (Exception: see 11.5e).
23.1e Resolve each Close Combat beforeconducting other movement. Units wishingto conduct a Close Combat together must startthe phase stacked together (except for leaders,who can come from anywhere).
23.1f No unit can participate in a CloseCombat unless it is actually in the combat’shex.
23.1g Calculate stacking and fire limitsfor each side separately.
23.1h Calculate fire points in CloseCombats using the “Close Combat” range onthe Firepower Tables.
23.1i When the attacker enters CloseCombat through a unit’s rear or flank hexsides,the defender fires with an additional modifier.
23.1j Unit size greater than “AA” has noadditional effect on the Close Combat OddsTable.
23.1k If the attacker must retreat, thefirst retreat hex must be the one from whichthe attack began. The defender’s first retreathex must be opposite the attacker’s entrypoint, or as close as possible given any enemyunits or prohibited terrain.
23.1L If fire combat in the Close Combatprocedure eliminates the defending units, theattacker must still conduct his Morale Check(with the Close Combat modifiers).
23.1m BL units are not required to makeClose Combat attacks.
23.1n Units in column can conduct CloseCombat into an enemy hex by attack across abridge. Resolve the combat normally, exceptthat the attacking column cannot fire and willautomatically lose the combat should the OddsTable be used. Even though the attackerdoesn’t fire during the combat resolution, thedefender’s morale check occurs normally.
23.1o Both the attacker and defender canfreely adjust the facing of units involved in aClose Combat after the completion of thecombat.
Example: Close Combat SequenceThis example narrates a Close Combat toshow the procedure. The details of fire combatand morale checks have been omitted.
The attacker announces the Close Combat,pays the defender’s hex movement point costplus two, and enters the defender’s hex. AnySkirmishers in either stack drop to the bottomof their respective stacks. The Defender firesfirst, then the Attacker. While the attacker isunable to bring any artillery along, thedefender can use his (assuming it isunlimbered). The losses and stragglers aremarked on both side’s Loss Charts as eachside fires. The attacker then checks his morale.
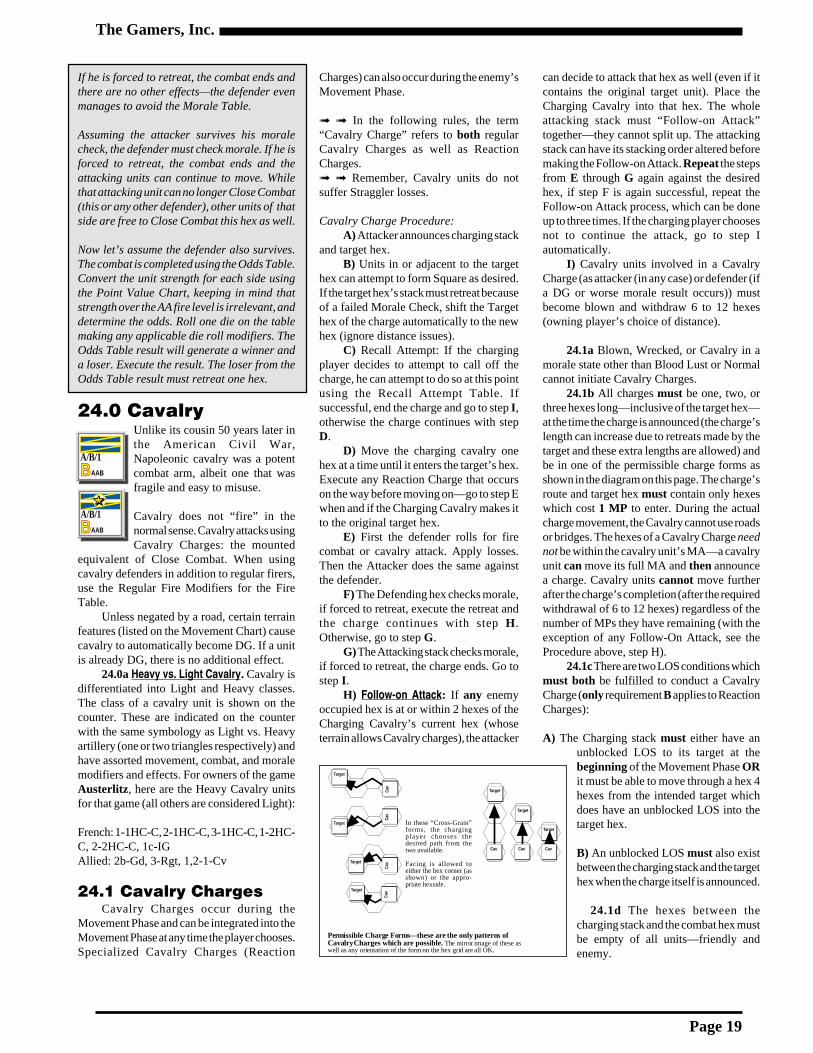
The Gamers, Inc.
Page 19
If he is forced to retreat, the combat ends andthere are no other effects—the defender evenmanages to avoid the Morale Table.
Assuming the attacker survives his moralecheck, the defender must check morale. If he isforced to retreat, the combat ends and theattacking units can continue to move. Whilethat attacking unit can no longer Close Combat(this or any other defender), other units of thatside are free to Close Combat this hex as well.
Now let’s assume the defender also survives.The combat is completed using the Odds Table.Convert the unit strength for each side usingthe Point Value Chart, keeping in mind thatstrength over the AA fire level is irrelevant, anddetermine the odds. Roll one die on the tablemaking any applicable die roll modifiers. TheOdds Table result will generate a winner anda loser. Execute the result. The loser from theOdds Table result must retreat one hex.
24.0 CavalryUnlike its cousin 50 years later inthe American Civil War,Napoleonic cavalry was a potentcombat arm, albeit one that wasfragile and easy to misuse.
Cavalry does not “fire” in thenormal sense. Cavalry attacks usingCavalry Charges: the mounted
equivalent of Close Combat. When usingcavalry defenders in addition to regular firers,use the Regular Fire Modifiers for the FireTable.
Unless negated by a road, certain terrainfeatures (listed on the Movement Chart) causecavalry to automatically become DG. If a unitis already DG, there is no additional effect.
24.0a Heavy vs. Light Cavalry. Cavalry isdifferentiated into Light and Heavy classes.The class of a cavalry unit is shown on thecounter. These are indicated on the counterwith the same symbology as Light vs. Heavyartillery (one or two triangles respectively) andhave assorted movement, combat, and moralemodifiers and effects. For owners of the gameAusterlitz , here are the Heavy Cavalry unitsfor that game (all others are considered Light):
French: 1-1HC-C, 2-1HC-C, 3-1HC-C, 1-2HC-C, 2-2HC-C, 1c-IGAllied: 2b-Gd, 3-Rgt, 1,2-1-Cv
24.1 Cavalry ChargesCavalry Charges occur during the
Movement Phase and can be integrated into theMovement Phase at any time the player chooses.Specialized Cavalry Charges (Reaction
Charges) can also occur during the enemy’sMovement Phase.
➟ ➟ In the following rules, the term“Cavalry Charge” refers to both regularCavalry Charges as well as ReactionCharges.➟ ➟ Remember, Cavalry units do notsuffer Straggler losses.
Cavalry Charge Procedure:A) Attacker announces charging stack
and target hex.B) Units in or adjacent to the target
hex can attempt to form Square as desired.If the target hex’s stack must retreat becauseof a failed Morale Check, shift the Targethex of the charge automatically to the newhex (ignore distance issues).
C) Recall Attempt: If the chargingplayer decides to attempt to call off thecharge, he can attempt to do so at this pointusing the Recall Attempt Table. Ifsuccessful, end the charge and go to step I ,otherwise the charge continues with stepD.
D) Move the charging cavalry onehex at a time until it enters the target’s hex.Execute any Reaction Charge that occurson the way before moving on—go to step Ewhen and if the Charging Cavalry makes itto the original target hex.
E) First the defender rolls for firecombat or cavalry attack. Apply losses.Then the Attacker does the same againstthe defender.
F) The Defending hex checks morale,if forced to retreat, execute the retreat andthe charge continues with step H .Otherwise, go to step G.
G) The Attacking stack checks morale,if forced to retreat, the charge ends. Go tostep I .
H) Follow-on Attack: If any enemyoccupied hex is at or within 2 hexes of theCharging Cavalry’s current hex (whoseterrain allows Cavalry charges), the attacker
can decide to attack that hex as well (even if itcontains the original target unit). Place theCharging Cavalry into that hex. The wholeattacking stack must “Follow-on Attack”together—they cannot split up. The attackingstack can have its stacking order altered beforemaking the Follow-on Attack. Repeat the stepsfrom E through G again against the desiredhex, if step F is again successful, repeat theFollow-on Attack process, which can be doneup to three times. If the charging player choosesnot to continue the attack, go to step Iautomatically.
I) Cavalry units involved in a CavalryCharge (as attacker (in any case) or defender (ifa DG or worse morale result occurs)) mustbecome blown and withdraw 6 to 12 hexes(owning player’s choice of distance).
24.1a Blown, Wrecked, or Cavalry in amorale state other than Blood Lust or Normalcannot initiate Cavalry Charges.
24.1b All charges must be one, two, orthree hexes long—inclusive of the target hex—at the time the charge is announced (the charge’slength can increase due to retreats made by thetarget and these extra lengths are allowed) andbe in one of the permissible charge forms asshown in the diagram on this page. The charge’sroute and target hex must contain only hexeswhich cost 1 MP to enter. During the actualcharge movement, the Cavalry cannot use roadsor bridges. The hexes of a Cavalry Charge neednot be within the cavalry unit’s MA—a cavalryunit can move its full MA and then announcea charge. Cavalry units cannot move furtherafter the charge’s completion (after the requiredwithdrawal of 6 to 12 hexes) regardless of thenumber of MPs they have remaining (with theexception of any Follow-On Attack, see theProcedure above, step H).
24.1c There are two LOS conditions whichmust both be fulfilled to conduct a CavalryCharge (only requirement B applies to ReactionCharges):
A) The Charging stack must either have anunblocked LOS to its target at thebeginning of the Movement Phase ORit must be able to move through a hex 4hexes from the intended target whichdoes have an unblocked LOS into thetarget hex.
B) An unblocked LOS must also existbetween the charging stack and the targethex when the charge itself is announced.
24.1d The hexes between thecharging stack and the combat hex mustbe empty of all units—friendly andenemy.
1-Cav
BAB
A/B/1
BAAB
2-Cav
AA
A/B/1
BAAB
Permissible Charge Forms—these are the only patterns ofCavalry Charges which are possible. The mirror image of these aswell as any orientation of the form on the hex grid are all OK.
Target
Target
Cav Cav
In these “Cross-Grain”forms, the chargingplayer chooses thedesired path from thetwo available.
Facing is allowed toeither the hex corner (asshown) or the appro-priate hexside.
Target
Target
Target
Target
Target
Cav
Cav
Cav
Cav
Cav
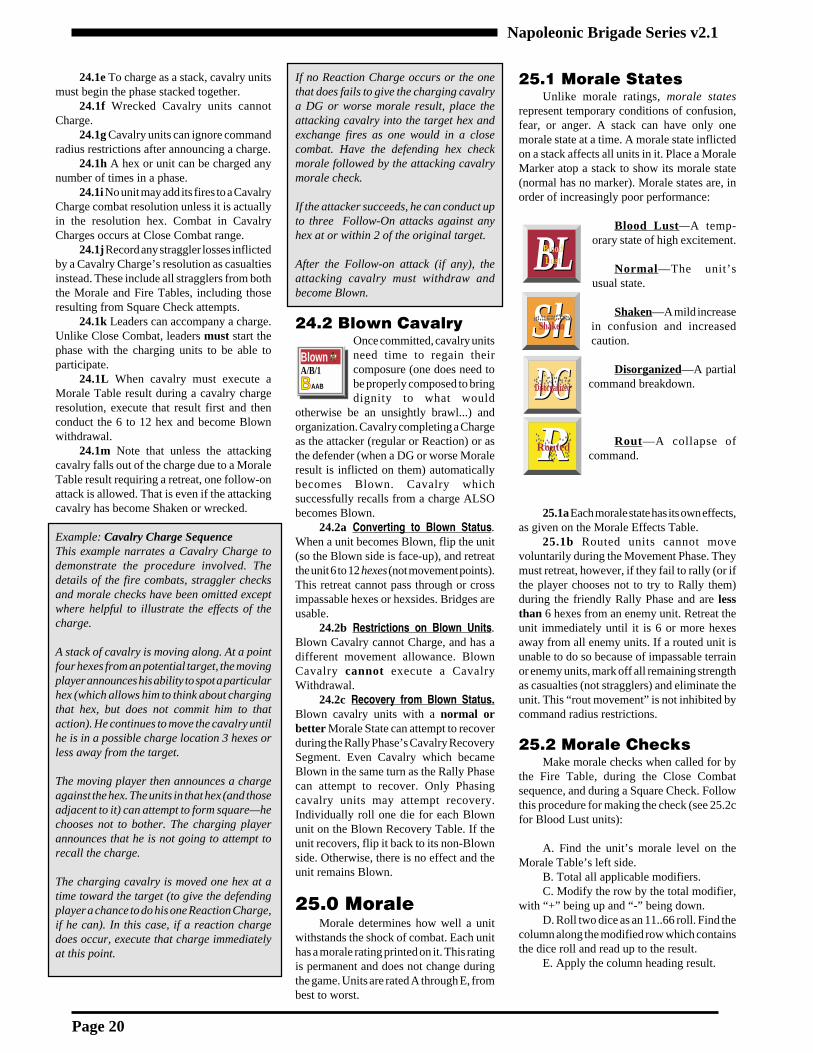
Napoleonic Brigade Series v2.1
Page 20
24.1e To charge as a stack, cavalry unitsmust begin the phase stacked together.
24.1f Wrecked Cavalry units cannotCharge.
24.1g Cavalry units can ignore commandradius restrictions after announcing a charge.
24.1h A hex or unit can be charged anynumber of times in a phase.
24.1i No unit may add its fires to a CavalryCharge combat resolution unless it is actuallyin the resolution hex. Combat in CavalryCharges occurs at Close Combat range.
24.1j Record any straggler losses inflictedby a Cavalry Charge’s resolution as casualtiesinstead. These include all stragglers from boththe Morale and Fire Tables, including thoseresulting from Square Check attempts.
24.1k Leaders can accompany a charge.Unlike Close Combat, leaders must start thephase with the charging units to be able toparticipate.
24.1L When cavalry must execute aMorale Table result during a cavalry chargeresolution, execute that result first and thenconduct the 6 to 12 hex and become Blownwithdrawal.
24.1m Note that unless the attackingcavalry falls out of the charge due to a MoraleTable result requiring a retreat, one follow-onattack is allowed. That is even if the attackingcavalry has become Shaken or wrecked.
Example: Cavalry Charge SequenceThis example narrates a Cavalry Charge todemonstrate the procedure involved. Thedetails of the fire combats, straggler checksand morale checks have been omitted exceptwhere helpful to illustrate the effects of thecharge.
A stack of cavalry is moving along. At a pointfour hexes from an potential target, the movingplayer announces his ability to spot a particularhex (which allows him to think about chargingthat hex, but does not commit him to thataction). He continues to move the cavalry untilhe is in a possible charge location 3 hexes orless away from the target.
The moving player then announces a chargeagainst the hex. The units in that hex (and thoseadjacent to it) can attempt to form square—hechooses not to bother. The charging playerannounces that he is not going to attempt torecall the charge.
The charging cavalry is moved one hex at atime toward the target (to give the defendingplayer a chance to do his one Reaction Charge,if he can). In this case, if a reaction chargedoes occur, execute that charge immediatelyat this point.
If no Reaction Charge occurs or the onethat does fails to give the charging cavalrya DG or worse morale result, place theattacking cavalry into the target hex andexchange fires as one would in a closecombat. Have the defending hex checkmorale followed by the attacking cavalrymorale check.
If the attacker succeeds, he can conduct upto three Follow-On attacks against anyhex at or within 2 of the original target.
After the Follow-on attack (if any), theattacking cavalry must withdraw andbecome Blown.
24.2 Blown CavalryOnce committed, cavalry unitsneed time to regain theircomposure (one does need tobe properly composed to bringdignity to what would
otherwise be an unsightly brawl...) andorganization. Cavalry completing a Chargeas the attacker (regular or Reaction) or asthe defender (when a DG or worse Moraleresult is inflicted on them) automaticallybecomes Blown. Cavalry whichsuccessfully recalls from a charge ALSObecomes Blown.
24.2a Converting to Blown Status.When a unit becomes Blown, flip the unit(so the Blown side is face-up), and retreatthe unit 6 to 12 hexes (not movement points).This retreat cannot pass through or crossimpassable hexes or hexsides. Bridges areusable.
24.2b Restrictions on Blown Units.Blown Cavalry cannot Charge, and has adifferent movement allowance. BlownCavalry cannot execute a CavalryWithdrawal.
24.2c Recovery from Blown Status.Blown cavalry units with a normal orbetter Morale State can attempt to recoverduring the Rally Phase’s Cavalry RecoverySegment. Even Cavalry which becameBlown in the same turn as the Rally Phasecan attempt to recover. Only Phasingcavalry units may attempt recovery.Individually roll one die for each Blownunit on the Blown Recovery Table. If theunit recovers, flip it back to its non-Blownside. Otherwise, there is no effect and theunit remains Blown.
25.0 MoraleMorale determines how well a unit
withstands the shock of combat. Each unithas a morale rating printed on it. This ratingis permanent and does not change duringthe game. Units are rated A through E, frombest to worst.
25.1 Morale StatesUnlike morale ratings, morale states
represent temporary conditions of confusion,fear, or anger. A stack can have only onemorale state at a time. A morale state inflictedon a stack affects all units in it. Place a MoraleMarker atop a stack to show its morale state(normal has no marker). Morale states are, inorder of increasingly poor performance:
Blood Lust—A temp-orary state of high excitement.
Normal—The unit’susual state.
Shaken—A mild increasein confusion and increasedcaution.
Disorganized—A partialcommand breakdown.
Rout—A collapse ofcommand.
25.1a Each morale state has its own effects,as given on the Morale Effects Table.
25.1b Routed units cannot movevoluntarily during the Movement Phase. Theymust retreat, however, if they fail to rally (or ifthe player chooses not to try to Rally them)during the friendly Rally Phase and are lessthan 6 hexes from an enemy unit. Retreat theunit immediately until it is 6 or more hexesaway from all enemy units. If a routed unit isunable to do so because of impassable terrainor enemy units, mark off all remaining strengthas casualties (not stragglers) and eliminate theunit. This “rout movement” is not inhibited bycommand radius restrictions.
25.2 Morale ChecksMake morale checks when called for by
the Fire Table, during the Close Combatsequence, and during a Square Check. Followthis procedure for making the check (see 25.2cfor Blood Lust units):
A. Find the unit’s morale level on theMorale Table’s left side.
B. Total all applicable modifiers.C. Modify the row by the total modifier,
with “+” being up and “-” being down.D. Roll two dice as an 11..66 roll. Find the
column along the modified row which containsthe dice roll and read up to the result.
E. Apply the column heading result.
B
Blow
nBlownA/B/1
BAAB
BLBLBloodLust
ShShShaken
DGDGDisorganized
RRRouted
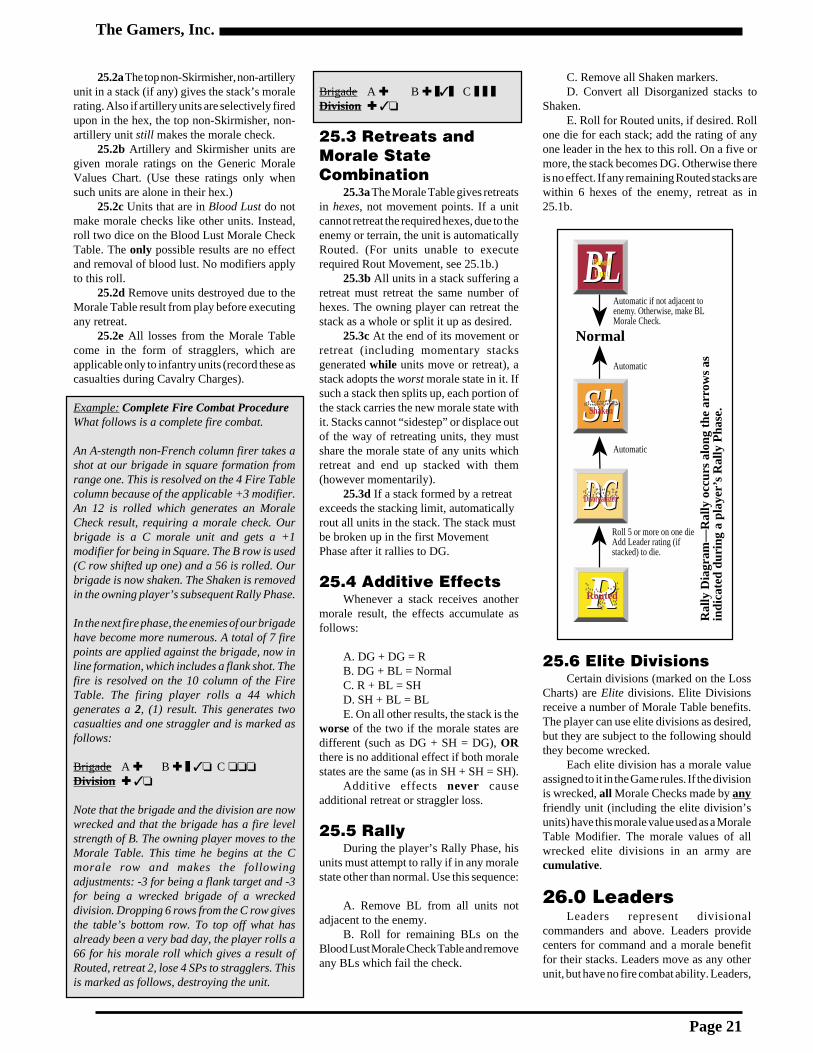
The Gamers, Inc.
Page 21
25.2a The top non-Skirmisher, non-artilleryunit in a stack (if any) gives the stack’s moralerating. Also if artillery units are selectively firedupon in the hex, the top non-Skirmisher, non-artillery unit still makes the morale check.
25.2b Artillery and Skirmisher units aregiven morale ratings on the Generic MoraleValues Chart. (Use these ratings only whensuch units are alone in their hex.)
25.2c Units that are in Blood Lust do notmake morale checks like other units. Instead,roll two dice on the Blood Lust Morale CheckTable. The only possible results are no effectand removal of blood lust. No modifiers applyto this roll.
25.2d Remove units destroyed due to theMorale Table result from play before executingany retreat.
25.2e All losses from the Morale Tablecome in the form of stragglers, which areapplicable only to infantry units (record these ascasualties during Cavalry Charges).
Example: Complete Fire Combat ProcedureWhat follows is a complete fire combat.
An A-stength non-French column firer takes ashot at our brigade in square formation fromrange one. This is resolved on the 4 Fire Tablecolumn because of the applicable +3 modifier.An 12 is rolled which generates an MoraleCheck result, requiring a morale check. Ourbrigade is a C morale unit and gets a +1modifier for being in Square. The B row is used(C row shifted up one) and a 56 is rolled. Ourbrigade is now shaken. The Shaken is removedin the owning player’s subsequent Rally Phase.
In the next fire phase, the enemies of our brigadehave become more numerous. A total of 7 firepoints are applied against the brigade, now inline formation, which includes a flank shot. Thefire is resolved on the 10 column of the FireTable. The firing player rolls a 44 whichgenerates a 2, (1) result. This generates twocasualties and one straggler and is marked asfollows:
Brigade A ✚ B ✚ ❚ ✓❏ C ❏❏❏Division ✚ ✓❏
Note that the brigade and the division are nowwrecked and that the brigade has a fire levelstrength of B. The owning player moves to theMorale Table. This time he begins at the Cmorale row and makes the followingadjustments: -3 for being a flank target and -3for being a wrecked brigade of a wreckeddivision. Dropping 6 rows from the C row givesthe table’s bottom row. To top off what hasalready been a very bad day, the player rolls a66 for his morale roll which gives a result ofRouted, retreat 2, lose 4 SPs to stragglers. Thisis marked as follows, destroying the unit.
Brigade A ✚ B ✚ ❚✓❚ C ❚ ❚ ❚Division ✚ ✓❏
25.3 Retreats andMorale StateCombination
25.3a The Morale Table gives retreatsin hexes, not movement points. If a unitcannot retreat the required hexes, due to theenemy or terrain, the unit is automaticallyRouted. (For units unable to executerequired Rout Movement, see 25.1b.)
25.3b All units in a stack suffering aretreat must retreat the same number ofhexes. The owning player can retreat thestack as a whole or split it up as desired.
25.3c At the end of its movement orretreat (including momentary stacksgenerated while units move or retreat), astack adopts the worst morale state in it. Ifsuch a stack then splits up, each portion ofthe stack carries the new morale state withit. Stacks cannot “sidestep” or displace outof the way of retreating units, they mustshare the morale state of any units whichretreat and end up stacked with them(however momentarily).
25.3d If a stack formed by a retreatexceeds the stacking limit, automaticallyrout all units in the stack. The stack mustbe broken up in the first MovementPhase after it rallies to DG.
25.4 Additive EffectsWhenever a stack receives another
morale result, the effects accumulate asfollows:
A. DG + DG = RB. DG + BL = NormalC. R + BL = SHD. SH + BL = BLE. On all other results, the stack is the
worse of the two if the morale states aredifferent (such as DG + SH = DG), ORthere is no additional effect if both moralestates are the same (as in SH + SH = SH).
Additive effects never causeadditional retreat or straggler loss.
25.5 RallyDuring the player’s Rally Phase, his
units must attempt to rally if in any moralestate other than normal. Use this sequence:
A. Remove BL from all units notadjacent to the enemy.
B. Roll for remaining BLs on theBlood Lust Morale Check Table and removeany BLs which fail the check.
C. Remove all Shaken markers.D. Convert all Disorganized stacks to
Shaken.E. Roll for Routed units, if desired. Roll
one die for each stack; add the rating of anyone leader in the hex to this roll. On a five ormore, the stack becomes DG. Otherwise thereis no effect. If any remaining Routed stacks arewithin 6 hexes of the enemy, retreat as in25.1b.
25.6 Elite DivisionsCertain divisions (marked on the Loss
Charts) are Elite divisions. Elite Divisionsreceive a number of Morale Table benefits.The player can use elite divisions as desired,but they are subject to the following shouldthey become wrecked.
Each elite division has a morale valueassigned to it in the Game rules. If the divisionis wrecked, all Morale Checks made by anyfriendly unit (including the elite division’sunits) have this morale value used as a MoraleTable Modifier. The morale values of allwrecked elite divisions in an army arecumulative.
26.0 LeadersLeaders represent divisional
commanders and above. Leaders providecenters for command and a morale benefitfor their stacks. Leaders move as any otherunit, but have no fire combat ability. Leaders,
Ral
ly D
iagr
am—
Ral
ly o
ccur
s al
ong
the
arro
ws
as
indi
cate
d du
ring
a pl
ayer
’s R
ally
Pha
se.
BLBLBloodLust
DGDGDisorganized
RRRouted
ShShShaken
Roll 5 or more on one die Add Leader rating (if stacked) to die.
Automatic
Automatic if not adjacent to enemy. Otherwise, make BL Morale Check.
Normal
Automatic
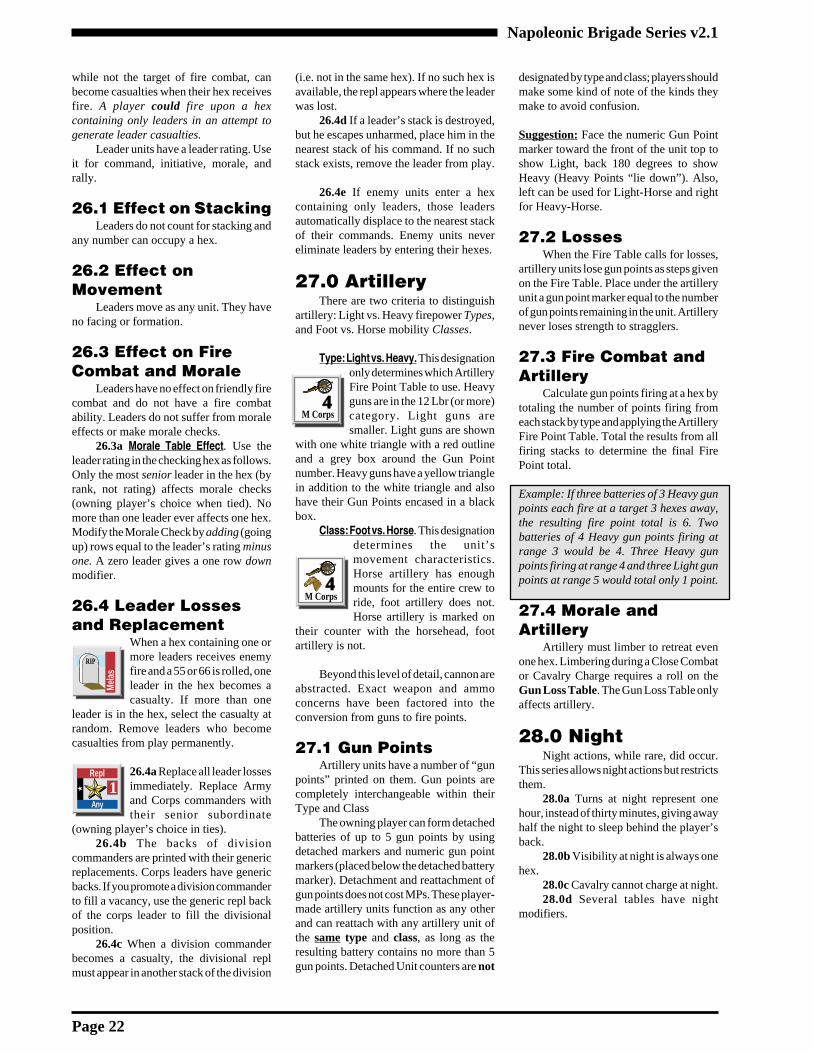
Napoleonic Brigade Series v2.1
Page 22
while not the target of fire combat, canbecome casualties when their hex receivesfire. A player could fire upon a hexcontaining only leaders in an attempt togenerate leader casualties.
Leader units have a leader rating. Useit for command, initiative, morale, andrally.
26.1 Effect on StackingLeaders do not count for stacking and
any number can occupy a hex.
26.2 Effect onMovement
Leaders move as any unit. They haveno facing or formation.
26.3 Effect on FireCombat and Morale
Leaders have no effect on friendly firecombat and do not have a fire combatability. Leaders do not suffer from moraleeffects or make morale checks.
26.3a Morale Table Effect. Use theleader rating in the checking hex as follows.Only the most senior leader in the hex (byrank, not rating) affects morale checks(owning player’s choice when tied). Nomore than one leader ever affects one hex.Modify the Morale Check by adding (goingup) rows equal to the leader’s rating minusone. A zero leader gives a one row downmodifier.
26.4 Leader Lossesand Replacement
When a hex containing one ormore leaders receives enemyfire and a 55 or 66 is rolled, oneleader in the hex becomes acasualty. If more than one
leader is in the hex, select the casualty atrandom. Remove leaders who becomecasualties from play permanently.
26.4a Replace all leader lossesimmediately. Replace Armyand Corps commanders withtheir senior subordinate
(owning player’s choice in ties).26.4b The backs of division
commanders are printed with their genericreplacements. Corps leaders have genericbacks. If you promote a division commanderto fill a vacancy, use the generic repl backof the corps leader to fill the divisionalposition.
26.4c When a division commanderbecomes a casualty, the divisional replmust appear in another stack of the division
(i.e. not in the same hex). If no such hex isavailable, the repl appears where the leaderwas lost.
26.4d If a leader’s stack is destroyed,but he escapes unharmed, place him in thenearest stack of his command. If no suchstack exists, remove the leader from play.
26.4e If enemy units enter a hexcontaining only leaders, those leadersautomatically displace to the nearest stackof their commands. Enemy units nevereliminate leaders by entering their hexes.
27.0 ArtilleryThere are two criteria to distinguish
artillery: Light vs. Heavy firepower Types,and Foot vs. Horse mobility Classes.
Type: Light vs. Heavy. This designationonly determines which ArtilleryFire Point Table to use. Heavyguns are in the 12 Lbr (or more)category. Light guns aresmaller. Light guns are shown
with one white triangle with a red outlineand a grey box around the Gun Pointnumber. Heavy guns have a yellow trianglein addition to the white triangle and alsohave their Gun Points encased in a blackbox.
Class: Foot vs. Horse. This designationdetermines the unit’smovement characteristics.Horse artillery has enoughmounts for the entire crew toride, foot artillery does not.Horse artillery is marked on
their counter with the horsehead, footartillery is not.
Beyond this level of detail, cannon areabstracted. Exact weapon and ammoconcerns have been factored into theconversion from guns to fire points.
27.1 Gun PointsArtillery units have a number of “gun
points” printed on them. Gun points arecompletely interchangeable within theirType and Class
The owning player can form detachedbatteries of up to 5 gun points by usingdetached markers and numeric gun pointmarkers (placed below the detached batterymarker). Detachment and reattachment ofgun points does not cost MPs. These player-made artillery units function as any otherand can reattach with any artillery unit ofthe same type and class, as long as theresulting battery contains no more than 5gun points. Detached Unit counters are not
designated by type and class; players shouldmake some kind of note of the kinds theymake to avoid confusion.
Suggestion: Face the numeric Gun Pointmarker toward the front of the unit top toshow Light, back 180 degrees to showHeavy (Heavy Points “lie down”). Also,left can be used for Light-Horse and rightfor Heavy-Horse.
27.2 LossesWhen the Fire Table calls for losses,
artillery units lose gun points as steps givenon the Fire Table. Place under the artilleryunit a gun point marker equal to the numberof gun points remaining in the unit. Artillerynever loses strength to stragglers.
27.3 Fire Combat andArtillery
Calculate gun points firing at a hex bytotaling the number of points firing fromeach stack by type and applying the ArtilleryFire Point Table. Total the results from allfiring stacks to determine the final FirePoint total.
Example: If three batteries of 3 Heavy gunpoints each fire at a target 3 hexes away,the resulting fire point total is 6. Twobatteries of 4 Heavy gun points firing atrange 3 would be 4. Three Heavy gunpoints firing at range 4 and three Light gunpoints at range 5 would total only 1 point.
27.4 Morale andArtillery
Artillery must limber to retreat evenone hex. Limbering during a Close Combator Cavalry Charge requires a roll on theGun Loss Table. The Gun Loss Table onlyaffects artillery.
28.0 NightNight actions, while rare, did occur.
This series allows night actions but restrictsthem.
28.0a Turns at night represent onehour, instead of thirty minutes, giving awayhalf the night to sleep behind the player’sback.
28.0b Visibility at night is always onehex.
28.0c Cavalry cannot charge at night.28.0d Several tables have night
modifiers.
RIPMay1864
RIP
Mela
s
1★
Repl
Any
Cav2
M Corps4
V Corps2
M Corps4
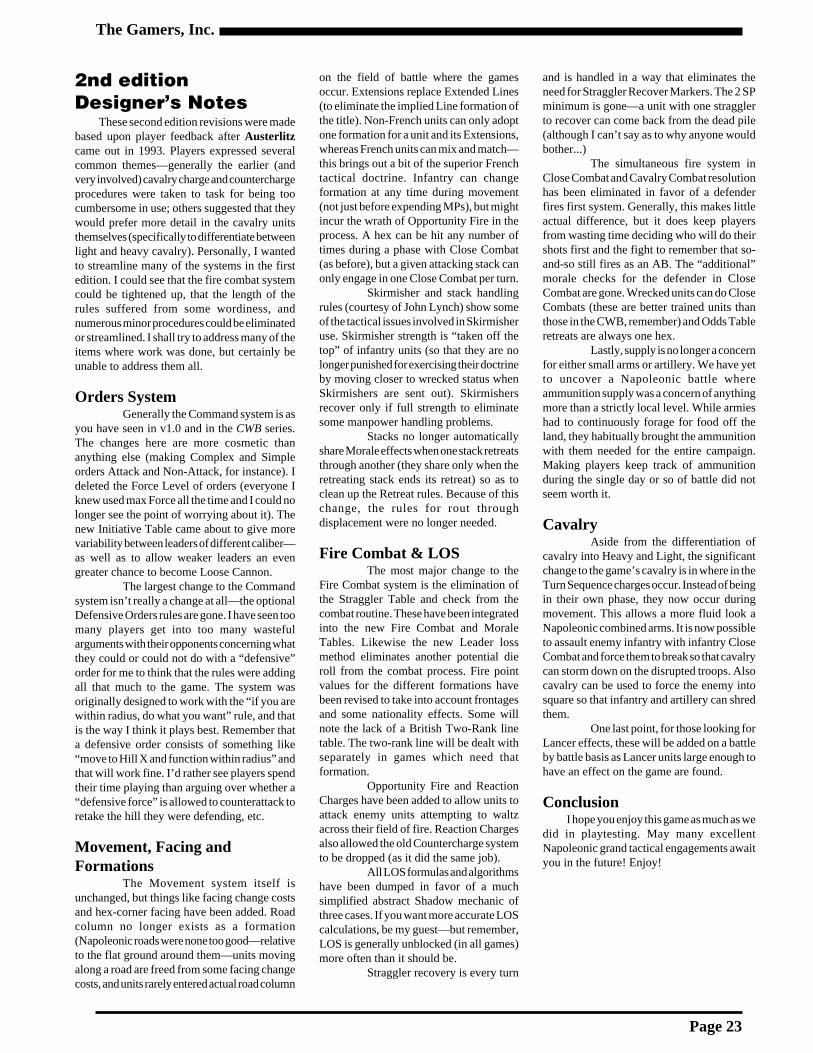
The Gamers, Inc.
Page 23
2nd editionDesigner’s Notes
These second edition revisions were madebased upon player feedback after Austerlitzcame out in 1993. Players expressed severalcommon themes—generally the earlier (andvery involved) cavalry charge and counterchargeprocedures were taken to task for being toocumbersome in use; others suggested that theywould prefer more detail in the cavalry unitsthemselves (specifically to differentiate betweenlight and heavy cavalry). Personally, I wantedto streamline many of the systems in the firstedition. I could see that the fire combat systemcould be tightened up, that the length of therules suffered from some wordiness, andnumerous minor procedures could be eliminatedor streamlined. I shall try to address many of theitems where work was done, but certainly beunable to address them all.
Orders SystemGenerally the Command system is as
you have seen in v1.0 and in the CWB series.The changes here are more cosmetic thananything else (making Complex and Simpleorders Attack and Non-Attack, for instance). Ideleted the Force Level of orders (everyone Iknew used max Force all the time and I could nolonger see the point of worrying about it). Thenew Initiative Table came about to give morevariability between leaders of different caliber—as well as to allow weaker leaders an evengreater chance to become Loose Cannon.
The largest change to the Commandsystem isn’t really a change at all—the optionalDefensive Orders rules are gone. I have seen toomany players get into too many wastefularguments with their opponents concerning whatthey could or could not do with a “defensive”order for me to think that the rules were addingall that much to the game. The system wasoriginally designed to work with the “if you arewithin radius, do what you want” rule, and thatis the way I think it plays best. Remember thata defensive order consists of something like“move to Hill X and function within radius” andthat will work fine. I’d rather see players spendtheir time playing than arguing over whether a“defensive force” is allowed to counterattack toretake the hill they were defending, etc.
Movement, Facing andFormations
The Movement system itself isunchanged, but things like facing change costsand hex-corner facing have been added. Roadcolumn no longer exists as a formation(Napoleonic roads were none too good—relativeto the flat ground around them—units movingalong a road are freed from some facing changecosts, and units rarely entered actual road column
on the field of battle where the gamesoccur. Extensions replace Extended Lines(to eliminate the implied Line formation ofthe title). Non-French units can only adoptone formation for a unit and its Extensions,whereas French units can mix and match—this brings out a bit of the superior Frenchtactical doctrine. Infantry can changeformation at any time during movement(not just before expending MPs), but mightincur the wrath of Opportunity Fire in theprocess. A hex can be hit any number oftimes during a phase with Close Combat(as before), but a given attacking stack canonly engage in one Close Combat per turn.
Skirmisher and stack handlingrules (courtesy of John Lynch) show someof the tactical issues involved in Skirmisheruse. Skirmisher strength is “taken off thetop” of infantry units (so that they are nolonger punished for exercising their doctrineby moving closer to wrecked status whenSkirmishers are sent out). Skirmishersrecover only if full strength to eliminatesome manpower handling problems.
Stacks no longer automaticallyshare Morale effects when one stack retreatsthrough another (they share only when theretreating stack ends its retreat) so as toclean up the Retreat rules. Because of thischange, the rules for rout throughdisplacement were no longer needed.
Fire Combat & LOSThe most major change to the
Fire Combat system is the elimination ofthe Straggler Table and check from thecombat routine. These have been integratedinto the new Fire Combat and MoraleTables. Likewise the new Leader lossmethod eliminates another potential dieroll from the combat process. Fire pointvalues for the different formations havebeen revised to take into account frontagesand some nationality effects. Some willnote the lack of a British Two-Rank linetable. The two-rank line will be dealt withseparately in games which need thatformation.
Opportunity Fire and ReactionCharges have been added to allow units toattack enemy units attempting to waltzacross their field of fire. Reaction Chargesalso allowed the old Countercharge systemto be dropped (as it did the same job).
All LOS formulas and algorithmshave been dumped in favor of a muchsimplified abstract Shadow mechanic ofthree cases. If you want more accurate LOScalculations, be my guest—but remember,LOS is generally unblocked (in all games)more often than it should be.
Straggler recovery is every turn
and is handled in a way that eliminates theneed for Straggler Recover Markers. The 2 SPminimum is gone—a unit with one stragglerto recover can come back from the dead pile(although I can’t say as to why anyone wouldbother...)
The simultaneous fire system inClose Combat and Cavalry Combat resolutionhas been eliminated in favor of a defenderfires first system. Generally, this makes littleactual difference, but it does keep playersfrom wasting time deciding who will do theirshots first and the fight to remember that so-and-so still fires as an AB. The “additional”morale checks for the defender in CloseCombat are gone. Wrecked units can do CloseCombats (these are better trained units thanthose in the CWB, remember) and Odds Tableretreats are always one hex.
Lastly, supply is no longer a concernfor either small arms or artillery. We have yetto uncover a Napoleonic battle whereammunition supply was a concern of anythingmore than a strictly local level. While armieshad to continuously forage for food off theland, they habitually brought the ammunitionwith them needed for the entire campaign.Making players keep track of ammunitionduring the single day or so of battle did notseem worth it.
CavalryAside from the differentiation of
cavalry into Heavy and Light, the significantchange to the game’s cavalry is in where in theTurn Sequence charges occur. Instead of beingin their own phase, they now occur duringmovement. This allows a more fluid look aNapoleonic combined arms. It is now possibleto assault enemy infantry with infantry CloseCombat and force them to break so that cavalrycan storm down on the disrupted troops. Alsocavalry can be used to force the enemy intosquare so that infantry and artillery can shredthem.
One last point, for those looking forLancer effects, these will be added on a battleby battle basis as Lancer units large enough tohave an effect on the game are found.
ConclusionI hope you enjoy this game as much as we
did in playtesting. May many excellentNapoleonic grand tactical engagements awaityou in the future! Enjoy!
Napoleonic Brigade Series v2.1
Page 24
Welcome to The Gamers and ourWelcome to The Gamers and ourWelcome to The Gamers and ourWelcome to The Gamers and ourWelcome to The Gamers and ourdefinition of Total Game Support !!!definition of Total Game Support !!!definition of Total Game Support !!!definition of Total Game Support !!!definition of Total Game Support !!!
We’re Here to Help!We’re Here to Help!We’re Here to Help!We’re Here to Help!We’re Here to Help!1. Rules Help.1. Rules Help.1. Rules Help.1. Rules Help.1. Rules Help.
We are personally available to answer your rules questions, one on one, by phone most business days (and frequentlyduring off hours). If you come up with something during play, give us a ring. We will be able to give you the “official”interpretation of the rule in question and your input will help us in locating rules and phrases that cause players the mostproblems. (217) 896-2145
If we aren’t there, leave word on the answering machine and I’ll get back to you as soon as I can. That’s a promise.
Don’t hesitate! A personal explanation can do wonders. Besides, if you run into something that you and your opponent cannotagree on, I can play an impartial judge on a specific event. (These last are usually the most fun, too.)
2. On-Line Help.2. On-Line Help.2. On-Line Help.2. On-Line Help.2. On-Line Help.E-mail can reach me at [email protected] or [email protected]. Check out our web site at www.tgamers.com
and you can join our e-mail discussion group (The Gamers List) there.
3. Letters and Fax3. Letters and Fax3. Letters and Fax3. Letters and Fax3. Letters and FaxWe will be happy to answer your letter and Fax questions, too. We turn them around as soon as possible (same or
next day at most). I’ll Fax a response directly to the number you give. Mailed questions are answered in as much depth asI can think of (phone questions are easier to handle in that regard, as we get to go back and forth with you) and we do not requirethings like SASEs or Yes/No format.
Fax: (217) 896-2880
Write: The Gamers, Inc.500 W. 4th StreetHomer, IL 61849
4. Your Input is Important!4. Your Input is Important!4. Your Input is Important!4. Your Input is Important!4. Your Input is Important!While we attempt to maintain the continuity of our series rules—to eliminate repetitive rules learning—we do allow
them to develop further after publication. The rules remain stable, not static. Chances are the rules will be revised at least oncein the form newer editions. Moreover, Operations (our magazine) does offer options, additional rules, and clarifications astime goes on which will help refine the series. We do not publish games and then forget them! All of this refinement activitydepends heavily on the active participation of the players of our games and feedback is desired. What is more important,feedback has an effect on what we do and how we do it.
5. We Don’t Make Empty Promises, Either!5. We Don’t Make Empty Promises, Either!5. We Don’t Make Empty Promises, Either!5. We Don’t Make Empty Promises, Either!5. We Don’t Make Empty Promises, Either!If you are new to The Gamers, but not new to wargaming, you are probably saying to yourself “Yeah, right. I’ve been
lied to by the best!” We can’t change things others have done. We can, however, live up to our own standards and promises.Ask anyone who has dealt with us directly before, or try us on any of the above. We’ll be happy to surprise you!
Welcome to the Best Kept Secret inWelcome to the Best Kept Secret inWelcome to the Best Kept Secret inWelcome to the Best Kept Secret inWelcome to the Best Kept Secret inWargaming!!!Wargaming!!!Wargaming!!!Wargaming!!!Wargaming!!!