moorpark college physics m20b lab manual by …
TRANSCRIPT

1
MOORPARK COLLEGE
PHYSICS M20B LAB MANUAL
BY PROFESSOR MEYER
With contributions from Professor Becht
1. Errors and the Propagation of Uncertainties …………………….. 2
2. Specific Heat of Metals and the Heat of Fusion of Water ………. 9
3. Newton’s Law of Cooling ……………………………………. 12
4. Calibrating a Thermometer ……………………………………… 15
5. The Nature of Electrical Resistance …………………………….. 17
6. Electric Field Plotting …………………………………………… 23
7. Capacitance and Capacitors ……………………………………… 26
8. Voltage and Current Divider Circuits …………………………… 29
9. The Oscilloscope ………………………………………………… 33
10. Waveform Analysis and Rectifiers ……………………………… 37
11. Determining µo Using a Current Balance ………………………... 43
12. e/m the Charge to Mass Ratio of Electron ………………………. 48
13. Simple AC Circuits ………………………………………………. 53

2
ERRORS AND ERROR PROPAGATION
INTRODUCTION: Laboratory experiments involve taking measurements and using those
measurements in an equation to calculate an experimental result. It is also necessary to know
how to estimate the uncertainty, or error, in physical measurements and to know how to use
those uncertainties to calculate the error in the experimental result.
READ THIS HANDOUT AND DO THE EXERCISES AT THE END OF THIS
HANDOUT. YOUR GRADE WILL BE DETERMINED BY HOW WELL YOU DO THE
EXERCISES. AT THE END OF THE PERIOD HAND IN THE EXERCISES ALONG
WITH YOUR NEATLY DONE CALCULATION SHEETS SHOWING ALL OF YOUR
WORK.
TYPES OF EXPERIMENTAL ERRORS
Experimental errors can generally be classified into three types: personal, systematic, and
random.
Personal Errors
These errors arise from personal bias of carelessness in reading an instrument, in recording data,
or in calculations, and parallax in reading a meter. Of these, only parallax errors can be
estimated and used in error propagation. Effort should be made to eliminate experimental errors.
(When looking at non-digital meter, there is a small distance between the needle and the scale.
As a result, the reading will change as the observer’s eye position changes from side to side.
This apparent change in reading, due to the change in position of the observer’s eye, is called
parallax.)
Systematic Errors
Errors of this type result in measured values which are consistently to high or to low.
Conditions which lead to systematic errors are as follows:
1. An improperly calibrated instrument such as a thermometer which consistently
reads 99ºC in boiling water instead of 100ºC.
2. A meter, micrometer, vernier caliper, or other instrument which was not
properly zeroed or for which the zero correction factor was not considered.
3. Theoretical errors due to a simplified mathematical model for the system
which consistently gives a calculated value different from the calculated value predicted
from a more accurate mathematical model.
Random Errors

3
Random errors result from unknown and unpredictable variations in experimental measurements.
Possible sources of random errors are:
1. Observational-e.g. , errors when reading the scale of a measuring device to the
smallest division.
2. Environmental- unpredictable fluctuations in readings beyond the
experimenters control. Such errors can be determined statistically or can be
estimated by the experimenter.
STATISTICAL DETERMINATION OF RANDOM ERRORS
When there are many measurements of the same quantity, the average or mean value is defined
by
N
i
ixN
x1
_ 1 where ix is the i
th measured value and N is the total number of measurements.
There are two ways to statistically calculate the uncertainty in the measured value. One method
is to calculate the deviation from the mean or “mean deviation d”
N
xx
d
N
i
i
1
It is common to express the experimental value of the measurement as:
Measured value of x = dx
where d a statistical estimate of the uncertainty in the measured value. As can be observed, the
mean deviation is a measure of the spread on the data.
Another method used to calculate the random error is by calculating the “standard deviation,
(s.d.)”
N
xx
ds
N
i
i
2
1..
The measures value of x can then be expressed as:
Measured value of ..dsxx
The statistical methods above will be used in selected lab exercises to follow such as “THE
SIMPLE PENDELUM” and “MOMENT OF INERTIA” where several measurements of time
are needed and an average or mean is calculated.
ESTIMATION OF RANDOM ERRORS

4
An easier method to determine random error is to estimate the random error by utilizing the
accuracy of the instrument and the judgment of the experimenter. The error in a given
instrument is determined by the smallest division on that instrument or “least count.” For
example, the smallest division on a meter stick is 1mm or 0.1cm. This is the least count for the
meter stick. In most measurements the smallest division represents the rightmost digit in the
value of that measurement and the estimated error is the measurement is the least count. For
example, a measure value may be 78.2cm 0.1cm.
Sometimes a measurement may be made with an estimated error less than the least count. For
example, an experimenter may estimate reading on a meter stick as 78.25cm by noting that the
reading was about half way between 78.2cm and 78.3cm. The experimenter may represent the
value as 78.25cm 0.05cm. Keep in mind that rightmost digit must be estimated by the
experimenter and is thus doubtful.
Sometimes the estimated error is larger than the least count. For example, when measuring the
distance between the two spots below, the experimenter would need to estimate where the center
of each spot would be located. The error in the measured distance would be larger than the least
count and the amount of the estimated error would be up to the judgment of the experimenter.
Note how much the error estimates depend on the judgment of the experimenter. There may be
errors in judgment; however, to avoid stating a result more accurately than you probably
measured it, one should try to avoid being too conservative in estimating errors.
ERROR PROPAGATION
PARTIAL DERIVITIVES
Before we can perform error propagation calculations, we must know how to take what are
called “partial derivatives” of a function with many variables. Some may already know how to
do this; you can help the others.
Suppose we have a function f where f=f(x,y,z). The partial derivative of f with respect to x is
found by taking the ordinary derivative while treating y and z as constants. The notation for this
derivative is x
f
. Likewise, the partial derivative of f with respect to y is found by taking the
ordinary derivative while treating x and z as constants and is written as y
f
and the partial
derivative of f with respect to z is found by taking the ordinary derivative while treating x and y
as constants and is written as z
f
.

5
As an example, let 325 yzxf . Then 325 yzxxx
f
= 3
23 105 xyz
x
xyz
Convince yourself that 325 zxy
f
and that 2215 yzx
z
f
.
ABSOLUTE AND RELATIVE ERRORS
Absolute Error: When an error is estimated in a measured value of x it will be designated as
x (delta x). x has the same units as x and is called the absolute error in x. For example, if
cmcmx 1.00.2 , the absolute error is cmx 1.0 .
Relative Error: The ratio of the absolute error x to the measured value x, x
x, is called the
relative error. It is usually represented as a percent. For example, the relative error in the
above example is %505.00.2
1.0
0.2
1.0
cm
cm
(note, there are times when it is necessary to from relative error back to absolute error:
xerrorx relative )
COMPUTATION OF ERROR
For a function zyxff ,, , the absolute error in f, f , is defined as:
222
zz
fy
y
fx
x
ff
The relative error in f would thus be
222
1z
z
fy
y
fx
x
f
ff
f
EXAMPLE
Using the function we used as an example for partial derivatives, we would have
22223223 15510 zyzxyzxfxyzf

6
thus
2
32
222
32
322
32
3
5
15
5
5
5
10z
yzx
yzxy
yzx
zxx
yzx
xyz
f
f
which when simplified
becomes
22232
z
z
y
y
x
x
f
f
Note that the quantities in the parentheses are just the percent errors multiplied by the exponent
for that particular variable.
Suppose we have the experimental values for x, y, and z as:
cmcmx 1.00.3 , cmcmy 1.02.5 , and cmcmz 1.04.2 .
We would thus have the percent error in f as:
222
4.2
1.03
2.5
1.0
0.3
1.02
f
f=
0.143 ≈15%
Note that the % error is rounded up to the nearest whole number. Since it is just an e
nstimate, we can not justify more accuracy in the error.
ANOTHER EXAMPLE
Suppose c
baV
22 53 where cma 1.02.8 , cmb 1.05.6 , and cmc 1.01.5
Thus
222
cc
Vb
b
Va
a
VV
where c
a
a
V 6
,
c
b
b
V 10
, and
2
22 53
c
ba
c
V
; or,
2
2
2222
53106c
c
bab
c
ba
c
aV
Notice that the negative sign in c
V
does not matter since it is squared.

7
Now
2
22
2
222
22
2
22 53
53
53
10
53
6
c
c
ba
c
ba
b
c
ba
c
b
a
c
ba
c
a
V
V
Or,
22
22
2
22 1.5
1.01.0
5.652.83
5.6101.0
5.652.83
2.86
V
V=5.5%
≈6%
The final results would be given as %681 cmV
PERCENT DISCREPANCY
Once an experimental value and its percent error are calculated, the percent discrepancy is
defined as
percent discrepancy in X= accepted
erimentalaccepted
X
XX exp
There will be agreement between the accepted value and the experimental value if the percent
discrepancy is less than the predicted percent error in the experimental value as determined by
error propagation. In other words, the experimental value is within the margin of error. This
should be addressed in your conclusion.
If there is not agreement, some sources of error may be present which may not have been
accounted for and some reasonable explanation should be included in the conclusion of your
report.
ERROR PROPAGATION EXERCISES
Determine the calculated value using the given values in the given equations. Be sure to include
the units in your answer. Using the error propagation method described above, calculate the
percent error in the calculated value. For this exercise, your percent error is to be given to two
significant figures.
22
22
2
22 53
10
53
6
c
cb
ba
ba
ba
a
V
V

8
Hand in this answer sheet. Work the problems neatly on scratch paper and staple your work
to this sheet.
1. A=xy, cmcmx 1.00.3 , cmcmy 1.00.4 ______________ _______%
2. f=x+y, for x and y given in problem # 1 ______________ _______%
3. f=x-y, for x and y given in problem # 1 ______________ _______%
4. z=3x+2y, for x and y given in problem # 1 ______________ ______%
5. 2
2
t
hg for %300.2 mh , %4630.0 st ______________ ______%
6. k
MT 2 , %65.2 KgM , %2
100
m
Nk ______________ ______%
7. 3
2
00.5ML
gcmd
, %20.30 gM , cmL 2.03.20 ___________ ______%
8. 22 yxz , %20.3 cmx , %20.4 cmy ______________ ______%
9. C
bcmaz
23 25 , %10.2 cma , %10.3 cmb , %20.11 cmC
______________ ______%
10. sindh , mmd 05.000.1 , 110 ______________ ______%
Hint: Convert 1° to radians

9
SPECIFIC HEAT CAPACITY FOR METALS AND HEAT
OF FUSION FOR WATER
INTRODUCTION: Using the method of mixtures, the specific heat capacity of copper and
aluminum will be measured;
APPARATUS: Ice, Steam generator, calorimeter, two thermometers, solid specimens of copper
and aluminum, metric “Dial-O-Gram” balance, DI water, towels, strainer, bucket (if no sink).
THEORY: TO BE COMPLETED PRIOR TO CLASS
Part 1. The specific heat capacity of a substance is defined as the heat energy per unit mass per
unit change in temperature or: 𝒄 =∆𝑸
𝒎∆𝑻
The units we will use are gramC
cal
From the definition of specific heat capacity, we can express the change in heat energy, ∆Q ,
when the temperature of a solid changes by ∆T, as:
TmcQ
The method of mixtures consists of determining the quantity of heat transferred from a given
amount of hot solid to a given amount of water and calorimeter at a given lower temperature. If
it is assumed that there is no heat exchange between the calorimeter and its surroundings, the
heat lost by the hot solid is equal to the heat gained by the water and calorimeter.
Let mw be the mass of the water in the calorimeter, mc is the mass of the calorimeter container
(insert); both are at an initial temperature T1. A solid of mass m is heated to a temperature of T2.
After the solid is placed in the water, the final temperature of the mixture is T.
The specific heat capacity of the calorimeter insert is given by cc.
The specific heat capacity of the solid is given by c and the specific heat of water is given by
cw.
Conservation of energy means that the heat lost by the solid specimen equals the heat gained by
the calorimeter container (insert) and water.
Thus, 𝑚𝑐(𝑇2 − 𝑇) = 𝑚𝑤𝑐𝑤(𝑇 − 𝑇1) + 𝑚𝑐𝑐𝑐(𝑇 − 𝑇1)
As part of the theory in your report, this equation is to be solved for c.

10
Part 2. Heat of fusion is given by: fmLQ Where m is the amount of ice melting to water at
0ºC and Lf is the latent heat of fusion for ice to water.
PROCEDURE:
NOTE: In all experiments, before taking measurements, organize a neat data sheet with
rows and columns all labeled with variables and units. As part of your data, record the
estimated uncertainty in each measurement.
Part 1:
Fill the steam generator two thirds full and plug it in.
Determine the mass of enough of one kind of metal to fill the boiler cup about 2/3 full
of the metal. Insert a thermometer into the metal and place the boiler cup into the
boiler.
“Weight” the empty aluminum container (insert) inside the calorimeter .
Fill the calorimeter insert about half full of distilled water, place a few pieces of ice in
the calorimeter insert to bring the temperature of the water two or three degrees below
room temperature and weight it again.
Using a second thermometer, measure and record the temperature of the water inside
the calorimeter insert.
After the water in the boiler begins to boil, wait a few minutes for the temperature of
the metal to stabilize, record this temperature. Pour the hot metal shot into the
calorimeter insert. Assemble the calorimeter, stir the mixture, and record the final
temperature when equilibrium has been reached. (How do you know when
equilibrium has been reached?)
Repeat the process for another solid.
It is assumed that the calorimeter contents are thermally isolated from their surroundings, i.e.
insulated. This is difficult to realize in practice, but the effect due the heat exchange can be
minimized by having the temperature difference between the initial calorimeter insert
contents and the surroundings about the same as the difference between the final temperature
of the calorimeter contents and the surroundings.
Part 2: In this part of the experiment, you will design an experiment to determine the latent
heat of fusion for water. You should come to the laboratory with an outline of the procedure
you plan to use. Include in your report the details of the procedure you used.
REPORT: Unless a formal report is required by your professor, your write up shall include the
following: (see writing a formal report in the appendix)

11
Theory: Derive each equation used in the analysis for parts one and two.
Procedure: State the details of how part 2 of this experiment was performed.
Analysis: Type the data sheet. Compute the specific heat capacities of the two metals . Compute
the heat of fusion for ice. Perform a sample calculation of each type. (state the equation used,
substitute the numbers, then state the answer). Using error propagation determine the percent
uncertainty in your results. Assume a 2% error in all of the ΔT’s. Calculate the percent
discrepancy between your results and the accepted values.
Conclusion: (to be typed) A conclusion containing a summary of results, and a comparison of
your experimental values with accepted values. (Is the percent discrepancy less than predicted
error?) The conclusion should also include sources of error and how the experiment could be
improved.
Appendix: The original signed data sheet and answers to questions should be placed in the
appendix.

12
NEWTONS LAW OF COOLING
PURPOSE
To experimentally observe Newton’s law of cooling , ∆𝑇 = (𝑇0 − 𝑇𝑠) 𝑒−𝑡
𝜏⁄ , and determine the
time constant τ.
REQUIRED EQUIPMENT (see photo)
Half inch copper tube about 20 cm long, stoppered with a dowel at one end, 2 ring stands, 2 tube
clamps, one thermometer, stop watch, propane torch.
THEORY
Newton’s law of cooling states that the rate of heat flow from an object is proportional to the
temperature difference between the object and the surroundings:
𝑑𝑄
𝑑𝑡= −𝑘∆𝑇 (1)
Here k is a constant and ΔT=T-Ts where Ts is the temperature of the surrounding air.
From the equation 𝑄 = 𝑚𝑐∆𝑇, we have 𝑑𝑄
𝑑𝑡= 𝑚𝑐
𝑑𝑇
𝑑𝑡 (2)
Prior to the lab class period, combine equations (1) and (2), separate the variables and simplify
to obtain:
∆𝑇 = (𝑇0 − 𝑇𝑠 )𝑒−𝑘𝑡
𝑚𝑐⁄
Where T0 is the initial temperature of the object which is cooling.
We shall define the time constant 𝜏 =𝒎𝒄
𝒌 and hence ∆𝑇 = (𝑇0 − 𝑇𝑠) 𝑒
−𝑡𝜏⁄ (3) .
PROCEDURE
Look at the picture below and set up your station as shown. Be sure the thermometer is centered
in the copper tube and is not touching the sides of the tube. Using the propane torch, heat the
pipe uniformly along its length to a temperature of between 1250C and 150
0C. When the
temperature has somewhat stabilized, record the temperature as T0.
Record the temperature T at 15 s intervals for the first two minutes and then at 30s intervals for
the next five minutes.

13
ANALYSIS
Assume m= 126g ± 2%
Using Microsoft’s EXCEL, plot a simi-log graph (lnΔT vs. t). Eye-ball the max-min lines and plot them by hand. From the max and min slope lines, determine
a percent error in the slope.
% 𝑠𝑙𝑜𝑝𝑒 𝑒𝑟𝑟𝑜𝑟 =max 𝑠𝑙𝑜𝑝𝑒 − min 𝑠𝑙𝑜𝑝𝑒
2(𝑏𝑒𝑠𝑡 𝑓𝑖𝑡 𝑠𝑙𝑜𝑝𝑒)
From the slope of the graph and the slope error, determine τ and the % error in τ.
Take the ln of both sides of the equation (3) and show that the slope of the
graph is -1/τ.
You do not have a theoretical value for τ because we do not know k.

14
THE REPORT (see writing a formal report in the appendix)
Unless a formal report is required by your professor, your report shall consist of:
Theory, including any derivations
Analysis and discussion of results
Conclusion (to be typed).
Appendix with original data sheet and typed answers to any questions
QUESTIONS
(1) Calculate the time it takes for the temperature difference between the copper tube and its
surroundings to cool to within 1% of the beginning temperature difference between the
tube and its surroundings.
(2) Using error propagation and the % error in τ, determine the % uncertainty in this time.
(3) Does the time calculated in question one depend on the initial temperature-justify your
answer?

15
CALIBRATING A THERMOMETER
INTRODUCTION
When a measureable physical property of an object varies with temperature, that object can be
calibrated to function as a thermometer. In this experiment, the electrical resistance of a simi-
conductor, called a thermistor, will be used for this purpose.
REQUIRED EQUIPMENT AND SUPPLIES
Portable DMM
Test Leads & Clips
Thermistor
Steam Generator
Tub of Slushy Ice
3 Tubs of Water at Approx.Temps. 10°C, 20°C, & 30°C
Digital Thermometer
THEORY
From other experiments, it is found that the resistance of a thermistor varies according to the
equation
𝑹 = 𝑹𝟎𝒆𝑩
𝑻⁄ (1)
Where R0 and B are constants and T is the absolute temperature.
From two measurements of the resistance at the (known) steam points and ice points, the above
equation can be used to determine B and R0 .
Taking the log of both sides, one can see that
𝑻 =𝑩
𝒍𝒏(𝑹
𝑹𝟎 ) (2)
Prior to lab class, use R1 at T1 and R2 at T2 in equation (1)
and derive expressions for R0 and B. Show all of the algebra and include the derivation in the
theory portion of your report. The expression for B is

16
𝑩 = (𝑻𝟏 𝑻𝟐
𝑻𝟏 − 𝑻𝟐) 𝐥𝐧 (
𝑹𝟐
𝑹𝟏)
PROCEDURE
Connect the thermistor the DMM with the DMM set to read OHMS (ohmmeter).
Immerse the thermistor in a bath of melting ice and record the resistance-this ice point is one of
your known temperatures.
Immerse the thermistor in a bath of boiling water and record the resistance-this steam is your
other known temperature.
Three water baths have been prepared, one below room temperature, on at approximately room
temperature, and one above room temperature.
Measure the resistance of the thermistor when placed in each of the water baths.
Also, measure the temperature of each water baths with a digital thermometer.
Assume a ±2% uncertainty in the resistance for all readings.
ANALYSIS
Calculate the constants B and R0 using the ice and steam point thermistor resistance data.
Using equation (2), Calculate the temperatures of the three baths using the thermistor resistance
data.
Determine the uncertainty of these temperatures by propagating the uncertainties in equation (2).
Assume a 2% error in B, R0, and R. Error propagation only needs to be done for one
temperature, not three. Chose the value of R which gives the maximum percent error.
Compare your results with the digital thermometer values and discuss the results-are your results
within the margin of error, if not, why not?
THE REPORT
Read “WRITING A REPORT” and follow those guidelines for this report. This will be a
formal report.

17
THE NATURE OF ELECTRICAL RESISTANCE
INTRODUCTION
The experimental objectives of this experiment are to study some fundamental properties of the
electrical resistance of metals. We shall investigate how the resistance depends on the current
thru a wire and thru a tungsten filament light bulb. The resistivity of an unknown metal will be
determined. In the course of doing the experiment, you will learn how to wire a simple circuit
and how to make measurements with voltmeters, ammeters, and ohmmeters.
REQUIRED EQUIPMENT AND SUPPLIES
0-25 VOLT DC POWER SUPPLY, 2 DIGITAL MULTIMETERS, SMALL DIAMETER
RESISTIVE WIRE, MICROMETERS, 0-6V TUNGSTEN FILAMENT LIGHT BULB. SHARP
KNIFE TO SCRAPE OFF INSULATION FROM THE WIRE.
SIMPLE CIRCUITS
Figure 1 shows a simple circuit that has only two components. First, the power supply provides
the electromotive force (emf, VorE ) that creates the electric current (I) in the current is the
Ampere ( A). The power supply has a positive and a negative terminal. The arrow indicates that
the current flows from the positive terminal to the negative terminal of the power supply. (If
viewed microscopically, electrons flow from negative to positive but “conventional current” has
positive charge flowing from positive to negative. We shall use conventional current in this
class.)
Figure 1
The component on the right is called a resistor; its resistance is measured in ohms ( Ω). You can
think of the power supply as the source of electrical power which is dissipated by the resistor or
load. In other words, resistance is the physical property that converts electrical energy to heat.
I
R +
- E

18
The straight lines connecting the power supply to the resistor are wires (conductors) that serve as
conduit for the electrical current. They are assumed to have no resistance.
𝐼 =V/R Eq. 1
or I=E /R hence we see that current thru the resistor is proportional to the voltage across the resistor.
This equation can also be written as V= RI. From this equation, we see that if voltage is
plotted on the y-axis and current on the x-axis, the graph would be a straight line if the resistance
of the circuit component or device is constant and the slope of the line would be equal to R. If the graph is a straight line, the device is said to be an ohmic device.
If the graph of V vs. I is not a straight line, the circuit component is said to be non-ohmic. For
these other types of components, resistance is not a constant but may vary with temperature or
current thru the device.
THE USE OF AMMETERS AND VOLTMETERS
An ammeter is used to measure the current that passes through a circuit component. The
ammeter is always connected in series with the component so the current that passes through the
component must pass through the meter. Ammeters have very little resistance so the will
change the current in the circuit very little.
See figure 2.
Figure 2
R +
_ E
A I
+ _
+
_

19
A voltmeter is used to measure the voltage difference across a component. The voltmeter is
always connected in parallel with the component as in figure 3.
I
Figure 3
Your professor will explain the use of the particular meter you will be using for this experiment.
It is important that you anticipate the current or voltage magnitude and that you set your meter
on a high enough scale for the reading. Better to set it too high than too low. Voltmeters have a
very high resistance so they have very little current passing thru them. The ammeter is more
easily damaged than the voltmeter; therefore, pay particular attention to the scale setting and
make sure it is wired in series.
PART 1: OHM’S LAW AND THE RESISTIVY OF METALS
THEORY
PART 1
Even good conductors, like metals, have some resistance. For small currents, the resistance of a
metal is independent of the voltage across its length. Each kind of metal has a characteristic
property called its resistivity ρ. The resistance, R, of a wire is given in terms of the resistivity ρ
according to the relationship
𝑹 = 𝝆𝒍
𝑨 Eq. 2
R
+
_ E
V
l
+
_

20
Where l is the length of the wire and A is the cross-sectional area as shown in the diagram above.
By measuring the voltage from one end of the wire to the other and by measuring the current thru
the wire, R can be determined. The length l and the diameter d will be measured directly and ρ
of an unknown metal can be calculated. We shall assume the temperature remains constant
throughout the experiment.
PART 2
When the temperature of a metal changes, the resistance increases according to the relationship
𝑅 = 𝑅0 [1 + 𝛼(𝑇 − 𝑇0)] Eq. 3
Where R0 is the resistance at T0 (room temperature) α is the temperature coefficient of
resistance and is positive for metals. This experiment will use a tungsten filament light bulb.
By increasing the voltage across the bulb, the current thru the bulb will increase and so will the
temperature of the filament. You will verify qualitatively that the resistance of the tungsten
increases with temperature.
PROCEDURE
PART 1
Cut a length a length of approximately 1 m of the unknown wire. Scrape the insulation from
both ends for good electrical connection.
Wire the circuit as shown in figure 4 using alligator clips to make connections with the wire.
Make sure the power supply is turned off and do not turn it on until your circuit is
approved by your instructor.
I
Figure 4
A
+
_ E
V
+
_
A
cut
wire power
supply

21
Turn the power supply knobs to minimum settings and turn on the power supply. Gradually turn
the voltage up on the power supply to increase the current. Obtain at least six data points of
voltage and current with currents between 0 and 100 mA.
Measure the length of the wire between the connections. Using a micrometer, measure the
diameter of the wire. Be sure to record the estimated uncertainties. (one source or error is the
insulation on the wire)
Before dismantling your circuit, make a rough graph of V vs. I .
It should be close to a straight line.
PART 2
I
Figure 5
Measure the resistance of the 6 V light bulb (tungsten filament) with an ohmmeter. Use this
value as R0.
Replace the cut wire with the 6 V light bulb as shown in figure 5.
Take current reading with voltages settings from 0.5 V to 6 V in 0.5 volt increments.
ANALYSIS AND DISCUSSION
PART 1
Plot the voltage vs. the current and from the slope, determine the resistance of the wire.
Use error propagation of errors, to find the uncertainty in the result. Assume a 2% error in R.
State your final result for the resistivity of the unknown metal, together with the percent
uncertainty.
+
_ E
V
+
_
A
light
bulb power
supply

22
PART 2
Using EXCEL, Plot a graph of V vs. I .
What does the graph tell you about the resistance of the filament as a function of the
temperature?
Estimate the lowest and highest resistance by estimating the max and min slopes of the graph by
drawing tangent lines and determining their slope. This can be done with EXCEL.
Using Ohm’s law, calculate the resistance of the hot filament at the 6 V reading.
Assuming that the temperature of the hot filament is about 5,000 0
C, use the resistance of the hot
filament at 6 V and use equation 3 to calculate α for the filament. Compare your value to the
accepted value of α = 0.0045/0C for tungsten.
QUESTIONS (show the math where appropriate)
1. Suppose that you could stretch your wire and its density remained the same. If it is
now stretched to twice its original length, what is the ratio of the new resistance to
the original resistance. (note that the area and length both change)
2. By what factor would the resistance of your wire change if it were cut in half, both
ends scraped and twisted together so you now had two wires side by side with the
other ends twisted together also. (hint: use the ratio method)
3. If the ammeter and the voltmeter were mistakenly interchanged in the circuit of part
1, and the power is turned on, would either of these meters be damaged?
4. Suppose the ends of the wire were not properly scraped; how would this affect the
results, if at all? Would this likely cause systematic, or random error in the results.
5. You are asked to design a circuit component with zero temperature coefficient of
resistance. Considering this experiment, how might this be accomplished?
6. What is the benefit to the bulb if the resistance increases with temperature ?
THE REPORT (see writing a report)
Unless a formal report is required by your professor, your report shall consist of:
Theory, including any derivations
Analysis and discussion of results
Conclusion
Appendix with original data sheet and answers to any questions

23
ELECTRIC FIELD PLOTTING
INTRODUCTION The electric field originates on positive charge and ends on negative charge. The field direction
is therefore from positive to negative. Just as the gravitational field lines are perpendicular to an
equipotential surface, such as a table top, electric field lines (E field lines) are perpendicular to
equipotential lines. Electric potential is measured in volts, thus equipotential lines are equal
voltage lines. By plotting equipotential lines and drawing lines perpendicular to them, the E
field can be mapped.
In this experiment, a voltmeter is used to determine points of equal potential on a carbonized
conducting paper. Using a power supply a potential difference, or voltage difference, is
established between two metalized areas. The current thru the paper causes the potential to
smoothly change between the positive and negative terminals. The voltage in different regions
can be measured with a probe and voltmeter and equal voltage region can be mapped.
+
CARBONIZED
PAPER
V
_
_
PROBE DIPOLE
20 V
+
+
FIGURE 1
EQUIPMENT AND SUPPLIES

24
CARBONIZED PAPER WITH SILVER PAINTED ELECTRODES
CORK BACKED PLYWOOD BOARDS
WHITE PAPER
DMM
0-25V DC POWER SUPPLY
PUNCH PINS
THUMB TACKS WITH SOLDERED LOOPS
LEAD WITH PROBE END
STRAIGHT PINS
FLEXIBLE CURVE DRAWER
SISSORS
PROCEDURE
PART 1
Review dipoles fields and electric field mappings in your text.
Place the cork board, cork side up, on your table. Put two sheets of plain white paper (one for
each partner) on the board and then place the carbonized paper on top of the should be on top.
Place push pins at each corner. Use the specially built thumb tacks and alligator clips to connect
the wire leads to the metalized dipole areas. Wire the circuit as shown in figure 1
Turn on the power supply and establish 20 V between the dipoles. Good contact is critical. If
good contact is made, when the probe is placed about half-way between the two poles, the
reading should be close to 10 V; and, when the probe is placed in the +20 V metalized pole area
(not the tack) the voltage should read about 20 V. Once you have established good contact, do
not disturb the thumb tacks in any way.
You will now locate equipotentials at 3 V, 6 V, 10 V, 14 V, and 17 V. You will need 7 points for
each equipotential, one at the line of symmetry, and three on each side of the line of symmetry.
Carefully move the probe around (without disturbing the thumb tack connections) to find the
location of the equipotential points. Carefully mark the equipotential point with a pencil. Do not
damage the paper in any way. Do not take data points next to the edge of the paper.
PART 2
Disconnect the alligator clip from the positive pole thumbtack and connect it to the thumbtack
located at the center of metalized line. Make sure the power supply is still at 20 V. Locate the 5
V, 10 V, and 15 V equipotential. Again, you will need 7 points for each equipotential, one at the
line of symmetry, and three on each side of the line of symmetry. Carefully move the probe
around (without disturbing the thumb tack connections) to find the location of the equipotential
points. Carefully mark the equipotential point with a pencil. Do not damage the paper in any
way. Do not take data points next to the edge of the paper.

25
After all equipotential data points for both parts have been located, use a pin tack to punch a hole
at each data point thru all three layers of paper. Also, perforate around the perimeters of each
metalized area. The perforated white sheets are your data sheets for this experiment.
THE REPORT
1. You will prepare two electric field plots, one for the dipole and the other for the point and
line charge. Lay the perforated sheet on top of another sheet of white paper. Copy the
perforated data points onto the white paper by marking each
2. Each data pencil mark on the new sheet should now be “protected” by a small circle.
Next, draw the equipotential lines using a flexicurve ruler. Do not draw Do not draw the
curve from point to point; some points may lie on one side of the curve or the other.
3. Draw the electric field lines as smooth, solid curves, perpendicular to the equipotential
curves where they intersect. The metalized areas are also equipotentials; therefore, make
sure the E-field lines intersect perpendicular to the metalized area. Draw the field line
along the line of symmetry and three additional lines on each side. Symmetry of the field
lines will be a factor in grading your drawing. Think of the line of symmetry as a mirror
and draw the field lines accordingly.
4. The equipotential voltages should be labeled and the E-field lines should have arrows in
the proper direction.
QUESTIONS: (justify your answers)
1. Considering the dipole field, where is it the strongest? The weakest?
2. For each part, the edge of the center pole of the dipole was at zero potential; is the E-field
zero there also?
3. Using ∆𝑉 = 𝐸∆𝑥, calculate the average E-field along the line of symmetry between 6V
and 14V potentials and between the 3V and 6V potentials, for the dipole field.
4. How do the E-fields found in question 3 compare and are the results as expected?.

26
CAPACITANCE and CAPACITORS
PURPOSE:
Part 1
To build a capacitor using paper sandwiched between two aluminum sheets.
To measure the dielectric constant of papers
Observe how capacitance depends on the geometry of the capacitor
Part 2
From the discharge curve, determine the RC time constant of a series RC circuit and compare it
to the calculated value RC.
THEORY:
Part 1
The capacitance C is defined as Q/V. Capacitance is determined by the separation d between the
plates and A, the area of the plates according to the equation
𝑪 = 𝜿𝝐𝟎 𝑨
𝒅 (equation 1)
Where 𝜿 is the dielectric constant-the dielectric in this experiment is paper.
Part 2
The voltage of a discharging capacitor in series with a resistor is given by
𝑽 = 𝑽𝟎𝒆−𝒕
𝑹𝑪⁄ (equation 2)
RC is defined as the time constant τ. Prior to class, take the ln of both sides and put this equation in the form of a straight line and
identify the slope.
EQUIPMENT LIST:
Two cork covered plywood boards.
Two 20 cm X 28cm aluminum sheets
Two 20 cm X 14 cm aluminum sheets
Portable DMM
1 µF capacitor
1 50 MΩ resistor
Stopwatch
0 to 25V dc power supply
Capacitance meter
Stack of printer paper for the class
Micrometer
Graph paper
Rulers
Assorted kilogram weights
PROCEDURE:

27
Part 1-constructing a capacitor and measuring its capacitance
1. Using micrometers, measure the thickness of ten sheets of paper. Measure the length and
width of the aluminum sheets.
2. Construct the capacitor by putting the large aluminum sheets and one sheet of paper
between two cork boards as shown. Let the tabs stick out of the edge of the boards on
opposite ends
3.
4. Place 4 Kg of mass on the cork board. Using test leads and alligator clips, attach a
capacitance meter to the tabs on the aluminum sheets. Be sure the two sheets of
aluminum and the tabs do not “short out.” Record the capacitance, C1, as seen on the
meter. Vary the force and notice the variation in C1. Think of why it varies.
5. Carefully insert another sheet of paper and re-measure the capacitance C2 again standing
on the cork board.
6. Now remove large aluminum sheets and replace them with the smaller aluminum sheets
and insert just one sheet of paper. Again, place 4 Kg of mass on the cork board, and
measure the capacitance C3 .
Part 2- The RC time constant τ
Wire the circuit shown in the schematic show below. Note that the voltmeter is wired
“incorrectly” in series with the 50 MΩ resistor rather than in parallel as in other circuits. This is
done so the internal 11 MΩ resistance of the voltmeter is added to the 50 MΩ resistor giving a
total value of R=61 MΩ.
cork
board
aluminum
sheet paper
50 MΩ
+
- E
C= 1µF
DVM
11 MΩ

28
Set the power to the maximum voltage of the power supply. Do not exceed 25 V. Close the
switch and charge the capacitor. The capacitor is charged when the voltmeter reaches a steady
state. Open the switch to discharge the capacitor thru the resistor and DVM. Take voltage
reading for three minutes. Take readings frequently during the first minute and then just a few
for the remaining time.
ANALYSIS AND DISCUSSION
Part 1. Using equation 1, the area A, the separation d and capacitance C1, calculate the value of
𝛋 for paper. Use the propagation of uncertainties to calculate the uncertainty in your
result. Given that the value of 𝛋 for paper is 3.7, calculate the percent discrepancy in your from the measured value. Are your results within the margin of error? Discuss sources of error and suggest improvements. Calculate the ratios C1/C2 and C1/C3 . Are the ratios as expected? Discuss. Part 2 Take the natural log of both sides of equation 2. This yields a straight line equation
when lnV is plotted vs. t. The slope of the line is -1/RC = -1/τ.
Using Excel, Plot lnV vs. t and from the slope of the displayed equation, determine τ. Assume a 10% error in C and a 5% error in R . Use the values of R and C to calculate the
theoretical value of τ. Use error propagation to determine the predicted error in the
theoretical value of τ. Calculate the percent discrepancy in the value of τ. Is your
experimental value of τ within the margin of error?
THE REPORT:
Unless a formal report is required by your professor, your report shall consist of:
Theory
Analysis and discussion of results
Conclusion
Appendix with original data sheet

29
VOLTAGE AND CURRENT DIVIDER CIRCUITS
INTRODUCTION The experimental objectives in this lab are to design voltage and current divider circuits to
particular specifications and then measure the voltages and currents in these circuits. objectives
are to gain further experience in using the voltmeters and ammeter and to study some important
arrangements of resistors frequently used in electronic circuits.
Resistors are circuit components which are specifically built to provide a given amount of
resistance. You will be using fixed (value) and variable resistors in the experiment. Fixed
resistors have their resistance and tolerance printed on then with a color code as shown below:
EQUIPMENT AND SUPPLIES
TOLERANCE
± 5%
± 10%

30
TWO DMMS
0-25V POWER SUPPLY
ASSORTMENT OF RESISTORS
LEADS
BREADBOARDS
ALLEGATOR CLIPS
JUMPER WIRE KIT
THEORY
RESISTORS IN SERIES-THE VOLTAGE DIVIDER
Study the combinations of resistors in your text.
The resistance of n resistors in series is given as:
𝑹𝒆𝒒 = ∑ 𝑹𝒏𝑵𝟏
Therefore the equivalent resistance of two resistors in series is 𝑹𝒆𝒒 = 𝑹𝟏 + 𝑹𝟐 eq’n 1
The corresponding circuit is shown below:
A
+ b
_
V
a
Figure 1
Prior to the lab period, use equation 1 together with Ohm’s law, I= E /R and derive the
voltage divider equation Vab = R1
R1+R2E . Include this derivation in the theory portion of
your report.
RESISTORS IN PARALLEL-THE CURRENT DIVIDER
Resistors in parallel combine according to the equation:
𝟏
𝑹𝒆𝒒= ∑
𝟏
𝑹𝒏
𝑵
𝟏
E
R2
R1

31
The corresponding diagram is:
I
A
Figure 2
𝑹𝒆𝒒 = 𝑹𝟏𝑹𝟐
𝑹𝟏+𝑹𝟐
𝑰𝟏 = 𝑰𝑹𝟐
𝑹𝟏+𝑹𝟐
and 𝑰𝟐 = 𝑰𝑹𝟏
𝑹𝟏+𝑹𝟐 . Include these derivations in your report.
PROCEDURE
PART 1: VOLTAGE DIVIDER
Design a voltage divider circuit, such as the one in figure 1. The power supply voltage is 5.0 V,
the current is to be 3.31 mA, and the voltage Vab should be 1.69 V. Draw a neat schematic
diagram with the proper resistor values labeled, have it approve by your instructor. If, the values
calculate for the resistors are not available, use the closest value resistor available, or
combinations of resistors in series, and calculate new voltages and currents. Build the circuit,
and verify your design by measuring the predicted current and voltage. Note the location of the
ammeter and voltmeter in figure 1. If you could not find the exact values, use values close to
what you need and then re-calculate the voltages. Compare these new voltages with measured
values.
R1
+
_ E
+
_
+ R2
_
I1 I2

32
PART 2: CURRENT DIVIDER
Design a current divider circuit where the power supply voltage is 10 V, I = 6.0 mA and 𝑰𝟏
𝑰𝟐=
𝟏
𝟓. Note how the ammeter is connected in series to measure current I1. You will need a similar
connection to measure I, I1, and I2. If, the values calculated for the resistors are not available, use
the closest value resistor available, or combinations of resistors in series, and calculate new
currents. Build the circuit, and verify your design by measuring the predicted current and
voltage. Note the location of the ammeter and voltmeter in figure 2.
THE REPORT (see writing a report) ( EVERYTHING MUST BE TYPED-USE WORD
AND EQUATION EDITOR OR EQUIVALENT)
Unless a formal report is required by your professor, your report shall consist of:
Theory: Derive the equations for parts 1 and 2
Analysis and discussion of results: Draw your own schematic for each part using the “insert
shapes” in Word or another program. Label the resistors with the values you used. Do not
photocopy or “snip” the schematics provided in this handout. Re-write the equations derived in
the theory and show calculations for parts one and two. Compare the voltages and currents, for
which the circuit was designed, with the measures values. Use error propagation to predict the
error of the calculated voltages and currents. Assume negligible error in the power supply
voltage. Assume 5% tolerance in the resistors.
Conclusion
Appendix with original data sheet and original calculations

33
THE OSCILLOSCOPE
INTRODUCTION
The oscilloscope is one of the most versatile test instruments used in science and engineering.
Your instructor will lecture on its basic usage. A function generator will be connected to the
oscilloscope and each student will practice the initial setup of the scope and practice measuring
voltage and period of a sinusoidal voltage. The frequency will be calculated from the period and
compared with the frequency indicated on the generator. An oral test will be administered to
each student to check their proficiency with the scope. A written multiple choice quiz will also
be given at the end of the class period.
The figure below shows the Control Panel you will find on our lab oscilloscopes (as well as free-
standing Hitachi oscilloscopes). The scope Display CRT (not shown) is to the left of the control
panel. The numbered labels are indexed to the Set-up Procedures (Table 1) provided on the next
page. The numbering is also consistent with the oscilloscope Hitachi Operation Manual
(available in lab office), if additional technical information is sought, such as the meaning of
labels not addressed in Table 1.
❶

34
Figure 1 – Hitachi Model V 422 Oscilloscope Control Panel
PROCEDURE
SCOPE SETUP
Connect the female BNC to female BNC cable to the function generator and then to the
oscilloscope. Set the function generator frequency to 1 kilohertz (kHz) and switch it to the sine
function. Set the amplitude to about the middle position. Turn on power to the scope (button 1)
and the function generator. Follow the basic oscilloscope setup procedure provided in Table 1
below.
①
③
⑱
⑭
⑳
⑩
⑫ ⑪ ⑨
⑥
⑬
⑮ ⑲
④
⑰
②
⑤
26
27 29
30
34
21
37
28 35 33
31
37 24 23 32 25

35
EQUIPMENT LIST
Hitachi V 422 oscilloscope
Function generator
BNC splitter tee-male to female
2 female BNC to female BNC cable
Female BNC to banana jack adapter
DMM
Oscilloscope quiz
Table 1 – Setup Procedures for Hitachi Model V 422 Oscilloscope
STEP CONTROL #
See Figure 1
CONTROL NAME SET CONTROL TO:
1 1 POWER ON
2 4 ILLUM MID POSITION
3 26 TIME/DIV 0.1millisecond (ms)
4 27 SWP VAR FULLY CLOCKWISE
(until it clicks off)
5 29 POSITION
(PULL X 10 MAG)
MID POSITION
PUSH IN
6 30 CH1 ALT/MAG OUT
7 35 MODE AUTO
8 34 LEVEL
[PULL (-) SLOPE]
MID POSITION
PUSH IN
9 31 SOURCE INT
10 21 MODE CHOP
11 32 INT TRIG CH1
CHANNEL 1 OR X-SECTION 12 13 VOLTS/DIV 1 V
13 15 VAR
(PULL X5 GAIN)
FULLY CLOCKWISE
PUSH IN
14 19 POSITION
(PULL DC OFFSET)
MID POSITION
PUSH IN
15 11 AC/GND/DC DC
CHANNEL 2 OR Y-SECTION 16 12, 14, 16, 20, SET ALL CONTROLS THE SAME AS FOR CHANNEL 1
17 6 INTENSITY SET FOR VISIBLE
NOT TOO BRIGHT
18 3 FOCUS SET FOR SHARPEST
Adjust control knob 13 (VOLTS/DIV) so the sine wave fits on the screen. You should now have
a full wave displayed on the screen.
AC MEASUREMENT
Count the number of horizontal divisions and determine the period of the wave displayed on the
screen. From the period, determine the frequency and compare it with 1 kHz. Count the number
of vertical divisions from the bottom of the sine wave to the peak of the sine wave. Using the
VOLTS/DIV setting, determine the “PEAK TO PEAK” voltage (VP-P). Divide this voltage by

36
2 to determine the amplitude of the sine wave. Make sure all controls are in the calibrated
mode.
RMS MEASUREMENT
Connect a BNC tee splitter to the generator. Connect the female BNC to female BNC cable to
the BNC tee on the function generator and then to the oscilloscope. Connect the female to
banana jack adapter to the end of the BNC tee and then connect to the DMM. Set the DMM to
read AC and adjust the output of the AC generator to read 5 V. This 5 V reading is the rms, or
effective voltage. The peak voltage of the sinusoidally varying voltage is 1.41 times the rms
voltage. The peak voltage refers to the amplitude of the sine-wave. Disconnect the banana jack
adapter and connect the BNC cable from the generator to the scope. Measure VP-P and from it
determine the peak voltage. Compare the peak voltage with 1.41 times the rms voltage. Repeat
these measurements and calculations for several other voltages.
Take turns with your partner; practice setting up the scope and measuring different voltages and
determining different frequencies by measuring the period. Compare each of the calculated
frequencies with the frequency set on the generator. When you feel confident using the
oscilloscope, have your instructor give you an oral quiz on using the oscilloscope.
OSCILLOSCOPE QUIZ
When completed with the lab exercises above, your instructor will give you a 15 question
multiple choice quiz. Make sure you are familiar with the function of the controls, especially the
TIME/DIV and VOLT/DIV controls and what effect changing them has on the screen display.
REPORT
No report is required for this lab, your grade will be determined from the oral quiz and the
written quiz, 50% each.

37
WAVEFORM ANALYSIS AND RECTIFIERS
INTRODUCTION
PART 1
The charging and discharging curves for a capacitor will be displayed on the oscilloscope. The
display will be graphed and from the graph, the RC time constant will be determined.
PART 2
A half-wave and a full-wave rectifier circuit will be constructed and the waveforms displayed on
the oscilloscope. Measurements of period and peak voltage will be taken. The displays will also
be graphed.
PART 3 A smoothing capacitor will be wired in parallel with the load resistor and the waveform
displayed on the oscilloscope.
SUPPLIES AND EQUIPMENT
OSCILLOSCOPE
FUNCTION GENERATOR
CENTER TAP ADJUSTABLE TRANSFORMER
330Ω RESISTOR
DIODES
1µF CAPACITOR and 1000µF CAPACITOR
DECADE RESISTOR
BREADBOARDS
BNC TO BANANA JACK ADAPTER
OSCILLOSCOPE GRAPH PAPER
BNC TEE-SPLITTER
THEORY:
PART 1 The discharge equation tor a capacitor is given by
𝑽 = 𝑽𝟎𝒆−𝒕
𝑹𝑪⁄ and the charging equation is given by
𝑽 = 𝑽𝟎 − 𝑽𝟎𝒆−𝒕
𝑹𝑪⁄

38
Consider the following circuit:
Note that channel 1 displays the voltage across the capacitor. This waveform is shown above as
the Vc graph.
PART 2
A diode is analogous to a valve that only lets current flowing in one direction. The symbol for a
diode is
To CH 2 vertical input
To CH 1 vertical input
To oscilloscope ground
Square
wave
generator
decade resistor
box
C=1µF
+ -

39
When the polarity is as shown, the diode is said to be forward biased and conventional current
flows in the direction of the arrow with almost no resistance. The forward bias voltage across
the diode as about 0.5 volts. Since the diode has almost no resistance when forward biased, a
current limiting resistor is used in series with the diode.
When the diode is reverse biased, very little current is allowed to pass thru the diode and it has a
very large resistance and it is almost like an open circuit.
- +
PROCEDURE
PART 1
Wire the circuit show. CH2 of the oscilloscope displays the square wave output of the generator.
This should be a nice square wave. Set the frequency of the generator at 100Hz and the decade
box at 1KΩ. Adjust the horizontal sweep and vertical voltage on the channels so one charging
phase as seen by the voltage across the resistor is displayed fully on the screen. Remember, this
shows the current decaying exponentially. Draw a graph of this waveform. Repeat this for an
800Ω resistor.
PART 2
The half wave rectifier.
Wire the circuit as shown.
Adjust the vertical and horizontal oscilloscope display so one complete waveform is shown.
Draw the waveform on the oscilloscope display paper provided by your instructor. Show both
the peak voltage and the period.

40
Full wave rectifier
Wire the above circuit using the AC transformer output at the top center of your station. Use RL
= 330Ω
Adjust the vertical and horizontal oscilloscope display so two complete waves are shown. Draw
the waveform on the oscilloscope display paper provided by your instructor. Show both the peak
voltage and the period.
To CH 1 vertical input
To oscilloscope ground
sine wave
generator
To CH2 vertical input
R = 330Ω
To CH1 vertical
input

41
Using a DMM set on the DC scale, measure the output voltage of the full wave rectifier.
PART 3
Wire a 100µF capacitor in parallel with the load resistor and display two full waves on the
oscilloscope. Keep the same voltage scale as for the full wave display.
Draw a graph of this display superimposed on the full wave display.
ANALYSIS
PART 1
Drawing vertical and horizontal lines on the discharge graph with f=100Hz and the decade box
set at 1 KΩ, determine the time is takes the current to decrease to 37 % of its maximum value.
This time interval should be equal to τ. Assume 10% error in C and 5% in R and propagate the
error in τ = RC.
PART 2
The average voltage for the full wave rectifier is:
To CH1 vertical
input
C=100µF

42
𝑉𝑝
𝑏∫ sin
𝜋𝑥
𝑏𝑑𝑥
𝑏
0
Where b is the period and is equal to π in this case since T is for one half of a sine wave.
Where Vp is the peak voltage and T is the period for one half of the normal sin function period.
Evaluate this integral and use Vp from your graph. Compare this calculated value of Vavg with
the value as measured using the DMM.
THE REPORT:
Unless a formal report is required by your professor, your report shall consist of:
Analysis and discussion of results
Conclusion
Appendix with original data sheet and oscilloscope graphs

43
DETERMINING µ0 USING A CURRENT BALANCE
INTRODUCTION: A current balance will be used to measure the force between two parallel
conductors as the current thru the conductors is varied. The data will be graphed and from the
slope of the graph, µ0 will be determined.
THEORY: We have learned that parallel currents attract, while anti-parallel currents repel each
other. The magnitude of the attractive or repulsive force, FB, depends upon the
magnitude of the two currents, I1 and I2 and their separation distance r. The governing
equation for the magnetic force between the two wires is
𝐹𝐵 =𝜇0𝐼1𝐼2𝐿
2𝜋𝑟 equation (1)
where L is the length of the wires. If the same current passes through each wire, equation
(1) reduces to
𝐹𝐵 =𝜇0𝐼2𝐿
2𝜋𝑟 equation (2)
In this experiment, one wire will be held in a fixed position while the other is allowed to
Move freely on a knife-edge fulcrum balanced by counterweights. The wires will be
arranged horizontally such that the upper wire is the free moving wire. This wire contains
a small pan in which weights may be placed.
The two wires here carry current in opposite directions. This will push the free wire
upwards from its equilibrium position. However, placing the appropriate weights in the
pan attached to this wire will push the wire back down. When the gravitational force
acting on the weights exactly equals the magnetic force acting on the wire, it will remain
in its equilibrium position. Show that the mass required is given by
𝑚 =𝜇0𝐿𝐼2
2𝜋𝑟𝑔 equation (3)
The value of r will be measured and from the slope of a graph of m vs. I2
, the value of µ0 can
be determined.
EQUIPMENT LIST
01: Current Balance Apparatus 10: Fine Steel Wool
02: Modified Epsco Power Supply 11: Tape Measure
03: Large Variac 12: Vernier Caliper
04: Shunt Resistor 13: Test leads, Banana
05: Laser 14: Alligator Clips
06: Small Ring Stand With 60cm Metal Rod 15: Ruler
07: Meter Stick Clamp 16: Digital Multimeter
08: Meter Stick 18: Bubble Level
09: Micro Weight Set 19: Micrometers

44
THE APPARATUS
FIGURE 1
LASER MIRROR
METER STICK
L
a
mirror
D
b
d
LASER
METER STICK
d r
R
R

45
SHUNT RESISTOR MODIFIED EPSCO POWER SUPPLY
DMM
FIGURE 2
LARGE
VARIAC
KNIFE
EDGE
PIVOT

46
APPARATUS SET UP
ALIGNMENT
The apparatus should be aligned and ready to go. If not, you will need to do the following:
Handle the equipment gently. First, remove the frame from the balance and clean the knife edges
and supports with steel wool so they make good electrical contact. If there are any burrs on the
knife edges, contact your instructor. Place the balance on the table and level it using the
adjustment screws on the base. Make sure the balance is firmly situated on the table.
To align the two front bars, examine them for straightness. If they appear to be bent, contact
your instructor. To check the alignment, lift the frame up by rotating the alignment pins into the
conical holes located under the back of the frame by the knife edges. Let the frame down slowly
and check for alignment by placing a coin on the weight pan to force the bars together without
distorting them. If the bars are not parallel and one directly above the other, use the adjusting
screws to make the bars touch each other uniformly across their entire length. Place a white
paper behind the bars to help ascertain that there are no gaps. It is almost impossible to achieve
perfect contact but good results can still be obtained. Check alignment again as instructed above.
SET-UP
The upper frame rotates about the knife edges, the mirror rotates with it. Adjust the
counterbalance (counterpoise), located behind the mirror, so the two front bars are
separated by a couple of millimeters when at equilibrium. There is another counterpoise
located under the frame which can be adjusted to determine the period of oscillations for the
frame. Adjust this counterpoise until the period of oscillation is one to two seconds. There is an
aluminum blade which oscillates between two damping magnets. The oscillations should die out
within 10 to 15 seconds when the damping magnets are about 2 mm apart. Be sure that the
aluminum blade does not rub against the pole faces of the magnets.
Set up the laser and meter stick as shown it the above diagrams. The laser should be at least two
meters from the mirror.
MEASURING THE CURRENT
The current needed in this lab is larger than the DMM’s will read. The current is determined by
reading the voltage across the shunt resistor and the using ohm’s law. The value of the shunt
resistor is written on the shunt resistor wooden block. Record the value of the shunt resistor.
PROCEDURE
Turn on the laser but leave the shutter closed for the time being.
Measure the length L of the top bar and estimate it uncertainty.
To determine the center to center distance, r, between the parallel bars, d needs to be measured
and twice the radius of the bar (or the diameter of one bar) is added to d. Using micrometers,
measure the diameter, 2R, of one of the bars. Estimate the uncertainty in 2R. To determine d,
place a coin in the tray to bring the bars together. Open the shutter on the laser and align the
laser so the beam reflects off of the mirror and onto the meter stick. Caution, do not
look into the beam or at the reflected beam. Do not allow the beam

47
to stray beyond the station and use the shutter (beam block) when
not in use. Record the meter stick reading at the center of the spot; this will be Y1. Remove
the coin and let the bar come to equilibrium. Again record the meter stick reading for the center
of the spot: this will be Y2. The value D in figure 1 is found form D = Y2 –Y1. Using the law of
reflection and similar triangles, prove, in the analysis section, that
𝒅 =𝑫𝒂
𝟐𝒃 equation (4)
d should be about 2 or 3 mm. Note, r=2R + d. The value of Y2 is the equilibrium position for the upper bar.
Place a 50 mg weight on the weight pan and, using the variac, adjust the current through the bars
until the laser spot returns to the equilibrium position,Y2. Record the voltage across the shunt
resistor. Increase the weights by 50 mg and again increase the current to bring the bar back to
the equilibrium as indicated by the spot retuning to Y2 on the meter stick. Again, record the
voltage across the shunt resistor Repeat for 50 mg weight increases up to 300 mg.
ANALYSIS
Derive equation (4) and use it to find r.
Using the voltage readings and the value of the shunt resistor, calculate the currents
for each weight.
Graph m verses I2. Using the slope of this line along with equation (3), 𝑚 =
𝜇0𝐿𝐼2
2𝜋𝑟𝑔,
determine µ0. Note: slope = 𝜇0𝐿
2𝜋𝑟𝑔 .
Assume a 2% error in the slope of the line, and a 2% error in r . Use your estimated error in L to
calculate a % error in L. Propagate the error in µ0.
Calculate the percent discrepancy in µ0 using the accepted value of 4π X 10-7
T۰m/A
REPORT
THE REPORT (see writing a report)
Unless a formal report is required by your professor, your report shall consist of:
Theory, including any derivations
Analysis and discussion of results
Conclusion
Appendix with original data sheet and answers to any questions

48
e/m EXPERIMENT
Theory
In order to measure e/m, the charge to mass ratio of the electron, a beam of electrons is accelerated
through a known potential in order to determine the velocity of the electrons. The electrons are
deflected by Helmholtz Coils and exhibit cyclotron motion.
Prior to the class meeting, use the following equations to derive the equation for
2
23
)(
)4
5(2
IrN
aV
m
e
o
BvqFm
where mF
= the magnetic force acting on a charged particle, q=charge on the particle, v
=velocity, and B
=magnetic field,.
2
2
1mveV
r
mvFc
2
and a
INB o
23
)4
5(
][
for the Helmholtz Coils.
where
a=the radius of the Helmholtz coils (0.15m)
N=the number of the turns on each Helmholtz coil (130 turns)
µo= permeability constant=4x10⁻⁷ A
mT
I=the current through the Helmholtz coils
r=the radius of the electron beam path

49
Operation Measuring e/m

50
Procedure:
1. Place hood over e/m apparatus.
2. Flip switch to e/m measure position.
3. Turn off Helmholtz current power supply (on the left in the picture)
4. Place the current adjust knob for the Helmholtz coils to the maximum position.
5. Connect power supplies and meters to the e/m apparatus as shown in Figure 2 above.
6. Set the power supplies to the following levels:
Electron gun:
Set Heater: 6 VAC (CAUTION, DO NOT EXCEED 6V)
The accelerating voltages will be 200V, 250V, 300V DC

51
Vary the Helmholtz Coil Currents using the Helmholtz current power supply. Set the voltage
control to zero and the current control to max. Vary the current by adjusting the voltage control
knob. Watch the current meter and do not exceed 2 Amps. Vary the Helmholtz current 3 times
for each accelerating voltage such that you get a well-defined circle that can be measured with
the mirrored scale.
7. When the electron beam to emerges from the electron gun, make sure the plane of the electron
beam circle is parallel to the Helmholtz coils (if not, turn the tube slightly until it is).
8. Read the current to the Helmholtz coils from the ammeter and the accelerating voltage from the
voltmeter.
9. Measure the radius of the electron beam using the mirrored scale. Close one eye and move
you’re your head left or right to align the reflected beam with the electron beam to avoid
parallax errors. Measure the inside and outside radius of the beam on both the left and the right
sides of the scales.
Data:
Error in V: 𝜹𝑽 = Error in r: 𝜹𝒓 = Error in I: 𝜹𝑰 =
Accelerating Voltage V
rleft rright Helmholtz Current
200V routside = routside =
200V rinside = rinside =
200V routside= routside=
200V rinside = rinside =
200V routside= routside=
200V rinside = rinside =
250V routside = routside =
250V rinside = rinside =
250V routside = routside =
250V rinside = rinside =
250V routside = routside =
250V rinside = rinside =
300V routside = routside =
300V rinside = rinside =
300V routside = routside =
300V rinside = rinside =
300V routside = routside =
300V rinside = rinside =
ANALYSIS and DISCUSSION: Copy all of your data into and EXCEL spreadsheet and program a
column to calculate the value of r which will be the average of rleft and rright for both rinside and routside

52
for a fixed accelerating voltage and helmholts current. Program the e/m equation in the last column (you
should have 18 rows of data in your spreadsheet). Print the program in the analysis section of your
report. Use EXCEL functions (AVERAGE; STDEVP) to calculate and average and standard deviation.
Determine the percent discrepancy of e/m. Use charge e = 1.60217646 × 10⁻¹⁹
coulombs and electron
mass = 9.10938188 × 10⁻³¹
kilograms. Note: percent discrepancy = 𝒆𝒙𝒑𝒆𝒓𝒊𝒎𝒆𝒏𝒕𝒂𝒍 𝒗𝒂𝒍𝒖𝒆−𝒂𝒄𝒄𝒆𝒑𝒕𝒆𝒅 𝒗𝒂𝒍𝒖𝒆
𝒂𝒄𝒄𝒆𝒑𝒕𝒆𝒅 𝒗𝒂𝒍𝒖𝒆
converted to %.
One way to get a predicted % error is 𝑠𝑡𝑎𝑛𝑑𝑎𝑟𝑑 𝑑𝑒𝑣.
𝑎𝑣𝑒𝑟𝑎𝑔𝑒 converted to %.
Another way to get a predicted error is to use differential error propagation. See the handout on error propagation. If this method is requested by your instructor, show all of the details of your error propagation in the analysis section and use equation editor for the algebra. Note if the percent discrepancy is less than the predicted error. (i.e. are your results within the margin of error?)
Report: Write a formal report for this lab unless told otherwise by your instructor.

53
SIMPLE AC CIRCUITS
INTRODUCTION: In part 1 of this experiment, calculated voltages for R, L, and C in a series
circuit will be compared with the measured values. In part 2, the phase relationship between
voltages and current for an inductor, capacitor and resistor in a series R, L, C, circuit will be
measured and compared to the calculated value of the phase difference. In part 3 of this
experiment, the frequency response will be determined by varying the frequency of the generator
and measuring the voltage across the resistor.
Parts 1 and 2 will be performed the first week and part 3 the second week. This lab is worth
twice what the other labs are worth.
THEORY
Part 1: The voltages in a series RLC circuit add as vectors; hence,
𝑉𝑇 = {𝑉𝑅2 + (𝑉𝐿 − 𝑉𝐶)2}
1
2, the impedance 𝑍 = √(𝑋𝐿 − 𝑋𝐶)2 + 𝑅2 where
𝑋𝐿 = 𝜔𝐿, and 𝑋𝐶 = 1
𝜔𝐶 and the current 𝐼𝑆 =
𝑉𝑇
𝑍 . 𝑋𝐿 = 𝜔𝐿, 𝑋𝐶 =
1
𝜔𝐶.
𝑉𝑅 = 𝐼𝑆𝑅, 𝑉𝐶 = 𝐼𝑠𝑋𝐶, and 𝑉𝐿 = 𝐼𝑆𝑋𝐿
Part 2:
When the voltage of the funcion generator is given by v(t)=Vmax sin(ωt-φ)
The current is then i(t)= Imax sin ωt where φ is the phase difference between the current and
voltage.
The voltage across R is VR= ImaxRsin ωt which as we see is in phase with the current since φ=0
for both.
The voltage across the capacitor is given by VC= ImaxXcsin(ωt-90° ) where 𝑋𝑐 =1
𝜔𝑐.
The voltage across the inductor is given by VL= ImaxXLsin(ωt+90° ) where 𝑋𝐿 = 𝜔𝐿.
𝐼𝑚𝑎𝑥 =𝑉𝑚𝑎𝑥
𝑍 where 𝑍 = √(𝑋𝐿 − 𝑋𝐶)2 + 𝑅2.
As shown in the diagram below: 𝜑 = 𝑡𝑎𝑛−1 (𝑉𝐿−𝑉𝐶
𝑉𝑅)
𝜑 = 𝑡𝑎𝑛−1 (𝐼𝑚𝑎𝑥𝑋𝐿 − 𝐼𝑚𝑎𝑥𝑋𝐶
𝐼𝑚𝑎𝑥𝑅)
𝜑 = 𝑡𝑎𝑛−1 (𝑋𝐿−𝑋𝐶
𝑅)
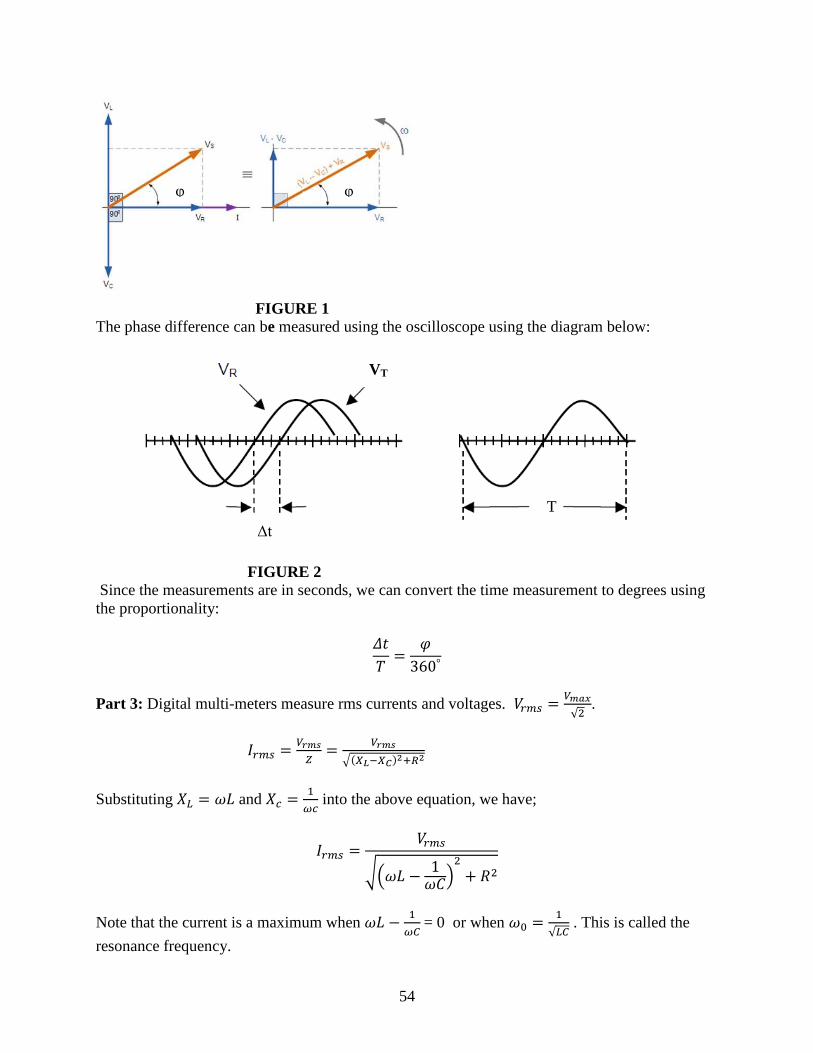
54
FIGURE 1
The phase difference can be measured using the oscilloscope using the diagram below:
FIGURE 2
Since the measurements are in seconds, we can convert the time measurement to degrees using
the proportionality:
𝛥𝑡
𝑇=
𝜑
360°
Part 3: Digital multi-meters measure rms currents and voltages. 𝑉𝑟𝑚𝑠 =𝑉𝑚𝑎𝑥
√2.
𝐼𝑟𝑚𝑠 =𝑉𝑟𝑚𝑠
𝑍=
𝑉𝑟𝑚𝑠
√(𝑋𝐿−𝑋𝐶)2+𝑅2
Substituting 𝑋𝐿 = 𝜔𝐿 and 𝑋𝑐 =1
𝜔𝑐 into the above equation, we have;
𝐼𝑟𝑚𝑠 =𝑉𝑟𝑚𝑠
√(𝜔𝐿 −1
𝜔𝐶)2
+ 𝑅2
Note that the current is a maximum when 𝜔𝐿 −1
𝜔𝐶 = 0 or when 𝜔0 =
1
√𝐿𝐶 . This is called the
resonance frequency.
φ φ
VT
Δt
T

55
FIGURE 3
EQUIPMENT:
Ac generator
Oscilloscope
DMM
R, L, and C decade boxes
Frequency counter
Oscilloscope graph paper
PROCEDURE AND ANALYSIS
Part 1: Voltage and Current Relationships
A plot of the rms current verses the frequency is
shown for three resistance values. In each case, the
maximum current is at the resonance frequency.
Notice that the peak becomes higher and narrower as
R becomes smaller and the more narrow the band
width of frequency passed. This circuit is called a
band pass filter. Since the power delivered to the
load resistor is proportional to 𝐼𝑟𝑚𝑠2 , the half power
points occur at a frequency above and below the
resonance frequency where the current is 𝐼𝑚𝑎𝑥
√2. These
frequencies are the cut-off frequencies 𝜔𝑙𝑜𝑤, and
𝜔ℎ𝑖𝑔ℎ. ∆𝜔 = 𝜔𝑙𝑜𝑤 − 𝜔ℎ𝑖𝑔ℎ is called the bandwidth.
The more narrow the bandwidth compared to ω0 the
higher the quality factor Q.
𝑄 =𝜔0
∆𝜔 it can be shown that 𝑄 =
𝜔0𝐿
𝑅
= VT

56
Prior to class, given the RLC circuit shown above, calculate the values of IS, VR, VL, and VC
given VS =5Vrms , R= 10kΩ, L=1H, C=0.022µF, for the three frequencies 800Hz, 1074Hz and
1.4 kHz. Do these calculations neatly and attach them to this handout as part of your report.
Wire the circuit with the values given for R, L, and C. Attach the frequency counter across the
power supply. Set the supply voltage for VS =5Vrms and f= 800Hz. Record the current IS and
use the DMM to measure VR , VL, and VC. Repeat these measurements for f= 1074Hz and f=
1400Hz. Record these measurements in the table below and compare them to the calculated
values.
You will need to keep Vs set at 5Vrms when changing frequencies.
Meas Calc Meas Calc Meas Calc Meas Calc
f(Hz) VR VR %diff VL VL %diff VC VC %diff IS IS %diff
800
1074
1400
Calculate VT using the equation
𝑉𝑇 = {𝑉𝑅2 + (𝑉𝐿 − 𝑉𝐶)2}
1
2 , and the measurements for VR, VL, and VC. Compare these values to
the 5Vrms of the supply voltage.
Frequency (Hz) 𝑉𝑇 = {𝑉𝑅
2 + (𝑉𝐿 − 𝑉𝐶)2}12
% difference from 5Vrms
800
1074
1400
Part 2: Phase relationship between I and VT
Using the series RLC circuit, set the signal generator to 2 kHz. Set the inductor to 1H, the
capacitor to 0.022µF, and the resistor to 10 kΩ. One end of the resistor should be connected to
ground.
1. Connect channel 1 input across the resistor to display the voltage across R.
2. Connect channel 2 input to the generator output and connect the oscilloscope ground
to the generator ground.
3. Set the oscilloscope to trigger on the channel 1 signal.
4. Adjust the controls so one complete wave is displayed for the channel 1 signal. This
is the reverence waveform.
5. Superimpose the channel 2 waveform (generator input) onto the channel 1 waveform. 6.
Adjust the vertical display so both waveforms have about the same amplitude. The
display should now look similar to figure 2.

57
6. Measure the period T and the phase difference Δt. Copy the two waveforms on the
oscilloscope graph paper. Be sure to note the time/division scale.
7. Compute the phase difference in degrees using 𝛥𝑡
𝑇=
𝜑
360°
8. Compare this to the phase difference using 𝜑 = 𝑡𝑎𝑛−1 (𝑋𝐿−𝑋𝐶
𝑅).
φ measured φ calculated % discrepancy
Part 3: Series Resonance
Using the RLC series circuit, let L= 30mH, C= 0.01µF, and R= 100Ω. Again, one end of R
should be connected to the ground terminal of the generator.
1. Calculate the resonance frequency of your circuit
2 Connect the oscilloscope CH1 input across the resistor. Make sure the oscilloscope
ground is connected to the generator ground.
3. Set the generator output to 10kHz and 2Vrms
4. Set the trigger mode to channel 1 and obtain a steady display.
5. Connect a frequency counter across the generator output.
6. Sweep the generator over the resonant frequency , back and forth above and below
the resonant frequency. Look at the oscilloscope display and note that maximum
amplitude of the resistor voltage occurs at resonance. (Why?)
7. Read the resonant frequency on the frequency counter and record it below.
8. Complete the table below. Important! The generator output voltage (VS) must be kept
constant throughout the experiment. This means that you must adjust the output
TO CHANNEL
1 ON CRO
TO CHANNEL
2 ON CRO
=VT
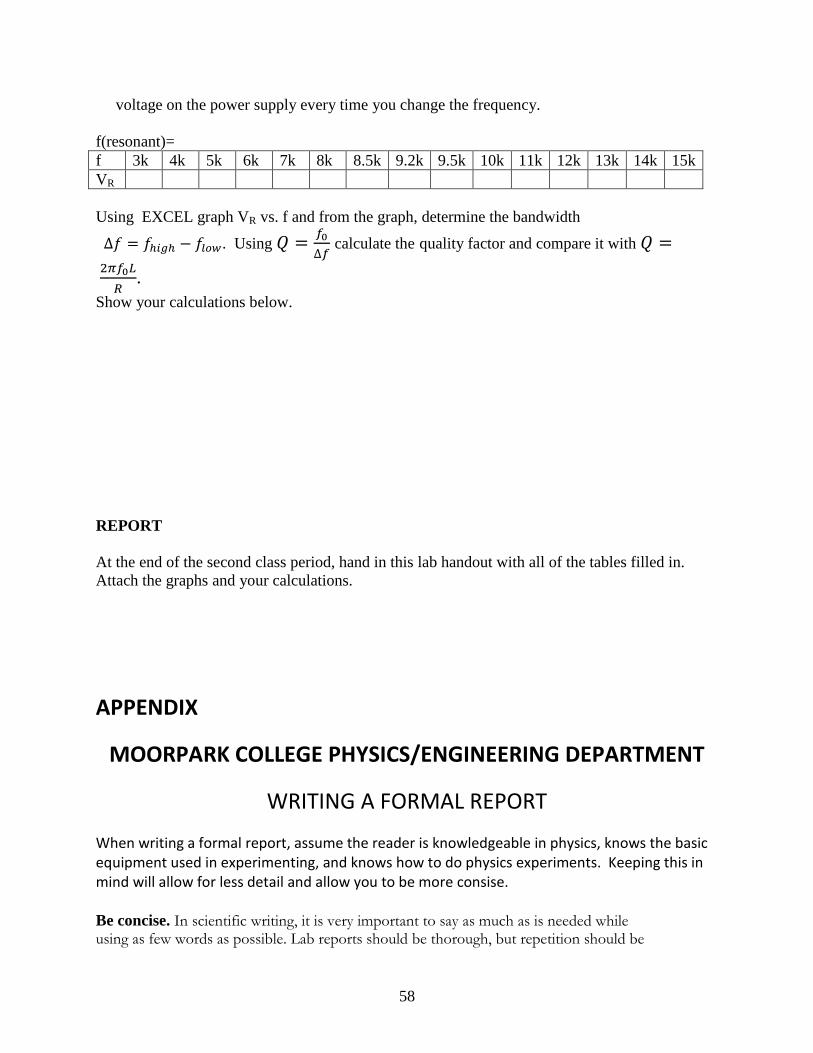
58
voltage on the power supply every time you change the frequency.
f(resonant)=
f 3k 4k 5k 6k 7k 8k 8.5k 9.2k 9.5k 10k 11k 12k 13k 14k 15k
VR
Using EXCEL graph VR vs. f and from the graph, determine the bandwidth
∆𝑓 = 𝑓ℎ𝑖𝑔ℎ − 𝑓𝑙𝑜𝑤. Using 𝑄 =𝑓0
∆𝑓 calculate the quality factor and compare it with 𝑄 =
2𝜋𝑓0𝐿
𝑅.
Show your calculations below.
REPORT
At the end of the second class period, hand in this lab handout with all of the tables filled in.
Attach the graphs and your calculations.
APPENDIX
MOORPARK COLLEGE PHYSICS/ENGINEERING DEPARTMENT
WRITING A FORMAL REPORT
When writing a formal report, assume the reader is knowledgeable in physics, knows the basic equipment used in experimenting, and knows how to do physics experiments. Keeping this in mind will allow for less detail and allow you to be more consise. Be concise. In scientific writing, it is very important to say as much as is needed while using as few words as possible. Lab reports should be thorough, but repetition should be

59
avoided. The entire report should be clear and straightforward.
Write in the third person. Avoid using the words “I” or “we” when referring to the experimental
procedure. For example, instead of “I boiled 50 mL of water for 10 minutes, ”the report should
read, “50 mL of water was boiled for 10 minutes.” This can be a bit difficult to get used to, so it is
important to pay close attention to the wording in the report.
THE REPORT
TITLE PAGE: The title page should include the title of the lab experiment, your name, your
partners name(s), class name and period, and the date. The abstract should be written on the
bottom half of the title page.
ABSTRACT: The abstract should be written concisely in normal rather than highly abbreviated English.
The author should assume that the reader has some knowledge of the subject but has not read the
paper. Thus, the abstract should be intelligible and complete in itself; particularly it should not cite
figures, tables, or sections of the paper. The opening sentence or two should, in general, indicate the
subjects dealt with in the report and should state the objectives of the investigation.
The body of the abstract should summarize the results and conclusions of the experiment. In the case
of experimental results, the abstract should indicate the methods used in obtaining them. The degree
of accuracy should be given and results compared with accepted or predicted values (are the results
within the margin of error?). The abstract should be typed as one paragraph. Its optimum length will
vary somewhat with the nature and extent of the paper, but it usually does not exceed 200 words.
(since the abstract summarizes the report, it should be written last)
INTRODUCTION: This consists of one or two sentences describing the experimental objectives of the
laboratory and what you are going to do to accomplish those objectives. An example would be “By
varying the length, mass and amplitude of a simple pendulum, the empirical equation for how the
period of the pendulum depends upon those variables will be determined.” Notice that statements
such as “To learn how to analyze data” or “To learn how to organize a data sheet” or other
“Instructional Objectives” do not belong in the introduction or anywhere else in the report. These
comments will be found only in the laboratory manual.
THEORY: Some of the laboratory experiments require the derivation of equations from the fundamental
physics concepts. The derivations are to be done prior to the class meeting and are to be included in the
formal report. Written explanations of what you are doing should be included; not just the
mathematics. The equations should be typed using Microsoft Word and Equation Editor or an
equivalent program.
PROCEDURE: The procedure discusses how the experiment occurred. Documenting the procedures of your laboratory experiment is important not only so that others can repeat your results but also so that you can replicate the work later, if the need arises. Because your audience expects you to write the

60
procedures as a narrative, you should do so and not write as an outline. Achieving a proper depth in laboratory procedures is challenging. In general, you should give the audience enough information that they could replicate your results. For that reason, you should include those details that affect the outcome
ANALYSIS AND DISCUSSION: In analyzing the results, you should not only analyze the results, but also
discuss the implications of those results. Moreover, pay attention to the errors that existed in the
experiment, both where they originated and what their significance is for interpreting the reliability of
conclusions. One important way to present numerical results is to show them in graphs. This section
includes the typed data table and a sample calculation of each type with error propagation if
appropriate. Any graphs needed should also be in this section, as well as the calculation of percent
discrepancies. This section shall be typed using Microsoft Word and Equation Editor or equivalent.
Graphs shall be done using Microsoft EXCEL or an equivalent program.
CONCLUSION:
Whereas the ‘ANALYSIS AND DISCUSSION” section has discussed the results individually, the
CONCLUSION section discusses the results in the context of the entire experiment. The objectives
mentioned in the "Introduction" are examined to determine whether the experiment succeeded. This
section also includes a summary of the results along with the estimated error. Error may be the random
error as calculated from the standard deviation, or it could be an error calculated from error estimates
in your measurements. When a physical quantity is measured, as in this lab, include in the conclusion a
comparison of the measured value with the accepted value (% discrepancy ). Note whether or not the %
discrepancy is greater or less than the predicted uncertainty (in other words, are the results within the
margin of error? ). If the results are not within the margin of error, try to give a reasonable explanation
as to why. If the objectives were not met, you should analyze why the results were not as predicted.
Lastly, state sources of error and give suggestions for how errors could be reduced. Suggestions for
reducing the error and improving the experiment are included here also.
APPENDIX: Attach the signed data sheet and answers to questions.