ibm smartcloud entry · ibm® smartcloud entry (delivered as ibm starter kit for cloud) 2.2 is a...
TRANSCRIPT
IBM
IBM SmartCloud Entry User Guide - Version 2.2
This edition applies to version 2, release 2, modification 0 of IBM SmartCloud Entry (product number 5765-SKC) and to all subsequent releases and modifications until otherwise indicated in new editions.
© Copyright International Business Machines Corporation 2011.US Government Users Restricted Rights - Use, duplication or disclosure restricted by GSA ADP Schedule Contract with IBM Corp.
Table of ContentsIBM SmartCloud Entry User Guide .................................................................................. 1 Using IBM SmartCloud Entry ........................................................................................... 2
Virtual infrastructure .............................................................................................................. 2 Terminology ............................................................................................................................................ 2
First time use ............................................................................................................................. 3
Welcome tab .............................................................................................................................. 4
Projects tab ............................................................................................................................... 5 Project membership roles ........................................................................................................................ 5 Creating a project .................................................................................................................................... 5 Editing project properties ........................................................................................................................ 6 Setting the active project ......................................................................................................................... 7 Requesting project membership .............................................................................................................. 7 Deleting an existing project .................................................................................................................... 8
Appliances tab ........................................................................................................................... 8 Viewing a virtual appliance properties .................................................................................................... 9 Deploying a virtual appliance ................................................................................................................. 9
Workloads tab ......................................................................................................................... 10 Workload properties .............................................................................................................................. 11
Viewing workload definition ............................................................................................................ 12 Copying a workload definition ......................................................................................................... 12 Capturing a workload snapshot (VMC only) ................................................................................... 12 Starting/Stopping a workload ........................................................................................................... 13 Resizing a workload ........................................................................................................................ 13 Resizing a workload (VMware) ...................................................................................................... 14 Deleting or hiding a workload .......................................................................................................... 14 Moving a workload to another project ............................................................................................. 15 Viewing the virtual servers in a workload ........................................................................................ 15 Viewing pending requests for a workload ........................................................................................ 15 Viewing workload timestamps and logs ........................................................................................... 15 Adding storage to a virtual server in a workload (VMC only) ........................................................ 15
Virtual server properties ........................................................................................................................ 15 Adding storage to a virtual server (VMC only) ............................................................................... 17
Saving and restoring virtual server images (VMware only) ................................................................. 18 Saving a virtual server image ........................................................................................................... 18 Restoring a saved image ................................................................................................................... 19 Managing saved images ................................................................................................................... 20
Requests tab (for administrative user) .................................................................................. 20 Administering request approval policies ............................................................................................... 22
Approval policies ............................................................................................................................. 22 Modifying approval policies ............................................................................................................ 22 Enable/disable request approval support .......................................................................................... 22
Requests tab (for non-administrative user) .......................................................................... 23 Withdrawing a request .......................................................................................................................... 23 Resubmitting a rejected request ............................................................................................................ 24
IBM SmartCloud Entry i
Accounts tab ............................................................................................................................ 25 Creating an account ............................................................................................................................... 26 Viewing or managing an account .......................................................................................................... 27 Add members to an account .................................................................................................................. 28 Deleting an account ............................................................................................................................... 29
Users tab (for administrative users) ...................................................................................... 29 Creating a user ...................................................................................................................................... 29 Viewing or updating a user ................................................................................................................... 30 Deleting a user ...................................................................................................................................... 30
Network tab (for administrative users) ................................................................................. 31
Events tab ................................................................................................................................ 31
Resource usage widget ............................................................................................................ 31
Troubleshooting ................................................................................................................ 33 Limitations .............................................................................................................................. 33
Deploying workloads that contain Microsoft Windows operating systems on VMware virtual infrastructure might prompt for product key. ........................................................................................ 33
Known Issues .......................................................................................................................... 33 Display issues with Internet Explorer 9 ................................................................................................ 33
Accessibility ....................................................................................................................... 36 Notices ............................................................................................................................... 37
Trademarks ............................................................................................................................. 38
IBM SmartCloud Entry ii

IBM SmartCloud Entry User GuideIBM® SmartCloud Entry (delivered as IBM Starter Kit for Cloud) 2.2 is a self-service portal for the Cloud end user that complements IBM Systems Director VMControl, VMware vSphere, and various other cloud implementations. IBM SmartCloud Entry is implemented as a lightweight web-based application that runs as an Open Services Gateway initiative (OSGi) application. SmartCloud Entry enables you to provide an environment that lets cloud users serve themselves while maintaining control over the allocation of resources.
The self-service capabilities of IBM SmartCloud Entry simplify the process of performing many common public or private Cloud operations such as:
• Provisioning (deploying) and de-provisioning servers
• Drafting and cloning workloads
• Taking workloads snapshots
• Starting up and shutting down servers as part of a workload
• Resizing existing servers
These and many other features are included in this version of the IBM SmartCloud Entry.
IBM SmartCloud Entry 1
Using IBM SmartCloud EntryThis document describes how to use IBM SmartCloud Entry. These instructions assume the user does not have a previous IBM SmartCloud Entry account.
Virtual infrastructure The IBM SmartCloud Entry uses either IBM Systems Director VMControl (VMC) or VMware vSphere 4.1 with vCenter (VMware) to provide the underlying virtual infrastructure environment. Certain features and functions apply only to one type of environment or the other, and are marked with “VMC” or “VMware” in this document. Functions and features that are not marked apply to both environments. On the IBM SmartCloud Entry web pages, functions that do not apply to your environment are not shown.
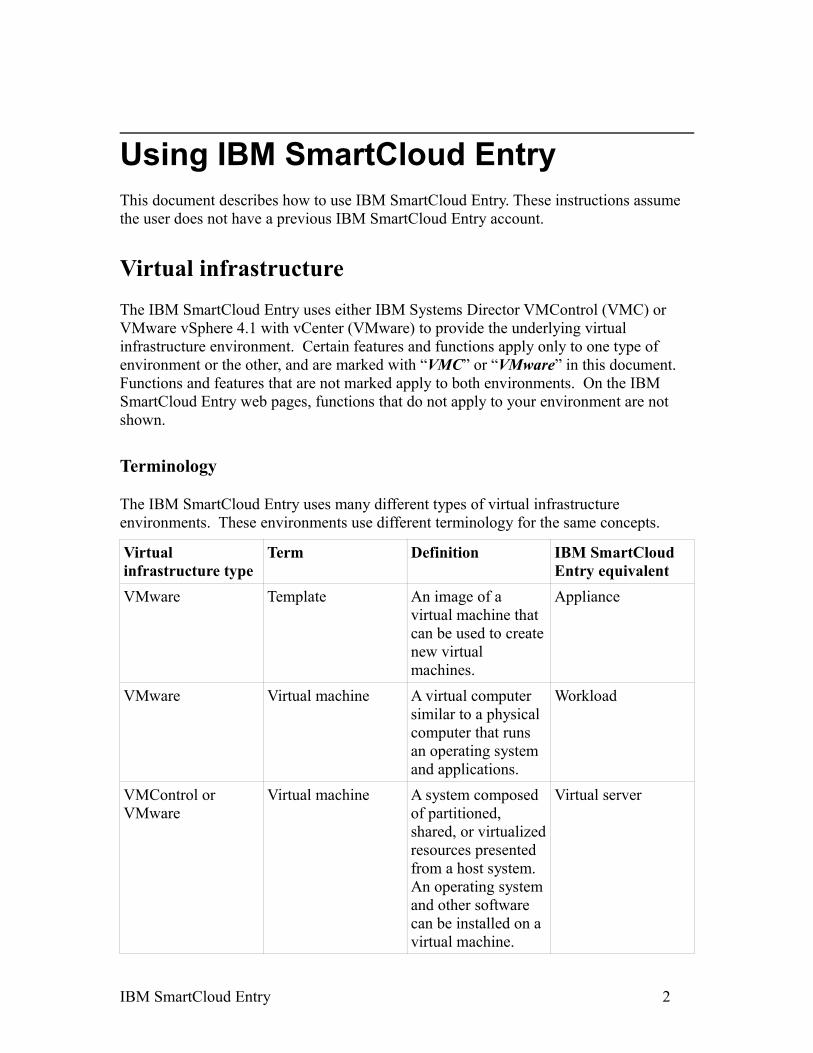
Terminology
The IBM SmartCloud Entry uses many different types of virtual infrastructure environments. These environments use different terminology for the same concepts.
Virtual infrastructure type
Term Definition IBM SmartCloud Entry equivalent
VMware Template An image of a virtual machine that can be used to create new virtual machines.
Appliance
VMware Virtual machine A virtual computer similar to a physical computer that runs an operating system and applications.
Workload
VMControl or VMware
Virtual machine A system composed of partitioned, shared, or virtualized resources presented from a host system. An operating system and other software can be installed on a virtual machine.
Virtual server
IBM SmartCloud Entry 2
Terms also used for this concept are Virtual Server.
First time use1. Ask your IBM SmartCloud Entry administrator for the location of your IBM
SmartCloud Entry server.
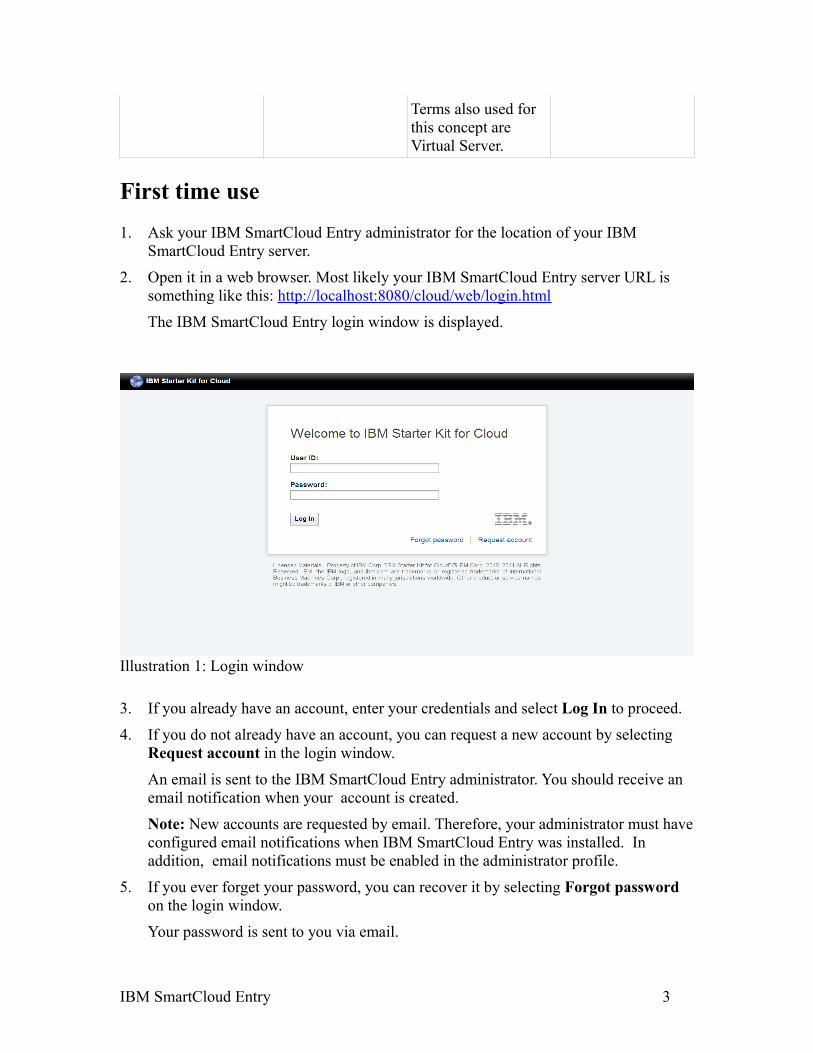
2. Open it in a web browser. Most likely your IBM SmartCloud Entry server URL is something like this: http://localhost:8080/cloud/web/login.html
The IBM SmartCloud Entry login window is displayed.
Illustration 1: Login window
3. If you already have an account, enter your credentials and select Log In to proceed.
4. If you do not already have an account, you can request a new account by selecting Request account in the login window.
An email is sent to the IBM SmartCloud Entry administrator. You should receive an email notification when your account is created.
Note: New accounts are requested by email. Therefore, your administrator must have configured email notifications when IBM SmartCloud Entry was installed. In addition, email notifications must be enabled in the administrator profile.
5. If you ever forget your password, you can recover it by selecting Forgot password on the login window.
Your password is sent to you via email.
IBM SmartCloud Entry 3
Note: If email notifications are not configured in your IBM SmartCloud Entry server, or if you did not provide an email address on your account, an administrator must recreate your user account, and you will lose your IBM SmartCloud Entry information.
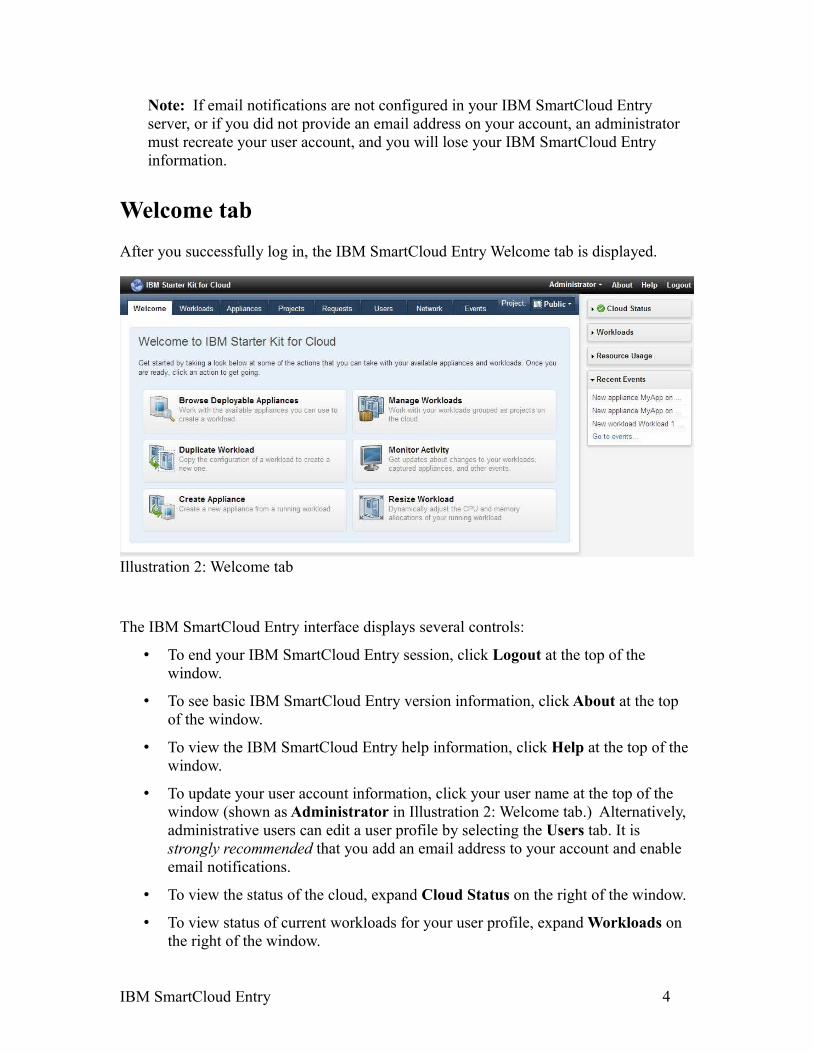
Welcome tabAfter you successfully log in, the IBM SmartCloud Entry Welcome tab is displayed.
Illustration 2: Welcome tab
The IBM SmartCloud Entry interface displays several controls:
• To end your IBM SmartCloud Entry session, click Logout at the top of the window.
• To see basic IBM SmartCloud Entry version information, click About at the top of the window.
• To view the IBM SmartCloud Entry help information, click Help at the top of the window.
• To update your user account information, click your user name at the top of the window (shown as Administrator in Illustration 2: Welcome tab.) Alternatively, administrative users can edit a user profile by selecting the Users tab. It is strongly recommended that you add an email address to your account and enable email notifications.
• To view the status of the cloud, expand Cloud Status on the right of the window.
• To view status of current workloads for your user profile, expand Workloads on the right of the window.
IBM SmartCloud Entry 4
• To view recent IBM SmartCloud Entry events, expand Recent Events on the right of the window.
The Welcome tab displays shortcuts to some of the primary actions available in IBM SmartCloud Entry. Clicking on one of the shortcuts displays the corresponding tab to perform the selected action.
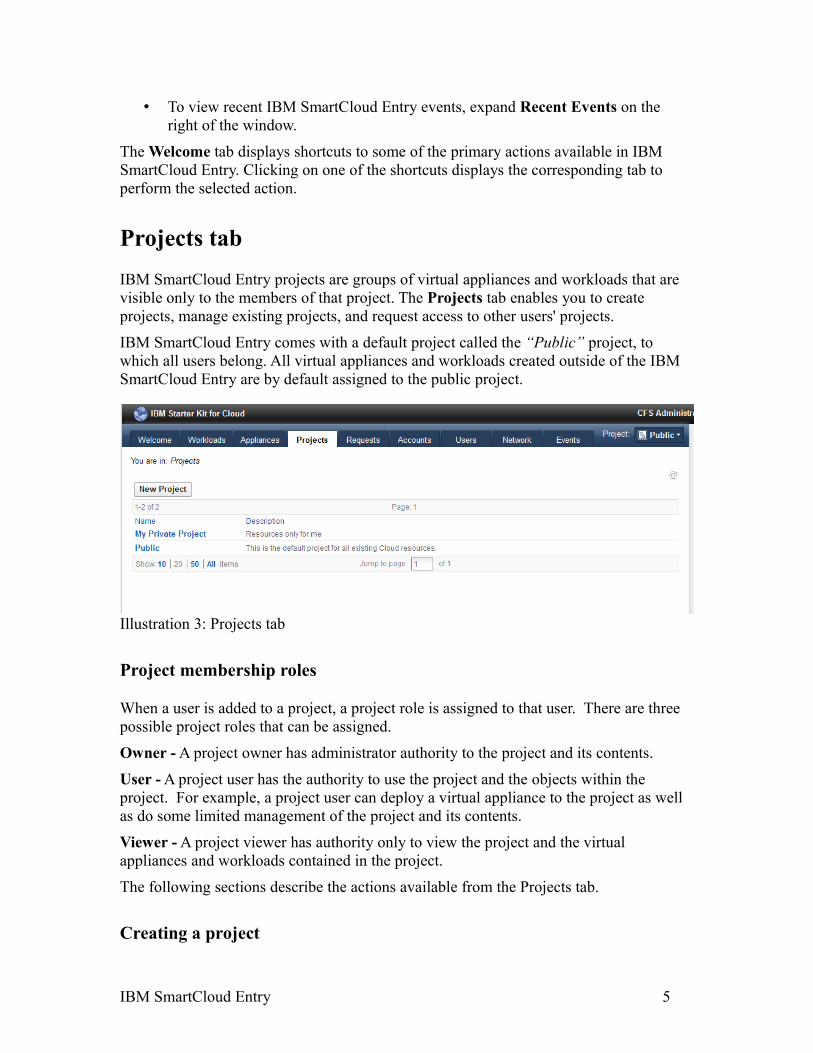
Projects tabIBM SmartCloud Entry projects are groups of virtual appliances and workloads that are visible only to the members of that project. The Projects tab enables you to create projects, manage existing projects, and request access to other users' projects.
IBM SmartCloud Entry comes with a default project called the “Public” project, to which all users belong. All virtual appliances and workloads created outside of the IBM SmartCloud Entry are by default assigned to the public project.
Illustration 3: Projects tab
Project membership roles
When a user is added to a project, a project role is assigned to that user. There are three possible project roles that can be assigned.
Owner - A project owner has administrator authority to the project and its contents.
User - A project user has the authority to use the project and the objects within the project. For example, a project user can deploy a virtual appliance to the project as well as do some limited management of the project and its contents.
Viewer - A project viewer has authority only to view the project and the virtual appliances and workloads contained in the project.
The following sections describe the actions available from the Projects tab.
Creating a project
IBM SmartCloud Entry 5
To create a project, complete the following steps:
1. Select New Project.2. Type a project name and description in the corresponding fields.
3. Select Create.
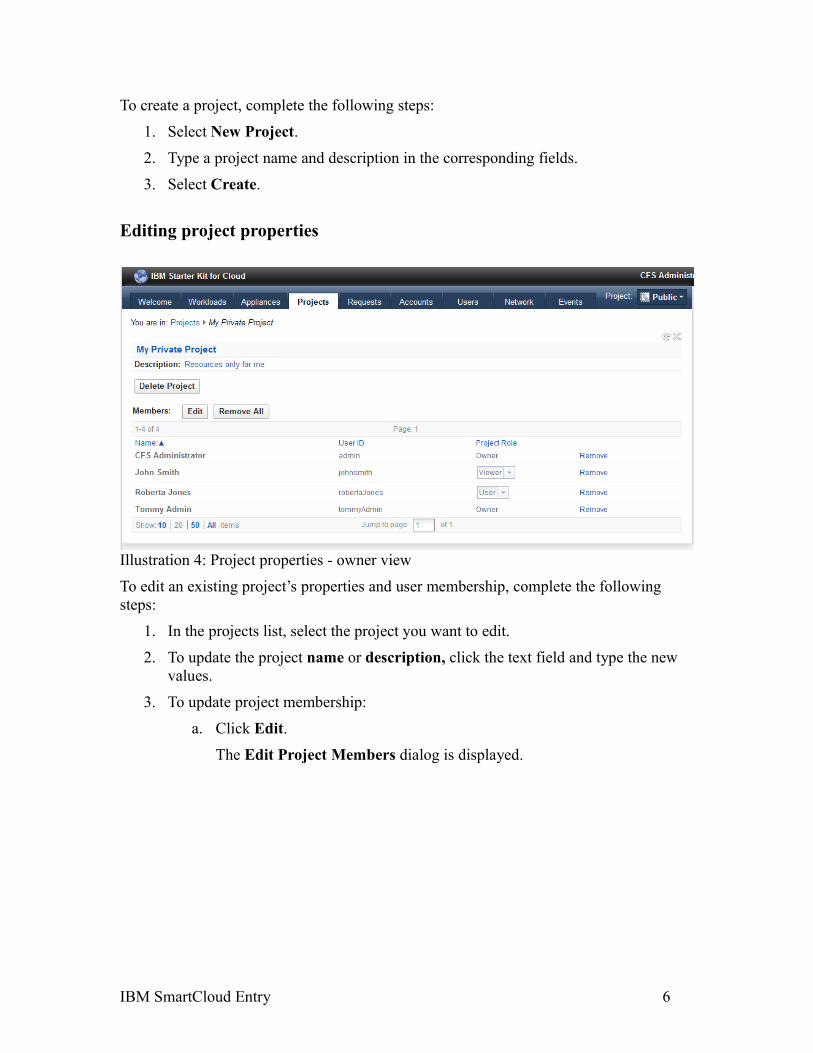
Editing project properties
Illustration 4: Project properties - owner view
To edit an existing project’s properties and user membership, complete the following steps:
1. In the projects list, select the project you want to edit.
2. To update the project name or description, click the text field and type the new values.
3. To update project membership:
a. Click Edit.The Edit Project Members dialog is displayed.
IBM SmartCloud Entry 6
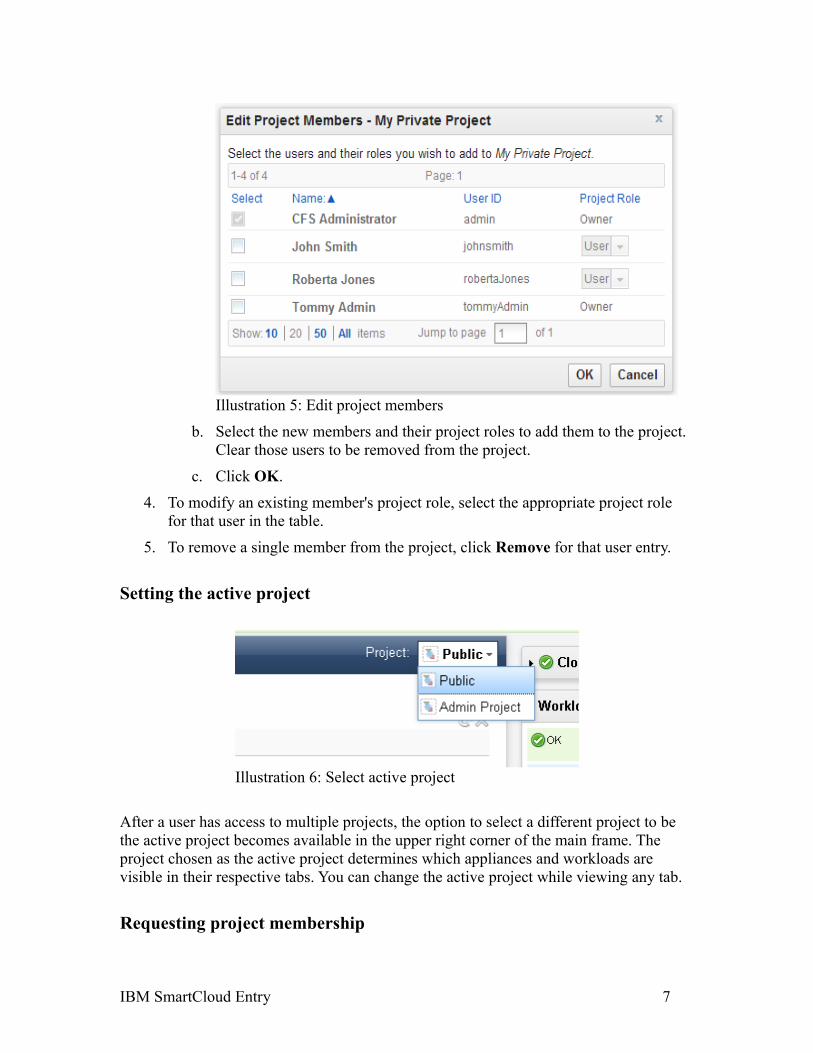
Illustration 5: Edit project members
b. Select the new members and their project roles to add them to the project. Clear those users to be removed from the project.
c. Click OK.
4. To modify an existing member's project role, select the appropriate project role for that user in the table.
5. To remove a single member from the project, click Remove for that user entry.
Setting the active project
After a user has access to multiple projects, the option to select a different project to be the active project becomes available in the upper right corner of the main frame. The project chosen as the active project determines which appliances and workloads are visible in their respective tabs. You can change the active project while viewing any tab.
Requesting project membership
IBM SmartCloud Entry 7
Illustration 6: Select active project
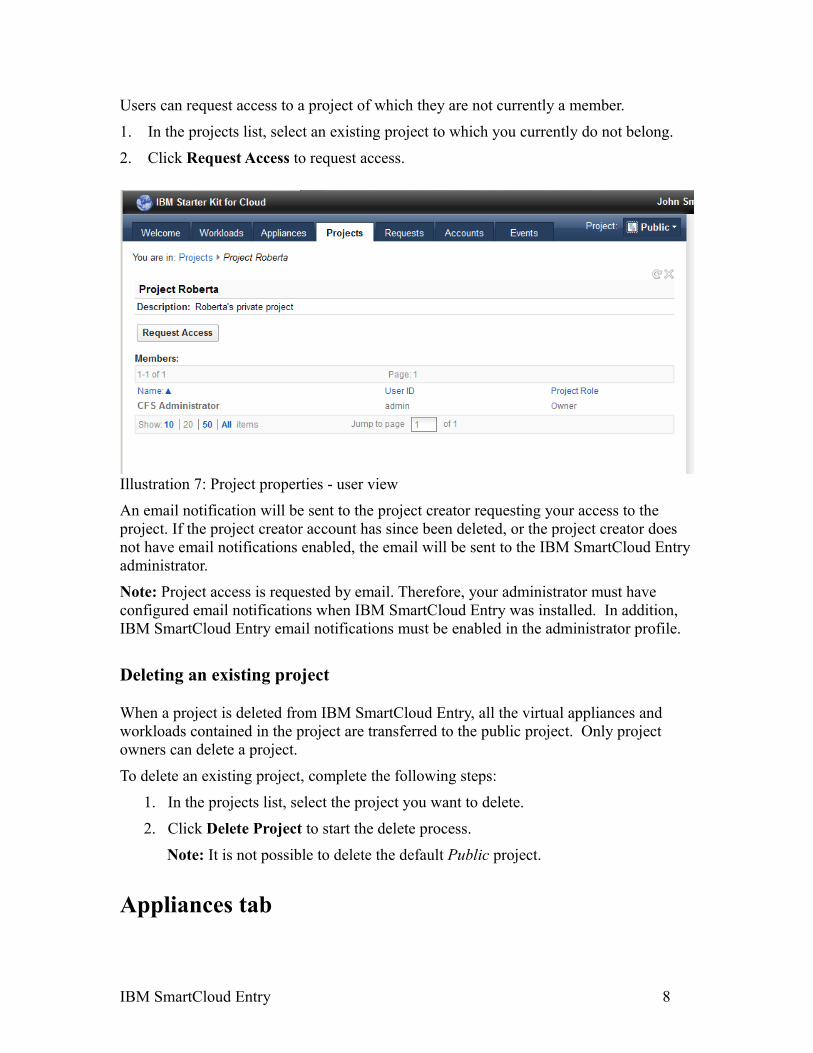
Users can request access to a project of which they are not currently a member.
1. In the projects list, select an existing project to which you currently do not belong.
2. Click Request Access to request access.
Illustration 7: Project properties - user view
An email notification will be sent to the project creator requesting your access to the project. If the project creator account has since been deleted, or the project creator does not have email notifications enabled, the email will be sent to the IBM SmartCloud Entry administrator.
Note: Project access is requested by email. Therefore, your administrator must have configured email notifications when IBM SmartCloud Entry was installed. In addition, IBM SmartCloud Entry email notifications must be enabled in the administrator profile.
Deleting an existing project
When a project is deleted from IBM SmartCloud Entry, all the virtual appliances and workloads contained in the project are transferred to the public project. Only project owners can delete a project.
To delete an existing project, complete the following steps:
1. In the projects list, select the project you want to delete.
2. Click Delete Project to start the delete process.
Note: It is not possible to delete the default Public project.
Appliances tab
IBM SmartCloud Entry 8
The Appliances tab in the IBM SmartCloud Entry shows the virtual appliances that are available for deployment. The following sections describe the actions available from the Appliances tab.
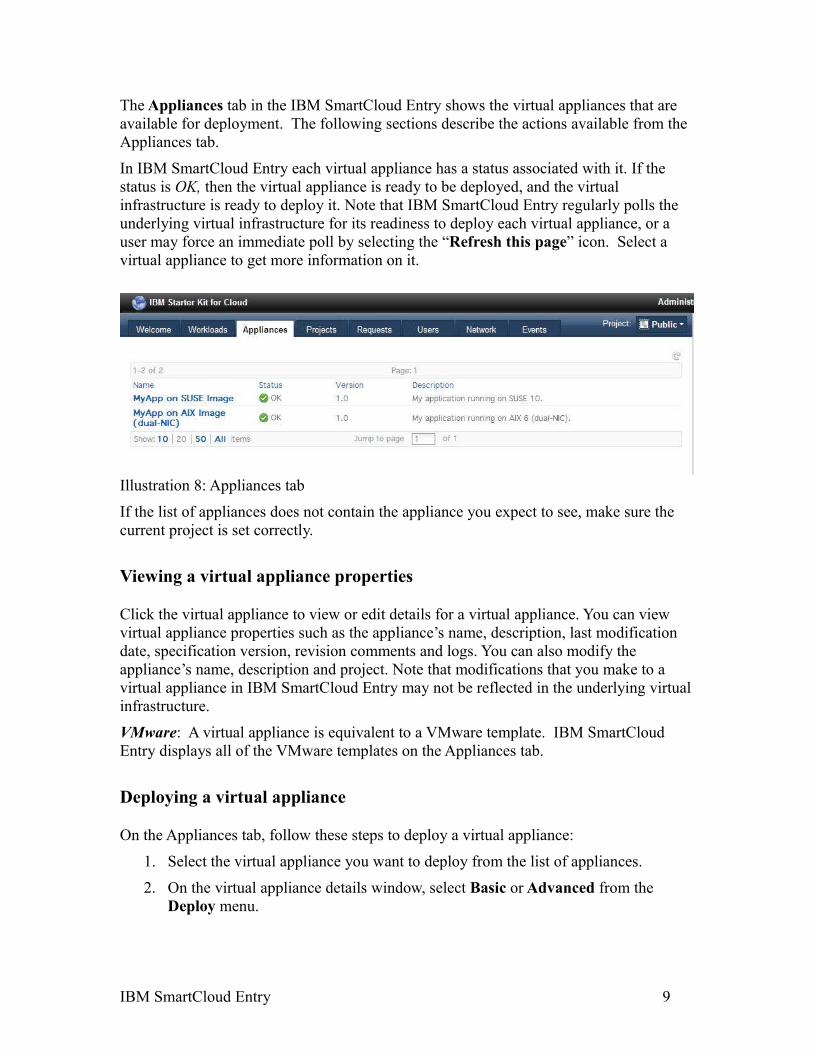
In IBM SmartCloud Entry each virtual appliance has a status associated with it. If the status is OK, then the virtual appliance is ready to be deployed, and the virtual infrastructure is ready to deploy it. Note that IBM SmartCloud Entry regularly polls the underlying virtual infrastructure for its readiness to deploy each virtual appliance, or a user may force an immediate poll by selecting the “Refresh this page” icon. Select a virtual appliance to get more information on it.
Illustration 8: Appliances tab
If the list of appliances does not contain the appliance you expect to see, make sure the current project is set correctly.
Viewing a virtual appliance properties
Click the virtual appliance to view or edit details for a virtual appliance. You can view virtual appliance properties such as the appliance’s name, description, last modification date, specification version, revision comments and logs. You can also modify the appliance’s name, description and project. Note that modifications that you make to a virtual appliance in IBM SmartCloud Entry may not be reflected in the underlying virtual infrastructure.
VMware: A virtual appliance is equivalent to a VMware template. IBM SmartCloud Entry displays all of the VMware templates on the Appliances tab.
Deploying a virtual appliance
On the Appliances tab, follow these steps to deploy a virtual appliance:
1. Select the virtual appliance you want to deploy from the list of appliances.
2. On the virtual appliance details window, select Basic or Advanced from the Deploy menu.
IBM SmartCloud Entry 9
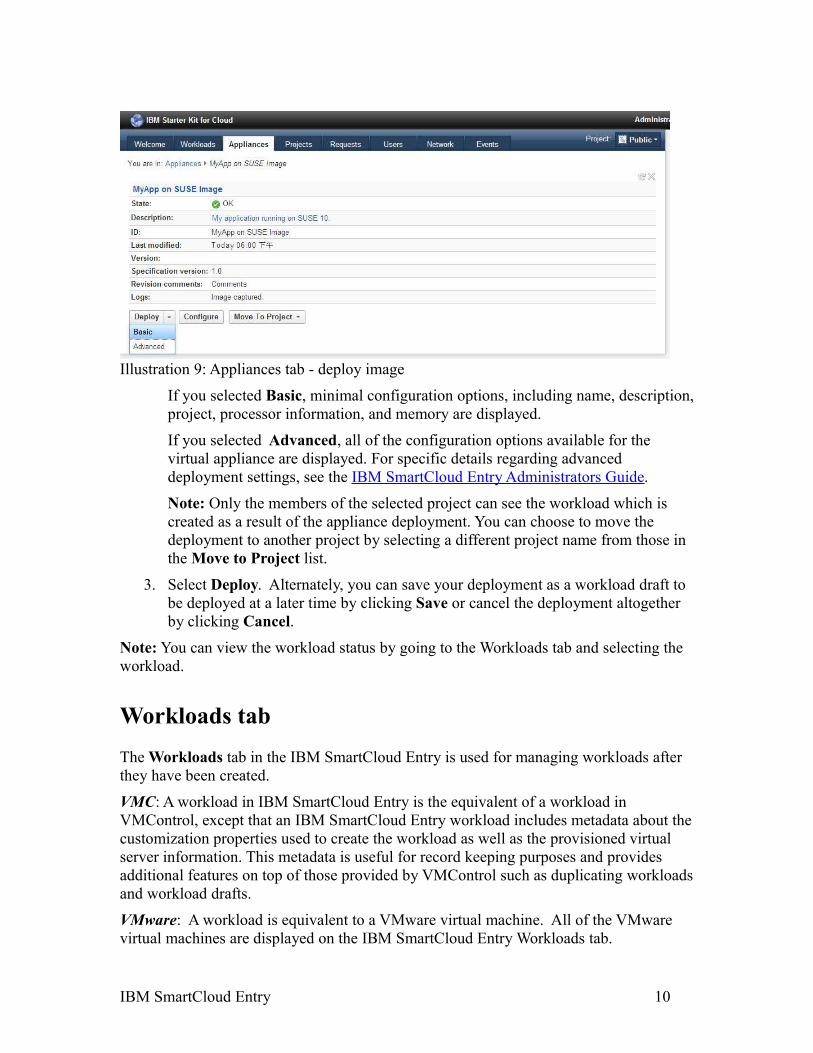
Illustration 9: Appliances tab - deploy image
If you selected Basic, minimal configuration options, including name, description, project, processor information, and memory are displayed.
If you selected Advanced, all of the configuration options available for the virtual appliance are displayed. For specific details regarding advanced deployment settings, see the IBM SmartCloud Entry Administrators Guide.
Note: Only the members of the selected project can see the workload which is created as a result of the appliance deployment. You can choose to move the deployment to another project by selecting a different project name from those in the Move to Project list.
3. Select Deploy. Alternately, you can save your deployment as a workload draft to be deployed at a later time by clicking Save or cancel the deployment altogether by clicking Cancel.
Note: You can view the workload status by going to the Workloads tab and selecting the workload.
Workloads tabThe Workloads tab in the IBM SmartCloud Entry is used for managing workloads after they have been created.
VMC: A workload in IBM SmartCloud Entry is the equivalent of a workload in VMControl, except that an IBM SmartCloud Entry workload includes metadata about the customization properties used to create the workload as well as the provisioned virtual server information. This metadata is useful for record keeping purposes and provides additional features on top of those provided by VMControl such as duplicating workloads and workload drafts.
VMware: A workload is equivalent to a VMware virtual machine. All of the VMware virtual machines are displayed on the IBM SmartCloud Entry Workloads tab.
IBM SmartCloud Entry 10
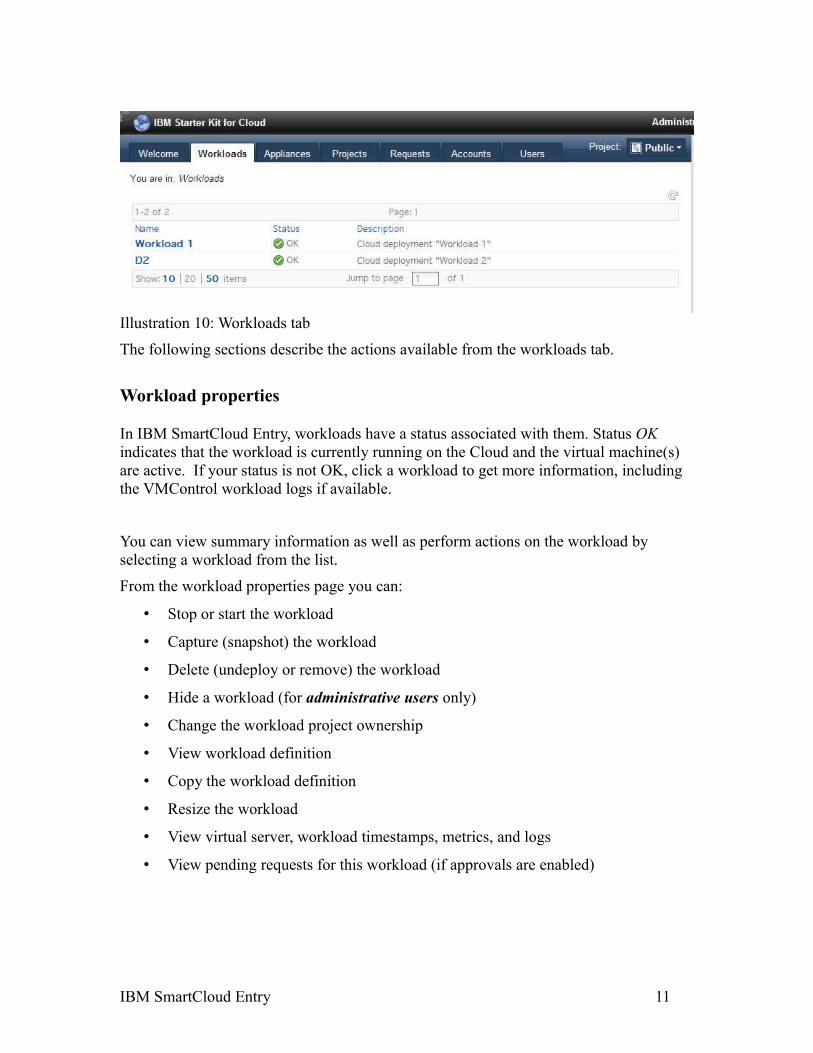
Illustration 10: Workloads tab
The following sections describe the actions available from the workloads tab.
Workload properties
In IBM SmartCloud Entry, workloads have a status associated with them. Status OK indicates that the workload is currently running on the Cloud and the virtual machine(s) are active. If your status is not OK, click a workload to get more information, including the VMControl workload logs if available.
You can view summary information as well as perform actions on the workload by selecting a workload from the list.
From the workload properties page you can:
• Stop or start the workload
• Capture (snapshot) the workload
• Delete (undeploy or remove) the workload
• Hide a workload (for administrative users only)
• Change the workload project ownership
• View workload definition
• Copy the workload definition
• Resize the workload
• View virtual server, workload timestamps, metrics, and logs
• View pending requests for this workload (if approvals are enabled)
IBM SmartCloud Entry 11
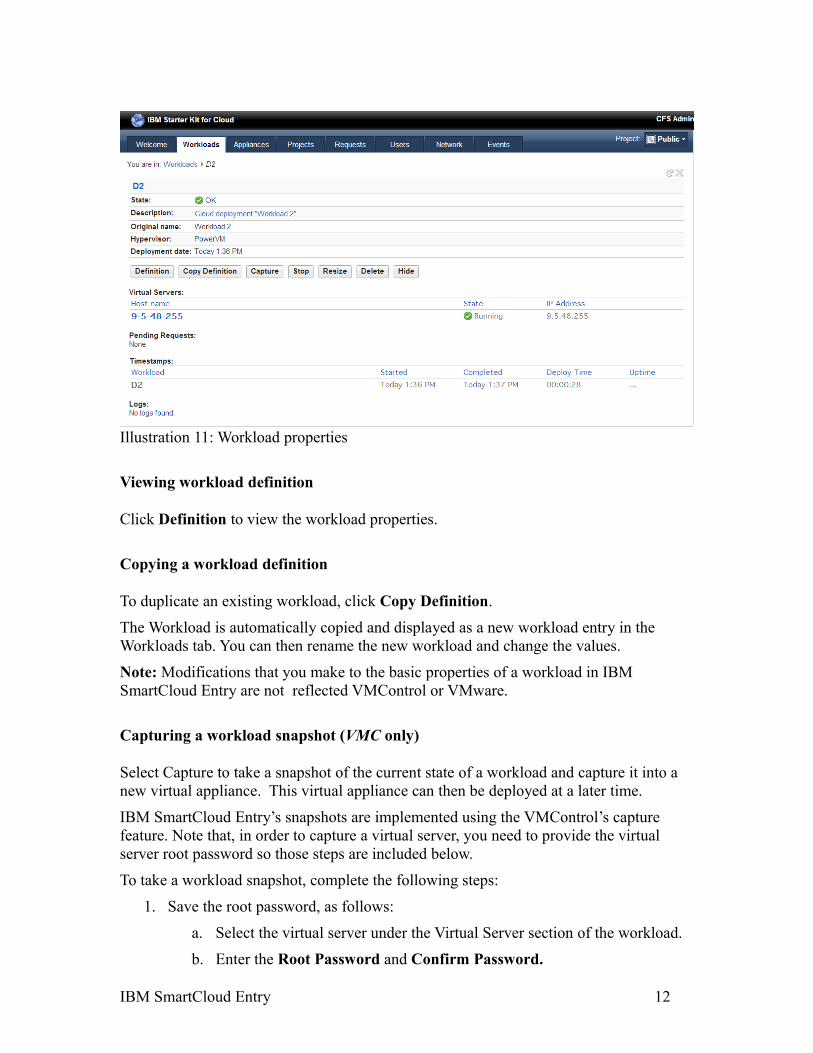
Illustration 11: Workload properties
Viewing workload definition
Click Definition to view the workload properties.
Copying a workload definition
To duplicate an existing workload, click Copy Definition.
The Workload is automatically copied and displayed as a new workload entry in the Workloads tab. You can then rename the new workload and change the values.
Note: Modifications that you make to the basic properties of a workload in IBM SmartCloud Entry are not reflected VMControl or VMware.
Capturing a workload snapshot (VMC only)
Select Capture to take a snapshot of the current state of a workload and capture it into a new virtual appliance. This virtual appliance can then be deployed at a later time.
IBM SmartCloud Entry’s snapshots are implemented using the VMControl’s capture feature. Note that, in order to capture a virtual server, you need to provide the virtual server root password so those steps are included below.
To take a workload snapshot, complete the following steps:
1. Save the root password, as follows:
a. Select the virtual server under the Virtual Server section of the workload.
b. Enter the Root Password and Confirm Password.
IBM SmartCloud Entry 12
c. Click Save.
1. From the Director VMControl server, verify that the virtual server can be accessed using ssh or telnet.
2. Click Capture.3. Switch to the Appliances tab.
You will see a new virtual appliance named “{Workload Name} snapshot” in the Capturing state, where {Workload Name} is the name of the workload that you captured.
After the newly captured virtual appliance is created, it enters the Ready state. You can track the capture progress by clicking on the appliance to show the appliance details.
Notes:
For saving an image with VMware, see Saving and restoring virtual server images(VMware only).
Starting/Stopping a workload
Click Stop to shut down a workload, and stop all the virtual machines in it.
Click Start to start up a workload, and turn on all the virtual machines in it.
Resizing a workload
You can add resources to the virtual machine(s) provisioned by your workload at runtime using a workload resize. To resize an existing workload, follow these steps:
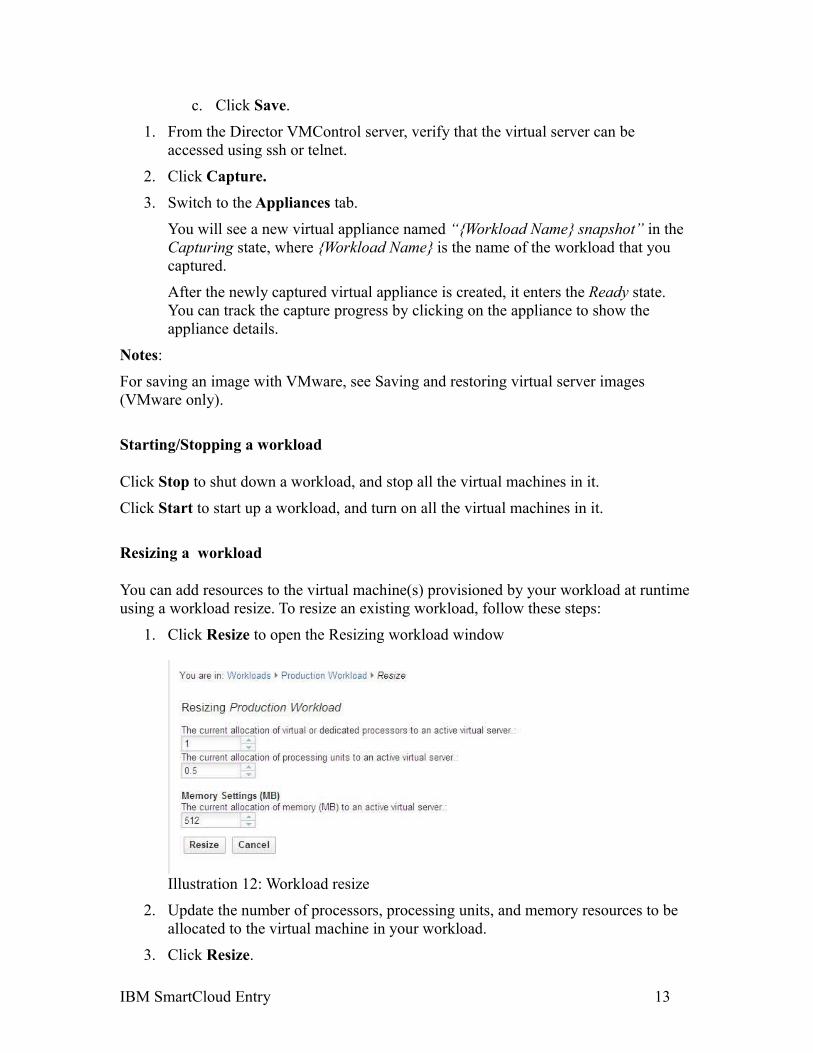
1. Click Resize to open the Resizing workload window
Illustration 12: Workload resize
2. Update the number of processors, processing units, and memory resources to be allocated to the virtual machine in your workload.
3. Click Resize.
IBM SmartCloud Entry 13
Resizing a workload (VMware)
You can add resources to the virtual machine(s) provisioned by your workload running on VMware. Depending on how your VMware virtual machines are configured, you may add memory and processing units while your virtual server is running.
1. To resize an existing workload, click Resize. 2. Update the number of processors, processing units, and memory resources to be
allocated to the virtual machine in your workload.
The settings that can be resized when a virtual machine is in the started state depend on how the virtual machine is configured on VMware:
◦ For memory, the virtual machine must have the Memory Hot Add option enabled. Memory is only allowed to be increased and the maximum amount and the valid values are determined by VMware.
◦ For processors, the virtual machine must have the CPU Hot Plug option enabled. To remove processors, the virtual machine must have the CPU Hot Add and Remove option enabled. The maximum amount of processors allowed is determined by the number of logical processors on the vSphere machine that is running the virtual machine.
For more information about changing memory and processors on a running virtual machine, see the VMware documentation.
1. Click Resize.
Note: How a running virtual machine handles changes in memory and processor depends on the operating system. See the VMware documentation and operating system documentation to determine how changes in memory and CPU are tolerated on a operational system.
Adding storage to a virtual machine makes more memory available and does not change the size of the file system. There are commands that must be run on the guest operating system to increase the size of the file system. Refer to the operating system documentation on how to change the size of the file system after storage has been added.
Deleting or hiding a workload
There are two kinds of workloads deletions available: Delete (i.e. hard delete) and Hide (i.e. soft delete).
The Delete operation de-provisions the virtual machines and storage in the workload. You cannot restore a workload that has been deleted.
The Hide operation (for administrative users only) hides a workload such that it will no longer appear in Cloud Starter Kit as part of any projects, but it does not de-provision any of the resources associated with the workload. You cannot restore a workload that has been hidden.
IBM SmartCloud Entry 14
Click Delete to delete a workload from IBM SmartCloud Entry. You are asked to confirm the deletion. Select Yes to confirm.
Note: (VMware) When you delete a workload with saved images, all the saved images are deleted.
Moving a workload to another project
Click Move to Project and select a different project to move a workload from one project to another project.
Viewing the virtual servers in a workload
The virtual servers that belong to the workload are displayed in the Workload properties window, along with their current state and IP address, if it is known to the IBM SmartCloud Entry. Click on a virtual server in the Virtual Servers section to view operating details.
Viewing pending requests for a workload
The pending requests for a workload are displayed in the Workload properties window, along with the requesting user, request status, action requested, and date of the request. Click on the request id to view additional details about the pending request.
Viewing workload timestamps and logs
The workload metrics are located in the Timestamps section on the Workload properties window. If more than one virtual machine was provisioned in the same workload, the workload times for each virtual machine will be shown here.
The workload logs are located in the Logs section on the Workload properties window. A list of all the logs for the workload will be shown.
Adding storage to a virtual server in a workload (VMC only)
Click the Add Storage link on the Workload properties window to add additional storage to a virtual server. For details on adding storage, see Adding storage to a virtual server(VMC only).
Virtual server properties
In IBM SmartCloud Entry, virtual servers have a state associated with them. A state of Running indicates that the virtual server is currently started and active on the Cloud.
You can view summary information as well as perform actions on the virtual server by selecting a virtual server from the Workload properties window.
IBM SmartCloud Entry 15
From the virtual server properties page you can:
• Add storage
• View storage volume information
• View virtual server properties
• Provide the root password (for capture of the virtual server)
Note: The root password here is for capture only and is not a mechanism for changing the virtual server's password.
IBM SmartCloud Entry 16
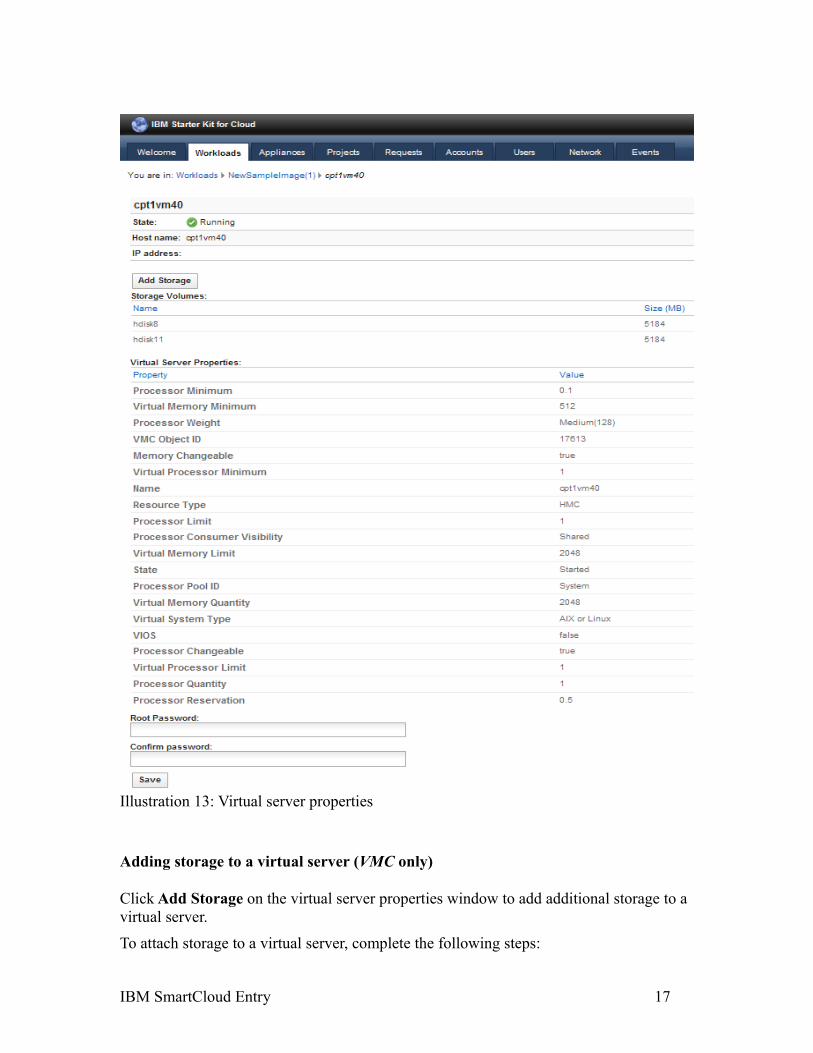
Illustration 13: Virtual server properties
Adding storage to a virtual server (VMC only)
Click Add Storage on the virtual server properties window to add additional storage to a virtual server.
To attach storage to a virtual server, complete the following steps:
IBM SmartCloud Entry 17
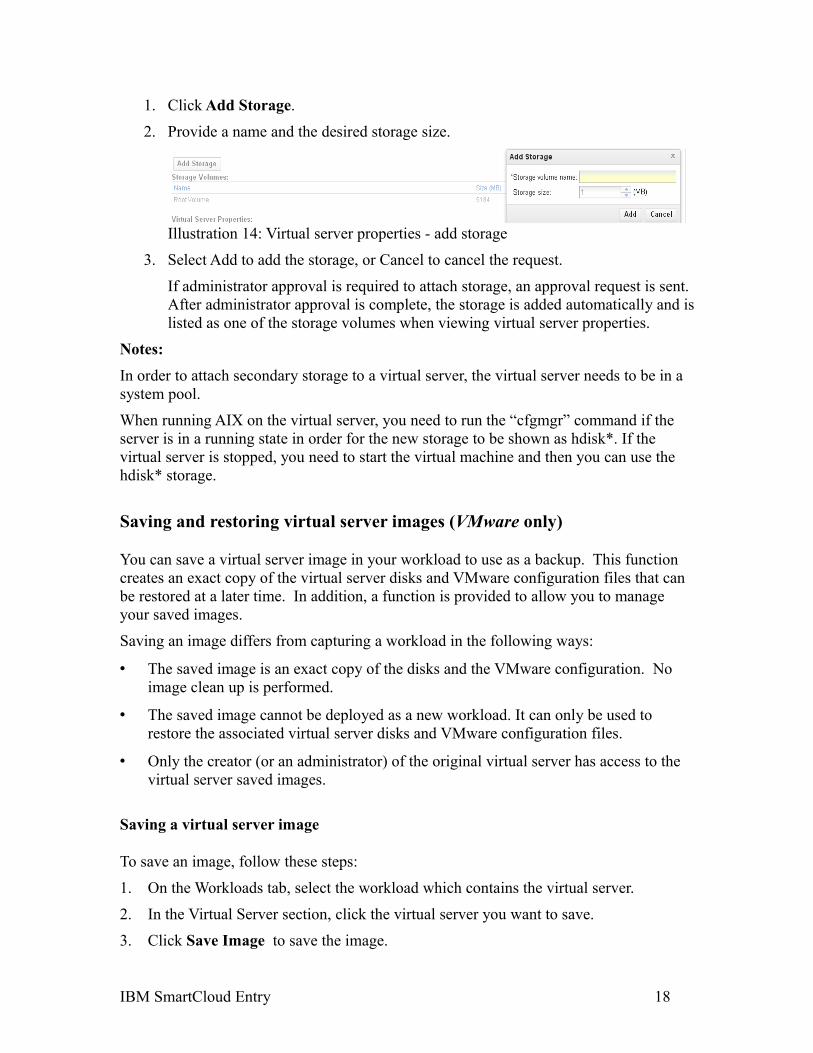
1. Click Add Storage.
2. Provide a name and the desired storage size.
Illustration 14: Virtual server properties - add storage
3. Select Add to add the storage, or Cancel to cancel the request.
If administrator approval is required to attach storage, an approval request is sent. After administrator approval is complete, the storage is added automatically and is listed as one of the storage volumes when viewing virtual server properties.
Notes:In order to attach secondary storage to a virtual server, the virtual server needs to be in a system pool.
When running AIX on the virtual server, you need to run the “cfgmgr” command if the server is in a running state in order for the new storage to be shown as hdisk*. If the virtual server is stopped, you need to start the virtual machine and then you can use the hdisk* storage.
Saving and restoring virtual server images (VMware only)
You can save a virtual server image in your workload to use as a backup. This function creates an exact copy of the virtual server disks and VMware configuration files that can be restored at a later time. In addition, a function is provided to allow you to manage your saved images.
Saving an image differs from capturing a workload in the following ways:
• The saved image is an exact copy of the disks and the VMware configuration. No image clean up is performed.
• The saved image cannot be deployed as a new workload. It can only be used to restore the associated virtual server disks and VMware configuration files.
• Only the creator (or an administrator) of the original virtual server has access to the virtual server saved images.
Saving a virtual server image
To save an image, follow these steps:
1. On the Workloads tab, select the workload which contains the virtual server.
2. In the Virtual Server section, click the virtual server you want to save.
3. Click Save Image to save the image.
IBM SmartCloud Entry 18
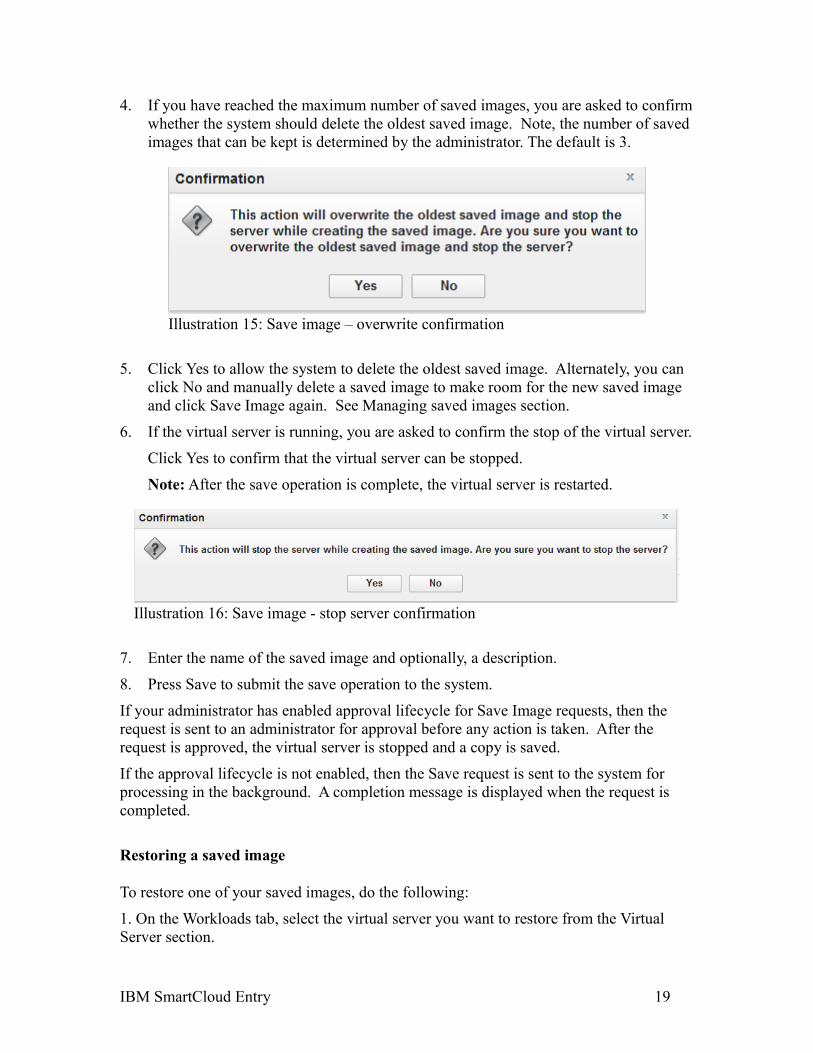
4. If you have reached the maximum number of saved images, you are asked to confirm whether the system should delete the oldest saved image. Note, the number of saved images that can be kept is determined by the administrator. The default is 3.
5. Click Yes to allow the system to delete the oldest saved image. Alternately, you can click No and manually delete a saved image to make room for the new saved image and click Save Image again. See Managing saved images section.
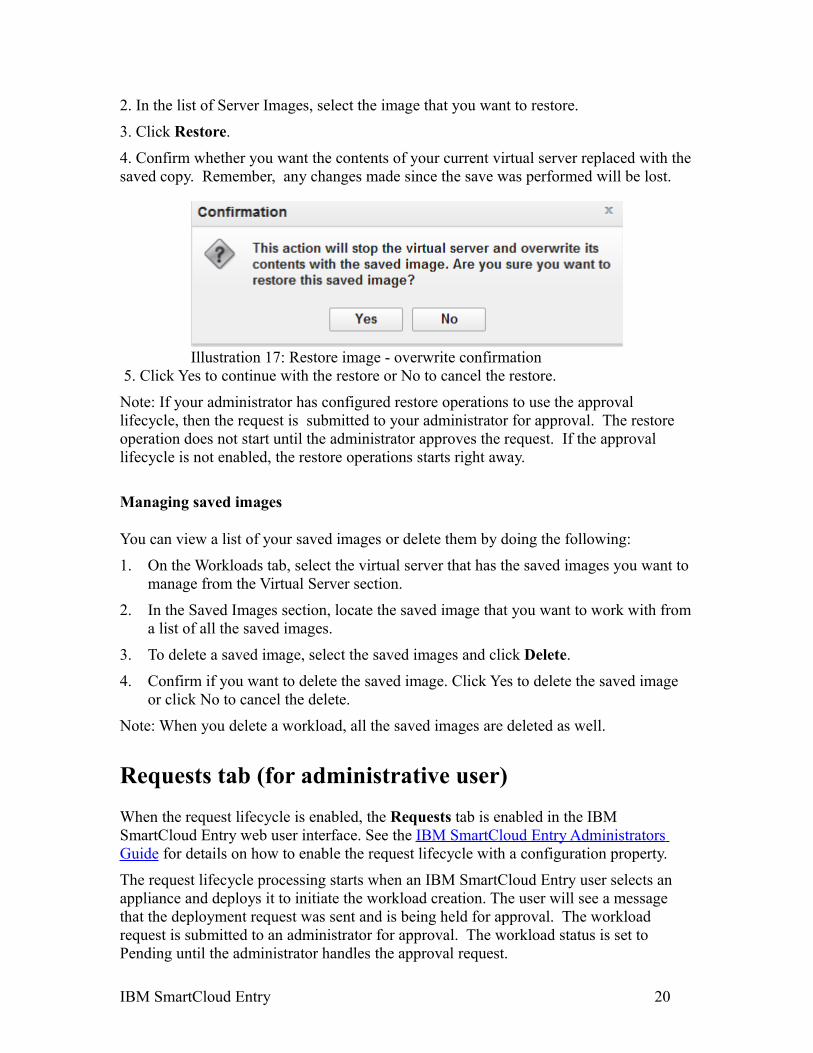
6. If the virtual server is running, you are asked to confirm the stop of the virtual server.
Click Yes to confirm that the virtual server can be stopped.
Note: After the save operation is complete, the virtual server is restarted.
7. Enter the name of the saved image and optionally, a description.
8. Press Save to submit the save operation to the system.
If your administrator has enabled approval lifecycle for Save Image requests, then the request is sent to an administrator for approval before any action is taken. After the request is approved, the virtual server is stopped and a copy is saved.
If the approval lifecycle is not enabled, then the Save request is sent to the system for processing in the background. A completion message is displayed when the request is completed.
Restoring a saved image
To restore one of your saved images, do the following:
1. On the Workloads tab, select the virtual server you want to restore from the Virtual Server section.
IBM SmartCloud Entry 19
Illustration 15: Save image – overwrite confirmation
Illustration 16: Save image - stop server confirmation
2. In the list of Server Images, select the image that you want to restore.
3. Click Restore.
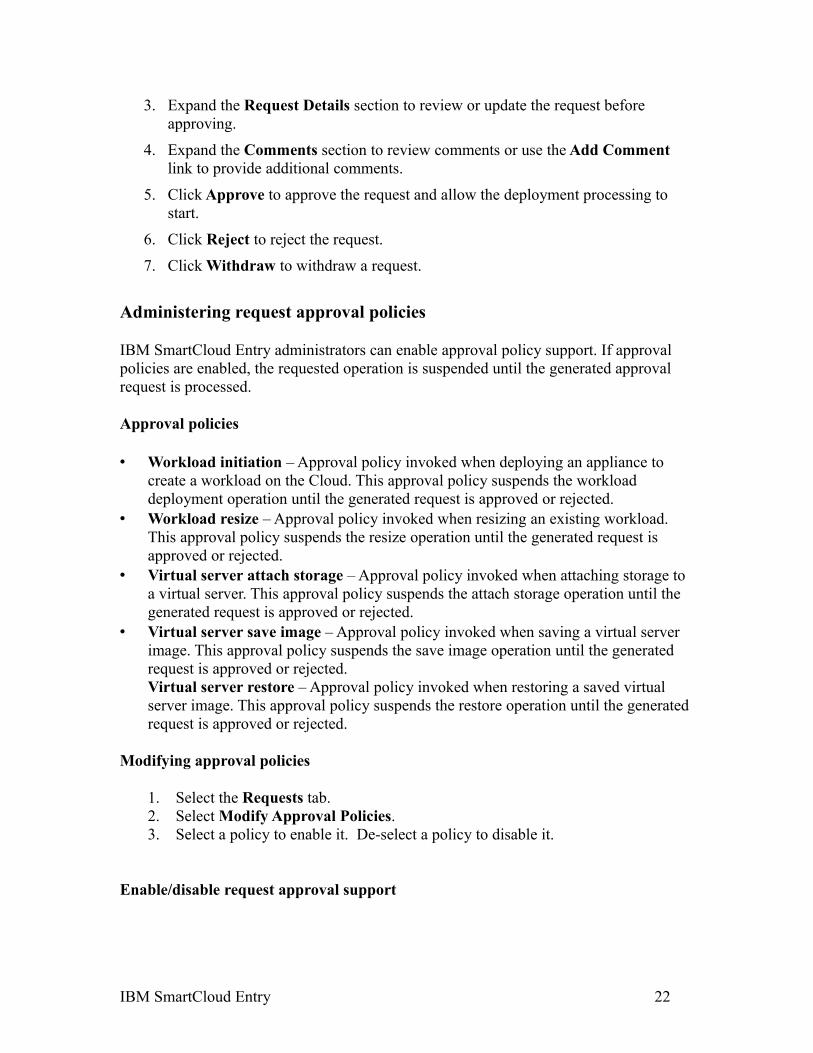
4. Confirm whether you want the contents of your current virtual server replaced with the saved copy. Remember, any changes made since the save was performed will be lost.
5. Click Yes to continue with the restore or No to cancel the restore.
Note: If your administrator has configured restore operations to use the approval lifecycle, then the request is submitted to your administrator for approval. The restore operation does not start until the administrator approves the request. If the approval lifecycle is not enabled, the restore operations starts right away.
Managing saved images
You can view a list of your saved images or delete them by doing the following:
1. On the Workloads tab, select the virtual server that has the saved images you want to manage from the Virtual Server section.
2. In the Saved Images section, locate the saved image that you want to work with from a list of all the saved images.
3. To delete a saved image, select the saved images and click Delete.
4. Confirm if you want to delete the saved image. Click Yes to delete the saved image or click No to cancel the delete.
Note: When you delete a workload, all the saved images are deleted as well.
Requests tab (for administrative user)When the request lifecycle is enabled, the Requests tab is enabled in the IBM SmartCloud Entry web user interface. See the IBM SmartCloud Entry Administrators Guide for details on how to enable the request lifecycle with a configuration property.
The request lifecycle processing starts when an IBM SmartCloud Entry user selects an appliance and deploys it to initiate the workload creation. The user will see a message that the deployment request was sent and is being held for approval. The workload request is submitted to an administrator for approval. The workload status is set to Pending until the administrator handles the approval request.
IBM SmartCloud Entry 20
Illustration 17: Restore image - overwrite confirmation

Administrators can use the Requests tab to view, approve, reject or withdraw workload requests. Note that withdraw is a possibility if the approver is the owner of the original request. An administrator can also modify approval policies.
Illustration 18: Requests tab for administrative user
Follow these steps to process a pending request:
1. Select the Requests tab.
2. Select the Pending workload. The Request properties page appears.
IBM SmartCloud Entry 21
Illustration 19: Request properties for administrative user
3. Expand the Request Details section to review or update the request before approving.
4. Expand the Comments section to review comments or use the Add Comment link to provide additional comments.
5. Click Approve to approve the request and allow the deployment processing to start.
6. Click Reject to reject the request.
7. Click Withdraw to withdraw a request.
Administering request approval policies
IBM SmartCloud Entry administrators can enable approval policy support. If approval policies are enabled, the requested operation is suspended until the generated approval request is processed.
Approval policies
• Workload initiation – Approval policy invoked when deploying an appliance to create a workload on the Cloud. This approval policy suspends the workload deployment operation until the generated request is approved or rejected.
• Workload resize – Approval policy invoked when resizing an existing workload. This approval policy suspends the resize operation until the generated request is approved or rejected.
• Virtual server attach storage – Approval policy invoked when attaching storage to a virtual server. This approval policy suspends the attach storage operation until the generated request is approved or rejected.
• Virtual server save image – Approval policy invoked when saving a virtual server image. This approval policy suspends the save image operation until the generated request is approved or rejected.Virtual server restore – Approval policy invoked when restoring a saved virtual server image. This approval policy suspends the restore operation until the generated request is approved or rejected.
Modifying approval policies
1. Select the Requests tab.2. Select Modify Approval Policies.3. Select a policy to enable it. De-select a policy to disable it.
Enable/disable request approval support
IBM SmartCloud Entry 22
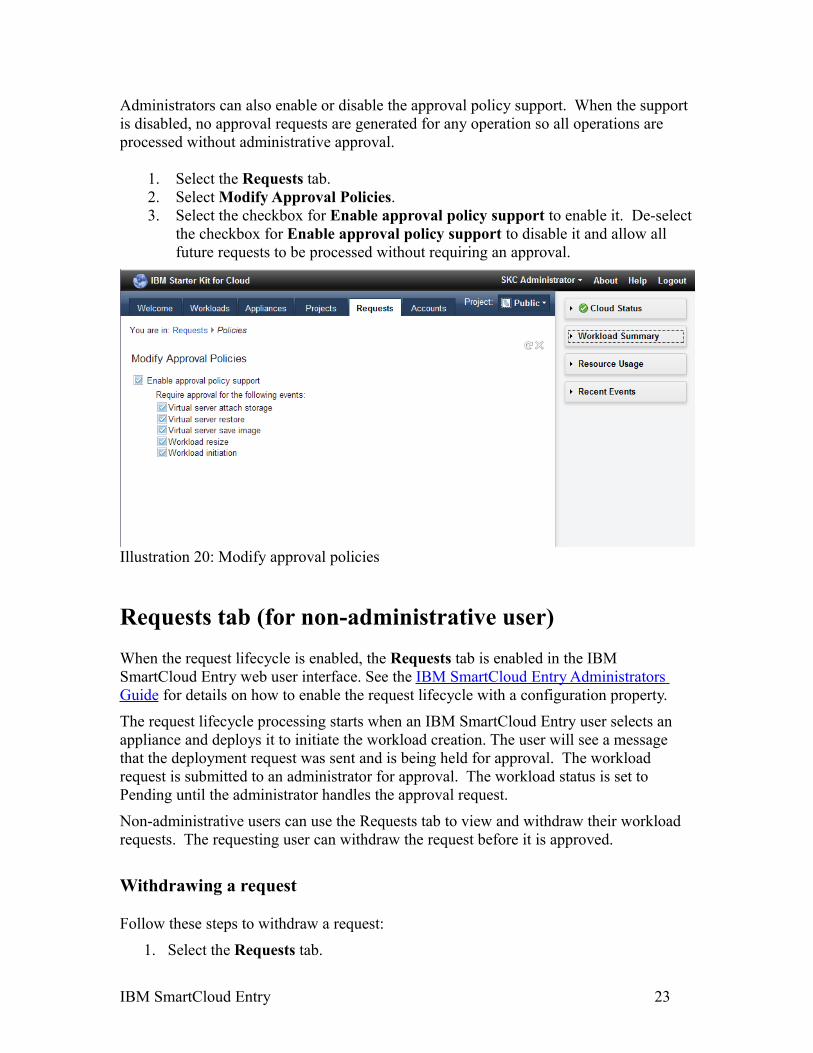
Administrators can also enable or disable the approval policy support. When the support is disabled, no approval requests are generated for any operation so all operations are processed without administrative approval.
1. Select the Requests tab.2. Select Modify Approval Policies.3. Select the checkbox for Enable approval policy support to enable it. De-select
the checkbox for Enable approval policy support to disable it and allow all future requests to be processed without requiring an approval.
Requests tab (for non-administrative user)When the request lifecycle is enabled, the Requests tab is enabled in the IBM SmartCloud Entry web user interface. See the IBM SmartCloud Entry Administrators Guide for details on how to enable the request lifecycle with a configuration property.
The request lifecycle processing starts when an IBM SmartCloud Entry user selects an appliance and deploys it to initiate the workload creation. The user will see a message that the deployment request was sent and is being held for approval. The workload request is submitted to an administrator for approval. The workload status is set to Pending until the administrator handles the approval request.
Non-administrative users can use the Requests tab to view and withdraw their workload requests. The requesting user can withdraw the request before it is approved.
Withdrawing a request
Follow these steps to withdraw a request:
1. Select the Requests tab.
IBM SmartCloud Entry 23
Illustration 20: Modify approval policies

2. Select the Pending workload.
3. Click Withdraw to formally withdraw the request from the queue.
Note: A user can expand the Comments section and use the Add Comment link to enter additional comments about the request.
Illustration 21: Request properties for non-administrative user
Resubmitting a rejected request
If an administrator rejects your workload request, you may provide additional comments to resolve any issues and resubmit your request.
Follow these steps to resubmit a rejected request:
1. Select the Requests tab.
2. Select the Rejected workload.
3. Expand the Request Details section to change any of the request parameters before resubmitting the request.
4. Expand the Comments section and use the Add Comment link to enter any additional information needed for your request.
5. Click the Resubmit button to resubmit a request.
IBM SmartCloud Entry 24
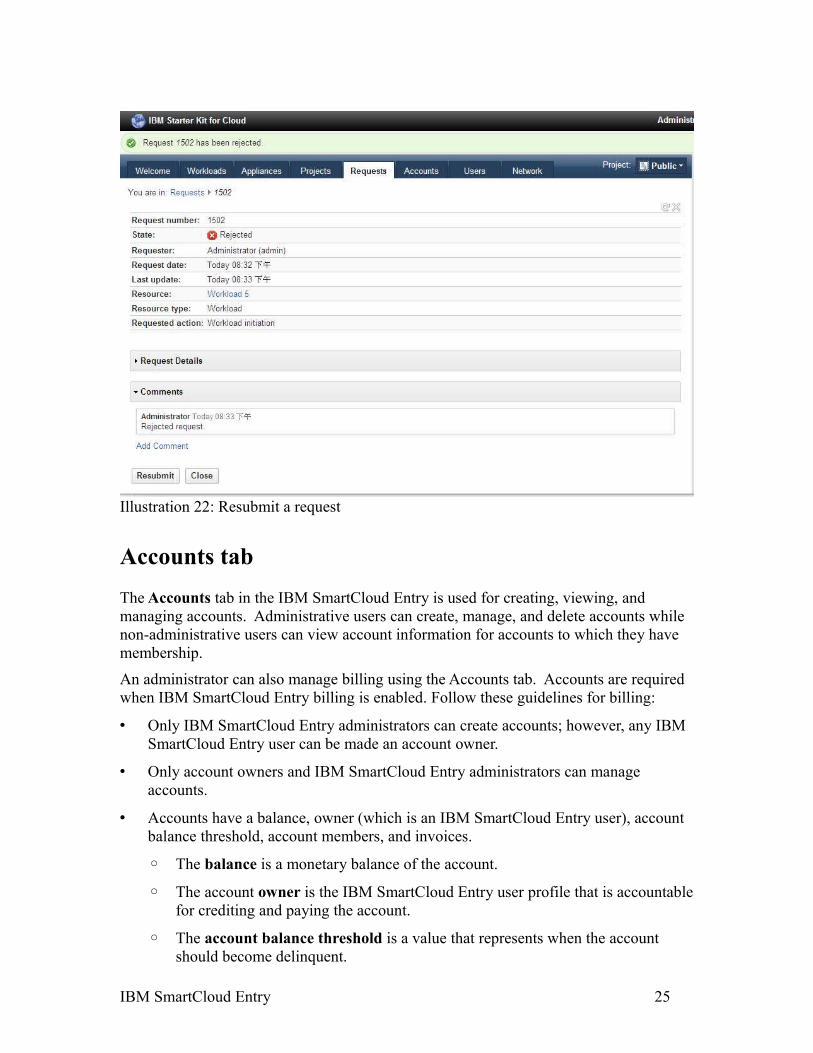
Illustration 22: Resubmit a request
Accounts tabThe Accounts tab in the IBM SmartCloud Entry is used for creating, viewing, and managing accounts. Administrative users can create, manage, and delete accounts while non-administrative users can view account information for accounts to which they have membership.
An administrator can also manage billing using the Accounts tab. Accounts are required when IBM SmartCloud Entry billing is enabled. Follow these guidelines for billing:
• Only IBM SmartCloud Entry administrators can create accounts; however, any IBM SmartCloud Entry user can be made an account owner.
• Only account owners and IBM SmartCloud Entry administrators can manage accounts.
• Accounts have a balance, owner (which is an IBM SmartCloud Entry user), account balance threshold, account members, and invoices.
◦ The balance is a monetary balance of the account.
◦ The account owner is the IBM SmartCloud Entry user profile that is accountable for crediting and paying the account.
◦ The account balance threshold is a value that represents when the account should become delinquent.
IBM SmartCloud Entry 25
◦ The account members are IBM SmartCloud Entry users that belong to the account. When account members deploy workloads in IBM SmartCloud Entry, the workloads are billed to their account.
• Each workload has an Invoice. An account can have many invoices which are viewable from the Account properties window.
• A user can deploy workloads only if the user is an account member, and the account is not delinquent.
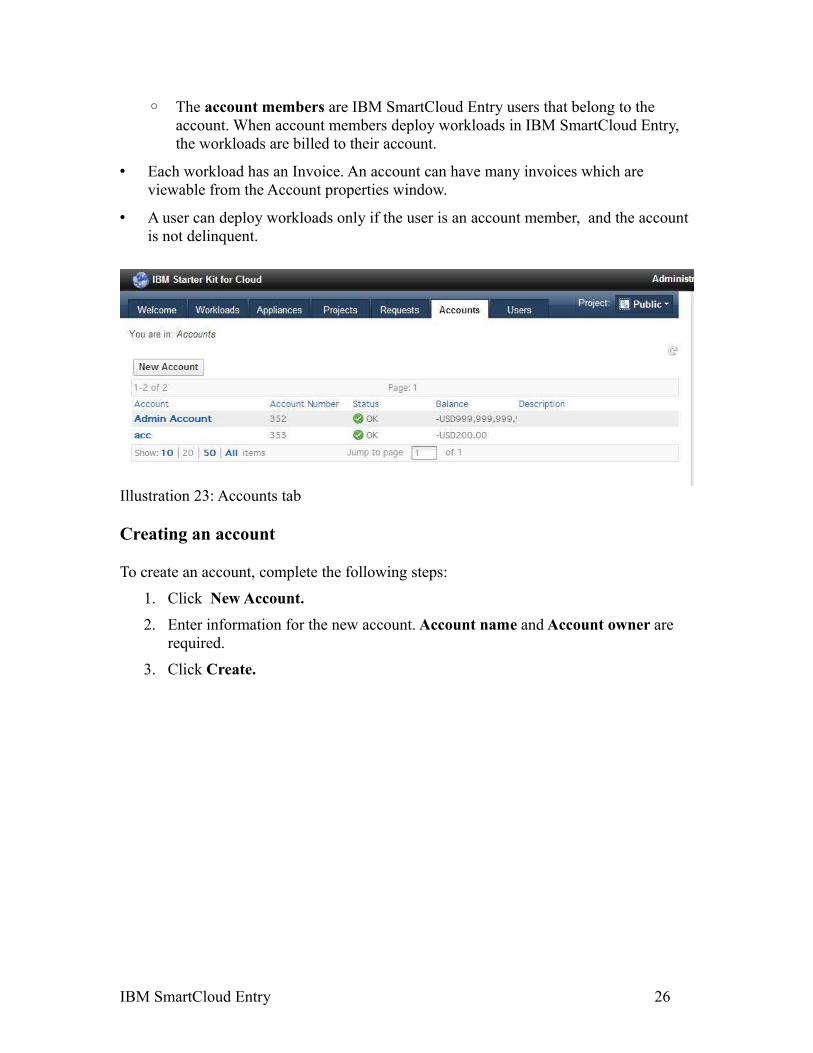
Illustration 23: Accounts tab
Creating an account
To create an account, complete the following steps:
1. Click New Account.2. Enter information for the new account. Account name and Account owner are
required.
3. Click Create.
IBM SmartCloud Entry 26
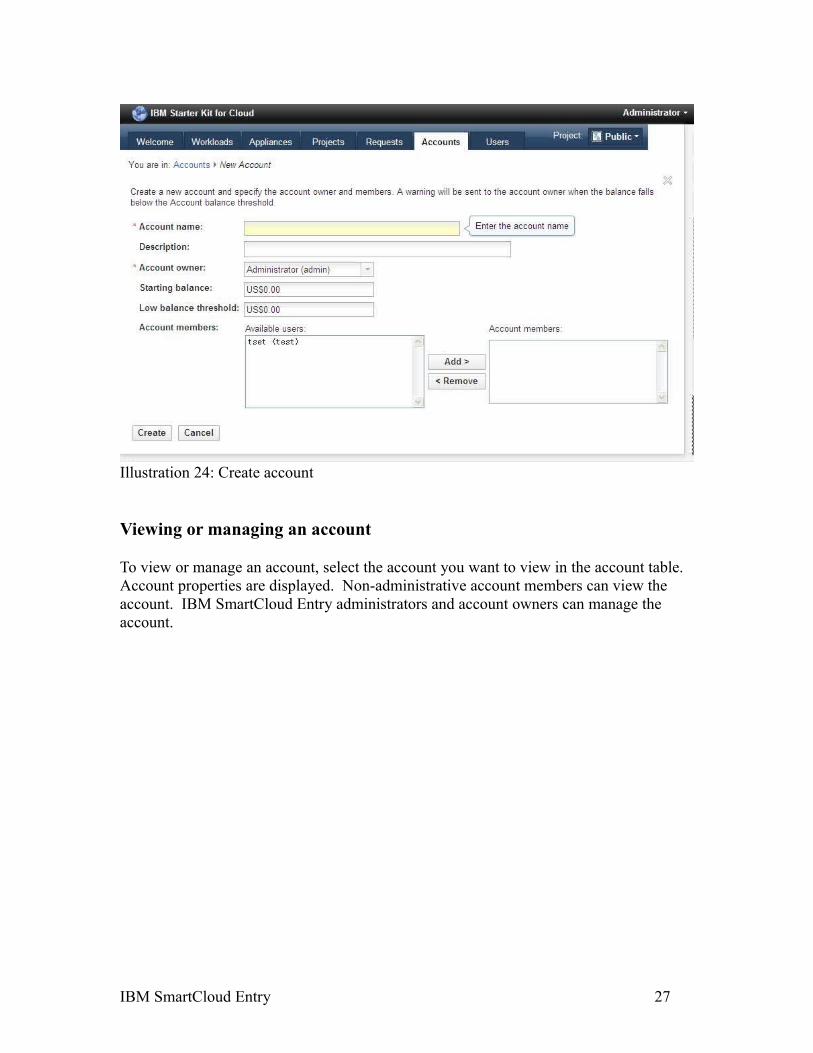
Illustration 24: Create account
Viewing or managing an account
To view or manage an account, select the account you want to view in the account table. Account properties are displayed. Non-administrative account members can view the account. IBM SmartCloud Entry administrators and account owners can manage the account.
IBM SmartCloud Entry 27
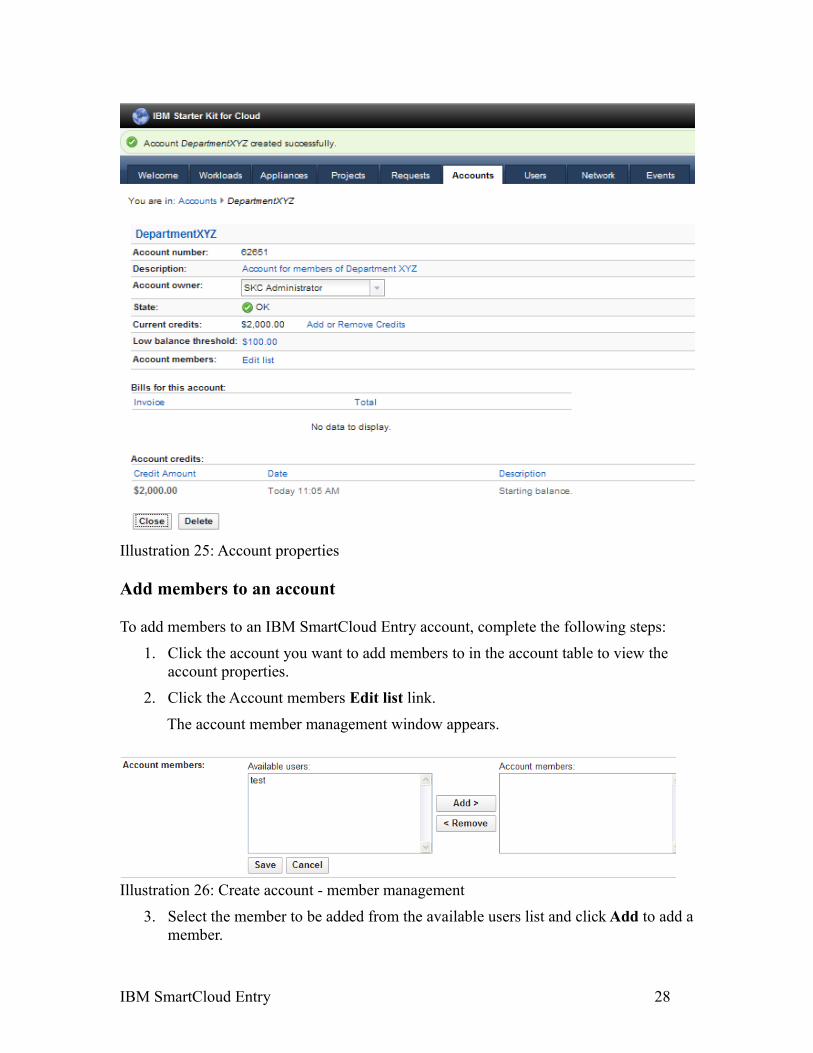
Illustration 25: Account properties
Add members to an account
To add members to an IBM SmartCloud Entry account, complete the following steps:
1. Click the account you want to add members to in the account table to view the account properties.
2. Click the Account members Edit list link.
The account member management window appears.
Illustration 26: Create account - member management
3. Select the member to be added from the available users list and click Add to add a member.
IBM SmartCloud Entry 28
4. Select the member to be removed from the account members list and click Remove to remove a member.
Deleting an account
To delete an account, complete the following steps:
1. Click the account you want to delete in the account table to view the account properties.
2. Click Delete.
3. Confirm the account deletion.
Note: All workloads for an account must be stopped or deleted before deleting an account.
Users tab (for administrative users)The Users tab in the IBM SmartCloud Entry is enabled for administrative users and is used for creating, viewing, and managing users.
Creating a user
To create a user, complete the following steps:
1. Click New User.2. Enter information for the new user.
3. Click Create.
IBM SmartCloud Entry 29
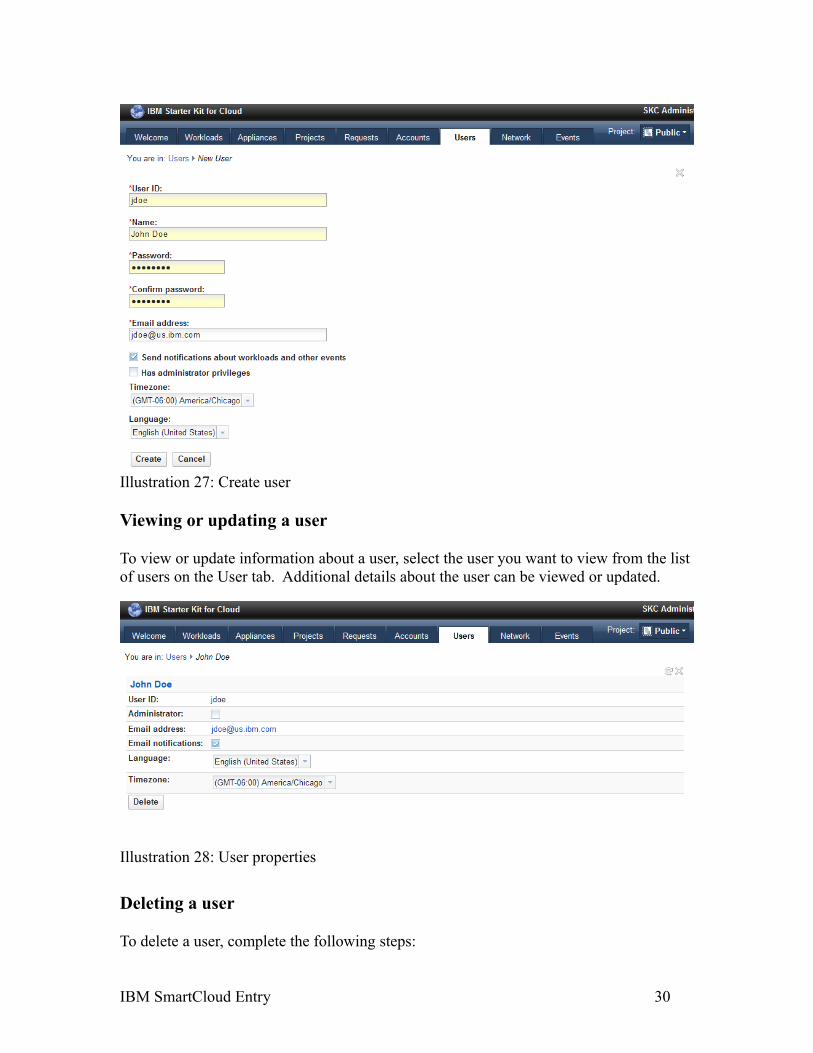
Illustration 27: Create user
Viewing or updating a user
To view or update information about a user, select the user you want to view from the list of users on the User tab. Additional details about the user can be viewed or updated.
Illustration 28: User properties
Deleting a user
To delete a user, complete the following steps:
IBM SmartCloud Entry 30
1. Click the user you want to delete from the list of users on the User tab.
2. Click Delete.
3. To confirm the user deletion, select Yes. To cancel the user deletion, select No.
Network tab (for administrative users)The Network tab is enabled for administrative users and provides a listing of all existing network configurations. An administrator can create, edit, and delete network configurations from here. Network configurations may need to be set up by an IBM SmartCloud Entry administrator before an appliance can be deployed.
For additional details on network configuration, talk to your IBM SmartCloud Entry administrator or see the Network Configurations section in the IBM SmartCloud Entry Administrators Guide.
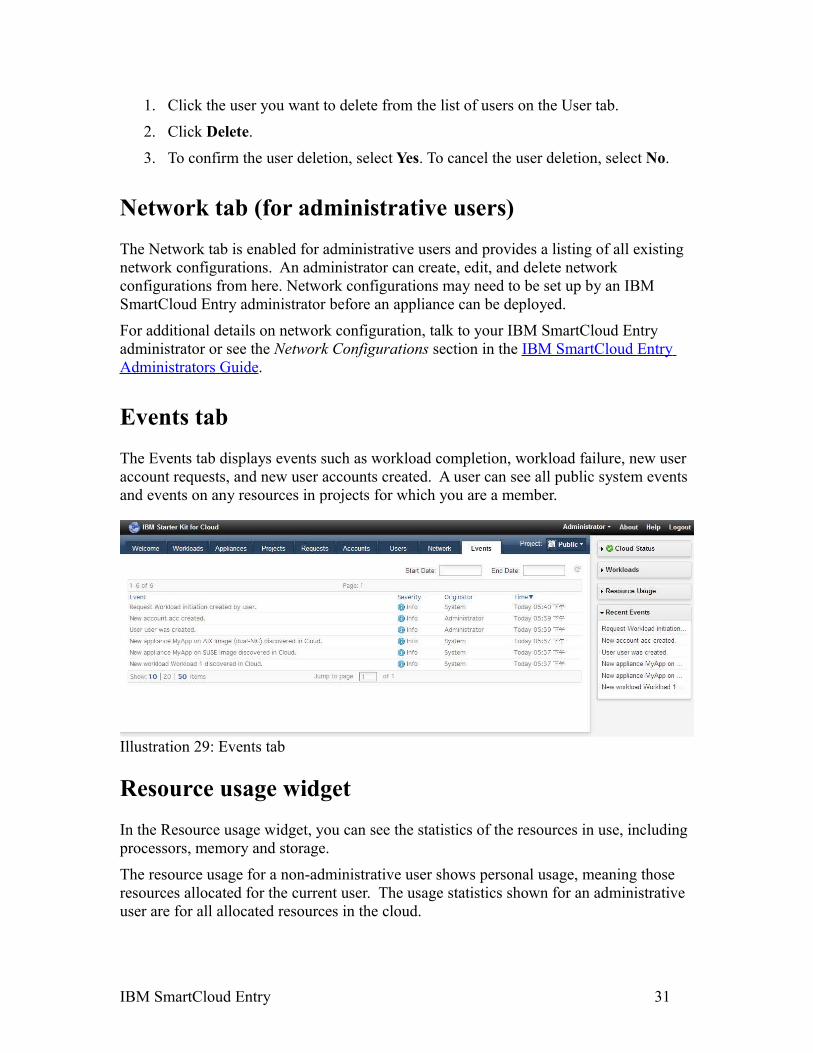
Events tabThe Events tab displays events such as workload completion, workload failure, new user account requests, and new user accounts created. A user can see all public system events and events on any resources in projects for which you are a member.
Illustration 29: Events tab
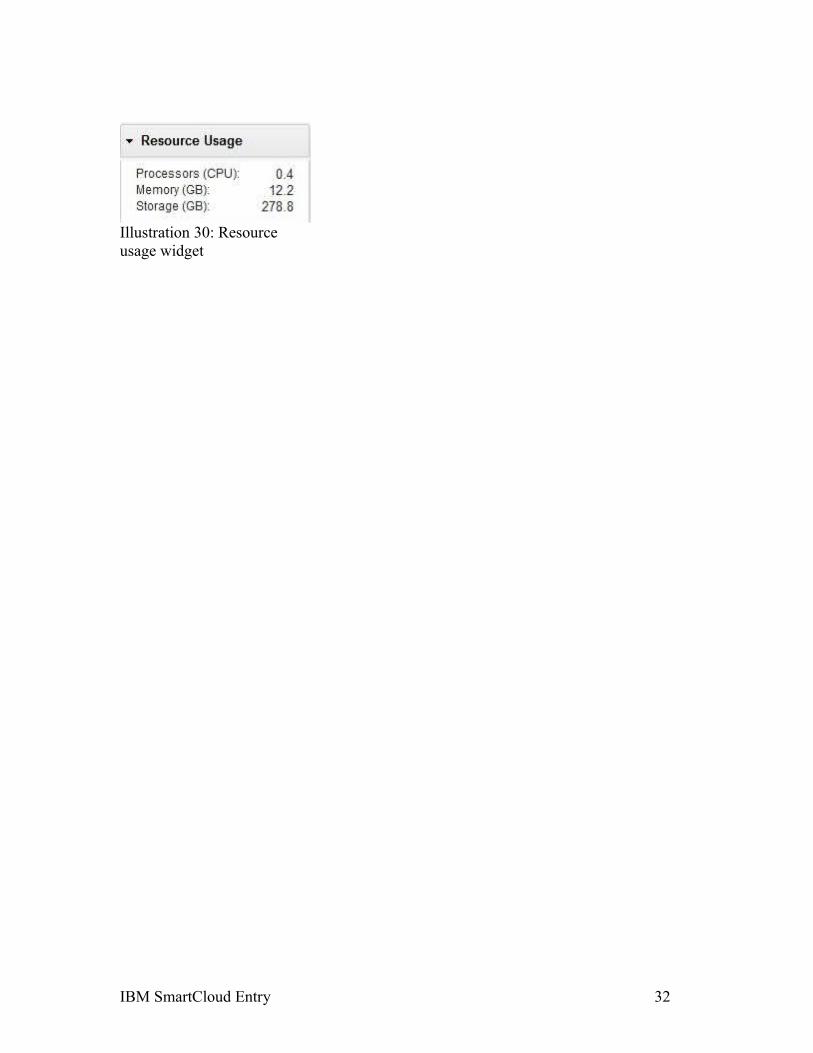
Resource usage widgetIn the Resource usage widget, you can see the statistics of the resources in use, including processors, memory and storage.
The resource usage for a non-administrative user shows personal usage, meaning those resources allocated for the current user. The usage statistics shown for an administrative user are for all allocated resources in the cloud.
IBM SmartCloud Entry 31
IBM SmartCloud Entry 32
Illustration 30: Resource usage widget
Troubleshooting
Limitations
Deploying workloads that contain Microsoft Windows operating systems on VMware virtual infrastructure might prompt for product key.
When IBM SmartCloud Entry deploys a Microsoft Windows operating system, the VMware virtual infrastructure environment runs a customization process. IBM SmartCloud Entry provides an entry field for the product key when using advanced deployment properties. Without a valid Windows product key, the deployment will succeed but the customization process will not. See the IBM SmartCloud Entry Administrators Guide for installation and prerequisite software instructions for VMware.
Known Issues
Display issues with Internet Explorer 9
Summary: IBM SmartCloud Entry's layout and format sometimes appears to be out of place and hard to navigate in Internet Explorer 9.
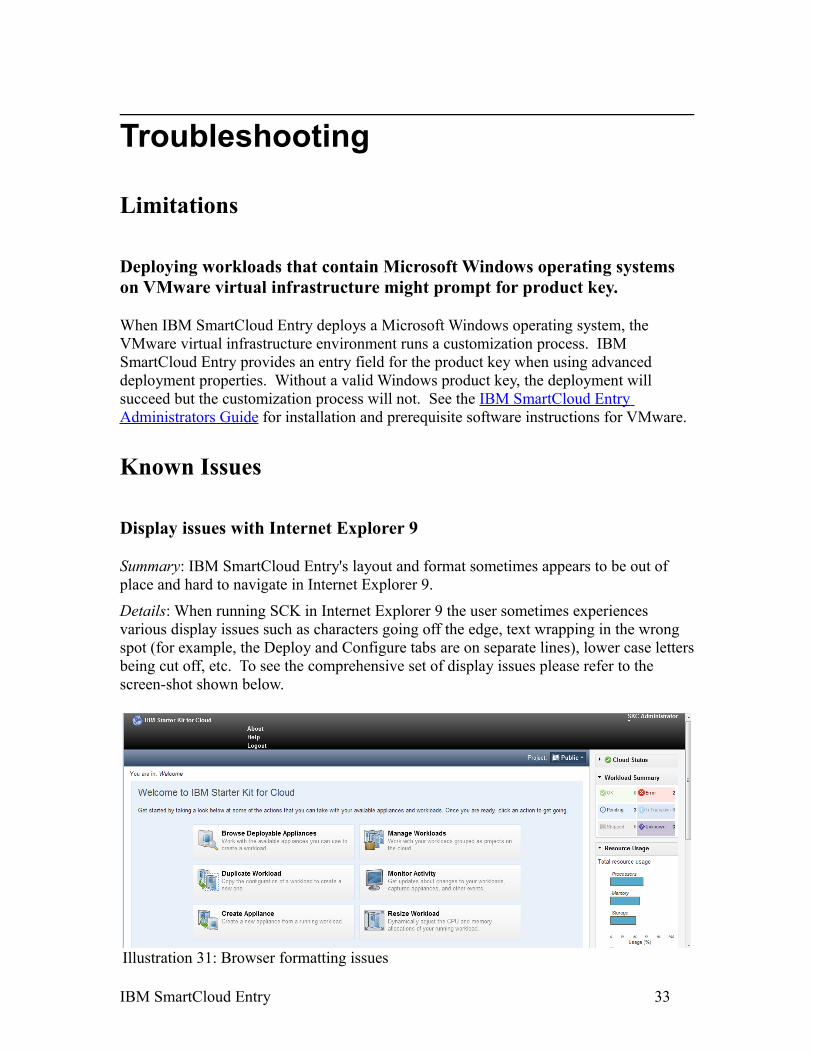
Details: When running SCK in Internet Explorer 9 the user sometimes experiences various display issues such as characters going off the edge, text wrapping in the wrong spot (for example, the Deploy and Configure tabs are on separate lines), lower case letters being cut off, etc. To see the comprehensive set of display issues please refer to the screen-shot shown below.
IBM SmartCloud Entry 33
Illustration 31: Browser formatting issues
The IBM SmartCloud Entry shown above is running under Internet Explorer 9.
Solution: The display issue occurs because Internet Explorer 9 by default displays IBM SmartCloud Entry in Internet Explorer 9 Compatibility View mode. To resolve this issue the user needs to switch from Internet Explorer 9 Compatibility View mode to the standard Internet Explorer 9 mode.
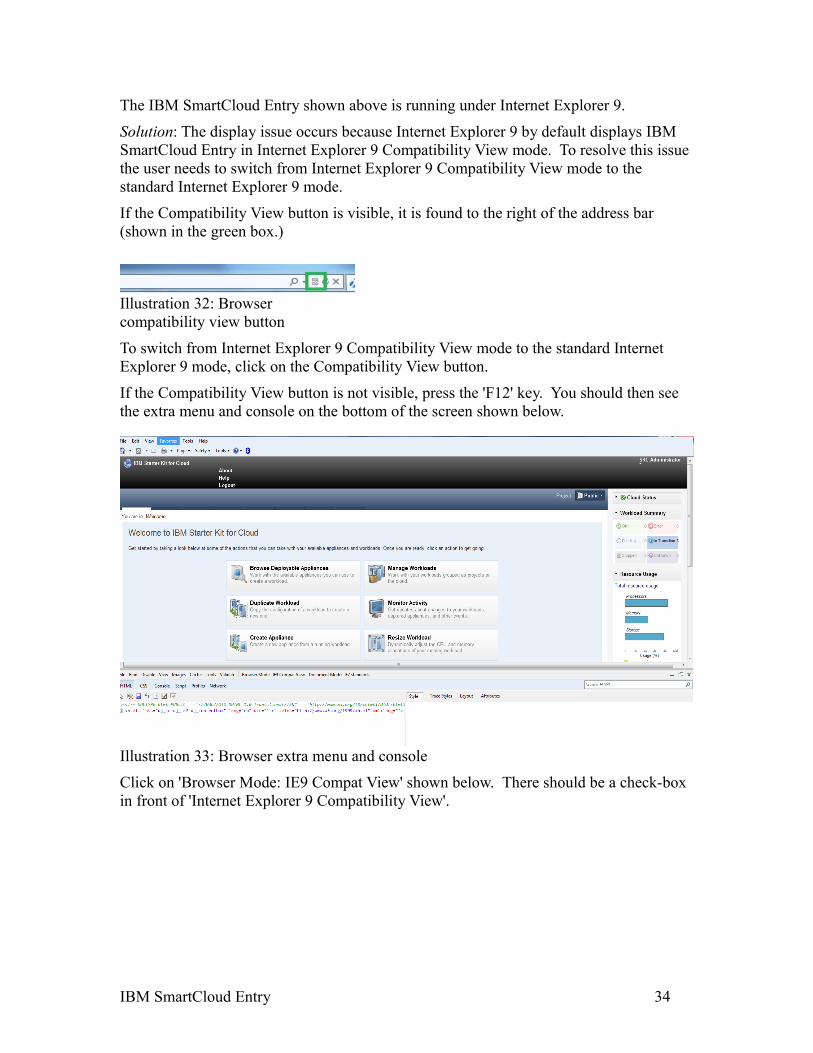
If the Compatibility View button is visible, it is found to the right of the address bar (shown in the green box.)
Illustration 32: Browser compatibility view button
To switch from Internet Explorer 9 Compatibility View mode to the standard Internet Explorer 9 mode, click on the Compatibility View button.
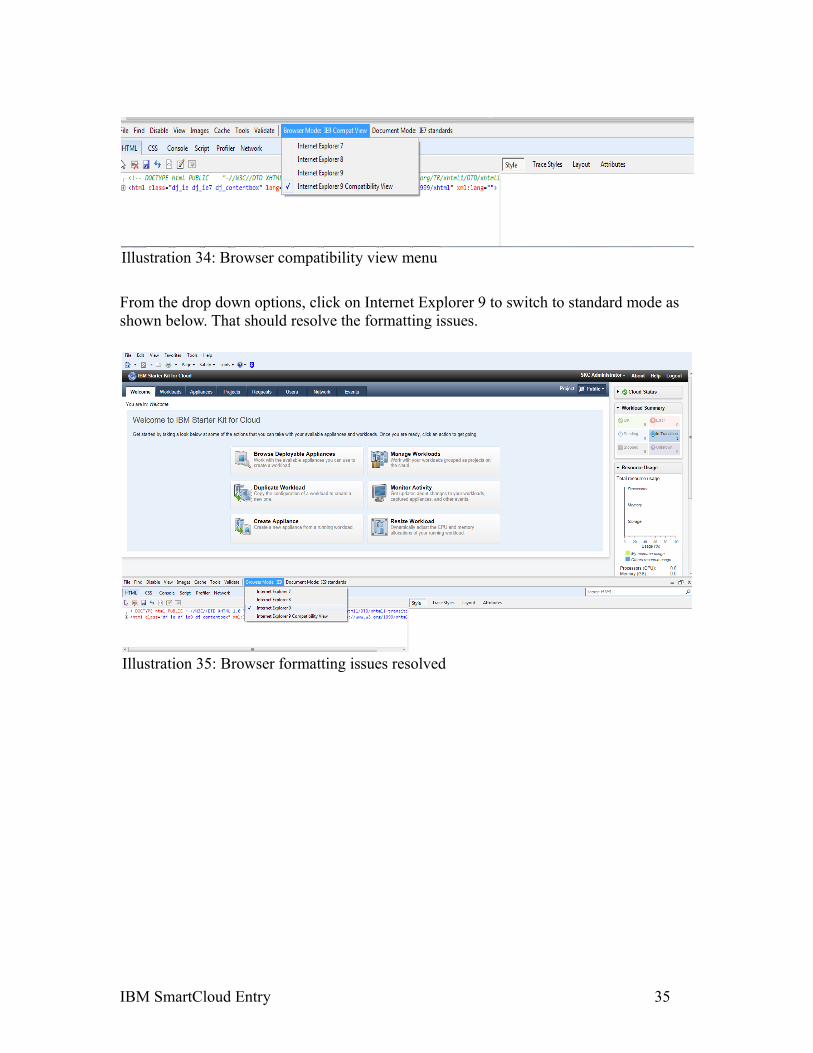
If the Compatibility View button is not visible, press the 'F12' key. You should then see the extra menu and console on the bottom of the screen shown below.
Illustration 33: Browser extra menu and console
Click on 'Browser Mode: IE9 Compat View' shown below. There should be a check-box in front of 'Internet Explorer 9 Compatibility View'.
IBM SmartCloud Entry 34
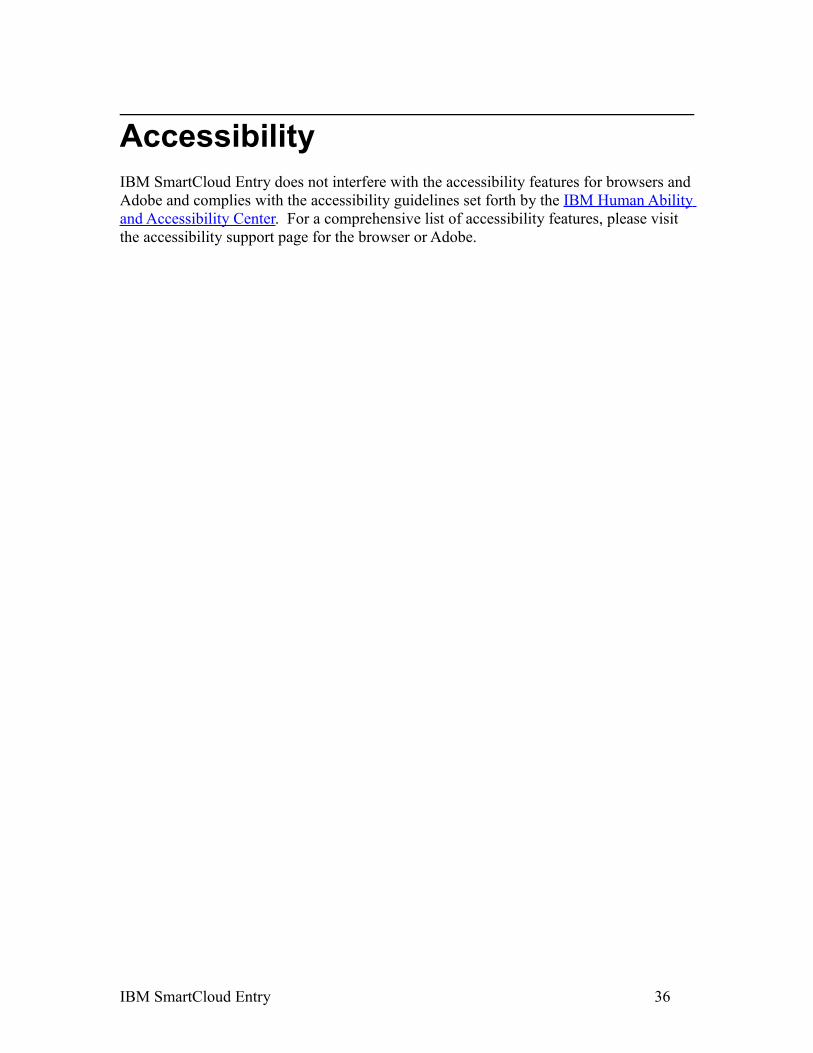
From the drop down options, click on Internet Explorer 9 to switch to standard mode as shown below. That should resolve the formatting issues.
IBM SmartCloud Entry 35
Illustration 34: Browser compatibility view menu
Illustration 35: Browser formatting issues resolved
AccessibilityIBM SmartCloud Entry does not interfere with the accessibility features for browsers and Adobe and complies with the accessibility guidelines set forth by the IBM Human Ability and Accessibility Center. For a comprehensive list of accessibility features, please visit the accessibility support page for the browser or Adobe.
IBM SmartCloud Entry 36

NoticesThis information was developed for products and services offered in the U.S.A.
IBM may not offer the products, services, or features discussed in this document in other countries. Consult your local IBM representative for information on the products and services currently available in your area. Any reference to an IBM product, program, or service is not intended to state or imply that only that IBM product, program, or service may be used. Any functionally equivalent product, program, or service that does not infringe any IBM intellectual property right may be used instead. However, it is the user's responsibility to evaluate and verify the operation of any non-IBM product, program, or service.
IBM may have patents or pending patent applications covering subject matter described in this document. The furnishing of this document does not grant you any license to these patents. You can send license inquiries, in writing, to:
IBM Director of LicensingIBM CorporationNorth Castle DriveArmonk, NY 10504-1785U.S.A.
For license inquiries regarding double-byte character set (DBCS) information, contact the IBM Intellectual Property Department in your country or send inquiries, in writing, to:
Intellectual Property LicensingLegal and Intellectual Property LawIBM Japan Ltd.1623-14, Shimotsuruma, Yamato-shiKanagawa 242-8502 Japan
The following paragraph does not apply to the United Kingdom or any other country where such provisions are inconsistent with local law: INTERNATIONAL BUSINESS MACHINES CORPORATION PROVIDES THIS PUBLICATION "AS IS" WITHOUT WARRANTY OF ANY KIND, EITHER EXPRESS OR IMPLIED, INCLUDING, BUT NOT LIMITED TO, THE IMPLIED WARRANTIES OF NON-INFRINGEMENT, MERCHANTABILITY OR FITNESS FOR A PARTICULAR PURPOSE. Some states do not allow disclaimer of express or implied warranties in certain transactions, therefore, this statement may not apply to you.
This information could include technical inaccuracies or typographical errors. Changes are periodically made to the information herein; these changes will be incorporated in new editions of the publication. IBM may make improvements and/or changes in the product(s) and/or the program(s) described in this publication at any time without notice.
IBM SmartCloud Entry 37
Any references in this information to non-IBM Web sites are provided for convenience only and do not in any manner serve as an endorsement of those Web sites. The materials at those Web sites are not part of the materials for this IBM product and use of those Web sites is at your own risk.
IBM may use or distribute any of the information you supply in any way it believes appropriate without incurring any obligation to you.
Licensees of this program who wish to have information about it for the purpose of enabling: (i) the exchange of information between independently created programs and other programs (including this one) and (ii) the mutual use of the information which has been exchanged, should contact:
IBM CorporationDepartment 917/006-13605 Hwy 52 NorthRochester, MN 55901U.S.A.
Such information may be available, subject to appropriate terms and conditions, including in some cases, payment of a fee.
The licensed program described in this document and all licensed material available for it are provided by IBM under terms of the IBM Customer Agreement, IBM International Program License Agreement or any equivalent agreement between us.
Any performance data contained herein was determined in a controlled environment. Therefore, the results obtained in other operating environments may vary significantly. Some measurements may have been made on development-level systems and there is no guarantee that these measurements will be the same on generally available systems. Furthermore, some measurements may have been estimated through extrapolation. Actual results may vary. Users of this document should verify the applicable data for their specific environment.
Information concerning non-IBM products was obtained from the suppliers of those products, their published announcements or other publicly available sources. IBM has not tested those products and cannot confirm the accuracy of performance, compatibility or any other claims related to non-IBM products. Questions on the capabilities of non-IBM products should be addressed to the suppliers of those products.
This information contains examples of data and reports used in daily business operations. To illustrate them as completely as possible, the examples include the names of individuals, companies, brands, and products. All of these names are fictitious and any similarity to the names and addresses used by an actual business enterprise is entirely coincidental.
If you are viewing this information softcopy, the photographs and color illustrations may not appear.
Trademarks
IBM SmartCloud Entry 38
IBM, the IBM logo, and ibm.com are trademarks or registered trademarks of International Business Machines Corp., registered in many jurisdictions worldwide. Other product and service names might be trademarks of IBM or other companies. A current list of IBM trademarks is available on the Web at “Copyright and trademark information” at www.ibm.com/legal/copytrade.shtml.
Adobe is either a registered trademark or trademark of Adobe Systems Incorporated in the United States, and/or other countries.
Microsoft and Windows are trademarks of Microsoft Corporation in the United States, other countries, or both.
IBM SmartCloud Entry 39