historian replay and analysis tools - start group replay...installed citectscada or vijeo citect...
TRANSCRIPT

Khronos Historian Replay and Analysis Tools
Quickstart Guide for Khronos Replay
Welcome to Khronos, your historian companion.
This Guide will take you through the basic steps required to install, setup
and use Khronos Replay as a companion to your Citect or Vijeo Historian.
Khronos has been specifically designed to be very simple to install and use,
and it should take you less than fifteen minutes to follow the steps in this
guide and achieve a fully functioning system.
Start Services Pty Ltd ABN 11 107 656 995

Khronos Replay Quickstart Guide V1.0 Page 2 of 12
Pre-Requisites
You should be installing Khronos Replay on a computer which has access to your production historian (either
CitectHistorian or Vijeo Historian), but not on the historian server itself. To prevent confusion it is recommended
that Khronos not be installed on a production SCADA node either.
Your Khronos Replay computer will typically have Windows 7 operating system, and you should have already
installed CitectSCADA or Vijeo Citect V7.20 or later. If you are not using either of these products for your replay
client (ie. you are using a 3rd party OPC DA V2 client), then you will need to refer to the product help after
installing Khronos for the OPC details required to configure the client connection to the Khronos server. You will
also need to install the Microsoft .NET 4 framework prior to installing Khronos if it is not already installed on your
replay computer.
Pre-requisite checklist:
� Windows 7 operating system (or optionally Windows 2003 or 2008)
� Microsoft .NET 4 framework
� CitectSCADA or Vijeo Citect V7.20 or later
� CitectHistorian or Vijeo Historian V4.30 or later installed and available on your network
� Non-production computer with network access to your production historian
Step 1: Installing Khronos
Download the install files from the internet at www.startgroup.com.au. Unzip the files and run the
StartGroup.Khronos.msi (or StartGroup.Khronos.Trial.msi if you are using the evaluation version) installation file.
When you are prompted by Windows, select Run to continue
with the installation.
When the install wizard appears, click Next to continue.

Khronos Replay Quickstart Guide V1.0 Page 3 of 12
Read through the license agreement, and tick the box to
confirm your acceptance of the license before clicking Next to
continue.
If required, modify the installation path of the application, then
click Next to continue.
In this version, both Server and Client components must be
installed together. Leave the installation options with their
default settings and click Next to continue.
Click Install to commence the installation.
Khronos Replay Quickstart Guide V1.0 Page 4 of 12
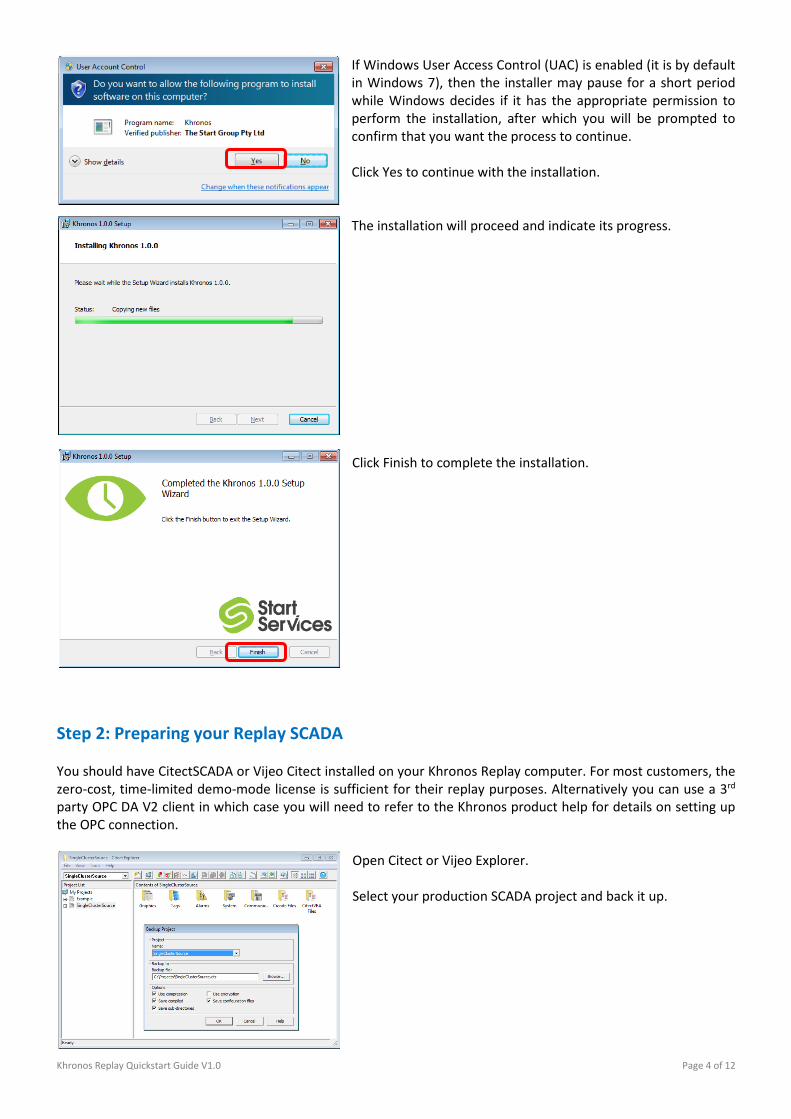
If Windows User Access Control (UAC) is enabled (it is by default
in Windows 7), then the installer may pause for a short period
while Windows decides if it has the appropriate permission to
perform the installation, after which you will be prompted to
confirm that you want the process to continue.
Click Yes to continue with the installation.
The installation will proceed and indicate its progress.
Click Finish to complete the installation.
Step 2: Preparing your Replay SCADA
You should have CitectSCADA or Vijeo Citect installed on your Khronos Replay computer. For most customers, the
zero-cost, time-limited demo-mode license is sufficient for their replay purposes. Alternatively you can use a 3rd
party OPC DA V2 client in which case you will need to refer to the Khronos product help for details on setting up
the OPC connection.
Open Citect or Vijeo Explorer.
Select your production SCADA project and back it up.

Khronos Replay Quickstart Guide V1.0 Page 5 of 12
Once your backup is complete, Restore it as a new project on
your Khronos Replay computer.
NOTE: It is important that you do not use your production
project for replay operations, as Khronos will ‘Convert’ it to
allow it to interact with the Khronos Server.
The convert process modifies PLC communication definitions,
server definitions, as well as tag and trend definitions to suit an
offline replay operation that communicates with the Khronos
Server instead of PLCs.
Step 3: Setting up Khronos Run Khronos by double-clicking on the desktop icon or using the Start | Programs menu.
Once Khronos opens, select Settings from the
Tools menu.
Select the SCADA tab from the left hand menu.
Select the SCADA type from the pull-down list.
If the SCADA type is CitectSCADA or Vijeo Citect,
use the Browse button to identify the folder
that the Citect.INI file is located in, then click
Apply.
NOTE: By default, the path will be set to the
standard CitectSCADA V7.20 or Vijeo Citect
V7.20 location. If you are using a later version of
these products, then you may need to browse to
the appropriate location, typically at:
C:\ProgramData\Schneider Electric\Vijeo Citect 7.30\Config\
Leave the Auto Alarm Acknowledge option turned off (unless you perform the additional manual steps required
to enable this feature. Refer to the product help, or the online knowledgebase at www.startgroup.com.au for
more details).

Khronos Replay Quickstart Guide V1.0 Page 6 of 12
Select the Khronos tab from the left hand
menu.
In this version, the server path is always local
to the installation, and cannot be adjusted.
If you want the system clock to mimic the
replay time during a replay operation1, tick
this option, then click Apply.
NOTE: If you are using a SCADA CIP key, or
have other software on this computer which
will be affected by changes in the system
clock, then this option should be left disabled.
SCADA CIP keys will fail if this setting is turned on. For many customers, running the replay SCADA in demo mode
without a key is sufficient for their purposes.
Select the Historian tab from the left hand
menu.
Type in the MS SQL Server name and instance in
the top box.
Typically, this will be:
“ServerName\VijeoHistorian” or
“ServerName\CitectHistorian”
Enter the MS SQL login credentials you created
earlier.
Type in the name of the historian data archive database. Note that this
is the data archive database, not the historian configuration database.
If you are unsure of these details, you can copy them from the
Historian configuration properties as shown on the left.
NOTE: If you elect to use Windows credentials for your connection,
then you will need to modify the login which the Khronos Service runs
under. This is done by opening Windows Administrator Tools, then
opening Services, and opening the Khronos Server properties. On the
Login tab, identify the appropriate Windows credentials to use, then
click OK and restart the Khronos Server. The credentials specified must
have read access to the historian data archive SQL database.
When you are finished, Test2 the connection to validate that your
settings are correct. You should receive a green tick and a successful
connection message.
1 Enabling this feature allows SCADA features such as Trend buttons that jump to the current time to use the replay time instead of real-time, which
improves the user experience during replay. 2 Test Connection does not work if you are running the Khronos client on another computer via remote desktop.
Khronos Replay Quickstart Guide V1.0 Page 7 of 12
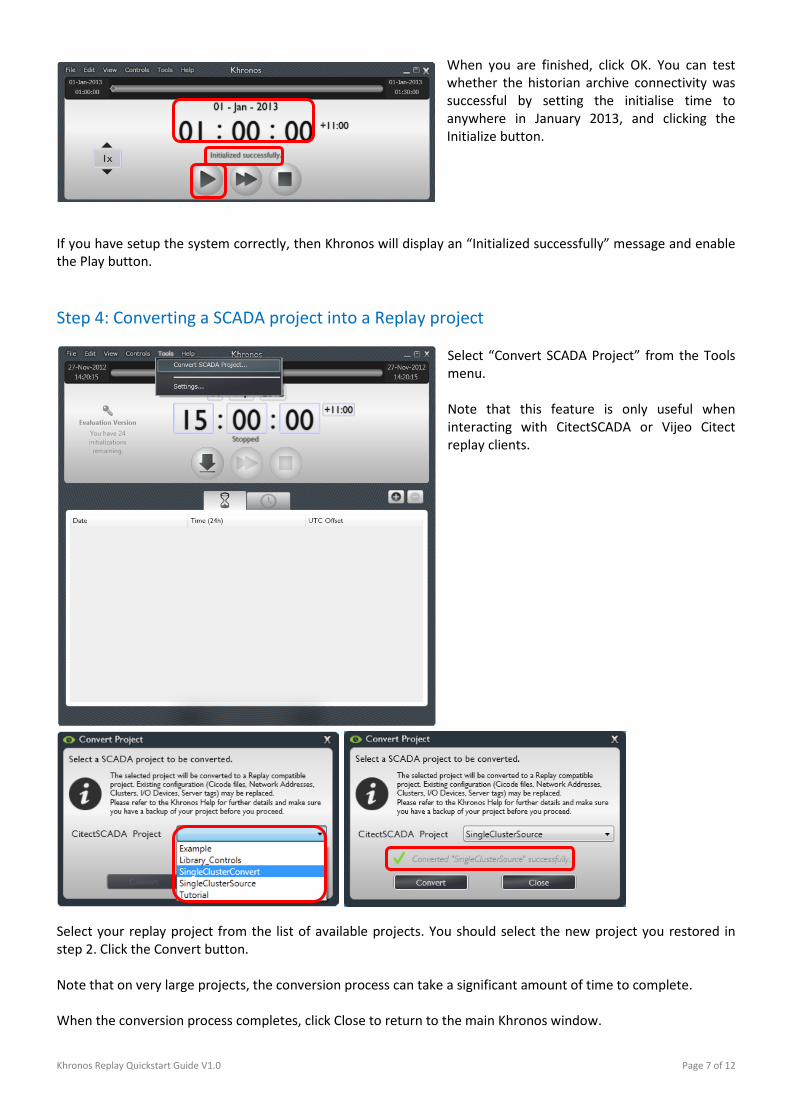
When you are finished, click OK. You can test
whether the historian archive connectivity was
successful by setting the initialise time to
anywhere in January 2013, and clicking the
Initialize button.
If you have setup the system correctly, then Khronos will display an “Initialized successfully” message and enable
the Play button.
Step 4: Converting a SCADA project into a Replay project
Select “Convert SCADA Project” from the Tools
menu.
Note that this feature is only useful when
interacting with CitectSCADA or Vijeo Citect
replay clients.
Select your replay project from the list of available projects. You should select the new project you restored in
step 2. Click the Convert button.
Note that on very large projects, the conversion process can take a significant amount of time to complete.
When the conversion process completes, click Close to return to the main Khronos window.

Khronos Replay Quickstart Guide V1.0 Page 8 of 12
Step 5: Running Khronos Replay
Open your Citect or Vijeo Explorer, and Pack,
then Compile the converted project. Your
project may already indicate that it is compiled,
but it will need to be both packed and
recompiled as the configuration has been
manipulated from outside the SCADA
configuration environment by Khronos.
Once your project is compiled, run the Citect or Vijeo Project Setup Wizard to prepare your Replay project for
runtime.
Note that if you do not have a license key, you will need to
configure your project to run as Single Processor with Stand-
alone Networking to run in Demonstration mode.
Once your project is prepared, you can Initialize Khronos and run your Replay SCADA system.
Switch to your Khronos window and enter the initial time that
you wish to start your replay from. Don’t forget to include an
alternate UTC offset if your historian data was captured during
daylight savings, or in an alternate time zone.
Press the Initialize button and wait for confirmation that
Khronos has initialized successfully.
Start your SCADA system. The SCADA display should update to
indicate healthy data, with the most recent values for all tags as
of the initialize time you specified.

Khronos Replay Quickstart Guide V1.0 Page 9 of 12
If you have configured your SCADA pages to use the tag extended properties to indicate the data
timestamp (eg. TagName.field.vt), then your page will show the most recent sample time for each
tag, prior to or equal to the initialization time.
Note that until you initialize Khronos Replay, there will be no Replay
data available for the Replay SCADA system to use. Therefore the
SCADA will display bad quality data as shown on the right. This is
typically indicated with #Com or #Bad messages and pixilation over
the symbols.
Generally, due to the delays in SCADA systems reconnecting to failed communication paths, it is always better to
Initialize Khronos before running your SCADA project.
You can now click the Play button, and Khronos will commence
replaying production data into your SCADA system. The replay
time will update every second on your main Khronos window.

Khronos Replay Quickstart Guide V1.0 Page 10 of 12
Step 6: Khronos Runtime Features
Mini-Player Mode: The Khronos window consumes a relatively large amount of space on your monitor, and
ideally you want most of this space to be used by your SCADA system. Khronos has a Mini-Player mode, whereby
the main window is reduced to a small bar across the top of your screen.
You can enter Mini-Player mode either by clicking the icon at the top-right of the Khronos window, or selecting it
from the View menu.
The Play, Pause, Fast Forward and Stop buttons
are still accessible in Min-Player mode, as is the
replay time display. The button on the far right
of the Min-Player returns you to the full
Khronos window.
The Mini-Player can be hidden even further by
clicking on the bottom tab. This will slide the
player off-screen, maximising the amount of
monitor space available to your SCADA.

Khronos Replay Quickstart Guide V1.0 Page 11 of 12
Fast Forward: Khronos allows you to fast forward through your production history, to quickly reach events and
incidents of interest. Clicking the Fast Forward button will replay your system in 1 minute increments. Note that
this is dependent on your historian data density and volume, as well as your hardware and network infrastructure
capabilities.
To exit Fast Forward mode, click the Pause button, and then Play.
Pause Points: As well as allowing you to
manually pause a replay operation using the
Pause button, Khronos allows you to define a list
of scheduled Pause Points, whereby it will
automatically pause when it reaches those
times. While Khronos Replay is paused (or
playing), you can navigate around your SCADA
project to closely inspect your process before
continuing with the replay.
On the main Khronos window, click the plus (+)
button to create a new Pause Point. Click in the
date, time and UTC Offset fields to specify the
exact time you require.
Click plus (+) again to add more pause points, or
minus (-) to remove them.
You can modify Pause Points at any time while
Khronos is running.
Saving Profiles: You may have defined an
Initialization time and a series of Pause Points
that focus on a particular historical incident
within your production process. You may want
to replay this same scenario at a later time for
other people, or for further diagnostics. Khronos
allows you to save these details as a ‘Profile’ so
that you can easily recall them at a later time.
Under the File menu, select Save Profile As…

Khronos Replay Quickstart Guide V1.0 Page 12 of 12
Browse to an appropriate folder to save your
profile and give it a meaningful name, then click
Save.
To recall a previously saved profile, select
Open Profile from the File menu.
Navigate to a saved Khronos Profile file and
click Open.
The Initialize time and Pause Points will be
loaded and your replay scenario is ready to
initialize and play.
--- End ---