citectscada batch example
DESCRIPTION
citectTRANSCRIPT

Citect Pty Ltd 3 Fitzsimmons Lane Gordon NSW 2072 Australia
Batch Example Project
Version
1.2.1
www.citect.com
2
DISCLAIMER Citect Pty. Limited makes no representations or warranties with respect to this manual and, to the maximum extent permitted by law, expressly limits its liability for breach of any warranty that may be implied to the replacement of this manual with another. Further, Citect Pty. Limited reserves the right to revise this publication at any time without incurring an obligation to notify any person of the revision. COPYRIGHT © Copyright 2004 Citect Pty Limited. All rights reserved. TRADEMARKS Citect Pty Limited has made every effort to supply trademark information about company names, products and services mentioned in this manual. Trademarks shown below were derived from various sources. CitectSCADA, CitectHMI/SCADA, CitectFacilities and CitectSCADA Batch are registered trademarks of Citect Pty. Limited. IBM, IBM PC and IBM PC AT are registered trademarks of International Business Machine Corporation. MS-DOS, Windows, Windows 98, Windows 2000, Windows XP and Excel are trademarks of Microsoft Corporation. dBase is a trademark of Borland Inc. General Notice: Some product names used in this manual are used for identification purposes only and may be trademarks of their respective companies. November 2004 Edition for CitectSCADA Batch Manual Revision 1.2.1
CitectSCADA Batch Example 1.21.doc

3
TABLE OF CONTENTS
Contents INTRODUCTION.........................................................................................................................................4
INSTALLING THE BATCH EXAMPLE ..................................................................................................5
RUNNING THE BATCH EXAMPLE PROJECT.....................................................................................6
TANKS, PIPES, VALVES AND UNITS.....................................................................................................8
UNIT CONFIGURATION.........................................................................................................................10
PHASES......................................................................................................................................................11 VALVES.....................................................................................................................................................12 OTHER INFORMATION................................................................................................................................12
Unit Status............................................................................................................................................13 Unit Control Tag ..................................................................................................................................13
PHASES.......................................................................................................................................................13
AGITATOR ON OFF PHASE.........................................................................................................................14 DRAIN TO PACKAGING PHASE...................................................................................................................15 FM1 ADDITION .........................................................................................................................................16 FM1 RELEASE PHASE................................................................................................................................17 FM1 REPORT PHASE..................................................................................................................................18 MANUAL INPUT PHASE..............................................................................................................................19 MANUAL INPUT REPORT PHASE ................................................................................................................20
OPERATIONS ............................................................................................................................................20
AGITATOR ON OFF OPERATION.................................................................................................................20 CHOCOLATE MILK OPERATION .................................................................................................................22 DRAIN TO PACKAGING OPERATION...........................................................................................................25
Extended Mix Opertion ........................................................................................................................26 MANUAL INPUT OPERATION......................................................................................................................29
THE CHOCOLATE MILK MASTER RECIPE .....................................................................................30
CHOCOLATE MILK UNIT PROCEDURE........................................................................................................31 AGITATOR ON OPERATION........................................................................................................................32 CHOCOLATE MILK OPERATION .................................................................................................................33 AGITATOR OFF OPERATION.......................................................................................................................34 MANUAL INPUT OPERATION......................................................................................................................34 EXTENDED MIX OPERATION......................................................................................................................35 DRAIN TO PACKAGING OPERATION...........................................................................................................35
FURTHER COMMENTS ..........................................................................................................................36
GENERAL...................................................................................................................................................36 CITECT PROJECT........................................................................................................................................36 DIAGNOSTIC PAGE.....................................................................................................................................36 MANUAL CONTROLS .................................................................................................................................37 UNIT CONTROL TAG..................................................................................................................................37 CITECT BATCH REDUNDANT DATABASE ...................................................................................................37 ARCHIVE DATABASE .................................................................................................................................38 BATCH 1.1- BATCH API ............................................................................................................................42 BASIC TROUBLE SHOOTING.......................................................................................................................43
Stuck Phases.........................................................................................................................................44 Unlocking a pipe ..................................................................................................................................46 Checking a Control Recipe Overview ..................................................................................................47
CitectSCADA Batch Example 1.21.doc
4
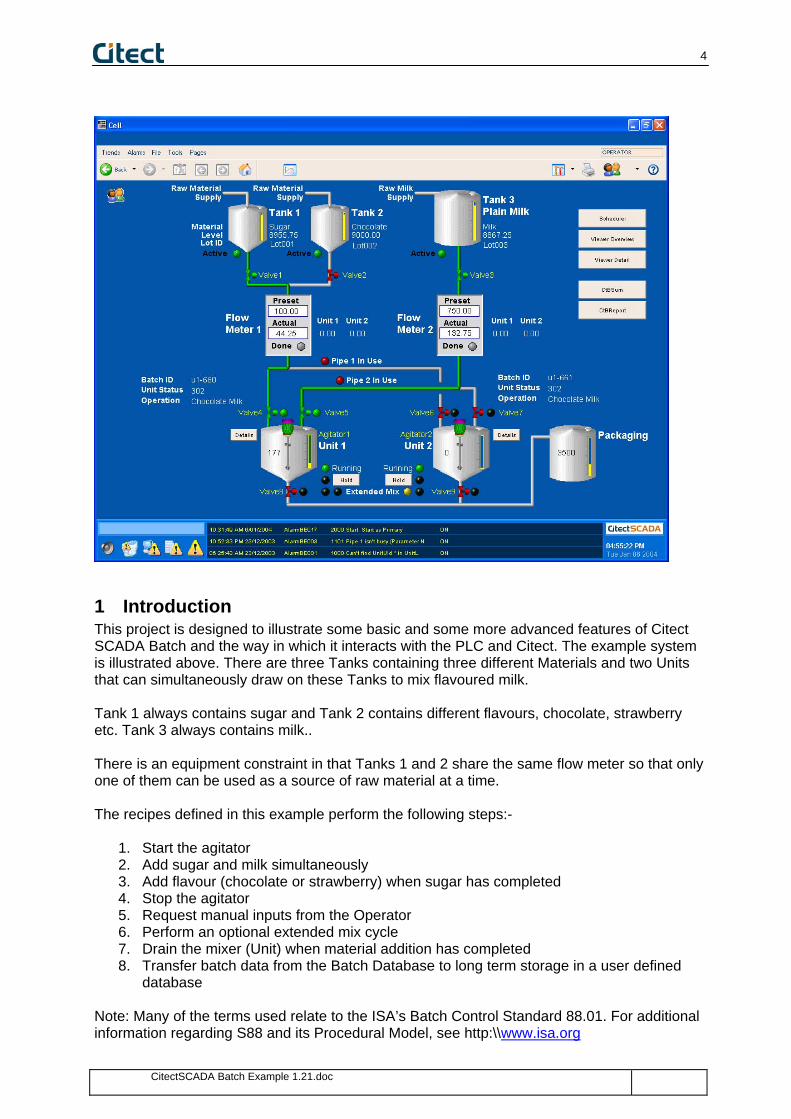
1 Introduction This project is designed to illustrate some basic and some more advanced features of Citect SCADA Batch and the way in which it interacts with the PLC and Citect. The example system is illustrated above. There are three Tanks containing three different Materials and two Units that can simultaneously draw on these Tanks to mix flavoured milk. Tank 1 always contains sugar and Tank 2 contains different flavours, chocolate, strawberry etc. Tank 3 always contains milk.. There is an equipment constraint in that Tanks 1 and 2 share the same flow meter so that only one of them can be used as a source of raw material at a time. The recipes defined in this example perform the following steps:-
1. Start the agitator 2. Add sugar and milk simultaneously 3. Add flavour (chocolate or strawberry) when sugar has completed 4. Stop the agitator 5. Request manual inputs from the Operator 6. Perform an optional extended mix cycle 7. Drain the mixer (Unit) when material addition has completed 8. Transfer batch data from the Batch Database to long term storage in a user defined
database Note: Many of the terms used relate to the ISA’s Batch Control Standard 88.01. For additional information regarding S88 and its Procedural Model, see http:\\www.isa.org
CitectSCADA Batch Example 1.21.doc

5
Note: Some additional features have been added to show how the Batch API (introduced with CitectSCADA Batch 1.1) can be used to automate some Batch procedures from Citect. See additional comments at the end of this document,
2 Installing the Batch Example The Batch_Example Citect and Batch Projects have been tested with Citect 6.0, CitectBatch 1.1.
1. Install Citect 6.0 if it is not already installed. 2. Install Citect SCADA Batch 1.1 as per the installation instructions that come with Citect
SCADA Batch. The instructions are in the “Document” folder of the Batch installation disk and the file name is “WDK20030722_Installation_CTB_ASW_Guide_V1.1.1.doc”. Install the Batch Server (which includes the Client). You must be logged in as with Local Administrator rights to install Batch. A “./Batch” instance of MSDE (Microsoft Desktop Engine), cut down version of SQL Server will be installed automatically. When installing MSDE, do not browse to locations for the MSDE and database file locations, simply click next in both occasions and the install program will create the correct directories. If there a problems installing DAO, try restarting is Safe Mode, with Local Administrator rights.
3. Restore the Batch_Example.ctz project backup using the Citect Explorer and preserving the original Project Name. There will be a folder in the restored Project called “OtherFiles” which contains most of the other files that are needed.
4. Restore the CtBInclude Citect project from the Batch install “Citect Projects” directory or the “OtherFiles” directory of the Batch_Example project.
5. Run the Citect Computer Setup Wizard choosing Custom Setup. 6. In the Citect Computer Setup Wizard enter or select “Server and Display Client”,
Project Name =“Batch_Example”, “This Computer is and I/O Server”, Startup Page = “Cell” and Startup Cicode = “StartUp”. The computer should be an Alarm Server and an Event Server.
7. Using the Batch Editor, create a new Batch database called “Batch_Example”. 8. The Batch_Example Batch database was installed automatically when CitectSCADA
Batch was installed. If it is not the current Batch database in the Recipe Editor, use File/Open (in the Recipe Editor) to make it the current Batch database.
9. If for some reason, the Batch_Example Batch database is not installed, use the Recipe Editor to restore Batch_Example.bak from the “OtherFiles” directory of the Batch_Example Citect project.
10. Run the Batch Advanced Setup Wizard selecting “Server and Display Client”, “Primary Server” (CtBE Port 4000) and “Batch_Example\<YourComputerName>\Batch” (may not be entirely visible).
11. Compile and run the Citect BatchExample Project. The Citect.ini that was used to develop the project has been included to show typical Batch entries. Please note that Batch_Example is intended for a single computer installation of Citect and Batch Server and Clients using Memory and Disk PLCs. This makes the setup for a demo system self contained. Batch_Example can be used in various distributed environments but an advanced knowledge Citect and Batch in a network environment and Citect/Batch Keys are required. Note 1: If there is a Citect key on your PC and it does not include a Batch license, CitectSCADA Batch will NOT start in Demo Mode but will have 0 Batch Licenses and therefore will not function. To run both Citect and Batch in Demo Mode remove the Citect key and restart both applications.
CitectSCADA Batch Example 1.21.doc

6
Note 2: A section called [Batch_Example] can be used to change some of the behaviour of this example. The parameters that can be set and their default values are listed below:- [Batch_Example] Default SQLSvr=. “.”, the local, default SQL Instance. SQLUsr=sa “sa”, the SQL System Administrator. SQLPwd= “”, no password, not recommended by Microsoft. SPDelay=200 Delay in ms between SQL Stored Proc. calls SimulationDelay=500 Delay in ms for flow simulation Cicode UpdateCitectCount=10 If set to 10, SQL Stored Procs. Run every 10 time SQL=1 1 = export batch data to SQL Server Access=0 1 = export batch data to MS Access DTSFilePkg= C:\DataLinks\ExportBatchData.dts UserLevel 0 = manual input form without password
1 = manual input form will require a password 2 = manual input form suppressed for continuous testing
The DTSFilePkg parameter tells Batch Example to run the file version of the DTS Package at the path indicated. If this entry exists but is empty, Batch Example will look for the DTS Package on the default instance of the local SQL Server. The defaults shown are built into Cicode and if they are acceptable no Citect.ini entry is necessary. Note 3: If Citect_Batch is installed in “C:\Program Files\Citect\CitectSCADA\Batch, the space in “Program Files” causes a problem when Cicode attempts to execute kill.exe to shutdown CitectBatch as Citect shuts down. To overcome this, the code checks the [CTEDIT] BIN parameter. If it is “C:\Citect\Bin” the code directly executes “C:\Citect\Batch\Kill.exe”. If it is not, a batch file called kill.bat in the BatchEx_Include directory is run (as obtained from the [BatchInclude] PathBatchProject parameter). The batch file assumes that the correct file to execute is “C:\Program Files\Citect\CitectSCADA\Batch\Kill.exe”. Kill.bat should be changed if this is not the correct location. Note 4: Do not access the Batch Viewer, Batch Scheduler or other Batch ActiveX pages via the automatically generated Citect Page Menu. You should use the buttons on the Cell Page, which use the correct Cicode function or use navigation within the Batch ActiveX Controls. Note 5: The “physical” valves associated with each unit (Valves 4, 5, 6, 7, 8 & 9) are controlled by “virtual” Valves 4, 5, 6, 7, 8 & 9 which are in turn controlled by the Batch Engine. The Citect Tags for the virtual valves begin with “BE_”. Additional logic is used to close the physical valves when the Unit they are associated with is in the Held state. There is an “LED” adjacent to each physical valve which shows the status of the virtual valves. When a unit is in the Held state some of the virtual valves will be open but the physical valves will be closed. This logic in Batch_Example is implemented in Cicode but would normally be implemented in the PLC.
3 Running the Batch Example Project It is suggested that the following procedure should be used to use the Batch Example project to explore some of the features of Citect SCADA Batch.
1. When logging in to the Batch Editor, Equipment Editor and Batch Engine, a valid User ID is “123” with Password “batch123”. There is also a User ID “999” with password “Batch998” or “Batch999”.
2. In the Recipe Editor Create a Process Order for say 100,000 Kg of Chocolate Milk. 3. Create a few (about 5) Control Recipes from the Process Order with an Order Size of
1,000 Kg for Unit 1 and 800 Kg for Unit 2. To make them easy to identify, it is suggested that the Batch Start No should be “u1-choc-” and “u2-choc-_”. Note: The batch engine will break up the order size based on the allowable batch size as defined
CitectSCADA Batch Example 1.21.doc

7
by the Unit. If we, for instance, define an order size of 2,000 Kg, this will create 2 batches or Control Recipes.
4. Transfer at least one Control Recipe for each Unit to the Batch Scheduler (Right click on Control Recipes, in Recipe Editor, to bring up the Control Recipes list).
5. Confirm, in the Batch Editor, that Tank 1 contains sugar, Tank 2 Chocolate and Tank 3 Milk.
6. Use the Batch Scheduler (in Citect) to Release a Control Recipe for each Unit. 7. Go to the Citect Cell Page and note that the batches have been loaded into each unit. 8. Return to the Schedule page, double click the Unit 1 batch and Start it. 9. Click the Back button, double click the Unit 2 batch and Start it. 10. Return to the Cell page and observe the sequence in which valves are opened &
closed and behaviour of the flow meters. Note how access to Pipe 1 and Pipe 2 is controlled by the Batch Engine.
11. Notice that the set points are scaled to the batch sizes for Units 1 & 2. 12. When batches have finished on both units go to the Report Page and open the reports
for each batch. 13. Go to the Batch Summary Page and observe the data that has been logged for each
batch. As an additional test, try changing the Material in Tank 2 to be something other than Chocolate and run another Control Recipe. The Material is changed by clicking on the Material name for any Tank.
Observe that the batch runs until it attempts to add Chocolate then waits (neither the virtual Valve for the Unit nor Pipe 1 are activated) until the Material for Tank 2 is changed to Chocolate before completing. The Units can be put into the Held state by clicking on the “Hold” button for the Unit. The LED will change to red and the Unit will go to the “Held” state. To continue the batch, first click the Hold button to turn the Hold LED off, then go to the Unit Procedure level in the Batch Viewer
CitectSCADA Batch Example 1.21.doc

8
and Restart and Operations that in the Held state. Note that the Batch Engine only changes the state of the Unit; any control actions (to stop flow etc) must be implemented in the control system. Batch_Example illustrates how this can be achieved in Citect although most of the logic would normally be implemented in the PLC.
4 Tanks, Pipes, Valves and Units Central to the operation of the Citect SCADA Batch is the concept of Tanks, Pipes, Valves and Units. An important point to remember is that, while Tanks and Units usually correspond to physical items of plant, Valves and Pipes do not necessarily relate to physical valves and pipes.
Tank 1 Tank 3Tank 2
Unit 1 Unit 2
Pipe 1
Pipe 2
Material A Material B Material C
Product 1 Product 2
Valve 4 Valve 5 Valve 6 Valve 7
The Tanks can be regarded as Material sources and the Units as Material destinations. The pipes and valves are used by the Batch Engine to create logical connections between Materials in the Tanks and the Units. The valves have been given the same numbers as the physical valves in the plant but they are actually virtual valves. The Citect Tags for the virtual valves begin with “BE_”. For example the virtual counterpart of Valve1 is BE_Valve1. Similarly, while Pipes 1 & 2 appear to match up with pipes in the plant, they are virtual pipes. Notice that valves 1, 2 and 3 do not appear in this virtual diagram at all. The virtual valves are associated with the destination Unit whereas the virtual pipes are associated with the source Tank or Tanks. In the Equipment Editor, Valves 4 & 6 are assigned to Pipe 1 and Valves 5 & 7 are assigned to Pipe 2. In turn Pipe 1 is assigned to Tanks 1 and 2 and Pipe 2 is assigned to Tank 3. Finally Valves 4 & 5 are assigned to Unit 1 and Valves 6 & 7 to Unit 2. In the Recipe Editor, Materials are assigned to Tanks 1, 2 and 3. On the following page, the some of the Equipment Editor forms involved are shown.
CitectSCADA Batch Example 1.21.doc

9
When a recipe calls for a Material, the Batch Engine checks which virtual Valves are associated with the Unit. If it finds a Pipe that is associated with a Tank that contains the required Material, it will activate the Pipe and the Valve that connects the Pipe to the Unit. If the Material cannot be found in any of the available Tanks, none of the virtual Pipe or Valve Tags will be activated. If the Tags are used to control the Batch, execution will halt until the required Material is assigned to one of the Tanks. If more than one available Tank contains the Material one of them will be selected but which one is not predictable. The Active Tank check
CitectSCADA Batch Example 1.21.doc

10
box in the Recipe Editor can be used to control which Tank is selected under these circumstances. The Lot Number assigned to the Tank is used in the Batch Report. A PowerPoint (EquipmentModel.ppt) illustrating how Tanks, Pipes and Valves work can be found in the “OtherFiles” folder for the Batch_Example Citect Project. In the Equipment Editor the Pipes and Valves are assigned Citect Tags which are set to 1 or 0 at the appropriate times during the execution of a batch. This will happen when the Batch Engine finds the requested Material via a particular virtual Valve and Pipe. The Citect Tags are used to activate PLC logic that controls the plant. In general the Pipe Tag can be used to activate equipment associated with the source of the Material (the Tank) and the Valve Tag to connect to the destination (Unit). Almost always additional logic is required
5 Unit Configuration
The configuration of each Unit is what ties the Phases and Operations to real items of Plant. The “Max batch size” parameter is used by the Recipe Editor (RE) when creating Control Recipe. If the Control Recipe quantity exceeds this number, multiple Control Recipes are created. The “Min batch size” is also used by the RE when creating Control Recipes to ensure that batches are not less than this quantity. The Capacity parameter is for information only.
CitectSCADA Batch Example 1.21.doc

11
5.1 Phases
Phases that are applicable to the Unit are added and the Phase Parameters as assigned to Citect Tags. The Release Parameters are internal to the Batch Engine and are therefore not assigned to Citect Tags.
CitectSCADA Batch Example 1.21.doc

12
5.2 Valves
Valves are assigned to the Unit thus linking the Unit to Pipes and Tanks for the purpose of adding (dosing) Materials and logging (Reporting) the quantities and Lot Numbers. The Citect Tags for each Valve were previously assigned in the Valve Definition. The Batch Engine will set the appropriate Valve (and its associated Pipe) to 1 when it locates a Material required during dosing.
5.3 Other Information Citect Tags can be assigned to display information on Citect Pages as indicated. All parameters are string outputs except the Unit Status (integer output) and the Unit Control Tag (integer input) The Unit Control Tag can be used to stop/start a Recipe on the Unit.
CitectSCADA Batch Example 1.21.doc

13
5.3.1 Unit Status This Tag be used in conjunction with the Unit Control Tag enable page animation and PLC control to respond when a Operations are Held by turning on only when the Unit Status = “302”.
5.3.2 Unit Control Tag The Unit Control Tag can be used to place any Operations on the Unit into the Held state. To continue the batch first set the Unit Control Tag to 0, then go to the Batch Viewer and Restart any Operations that are in the Held state. If the Unit Control Tag has a value of 1 when the Operations are Restarted, they will immediately return to the Held state.
6 Phases The following Phases are utilised in the example Recipe 000004 Chocolate Milk:-
1. Agitator On Off – Turns the Unit Agitator on or off. 2. Drain To Packaging – Drains the Unit to the Packaging Storage Tank. 3. Extended Mix – An option in an Operation to mix for an extended period. 4. FM1 Addition – Add Sugar, Milk and Flavour to the Unit via Flow Meter 1 while
agitating. 5. FM1 Release – Release Pipe 1 when Flow Meter 1 has measured the required
quantity. 6. FM1 Report – Log the actual value measured by Flow Meter 1. 7. FM2 Addition – Add Sugar, Milk and Flavour to the Unit via Flow Meter 2 while
agitating. 8. FM2 Release – Release Pipe 2 when Flow Meter 1 has measured the required
quantity. 9. FM2 Report – Log the actual value measured by Flow Meter 2. 10. Manual Input – Display a Cicode form to enter manual data.
CitectSCADA Batch Example 1.21.doc

14
11. Manual Input Report– Log the manually entered data. Most of the Parameters in Phases (e.g. Input, Output and Report) are assigned to PLC Tags. When defining Phases, the Parameters and their Parameter Types are configured within each Phase. These Parameters are assigned to Tags when they are assigned to Units making it possible to use them on multiple Units by using different Citect Tags.
6.1 Agitator On Off Phase
This is a simple Phase that turns the Unit Agitator on or off depending whether the parameter is set to 1 or 0. 10_Agitator – An Output used to turn the Unit Agitator On or Off as indicated
CitectSCADA Batch Example 1.21.doc

15
6.2 Drain To Packaging Phase
This Phase has been set up as a demonstration showing how some Phase Logic can be implemented in the Batch Engine. In this case the Batch Engines senses when low level has been reached. When adding Materials, measurements are more critical and such logic is performed in the PLC. 10_DrainValve – An Output that controls the “Virtual” Drain Valve. PLC logic uses the status of this Virtual Valve to control the Physical Valve depending whether or not Unit is in the Held State. 20_UnitLevel – An Input used in the Transition logic to sense when the Unit is nearly empty.
CitectSCADA Batch Example 1.21.doc
16
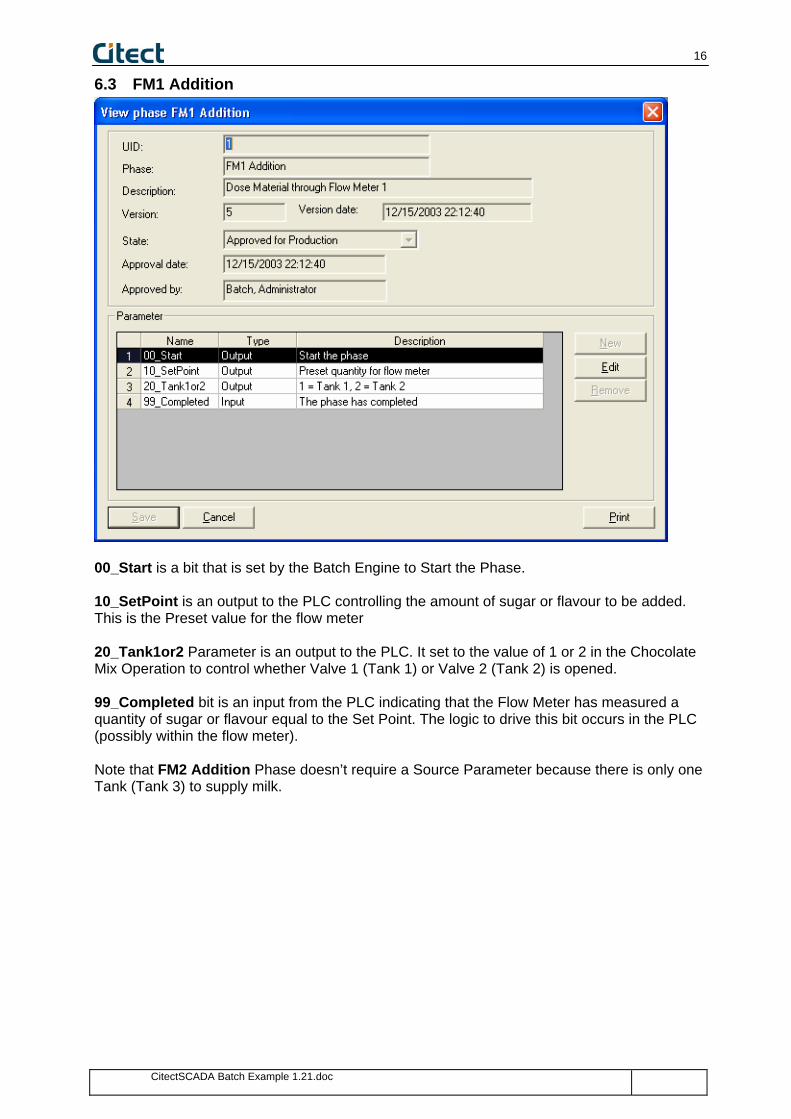
6.3 FM1 Addition
00_Start is a bit that is set by the Batch Engine to Start the Phase. 10_SetPoint is an output to the PLC controlling the amount of sugar or flavour to be added. This is the Preset value for the flow meter 20_Tank1or2 Parameter is an output to the PLC. It set to the value of 1 or 2 in the Chocolate Mix Operation to control whether Valve 1 (Tank 1) or Valve 2 (Tank 2) is opened. 99_Completed bit is an input from the PLC indicating that the Flow Meter has measured a quantity of sugar or flavour equal to the Set Point. The logic to drive this bit occurs in the PLC (possibly within the flow meter). Note that FM2 Addition Phase doesn’t require a Source Parameter because there is only one Tank (Tank 3) to supply milk.
CitectSCADA Batch Example 1.21.doc

17
6.4 FM1 Release Phase
This Phase is always configured to occur immediately after the FM1 Report Phase to release Pipe 1. 10_Release is an internal Batch Engine Parameter and does not have a Citect Tag assigned to it. This parameter is required to release the Pipe, Valve and Tank when a Raw Material addition is complete. The release is assigned a Raw Material in the Unit Procedure (see below). 20_Completed is an output Parameter which resets (sets to 0) the Ready bit that was set to 1 by the PLC logic. It is used by a transition in the Recipe to sense that sugar or flavour dosing has completed.
CitectSCADA Batch Example 1.21.doc

18
6.5 FM1 Report Phase
This Phase is always configured to immediately follow the FM1 Addition Phase. 10_ReportSetpoint – Used to log the set point. 20_ReportActual – Used to log the actual quantity measured by the Flow Meter.
CitectSCADA Batch Example 1.21.doc
19
6.6 Manual Input Phase
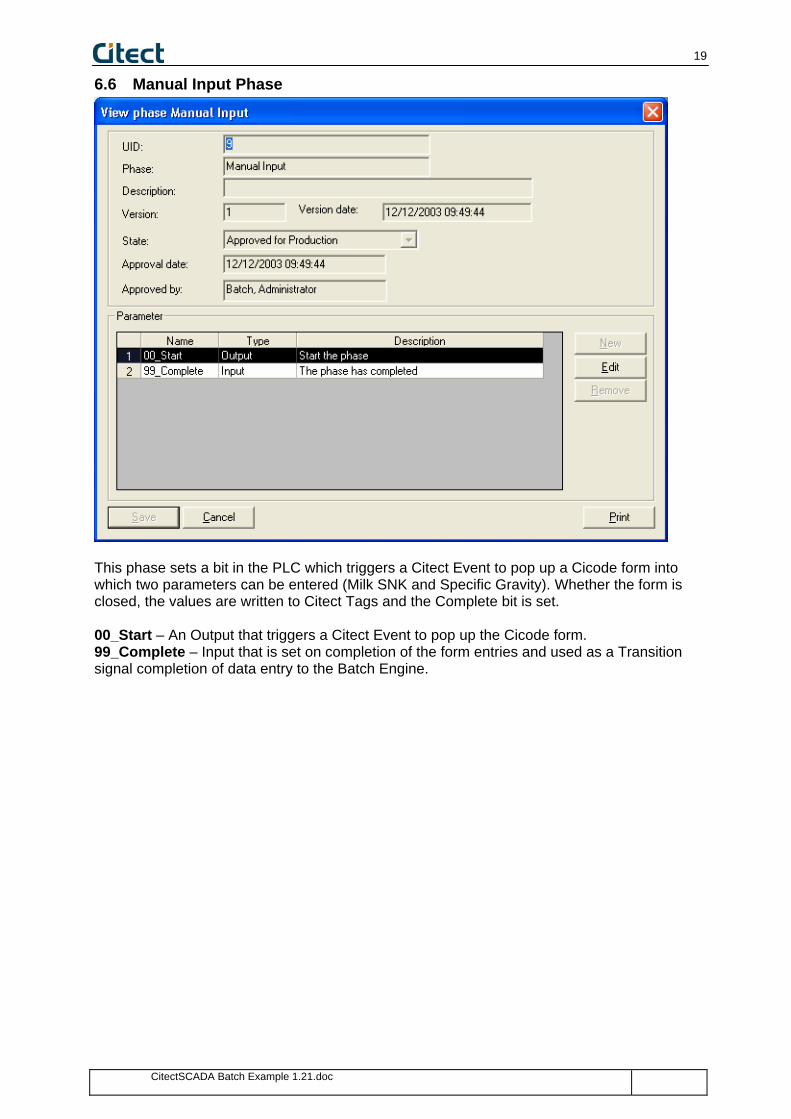
This phase sets a bit in the PLC which triggers a Citect Event to pop up a Cicode form into which two parameters can be entered (Milk SNK and Specific Gravity). Whether the form is closed, the values are written to Citect Tags and the Complete bit is set. 00_Start – An Output that triggers a Citect Event to pop up the Cicode form. 99_Complete – Input that is set on completion of the form entries and used as a Transition signal completion of data entry to the Batch Engine.
CitectSCADA Batch Example 1.21.doc

20
6.7 Manual Input Report Phase
This Phase always immediately follows the Manual Input Phase and logs the values entered into the Citect form. SG_Report – A Report Parameter mapped to a different Citect Tag for each Unit to log the Specific Gravity SNF_Report – A Report Parameter to log the SNF value entered into the form.
7 Operations The Operations defined for Master Recipe 0001 Chocolate Milk are as follows:-
1. Agitator On Off – Turns the Unit Agitator On or Off 2. Mix Chocolate Milk – Controls the addition of the required amounts of sugar, flavour
and milk. 3. Drain – Empties the mixer (Unit) after the materials have been added and mixed 4. Mixing_OFF – Sets the agitator Tag to 0
7.1 Agitator On Off Operation
CitectSCADA Batch Example 1.21.doc

21
This Operation simply executes the Agitator On Off Phase setting the Unit Agitator Tag to 1 or 0 as per the 10_Agitator parameter. The Sort numbers are used by the Batch Viewer (BV) to control the order in which elements are displayed.
CitectSCADA Batch Example 1.21.doc

22
7.2 Chocolate Milk Operation
This is the most complex Operation. Sugar and Milk are added simultaneously. For the Material (Sugar, Milk, and Chocolate) Addition Phases, the proportional quantities are configured.
CitectSCADA Batch Example 1.21.doc

23
The Transitions
wait for the PLC to set the Complete(d) bit.
CitectSCADA Batch Example 1.21.doc

24
The Report Phases log the Set Point and Actual (measured) values.
The Release Phases Release the Pipe from the appropriate Material. At the same time the Complete bit is reset.
CitectSCADA Batch Example 1.21.doc

25
7.3 Drain To Packaging Operation
This Operation, opens the Unit Drain Valve waits for the unit to empty then closes the Unit Drain Valve.
Step 10, the Unit Drain Valve Tag is set to 1.
CitectSCADA Batch Example 1.21.doc

26
The Transition (Step 20) waits for the Unit Level to be less than 10. If the Transition was Unit Level equals 10, then the value could pass through that values without the condition being met.
The Unit Drain Valve Tag is set to 0.
7.3.1 Extended Mix Opertion
CitectSCADA Batch Example 1.21.doc

27
The intention of this Operation is intended to demonstrate the ability to change logic flow in a recipe based on input from Citect. The Transitions 20 and 50 senses whether the Unit Extended Mix bit is set or not.
Depending on the value of 10_ExtendedMixRequired, Transitions 30 or 60 will be true and one of the two paths will be executed.
CitectSCADA Batch Example 1.21.doc

28
The NOP (No Operation) Phase does nothing.
The Extended Mix On Phase turns the Agitator on and waits 10 seconds then the Extended Mix Off Phase turns the Agitator off.
CitectSCADA Batch Example 1.21.doc

29
7.4 Manual Input Operation
This Operation sets a Tag in Citect that triggers and Event while calls a Cicode function to pop up a form to accept two parameters from the Operator.
The Show Form Phase sets the Citect Tag associated with 00_Start Parameter to 1. This will be a different Tag for each Unit. When the Tag is set to 1, a Cicode function called “ManualInputForm()” is run. The Operator enters the two parameters and clicks OK.
CitectSCADA Batch Example 1.21.doc
30
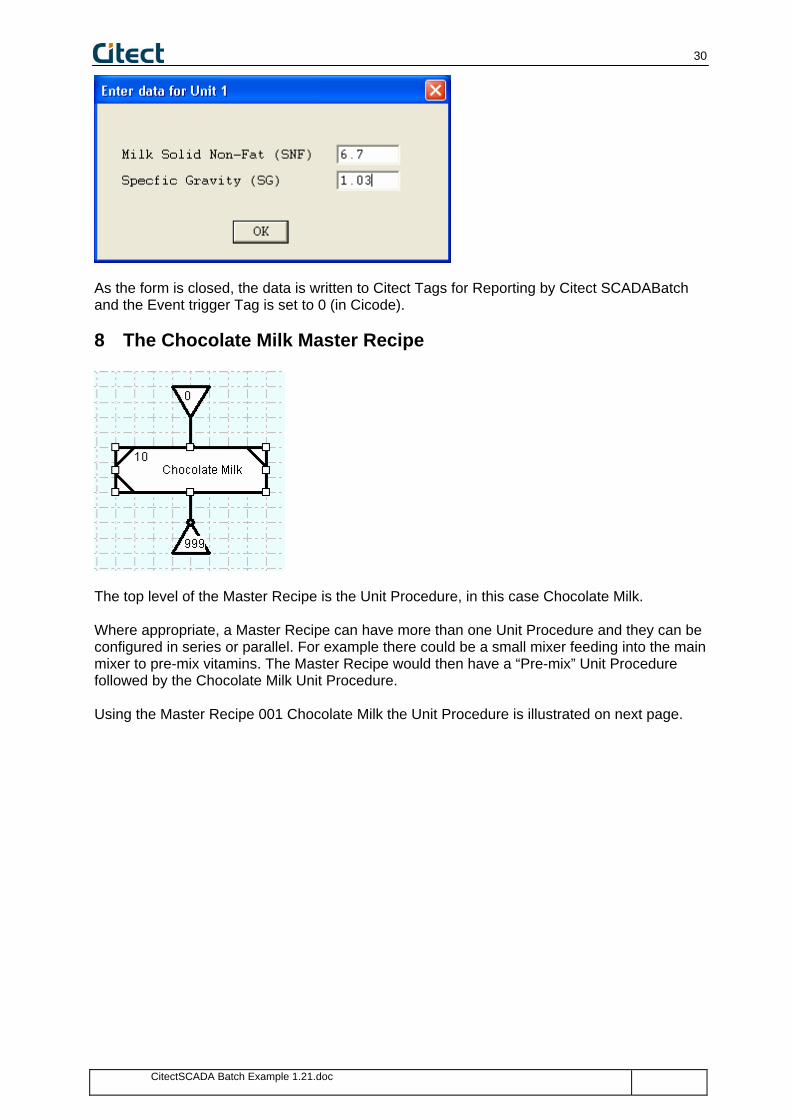
As the form is closed, the data is written to Citect Tags for Reporting by Citect SCADABatch and the Event trigger Tag is set to 0 (in Cicode).
8 The Chocolate Milk Master Recipe
The top level of the Master Recipe is the Unit Procedure, in this case Chocolate Milk. Where appropriate, a Master Recipe can have more than one Unit Procedure and they can be configured in series or parallel. For example there could be a small mixer feeding into the main mixer to pre-mix vitamins. The Master Recipe would then have a “Pre-mix” Unit Procedure followed by the Chocolate Milk Unit Procedure. Using the Master Recipe 001 Chocolate Milk the Unit Procedure is illustrated on next page.
CitectSCADA Batch Example 1.21.doc

31
8.1 Chocolate Milk Unit Procedure.
The Unit Procedure has a series of sequential as shown. Each step is infact one of the Operations that have been configured.
CitectSCADA Batch Example 1.21.doc

32
8.2 Agitator On Operation
Sets the Tag that .controls the Unit Agitator to 1, starting it.
CitectSCADA Batch Example 1.21.doc

33
8.3 Chocolate Milk Operation
Executes all the Phases involved in mixing Chocolate Milk. All the parameters and their values can be seen in the list (not all are visible here).
CitectSCADA Batch Example 1.21.doc

34
8.4 Agitator Off Operation
This Operation executes the same Phase ( Agitator On Off) as Agitator On but sets the parameter to 0, turning the Agitator off.
8.5 Manual Input Operation
Shows a Citect form for manual input and logs the data to the Batch database.
CitectSCADA Batch Example 1.21.doc
35
8.6 Extended Mix Operation
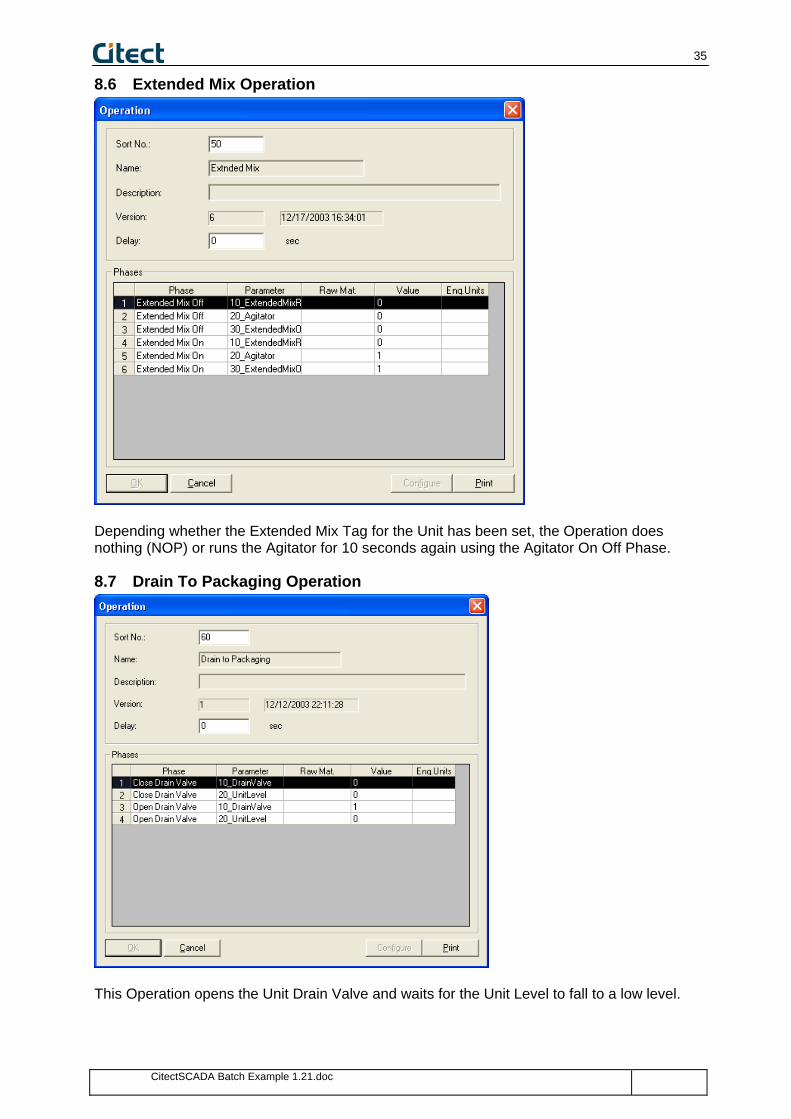
Depending whether the Extended Mix Tag for the Unit has been set, the Operation does nothing (NOP) or runs the Agitator for 10 seconds again using the Agitator On Off Phase.
8.7 Drain To Packaging Operation
This Operation opens the Unit Drain Valve and waits for the Unit Level to fall to a low level.
CitectSCADA Batch Example 1.21.doc
36
9 Further Comments
9.1 General The Citect project (Batch Example) has a Cicode file (BatchTest.ci) containing code to simulate Material Flow and emulate PLC logic. As can be seen from the Cicode, some simple PLC logic is required to control plant equipment in response to virtual Pipes, virtual Valves, Phase Parameters and being set by the Batch Engine. Citect Tags are also used to provide feedback to the Batch Engine via Input Parameters, for example, when a flow meter has measured the required quantity of material. The Batch_Example Project is designed to provide an uncluttered example of the basic principals of Citect SCADA Batch and to explore some more advanced options. Tank 3, for example, demonstrates the basic principals of Tanks, Valves. Pipes and Units and Tanks1 & 2 illustrate how to deal with a slightly more complex situation. The demo can also be used to demonstrate the way in which the Batch Engine queues requests to use a common Pipe when two (or more) Units are executing batches simultaneously.
9.2 Citect Project In the Citect Project, the Cicode has been kept to an absolute minimum and structured to separate Material flow simulation and PLC emulation as far as possible. The number of Citect Tags has also been kept to a minimum and Tag names that are easy to identify have been chosen. In a real project none of this Cicode should be necessary; the Material flow simulation would not be required at all and the remaining logic would be implemented as PLC code. The PLC code would be structured quite differently to the Cicode simulation code.
9.3 Diagnostic Page It is important for a Batch Project to have a Diagnostic Page which can be used to monitor and test Phase logic. Typically the Start and Complete bits for each Phase and any Parameters are shown and it is possible to toggle bits and edit numeric values. For example the “Show Form” bit can be turned on; causing the Cicode form to popup and when the form is closed the bit is reset. In a real world situation, the diagnostic page could be used to activate and test the PLC Phase logic during commissioning.
CitectSCADA Batch Example 1.21.doc
37
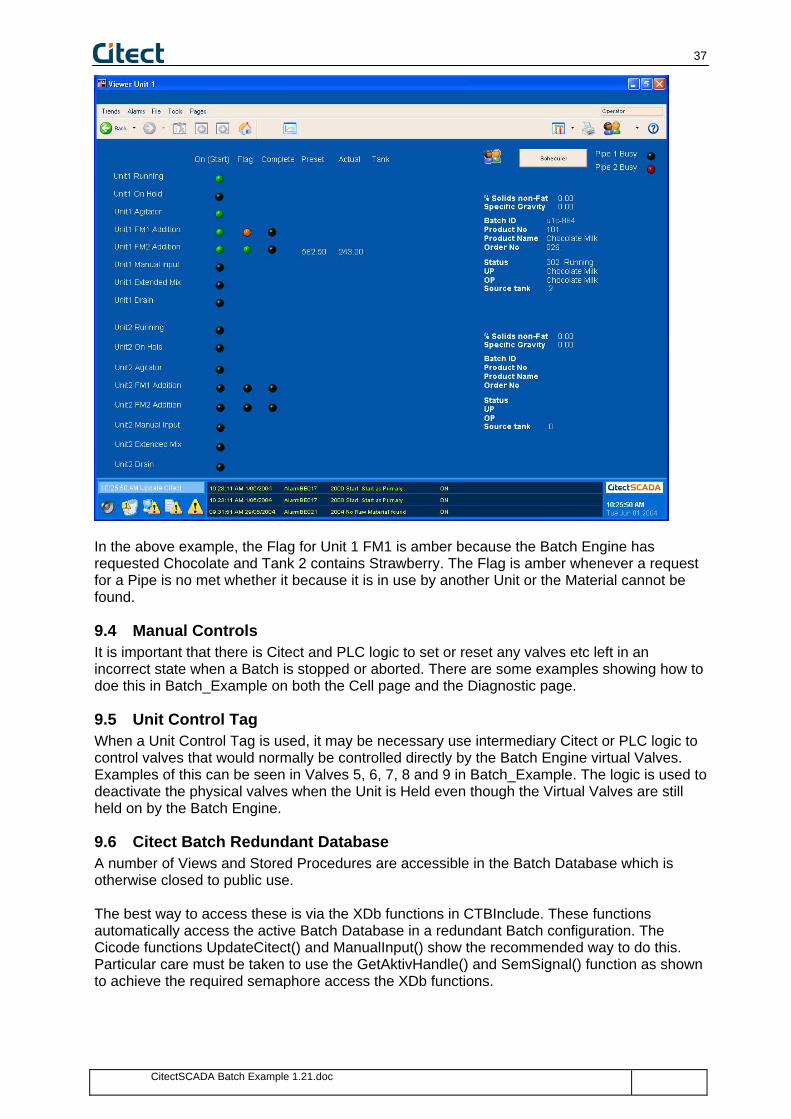
In the above example, the Flag for Unit 1 FM1 is amber because the Batch Engine has requested Chocolate and Tank 2 contains Strawberry. The Flag is amber whenever a request for a Pipe is no met whether it because it is in use by another Unit or the Material cannot be found.
9.4 Manual Controls It is important that there is Citect and PLC logic to set or reset any valves etc left in an incorrect state when a Batch is stopped or aborted. There are some examples showing how to doe this in Batch_Example on both the Cell page and the Diagnostic page.
9.5 Unit Control Tag When a Unit Control Tag is used, it may be necessary use intermediary Citect or PLC logic to control valves that would normally be controlled directly by the Batch Engine virtual Valves. Examples of this can be seen in Valves 5, 6, 7, 8 and 9 in Batch_Example. The logic is used to deactivate the physical valves when the Unit is Held even though the Virtual Valves are still held on by the Batch Engine.
9.6 Citect Batch Redundant Database A number of Views and Stored Procedures are accessible in the Batch Database which is otherwise closed to public use. The best way to access these is via the XDb functions in CTBInclude. These functions automatically access the active Batch Database in a redundant Batch configuration. The Cicode functions UpdateCitect() and ManualInput() show the recommended way to do this. Particular care must be taken to use the GetAktivHandle() and SemSignal() function as shown to achieve the required semaphore access the XDb functions.
CitectSCADA Batch Example 1.21.doc

38
9.7 Archive Database When data is logged to the Batch Database it is only kept there for a limited time. The Batch Example Project has an Event configured for each unit to transfer the data for each Batch to an external database at the completion of each Batch. The Events are triggered when the Unit Status changes to “301”. A Cicode Function called “BatchExport” is called. The Cicode executes a SQL Server DTS Package called “ExportBatchData” to copy the data from the Batch Database to another Database. The DTS Package can be found in the “OtherFiles\DataLinks” folder. Also in the Folder are the two Universal Data Link (UDL) files used by the DTS Package. There is also a Crystal Report based on this data (BatchSummary.rpt) and a sample PDF output (BatchSummary.pdf) of the report. SQL Server/Crystal Reports Some SQL Server knowledge and access to SQL Server Enterprise Manager is required to set this up. The procedure is as follows.
1. Create a Database on SQL Server called “BatchStageTables”, on the default instance of SQL Server..
2. Restore “BatchStageTables.bak from the “OtherFiles” folder. 3. Open the DTS Package file from the “OtherFiles\DataLinks” folder and save it to the
SQL Server using SQL Enterprise Manager or DTSBackup2000. In the Citect.ini file set [Batch_Example] DTSFilePkg=. If this parameter is set to nothing as shown, the DTS Package on the SQL Server will be used.
4. Alternatively copy the ExportBatchData.dts file to C:\DataLinks\ExportBatchData.dts. [Batch_Example] DTSFilePkg= defaults to C:\DataLinks\ExportBatchData.dts. If this is not the location of the file, change this parameter accordingly.
5. In the [Batch_Example] section of Citect.ini, change the values of SQLSvr, SQLUsr and SQLPwd parameters to the appropriate SQL Server Name, User Name and Password. To specify the default, local instance of SQL Server use “.” Or “MyComputerName” .Note that the SQL Server Name of a SQL Server Instance called “MyInstance” can be set as “.\MyInstance”.
6. Create a directory called “C:\DataLinks”. 7. Copy BatchDB.udl and BatchStageTbl.udl from the “OtherFiles\DataLinks” folder into
this directory. Double click each Universal Data Link (udl) file in turn, change the settings to your Batch database and BatchStageTables database, test and save. The BatchDB.udl is set to “.\Batch” with a User ID or batch and a password of batch so it should work unchanged.
The data for each Batch will be copied to the BatchStageTables database at the completion of each Batch using the ExportBatchData DTS Package. The Crystal Report file “BatchDetails.rpt” requires an ODBC System DSN called “BatchArchive” which should point to the “BatchStageTables” database. The Report uses Stored Procedure called usp_sel_BatchData which has one parameter, the Batch ID. Microsoft Access Database and Reports Some customers prefer not to install SQL Server and use Microsoft Access to store the data and run reports. Batch_Example includes a simple Access database called Batch_Example.mdb and some Cicode to export Batch Data to it. To activate the Cicode, find or create a {Batch_Example] section in Citect.ini and set “Access=1”. You will need to establish two ODBC DSNs to use Access code. The first is “Batch_Example” and is a SQL Server DSN as shown on the next page:-
CitectSCADA Batch Example 1.21.doc

39
CitectSCADA Batch Example 1.21.doc

40
CitectSCADA Batch Example 1.21.doc
41
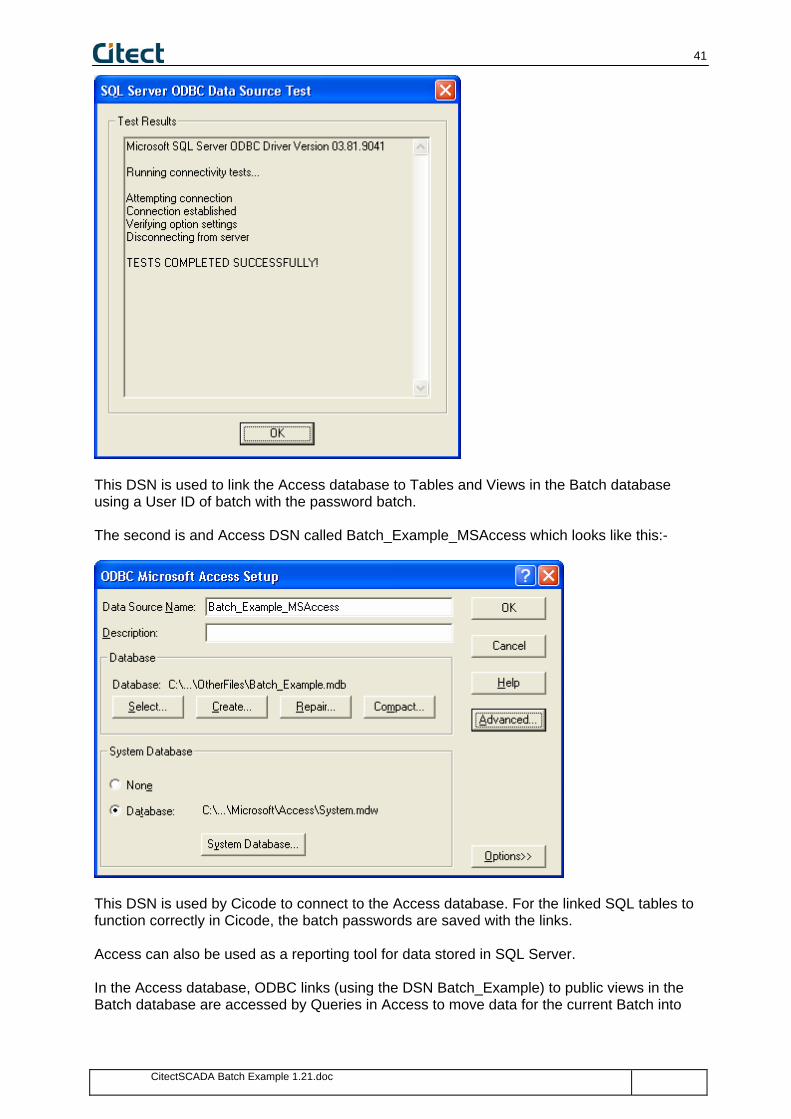
This DSN is used to link the Access database to Tables and Views in the Batch database using a User ID of batch with the password batch. The second is and Access DSN called Batch_Example_MSAccess which looks like this:-
This DSN is used by Cicode to connect to the Access database. For the linked SQL tables to function correctly in Cicode, the batch passwords are saved with the links. Access can also be used as a reporting tool for data stored in SQL Server. In the Access database, ODBC links (using the DSN Batch_Example) to public views in the Batch database are accessed by Queries in Access to move data for the current Batch into
CitectSCADA Batch Example 1.21.doc

42
SQL tables. The Access Queries are called from Cicode using the Batch_Example_MSAccess DSN.
9.8 Batch 1.1- Batch API Batch Example has recently been modified to demonstrate some of the features of Batch API. Most visible on the Cell Page are the following… Continuous Batches Light. When this light is green any batch (Control Recipe) that is loaded by the Batch Scheduler will start automatically when the Batch Scheduler status becomes “In Progress” and the Control Recipe status is “idle”. If a large number of recipes have been scheduled, they will run automatically one after the other. The light can be toggled on and off by clicking on iy. Schedule Order. This button calls some Cicode that displays list of Process Orders. If a Process Order is sleeted and the OK button is clicked, all Control Recipes in the Process Order that are either “Not Assigned” or “Assigned” are “Released”. The first batch in the list should start automatically all others will become “Scheduled” and should execute in turn. Using this button avoids having to “Transfer” (Recipe Editor) and “Release” (Batch Scheduler) every batch (Control Recipe) that has been generated for a Process Order.
Unschedule Order. This button can be used to unscheduled batches by Process Order. All batches for the selected Process Order that are “Scheduled” are changed to “Assigned”. Start Batch. This button can be used when the Continuous Batches Light is turned off to start a batch from the Citect page. It is assumed that the next batch to be run has been loaded by the Batch Scheduler and the the status is “In Progress (idle)”.
CitectSCADA Batch Example 1.21.doc

43
9.9 Basic Trouble Shooting A good place to trouble shoot problems is in the Batch Scheduler. First go the Batch Scheduler and check that the Unit you want to troubleshoot is green. If the Unit is not green, it is not running and no status information will be displayed. If the Unit it green, double click on it to see the following display…
CitectSCADA Batch Example 1.21.doc

44
The Batch Engine spends most of its waiting for Transitions to occur but in the example show above it is waiting on two Phases. This is because Chocolate Milk Phase is waiting to gain access to a Pipe. The next picture shows the “normal” situation where the Batch Engine is waiting on a Transition. Note that Transition steps are indicated by “(T)”.
9.9.1 Stuck Phases If Batch Example becomes stuck on a Phase for an extended period of time, it is possible that the Material in Tank 2 is not correct for the recipe. For example you might be running a Chocolate Milk recipe with Tank 2 containing Strawberry flavour. Changing the Another reason that a batch might become stuck on a Phase is if a Tag that it is trying to write to or read from does not exist. This is not likely to happen in Batch Example but it can happen on a new project. See also comments on checking the Control Recipe Overview The last reason that a batch can become stuck on a Phase is if a Pipe that the Phase is trying to acquire has been left busy from a previous batch. Later in this document the resetting of a locked Pipe is discussed.
CitectSCADA Batch Example 1.21.doc

45
If you select a Transition you can monitor the transition condition and it will change to green when it becomes true, see next page. Notice also that there is a tool tip on each variable in the expression indicating which Parameter is used to obtain the value. To sum up, there are three common reasons for a batch becoming stuck..
1. The Material in Tank 2 is not correct for the Recipe being executed. It could be a Chocolate Milk Recipe with strawberry flavour in Tank 2 for example.
2. One of the Tags assigned to parameters for a Unit may be invalid. 3. The Phase might be trying to reserve a Pipe that has been left busy by a previous
batch.
CitectSCADA Batch Example 1.21.doc

46
9.9.2 Unlocking a pipe To unlock a pipe that has been left busy you must log into the Batch Engine.
Then access the View/Tank List menu item.
CitectSCADA Batch Example 1.21.doc

47
Lastly double click on the busy Pipe and click “Yes” free it. If the Pipe appears more than once in the list, it doesn’t matter which one you double click.
9.9.3 Checking a Control Recipe Overview The Control Recipe Overview provides a lot of valuable diagnostic information. It lists all Operation and Phases with scaled up parameter values and also list the Tags to which parameters written to or read from. To view the Control Recipe Overview take the following steps…
CitectSCADA Batch Example 1.21.doc

48
Right click on a Control Recipe and select “Overview (Table)”.
Notice that the scaled Material quantities are shown and the Tags that will be used for each parameter are listed. If there is problem getting a Recipe to work for the first time, it can be very useful to print out this report and check that Tags are correct etc.
CitectSCADA Batch Example 1.21.doc