citectscada web client - citect.aveva.com€¦ · citectscada web client the citectscada web client...
TRANSCRIPT

Web Client User Guide
Citect Pty. Limited
3 Fitzsimons LanePO Box 174
Pymble NSW 2073Australia
Telephone: 61 2 9496 7300Fax: 61 2 9496 7399

DISCLAIMERCitect Corporation makes no representations or warranties with respect to this manual and, to the maximum extent permitted by law, expressly limitsits liability for breach of any warranty that may be implied to the replacement of this manual with another. Further, Citect Corporation reserves the rightto revise this publication at any time without incurring an obligation to notify any person of the revision.
COPYRIGHT© Copyright 2004 Citect Corporation. All rights reserved.
TRADEMARKSCitect Pty. Limited has made every effort to supply trademark information about company names, products and services mentioned in this manual.Trademarks shown below were derived from various sources.
Citect, CitectHMI, and CitectSCADA are registered trademarks of Citect Corporation.
IBM, IBM PC and IBM PC AT are registered trademarks of International Business Machines Corporation.
MS-DOS, Windows, Windows 95, Windows NT, Windows 98, Windows 2000, Windows for Workgroups, LAN Manager, Microsoft Windows XP, Exceland MSMAIL are trademarks of Microsoft Corporation.
DigiBoard, PC/Xi and Com/Xi are trademarks of DigiBoard.
Novell, Netware and Netware Lite are registered trademarks of Novell Inc.
dBASE is a trademark of Borland Inc.
GENERAL NOTICESome product names used in this manual are used for identification purposes only and may be trademarks of their respective companies.
September 2004 edition for CitectSCADA Version 6.0
Manual Revision Version 6.0.
Printed in Australia.

Contents
CitectSCADA Web ClientGetting Started . . . . . . . . . . . . . . . . . . . . . . . . . . . . . . . . . . . . . . . . . . . . . . . . 1System architecture. . . . . . . . . . . . . . . . . . . . . . . . . . . . . . . . . . . . . . . . . . . . . 2
The CitectSCADA Web Server . . . . . . . . . . . . . . . . . . . . . . . . . . . . . 2The CitectSCADA Runtime Servers . . . . . . . . . . . . . . . . . . . . . . . . . . 2The Web Client . . . . . . . . . . . . . . . . . . . . . . . . . . . . . . . . . . . . . . . . . 2
Installation . . . . . . . . . . . . . . . . . . . . . . . . . . . . . . . . . . . . . . . . . . . . . . . . . . . . 3Requirements . . . . . . . . . . . . . . . . . . . . . . . . . . . . . . . . . . . . . . . . . . . 4
What’s been installed? . . . . . . . . . . . . . . . . . . . . . . . . . . . . . . . . . . . . . . . . . . 4The IIS virtual directory . . . . . . . . . . . . . . . . . . . . . . . . . . . . . . . . . . . 5
Security . . . . . . . . . . . . . . . . . . . . . . . . . . . . . . . . . . . . . . . . . . . . . . . . . . . . . . . . . . . . 7Web Client user account types . . . . . . . . . . . . . . . . . . . . . . . . . . . . . . . . . . . . 7
Client type access rights . . . . . . . . . . . . . . . . . . . . . . . . . . . . . . . . . . 7Setting up Security . . . . . . . . . . . . . . . . . . . . . . . . . . . . . . . . . . . . . . . . . . . . . 8Configuring client account user groups . . . . . . . . . . . . . . . . . . . . . . . . . . . . . . 9Preparing the Web Server folder . . . . . . . . . . . . . . . . . . . . . . . . . . . . . . . . . . 10Setting up access rights for client accounts . . . . . . . . . . . . . . . . . . . . . . . . . 13Testing the Web Server security settings . . . . . . . . . . . . . . . . . . . . . . . . . . . 14Logging on to the Web Server. . . . . . . . . . . . . . . . . . . . . . . . . . . . . . . . . . . . 14
Preparing a CitectSCADA project for deployment . . . . . . . . . . . . . . . . . . . . . . . . . . 15Functionality limitations of the Web Client platform. . . . . . . . . . . . . . . . . . . . 16
Feature Limitations . . . . . . . . . . . . . . . . . . . . . . . . . . . . . . . . . . . . . . 16Cicode Function Limitations . . . . . . . . . . . . . . . . . . . . . . . . . . . . . . . 16
Preparing a project’s user files for delivery . . . . . . . . . . . . . . . . . . . . . . . . . . 17Running the Web Deployment Preparation tool . . . . . . . . . . . . . . . . . . . . . . 18
Configuring a deployment . . . . . . . . . . . . . . . . . . . . . . . . . . . . . . . . . . . . . . . . . . . . . 19Creating a new deployment. . . . . . . . . . . . . . . . . . . . . . . . . . . . . . . . . . . . . . 20Deploying a project from within CitectSCADA. . . . . . . . . . . . . . . . . . . . . . . . 23Displaying a deployment . . . . . . . . . . . . . . . . . . . . . . . . . . . . . . . . . . . . . . . . 25Editing an existing deployment . . . . . . . . . . . . . . . . . . . . . . . . . . . . . . . . . . . 25Updating a deployment to reflect project changes . . . . . . . . . . . . . . . . . . . . 26Deleting a deployment. . . . . . . . . . . . . . . . . . . . . . . . . . . . . . . . . . . . . . . . . . 27
Implementing multiple language support . . . . . . . . . . . . . . . . . . . . . . . . . . . . . . . . . 27How default languages are implemented . . . . . . . . . . . . . . . . . . . . . . . . . . . 28Using a language different to the current system locale setting . . . . . . . . . . 28Implementing a non-default language . . . . . . . . . . . . . . . . . . . . . . . . . . . . . . 29
Frequently Asked Questions . . . . . . . . . . . . . . . . . . . . . . . . . . . . . . . . . . . . . . . . . . . 31Windows 2003 Server-related issues . . . . . . . . . . . . . . . . . . . . . . . . 31

Contentsiv
General issues . . . . . . . . . . . . . . . . . . . . . . . . . . . . . . . . . . . . . . . . . 33

CitectSCADA Web Client
The CitectSCADA Web Client allows you to view a live CitectSCADA project within a Web browser. It provides easy access to CitectSCADA Runtime for LAN‐connected users requiring read/write access to current production information.
For example, a senior manager could monitor a facility and access current production information from any computer on the LAN. This is achieved without requiring extensive downloads or software installation.
See Also System architectureGetting Started
Getting Started The CitectSCADA Web Client Help has a procedural structure that is intended to guide you through the steps required to successfully set up a Web Client system.
To ensure a successful installation, it is recommended that you intially familirise yourself with the System architecture, and then work your way through the following topics, as they logically guide you though the set up process.
1 Installation ‐ covers the hardware and software requirements, the process for installing the Web Server software, and an explanation of what gets installed.
2 Web Client user account types ‐ describes the different types of client accounts supported by the Web Server and their access rights.
3 Setting up Security ‐ describes how to prepare the Web Server for secure communication and how to set up client accounts.
4 Preparing a CitectSCADA project for deployment ‐ explains the adjustments that need to be made to a CitectSCADA project prior to deployment on the Web Server.
5 Configuring a deployment ‐ describes how to deploy a project on the Web Server, by identifying its source location and associated servers.
6 Implementing multiple language support ‐ if required, there are seeral language options you can implement on the Web Server interface.
If you have worked your way through the procedures outlined above and are still having problems, there is a Frequently Asked Questions section to help resolve some of the problems that may be encountered.
See Also System architectureInstallation

CitectSCADA Web Client2
What’s been installed?
System architecture To display a live CitectSCADA project in an Internet browser, you need to bring together the content of the project pages and the current data these pages present. This has to be achieved using standard, Web‐based communication protocols. To understand the communication architecture for the CitectSCADA Web Client, it’s easiest to consider the role each of the following components play in achieving this outcome.
The CitectSCADA Web ServerThe CitectSCADA Web Server performs the server‐side functionality of the system. As well as facilitating communication, it is responsible for directing a client to the graphical and functional content of a CitectSCADA project, and the location of the Runtime servers. This information is stored on the Web Server when a CitectSCADA project is configured as a “deployment”. A CitectSCADA Web Server can contain multiple deployments.
The CitectSCADA Runtime ServersThe CitectSCADA Runtime Servers (including the I/O Server, Alarms Server, Trends Server and Report Server) monitor the physical production facility and contain the live variable tag data, alarms and trends that the Web Client will display.
The Web ClientThe Web Client provides the platform to merge a deployed project’s pages and content with the raw data drawn from the Runtime servers. Again, standard Web technologies are a requirement, so the client achieves this using Microsoft Internet Explorer.

CitectSCADA Web Client 3
The following diagram shows further details of how these components interact.
CitectSCADA Web Client communications architecture.
Once the Web Client has connected to the Runtime servers, steps two and three become an ongoing process, with the required content being called upon as the user navigates through the various pages of a project.
Note that this diagram has the system components set up on different computers purely for the sake of explaining the communications model. In reality, the flexibility of the architecture will allow these components to be distributed in any required arrangement; they can even share a common location.
See Also Installation
Installation The only component of the Web Client system that requires software installation is the Web Server. The Web Server can be located on any computer on the LAN.
Note: If the CitectSCADA Web server and CitectSCADA server are set up on different machines, the two machines must be on the same domain so that the

CitectSCADA Web Client4
CitectSCADA Web server can access the directory on the CitectSCADA server that contains the web deployment files.
RequirementsIf you have not yet installed the Web Server software, ensure the computer meets the following requirements.
Hardware requirements
Minimum: Pentium II 500MHz, 256MB RAM, 25MB HD (free)
Recommended: Pentium IV 1GHz, 512MB RAM, 1GB HD (free)
Note: The memory requirements are dependent upon how many simultaneous Web Client connections are expected.
Software requirements
To install CitectSCADA Web Server:
1 Launch the Web Server installer on the host computer.
2 Select the destination folder for the installation. By default, this will be “C:\Program Files\Citect\CitectSCADA\WebServer”. (See the Note above.)
3 The installer allows you to choose a Complete or Custom installation. Choose Custom if you would like to install specific components of the Web Server system, for example, just the Web Client component.
4 Click Install to run the installation.
See Also What’s been installed?
What’s been installed? Once a full installation has taken place, you will find the following directories in the specified destination folder.
Web Server 1. Windows 2000 Pro, XP Pro, 2000 Server, or 2003 Server2. Microsoft Internet Information Services (IIS) (Version 5 or later)3. Microsoft Internet Explorer (Version 6.0 or later)4. NTFS file systemNote: The target drive for the Web Server software must use an NTFS file system, otherwise you won’t have full access to the required Windows security settings (i.e. the Folder Properties dialog will not have a Security tab). If you are currently using a FAT/FAT32 system, ensure you convert the drive to NTFS before installion of the Web Server software.
Web Client 1. Windows 2000 Pro, XP Pro, 2000 Server, 2003 Server or NT 4 (Service Pack 6)2. Microsoft Internet Explorer (Version 6.0 or later)Note: By default, CitectSCADA uses NetBIOS to facilitate communications over a network. To use the Web Server, you need to switch your system over to TCP/IP. For more information, see Using TCP/IP for network communications.

CitectSCADA Web Client 5
The WebServer directory primarily hosts the administrative pages that are displayed by a Web Server.
The cgi‐bin and images directories contain the content required to display these pages.
The client folder contains the client components (.cab files) that are delivered to a remote computer to run a deployment. Any subdirectories includes the components associated with the a particular release (in this case, Version 6.00).
The Deploy folder includes the files associated with any deployments (CitectSCADA projects) that have been configured on the Web Server.
The #DisplayClient folder (located in the Deploy folder) plays a key role in the Web Server security, as the permissions defined for this folder determine the access rights for each user.
The locales folder contains the files required to support different languages for the client interface. See also Implementing multiple language support.
The IIS virtual directoryThe installation process also adds a virtual directory called CitectSCADA to Windows IIS (Internet Information Services). This virtual directory primarily establishes the Web Server as a valid destination for client applications. However, it also plays an important role in managing which users have access to the site.
You can view evidence of this virtual directory in the IIS management console, which is launched by selecting Internet Information Services (or Internet Services Manager on Windows 2000) from Windows’ Administration Tools
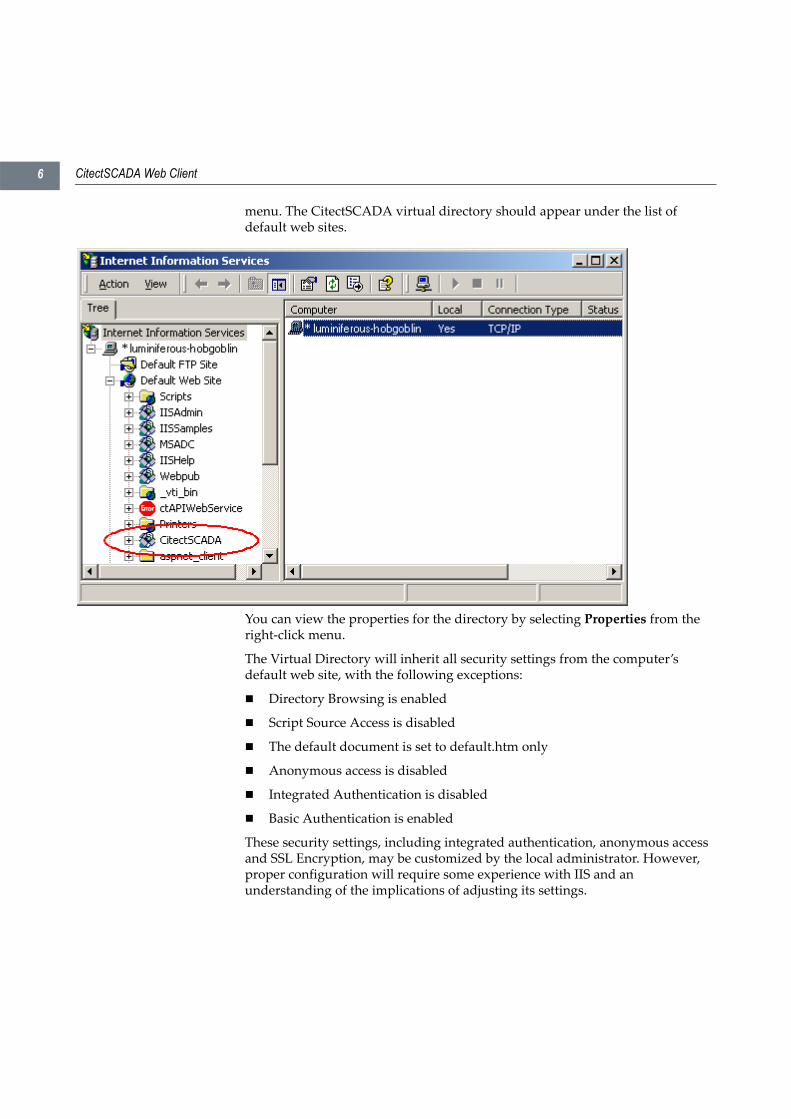
CitectSCADA Web Client6
menu. The CitectSCADA virtual directory should appear under the list of default web sites.
You can view the properties for the directory by selecting Properties from the right‐click menu.
The Virtual Directory will inherit all security settings from the computer’s default web site, with the following exceptions:
Directory Browsing is enabled
Script Source Access is disabled
The default document is set to default.htm only
Anonymous access is disabled
Integrated Authentication is disabled
Basic Authentication is enabled
These security settings, including integrated authentication, anonymous access and SSL Encryption, may be customized by the local administrator. However, proper configuration will require some experience with IIS and an understanding of the implications of adjusting its settings.
CitectSCADA Web Client 7
SecuritySecurity on the CitectSCADA Web Server is handled by IIS security, which is tightly integrated with Windows’ user‐based authentication.
Note: While the Web Client security architecture controls access to your projects on the Web Server, it is important to note that CitectSCADA’s system security (privilege/area settings) still manages protection of the control system, maintaining a primary level of security.
The installation and initial configuration of the Web Server must be performed by a Windows user with local administrator permissions; that is, they must be able to add and edit Windows’ User accounts, and modify file/folder protection. This capability is required to set up Web Client user accounts and manage security settings.
See Also Web Client user account typesSetting up SecurityConfiguring client account user groupsPreparing the Web Server folderSetting up access rights for client accountsTesting the Web Server security settings
Web Client user account types
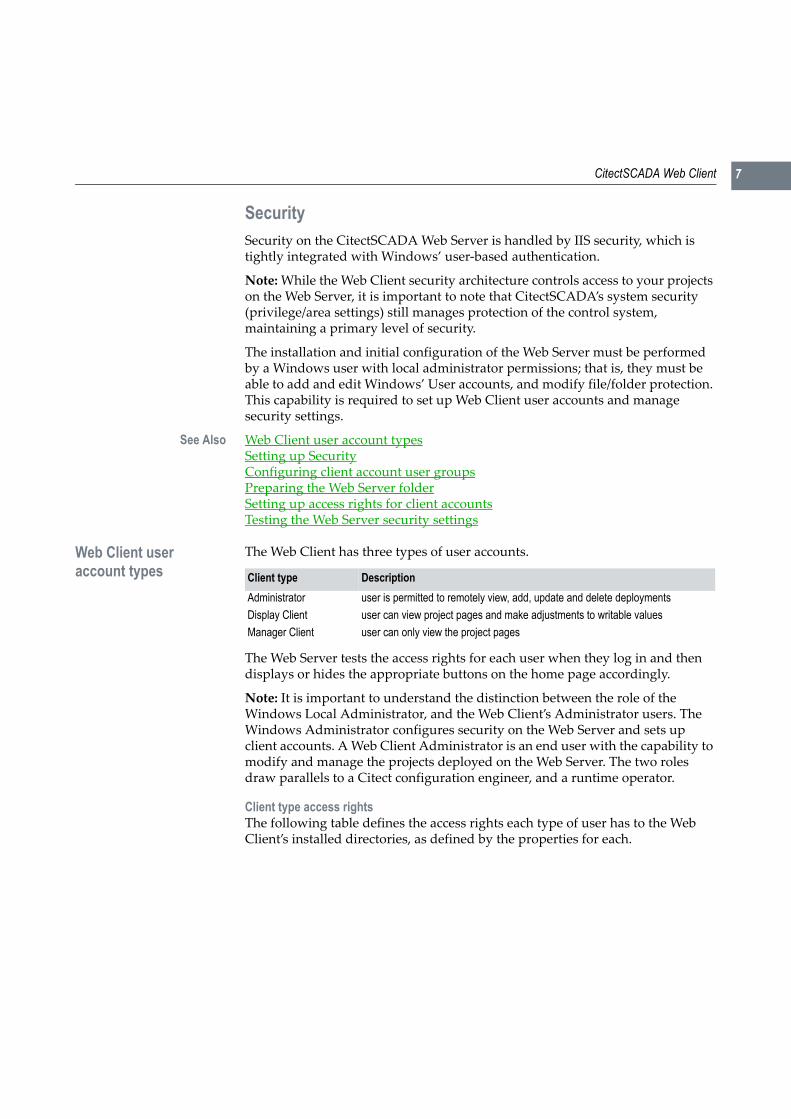
The Web Client has three types of user accounts.
The Web Server tests the access rights for each user when they log in and then displays or hides the appropriate buttons on the home page accordingly.
Note: It is important to understand the distinction between the role of the Windows Local Administrator, and the Web Client’s Administrator users. The Windows Administrator configures security on the Web Server and sets up client accounts. A Web Client Administrator is an end user with the capability to modify and manage the projects deployed on the Web Server. The two roles draw parallels to a Citect configuration engineer, and a runtime operator.
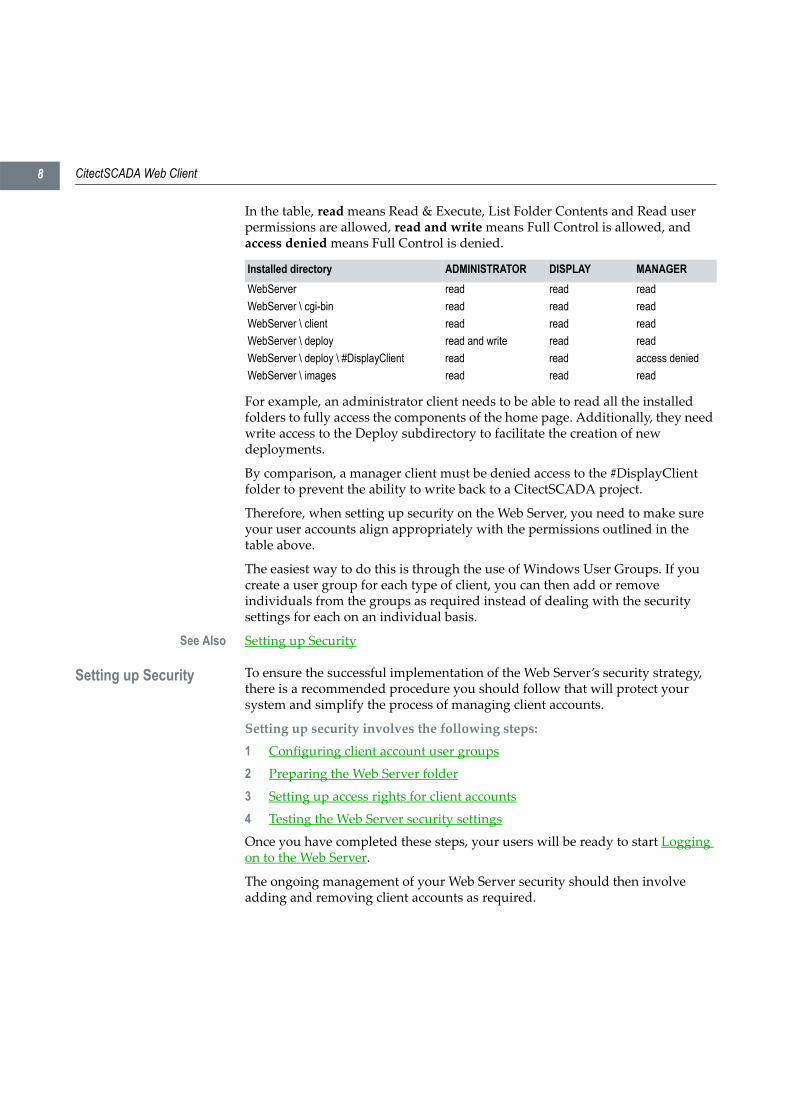
Client type access rightsThe following table defines the access rights each type of user has to the Web Client’s installed directories, as defined by the properties for each.
Client type DescriptionAdministrator user is permitted to remotely view, add, update and delete deploymentsDisplay Client user can view project pages and make adjustments to writable valuesManager Client user can only view the project pages
CitectSCADA Web Client8
In the table, read means Read & Execute, List Folder Contents and Read user permissions are allowed, read and write means Full Control is allowed, and access denied means Full Control is denied.
For example, an administrator client needs to be able to read all the installed folders to fully access the components of the home page. Additionally, they need write access to the Deploy subdirectory to facilitate the creation of new deployments.
By comparison, a manager client must be denied access to the #DisplayClient folder to prevent the ability to write back to a CitectSCADA project.
Therefore, when setting up security on the Web Server, you need to make sure your user accounts align appropriately with the permissions outlined in the table above.
The easiest way to do this is through the use of Windows User Groups. If you create a user group for each type of client, you can then add or remove individuals from the groups as required instead of dealing with the security settings for each on an individual basis.
See Also Setting up Security
Setting up Security To ensure the successful implementation of the Web Server’s security strategy, there is a recommended procedure you should follow that will protect your system and simplify the process of managing client accounts.
Setting up security involves the following steps:
1 Configuring client account user groups
2 Preparing the Web Server folder
3 Setting up access rights for client accounts
4 Testing the Web Server security settings
Once you have completed these steps, your users will be ready to start Logging on to the Web Server.
The ongoing management of your Web Server security should then involve adding and removing client accounts as required.
Installed directory ADMINISTRATOR DISPLAY MANAGERWebServer read read readWebServer \ cgi-bin read read readWebServer \ client read read readWebServer \ deploy read and write read readWebServer \ deploy \ #DisplayClient read read access deniedWebServer \ images read read read

CitectSCADA Web Client 9
Configuring client account user groups
Creating a user group associated with each type of Web Client account on your Web Server allows you to manage security without having to deal with each user on an individual basis. Users can simply be added to a group, which means they automatically adopt the security status set for the group.
To create a User Group on the Web Server computer, you will have to log in to Windows with Local Administrator permissions.
To create the client account user groups:
1 Go to the Computer Management tool, which is launched from the Win‐dows Start menu or Control Panel.
2 Locate Local Users and Groups in the directory tree. This is where the users and groups for the local machine are configured and managed.
3 Right click on the Groups folder and select New Group. This will call up the New Group dialog.
4 In the Group Name type “Web Client Administrator” (or something appropriate), and provide a description of the group’s purpose.
5 Click the Create button.
The group you have just created should now appear in the list of groups presented in the Computer Management console.
6 Repeat steps three to five to create Display Client and Manager Client user groups.

CitectSCADA Web Client10
7 To eventually test your security settings, you should add at least one user to each group.
You are now ready to start Preparing the Web Server folder.
Preparing the Web Server folder
You need to adjust the security settings for the WebServer folder and its sub‐directories, as this will determine the access granted to each type of client account.
To prepare the WebServer folder:
1 Log on to the Web Server computer as a Windows Administrator.
2 Launch Windows Explorer and browse to the WebServer folder.
The WebServer folder is located in the installation directory. By default, this will be “C:\Program Files\Citect\CitectSCADA\WebServer”.
3 Right click on the WebServer folder and select Properties.
4 From the Properties dialog, select the Security tab. The dialog will display the users that are currently configured for the folder.

CitectSCADA Web Client 11
5 It is likely there will be a number of groups already defined in this folder. The two you need to pay particular attention to are the Administrators group and the Everyone group.
The Administrators group represents all the Windows users recognized by the Web Server computer with Local Administrator rights. This group has Full Control permissions on the folder, facilitating the ability to adjust the Web Server security settings. If this is the case, there should be no reason to modify this group.
The Everyone group represents all other users recognized by the local machine. It is recommended that you provide this group with “read” access to the WebServer folder; that is, allow Read & Execute, List Folders Contents, and Read permissions. This will provide all local users on the Web Server machine with the equivalent of Display Client permissions.
CitectSCADA Web Client12
If there are any other groups defined for the Web Server folder, for example ” Power Users”, you may want to remove these groups to simplify the management of your Web Client accounts.
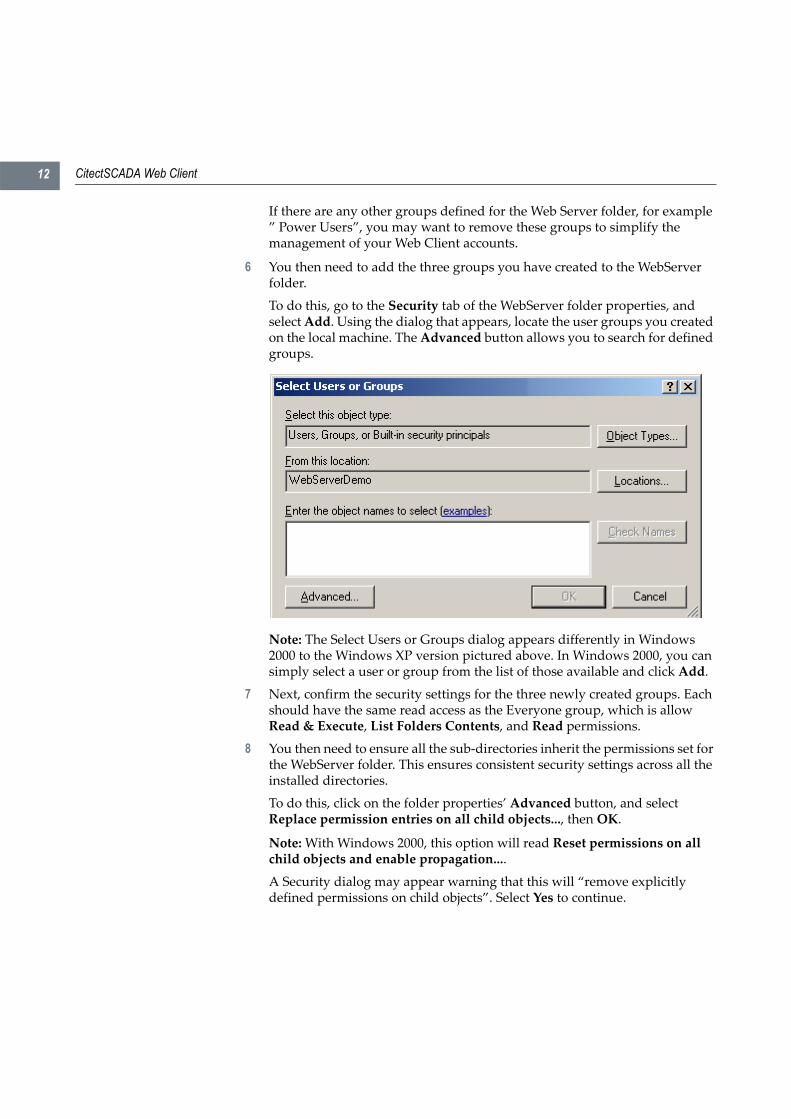
6 You then need to add the three groups you have created to the WebServer folder.
To do this, go to the Security tab of the WebServer folder properties, and select Add. Using the dialog that appears, locate the user groups you created on the local machine. The Advanced button allows you to search for defined groups.
Note: The Select Users or Groups dialog appears differently in Windows 2000 to the Windows XP version pictured above. In Windows 2000, you can simply select a user or group from the list of those available and click Add.
7 Next, confirm the security settings for the three newly created groups. Each should have the same read access as the Everyone group, which is allow Read & Execute, List Folders Contents, and Read permissions.
8 You then need to ensure all the sub‐directories inherit the permissions set for the WebServer folder. This ensures consistent security settings across all the installed directories.
To do this, click on the folder properties’ Advanced button, and select Replace permission entries on all child objects..., then OK.
Note: With Windows 2000, this option will read Reset permissions on all child objects and enable propagation....
A Security dialog may appear warning that this will “remove explicitly defined permissions on child objects”. Select Yes to continue.

CitectSCADA Web Client 13
The Web Server’s installed directories should now have consistent security settings for all the required user groups.
Next, you will need to modify the security setting for two specific folders to implement the required permissions for the different client account types.
See Also Setting up access rights for client accounts.
Setting up access rights for client accounts
The three client account types supported by the Web Client are defined by the security settings for each within the installed directories on the Web Server machine.
The differences, outlined in the table in Client type access rights, require specific security settings for the Administrator Client and Manager Client types. An Administrator needs write access to the Deploy subdirectory, and the Manager needs to be denied access to the #DisplayClient subdirectory.
The Display Client group needs no additional configuration, as it uses the settings outlined in the topic Preparing the Web Server folder.
To configure security setting for the Administrator Client group:
The Administrator Client requires full access to the Deploy subdirectory to enable the creation and modification of deployments.
1 Locate the Deploy subdirectory in the Web Server folder. By default, this will be “C:\Program Files\Citect\CitectSCADA\WebServer\Deploy”.
2 Right‐click on the folder and select Properties. This will make the Deploy folder properties appear.
3 Click on the Security tab and locate the Web Client Administrator group you created in the list of users and groups.
4 Edit the permissions set for the group to Allow Full Control.
To configure the security settings for the Manager Client group:
The Manager Client must be denied access to the #DisplayClient subdirectory, as this will stop any write changes being made to a deployed CitectSCADA project.
1 Locate the #DisplayClient subdirectory in the Web Server folder. By default, this will be “C:\Program Files\Citect\CitectSCADA\Web‐Server\Deploy\#DisplayClient”.
2 Right‐click on the folder and select Properties. This will make the folder properties appear.
3 Click on the Security tab and locate the Web Client Manager group you created in the list of users and groups.
4 Edit the permissions set for the group, which you should change to Deny Full Control.

CitectSCADA Web Client14
A Security dialog will appear warning “Deny entries take priority over all Allow entries”. Select Yes to continue.
Note: If you want to delete a user account from the Web Server and security is a concern, you should set the user’s access rights to Deny Full Control before you remove them from a group. This avoids a known problem where the operating system doesn’t immediately acknowlege that a user account has been deleted, creating a short period where a deleted user can still log on. With all access denied, they will not be able to take any action even if they are able to gain access.
You have now successfully configured the security settings for the client groups on the Web Server. Next, you should commence Testing the Web Server security settings.
Testing the Web Server security settings
To test the security settings for your Web Server client groups:
1 Launch Internet Explorer on the Web Server machine.
2 Call up the Web Client home page by keying in the following address:
http://localhost/CitectSCADA
3 Try logging in to the home page using a user name and password that’s been added to the Administrator Client group.
If successful, the System Messages dialog should read “LOGINADMIN Admin (UserName) logged in”.
If the message starts with LOGINDC (for Display Client) or LOGINMC (for Manager Client), it means there is a problem with your configuration. Confirm that you are using the correct user name for the group you are testing. If the problem still occurs, you may need to revisit the process outlined in Setting up Security to ensure an error hasn’t been made.
4 Repeat this process with a Display Client and Manager Client user.
Once you have confirmed that security is correctly set up on the Web Server, you are now ready to prepare your CitectSCADA projects for deployment.
Logging on to the Web Server
Once you have set up your client accounts, you will have to provide the following details to each end user so they can log on to the Web Server:
the address of the Web Server
This is the address they will have to key into their Web browser to gain access to the CitectSCADA Web Server.
If they are doing this remotely, the address will be:
http://<machine name>/CitectSCADA
or

CitectSCADA Web Client 15
http://<machine IP address>/CitectSCADA
If they are logging on to the Web Server computer, the address is:
http://localhost/CitectSCADA
User name and password
Once the browser has arrived at the Web Server, the end user will be asked to provide a user name and password. Typically, you will just need to inform them that their Windows user name and password will provide appropriate access. If you had to create a new user profile for a particular person, you will have to provide them with the details.
Preparing a CitectSCADA project for deploymentBefore you deploy a project on a Web Server, you will probably need to make a few adjustments within the CitectSCADA configuration environment to ensure it is ready for Web‐based delivery. You will need to consider the following issues:
Functionality limitations of the Web Client platform
Preparing a project’s user files for delivery
Running the Web Deployment Preparation tool
Note: By default, CitectSCADA uses NetBIOS to facilitate communications over a network. To use the Web Client, you need to switch your system over to TCP/IP, which involves adjusting two specific [LAN] parameters, and mapping your server TCP/IP addresses. For example:
[LAN]
tcpip=1
netbios=0
[DNS]
<SCADA I/O server name>=<IP address>
<alarm server name>Alarm=<IP address>
<report server name>Report=<IP address>
<trend server name>Trend=<IP address>
Note: If the project is set up for redundancy, both servers must appear in the [DNS] section of the Citect.ini file.
CitectSCADA Web Client16
See the topic Using TCP/IP for network communications in the CitectSCADA User Guide for more information on setting your DNS parameters.
Functionality limitations of the Web Client platform
Due to the architecture required to support Web‐based execution of CitectSCADA projects, the Web Client cannot support the full functionality offered by a standard CitectSCADA system.
You should consider the following list of unsupported features and Cicode functions to assess if this will be detrimental to the performance of your project. Some adjustments may be required.
Feature LimitationsThe following features are not supported:
Cicode Debugger
Remote shutdown
Fuzzy Logic
Cluster functionality
Kernel windows
Web Client is unable to act as a CitectSCADA Server
Pages based on the default Menu Page template will only show buttons for pages previously visited
The Page Select button on the default Normal template will only list pages previously visited
The CSV_Include project’s Update Page List menu item will not work
Note: If your project is based on the CSV_Include template, you will need to create a customized menu to access pages from the menu bar.
Cicode Function LimitationsThere are several Cicode functions that are also unavailable with the Web Client, or limited in their capabilities. These are:
Cluster Functions Cluster functionality not supportedDebugBreak Cicode debugger not supportedDelayShutdown Programmatic Shutdown not supportedFTP Functions All FTP functions are not supportedFuzzy Logic Functions Removed from control due to sizeKerCmd Kernel windows not supported

CitectSCADA Web Client 17
See Also Preparing a project’s user files for delivery
Preparing a project’s user files for delivery
If the content of your CitectSCADA project incorporates any user created files, such as DBF files, HTML files, or CSV files, you will need to manually place these into a special zip file called Misc.zip for delivery to the Web Server.
Similarly, if a project contains any ActiveX objects, these will also need to be included in a zip file called ActiveX.zip.
To prepare any user‐created files for deployment:
1 Identify all the user‐created files that are associated with the project you would like to deploy.
These files could include any CSV or DBF files associated with tables presented on project pages, or any HTML content.
2 Use a compression tool to zip these files up into a single file called Misc.zip.
3 Place Misc.zip in the main folder for the project. For example, in the case of the CSV_Example project, this would be:
C:\Program Files\Citect\CitectSCADA\User\CSV_Example
ProjectRestartGet Programmatic Shutdown not supportedProjectRestartSetProjectSetShutdownShutdownFormSwitchConfig Configuration environment not availableTraceMsg Kernel windows not supportedUserCreate Changes to user profiles must be made on the machine where the project is
compiled and auto-deployed. UserCreateFormUserDeleteUserEditFormUserPasswordUserPasswordFormGetWinTitle Windows other than the main window onlyWinFreeWinModeWinMoveWinPosWinSizeWinTitleWndShowWndViewer Invokes multimedia applications Feature not supported

CitectSCADA Web Client18
Note: If you’re project has any included projects that use ActiveX objects, you need to ensure they are also zipped up in an Activex.zip file within the included project’s directory.
The files are now ready for deployment on the Web Server.
To prepare any included ActiveX objects for deployment:
1 Identify all the ActiveX object associated with the project you would like to deploy.
2 Use a compression tool to zip these files up into a single file called ActiveX.zip.
3 Place ActiveX.zip in the main folder for the project. For example, in the case of the CSV_Include project, this would be:
C:\Program Files\Citect\CitectSCADA\User\CSV_Include
Note: If an ActiveX object has an associated data source, you need to ensure the data source can be located by the computer hosting the Web Client. See the topic Managing associated data sources under the section on ActiveX objects in the CitectSCADA User Guide Help.
See Also Running the Web Deployment Preparation tool
Running the Web Deployment Preparation tool
The final step in the process of preparing a project for deployment involves running it through the Web Deployment Preparation tool. This takes a freshly compiled project and creates the required files and directories for web‐based delivery.
To run a project through the Web Deployment Preparation tool:
1 Ensure the project you would like to deploy has all its associated user files and ActiveX objects zipped up for delivery (see Preparing a project’s user files for delivery).
2 Locate the project you would like to deploy in Citect Explorer and do a fresh compile.
3 Go to the Citect Explorer Tools menu and select Web Deployment Preparation. You can also achieve this by selecting the following icon on the Explorer toolbar.
4 A progress indicator will appear. The size of the project will significantly affect how long this process will take; a very large project with many files may take well over ten minutes to process, depending on the hardware available. Note you have the option to abort the process.

CitectSCADA Web Client 19
5 When complete, a dialog will appear informing you the preparation was successful. Click OK.
The project is now ready for deployment on the Web Server.
Hint: You also have the option to automatically run the Web Deployment Preparation tool every time you compile a project. To do this, go to the Citect Project Editor Tools menu and select Options. Select the Prepare for Web Deployment option and click OK. Note, however, that this will dramatically increase the amount of time taken for each compile, particularly for large projects.
See Also Configuring a deployment
Configuring a deploymentA deployment represents the implementation of a CitectSCADA project on the Web Server. It incorporates the files and components required to display a project, and then stores the location of the servers where CitectSCADA Runtime data is generated.
The deployments configured on a Web Server are listed on the Web Client home page, which is the page that appears when you initially log in. The configuration details for a deployment can be displayed by clicking the small plus icon to the left of the deployment name.
The type of action you can implement for a deployment depends on the permissions granted by your log in. For example, if you log in as a Manager Client, you will only be able to view a deployment. If you are an administrator, you will be able to edit deployments and create new ones.

CitectSCADA Web Client20
The following list describes the functionality associated with each of the icons presented on the home page.:
Additionally, the System Messages panel provides notification of events that impact the current status of the Web Server.
See Also Preparing a CitectSCADA project for deploymentCreating a new deploymentDeploying a project from within CitectSCADADisplaying a deploymentEditing an existing deploymentUpdating a deployment to reflect project changesDeleting a deployment
Creating a new deployment
To configure a deployment of a CitectSCADA project on a Web Server, you must log in with Administrator Client permissions. This will provide you with access to the full functionality of the home page.
To add a new deployment
1 Click on the Add New Deployment icon.
Add New Deployment - takes you to the Deployment Configuration page where you can create a new deployment (Administrator Clients only).
Help - launches a PDF file explaining how to configure and use the Web Client.
Edit Deployment - takes you to the Deployment Configuration page and allows you to edit the selected deployment (Administrator Clients only).
Delete Deployment - Deletes the selected deployment (Administrator Clients only).
Start Display Client - Displays the selected deployment with Display Client permissions (Display Client and Administrator Client only)
Start Manager Client - Displays the selected deployment with Manager Client permissions

CitectSCADA Web Client 21
This will take you to the Deployment Configuration page.
2 Key in a name in the Deployment field, and include a Description if required.
Note: A deployment name cannot contain any of the following characters:\ * ? | . / " ' : ; < > # &
3 Identify the source of the CitectSCADA project’s content in the Project Path field.
If the project is located locally on the Web Server computer, you can use a normal path address. The path must point directly to the project within the CitectSCADA User directory. For example, the location of the Example project would be:
C:\Program Files\Citect\CitectSCADA\User\Example
Note: If you are remotely administering the Web Server and you use a local path address, make sure it relates to the Web Server computer, not the computer you are currently using.
If you need to address a computer on a network, you need to share the path of the Example project. For example, if the project resides on the CitectSCADA server (Program Files\Citect\CitectSCADA\User\Example), you would create a share (called WebShare, for example) and then use the following project path:
\\ComputerName\WebShare
4 Identify the CitectSCADA servers associated with the deployment. You have the option to provide a name in the Server field (as defined in your CitectSCADA project), the IP Address of the server, and the Port number.
There are, however, two scenarios you need to consider here:
Have the IP addresses for the project servers already been identified in the [DNS] section of the Citect.ini file? If you have already done this in the process of setting up TCP/IP, you don’t need to identify any servers as the IP addresses can be retrieved from the Citect.ini file. See Using
CitectSCADA Web Client22
TCP/IP for network communications in the CitectSCADA User Guide Help for information on using the [DNS] parameters.
Note: If you include an IP address for a server in the configuration of your deployment, it will take precedence over a different address identified for the same server in the [DNS] section of your Citect.ini file.
Are your CitectSCADA servers protected behind a firewall? If so, with each server name you will need to provide the public address and port number for your firewall. The firewall should be configured to handle the mapping to private IP address and port number for each Citect server.
5 Add any additional servers to your deployment by clicking the Add New Server button, and repeating step four for each server.
Typically, a CitectSCADA project will incorporate an I/O server, alarms server, trends server and report server. You must identify each of the servers associated with the project.
6 Use the Client Control field to specify the use of a particular version of the Web Client component when the deployment is displayed.
The drop‐down menu includes a list of all the different versions of the Web Client control currently installed on the Web Server. Typically, you should select the version of the control that coincides with the version of CitectSCADA your project was compiled on.
7 Once you have finished configuring the deployment, click on the Apply Changes button.
This is important, as your changes will be lost if you jump straight back to the home page.
This triggers a process where all the project files are retrieved from the path indicated, and copied to the Web Server ready for access by the Web Clients. A dialog will pop up to indicate how this process is progressing.
Once this is complete, information about the size of the project will appear in the File Paths banner above the Project Path field. The number to the left indicates how many files are included in the project, the number to the right indicates the total size of the project.

CitectSCADA Web Client 23
The deployment will have now been saved. When you return to the Web Client home page, by clicking on the home icon, your new deployment will be among those listed.
See Also Deploying a project from within CitectSCADADisplaying a deployment
Deploying a project from within CitectSCADA
The Web Client architecture allows you the option to deploy a project from within the CitectSCADA configuration environment, avoiding the need to use the Web Client interface to setup a system.
This process requires the adjustment of two parameters in the Citect.ini file, [WebServer]WebClientCab and [WebServer]DeployRoot. These identify which client component is used with the project, and the location of the deployment root directory. When the project is compiled and prepared for deployment, it will then be placed directly on the Web Server.
Note:
When implementing this option, you should pay careful attention to your Citect.ini file configuration, as any errors with these parameters will be difficult to diagnose. To avoid the possibility of input error, it is recommended you use the Web Deployment Tool on the Citect Explorer toolbar in combination with the Web Server’s Web Deployment GUI.
If the project name contains non‐English characters, this process of deploying from within CitectSCADA may fail. Under these circumstances, it is suggested you use the Web Server interface to create the deployment.
To deploy a project from within CitectSCADA:
1 Confirm that your CitectSCADA system is configured to use TCP/IP to facil‐itate communications over a network. This involves adjusting the following Citect.ini parameters:[LAN]
tcpip=1
netbios=0
2 Confirm that your CitectSCADA servers are correctly mapped to their IP addresses within the DNS section of the Citect.ini file. (See the topic Using TCP/IP for network communications in the CitectSCADA User Guide for more information.)
For example:
[DNS]
<SCADA I/O server name>=<IP address>
<alarm server name>Alarm=<IP address>

CitectSCADA Web Client24
<report server name>Report=<IP address>
<trend server name>Trend=<IP address>
Note: NetBIOS automatically identifies a server’s role by appending the word “Alarm”, “Trend” or “Report” to the end of the proposed server name when it is initially created by the Computer Setup Wizard. To identify a server for TCP/IP, you will need to add this appendage yourself in the DNS identification settings.
If the project is set up for redundancy, both servers must appear in the Citect.ini file.
3 Adjust the [WebServer]DeployRoot and [WebServer]WebClientCab parameters within the Citect.ini file.
The DeployRoot parameter represents the directory where the deployment will be located on the WebServer. Typically, this will be the Deploy directory within the installed directories. For example:
[webserver]
DeployRoot="C:\Program Files\Citect\CitectSCADA\WebServer\deploy"
Note:
When setting the [WebServer]DeployRoot ini parameter, the path must contain ʺdeployʺ as the last subfolder name, otherwise the deployment will fail.
It is also recommended that you use a mapped drive instead of a UNC address if you’re deploying to a network destination from a Windows 2000 system. This will avoid potential deployment failures. Do not map a drive directly to the deployment location, as the path must finish with a “deploy” subfolder.
4 The WebClientCab parameter represents the directory path and client component to be used when a deployment is run, in relation to the installed Client directory. For example:[webserver]
WebClientCab=600/CitectSCADAWebClient_6_0_176.cab
Note the use of a forward slash in the defined path.
5 Compile your project and then prepare it for deployment. Go to the Citect Explorer Tools menu and select Web Deployment Preparation or select the following icon on the Explorer toolbar.

CitectSCADA Web Client 25
Note: You also have the option to automatically run the Web Deployment Preparation process every time you compile a project. To do this, go to the Citect Project Editor Tools menu and select Options. Select the Prepare for Web Deployment option and click OK. Be aware, however, that this may signifcantly increase the amount of time required for a project to compile.
Your project should now appear as a deployment within the Web Client home page next time you log in.
See Also Displaying a deployment
Displaying a deployment
When you display a deployment, you trigger the process of downloading the required Web Client component file from the Web Server, enabling you to run the associated CitectSCADA project in your Web browser.
To display a deployment:
1 Locate the deployment you would like to display in the list of available deployments.
2 Click on the relevant icon (Start Display Client or Start Manager Client) to display the deployment.
The display options available to you will depend on your log in permissions. If you select the Manager Client icon (the one with the gold lock), you will only be able to read the current values for the CitectSCADA project.
Once the required project files and components have been downloaded, the CitectSCADA project will appear. You can now navigate through the project pages as required.
Note: An error message may appear if the current user on the client machine does not have Windows administrator rights when a new or updated component file (.cab file) is downloaded. Ensure the current Windows user has administrator rights if a new deployment is run or an updated .cab file needs to be downloaded.
See Also Editing an existing deployment
Editing an existing deployment
If required, you can edit the settings for a deployment. For example, you may want to change the name of the deployment, or you may have to identify a new address for a Runtime server.
To edit a deployment’s settings, you must be logged in as an Administrator Client.

CitectSCADA Web Client26
To edit an existing deployment
1 Locate and select the deployment you need to edit in the list of available deployments.
2 Click on the Edit Deployment icon.
This will take you to the Deployment Configuration page.
Make adjustments to the fields as required. If you require an explanation of any of the fields, see Creating a new deployment.
Note: If you give a deployment a new Name, it will be duplicated instead being updated and overwritten. This allows you to easily make a copy of an existing deployment, however, you will have to delete the original deployment with the old name if it’s no longer required.
3 Once you have finished making your changes, click on the Apply Changes icon.
This is important, as your changes will be lost if you jump straight back to the home page.
The Web Server will retrieve a fresh set of pages and components for the CitectSCADA project, which will include any recent changes.
See Also Updating a deployment to reflect project changes
Updating a deployment to reflect project changes
If you make changes to a source CitectSCADA project, you will have to update its associated deployment to ensure the changes are reflected on the Web Server.
Updating a deployment ensures the latest project pages and components are retrieved by the Web Server and available for distribution. This is important as discrepancies may occur between the project pages and the data being pulled from the Runtime servers if the content is not up to date.
To update a deployment:
1 Locate and select the deployment you would like to update.
2 Click on the Edit Deployment icon.
This will take you to the Deployment Configuration page.

CitectSCADA Web Client 27
3 Click on the Apply Changes icon.
The Web Server will retrieve a fresh set of pages and components for the CitectSCADA project, which will include any recent changes.
See Also Editing an existing deploymentDeleting a deployment
Deleting a deployment To delete a deployment from a Web Server, you must be logged in as an Administrator Client.
To delete a deployment from the Web Server:
1 Locate and select the deployment you would like to delete in the list of avail‐able deployments.
2 Click on the Delete Deployment icon.
A dialog will ask you to confirm that you want to Delete the deployment. Click OK.
See Also Configuring a deployment
Implementing multiple language supportThe Web Client deployment configuration interface can be displayed using languages other than English. The following languages are supported by default:
French
German
Spanish
Chinese
Japanese
Korean
You can also implement other languages by performing your own translation of the resource message file that defines the text displayed. In the case of the languages listed above, this file has already been translated with a version for each language stored in the installed ʺlocalesʺ folder.
See Also How default languages are implemented

CitectSCADA Web Client28
Using a language different to the current system locale settingImplementing a non‐default language
How default languages are implemented
When you connect a client computer to the Web Server, the script on the web page will automatically detect the language code currently defined as the default for the browser. This code is drawn from the system locale setting, as defined in Control Panel|Regional Options on the client machine.
Once the browser’s language code has been determined, the script attempts to match it with those available on the Web Server. If a match is made, the associated language will be automatically used for the Web Client deployment configuration interface. If a match cannot be made, it will default to English.
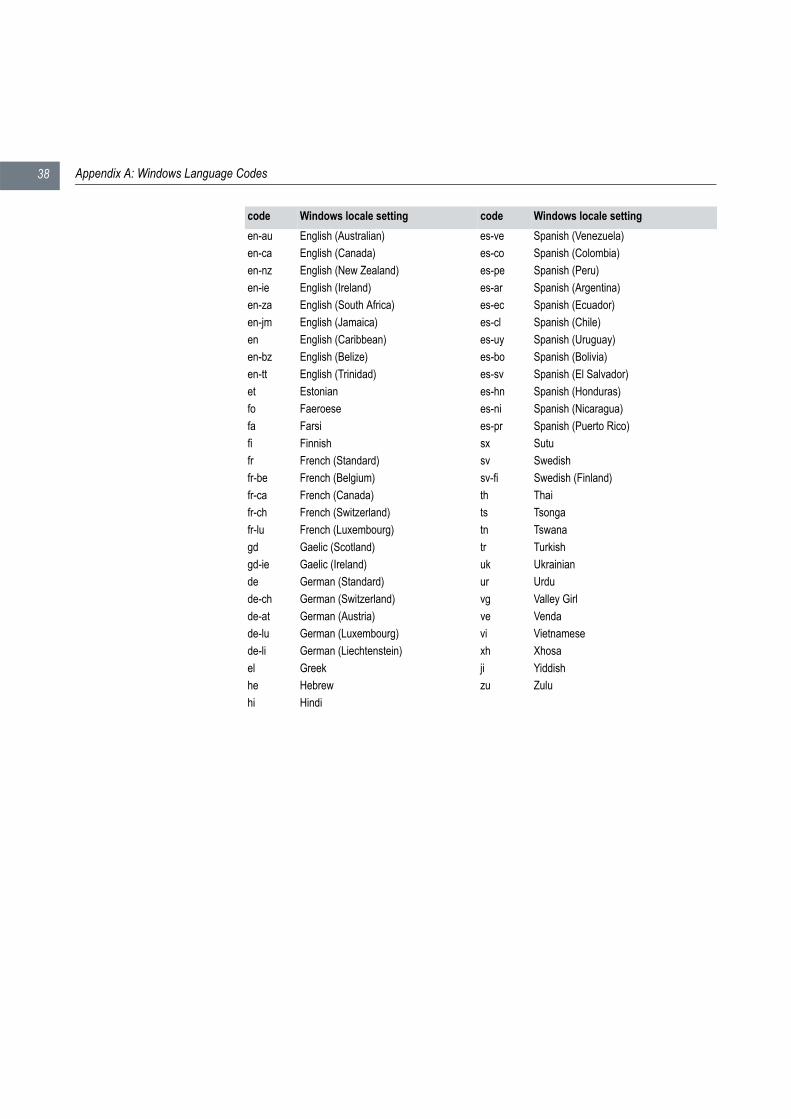
For example, if your Windows Locale setting is Chinese (PRC), the language code set for your browser would be ʺzh‐cnʺ. This is compared to the current list of language codes on the Web Server, which by default is the following:
Having failed to exactly match ʺzh‐cnʺ, the script will try to load Simplified Chinese language, ʺzhʺ, as an appropriate match. The interface will automatically display in Chinese.
See Also Using a language different to the current system locale setting
Using a language different to the current system locale setting
You can display the content of the Web Client’s deployment configuration pages using a language that’s different to the current system locale setting for the computer. To do this, you can simply use a url query string in the address field of your browser.
To switch to a language other than the default:
1 Decide which language you would like to use and determine its associated language code. (See How default languages are implemented for a list of the codes for the seven default languages supported by the Web Server).
For example, if you wanted to use Chinese, the code required would be zh.
Note: If the language you would like to use is not one of the seven supported languages, you will have to create and translate your own message file. See Implementing a non‐default language.
Language Windows Language CodeEnglish enFrench frGerman deSpanish esSimplified Chinese zhJapanese jaKorean ko
CitectSCADA Web Client 29
2 Use a URL query to indicate which language you’d like to use for the Web Client deployment pages. For example, if the address field on your browser currently reads the following:http://localhost/CitectSCADA
add a ʺ/?lang=" query to the end of the address. For example, Chinese would be:
http://localhost/CitectSCADA/?lang=zh
Note: If you use a code that represents a regional variation of one of the default languages, and that specific code cannot be exactly matched, the Web Server will only be able to implement the available default version of the language. For example, using the language code for Chinese (PRC), ʺzh‐cnʺ, will result in the Simplified Chinese being used, ʺzhʺ.
Your Web Browser will now display the Web Client’s deployment configuration pages with the appropriate language displayed.
See Also Implementing a non‐default language
Implementing a non-default language
If you have a specific need to use a language on the Web Client’s deployment configuration interface other than one of the seven defaults supported by the Web Server, you have the option to implement your own translation of the messages file that defines the text that appears.
To display a language other than those supported by default:
1 Using a text editor that supports the language you’re about to edit, open one of the existing message files located in the Web Server’s ʺlocalesʺ directory, the default path being:
C:\Program Files\Citect\CitectSCADA\Web Server\locales
The file you open should include the language that will be easiest to translate. The language code at the start of each file name can be used to identify the language each file represents; for example, the English language file is called enmsg.xml.
2 Save the file back to the locales directory, using the appropriate language code in the name.
To name the file correctly, you will need to check the list of Windows Language Codes for the appropriate code. This will allow your translated resource file (XXmsg.xml) to be automatically loaded when the Web Client home page is launched, provided it matches the current system locale setting.
For example, if you wanted to implement Hebrew on the Web Client’s configuration pages, you should name your file hemsg.xml. If you wanted

CitectSCADA Web Client30
to use the Taiwanese variation of Chinese, you should call the file zh‐twmsg.xml.
3 You’re now ready to make the required changes to the content of the file. Firstly, you’ll need to set the correct encoding format.
The encoding format is defined in the top line of the file, which appears as follows:
<?xml version="1.0" encoding="iso-8859-1" ?>
If the language uses English characters, the format you would use is ANSI, which is defined as “iso‐8859‐1” (see example above).
If the language uses non‐English characters, you would use Unicode, which is defined as “UTF‐8” (see example below).
<?xml version="1.0" encoding="UTF-8" ?>
4 You can now start translating the text that appears on the Web Client interface.
The content that needs to be translated is divided across two sections within the file: “labels” and “messages”. The labels section includes the content used to describe and identify the elements of the interface, the messages section includes the notifications that appear in the system messages panel.
To translate these sections, simply alter the text between the enclosing XML tags. Do not alter the tags themselves.
Note: Make sure you maintain any ʺ%ʺ characters, as these are used to insert system information.
For example, the English file:
<!-- Labels -->
<span id="TITLE">CitectSCADA Web Client Deployment</span>
<span id="SYSMSG">System Messages</span>
<span id="DEP">Deployment</span>
<span id="DESC">Description</span>
<span id="ACTION">Action</span>
<!-- Messages -->
<sysmsg id="DELOK">% deleted.</sysmsg>
<sysmsg id="DELCAN">% will NOT be deleted.</sysmsg>
<sysmsg id="DEPNULL">You can't % an empty deployment.</sysmsg>
...
would appear as follows in Spanish:
<!-- Labels -->

CitectSCADA Web Client 31
<span id="TITLE">Despliegue del Cliente Web CitectSCADA</span>
<span id="SYSMSG">Mensajes del Sistema</span>
<span id="DEP">Despliegue</span>
<span id="DESC">Descripción</span>
<span id="ACTION">Acción</span>
<!-- Messages -->
<sysmsg id="DELOK">% eliminado.</sysmsg>
<sysmsg id="DELCAN">% NO será eliminado.</sysmsg>
<sysmsg id="DEPNULL">No puede % un despliegue vacío.</sysmsg>
Once you have completed translating the file and saved it with the appropriate name to the locales folder, your Web Server will be able to support the language.
Note: When you save your file, make sure the text editor you used saves the file in the appropriate format, i.e. ANSI or Unicode (UTF‐8).
Frequently Asked QuestionsThis section contains answers to frequently asked questions concerning the Web Client. One section is dedicated to issues pertaining to Windows 2003 Server, and the other to general issues.
Windows 2003 Server-related issuesThis section describes issues relating to the Windows 2003 server product.
Q. My Web Client Deployment Page displays incorrectly on Windows 2003 Server: Show Server Details is missing and the icons for Start Display Client, Delete Deployment, and Edit Deployment are also missing. How do I fix this?
A: There are two problems that could be occuring here:
When IIS 6.0 is installed, it defaults to a secure ʺlockedʺ mode, meaning it can serve up only static content. ASP, ASP.NET, and FrontPage Server Extensions are all disabled and have to be explicitly and separately enabled. The CitectSCADA Web Server needs ASP enabled on the IIS.
To enable ASP for IIS6 on Windows 2003 Server:
1 Choose Start|Control Panel, then double‐click Add or Remove Programs.
2 In the Add or Remove Programs dialog box, click Add/Remove Windows Components.
3 In the Windows Components Wizard dialog box, select Application Server, and then click Details.

CitectSCADA Web Client32
4 In the Application Server dialog box, select Internet Information Services (IIS) and click Details.
5 In the Internet Information Services (IIS) dialog box, select World Wide Web Service and click Details.
6 In the World Wide Web Service dialog box, make sure Active Server Page is selected.
On Windows 2003 Server, the default setting is to have all the web locations except localhost as an untrusted site. Consequently you must modify your browser’s security settings.
To update your Trusted Sites settings for Winodws 2003 Server:
1 Choose Tools|Internet Options.
2 Click the Security tab and then Trusted Sites|Sites.
3 In Add this Web site to the zone field, add the web serverʹs IP address as follows:http://<ip address>
Note: If you experience further problems on your Web Client pages, you may want to verify your security settings even if you are not running Windows 2003 Server.
Q: When I try to start the Web Client, I get the error message “Starting Citect Web Client Failed: Can not initialize citect system”, and then the Web Client fails. How do I correct this?
A: You should firstly check that you haven’t accidentally deleted the #DisplayClient folder from the installed Web Server directory, as this will cause this error. By default, this directory will be located at:
C:\Program Files\Citect\CitectSCADA\WebServer\Deploy\#DisplayClient
If this is not the case, this issue is due to a MIME configuration problem: the initialization files are not being recognized in Windows 2003 as registered file extensions. To correct this, you must add the correct MIME type extension by doing the following:
1 Run the IIS manager and go to Web Sites|Default Web Site|Citect SCADA|deploy|(Deployed project directory).
2 Choose Properties from the folder’s right‐click menu.
3 Go to HTTP Headers|MIME types.
4 Add the MIME type (File Extension) “.*”
5 Restart your Web server and client.

CitectSCADA Web Client 33
General issuesThis section describes general issues relating to the Web Client product.
Q. When I try to run a deployment in Internet Explorer, I get the following error: “Problems with this page might prevent it from being displayed properly...”. What is the problem?
A. The actual cause of this problem stems from the process of downloading the client component (the .cab file) associated with the deployment. If the current user on the client computer does not have Windows’ local administrator rights when the download takes place, this error message will appear.
The solution is to ensure that the person who runs a deployment for the first time is a Windows local administrator on the client machine. Once the components have been downloaded, the problem will not reoccur and any user can access the deployment; unless the .cab file is updated and a newer version must be downloaded.
Q. I deployed a project from within CitectSCADA using the appropriate Citect.ini [WebServer] parameters, but the project has not appeared in the list of deployments on the Web Server. A dialog informed me that the deployment was successful, what has happened?
A. This problem can occur if you make an error with the syntax for the [WebServer]DeployRoot parameter. If, for example, you use a curly bracket instead of a square bracket, i.e.“[WebServer}DeployRoot”, the compiler cannot read the parameter and deployment files are sent to the CitectSCADA project directory instead:
C:\Program Files\Citect\CitectSCADA\User\<Project Name>
The deployment is flagged as successful, but it cannot be located by the Web Server.
You should check the location above for evidence of this problem, as a subfolder called ʺWeb Deployʺ will have appeared. If this is the case, you should review the syntax used in your Citect.ini file.
Q. I deleted a user from the list of users configured for access to the Web Server, but they were still able to log in. How do I deny them access?
A. In certain circumstances, a user can connect to the Web Server even after the user account has been deleted. This is due to the operating system failing to acknowledge that a user has been deleted for a period of around half an hour.
The solution to this problem is to ensure you deny full access to the user before you delete them. That way, they won’t be able to gain access.
Q. When I try to run the Web Client component for the first time, I get a “System Settings Change” message instructing me to restart my computer. What should I do?
CitectSCADA Web Client34
A. This is a known problem affecting computers that contain old versions of some system files required by the Web Client Control. If these files are in use by another application during installation, this System Settings Change message will appear. Simply click the OK button to restart your machine, and this will allow the newer versions of the required files to be installed during system reboot. The problem will no longer occur.
Q. One of the ActiveX Object’s included in my project cannot locate its associated data source. Where is it?
A. If an ActiveX object has an associated data source, you need to ensure the data source can be located by the computer hosting the Web Client. See the topic Managing associated data sources for more information.
Q. The Process Analyst interface normally displays in a foreign language as I translated the language resource DLL, but it displays in English on the Web Client platform. How do I correct this?
A. A Process Analyst running inside a CitectSCADA Web Client supports run time language switching, but you must configure which languages the Web Client will download to the client machine.
To configure the languages to download:
1 Create a zip file in the CitectSCADA \bin folder called bin.zip.
2 Add to the zip file all the language resource DLL files that you want the client to download and use. (You can find these files in your \Program Files\Common Files\Citect folder.)
Note: The bin.zip file and its contents are not version‐checked. This means you must manually remove the bin.zip from the Web Client machines if your server contains a more recent bin.zip file. To do this:
1 Find the installation directory of the Analyst.dll file on your Web Client machines and look for a file called bin.zip in this directory.
2 Delete this file.
3 Reconnect to the Web server to download the latest bin.zip file.
Q. I have keyboard shortcuts configured in my CitectSCADA project, but they do not work properly when the project is deployed in the Web Client. What’s wrong?
A. The keyboard shortcuts configured for Internet Explorer (IE) take precedence over any keyboard shortcuts configured within your CitectSCADA projects. For example, the CSV_Example project has F11 assigned to call up help on a selected animation point on a graphics page. If the project is run as a Web Client deployment, F11 will toggle the view to full screen, as is the case normally with IE.

CitectSCADA Web Client 35
This is unfortunately a limitation of using Internet Explorer as a host to CitectSCADA projects. The easiest solution to the problem is to return to the CitectSCADA configuration environment and assign your shortcuts so that no clashes occur. See the Internet Explorer Help for details of preconfigured keyboard shortcuts.
Q. I can’t print from the Web Client. Why not?
A. You can print from the Web Client, but not by using your browser’s File | Print command. Instead, in your CitectSCADA project, create a Print control that uses the Cicode WinPrint() function to print the page you want.
Q. The new page that I added to my CitectSCADA project does not appear in the Page Select list or the default menu page in the Web Client. How can I correct this?
A: If the page you added to your CitectSCADA project does not appear in Web Client, you can manually type in the page name in the Page Select list to view this new page. In this version of the Web Client, the new page is not added to the default menu page.
Q. How does the Web Client deal with ActiveX controls (for example, CiMeterX.ocx) and user files (Recipes.dbf, for example) that are required by a user project?
A. If your user project requires files such as these, you need to create special zip files to contain them. Create an ActiveX.zip file to contain the ActiveX files required by your project, and a Misc.zip file to contain other files that your project needs; for example, recipes.dbf, Chinese.dbf, Japan.dbf, and so on. Add these files under the main project path (for example, C:\Program Files\Citect\CitectSCADA\User\Example).
Note: You can have subfolders within the zip files, but your project must be configured to use the same relative path structure.
During compilation, any zip files that contain supporting files required by a CitectSCADA project are copied to the Webdeploy subfolder. During startup, the Web Client will check the timestamp of any zip files to determine if the zip files have been updated; if the files have been updated, the zip files will be downloaded.
Q. The Web Client Deployment Page displays incorrectly on Windows 2000 Advanced Server. ʹShow Server Detailsʹ is missing, and the icons for Start Display Client, Delete Deployment and Edit Deployment are also missing. What is wrong?
A. This appears to be caused by Windows Automatic Update installing a number of components at the same time after a fresh install of the operating system. Even though Internet Explorer may have been upgraded to the latest version (for example, 6.0.2800.1106) it may still behave as a version 5 browser;

CitectSCADA Web Client36
for example, it offers limited support for ʺiframesʺ. If you call up About Internet Explorer from the Help menu, and a Version 5‐style dialog appears with a version 6 release number, then your computer is affected in this way.
A complete uninstall/reinstall of Internet Explorer will correct the problem.

Appendix A: Windows Language Codes
code Windows locale setting code Windows locale settingaf Afrikaans hu Hungariansq Albanian is Icelandicar-sa Arabic (Saudi Arabia) id Indonesianar-iq Arabic (Iraq) it Italian (Standard) ar-eg Arabic (Egypt) it-ch Italian (Switzerland)ar-ly Arabic (Libya) ja Japanesear-dz Arabic (Algeria) ko Koreanar-ma Arabic (Morocco) ko Korean (Johab)ar-tn Arabic (Tunisia) lv Latvianar-om Arabic (Oman) lt Lithuanianar-ye Arabic (Yemen) mk FYRO Macedonianar-sy Arabic (Syria) ms Malaysianar-jo Arabic (Jordan) mt Maltesear-lb Arabic (Lebanon) no Norwegian (Bokmal)ar-kw Arabic (Kuwait) no Norwegian (Nynorsk)ar-ae Arabic (U.A.E.) pl Polishar-bh Arabic (Bahrain) pt-br Portuguese (Brazil)ar-qa Arabic (Qatar) pt Portuguese (Portugal)eu Basque rm Rhaeto-Romanicbg Bulgarian ro Romanianbe Belarusian ro-mo Romanian (Moldavia)ca Catalan ru Russian zh-tw Chinese (Taiwan) sz Sami (Lappish)zh-cn Chinese (PRC) sr Serbian (Cyrillic) zh-hk Chinese (Hong Kong SAR) sr Serbian (Latin) zh-sg Chinese (Singapore) sk Slovak hr Croatian sl Sloveniancs Czech sb Sorbian da Danish es Spanish (Traditional)nl Dutch (Standard) es-mx Spanish (Mexico)nl-be Dutch (Belgium) es-gt Spanish (Guatemala)en English es-cr Spanish (Costa Rica)en-us Englsih (United States) es-pa Spanish (Panama) en-gb English (United Kingdom) es-do Spanish (Dominican Republic)
Appendix A: Windows Language Codes38
en-au English (Australian) es-ve Spanish (Venezuela) en-ca English (Canada) es-co Spanish (Colombia) en-nz English (New Zealand) es-pe Spanish (Peru) en-ie English (Ireland) es-ar Spanish (Argentina)en-za English (South Africa) es-ec Spanish (Ecuador)en-jm English (Jamaica) es-cl Spanish (Chile) en English (Caribbean) es-uy Spanish (Uruguay)en-bz English (Belize) es-bo Spanish (Bolivia)en-tt English (Trinidad) es-sv Spanish (El Salvador) et Estonian es-hn Spanish (Honduras)fo Faeroese es-ni Spanish (Nicaragua)fa Farsi es-pr Spanish (Puerto Rico)fi Finnish sx Sutu fr French (Standard) sv Swedishfr-be French (Belgium) sv-fi Swedish (Finland) fr-ca French (Canada) th Thaifr-ch French (Switzerland) ts Tsongafr-lu French (Luxembourg) tn Tswanagd Gaelic (Scotland) tr Turkishgd-ie Gaelic (Ireland) uk Ukrainiande German (Standard) ur Urdude-ch German (Switzerland) vg Valley Girlde-at German (Austria) ve Vendade-lu German (Luxembourg) vi Vietnamesede-li German (Liechtenstein) xh Xhosael Greek ji Yiddishhe Hebrew zu Zuluhi Hindi
code Windows locale setting code Windows locale setting
IndexAActiveX.zip, 17Administrator
Web Client, 7
Cconfiguring
Web Client deployment, 19creating
Web Client deployment, 20
Ddefault languages for Web Client, 28deployment for Web Client
configuring, 19creating, 20deleting, 27displaying, 25editing, 25from CitectSCADA, 23updating, 26
Display ClientWeb Client, 7
FFAQs
Web Client, 31frequently asked questions
Web Client, 31functionality limitations, 16
Iinstallation
Web Client, 3
Llanguages
Web Client, 27limitations
Cicode functions, 16
functionality, 16logging on to Web Server, 14
MManager Client
Web Client, 7Misc.zip file, 17multiple language support for Web Client, 27
non‐default languages, 29
Ppreparing a project for Web Client deployment, 15
Ssecurity
configuring Web Client user groups, 9preparing the Web Server folder, 10settting up Web Client accounts, 13testing Web Client settings, 14Web Client, 7Web Client setup, 8
software requirementsWeb Client, 4
Uunsupported functionality, 16users
Web Client, 7
WWeb Client, 1
ActiveX.zip file, 17Administrator, 7client account access rights, 13configuring a deployment, 19configuring client account user groups, 9creating a deployment, 20default languages, 28deleting a deployment, 27Deploy folder, 4deploying a project from CitectSCADA, 23Display Client, 7DisplayClient folder, 4

40 Index
displaying a deployment, 25editing a deployment, 25frequently asked questions, 31functionality limitations, 16Getting Started, 1implementing non‐default langauges, 29installed directories, 4installing, 3introduction, 1logging on to Web Server, 14Manager Client, 7minimum requirements, 3Misc.zip file, 17multiple language support, 27preparing a project for deployment, 15preparing the Web Server folder, 10
preparing user files for delivery, 17security, 7setting up a system, 1setting up access rights, 13setting up security, 8system architecture, 2testing security, 14updating a deployment, 26user account types, 7using a different language to the locale setting, 28Web Deployment Preparation tool, 18Web Server address, 14
Web Deployment Preparation tool, 18Web Server
address, 14