faculty of engineering - foe.mmu.edu.myfoe.mmu.edu.my/lab/lab sheet/trim 1/epsilon/eee3106/eee3106...
TRANSCRIPT

I
FACULTY OF ENGINEERING
LAB SHEET
EEE3106
PROCESSING AND FABRICATION
TECHNOLOGY
TRIMESTER 2 2013/2014
PFTI - NMOS Processing Simulation
PFT2 - PMOS Processing Simulation
*Note: On-the-spot evaluation will be carried out during or at the end of the experiments.
Questions regarding metal oxide semiconductor (MOS) device processing and fabrication,
as well as device simulation will be asked during the evaluation. Students are advised to read through this lab sheet before doing experiment. Your
individual performance during on-the-spot evaluation, participation in the lab simulation work, teamwork effort, and learning attitude will count towards the lab marks, in addition
to the lab report. Please bring along your USB stick for data files saving purpose.

2
INTRODUCTION:
Complementary metal-oxide-semiconductor (CMOS) is a major class of integrated
circuits. CMOS technology is used in chips such as microprocessors, microcontrollers,
static RAM, and other digital logic circuits. CMOS technology is also used for a wide
variety of analog circuits such as image sensors, data converters, and highly integrated
transceivers for many types of communication. CMOS is also sometimes explained as
complementary-symmetry metal-oxide-semiconductor. The words "complementary-
symmetry" refer to the fact that the typical digital design style with CMOS uses
complementary and symmetrical pairs of p-type and n-type MOSFETs for logic functions.
Two important characteristics of CMOS devices are high noise immunity and low static
power supply drain. Significant power is only drawn when its transistors are switching
between on and off states; consequently, CMOS devices do not produce as much heat as
other forms of logic such as TTL (transistor-transistor logic). CMOS also allows a high
density of logic functions on a chip.
In this simulation, the fundamentals of MOS chip fabrication will be discussed and the
major steps of the process flow will be examined. The emphasis will be on the general
outline of the process flow and on the interaction of various processing steps, which
ultimately determine the device and the circuit performance characteristics. This
simulation shows that there are very strong links between the fabrication process and the
device performance. Hence, the circuit designer must have a working knowledge of chip
fabrication to create effective designs and to optimize the circuits with respect to various
manufacturing parameters.
The following discussion will concentrate on the well-established CMOS fabrication
technology, which requires that both the n-channel (nMOS) and p-channel (pMOS)
transistors be built on the same chip substrate. To accommodate both nMOS and pMOS
devices, special regions must be created in which the semiconductor type is opposite to
the substrate type. These regions are called wells or tubs. A p-well is created in an n-type
substrate or, alternatively, an n- well is created in a p-type substrate. In the simple n-well
CMOS fabrication technology presented, the nMOS transistor is created in the p-type
substrate, and the pMOS transistor is created in the n-well, which is built-in into the p-
type substrate. In the twin-tub CMOS technology, additional tubs of the same type as the
substrate can also be created for device optimization.
The simplified process sequence for the fabrication of CMOS integrated circuits on a p-
type silicon substrate is shown in Fig. 1. The process starts with the creation of the n-well
regions for pMOS transistors, by impurity implantation into the substrate. Then, a thick
oxide is grown in the regions surrounding the nMOS and pMOS active regions. The thin
gate oxide is subsequently grown on the surface through thermal oxidation. These steps
are followed by the creation of n+ and p+ regions (source, drain and channel-stop
implants) and by final metallization (creation of metal interconnects).

3
Figure-l: Simplified process sequence for fabrication of the n-well CMOS integrated
circuit with a single polysilicon layer, showing only major fabrication steps.
The process flow sequence pictured in Fig.l may at first seem to be too abstract, since
detailed fabrication steps are not shown. To obtain a better understanding of the issues
involved in the semiconductor fabrication process, we first have to consider some of the
basic steps in more detail.
Fabrication Process Flow - Basic Steps
The integrated circuit may be viewed as a set of patterned layers of doped silicon,
polysilicon, metal and insulating silicon dioxide. In general, a layer must be patterned
before the next layer of material is applied on chip. The process used to transfer a pattern
to a layer on the chip is called lithography. Since each layer has its own distinct
patterning requirements, the lithographic sequence must be repeated for every layer,
using a different mask.

4
To illustrate the fabrication steps involved in patterning silicon dioxide through optical
lithography, let us first examine the process flow shown in Fig. 2. The sequence starts
with the thermal oxidation of the silicon surface, by which an oxide layer of about I
micrometer thickness, for example, is created on the substrate (Fig. 2(b)). The entire
oxide surface is then covered with a layer of photoresist, which is essentially a light-
sensitive, acid-resistant organic polymer, initially insoluble in the developing solution
(Fig. 2(c)). If the photoresist material is exposed to ultraviolet (UV) light, the exposed
areas become soluble so that they are no longer resistant to etching solvents. To
selectively expose the photoresist, we have to cover some of the areas on the surface with
a mask during exposure. Thus, when the structure with the mask on top is exposed to UV
light, areas which are covered by the opaque features on the mask are shielded. In the
areas where the UV light can pass through, on the other hand, the photoresist is exposed
and becomes soluble (Fig. 2(d)).

5
Figure-2: Process steps required for patterning of silicon dioxide.
The type of photoresist which is initially insoluble and becomes soluble after exposure to
UV light is called positive photoresist. The process sequence shown in Fig. 2 uses
positive photoresist. There is another type of photoresist which is initially soluble and
becomes insoluble (hardened) after exposure to UV light, called negative photoresist. If
negative photoresist is used in the photolithography process, the areas which are not
shielded from the UV light by the opaque mask features become insoluble, whereas the
shielded areas can subsequently be etched away by a developing solution. Negative
photoresists are more sensitive to light, but their photolithographic resolution is not as
high as that of the positive photoresists. Therefore, negative photoresists are used less
commonly in the manufacturing of high-density integrated circuits.
Following the UV exposure step, the unexposed portions of the photoresist can be
removed by a solvent. Now, the silicon dioxide regions which are not covered by
hardened photoresist can be etched away either by using a chemical solvent (HF acid) or
by using a dry etch (plasma etch) process (Fig. 2(e)). Note that at the end of this step, we
obtain an oxide window that reaches down to the silicon surface (Fig. 2(f)). The
remaining photoresist can now be stripped from the silicon dioxide surface by using
another solvent, leaving the patterned silicon dioxide feature on the surface as shown in
Fig. 2(g).

6
The sequence of process steps illustrated in detail in Fig. 2 actually accomplishes a single
pattern transfer onto the silicon dioxide surface, as shown in Fig. 3. The fabrication of
semiconductor devices requires several such pattern transfers to be performed on silicon
dioxide, polysilicon, and metal. The basic patterning process used in all fabrication steps,
however, is quite similar to the one shown in Fig. 2. Also note that for accurate
generation of high-density patterns required in sub-micron devices, electron beam (E-
beam) lithography is used instead of optical lithography. In the following section, the
main processing steps involved in the fabrication of an n-channel MOS transistor on p-
type silicon substrate will be examined.
Figure-3: The result of a single lithographic patterning sequence on silicon
dioxide, without showing the intermediate steps. Compare the unpatterned structure (top)
and the patterned structure (bottom) with Fig. 2(b) and Fig. 2(g), respectively.
The process starts with the oxidation of the silicon substrate (Fig. 4(a)), in which a relatively thick silicon dioxide layer, also called field oxide, is created on the surface (Fig. 4(b)). Then, the field oxide is selectively etched to expose the silicon surface on which the MOS transistor will be created (Fig. 4(c)). Following this step, the surface is covered with a thin, high-quality oxide layer, which will eventually form the gate oxide of the MOS transistor (Fig. 4(d)). On top of the thin oxide, a layer of polysilicon (polycrystalline silicon) is deposited (Fig. 4(e)). Polysilicon is used both as gate electrode material for MOS transistors and also as an interconnect medium in silicon integrated circuits. Undoped polysilicon has relatively high resistivity. The resistivity of polysilicon can be reduced, however, by doping it with impurity atoms.
After deposition, the polysilicon layer is patterned and etched to form the interconnects
and the MOS transistor gates (Fig. 4(f)). The thin gate oxide not covered by polysilicon is
also etched away, which exposes the bare silicon surface on which the source and drain
junctions are to be formed (Fig. 4(g)). The entire silicon surface is then doped with a high
concentration of impurities, either through diffusion or ion implantation (in this case with
donor atoms to produce n-type doping). Figure 4(h) shows that the doping penetrates the

7
exposed areas on the silicon surface, ultimately creating two n-type regions (source and
drain junctions) in the p-type substrate. The impurity doping also penetrates the
polysilicon on the surface, reducing its resistivity. Note that the polysilicon gate, which is
patterned before doping actually defines the precise location of the channel region and,
hence, the location of the source and the drain regions. Since this procedure allows very
precise positioning of the two regions relative to the gate, it is also called the self-aligned
process.
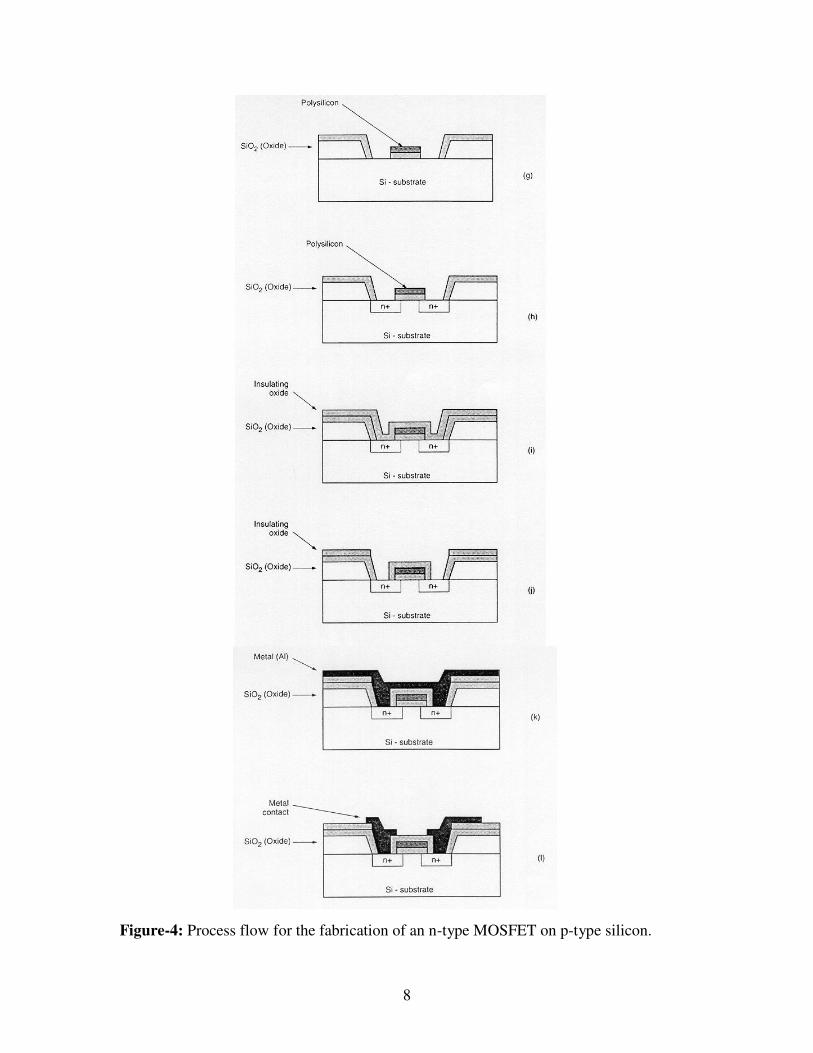
Figure-4: Process flow for the fabrication of an n-type MOSFET on p-type silicon.
8

9
Once the source and drain regions are completed, the entire surface is again covered with
an insulating layer of silicon dioxide (Fig. 4(i)). The insulating oxide layer is then
patterned in order to provide contact windows for the drain and source junctions (Fig. 4(j)). The surface is covered with evaporated aluminum which will form the interconnects (Fig. 2.4(k)). Finally, the metal layer is patterned and etched, completing the interconnection of the MOS transistors on the surface (Fig. 4(l)). Usually, a second (and third) layer of metallic interconnect can also be added on top of this structure by creating another insulating oxide layer, cutting contact (via) holes, depositing, and patterning the metal.
The schematic cross-section of a simple CMOS inverter circuit constituted by an n-
channel MOS transistor and a p-channel MOS transistor is shown in Fig. 5 below. The
CMOS integrated circuit can be accomplished by fabricating the n-channel and p-channel
MOS devices on the same substrate, following the fabrication processes discussed in Fig. 1-4.
Figure-5: Schematic cross-section of a CMOS inverter constituted by an n-channel MOS
transistor and a p-channel MOS transistor.
References:
1. Houda Graoui and Amir Al-Bayati, Accuracy of Doping and Process Optimization
for 0.18um PMOS technology, IEEE. Ion Implantation Tech., pg.189-192, 2002.
2. W. Maly, Atlas of IC Technologies, Menlo Park, CA: Benjamin/Cummings, 1987.
3. A. S. Grove, Physics and Technology of Semiconductor Devices, New York, NY:
John Wiley & Sons, Inc., 1967.
4. G. E. Anner, Planar Processing Primer, New York, NY: Van Nostrand Rheinhold,
1990.
5. T. E. Dillinger, VLSI Engineering, Englewood Cliffs, NJ: Prentice-Hall, Inc., 1988.
6. S.M. Sze, VLSI Technology, New York, NY: McGraw-Hill, 1983.
10
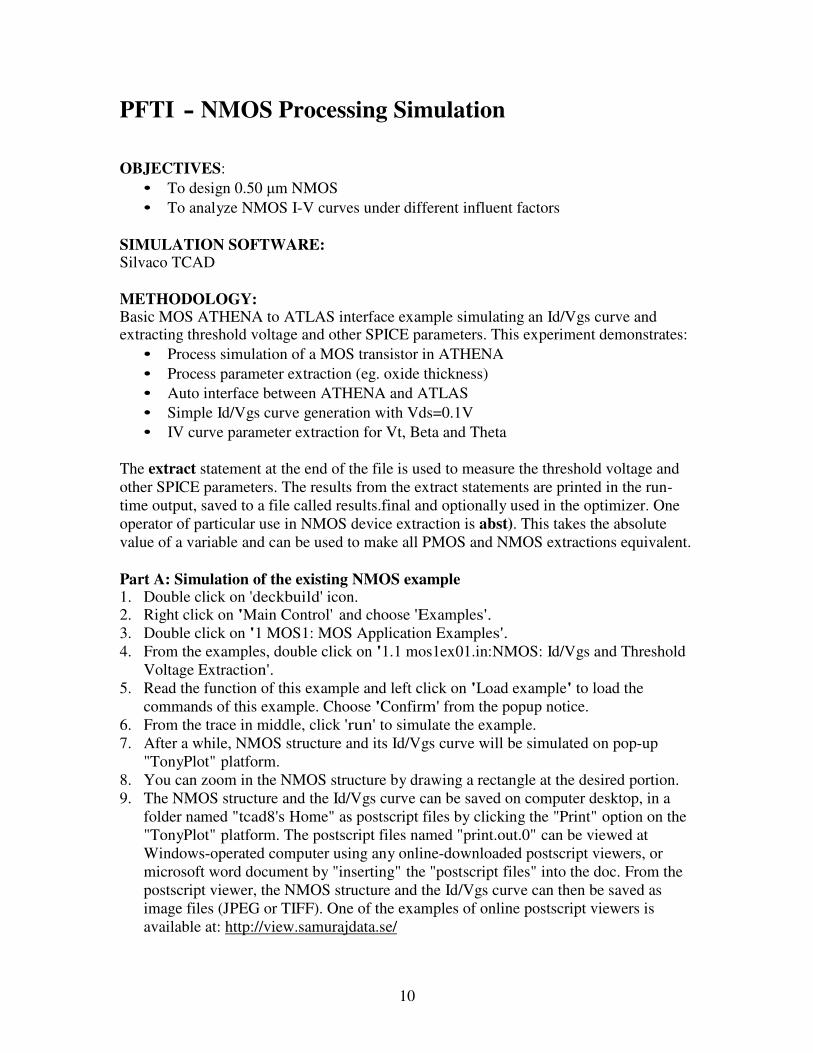
PFTI - NMOS Processing Simulation
OBJECTIVES:
• To design 0.50 µm NMOS
• To analyze NMOS I-V curves under different influent factors
SIMULATION SOFTWARE: Silvaco TCAD
METHODOLOGY: Basic MOS ATHENA to ATLAS interface example simulating an Id/Vgs curve and extracting threshold voltage and other SPICE parameters. This experiment demonstrates:
• Process simulation of a MOS transistor in ATHENA
• Process parameter extraction (eg. oxide thickness)
• Auto interface between ATHENA and ATLAS
• Simple Id/Vgs curve generation with Vds=0.1V
• IV curve parameter extraction for Vt, Beta and Theta
The extract statement at the end of the file is used to measure the threshold voltage and
other SPICE parameters. The results from the extract statements are printed in the run-
time output, saved to a file called results.final and optionally used in the optimizer. One
operator of particular use in NMOS device extraction is abst). This takes the absolute
value of a variable and can be used to make all PMOS and NMOS extractions equivalent.
Part A: Simulation of the existing NMOS example 1. Double click on 'deckbuild' icon. 2. Right click on 'Main Control' and choose 'Examples'.
3. Double click on '1 MOS1: MOS Application Examples'.
4. From the examples, double click on '1.1 mos1ex01.in:NMOS: Id/Vgs and Threshold
Voltage Extraction'.
5. Read the function of this example and left click on 'Load example' to load the
commands of this example. Choose 'Confirm' from the popup notice.
6. From the trace in middle, click 'run' to simulate the example.
7. After a while, NMOS structure and its Id/Vgs curve will be simulated on pop-up
"TonyPlot" platform.
8. You can zoom in the NMOS structure by drawing a rectangle at the desired portion.
9. The NMOS structure and the Id/Vgs curve can be saved on computer desktop, in a
folder named "tcad8's Home" as postscript files by clicking the "Print" option on the
"TonyPlot" platform. The postscript files named "print.out.0" can be viewed at
Windows-operated computer using any online-downloaded postscript viewers, or
microsoft word document by "inserting" the "postscript files" into the doc. From the
postscript viewer, the NMOS structure and the Id/Vgs curve can then be saved as
image files (JPEG or TIFF). One of the examples of online postscript viewers is
available at: http://view.samurajdata.se/

11
10. In your report, sketch the Id/Vgs curves. The raw data of Id/Vgs curve can be
obtained from the "tcad8's Home" folder, from a file with ".log" extension. 11. In your report, record the extraction values from the 'result.final' file. (eg. gate oxide
thickness, Vt)
Part B: Effects of different influent factors on NMOS structure and Ids/Vgs curve
Bl. Effects of Source/Drain Concentration
1. In ANTHENA, change S/D concentration to 5e12cm-3
#S/D implant
implant arsenic dose=5.0e15 energy=50 pearson implant
2. Click on "run" button to start simulation.
3. Save the simulated structure and graph generated
4. Repeat step 2 and 4 with S/D concentration of 8e17 cm-3
5. Compare and discuss the structure, Id-VgS curve simulated
B2. Effects of Threshold Voltage Adjust Implant Concentration
1. In ANTHENA, alter the Vt adjust concentration to 9.5e10cm-3
#vt adjust implant
implant boron dose=9.5e11 energy=10 pearson boron
2. Click on "run" button to start simulation.
3. Save the simulated structure and graph generated
4. Repeat step 2 and 4 with Vt adjust implant concentration of 9.5e12 cm-3
5. Compare and discuss the structure, Id-VgS curve simulated

12
PFT2 - PMOS Processing Simulation
OBJECTIVES:
• To design 0.50 µm PMOS
• To analyze PMOS I-V curves under different influent factors
SIMULATION SOFTWARE: Silvaco TCAD
METHODOLOGY: Basic MOS ATHENA to ATLAS interface example simulating an Id/Vgs curve and extracting threshold voltage and other SPICE parameters. This experiment demonstrates:
• Process simulation of a MOS transistor in ATHENA
• Process parameter extraction (eg. oxide thickness)
• Auto interface between ATHENA and ATLAS
• Simple Id/Vgs curve generation with Vds=-0.1V
• IV curve parameter extraction for Vt, Beta and Theta
The extract statement at the end of the file is used to measure the threshold voltage and
other SPICE parameters. The results from the extract statements are printed in the run-
time output, saved to a file called results.final and optionally used in the optimizer. One
operator of particular use in PMOS device extraction is abst). This takes the absolute
value of a variable and can be used to make all PMOS and NMOS extractions equivalent.
Part A: Simulation of the existing PMOS example 1. Double click on 'deckbuild' icon. 2. Right click on 'Main Control' and choose 'Examples'.
3. Double click on '1 MOS1: MOS Application Examples'.
From the examples, double click on '1.8 mos1ex08.in:PMOS: Id/Vgs and Threshold
Voltage Extraction'.
4. Read the function of this example and left click on 'Load example' to load the
commands of this example. Choose 'Confirm' from the pop-up notice.
5. From the trace in middle, click 'run' to simulate the example.
6. After a while, PMOS structure and its Id/Vgs curve will be simulated on pop-up
"TonyPlot" platform.
7. You can zoom in the PMOS structure by drawing a rectangle at the desired portion.
8. The PMOS structure and the Id/Vgs curve can be saved on computer Desktop, in a
folder named "tcad8's Home" as postscript files by clicking the "Print" option on the
"TonyPlot" platform. The postscript files named "print.out.0" can be viewed at
Windows-operated computers using any online-downloaded postscript viewers, or
microsoft word document by "inserting" the "postscript files" into the doc. From the
postscript viewer, the PMOS structure and the Id/Vgs curve can then be saved into
image files (JPEG or TIFF). One of the examples of online postscript viewers is
available at: http://view.samurajdata.se/
13
9. In your report, sketch the Id/Vgs curves. The raw data of Id/Vgs curve can be obtained
from the "tcad8's Home" folder, from a file with ".log" extension. 10. In your report, record the extraction value from the 'result.final' file. (eg. gate oxide
thickness, Vt)
Part B: Effects of different influent factors on PMOS structure and Ids/Vgs curve
Bl: Effect of the doping concentration of phosphorus in silicon 1. Scroll down the PMOS commands until you find the lines below:
# Start off by defining silicon with 1e14 phos doping.
# Decrease the following space.mult parameter for a denser
# mesh and more accuracy...
init orientation=100 c.phos=1e14 space.mult=2
2. In the last line of the above commands, change the value of c.phos to 1e15, for
example, 'c.phos=1e15'.
3. Simulate the newly created PMOS commands and notify the changes on both PMOS
structure and Ids/Vgs curve.
4. Repeat step 2 and 3 for different doping.
B2: Effect of the BF2 dose in PLDD implant amorphous 1. Look for the commands below:
# PLDD implant amorphous
implant amorphous bf2 dose=2.0e14 energy=50 pearson
2. Change bf2dose=2.0e14 to 2.0e16, for example 'bf2 dose=2.0e16'
3. Simulate the newly created PMOS commands and notify the changes on both PMOS
structure and Ids/Vgs curve.
4. Repeat step 2 and 3 for different bf2 dose.
Part C: Device design and evaluation of NMOS/PMOS with different dimensions
1. You should carry out preparation work including literature reviews and trial
simulations prior to the PFT2 lab session, so that you can deliver a more efficient
device design of the NMOS (n-channel MOSFET) or PMOS (p-channel MOSFET)
within the lab session of the PFT2.
2. You are required to design and simulate a 0.30 µm NMOS or PMOS.
3. You are expected to evaluate the performance of a 0.30 µm NMOS or PMOS in
terms of device characteristics such as subthreshold slope, threshold voltage and
charge carrier mobility. 4. Based on your evaluations, compare the device performance of the 0.30 µm NMOS
or PMOS with that of a 0.50 µm NMOS or PMOS.
5. Compare and discuss your results.

Marking Scheme
Lab (10%)
Assessment Components
Details
Hands-On & Efforts (20%)
The hands-on capability of the students and their efforts during the lab sessions will be assessed.
On the Spot Evaluation (20%)
The students will be evaluated on the spot based on the laboratory experiments and the observations on the
device characteristics.
Lab Report PFT1 & PFT2
combined (60%)
Each student will have to submit his/her lab final report within 10 days of performing the lab experiment PFT2.
The report should cover the followings:
1. Introduction, which includes background
information on monolithic integrated MOSFETs
processing and device simulation.
2. Experimental section, which includes the general
summary of the lab experiment work in PFT1
and PFT2.
3. Results and Discussions, which include the
device simulation results, analysis, and
evaluations, with neat graphs/images of the
results and recorded data, as well as the
discussion on the device design of the 0.30 and
0.50 µm MOSFETs.
4. Conclusion, which includes a conclusion on the
experimental and design work. 5. List of References, which includes all the
technical references cited throughout the entire lab report.
The report must have references taken from online
scientific journals (e.g. www.sciencedirect.com,
http://ieeexplore.ieee.org/xpl/periodicals.jsp,
http://www.aip.org/pubs/) and/or conference
proceedings (e.g.
http://ieeexplore.ieee.org/xpl/conferences.jsp).
Format of references: The references to scientific
journals and text books should follow the following
standard format:
Examples:
[1] William K, Bunte E, Stiebig H, Knipp D,
Influence of low temperature thermal annealing on
the performance of microcrystalline silicon thin-film
transistors, Journal of Applied Physics, 2007, 101, p.
074503.
14
[2] Hodges DA, Jackson HG, Analysis and design of
digital integrated circuits, New York, McGraw-Hill
Book Company, 1983, p. 76.
Reports must be typed and single-spaced, and adopt a
12-point Times New Roman font for normal texts in the
report.
Any student found plagiarizing their reports will have
the assessment marks for this component (6%) forfeited.
The lab report has to be submitted to the
Nanotechnology lab staff. Please make sure you sign the
student list for your submission. No plagiarism is
allowed. Though the transistor structures and the
Ids/Vgs curves for the students from the same group can
be similar, the report write-up cannot be duplicated for
group members. Please make sure you join/form the
same group for both lab sessions (PFT1 and PFT2). The
single report presenting PFT1 and PFT2 lab experiments
has to be submitted within 10 days from the date of your
lab session for the PFT 2. No late submission is allowed
(strictly).
15