exacqvision web service - exacq technologies
TRANSCRIPT

exacqVision Web Service
User Manual (updated December 15, 2014)
Information in this document is subject to change without notice. © Copyright 2008-2014, Exacq Technologies, Inc. All rights reserved.
Exacq Technologies is a trademark of Exacq Technologies, Inc. Other trademarks and trade names may be used in this document to refer to either the entities claiming the marks and
names or their products. Exacq Technologies, Inc., disclaims any proprietary interest in trademarks and trade names other than its own.
Exacq Technologies makes no warranty of any kind with regard to this material, including, but not limited to, the implied warranties of merchantability and fitness for a particular purpose.
Exacq Technologies shall not be liable for errors contained herein or for incidental or consequential damages in connection with the furnishing, performance, or use of this manual.
Exacq Technologies, Inc.
11955 Exit Five Parkway, Bldg 3 Fishers, IN 46037 USA

www.exacq.com
Page 2 of 20 12/15/2014
Contents
1 OVERVIEW AND REQUIREMENTS ................................................................................................ 3
CLIENT REQUIREMENTS ............................................................................................................................ 4
CLIENT BANDWIDTH USAGE ..................................................................................................................... 4
HARDWARE RECOMMENDATIONS ........................................................................................................... 5
2 INSTALLING AND CONFIGURING THE EXACQVISION WEB SERVICE ............................................ 6
SERVERS .................................................................................................................................................... 7
BASIC SERVICE CONFIGURATION .............................................................................................................. 8
ADMINISTRATION CONFIGURATION......................................................................................................... 9
3 CONFIGURING YOUR EXACQVISION SERVER ............................................................................. 10
4 WEB BROWSER/THIN CLIENT ..................................................................................................... 11
PTZ CONTROL .......................................................................................................................................... 13
VIEWS ...................................................................................................................................................... 14
MAPS ....................................................................................................................................................... 15
SOFT TRIGGERS ....................................................................................................................................... 15
SEARCH AND PLAYBACK .......................................................................................................................... 16
EXPORTING.............................................................................................................................................. 18
5 ACTIVE DIRECTORY SUPPORT FOR WEB SERVICE ...................................................................... 19
ACTIVE DIRECTORY IN WINDOWS-BASED WEB SERVICE ........................................................................ 19
ACTIVE DIRECTORY/LDAP IN LINUX-BASED WEB SERVICE ...................................................................... 20

www.exacq.com
Page 3 of 20 12/15/2014
1 OVERVIEW AND REQUIREMENTS The exacqVision Web Service allows you to use a web browser to view live video, search and play back recorded video, and control pan/tilt/zoom functions on cameras connected to exacqVision servers. The Web Service connects to the exacqVision server as a client and transcodes captured video into JPEG files. The service then sends the JPEGs to the browser as fast as requested by the browser, or as fast as possible if the requested rate is too high for the connection. NOTE: The exacqVision Web Service is pre-installed on all exacqVision A Series and Z Series systems. It can also be installed on exacqVision ELX Series systems. (Do not install it on exacqVision EL Series systems.) The exacqVision Web Service works with browsers as shown in the following diagram:
The exacqVision Web Service is normally run as an integrated system on an exacqVision Server. Alternatively, a distributed system with a dedicated web server can be used for higher-capacity systems. Video can be viewed on the local network by using a web browser, over the Internet using a web browser, or on a mobile device using a mobile browser or exacqVision application.

www.exacq.com
Page 4 of 20 12/15/2014
CLIENT REQUIREMENTS
The Web Service client is supported on a wide variety of browsers and devices:
Firefox 3.6 or later
Internet Explorer 8 or later
Safari 4.0 or later
Opera 10.0 or later
iOS 4.2 or later
Android 2.2 or late
CLIENT BANDWIDTH USAGE
The following table is an estimate of client bandwidth usage when streaming video to web browsers and mobile devices. Actual bandwidth will vary based on the composition of the camera scene.
Device Resolution (device) # cams
in layout Quality FPS Frame size in KB
(each cam) Bandwidth
(Mb/s)
Smartphone 960x540 1 1 5 9 0.4
Smartphone 960x540 1 3 5 15 0.6
Smartphone 960x540 1 5 5 21 0.8
Smartphone 960x540 1 7 5 31 1.2
Smartphone 960x540 1 9 5 63 2.5
iPad 1024x768 1 1 5 16 0.6
iPad 1024x768 1 3 5 27 1.1
iPad 1024x768 1 5 5 39 1.5
iPad 1024x768 1 7 5 54 2.1
iPad 1024x768 1 9 5 110 4.3
PC browser 1920x1080 1 1 5 48 1.9
PC browser 1920x1080 1 3 5 80 3.1
PC browser 1920x1080 1 5 5 103 4.0
PC browser 1920x1080 1 7 5 133 5.2
PC browser 1920x1080 1 9 5 241 9.4
PC browser 1920x1080 1 10 5 720 28.1
PC browser 1920x1080 4 1 5 15 2.3
PC browser 1920x1080 4 3 5 26 4.1
PC browser 1920x1080 4 5 5 33 5.2
PC browser 1920x1080 4 7 5 45 7.0
PC browser 1920x1080 4 9 5 78 12.2
PC browser 1920x1080 4 10 5 216 33.8
NOTES:
The resolution of the camera is not relevant to the bandwidth. The Web Service resizes the image to fit the client device resolution.
The resolution of the device has more impact on bandwidth than the number of cameras. For example, a four-camera layout that fills all pixels requires about 20 percent more bandwidth than a one-camera layout (not 400 percent as might be expected).

www.exacq.com
Page 5 of 20 12/15/2014
HARDWARE RECOMMENDATIONS
The exacqVision Web Service uses a significant amount of computer resources to transcode video. Required resources increase in proportion to the number of simultaneous connections and the data rate of incoming video. Hardware upgrades might be necessary to support heavy Web Service workloads.
Performance Processor RAM Example exacqVision NVR
Minimum Intel Celeron 2GB exacqVision LC
Recommended Intel i3 4GB exacqVision A-Series
High performance Intel i7 8GB exacqVision Z-Series
www.exacq.com
Page 6 of 20 12/15/2014
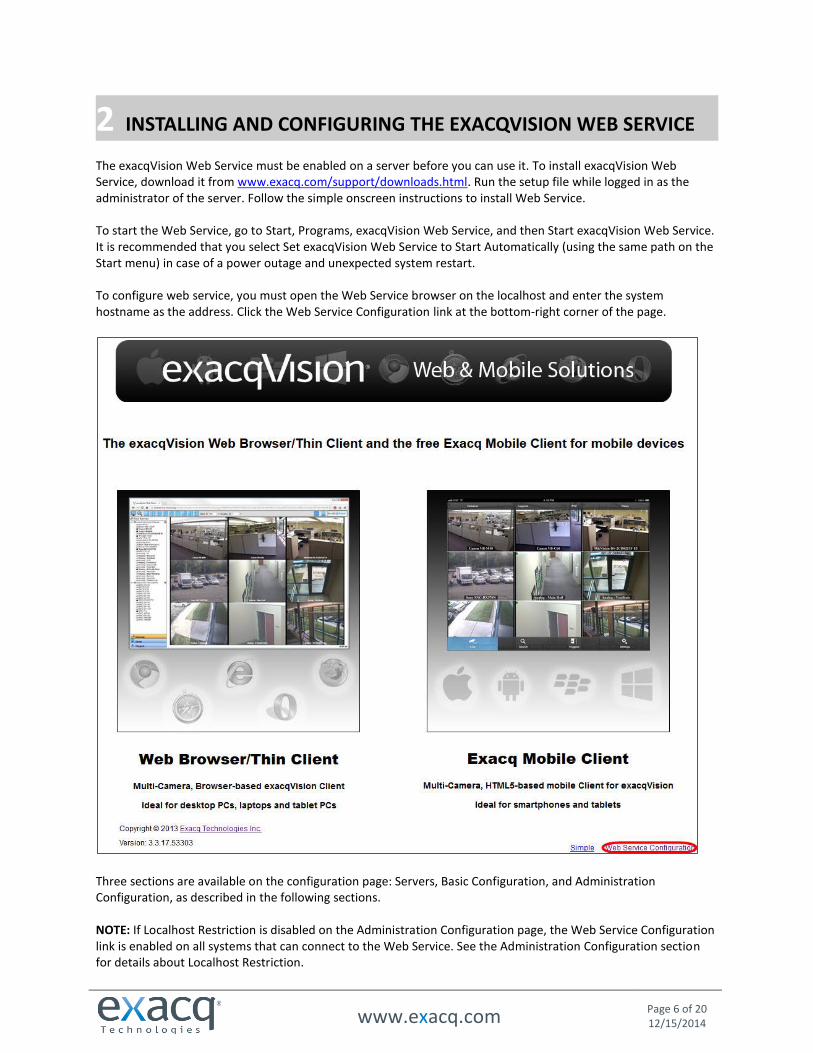
2 INSTALLING AND CONFIGURING THE EXACQVISION WEB SERVICE The exacqVision Web Service must be enabled on a server before you can use it. To install exacqVision Web Service, download it from www.exacq.com/support/downloads.html. Run the setup file while logged in as the administrator of the server. Follow the simple onscreen instructions to install Web Service. To start the Web Service, go to Start, Programs, exacqVision Web Service, and then Start exacqVision Web Service. It is recommended that you select Set exacqVision Web Service to Start Automatically (using the same path on the Start menu) in case of a power outage and unexpected system restart. To configure web service, you must open the Web Service browser on the localhost and enter the system hostname as the address. Click the Web Service Configuration link at the bottom-right corner of the page.
Three sections are available on the configuration page: Servers, Basic Configuration, and Administration Configuration, as described in the following sections. NOTE: If Localhost Restriction is disabled on the Administration Configuration page, the Web Service Configuration link is enabled on all systems that can connect to the Web Service. See the Administration Configuration section for details about Localhost Restriction.
www.exacq.com
Page 7 of 20 12/15/2014
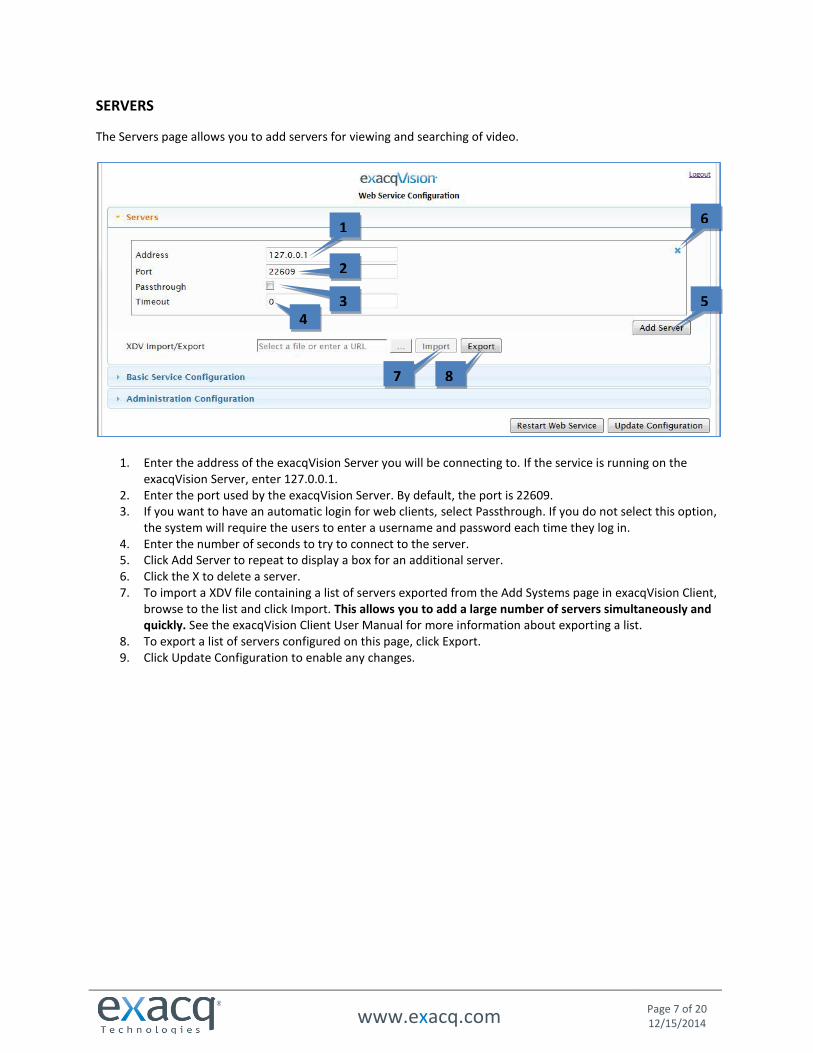
SERVERS
The Servers page allows you to add servers for viewing and searching of video.
1. Enter the address of the exacqVision Server you will be connecting to. If the service is running on the exacqVision Server, enter 127.0.0.1.
2. Enter the port used by the exacqVision Server. By default, the port is 22609. 3. If you want to have an automatic login for web clients, select Passthrough. If you do not select this option,
the system will require the users to enter a username and password each time they log in. 4. Enter the number of seconds to try to connect to the server. 5. Click Add Server to repeat to display a box for an additional server. 6. Click the X to delete a server. 7. To import a XDV file containing a list of servers exported from the Add Systems page in exacqVision Client,
browse to the list and click Import. This allows you to add a large number of servers simultaneously and quickly. See the exacqVision Client User Manual for more information about exporting a list.
8. To export a list of servers configured on this page, click Export. 9. Click Update Configuration to enable any changes.
1
2
3 4
5
6
7 8

www.exacq.com
Page 8 of 20 12/15/2014
BASIC SERVICE CONFIGURATION
The Basic Service page allows you to configure logging, the Web Service port, and security.
1. Download the log file as desired. 2. Select the lowest level of information that you want to log. All messages equal or higher than the selected
level will be logged:
Error. Only catastrophic issues, such as a system crash, are logged.
Warning. Warnings, such as server login failures, are also logged.
Information. Every action that occurs in the Web Service is logged.
Debug. This logs additional information that is normally useful only with the assistance of Exacq Technical Support.
3. Select the period of information included in each log file. 4. Select the number of log files to maintain before the oldest log file is deleted. 5. Select the Web Service Port (80 by default). 6. Select Enable CSRF Protection to prevent Cross-Site Request Forgery attacks, unless it is necessary to
disable it in your environment. 7. Click Update Configuration when finished.
1 2
3
4
5 6 7
www.exacq.com
Page 9 of 20 12/15/2014
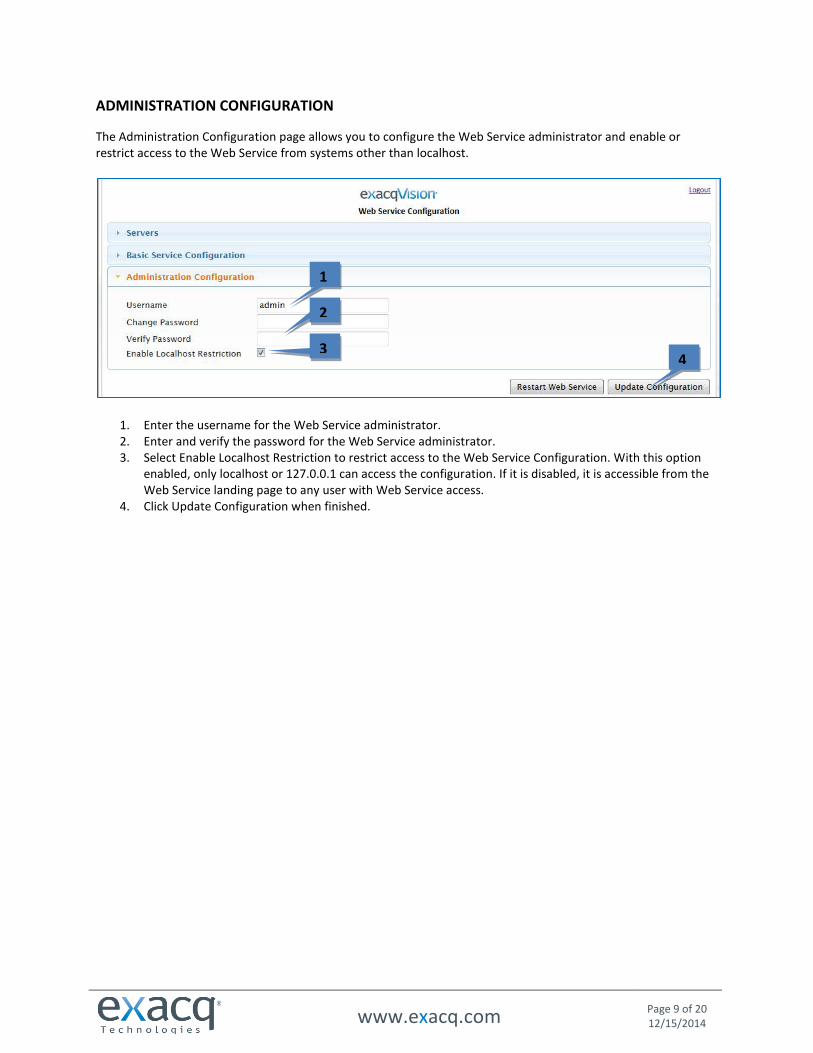
ADMINISTRATION CONFIGURATION
The Administration Configuration page allows you to configure the Web Service administrator and enable or restrict access to the Web Service from systems other than localhost.
1. Enter the username for the Web Service administrator. 2. Enter and verify the password for the Web Service administrator. 3. Select Enable Localhost Restriction to restrict access to the Web Service Configuration. With this option
enabled, only localhost or 127.0.0.1 can access the configuration. If it is disabled, it is accessible from the Web Service landing page to any user with Web Service access.
4. Click Update Configuration when finished.
1
2
3 4
www.exacq.com
Page 10 of 20 12/15/2014
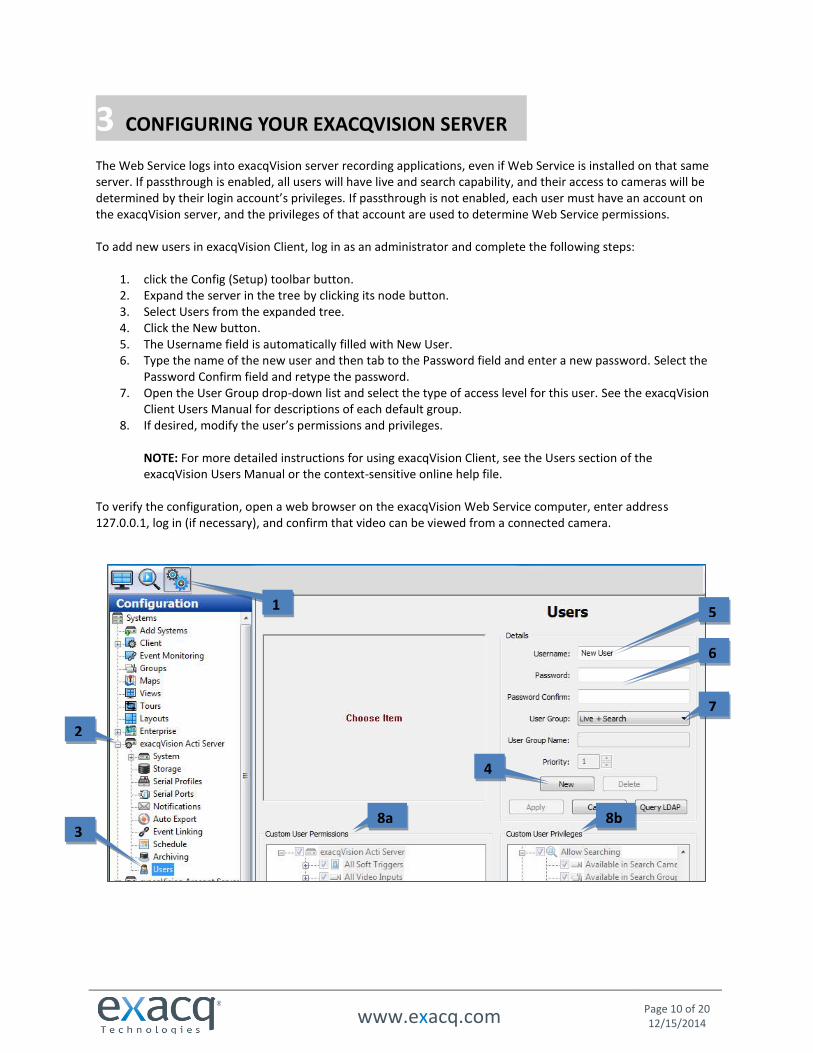
3 CONFIGURING YOUR EXACQVISION SERVER The Web Service logs into exacqVision server recording applications, even if Web Service is installed on that same server. If passthrough is enabled, all users will have live and search capability, and their access to cameras will be determined by their login account’s privileges. If passthrough is not enabled, each user must have an account on the exacqVision server, and the privileges of that account are used to determine Web Service permissions. To add new users in exacqVision Client, log in as an administrator and complete the following steps:
1. click the Config (Setup) toolbar button. 2. Expand the server in the tree by clicking its node button. 3. Select Users from the expanded tree. 4. Click the New button. 5. The Username field is automatically filled with New User. 6. Type the name of the new user and then tab to the Password field and enter a new password. Select the
Password Confirm field and retype the password. 7. Open the User Group drop-down list and select the type of access level for this user. See the exacqVision
Client Users Manual for descriptions of each default group. 8. If desired, modify the user’s permissions and privileges.
NOTE: For more detailed instructions for using exacqVision Client, see the Users section of the exacqVision Users Manual or the context-sensitive online help file.
To verify the configuration, open a web browser on the exacqVision Web Service computer, enter address 127.0.0.1, log in (if necessary), and confirm that video can be viewed from a connected camera.
1
2
3
4
5
6
7
8a 8b
www.exacq.com
Page 11 of 20 12/15/2014
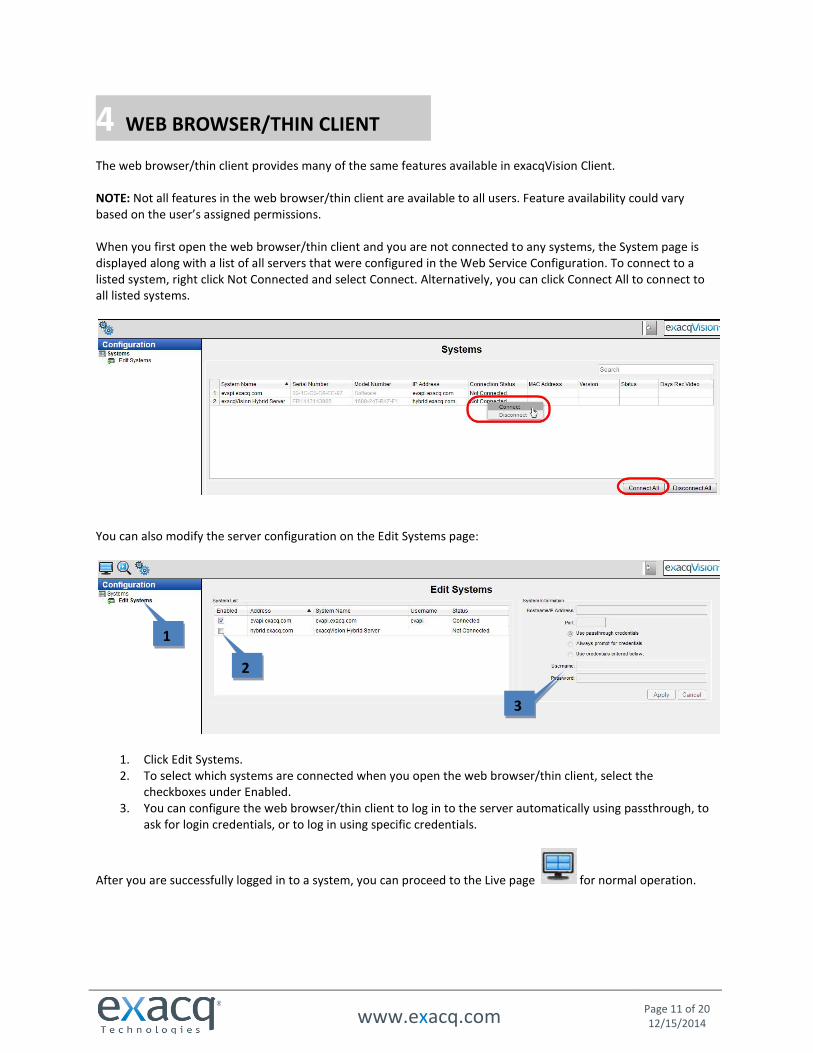
4 WEB BROWSER/THIN CLIENT The web browser/thin client provides many of the same features available in exacqVision Client. NOTE: Not all features in the web browser/thin client are available to all users. Feature availability could vary based on the user’s assigned permissions. When you first open the web browser/thin client and you are not connected to any systems, the System page is displayed along with a list of all servers that were configured in the Web Service Configuration. To connect to a listed system, right click Not Connected and select Connect. Alternatively, you can click Connect All to connect to all listed systems.
You can also modify the server configuration on the Edit Systems page:
1. Click Edit Systems. 2. To select which systems are connected when you open the web browser/thin client, select the
checkboxes under Enabled. 3. You can configure the web browser/thin client to log in to the server automatically using passthrough, to
ask for login credentials, or to log in using specific credentials.
After you are successfully logged in to a system, you can proceed to the Live page for normal operation.
1
2
3
www.exacq.com
Page 12 of 20 12/15/2014
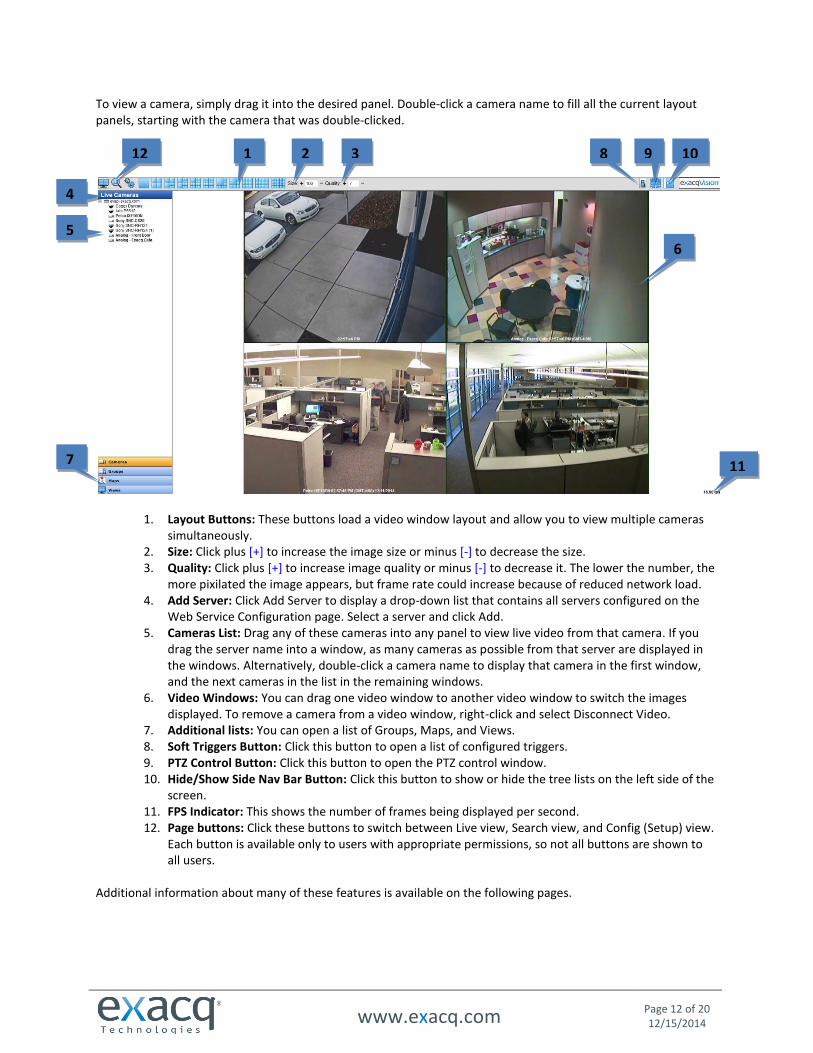
To view a camera, simply drag it into the desired panel. Double-click a camera name to fill all the current layout panels, starting with the camera that was double-clicked.
1. Layout Buttons: These buttons load a video window layout and allow you to view multiple cameras simultaneously.
2. Size: Click plus [+] to increase the image size or minus [-] to decrease the size. 3. Quality: Click plus [+] to increase image quality or minus [-] to decrease it. The lower the number, the
more pixilated the image appears, but frame rate could increase because of reduced network load. 4. Add Server: Click Add Server to display a drop-down list that contains all servers configured on the
Web Service Configuration page. Select a server and click Add. 5. Cameras List: Drag any of these cameras into any panel to view live video from that camera. If you
drag the server name into a window, as many cameras as possible from that server are displayed in the windows. Alternatively, double-click a camera name to display that camera in the first window, and the next cameras in the list in the remaining windows.
6. Video Windows: You can drag one video window to another video window to switch the images displayed. To remove a camera from a video window, right-click and select Disconnect Video.
7. Additional lists: You can open a list of Groups, Maps, and Views. 8. Soft Triggers Button: Click this button to open a list of configured triggers. 9. PTZ Control Button: Click this button to open the PTZ control window. 10. Hide/Show Side Nav Bar Button: Click this button to show or hide the tree lists on the left side of the
screen. 11. FPS Indicator: This shows the number of frames being displayed per second. 12. Page buttons: Click these buttons to switch between Live view, Search view, and Config (Setup) view.
Each button is available only to users with appropriate permissions, so not all buttons are shown to all users.
Additional information about many of these features is available on the following pages.
1 2 3
5
7
4
6
8 9 10 12
11
www.exacq.com
Page 13 of 20 12/15/2014
PTZ CONTROL
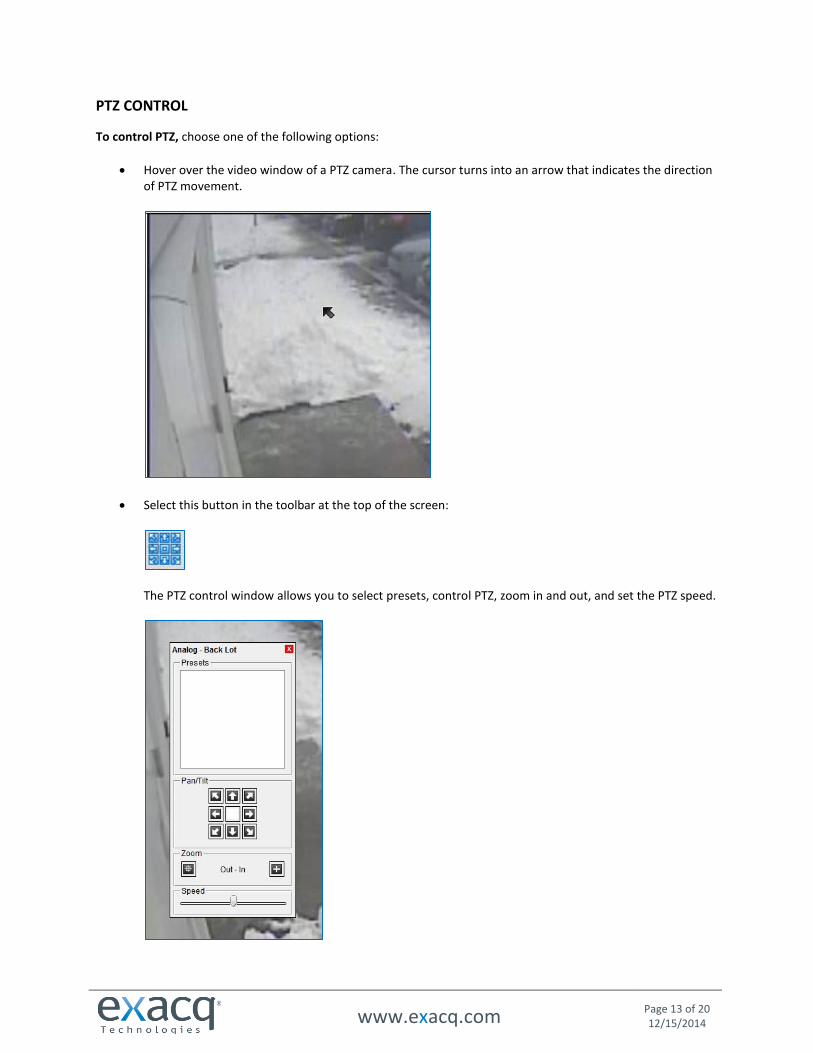
To control PTZ, choose one of the following options:
Hover over the video window of a PTZ camera. The cursor turns into an arrow that indicates the direction of PTZ movement.
Select this button in the toolbar at the top of the screen:
The PTZ control window allows you to select presets, control PTZ, zoom in and out, and set the PTZ speed.
www.exacq.com
Page 14 of 20 12/15/2014
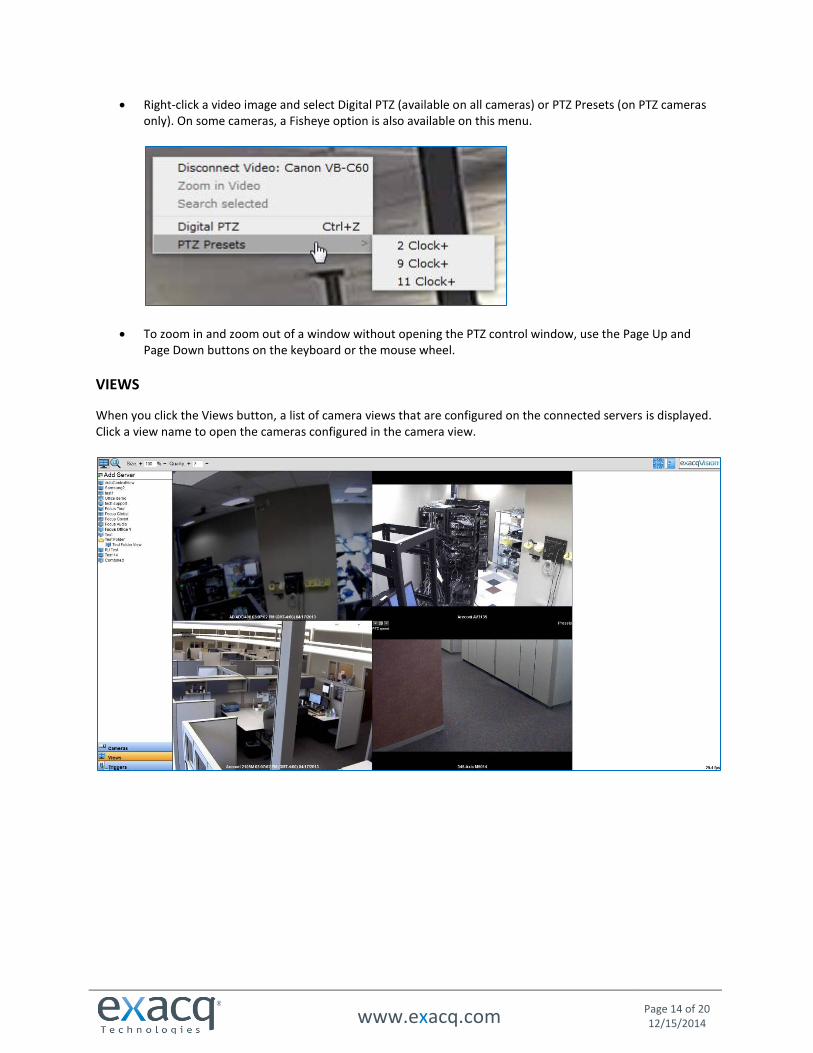
Right-click a video image and select Digital PTZ (available on all cameras) or PTZ Presets (on PTZ cameras only). On some cameras, a Fisheye option is also available on this menu.
To zoom in and zoom out of a window without opening the PTZ control window, use the Page Up and Page Down buttons on the keyboard or the mouse wheel.
VIEWS
When you click the Views button, a list of camera views that are configured on the connected servers is displayed. Click a view name to open the cameras configured in the camera view.
www.exacq.com
Page 15 of 20 12/15/2014
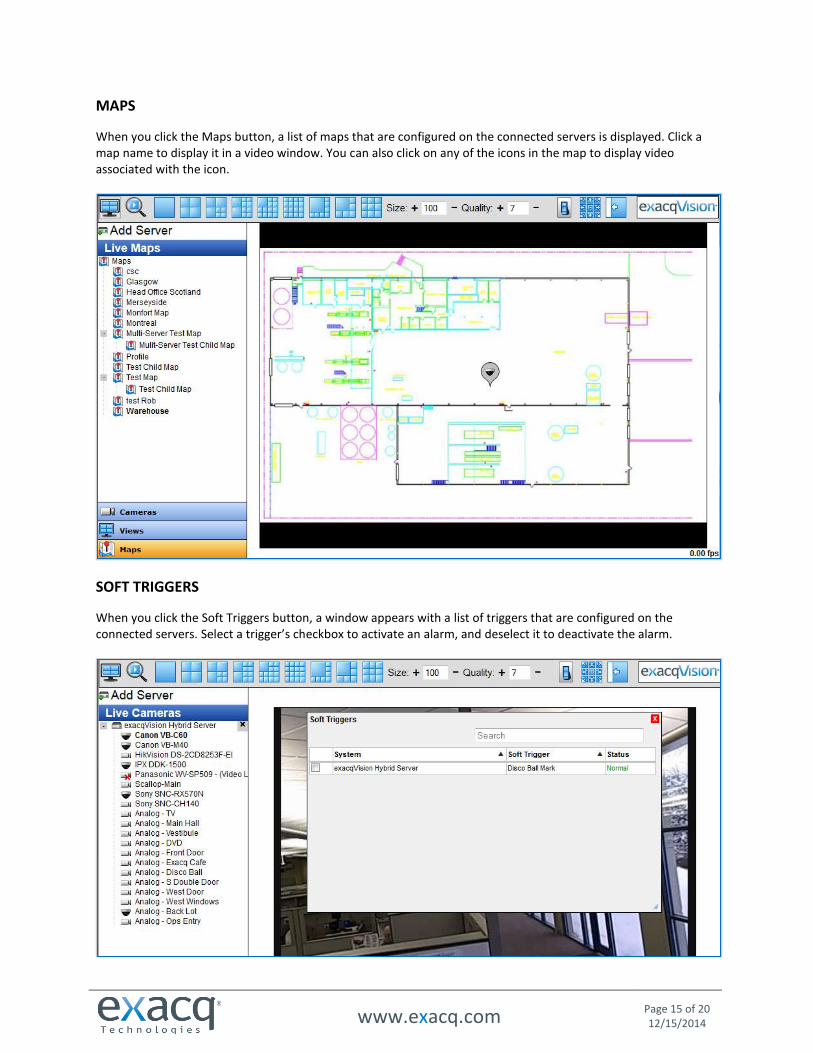
MAPS
When you click the Maps button, a list of maps that are configured on the connected servers is displayed. Click a map name to display it in a video window. You can also click on any of the icons in the map to display video associated with the icon.
SOFT TRIGGERS
When you click the Soft Triggers button, a window appears with a list of triggers that are configured on the connected servers. Select a trigger’s checkbox to activate an alarm, and deselect it to deactivate the alarm.
www.exacq.com
Page 16 of 20 12/15/2014
SEARCH AND PLAYBACK
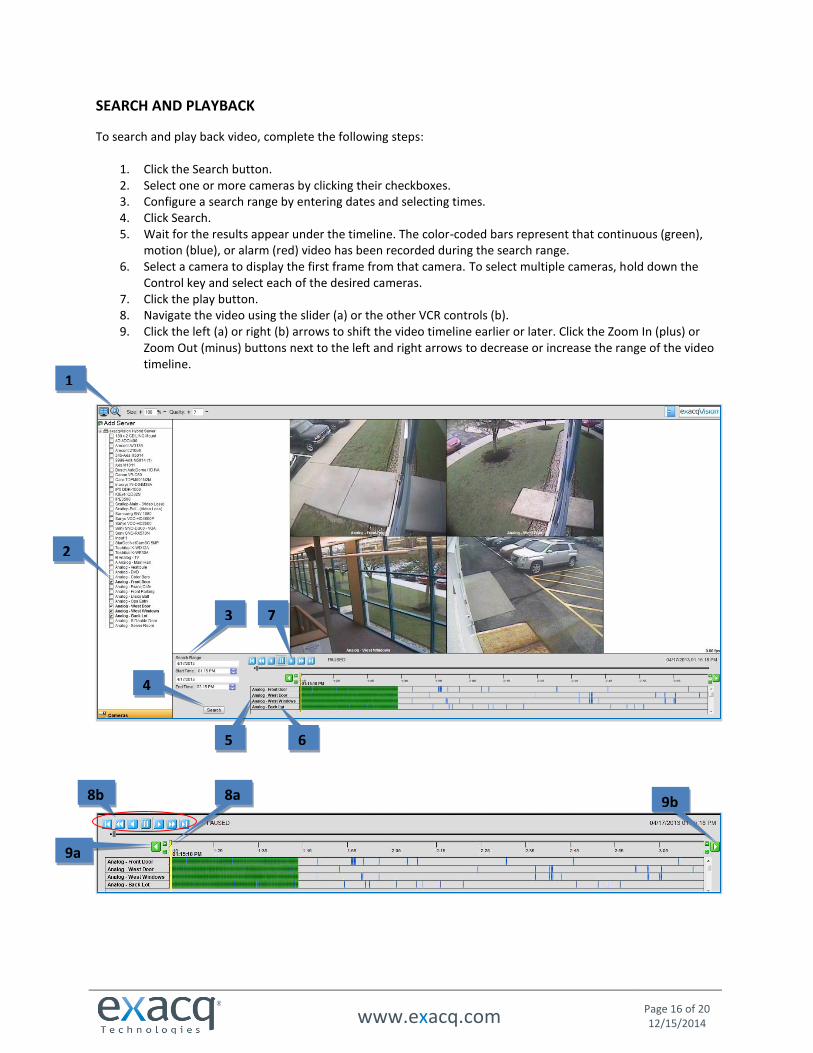
To search and play back video, complete the following steps:
1. Click the Search button. 2. Select one or more cameras by clicking their checkboxes. 3. Configure a search range by entering dates and selecting times. 4. Click Search. 5. Wait for the results appear under the timeline. The color-coded bars represent that continuous (green),
motion (blue), or alarm (red) video has been recorded during the search range. 6. Select a camera to display the first frame from that camera. To select multiple cameras, hold down the
Control key and select each of the desired cameras. 7. Click the play button. 8. Navigate the video using the slider (a) or the other VCR controls (b). 9. Click the left (a) or right (b) arrows to shift the video timeline earlier or later. Click the Zoom In (plus) or
Zoom Out (minus) buttons next to the left and right arrows to decrease or increase the range of the video timeline.
1
2
3
4
5 6
7
8a 8b
9a
9b
www.exacq.com
Page 17 of 20 12/15/2014
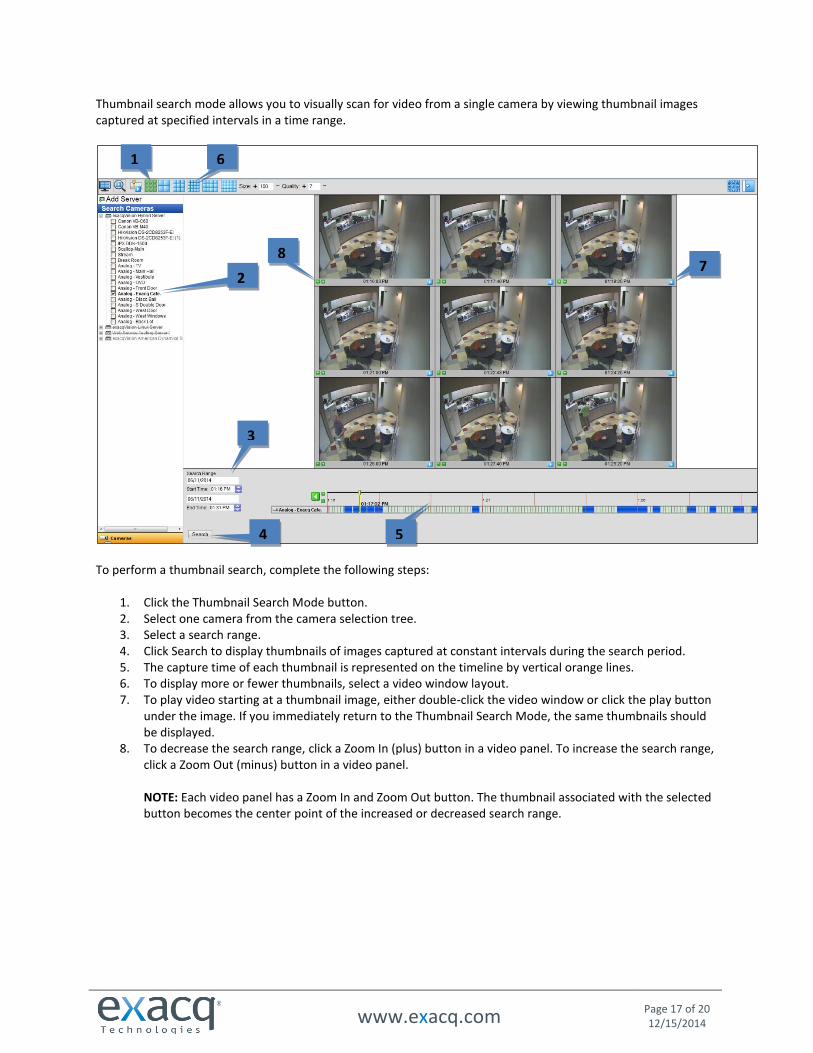
Thumbnail search mode allows you to visually scan for video from a single camera by viewing thumbnail images captured at specified intervals in a time range.
To perform a thumbnail search, complete the following steps:
1. Click the Thumbnail Search Mode button. 2. Select one camera from the camera selection tree. 3. Select a search range. 4. Click Search to display thumbnails of images captured at constant intervals during the search period. 5. The capture time of each thumbnail is represented on the timeline by vertical orange lines. 6. To display more or fewer thumbnails, select a video window layout. 7. To play video starting at a thumbnail image, either double-click the video window or click the play button
under the image. If you immediately return to the Thumbnail Search Mode, the same thumbnails should be displayed.
8. To decrease the search range, click a Zoom In (plus) button in a video panel. To increase the search range, click a Zoom Out (minus) button in a video panel. NOTE: Each video panel has a Zoom In and Zoom Out button. The thumbnail associated with the selected button becomes the center point of the increased or decreased search range.
1
2
3
4 5
6
7 8
www.exacq.com
Page 18 of 20 12/15/2014
EXPORTING
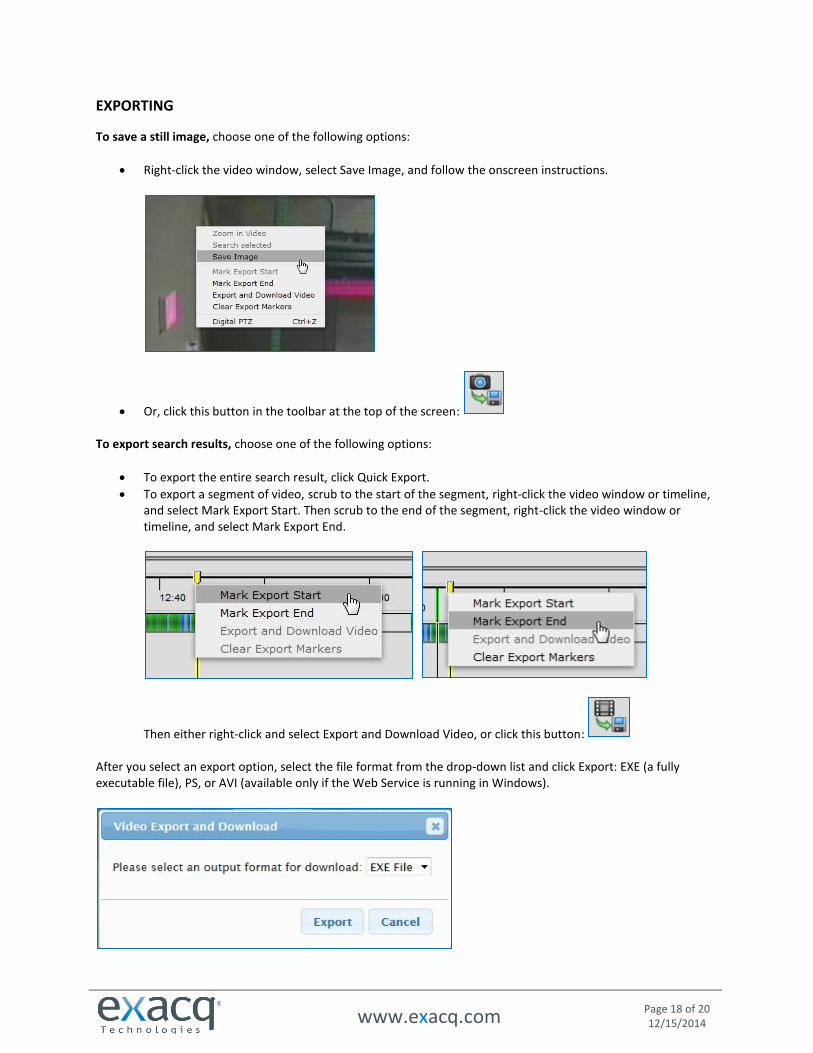
To save a still image, choose one of the following options:
Right-click the video window, select Save Image, and follow the onscreen instructions.
Or, click this button in the toolbar at the top of the screen: To export search results, choose one of the following options:
To export the entire search result, click Quick Export.
To export a segment of video, scrub to the start of the segment, right-click the video window or timeline, and select Mark Export Start. Then scrub to the end of the segment, right-click the video window or timeline, and select Mark Export End.
Then either right-click and select Export and Download Video, or click this button: After you select an export option, select the file format from the drop-down list and click Export: EXE (a fully executable file), PS, or AVI (available only if the Web Service is running in Windows).
www.exacq.com
Page 19 of 20 12/15/2014
5 ACTIVE DIRECTORY SUPPORT FOR WEB SERVICE exacqVision Web Client and Exacq Mobile app users can use domain credentials to log in to exacqVision servers if the following are true:
1. The exacqVision server is configured to communicate with Active Directory (AD) or LDAP. 2. User permissions are mapped to AD or LDAP groups or users. 3. The server running the exacqVision Web Service is configured as part of the domain.
Items 1 and 2, related to configuring the exacqVision server, are described in the AD guides for each platform available at https://exacq.com/support/specsheets.php?perma=exacqVision+User+Manuals. To configure the exacqVision Web Service to communicate with AD in either Windows and Linux, see the instructions in the following sections. NOTES:
When using domain credentials, the username should be specified as <username>@<domain>.
You cannot configure an AD account as the stored passthrough account in the Web Service configuration. Only AD accounts can be used by installed client, web client and mobile app users.
ACTIVE DIRECTORY IN WINDOWS-BASED WEB SERVICE
When using Windows client computers and Windows domains, it is recommended that you configure your Active Directory (AD) server’s IP address as one of your DNS servers. Then you should make sure the AD server’s fully qualified host name resolves. If there are any DNS resolution issues, Windows login will require a large amount of time for processing, and it will ultimately fail. To join your Windows system to the AD domain, complete the following steps:
1. On the system’s Desktop, right-click System and select Properties. 2. Select the Computer Name tab. 3. Click the Change button to join the domain. 4. Specify a unique computer name. (If you change the name, you must restart the system before
continuing.) 5. Select Domain and enter the AD domain. 6. Enter an authorized domain username and password. 7. Restart the system.
NOTE: When adding an exacqVision server with an Enterprise license configured on the AD domain, you cannot configure an AD account as passthrough. AD accounts must manually log in every time.

www.exacq.com
Page 20 of 20 12/15/2014
ACTIVE DIRECTORY/LDAP IN LINUX-BASED WEB SERVICE
To configure your Linux system for Active Directory or OpenLDAP, complete the following steps:
1. Install Kerberos. KRB5 (MIT Kerberos V5) has specifically been tested for this purpose. Installing krb5-user and libkrb5-dev should also install krb5-config, which is valid for all Ubuntu types.
2. Configure the /etc/krb5.conf file. Add a stanza for the AD domain, and change the default realm to the AD domain. Fully qualified domain names (FQDN) for the KDC and admin server is preferred, in case the IP addresses will ever be changed (just make sure the FQDN resolves for the AD server). Make sure the AD domain name is upper-case; for example: [libdefaults]
default_realm = EXACQ.TEST.COM
[realms]
EXACQ.TEST.COM = {
kdc = adserver2008.exacq.test.com
admin_server = adserver2008.exacq.test.com
}
3. Note the AD domain, along with the FQDN and IP address of the AD server:
EXACQ.TEST.COM adserver2008.exacq.test.com 192.168.1.70
4. Use the kinit command to confirm that the Kerberos configuration works as intended. Try to obtain a
ticket for the Kerberos login; you can verify success using the klist command. Use kdestroy to release the ticket when you have verified the configuration.
NOTES
When adding an exacqVision server with an Enterprise license configured on the AD domain, you cannot configure an AD account as passthrough. AD accounts must manually log in every time.
For each exacqVision server you intend to connect to with a user principal instead of an exacqVision user name, you must add the exacqVision server’s FQDN to your /etc/hosts file, and it must be the first name listed for that IP address. Otherwise, you will receive Kerberos failures.