exacq commend integration guide · repeat this for each commend intercom station that you intend to...
TRANSCRIPT
Exacq Commend Integration Guide
www.exacq.com
+1.317.845.5710 +5255.56080817 +44.1438.310163 +31.485.324.347
USA (Corporate Headquarters) Mexico Europe/Middle East/Asia Central Europe
Page 1 of 16 4/12/2016
Purpose The purpose of this document is to provide guidance configuring the exacqVision server for the Commend integration. This is a guide based off of a working example of the integration. This is one of two guides that are hosted at exacq.com. The second guide is titled Commend RTP Interface Guide and will guide the setting up of RTP streams in the Commend system for use with exacqVision.
Software/Hardware Requirements
Exacq
1. exacqVision server 8.0 or later https://exacq.com/support/downloads.php 2. exacqVision client 8.0 or later https://exacq.com/support/downloads.php 3. exacqVision Enterprise or professional license 4. a user with Power User privileges (or higher) on the exacqVision system 5. exacqVision evRTPshim https://exacq.com/support/downloads.php
Commend
1. Commend RTP Interface Guide 2. Software package version PRO2.1 or higher 3. RTP recording interface via Intercom Station or IP subscriber 4. Commend CCT800 version 5.1 5. Commend Intercom Server (GE300, IS300, GE800, SIS) and Intercom Stations 6. Central time synchronization server for Commend server(s), intercom stations 7. ICX License to enable data interface 8. D Level subscriber port per recording channel 9. L-IP-REC-1 license per recording channel
Overview
1. Configure Commend system via CCT800 2. Install and configure exacqVision evRTPshim on exacqVision recorder 3. Update and configure exacqVision 4. Operate the integration and use exacqVision Search

Exacq Commend Integration Guide
www.exacq.com
+1.317.845.5710 +5255.56080817 +44.1438.310163 +31.485.324.347
USA (Corporate Headquarters) Mexico Europe/Middle East/Asia Central Europe
Page 2 of 16 4/12/2016
Commend Configuration Please see Commend RTP Interface Guide
Exacq Commend Integration Guide
www.exacq.com
+1.317.845.5710 +5255.56080817 +44.1438.310163 +31.485.324.347
USA (Corporate Headquarters) Mexico Europe/Middle East/Asia Central Europe
Page 3 of 16 4/12/2016
evRTP Shim Installation and Configuration
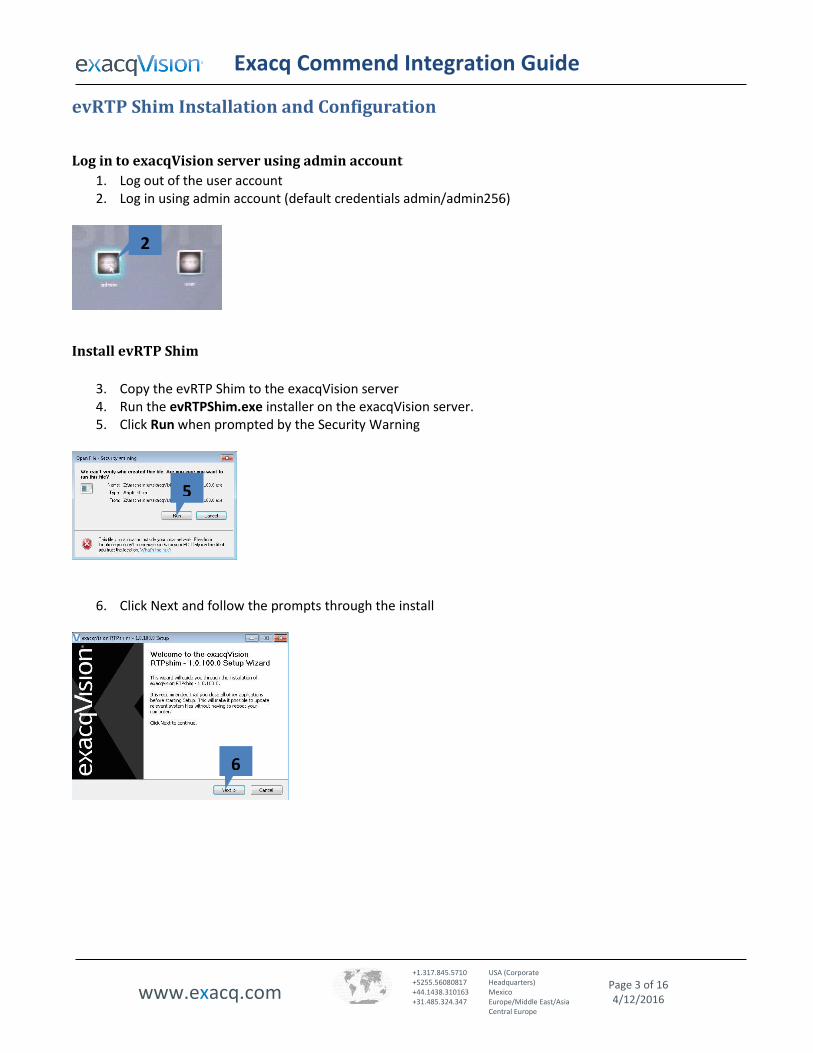
Log in to exacqVision server using admin account
1. Log out of the user account 2. Log in using admin account (default credentials admin/admin256)
Install evRTP Shim
3. Copy the evRTP Shim to the exacqVision server 4. Run the evRTPShim.exe installer on the exacqVision server. 5. Click Run when prompted by the Security Warning
6. Click Next and follow the prompts through the install
5
6
2
Exacq Commend Integration Guide
www.exacq.com
+1.317.845.5710 +5255.56080817 +44.1438.310163 +31.485.324.347
USA (Corporate Headquarters) Mexico Europe/Middle East/Asia Central Europe
Page 4 of 16 4/12/2016
Configure evRTP Shim
1. Click Edit evRTP shim configuration from the Start menu
RTSPserver
1. Port - this is the port which you will use to create RTSP connections from exacqVision
2. Address - The IP address which you will use to establish an RTSP connect from exacqVision
ICXserver
3. Frequency - PCM Frequency that is set in Commend and exacq. This is usually 8000
4. Port - Commend’s ICX communications port 5. Address - IP address of Commend system
NVR
6. Address - IP address of NVR (in the case of running this integration on an exacqVision recorder this will be the localhost address or 127.0.0.1
Station
7. ID - Specify each station ID here (stations can be added by first highlighting the “NVR” level of the node tree then selecting “station” from the combo box above and clicking the “Add Field” button.)
8. ExacqSerialPort - This sets the TCP port over which the shim will deliver serial data to the exacqVision recorder. There will be a corresponding TCP/IP serial port defined in the exacqVision Serial Ports page for each station. (page 11)
9. Save - Click Save
10. Restart the evRTPshim by using the Stop evRTPshim
service shortcut 11. Then click on the Start evRTPshim service shortcut
Alternatively you can use services.msc to stop and start the evRTPshim service
1
2
3
4
5
6 7
8
9
10
10
11
Exacq Commend Integration Guide
www.exacq.com
+1.317.845.5710 +5255.56080817 +44.1438.310163 +31.485.324.347
USA (Corporate Headquarters) Mexico Europe/Middle East/Asia Central Europe
Page 5 of 16 4/12/2016
Exacq Configuration
Update and Verify Date/Time Configuration
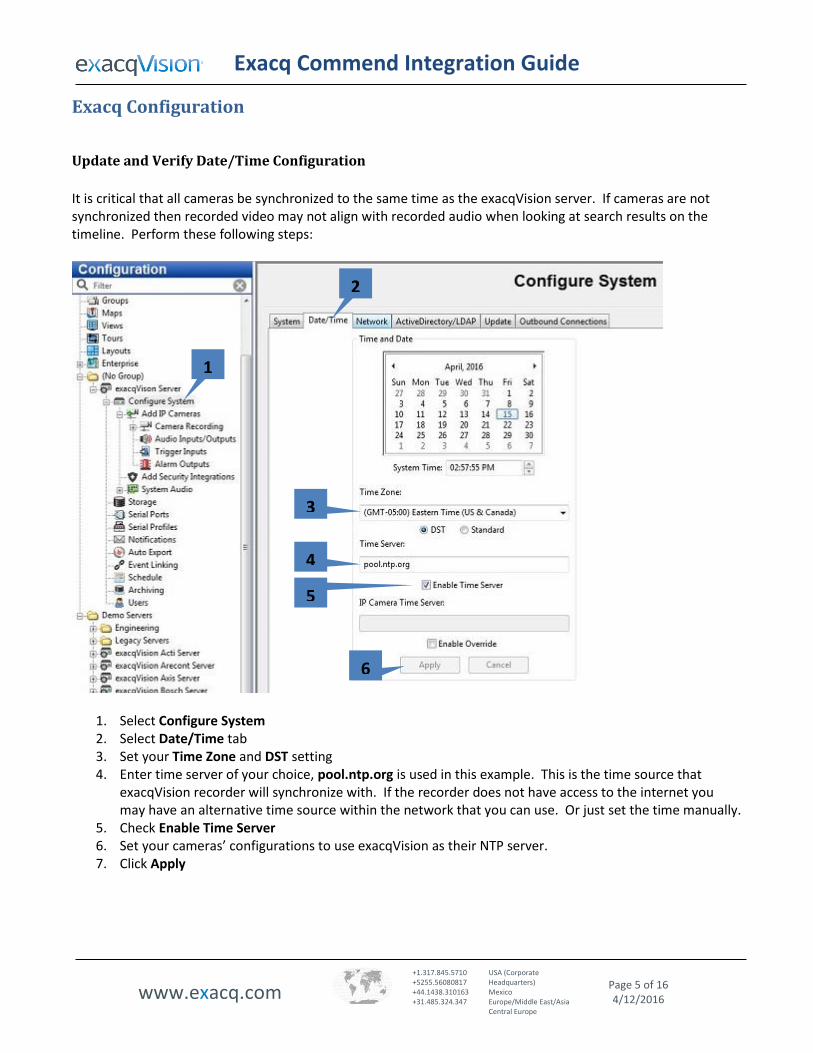
It is critical that all cameras be synchronized to the same time as the exacqVision server. If cameras are not synchronized then recorded video may not align with recorded audio when looking at search results on the timeline. Perform these following steps:
1. Select Configure System 2. Select Date/Time tab 3. Set your Time Zone and DST setting 4. Enter time server of your choice, pool.ntp.org is used in this example. This is the time source that
exacqVision recorder will synchronize with. If the recorder does not have access to the internet you may have an alternative time source within the network that you can use. Or just set the time manually.
5. Check Enable Time Server 6. Set your cameras’ configurations to use exacqVision as their NTP server. 7. Click Apply
1
2
4
5
6
3
Exacq Commend Integration Guide
www.exacq.com
+1.317.845.5710 +5255.56080817 +44.1438.310163 +31.485.324.347
USA (Corporate Headquarters) Mexico Europe/Middle East/Asia Central Europe
Page 6 of 16 4/12/2016
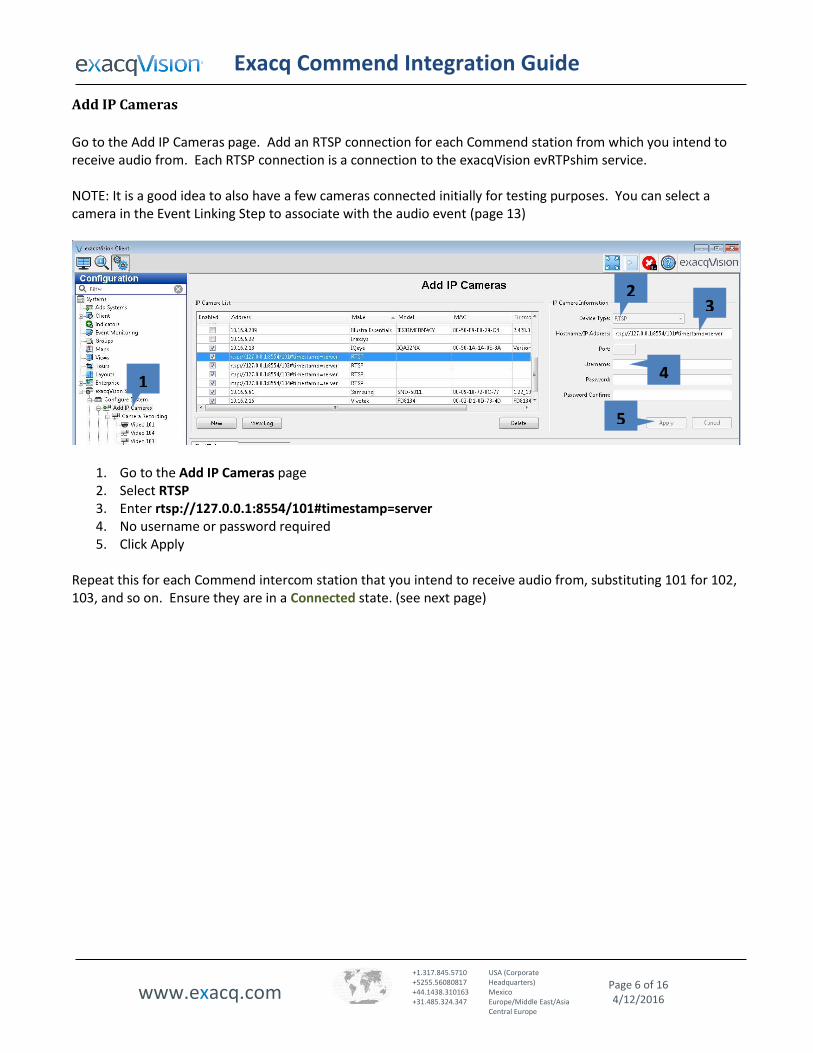
Add IP Cameras
Go to the Add IP Cameras page. Add an RTSP connection for each Commend station from which you intend to receive audio from. Each RTSP connection is a connection to the exacqVision evRTPshim service. NOTE: It is a good idea to also have a few cameras connected initially for testing purposes. You can select a camera in the Event Linking Step to associate with the audio event (page 13)
1. Go to the Add IP Cameras page 2. Select RTSP 3. Enter rtsp://127.0.0.1:8554/101#timestamp=server 4. No username or password required 5. Click Apply
Repeat this for each Commend intercom station that you intend to receive audio from, substituting 101 for 102, 103, and so on. Ensure they are in a Connected state. (see next page)
1
2 3
4
5
Exacq Commend Integration Guide
www.exacq.com
+1.317.845.5710 +5255.56080817 +44.1438.310163 +31.485.324.347
USA (Corporate Headquarters) Mexico Europe/Middle East/Asia Central Europe
Page 7 of 16 4/12/2016
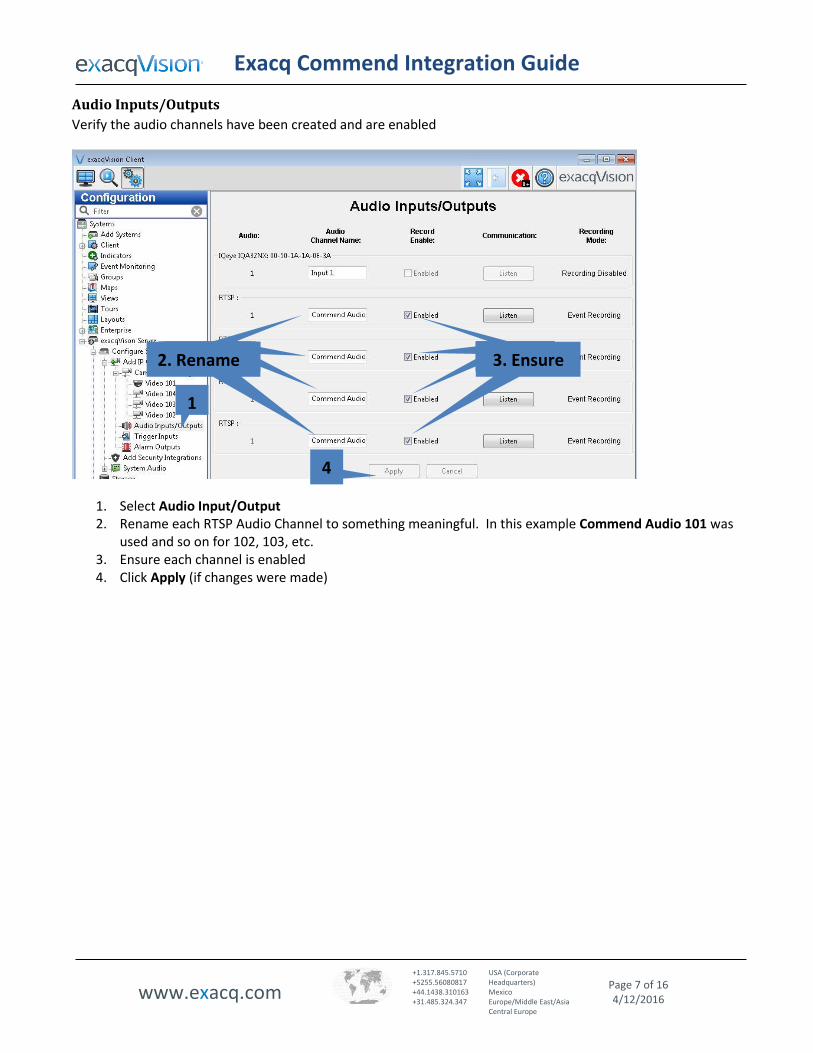
Audio Inputs/Outputs
Verify the audio channels have been created and are enabled
1. Select Audio Input/Output 2. Rename each RTSP Audio Channel to something meaningful. In this example Commend Audio 101 was
used and so on for 102, 103, etc. 3. Ensure each channel is enabled 4. Click Apply (if changes were made)
1
Ensure Ensure Ensure 3. Ensure Rename Rename Rename 2. Rename
4
Exacq Commend Integration Guide
www.exacq.com
+1.317.845.5710 +5255.56080817 +44.1438.310163 +31.485.324.347
USA (Corporate Headquarters) Mexico Europe/Middle East/Asia Central Europe
Page 8 of 16 4/12/2016
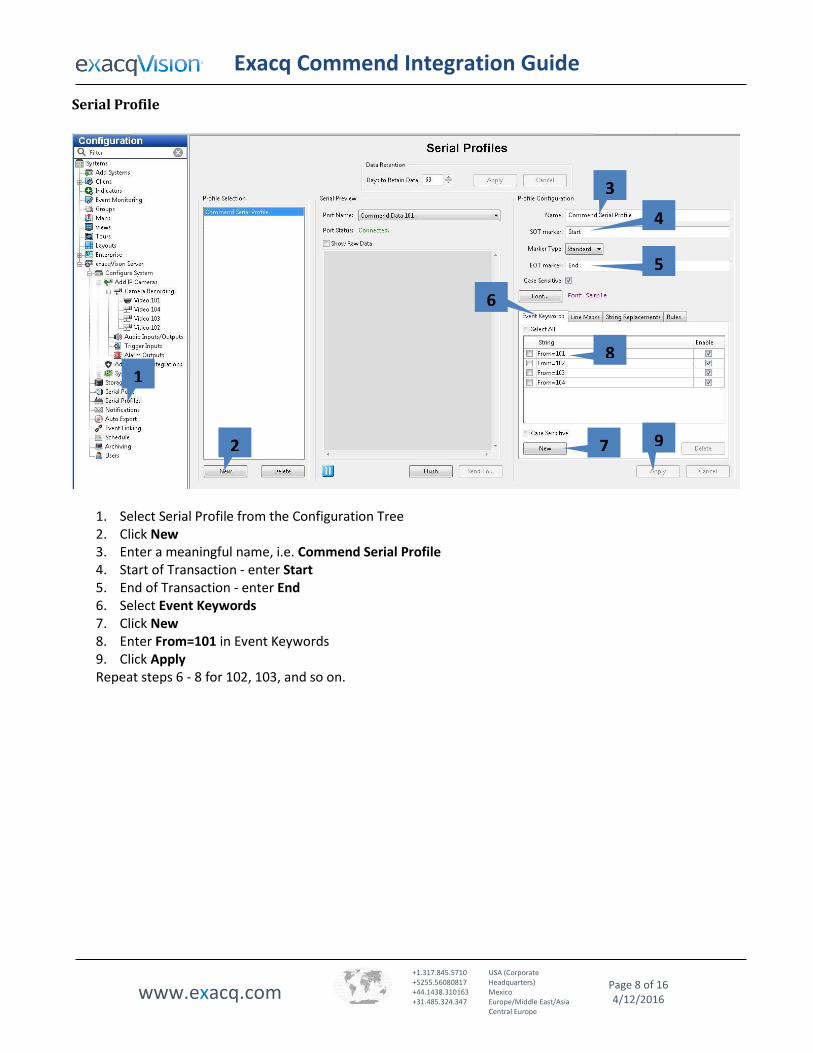
Serial Profile
1. Select Serial Profile from the Configuration Tree 2. Click New 3. Enter a meaningful name, i.e. Commend Serial Profile 4. Start of Transaction - enter Start 5. End of Transaction - enter End 6. Select Event Keywords 7. Click New 8. Enter From=101 in Event Keywords 9. Click Apply Repeat steps 6 - 8 for 102, 103, and so on.
1
2
3
4
5
7
8
9
6
Exacq Commend Integration Guide
www.exacq.com
+1.317.845.5710 +5255.56080817 +44.1438.310163 +31.485.324.347
USA (Corporate Headquarters) Mexico Europe/Middle East/Asia Central Europe
Page 9 of 16 4/12/2016
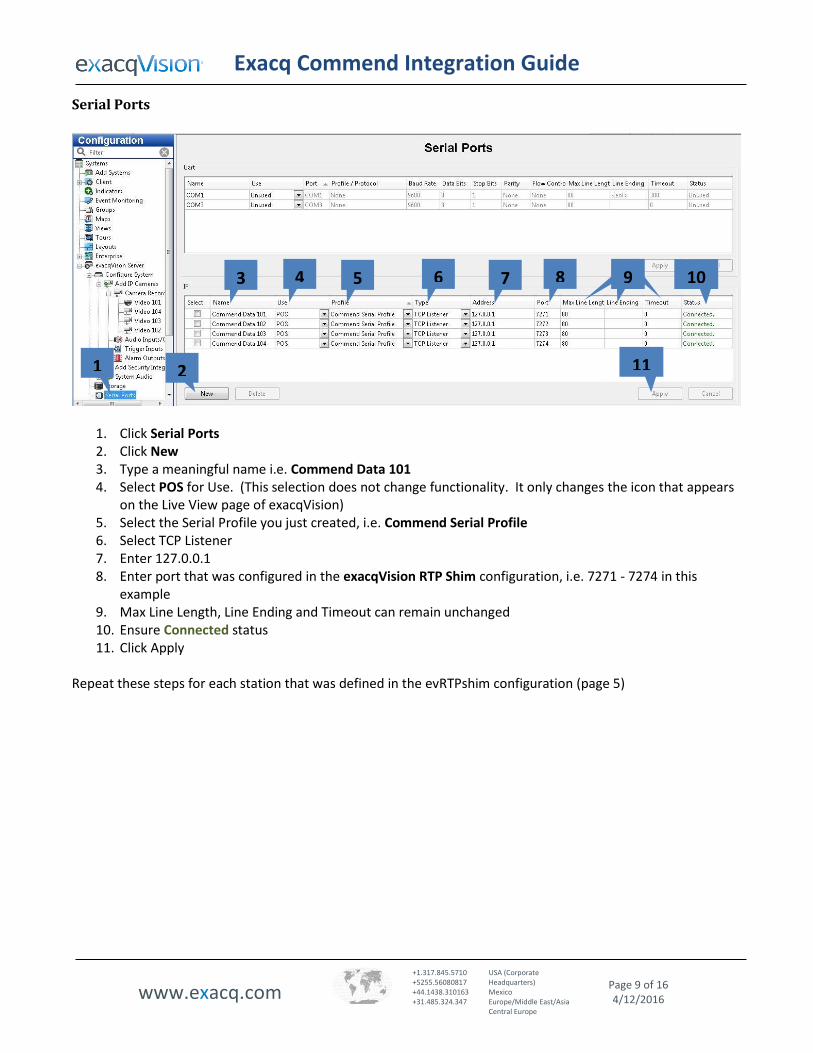
Serial Ports
1. Click Serial Ports 2. Click New 3. Type a meaningful name i.e. Commend Data 101 4. Select POS for Use. (This selection does not change functionality. It only changes the icon that appears
on the Live View page of exacqVision) 5. Select the Serial Profile you just created, i.e. Commend Serial Profile 6. Select TCP Listener 7. Enter 127.0.0.1 8. Enter port that was configured in the exacqVision RTP Shim configuration, i.e. 7271 - 7274 in this
example 9. Max Line Length, Line Ending and Timeout can remain unchanged 10. Ensure Connected status 11. Click Apply
Repeat these steps for each station that was defined in the evRTPshim configuration (page 5)
3
1
4 5 6 7 8
2
8 8 9 10
11
Exacq Commend Integration Guide
www.exacq.com
+1.317.845.5710 +5255.56080817 +44.1438.310163 +31.485.324.347
USA (Corporate Headquarters) Mexico Europe/Middle East/Asia Central Europe
Page 10 of 16 4/12/2016
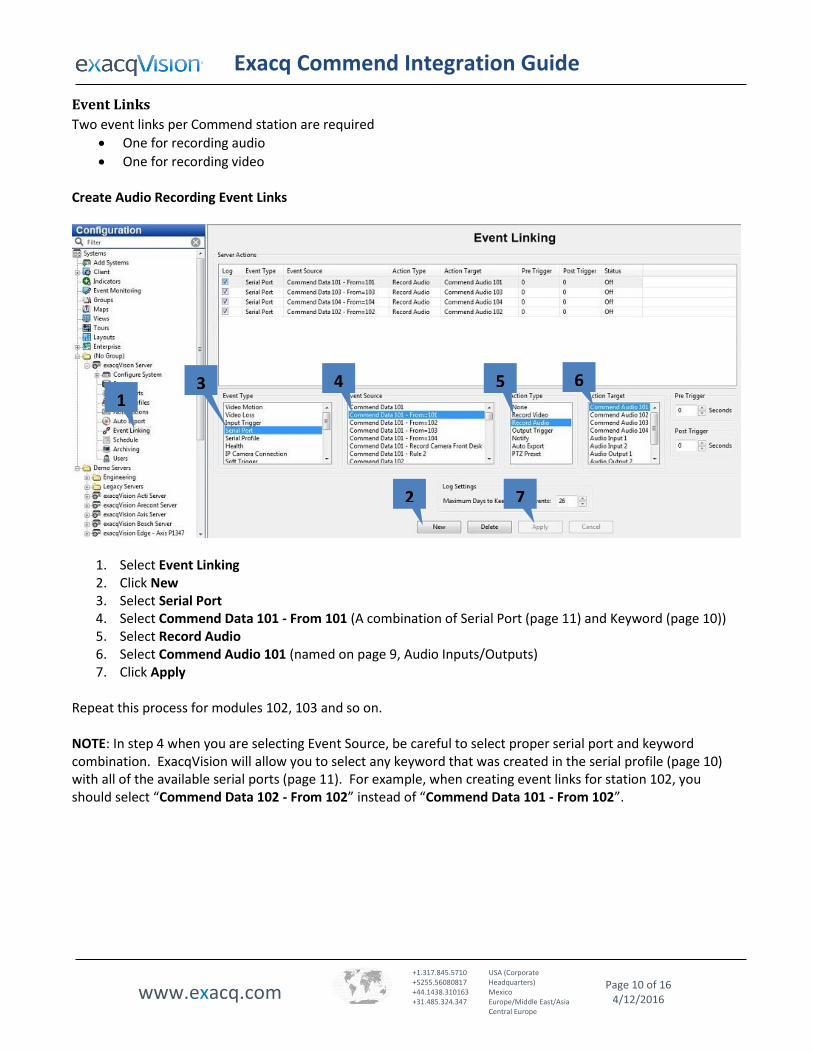
Event Links
Two event links per Commend station are required
One for recording audio
One for recording video Create Audio Recording Event Links
1. Select Event Linking 2. Click New 3. Select Serial Port 4. Select Commend Data 101 - From 101 (A combination of Serial Port (page 11) and Keyword (page 10)) 5. Select Record Audio 6. Select Commend Audio 101 (named on page 9, Audio Inputs/Outputs) 7. Click Apply
Repeat this process for modules 102, 103 and so on. NOTE: In step 4 when you are selecting Event Source, be careful to select proper serial port and keyword combination. ExacqVision will allow you to select any keyword that was created in the serial profile (page 10) with all of the available serial ports (page 11). For example, when creating event links for station 102, you should select “Commend Data 102 - From 102” instead of “Commend Data 101 - From 102”.
2
3 4 5 6 1
7
Exacq Commend Integration Guide
www.exacq.com
+1.317.845.5710 +5255.56080817 +44.1438.310163 +31.485.324.347
USA (Corporate Headquarters) Mexico Europe/Middle East/Asia Central Europe
Page 11 of 16 4/12/2016
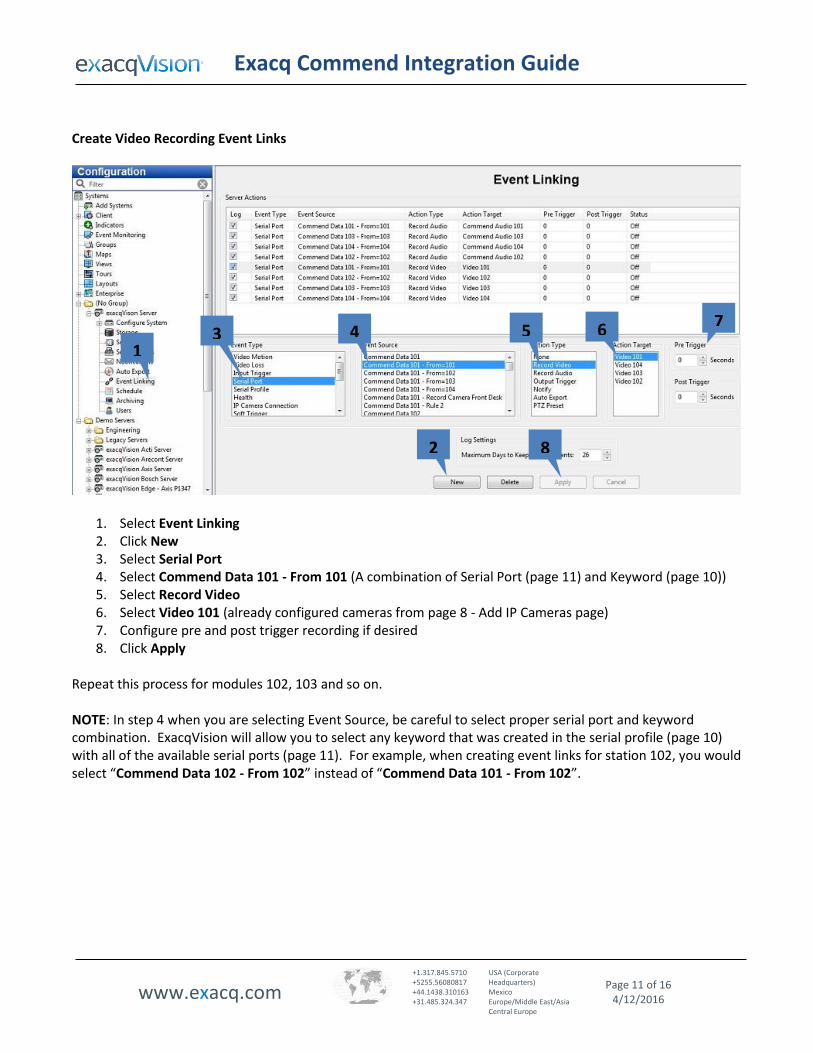
Create Video Recording Event Links
1. Select Event Linking 2. Click New 3. Select Serial Port 4. Select Commend Data 101 - From 101 (A combination of Serial Port (page 11) and Keyword (page 10)) 5. Select Record Video 6. Select Video 101 (already configured cameras from page 8 - Add IP Cameras page) 7. Configure pre and post trigger recording if desired 8. Click Apply
Repeat this process for modules 102, 103 and so on. NOTE: In step 4 when you are selecting Event Source, be careful to select proper serial port and keyword combination. ExacqVision will allow you to select any keyword that was created in the serial profile (page 10) with all of the available serial ports (page 11). For example, when creating event links for station 102, you would select “Commend Data 102 - From 102” instead of “Commend Data 101 - From 102”.
2
3 4 5 6 1
7
8
Exacq Commend Integration Guide
www.exacq.com
+1.317.845.5710 +5255.56080817 +44.1438.310163 +31.485.324.347
USA (Corporate Headquarters) Mexico Europe/Middle East/Asia Central Europe
Page 12 of 16 4/12/2016
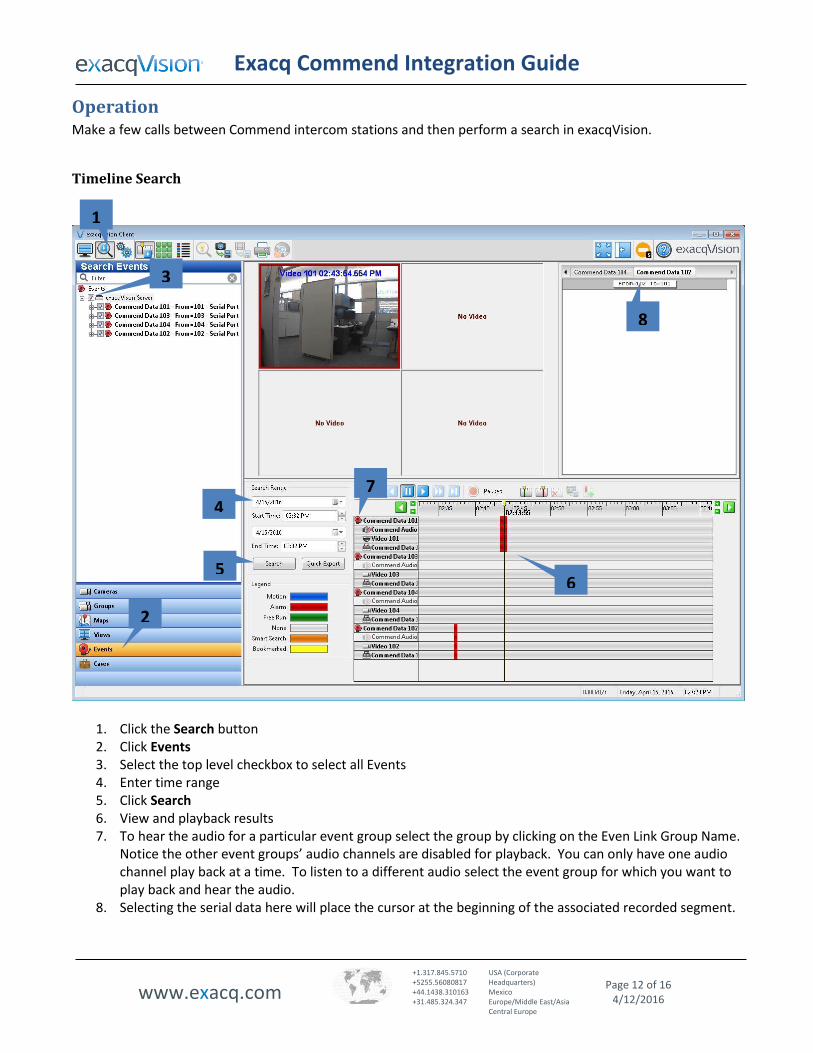
Operation Make a few calls between Commend intercom stations and then perform a search in exacqVision.
Timeline Search
1. Click the Search button 2. Click Events 3. Select the top level checkbox to select all Events 4. Enter time range 5. Click Search 6. View and playback results 7. To hear the audio for a particular event group select the group by clicking on the Even Link Group Name.
Notice the other event groups’ audio channels are disabled for playback. You can only have one audio channel play back at a time. To listen to a different audio select the event group for which you want to play back and hear the audio.
8. Selecting the serial data here will place the cursor at the beginning of the associated recorded segment.
1
2
4
5
3
6
7
8

Exacq Commend Integration Guide
www.exacq.com
+1.317.845.5710 +5255.56080817 +44.1438.310163 +31.485.324.347
USA (Corporate Headquarters) Mexico Europe/Middle East/Asia Central Europe
Page 13 of 16 4/12/2016
Event Search
Event Search is useful with this integration.
1. Select Search 2. Select Event Search 3. De-select Event and Motion from the Results Filter leaving Alarm checked
Perform the same search tasks as in the previous step by entering time range and clicking the search button. Now the results will show up grouped as Alarm based events in the search window. Event Link triggers are considered Alarms in exacq.
4. You can highlight the Alarm based recording by clicking on it 5. Then click Play. The Search window will change back to the timeline search style to play back the
recordings.
1 2
2 3
4
4
Exacq Commend Integration Guide
www.exacq.com
+1.317.845.5710 +5255.56080817 +44.1438.310163 +31.485.324.347
USA (Corporate Headquarters) Mexico Europe/Middle East/Asia Central Europe
Page 14 of 16 4/12/2016
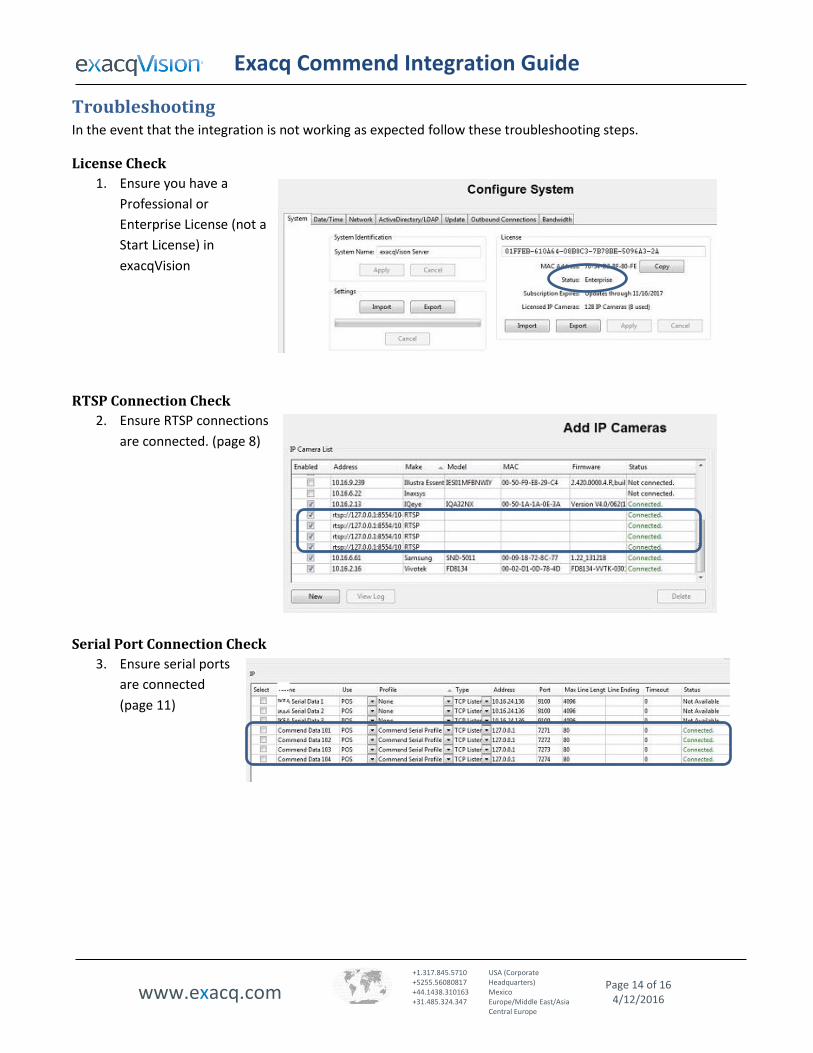
Troubleshooting In the event that the integration is not working as expected follow these troubleshooting steps.
License Check
1. Ensure you have a
Professional or
Enterprise License (not a
Start License) in
exacqVision
RTSP Connection Check
2. Ensure RTSP connections
are connected. (page 8)
Serial Port Connection Check
3. Ensure serial ports
are connected
(page 11)
Exacq Commend Integration Guide
www.exacq.com
+1.317.845.5710 +5255.56080817 +44.1438.310163 +31.485.324.347
USA (Corporate Headquarters) Mexico Europe/Middle East/Asia Central Europe
Page 15 of 16 4/12/2016
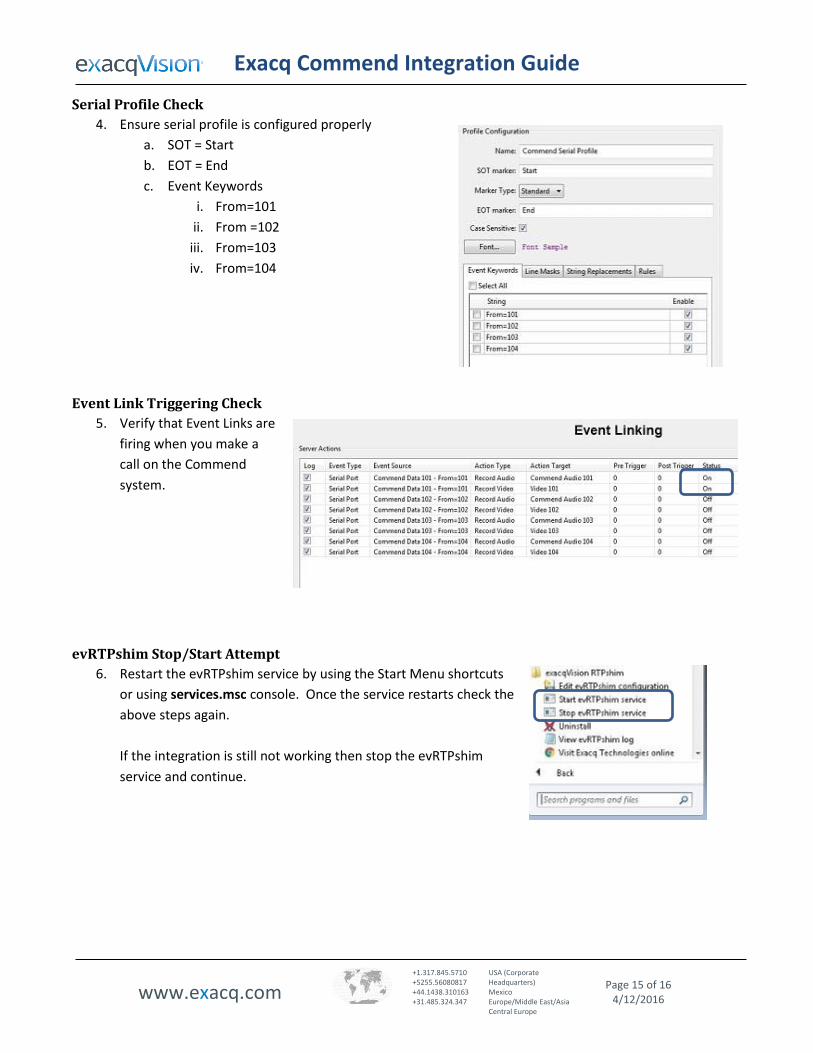
Serial Profile Check
4. Ensure serial profile is configured properly
a. SOT = Start
b. EOT = End
c. Event Keywords
i. From=101
ii. From =102
iii. From=103
iv. From=104
Event Link Triggering Check
5. Verify that Event Links are
firing when you make a
call on the Commend
system.
evRTPshim Stop/Start Attempt
6. Restart the evRTPshim service by using the Start Menu shortcuts
or using services.msc console. Once the service restarts check the
above steps again.
If the integration is still not working then stop the evRTPshim
service and continue.
Exacq Commend Integration Guide
www.exacq.com
+1.317.845.5710 +5255.56080817 +44.1438.310163 +31.485.324.347
USA (Corporate Headquarters) Mexico Europe/Middle East/Asia Central Europe
Page 16 of 16 4/12/2016
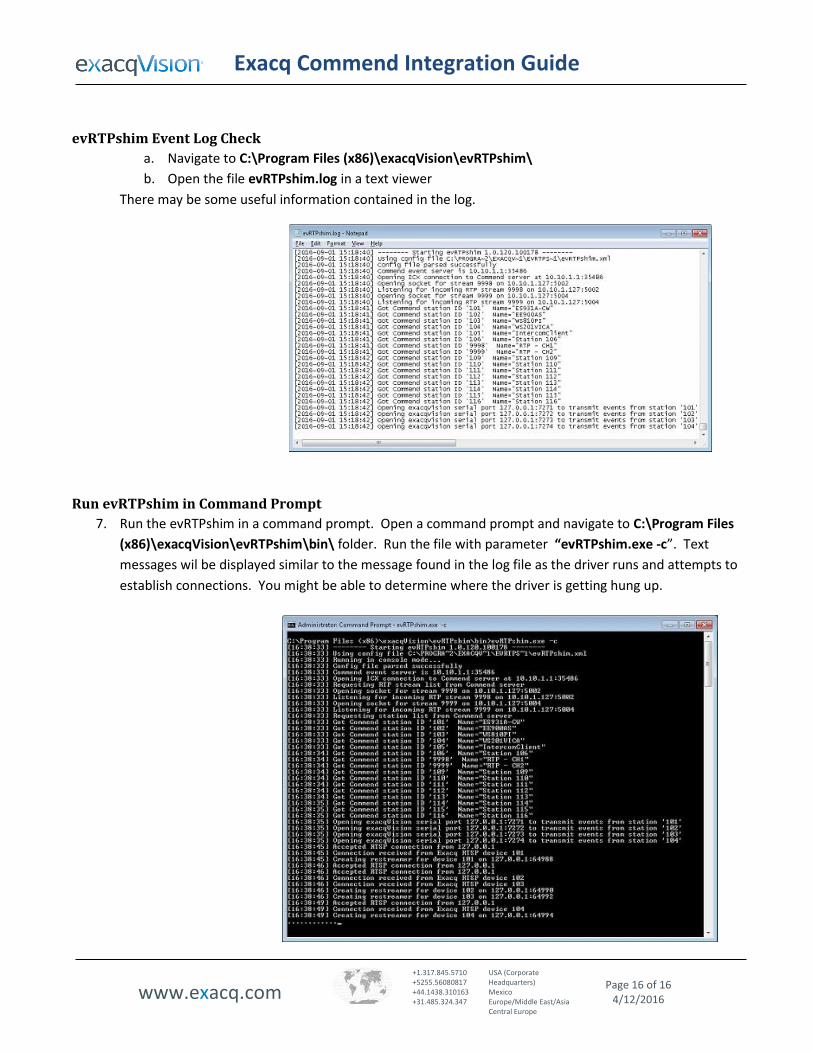
evRTPshim Event Log Check
a. Navigate to C:\Program Files (x86)\exacqVision\evRTPshim\
b. Open the file evRTPshim.log in a text viewer
There may be some useful information contained in the log.
Run evRTPshim in Command Prompt
7. Run the evRTPshim in a command prompt. Open a command prompt and navigate to C:\Program Files
(x86)\exacqVision\evRTPshim\bin\ folder. Run the file with parameter “evRTPshim.exe -c”. Text
messages wil be displayed similar to the message found in the log file as the driver runs and attempts to
establish connections. You might be able to determine where the driver is getting hung up.