e11: autonomous vehicles lab 2: 3d cad and printing autonomous vehicles lab 2: 3d cad and printing...
TRANSCRIPT

1
E11: Autonomous Vehicles
Lab 2: 3D CAD and Printing
The goal of this lab is to create a robot chassis in SolidWorks that can be printed on HMC’s 3D
printer. When you are done, the chassis should look like the one below. After you finish
designing the chassis, you’ll be assembling your robot’s gearbox, which you will use to finish
assembling your robot in Lab 4.
Sketches and Features
SolidWorks is a computer-aided design (CAD) program for modeling 3-dimensional objects.
Using CAD tools, engineers can create models ranging from a single component to a fully-
assembled machines. In this lab, you will create a single part: the chassis of your robot. When
designing a part in SolidWorks, you will start with a two-dimensional drawing, called a Sketch.
This sketch is then converted into a Feature to give it depth in the third dimension. By extruding
sketches on various planes, complex parts can be created.
Cutouts (reduce
print volume)
Gearbox and motor inset
Stack bolt holes
Caster Bolt Holes Front bumper
Sensor tower and
reflectance sensor
holes
2
Constraints
CAD tools are meant to create parts for the real world, which means that each part must be fully
dimensioned. Under the hood, SolidWorks stores a set of constraints that define a drawing.
These constraints specify length, orientation, angle with respect to other objects, or many other
characteristics. It is important to make each drawing fully defined, so that there is no uncertainty
in the shape of the part. A fully defined line will show up in black; an undefined line will be
drawn in blue.
3D Printing
A 3D printer is an additive manufacturing technology that builds up a 3-dimensional object with
successive layers of material. The HMC Dimension SST 1200 3D printer constructs objects
from white ABS plastic. The printer also uses a soluble black support material, which is used to
hold up the building material. This support material is then dissolved away. Since a part is built
upward in 10-mil layers, any layer that is larger than the lower layer requires support material to
hold itself up while printing. The process costs approximately $10/in3 of building material.
Support material is less expensive, but it is nevertheless a good idea to use no more than
necessary.
To minimize printing time and cost, you will build a chassis that is made as thin as is practical
and has cutouts to reduce volume. The design consumes less than 2 in3 of printing material, and
prints in about 2 hours.
3
Getting started
First, log in to a computer in the Digital Electronics Lab. Find SolidWorks 2017 on your
Desktop or under the applications list on windows.
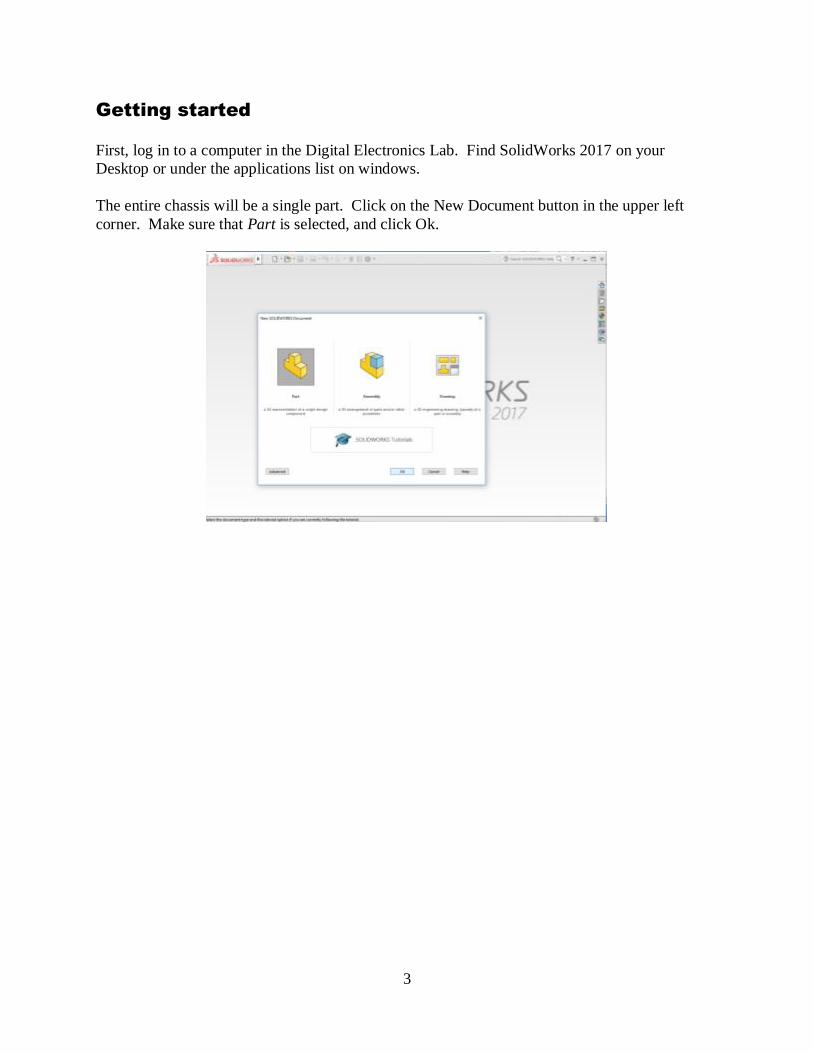
The entire chassis will be a single part. Click on the New Document button in the upper left
corner. Make sure that Part is selected, and click Ok.
4
Helpful Tips & Tricks
Here are a couple shortcuts and other debugging skills that might be helpful as you go along. Keep this
page handy throughout the tutorial.
1. Escape Key
The escape key up on the top left of your keyboard will become your best friend. If ever you triggered
a command you didn't mean to, pushing escape will cancel the command.
Ex: You finished drawing a contour or centerline, but it seems to want to keep drawing.
Pushing 'Esc' will keep what you've already drawn, while getting you out of the drawing mode.
2. Ctrl+Z: How to undo a mess
If you don't want to bother with re-dimensioning something, finding the convoluted way to delete a
sketch or are just fed up and think it's easier to just do the whole step over again, Ctrl+Z will undo the
last step. If you Ctrl+Z too many times, use Ctrl+Y to redo.
3. Click & Drag to select parts of a sketch
Helpful for selecting multiple parts of a sketch. Instead of holding control while clicking each line
segment, you can draw a selection box by holding down the left mouse button and dragging it across
the screen. The place you clicked and the location of your mouse will form two opposite corners of
the selection box.
Note: this will only work to select things in the current sketch you are editing. This will not
highlight previous sketches or features.
4. Feature vs. Sketch: Extrude out? Extrude cut? or Oops, I forgot to select a feature! A sketch is a 2D representation, like a sketch on paper. A feature is what is added to a sketch to make
it 3D. Note that a sketch always precedes a feature.
Step 1: Removing an incorrect feature from a correct sketch
Right click on the incorrect feature, choose delete. The sketch should still be there.
Step 2: Your sketch is awesome and complete, but there's no feature attached!
Click on the sketch name in the left panel, and then click the correct feature button.
5. Rotating the component
Holding down the middle mouse button while moving the mouse around allows for viewing the part
at any angle. This can be useful for amusing yourself as well as other more practical purposes.
Ex: When in Features, editing the extrusions, SolidWorks will put in a phantom projection of
what it will look like. You can view it by rotating your piece, checking if the proportions and
locations of the extrusions/cuts are visually correct.
6. Design Tree
The left hand side of the screen will list in order the steps of your design. Within each main step, you
can click the plus sign next to it to view the substeps, such as sketches. The blue line at the bottom of
this panel is the Rollback feature. You can grab and drag the blue line up to revert your drawing to the
state it was in after the last design step before the new blue line location. This makes changing a
sketch you made earlier and built over much easier. Be careful not to delete features that will be
needed in later design steps when you revert back or SolidWorks will yell at you.

5
7. Editing Smart Dimensions
When in sketch mode, you can change an already placed dimension by double clicking on the
dimension. This only works if you are not in Smart Dimension mode (use Esc). It is not necessary to
delete the dimension and reenter it.
8. Zooming
To zoom in and out, use the scroll (middle mouse button). It will zoom in/out centered around the
location of your mouse. Or, you can press the 'f' key to make the part 'fit the screen'.
9. Save Often
To save your work, click on the Save icon at the top of the screen or press Ctrl-S.
Adding Features
You will continually add many features (starting with the base) to your part. The same process
can be repeated each time, and involves the following steps:
1. Select a Feature (e.g. Extruded Base, Extruded Cut, …)
2. Selecting the plane to which you will draw a 2D Sketch of the Feature.
3. Draw the 2D Sketch using one of the shapes (e.g. Line, Corner Rectangle, …)
4. Giving the exact dimensions of the shapes.
5. Exiting the Sketch
6. Growing the sketch into 3D by setting the Feature parameters (e.g. depth dimension)
7. Name the Feature
8. Save your work
Starting the base
Let’s get started with drawing the part. We want the base to be a single rectangle, centered on
the origin. We will use the 8 steps listed above.
1. Select the Features Tab and Extruded Boss/Base
2. A set of planes should show up in the main window. Click on Top Plane. This means
you’ll be seeing the part from above. At this point, you may need to change perspective
to make drawing more intuitive. There is a button on top of the main window that lets
you select a perspective- this is the View Orientation button. Use it to shift into
downward-looking viewpoint (this is very useful later on).

6
3. Let’s create the Sketch for the base in the shape of a rectangle. In the Sketch tab, click on
the arrow next to the rectangle, and select Center Rectangle.
4. Select the Top Plane as the plane for sketching. If you move your mouse into one of the
quadrants, the Top Plane should become highlighted with an orange border. Now, click
in the very center of the plane (the cursor should show an orange dot) and draw a
rectangle- the exact size does not matter.
5. All of the lines defining this rectangle are blue. That’s because the rectangle doesn’t yet
have any associated dimensions. To assign dimensions, click on Smart Dimension in the
upper corner of the Sketch tab.
Click on the rectangle’s left side, move the cursor a bit to the left, and click again to place
the dimension on the sketch. At this point, a window should pop up allow you to set the
dimension. We want the rectangle to be 3” by 5.375”, so enter 3 in the window and click
the check box.
Important Note: Solidworks sometimes defaults to setting dimensions in metric units. To
change this, go to Options Document Properties Units IPS (Imperial)

7
Now, repeat the process for the long side, making it 5.375” long. All the lines of the
rectangle should now be black, and you should see “Fully Defined” in the status bar at
the bottom of the screen.
6. We’re all done with the sketch, so click on Exit Sketch in the upper left corner of the
Sketch tab. Important: Remember to Exit Sketch at the end of each feature you add!
7. Now, we’re going to push the sketch of the rectangular base into the 3rd dimension!
Switch from the Sketch tab to the Features tab and select Extruded Boss/Base.
The left pane will allow you to select options for Boss-Extrusion. Make sure the drop-
down menu for Direction 1 is set to Blind, and select a depth of 0.18 inches. To finish,
click on the green check mark.
You should now see a rectangular prism in the main window. Hold down the middle
mouse button to spin around the part; press ‘f’ to zoom to the extents of your part.
8. In the left most pane, there will be a list of features. At the bottom of this list will be the
feature you just added called “Boss-Extrude 1”. Let’s rename it to “Chassis Base”, by
selecting it, pausing, and then selecting it again.
9. This is a great time to save your work. Save again at regular intervals as you go.

8
Cutting corners from the base
Let’s cut corners from the rectangular base. Again, we will use the 8 steps listed above.
1. We will cut out excess material on the front of the robot. In the Features tab, select
Extruded Cut. Note: do not choose Extruded Boss/Base.
2. SolidWorks now asks for a plane on which to draw – this is what’s known as the sketch
plane. Click the top face of the rectangular prism. IT SHOULD TURN BLUE!
(DEFAULT)
Note: If you’ve gotten disoriented from all your spinning, remember that you can reorient
yourself using the View Orientation button at the top of the window to return to the top
view.
3. This time, select a Corner Rectangle from the Sketch tab. Draw a rectangle from the top
right corner down, (see image below). SolidWorks is enthusiastic about snapping
sketches to existing lines and corners in the drawing. Visual cues should indicate when
the rectangle is snapping to the corner of the base. Again, the exact size doesn’t matter,
since it will change when you apply dimensions to the rectangle.
4. Use Smart Dimension to define the rectangle as 1.375” by 0.8”. You should end up with
the following:

9
To save on effort, we will now mirror this rectangle along the long axis of the base.
Select Centerline in the Sketch tab. This tool will be very useful for making symmetric
parts.
The centerline should connect the midpoints of the left and right sides of the base. Move
the mouse along the left side of the base. When you are near the middle, an orange
square should appear, indicating the midpoint of the line. Click on the square to start the
centerline, move horizontally to the right side's midpoint, and click again to place a
vertex. Press Esc once or Enter twice to complete the line.
Select the rectangle that you’ve just drawn and the mirror line (either hold the Ctrl key
and click multiple times or Click & Drag to select multiple items - refer to Helpful Tips
& Tricks). Now, click Mirror Entities in the Sketch tab. For the “Entities to Mirror”,
select the corner rectangle to mirror. For the “Mirror About”, select the center line.
SolidWorks will automatically decide that you want to mirror about the centerline. It
should reflect the rectangle onto the lower half of the base.
5. Now, exit the sketch.
6. A new options menu for the Extrude command should appear on the left hand side of the
screen. In the options for Extrude, change “Blind” to “Through All”. This will ensure
that if you change the thickness of the base, the cutouts will still go through the entire
thing. Click the green checkmark, and admire your work.
7. In the left most pane, there will be a list of features. At the bottom of this list will be the
feature you just added called “Cut-Extrude 1”. Lets rename it to “Corner Cutouts”, by
selecting it, pausing, then selecting it again.
8. Save your work.

10
Cutouts for gearbox and motors
It’s time to add an inset for the gearbox and motors. Steps 1 through 8 ….
1. Again, select Extruded Cut
2. Click on the top face of the base.
3. First, draw a centerline across the base. In the Sketch tab, select Line and draw something
like the following:
Be careful to keep that the lines stay either horizontal or vertical. Make sure that the line
starts on the side of the base, and ends on the centerline. SolidWorks gives you visual
cues (e.g. changing colors) to show when it’s snapping points to other lines on the
drawing.
We want this shape on both sides of the centerline. Again, select all of the lines and the
centerline; press Mirror Entities in the Sketch tab to make a reflection. Make sure that
the contour is closed- if there isn’t one already, draw a line from the top left to
bottom left vertex.
4. Now, use Smart Dimension to give this shape dimensions. Observe that as you set
dimensions on the bottom of the sketch, the top half adjusts itself to stay mirrored. Make
sure the piece is fully defined. (see dimensions on next page).
Note: You do not want to over define the sketch. If there is a warning box asking if you
want to make a dimension 'driven', that indicates the dimension you are trying to add is
unnecessary.
5. Exit the sketch.

11
6. Set the extrusion’s end condition to “Blind”, and pick a depth of 0.1”. This will cut part
way through the body. Complete the extrusion, and look over your work. Rotate the view
so you can see that you have actually cut away from the base.
7. Rename the feature.
8. Save the part.
Satisfied? Good!
Gearbox Holes
The gearbox has screw holes that make it easy to attach. We can punch holes through the base
for these screws.
1. Select Extruded Cut, with the gearbox inset as your sketch plane.
2. Click on the top surface plane that has had its depth reduced.
3. Select Circle from the sketch tab, and draw a circle inside the tab at the bottom of the
cutout. As always, exact dimensions don’t matter at this stage.
4. Using Smart Dimension, click on the outside of the circle. You’ll create a diameter
dimension; set it to 0.12”. The circle’s size is now defined, but you still need to give it a
location.
Click on the center of the circle, then on the line on the left side of the tab (see next
page):
12
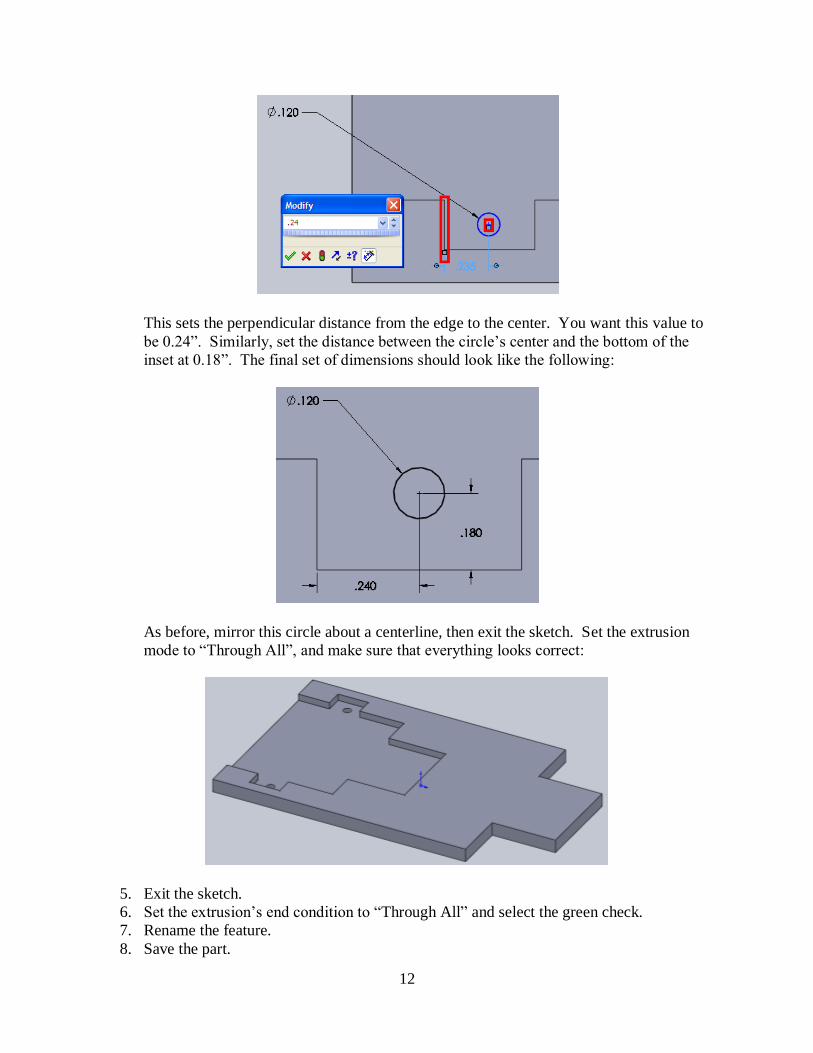
This sets the perpendicular distance from the edge to the center. You want this value to
be 0.24”. Similarly, set the distance between the circle’s center and the bottom of the
inset at 0.18”. The final set of dimensions should look like the following:
As before, mirror this circle about a centerline, then exit the sketch. Set the extrusion
mode to “Through All”, and make sure that everything looks correct:
5. Exit the sketch.
6. Set the extrusion’s end condition to “Through All” and select the green check.
7. Rename the feature.
8. Save the part.
13
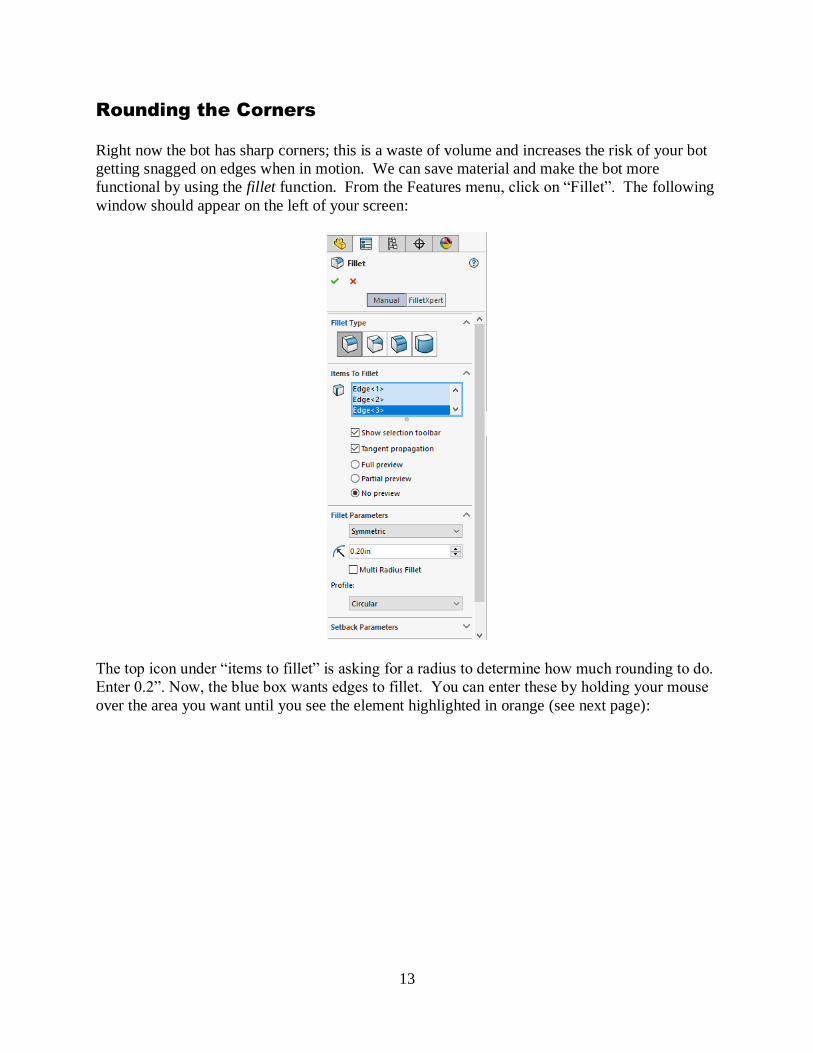
Rounding the Corners
Right now the bot has sharp corners; this is a waste of volume and increases the risk of your bot
getting snagged on edges when in motion. We can save material and make the bot more
functional by using the fillet function. From the Features menu, click on “Fillet”. The following
window should appear on the left of your screen:
The top icon under “items to fillet” is asking for a radius to determine how much rounding to do.
Enter 0.2”. Now, the blue box wants edges to fillet. You can enter these by holding your mouse
over the area you want until you see the element highlighted in orange (see next page):

14
Now click on it, and it should stay highlighted and an element will appear in the blue box,
indicating that element will be filleted. Do this for the four main corners (not the front where
you will later put the bumper). Make sure you click on the four vertical edges (use the middle
mouse button to rotate your object as needed to select them). If you click on an incorrect item by
mistake, clicking it again will remove it from the list to be filleted. When you are ready, click
the green check mark. Your chassis should now look like this:

15
Identification Label
Put your name on the bottom side of the robot chassis so you’ll be able to identify your robot
after it is manufactured. Use an extruded cut (make sure you have used to orientation tool to
ensure you are on the bottom face!). Choose the text tool. Enter your initials. The default font
isn’t very readable. Uncheck the “Use Document Font” box and click on Font. As shown in the
figure below, choose Arial (under font) and Black (under Font Style). Set the height to 0.2
inches. Apply dimensions to place it in a good location where you won’t be making holes. After
Exiting the Sketch, set the depth to 0.05 inches.

16
Boldly onwards!
Now, look at the drawing of the completed chassis. You will see that you are missing various
important pieces:
• Corner holes for attaching PCB
• Rectangular hole for the reflectance sensor
• Circular hole for mounting the sensor tower
• Pair of holes for attaching caster wheel
• Front bumping plate
• Miscellaneous cutouts to reduce part volume
The drawing has enough information for you to add these pieces to your own chassis. Proceed
boldly onwards, and ask your instructor for clarification if you have any questions. Make sure to
check that your initials haven’t been cut through before finishing.
Some hints: Remember to use everything you’ve learned (like mirroring – you can mirror
across horizontal or vertical center lines!).
17
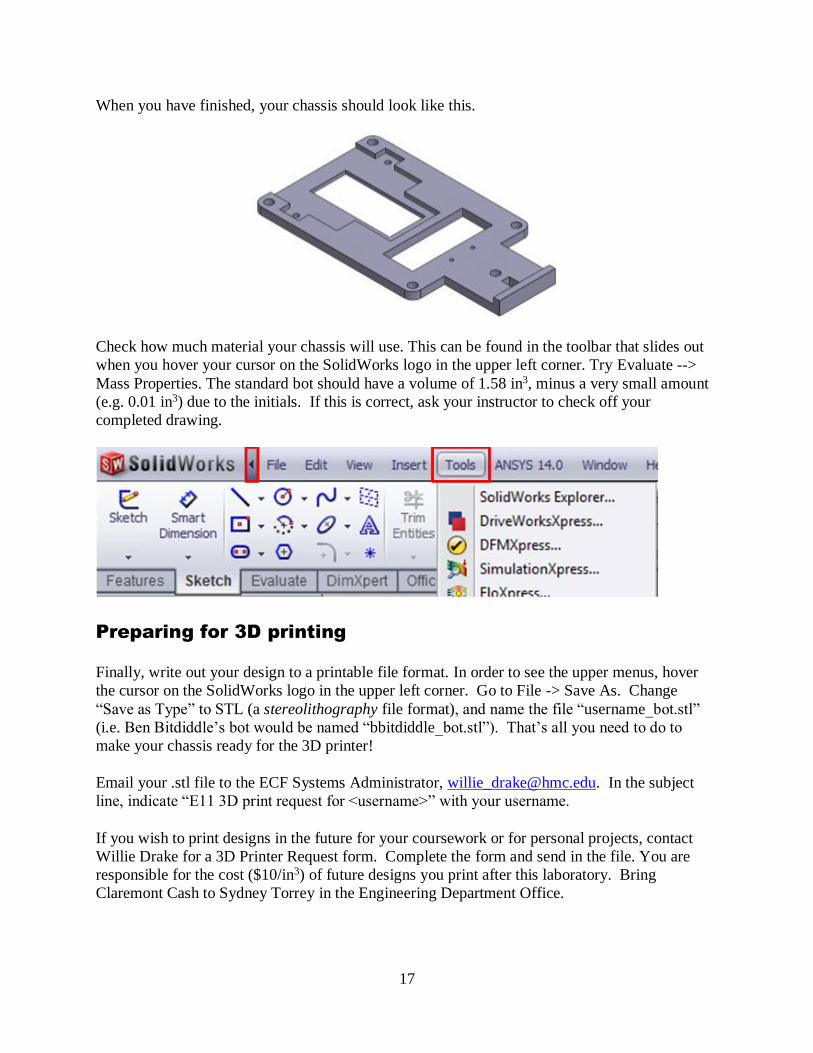
When you have finished, your chassis should look like this.
Check how much material your chassis will use. This can be found in the toolbar that slides out
when you hover your cursor on the SolidWorks logo in the upper left corner. Try Evaluate -->
Mass Properties. The standard bot should have a volume of 1.58 in3, minus a very small amount
(e.g. 0.01 in3) due to the initials. If this is correct, ask your instructor to check off your
completed drawing.
Preparing for 3D printing
Finally, write out your design to a printable file format. In order to see the upper menus, hover
the cursor on the SolidWorks logo in the upper left corner. Go to File -> Save As. Change
“Save as Type” to STL (a stereolithography file format), and name the file “username_bot.stl”
(i.e. Ben Bitdiddle’s bot would be named “bbitdiddle_bot.stl”). That’s all you need to do to
make your chassis ready for the 3D printer!
Email your .stl file to the ECF Systems Administrator, [email protected]. In the subject
line, indicate “E11 3D print request for <username>” with your username.
If you wish to print designs in the future for your coursework or for personal projects, contact
Willie Drake for a 3D Printer Request form. Complete the form and send in the file. You are
responsible for the cost ($10/in3) of future designs you print after this laboratory. Bring
Claremont Cash to Sydney Torrey in the Engineering Department Office.

18
Assembling the Gearbox
Find the gearbox kit in your toolbox. The robot’s gearbox can be assembled in different ways
depending on the desired speed and torque. For this lab, assemble it in the lowest-speed
configuration with a 344.2:1 gear ratio. You will be allowed to change the configuration after
completing Lab 5. Follow the directions in the gearbox kit.
NOTE: When you apply grease to the gears, be careful not to use too much. Apply one or
two drops and then rotate the gears.
The directions contain a scale that will help you place the parts at the right position on the shaft.
Be sure to tighten down the grub screw forcefully against a flat edge of the hex shaft so that the
gear hub does not slip when the motors apply full torque. If the hub does slip later, you’ll have
to disassemble your gear box and rebuild it. Keep the spare parts in case you want to rebuild your
gearbox with a different gear ratio at a later time.