drill press - | welcome · pdf filedrill press r----model number ... any motor of conventional...
TRANSCRIPT

OPERATING INSTRUCTIONS AND PARTS LIST FOR
DRILL PRESS
r----Model Number 103.2362 This is the model number of your Drill Press. It will be found on a plate located on the base near the column. Always mention thismodelnumberwhencommunicating with us regarding your Drill Press or when ordering parts .
...--Instructions For Ordering Parts.----. ---------
-- All parts liSted herein must be ordered through a Sears retail store or mail order house. Parts are shipped' prepaid. When ordering repair parts. always give the following information:
1. The Part Number. 2. The Part Name and Price. 3. The Model Number 103.23620.
This lili\t is valuable. It will assure your being able to obtain proper parts service. We suggest you keep it with other valuable papers.
SEARS, ROEBUCK and CO.
UTHOGRAPHED IN U, S. A.
SOURCE FORM 26949
-,
1

OPERATING INSTRUCTIONS AND PRICE LIST FOR DRILL PRESS
Model Number 103.23620
TABLE LOC:K --.11 HANDLE
FIGURE I
You now own one of the handiest drill presses avail· able for wood and metal drilling in the home work shop.
The quality of the material and the precision ma· chining operations are controlled by rigid tolerances to assure accuracy within a few thousandths of an inch. The rigid steel column, the sturdy base and table, and the massive box type head casting enclos· ing the operating mechanism are designed to maintain this accuracy through the wide range of operations which may be performed on the drill press.
The fully enclosed floating spindle design does away with the projection of the splines at the top thus making your drill press a safer-neater appearing tool. This feature allows you to change the belt to the various pulley steps or even remove the belt quickly and easily without interference from a guard or cover.
The quiet long life porous bronze bearings filter and feed oil to the moving parts as it is needed.
In its price class, we feel that this drill press is un· equaled in quality, service, and convenience of opera· tion.
ASSEMBLING: Your drill press has been carefully inspected and tested at the factory. To avoid loss during shipment, the following parts have been packed separately in an enclosed carton.
Knurled Collar-18428-Turn this collar onto the threads just above the spindle taper. Chuck-The standard #33 Jacobs chuck will hold drills from 5/64 inch up to Y2 inch in diameter.
2
Clean the spindle taper and the taper seat in the chuck. Place the chuck on the spindle, and tap the chuck body-not the jawa--from below with a piece of wood to seat the chuck firmly on the spindle. Chuck Key and Wedge--Keep these parts in a handy place close to the drill press. Motor PuDey-Install this pulley on your motor with the small step toward the motor. ADen Wrench-This Va inch standard Allen wrench will fit the motor pulley set screw, and the set screw in the feed stop collar. Belt-Place the belt around corresponding steps of the motor and spindle pulleys. Motor Mount Bolts, Nuts, and Washers--These parts should serve the purpose for attaching most any motor of conventional design to the drill press motor mount.
INSTALLATION: The drill press should be holted to a well built work stand or bench before operating. Three 11/32 inch holes are provided in the base for this purpose.
To install the motor loosen the motor mount lock screw and remove the mount from the drill press. Fasten the motor to the mount with the bolts pro· vided. The direction of Rotation of the Motor PuUey Must be Clockwise. Reinstall the motor mount, with motor attached, and tighten the mount lock screws. For normal operation the large step of the spindle pulley should be in line with the small step
..
'-,

of the motor pulley. Place the belt around the pulleys and tighten by sliding the motor mount away from the drill press head. Tighten the mount lock screws securely to hold this tensioa. The belt tension should be just sufficient to prevent slippage during normal operation. Excessive tension overloads the motor and places unnecessary strain on the drill press mechanism.
LUBRICATION: There are four points at which you should apply a good quality automobile engine oil. S.A.E. No. 30. to your drill press.
I. An oil hole is provided in the head casting directly over the pinion shaft #26623.
2. An access hole is located in the top surface of the 3 v.. inch diameter step of the spindle pulley through which you can reach the oil hole in the head casting directly behind the spindle.
3. Lower the spindle and apply oil through the hole in the keyway on the left side of the quill No. 26120.
4. Apply oil to the splines at the top of the spindle.
Keep oil off the belt. To maintain the smooth sliding action of the table on the column. and to prevent rust. it is wise to wipe the exposed surfaces of the column and table occasionally with an oily rag. Do not drill holes for oil thru the bearings.
MOTOR-SPEED: A 1 /3 horsepo~,~JI 750 R.P.!\1. baH bearing motor will provide sufficient speed and power for your drill press. The operating speeds available with normal set-up are shown in the chart. Other speeds are available by changing the position of the motor pulley in relation to the spindle pulley so that different step combinations are created.
DRILL PRESS
MOTOR (1750 RPM)
SPINDLE R.PM, 4000 2275 1346 765 A -~ - -- .. - ..
~~ ~ ;"~'" «(<;: 9~ ~ - ~
MOTOR PULLEY RAISED ONE GROOVE=:Jl
~sg~ .-_3i~ <~ MOTOR PULLEY RAISED TWO GROOVES ~
CONTROLS: The Feed Handle is designed to permit quick leverage adjustment to allow greater feed pres-
3
sures without excessive hand r---:C;;:::::;;~ pressure. This design feature also allows the handle to slide through the pinion shaft quickly and easily to clear work which might be in the way of a fixed feed handle. The Feed Stop Collar allows you to pre-set the feed depth when you wish to drill several holes to the same depth or when the depth of a blind hole must be set before drilling. See illustration. The feed depth is
lower the drill to the planned depth of cut. Set
.--~f--..., quill lock.
-~ shown by calibrations on the pinion shaH near the collar. The Table Lock Handle when loosened releases the grip of the barrel-lock on the column to allow change of table position. When you release the table lock handle. support the table firmly to prevent its dropping. The Quill Lock Handle when tight holds the quill firmly in place for operations such as shaping. fluting. surface grinding. etc. Never attempt to lower the spindle while the quill lock is tight. The Headstock Lock Handle functions in the same way as the table lock. However. more care must be exercised when releasing this lock due to the greater weight of the parts supported.
Tighten the lock handles securely to prevent shifting after the position of the head or table is changed.
ADJUSTMENTS: The Feed Return Adjusting Knob when turned counteI:-clockwise will increase the tension of the feed return spring. If the feed return becomes sluggish loosen the adjusting knob lock screw and turn the adjusting knob until the desired tension is reached. Tighten the lock screw securely after adjustment.
If the headstock lock handle should strike the motor mount before locking. or if it blocks access to the motor mount lock screws. the position may be changed without disturbing the locking efficiency. The hex nut in the barrel-lock # 1812 1 may be removed and rotated-thus causing the handle to lock in a new position.
Retighten pulley set screws after a few hours operation.
DRILLS AND BITS: Quite a variety of drills and bits are available for use in your drill press.
For metal drilling, the standard twist drill has proven most satisfactory. High Speed Steel Drills generally give more satisfactory service 'for commercial operation because they hold their edge longer and may be operated at higher speeds. However. their greater cost often makes their use in the home shop unwarranted. Unless extensive metal drilling operations are plannea. the less expensive carbon steel drills will give satisfactory servIce.
The standard twist drill may also be used in wood. This drill will operate much more effi-
--,

ciently in wood, however, if the point is altered from the original 120 degree angle to a much sharper angle of approximately 70 degrees.
Most any standard bit may be used for wood drilling in the drill press. Slight alterations may be necessary in some cases. The solid center wood bit com-
For Metal For Wood
monly used with the hand brace can readily be reworked for drill press use by filing the threads off the point and by cutting off the enlarged adapter section at the end of the bit shank.
The Spur Machine Bit is probably the best bit for wood drilling with the drill press. It combines the best qualities of the twist drill and the standard wood bit. Its stiffness and cutting spurs combine
Solid Center Wood Bit
Spur Machine Bit
Double lip Counter Sink
to make a better tracking bit which drills an exceptionally smooth true hole in wood.
The Expansive Bit is a handy t~ol for drillin~ large holes. With this tool you can drill a variety of large hole sizes without having to buy separate large diameter drills for each hole size. As is true with any of the wood bits when used in the drill press, the screw point must be filed to a brad point. This prevents the coarse screw threads from biting into the work and lifting it from the table.
The Double Lip Counter sink is more desirable than the rosette type. for drill press use. It will cut cleaner and is less apt to load up with chips and gum under continuous operation.
DRILL SHARPENING:
To maintain the accuracy and cutting efficiency of your twist drills, extreme care should be exercised during grinding. The two cutting lips must be of equal length and their angle in relation to the axis of the drill must be equal. Relieve the metal gradually behind the cutting lips so that the angle at the heel of the cutting edge is approximately 12 degrees on a side less than at the cutting lip.
4
Length of Cutting lips must be equal
OPERATION:
Heel of Cutting Lip
When the drill press is used for wood working it is advisable to fasten a smooth level auxiliary table of Y4 inch p.lywood to the metal table using countersunk flat head screws or bolts. This auxiliary table not only increases the working surface available, but provides a surface on which auxiliary fences, shaping, guides, pivot pins and other similar units may easily be used. This auxiliary table also will reduce the danger of drilling through the work piece 'into the metal table.
If the drill is to pass completely through the work piece it is advisable to place a piece of scrap wood under the work piece at the point of breaking through to prevent splintering and mutilation of the lower surface as the bit breaks through. Ano~her method of preserving the surface, at drill break through is to reverse the wood and drill through from the opposite side as soon as the drill point emerges on the lower 'Surface.
Due to variation in the bit pattern, the type, hardness. and grain of the material, and the depth and quality of the hole desired, it is impractical to attempt to establish a fixed table of drill feeds and speeds for boring in wood. It is best to follow this general rule: the larger the hole and the harder the material the slower the feed and speed. Start any drilling operation with a moderate feed and speed, increasing either or both after noting the effect on the drill.
In wood drilling operations, drills up to ¥.t inch in diameter may generally be run at 1800 to 3000 RP.M. without burning while bits Y4 inch in diameter and over cannot generally be run over 2400 RP.M. without burning. Multi-spur bits, expansive bits and hole saws should never be operated over 750 RP.M. In general, if the drill smokes in the hole, reduce the feed and speed to prevent burning.
When drilling metal. if it is noted that the drill wears away at the extreme outer corners of the cutting edges, it is an indication of too much speed. Likewise if the drill chips on the cutting edge, it is an indication of too heavy a feed. Very small drills are generally designed for high speed and light feed and should be used accordingly for best results.
A straight piece clamped to the table as a guide or fence has many uses, as in drilling several holes the same distance from a common edge or as a guide in grooving or fluting operations.
The work piece should be held securely on the table either by clamps or pins to prevent turning with the drill.
A drill vise is an inexpensive and very handy unit, designed to hold various odd shaped work pieces for drilling. Cylindrical work pieces such as dowels, or
turned work pieces of various diameters present difficulties when an attempt is made to drill through or into their centers without an adequate stabilizing device. The drill vise or a V block should always be used for work of this type.
If the drill is long enough to go through the piece. but its 'penetration is limited by the travel or feed limit of the chuck. the piece may be set up on a block after the first cut of maximum feed depth has been made. thus allowing the drill to penetrate to its maximum length.
Holes through a' piece. the thickness of which is greater than the drill length may often be completed by first establishing the location of the piece in relation to the drill center. then after drilling as far as possible from one side the piece may be reversed and the hole completed from the other side.
All metal work should be clamped securely to the work table before drilling is attempted. Should the drill lodge in a piece not clamped. it could easily tear the piece from the operator's grip resulting in injury to the operator as well as mutilation of the drill press and work piece.
A punch mark on the metal surface at the center of the proposed hole will tend to keep the drill on center until the drill-spot is established.
Always reduce the feed pressure when the drill is breaking through the surface of a work piece. This reduces the tendency of the drill to bite deeply at this point and thereby minimizes drill breakage.
Avoid set-ups which will allow the work to spring. This will help minimize drill breakage.
Lubricants should be used on all metals except cast iron which is drilled dry. For most metals. lard oil is a suitable lubricant. for the harder metals a solution of sal soda in water may be used.
This drill press is designed to give maximum protection from moving parts at all times. Since a guard on the chuck and drill would also hide the work. it must be impressed upon the operator that as with all rotating power tools. no loose clothing should be worn when working with the drill press.
The face should be kept away from the drill so that the hair does not become entangled with moving parts or that flying chips do not injure the operator.
Accessories are available with which further operations may be performed on your drill press such as dovetailing. shaping. routing. carving. sanding. spot finish or engine turn. cutting of plugs or dowels. fluting and reeding and buffing. An interesting booklet covering details on these various operations is available.
il II
PARTS LIST il I
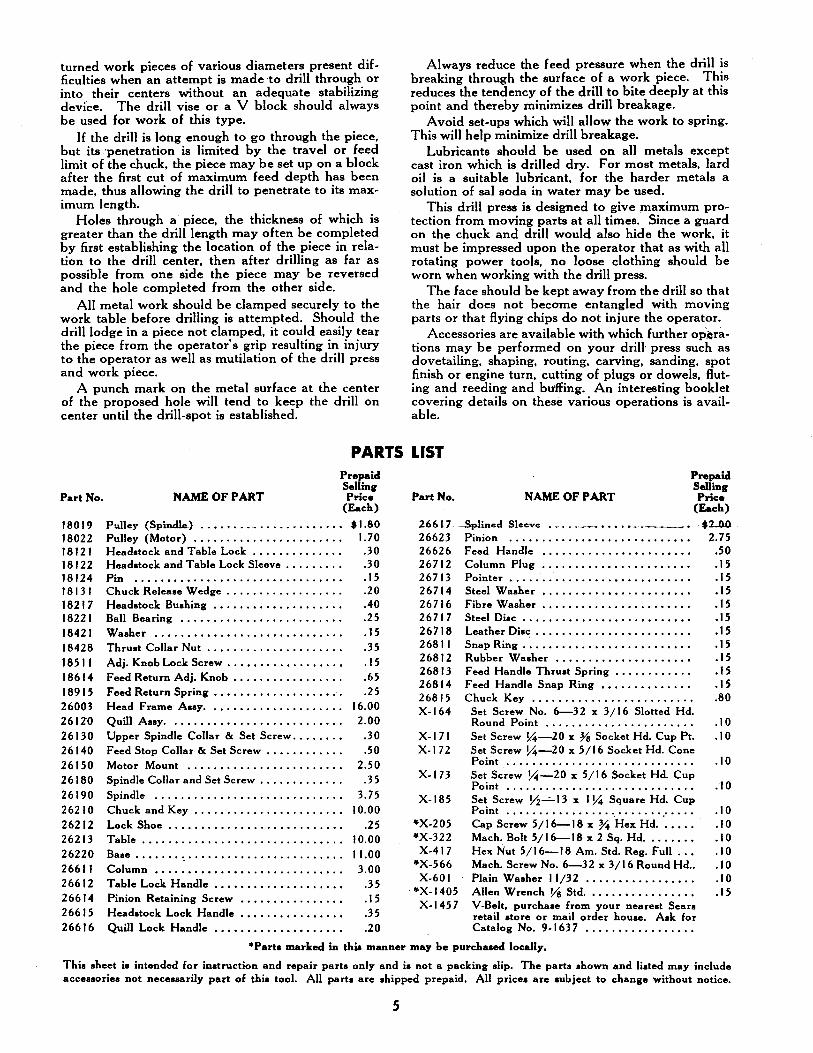
Part No.
18019 18022 18121 18122 18124 1813 I 18217 18221 18421 18428 1851 I 18614 18915 26003 26120 26130 26140 26150 26180 26190 26210 26212 26213
NAME OF PART
Prepaid Selling Price
(Each)
Pulley (Spindle) ........ _ ........... .. Pulley (Motor) ............••...•..... Headstock and Table Lock ..••••••...... Headstock and Table Lock Sleeve ........• Pin .............................. .. Chuck Release Wedge ............... , .. Headstock Bushing ••.•..•..•.......... Ball Bearing ••.••.••..••..•..........
Washer •.•..••.••.•••.•..•..••.••..• Thrust Collar Nut ..•...........•......
Adj. Knob Lock Screw ..••..••.•....•..• Feed Return Adj. Knob ...•........•.... Feed Return Spring •.•..•...........•.. Head Frame Aaay .••.••..•..•.......•. Quill Assy .•.•.••••••••............•• Upper Spindle Collar & Set Screw .......• Feed Stop Collar & Set Screw .••.........
Motor Mount •.....•..............•.. Spindle Collar and Set Screw ............ .
Spindle ............................•
Chuck and Key .............•.........
Lock Shoe .•.•.•..•.......•.•..•...••
$1.80 1.70 .30 .30 · I 5 .20 .40 .25 .15 .35 • I 5 .65 .25
16.00 2.00
.30
.50 2.50
.35 3.75
10.00 .25
Table . • . . . • . . . • . . . . . . . . . . . . . . • . . • . .• 10.00 26220 Base ••••.... ,........................ I 1.00 266 I I Column... • • • • • • . • • • • . . • . . • . . . . . . • .• 3.00 26612 Table Lock Handle.................... .35 26614 26615 26616
Pinion Retaining Screw •••••.••...•..••
Headstock Lock Handle '" ..••••.•.••.• Quill Lock Handle •••••••••••••••..•.•
· I 5 .35 . 20
Prepaid
Part No. NAME OF PART Price Selling '.j
(Each) I 26617. -Splined Sleeve ..•. --~. , ••. ~~---- • $2.D.O.. --')11 26623 Pinion ............................ 2.75 I 26626 Feed Handle •.••...•...•••••...•••• .50 26712 Column Plug....................... .15 267 I 3 Pointer............ • • . . • • • . . • . • • . • • • I 5 II 267 I 4 Steel Washer •.....••..•••.••••• ,... • I 5 ;! 26716 Fibre Washer ....................... .15 . 267 I 7 Steel Disc .•. . . . . • . . • . • • • • . . • • • • . • • • • I 5 ," 267 I 8 Leather Disc. . • . . . • • • . . . . • • • . . • . • • . . • 15 268 I I Snap Ring. . • • • . . . • . . • . . . . . . • . • • • • • . . I 5 268 I 2 Rubber Washer •••...••.•••••••.••.• • I 5 268 I 3 Feed Handle Thrust Spring . . . . . . . • • • . • • I 5 268 I 4 Feed Handle Snap Ring .............. • I 5 26815 Chuck Key ........................• .80 X-164 Set Screw No. 6-32 x 3/16 Slotted Hd.
X-I71 X-I72
X-I73
X-I85
·X-205 ·X-322
X-417 ·X-566 X-601
·X-1405 X-I457
Round Point ...................... . Set Screw !4-20 x Ys Socket Hd. Cup Pt. Set Screw ];4-20 x 5/16 Socket Hd. Cone Point ..•.•...•.........•.•........ Set Screw !4-20 x 5/16 Socket Hd. Cup Point .................•..•.......• Set Screw Y2-"- I 3 x 1!4 Square Hd. Cup Point ..•....••........ , ........••..• Cap Screw 5/ 16-18 x ~ Hex Hd .•••.• Mach. Bolt 5/16-18 x 2 Sq. Hd ...•...• Hex Nut 5/1 6-18 Am. Std. Reg. Full ..• Mach. Screw No. 6-32 x 3/1 6 Round Hd .. Plain Washer 11/32 •.•.••.••••••.•.. Allen Wrench Vs Std. • ..•.••..•...••• V-Belt. purchase from your nearest Sears retail store or mail order house. Ask for Catalog No. 9- I 637 •....••••..•..•.•
.10
.10
.10
.10
.10
.10
.10
.10
.10
.10 • I 5
·Part. marked in this manner may be purchased locally.
This sheet is intended for instruction and repair parts only and is not a packing slip. The parts shown and listed may include accessories not necessarily part of this tool. All parts are shipped prepaid. All prices are subject to change without notice .
• 5

X171-o
26150-------_
X417 ___
X601 e. 0
X601
26615 --------
X322---------
X171-----4E:...-,.
X1457--+I
18022--...... -,
X1405 --..... --"'"""-'-"
18122~
26612-----.l)
26712 •
26611------
26212-----
FIGURE 2
6
-18019
26190
-----26210 ""i~------2681 5
,-------26213
-----?6220
X566
"
26718
26717 26813
26140 X173
26814
26623 26626
'.,
8000-8-50