drill press lathe
DESCRIPTION
A drill press has all the makings of a lathe, except that it's vertical. But who's to say a lathe has to be horizontal?TRANSCRIPT

http://www.instructables.com/id/Drill-Press-Lathe/
Home Sign Up! Explore Community Submit
All Art Craft Food Games Green Home Kids Life Music Offbeat Outdoors Pets Photo Ride Science Tech
Drill Press Latheby Tool Using Animal on February 26, 2008
Table of Contents
License: Attribution Non-commercial Share Alike (by-nc-sa) . . . . . . . . . . . . . . . . . . . . . . . . . . . . . . . . . . . . . . . . . . . . . . . . . . . . . . . . . . . . . . . . . . . . . . . . . . . . . 2
Intro: Drill Press Lathe . . . . . . . . . . . . . . . . . . . . . . . . . . . . . . . . . . . . . . . . . . . . . . . . . . . . . . . . . . . . . . . . . . . . . . . . . . . . . . . . . . . . . . . . . . . . . . . . . . . . . . . . . 2
step 1: Make a live center . . . . . . . . . . . . . . . . . . . . . . . . . . . . . . . . . . . . . . . . . . . . . . . . . . . . . . . . . . . . . . . . . . . . . . . . . . . . . . . . . . . . . . . . . . . . . . . . . . . . . . 2
step 2: Making a great fit . . . . . . . . . . . . . . . . . . . . . . . . . . . . . . . . . . . . . . . . . . . . . . . . . . . . . . . . . . . . . . . . . . . . . . . . . . . . . . . . . . . . . . . . . . . . . . . . . . . . . . . 3
step 3: Almost done . . . . . . . . . . . . . . . . . . . . . . . . . . . . . . . . . . . . . . . . . . . . . . . . . . . . . . . . . . . . . . . . . . . . . . . . . . . . . . . . . . . . . . . . . . . . . . . . . . . . . . . . . . . 4
step 4: Turning . . . . . . . . . . . . . . . . . . . . . . . . . . . . . . . . . . . . . . . . . . . . . . . . . . . . . . . . . . . . . . . . . . . . . . . . . . . . . . . . . . . . . . . . . . . . . . . . . . . . . . . . . . . . . . 5
Related Instructables . . . . . . . . . . . . . . . . . . . . . . . . . . . . . . . . . . . . . . . . . . . . . . . . . . . . . . . . . . . . . . . . . . . . . . . . . . . . . . . . . . . . . . . . . . . . . . . . . . . . . . . . . . . 7
Advertisements . . . . . . . . . . . . . . . . . . . . . . . . . . . . . . . . . . . . . . . . . . . . . . . . . . . . . . . . . . . . . . . . . . . . . . . . . . . . . . . . . . . . . . . . . . . . . . . . . . . . . . . . . . . . . . . 7
Comments . . . . . . . . . . . . . . . . . . . . . . . . . . . . . . . . . . . . . . . . . . . . . . . . . . . . . . . . . . . . . . . . . . . . . . . . . . . . . . . . . . . . . . . . . . . . . . . . . . . . . . . . . . . . . . . . . . . 7
http://www.instructables.com/id/Drill-Press-Lathe/
License: Attribution Non-commercial Share Alike (by-nc-sa)
Intro: Drill Press LatheI think any wood worker will eventually gravitate towards wood turning. However wood lathes (good ones anyways) are expensive, this is my variant based on the onesfrom Grizzly, Vertilathe and Eccentric cubicle.
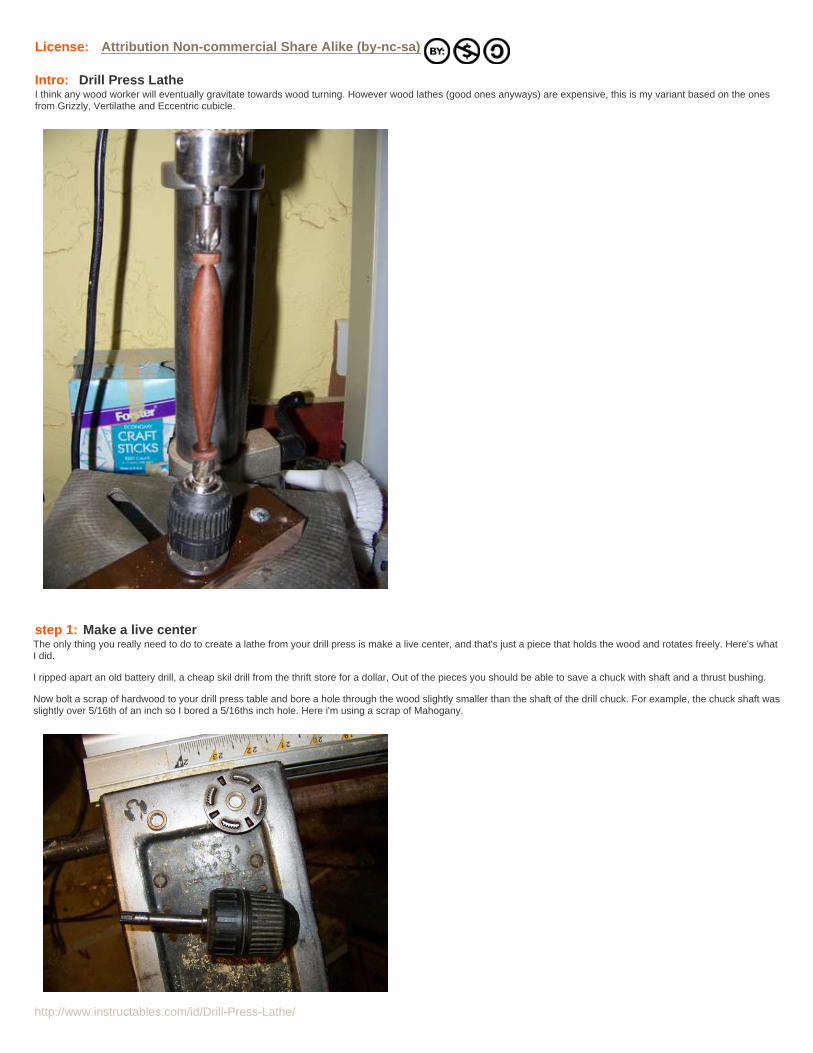
step 1: Make a live centerThe only thing you really need to do to create a lathe from your drill press is make a live center, and that's just a piece that holds the wood and rotates freely. Here's whatI did.
I ripped apart an old battery drill, a cheap skil drill from the thrift store for a dollar, Out of the pieces you should be able to save a chuck with shaft and a thrust bushing.
Now bolt a scrap of hardwood to your drill press table and bore a hole through the wood slightly smaller than the shaft of the drill chuck. For example, the chuck shaft wasslightly over 5/16th of an inch so I bored a 5/16ths inch hole. Here i'm using a scrap of Mahogany.

http://www.instructables.com/id/Drill-Press-Lathe/
step 2: Making a great fitTo ensure a good fit between the shaft of the chuck and the block of hardwood, we're going to use the shaft to burnish the wood to size. Use a hex shaft screw driver bitand chuck it into the drill press, now attach the chuck we're using as a center and with the drill press running slowly, very slowly feed the shaft of the chuck into the holewe bored into the hardwood.

http://www.instructables.com/id/Drill-Press-Lathe/
step 3: Almost doneNow that you have the hole in the hardwood sized, pull out the chuck and slip the thrust bearing into place, add a couple of drops of light oil and you should find the livecenter turns very freely, Chuck a couple of countersinks to hold the work place and your are ready to start turning.

http://www.instructables.com/id/Drill-Press-Lathe/
step 4: TurningBecause we don't yet have a tool rest we won't be using proper turning tools for shaping, instead we'll be using shurform blades and wood rasps.
Use a mallet to knock the drive countersink into the work piece and then slip the piece between the chucks and lift the table so the work piece is securely held. Turn thepiece by hand a couple of times to make sure it's centered. Now take a deep breath and turn the drill press on at medium speed.
Provided the wood did not fly out you can start rounding it with the shurform blade, once it's round, shaping can be done with the rasps.
and yes I really want real lathe now.

http://www.instructables.com/id/Drill-Press-Lathe/
Image Notes1. mallet one countersink bit into the wood, chuck it into the top drill, then raise thetable with the second countersink bit in it to hold the wood up

http://www.instructables.com/id/Drill-Press-Lathe/
Related Instructables
How to turn awooden pen ona lathe bySuperninjacamper941
LatheAttachment forDrill Press byMarsh
100%HomemadeLathe bycatwood Make your own
Lathe fromother peoplesrubbish bybongodrummer
Magnetic ToolRack bypackrathacker
Tool Rest for aBelt Sander forSharpening(slideshow) byTool UsingAnimal
Shop Tools(guide) by noahw
Bench SawTable for aWood Lathe byPhil B
Advertisements
Comments49 comments Add Comment
Jack A Lopez says: Aug 14, 2009. 7:37 PM REPLYI just noticed this instructable, and I like it!
Here's an instructable of mine using a similar trick to make soldering iron tips:http://www.instructables.com/id/Soldering-iron-tips-from-6-AWG-copper-wire/
Finally, for those commenters still consternated and trembling in fear of putting a "side load" on your spindle, I think that's why TUA put a chuck on thebottom, to help push back against the cutting tool. Also perhaps you could try balancing the forces by holding something blunt on the other side of the cuttingtool. I frequently do this. I haven't killed the bearings on my little drill press yet. Knock on steel.

http://www.instructables.com/id/Drill-Press-Lathe/
rimar2000 says: Aug 2, 2009. 2:51 PM REPLYHere it is mine: http://www.instructables.com/id/Torno-del-pobre-poor-man-lathe/
hammy10809 says: Jul 8, 2009. 8:03 AM REPLYyou have the same drill presses as me, how much did u get for it? i got mine for 70 bucks at an auction
Richard.marier says: Jun 7, 2009. 8:20 AM REPLYDo you think you could turn the press drill on it's side to work?
Einsteins Circuitry says: Mar 1, 2008. 9:05 AM REPLYCould this be used as a metal lathe? maybe with some modifications?
Nice instructable +1 and favorited
_soapy_ says: May 16, 2009. 9:35 AM REPLYNo, it won't last a few minutes under the side loadings required.
NCRatSniper says: Jan 5, 2009. 8:39 PM REPLYWait a second, this will KILL your drill press! They are not meant to take side loads and over short periods of doing this, the bearings will be dead.
_soapy_ says: May 16, 2009. 9:29 AM REPLY- What he said. The bearings will be rapidly destroyed. My drill press has never recovered from my attempt to do this.
0087adam says: Feb 26, 2009. 7:23 PM REPLYusually i cut out a square on the end of the piece of wood, a fairly small square and put it in the chuck, and use the hole thats already on my table to spin it. itworks.
AnarchistAsian says: Sep 19, 2008. 8:27 PM REPLYwoah, cool...this should keep me content until i get a real one.
reluctant_paladin says: May 17, 2008. 10:37 AM REPLYGreat idea. I've been really wanting to try my hand at making turned wooden pens, but no way I was going to invest hundreds of dollars in a lathe just forthat. This way I can scratch the itch for a couple of bucks. Only need the rasp, surform, and sandpaper blocks for the pen turning. Safe (slow speed) andcheap. Great combination :)
Tool Using Animal says: May 17, 2008. 11:41 AM REPLYGlad you likeit, however, if you just want to turn pens Rockler has a tut. on doing it with just a drill press.
bombmaker2 says: Jul 28, 2008. 9:23 AM REPLYcould you use this to turn metal rod

http://www.instructables.com/id/Drill-Press-Lathe/
finnindian says: Jun 16, 2008. 2:21 PM REPLYPopular Mechanics put out a 12 volume encyclopedia set in the 1950's, it has a red cover, I have bought them for as little as $5.00. The set has a lot of plansfor building your power-tools.
photochromes says: Mar 10, 2008. 10:38 AM REPLYGreat idea! 1st, I don't think there is any problem with the Morse taper working loose as the work piece should hold it in place just the way the morse taperon a regular lathe is held in place by holding the work piece in compression between the head and tailstock. That is assuming the work piece is properlyinstalled and does not disintegrate or something. 2nd,I was glad to see that only a rasp was being used. Being experienced in turning wood, the firstimpression I got from looking at this set up made me cringe. Wood lathes are actually one of the most dangerous tools to use and many experienced turnerscome to grief operating them. For safety, the operator tries to stand aside and behind the work piece so that if the tool kicks back, he or she is not spearedby it as it is thrown like a bullet perpendicularly from the spinning work. The operator also tries to stand with his body back behind the head or tailstock ifpossible so that if the wood disintegrates, he or she is not impailed by the sometimes large and leathal splinters. With this vertical set up, there does notseem to be any safe place for the operator to stand. Perhaps it would be best to set the drill press horizontally as someone else has already suggested justfor safety's sake, if for no other reason. Also, it would not hurt to learn about lathe operations before ever turning the thing on. I don't want to sound like adowner because I do like the idea.
rjnerd says: Mar 6, 2008. 2:31 PM REPLYDanger Will Robinson Danger Check the lathe to see if the chuck mount involves a taper to make it easy to swap chucks. They are usually found on larger,more expensive drill presses. Tapers are a great way to mount a chuck, UNTIL you apply a side load. (like pressing against your workpiece with a tool) Theywill walk right out, and your workpiece and chuck will go sailing across the room. From the looks of the setup the wood is pretty light, but a chuck can weighover a pound.... (this is why they tell you not to use your drill press as a milling machine. real milling machines have a long bolt from the top of the machine,specifically to keep the tool from doing an "exit, stage left", and why you have to use a collet, rather than a chuck to hold your end mills)
How to tell if you have a taper. The easiest is to look in the manual. It might say something like spindle 2MT, or chuck 6JT. If you look at the side of thespindle, with the chuck cranked down, and see a slot, with the end of a metal tang visible inside, you have a morse taper spindle, and with the aid of a singleflat wedge, that came with the drill press, and the first owner promptly lost, you can quickly change chucks, or use drill bits that have a morse taper formeddirectly onto the non-sharpened end, so they mount directly into the spindle, without needed a chuck. It also says you have to go lathe shopping.
So you have verified that you have a cheaper lathe that doesn't use a MT spindle. It still may taper mount the chuck. If you have the instructions, and it talksabout using a pair of wedges to get the chuck off, again you have to try this on another machine. (unlike the spindle taper wedge, JT wedges don't usuallycome with the drill press)
If there is a screw thread involved in holding the chuck in place (either one you get at by poking a screwdriver up where the drill bit goes, or they tell you tograb an allen wrench with the chuck and tap the long bit sticking out, to break the threads free, you don't have to worry about a taper, and you can give this atry.
sansbury says: Mar 8, 2008. 9:25 AM REPLYI've had chucks and tapers detach in floor-standing drill presses before, and while it's annoying, it's never been catastrophic--the chuck drops, maybe adrill bit breaks, the operator utters a few choice expletives, and remounts the chuck.
With the workpiece pinning it all in place, you have a pseudo-drawbar action, which would seem to mitigate further against problems. So long as youstick to small workpiece diameters, and use rasps and files, the sideloads shouldn't be that significant, and with light cuts in wood, you're not going to getthat much chatter.
That said, one thing to consider is the spindle bearing(s). Drill presses typically take only axial/thrust loads (i.e. along the axis of the drill bit) while lathesand mills also take radial (side) loads. Some types of bearings can only handle one type of load well so there is some risk of premature wear/failure withthis if the sideloads are significant (rasping a pen body IMHO can probably be done OK so long as the operator keeps these issues in mind). You canreplace bearings but for $99 you can also get a perfectly serviceable lathe from Harbor Freight and be done with it.
rjnerd says: Mar 8, 2008. 2:48 PM REPLYI used to do things like this. I stopped when an acquaintance using one of those planing gadgets, launched it and the chuck thru a sheetrock wall.Since then my rule is no drawbar, no sideloads. (it does help that I have a real milling machine available now, so I am not tempted to cheat any more)
I have had chucks come off, when drilling. Its usually associated with the bit stalling. With the drill bit to hold stuff in place, and the chuck notparticularly turning, it is less exciting. (it also means it may be time to re-surface the tapers, something that takes equipment rarely found in a homeshop). Using the heat the chuck prior to installing trick makes it a lot less likely to spin off.
You can make a serviceable wood lathe out of some scrap hardwood, some plumbing parts, and a hand held drill. Use a long-reach pipe clampmechanism to make the tailstock. Even better, get some pillow blocks, a bit of shafting, (get any place that sells iron plumbing pipe to thread theoutside, so you can use a floor flange as a faceplate) add a small (1/3-1/2 hp) motor and some step pulleys (if nothing else, you can borrow themfrom your drill press) Put a drill bit in your improvised tailstock, and use it to drill a mounting hole in your spindle, to hold the counter sink or other sortof drive center. (you will have to cross drill, and tap a hole in the spindle to mount a grub screw to hold it in place. If you know someone with morsetaper reamers, you can cut a taper for a real drive center, but the reamer will cost you as much as a used lathe).
A bit of bed frame angle as a tool rest, a little creativity and some of the hardwood, to give you a way to hold it (adjustably) in place, and you areready to turn.
Unless you have the stuff (especially the pillow blocks) in your junk box, you can easily spend more than the harbor fright lathe would cost you.
rjnerd says: Mar 6, 2008. 2:36 PM REPLYOn the very first line where it says "Check the lathe", it should say "Check the Drill Press". Says I need to check my blood sugar...

http://www.instructables.com/id/Drill-Press-Lathe/
Tool Using Animal says: Mar 6, 2008. 2:54 PM REPLYWell that sure spoiled my fun. ;-) maybe I'll just pick up a cheap wilton or psi lathe.
Lokisgodhi says: Nov 8, 2008. 11:36 PM REPLYGrizzly tools make something like this for $19.95.
http://www.grizzly.com/products/h8071
If you get hurt using it then you have someone to sue because you were using it as it was intended, not something you rigged up.
By the way, they also have a hand drill powered lathe for $45.95.
http://www.grizzly.com/products/Hobby-Lathe/H2669
mg0930mg says: Dec 31, 2008. 11:33 AM REPLYHaha,cool.Thanks for the info.
rjnerd says: Mar 6, 2008. 7:25 PM REPLYDon't give up hope until you check your drill. If you happen to have a fairly small import, it will have a one piece spindle, and a screw mountchuck. Tapers cost money compared with cutting a thread. Also they make a LOT of screw mount chucks, which are the norm on hand held drills,where side loads happen. Saves them some more money to avoid the low volume part.
But if your drill is 14" or larger, its likely to use a taper mount chuck. At 16 inches, you start seeing morse taper spindles (especially if it s morethan 10 years old) A 20" drill will have a taper spindle.
Tool Using Animal says: Mar 7, 2008. 3:11 AM REPLYThe manual doesn't specify what kind of taper, but assembly consisted of driving the chuck on with a wooden mallet. :-(
Question. I can see how the chuck could walk off in a milling operation, but my setup, it's supported in place, so wouldn't it be much less likelyto happen?
I've some 1/4 lexan, maybe I'll see if I can rig a shield.
rjnerd says: Mar 7, 2008. 12:35 PM REPLYWell thats clearly a taper. (hint for the future, heat the chuck to 250F, then tap it onto the room temp spindle - it will be a lot more resistantto "spinning out")
If it is truly well supported, give it a try. Wood lathes do use a taper mount drive center without a drawbar when spindle turning, but theyhave the tailstock that can be cranked to hold the wood tightly, and the drive center is a lot lighter than a drill chuck should something gowrong. It did just occur to me, if your lathe does have a morse taper spindle, you could buy a drive center. Doesn't solve the tailstockproblem, but it is a lot less likely to split the workpiece like the countersinks can. If you had a quill lock so you could crank the spindledown and hold firmly, that would help. I can't imagine the juggling act trying to use the table crank to get things tight, without theworkpiece falling out, and especially while keeping the live center fastened to the table aligned...
When you faceplate turn, the chuck mounts on the threads on the outside of the spindle. Just think about this, a used hobby wood lathe ischeaper than a single visit to the ER.
Find a 40 year old belt drive hobby machine, that has been sitting in someones basement a while. You get the option of using chisels, andeven faceplate turning (make bowls, not just pens). For $50-75 (total), they may even throw in their starter set of chisels. If you don't likethe craft, you could just sell it, for $$ comparable to what it cost you. It will let you know if you like turning, and when you are suitablyaddicted, and buy a "real" lathe, you can pass the starter machine along to addict someone else.
A wood lathe is a fairly simple device, as long as the bearing doesn't wander or make awful noises, there isn't a lot else to go wrong withthem. We have been making lathes for thousands of years, and the only real change from the pole lathe that a roman would recognize, isthat the work doesn't spend half its time running the wrong way. (and the chisels stay sharp a lot longer)
They don't have the alignment/wear issues of a metal lathe - the toolrest placement is arbitrary, after all. Belt drive means that if the motorbites the dust, you can get going again with a scavenged attic blower motor or similar.
Tool Using Animal says: Mar 7, 2008. 2:45 PM REPLYI've been keeping an eye on craigslist, but most people seem to want more for their used lathe than amazon sells new (?).
As a unemployed college student, I'll have to wait for an extra ordinary deal.
I have a 1/2inch corded drill languishing, maybe I'll cobble together a "safer" lathe from that. It will be adequate for the small projects Ihave in mind currently.

http://www.instructables.com/id/Drill-Press-Lathe/
Bobpinda says: Mar 8, 2008. 10:45 AM REPLYWonder why not use one chuck only. The other end a simple conicpoint would do the same. No ?
Tool Using Animal says: Mar 8, 2008. 10:55 AM REPLYYes, I just had the chuck to use, and no conic points.
DaveNJ says: Mar 6, 2008. 5:23 PM REPLYGreat ideas. Thanks for sharing this.
jongscx says: Mar 6, 2008. 5:18 PM REPLYEffin Awsome...
Can you put the press on its side, so it's more... um... traditional-looking? or will that screw over something about lateral forces and balances and whatnot?
triumphman says: Mar 3, 2008. 10:25 AM REPLYI tried this but many things went haywire! When I chucked wood into it the wood split no matter how easy I pressed down. Even harder woods such asmaple, oak and cherry. Pine is the softest but not durable for worthwile projects. When I tried to carve into the wood with tools of all sorts (wood chisels,edged blades, files, etc..., I got very poor results. I think this is too dangerous and did not produce the results I saw in your pictures. I have tried all speedsand changed parts to accomodate many combinations but nothing worked. What do you suggest to get better results. I am out of choices and don't have thepesos (moola) to buy a real lathe. Thanks.
Tool Using Animal says: Mar 3, 2008. 4:43 PM REPLYHere ya go, this is a spalty piece of something, it's so rotten I have to keep soaking cyano into the cracks so it holds together.
Tool Using Animal says: Mar 3, 2008. 11:10 AM REPLYNot having a tool rest you are limited to using rasps, files and surform blades, any thing like a gouge or chisel will be INCREDIBLY dangerous. What I'vebeen doing is roughing to round with a surform blade, and carving with coarse files (which need frequent cleaning).
As to the splitting, here's an alternate drive method, which I'm using for some work, Drill a small hole about 1/4 inch deep in the drive end, on axis, andscrew in a dry wall screw (coarse wood screw), now either cut the head off the screw and chuck the screw shaft in the drill, or place a screw driver bit inthe drill and drive the screw. I'll post a picture of what I mean later tonight, if possible.
The only wood i've had split so far was poplar.
Bobpinda says: Mar 8, 2008. 10:57 AM REPLYGreat comment.Sure is VERY dangerous.Fight for the tool rest.
GibbonsRock says: Mar 3, 2008. 11:42 AM REPLYTUA: This is a very neat idea. I have a small drill press that would be perfect for this instructible (and gives me an excuse to buy the larger drill press that I"need "to graduate to.) Also, using surforms instead of chisels is head-smackingly effective approach to saving fingers. +1!
BTW: Thank you for featuring my instructible last month- the chameleon free range. When I submitted it, I really didn't know anything about featuring or otherinstructible-related social stuff, so it was a real charge to wake up the next morning and see mine on the front page!
Cheers, Jim

http://www.instructables.com/id/Drill-Press-Lathe/
glorybe says: Mar 1, 2008. 12:11 PM REPLYIt is easy enough to add a tool post and you could even turn the press sideways so that the usual turning position is in use.I am all for this type of idea and have done similar things myself but I do advise that people keep turning speeds down and wear good quality protection forthe face, eyes and throat when using homemade equipment or at least until they acquire some real hours of operation. Beginners are prone to injury andshould seek aid from others.
susie says: Mar 1, 2008. 8:21 AM REPLYI thought your project said Drill Press Latte.You could add a little fan to the bottom of it for foaming milk.
Mr. Rig It says: Feb 27, 2008. 8:00 PM REPLYWhat a cool idea and I just threw away an old drill too.
PKM says: Feb 27, 2008. 10:29 AM REPLYIt's probably just my lack of any practical lathe-using experience, but I'm a little confused by the end of this Instructable. Does the bottom chuck shaft rotatein the wood block, or just the jaws? Also, I'm not quite sure of the order you're meant to do the last steps in. Am I right in thinking you mallet one countersinkbit into the wood, chuck it into the top drill, then raise the table with the second countersink bit in it to hold the wood up?
It's a neat idea, anyway, and slightly reminiscent of the Afghan gunsmith lathe, which I'd link to if I could find it.
Tool Using Animal says: Feb 27, 2008. 10:48 AM REPLYYes the shaft of the bottom chuck spins in the block of wood. and yes you interpreted my instructions properly. In fact I'm going to borrow them and editthe instructable.
rimar2000 says: Feb 27, 2008. 4:29 AM REPLYVery intelligent, and well done.
I use the drill to turn the wood, and the manual grinder as carving tool.
It is dangerous, but very effective.
trebuchet03 says: Feb 26, 2008. 9:26 PM REPLYNice work :)
lordofthedonuts says: Feb 26, 2008. 9:10 PM REPLYGood idea!
I've already tried to turn some crayon on my drillpress because I was bored but tought it was just funny to have fancy crayons, now maybe I'll make somepencils with that!
Great Idea (+1), hoping you'll win the Tool Tips contest.
wiiman8 says: Feb 26, 2008. 6:54 PM REPLYI agree with SWV1787. This would be pretty hard, in my opinion, to work with the stock upright.
SWV1787 says: Feb 26, 2008. 5:13 PM REPLYNice idea but I think it might be difficult to use with the work standing upright.
snoyes says: Feb 26, 2008. 1:32 PM REPLYDo you plan on making a tool rest eventually?
Do you have a strategy for getting the tail stock centered again once you've used the press for something else?
Tool Using Animal says: Feb 26, 2008. 1:53 PM REPLYI'm undecided on a tool rest right now. Re-centering it is easy, just mate the chucks with a hex shank bit and tighten down the bolts.
marc92 says: Feb 26, 2008. 12:53 PM REPLYGreat idea and a nice Instructable!
+1

http://www.instructables.com/id/Drill-Press-Lathe/
GorillazMiko says: Feb 26, 2008. 12:27 PM REPLYAnother great Tool Tip added to Instructables.
I actually have a Tool Tip needed to be posted soon...