dcb, dcfcb, and dcfctb models - federal signal … · scope of this manual ... federal signal...
TRANSCRIPT

DCB, DCFCB, and
DCFCTB Models
Battery Operated
2001 Siren Control System
with Federal Controller,
One-Way and Two-Way Series B (FCT)
Installation, Operation, and
Service Manual
255360J5
114
Printed in U.S.A.
© Copyright 2014 Federal Signal Corporation

Limited Warranty
The Alerting and Notification Systems Division of Federal Signal Corporation (Federal)
warrants each new product to be free from defects in material and workmanship, under normal use
and service, for a period of two years on parts replacement and factory-performed labor (one year
for Informer, EAS, and Federal software products) from the date of delivery to the first user-
purchaser. Federal warrants every 2001, Eclipse and 508 Siren (Top of pole only) to be free from
defects in material, per our standard warranty, under normal use and service for a period of five
years on parts replacement.
During this warranty period, the obligation of Federal is limited to repairing or replacing, as
Federal may elect, any part or parts of such product which after examination by Federal, are
determined to be defective in material and/or workmanship.
Federal will provide warranty for any unit, which is delivered, transported prepaid, to the Federal
factory or designated authorized warranty service center for examination and such examination
reveals a defect in material and/or workmanship.
This warranty does not cover travel expenses, the cost of specialized equipment for gaining access
to the product, or labor charges for removal and re-installation of the product. The Federal Signal
Corporation warranty shall not apply to components or accessories that have a separate warranty
by the original manufacturer, such as, but not limited to batteries.
Federal will provide on-site warranty service during the first 60-days after the completion of the
installation, when Federal has provided a turn-key installation including optimization and/or
commissioning services.
This warranty does not extend to any unit which has been subjected to abuse, misuse, improper
installation or which has been inadequately maintained, nor to units which have problems related
to service or modification at any facility other than the Federal factory or authorized warranty
service centers. Moreover, Federal shall have no liability with respect to defects arising in
Products through any cause other than ordinary use (such as, for example, accident, fire, lightning,
water damage, or other remaining acts of God).
THERE ARE NO OTHER WARRANTIES, EXPRESSED OR IMPLIED, INCLUDING BUT
NOT LIMITED TO, ANY IMPLIED WARRANTIES OF MERCHANTABILITY OR FITNESS
FOR A PARTICULAR PURPOSE. IN NO EVENT SHALL FEDERAL BE LIABLE FOR ANY
LOSS OF PROFITS OR ANY INDIRECT OR CONSEQUENTIAL DAMAGES ARISING OUT
OF ANY SUCH DEFECT IN MATERIAL WORKMANSHIP.
2645 Federal Signal Drive, University Park, IL 60484-3167
Phone: 800-524-3021
E-mail: [email protected]
Website: http://www.alertnotification.com
DCB, DCFCB and DCFCTB Models
Contents
SAFETY MESSAGE ..................................................................................................................................... 1
Important Notice ....................................................................................................................................................... 1
Publications ............................................................................................................................................................... 1
Planning .................................................................................................................................................................... 1
Installation and Service ............................................................................................................................................. 2
Operation ................................................................................................................................................................... 3
CHARACTERISTICS .................................................................................................................................... 4
Scope of this Manual ................................................................................................................................................. 4
Overview ................................................................................................................................................................... 4
Control Unit/Battery Box .......................................................................................................................................... 5
DCFCTB Communications Controller ...................................................................................................................... 5
Two-Way Radio Control ........................................................................................................................................... 6
DCB and DCFCB Communications Controller ........................................................................................................ 6
One-Way Radio Control ............................................................................................................................................ 7
SPECIFICATIONS ........................................................................................................................................ 8
Specifications for the Controllers .............................................................................................................................. 8
Input Power Requirements .................................................................................................................................... 8
AC Power and Battery Warmer Options ............................................................................................................... 8
System Operating Power from the 4 Battery System ............................................................................................ 8
Charging System and Recommended Batteries .................................................................................................... 9
Environmental ....................................................................................................................................................... 9
Dimensions ........................................................................................................................................................... 9
Control Board Specifications .................................................................................................................................... 9
Input Power Requirements .................................................................................................................................... 9
Serial Communications ....................................................................................................................................... 10
Signaling Format Specifications ............................................................................................................................. 10
Two Tone Sequential .......................................................................................................................................... 10
Single Tone ......................................................................................................................................................... 10
DTMF ................................................................................................................................................................. 10
FSK ..................................................................................................................................................................... 10
EAS ..................................................................................................................................................................... 10
POCSAG ............................................................................................................................................................. 11
Inputs and Outputs .................................................................................................................................................. 11
Relay Outputs ..................................................................................................................................................... 11
Audio Output (Optional) ..................................................................................................................................... 11
Remote Activation Inputs ................................................................................................................................... 11
Transceiver Specifications ...................................................................................................................................... 11
FUNCTIONAL DESCRIPTION ................................................................................................................... 12
System Operating Description................................................................................................................................. 12
Siren Activation .................................................................................................................................................. 12
Site Status Monitoring (DTMF only) .................................................................................................................. 12
Automatic Reports .............................................................................................................................................. 12
Growl Test .......................................................................................................................................................... 12

DCB, DCFCB and DCFCTB Models
Control Cabinet Functional Descriptions ................................................................................................................ 13
Communications/Controller Board Layout ......................................................................................................... 15
ACFCTB Communications / Controller Board Layout ...................................................................................... 15
Transceiver Interface ............................................................................................................................................... 25
Transmit Audio ................................................................................................................................................... 25
Receive Audio..................................................................................................................................................... 25
PTT ..................................................................................................................................................................... 25
+12 VDC ............................................................................................................................................................. 25
Carrier Detect ...................................................................................................................................................... 26
Sensors and Sensor Inputs ....................................................................................................................................... 26
AC Sensor (built-in) ............................................................................................................................................ 26
Low Battery Sensor (built-in) ............................................................................................................................. 26
Digital Inputs for Rotation Sensor ...................................................................................................................... 26
Digital Input for Current Sensor ......................................................................................................................... 27
Digital Input for Intrusion Sensor ....................................................................................................................... 27
Digital Input for Pressure Sensor (not used with 2001-130 sirens)..................................................................... 27
Relay Outputs .......................................................................................................................................................... 27
Speaker Output ........................................................................................................................................................ 28
Monitor Received Audio ..................................................................................................................................... 28
Remote Public Address ....................................................................................................................................... 28
Audio Function Generator Option ...................................................................................................................... 28
Landline and Local Pushbutton Activation ............................................................................................................. 28
Control Board Power Input ..................................................................................................................................... 29
DTMF Decoding and Encoding Formats ................................................................................................................ 29
Decoding Format ................................................................................................................................................ 29
DTMF Encoding Format ..................................................................................................................................... 29
THEORY OF OPERATION ......................................................................................................................... 30
Control Board Theory of Operation ........................................................................................................................ 30
Description of DCFCTB Block Diagram ............................................................................................................ 30
Software Description of DCFCTB Encoding Format ......................................................................................... 36
Chopper Motor Current Sensor Theory of Operation ............................................................................................. 38
Overview ............................................................................................................................................................. 38
Circuit Description .............................................................................................................................................. 38
Rotator Motor Current Sensor Theory of Operation ............................................................................................... 41
Overview ............................................................................................................................................................. 41
Electrical Specifications ...................................................................................................................................... 41
Connectors .......................................................................................................................................................... 42
Circuit Description .............................................................................................................................................. 42
Battery Charger Theory of Operation...................................................................................................................... 43
Overview ............................................................................................................................................................. 43
Circuit Description .............................................................................................................................................. 44
PROGRAMMING SOFTWARE .................................................................................................................. 47
FSPWARE .............................................................................................................................................................. 47
The Commander™
Digital System Software (SFCDWARE) .............................................................................. 47
INSTALLATION .......................................................................................................................................... 48
Recommendations on Control and Battery Box Location ....................................................................................... 48
DCB, DCFCB and DCFCTB Models
Control and Battery Box Installation ....................................................................................................................... 50
Installer Supplied Material List........................................................................................................................... 50
Pole Mounting..................................................................................................................................................... 52
Flat Surface Mounting ........................................................................................................................................ 52
Electrical Connections............................................................................................................................................. 53
Siren Connections ............................................................................................................................................... 57
AC Power Connections ....................................................................................................................................... 58
Battery Installation and Wiring ........................................................................................................................... 58
Land Line Control ............................................................................................................................................... 60
Antenna Installation ................................................................................................................................................ 60
Yagi Antenna Installation ................................................................................................................................... 60
Omni Fiberglass Antenna Models: (no tuning required)..................................................................................... 62
PRE-OPERATIONAL SYSTEM TESTING ................................................................................................. 67
Initial Sensor Adjustments and Testing ................................................................................................................... 67
Rotation Current Sensor ...................................................................................................................................... 67
Chopper Current Sensor ...................................................................................................................................... 67
AC Power Sensor ................................................................................................................................................ 68
Intrusion Sensor .................................................................................................................................................. 68
Battery Voltage Measurement ................................................................................................................................. 68
Battery Charger Voltage Measurement ................................................................................................................... 69
2001TRB Transformer/Rectifier testing (optional) ................................................................................................. 69
Manual Siren Activation ......................................................................................................................................... 69
Land Line Siren Activation (optional) .................................................................................................................... 69
Transceiver Audio Level Adjustments and VSWR Testing .................................................................................... 69
DTMF Transmit Level Adjustments (DTMF versions of DCFCTB only) ......................................................... 70
FSK Transmit Level Adjustments (Digital FSK versions of DCFCTDB only) .................................................. 70
Receive Level Adjustments ................................................................................................................................ 70
Two-tone and DTMF Controller Decode-ability Testing ................................................................................... 70
Confirming Controller Auto-Reporting .............................................................................................................. 71
Test Activation Codes ......................................................................................................................................... 71
SERVICE AND MAINTENANCE ................................................................................................................ 72
General Information ................................................................................................................................................ 72
Preventative Maintenance ....................................................................................................................................... 72
Monthly Testing .................................................................................................................................................. 72
Annual Inspection ............................................................................................................................................... 73
OPTIONS .................................................................................................................................................... 74
Model 2001TRB ...................................................................................................................................................... 74
2001TRB Mounting Location ............................................................................................................................. 74
2001TRB Specifications ..................................................................................................................................... 74
2001TRB Wiring ................................................................................................................................................ 74
Model -240B (Stepdown Transformer) ................................................................................................................... 79
-240B Mounting Location ................................................................................................................................... 79
-240B Specifications ........................................................................................................................................... 80
-240B Wiring ...................................................................................................................................................... 80
Model HTR2 and HTR4 (Battery Warmers) ........................................................................................................... 81
Model 2001HR (Holding Relay) ............................................................................................................................. 82

DCB, DCFCB and DCFCTB Models
Solar Power ............................................................................................................................................................. 82
MODEL DCFCTBD-IP ................................................................................................................................ 85
General .................................................................................................................................................................... 85
Ethernet Board Specifications ................................................................................................................................. 85
Network Information ............................................................................................................................................... 87
Protocols Supported ............................................................................................................................................ 87
IP Ports Used ...................................................................................................................................................... 87
IP Address ........................................................................................................................................................... 88
TOS/DSCP (Type of Service) ............................................................................................................................. 88
Bandwidth Requirements .................................................................................................................................... 88
GLOSSARY ................................................................................................................................................ 96
INDEX ......................................................................................................................................................... 98
Figures Figure 1 DCB, DCFCB, and DCFCTB Battery and Control Cabinets ................................................................ 4
Figure 2 DCB and DCFCB Signal Characteristics ............................................................................................ 7
Figure 3 Communications/Controller Board Layout ................................................................................... 24
Figure 4 Transceiver Interface Connector P1 .............................................................................................. 25
Figure 5 DCFCTB Block Diagram .................................................................................................................. 35
Figure 6 Chopper Motor Current Sensor Board Schematic ........................................................................ 40
Figure 7 Rotator Motor Current Sensor Board Schematic 2005221B ........................................................ 43
Figure 8 Charger Schematic ........................................................................................................................ 46
Figure 9 Typical DCFCB or DCFCTB with 2001TRB Installation Drawing ..................................................... 49
Figure 10 DCFCTB Wiring Diagram .............................................................................................................. 54
Figure 11 DCB Wiring Diagram .................................................................................................................... 55
Figure 12 DCFCB Wiring Diagram ................................................................................................................ 56
Figure 13 Battery Positioning and Wiring ................................................................................................... 59
Figure 14 Yagi Antenna Installation Example.............................................................................................. 64
Figure 15 Omni Antenna Installation Example ........................................................................................... 65
Figure 16 Antenna Grounding ..................................................................................................................... 66
Figure 17 Schematic Diagram 2001TRB ...................................................................................................... 75
Figure 18 Transformer Rectifier Wiring to Control Unit ............................................................................. 78
Figure 19 2001TRB Transformer Rectifier Parts List ................................................................................... 79
Figure 20 Stepdown Transformer Connections .......................................................................................... 80
Figure 21 HTR2 and HTR4 Wiring Diagram ................................................................................................. 81
Figure 22 DCFCTB Solar Wiring ................................................................................................................... 83
Figure 23 DCB and DCFCB Solar Wiring ...................................................................................................... 84
Figure 24 Serial to Ethernet Board .............................................................................................................. 87
Figure 25 DCFCTB-IP Final Assembly ........................................................................................................... 89
Figure 26 DCFCTB-IP Wiring Diagram ......................................................................................................... 90
Figure 27 DCFCTB Final Assembly ............................................................................................................... 91

DCB, DCFCB and DCFCTB Models
Figure 28 DCB Final Assembly ..................................................................................................................... 92
Figure 29 DCFCB Final Assembly ................................................................................................................. 93
Figure 30 DCTB-PGE Wiring ........................................................................................................................ 94
Figure 31 DCTB-PGE Final Assembly ........................................................................................................... 95
Tables Table 1 Conversion of DTMF Digit to BCD .................................................................................................. 36
Table 2 Unit Types ....................................................................................................................................... 36
Table 3 Function currently running ............................................................................................................. 37
Table 4 Digit 7 ............................................................................................................................................. 37
Table 5 Digit 8 ............................................................................................................................................. 37
Table 6 Bit Status ........................................................................................................................................ 37
Table 7 Parts List ......................................................................................................................................... 41
Table 8 Installer Supplied Material List ....................................................................................................... 50
Safety Message
DCB, DCFCB and DCFCTB Models
1
Safety Message
It is important to follow all instructions shipped with this product. This device is to be
installed by trained personnel who are thoroughly familiar with the country electric
codes and will follow these guidelines as well as local codes.
Listed below are important safety instructions and precautions you should follow:
Important Notice
Federal Signal reserves the right to make changes to devices and specifications
detailed in the manual at any time in order to improve reliability, function or design.
The information in this manual has been carefully checked and is believed to be
accurate; however, no responsibility is assumed for any inaccuracies.
Publications
Federal Signal recommends the following publications from the Federal Emergency
Management Agency for assistance with planning an outdoor warning system:
The “Outdoor Warning Guide” (CPG 1-17)
“Civil Preparedness, Principles of Warning” (CPG 1-14)
FEMA-REP-1, Appendix 3 (Nuclear Plant Guideline)
FEMA-REP-10 (Nuclear Plant Guideline).
Planning
If suitable warning equipment is not selected, the installation site for the siren is
not selected properly or the siren is not installed properly, it may not produce the
intended optimum audible warning. Follow Federal Emergency Management
Agency (FEMA) recommendations.
If sirens are not activated in a timely manner when an emergency condition
exists, they cannot provide the intended audible warning. It is imperative that
knowledgeable people, who are provided with the necessary information, are
available at all times to authorize the activation of the sirens.
When sirens are used out of doors, people indoors may not be able to hear the
warning signals. Separate warning devices or procedures may be needed to
effectively warn people indoors.

2
Safety Message
DCB, DCFCB and DCFCTB Models
The sound output of sirens is capable of causing permanent hearing damage. To
prevent excessive exposure, carefully plan siren placement, post warnings, and
restrict access to areas near sirens.
Activating the sirens may not result in people taking the desired actions if those
to be warned are not properly trained about the meaning of siren sounds. Siren
users should follow FEMA recommendations and instruct those to be warned of
correct actions to be taken.
After installation, service, or maintenance, test the siren system to confirm that it
is operating properly. Test the system regularly to confirm that it will be
operational in an emergency.
If future service and operating personnel do not have these instructions to refer to,
the siren system may not provide the intended audible warning and service
personnel may be exposed to death, permanent hearing loss, or other bodily
injury. File these instructions in a safe place and refer to them periodically. Give
a copy of these instructions to new recruits and trainees. Also give a copy to
anyone who is going to service or repair the siren.
Installation and Service
Electrocution or severe personal injury can occur when performing various
installation and service functions such as making electrical connections, drilling
holes, or lifting equipment. Therefore only experienced electricians should install
this product in accordance with national, state and any other electrical codes
having jurisdiction. Perform all work under the direction of the installation or
service crew safety foreman.
The sound output of sirens is capable of causing permanent hearing damage. To
prevent excessive exposure, carefully plan siren placement, post warnings and
restrict access to areas near the sirens. Sirens may be operated from remote
control points. Whenever possible, disconnect all siren power including batteries
before working near the siren.
After installation or service, test the siren system to confirm that it is operating
properly. Test the system regularly to confirm that it will be operational in an
emergency.
If future service personnel do not have these warnings and all other instructions
shipped with the equipment to refer to, the siren system may not provide the
intended audible warning and service personnel may be exposed to death,
permanent hearing loss, or other bodily injury. File these instructions in a safe
place and refer to them periodically. Give a copy of these instructions to new
recruits and trainees. Also, give a copy to anyone who is going to service or
repair the sirens.

3
Safety Message
DCB, DCFCB and DCFCTB Models
Operation
Failure to understand the capabilities and limitations of your siren system could result
in permanent hearing loss, other serious injuries or death to persons too close to the
sirens when you activate them or to those you need to warn. Carefully read and
thoroughly understand all safety notices in this manual and all operations-related-
items in all instruction manuals shipped with equipment. Thoroughly discuss all
contingency plans with those responsible for warning people in your community,
company, or jurisdiction.
Read and understand the information contained in this manual before attempting to
install or service the siren.
Pay careful attention to the following notices located on the equipment.
Notices—Externally Placed
Notices—Internally Placed

4
Characteristics
DCB, DCFCB and DCFCTB Models
Characteristics
Scope of this Manual
This manual describes the characteristics, specifications, functional description,
theory of operation, installation, and setup instructions for the controller and its
sensors as well as the additional information required to operate, service, and
maintain the control unit.
Figure 1 DCB, DCFCB, and DCFCTB Battery and Control Cabinets
Overview
The DCFCTB series Siren Control Systems contain the following components:
2001-130 siren controller with battery cabinet
48 VDC battery charging system
Two-way communications controller with diagnostic sensors
Radio transceiver (optional)
The DCB and DCFCB one-way series Siren Control Systems does not include
two-way communications.

5
Characteristics
DCB, DCFCB and DCFCTB Models
The antenna system is not included with the radio controller models. The appropriate
directional or omni-directional antenna system must be ordered separately.
Control Unit/Battery Box
The Control Unit/Battery Box consists of two cabinets, which are channel mounted
for ease of installation (refer to Figure 1 DCB, DCFCB, and DCFCTB Battery and
Control Cabinets.) The upper NEMA 4 cabinet houses the necessary electronics and
controls for producing the siren signals, and the charging system for the four 12 Volt
batteries.
The lower vented NEMA 4 style enclosure houses four (4) user provided,
maintenance free, lead-acid, deep-cycle, rechargeable batteries. The lower and upper
cabinets are interconnected via Liquid-Tight conduit, which is sealed to prevent
harmful vapors from entering the control area. The four batteries are connected in
series to provide 48 VDC operating power to the siren, while the chargers in the
upper cabinet operate on 120 VAC to keep the batteries charged. This arrangement
continues to provide power to the siren in the event of a power failure. The controller
works primarily off the AC input voltage. In the event of an AC power failure, the
controller automatically obtains power from a 48 V to 12 V DC-to-DC converter
powered by the four 12 V batteries.
DCFCTB Communications Controller
The DCFCTBs are two-way control and status monitoring siren controllers. The units
interface to an off-the-shelf two-way radio transceiver and communicate to a base
control unit via either DTMF or FSK signaling depending on the model purchased.
The controllers decode any combination of Single-Tone, Two-Tone Sequential,
DTMF, EAS, POCSAG or FSK formats for activation. This makes the two-way
controller compatible with virtually any existing siren control system.
The digital DCFCTBs provide the capability of digital encoding and decoding with
added Security. Throughout this manual, all references to digital encoding, digital
decoding, and FSK features and functions pertain only to the DCFCTBD series
models. You can upgrade the DTMF version of the DCFCTB to the digital version
DCFCTBD with a software update. All DCFCTB models come equipped with two
useable relay outputs, which can be programmed independently to activate with
various codes. Relay #3 is wired as a normally closed contact and is used to interrupt
the 2001AC transformer during a growl test (if applicable). Relay #4 is reserved for a
low voltage disconnect.
There are also four landline inputs and four local pushbuttons, which you can use to
activate and cancel the unit.
The decode codes, relay timing and optional warning sounds are programmed into the
unit through a standard RS232 serial port.

6
Characteristics
DCB, DCFCB and DCFCTB Models
The DCFCTBs contain six user programmable functions in addition to the five preset
functions: ARM, DISARM, REPORT, GROWL TEST, MASTER RESET.
The DCFCTBs come equipped with the necessary sensors and wiring to provide
information on the following areas of operation:
AC Power Status
Communications Status
Low Battery Voltage Indication
Siren Activation Current
Intrusion into Control Cabinet/Battery Cabinet
Siren Rotation
The above information is returned in a Pass/Fail format. For example, if battery
voltage is at proper operating level, then it is returned as “Battery Voltage OK.” This
status information is made available for viewing at the Central Control Unit. This
reporting feature greatly improves warning system reliability by quickly alerting
operating personnel to problems that are encountered.
The Integral LCD displays Function Counters, Decoded two-Tone, DTMF,
POCSAG, MSK Digital functions decoded and the current Software Revision. The
display constantly scrolls through the display items.
Two-Way Radio Control
The Federal Signal DCFCTBs are available in VHF and UHF models transceivers to
provide two-way signaling capabilities. Refer to the radio instruction manual for
details concerning operation, specifications and maintenance. Consult Customer Care
at (800) 548-7229 or Technical Support at (800) 524-3021 for specialized radio
equipment needs.
DCB and DCFCB Communications Controller
The DCB and DCFCBs are one-way control and status monitoring siren controllers.
They have ten separately fused circuits to protect the siren controller. Two AC power
fuses (F1 and F2) protect the chargers and optional battery warmers respectively. The
main siren motor is protected by a 200 amp DC fuse. An in line fuse connected to K1
fuses the rotator motor. The contactor coils are fused with in line fuses. The charger
output wires are also individually protected with in line fuses (refer to Figure 11 DCB
Wiring Diagram, Figure 12 DCFCB Wiring Diagram, and Figure 13 Battery
Positioning and Wiring).
The Models DCB and DCFCB siren controllers are capable of producing a Steady
signal, Wailing signal, and a Fast Wail or Fire signal. The Steady signal is frequently

7
Characteristics
DCB, DCFCB and DCFCTB Models
used as a Civil Defense “Alert” signal. The Wailing signal is often used as a Civil
Defense “Attack” signal. The Fast Wail or Fire signal is often used to summon the
local fire department. You can use any of the signals for any desired application.
These signals are shown graphically in the following figure.
Figure 2 DCB and DCFCB Signal Characteristics
One-Way Radio Control
You can remotely activate the siren by a radio signal when an optional radio
receiver/decoder is incorporated with the Control Unit/Battery Box. The advantage of
radio control activation is that control lines are not required between the siren control
site and the siren location. For units equipped with the optional integral radio
receiver, the RF Frequency configuration parameter sets the frequency of the radio
channel. Changing this parameter from its factory setting requires re-alignment of the
radio for maximum performance. The value entered must fall within the range
specified for the receiver band equipped.
8
Specifications
DCB, DCFCB and DCFCTB Models
Specifications
Specifications for the Controllers
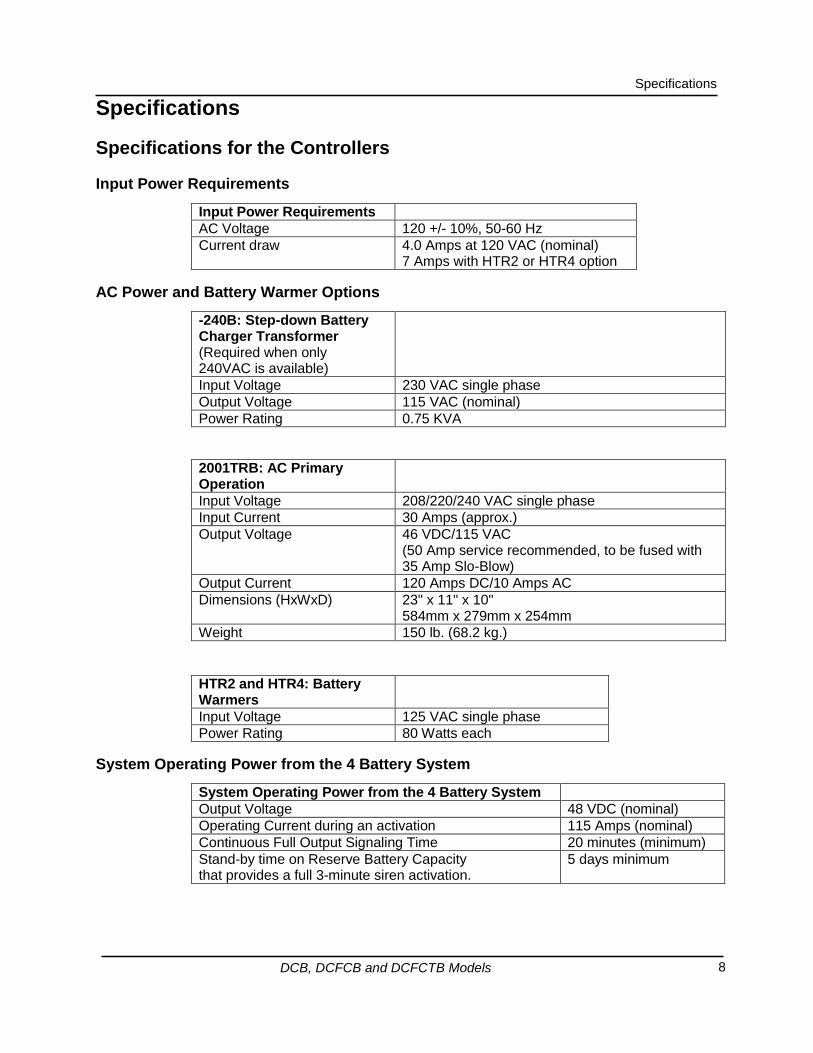
Input Power Requirements
Input Power Requirements
AC Voltage 120 +/- 10%, 50-60 Hz
Current draw 4.0 Amps at 120 VAC (nominal) 7 Amps with HTR2 or HTR4 option
AC Power and Battery Warmer Options
-240B: Step-down Battery Charger Transformer (Required when only 240VAC is available)
Input Voltage 230 VAC single phase
Output Voltage 115 VAC (nominal)
Power Rating 0.75 KVA
2001TRB: AC Primary Operation
Input Voltage 208/220/240 VAC single phase
Input Current 30 Amps (approx.)
Output Voltage 46 VDC/115 VAC (50 Amp service recommended, to be fused with 35 Amp Slo-Blow)
Output Current 120 Amps DC/10 Amps AC
Dimensions (HxWxD) 23" x 11" x 10" 584mm x 279mm x 254mm
Weight 150 lb. (68.2 kg.)
HTR2 and HTR4: Battery Warmers
Input Voltage 125 VAC single phase
Power Rating 80 Watts each
System Operating Power from the 4 Battery System
System Operating Power from the 4 Battery System
Output Voltage 48 VDC (nominal)
Operating Current during an activation 115 Amps (nominal)
Continuous Full Output Signaling Time 20 minutes (minimum)
Stand-by time on Reserve Battery Capacity that provides a full 3-minute siren activation.
5 days minimum
9
Specifications
DCB, DCFCB and DCFCTB Models
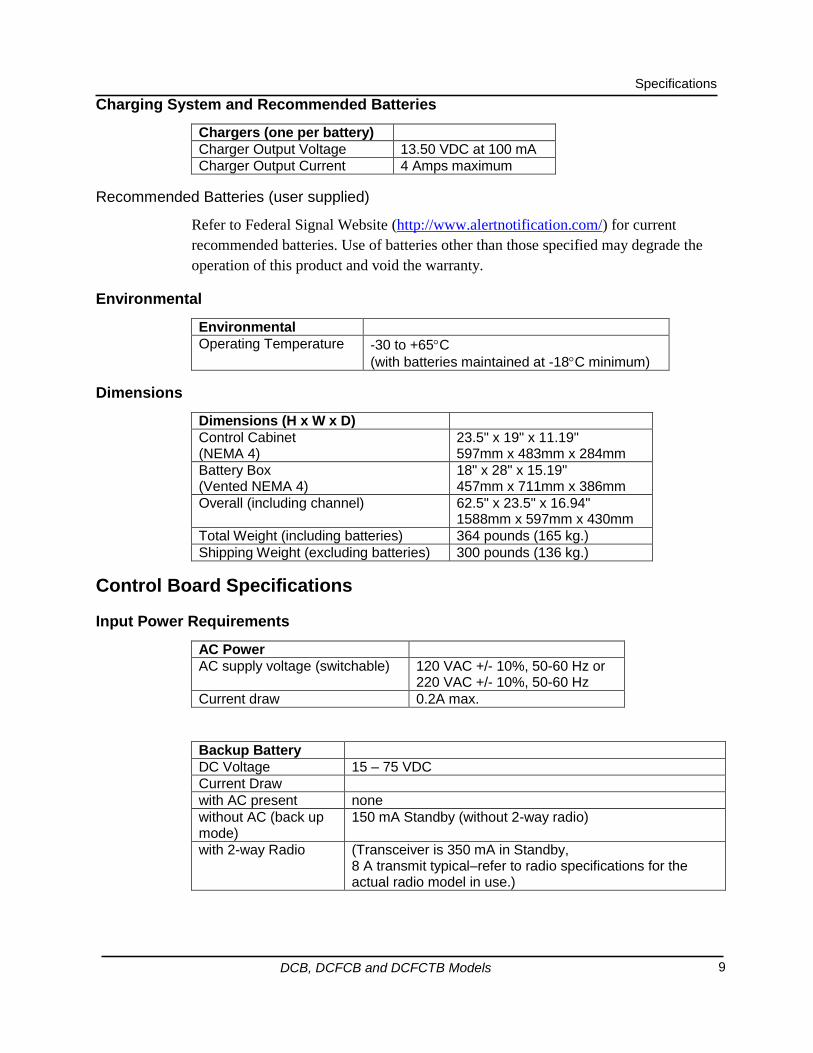
Charging System and Recommended Batteries
Chargers (one per battery)
Charger Output Voltage 13.50 VDC at 100 mA
Charger Output Current 4 Amps maximum
Recommended Batteries (user supplied)
Refer to Federal Signal Website (http://www.alertnotification.com/) for current
recommended batteries. Use of batteries other than those specified may degrade the
operation of this product and void the warranty.
Environmental
Environmental
Operating Temperature -30 to +65C
(with batteries maintained at -18C minimum)
Dimensions
Dimensions (H x W x D)
Control Cabinet (NEMA 4)
23.5" x 19" x 11.19" 597mm x 483mm x 284mm
Battery Box (Vented NEMA 4)
18" x 28" x 15.19" 457mm x 711mm x 386mm
Overall (including channel) 62.5" x 23.5" x 16.94" 1588mm x 597mm x 430mm
Total Weight (including batteries) 364 pounds (165 kg.)
Shipping Weight (excluding batteries) 300 pounds (136 kg.)
Control Board Specifications
Input Power Requirements
AC Power
AC supply voltage (switchable) 120 VAC +/- 10%, 50-60 Hz or 220 VAC +/- 10%, 50-60 Hz
Current draw 0.2A max.
Backup Battery
DC Voltage 15 – 75 VDC
Current Draw
with AC present none
without AC (back up mode)
150 mA Standby (without 2-way radio)
with 2-way Radio (Transceiver is 350 mA in Standby, 8 A transmit typical–refer to radio specifications for the actual radio model in use.)

10
Specifications
DCB, DCFCB and DCFCTB Models
Serial Communications
Serial Communications
Serial Port Configuration RS232C 1200,N,8,1
Signaling Format Specifications
Six (6) user programmable functions in addition to the five (5) preset functions:
ARM, DISARM, REPORT, GROWL TEST, and MASTER RESET. Wildcard
options for each of the DTMF strings.
Two Tone Sequential
Frequency range 282 Hz - 3000 Hz
Tone timing 1st Tone – 0.5 second minimum 2nd Tone – 0.25 second minimum 8 seconds maximum for both tones
Intertone Gap 400ms (maximum)
Tone Accuracy +/- 1.5%
Tone Spacing 5.0% preferred, 3% minimum
Single Tone
Frequency range 282 Hz - 3000 Hz
Tone timing 0.5 second - 8 seconds maximum
Tone Accuracy +/- 1.5%
Tone Spacing 5.0% preferred, 3% minimum
DTMF
All timing in milliseconds
String length 3 - 12 standard DTMF characters
Mark/Space timing:
Decoder Minimum 50 ms/50 ms (below 50/50 consult factory)
Decoder Maximum 800 ms total mark/space timing per function
Encoder 100ms/100ms mark/space timing
Space between Stacked codes, minimum
1.25 seconds
FSK
Baud rate 1200 bps
Modem type MSK (minimal shift key)
Mark frequency 1200 Hz
Space frequency 1800 Hz
Error checking 16 bit CRC
EAS
Supports standard EAS codes and wildcards.

11
Specifications
DCB, DCFCB and DCFCTB Models
POCSAG
Supports Binary frequency shift keying 512 Baud numeric messages.
Inputs and Outputs
Relay Outputs
4 relay outputs SPST (2 relays standard, 4 relays max.)
Contact Rating 5 A at 28 VDC and 240 VAC
Audio Output (Optional)
Output Voltage >2 Vpeak to peak
Maximum Load 8 ohms
Total Harmonic Distortion < 10% at 1 kHz Sinewave
Remote Activation Inputs
Quantity 4
Input Type Dry contact closure <1 k ohm (Requires >1 second closure)
Transceiver Specifications
Programmable Frequency, Power Out, and Private Line options are available. For
further details, consult the radio owner’s manual.

12
Functional Description
DCB, DCFCB and DCFCTB Models
Functional Description
System Operating Description
Siren Activation
The DTMF versions of DCFCTBs enable the user to program an ARM string into the
controller for extra security. If an arm string is not programmed, then an ARM
command is not required to activate a function. Digital versions of DCFCTBs do not
use the ARM function.
Activation Using the ARM function
To start a siren activation via the radio, it is necessary to ARM the siren before
initiating a siren function; such as, a Wail or Steady. Once the siren is ARMed, it
remains ARMed for 255 seconds or 4.25 minutes. Upon activation of the siren, it runs
until the function times out, is canceled, or is reset. If the siren function is greater
than 4.25 minutes, you must send another ARM command prior to sending a
CANCEL command to shut off the siren. The ARM command is not required prior to
sending a RESET command.
To start a function by either land line or pushbutton it is necessary to provide a one
second closure on the landline or a one second depression of the pushbuttons.
Site Status Monitoring (DTMF only)
The siren controller will report when polled from the SS2000 or when one of its
sensors changes state. The status of the site is encoded in a 9-digit DTMF string that
is designed to work with a Federal Signal SS2000 to decode, format, and time and
date stamp the received string. For detailed information about the DTMF coding
format, refer to the Software Description of DCFCTB Encoding Format section on
page 36.
Automatic Reports
The DCFCTB automatically sends back a report if one of the following sensors has a
change of state: AC, Low Battery, Intrusion, or the siren is activated locally. The
control station can also be set to automatically poll the system at a predefined
interval. Automatic reporting may be optionally disabled on DCFCTBD systems. The
DCFCTB is equipped with a carrier detect transmit hold off that causes the unit to
wait until the channel is clear before an Automatic report is transmitted.
Growl Test
The Standard Growl Test runs the rotator for 12 seconds and the chopper motor until
the sensors latch or a maximum of 2 seconds. This function is commonly used when
doing periodic testing to verify proper operation while generating minimal sound.

13
Functional Description
DCB, DCFCB and DCFCTB Models
Control Cabinet Functional Descriptions
The DC Control cabinet has the following main parts:
Motor Contactors
Battery Chargers
Power Distribution and fusing at the din rail
Radio Transceiver (not included with DCB models)
FCM Communications/Controller Board (not included with DCB models)
Motor Contactors
Two 200 Amp rated motor contactors are used for switching the 48 VDC power to
the siren motor via K2, and the rotator motor via K1. The contactors are controlled by
the relay outputs on the DCB, DCFCB and DCFCTB.
A third optional contactor, K3, is used to switch between the rectified 48 VDC
provided by the 2001TRB option and the 48 VDC provided by the four (4) batteries
in the battery cabinet. The switching occurs automatically when the 2001TRB power
is lost.
The wiring to the siren and rotator motor is protected by a 200 Amp fuse.
Battery Chargers
Four chargers are used to independently charge each of the batteries in the battery
box. The chargers are connected in series, as are the batteries to provide the 48VDC
to the siren and rotator motors. Each charger has a built-in 7.5 Amp fuse, and charger
wires are fused with 10 Amp fuses within the battery cabinets.
Power Distribution and Fusing at the Din Rail
The din rail is used to distribute and fuse various voltages. The following is a
description of the terminals at the din rails:
Terminal Description
TB1
1 +12 VDC, from Charger 1
2 +24 VDC, from Charger 2
3 +36 VDC, from Charger 3
4 +48 VDC, from Charger 4
TB2
1 Ground 2 Ground 3 Ground

14
Functional Description
DCB, DCFCB and DCFCTB Models
TB3
1 12 VDC from Converter 2 12 VDC from Converter
TB4
1 48 VDC
TB5
F1 10 Amp fuse for 120 VAC Neutral F2 10 Amp fuse for 120 VAC Line 1 FUSED AC Neutral 2 FUSED AC Neutral 3 Ground 4 FUSED AC Line 5 FUSED AC Line
Radio Transceiver
When a radio option is purchased, the transceiver is factory installed, programmed
and aligned to work with Federal Signal’s DCFCTB. The 12 V transceiver is
powered by the 48 V to 12V DC-to-DC converter. The converter is powered by the
four 12 V batteries that continue to run the controller in case of a power failure.
Consult the radio’s operating manual for further operating details.
Communications/Controller Board
The Communications/Controller board is located on the backplane of the control
cabinet. This board controls all functions of the DCFCB and DCFCTB. The board
consists of seven main sections:
Transceiver Interface
Digital Inputs
Relay Outputs
Speaker Output
Land Line and Local Pushbuttons
Power Inputs and Power Supply
Encoder and Decoder Sections

15
Functional Description
DCB, DCFCB and DCFCTB Models
Communications/Controller Board Layout
ACFCTB Communications / Controller Board Layout
Refer to Figure 3 Communications/Controller Board Layout on page 24.
Reference Description Indication
D48 CPU LED Microprocessor Heartbeat
D12 RECEIVE LED RF Carrier Indicator on with carrier
D7 TRANSMIT LED Transmit
D25 RELAYS ARMED Power to relays on
D29 RELAY #1 LED Relay #1 closed D38 RELAY #2 LED Relay #2 closed
D39 RELAY #3 LED Relay #3 closed
D43 RELAY #4 LED Relay #4 closed, or PA mode
D15 PRESSURE LED Pressure Sensor input
D13 INTRUSION LED Intrusion Sensor input
D18 CURRENT LED Current Sensor input
D14 ROTATION LED Rotation Sensor input
D16 LOW BATTERY LED Low Battery Sensor (internal)
D17 AC POWER FAIL LED
AC Power Fail Sensor (internal)
D34 POWER LED 12 V Operating Power
D36 ISO 12V Isolated 12V power
D34 ISO 5V Isolated 5V power
U16 LCD Display Displays Function Counters, Decodes and Software Revision
JP1 SINAD
1 Receiver module carrier detect, short to pin 2 when using SINAD board along with both sides of JP4 and remove D1.
2 External transceiver carrier detect.
JP2 Test Speaker
1 0 to 2 Vp-p, Audio Source: Receiver Audio during P.A. functions, Siren Audio during Electronic Siren functions.
2 Ground
JP3 Short For VOX Carrier Detect
1 Short to (JP3, pin 2), for VOX carrier detect.

16
Functional Description
DCB, DCFCB and DCFCTB Models
JP4 Test Speaker
1 VCC, +5 V
2 VCC, +5 V
3 Short pins 1 and 3 to give priority to the external transceiver.
4 Short pins 2 and 4 to give priority to the internal receiver. With no shorting jumper, first carrier detect has priority. Short both sides when using SINAD board along with JP1.
JP5 Sensor Inputs (#1 at left edge)
1 Pressure sensor input, dry Contact closure < 1 K.
2 ISO Ground.
3 Intrusion sensor input, dry Contact closure < 1 K.
4 ISO Ground.
5 Current sensor input, dry Contact closure < 1 K.
6 ISO Ground.
7 Rotation sensor input, dry Contact closure < 1 K.
8 ISO Ground.
9 48 Volt Battery input to 48 Volt sensor and to power supply, 15–75 VDC.
10 Ground
11 12 Volt Battery input to 12 Volt sensor and to power supply, 11–15 VDC.
12 Ground
JP6 Speaker Mute gate bypass
Short pins 1and2 to bypass speaker mute gate, allow monitoring of radio channel with local speaker
JP7 Receiver Module
1 Ground
2 +8 Volts DC, < 100 mA current.
3 Synthesizer programming Clock line, 0 to 5 Volt levels.
4 Synthesizer programming Data line, 0 to 5 Volt levels.
5 Synthesizer programming Latch line, 0 to 5 Volt levels.
6 Carrier Detect not line, goes low with carrier, 0 to 5 Volt levels.
7 Receive Audio, De-emphasized, 700 to 900m Vp-p with 1 kHz tone at standard dev.
8 Receive Audio, Flat.
JP8 Serial and FLASH programming Port
1
2 TXD, standard RS232 levels
3 RXD, standard RS232 levels.
4 Ground.
5 Processor Serial Clock, used during FLASH programming.
6 Processor Reset not, pulsed low (to Ground) during FLASH programming.

17
Functional Description
DCB, DCFCB and DCFCTB Models
JP9 LEDs on with Intrusion
1 Short to pin 2, to disable LEDs when Intrusion switch is closed.
JP10 Remote Activation and Sensor Inputs (#1 at left edge of connector)
1 Spare Sensor Input #2, dry Contact closure < 1 K.
2 ISO Ground.
3 Spare Sensor Input #1, dry Contact closure < 1 K.
4 ISO Ground.
5 Remote Activation Input #4, Activates Functions under code 4, dry Contact closure < 1 K.
6 ISO Ground.
7 Remote Activation Input #3, Activates Functions under code 3, dry Contact closure < 1 K.
8 ISO Ground.
9 Remote Activation Input #2, Activates Functions under code 2, dry Contact closure < 1 K.
10 ISO Ground.
11 Remote Activation Input #1, Activates Functions under code 1, dry Contact closure < 1 K.
12 ISO Ground.
JP11 Emulation and Options Emulation
1 TCK
2 GND
3 TDO
4 VCC (+5V)
5 TMS
6 RESET NOT
7 VCC (+5V)
8 N.C.
9 TDI
10 GND
Options
Jumper pins 1 and 2 for Solar mode
For 2001 DC Solar mode
AC (Power)
AC and External Power or 50VDC (AC power or 48V battery/Charger) Latching
Battery >12.3v (DC-DC) AND >41.6 (48V battery)
Pressure Motor fuse (low = pass)

18
Functional Description
DCB, DCFCB and DCFCTB Models
For 2001 DC Non-Solar mode
AC (Power)
AC Power and External AC power (not looking at 48VDC)
Battery >12.3v (DC-DC)AND >41.6 (48V battery) (either 12 or 48 fail will cause a fail) Transfer switch low voltage detect (External AC input Sense2, low=voltage pass)
Pressure Motor fuse (low = pass)
For FCD Repeater Solar mode
AC (Power)
AC AND External Power or 50VDC (AC power or 48V battery/Charger) Latching
Battery 12.3VDC (connects to 12V battery or DC-DC convertor)
Pressure Charger = External charger sense contact (low = pass)
For FCD Repeater Non-Solar mode;
AC (Power)
AC AND External Power or 50VDC (AC power or 48V battery/Charger) Latching
Battery 12.3VDC (connects to 12V battery or DC-DC convertor)
Pressure Charger = External charger sense contact (low = pass))
Jumper pins 9 and 10 for Kenwood/TR Monitor and Control mode
When the Kenwood mode is polled, the unit responds over the port which received
the poll request only.
TR monitor and Control mode
For FCD2001 or FCD Eclipse types, relay #3 is used for TR Control and Remote AC
power Sense is used to monitor TR voltage.
Remote AC power Sense debounce fixed at 4 seconds (normally 28 Sec).
Standby:
If low voltage is detected close relay #3
If low voltage is not detected open relay #3
Running a function:
If low voltage is detected relay #3 closes for duration of function.
If voltage changes to good while running a function relay remains closed for
duration of function
If unit is not a FCD2001 or FCD Eclipse or JP11-9,10 is not asserted relay #3
functions as programmed.

19
Functional Description
DCB, DCFCB and DCFCTB Models
JP12 SINAD
1 Directly to processor pin #58 (ADC7).
2 Ground.
JP13 CTCSS Encoder/Decoder
1 Receive audio, not DC isolated, set to 1 Vp-p with 1 kHz tone at 3 kHz dev.
2 Ground.
3 +8 Volts DC, < 100 mA current.
4 Decode not & PTT line, low with decode, set low by processor during transmit.
5 Transmit audio, 0 to 2 Vp-p of Digital data or Tone.
JP14 Force Carrier Detect
1 Short to (JP14, pin 2), to force carrier detect on.
2 Ground.
JP15 Short To Set Deviation
1 Short to ISO Ground (JP15, pin 2), causes unit to transmit for setting deviation.
2 ISO Ground.
JP16 I2C Port
1
2 I2C Data line, buffered.
3 I2C Clock line, buffered.
4 +12 Volts DC, 1 Amp max. current.
5 Ground
6
JP17 Short to Test Relay Output #1 1 Short to pin 2, to engage Relay output #1.
JP18 Short to Test Relay Output #2 1 Short to pin 2, to engage Relay output #2.
JP19 Short to Test Relay Output #3 1 Short to pin 2, to engage Relay output #3.

20
Functional Description
DCB, DCFCB and DCFCTB Models
JP20 Short to Test Relay Output #4 1 Short to pin 2, to engage Relay output #4.
JP21 Relay Outputs, 3 Amps, up to 240 VAC, (#1 at left edge of connector)
1 Relay 1, Common
2 Relay 1, N.O.
3 Relay 2, Common
4 Relay 2, N.O.
5 Relay 3, Common
6 Relay 3, N.O. or N.C., depending on jumper JU1
7 Relay 4, Common
8 Relay 4, N.O. or N.C., depending on jumper JU2
JP22 AC Power Input 1 and 2 120 or 240 VAC +/- 10%, 60 Hz
P1 Transceiver Interface
1 Transmit audio, DC isolated, 0 to 1 Vp-p
2 Receive audio, DC isolated, 350 mVp-p to 3 Vp-p
3 PTT not, goes low (<0.65 V) during transmit
4 Ground
5 +12 Volts DC, 100 mA max, 2 A with battery.
6 Carrier Detect not, set low (<0.65 V) during receive
7 No connection
8 Ground
9 Ground
TJ1 Test Jack
1 Ground
2 Reference (+4 V)
3 Receive Audio
4 VCC (+5 V)
5 +8 V
6 +12 V
7 +17 V
8
TJ2 Test Jack
1 Isolated +12 V
2 Isolated +5 V
3 Isolated Ground

21
Functional Description
DCB, DCFCB and DCFCTB Models
TP1 Two-Tone Decoder, HighPass Filter Enable
Goes high when processor is decoding a tone > 2100 Hz
TP2 Receive audio to Two-Tone Decoder
Audio at last stage before two-tone comparator, 1 to 3 Vp-p.
TP3 Transmit audio
0.1 to 3 Vp-p.
TP4 Receive audio from Two-Tone Decoder to processor
Audio after two-tone comparator, square waves to processor, 0 to 5 Vp-p.
TP5 Voltage at 48 Volt Battery Input
0 – 70 Volts = 0 – 5 Volts
TP6 Voltage at 12 Volt Battery Input
0 – 20 Volts = 0 – 5 Volts
TP7 Two-Tone Decoder, LowPass Filter Enable
Goes high when processor is decoding a tone < 400 Hz
TP8 Receive audio level set
External transceiver receive audio set to 1Vpp using R48
TP9 RX Data
Receive data from digital modem IC, 0 to 5 Volts.
TP10 DTMF Decoder STD
Goes low whenever a DTMF digit is being decoded.
TP11 8 Volt Regulated power supply
TP12 5 Volt Regulated power supply
TP13 Incoming unregulated 17 Volt power supply
22
Functional Description
DCB, DCFCB and DCFCTB Models
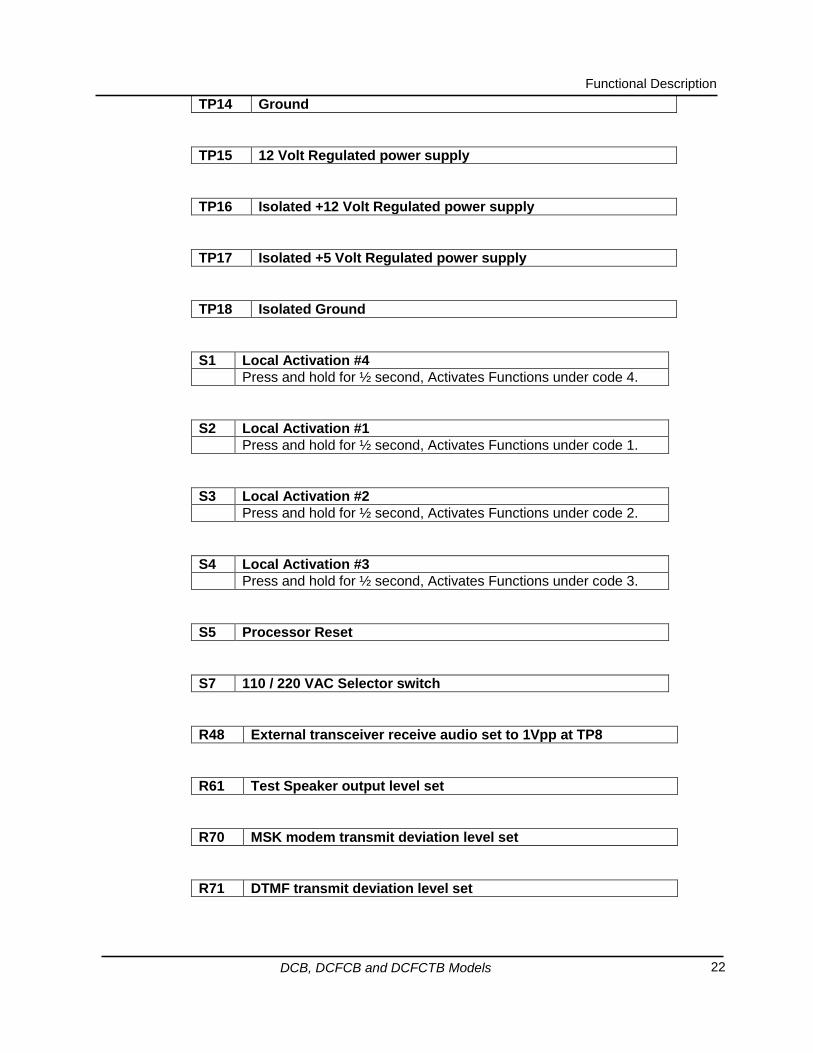
TP14 Ground
TP15 12 Volt Regulated power supply
TP16 Isolated +12 Volt Regulated power supply
TP17 Isolated +5 Volt Regulated power supply
TP18 Isolated Ground
S1 Local Activation #4
Press and hold for ½ second, Activates Functions under code 4.
S2 Local Activation #1
Press and hold for ½ second, Activates Functions under code 1.
S3 Local Activation #2
Press and hold for ½ second, Activates Functions under code 2.
S4 Local Activation #3
Press and hold for ½ second, Activates Functions under code 3.
S5 Processor Reset
S7 110 / 220 VAC Selector switch
R48 External transceiver receive audio set to 1Vpp at TP8
R61 Test Speaker output level set
R70 MSK modem transmit deviation level set
R71 DTMF transmit deviation level set
23
Functional Description
DCB, DCFCB and DCFCTB Models
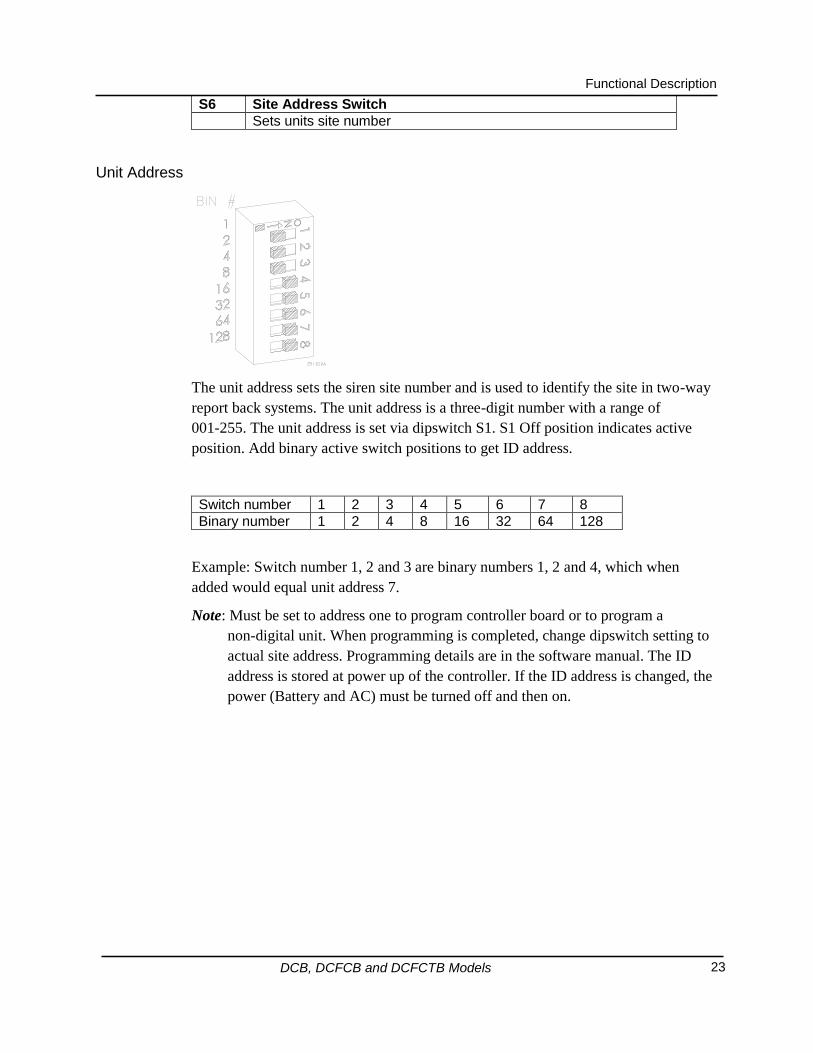
S6 Site Address Switch
Sets units site number
Unit Address
The unit address sets the siren site number and is used to identify the site in two-way
report back systems. The unit address is a three-digit number with a range of
001-255. The unit address is set via dipswitch S1. S1 Off position indicates active
position. Add binary active switch positions to get ID address.
Switch number 1 2 3 4 5 6 7 8
Binary number 1 2 4 8 16 32 64 128
Example: Switch number 1, 2 and 3 are binary numbers 1, 2 and 4, which when
added would equal unit address 7.
Note: Must be set to address one to program controller board or to program a
non-digital unit. When programming is completed, change dipswitch setting to
actual site address. Programming details are in the software manual. The ID
address is stored at power up of the controller. If the ID address is changed, the
power (Battery and AC) must be turned off and then on.

24
Functional Description
DCB, DCFCB and DCFCTB Models
Figure 3 Communications/Controller Board Layout
25
Functional Description
DCB, DCFCB and DCFCTB Models
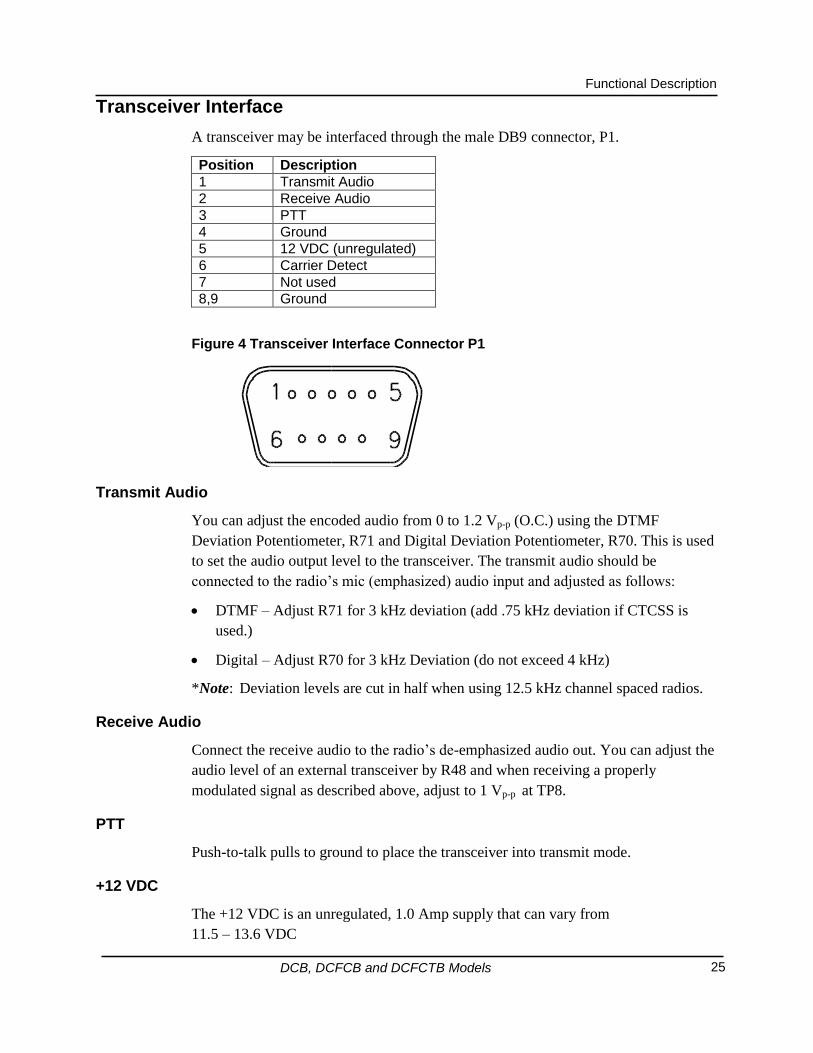
Transceiver Interface
A transceiver may be interfaced through the male DB9 connector, P1.
Position Description
1 Transmit Audio
2 Receive Audio
3 PTT
4 Ground
5 12 VDC (unregulated)
6 Carrier Detect
7 Not used
8,9 Ground
Figure 4 Transceiver Interface Connector P1
Transmit Audio
You can adjust the encoded audio from 0 to 1.2 Vp-p (O.C.) using the DTMF
Deviation Potentiometer, R71 and Digital Deviation Potentiometer, R70. This is used
to set the audio output level to the transceiver. The transmit audio should be
connected to the radio’s mic (emphasized) audio input and adjusted as follows:
DTMF – Adjust R71 for 3 kHz deviation (add .75 kHz deviation if CTCSS is
used.)
Digital – Adjust R70 for 3 kHz Deviation (do not exceed 4 kHz)
*Note: Deviation levels are cut in half when using 12.5 kHz channel spaced radios.
Receive Audio
Connect the receive audio to the radio’s de-emphasized audio out. You can adjust the
audio level of an external transceiver by R48 and when receiving a properly
modulated signal as described above, adjust to 1 Vp-p at TP8.
PTT
Push-to-talk pulls to ground to place the transceiver into transmit mode.
+12 VDC
The +12 VDC is an unregulated, 1.0 Amp supply that can vary from
11.5 – 13.6 VDC

26
Functional Description
DCB, DCFCB and DCFCTB Models
Carrier Detect
Carrier Detect input requires a pull to ground to indicate when carrier is present.
Sensors and Sensor Inputs
The DCFCB and DCFCTB comes with the following inputs to work with external
sensors and 2 built-in sensors to report the following conditions:
AC JP22
AC (External Sensor Input) JP10-1
Low Battery, 12 VDC JP5-11
Low Battery, 48 VDC JP5-9 (only used with 48 V type sirens.)
Rotation (Proximity Switch) JP5-7
Rotation (Current Sensor) JP10-3
Main Siren Motor Current JP5-5
Intrusion JP5-3
AC Sensor (built-in)
During normal operation (when AC is present) the built-in AC sensor does not light.
If AC is lost, the AC LED lights. The AC sensing logic is dependent on both the
built-in AC sense and the external AC sense points. If an AC loss is detected at either
point, a report is sent. A loss of AC is not reported immediately. The controller
makes sure the loss lasts at least 2 seconds then it adds (1 second * Site #) before
reporting. Each siren with an AC failure reports by site number in sequential order
with a two second delay between sites. Once AC is restored, another automatic report
is sent in the same order to show change of state. If AC is restored before the
automatic report is sent, the report is cancelled.
Low Battery Sensor (built-in)
The low battery sensor input measures the voltage across the four (4) series batteries.
If the battery voltage goes below ~40 V for 20 seconds, the controller reports a low
battery condition. The controller does not automatically report when the battery
voltage returns to normal to eliminate the possibility of multiple reports when a
battery is very weak. The low battery condition remains latched in memory until the
controller is reset or a function is run and the battery voltage is restored.
Digital Inputs for Rotation Sensor
Two rotation sensor inputs exist. Depending on the sensor option purchased, either
the current sensor or proximity switch input is used.
Standard Rotation Sensor Input: JP10-3 is used for the rotation motor current
sensor. This input latches when current is detected. During a siren rotation this
input is pulled low. The latch is reset by the RESET command.

27
Functional Description
DCB, DCFCB and DCFCTB Models
Proximity Switch Rotation Sensor Input: JP5-7 is used to connect a proximity
switch to detect siren rotation. You may leave this input unconnected if a
non-rotating siren is used or if JP10-3 is used to detect rotation. During a normal
siren activation (when the siren is rotating), the external rotation sensor, which is
usually an open collector proximity device mounted in the siren to detect gear
movement, provides active low pulses. Once this input receives more than 11 low
pulses during a siren activation, this input will latch active until a reset command
is received.
Digital Input for Current Sensor
JP5-5 is used to detect the main siren motor operating current during siren activation.
This input is pulled low when the external current sensor detects proper running
current during a siren activation. If this input is pulled low for 1/4 second, the input is
latched active until another activation command is received or a Reset command is
sent.
Digital Input for Intrusion Sensor
JP5-3 is used to detect an intrusion into the control cabinet. With the control cabinet
closed, the intrusion switch is in a normally closed position. If the intrusion condition
changes state for more than one second, an auto-report is sent.
Digital Input for Pressure Sensor (not used with 2001-130 sirens)
JP5-1 is used to detect blower pressure on Thunderbolt sirens during siren activation.
This sensor input latches when operating current is detected (input is pulled low) and
resets when a RESET command is received.
Relay Outputs
JP21
Pin Out
1 Relay 1, Common
2 Relay 1, N.O.
3 Relay 2, Common
4 Relay 2, N.O.
5 Relay 3, Common
6 Relay 3, N.O. or N.C., depending on jumper JU1, (N.C is standard)
7 Relay 4, Common
8 Relay 4, N.O. or N.C., depending on jumper JU2, (N.O. is standard)
There are four (4) relay outputs, which are controlled by the microprocessor. The
relays provide isolation and are spike protected to prevent voltage spikes from
affecting the unit. As the relay coil is energized, the outputs close and the associated
LED lights. The DCFCB and DCFCTB come standard with two DPST relays. Relay

28
Functional Description
DCB, DCFCB and DCFCTB Models
#3 is reserved for a 2001AC disconnect option. Relay #4 is reserved for the low
voltage cutoff feature.
Speaker Output
You can use the speaker output at JP2 to monitor received audio, route remote P.A.
or provide signal out when the tone generator option is used. You can adjust speaker
output up 2.0 Vp-p into an 8-Ohm load using R61.
Monitor Received Audio
When carrier is present, the received audio is routed to the test speaker output at JP2.
Remote Public Address
You need to program the P.A. as a function through the software if it is to be used.
When the P.A. function is activated, the DCFCTB routes the received audio to the
speaker output as long as carrier is detected. If the carrier drops out for more than
15 seconds, the unit goes back to standby mode.
Audio Function Generator Option
To use this feature, you need to program one of the standard signals or a custom
signal through the software. When the audio function is activated, the audio from the
function generator is routed to the speaker output until the function finishes or a
cancel code is sent.
Landline and Local Pushbutton Activation
You can activate the first four (4) pre-programmed functions locally through the
pushbuttons, on the DCFCTB PCB, or remotely by grounding one of the landline
activation inputs at JP12 for at least one second. The remote inputs are protected by
limiting diodes and cannot exceed 5.1 Volt. Each pushbutton is labeled with its
associated function.
The remote inputs on JP10 are identified as follows:
JP10 Pin-out
Pin #1 EXTERNAL AC SENSOR INPUT
Pin #2 common
Pin #3 ROTATOR CURRENT SENSOR INPUT
Pin #4 common
Pin #5 FUNCTION #4
Pin #6 common
Pin #7 FUNCTION #3
Pin #8 common
Pin #9 FUNCTION #2
Pin #10 common

29
Functional Description
DCB, DCFCB and DCFCTB Models
JP10 Pin-out
Pin #11 FUNCTION #1
Pin #12 common
Control Board Power Input
The controller has a 115 VAC power input. The DCFCB and DCFCTB may be
ordered with the –240B option to enable operation from 208-240 VAC. The AC
selection switch (S7) on the control board must always be set to the 110 VAC
position. When the proper voltage is applied, the “POWER” LED is lit. Refer to the
Installation section on page 48 for installation details.
DTMF Decoding and Encoding Formats
Decoding Format
DTMF
The DCFCTB decodes any valid 3 to 12 digit DTMF string with timing of 50/50 to a
total mark/space time of 800 milliseconds. Faster DTMF decode timing, down to
35/5 ms, is available but you need to specify when ordered. When stacking multiple
DTMF strings together, a 1250 millisecond spacing is needed before and after a valid
DTMF string for proper decoding. Otherwise, the decoder disregards the string.
Two-Tone
The DCFCTB decodes two-tone codes with tone accuracy within 1.5%. Timing must
be at least 80% of what has been programmed. The inter tone gap must be less than
400 milliseconds. The recommended minimum tone spacing is 5%. You can use tone
timings between 0.5 seconds and 8 seconds for the A tone and between 0.25 seconds
and 8 seconds for the B tone.
DTMF Encoding Format
The DCFCTB encodes a nine (9) digit DTMF string that includes the RTU’s unit
type, id number, function status and sensors status. Refer to the Software Description
of DCFCTB Encoding Format section on page 36 for detailed information.

30
Theory of Operation
DCB, DCFCB and DCFCTB Models
Theory of Operation
Control Board Theory of Operation
Description of DCFCTB Block Diagram
Power Supply Section
You can power the unit by either 110 VAC or 220 VAC (on JP22). The unit is
protected by MOVs V5, V6 and V7, resistors R147 and R148 and by fuse F2. These
absorb spikes and limit over-voltages. The power is stepped down by the transformer,
rectified by D59 and filtered by C99. The voltage at this point is about 24 Volts DC.
Transorb D61 blows fuse F1, if the voltage exceeds 30 VDC. This voltage is
regulated to 12 VDC by switching regulator U27. This voltage turns on Q14 thru
R104. The collector of Q14 sends a low to U22 pin 2 indicating the presence of AC
Power.
U27 can also be powered by up to 75 Volts DC thru JP5 pin 9 from an external DC
source. The 12VDC from U27 turns on Q15 thru R116. This pulls the gate of switch
Q20 low allowing it to pass voltage from the 12 Volt battery thru Q20 to the rest of
the board if needed due to a power failure. The passed battery voltage turns on Q16
thru R118 and Zener diode D57. Q16 also pulls the gate of Q20 low turning it on. If
AC power fails, Q15 releases its low to Q20. Then if the battery voltage drops below
about 9.6 VDC, Q16 releases its low to Q20. This turns off the power to the board;
this stays off until AC power is restored.
U28 regulates the voltage further to 8 VDC and U24 regulates the voltage further to 5
VDC. An LED (D34) is also tied to this point and indicates power. U18 is an isolated
DC to DC converter which converts the 12 Volt supply to an isolated 5 Volt supply.
This is used for sensor and remote activation inputs. LED (D36) is also tied to this
point and indicates isolated 5 Volt power. U29 is an isolated DC to DC converter
which converts the 12 Volt supply to an isolated 12 Volt supply. This is used for
relay outputs. LED (D53) is also tied to this point and indicates isolated 12 Volt
power.
U14 monitors the voltage of the 5 Volt power. If the power supply voltage falls
below 3.3 Volts, U14 resets the microprocessor.
CPU Section
The microprocessor section is comprised of the microprocessor (U15). This processor
contains a watchdog timer, a day/date clock, non-volatile EEPROM and FLASH
memory, I/O pins and A to D convertors. The EEPROM is the non-volatile memory
where all customer specific information held while the FLASH is the non-volatile
memory where the main program is held. One (1) allows the microprocessor to
communicate over serial port JP8 for programming.
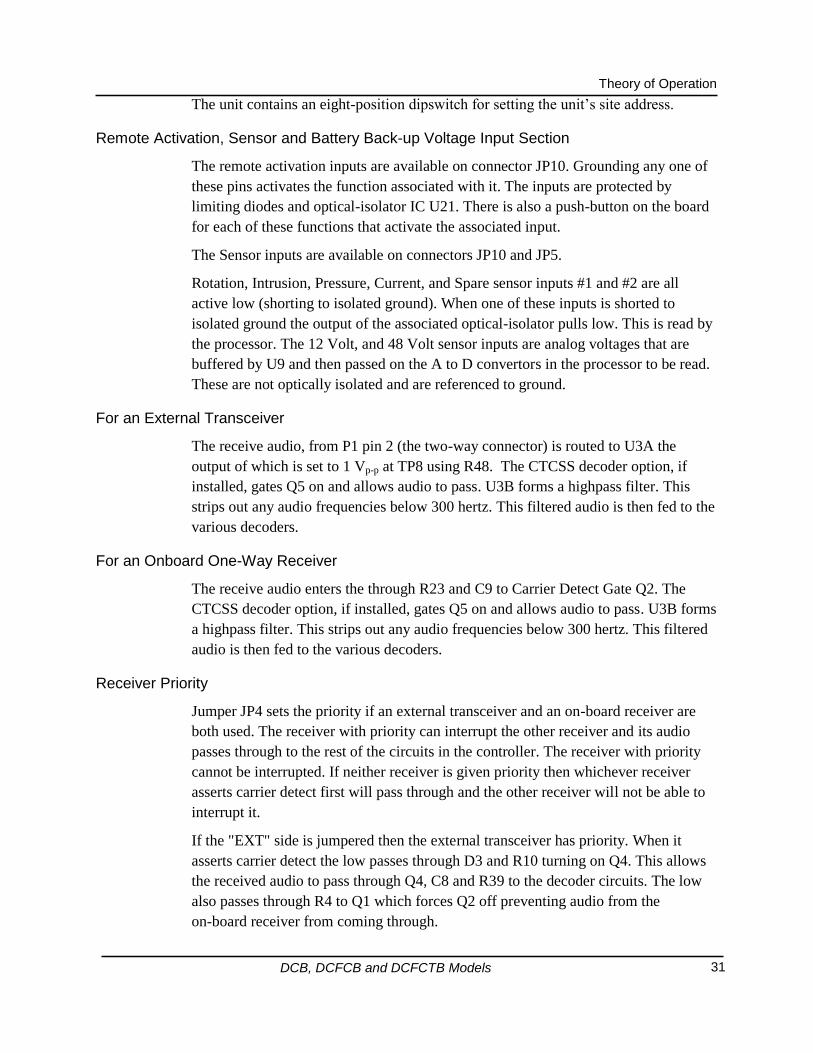
31
Theory of Operation
DCB, DCFCB and DCFCTB Models
The unit contains an eight-position dipswitch for setting the unit’s site address.
Remote Activation, Sensor and Battery Back-up Voltage Input Section
The remote activation inputs are available on connector JP10. Grounding any one of
these pins activates the function associated with it. The inputs are protected by
limiting diodes and optical-isolator IC U21. There is also a push-button on the board
for each of these functions that activate the associated input.
The Sensor inputs are available on connectors JP10 and JP5.
Rotation, Intrusion, Pressure, Current, and Spare sensor inputs #1 and #2 are all
active low (shorting to isolated ground). When one of these inputs is shorted to
isolated ground the output of the associated optical-isolator pulls low. This is read by
the processor. The 12 Volt, and 48 Volt sensor inputs are analog voltages that are
buffered by U9 and then passed on the A to D convertors in the processor to be read.
These are not optically isolated and are referenced to ground.
For an External Transceiver
The receive audio, from P1 pin 2 (the two-way connector) is routed to U3A the
output of which is set to 1 Vp-p at TP8 using R48. The CTCSS decoder option, if
installed, gates Q5 on and allows audio to pass. U3B forms a highpass filter. This
strips out any audio frequencies below 300 hertz. This filtered audio is then fed to the
various decoders.
For an Onboard One-Way Receiver
The receive audio enters the through R23 and C9 to Carrier Detect Gate Q2. The
CTCSS decoder option, if installed, gates Q5 on and allows audio to pass. U3B forms
a highpass filter. This strips out any audio frequencies below 300 hertz. This filtered
audio is then fed to the various decoders.
Receiver Priority
Jumper JP4 sets the priority if an external transceiver and an on-board receiver are
both used. The receiver with priority can interrupt the other receiver and its audio
passes through to the rest of the circuits in the controller. The receiver with priority
cannot be interrupted. If neither receiver is given priority then whichever receiver
asserts carrier detect first will pass through and the other receiver will not be able to
interrupt it.
If the "EXT" side is jumpered then the external transceiver has priority. When it
asserts carrier detect the low passes through D3 and R10 turning on Q4. This allows
the received audio to pass through Q4, C8 and R39 to the decoder circuits. The low
also passes through R4 to Q1 which forces Q2 off preventing audio from the
on-board receiver from coming through.

32
Theory of Operation
DCB, DCFCB and DCFCTB Models
If the "INT" side is jumpered then the on-board receiver has priority. When it asserts
carrier detect the low passes through D2 and R9 turning on Q2. This allows the
received audio to pass through Q2, C8 and R39 to the decoder circuits. The low also
passes through R11 to Q3 which forces Q4 off preventing audio from the external
transceiver from coming through.
If both sides of JP4 are jumpered then the two receive audio signals are mixed
together. This is done if the SINAD option is used as it allows receive audio from the
external transceiver jack to pass through Q4 and Q2 back to the on-board receiver
connector to feed the SINAD option board. JP1 must also be jumpered when the
SINAD option is installed.
VOX
Receive audio is routed from the external transceiver connector to buffer amplifier
U2A, which drives RMS to DC converter U5B. The DC voltage at the cathode of D6
represents the Level of the incoming receives audio. U5A acts as a comparator who’s
output pulls low when the receive audio exceeds about 45 mVp-p or about 750 Hz of
deviation (350 Hz for narrowband systems). This passes to JP3 which can be
jumpered to provide VOX carrier detect for radios that do not provide carrier detect.
DTMF
Receive audio enters the DTMF decoder IC (U7) from the high pass filter thru C40
and R74. When a proper DTMF digit is being decoded, TP10 goes low and a binary
output appears on pins 18, 19, 20, and 20 of U7.
Tone Decode
Receive audio from the high pass filter U3B, is passed on to low pass filter U3C.
These form a band pass filter from 300 to 3000 Hz. When the processor is decoding a
tone greater than 2100 Hz, it turns Q6 on. This makes the band pass filter from 1900
to 3000 Hz, which aids in the decoding of high frequency tones. When the processor
is decoding a tone less than 500 Hz, it turns Q7 on. This makes the band pass filter
from 300 to 500 Hz, which aids in the decoding of low frequency tones. After the
band pass filter the tone is amplified by U3D then passed to U6B, a comparator that
converts the tone to a square wave, and feeds it to the microprocessor to be measured.
The square waves can be seen on TP4.
EAS Decode
Receive audio from the high pass filter U3B, is passed on to low pass filter U3C.
When EAS functions are programmed, the processor turns Q2 on. These form a band
pass filter from 300 to 3000 Hz. After the band pass filter the tones is amplified by
U3D then passed to U6B, a comparator that converts the tone to a square wave, and
feeds it to the microprocessor to be decoded. The square waves can be seen on TP4.

33
Theory of Operation
DCB, DCFCB and DCFCTB Models
POCSAG Decode
All POCSAG messages contain a Receiver Identity Code (RIC) or CAP code. This
indicates which unit or group of units a message is intended for. The unit must have
its RIC configured before it responds to a message.
The Standard Format for Federal Signal POSAG codes consists of a five (5) character
numeric message preceded by a bracket “[“ and followed by a bracket “]” for a total
of seven (7) characters. The first three (3) numbers are the unit number. Any unit
number less than 300 activates only that unit number. A unit number of 300 activates
all units. Unit number of 301 to 316 activates all units in zones 1 to zone 16
respectively. The unit must be configured for the zone in which it is to function.
The last two numbers in the message are the function number (01 through 06), which
activates functions 1 through 6. Function numbers 96, 97, 98 and 99 activate Poll All,
Reset, Quiet Test or Cancel respectively.
Receive audio from the receiver module enters on JP7, pin 8. This audio is direct
coupled and passes through lowpass filter U1A. R18 and C7 average the DC voltage
present on U1A pin 1 and pass it to U1B pin 6. U1B acts a comparator converting the
audio present on pin 5 into squarewaves. This is fed to the processor for decoding.
Digital
The receive audio is fed to the digital decoder IC (U8). U8 converts the alternating
tones in the digital code to a string of highs and lows forming serial data. The data is
sent to the processor’s RXD port to be decoded.
Encoder Section
The transmit audio is generated by U7 (the DTMF encoder), U8 (the digital encoder)
and the CTCSS board (if present). PTT is generated by the processor taking pin 26
low. This gates Q9 on allowing the transmit audio to pass out to the transmitter.
The PTT also sets the output of U12F high, which allows R65 to turn on Q8 thru
R49. Q8 pulls the PTT line low and activates TRANSMIT LED D7. U12F, being
high, also allows R57 to begin charging C34. When this exceeds 5 volts, U6A forces
its output to ground and shuts off Q8. This provides a time-out timer to prevent the
transmitter from getting stuck in transmit.
The PTT signal also sets the output of U12F high turning on Q13. Q13 sends a
ground to the CTCSS board, telling to encode rather than decode.
Relay Outputs Section
There are four (4) relay outputs that are controlled by the processor. They are driven
through opto-isolator U25 and spike protected to prevent voltage spikes from
affecting the unit. The outputs appear on a connector at the bottom of the board and

34
Theory of Operation
DCB, DCFCB and DCFCTB Models
are all normally open with contact ratings up to 5 Amps and 240 Volts AC RMS. K3
and K4 outputs have selectable No or NC contacts.
Speaker Output Section
The microprocessor (U13) generates warning sounds on pin 17, which are routed out
thru amplifier U10 to the speaker output JP2.
Serial and I2C Ports
Transmit serial data from pin 3 of the micro (U15) goes to U11 - pin 7, which
converts the TTL level to +/- 12 volts RS232 levels and passes the transmit data to
serial port JP8. Receive data from JP8 is likewise converted from RS232 levels to
TTL levels and sent to the micro on pin 2.

35
Figure 5 DCFCTB Block Diagram

DCB, DCFCB and DCFCTB Models
Theory of Operation
36
Software Description of DCFCTB Encoding Format
The DCFCTB encodes a nine (9) digit DTMF string that includes the RTU’s unit
type, id number, function status and sensors status.
Digit # Description
1 Start Character, always a DTMF ―*‖
2 Unit type programmed into unit (see unit types)
3 Function status (see function currently running)
4 unit number: BCD most significant digit
5 unit number: BCD middle digit
6 unit number: BCD least significant digit
7 BCD of sensor status: (see decoding of sensor status)
8 BCD of sensor status: (see decoding of sensor status)
9 Terminating Character ―*‖
Table 1 Conversion of DTMF Digit to BCD
DTMF Character
BCD equivalent
1 0 0 0 1
2 0 0 1 0
3 0 0 1 1
4 0 1 0 0
5 0 1 0 1
6 0 1 1 0
7 0 1 1 1
8 1 0 0 0
9 1 0 0 1
0 1 0 1 0
* 1 0 1 1
# 1 1 0 0
A 1 1 0 1
B 1 1 1 0
C 1 1 1 1
D 0 0 0 0
Table 2 Unit Types
DTMF Character
DCFCTB types
A Single motor mechanical
B Three motor mechanical
C 2001AC or DCB

DCB, DCFCB and DCFCTB Models
37
Theory of Operation
Table 3 Function currently running
DTMF Character
Function
0 Standby
1 Function 1
2 Function 2
3 Function 3
4 Function 4
5 Function 5
6 Function 6
Decoding sensor status
Sensor status decoding using the DTMF digit to BCD reports current sensor
status. Depending on the type of unit selected the sensors required vary.
Table 4 Digit 7
Digit 7 DCB or 2001AC Single Motor Siren Three Motor Siren
Bit 1 (LSB)
Rotation N/A Rotation
Bit 2 Intrusion Intrusion Intrusion
Bit 3 Not used, always 0 Not used, always 0 Not used, always 0
Bit 4 AC power AC power AC power
Table 5 Digit 8
Digit 8 DCB or 2001AC Single Motor Siren Three Motor Siren
Bit 1 Battery voltage* Battery voltage* Battery voltage*
Bit 2 AUX 1 AUX 1 Blower motor
Bit 3 Activation current Activation current Activation current
Bit 4 Local activation Local activation Local activation
* Battery voltage refers to the 48V siren voltage.
Table 6 Bit Status
0 1
Rotation did occur Rotation did not occur
Cabinet door is closed Cabinet door is open
AC power is ON AC power is OFF
AUX 1 closed AUX 1 open
Blower did operate Blower did not operate
Activation current detected
Activation current not detected
Battery voltage okay Battery voltage low
Local activation occurred Local activation did not occur

DCB, DCFCB and DCFCTB Models
38
Theory of Operation
Example
Received DTMF report string * C 1 D D 2 05 *
* Starting character
C Unit type DCFCTB with 2001 siren
1 Currently running function 1
DD2 Siren site number (0000) (0000) (0010), which equals site number 002
0 Sensor status is (0000), Bit 1 is 0, rotation occurred
Bit 2 is 0, cabinet door is open
Bit 3 is 0, not used, always 0
Bit 4 is 0, AC power is on
5 Sensor status is (0101), Bit 1 is 1, battery voltage is low
Bit 2 is 0, AUX 1 is closed
Bit 3 is 1, activation current not detected
Bit 4 is 0, local activation occurred
Chopper Motor Current Sensor Theory of Operation
Overview
The adjustable current sensor 2001062B is a window comparator device that uses
a Hall Effect current sensor and an LM358 based window comparator. The active
high output is opto-coupled and the entire circuit is powered by an MC78L08AC
voltage regulator IC. The ground for the circuit is selected by way of jumper J2
between isolated or earth ground. The operation of the circuit is such that if the
current passing through the probe of the current sensor is larger than the lower
preset level and is less than the upper preset level, an active high output results
turning on the opto-coupled output, indicating that the sensed current is within the
acceptable range.
Circuit Description
The circuit is energized when 12 VDC (nominal) is applied to J1-3 and ground is
applied to J1-1. The 12 VDC at J1-3 is applied directly to the MC78L08AC
voltage regulator, IC1. The regulated 8 VDC output of IC1 is applied to the
LM358 dual op amp (IC2) at pin 8, to MC14001B quad NOR gate (IC3) at pin 14,
and also to the Hall-Effect current sensor (CS1) at its (+) input.
Current probe CS1 is designed to generate a reference voltage of 1/2 the supply
voltage on its (0) output pin. With 8.0 VDC at the (+) input of CS1 and ground
applied at the (-) input of CS1, CS1 outputs 4.0 VDC on the (0) output when the
current passing through the probe of CS1 is zero. This voltage is applied to R2,

DCB, DCFCB and DCFCTB Models
39
Theory of Operation
through which C4 is charged to 4.0 Volts, and this voltage is applied to the non-
inverting input of IC2B and the inverting input of IC2A. The output of the current
sensor is linearly scaled such that a change of 100 Amps in sensed current results
in a change of 1.0 Volt at the output, and a change of 1.0 Amp results in a change
of 0.01 Volts at the output. Using this calibration, POT1 and POT2 can be
adjusted to set upper and lower current thresholds, respectively.
A typical application of the current sensor could be to set the device for an upper
current threshold of 300 Amps, and a lower current threshold of 50 Amps. Using
these values, the voltage at TP1 corresponding to 150 Amps is the following:
4.0V + (300A * 0.01V/A) = 7V
The voltage at TP1 corresponding to 70 Amps is the following:
4.0V + (50A * 0.01V/A) = 4.5V
Adjusting POT1 sets the upper current threshold voltage of 7V at TP2, and
adjusting POT2 sets the lower current threshold voltage of 4.5 V at TP4. With a
sensed current value between 50 and 300 Amps, the voltage at TP1 is between 4.5
and 7 Volts. Since the voltage at the inverting input of IC2B (pin 6, also TP2) is
set to 7 Volts, and the voltage at the non-inverting input (pin 5) is less than 7
Volts, the output of IC2B (pin 7) is logic low. Similarly, since the voltage at the
non-inverting input of IC2A (pin3, also TP4) is set to 4.5 Volts, and the voltage at
the inverting input (pin 2) is greater than 4.5 Volts, the output of IC2A (pin 1) is
also logic low.
The outputs of IC2A and IC2B are applied directly to the inputs of NOR gate IC3.
With a logic low at both inputs of IC3 (pins 1 and 2), the output of IC3 at pin 3 is
a logic high, approximately 8 Volts. 8 Volts applied through R1 to the input (pin
1) of opto-coupler IC4 causes the output transistor of IC4 to be saturated and a
logic low is applied to J1-2, indicating that the sensed current is within the preset
acceptable range.
In the case that the sensed current exceeds the upper current limit, the voltage at
TP1 is larger than 7 Volts, putting the non-inverting input of IC2B at a higher
potential than the inverting input, resulting in a logic high at the output of IC2B,
which is applied to pin 1 of IC3. A logic high at either or both inputs of IC3 yields
a logic low at the output of IC3, which causes the output transistor of IC4 to be
cut off and a logic high is applied to J1-2, indicating that the sensed current is
outside the acceptable range. J2-1 must be pulled high by whatever circuit it is
connected to. In similar fashion, if the sensed current falls below the lower current
limit, the voltage at TP1 is less than 4.5 Volts, putting the inverting input at a
lower potential than the non-inverting input, resulting in a logic high at the output
of IC2A, which is applied to pin 2 of NOR gate IC3. As described above, this

DCB, DCFCB and DCFCTB Models
40
Theory of Operation
results in an active high applied to J1-2, indicating that the sensed current is
outside the acceptable range.
Miscellaneous
Capacitors C1 and C3 are power supply bypass capacitors that act to absorb
power supply line transients. Capacitors C2 and C5 dampen any transient voltages
on the inputs of the op-amps.
Figure 6 Chopper Motor Current Sensor Board Schematic

DCB, DCFCB and DCFCTB Models
41
Theory of Operation
Table 7 Parts List
FEDERAL PART NO. LOCATION DESCRIPTION
107A907A C1,C2,C5 CAPACITOR, MONO, 33 UFD
107A905A C3 CAP, MONO, .01 UFD, 50V
1071033A C4 CAPACITOR, MONO, 1 UF, 50V
128A217A IC1 I.C., 8 VOLT, MC78L08ACP
128A045A IC2 I.C., LM358, DUAL OP-AMP
128A123A IC3 I.C., MC14001B
128254-01 IC4 I.C., TLP321GB OPTO
288462A CS1 CURRENT SENSOR
105A276A POT 1, POT 2 POTENTIOMETER, 100 K OHM
140351-01 PIN 1, PIN 2, CONN, HEADER, 1 POSITION
PIN 3, PIN 4
140A235A-01 J1 CONNECTOR, 4 POSITION
301A122 J2,JU1,JU2 WIRE,BUSS,SOLID,22 GA.
100A247 R1 RESISTOR, CF, 820 OHM, 5%
100A262 R2 RESISTOR, CF, 100 K OHM 5%
103469B PCB, ADJ. CURRENT SENSOR
Rotator Motor Current Sensor Theory of Operation
Overview
The Current Sensor board, 2005221 Rev B, is mounted on the backplane under
the DC contactors. It monitors the DC current of the rotator motor. It scales the
voltage reading to allow direct reading of the current passing through the sensor
and employs a window comparator which signals that the current is between a
lower and an upper limit.
Features
Easy direct reading of current passing through the sensor
Fixed window comparator, no adjustment needed
Accurate to +/- 5%
Electrical Specifications
Input Voltage 7 VDC – 30 VDC
Input Current <30 mA maximum
Measurement Current Ranges 0 to 5 Amps, 0 to 5 VDC at TP3
0 to 15 Amps, 0 to 5 VDC at TP3
Window Comparator Thresholds JP3 and JP4 not jumpered
0.34 VDC min., 1.50 VDC max.
(0.34 and 1.5 Amps)
JP3 and JP4 jumpered
1.00 VDC min., 2.67 VDC max.
(3.0 and 8 Amps)
Window Comparator Output Open collector, sink </= 500 mA

DCB, DCFCB and DCFCTB Models
42
Theory of Operation
Connectors
JP1 Current Measurement Pass-Through
1 (+) voltage source
2 0-5 Amp (for gear driven rotators) output to motor, (-)
3 0-15 Amp (for belt driven rotators) output to motor, (-)
JP2 Interface, Power In and Signal Output
1 Ground
2 Window comparator output, open collector, pulls low when current is above minimum and below maximum current
3 DC supply voltage input (7 VDC to 30 VDC)
4 Analog sensor output. 0 – 5 VDC for 0 - 5 Amp input
0 – 5 VDC for 0 - 15 Amp input
JP3 and JP4 Jumper headers
Shorted to set window comparator thresholds for belt driven rotators
Circuit Description
Power Supply
Power enters through D1, is regulated down to 5 VDC, +/- 2% by U4 and is
filtered by C2 and C3.
The Current Measurement Path
The current sensor, U1, outputs a fixed DC voltage (2.5 V) plus a variable voltage
representing the current being measured. For the 0 - 5 Amp input a 2 Amp current
draw would = 2.5 VDC + 0.625 VDC or 3.125 VDC.
U3B generates an offset voltage. This voltage is summed through U3A with the
voltage from the current sensor. This subtracts off the 2.5 VDC from the current
sensor leaving only the voltage representing the current being measured. U3A
multiplies this voltage and scales it so that 1 Amp of current being measured = 1
VDC at TP3 (3 Amps = 1 VDC for the 0 - 15 Amp input).
The output of window comparator U2A and U2B goes high if the voltage is
greater than the voltage at U2 pin 6 and less than the voltage at U2 pin 3. This
turns on Q1 which pulls the output at JP2 pin 2 low.

DCB, DCFCB and DCFCTB Models
43
Theory of Operation
Figure 7 Rotator Motor Current Sensor Board Schematic 2005221B
Battery Charger Theory of Operation
Overview
The charger features a switch mode voltage and current regulator to improve
efficiency and reduce heat. It switches on each 60 Hz AC cycle, one at a time, as
needed, to control voltage and current. The charger incorporates a three-stage
charge algorithm to charge the battery without gassing and to maintain the
batteries at the optimum charge level. The charger delivers a constant 2 Amp
trickle charge until the battery’s voltage reaches 10 Volts. The charger then limits
the charge current to 4 Amps, the bulk charge, until the battery’s voltage reaches
the float voltage of 13.5 Volts. The charger also incorporates a temperature sensor
that limits the charge current to 2 Amps if the ambient temp of the charger
reaches 105°C.

DCB, DCFCB and DCFCTB Models
44
Theory of Operation
Circuit Description
The charger implements a three-stage charging algorithm. The three stages are trickle
charge, bulk charge, and float charge. The stages operate as follows.
The charger supplies a steady 2 Amp current to the battery until the battery voltage
reaches a predetermined threshold value. The purpose behind trickle charging is to
prevent a potentially hazardous condition caused by continuously pumping bulk
charge current into a damaged battery. Too heavy a charge when the battery is in this
severely discharged state can cause gassing which is corrosive, explosive and
shortens the life of the battery.
Bulk Charge
The charger supplies as much current as the transformer can supply, limited to
4 Amps, during the bulk charge. The bulk charge starts as the battery voltage rises

DCB, DCFCB and DCFCTB Models
45
Theory of Operation
above the 10 Volt threshold. Current is applied until the battery voltage rises to
13.5 Volts.
Float Charge
The float charge is entered when the battery voltages reaches 13.5 Volts. The
battery voltage is held at 13.5 Volts. While in the float state, the charger supplies
up to 4 Amps to a load and the battery. The charger remains in the float/bulk
charge state until the battery voltage drops below 9 Volts.
Voltage Regulator
Voltage entering from the transformer is converted to full-wave rectified D.C. by
D9. This yields 120 positive going voltage peaks a second. Through resistor
divider R17 and R18, U3-A compares the battery voltage to that of U5, a 5 Volt
reference. If the battery voltage is less than 13.5 Volts, the output of U3-A goes
high turning on Q5. This turns on SCR D3 allowing the one voltage peak to pass
to the battery helping to raise its voltage. When the voltage peak falls back below
that of the battery, the current through D3 drops to zero and D3 turns off. U3-A
continuously sends voltage peaks to the battery until its voltage reaches 13.5 V.
Current Limiter
U1-A monitors the current output of the charger by watching the voltage
developed across R24. If the current rises above 4 Amps, the output of U1-A
rises, turning on Q2. This temporarily prevents U3-A from sending any peaks of
voltage to the battery through D3 and reduces the current output.
U1-B monitors the battery’s voltage. If it is below 10 Volts, the output of U1-B
goes high turning on Q3 and pulling R6 to ground. This changes the current
limiter’s threshold from 4 Amps to 2 Amps.
Thermal Limiter
U2 monitors the temperature of the PC board. If the temp exceeds 105°C, the
output of U2 goes high. This turns on Q1 and pulls R6 to ground. This limits the
charge current to 2 Amps rather than 4 to help prevent the charger from
overheating.

DCB, DCFCB and DCFCTB Models
46
Theory of Operation
Figure 8 Charger Schematic

DCB, DCFCB and DCFCTB Models
47
Programming Software
Programming Software
FSPWARE
FSPWARE is a Microsoft Windows® based programming software for two-tone and
DTMF controlled systems. This software requires a direct connection between the
siren and the computer’s RS232 port via the use of a PCB universal cable adaptor.
The Commander™
Digital System Software (SFCDWARE)
SFCDWARE™ software is a Microsoft Windows® based program used to control,
monitor and configure the digital version of the siren controller. The software
communicates with the siren controller over an RS232 port. Refer to the Help menu
provided with the software for operational details.

DCB, DCFCB and DCFCTB Models
48
Installation
Installation
Electrocution or severe personal injury can occur when making electrical
connections, drilling holes, or lifting equipment. Therefore, experienced electricians
in accordance with national and local electrical codes, acting under the direction of
the installation crew safety foreman, should perform installation.
Explosive gases and corrosive materials may be present. To prevent explosion or
severe personal injury, installation technicians must be experienced with the safe
installation of lead-acid type batteries.
Recommendations on Control and Battery Box Location
First consider the siren location and method of activation before determining control
and battery box location. You can activate the DCFCB and DCFCTB unit remotely
through radio or landline controls and locally using pushbuttons provided in the
control unit. Refer to the Land Line Control section on page 60 for additional
information on remote activation using landline controls.
Since the controls are in a NEMA 4 rated enclosure and the batteries are protected,
you may install the controls indoors or outdoors. If you install indoors, ensure
adequate ventilation is provided for the four lead acid batteries to prevent build-up of
explosive gas.
To ensure proper siren power is maintained, it is recommended that the control and
battery box location be within a 50 feet wire run to the siren. If it is necessary to
make a longer run, use a 1 AWG or larger wire for the siren motor.
When mounting the control and battery box, it is recommended that the units be out
of reach to avoid vandalism but accessible to service personnel. Both boxes come
equipped with padlock hasps. Use these for added security.
The control and battery boxes are shipped mounted on an aluminum channel with
four mounting holes for 1/2-inch bolts. The total weight of the control and battery
box is approximately 364 pounds including the batteries. Therefore, insure that the
mounting surface and fasteners can safely sustain the weight of the assembly and any
additional environmental stresses placed on it.
Refer to Figure 9 Typical DCFCB or DCFCTB with 2001TRB Installation Drawing
on page 49.
Note: When installing this product, insure that Local and NEC guidelines are
followed.

DCB, DCFCB and DCFCTB Models
49
Installation
Figure 9 Typical DCFCB or DCFCTB with 2001TRB Installation Drawing

DCB, DCFCB and DCFCTB Models
50
Installation
Control and Battery Box Installation
The control and battery box is attached to a length of 5” channel. There are five (5)
pre-drilled holes in the channel:
(1) 1-1/4” convenient lifting point
(4) 5/8” mounting holes
The total weight of the control/battery boxes including batteries is approximately
364 lb (165 kg). Therefore, it is imperative that the mounting surface and mounting
method selected can safely sustain the weight of the assembly. In addition, the
mounting method and surface used must be able to withstand external mechanical
stresses that may be applied to the assembly.
Installer Supplied Material List
The following is a general list of material required to install the model
DCB/DCFCB/DCFCTB, 2001-130 siren, and the 2001TRB option. This list varies
depending on mounting methods, length of pole, other options, local electrical codes,
etc. Therefore, use this list as a reference guideline only. Stainless steel hardware is
recommended.
Table 8 Installer Supplied Material List
Material Description QTY
1. 240 VAC, 1 phase/3 wire, fused disconnect 1 ea.
2. FRN 30, 30 Amp time delay fuse 2 ea.
3. 100 Amp meter socket (if required) 1 ea.
4. 1‖ meter hub (overhead service only) 1 ea.
5. 1‖ service entrance (overhead service only) 1 ea.
6. Fork bolt (overhead service only) 1 ea.
7. 1/2‖ Liquid-Tight, 90 degree connectors (2001TRB option primary feed) 2 ea.
8. 1‖ Liquid-Tight 90 degree connector (2001TRB option secondary feed) 1 ea.
9. 1‖ Liquid-Tight 45 degree connector (2001TRB option secondary feed) 1 ea.
10. 1/2‖ EMT compression box connector (disconnect/meter ground) 1 ea.
11. 1‖ heavy wall compression fittings (rotator cabinet/OH meter) 1 ea.
12. 1/2‖ Liquid-Tight flexible conduit (2001TRB primary feed) 18‖
13. 1‖ Liquid-Tight flexible conduit (2001TRB option secondary feed) 7 1/2‖
14. 1/2‖ EMT thin wall conduit (disconnect/meter ground) 10’
15. 1‖ aluminum rigid (if applicable in your area/cabinetry-siren raceway)
50’
16. 1/2‖ nail drive straps (securing 1/2‖ ground pipe) 4 ea.
17. 1/2‖ jiffy straps (substitute for nail straps) 4 ea.
18. 1‖ heavy wall 2-hole straps (1‖ raceway clamping) 15 ea.
19. 1‖ lock rings (1‖ raceway tightening) 5 ea.
20. 1‖ plastic bushings 2 ea.
21. 1/2‖ plastic bushings 2 ea.
22. 1‖ close nipple (1‖ raceway/cabinet-siren) 1 ea.
23. 1‖ chase nipple (1‖ LB-cabinet connection) 1 ea.

DCB, DCFCB and DCFCTB Models
51
Installation
24. 1‖ LB’s withgaskets and covers (1‖ raceway/cabinet-siren) 2 ea.
25. Split bolts, 10 AWG wire (2001TRB option primary connection)
2 ea.
26. Mechanical lugs, 2 AWG wire (2001TRB option/siren motor feed)
6 ea.
27. Mechanical lugs, 6 AWG wire (system ground) 4 ea.
28. #6 copper ground wire (system ground) 75’
29. 5/8‖ x 8’ Copper Ground rod (system ground) 1 ea.
30. Ground rod connector cold water type/ acorn style
(system ground) 1 ea.
31. 1 1/4‖ to 1‖ Reducing washer (meter socket/O.H. service) 2 ea.
32. 1 1/4‖ Galvanized staples (securing ground wire to pole) 30 ea.
33. 3/4‖ Galvanized staples (securing antenna cable) 30 ea.
34. 12 AWG THHN stranded CU wire (orange/rotator motor feed) 40’
35. 14 AWG THHN stranded CU wire (black/charger circuit) 40‖
36. 14 AWG THHN stranded CU wire (white/charger circuit) 40‖
37. 10 AWG THHN stranded CU wire (black/TR option primary) 30‖
38. 16 AWG THHN stranded CU wire (optional, black/proximity sensor) 45’
39. 16 AWG THHN stranded CU wire (optional, brown/proximity sensor) 45’
40. 16 AWG THHN stranded CU wire (optional, blue/proximity sensor) 45’
41. 2 AWG, 600V, stranded CU wire (optional, 2001TRB 48V and ground)
12’
42. Green electrical tape (33+) (ground wire identification) 1 roll
43. Red electrical tape (33+) (48+ wire identification) 1 roll
44. White electrical tape (33+) (neutral wire identification) 1 roll
45. Black electrical tape (33+) (connector insulating wrap) 1 roll
46. Blue electrical tape (33+) (identification marking) 1 roll
47. Rubber tape (insulating connections) 1 roll
48. Spade crimp connector (red-14 ga. wire/charger circuit) 2 ea.
49. Ring crimp connector (1/4‖ stud size 12 ga. wire/rotator feed)
1 ea.
50. 1/4 x 20 3/4‖ hex head bolt (ground connection on siren leg) 1 ea.
51. 1/4 x 20 standard flat washer (ground connection on siren leg) 1 ea.
52. 1/4 x 20‖ intern/ extern star washer (ground connection on siren leg) 1 ea.
53. 1/4 x 20 split washer (ground connection on siren leg) 1 ea.
54. 1/4 x 20 hex head nut (ground connection on siren leg) 1 ea.
55. 5/16 hex head nut (ground connection on control cabinet)
1ea.
56. 1/2‖x 4‖ hex head lag bolt (securing TR option to utility pole) 3 ea.
57. 1/2‖x 6‖ hex head SS lag bolt (securing siren/control cabinet to utility pole)
16 ea.
58. 1/2‖ SS (stainless steel) flat washers (backing 1/2‖ lag bolts) 19 ea.
59. 10 x 1‖ hex head, slotted, sheet metal screws (securing straps/equip to pole)
1 box
60. 10 x 2‖ hex head, slotted, sheet metal screws (securing straps/equip to pole)
1 box
61. 10 x 3‖ hex head, slotted, sheet metal screws (securing straps/equip to pole)
1 box
DCB, DCFCB and DCFCTB Models
52
Installation
Pole Mounting
1. Remove any batteries from the battery box before lifting the control/battery box.
2. Use a crane to lift the control/battery unit to the desired mounting height along
the pole.
3. Use the crane to hold the control/battery unit against the pole so that the four
mounting holes on the mounting channel can be used as a template to drill four
3/8” holes at least 3-1/2” deep.
4. Attach the control/battery box to the pole using four user supplied 1/2” x 5” lag
bolts. Slide a user supplied 1/2” flat washer onto each bolt before threading the
bolt into the pole. Ensure the channel is plumb and straight. Do not bend the
mounting channel by over tightening the lag bolts. Notch the pole or use shims if
necessary to provide a flat stable mounting surface.
5. Mount a user supplied fused disconnect switch on the pole beneath or opposite
the control/battery box assembly in accordance with Local and National
Electrical Codes.
6. If the optional Transformer/Rectifier is required, drill three 3/8” holes at least
3-1/2” deep using the Transformer/Rectifier as a template. Attach the cabinet to
the pole using three user-supplied 1/2” x 5” lag bolts. Slide a user-supplied 1/2”
flat washer onto each bolt before threading into pole.
Flat Surface Mounting
1. Remove any batteries from the battery box before up righting the control/battery
box.
2. Prepare the mounting surface for hanging the assembly using the steel channel as
a template.
3. Attach the control/battery box to a wall or other substantial vertical surface using
the four 5/8” mounting holes.
4. Mount a user supplied fused disconnect switch in accordance with Local and
National Electrical Codes.
5. If the optional Transformer/Rectifier is required, attach the cabinet to a wall or
other substantial vertical surface using the three mounting holes. Make sure that
the mounting surface and mounting method selected can safely sustain the weight
of the transformer. The weight of the Transformer/Rectifier is approximately
150 lb.

DCB, DCFCB and DCFCTB Models
53
Installation
Electrical Connections
Install the siren electrical system in compliance with local electrical codes and NEC
recommendations. Federal Signal also recommends that all user-installed conduit
connections enter from the bottom of the cabinet. Disconnect all power and read all
warnings at the beginning of this manual and on the batteries before making
connections.
THE SIREN AND CONTROL UNITS MUST BE SOLIDLY CONNECTED TO AN
EARTH GROUND. If the siren is installed in a building, ground the system to a
metallic object known to be grounded. For pole mount installations, drive a metal rod
or bar at least 8 feet into the ground, as close as practical to the base of the pole. USE
A SEPARATE, CONTINUOUS 6 AWG OR LARGER WIRE FROM THE SIREN
FRAME TO GROUND AND FROM THE CABINET OF EACH SIREN
CONTROL UNIT TO GROUND.

54
Figure 10 DCFCTB Wiring Diagram

55
Figure 11 DCB Wiring Diagram

56
Figure 12 DCFCB Wiring Diagram

DCB, DCFCB and DCFCTB Models
57
Installation
Siren Connections
The complete system wiring diagrams are shown in Figure 10 DCFCTB Wiring
Diagram, Figure 11 DCB Wiring Diagram, Figure 12 DCFCB Wiring Diagram. All
interconnections between the Siren and Control Unit are accomplished using three
wires. Two 2 AWG wires provide operating power to the siren motor. A single 12
AWG wire provides operating power to the rotator motor. There are two terminal
blocks located in the rotator housing of the siren that accept stripped wire, and a
terminal block and relays in the control box that accept 1/4 inch and 5/16 inch ring
terminals. These points provide convenient locations for making connections. Refer
to the Options section on page 74 for wiring of options.
Siren and Control Unit Interconnecting Wiring
1. Install a 1" user-supplied electrical conduit fitting in the bottom of the Control
Unit cabinet and in the bottom of the siren rotator housing.
2. Install 1" user-supplied electrical conduit between the conduit fitting in the
bottom of the siren rotator housing and the conduit fitting at the bottom of the
Control Unit cabinet.
3. Route the interconnecting wiring (user-supplied) from the siren rotator housing to
the Control Unit cabinet through the conduit.
4. Connect a red 12 AWG wire from terminal 1 of the three position terminal block
(TB1) in the rotator housing to the bottom open terminal of the rotator control
relay, K1, using a 1/4” ring terminal (user-supplied) at K1.
5. Connect a red 2 AWG wire from terminal 2 of the three position terminal block
(TB1) in the rotator housing to the open left side of the 200 Amp fuse
(148A147A) using a 1/4” ring terminal (user-supplied). Refer to Figure 10
DCFCTB Wiring Diagram, Figure 11 DCB Wiring Diagram, or Figure 12
DCFCB Wiring Diagram.
6. Connect a black 2 AWG wire to terminal 3 of the three position terminal block
(TB1) in the rotator housing. Run the black 2 AWG wire to a 5/16” backplane
ground stud in the control cabinet (labeled GND) using a 5/16” ring terminal
(user-supplied).
7. Ground the Siren and Control Unit to earth ground using separate continuous runs
of wire (do not “T” from another ground wire).
8. Tighten all connections securely to provide good electrical connections.

Installation
58 DCB, DCFCB and DCFCTB Models
AC Power Connections
TO PREVENT DAMAGE TO THE CONTROL UNIT, DO NOT CONNECT
240VAC POWER WITHOUT A MODEL –240B STEP DOWN TRANSFORMER.
1. As shipped from the factory, the Control Unit is configured for 120 VAC
operation. The AC selector switch, S7 on the siren control board, must be set to
the 120 VAC position (refer to -240B Wiring on page 80 for operation at
240 VAC or 2001TRB Wiring on page 74 if the 2001TRB option is used).
2. After drilling or punching an appropriate sized hole in the bottom of the Control
Unit cabinet, install a user supplied 1/2” electrical conduit fitting. Route 1/2”
conduit (steel preferred) between a user-supplied fused disconnect switch and
user-supplied conduit fitting in the bottom of the Control Unit cabinet.
3. Route three user-supplied wires through the conduit that was just installed
between the Control Unit and the fused disconnect switch. Use 14 AWG wire or
larger.
4. Connect Neutral (white wire) from service disconnect to F1 on the DIN rail in
Control Unit cabinet (refer to Figure 10 DCFCTB Wiring Diagram, Figure 11
DCB Wiring Diagram, or Figure 12 DCFCB Wiring Diagram).
5. Connect Line (black wire) from service disconnect to F2 on the DIN rail in
Control Unit cabinet (refer to Figure 10 DCFCTB Wiring Diagram, Figure 11
DCB Wiring Diagram, or Figure 12 DCFCB Wiring Diagram).
6. Connect Ground (green wire) from service disconnect to the green ground block
on the DIN rail in Control Unit cabinet (refer to Figure 10 DCFCTB Wiring
Diagram, Figure 11 DCB Wiring Diagram, or Figure 12 DCFCB Wiring
Diagram). A small screwdriver must be pushed into the square opening in the
terminal block to open the contacts of this block.
7. Follow the instructions included with the lightning protector (supplied) and install
it in the service disconnect.
8. Size fuse or circuit breaker in service disconnect to 15 Amps max.
Battery Installation and Wiring
1. Install the batteries in the Battery Box, per illustration Figure 13 Battery
Positioning and Wiring, taking care not to touch the battery terminals against
cabinet. It may be necessary to temporarily relocate the wiring in the enclosure
before installing the batteries. The polarity of the battery terminals is clearly
marked on the battery case. See Figure 13 Battery Positioning and Wiring for
correct orientation. (For optional battery warmers, refer to the Model HTR2 and

Installation
59 DCB, DCFCB and DCFCTB Models
HTR4 (Battery Warmers) section on page 81 and Figure 21 HTR2 and HTR4
Wiring Diagram).
2. There are several wires entering the battery cabinet: a red 4 AWG, a black 4
AWG, and a multiple conductor cable. The red and black 4 AWG wires provide
48 VDC operating power to the siren. The multiple conductor cable provides the
charge current for the batteries. Several white wires with lugs on each end are
also packaged with the batteries. These white wires are used to connect the
batteries in series.
3. Connect the wires to the batteries per Figure 13 Battery Positioning and Wiring
and securely fasten all connections.
4. Apply user supplied silicon grease, or other oxide inhibiting compound to the
battery terminals.
Figure 13 Battery Positioning and Wiring

Installation
60 DCB, DCFCB and DCFCTB Models
Land Line Control
You may activate the controller by applying contact closures to the remote activation
inputs. Refer to the Landline and Local Pushbutton Activation section on page 28 for
a functional description and details on interfacing and wiring connections.
Antenna Installation
TO PREVENT ELECTROCUTION OR SEVERE PERSONAL INJURY; INSTALL
ANTENNA AWAY FROM POWER LINES AND INSTALL WITH PROPER
GROUNDING. Refer to section 810 of the National Electrical Code, ANSI/NAPA
No. 70. Refer to Figure 16 Antenna Grounding on page 66 for details.
A factory installed internally wired Type N bulkhead is provided on the bottom side
of the Control Unit for ease of antenna cable interface. The bulkhead requires the
installation of a male Type N connector on the antenna cable for correct interface. It
is essential that the installer follow all tuning (if applicable), installation and
safety instructions provided by the antenna manufacturer.
Yagi Antenna Installation
Yagi Antenna Pre-Assembly Instruction:
1. Unpack the antenna and locate the following parts:
Boom (1-14” for 5 element model, 7/8” dia. for 3 element model)
3/8 diameter elements (y---3 = 3 elements, y----5 = 5 elements)
Gamma match parts bag
Mounting bracket parts bag
2. Find the proper element dimension chart for your antenna, within the antenna
instructions, and trim each element according to your operating frequency. Use
care to trim equal lengths from each end of each element ensuring that the
mounting hole is at the center.
Note A: Proper trimming and adjustment is critical to the Voltage Standing Wave
Ratio, known as VSWR. (High reflected power levels decrease forward
power. The life of the radio and transmit capabilities are dependent upon
the VSWR being low as possible).
Note B: If two frequencies are being used, then trim the antenna to the transmit
frequency of the unit where the antenna is mounted.

Installation
61 DCB, DCFCB and DCFCTB Models
3. Insert the elements into their respective locations through the boom, starting with
R1 (the reflective element) in the hole closest to the mounting holes. Then insert
Dr, D1 etc. in that order.
Note A: Shortest element is furthest away from the mount and increases in size as
it gets closer to the mount.
Note B: Be very careful to line up the holes and not cross thread when securing
the elements in the next step. The bolts must tighten all the way down
upon the lock washers.
4. Secure the elements with the stainless steel 10-32 hex bolts and #10 lockwashers
provided.
5. Locate the connector/brass tube assembly in the gamma match parts bag and
insert the assembly first through the connector bracket, then thread the connector
into the bracket. Be sure to tighten the connector fully. A drop of Locktite or
other thread lock may be used in the threads to eliminate the possibility of the
connector loosening.
6. Slide the gamma link onto the driven element and assemble the gamma match as
shown in figure 1 or 2 (under the antenna instructions provided by the antenna
manufacturer). Set dimensions “A” and “B” to those shown in table 1. Setting the
match to the dimensions shown for your antenna is a good starting point, which
allows you to quickly line tune later. Complete the assembly by attaching the end
cap onto the end of the gamma tube. The antenna is now ready for final tuning.
Final VSWR tuning
1. Before final installation of the antenna, temporarily set it up in a clear area at
least six feet above the ground.
Note A: Do not touch the antenna while the radio is transmitting.
Note B: Ensure antenna is not touching any conductive material and is pointed
away from all objects and people. Pointing antenna at objects in close
proximity may act as a reflector and create inaccurate readings.
2. Apply RF power to the antenna at the transmit frequency to be used at that
antenna, and check for the low VSWR while performing each of the following
steps.
A. Loosen the setscrew with the Allen key provided and make a slight
adjustment to the aluminum gamma tube for the lowest VSWR (Reflected
power).
B. Adjust the gamma link along the driven element for the lowest VSWR.
C. Repeat the above steps until the lowest VSWR is achieved. Reflected power
must be less than 10% of the forward power.
Installation
62 DCB, DCFCB and DCFCTB Models
D. Return to the dimensions shown in table 1 if there is any trouble achieving a
good match. If the element dimensions are incorrect for the frequency being
used, low VSWR may be unattainable. If the VSWR specification is still
unattainable, replace the cable (A simple ohm meter check of the cable does
not guarantee that the antenna cable is good, due to the DMM not having the
ability to check the cable at high frequencies. If that does not take care of the
problem, replace the antenna.
Mount Yagi Antenna
Refer to Figure 14 Yagi Antenna Installation Example.
1. Install antenna, (using installation bracket or equivalent) as high as possible, such
that the antenna cable and obstacles allows, and install on side of pole closest to
the receiving station. Aim antenna at receiving station.
Note: Objects around the antenna affects the antenna, keep antenna pointed
away from objects.
2. Ensure antenna cable connections are tight. Seal all connection points with heat
shrink or tape and seal with Scotch Coat, or equivalent.
3. Apply RF power to the antenna at the transmit frequency to be used at that
antenna, and check the VSWR (Reflected power). Reflected power must be less
than 10% of the forward power.
If the VSWR specification is unattainable, replace the cable (a simple ohm meter
check of the cable does not guarantee that the antenna cable is good, due to the
DMM not having the ability to check the cable at high frequencies). If that does
not take care of the problem, replace the antenna.
Omni Fiberglass Antenna Models: (no tuning required)
Refer to Figure 15 Omni Antenna Installation Example.
1. Install antenna, (using installation bracket or equivalent) as high as possible, such
that the antenna cable and obstacles allows, and install on side of pole closest to
the receiving station.
Note: Objects around the antenna affects the antenna, keep antenna away from
objects, and at least ¼ wavelength from siren pole.
2. Ensure antenna cable connections are tight. Seal all connection points with heat
shrink or tape and seal with Scotch Coat, or equivalent.
3. Apply RF power to the antenna at the transmit frequency to be used at that
antenna, and check the VSWR (Reflected power). Reflected power must be less
than 10% of the forward power.

Installation
63 DCB, DCFCB and DCFCTB Models
If the VSWR specification is unattainable, replace the cable (A simple ohm meter
check of the cable does not guarantee that the antenna cable is good, due to the
DMM not having the ability to check the cable at high frequencies). If that does
not take care of the problem, replace the antenna.

Installation
64 DCB, DCFCB and DCFCTB Models
Figure 14 Yagi Antenna Installation Example

Installation
65 DCB, DCFCB and DCFCTB Models
Figure 15 Omni Antenna Installation Example

Installation
66 DCB, DCFCB and DCFCTB Models
Figure 16 Antenna Grounding

Pre-operational System Testing
67 DCB, DCFCB and DCFCTB Models
Pre-operational System Testing
The output sound level of a siren is capable of causing severe hearing discomfort or
permanent hearing damage. Therefore, ALWAYS wear adequate hearing protection
and minimize exposure time when performing any testing or maintenance on the
siren.
Failure to properly test the siren system before placing into service may prevent the
siren from operating in an emergency. The following tests and calibrations must be
performed by an experienced technician prior to using the siren system.
Initial Sensor Adjustments and Testing
To ensure proper and reliable two-way status operation, the operation and alignment
of the sensors must be confirmed when the siren and control are installed. All of the
sensors are factory adjusted and the following alignment instructions may only
pertain to tuning replacement sensors.
Rotation Current Sensor
Locate the rotation current board (2005221) on the backplane of the control cabinet
with the blue current sensor (refer to Figure 10 DCFCTB Wiring Diagram on page
54). This board is preset at the factory and should not be adjusted.
To check the board for proper operation, do the following:
1. Verify that the output at JP2-2 is high (4 – 5VDC).
2. Activate a siren function by momentarily depressing one of the function
pushbuttons on the controller board.
3. Measure the DC voltage on TP2. The voltage should correspond to the DC
current draw of the siren motor (0.8 ADC, +/- .3 A).
4. Verify the output JP2-2 is low (0-1 VDC) for the duration of the siren function.
Chopper Current Sensor
Locate the chopper current board (2001062) on the backplane of the control cabinet
(refer to Figure 10 DCFCTB Wiring Diagram on page 54).
Adjustment Procedure
1. Using Pot 1, adjust the voltage at TP2 to 7 VDC.
2. Using Pot 2, adjust the voltage at TP4 to 4.5 VDC.

Pre-operational System Testing
68 DCB, DCFCB and DCFCTB Models
Activate a siren function by momentarily depressing one of the function pushbuttons
on the controller board. Verify that input #4 indicator (D14) on the controller board
turns on for the duration of the siren function.
AC Power Sensor
Verify that the AC power indicator (D17) on the controller board is on while AC
power is active. Measure across F1 TB5-1 and TB5-5 for 120 VAC. Confirm that
with the AC power source turned off (via service disconnect) the AC power indicator
is off.
Intrusion Sensor
With one cabinet door open, verify that intrusion indicator (D13) is ON. Depress the
intrusion switch located on the cabinet door. With the switch depressed, confirm that
the intrusion indicator is OFF. Verify the switches on both cabinet doors operate
correctly.
Note: A jumper preset at JP9 also causes all of the LED’s to go dim when intrusion
switch is pressed.
Battery Voltage Measurement
1. Allow the batteries to charge for 24 hours to ensure they are fully charged.
2. Turn off AC power to the battery chargers by disconnecting power at the service
disconnect or opening F1 and F2 in the control cabinet.
3. Using a digital multi-meter (Fluke model 75 or equivalent), measure the batteries
individually utilizing the following test points (refer to Figure 10 DCFCTB
Wiring Diagram on page 54 for details).
TB1-1 and Chassis Ground = 13.5 VDC*
TB1-1 and TB1-2 = 13.5 VDC*
TB1-2 and TB1-3 = 13.5 VDC*
TB1-3 and TB1-4 = 13.5 VDC*
TB1-3 and TB1-4B = 13.5 VDC*
* Voltage reflects battery float voltage and varies depending on state of charge.
4. Measure the combined battery voltage between chassis ground and TB1-3. The
measured voltage depends on the batteries’ state of charge and should be
54.0 +/ 1 V.
5. While monitoring the voltage in step 4, manually activate a steady siren function
by depressing the appropriate function pushbutton on the controller board. If the
measured voltage drops below 40 VDC, it is an indication of weak batteries and
causes the controller to terminate the siren function. If a low battery condition is

Pre-operational System Testing
69 DCB, DCFCB and DCFCTB Models
indicated, follow up by load testing each battery with an automotive type battery
load tester (180 Amp load recommended).
6. Turn AC power on by connecting F1 and F2 and turning on the service
disconnect switch.
Battery Charger Voltage Measurement
To measure the output voltage of each charger, it must be connected to a battery.
Since the battery’s state of charge affects the output voltage of the charger, the
measured voltages varies. Use a digital multi-meter to measure each battery charger
individually (refer to the test points given in the Battery Voltage Measurement
section on page 68). The output voltage of each battery charger should be between
13.4 VDC and 13.6 VDC when connected to a fully charged battery.
2001TRB Transformer/Rectifier testing (optional)
1. With the AC service turned on, measure for 46.0 VDC, +/- 0.5 VDC between
K3-3 and chassis ground (refer to Figure 18 Transformer Rectifier Wiring to
Control Unit).
2. Confirm that K3 is energized.
3. Shut off the service disconnect and confirm that K3 de-energizes.
Manual Siren Activation
Manually depress each function button and confirm correct siren operation. Refer to
the controller programming and test data sheet (shipped with controller) for siren
function details.
Land Line Siren Activation (optional)
Confirm that the user-supplied telephone control relay provides each appropriate
remote function input with a momentary contact closure (1 second nominal) and
observe proper siren activation. Refer to the Control Board Power Input section on
page 29 for details on interfacing and wiring.
Transceiver Audio Level Adjustments and VSWR Testing
Due to the test equipment requirements and RF control systems knowledge required
to perform the following controller testing, only a qualified two-way Radio Service
Technician should conduct the following test steps.
To ensure reliable radio controlled siren operation, the following testing must be
conducted upon initial controller installation. For the following steps, connect the
Communications Service Monitor to the RF bulkhead mounted on the bottom side of
the control cabinet.

Pre-operational System Testing
70 DCB, DCFCB and DCFCTB Models
DTMF Transmit Level Adjustments (DTMF versions of DCFCTB only)
1. To Transmit and generate a DTMF test tone, apply a jumper across the JP15 on
the FCT controller board, (refer to Figure 3 Communications/Controller Board
Layout on page 24 for details).
2. Confirm the deviation level is at 3.0 kHz (or 1.5 kHz for a 12.5 kHz spaced
channel). This level has been pre-set at the factory, however if adjustment is
required, set R71 on the controller board for the required deviation.
3. Utilizing an in-line Watt meter, confirm that the forward radiated power output
matches the specified power output listed on the final test data sheet supplied
with unit within 20%. Also verify that the VSWR is less than 5%. Refer to the
Installation section if the VSWR is excessive.
FSK Transmit Level Adjustments (Digital FSK versions of DCFCTDB only)
1. To Transmit and generate an FSK modem tone, apply a jumper across the JP15
on the FCT controller board, (refer to Figure 3 Communications/Controller Board
Layout on page 24 for details).
2. Confirm the deviation level is at *3.0 kHz. This level has been pre-set at the
factory; however if adjustment is required, set R70 on the controller board for the
required deviation. If CTCSS is used, set the CTCSS level to 0.75 kHz.
3. Using an in-line Watt meter confirm that the forward radiated power output
matches the specified power output listed on the final test data sheet supplied
with unit within 20%. Also verify that the VSWR is less than 5%. Refer to the
Installation section if the VSWR is excessive.
*Note: Deviation levels are cut in half on 12.5 kHz spaced channels.
Receive Level Adjustments
1. Inject a 100uV carrier signal modulated with a 1 kHz tone at *3.0 kHz deviation
for DTMF systems. Use *3.0 kHz deviation for digital systems.
2. Connect an oscilloscope to TP8 on the controller board and confirm a clean,
undistorted sinewave of 1 Vp-p. The level has been pre-set at the factory; however,
if adjustment is required, set R48 on the controller board to 1 Vp-p for the external
transceiver. The level of the on-board receiver module is fixed and does not need
to be adjusted.
*Note: Deviation levels are cut in half on 12.5 kHz spaced channels.
Two-tone and DTMF Controller Decode-ability Testing
1. Unplug JP21 to disable the siren.
2. With the transmit modulation level set to *3 kHz from the communication
monitor inject a 0.5 uV carrier signal.

Pre-operational System Testing
71 DCB, DCFCB and DCFCTB Models
*Note: Deviation levels are cut in half on 12.5 kHz spaced channels.
3. Encode the appropriate DTMF strings and or 2-tone tones required to activate the
desired siren function. Confirm reliable decoding of at least 10 of 10 tries.
4. Plug JP21 back in.
Confirming Controller Auto-Reporting
By toggling one of the following sensor inputs, confirm that the controller sends a
correct report to the SS2000 base controller. Note that with digital systems the
DCFCTDB must be programmed to auto-report the following sense points to perform
this test.
Intrusion
Depress intrusion switch for at least 5 seconds. Release the switch. Verify the door
closed and door open reports we received at the SS2000.
AC Line Voltage
By removing AC power at the service disconnect confirm that a report is generated
within 5 minutes. Confirm that another report is generated when power is restored.
The output sound level of a siren is capable of causing severe hearing discomfort or
permanent hearing damage. Therefore, ALWAYS wear adequate hearing protection
and minimize exposure time when performing any testing or maintenance on the
siren.
Test Activation Codes
Test all siren functions from the siren control point. This test must be performed to
ensure all desired siren functions have been properly entered at the control station and
at the siren site. Request a report from the control station during the siren function.
Verify the report indicates the proper status conditions for the site being tested.

Service and Maintenance
72 DCB, DCFCB and DCFCTB Models
Service and Maintenance
The siren has moving parts, high operating current, explosive gases, corrosive
materials, and high output sound levels which could cause severe personal injury,
electrocution, or death.
Service or maintenance should be performed by qualified personnel familiar with the
siren, associated controls, and power sources being used.
Before servicing or maintaining, ensure that remote activation cannot occur and
disconnect power to the siren and the associated control equipment.
General Information
The Model 2001-130 Siren and Controllers are designed to require a minimum of
maintenance. In addition, historical experience has shown that all Federal sirens are
highly reliable devices. However, if a siren or controller failure does occur, Federal
Signal will provide technical assistance with problems that cannot be handled
satisfactorily and promptly locally. If replacement parts are needed, refer to the parts
list in Figure 27 DCFCTB Final Assembly, Figure 28 DCB Final Assembly, and
Figure 29 DCFCB Final Assembly on pages 91, 92, and 93.
If you are experiencing any difficulties, contact Federal Signal Customer Care at:
(800) 548-7229 or Technical Support at: (800) 524-3021
Website: http://www.alertnotification.com/
E-mail: [email protected]
Federal Signal
2645 Federal Signal Drive
University Park, Illinois 60484 -3167
Preventative Maintenance
To insure that the warning system is fully operational and to maintain the highest
possible level of reliability, perform the following monthly testing and annual
inspection. In order to maintain the integrity of the warning system, prompt
investigation of any reported failures must be researched and corrected promptly.
Monthly Testing
The following is a typical monthly test outline:
1. Reset all sirens to clear latched sensor status inputs (DTMF systems only).
2. Activate one of the siren functions (3 minute activation recommended). If the
2001ACB option is used, test both AC and DC operation.
Service and Maintenance
73 DCB, DCFCB and DCFCTB Models
3. Poll the system for siren status reports.
4. Examine each site report for any failed condition. If you detect a failure
condition, notify designated service personnel.
Annual Inspection
Perform the pre-operational system test procedure on an annual basis. Refer to the
Pre-operational System Testing section on page 67 for details.
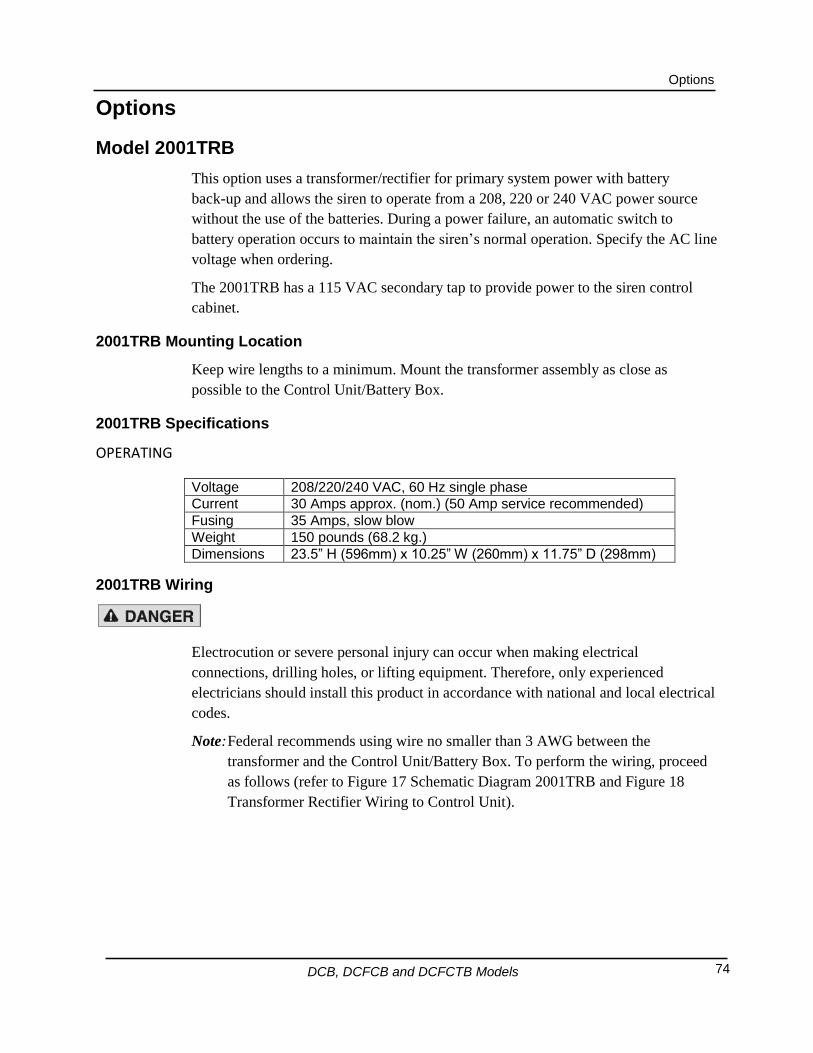
Options
74 DCB, DCFCB and DCFCTB Models
Options
Model 2001TRB
This option uses a transformer/rectifier for primary system power with battery
back-up and allows the siren to operate from a 208, 220 or 240 VAC power source
without the use of the batteries. During a power failure, an automatic switch to
battery operation occurs to maintain the siren’s normal operation. Specify the AC line
voltage when ordering.
The 2001TRB has a 115 VAC secondary tap to provide power to the siren control
cabinet.
2001TRB Mounting Location
Keep wire lengths to a minimum. Mount the transformer assembly as close as
possible to the Control Unit/Battery Box.
2001TRB Specifications
OPERATING
Voltage 208/220/240 VAC, 60 Hz single phase
Current 30 Amps approx. (nom.) (50 Amp service recommended)
Fusing 35 Amps, slow blow
Weight 150 pounds (68.2 kg.)
Dimensions 23.5‖ H (596mm) x 10.25‖ W (260mm) x 11.75‖ D (298mm)
2001TRB Wiring
Electrocution or severe personal injury can occur when making electrical
connections, drilling holes, or lifting equipment. Therefore, only experienced
electricians should install this product in accordance with national and local electrical
codes.
Note: Federal recommends using wire no smaller than 3 AWG between the
transformer and the Control Unit/Battery Box. To perform the wiring, proceed
as follows (refer to Figure 17 Schematic Diagram 2001TRB and Figure 18
Transformer Rectifier Wiring to Control Unit).
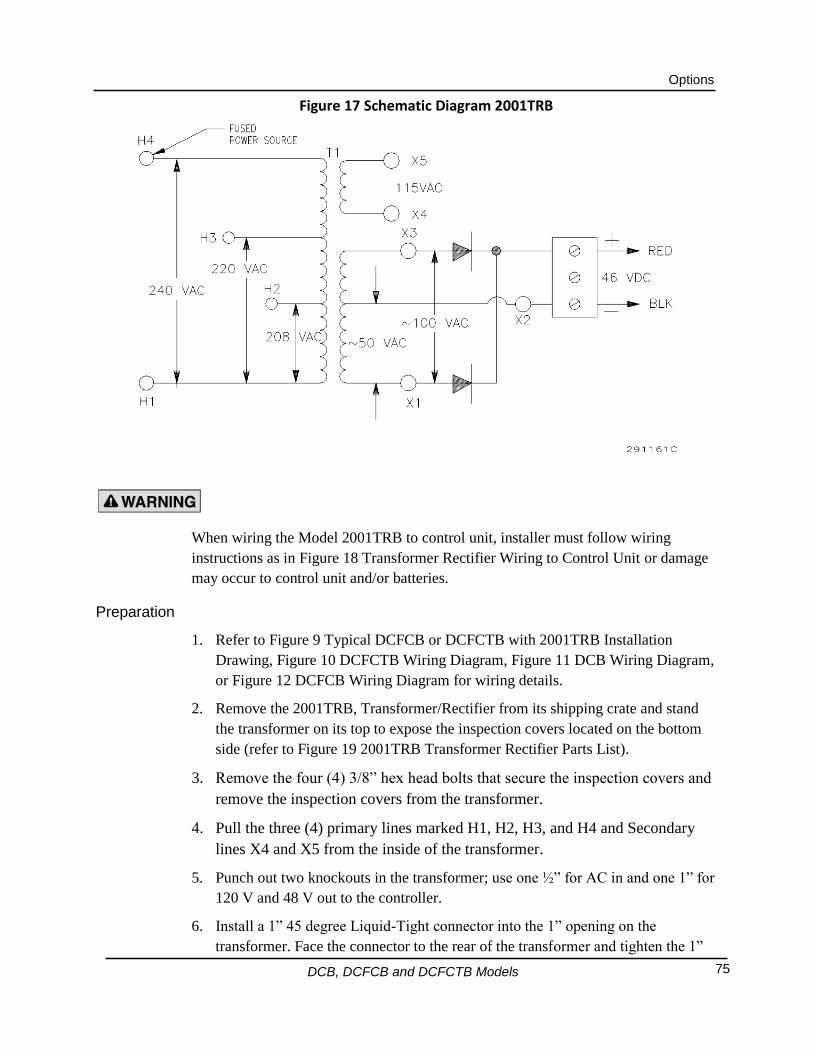
Options
75 DCB, DCFCB and DCFCTB Models
Figure 17 Schematic Diagram 2001TRB
When wiring the Model 2001TRB to control unit, installer must follow wiring
instructions as in Figure 18 Transformer Rectifier Wiring to Control Unit or damage
may occur to control unit and/or batteries.
Preparation
1. Refer to Figure 9 Typical DCFCB or DCFCTB with 2001TRB Installation
Drawing, Figure 10 DCFCTB Wiring Diagram, Figure 11 DCB Wiring Diagram,
or Figure 12 DCFCB Wiring Diagram for wiring details.
2. Remove the 2001TRB, Transformer/Rectifier from its shipping crate and stand
the transformer on its top to expose the inspection covers located on the bottom
side (refer to Figure 19 2001TRB Transformer Rectifier Parts List).
3. Remove the four (4) 3/8” hex head bolts that secure the inspection covers and
remove the inspection covers from the transformer.
4. Pull the three (4) primary lines marked H1, H2, H3, and H4 and Secondary
lines X4 and X5 from the inside of the transformer.
5. Punch out two knockouts in the transformer; use one ½” for AC in and one 1” for
120 V and 48 V out to the controller.
6. Install a 1” 45 degree Liquid-Tight connector into the 1” opening on the
transformer. Face the connector to the rear of the transformer and tighten the 1”

Options
76 DCB, DCFCB and DCFCTB Models
lock ring. Put a 1” plastic bushing over the exposed thread end on the 1”
connector.
7. Cut a section of 1” Seal-Tight, 7” in length. This provides raceway for the
48 VDC secondary and for control cabinet 120 VAC input.
8. Cut a section of 1/2” Seal-Tight 18” in length. This provides A/C input voltage
from the AC disconnect to the transformer. If the AC disconnect does not have
120VAC available, the X4 and X5 taps in the 2001TRB may be used to provide
AC voltage to the control cabinet. In this case, run the Seal-Tight between the
2001TRB and the siren controller.
Transformer Wiring
Transformer Primary (2 ea.) 10 AWG, CU, stranded, black 40‖ in length.
Rectifier Output (1 ea.) 2 AWG, CU, Black, 30‖ in length–48 VDC Negative.
(1 ea.) 2 AWG, CU, Red, 40‖ in length–48V DC Positive.
Control Cabinet (1 ea.) 14 AWG, CU, stranded, black 60‖ in length–120 VAC Line
(1 ea.) 14 AWG, CU, stranded, white 60‖ in length–Neutral
1. The (2 ea.) 40” black 10 AWG lines provide 208/220/240 VAC for transformer
primary input.
2. The 60” black, and the 60” white provide the AC input to the control cabinet.
These wires will pass through the transformer as a raceway then be routed into
the control cabinet unless the X4 and X5 taps are used in the 2001TRB (refer to
Figure 9 Typical DCFCB or DCFCTB with 2001TRB Installation Drawing,
Figure 10 DCFCTB Wiring Diagram, Figure 11 DCB Wiring Diagram, or Figure
12 DCFCB Wiring Diagram for wiring details).
3. The 30” black 2-AWG line provides the 48 VDC negative to the DCB control
cabinet. It connects the terminal block in the 2001TRB labeled “-“ and the 5/16”
ground stud on the backplane of the siren controller.
4. The 40” red 2 AWG line provides 48 VDC positive voltage to the DCB control
cabinet. It connects to the terminal block in the 2001TRB labeled “+” and to the
labeled terminal (#3) at K3.
AC Line Wire Terminations
240 VAC operation Service disconnect Transformer
Transformer Primary: 2 ea. #10 black wires
L1 H1
L2 H4

Options
77 DCB, DCFCB and DCFCTB Models
220 VAC operation Service disconnect Transformer
Transformer Primary: 2 ea. #10 black wires
L1 H1
L2 H3
208 VAC operation Service disconnect Transformer
Transformer Primary: 2 ea. #10 black wires
L1 H1
L2 H2
115 VAC Tap Service disconnect Transformer
Transformer Secondary X4
X5
Note A: Cap all unused taps with wire nuts
Note B: When using the model 2001TRB it is also necessary to provide a 120
VAC power source to provide power to the battery chargers. If 120
VAC is not available refer to Model -240B (Stepdown Transformer)
section on page 79.

Options
78 DCB, DCFCB and DCFCTB Models
Figure 18 Transformer Rectifier Wiring to Control Unit
5421 3
10 10
F1F2
A A

Options
79 DCB, DCFCB and DCFCTB Models
Figure 19 2001TRB Transformer Rectifier Parts List
Model -240B (Stepdown Transformer)
This option allows the Control Unit’s battery charger to operate when only 240 VAC
power is available. The unit provides a 115 VAC output.
Electrocution or severe personal injury can occur when making electrical
connections, drilling holes, or lifting equipment. Therefore, only experienced
electricians should install this product in accordance with national and local electrical
codes.
-240B Mounting Location
The transformer is located at the bottom of the control cabinet. It is pre-wired to a
DIN mounted terminal block at the lower right side of the cabinet.
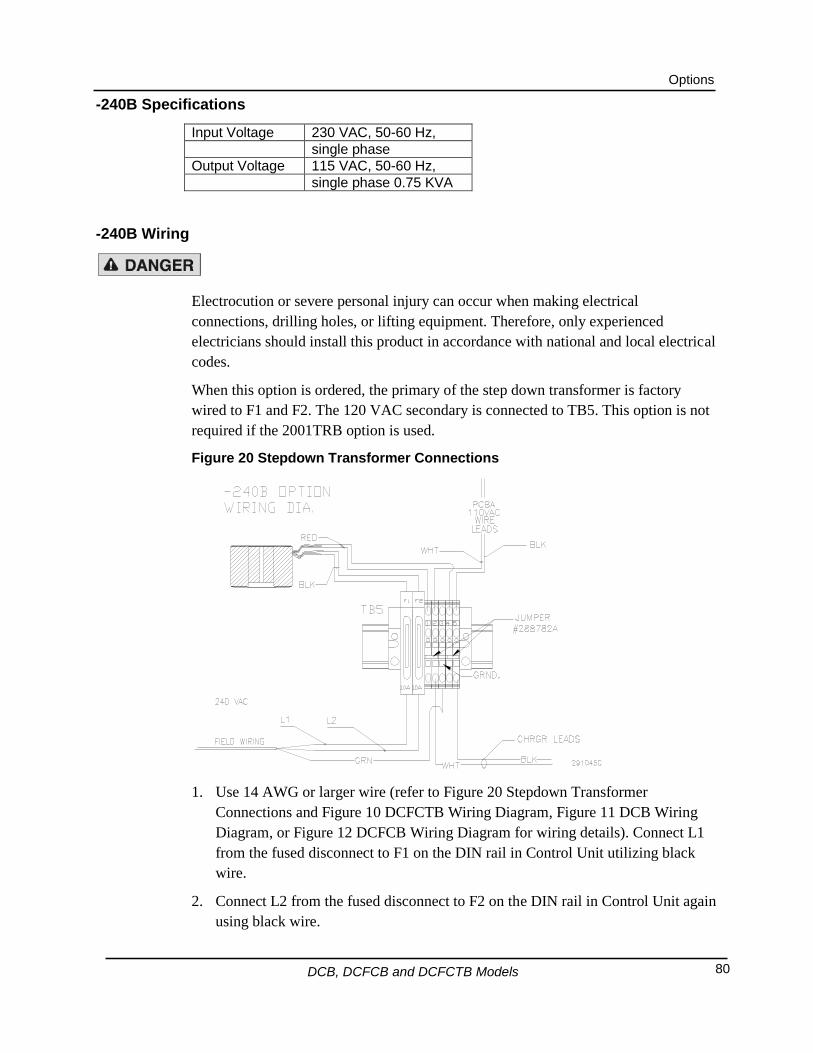
Options
80 DCB, DCFCB and DCFCTB Models
-240B Specifications
Input Voltage 230 VAC, 50-60 Hz,
single phase
Output Voltage 115 VAC, 50-60 Hz,
single phase 0.75 KVA
-240B Wiring
Electrocution or severe personal injury can occur when making electrical
connections, drilling holes, or lifting equipment. Therefore, only experienced
electricians should install this product in accordance with national and local electrical
codes.
When this option is ordered, the primary of the step down transformer is factory
wired to F1 and F2. The 120 VAC secondary is connected to TB5. This option is not
required if the 2001TRB option is used.
Figure 20 Stepdown Transformer Connections
1. Use 14 AWG or larger wire (refer to Figure 20 Stepdown Transformer
Connections and Figure 10 DCFCTB Wiring Diagram, Figure 11 DCB Wiring
Diagram, or Figure 12 DCFCB Wiring Diagram for wiring details). Connect L1
from the fused disconnect to F1 on the DIN rail in Control Unit utilizing black
wire.
2. Connect L2 from the fused disconnect to F2 on the DIN rail in Control Unit again
using black wire.

Options
81 DCB, DCFCB and DCFCTB Models
3. Connect Ground (green wire) from fused disconnect to the green ground block on
the DIN rail in the Control Unit. Push a small screwdriver into the square opening
in the terminal block to open the contacts of this block.
4. Follow the instructions included with the lightning protector (supplied) and install
in the service disconnect.
5. Size the fuse or circuit breaker in the service disconnect to 15 Amps maximum.
Model HTR2 and HTR4 (Battery Warmers)
In locations where temperatures may drop below freezing for extended periods, the
optional battery warmers are recommended to maintain battery efficiency. A
thermostat provides on-off control of the warmers that senses the inside temperature
of the battery cabinet. The battery warmer option is equipped with four (4) battery
warmers that are wrapped around each of the four (4) batteries in the battery cabinet.
The warmers are plugged into the cube taps, which plug into the thermostat cube,
which is plugged into a 120 VAC outlet that is provided for in the battery box. No
other connection or mounting is required for this option.
Figure 21 HTR2 and HTR4 Wiring Diagram
Electrocution or severe personal injury can occur when making electrical
connections, drilling holes, or lifting equipment. Therefore, only experienced
electricians should install this product in accordance with national and local electrical
codes.

Options
82 DCB, DCFCB and DCFCTB Models
Model 2001HR (Holding Relay)
This option enables the control of both of the siren motors from a single contact
closure on one-way models. This feature is typically required for telephone line
control systems and is only required if an FC is not purchased. The 2001HR is a
holding relay, which holds the rotator motor on for 15 seconds after the control
contact is released, keeping siren rotation active during Wail signals. The control
contact is wired between K2-C1 and ground.
Solar Power
When purchased, the solar option allows the siren to operate in areas where DC
power is not available. Our PVS2110-48 and PVS220W-48 models for the DCFCB
and DCFCTB controllers include a solar regulator and the solar panel kit. When
installed, the batteries are charged by the photovoltaic charging system, in lieu of a
battery charger, to provide operational power to the siren. Refer to Figure 22
DCFCTB Solar Wiring on page 83 and Figure 23 DCB and DCFCB Solar Wiring on
page 84.

83
Figure 22 DCFCTB Solar Wiring

84
Figure 23 DCB and DCFCB Solar Wiring

Model DCFCTBD-IP
MERGEFORMAT Configuring the Informer-
IPFORMAT General Descriptionations
DCB, DCFCB and DCFCTB Models
85
Model DCFCTBD-IP
General
The DCFCTBD-IP combines the characteristics of a DCFCTBD with Serial to
Ethernet conversion capabilities. This allows serial devices to communicate over an
Ethernet network and provides audio decoding of digitized audio sent over the
network.
The converter is configured with its own fixed IP address and port number. When
packets of data are received over the Ethernet port that are addressed to the board’s IP
and port number, they are converted to serial data and sent out over the serial port.
Likewise, any data coming into the serial port is converted to TCP/IP data packets
and sent out over the Ethernet port to the server’s IP address. The unit also contains a
digital to analog converter. This allows specially configured incoming data packets to
be converted to audio, which is then filtered and sent out over a 600 ohm audio port.
Ethernet Board Specifications
Electrical
Input Voltage 10.5- 95 VDC
Current Draw <150 mA
Serial Port
Serial Port Protocol RS232C, N, 8, 1 baud rate configurable
Ethernet Port
Protocol IEEE 802.3, 10 Base-T connection
600 Ohm Audio Output Port
Protection MOV and Transorb surge protection
Impedance 600 ohms
Audio Output Level Adjustable from 0.30 to 3.00 Vp-p, (-17 dB to +2.7 dB) into 600 ohms
Connectors
JP1 600 Ohm Audio Output Port
Balanced line output.
JP2 JTAG Emulation port
JP3 Audio Output Expanded or Flat Selection Jumper
Jumpers pins 1 and 2 for flat audio output.
Jumpers pins 2 and 3 for expanded dynamic range audio output
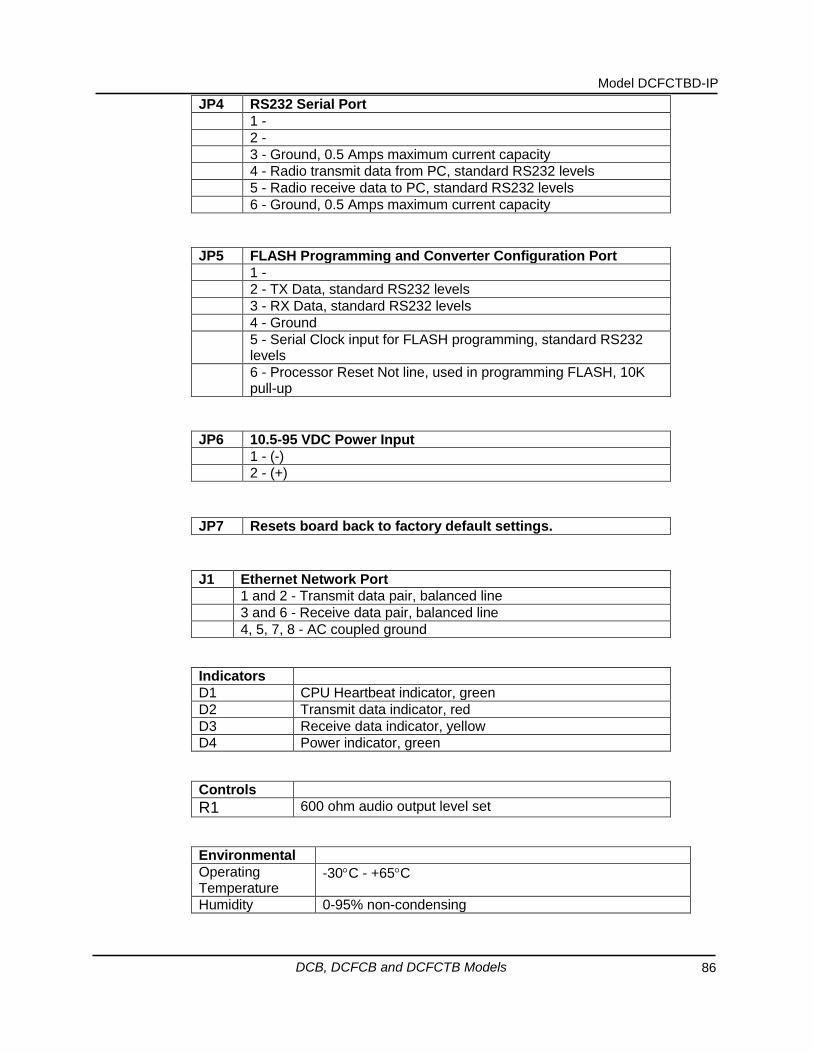
DCB, DCFCB and DCFCTB Models
86
Model DCFCTBD-IP
MERGEFORMAT Configuring the Informer-
IPFORMAT General Descriptionations
JP4 RS232 Serial Port
1 -
2 -
3 - Ground, 0.5 Amps maximum current capacity
4 - Radio transmit data from PC, standard RS232 levels
5 - Radio receive data to PC, standard RS232 levels
6 - Ground, 0.5 Amps maximum current capacity
JP5 FLASH Programming and Converter Configuration Port
1 -
2 - TX Data, standard RS232 levels
3 - RX Data, standard RS232 levels
4 - Ground
5 - Serial Clock input for FLASH programming, standard RS232 levels
6 - Processor Reset Not line, used in programming FLASH, 10K pull-up
JP6 10.5-95 VDC Power Input
1 - (-)
2 - (+)
JP7 Resets board back to factory default settings.
J1 Ethernet Network Port
1 and 2 - Transmit data pair, balanced line
3 and 6 - Receive data pair, balanced line
4, 5, 7, 8 - AC coupled ground
Indicators
D1 CPU Heartbeat indicator, green
D2 Transmit data indicator, red
D3 Receive data indicator, yellow
D4 Power indicator, green
Controls
R1 600 ohm audio output level set
Environmental
Operating Temperature
-30C - +65C
Humidity 0-95% non-condensing

DCB, DCFCB and DCFCTB Models
87
Model DCFCTBD-IP
MERGEFORMAT Configuring the Informer-
IPFORMAT General Descriptionations
Physical
Dimensions ~ 2‖ height, 4‖ width, 6.5" length.
Weight < 2 lbs
Figure 24 Serial to Ethernet Board
Network Information
Protocols Supported
TCP/IP
UDP (optional)
XML (optional)
XMPP (optional)
IP Ports Used
16,887 (Codespear TCP/IP)
80 (HTTP)
3100 (optional UDP Serial Over IP)
3101 (optional UDP Voice Over IP)

DCB, DCFCB and DCFCTB Models
88
Model DCFCTBD-IP
MERGEFORMAT Configuring the Informer-
IPFORMAT General Descriptionations
IP Address
User selectable
TOS/DSCP (Type of Service)
User selectable
Bandwidth Requirements
Voice Over IP 150K baud per connection
Siren Activation 50 bytes per connection
Siren Poll Response 74 bytes per connection

89
Figure 25 DCFCTB-IP Final Assembly

90
Figure 26 DCFCTB-IP Wiring Diagram

91
Figure 27 DCFCTB Final Assembly

92
Figure 28 DCB Final Assembly

93
Figure 29 DCFCB Final Assembly
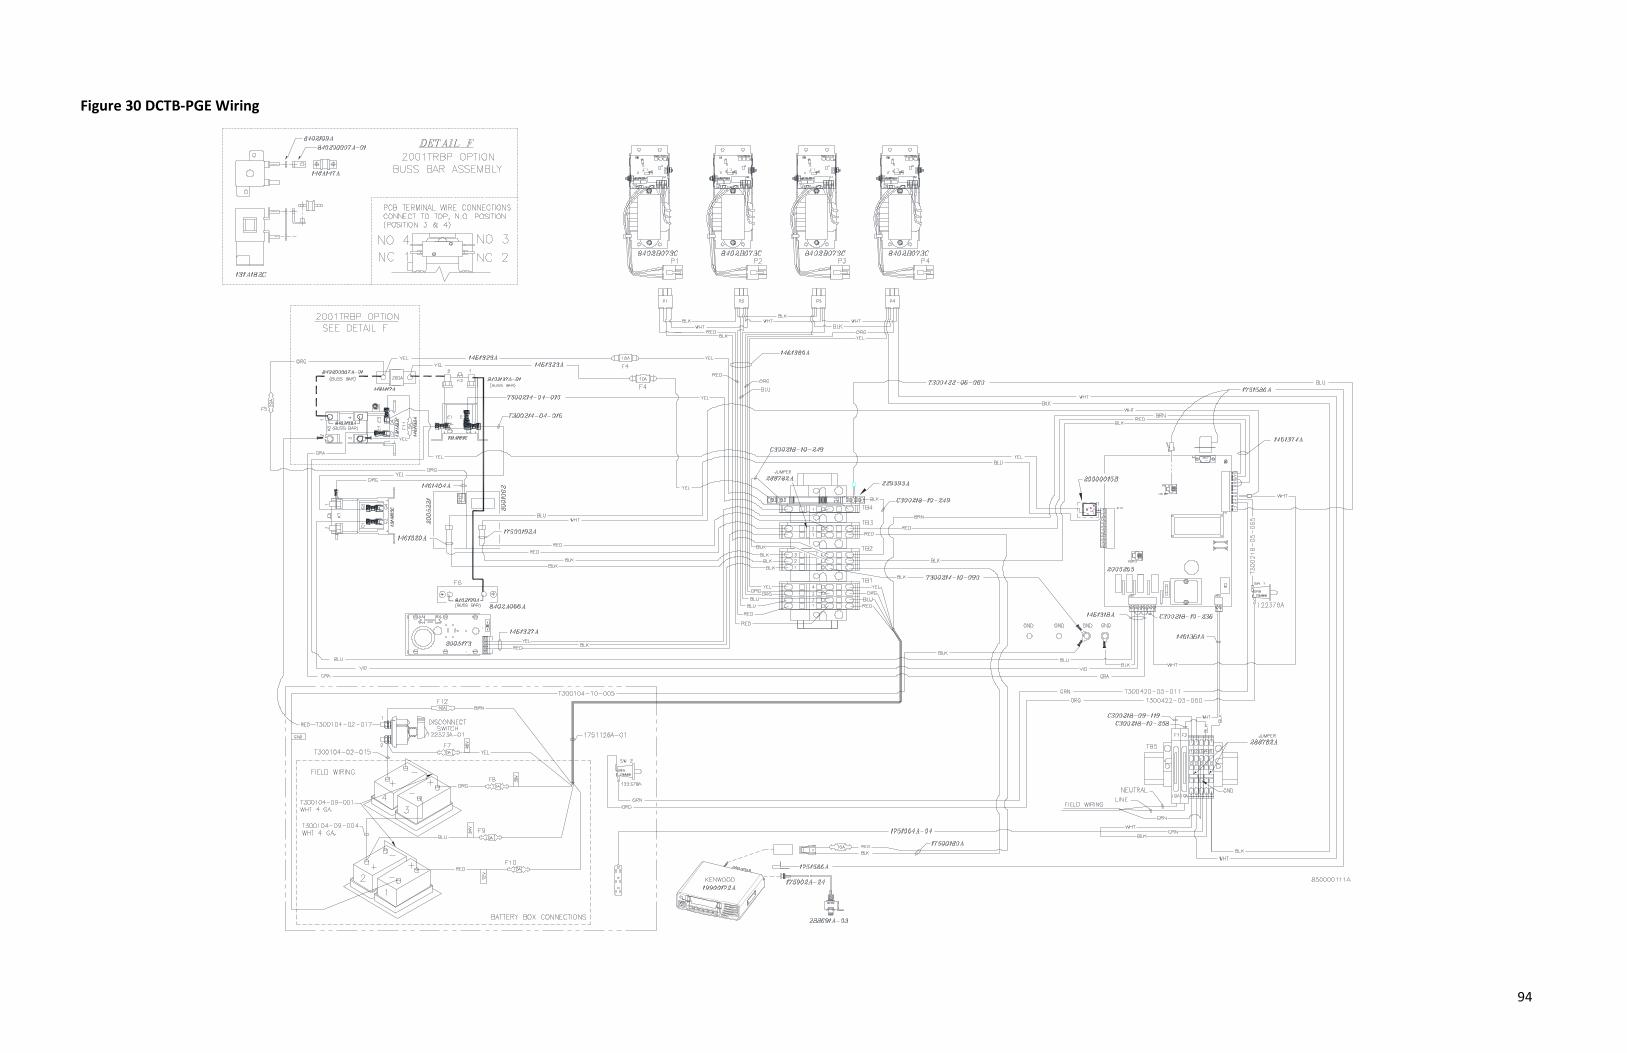
94
Figure 30 DCTB-PGE Wiring

95
Figure 31 DCTB-PGE Final Assembly

Glossary
MERGEFORMAT ConfiguGlossaryal
Descriptionations
DCB, DCFCB and DCFCTB Models
96
Glossary Term Description
AC Electric Alternating Current occurs when charge carriers in a conductor or semi-conductor periodically reverse their direction of movement. For sirens, this is provided by landline power.
AR Timer Activating control for Model 2 and STH10
AWG American Wire Gauge is a United States standard set of non-ferrous wire conductor sizes
BCD Binary Coded Decimal, a format for representing decimal numbers in which each digit is signified by four bits
CD Carrier Detect – an indication that an RF carrier is present
CPU Central Processing Unit
dBC dB = Decibel, a standard for measuring sound pressure level. C = C weighted filtering
DC Directional Current is the unidirectional flow or movement of electric charge carriers. For sirens, this is provided by battery power.
DMM Digital Multi-Meter
DSA Directional Speaker Array type of electronic siren
DTMF Dual-Tone Multi-Frequency, an analog communications technology
EAS Emergency Alert System
ECLIPSE8 Omni-directional DC siren with horns
ECLIPSENH Omni-directional DC siren with no horns
Ethernet A physical and data link layer technology for local area networks
FC Federal Controller
FCDS Federal Commander Digital System
FCT Federal Controller Two-way
FEMA Federal Emergency Management Association
FSK Frequency Shift Keying, a digital communications technology
FSPWARE Federal Signal Programmer Software
IAEM International Association of Emergency Managers
IC Integrated Circuit
IP Internet Protocol
LED A semiconductor device that emits visible light when an electric current passes through it.
Low Band Low frequency end of the VHF band, 30-50 MHz
MOD Modulator electronic siren
Model 2 Omni-directional mechanical siren
MOSCAD Motorola SCADA System
MSK Minimal Shift Keying – a form of FSK
NEMA National Emergency Managers Association
Ohm Standard International (SI) measurement of electrical resistance
Omni Antenna
An antenna with a non-directional pattern on the given plane of the antenna, and a directional pattern in any orthogonal plane
PCB Printed Circuit Board
PTT Push to Talk
RF Radio Frequency
RME Eclipse roof mounting plate
ROW Right Of Way
RTU Remote Terminal Unit
SCADA Supervisory Control and Data Acquisition

Glossary
MERGEFORMAT ConfiguGlossaryal
Descriptionations
DCB, DCFCB and DCFCTB Models
97
Term Description
SFCDWARE Federal Commander Digital System software package
SINAD Signal to noise and distortion ratio
SS2000 One-way or two-way digital encoder
STH10 Mechanical omni-directional siren
UHF Ultra High Frequency ranging from 450 MHz to 470 MHz for most applications
UL Underwriters Laboratories Inc.
UltraVoice Electronic siren controller
VAC Standard measurement of horsepower, Volts AC current
VDC Standard measurement of horsepower, Volts for DC current
VHF Very High Frequency ranging from 150 MHz to 174 MHz for most applications
VSWR Voltage Standing Wave Ratio
Yagi Antenna
Unidirectional antenna with gain (amplification)
2001-130 2001 Electro-mechanical siren

Index
MERGEFORMAT ConfiguIndexal
Descriptionations
DCB, DCFCB and DCFCTB Models
98
Index
+
+12 VDC ............................................................................ 25
2
2001TRB Mounting Location ............................................ 74
2001TRB Specifications ..................................................... 74
2001TRB Transformer/Rectifier testing ............................ 69
2001TRB Wiring ................................................................ 74
-240B Mounting Location ................................................. 79
-240B Specifications .......................................................... 80
-240B Wiring ..................................................................... 80
A
AC Line Wire Terminations ............................................... 76
AC Power and Battery Warmer Options ............................. 8
AC Power Connections ...................................................... 58
AC Power Sensor ............................................................... 68
AC Sensor .......................................................................... 26
Activation
Using the ARM function ............................................... 12
Adjustment Procedure ...................................................... 67
Annual Inspection ............................................................. 73
Audio Function Generator Option .................................... 28
Audio Output .................................................................... 11
Automatic Reports ............................................................ 12
B
Bandwidth Requirements ................................................. 88
Battery Back-up Voltage Input .......................................... 31
Battery Box ......................................................................... 5
Battery Charger ................................................................. 43
Battery Charger Voltage Measurement ............................ 69
Battery Chargers ............................................................... 13
Battery Installation and Wiring ......................................... 58
Battery Voltage Measurement ......................................... 68
Bulk Charge ....................................................................... 44
C
Carrier Detect ................................................................... 26
Characteristics .................................................................... 4
Charging System ................................................................. 9
Chopper Current Sensor ................................................... 67
Chopper Motor Current Sensor ........................................ 38
Circuit ................................................................................ 42
Circuit Description ...................................................... 38, 44
Commander™
Digital System Software ............................. 47
Communications/Controller Board .................................. 14
Communications/Controller Board Layout ...................... 15
Confirming Controller Auto-Reporting ............................. 71
Connectors ................................................................. 42, 85
Control and Battery Box Installation ................................ 50
Control and Battery Box Location .................................... 48
Control Board Power Input .............................................. 29
Control Board Theory of Operation .................................. 30
Control Cabinet Functional Descriptions .......................... 13
Control Unit ........................................................................ 5
Controllers
Specifications................................................................. 8
CPU ................................................................................... 30
Current Limiter ................................................................. 45
Current Measurement Path ............................................. 42
Current Sensor ................................................................. 27
Customer Care .................................................................. 72
D
DCB and DCFCB Communications Controller ..................... 6
DCFCTB Communications Controller .................................. 5
DCFCTB Encoding Format ................................................. 36
Decoding Format .............................................................. 29
DTMF ........................................................................... 29
Two-Tone .................................................................... 29
Decoding sensor status .................................................... 37
Description of DCFCTB Block Diagram .............................. 30
Digital ............................................................................... 33
Digital Input
Current Sensor............................................................. 27
Intrusion Sensor .......................................................... 27
Pressure Sensor ........................................................... 27
Digital Inputs
Rotation Sensor ........................................................... 26
Dimensions ......................................................................... 9
DTMF .......................................................................... 10, 32
DTMF Encoding Format .................................................... 29
DTMF Transmit Level Adjustments .................................. 70
E
EAS ................................................................................... 10
EAS Decode ...................................................................... 32
Electrical Connections ...................................................... 53
Electrical Specifications .................................................... 41
Encoder ............................................................................ 33
Environmental .................................................................... 9

Index
MERGEFORMAT ConfiguIndexal
Descriptionations
DCB, DCFCB and DCFCTB Models
99
Ethernet Board Specifications........................................... 85
External Transceiver ......................................................... 31
F
Final VSWR tuning ............................................................. 61
Flat Surface Mounting ...................................................... 52
Float Charge ...................................................................... 45
FSK .................................................................................... 10
FSK Transmit Level Adjustments ....................................... 70
FSPWARE .......................................................................... 47
Functional Description ...................................................... 12
Fusing at the Din Rail ........................................................ 13
G
Growl Test ......................................................................... 12
I
Initial Sensor Adjustments and Testing ............................. 67
Input Power Requirements ............................................. 8, 9
Inputs ................................................................................ 11
Installation ........................................................................ 48
Antenna ....................................................................... 60
Battery ......................................................................... 58
Control and Barrery box ............................................... 50
Yagi Antenna ................................................................ 60
Installer Supplied Material List ......................................... 50
Intrusion Sensor .......................................................... 27, 68
IP Address ......................................................................... 88
IP Ports Used ..................................................................... 87
J
Jumper pins
1 and 2 for Solar mode ................................................. 17
9 and 10 for Kenwood/TR Monitor and Control mode 18
L
Land Line Control .............................................................. 60
Land Line Siren Activation ................................................. 69
Landline and Local Pushbutton Activation ........................ 28
Low Battery Sensor ........................................................... 26
M
Manual Siren Activation .................................................... 69
Model 2001HR (Holding Relay) ......................................... 82
Model 2001TRB ................................................................ 74
Model –240B............................................................... 77, 79
Model DCFCTBD-IP ........................................................... 85
Model HTR2 and HTR4 (Battery Warmers) ...................... 81
Monitor Received Audio................................................... 28
Monthly Testing ............................................................... 72
Motor Contactors ............................................................. 13
Mount Yagi Antenna ........................................................ 62
N
Network Information ....................................................... 87
O
Omni Fiberglass Antenna Models .................................... 62
Onboard One-Way Receiver ............................................. 31
One-Way Radio Control...................................................... 7
Outputs ............................................................................ 11
P
POCSAG ............................................................................ 11
POCSAG Decode ............................................................... 33
Pole Mounting .................................................................. 52
Power Distribution ........................................................... 13
Power Supply.............................................................. 30, 42
Pre-operational System Testing ....................................... 67
Pressure Sensor ................................................................ 27
Preventative Maintenance ............................................... 72
Programming Software .................................................... 47
Protocols Supported ......................................................... 87
PTT.................................................................................... 25
Publications ........................................................................ 1
R
Radio Transceiver ............................................................. 14
Receive Audio ................................................................... 25
Receive Level Adjustments ............................................... 70
Receiver Priority ............................................................... 31
Recommended Batteries .................................................... 9
Relay Outputs ....................................................... 11, 27, 33
Remote Activation ............................................................ 31
Remote Activation Inputs ................................................. 11
Remote Public Address .................................................... 28
Rotation Current Sensor ................................................... 67
Rotation Sensor ................................................................ 26
Rotator Motor Current Sensor ......................................... 41
S
Safety Message .................................................................. 1
Sensor ............................................................................... 31

Index
MERGEFORMAT ConfiguIndexal
Descriptionations
DCB, DCFCB and DCFCTB Models
100
Sensors and Sensor Inputs ................................................ 26
Serial and I2C Ports ............................................................ 34
Serial Communications ..................................................... 10
Service and Maintenance ................................................. 72
SFCDWARE ........................................................................ 47
Single Tone ....................................................................... 10
Siren Activation ................................................................. 12
Siren and Control Unit Interconnecting Wiring ................ 57
Siren Connections ............................................................. 57
Site Status Monitoring ...................................................... 12
Solar Power ....................................................................... 82
Speaker Output ........................................................... 28, 34
Specifications ...................................................................... 8
Control Board ................................................................. 9
Signaling Format .......................................................... 10
Transceiver ................................................................... 11
System Operating ............................................................. 12
System Operating Power from the 4 Battery System ......... 8
T
Technical Support ............................................................. 72
Test Activation Codes ....................................................... 71
Theory of Operation
Battery Charger ............................................................ 43
Thermal Limiter ................................................................ 45
Tone Decode ..................................................................... 32
TOS/DSCP ........................................................................ See
TR monitor and Control mode.......................................... 18
Transceiver Audio Level Adjustments .............................. 69
Transceiver Interface ........................................................ 25
Transceiver Specifications ................................................ 11
Transformer Wiring .......................................................... 76
Transmit Audio ................................................................. 25
Two Tone Sequential ........................................................ 10
Two-tone and DTMF Controller Decode-ability Testing ... 70
Two-Way Radio Control ..................................................... 6
U
Unit Address ..................................................................... 23
V
Voltage Regulator ............................................................. 45
VOX................................................................................... 32
VSWR Testing ................................................................... 69
W
Warranty, Limited .............................................................. 2
Y
Yagi Antenna Installation ................................................. 60

2645 Federal Signal Drive, University Park, IL 60484-3167
Phone: 800-524-3021
E-mail: [email protected]
Website: http://www.alertnotification.com