completed ncoo crane ops do.docx · web view(16) provided with a mac 50, a completed annual...
TRANSCRIPT

UNITED STATES MARINE CORPSMARINE CORPS DETACHMENT
686 MINNESOTA AVEFORT LEONARD WOOD, MISSOURI 65473-963
LESSON PLAN
CRANE OPERATIONS
NCOO-B01
ENGINEER EQUIPMENT OPERATOR NCO
A16ACX1
REVISED 02/02/2012
APPROVED BY ______________________ DATE ___________________
1

INTRODUCTION (10 MIN)
(ON SLIDE # 1)
1. GAIN ATTENTION : As a Non Commissioned Officer in the 1345 Engineer Equipment Operator community you are going to be required to conduct many different types of operations, and many of them will have risk involved. However this period of instruction is going to give you the knowledge and skills that you will need to prevent you from having to take an unnecessary risk. Crane operation requires attention to detail and finesse and an understanding of inspecting and testing requirements. Slow is smooth and smooth is fast. ________________________________________________________________________________________________________________________________________________________________________________________________________________________________________________________________________________________________________________________________
(ON SLIDE # 2)
2. OVERVIEW : Good morning/afternoon class, my name is__________. The purpose of this period of instruction is to provide you with the knowledge and skills needed to perform operate operations to include the TEREX 50 TON All Terrain Crane (MAC 50) and the LRT-110 crane.
INSTRUCTOR NOTE
Introduce learning objectives.
(ON SLIDE # 3)
3. LEARNING OBJECTIVE(S):
a. TERMINAL LEARNING OBJECTIVE(S)
(1) Provided the LRT-110 Crane, and engineer equipment requirement, engineer equipment records and forms, and references, operate LRT-110 Crane in support of engineer operations to safely meet operational requirements with no injury to personnel or damage to equipment per the references. (1345-XENG-2002)
2

(2) Provided a MAC 50, an engineer equipment requirement, attachments, tools, engineer equipment records and forms, and references, operate the Marine All-Terrain Crane (MAC 50) to safely meet operational requirements with no injury to personnel or damage to the equipment per the references.(1345-XENG-2005)
(ON SLIDE # 4)
b. ENABLING LEARNING OBJECTIVES(S)
(1) Without the aid of reference, identify the characteristics of the LRT-110 per the TM 5-3810-305-10.(1345-XENG-2002a)
(2) Provided a LRT-110, engineer equipment records and forms, and with the aid of reference, initiate operator records and forms per the TM 4700-15/1_. (1345-XENG-2002b)
(3) Provided a LRT-110, engineer equipment records and forms, tools, petroleum, oils, and lubricants, and with the aid of reference, perform operation checks (before, during, and after) per the TM 5-3810-305-10. (1345-XENG-2002c
(4) Provided a LRT-110, engineer equipment records and forms, move crane to job site per the TM 5-3810-305-10. (1345-XENG-2002d)
(5) Provided a LRT-110, training aids to be lifted, and with the aid of reference, perform assigned lifts per the TM 5-3810-305-10. (1345-XENG-2002e)
(6) Provided a LRT-110, engineer equipment records and forms, and reference, complete operational records and forms per the TM 4700-15/1_. (1345-XENG-2002f)
(7) Without the aid of reference, identify the characteristics of the MAC 50 per the TM 11262A-OR/3. (1345-XENG-2005a)
(8) Provided a MAC 50, engineer equipment records and forms, and with the aid of reference, initiate operator records and forms per the TM 4700-15/1_. (1345-XENG-2005b)
(9) Provided a MAC 50, engineer equipment records and forms, tools, petroleum, oils, and lubricants, and with the aid
3

of reference, perform operation checks (before, during, and after) per the TM 11262A-OR/3. (1345-XENG-2005c)
(10) Provided a MAC 50, engineer equipment records and forms, move the crane to job site per the TM 11262A-OR/3. (1345-XENG-2005d)
(11) Provided a MAC 50, training aids to be lifted, and with the aid of reference, perform assigned lifts per the TM 11262A-OR/3. (1345-XENG-2005e)
(12) Provided a MAC 50, a clamshell, tools and equipment, and with the aid of reference, identify procedures to install/remove clamshell per the TM 11262A-OR/3. (1345-XENG-2005f)
(13) Provided a MAC 50, engineer equipment records and forms, and reference, complete operational records and forms per the TM 4700-15/1_. (1345-XENG-2005g)
(14) Without the aid of reference, identify the procedures for load testing per the MCO 11262.2. (1345-XENG-2005h)
(15) Provided with a LRT-110, a completed annual condition inspection, load test facilities and equipment, appropriate tools, and reference. Assist test director/instructor to conduct load test per the MCO 11262.2. (1345-XENG-2002g)
(16) Provided with a MAC 50, a completed annual condition inspection, load test facilities and equipment, appropriate tools and reference. Assist test director/instructor to conduct load test per the MCO 11262.2. (1345-XENG-2005i)
(ON SLIDE #5)
4. METHOD/MEDIA: This lesson will be taught by using the lecture method with the aid of computer aided graphics, Instructor demonstration and practical applications.
INSTRUCTOR NOTE
Explain the instructional rating forms to the students.
(ON SLIDE # 6)
4

5. EVALUATION: You will be evaluated by a written exam and a practical application exam at the times indicated on the training schedule.
6. SAFETY/CEASE TRAINING (CT) BRIEF. All instructors and students will use caution when walking around the equipment lot during equipment operations. Sun block should be used to avoid sunburn. Issue students bug spray if required. Encourage students to stay hydrated as temperatures can reach 100 degrees plus during the summer months. In the event of a casualty, emergency services (911) will be called and all students will move to the classroom and await further instruction
(ON SLIDE # 7)
TRANSITION: Are there any questions on what we will be covering or how you will be evaluated? Then let’s first discuss the Basic Rigging Fundamentals.________________________________________________________________________________________________________________________________________________________________________________________________
BODY (136 HRS 40MIN)
(ON SLIDE # 8, 9)
1. Basic Rigging Fundamentals : (30 MIN)
Rigging is the planned movement of material and equipment from one location to another, utilizing slings, hoists, or other types of material handling equipment and hardware. Most lifts where a crane is involved requires more than just the crane. Considerations need to be made concerning the devices, equipment, or materials that will be used in conjunction with the crane. Items such as slings, chains, hooks, eye bolts, straps, or shackles must also be evaluated for load limits, capacities, and capabilities.
A person designated as a rigger should be knowledgeable of crane operations, but a qualified and licensed operator will supervise all rigging tasks.
Supervision of a lift set-up cannot be taken lightly. There are many factors that can cause a catastrophic failure during a lift if procedures are ignored or overlooked.
5

a. To ensure a safe lift, the operator will verify the following prior to the lift:
(1) The type of slings and equipment being used are certified and are in serviceable working condition.
(2) The hardware and equipment used is appropriate for the lift. (Lifting capacities meet or exceed weight of the load).
(3) Hardware and equipment are being properly used.
(4) Obstacles have been planned for prior to the lift.
INSTRUCTOR NOTE
During lifting operations, there is no room for guesswork. Never experiment with rigging operations.
b. Slings and Rigging Hardware can be made of synthetic, wire rope, or steel alloy (chain) materials. All slings are required to have identification tags with the information including manufacturer, type of material the sling is made of, type of hitch, angle capacity, reach, number of slings legs in the set, and rated capacity.
c. Synthetic Slings are made of fiber materials such as polyester and nylon. Technological advances have allowed the combination these materials with other materials such as Kevlar, K-Spec, or Nomek (tear resistant materials used for combat gear, deep-sea diving, skydiving, etc...) to increase tinsel strength and decrease weathering effects. There are two types of synthetic slings:
(1) Synthetic Web Slings
(2) Synthetic Round Slings
(3) Synthetic Web Slings have several advantages and disadvantages than other types of slings.
d. Some advantages are:
(1) They are softer and wider than chain or wire rope slings preventing them from damaging items being lifted.
6

(2) They are lightweight making them easier to move around.
(3) They are flexible allowing them to mold to the shape of the load.
(4) They are elastic and can stretch under load which absorbs shock and cushions the load.
e. Disadvantages are: (1) They are more susceptible to cuts and abrasions.
(2) Weathering impacts are greater over time.
(3) Lifting capacities are less than alloy-metal based slings.
f. Wire Rope Slings are made of high-strength steel wires formed into strands wrapped around a supporting core. Wire rope in any application performs as a machine would perform with moving parts that will wear. A wire rope’s moving parts are the wires themselves. The wires in a rope interact with each other by continuously sliding and adjusting together in order to compensate for the ever-changes stresses on a working rope during a lift. It is for this reason that wire rope slings must be inspected prior to every use. The unserviceable or rejection criteria for wire rope slings are the same for wire rope cable used on a crane winch which will be discussed in more depth during the crane inspections portion of the training.
Wire rope slings can be purchased from a manufacturer in many different variations or fabricated locally using a metal loop and wire rope clips. Purchased wire rope slings will come with inspection and capacity tags and can lift 100% of the manufacturer’s recommended lift capacity. A locally fabricated wire rope sling is basically a sling you make yourself. The required materials to make a wire rope sling is a metal loop, a minimum of three wire rope clips (number of clips depends on size and length of wire rope), and a sufficient length of wire rope. Wire rope clips come in many different styles, but the most common is the U-Bolt clip. Wrap the wire rope around the metal loop so that at least three and one half feet extend beyond the end of the metal loop, bind tightly at the base of the loop around both “live” and “dead” ropes with the first clip. Extend the “dead” end of the wire rope along the “live” end placing clips every 10 to 12 inches for at least 3 feet leaving a 6 inch
7
tail off the end of the last clip. A locally fabricated wire rope sling only has 75% of the original lifting capacity of the wire rope and should never be used to attempt a max lift on any crane. Therefore, a wire rope that has a vertical strength of 1000 lbs is reduced to 750 lbs on a fabricated sling. ALWAYS test your wire rope sling assembly with a test weight in a safe environment, upon completion of the test retighten the wire rope clips. Only someone with rigging experience should make a wire rope sling. (ON SLIDE # 10) TRANSITION: Now that we talked about the Basic Rigging Fundamentals. Are there any questions at this point? Then I have some for you. Then we will take a break.________________________________________________________________________________________________________________________________________________________________________________________________
OPPORTUNITY FOR QUESTIONS:
1. QUESTIONS FROM THE CLASS:
2. QUESTIONS TO THE CLASS:
a. Slings and rigging hardware can be made of what types of material?
Synthetic, wire rope, or steel alloy and chains.
b. What are the tree disadvantages of Synthetic Web Slings?
(1) They are more susceptible to cuts and abrasions.
(2) Weathering impacts are greater over time.
(3) Lifting capacities are less than alloy-metal based slings.
(10 MIN BREAK)
TRANSITION: We have just the covered the Basic Rigging Fundamentals. If there is no further question, let’s move on to the inspections, maintenance, and start up procedures.________________________________________________________________________________________________________________________________________________________________________________________________
8

(ON SLIDE # 11, 14)
2. INSPECTIONS, MAINTENANCE, AND START UP: (30 MIN)
a. Mechanical safety and reliability of a crane cannot be assumed. Regular inspections and maintenance are required to detect hazards that may cause accidents.
b. Inspections must be made on a daily basis:
(1) Just because everything worked properly the day before, do not assume that it will today.
(2) Make sure you inspect the crane at the start of each work day.
c. When starting the piece of equipment there are several tasks to perform after the engine is running smoothly.
(1) Be sure that the warning lights do not show any problems.
(2) Check all gauges for proper readings and listen for any unusual noises.
(3) Operate all controls to insure that they are working correctly.
d. Before you go to a work site:
(1) Is the work site accessible?
(2) Has the roadway to the job site been inspected to make sure it's safe?
(3) Is there enough room at the work site to position the crane?
(4) Is there enough clearance for the boom?
(5) Will the crane be driven under or be working near any power lines?
(ON SLIDE # 15)
9

TRANSITION: Now that we talked about the inspections, maintenance, and start up. Are there any questions at this point? Then I have some for you. Then we will take a break.________________________________________________________________________________________________________________________________________________________________________________________________
OPPORTUNITY FOR QUESTIONS:
1. QUESTIONS FROM THE CLASS:
2. QUESTIONS TO THE CLASS:
a. How often should inspections be made on a crane?
daily
b. What is the minimum amount of clear clearance from all power lines?
10 ft.
(10 MIN BREAK) TRANSITION: We have just the covered the inspections, maintenance, and start up. If there is no further question, let’s move on to the safety up procedures.________________________________________________________________________________________________________________________________________________________________________________________________
(ON SLIDE # 16-46)
3. SAFETY PROCEDURES: (1 HR)
a. Over fifty percent of all crane accidents are due to improper machine setup. These accidents can be avoided if the operator follows proper set up procedures.
(ON SLIDE # 47) (1) If you do not know the load weight, do not use the load indicator (SLI) in the crane.
(ON SLIDE # 48)
10

(2) In figuring the load weight, include the attachments such as the hook block and slings as part of the total load weight.
(ON SLIDE # 49, 51)
(3) When lifting a load near the maximum rated capacity of the crane, even a small increase in the initial working radius affects stability. For instance, the boom deflects forward as a heavy load comes off the ground. This forward movement can be substantial if the boom is fully extended. The operator cannot rely on tipping to indicate overloading as structural damage can occur before tipping.
(ON SLIDE # 52)
(4) A general operating principle is to set up for a lift with the crane centered between the lift and the drop point.
(ON SLIDE # 53)
(5) In locating the crane you must allow room for outrigger clearance.
(ON SLIDE # 54, 55)
(6) When setting the outriggers, always check the ground under the crane.
(7) If the ground is soft, shoring support must be used to provide a solid base under the standard outrigger pads.
(8) Whether using shoring or not, check for settling during and after the lift.
(ON SLIDE # 56)
(9) You may have to reset the outriggers, especially if the load is near maximum rated loads.
(ON SLIDE # 56)
(10) Never position a crane close to embankments or ditches. The weight of the machine, the added weight of the load, and load movement can cause the embankment to collapse.
11

(ON SLIDE # 57-58)
b. P erfectly level to make a safe lift.
(1) All capacities listed in the load charts are based on lifting with a level machine.
(2) The importance of working from a level position cannot be over emphasized.
(ON SLIDE # 59, 60)
(3) Using a short boom length at both high and low boom angle. This chart (see Power Point) shows approximately what percentage of lift capacity is lost when the crane is one, two, or three degrees off level.
(ON SLIDE # 61, 62)
(4) When using a longer boom length, the decrease in lift capacity is even greater. Similar to the last chart, this chart (see Power Point) shows approximately what percentage of lift capacity is lost when the crane is one, two, or three degrees off level.
(ON SLIDE # 63)
c. Always ensure the crane is level prior to a lift.
(1) For every lift on outriggers, Use a carpenters level to ensure that the crane is level. Place the level parallel to the truck frame and across the truck frame as close to the turntable as possible. This will ensure that the turntable is level. Do not rely on the level indicator located inside the cab.
(ON SLIDE # 64)
(2)After the outriggers are fully out and fully down, raise only the outriggers needed to level the crane according to the level indicator. Insure that the tires are off the ground.
(3) Remember, you are leveling the turntable. The wheels and tires may not be level after leveling the turntable.
(ON SLIDE # 65)
12

d. Correct parts of line reeved between the boom head and the hook block . Is an important thing to consider when making a safe lift is to have:
(ON SLIDE # 66)
(1) Use the cable capacity load chart, for the parts of line required to handle the weight of the load.
(ON SLIDE # 67)
(2) It is vital for the hook block to be properly reeved in order to make a safe lift.
(3) Reeving must be changed as often as necessary to meet the load requirements.
(ON SLIDE # 68)
(4) This prevents any overloading on the cable and permits proper line pull from the winch.
(5) Always reeve the hook block so it hangs below the boom head as straight and balanced as possible.
(ON SLIDE # 69)
(6) When reeved with odd number parts of line, the hook block will appear slightly out of level.
(ON SLIDE # 70)
e. After the crane is on outriggers properly leveled, and the hook block is reeved with the correct parts of line, it's a good practice to make a "dry run".
(ON SLIDE # 71)
f. If the load chart shows you are in danger of exceeding limits you must reposition the crane and move closer to the load.
g. Any change in the setup must be within load chart limits.
(ON SLIDE # 72)
h. Electrocution is a major cause of serious accidents on construction sites.
13

(ON SLIDE # 73)
(1) Never work near power lines without a signalman. Keep a minimum of ten 10 ft. clearance from all power lines.
(2) Whenever possible, try to get the power shut off to the power lines to prevent serious bodily injury.
(3) Always keep signalman in view at all times.
(ON SLIDE # 74, 75)
(4) Always refer to voltage safety signs.
(ON SLIDE # 76)
TRANSITION: Now that we talked about the Safety Procedures. Are there any questions at this point? Then I have some for you. Then we will take a break.________________________________________________________________________________________________________________________________________________________________________________________________
OPPORTUNITY FOR QUESTIONS:
1. QUESTIONS FROM THE CLASS:
2. QUESTIONS TO THE CLASS:
a. Over fifty percent of all crane accidents are due to what?
Improper machine setup.
b. You must have the crane perfectly ________ to make a safe lift?
level (BREAK 10 MIN)TRANSITION: We have just the covered the safety procedures. If there is no further question, let’s move on to the proper handling of a load.________________________________________________________________________________________________________________________________________________________________________________________________
14

(ON SLIDE # 77)
4. PROPER HANDLING OF THE LOAD: (1 HR)
a. Once the load is in the air safe crane operation must continue if the load is to be handled properly.
(ON SLIDE # 78)
(1) Too many operators still operate by the "seat of the pants" meaning they use the stability of the crane rather than the load charts to determine capacity.
(2) Waiting for signs of tipping to warn of overloading conditions is extremely hazardous on hydraulic cranes.
(ON SLIDE # 79)
(3) When set up properly, cranes are designed to provide a solid operating base.
(ON SLIDE # 80)
b. In an overload condition structural failure will often occur before there are any signs of tipping. Avoid capacity problems by using load charts.
(ON SLIDE # 81)
c. Always keep the engine at normal operating RPM during normal operation, especially when lifting and placing a load.
(ON SLIDE # 82)
d. Never work alone when making a lift.
(1)Use an experienced signalman who is in full view of the operator and load at all times.
(2)Prior to the lift, discuss the signals you will be using to avoid any confusion.
(ON SLIDE # 83)
e. The load charts are used to determine capacity based on freely suspended loads with a vertical hoist line.
15

(ON SLIDE # 84)
(1) If the line is not absolutely plumb at lift, side loading will occur.
(2) This additional stress on the boom could affect structure limits and capacity limits.
(3) Bear in mind, booms are designed for a vertical hoist and lift.
(ON SLIDE # 85)
(4) Boom length is defined as the length of the boom from the hinge pin to the tip of the boom.
(ON SLIDE # 86)
f. If the load comes off the ground out of balance or not level, lower it immediately and adjust the legs of the sling.
(ON SLIDE # 87)
g. Always keep the load near the crane and as close to the ground as the terrain permits, especially on loads near capacity.
(ON SLIDE # 88)
h. If the load happens to strike the boom or outriggers, inspect any possible damage prior to the next lift. If the collision is hard, lower the load and carry out the inspection.
(ON SLIDE # 89)
i. The use of guy lines provides added safety for controlling loads.
(1) Only use rope -- NEVER chain or wire rope.
(2) When using guy lines, never wrap the line around a part of the body since the line may have to be released quickly.
(ON SLIDE # 90)
16

j. Rapid swinging causes the load to drift from the machine. This affects capacity by moving the load away from the crane and beyond the safe operating radius.
(ON SLIDE # 91)
k. Rough handling of a load affects lift capacity.
(1) Stopping a load too quickly can produce dynamic forces well in excess of the weight being lifted.
(ON SLIDE # 92)
(2) Maintain smooth operation by "feathering the controls".
(3) Remember to lift and lower loads at a slow, safe speed.
(ON SLIDE # 93,)
(4)Another situation where side loading occurs is during windy conditions.
(5)Guy lines are essential under these conditions in order to control the load. More than one guy line may be required.
(ON SLIDE # 94)
l. Two-blocking occurs when the hook block collides with the boom head.
(1) "Two-blocking" will damage the hook block and weaken the wire rope to a point where it could break.
(ON SLIDE # 95)
(2) As the boom is extended the hook will be raised. Unless wire rope is winched out simultaneously, "two-blocking" will occur.(ON SLIDE # 96)
m. When placing any load it must be set on proper blocking to prevent damage to the slings. Always safely place and block the load before unhooking.
(ON SLIDE # 97)
17

TRANSITION: Now that we talked about the proper handling of a load. Are there any questions at this point? Then I have some for you. Then we will take a break.________________________________________________________________________________________________________________________________________________________________________________________________
OPPORTUNITY FOR QUESTIONS:
1. QUESTIONS FROM THE CLASS:
2. QUESTIONS TO THE CLASS:
a. Always keep the engine at __________________ during normal operation, especially when lifting and placing a load?
Normal operating RPM’s.
b. Two-blocking is defined as?
Occurs when the hook block collides with the boom head.
(10 MIN BREAK) TRANSITION: We have just the covered the proper handling of a load. If there is no further question, let’s move on to the factors affecting lifting capacities.________________________________________________________________________________________________________________________________________________________________________________________________
(ON SLIDE # 98)
5. FACTORS AFFECTING LIFTING CAPACITIES: (1 HR)
All cranes, regardless of size, are rated on their maximum safe lifting capacities. There are 6 important factors that affect lifting capacity.
(ON SLIDE # 99)
a. Parts of Line:
(1) Parts of line are the number of hoist ropes directly supporting the hook block.
18

(2) As the parts of line on the hook block increase, the lifting capacity increases and the hook block speed decreases.
(3) As the parts of line on the hook block decrease, the lifting capacity decreases and hook block speed increases.
(ON SLIDE # 100)
b. Boom Angle:
(1) All cranes must be equipped with a functioning manual boom angle indicator.
(2) As the boom angle increases, lifting capacity increases.
(3) As the boom angle decreases, lifting capacity decreases.
(ON SLIDE # 101)
c. Operating Radius is defined as the horizontal distance measured from the center of rotation (before lifting) to the center of the hook block, or center of gravity of the load when lifted. When lifting heavier loads, boom deflection may occur, resulting in an increase of operating radius.
(1) Increasing the radius, decreases the lifting capacity.
(2) Decreasing the radius, increases the lifting capacity.
(ON SLIDE # 102)
d. Boom length:
(1) As the boom length increases, lifting capacity decreases.
(2)As the boom length decreases, the lifting capacity increases.(ON SLIDE # 103)
e. Stability of the Outriggers stabilizes the crane and increase-lifting capabilities provided that:
(1) The outriggers are fully extended and down.
19

(2) The complete weight of the crane is off the tires.
(3) The crane (turntable) is perfectly level.
(ON SLIDE # 104)
f. Types of footing are extremely important. In that the crane be positioned on firm and level material to prevent accidental tipping. If the ground is soft or uneven, wooden cribbing should be used under the outrigger pads. Cribbing should be 3 times the area of the outrigger pad.
(ON SLIDE # 105)
(1) Good footing is considered as:
(a) Level concrete.
(b) Hard packed moral.
(c) Hard packed earthen clay.
(ON SLIDE # 106)
(2) Fair footing is considered as:
(a) Asphalt.
(b) Gravel.
(c) Earth/Loam.
(ON SLIDE # 107)
(3) Poor footing is considered as:
(a) Moist earth.
(b) Sand.
(c) Uneven terrain.
(ON SLIDE # 108-110)
TRANSITION: Now that we talked about the factors affecting lifting capacities. Are there any questions at this point? Then I have some for you. Then we will take a break.
20

________________________________________________________________________________________________________________________________________________________________________________________________
OPPORTUNITY FOR QUESTIONS:
1. QUESTIONS FROM THE CLASS:
2. QUESTIONS TO THE CLASS:
a. What are the six important factors affecting the lifting
capacity?
1 Parts of line.
2 Boom angle
3 Operating radius
4 Boom length
5 Stability
6 Types of footing
b. Good footing is considered as?
Level concrete, hard packed moral, hard packed earthen clay. (10 MIN BREAK) TRANSITION: We have just the covered the factors affecting lifting capacity. If there is no further question, let’s move on to the load chart.________________________________________________________________________________________________________________________________________________________________________________________________
(ON SLIDE # 111)
6. LOAD CHARTS (1 HR)
a. In determining a safe boom angle and boom length with respect to the weight of the load, you must use the load charts
21

to aid you. Every crane is equipped with a load chart. If the load chart is missing or damaged, the crane cannot be used.
(ON SLIDE # 112)
b. The MAC 50 crane has two working ranges. They are Fully Extended Outriggers, Mid Point Outriggers.
(ON SLIDE # 113)
c. The LRT 110 crane has two working ranges on outriggers. They are retracted and extended. Additionally these working ranges are broken down to over-the-front and 360 degrees.
(ON SLIDE # 114)
d. Rough terrain cranes have three hundred sixty degree lift capacity.
e. For any lift made, all corresponding load charts are read the same way.
(ON SLIDE # 115)
(1) Boom lengths are shown across the top.
(2) Under each boom length is a complete range of boom angles.
(3) The combination of boom length and boom angle gives the operating radius.
(ON SLIDE # 116-117)
(4) The radius is shown along the left hand column. These ratings are based on a freely suspended load with the crane level and standing on a firm-supporting surface. The ratings make no allowances for adverse job conditions.
(ON SLIDE # 118)
22

23

INSTRUCTOR NOTE
Give the students the opportunity to answer the following question utilizing the load charts provided.
(ON SLIDE # 119)
PROBLEM 1: Your MAC 50 is set up as follows:
1. 50 feet of boom.
24

2. Working radius is 16 feet. 3. Reeving is 6 parts with an 880 pound hook block. 4. Lifting slings weigh 800 pounds. 5. Machine is on full outriggers.
What is the max load your crane will lift? 48,520lbs
(ON SLIDE # 120)
PROBLEM 2: Your MAC 50 is set up as follows:
1. 40 feet of boom. 2. Working radius is 25 feet. 3. Reeving is 4 parts with an 880 pound hook block. 4. Lifting slings weigh 800 pounds. 5. Machine is on mid outriggers.
What is the max load your crane will lift? 12,420lbs
(ON SLIDE # 121) PROBLEM 3: Your MAC 50 is set up as follows:
1. 55 feet of boom. 2. Working radius is 20 feet. 3. Reeving is 6 parts with an 880 pound hook block. 4. Lifting slings weigh 800 pounds. 5. Machine is on full outriggers.
What is the max load your crane will lift? 37,720lbs
(ON SLIDE # 122)
PROBLEM 4: Your MAC 50 is set up as follows: 1. 70 feet of boom. 2. Working radius is 45 feet. 3. Reeving is 2 parts with an 880 pound hook block. 4. Lifting slings weigh 800 pounds. 5. Machine is on mid outriggers.
What is the max load your crane will lift? 4,720lbs
(ON SLIDE # 123)
PROBLEM 5: Your MAC 50 is set up as follows:
1. 70 feet of boom.
25

2. Boom angle indicator reads 66 degrees. 3. Reeving is 4 parts with an 880 pound hook block 4. Lifting slings weigh 800 pounds. 5. Machine is on full outriggers.
What is the max load your crane will lift? 28,920lbs
(ON SLIDE # 124)
PROBLEM 6: Your MAC 50 is set up as follows: 1. Main boom minimum. 2. Boom angle indicator reads 35 degrees. 3. Reeving is 11 parts with an 880 pound hook block. 4. Lifting slings weigh 800 pounds. 5. Machine is on full outriggers.
What is the max load your crane will lift? 68,620lbs
(ON SLIDE # 125)
ROBLEM 7: Your MAC 50 is set up as follows:
1. Maximum of boom. 2. Reeving is 2 parts with an 880 pound hook block. 3. Working radius is 45 feet. 4. Lifting slings weigh 800 pounds. 5. Machine is on mid outriggers.
What is the max load your crane will lift? 3,620lbs
(ON SLIDE # 126)
PROBLEM 8: Your MAC 50 is set up as follows:
1. 30 feet of boom. 2. Working radius is 18 feet. 3. Reeving is 8 parts with an 880 pound hook block. 4. Lifting slings weigh 800 pounds. 5. Machine is on full outriggers.
What is the max load your crane will lift? NOT PERMISSIBLE INSTRUCTOR NOTE:
PROBLEMS 9 - 13 apply to the LRT 110 7.5 Ton crane.
26

(ON SLIDE # 127)
PROBLEM 9: Your LRT-110 is set up as follows:
1. Extended boom. 2. Hook block 235 lbs3. 360-degrees.4. On outriggers. 5. Lift 4,300 lbs.6. 235lbs hook block
What is your maximum radius? 25’
(ON SLIDE # 128)
PROBLEM 10: Your LRT-110 is set up as follows:
1. Extended boom. 2. Hook block 235 lbs3. 360-degrees.4. On outriggers. 5. Lift 5,350 lbs.6. 235lbs hook block
What is your maximum radius? 20’
(ON SLIDE # 129)
PROBLEM 11: Your LRT-110 is set up as follows:
27

1. Extended boom.2. Hook block 235 lbs3. 360-degrees.4. On outriggers.5. Lift 4,200 lbs.6. 235lbs hook block7.
What is your minimum boom angle? 27 degrees
(ON SLIDE # 130)
PROBLEM 12: Your LRT-110 is set up as follows:
1. Retracted Boom. 2. Hook block 235 lbs3. Over the front.4. On outriggers.5. Lift 14,765 lbs.6. 235lbs hook block
What is your maximum radius? 14 degrees
(ON SLIDE # 131)
PROBLEM 13: Your machine is set up as follows:
1. Retracted Boom 2. Hook block 235 lbs.3. Over the side.4. On outriggers.5. Lift 8,750 lbs.6. 235lbs hook block
What is your minimum boom angle? 29 degrees
(ON SLIDE # 132)
TRANSITION: Now that we talked about the load charts. Are there any questions at this point? If there is no further question, let’s take a break before moving on to the hand and arm signals.________________________________________________________________________________________________________________________________________________________________________________________________
(10 MIN BREAK)
28

INSTRUCTOR DEMONSTRATION (30 min)
The following Hand and arm diagram will be referenced while the instructor demonstrates.
(ON SLIDE # 133, 152)
7. HAND AND ARM SIGNALS (30 min)
Both operator and ground guide must have good a understanding and solid compunction. This is achieved by the uses of hand and arm signals.
29

(ON SLIDE # 153)
TRANSITION: Now that we talked about hand and arm signals. Are there any questions at this point? Then I have some for you. Then we will take a break.________________________________________________________________________________________________________________________________________________________________________________________________
OPPORTUNITY FOR QUESTIONS:
1. QUESTIONS FROM THE CLASS:
2. QUESTIONS TO THE CLASS:
a. What is the signal for raising the boom?
Arm extended fingers closed, thumb point upward.
b. What is the signal for stop?
Arm extended palm down, move arm back and forth horizontally. (10 MIN BREAK)
30

TRANSITION: We have just the covered hand and arm signals. If there is no further question, let’s move on to the LRT-110 Crane.________________________________________________________________________________________________________________________________________________________________________________________________
(ON SLIDE # 154, 157)
8. LRT-110 CRANE : (2 HRS)
The LRT-110 crane is a 7.5-ton, 4 wheel drive and steer, diesel engine powered hydraulic crane designed to perform normal lifting operations.
(ON SLIDE # 158)
a. Characteristics:
(1) Engine: A 4 cylinder Cummins diesel. Normal engine oil pressure is 10 psi at idle to 90 psi for cold oil.
(ON SLIDE # 159)
(2) Transmission: A four speed forward and reverse power shift unit manufactured by Funk Equipment.
(ON SLIDE # 160)
(3) Carrier (Lower Structure): Provides a means of transporting the upper structure. Equipment on the carrier includes the chassis, frame, engine, transmission, swing bearing, planetary axles, outriggers, operator’s cab, fuel tank, hydraulic reservoir, batteries, and tool compartment.
(ON SLIDE # 161)
(a) Fuel capacity is 44 gallons. The tank is located on the right side of the crane.
(b) The LRT-110 has a 24-volt electrical system. There are two 12-volt batteries located on the left side of the tractor. Next to the battery compartment is a tool compartment.
(c) Normal water temperature range is 140 - 220 degrees. Approximately 190 degrees is normal operating temperature.
31

(d) Hydraulic tank: Located behind the operators cab, with a capacity of 23.8 gallons. The entire hydraulic system holds 45 gallons.
(ON SLIDE # 162)
(4) Upper structure: Includes the counter weight, hydraulic winch, and boom attachment. The upper structure revolves 360 degrees on a bearing and ring gear.
(ON SLIDE # 163)
(5) Boom Attachment: Includes the two-section, telescope-type, box boom, the boom lift cylinder, and the hook block. The boom has a maximum boom length of 35.75 feet, and a minimum boom length of 21.75 feet. Maximum boom topping is 75 degrees.
(ON SLIDE # 164)
(6) Axles: Planetary drive with dual mounted steering cylinders.
(a) The front axle is mounted rigidly. It also has a disc brake that can be used either as a park brake or as an emergency brake.
(b) The rear axle is mounted to a cradle that allows for oscillation. The rear axle pivot cylinders will lock when the upper structure (turntable) swings 5 degrees off front center to maintain stability.
(c) Wheel nuts on the LRT 110 must be torque to 450 to 500 foot-pounds.
(ON SLIDE # 165)
(7) Winch: The LRT-110 is equipped with a single drum hydraulically operated winch. The winch must be wound with a maximum length 350 ft of 1/2 wire rope and should not have less than 180 ft in length of wire rope to be mission capable. Operators must ensure that they maintain at least three (3) wraps of wire rope on the winch drum at all times. Note: any twisting of the wire rope should be corrected before lifting any load.
(ON SLIDE # 166)(8)Brakes: The brakes are vacuum assisted. If the engine
is not running the crane will not have any brakes.
32

(ON SLIDE # 167)
(9) Hook Block: The hook block weighs 235 pounds.
(a) The hook is equipped with a “Hook Latch”. This is a device that is designed to retain loose slings or rigging equipment on the hook under slack conditions. Caution should be used to prevent the latch from supporting any of the load. The hook latch should be inspected daily.
(b) To remove the hook block from the storage bracket located on the front of the crane, raise the boom to a 45 degree angle. Keep the hook block in a vertical position. The hook can now be unlatched from the storage bracket.
(10) Counterweight: The counterweight is located behind the winch and weighs 2200 pounds.
(ON SLIDE # 168)
(11) Load Charts: All cranes, including the LRT 110, are required to have a load chart in the operator’s cab, visible to the operator while operating. Load charts represent the maximum allowable loads that the crane can lift. The LRT 110 crane has two load charts for working on outriggers. They are retracted and extended.
(ON SLIDE # 169)
(12) Boom, winch, and outrigger controls: The LRT 110 has five hydraulic controls located on the dash. From left to right they are the swing, boom telescope, boom hoist, winch, and outrigger levers.
(a) Swing lever: Controls rotation of upper structure. Push the lever to swing right and pull to swing left.
(b) Boom telescope lever: Extends or retracts boom. Push the lever to extend the boom and pull to retract the boom. Always operate with a fully extended or fully retracted boom.
(c) Boom hoist lever: Raises or lowers the boom. Pull the lever to raise the boom and push to lower the boom.
33

(d) Winch lever: Raises or lowers the hook block. Push the lever to lower your hook block or load and pull to raise hook block.
(e) Outrigger control lever: Lowers or raises the outrigger beams. This control must be utilized in conjunction with the outrigger switches. Each beam operates independently with the control switches. Pull to raise the outriggers and push to lower them.
(ON SLIDE # 170)
(13) The LRT 110 is equipped with a Rear Axle Centering Indicator. It is located on the front dash to the right of the Tachometer/Hour meter. The red light indicator warns the operator when the rear wheels are not centered or parallel to the line of travel while in two wheel steering.
(14) The LRT-110 is equipped with an anti two-block warning device. This device warns the operator when the hook block is in danger of colliding with the boom point.
(ON SLIDE # 171)
(a) Inspect anti-two block switch daily for damage.
(b) Check for free movement of the counterweight attached to the switch. Ensure counterweight is secured around correct line of the hoisting cable.
(ON SLIDE # 172)
(c) Inspect all electrical connections and entire length of ATB cable daily for damage, excessive wear and improper installation.
(d) Verify visual and audible warning devices operation by lifting counterweight.
(e) Check disconnects on control linkage prior to lifting any load. Hoist the hook block so actual contact between block and anti-two block counterweight is made. If all functions are operating properly, winch up, boom down, and boom extend will no longer be possible. If any of these functions continue, maintenance is to be notified.
34

(f) When traveling more than 2 miles off road or 5 miles on pavement, remove anti-two block weight and chain from the ATB switch. Failure to do so may cause damage to the hook block switch.
INTERIM TRANSITION: Are there any questions on what we have covered so far? Then let’s take a break before we move on.
(10 MIN BREAK)
(ON SLIDE # 173)
b. Capabilities:
(1) The maximum speed is 22 miles per hour on a hard level surface.
(2) Fording depth is 30 inches.
(ON SLIDE # 174)
(3) The crane is capable of 2 wheel, 4 wheel and crab steering. The steering selector (a black round knob) is located on the left side of the operator’s compartment.
(ON SLIDE # 175)
(4) The maximum lifting capacity is 15,000 pounds at a 13 foot radius or 4,000 pounds at a 30 foot radius throughout a 360 degree rotation on outriggers.
(ON SLIDE # 176)
c. Limitations:
(1) The LRT-110 is limited to raising a maximum load of 7.5 tons at a 10 foot working radius using any length of boom.
(2) The winch capacity is 350 feet of 1/2 inch wire rope.
(3) The hook block attachment can be reeved with a maximum of three parts of line at 6000 pounds per part of line.
(ON SLIDE # 177)
35

d. Employment of the LRT-110 7.5-ton crane has two attachments, the hook block and the aerial personnel basket. The uses of the hook block include:
(1) Constructing bridges.
(2) Installing or removing rotor blades on helicopters.
(3) Lifting any load rigged with slings at, above, or below ground level within the load chart limits.
(ON SLIDE # 178)
INTERIM TRANSITION: Now that we talked about LRT-110 Crane are there any questions at this point before the demonstration? Lets take a break before the demo.________________________________________________________________________________________________________________________________________________________________________________________________
(BREAK 10min)
INTERIM TRANSITION: Are there any more questions before the demonstration for LRT 110 7 ½ ton crane.
INSTRUCTOR NOTE
Perform the following demonstration.
1. DEMONSTRATION: (2.5 HRS) The purpose of this demonstration is to show the students how to operate the LRT 110 7 ½ ton crane. Before the demonstration the Instructor will have one LRT 110 prepared. Two instructors are required for this demonstration.
STUDENT ROLE: The students will gather around the LRT 110 with student handouts and observe the instructors demonstration. Students will be encouraged to ask questions.
INSTRUCTOR(S) ROLE: The instructor will conduct a detailed demonstration of how to perform the pre ops check and operation of the LRT 110. The alternate instructor will assist the primary instructor.1. Safety Brief: Instructor will cover ORAW. Hard hats will be worn while on the lot. Each student and Instructor will have hearing protection. Ensure all personnel are clear of the equipment prior to starting or moving the equipment. Ground
36

guides will be utilized when necessary. In case of mishap students will move to the classroom and instructor will call emergency personnel.2. Supervision and Guidance: The instructor will demonstrate the following.
(1) Introduction to the LRT 110 7 ½ ton crane.(2) Tool requirements.(3) 360 walk around.(4) Lifting and swinging a load.(5) Pre operation check.(6) Placing loads.(7) Post ops checks.3. Debrief: Allow students the opportunity to comment on what they experienced and/or observed. Provide overall feedback, guidance on any misconceptions, and review the learning points of the demonstration.
INSTRUCTOR NOTE
Instructor will reiterate the safety brief prior to the students Practical Application.
INTERIM TRANSITION: Are there any questions on the demonstration that we have just covered? If not let’s take a break before moving onto the Practical Application for the LRT 110 7 ½ ton crane.
(BREAK 10min)
INTERIM TRANSITION: Are there any more questions before moving onto the Practical Application for the 110 7 ½ ton crane.
INSTRUCTOR NOTE
Perform the following Practical Application. Allow students to take breaks as needed
1. PRACTICAL APPLICATION: (48 HRS) The purpose of this Practical Application is to allow the students the opportunity to practice operating the LRT 110 7 ½ ton crane. Before the practical application the Instructor will have all LRT 110 7 ½ ton cranes prepared. One instructor is required.
37

PRACTICE: Each student will be assigned a piece of equipment to operate; an additional student will be assigned to that piece of equipment as a ground guide for the student operating. Students are allowed to use hand outs and ask questions. The students will practice the following task.
(1) Initiate trip ticket.(2) 360 walk around.(3) Pre Op checks.(4) Lifting and swinging a load.(5) During operations checks.(6) Placing loads.(7) Post ops checks.(8) Complete trip ticket.
PROVIDE-HELP: The Instructor will assist students throughout the practical application and will ensure the students are properly operating the equipment. 1. Safety Brief: Instructor will cover ORAW. Hard hats will be worn while on the lot. Each student and Instructor will have hearing protection. Ensure all personnel are clear of the equipment prior to starting or moving the equipment. Ground guides will be utilized when necessary. In case of mishap students will move to the classroom and instructor will call emergency personnel.2. Supervision and Guidance: Brief the students of their responsibilities during the practical application. The Instructor will be on the lot observing operations, assisting students and answering questions.3. Debrief: Allow students the opportunity to comment on whatthey experienced and/or observed. Provide overall feedback,guidance on any misconceptions, and review the learning pointsof the Practical Application.
(ON SLIDE # 179-180)
TRANSITION: Are there any questions on the Practical application of operating the LRT 110 7 ½ ton crane? If not I have some questions for you.
OPPORTUNITY FOR QUESTIONS:
1. QUESTIONS FROM THE CLASS:
2. QUESTIONS TO THE CLASS:
38

a. The boom has a maximum boom length of ______ feet, and a minimum boom length of _______ feet?
Max 35.75 feet / Minimum 21.75 feet
b. The maximum lifting capacity is _______ pounds at a 13 foot radius or _______ pounds at a 30 foot radius throughout a 360 degree rotation on outriggers?
15,000 pounds / 4,000 pounds c. The hook block attachment can be reeved with a maximum of three parts of line at _________ per part of line.
6000 pounds
d. The LRT-110 is equipped with an anti two-block warning device. This device warns the operator when the hook block is in danger of colliding with what?
the boom point
e. The LRT 110 crane has two load charts for working on outriggers. What are they?
retracted and extended.
TRANSITION: If there are no more questions concerning the LRT lets move on to the MAC 50.
(ON SLIDE # 181, 183)
9. MAC 50 CRANE: (1 HR)
The MAC 50 is a 50 ton (100,000 lbs) capacity all-terrain crane. The Marine Corps began field testing these crane in January, 2007. The MAC 50 is a replacement for the HSHMC 25 ton crane. The lifting capacity of the crane was more than doubled by advanced engineering, but kept the same embarkation specifications to meet the standards of the Marine Corps.
(ON SLIDE # 184)
a. Characteristics:
(1) The MAC 50 is powered by an in-line 6 cylinder, turbocharged Cummins diesel engine that outputs 333 HP @ 2,000
39

RPM and 305 HP @ 2,200 RPM. The engine has the capability of being started at temperatures as low as -25 degrees Fahrenheit.
(ON SLIDE # 185-188)
(2) The transmission is fully automatic or manually controlled by the selector buttons on the transmission panel. The transmission range has 6 forward gears and 1 reverse with a maximum road speed of 48 MPH.
(ON SLIDE # 189)
(3) The axles can oscillate (+ 5 in.) and can traverse an uphill or downhill grade of 45 percent. Side slope that is perpendicular to the direction of travel is reduced to only 20 percent.
(ON SLIDE # 190)
(4) The MAC 50’s fording depth is 60 in.
(ON SLIDE # 191)
(5) With a fuel capacity of 148 gallons, the operating range is 300 miles or 10 hours at full RPM’s.
(ON SLIDE # 192)
(6) The electrical system is a standard 24 volt negative ground equipped with a NATO slave receptacle. A solar panel will aid in maintaining the charge of the four 12 volt batteries. The battery master switch is between the lower cab and the battery box.
(ON SLIDE # 193)
(7) The service brake is an all-wheel air brake system that can hold the crane at a 45% grade. The parking brake system on the 2nd, 3rd, and 4th axles is spring loaded and will hold at a 20% grade.
(ON SLIDE # 194, 196)
(8) There are three major components that make up the MAC 50 crane. The chassis refers to the frame, axles, lower or driving cab, and engine. The superstructure is the upper or
40

operating cab, turntable, and winch assembly. The boom is the lifting arm of the equipment and has three telescoping sections.
(ON SLIDE # 197, 201)
(9) The boom of the MAC 50 can extend to a maximum length of 82’ 3” and a minimum fully retracted length of 27’ 8”. The boom is comprised of three sections. Section #1 fully extends before sections 2 & 3. Sections 2 & 3 will deploy simultaneously (if not deployed in this order, unit maintenance should be advised). It is also equipped with a mechanical boom angle indicator positioned on the left side of the boom. The boom head is equipped with seven steel sheaves. There are also marks along the boom, indicating its extended length.
(10) The MAC 50 has a single winch positioned at the base of the boom that is equipped with 580 feet of 5/8 inch wire rope. The winch is capable of paying out or winding in rope at two speeds. The winch has a 9,700 lbs pull capacity. The high speed function is controlled by a button on the right operator’s hydraulic control lever. The main use of the high speed feature is when light load lift operations are being performed, and during clamshell operations. “The high range speed is not used when load is more than 30% of allowable weight.”
(ON SLIDE # 202)
(11) The steering of the MAC 50 will be front wheels only when in travel mode. Once the crane is on site, it is capable of crab or round steering. Axles 3 and 4 are controlled by a toggle switch next to the park brake lever.
(ON SLIDE # 203)
(12) The MAC 50 has heating and air conditioning in both the lower and upper cab. The heater for the upper cab runs on diesel fuel that feeds a small engine. There is a separate fuel tank for the heating unit positioned directly behind the upper cab with access via a service panel. If this tank is empty you will not have heat in the operator’s cab.
(ON SLIDE # 204)
TRANSITION: Now that we talked about the MAC 50 characteristics. Are there any questions at this point? Then I have some for you. Then we will take a break.
41

________________________________________________________________________________________________________________________________________________________________________________________________
OPPORTUNITY FOR QUESTIONS:
1. QUESTIONS FROM THE CLASS:
2. QUESTIONS TO THE CLASS:
a. With a fuel capacity of 148 gallons, the operating range is 300 miles or 10 hours at full RPM’s?
300 miles or 10 hours
b. The MAC 50 has a single winch positioned at the base of the boom that is equipped with how many feet of 5/8 inch wire rope?
580 feet
(10 MIN BREAK) TRANSITION: We have just the covered the MAC 50 Crane Characteristics. If there is no further question, let’s move on to the Controls, Instruments, and Functions of the MAC 50.__________________________________________________________________________________________________________________________________________________________________________________________________________________________________________
(ON SLIDE # 205)
10. Controls, Instruments, and Functions of the MAC 50: (2 HRS)
This crane can only be driven by utilizing the lower cab. The crane’s lower or driver’s cab has two separate seats allowing an assistant driver/operator to accompany the primary driver/operator.
(ON SLIDE # 206)
a. Lower Cab Controls:
(16) Parking brake (17) Accelerator
(18) Service brake (19) Steering Column
42

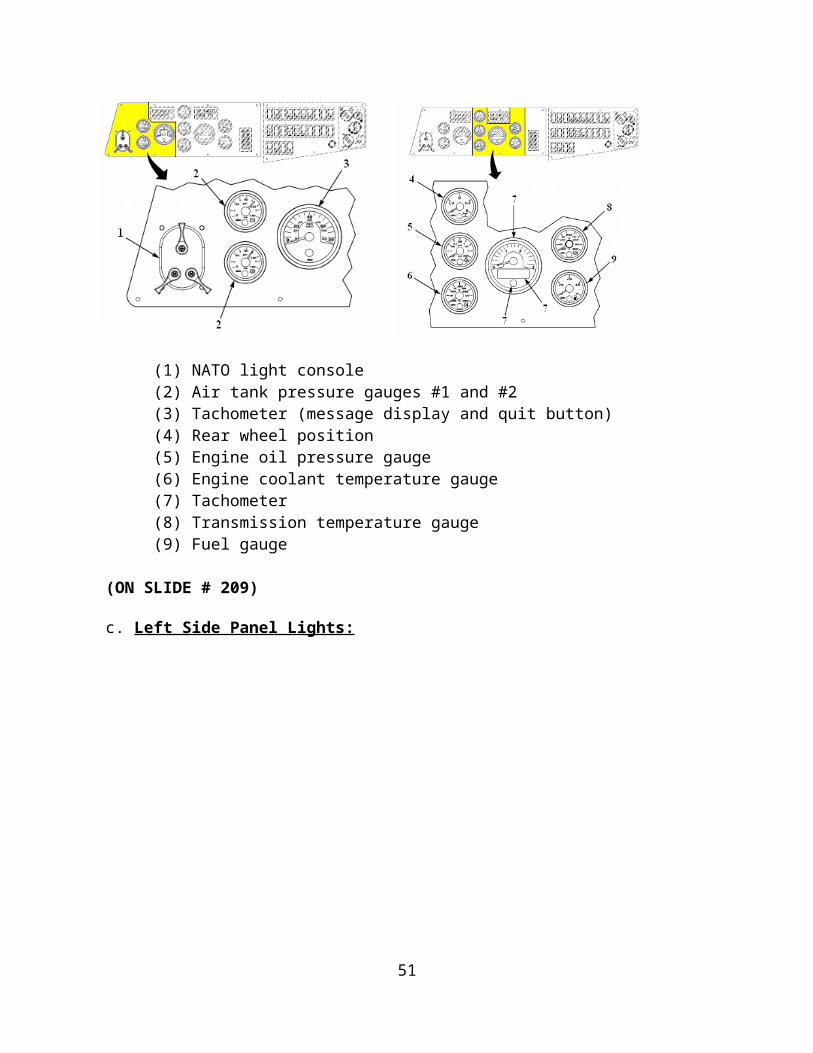
(ON SLIDE # 207, 208) b. Lower Cab Panel Identification and Functions:
(1) NATO light console (2) Air tank pressure gauges #1 and #2 (3) Tachometer (message display and quit button) (4) Rear wheel position
(5) Engine oil pressure gauge (6) Engine coolant temperature gauge (7) Tachometer (8) Transmission temperature gauge
(9) Fuel gauge
43

(ON SLIDE # 209) c. Left Side Panel Lights:
(1) Low Air Pressure (2) Parking Brake (3) High Beam Indicator (4) Air Filter Warning (5) Turn Signal Indicator
(6) WARNING: This simply indicates that there is a fault with something. All gauges should be checked immediately for unacceptable limits. If no effort is made to correct fault, situation may decline into STOP condition.
(7) STOP: If this light comes on during engine operation, engine must be shut down immediately and fault condition removed before resuming operations. Failure to comply could result in serious damage to equipment.
(8) Heater Plug Warming Indicator (Glow Plug)
(9) Battery Fault Indicator
(ON SLIDE # 210, 211)
d. Right Side Panel Lights:
44

(1) All-Wheel Drive Lock Indicator(2) Axle Differential Lock Indicator(3) Crane Operation Mode(4) Independent Rear Axle Steering-1(5) Independent Rear Axle Steering-2(6) Off-Road Mode(7) Transfer Case in Neutral(8) Independent Rear Axle Steering Mode
45

(1) Dolly Indicator (NOT USED) (2) Hydraulic Oil Filter Warning (3) Hydraulic Oil Temperature Warning
(4) Steering Circuit-1 (off when parking brake is disengaged) (5) Steering Circuit-2 (off at 6 MPH) (6) Steering Circuit-3 (NOT USED) (7) Front Left Suspension (8) Rear Left Suspension (9) Front Right Suspension (10) Rear Right Suspension
(ON SLIDE # 212, 213)
e. Lower Cab Panel Controls:
46

(1) Outrigger Lighting (2) Front Axle Suspension (3) Left Rear Axle Suspension (4) Right Rear Axle Suspension (5) All Axle Suspension (6) Air Conditioner (7) Independent Rear Axle Steering (8) All-Wheel Drive Lock (9) Axle Differential Lock (10) Transfer Case (11) Engine Ignition (12) Engine RPMs (13) Four-Way Hazard Lights
(ON SLIDE # 214)
INTERIM TRANSISTION: Are there any questions on what we have covered so far? Then let’s take a break before we continue. ________________________________________________________________________________________________________________________________________________________________________________________________
(10 MIN BREAK)
47

INTERIM TRANSISTION: Are there any more questions? Then let’s move on. ________________________________________________________________________________________________________________________________________________________________________________________________
(ON SLIDE # 215)
f. Transmission Control Panel:
(1) Digital Display (2) Mode (3) Pushbutton Transmission (4) Directional Pushbuttons (5) Rear Wheel Positioning (6) Quit (same function as dash quit) (7) Parking Brake
Before traveling the suspension must be leveled. This is controlled by suspension control switches on the lower cab control panel. When the crane’s suspension is completely level, all four suspension indicator lights will go off. This is easily accomplished by raising the entire suspension, then using the ALL
48
7

suspension switch, lower the crane until all four lights shut off. They may not all go out at the same time, but continue to hold the ALL button and the crane will compensate. The only task that is performed to begin upper cab operations is to turn off engine from lower cab, then restart engine from upper cab.
(ON SLIDE # 216, 219)
g. Upper Cab Panel identification and Functions:
(1) Fan Speed (2) Air Temperature Control (3) Emergency Stop (4) Heater (5) Air Conditioner (6) Air Source (7) Roof Window Wiper (8) Front Windshield
49

(9) Windshield Washer (10) Engine Ignition (11) Engine Shutoff (12) Engine RPM (13) Dashboard Lighting (14) Outrigger Lighting (15) Exterior Lighting
(1) Fuel Gauge (2) Engine Coolant Temperature (3) Engine Oil Pressure (4) Tachometer (5) Message Display Screen (6) Quit (7) Crane Operation Mode (8) Slew Gear Brake
50
(9) Boom 0% Extension (10) Battery (11) Hydraulic Filter (12) WARNING! (13) STOP! (14) Glow Plug (15) Chassis Warning light (ON SLIDE # 220, 222)
(1) Safe Load Indicator (SLI) Digital Display (2) Vertical Outrigger Control (3) Left Outrigger Control (4) All Outrigger Control (5) Right Outrigger Control (6) Horizontal Outrigger Control (7) Raise/Lower Axle Control (8) Slew Gear Brake (9) Slew Alarm Bypass
51

(ON SLIDE # 223)
h. Safe outrigger setup:
(1) The MAC 50 is capable of operating on four outriggers that must be locked in the mid position or the full position. There are two separate load charts; one for each position.
(ON SLIDE # 224)
(2) Once the crane is positioned correctly on site, the first step in setting up the crane is to prepare the outriggers and outrigger pads. The outrigger pads are to be stored in their respective travel positions until crane operations begin. If outrigger pads are not stowed properly for traveling, the tires can be punctured by them.
(ON SLIDE # 225-228)
(3) After the outrigger pads are properly installed, the decision is made then whether to operate with the outriggers in mid or full position. There are two locking pins on each outrigger frame that control the mid and full positions. To set up for mid position:
(a) Ensure that all four OUTTER pins are retracted
(b) Ensure all four INNER pins are engaged
(c) Using the outrigger controls, extend the outriggers (one at a time) until the INNER pin makes contact with the stopping block.
(d) Engage the OUTTER pin to lock outrigger
(4) Setting up in full outrigger position.
(a) Ensure that all four OUTTER and INNER pins are retracted
(b) Using the outrigger controls, extend the outriggers (one at a time) until they stop.
(c) Engage the OUTTER pin to lock outrigger
52

(ON SLIDE # 229-233)
(5) After dun-age is placed, raise the MAC 50 off the deck using the vertical outrigger control. The chassis will need to be level before any further operations are performed. This will be accomplished by raising the crane to the highest position and then leveling down. Leveling will be obtained by using the round bubble level on the right console and double checked by a second level placed both parallel and perpendicular to the crane’s frame.
(a) Once the frame is level, raise the axles all the way up by using the axle raise/lower switch.
(b) The MAC 50 must then be lowered equally until there is only two inches between the tires and the highest point on the deck. This will ensure a safe working setup, due to the crane’s center of gravity being as low as possible.
(6) If crane comes out of level while performing this, adjustments will be made as to maintain levelness.
(7) The next step in setting up properly for crane operations is the utilization of the Safe Load Indicator or SLI.
(ON SLIDE # 234-236)
(a) The SLI will come on when the engine is started from the upper cab and is mounted in the dashboard.
The MG 587 System is designed for use as an aid to crane operation.
Do not use this system as a substitute for an experienced crane operator who has been trained in crane operation and related safety guidelines, or for crane capacity information and guidelines supplied by the crane manufacturer.
(ON SLIDE # 237-238)
53

1-Current weight with graph 7-Change setup/confirm2-Two-block warning 8-Display select toggle3-90% capacity warning 9-Display select toggle4-100% capacity warning 10-Display screen contrast5-Setup code (four options)* 11-Display screen contrast6-Parts-of-line 12-Alarm override
(ON SLIDE # 239)
* 1 = Full Outriggers 3 = Clamshell 2 = Mid Outriggers 4 = Rigging/Travel
(ON SLIDE # 240-241)
(2) The purpose of the SLI is to translate data received from the computer and indicate actual load weight and percent of rated capacity on the digital display. Visual and audible warnings and alarms activate when capacity limits are approached or exceeded or when a two-block condition is encountered.
(ON SLIDE # 242-244)
(3) Once again, THE SLI IS NOT USED AS AN ALTERNATIVE OR REPLACEMENT TO EXPERIENCE AND A LOAD CHART!
(4) If the screen is not clearly visible, adjust the contrast until it is corrected.
(ON SLIDE # 245)
(5) Stowing and un-stowing of the boom and slings can only be accomplished by having the SLI in Rigging/Travel mode. When the boom is lower than 29 degrees the SLI will disengage the
54

controls if not in Rigging/Travel mode. While in this mode the SLI safety features are completely overridden.
(6) After the slings are attached to the hook block and/or the boom is above 29 degrees on the boom angle indicator the SLI must be configured at this time.
(ON SLIDE # 246-249)
CAUTION: WHEN UNSTOWING THE BOOM, THE FIRST AND ONLY FUNCTION DONE WILL BE TO RAISE THE BOOM OUT OF ITS CARRIAGE. If any other function is accidentally performed the lower cab could be damaged and/or the winch cable will backlash on the drum.
CAUTION: IF ANY OF THE MANUFACTURER’S 580 FEET HAS BEEN REMOVED FROM THE WIRE ROPE, UNIT MAINTENANCE MUST BE ADVISED. This is due to the calibrating of the SLI. The winch is equipped with a safety switch that will always keep three wraps of cable left on the drum. If any is cut off, the computer still counts the same amount of line being played out and will miss the safety mark. This will result in a reversal of the cable being wrapped around the drum.
CAUTION: THERE IS A BOOM LOCKING PIN THAT MUST BE REMOVED IN ORDER TO RAISE THE BOOM FROM ITS CARRIAGE.
CAUTION: WHEN STOWING THE BOOM, ENSURE THAT THE BOOM IS FULLY RETRACTED VIA ASSISTANT AND BOOM 0% EXTENSION INDICATOR LIGHT ON THE DASHBOARD. If this is forgotten when the boom is being lowered into the carriage, the boom will crush the roof of the lower cab.
55

(ON SLIDE # 250) i. Upper Cab Controls and Functions:
(1) Deadman Button (must be depressed during operations) (2) Winch High Speed Mode (3) Clamshell open/Close
(4) Slew Gear Drive Regulator (5) Boom Hoist Regulator
(ON SLIDE # 251-252)
56

The right joystick is equipped with a vibrating clicker that allows the operator to feel/hear how much and at what rate wire rope is paid out (as the rate increases the clicking gets faster and vice-versa). (ON SLIDE # 253-255)
j. Limitations:
(1) The MAC 50 is limited to raising a maximum load of 50 tons (100,000 lbs.) at a 10 ft. working radius on full outriggers.
(2) The MAC 50 is limited to raising a maximum load of 42.85 tons (85,700 lbs) at a 10 ft. working radius on mid outriggers.
(3) Utilizes two attachments: the hook block and the clamshell.
(4) The hook block can be reeved with a maximum of 11 parts of line. With rigged with 11 parts of line, the hook block cannot be lowered to the deck. This is due to the amount of wire rope being used up in the reeves.
(ON SLIDE # 256)
TRANSITION: Now that we talked about the Controls, Instruments, and Functions of the MAC 50. Are there any questions at this point? Then I have some for you. Then we will take a break.________________________________________________________________________________________________________________________________________________________________________________________________
OPPORTUNITY FOR QUESTIONS:
1. QUESTIONS FROM THE CLASS:
2. QUESTIONS TO THE CLASS:
a. The only task that is performed, to begin upper cab operations is what?
To turn off engine from lower cab, then restart engine from upper cab.
57

b. The MAC 50 is limited to raising a maximum load of ________________ at a 10 ft. working radius on mid outriggers?
42.85 tons (85,700 lbs)
(10 MIN BREAK) TRANSITION: We have just the covered the Controls, Instruments, and Functions of the MAC 50. If there is no further question, let’s move on to the attachments and Employment of the MAC 50 of the MAC 50.__________________________________________________________________________________________________________________________________________________________________________________________________________________________________________
(ON SLIDE # 257)
11. Attachments and Employment of the MAC 50 (30 MIN)
a. Hook Block uses are almost unlimited. A hook block may be used at, above, or below the ground level. The hook block weighs 880 pounds. Some of the uses for the hook block are:
(ON SLIDE # 258-259)
(1) Construction and employment of bridges
(2) Installing or removing rotor blades on helicopters and propellers on airplanes
(3) Loading and unloading ships or trucks
(4) Lifting any load rigged with slings or any vehicle equipped with lifting eyes
(ON SLIDE # 260-272)
b. Clamshell bucket is a vertically operated attachment capable of digging loose to medium type soils at, or above ground level with a capacity of 264 gallons (6,600 lbs.). The clamshell attaches to the hook block and should be used with two parts of line. Some uses for the clamshell are:
(1) Digging foundations, footings, trenches and cellars
(2) Handling bulk material such as gravel, garbage, snow
58

(3) Loading of bulk material into vehicles
(4) Filling bins, such as barriers and bastions (i.e. HESCO)
The clamshell works by the weight of the bucket pushing down on the ground and also with the closing action of the jaws. The clamshell is not used frequently and must be stored with the bucket slightly open as not to damage hydraulic seals after temperature expansion.
(ON SLIDE # 273)
INTERIM TRANSITION: Are there any questions on what we have covered? If not let’s take a break and then move onto the demonstration of operating the MAC 50 Crane.
(BREAK 10 min)
(ON SLIDE # 274)
INTERIM TRANSITION: Are there any questions before we go into the demonstration?
INSTRUCTOR NOTE
Perform the following demonstration.
2. DEMONSTRATION: (4 HRS) The purpose of this demonstration is to show the students how to operate the MAC 50 Crane. Before the demonstration the Instructor will have one MAC 50 Crane prepared. One instructor is required.
59

STUDENT ROLE: The students will gather around the Mac 50 with student handouts and observe the instructors demonstration. Students will be encouraged to ask questions.
INSTRUCTOR(S) ROLE: The instructor will conduct a detailed demonstration of how to operate the MAC 50 Crane. 1. Safety Brief: Instructor will cover ORAW. Hard hats will be worn while on the lot. Each student and Instructor will have hearing protection. Ensure all personnel are clear of the equipment prior to starting or moving the equipment. Ground guides will be utilized when necessary. In case of mishap students will move to the classroom and instructor will call emergency personnel. 2. Supervision and Guidance: The instructor will demonstrate the following.
(1) Introduction to the MAC 50 Crane.(2) 360 walk around.(3) Pre Op checks.(4) Lifting and swinging a load.(5) During operations checks.(6) Placing a load.(7) Post ops checks.
3. Debrief: Allow students the opportunity to comment on what they experienced and/or observed. Provide overall feedback, guidance on any misconceptions, and review the learning points of the demonstration.
INTERIM TRANSITION: Are there any questions on the demonstration of operating the equipment? If not let’s move onto the Practical Application for the MAC 50 Crane.
INSTRUCTOR NOTE
Perform the following Practical Application.
2. PRACTICAL APPLICATION: (60 HRS) The purpose of this Practical Application is to allow the students the opportunity to practice operating the MAC 50 Crane. Before the practical application the Instructor will have all MAC 50 Cranes prepared. One instructor is required.
60

PRACTICE: Each group of students will be assigned a piece of equipment. Students are allowed to use hand outs and ask questions. The students will practice the following task.(1) Initiate trip ticket.(2) 360 walk around.(3) Pre Op checks.(4) Lifting and swinging a load.(5) During operations checks.(6) Placing a load.(7) Post ops checks.(8) Complete trip ticket.
PROVIDE-HELP: The Instructor will assist students throughout the practical application and will ensure the students are properly operating the MAC 50. 1. Safety Brief: Instructor will cover ORAW. Hard hats will be worn while on the lot. Each student and Instructor will have hearing protection. Ensure all personnel are clear of the equipment prior to starting or moving the equipment. Ground guides will be utilized when necessary. In case of mishap students will move to the classroom and instructor will call emergency personnel.2. Supervision and Guidance: Brief the students of their responsibilities during the practical application. The Instructor will be on the lot observing operations, assisting students and answering questions.3. Debrief: Allow students the opportunity to comment on what they experienced and/or observed. Provide overall feedback, guidance on any misconceptions, and review the learning points of the Practical Application.
INTERIM TRANSITION: Are there any questions before we go into the next demonstration?
INSTRUCTOR NOTE
Perform the following demonstration.
3. DEMONSTRATION: (30 MIN) The purpose of this demonstration is to show the students how to install the MAC 50 Crane clamshell. Before the demonstration the Instructor will have one MAC 50 Crane and clamshell prepared. One instructor is required.
STUDENT ROLE: The students will gather around the Mac 50 with student handouts and observe the instructors demonstration. Students will be encouraged to ask questions.
61

INSTRUCTOR(S) ROLE: The instructor will conduct a detailed demonstration of how to install the MAC 50 Crane clamshell. 1. Safety Brief: Instructor will cover ORAW. Hard hats will be worn while on the lot. Each student and Instructor will have hearing protection. Ensure all personnel are clear of the equipment prior to starting or moving the equipment. Ground guides will be utilized when necessary. In case of mishap students will move to the classroom and instructor will call emergency personnel. 2. Supervision and Guidance: The instructor will demonstrate the following.
(1) Introduction to the MAC 50 Crane clamshell.(2) Pre Op checks.(3) Installing clamshell(4) Removing clamshell(7) Post ops checks.
3. Debrief: Allow students the opportunity to comment on what they experienced and/or observed. Provide overall feedback, guidance on any misconceptions, and review the learning points of the demonstration.
TRANSITION: Now that we covered the Crane operations, LRT 110 7 ½ ton and the MAC 50 Crane in detail. Are there any questions? Then I have a few for you.________________________________________________________________________________________________________________________________________________________________________________________________
(ON SLIDE #275)
OPERTUNITY FOR QUESTIONS:
1. QUESTIONS FROM THE CLASS:
2. QUESTIONS TO THE CLASS: a. The LRT 110 should not have less than how many feet of wire rope to be mission capable?
180 ft
b. The boom of the MAC 50 can extend to a maximum length of?
82’ 3”
62

TRANSITION: Now that you understand the operations of both cranes we are going to move into the inspection and testing process. Prior to the crane be operated you must conduct your 360 walk around, but once a year you are required to conduct a condition inspection followed by a load test and non destructive test every five years. If there are no questions, let us start by talking about the background.________________________________________________________________________________________________________________________________________________________________________________________________
(ON SLIDE #276-278)
12.BACKROUND (5 Min)
a. The Secretary of Defense requires all components, including the Marine Corps, to conform with the Department of Labor's Occupational Safety and Health Administration (OSHA) regulations (with some exceptions predicated by Defense missions). Extracts of pertinent safety instructions set forth in OSHA-29 Code of Federal Regulations (CFR) 1910 have been consolidated in the Marine Corps Order (MCO) P11262.2.
b. For many years most of the Department of Defense (DOD) agencies concerned have been much more stringent than OSHA requires with regard to industrial safety when load lifting equipment is involved. Load testing has been performed, especially in the Marine Corps, when not required by OSHA. This has resulted in considerable unnecessary expense of time, manpower, and material.
TRANSITION: Now that we know some of the background behind our order, are there any questions? Let’s move on to the responsibilities
(ON SLIDE #279-282)
13.Responsibilities (5 Min)
a. Commanding Officers (CO) and Officers-in-Charge (OIC) shall ensure that inspections, testing, and certifications are
63
INSTRUCTOR NOTEThis refers back to when the Marine Corps did Annual Load tests on equipment (late 80’s early 90’s)

conducted per (MCO) P11262.2 and appropriate TM's. This includes proper working of the items of equipment and annotating the appropriate equipment records (NAVMC 696D).
b. Commanding Generals (CG) shall designate specific 3rd Echelon capable organizations to provide inspection and testing services for units without the organic resources/maintenance authority to conduct those inspections and tests.
c. Commanders of Marine Corps Bases (MCB) and stations shall make the facilities referred to in chapter 3 of MCO P11262.2 available to tenant/geographically proximate Fleet Marine Force organizations.
d. Operators assume direct responsibility for equipment when it is assigned or dispatched to them. This responsibility includes safe operation, proper use, performance of such periodic maintenance as may be prescribed, and collection of operational data as may be required.
TRANSITION: Now that we know the responsibilities lets move into some general information about ACI’s and load testing. (ON SLIDE #283-311)
14.G eneral I nformation (15 Min)
a. Table 1-1 of MCO P11262.2 lists requirements by items of equipment for inspection, testing, and certification of load lifting equipment.
b. When set forth in TM's as a scheduled maintenance (SM) check, condition inspections will be conducted at the same time as SM using the Condition Inspection Record shown in TM 4700-15/1 Pg 2-25-1 through 2-25-3. When no general inspection is specified as part of SM services or where inspection requirements are not adequately covered, it will be conducted annually as set forth herein.
64
INSTRUCTOR NOTEHand out a copy of the Annual Condition Inspection checklist to the students; also have the students refer to TM 4700-15/1 pg 2-25-1 through 2-25-3 or MCO P11262.2 pg 4-9 through 4-11.

c. Only cranes and aerial personnel devices require load testing. Aerial personnel devices are defined as any mechanically, hydraulically, or electrically operated device used to lift a person in the air. Scheduled periodic load testing is not required. Prior to initial use, however, all, newly manufactured, extensively repaired or altered cranes/aerial personnel devices shall be load tested.
d. Condition inspection and/or load test is required prior to initial use and all new items being fielded will be inspected/tested as part of the equipment acceptance inspection unless the item of equipment has the required certifications that are current within the past 12 months.
e. Load tests are required for extensively repaired or altered cranes and aerial personnel devices. It is the responsibility of the organization doing the repairs to ensure the load tests are performed prior to returning the equipment to its owner. Therefore, upon receipt of a mobile crane/aerial device, the CO/OIC will determine if a load test has been accomplished by examination of the equipment records. If no certification is present, the CO/OIC may elect to refuse to accept the equipment or accept it and arrange to have it locally load tested.
f. The purpose of the annual condition inspection is to ensure that the overall structural, mechanical, hydraulic, and electrical components of the equipment have been maintained in a safe and serviceable condition and are functioning properly.
g. Certification. The certifying officer is responsible for ensuring the safety and reliability of all load-lifting equipment. The certifying officer shall be designated in writing by the CG/CO. Certifying officers shall either be Marine officers or qualified civilians. The Marines will possess military Occupational Specialties 1349 (Engineer Equipment Officer), 3510 (Motor Transport Maintenance Officer), or 2110 (Ordnance Vehicle Maintenance Officer). The certifying officer shall, in turn, designate the authorized test directors, inspection and test personnel. Certifications shall be based on the condition inspection and availability of load test certification.
(1) All contracts for the purchase of new mobile cranes/aerial personnel devices include a requirement for a manufacturer's load test certification to accompany the vehicle on delivery.
65

(2) Load testing is only required if the lifting portion of the crane or aerial personnel device has been repaired or altered; e.g., repairs to the truck portion of a mobile crane will not require load testing of the crane portion. Outriggers will be considered as part of the lifting portion of a crane/aerial personnel device.
(3) It is mandatory that contracts with repair contractors for rebuilt or significantly repaired mobile cranes/aerial personnel devices contain a load test requirement/certification clause. Depots are required to furnish the same.
(4) Certification officers should be qualified at an appropriate Marine Corps school or Labor Department approved civilian run school.Certification of condition inspection and/or load test shall be signed by the test inspector and certifying officer.
h. Certification Frequency. Each item of load lifting equipment shall be certified as condition inspected at least once annually.
i. Waivers.The requirements of MCO P11262.2 are waiver able for any unit under extended combat conditions.
(1) The requirements of MCO P11262.2 may be waived for items of equipment that are placed in administrative storage as delineated in paragraph 3002.11 (Deferred PMCS) of MCO P4790.2. Under no circumstances will a waiver for administrative storage extend beyond a 2-year period. This waiver does not apply to items placed on administrative deadline or low usage items. Local procedures must be addressed in the major command maintenance management standard operating procedure.
(2) During peacetime, CG's of the 4th Division Wing Team (DWT) authorized to waiver the requirements of MCO P11262.2 for a 1-year period. Equipment records will be so annotated. Copies of waivers will be maintained in the applicable equipment record jacket. At no time will an item of the 4th DWT equipment be allowed to go without inspection, testing, or certification for two consecutive years. CG's of the 4th DWT are encouraged to establish Inter-service Support Agreements (ISA) or commercial contracts to comply with these requirements if appropriate organic/Marine Corps personnel are not available or due to geographical location. Inspection, testing, and certification by
66

agencies outside the Marine Corps should clearly state that they are made per the provisions of MCO P11262.2.
j. Marking. Load lifting equipment shall be stenciled, in a position clearly visible to the operator, with certification data indicating the test status.
EXAMPLE: CAP. 50,000 lbs certified 15 July 1996.
(ON SLIDE #312, 313)
TRANSITION: We have just covered the background, responsibilities, and some general information about ACI’s and load test. Are there any questions?_________________________________________________________________________________________________________________________________________________________________________________
OPPORTUNITY FOR QUESTIONS:
1. QUESTIONS FROM THE CLASS
2. QUESTIONS TO THE CLASS:
a. Mandatory that rebuilt cranes contain a?
Load Test requirement clause
b. Waivers for administrative storage will not extend beyond what?
2 year period
(ON SLIDE #314)
(BREAK 10 MIN)
TRANSITION: Now that we know some of the background, responsibilities, and some general information about ACI’s and load test, let’s move on to what makes up an actual condition inspection._________________________________________________________________________________________________________________________________________________________________________________
(ON SLIDE #315-335)
15.A nnual C ondition I nspection (20 Min)
67

In addition to those inspections required by load lifting
equipment TM's or commercial manuals, the inspections in the following paragraphs (as applicable) will be performed on all load lifting equipment.
a. Check all mechanical controls for proper adjustments and check the entire control mechanism for excessive wear of components and contamination by leaking lubricants or foreign matter.
b. Check hydraulic system seals, hoses, lines, fittings, pumps, and valves for deterioration, leaks, and wear.
c. Check mast and lift carriage assemblies including forks and chains, for cracks, broken welds, distortion, improper fit, and excessive wear.
(1) Straightness of blade or shank - If deviation from straightness exceeds 0.5% of the length of the blade and/or the height of the shank, the fork shall not be returned to service until it has been repaired.
(2) Fork Angle - Any fork that has a deviation of greater than 3 deg. from the original specification shall not be returned to service until it has been reset and tested.
(3) Difference of Height of Fork Tips - If the difference in the tip heights exceeds 3% of the length of the blade, (2.16“. for 72“ forks and 1.2“ for 40“ forks) the set of forks shall not be returned to service until repaired.
(4) Fork blade and shank wear - If the thickness is reduced 10% of the original thickness, the fork shall not be returned to service.
(a) Only the manufacturer of the fork or an expert of equal competence shall decide if a fork may be repaired for continued use, and the repairs shall only be carried out by such parties.
68
INSTRUCTOR NOTEThe following standards are from ASME (American Society of Mechanical Engineers) B56.1-1993

d. Check the brake and steering systems for excessively worn or defective moving parts to include seat switches, parking brakes, and brake interlock switches.
e. Check electrical, gasoline, and diesel systems for signs of malfunction, excessive deterioration, dirt or moisture accumulation, and compliance with applicable safety regulations.
f. Check protective motor control circuit devices, battery cable connectors, battery compartment insulation, thermo protectors, compartment covers, filters, and emergency switches.
(1) Ensure that all electrical cables are appropriately mounted and protected to prevent damage by abrasion, cutting, or catching on stationary objects.
(2) Ensure that batteries are securely fastened in place to prevent spillage of electrolyte onto electrical cables.
(3) Ensure that battery compartments provide ample ventilation and have openings properly guarded to prevent contact of foreign objects with cell terminals.
(4) Equipment must be clean and free of excessive oil and grease accumulation, particularly within the confines of the motors and on electrical contacts.
g. All deficiencies observed shall be corrected and repairs made prior to load testing (if required).
(ON SLIDE #336, 337)
TRANSITION: We have just covered the forks inspection. Are there any questions? _________________________________________________________________________________________________________________________________________________________________________________
OPPORTUNITY FOR QUESTIONS:
1. QUESTIONS FROM THE CLASS:
2. QUESTIONS TO THE CLASS:
69

a. Fork with angle deviation of ______ from original spec not returned to service until reset and tested?
3 degrees.
b. Inspection performed in addition to those required by TM’s?
ACI
(ON SLIDE #338)
(BREAK 10 MIN)
TRANSITION: Now that we have covered the forks inspection, let us move on to the hook inspection. _________________________________________________________________________________________________________________________________________________________________________________
(ON SLIDE #339-355)
16.H ook I nspection (20 Min)
a. General Inspection. Hooks shall be inspected annually for wear in swivels and pins, other wear, cracks or gouges, and proper operation and condition of safety latches, where installed.
(1) Cracks and gouges parallel to the contour of the hook shall be removed by surface abrasion and shall result in a smooth surface retaining the profile of the hook.
(2) Where cracks and gouges cannot be removed by surface abrasion, the hook shall be discarded.
(3) Where cracks and gouges are transverse to the contour of the hook, the hook shall be evaluated for retention or disposal. Defects in the unstressed portion of the hook do not affect strength.
(4) No attempt shall be made to correct hook deficiencies by use of heat or welding.
70
INSTRUCTOR NOTEUse hook training aids

(5) Where normal wear or removal of cracks or gouges results in a reduction in the original sectional dimension of 10% or more, the hook shall be discarded.
(6) If the hook is visually bent or twisted, it shall be discarded. No attempt shall be made to straighten a bent or twisted hook.
b. Hook Throat Spread. Hooks shall be measured for hook throat spread upon receipt. A throat dimension base measurement shall be established by installing two tram points and measuring the distance between these tram points (+/-1/64”). This base dimension shall be retained in the "remarks" section of the equipment record jacket (NAVMC 696D) for the life of the hook. Hooks showing an increase in the throat opening by more than 15% from the base measurement shall be discarded.
c. Hook Block Inspection and Nondestructive Test. The hook, retaining nut, and bearings shall be thoroughly inspected annually. The hook and retaining nut shall be visually examined for thread wear and corrosion damage. The block bearing plate shall be visually inspected for cracks, wear, or other damage. Bearings shall be inspected for unusual wear and free rotation. All components shall be lubricated as required. The entire hook and retaining nut assembly shall be nondestructively tested for structural defects.
d. The nondestructive test of general-purpose service crane hooks is valid for five certification periods. The effective date of hook inspection and nondestructive test shall be the crane certification date. Nondestructive tests shall be performed during load tests. Five years after crane certification, a hook that has been with said crane that entire time will be subject to a new nondestructive test.
INTERIM TRANSITION: Are there any questions on Hook inspections before we go into the demonstration?
(ON SLIDE #356)
INSTRUCTOR NOTEPerform the following demonstration.
71

DEMONSTRATION. (30 MIN) Using the hook training aids, demonstrate the proper way to inspect the hook and measure hook throat spread.1. Inspection
a) Inspect for crack/gouges parallel and traverse of the contour of the hook.2. Hook throat spread a) Locate tram points.
b) Position dial calipers between tram points on hook throat opening. Ensure the dial is facing the students while you explain how it is read.
c) Restate how the measurements are documented on the 696D.
STUDENT ROLE: Observe process and ask questions.
INSTRUCTOR(S) ROLE: Demonstrate how to properly conduct the inspection.1. Safety Brief: Ensure the training aid is in constant contact with the table to prevent it from falling.2. Supervision & Guidance: Students will be encouraged to ask questions and make notes on their application.3. Debrief: Are there any questions or comments concerning the hook?
(ON SLIDE #357, 358)
TRANSITION: Are there any questions concerning the hook inspection or the demonstration we just done? _________________________________________________________________________________________________________________________________________________________________________________
OPPORTUNITY FOR QUESTIONS:
1. QUESTIONS FROM THE CLASS
2. QUESTIONS TO THE CLASS:
a. What are two types of hook block inspections and what are the intervals?
Hook inspection/NDT, Annually/every 5 years
b. If a hook is visibly bent or twisted what do you do?
72

Discard it.
(ON SLIDE #359)
(BREAK – 10 Min)
TRANSITION: Now that we have covered the annual condition inspection and hook inspection let us now talk about the inspection of wire rope and hardware._________________________________________________________________________________________________________________________________________________________________________________
(ON SLIDE #360-370)
17.I nspection of W ire R ope, F astenings, and T erminal H ardware (20 Min)
a. General Procedures. Remove the wire rope dressing from those areas exposed to maximum wear, exposure, and abuse. Inspect for crushing, kinks, corrosion, or other damage, broken wires, and proper lubrication. Check the wire rope sockets, swage fittings, eyes, swivels, trunnions, stays, pendants, and securing hardware for wear, cracks, corrosion, and other damage. The drum end fittings need only be disconnected and/or disassembled when visible evidence of deterioration deems it necessary.
b. Wire Rope Rejection Criteria. Remove the damaged portions, or replace all wire rope exceeding the following:
(1) Kinks or Crushed Sections. Severe kinks or crushed rope in straight runs where the core is forced through the outer strands or wires are damaged. (This does not apply to runs around eyes, thimbles, and shackles.)
(2) Flattened Sections. Flattened sections where the diameter across the flat is less than five-sixth (5/6) of original diameter. (This does not apply to runs around eyes, thimbles, and shackles.)
73
INSTRUCTOR NOTEShow students examples of wire rope and show parts of the wire rope.

(3) Wear. Not to exceed 30 percent the original diameter of outside individual wires.
c. Broken Wires.
(1) Running Ropes. The number of broken or torn wires is six or more randomly distributed broken or torn wires in one lay or three broken wires in one strand in one lay. Replace the end connection if there is one or more broken wires adjacent to the end connection.
(2) Standing, Guy, and Boom Pendant Ropes. More than two broken wires in one lay in sections beyond the end connection or one or more broken wires at an end connection.
(3) Loss in Diameter: Not to exceed 10 percent of the nominal diameter of the wire rope. Use calipers when measuring wire rope, and if reduction from nominal diameter is 3/64 inch or more, for 3/4 in. wire rope and 1/32 in. for 1/2 in. wire rope. Then wire rope must be replaced. Measurements should be about every six to seven feet apart for the entire length of the wire rope.
(4) Accumulation of Defects. An accumulation of defects that in the judgment of the inspector creates an unsafe condition.
(5) Rated Capacity. The rated capacity of the replacement wire rope for all cranes shall be per the manufacturer’s stated requirements.
(ON SLIDE #371, 372)
TRANSITION: We have covered the wire rope and hardware inspections are there any question? ___________________________________________________________________________________________________________________________________________________________________________________________________
OPPORTUNITY FOR QUESTIONS:
1. QUESTIONS FROM THE CLASS
2. QUESTIONS TO THE CLASS:
a. What is the wire rope rejection criterion on wear?
30% of outside individual wires.
74

b. What is the wire rope rejection criterion on loss of diameter?
Not to exceed 10% of nominal diameter.
(ON SLIDE #373)
(BREAK 10 MIN)
TRANSITION: Now that we have covered the wire rope and hardware inspection are there any question? Now let’s continue on with the remaining components.___________________________________________________________________________________________________________________________________________________________________________________________________
(ON SLIDE #374-377)
18.H oist, W inches, and S tructural M etal C omponents (20 MIN)
a. Operation Check. The operator shall perform an operation check as prescribed in the appropriate TM. For equipment where such checklist is not included in the TM the following inspections shall be conducted as a minimum requirement:
(1) Inspect all control mechanisms for maladjustment which could interfere with proper operation.
(2) Inspect all control mechanisms for excessive wear of components and contamination by lubricants or other foreign matter.
(3) Inspect all safety and locking devices for malfunction.
b. Condition Inspection.
During each annual certification, inspect for the following, as applicable:
1. General Information:
(a) Check for proper marking.
(b) Check for evidence of mishandling and/or damage.
75

(c) Check for excessive wear on brake and clutch system linings, pawls and ratchets.
(d) Check rope reeving for nonconformance with manufacturer’s specifications.
(e) Inspect sheaves for cracks, wear, and wire rope imprint.
c. Frames. Check for bends, distorted sections, broken welds, excessive corrosion, and loose bolts or rivets.
TRANSITION: Now that we have covered all the checks for the annual condition inspection are there any questions? Now we are going to cover the recording requirements._________________________________________________________________________________________________________________________________________________________________________________
(ON SLIDE #378-381)
19.Recording Requirements (5 MIN)
a. The form contained in TM 4700-15/1 Pg 2-25-1 shall be used for recording (as applicable) the annual condition inspection of load lifting equipment.
b. Load tests, when required, will be recorded and certified as shown in the form contained in TM 4700-15/1 Pg 2-26-1.
c. Annual condition inspection of load lifting equipment will be filed in the equipment record jacket (NAVMC 696D) and retained until successful completion of the next inspection/test.
d. Load test certification forms will be filed in the equipment record jacket (NAVMC 696D) and retained until successful completion of the next inspection/ test; however, the load test certification which documents the completion of the nondestructive tests shall be retained until completion of the next nondestructive test.
e. Additionally, the date of the nondestructive test will be annotated in the "remarks" section of forms NAVMC 696D and NAVMC 10395.
(ON SLIDE #382-383)
76

TRANSITION: We have covered the Hoist, Winches, and Structural Metal Components and Recording requirements. Are there any question?
OPPORTUNITY FOR QUESTIONS:
1. QUESTIONS FROM THE CLASS
2. QUESTION TO THE CLASS:
a. How long are ACI’s retained?
Until successful completion of the next inspection/test
INTERIM TRANSITION: Are there any more question? Let’s move into the demonstration ___________________________________________________________________________________________________________________________________________________________________________________________________
(ON SLIDE #384)
INSTRUCTOR NOTEPerform the following demonstration.
DEMONSTRATION (1 HR) Using the wire rope, hardware, and sheave training aids demonstrate the proper way to inspect, reject, document and record defects. 1. Inspection a) Inspect wire ropes for kinks, crushes, flattened sections and wear. Ensure you explain to the students, using the training aids, what exactly they should be looking for. Also restate that they will never use marlin spikes. b) Inspect hook block end connections. Take the students outside and show them an actual horses head for this demonstration. c) Inspect sheaves (Block and Horses Head). Use the sheave gauge, ensuring that all students can see. Ensure to rotate the sheave at least twice during the inspection. 2. Rejection criteria a) An accumulation of defects will determine if the wire rope is rejected.
b) Determine if the item meets the rejection criteria. 3. Document and recording defects/discrepancies
77

a) Properly document the defects/discrepancies on the ACI checklist.
STUDENT ROLE: Observe process and ask questions.
INSTRUCTOR(S) ROLE: Demonstrate how to properly conduct the inspection.1. Safety Brief: Ensure the training aid is in constant contact with the table to prevent it from falling.2. Supervision & Guidance: Students will be encouraged to ask questions and make notes on their application.3. Debrief: Are there any questions or comments concerning the inspection, rejection, documentation or record defects?
(ON SLIDE #385)
(BREAK 10 MIN)
TRANSITION: Now that we have covered how a condition inspection is done are there any more questions? If not let’s move on to what resources are required to perform load tests._________________________________________________________________________________________________________________________________________________________________________________
(ON SLIDE #386-389)
20.F acilities R equired (5 MIN)
The following facilities are required for load testing mobile cranes and aerial personnel devices.
a. A sufficiently large, level hardstand.
b. A deadman strong enough to withstand at least 150% of the area's largest mobile crane's capacity.
c. A calibrated Baldwin SR-4 load cell, or its equivalent, with a capacity of measuring at least 150% of the area's largest mobile crane's capacity.
d. Calibrated weights heavy and dense (compact) enough to be used in the load tests described.
(1) MCB, Camp Pendleton, California and MCLB, Barstow, California presently possess well-designed deadman/load lifting
78

measuring devices. Liaison with these installations is encouraged to determine data required to build similar facilities at other Marine Corps installations.
TRANSITION: Now they we have covered what resources are required to perform load tests. Are there and questions? Let’s talk about some general information on the test itself._________________________________________________________________________________________________________________________________________________________________________________
(ON SLIDE #390-392)
21.Load Test General Information (10 MIN)
a. Prescribed tests are overload tests and extreme caution should be observed at all times. When testing hydraulic boom cranes, an outrigger opposite a load positioned at a swing angle of 450, 1350, 2250, and 3150 (Measured from the front of the vehicle as 00) may rise off the ground. This is not tipping. At no time during testing should two outriggers of a hydraulic boom crane rise off the ground. If this condition occurs, testing should immediately be terminated by lowering the test load to the ground. A condition inspection per the instructions contained in paragraph 2000, of MCO P11262.2, will be conducted prior to load testing.
b. Personnel shall remain clear of suspended loads and areas where they could be struck in the event of boom failure.
c. The test load should be raised only to a height sufficient to perform the test.
d. Items of Marine Corps equipment shall not be used as load testing weights.
e. Safety chains attached to outriggers on the side opposite the lift are recommended to preclude accidental rollover during maximum (overload) testing.
79
INSTRUCTOR NOTEBrief students on the “Interim policy and procedures for the inspection, testing, and certification of Marine Corps tactical ground load lifting equipment during continuous combat operations.” Dated 15 Apr 2011

f. Wooden cribbing under the crane's counterweight is recommended to prevent rear rollover in the event a wire rope or hook fails during maximum (overload) testing.
(ON SLIDE #393, 394)
TRANSITION: We have just covered facilities required and general information. Are there any questions? _________________________________________________________________________________________________________________________________________________________________________________
OPPORTUNITY FOR QUESTIONS:
1. QUESTIONS FROM THE CLASS
2. QUESTIONS TO THE CLASS:
a. How strong should a DEADMAN be for load test?
150% of areas largest crane capacity.
b. What item of MC gear can be used for load testing?
NONE
(ON SLIDE #395)
(BREAK 5 MIN)
TRANSITION: Now that we have covered some general testing information, are there any more questions? Now let us get into the actual testing procedures._________________________________________________________________________________________________________________________________________________________________________________
(ON SLIDE #396-409)
22. Cranes Testing (30 MIN)
a. Extend outriggers and raise the crane carrier off the ground to completely unload tires or wheels. Level the crane as required by the manufacturer's load chart. Rotate the boom 900 from the longitudinal axis of the crane carrier and position the boom at the minimum working radius.
80

b. No-Load Test
(1) Hoist:
(a) Raise and lower the hook through the full working distance of hook travel.
(b) Run the hoist block into the limit switch(es) (where installed) at slow speed.
(c) Run the hoist block beyond the limit switch(es) (where installed) by using the bypass switch.
(2) Boom:
(a) Raise and lower the boom through the full working range.
(b) Raise the boom into the upper limit switch (where installed) Raise the boom past the boom upper limit switch, using the bypass switch.
(c) Test the lower limit switch (where installed) by the same procedure prescribed for testing the upper limit switch.
(d) Extend and retract the telescoping boom sections the full distance of travel.
(e) Check the radius indicator by measuring the radius at the minimum and maximum boom angle.
(f) Other motions, including swing, shall be operated through one cycle (one full revolution of major components).
c. Load Test. The load test consists of two parts: a maximum load test and a stability test. The tests will be performed in the following sequence:
(1) Maximum Test
(a) Position the crane with the boom at maximum prescribed lift angle, hook attached to the load lifting measuring device, with the position of the boom 900 to the right or left of the lower carrier frame, outriggers must be at full horizontal extension and vertical jacks lowered to level the turntable bearing. Check level with carpenter's level. Place level in direction of boom and at 900 to direction of boom to
81

establish a level turntable. Tires must be free of ground for test, and the wire rope connecting the hook to the boom in a vertical configuration (check wire rope with carpenter's level).
(b) Exert 110% of the crane's rated capacity on the load lifting measuring device and hold for one minute. Slowly decrease load until wire rope is barely slack. Repeat this test once more. The hook will be inspected per the procedures in paragraph 5 of this student outline. This will serve as the nondestructive hook test.
(2) Stability Test
(a) Choose any load from the load chart below the black (bold) line of the rated load 3600 chart. All weights above the bold line are in the structural strength portion of the load chart, and all weight below the bold line are in the stability portion. The test load must be able to clear outriggers during full 3600 rotation.
(b) Position of the crane for the lift is to be either right or left side at 900 to side of the lower carrier frame.
(c) Outriggers must be at full horizontal extension and vertical jacks lowered to level the turntable bearing. Check the level of the crane deck or frame with carpenter's level. Place the level in the direction of boom and at 900 to the direction of boom to establish a level turntable. Tires must be free of the ground for the test.
(d) Position the hook block in a manner to obtain the appropriate operating test radius for test boom length. Confirm the test radius by the actual measurement of the operating radius from the hook to the center of rotation. Adjustment may be necessary to obtain the specified radius.
(e) Mark the operating radius with a line of sufficient length to ensure its visibility when the load is suspended over it. The line should be on an arc about the axis of rotation for the tested radius.
(f) Position the test load inside the selected operating radius. The "rated load" is equal to the test weight plus hook-block weight (approximately 620 lbs) plus sling weight.
(g) Boom up 20 to 40 to position the hook block over the load and to compensate for boom deflection. Lift the rated
82

load. Boom down while keeping load close to ground until the rated load and hook block is centered over the selected operating radius and suspends the rated load 2” to 4” above the ground.
(h) Swing the crane through the 3600 rotation.
(i) Lower load.
(ON SLIDE #410, 411)
TRANSITION: We just talked about the testing of the crane itself. Are there any questions?_________________________________________________________________________________________________________________________________________________________________________________
OPPORTUNITY FOR QUESTIONS:
1. QUESTIONS FROM THE CLASS
2. QUESTIONS TO THE CLASS:
a. How do you confirm proper radius?
By actual measurement.
b. What is the max capacity of a load test?
110%
TRANSITION: We just talked about the testing of the crane itself, let us talk about the man basket._________________________________________________________________________________________________________________________________________________________________________________
(ON SLIDE #412, 413)
23.A erial P ersonnel D evices (5 MIN)
a. General Information. The sequence of inspections shall be condition inspection, no-load test, and load test.
b. Pre-operation. The operator shall perform a pre-operation check as prescribed in the appropriate TM's. For equipment where such a checklist is not included in the manual, the following shall be conducted as a minimum requirement:
83

(1) Position the vehicle on the test site.
(2) Check for proper markings.
(3) Carefully inspect all safety devices, including all specialized features.
c. Condition Inspection. This inspection shall be conducted per the instructions contained in paragraph 2000 of MCO P11262.2.
d. Load Test (Stability and Range of Movement). The load test shall be conducted with the vehicle not fastened to any artificial base and the outriggers in place. All tests shall be conducted using the ground level controls. At no time will personnel be permitted to ride on the platform (basket). The platform shall be loaded with an evenly distributed load equal to twice the rated working load and exercised through the full range of horizontal and vertical positions, to include at least the following:
(1) The upper and lower arms are moved to a horizontal or their most horizontal plane and extended to the maximum reach.
(2) The lower arm is moved to a horizontal or near horizontal position over the side of the vehicle and the upper arm is moved to the most vertical position possible.
(3) With the lower arm at the maximum travel from the towed position and the upper arm both horizontal and 450 to the side of the vehicle, or over the four corners of the vehicle, rotate the turntable both clockwise and counterclockwise with the test load through 3600 for a minimum of 15 minutes.
(ON SLIDE #414, 415)
TRANSITION: We just talked about Aerial Personnel Devices. Are there any questions?_________________________________________________________________________________________________________________________________________________________________________________
OPPORTUNITY FOR QUESTIONS
1. QUESTIONS FROM THE CLASS?
2. QUESTIONS TO THE CLASS.
84

a. How much weight is used to test aerial personnel devices?
Twice the rated working load.
b. While testing a aerial personnel device, the turntable is rotated a minimum of how long?
15 Minutes
(ON SLIDE #416)
(BREAK/END OF TRAINING DAY)
INTERIM TRANSITION: Are there any questions about anything we have covered before moving into the practical application?
(ON SLIDE #417)
85
INSTRUCTOR NOTEIntroduce the following Practical Application.
PRACTICAL APPLICATION. (6 HOURS) Have the students conduct an Annual Condition Inspection (ACI) and load test on a MAC-50 and LRT-110 crane and an ACI on a TRAM.
PRACTICE: Students will conduct the following; a) Use the Annual Condition Inspection checklist to conduct the proper ACI. b) Use the required equipment (Dead man, Dynamometer, dial caliper, 100’ tape, electronic level, and calibrated weights) to conduct a proper load test.
PROVIDE HELP: Observe the students and answer questions.1. Safety Brief: Ensure that all students are wearing proper PPE while conducting inspection/testing. Ensure that all students remain clear of all training aids that are suspended or moving. A ground guide will be used during all lifting operations.2. Supervision & Guidance: Be sure to follow the checklist step by step as covered in the student outline along with the instructor’s supervision.3. Debrief: Are there any questions or comments concerning the conduct of the ACI and load test. To ensure that your equipment is capable to perform the required mission it is paramount that the inspection and testing is completed correctly and when required.

TRANSITION: Are there any questions concerning the practical application or anything else we have covered?
(ON SLIDE #418, 419)
OPPORTUNITY FOR QUESTIONS
1. QUESTIONS FROM THE CLASS?
2. QUESTIONS TO THE CLASS.
a. Who is required to sign a finished ACI?
Certifying Officer, Test Director, and Inspector
b. What equipment requires a ACI
All load lifting equipment
(ON SLIDE #420)
SUMMARY: (10 min)
During this period of instruction we have covered the basic rigging fundamentals, inspection, maintenance, start up, safety procedures, proper handling of a load, factors affecting lifting capacities, load charts, hand and arm signals, the LRT 110 crane, Mac 50 crane, Controls, instruments and functions of the MAC 50, and the attachments and Employment of the MAC 50. Also we covered, load-lifting requirements, how to conduct inspection, testing, and certification of tactical ground load lifting equipment as well as load testing of equipment. Now that you have a better understanding of load testing and inspection procedures you can now conduct, supervise and manage your testing program. The Marines that have the IRF, finish filling them out and hand them to the instructor the remainder of the class take a 15 minute break.
INSTRUCTOR NOTE
86

Ensure to collect all IRF’s and safety questioners handed out.
REFERENCES:
Ground Equipment Record Procedures TM 4700-15/1_Inspection, Testing, and Certification of TacticalGround Load Lifting Equipment MCO P11262.2Operation/maintenance manual with repair part list TM 09166B-14&POperations and Operator/Crew Maintenance Manual for all- terrain crane TM 11262A-OR/3Operators manual for crane, wheel mounted, hydraulic, light, 7 ½ ton rough terrain crane TM 5-3810-305-10
87