compatibility report - comtrol corp600_f.pdf · test report overview the microsonic lcs+600/f...
TRANSCRIPT
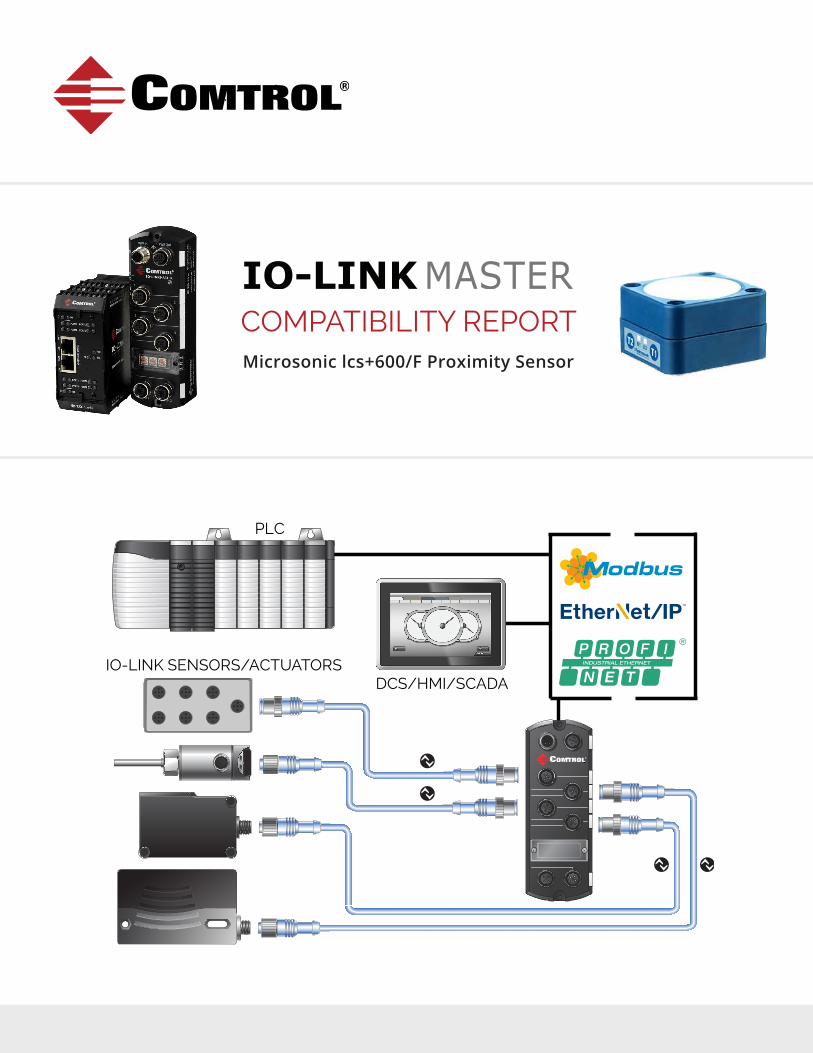
COMPATIBILITY REPORT
Microsonic lcs+600/F Proximity Sensor
PLC
DCS/HMI/SCADA
IO-LINK SENSORS/ACTUATORS
Table of Contents
Table of Contents .................................................................................................................................................................... 2
Test Report Overview ............................................................................................................................................................. 3
IO-Link Master – IO-Link Diagnostics Page ............................................................................................................................ 3
Configuring IO-Link Settings Settings ..................................................................................................................................... 4
After Configuring Friendly Port Names ................................................................................................................................ 5
Setting Up Passwords ............................................................................................................................................................. 6
IO-Link Device Configuration .................................................................................................................................................. 7
Loading the IODD Files ....................................................................................................................................................... 7
Verifying that the Correct IODD Files Loaded ................................................................................................................... 10
Changing Parameters in the Proximity Sensor with the GUI ............................................................................................ 11
Resetting the Sensor to Factory Defaults .......................................................................................................................... 14
Changing Parameters Using the ISDU Interface............................................................................................................... 16
Using the Device Validation Feature ..................................................................................................................................... 18
Incompatible Device Attached to Port ............................................................................................................................... 18
Compatible Device Attached to Port ................................................................................................................................. 19
2/26/2015 Microsonic LCS+600/F (Sensor #20 and #37) 2
Test Report Overview
The Microsonic lcs+600/F proximity sensor operates properly with the Comtrol IO-Link Master. This report contains the following topics:
• IO-Link Master – IO-Link Diagnostics page
• Configuring IO-Link settings
• Setting up passwords
• IO-Link device configuration
• Using the data storage feature
• Using the device validation feature
The sensors were tested using Application Base v1.3.8 on the IO-Link Master 4-EIP (machine mountable IP67). This report does not illustrate all Comtrol IO-Link Master features, such as: EtherNet/IP and Modbus/TCP configuration, uploading the latest software, or network configuration.
In addition, Data Storage is not illustrated, as this is an IO-Link v1.0 device. Data Storage is an IO-Link v1.1 feature.
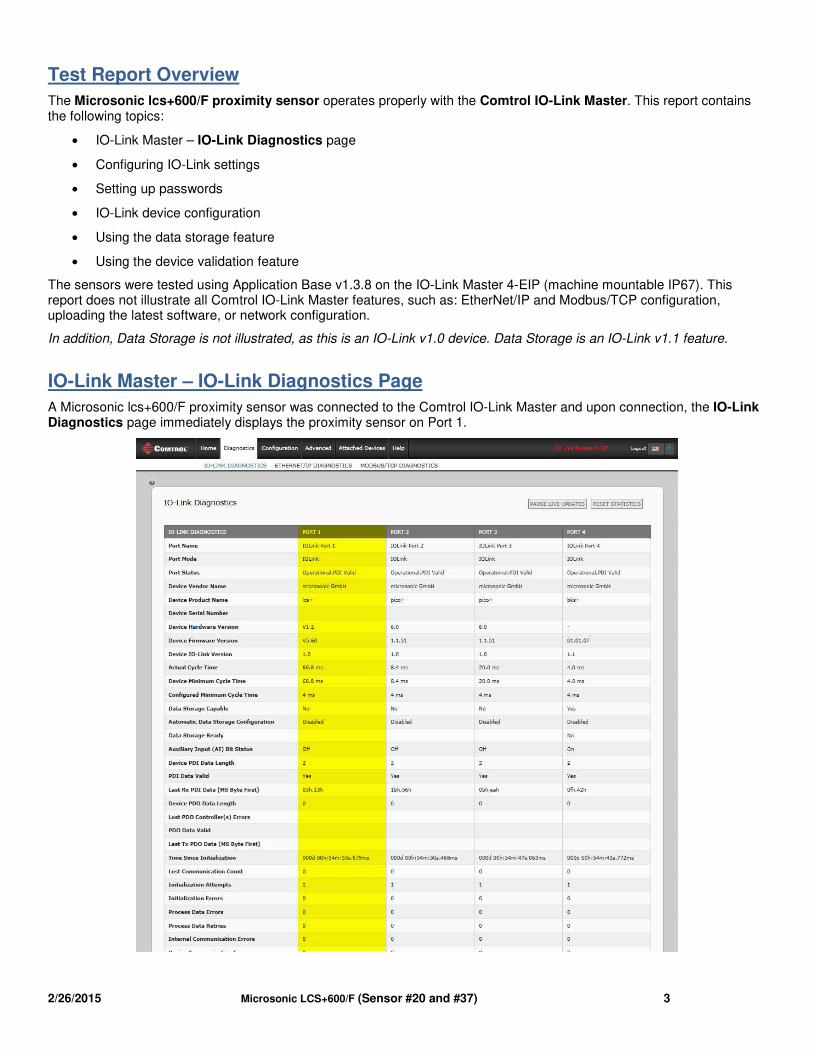
IO-Link Master – IO-Link Diagnostics Page
A Microsonic lcs+600/F proximity sensor was connected to the Comtrol IO-Link Master and upon connection, the IO-Link Diagnostics page immediately displays the proximity sensor on Port 1.
2/26/2015 Microsonic LCS+600/F (Sensor #20 and #37) 3
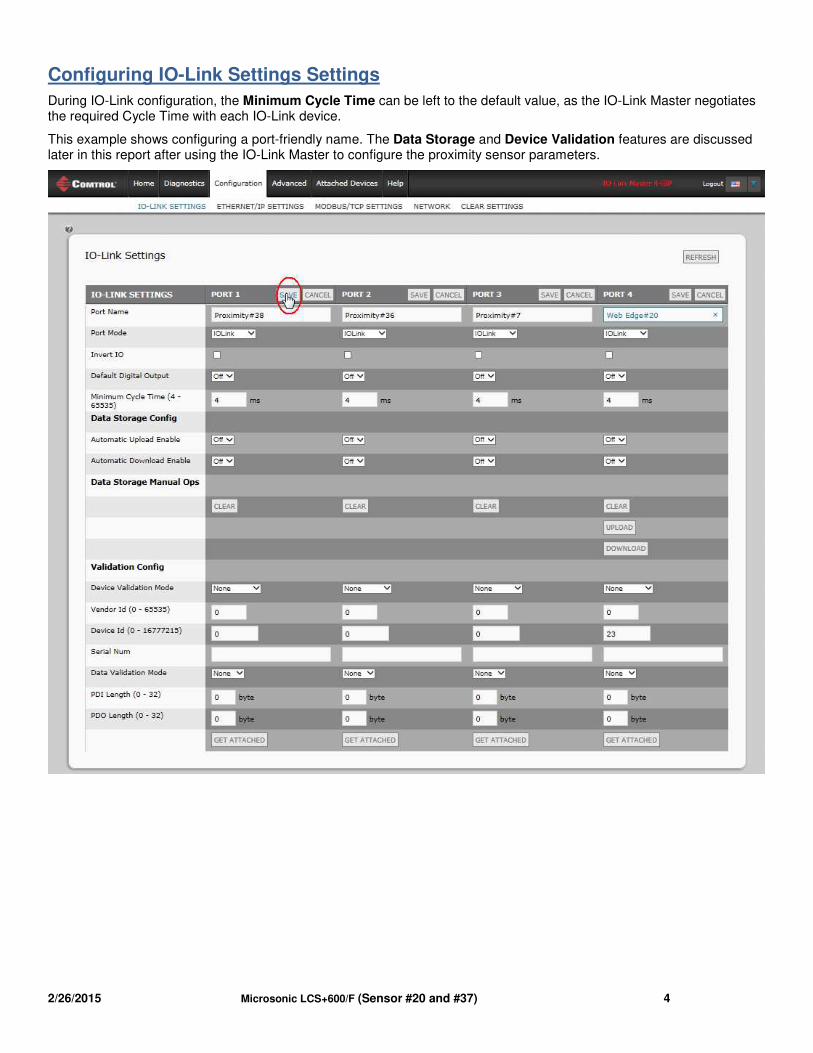
Configuring IO-Link Settings Settings
During IO-Link configuration, the Minimum Cycle Time can be left to the default value, as the IO-Link Master negotiates the required Cycle Time with each IO-Link device.
This example shows configuring a port-friendly name. The Data Storage and Device Validation features are discussed later in this report after using the IO-Link Master to configure the proximity sensor parameters.
2/26/2015 Microsonic LCS+600/F (Sensor #20 and #37) 4
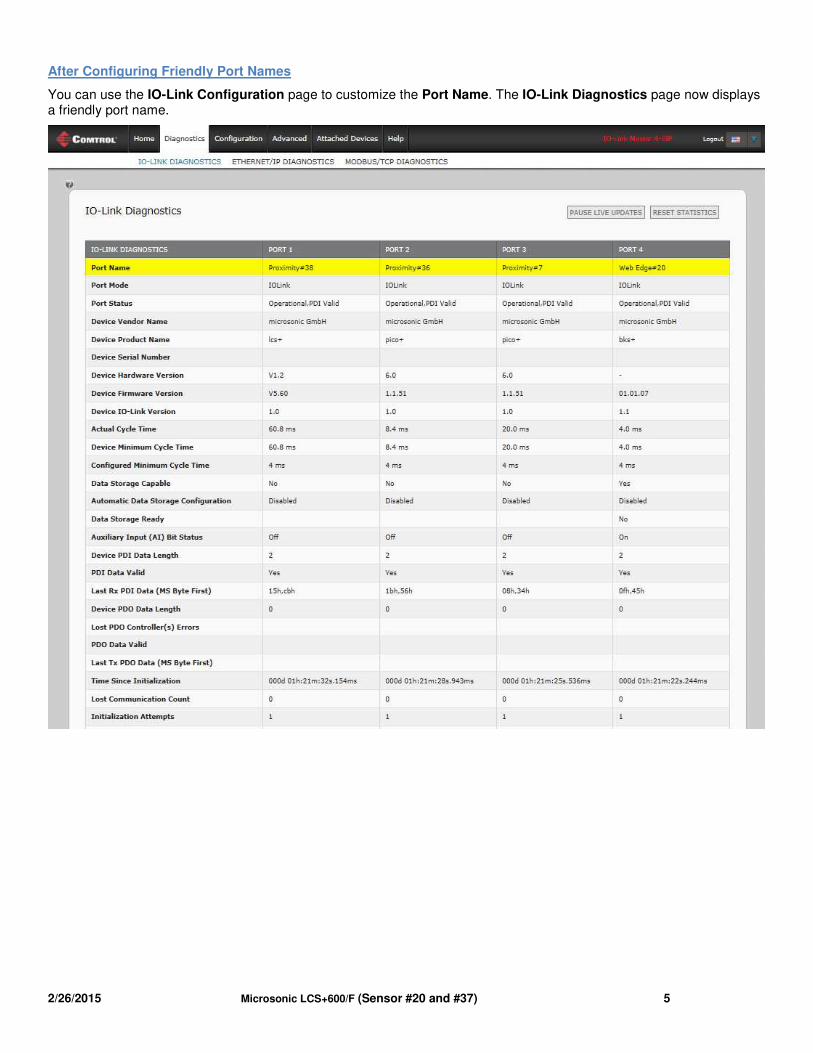
After Configuring Friendly Port Names
You can use the IO-Link Configuration page to customize the Port Name. The IO-Link Diagnostics page now displays a friendly port name.
2/26/2015 Microsonic LCS+600/F (Sensor #20 and #37) 5
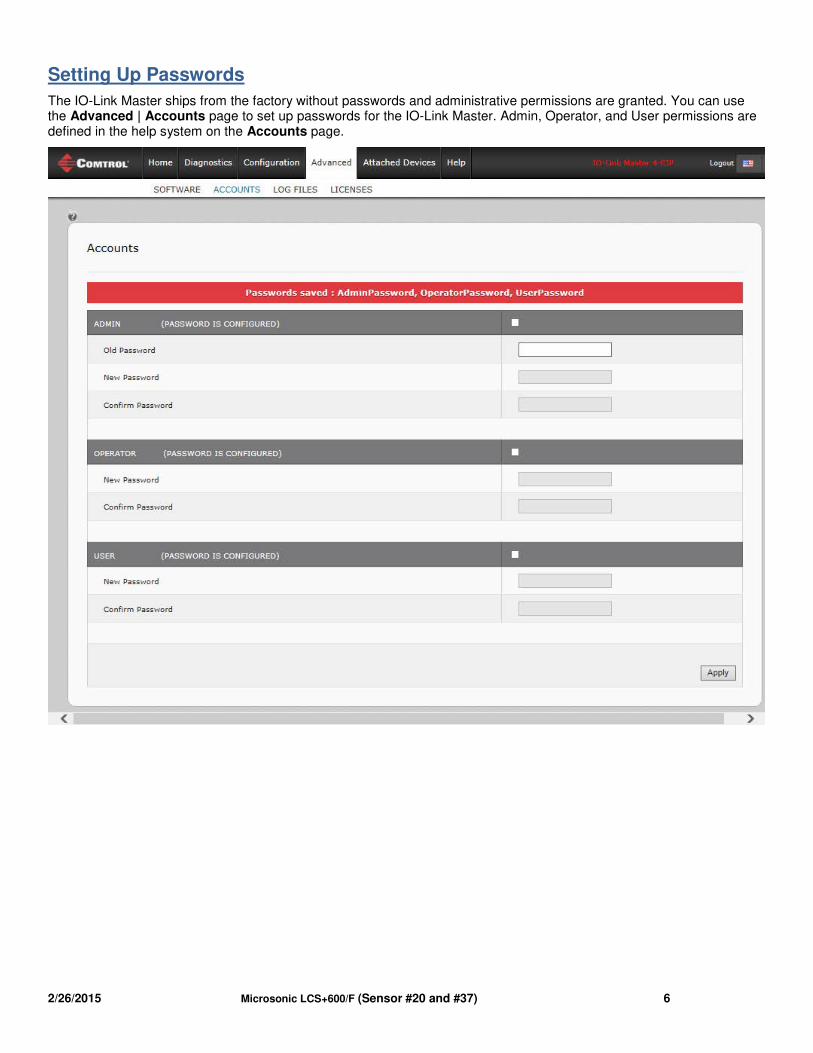
Setting Up Passwords
The IO-Link Master ships from the factory without passwords and administrative permissions are granted. You can use the Advanced | Accounts page to set up passwords for the IO-Link Master. Admin, Operator, and User permissions are defined in the help system on the Accounts page.
2/26/2015 Microsonic LCS+600/F (Sensor #20 and #37) 6
IO-Link Device Configuration
You can use the Comtrol IO-Link Master to configure the IO-Link device.
• If an IODD file is loaded, you may want to use the IO-Link Device Description table on the Attached Devices | Port page to change parameter settings.
• If an IODD file is not loaded, you can use the ISDU Interface on the Attached Devices | Port page to change parameter settings.
This section discusses the following topics:
• Loading IODD files
• Verifying that the correct IODD file is loaded
• Changing IO-Link device parameters using the IO-Link Device Description table (GUI)
• Resetting to the IO-Link device to factory defaults
• Changing IO-Link device parameters using the IO-Link Device ISDU Interface
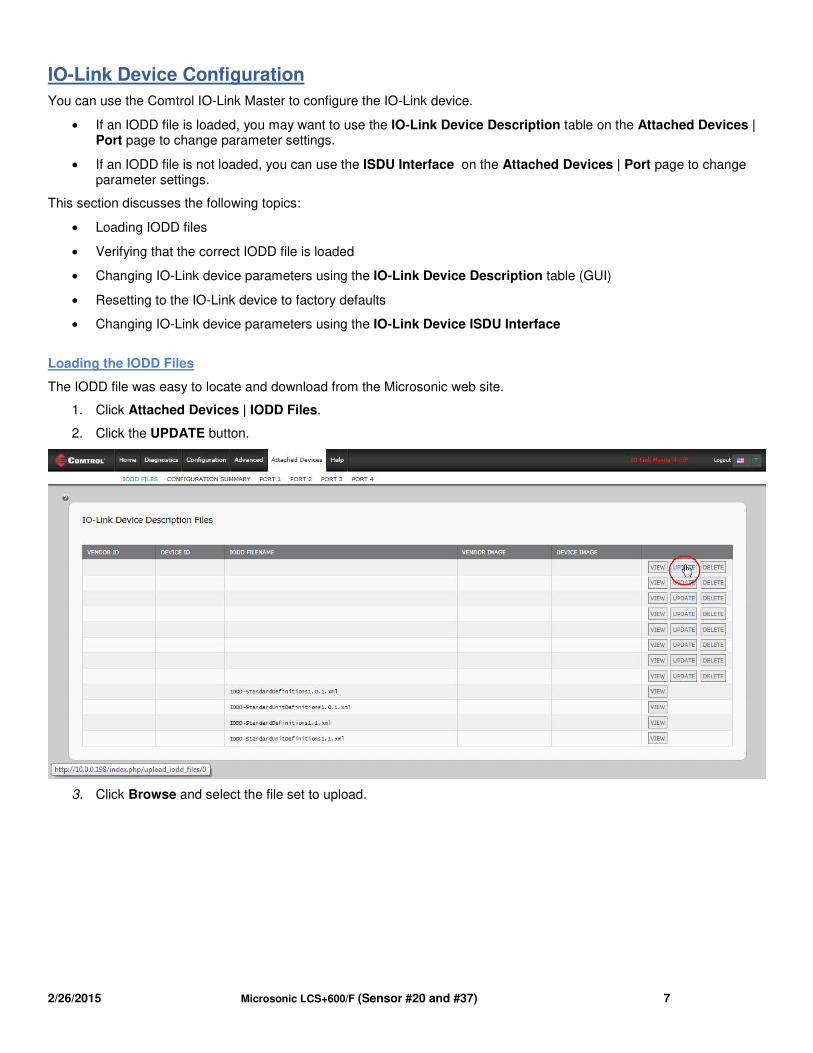
Loading the IODD Files
The IODD file was easy to locate and download from the Microsonic web site.
1. Click Attached Devices | IODD Files.
2. Click the UPDATE button.
3. Click Browse and select the file set to upload.
2/26/2015 Microsonic LCS+600/F (Sensor #20 and #37) 7
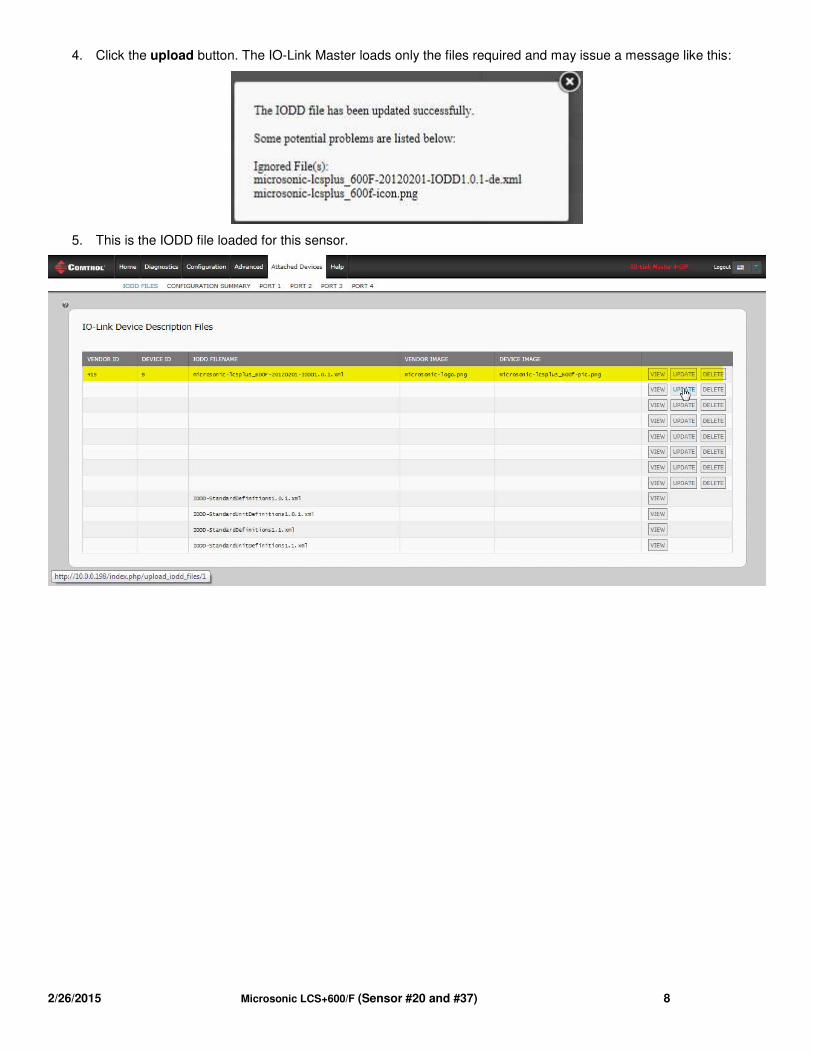
4. Click the upload button. The IO-Link Master loads only the files required and may issue a message like this:
5. This is the IODD file loaded for this sensor.
2/26/2015 Microsonic LCS+600/F (Sensor #20 and #37) 8
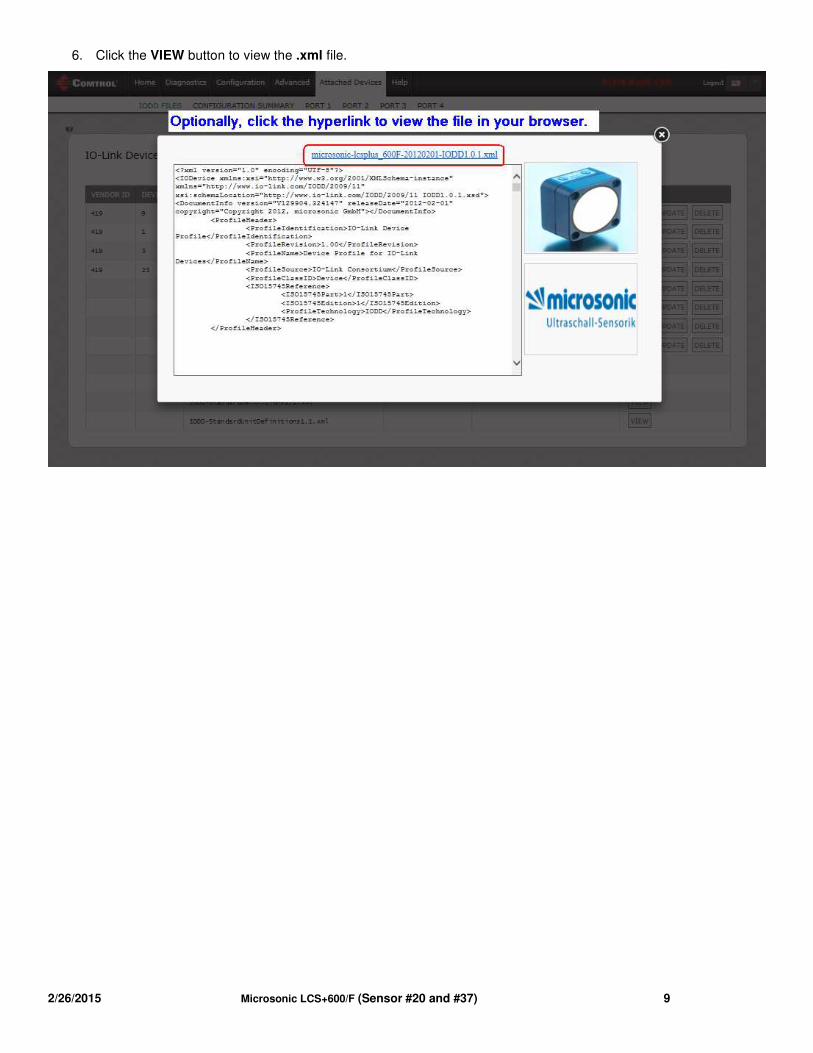
6. Click the VIEW button to view the .xml file.
2/26/2015 Microsonic LCS+600/F (Sensor #20 and #37) 9
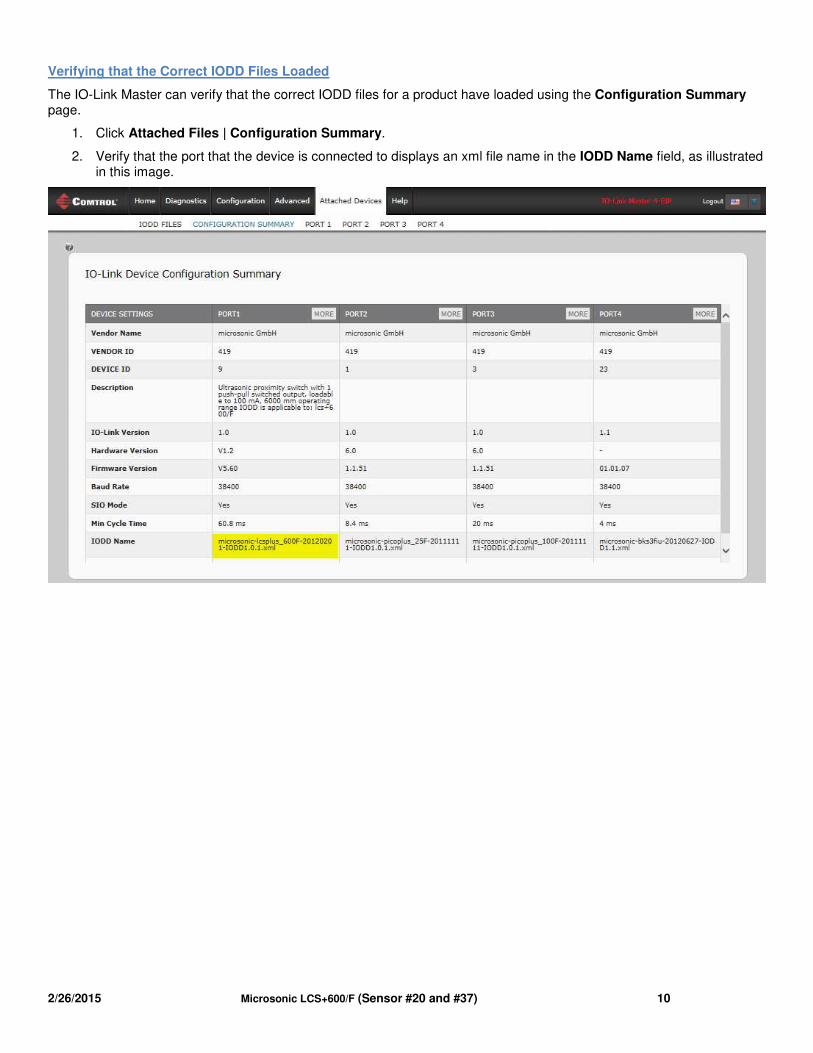
Verifying that the Correct IODD Files Loaded
The IO-Link Master can verify that the correct IODD files for a product have loaded using the Configuration Summary page.
1. Click Attached Files | Configuration Summary.
2. Verify that the port that the device is connected to displays an xml file name in the IODD Name field, as illustrated in this image.
2/26/2015 Microsonic LCS+600/F (Sensor #20 and #37) 10
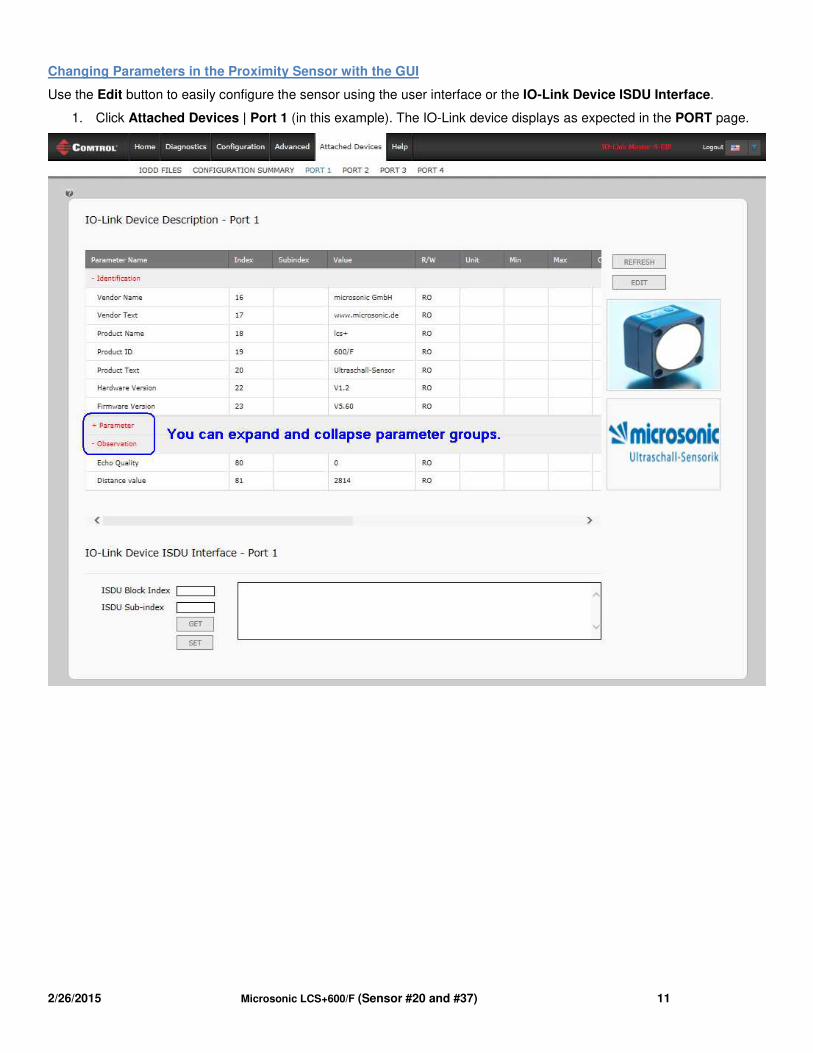
Changing Parameters in the Proximity Sensor with the GUI
Use the Edit button to easily configure the sensor using the user interface or the IO-Link Device ISDU Interface.
1. Click Attached Devices | Port 1 (in this example). The IO-Link device displays as expected in the PORT page.
2/26/2015 Microsonic LCS+600/F (Sensor #20 and #37) 11
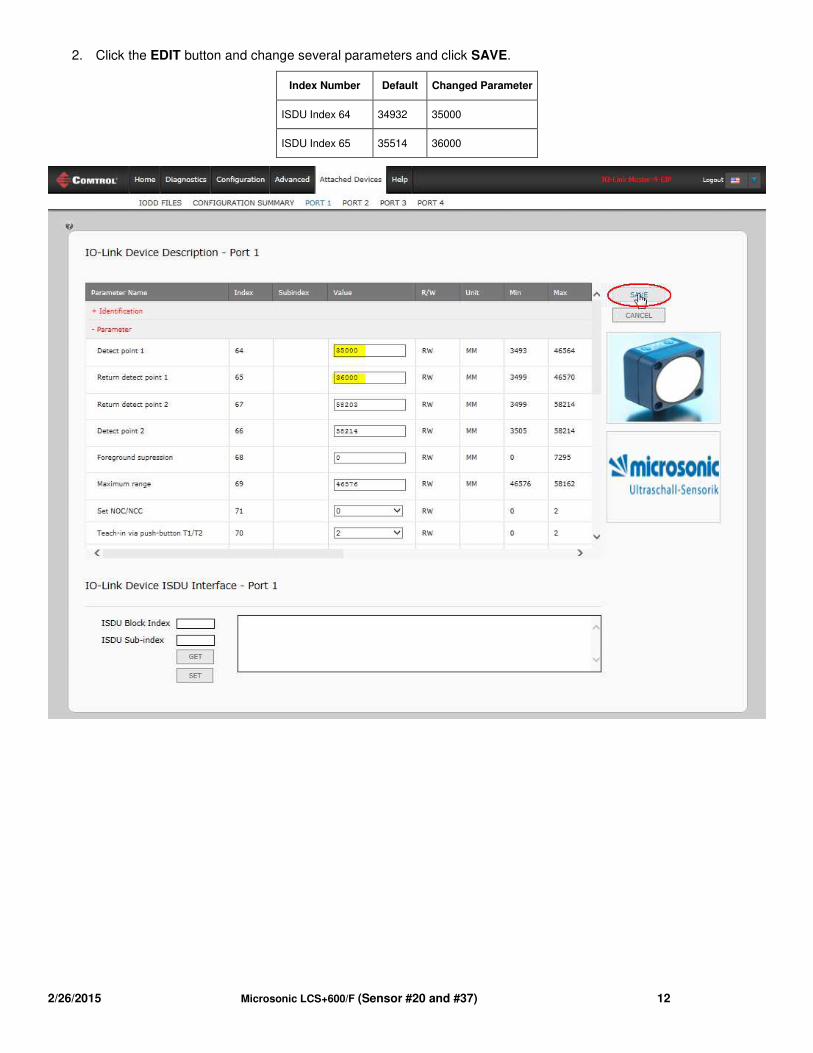
2. Click the EDIT button and change several parameters and click SAVE.
Index Number Default Changed Parameter
ISDU Index 64 34932 35000
ISDU Index 65 35514 36000
2/26/2015 Microsonic LCS+600/F (Sensor #20 and #37) 12

3. Click the REFRESH button to verify the changes have occurred.
2/26/2015 Microsonic LCS+600/F (Sensor #20 and #37) 13
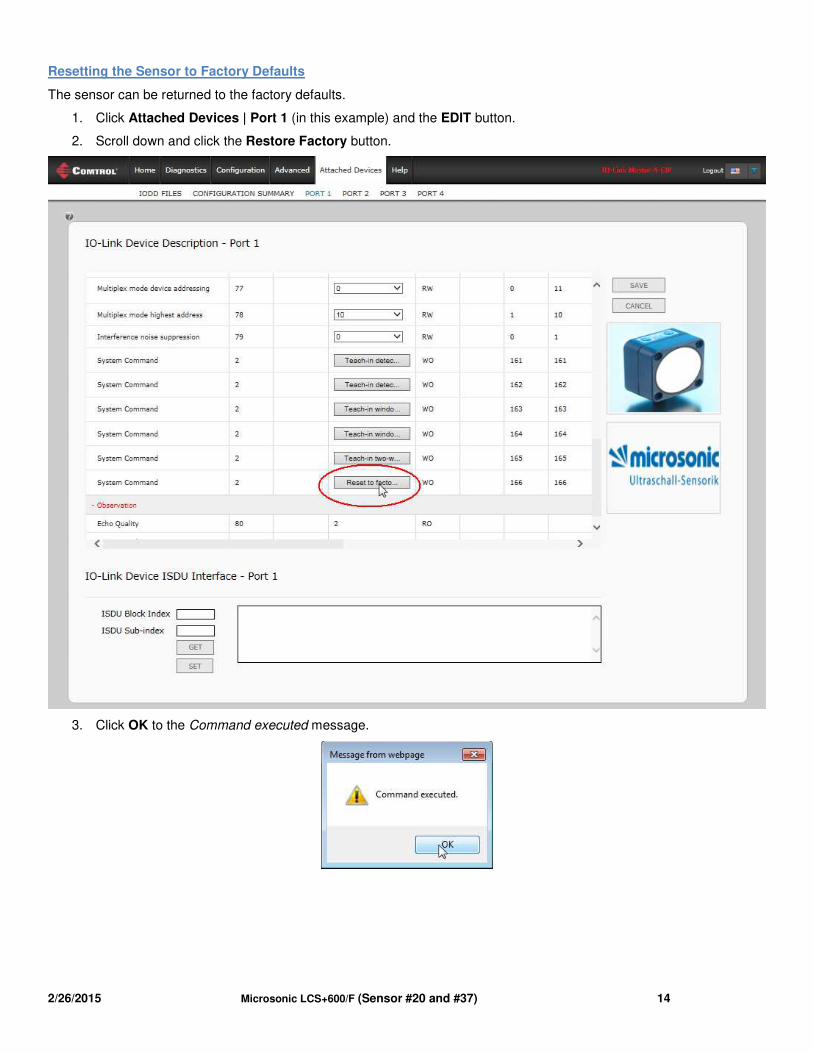
Resetting the Sensor to Factory Defaults
The sensor can be returned to the factory defaults.
1. Click Attached Devices | Port 1 (in this example) and the EDIT button.
2. Scroll down and click the Restore Factory button.
3. Click OK to the Command executed message.
2/26/2015 Microsonic LCS+600/F (Sensor #20 and #37) 14
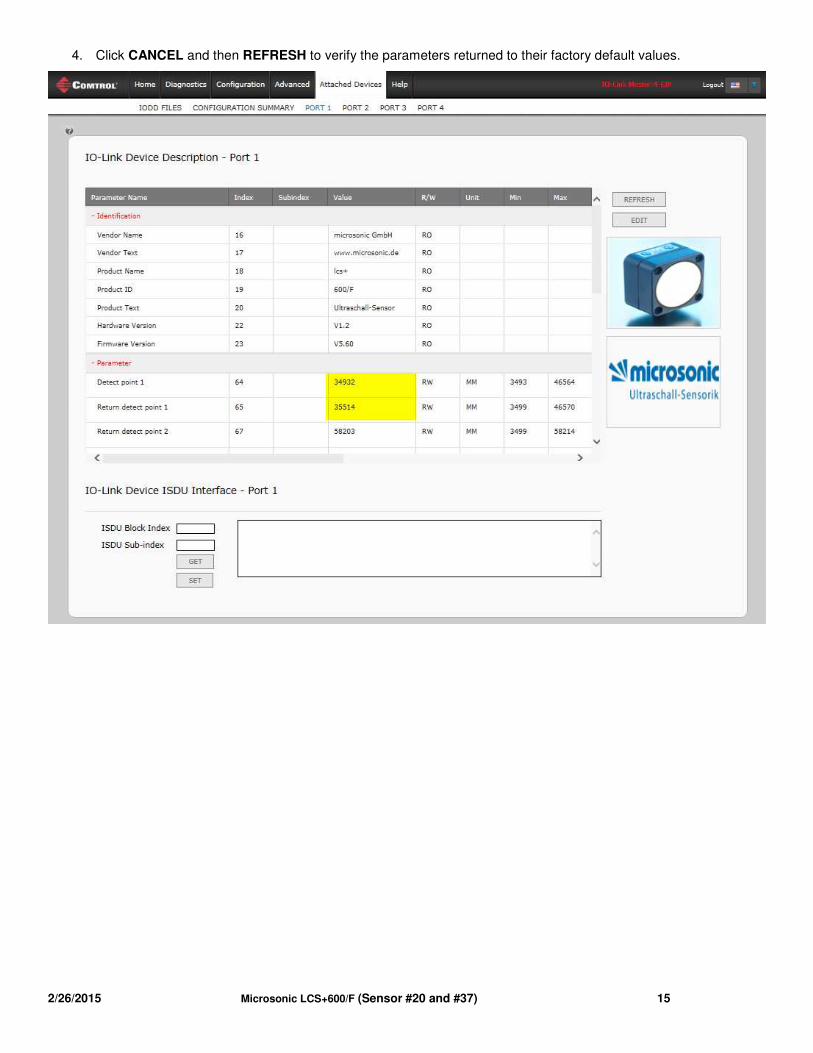
4. Click CANCEL and then REFRESH to verify the parameters returned to their factory default values.
2/26/2015 Microsonic LCS+600/F (Sensor #20 and #37) 15
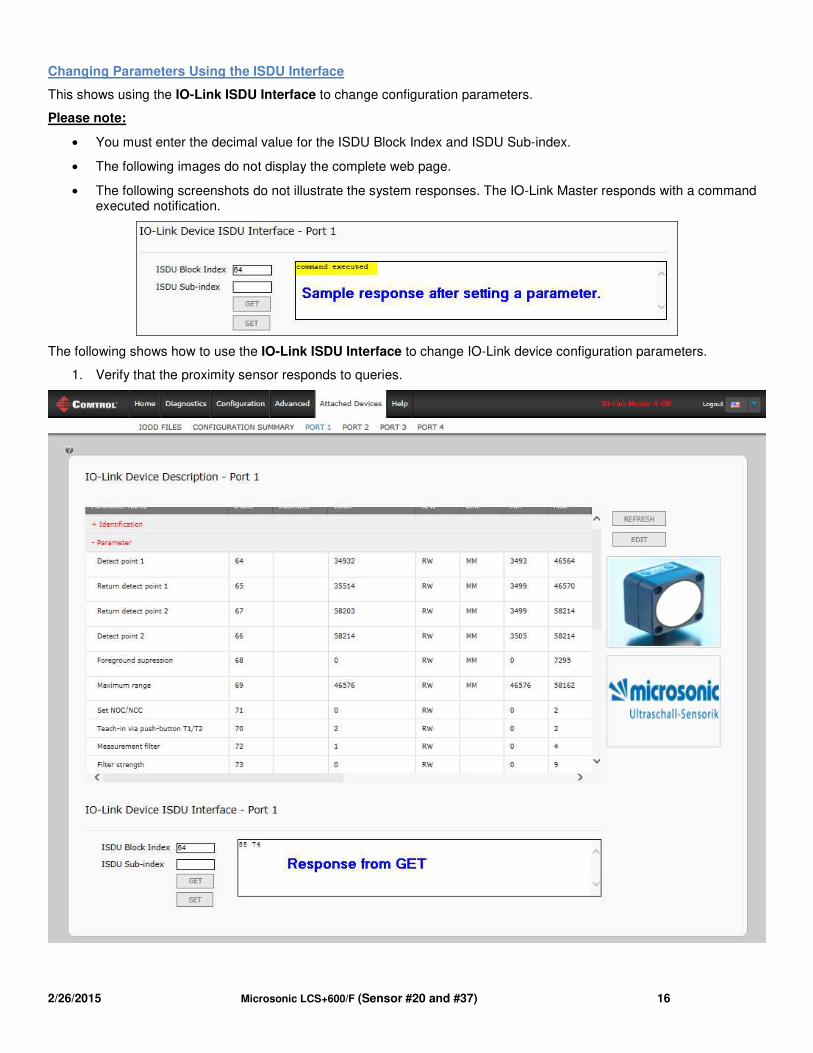
Changing Parameters Using the ISDU Interface
This shows using the IO-Link ISDU Interface to change configuration parameters.
Please note:
• You must enter the decimal value for the ISDU Block Index and ISDU Sub-index.
• The following images do not display the complete web page.
• The following screenshots do not illustrate the system responses. The IO-Link Master responds with a command executed notification.
The following shows how to use the IO-Link ISDU Interface to change IO-Link device configuration parameters.
1. Verify that the proximity sensor responds to queries.
2/26/2015 Microsonic LCS+600/F (Sensor #20 and #37) 16
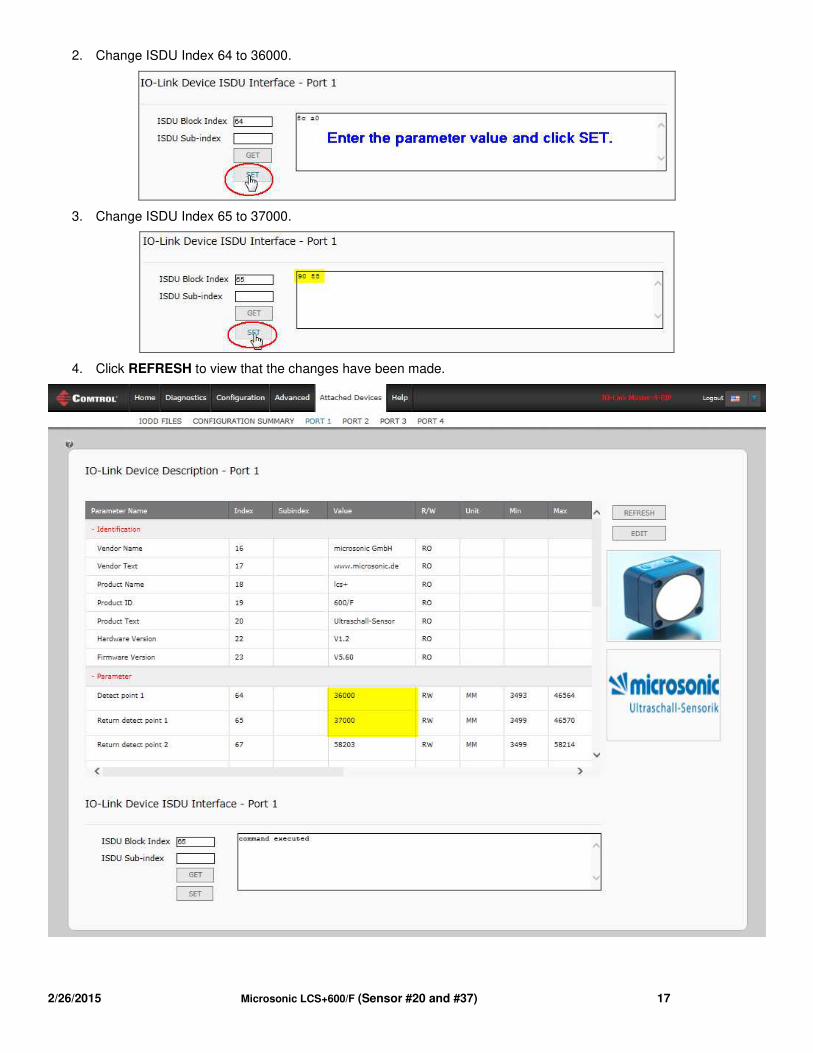
2. Change ISDU Index 64 to 36000.
3. Change ISDU Index 65 to 37000.
4. Click REFRESH to view that the changes have been made.
2/26/2015 Microsonic LCS+600/F (Sensor #20 and #37) 17
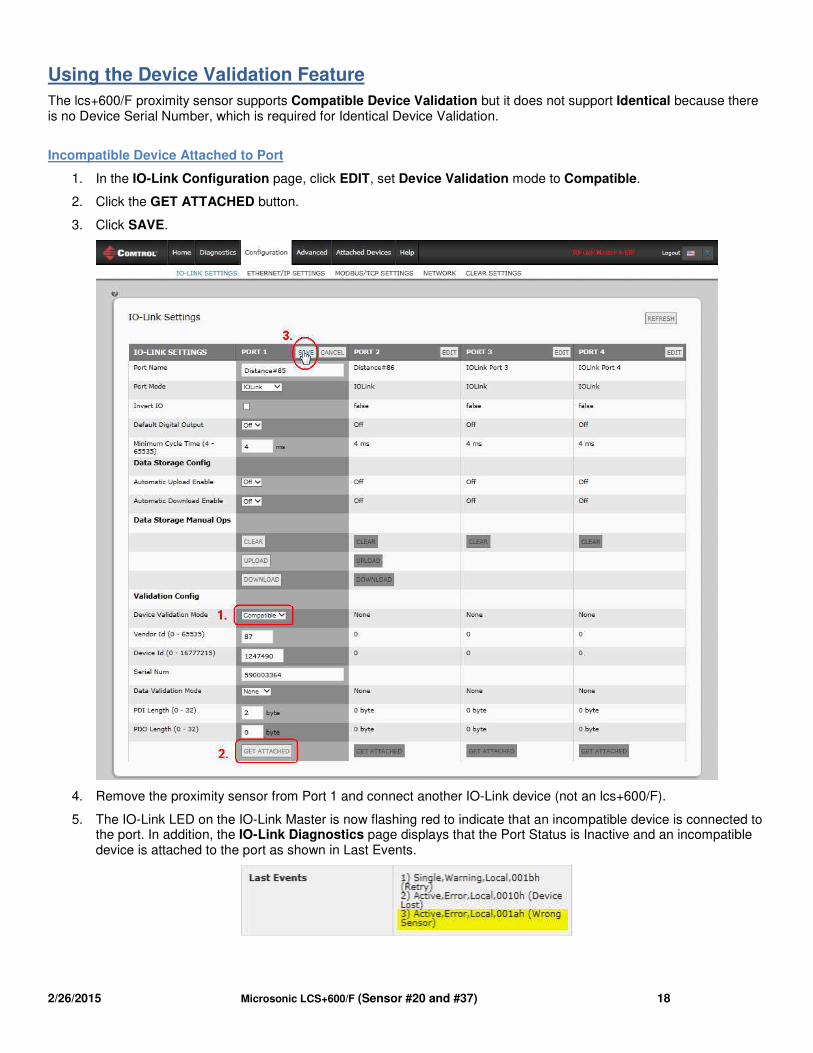
Using the Device Validation Feature
The lcs+600/F proximity sensor supports Compatible Device Validation but it does not support Identical because there is no Device Serial Number, which is required for Identical Device Validation.
Incompatible Device Attached to Port
1. In the IO-Link Configuration page, click EDIT, set Device Validation mode to Compatible.
2. Click the GET ATTACHED button.
3. Click SAVE.
4. Remove the proximity sensor from Port 1 and connect another IO-Link device (not an lcs+600/F).
5. The IO-Link LED on the IO-Link Master is now flashing red to indicate that an incompatible device is connected to the port. In addition, the IO-Link Diagnostics page displays that the Port Status is Inactive and an incompatible device is attached to the port as shown in Last Events.
2/26/2015 Microsonic LCS+600/F (Sensor #20 and #37) 18
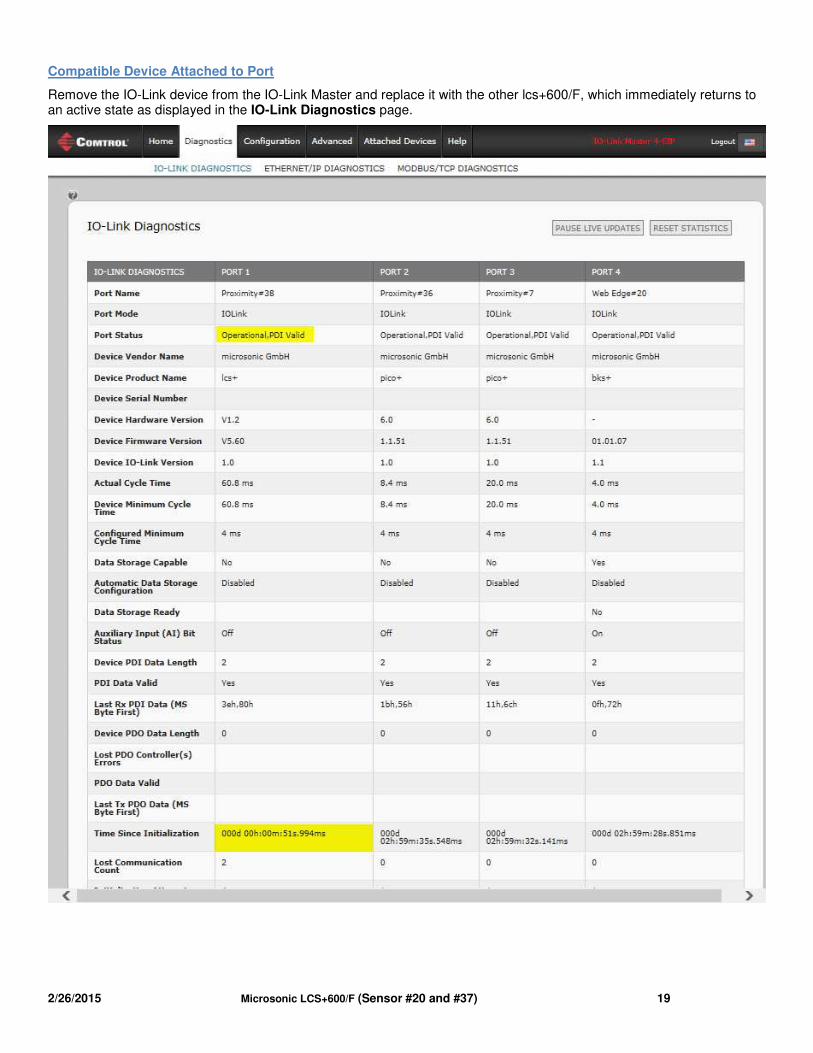
Compatible Device Attached to Port
Remove the IO-Link device from the IO-Link Master and replace it with the other lcs+600/F, which immediately returns to an active state as displayed in the IO-Link Diagnostics page.
2/26/2015 Microsonic LCS+600/F (Sensor #20 and #37) 19