clutch adjustment instructions - flyin' miata
TRANSCRIPT
Flyin' [email protected]
Rev 1.6
Flyin' Miata
Congratulations on your purchase of a Flyin’ Miata clutch and/or flywheel! Our goal was to create the most friendly Miata clutch on the planet. Smooth pedal take up and stock-like pedal effort is the result. These tips and instructions will help you with your installation. Please call or email us if you have installation questions. Our number and email are below.
90 - 05 Clutch installation tips and adjustment instructions
08-199XX

Flyin' [email protected]
Rev 1.6
Please read and follow all of the directions below. 99 out of 100 tech calls we receive about our clutches are cured when we read these directions back to the custom-er and they actually follow them. There especially seems to be a dis-connect with “pros” who don’t like to be told what to do. We have had to tell people to bring their cars home from the shop so we could talk them through the adjustment when their mechanic wouldn’t listen. If you have questions or don’t understand the procedure, feel free to call us, we’re happy to help. Please start by following all of the directions, though. While these directions were written for our clutches, they still apply to other clutches.
1. If you have a used flywheel, it must be machined to give the new disc a good surface to start with. New flywheels don’t need this. Also, you MUST thoroughly clean all fric-tion surfaces (on the flywheel and the pressure plate) with carb cleaner before assembly. Any oil will cause chatter, which will cause clutch failure. Don’t clean the friction ma-terial of the clutch disc, but do be very careful to keep any kind of oil or grease off of the friction material.
2. Carefully press / tap the pilot bearing in, using an appro-priately sized socket. Be sure that the socket contacts the thick outer race on the bearing but not the thin dust cover in the middle of the bear-ing face. Get the bearing centered within the flywheel, which should leave it very close to flush on both sides.
3. The holes in our flywheels may be very tight - this could be the coating and/or dried Loctite on the bolts (which should be cleaned off with a wire brush). If cleaning the bolts doesn’t work, you can thread the bolt through the coating, or gently clean up the coating. The holes need to be tight so don’t drill them larger than is absolutely necessary. Be sure to use blue Loctite and torque the bolts in a cross pattern (see step 7) to 71 - 75 lb-ft.
WARNING: Not everyone can perform every installation. It is critical that you be honest with yourself, in regards to your ability. We’re more than happy to help,
but there are only so many things we can do from the other end of a phone / computer. If in doubt, discuss the install with us before you dive in. Improper
installation could cause injury and / or death!Required tools:• Ratchet wrench• 14 and 19 mm sockets
• 12 and 17 mm wrenches• All purpose grease• Torque wrench
Torque Specs:• Flywheel 71-75 lb-ft cross pattern • Pressure plate 14-18 lb-ft cross pat-
tern
Flyin' [email protected]
Rev 1.6
1
2
4
3
5
6
2
3
3
1
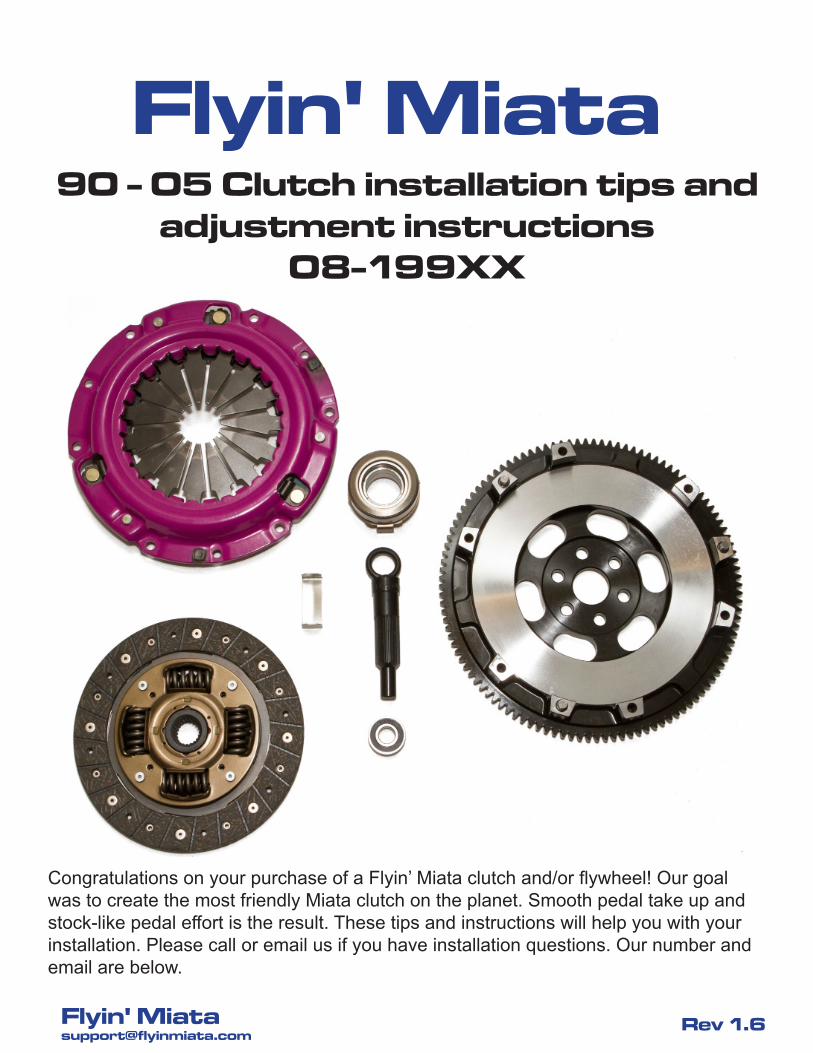
4. Peel back the rubber boot on your clutch slave cylinder to make sure you don’t have any leakage there (1). If you find any fluid under the boot, buy a new slave cylinder. Heavier pressure plates put more load on the hydraulics and will often finish off a marginal or tired slave cylinder or even the master. A stainless steel braided clutch hose is a good idea as well.
5. Don’t forget to put some grease on the end of the slave cylinder pushrod (or the depression on the throw out arm, as shown) where it meets the release arm or you will have a chirp that will eventually (if not sooner) drive you nuts.
6. IF YOU’RE INSTALLING OUR LEV-EL 2 CLUTCH, YOU MUST USE OUR THROWOUT / RELEASE BEARING. Stock-size bearings are not compatible with the Level 2 pressure plate. The Level 1 uses a stock bearing.
7. Put a thin layer of grease on the input shaft of the transmission (both the nose and the splines, 3) as well as the cor-responding sleeve on the clutch disc. Grease the sleeve that the throwout bearing slides on as well. Don’t use too much grease, as it will sling onto the clutch and cause clutch failure - the shaft in the picture has been fully greased, you shouldn’t use more than what’s shown. Also be sure that the disc slides easily on the input shaft.
8. Tighten the plate onto the flywheel using a diagonal pattern (as shown), tightening each bolt a few turns at a time. Do not tighten one bolt the whole way if the rest of them are loose. Do not use air tools and do make sure that the bolts are tightened to 14 – 18 lb-ft.
Flyin' [email protected]
Rev 1.6
5 5
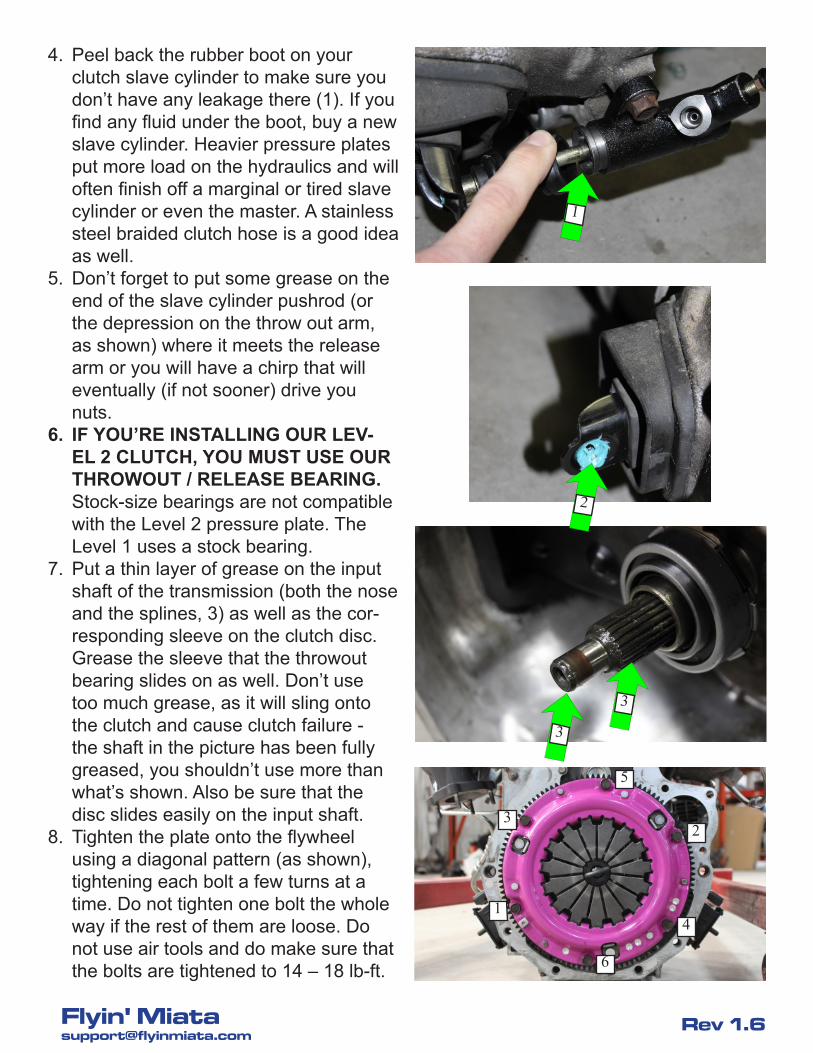
9. Raise the front of the engine as you’re installing the transmission, so that the input shaft of the transmission will ap-propriately line up with the center of the clutch disc. Typically you’d use a jack or something comparable - pushing it up by hand isn’t a realistic option. Be sure to use something to distribute the force, a small jack head could damage the oil pan.
10. It’s important that you properly align the transmission input shaft with the center of the disc. If this isn’t aligned, and you repeatedly stab the transmission (sometimes with much force) you can damage the cover on the clutch disc. This can cause the cover to ultimately fail, letting the springs out. It’s best to reinstall the transmission per the factory service manual, which means completely removing the exhaust. We’ve found that shortcuts typically make the process much longer - sometimes on the front end, sometimes on the back end (with damaged and ultimately failed com-ponents). Once you have the transmission in place, long extensions and universal joints can make it much easier to get the bolts in.
11. Don’t forget to reinstall the brackets at the top right of the transmission (5) - if there’s a terrible rattle once you’re done, you’ve probably forgotten one or both. This is typically done with the transmission in the car.
12. Be sure to appropriately line up the PPF, as shown. Put a straight edge between the frame rails, then measure from that straight edge up to the bottom of the PPF (power plant frame). Bear in mind that if your frame rails have been crushed, you’ll have to get creative in how you measure. The dimension you’re looking for is 2.37 - 2.83” (60 - 72 mm).
Flyin' [email protected]
Rev 1.6
7 6
8 9
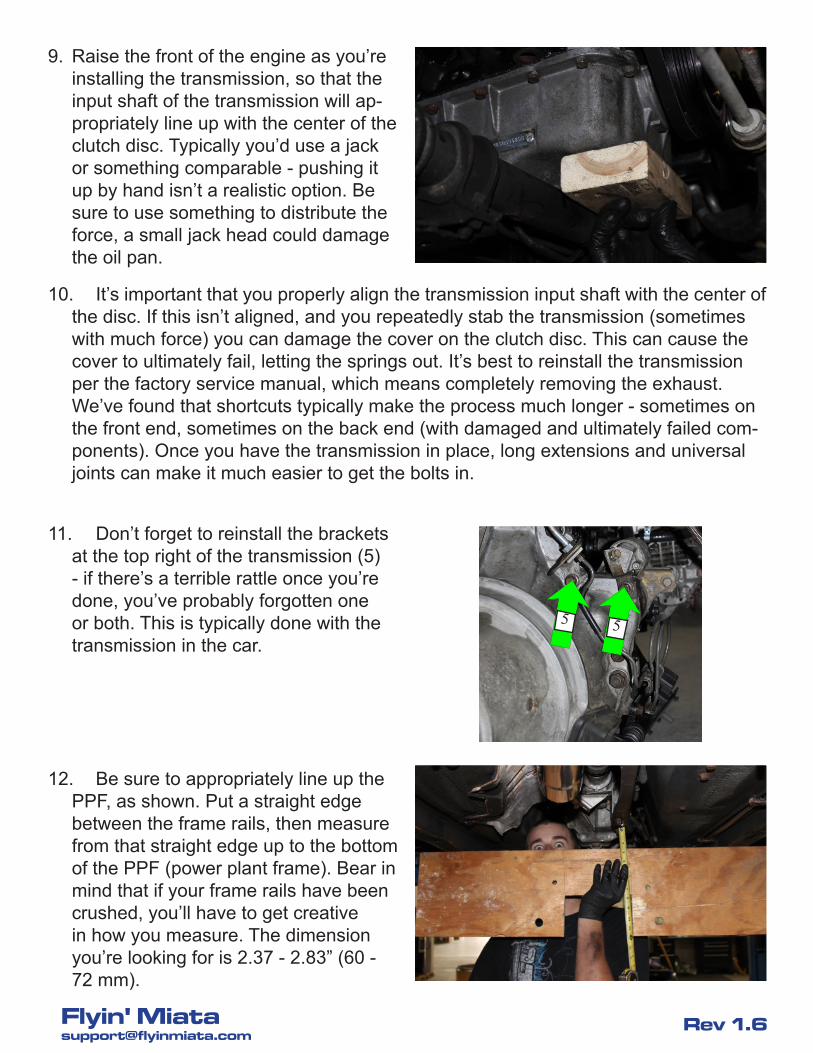
13. Flush your hydraulic system for the clutch. Do the brakes while you’re at it.
14. Many performance clutches (including the FM clutches) will engage much closer to the floor than a stock clutch, sometimes to the point of not dis-engaging com-pletely, even when the pedal is on the floor. Re-adjustment of the clutch pedal height and clutch master cylinder free-play is almost always required or the car will not go into gear. Really, we mean it. Please be sure to follow all of these direc-tions before you call us. Even if you’ve put in dozens of clutches, humor us - our way works. Getting this adjustment wrong will result in a clutch that doesn’t fully disengage (if you don’t adjust it far enough) or one that wears out quickly (if you adjust too far). The former is annoying, the latter isn’t covered under warranty. The parts discussed below are attached to the clutch pedal. Follow it up, and you’ll find the parts.
15. Start by cracking the nut loose on the larger clutch pedal switch (6); it’s a 17mm. This is the nut on the backside, not the silver welded nut on the front. Then unscrew the switch so that the met-al portion of the switch is flush with the weldnut in the bracket (as shown, 7). This will raise the resting position of the clutch pedal, giving you more travel. Be sure to tighten the locknut once the adjustment is complete.
16. Next adjust the free-play on the mas-ter cylinder pushrod by loosening the 12 mm locknut (8). Once that nut is loose you should be able to easily turn the pushrod by hand (9). You will need to lengthen it to reduce free-play. Turn the rod clockwise to lengthen and as soon as you feel it touch the piston in the master (i.e., resistance), back off a hair. Be sure to tighten the locknut once everything is adjusted properly.

Flyin' [email protected]
Rev 1.6
10
17. Get under the car and try to push the slave pushrod back into its bore. If you can push it in, you haven’t adjusted the rod too far. If you can’t push it in, you’ve adjusted it too far and need to shorten the rod on the clutch pedal a little. Once you’re able to push it in, be sure to pump the clutch pedal a few times. You want as little free-play as possible while still being able to push the slave pushrod back into its bore.
18. The farther you adjust the pushrod (up to a point, read the next step and the tech note on the next page), the more disengagement you have. In other words, if your engagement point is too low in the clutch pedal’s travel or the clutch isn’t disengag-ing fully (engine on, vehicle stationary), thread the pushrod out farther (clockwise). Again, it’s critical that you’re able to push the slave cylinder in by hand once you’ve adjusted the pushrod - you CANNOT skip that step, regardless of how much of a pain it is.
19. If you’ve adjusted the pushrod as far as possible, taking the ability to push the slave cylinder in into account, and the clutch won’t completely disengage, it’s possi-ble that you’ve actually gone too far. Try shifting with the engine on, vehicle station-ary, with the clutch pedal depressed at different distances. We already know that the clutch won’t disengage with the pedal 100% depressed, but what about 80%? 90%? 70%? If you’re able to disengage the clutch properly with less than full pedal trav-el, back off on your adjustment until 100% pedal = 100% disengagement. If it won’t disengage at any pedal position, proceed to step 19.
20. If you’ve backed the switch off as far as possible (step 14) and adjusted the pushrod as far as possible (step 15) while still being able to push the slave pushrod back into its bore (step 16) and checked for a too-far adjustment (step 18) and still can’t disengage the clutch, remove the pad at the upper clutch switch (10). Follow steps 15 and 16 again, and see if the clutch will disengage. If it will, shave down that pad, reinstall, and redo steps 15 and 16.
Flyin' [email protected]
Rev 1.6
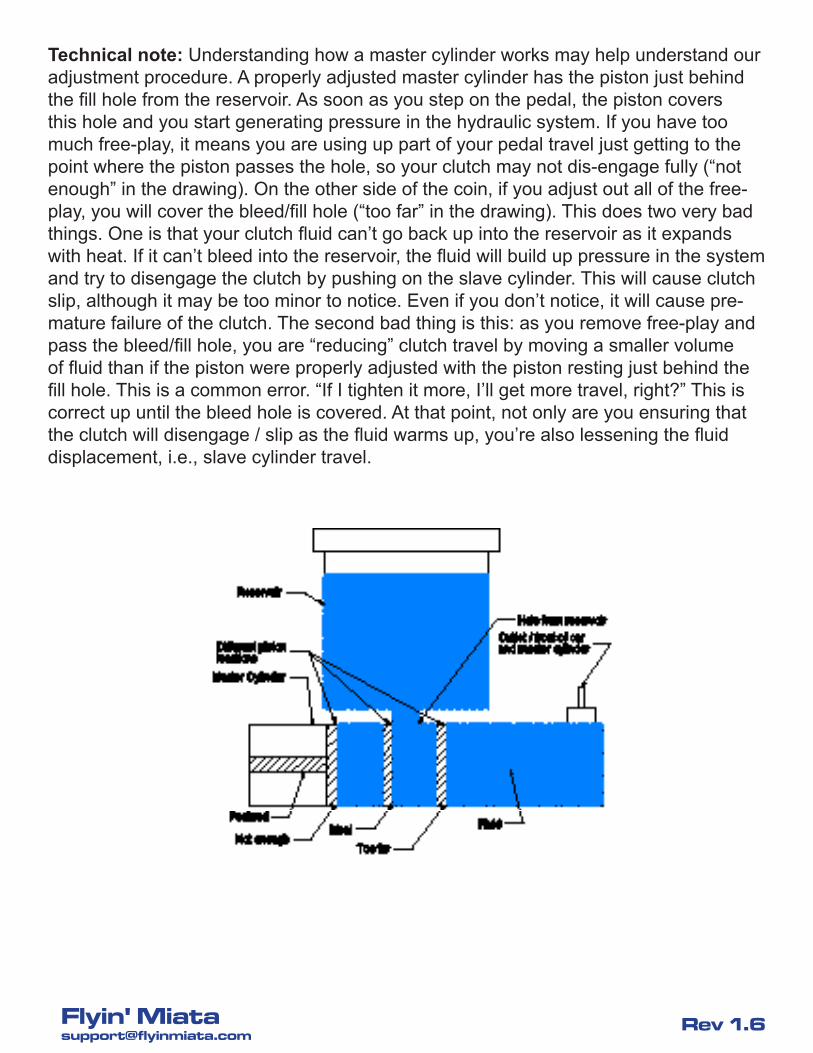
Technical note: Understanding how a master cylinder works may help understand our adjustment procedure. A properly adjusted master cylinder has the piston just behind the fill hole from the reservoir. As soon as you step on the pedal, the piston covers this hole and you start generating pressure in the hydraulic system. If you have too much free-play, it means you are using up part of your pedal travel just getting to the point where the piston passes the hole, so your clutch may not dis-engage fully (“not enough” in the drawing). On the other side of the coin, if you adjust out all of the free-play, you will cover the bleed/fill hole (“too far” in the drawing). This does two very bad things. One is that your clutch fluid can’t go back up into the reservoir as it expands with heat. If it can’t bleed into the reservoir, the fluid will build up pressure in the system and try to disengage the clutch by pushing on the slave cylinder. This will cause clutch slip, although it may be too minor to notice. Even if you don’t notice, it will cause pre-mature failure of the clutch. The second bad thing is this: as you remove free-play and pass the bleed/fill hole, you are “reducing” clutch travel by moving a smaller volume of fluid than if the piston were properly adjusted with the piston resting just behind the fill hole. This is a common error. “If I tighten it more, I’ll get more travel, right?” This is correct up until the bleed hole is covered. At that point, not only are you ensuring that the clutch will disengage / slip as the fluid warms up, you’re also lessening the fluid displacement, i.e., slave cylinder travel.
Flyin' [email protected]
Rev 1.6
Technical note: A clutch disc wears 10 - 20% of its total thickness in the first 1000± miles of its life. This is intentional, and your maximum clamping force is at this point - not when it’s brand new, or when it’s more heavily worn. Excessive slipping, especial-ly during break-in, can cause hot spots which cause chatter during engagement. For these reasons, properly breaking in your clutch is absolutely critical. Please don’t push things before you’ve gone through your two tanks of fuel.
Technical note: After the ~1000 mile break-in period we recommend you perform the pedal adjustment procedure again.
21. When you step on the clutch while starting the car, you are doing the worst thing possible to the thrust bearing on your crankshaft. You have no oil pressure (engine not running) and now you’re squeezing what little oil there is out from between the thrust bearing and the crankshaft. Due to the stronger pressure plate used in the clutch, this situation is even worse with an aftermarket HP clutch. Bypassing the starter interlock on the clutch pedal allows the car to be started without depressing the clutch, which will add many miles to the life of your crankshaft thrust bearing. We have included a stainless steel clip to defeat this switch, please refer to its in-stallation instructions. Bear in mind that this will allow you to start the car in gear and drive it into things - please pay attention and don’t do that.
22. Allow a 500± mile (roughly two tanks of fuel) break-in period before you start pushing it. Break-in means that you should “drive like you’re taking Grandma to church.” No excessive slipping, no clutch drops, and no full throttle - try to drive as smoothly as possible, so you’re not putting much heat into the clutch. Do drive normally, as slipping is what properly wears the clutch in, but don’t slip it exces-sively - don’t hold the car in place on hills with the clutch, for example. Actually, you shouldn’t ever hold the car in place with the clutch. Be sure that your free travel is still correct after the break-in, adjust it if need be. Since the disc wears so much during break-in (read below), re-adjustment is fairly common. If you find that the clutch no longer fully disengages, you need to re-adjust.