cac based remote desktop protocol v1 1
TRANSCRIPT

CAC Based Remote Desktop Protocol Guide Version 1.1 – 10 December 2007
Page 1 of 20
CAC Based Remote Desktop Protocol Guide Assumptions: Throughout this guide RDP sessions are presented in a window view, to change the view from full screen scroll the mouse to the top of the screen and click the “Restore Down” icon:
Audience: This guide is intended for any user who is required to connect to a CG Standard Workstation via a Remote Desktop Connection. This guide specifically covers CG Standard Workstations but also provides guidance for users on non-standard workstations. NOTE: The logon scenarios outlined in this guide reflect standard configurations. Additional software or other configuration changes may affect the processes outlined.

CAC Based Remote Desktop Protocol Guide Version 1.1 – 10 December 2007
Page 2 of 20
Contents CAC Based Remote Desktop Protocol Guide ................................................................................ 1
Assumptions................................................................................................................................ 1 Audience: .................................................................................................................................... 1 Contents ...................................................................................................................................... 2 Section 1 – Common Location for Remote Desktop Connection............................................... 3 Section 2 - Connect from Image 5.1 to CG Standard Workstation (RDP v5) ............................ 4 Section 3 - Connect from Image 5.2 to CG Standard Workstation (RDPv6) ............................. 7 Section 4 - Connect from Image 6.0 to CG Standard Workstation (RDPv6) .......................... 10 Section 5 - Connect from Image 5.1 to CG Terminal Sever (RDP v5) .................................... 14 Section 6 - Connect from Image 5.2 to CG Terminal Server (RDPv6) .................................... 16 Section 7 - Connect from Image 6.0 to CG Terminal Server (RDPv6) .................................... 18
CAC Based Remote Desktop Protocol Guide Version 1.1 – 10 December 2007
Page 3 of 20
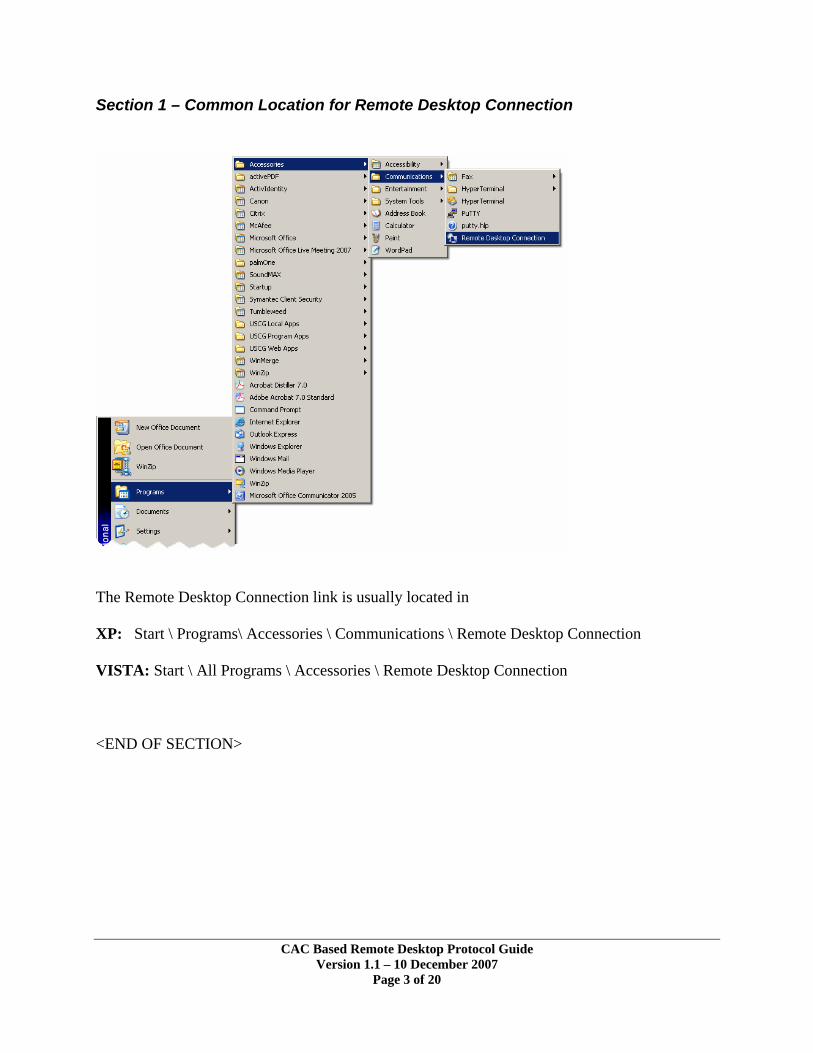
Section 1 – Common Location for Remote Desktop Connection
The Remote Desktop Connection link is usually located in XP: Start \ Programs\ Accessories \ Communications \ Remote Desktop Connection VISTA: Start \ All Programs \ Accessories \ Remote Desktop Connection <END OF SECTION>

CAC Based Remote Desktop Protocol Guide Version 1.1 – 10 December 2007
Page 4 of 20
Section 2 - Connect from Image 5.1 to CG Standard Workstation (RDP v5)
1. Open RDP client following steps from Section 1 and enter the workstation ip address or name in the “Computer” prompt, then Click “Connect.”
2. The RDP session will attempt to contact the remote computer.
3. Once RDP session is connected a full screen or window presentation of the remote
computer is displayed. The USCG Warning Dialog is presented as shown below. Click “Ok”
CAC Based Remote Desktop Protocol Guide Version 1.1 – 10 December 2007
Page 5 of 20
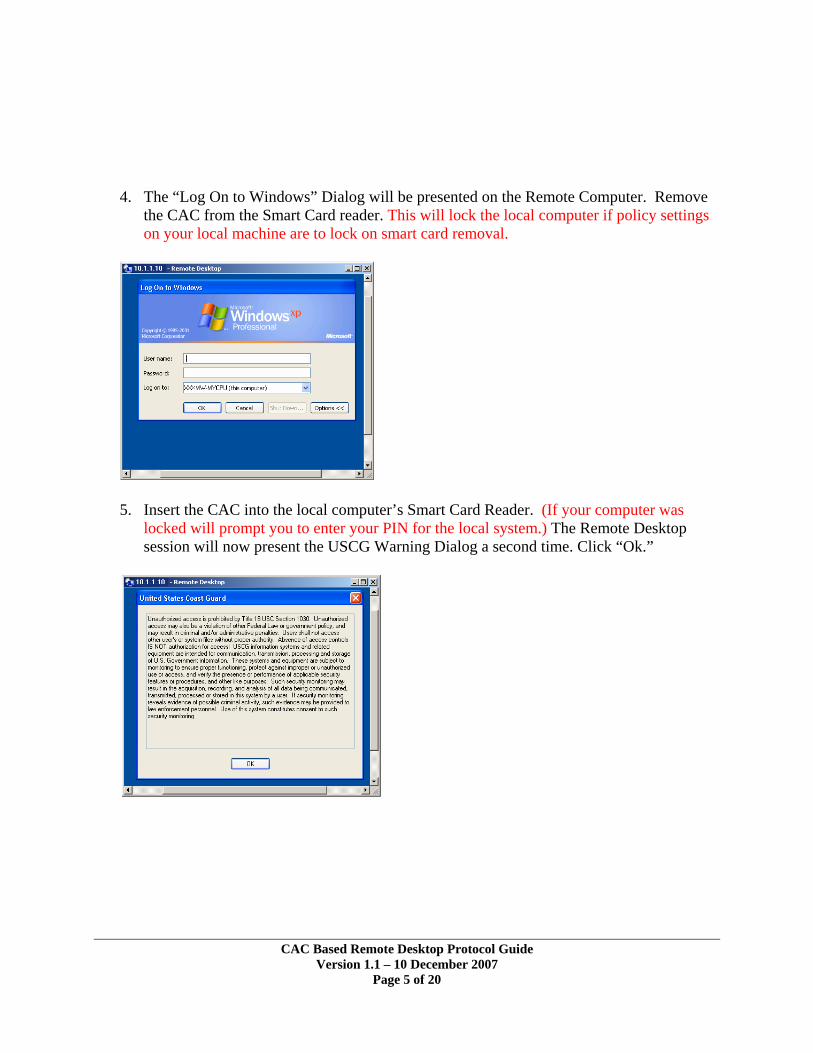
4. The “Log On to Windows” Dialog will be presented on the Remote Computer. Remove
the CAC from the Smart Card reader. This will lock the local computer if policy settings on your local machine are to lock on smart card removal.
5. Insert the CAC into the local computer’s Smart Card Reader. (If your computer was
locked will prompt you to enter your PIN for the local system.) The Remote Desktop session will now present the USCG Warning Dialog a second time. Click “Ok.”
CAC Based Remote Desktop Protocol Guide Version 1.1 – 10 December 2007
Page 6 of 20
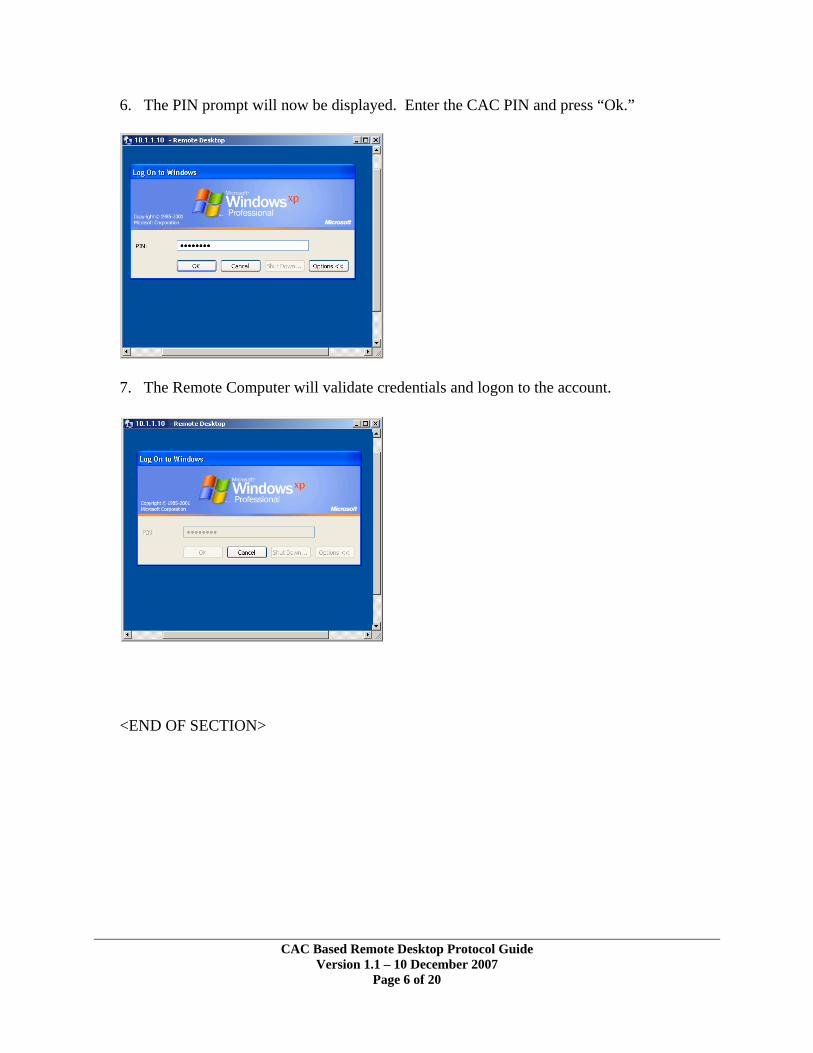
6. The PIN prompt will now be displayed. Enter the CAC PIN and press “Ok.”
7. The Remote Computer will validate credentials and logon to the account.
<END OF SECTION>
CAC Based Remote Desktop Protocol Guide Version 1.1 – 10 December 2007
Page 7 of 20
Section 3 - Connect from Image 5.2 to CG Standard Workstation (RDPv6)
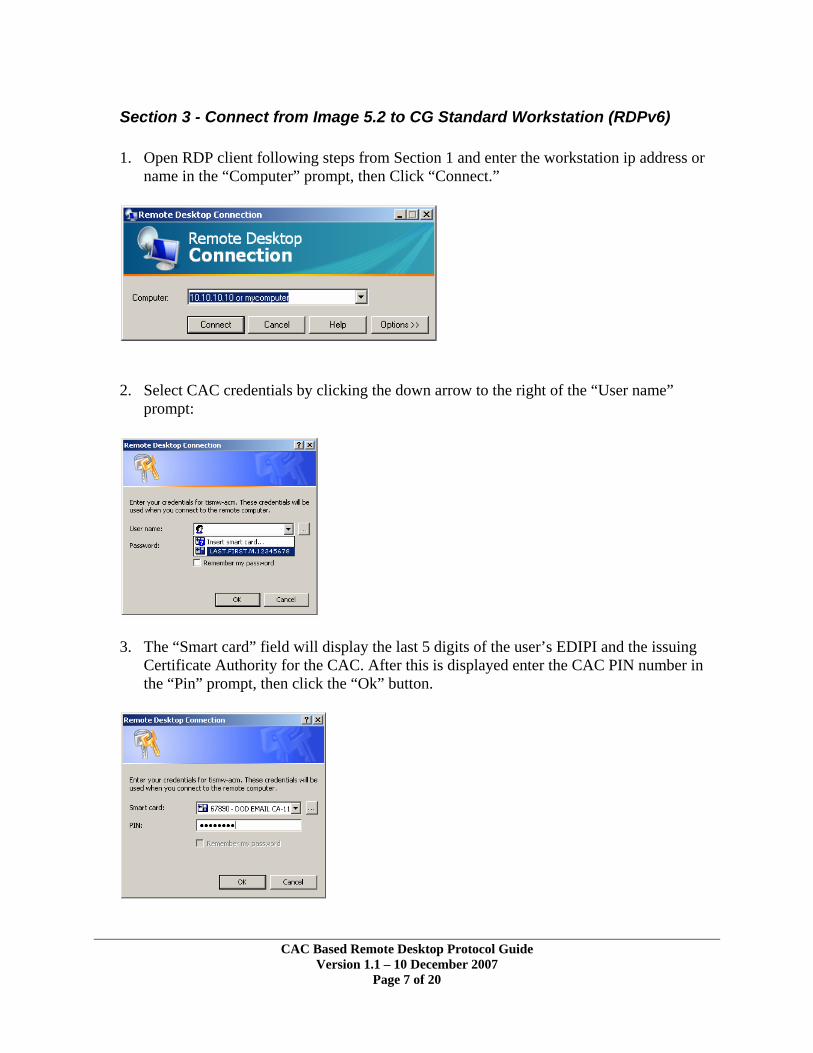
1. Open RDP client following steps from Section 1 and enter the workstation ip address or name in the “Computer” prompt, then Click “Connect.”
2. Select CAC credentials by clicking the down arrow to the right of the “User name” prompt:
3. The “Smart card” field will display the last 5 digits of the user’s EDIPI and the issuing
Certificate Authority for the CAC. After this is displayed enter the CAC PIN number in the “Pin” prompt, then click the “Ok” button.
CAC Based Remote Desktop Protocol Guide Version 1.1 – 10 December 2007
Page 8 of 20
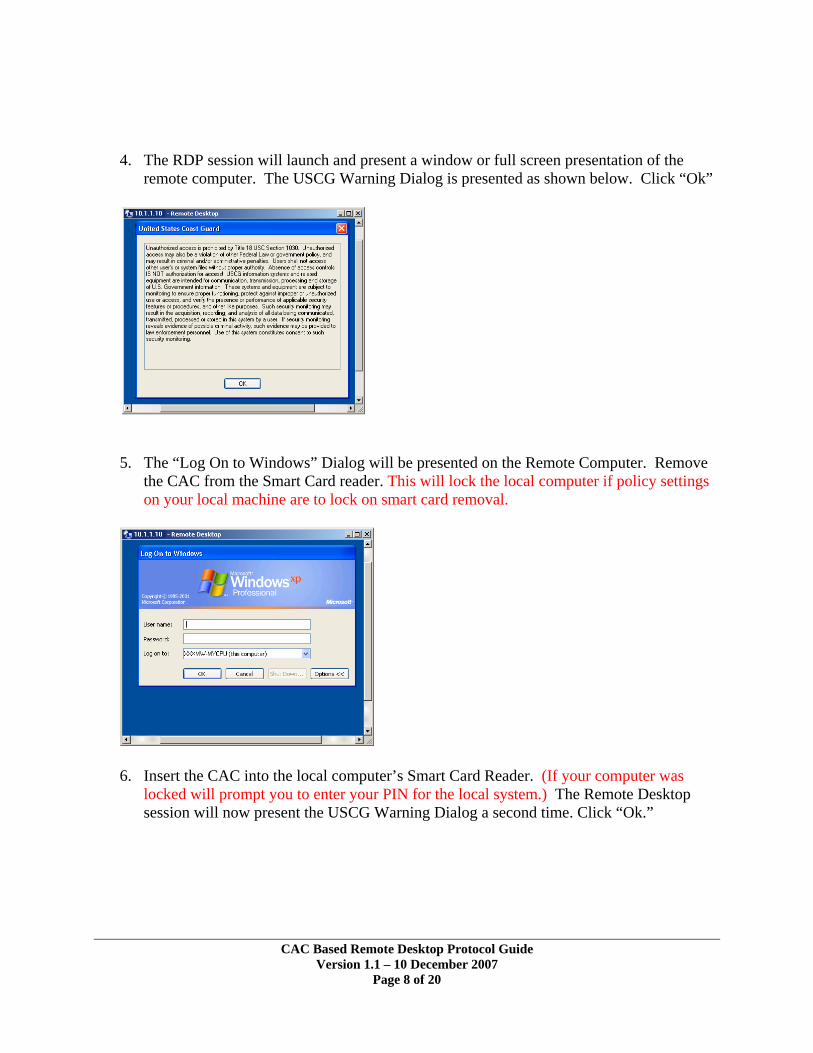
4. The RDP session will launch and present a window or full screen presentation of the
remote computer. The USCG Warning Dialog is presented as shown below. Click “Ok”
5. The “Log On to Windows” Dialog will be presented on the Remote Computer. Remove
the CAC from the Smart Card reader. This will lock the local computer if policy settings on your local machine are to lock on smart card removal.
6. Insert the CAC into the local computer’s Smart Card Reader. (If your computer was
locked will prompt you to enter your PIN for the local system.) The Remote Desktop session will now present the USCG Warning Dialog a second time. Click “Ok.”
CAC Based Remote Desktop Protocol Guide Version 1.1 – 10 December 2007
Page 9 of 20
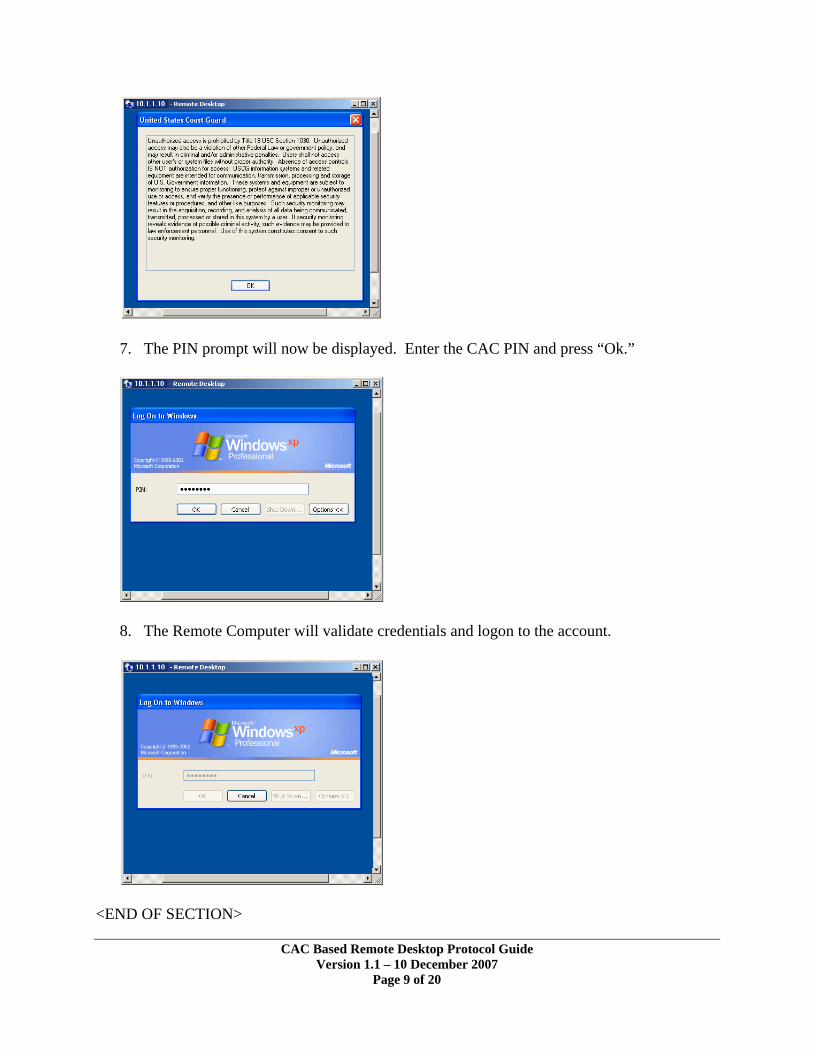
7. The PIN prompt will now be displayed. Enter the CAC PIN and press “Ok.”
8. The Remote Computer will validate credentials and logon to the account.
<END OF SECTION>

CAC Based Remote Desktop Protocol Guide Version 1.1 – 10 December 2007
Page 10 of 20
Section 4 - Connect from Image 6.0 to CG Standard Workstation (RDPv6)
1. Open RDP client following steps from Section 1 and enter the workstation ip address or name in the “Computer” prompt, then Click “Connect.”
2. Select CAC credentials by clicking “Smart Card Credential” area of dialog box.

CAC Based Remote Desktop Protocol Guide Version 1.1 – 10 December 2007
Page 11 of 20
3. The “Smart card” field will display the user’s EDIPI. After this is displayed enter the CAC PIN number under the credential information in the text filed provided as “PIN”, then click the “Ok” button.
4. The RDP session will launch and present a window or full screen presentation of the
remote computer. The USCG Warning Dialog is presented as shown below. Click “Ok”
CAC Based Remote Desktop Protocol Guide Version 1.1 – 10 December 2007
Page 12 of 20
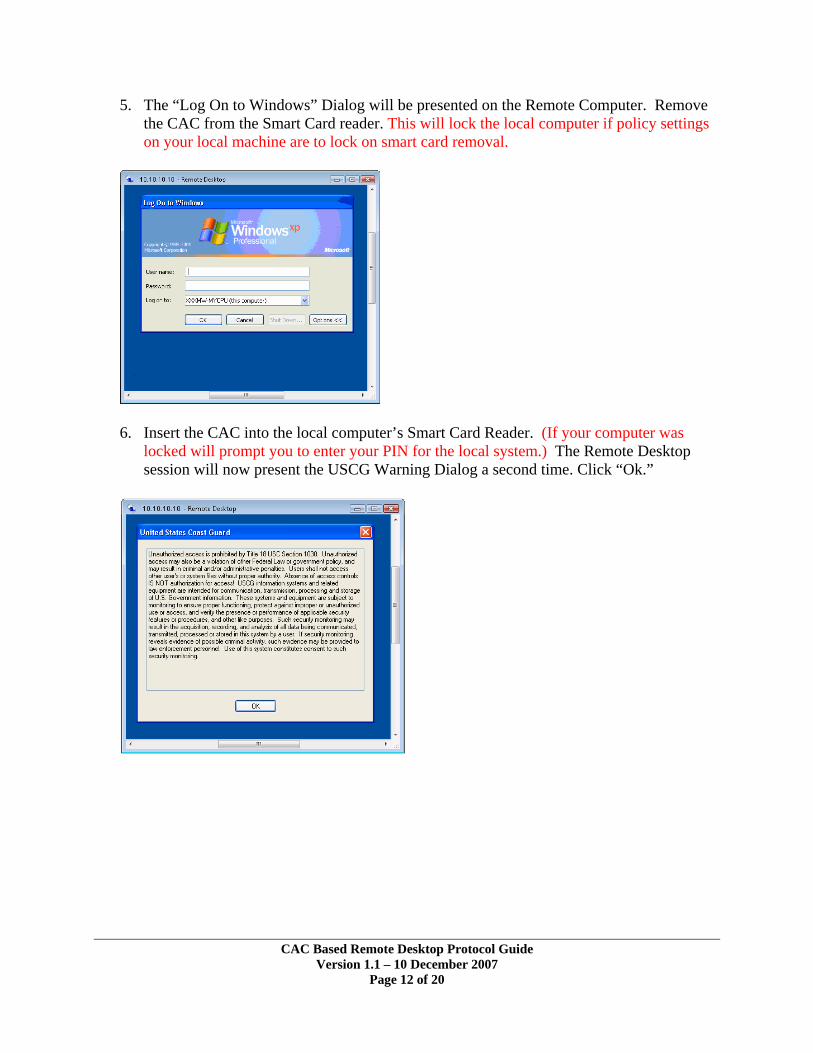
5. The “Log On to Windows” Dialog will be presented on the Remote Computer. Remove the CAC from the Smart Card reader. This will lock the local computer if policy settings on your local machine are to lock on smart card removal.
6. Insert the CAC into the local computer’s Smart Card Reader. (If your computer was
locked will prompt you to enter your PIN for the local system.) The Remote Desktop session will now present the USCG Warning Dialog a second time. Click “Ok.”
CAC Based Remote Desktop Protocol Guide Version 1.1 – 10 December 2007
Page 13 of 20
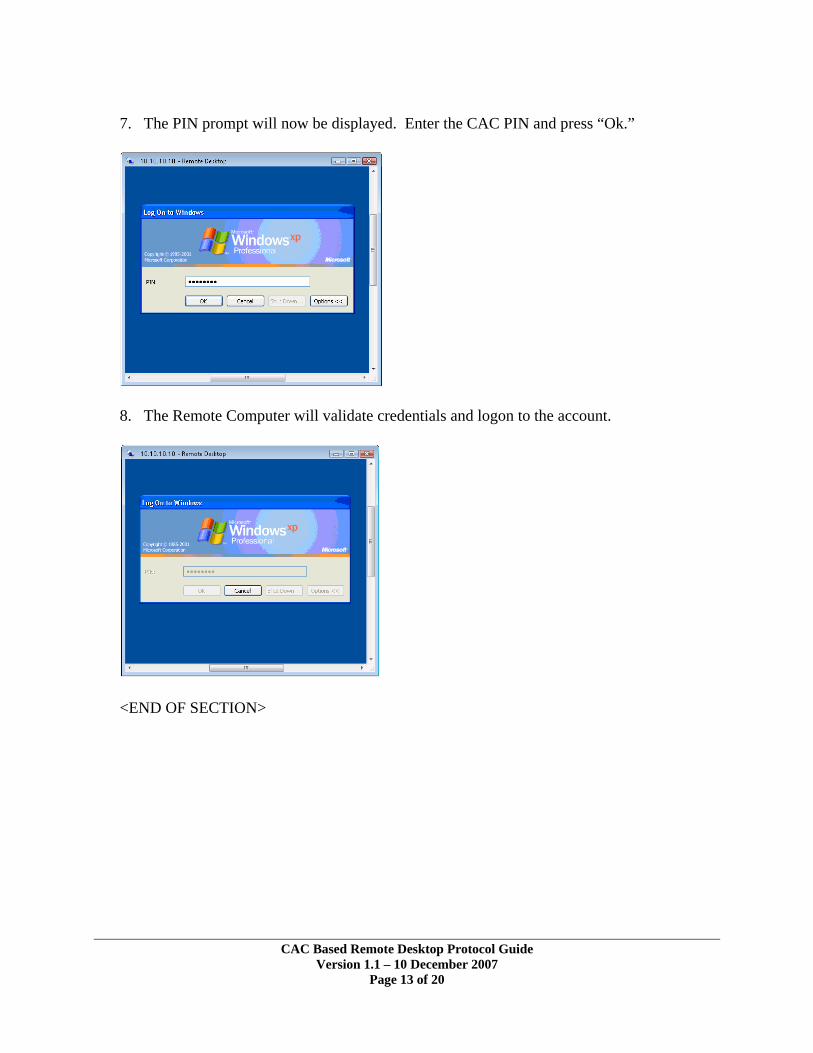
7. The PIN prompt will now be displayed. Enter the CAC PIN and press “Ok.”
8. The Remote Computer will validate credentials and logon to the account.
<END OF SECTION>

CAC Based Remote Desktop Protocol Guide Version 1.1 – 10 December 2007
Page 14 of 20
Section 5 - Connect from Image 5.1 to CG Terminal Sever (RDP v5)
1. Open RDP client following steps from Section 1 and enter the workstation ip address or name in the “Computer” prompt, then Click “Connect.”
2. The RDP session will attempt to contact the remote computer.
3. Once RDP session is connected a full screen or window presentation of the remote
computer is displayed. The PIN prompt will now be displayed. Enter the CAC PIN and press “Ok.”

CAC Based Remote Desktop Protocol Guide Version 1.1 – 10 December 2007
Page 15 of 20
4. The Remote Computer will validate credentials and logon to the account.
<END OF SECTION>

CAC Based Remote Desktop Protocol Guide Version 1.1 – 10 December 2007
Page 16 of 20
Section 6 - Connect from Image 5.2 to CG Terminal Server (RDPv6)
1. Open RDP client following steps from Section 1 and enter the workstation ip address or name in the “Computer” prompt, then Click “Connect.”
2. Select CAC credentials by clicking the down arrow to the right of the “User name” prompt:
3. The “Smart card” field will display the last 5 digits of the user’s EDIPI and the issuing
Certificate Authority for the CAC. After this is displayed enter the CAC PIN number in the “Pin” prompt, then click the “Ok” button.
CAC Based Remote Desktop Protocol Guide Version 1.1 – 10 December 2007
Page 17 of 20
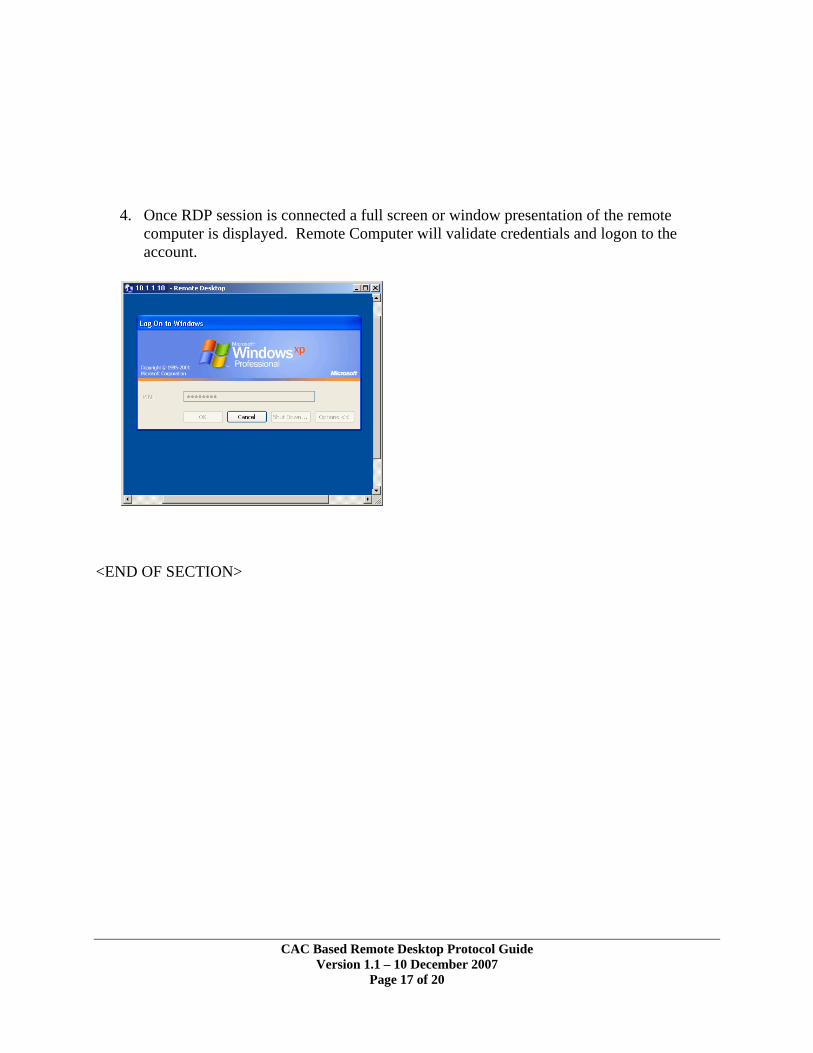
4. Once RDP session is connected a full screen or window presentation of the remote
computer is displayed. Remote Computer will validate credentials and logon to the account.
<END OF SECTION>
CAC Based Remote Desktop Protocol Guide Version 1.1 – 10 December 2007
Page 18 of 20
Section 7 - Connect from Image 6.0 to CG Terminal Server (RDPv6)
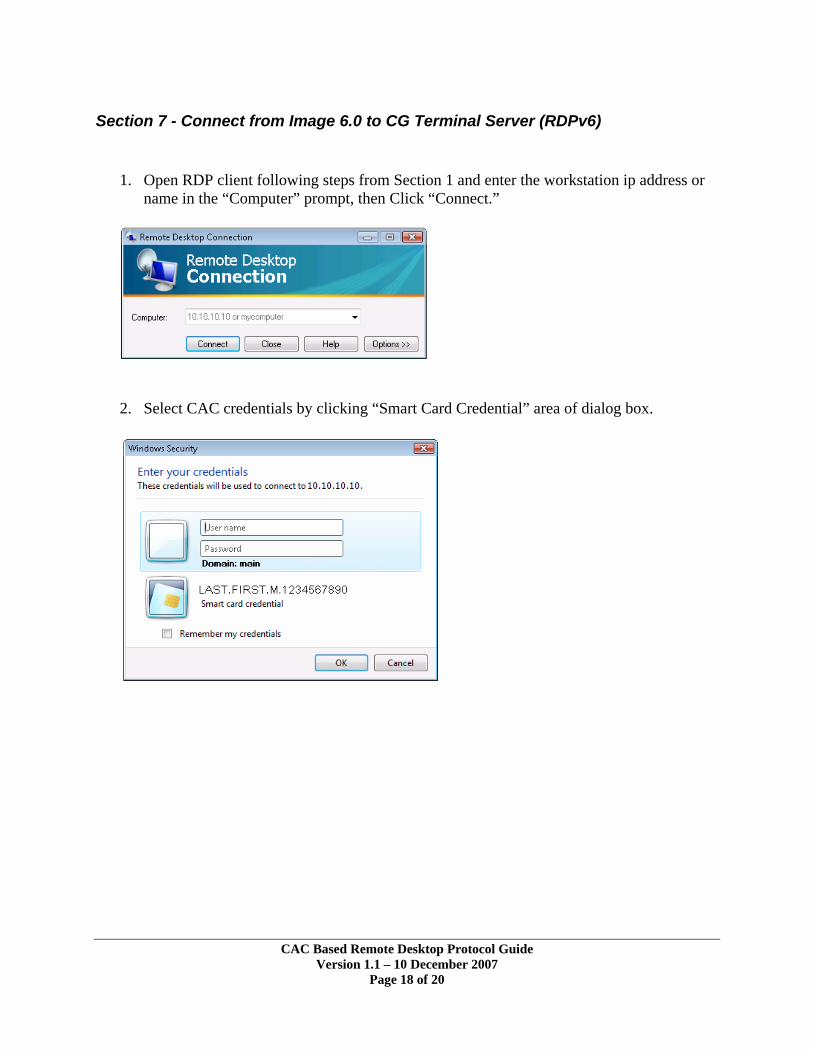
1. Open RDP client following steps from Section 1 and enter the workstation ip address or name in the “Computer” prompt, then Click “Connect.”
2. Select CAC credentials by clicking “Smart Card Credential” area of dialog box.
CAC Based Remote Desktop Protocol Guide Version 1.1 – 10 December 2007
Page 19 of 20
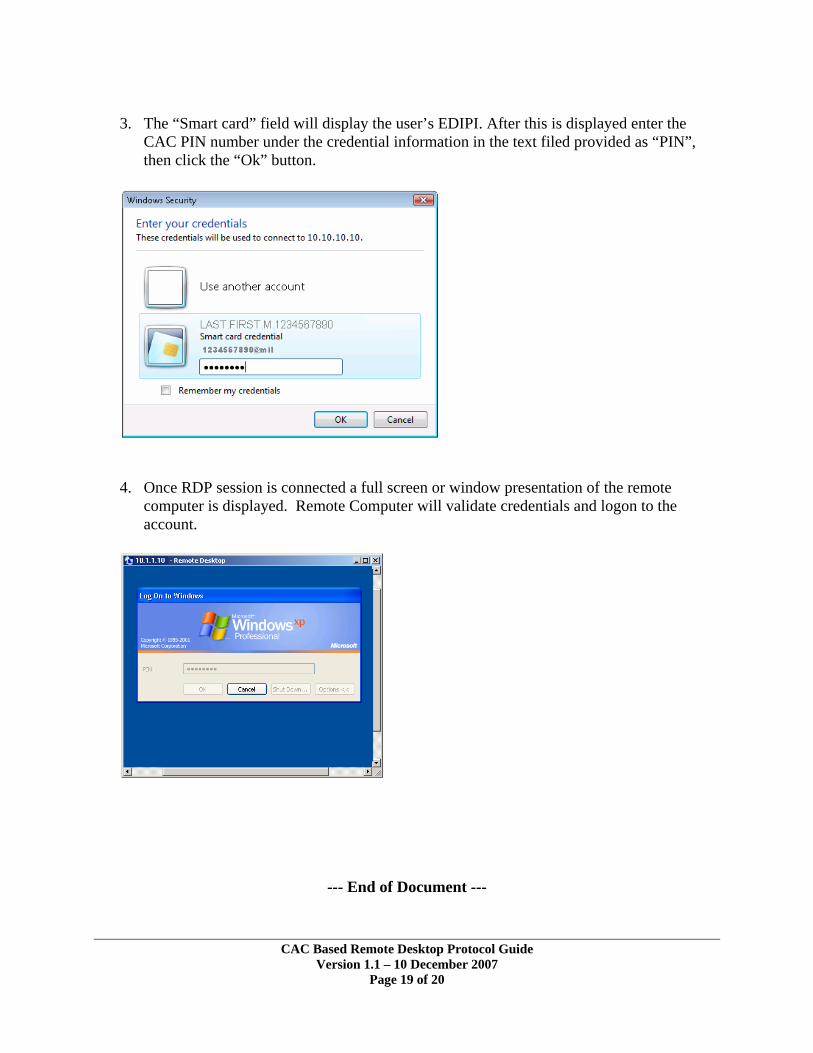
3. The “Smart card” field will display the user’s EDIPI. After this is displayed enter the
CAC PIN number under the credential information in the text filed provided as “PIN”, then click the “Ok” button.
4. Once RDP session is connected a full screen or window presentation of the remote
computer is displayed. Remote Computer will validate credentials and logon to the account.
--- End of Document ---

CAC Based Remote Desktop Protocol Guide Version 1.1 – 10 December 2007
Page 20 of 20