c h a p t e r 2: installation - effective training...
TRANSCRIPT

User Manual for LAN Version

Effective Training Inc. LAN and Site User Manual Jan 2013
1
Trademark Acknowledgements The ETI eLearning System is a trademark of Effective Training Inc. This product is authored using Flex and Flex from Adobe. Copyright 2012 – 2013.
14143 Farmington Rd • Livonia, MI 48154 Phone 1.800.886.0909 • FAX 734.744.5979 [email protected] www.etinews.com
10 9 8 7 6 5 4 3 2 1

Effective Training Inc. LAN and Site User Manual Jan 2013
2

Effective Training Inc. LAN and Site User Manual Jan 2013
3
License Agreements The license agreement for your copy of the ETI eLearning System software can be found in the documentation folder on your ETI eLearning System CD. A hard copy of the license agreement is also included in the packaging. For a new copy of the license agreement, please contact ETI’s sales department at 734-744-5940.

Effective Training Inc. LAN and Site User Manual Jan 2013
4
Table of Contents TRADEMARK ACKNOWLEDGEMENTS .......................................................................................................... 1 LICENSE AGREEMENTS ................................................................................................................................ 3 TABLE OF CONTENTS .................................................................................................................................. 4
C H A P T E R 1: INTRODUCTION ......................................................................................................... 5 WHAT IS THE ETI ELEARNING SYSTEM? WHAT CAN YOU USE IT TO DO? ................................................... 5
C H A P T E R 2: INSTALLATION ........................................................................................................... 7 SOFTWARE AND HARDWARE REQUIREMENTS ............................................................................................. 7
LAN Versions .......................................................................................................................................... 7 INSTALLATION OVERVIEW .......................................................................................................................... 7 NETWORK CONSIDERATIONS ....................................................................................................................... 8
Windows NT/2000/2003/2008 Server Installation Notes ........................................................................ 8 Using a Windows XP, Vista, or Windows 7 PC as the Server ................................................................ 8 Network Drive Letter Mappings ............................................................................................................. 9 Security Rights Requirements ................................................................................................................. 9 Configuring the Computers on the Network to Run the Shared Network Copy of the ETI eLearning System ..................................................................................................................................................... 9 Installation Instructions – Server ..........................................................................................................10
INSTALLATION INSTRUCTIONS – CLIENTS ..................................................................................................11 INSTALLATION INSTRUCTIONS – ADMINISTRATION TOOLS ........................................................................13 INSTALLING THE GD&T ADMINISTRATOR PROGRAM ................................................................................13 INSTALLING THE GD&T REPORTER PROGRAM ..........................................................................................15
C H A P T E R 3: REGISTRATION/ACTIVATION ..............................................................................18 INTERNET REGISTRATION/ACTIVATION .....................................................................................................18 EMAIL REGISTRATION/ACTIVATION ...........................................................................................................20 EMAIL REGISTRATION/ACTIVATION – EXPORT CODES BUTTON ................................................................22
C H A P T E R 4: DEACTIVATION .........................................................................................................25 DEACTIVATION ..........................................................................................................................................25
C H A P T E R 5: GETTING STARTED ..................................................................................................26 LAUNCHING THE ETI ELEARNING SYSTEM ................................................................................................26 NAVIGATION WITHIN THE ETI ELEARNING SYSTEM SOFTWARE................................................................29
C H A P T E R 6: CHECKING QUIZ RESULTS AND PRINTING CERTIFICATES .......................30 CHECKING QUIZ RESULTS ..........................................................................................................................30 PRINTING CERTIFICATES OF COMPLETION ..................................................................................................31
C H A P T E R 7: CONTACTING SUPPORT .........................................................................................32

Effective Training Inc. LAN and Site User Manual Jan 2013
5
C H A P T E R 1: Introduction
What is the ETI eLearning System? What can you use it to do?
The ETI eLearning System is a comprehensive computer-based training program that teaches the fundamentals of geometric dimensioning and tolerancing. It includes 10 courses covering the basic rules, definitions, and concepts of GD&T. The software features detailed, colorful lesson screens with full color animations that demonstrate concepts and help students visualize important topics. The ETI eLearning System lets you choose from the following courses: Fundamentals of GD&T Class Course (2009) – is a complete course in the fundamentals of GD&T based on ASME Y14.5-2009. The course includes 28 lessons, numerous exercises, 28 quizzes and a final exam. Each quiz must be successfully completed in order to progress to the next lesson. The minimum passing score for the quizzes and final exam can be set through the Course Administrator. A certificate of achievement may be printed upon completion. Fundamentals of GD&T Seminar Course (2009) – has the same lesson content as the class course without the quizzes or final exam. Lessons can be viewed in any order. When the course is finished, a certificate of completion may be printed. GD&T Certification Test (2009) – is a 150-question test that covers the fundamentals of GD&T and verifies the student’s mastery of the topic. A certificate may be printed upon receiving a score of 90% or higher. GD&T Skills Survey (2009) – is a 50-question skills survey that measures your knowledge of the fundamentals of GD&T based on ASME Y14.5-2009. GD&T Comparison (1994-2009) – This course covers over sixty significant revisions, additions, and deletions to the new standard. You'll learn how the subject matter has been reorganized, and about new sections that have been created for profile, orientation, and form. Fundamentals of GD&T Class Course (1994) – is a complete course in the fundamentals of GD&T based on ASME Y14.5M-1994. The course includes 28 lessons, numerous exercises, 28 quizzes and a final exam. Each quiz must be successfully completed in order to progress to the next lesson. The minimum passing score for the quizzes and final exam can be set through the Course Administrator. A certificate of achievement may be printed upon completion. Fundamentals of GD&T Seminar Course (1994) – has the same lesson content as the class course without the quizzes or final exam. Lessons can be viewed in any order. When the course is finished, a certificate of completion may be printed. Fundamentals of GD&T Overview (1994) – This accelerated course provides a short introduction to GD&T fundamentals, with no quiz or final exam. Based on ASME Y14.5M-1994 GD&T Certification Test (1994) – is a 150-question test that covers the fundamentals of GD&T and verifies the student’s mastery of the topic. A certificate may be printed upon receiving a score of 90% or higher.

Effective Training Inc. LAN and Site User Manual Jan 2013
6
GD&T Skills Survey (1994) – is a 50-question skills survey that measures your knowledge of the fundamentals of GD&T based on ASME Y14.5M-1994. The ETI eLearning System also includes the following tools: The Digital Design Dictionary (1994 & 2009) – The Digital Design Dictionary is a desktop research tool that defines over 200 technical terms used on engineering drawings. It includes drawing conventions, geometric dimensioning and tolerancing (GD&T), solid model tolerancing, gages and fixtures, casting and forgings, and more. Includes versions based on both ASME Y14.5-2009 and ASME Y14.5M-1994 The Quick Reference (1994 & 2009) – The software includes 220 topics that cover GD&T fundamentals, and each definition provides a full explanation of the concept, highlighted with colorful, detailed graphics. Many topics include animations so users can visualize the concept and understand it more readily, and topics are also cross-referenced to paragraphs in the ASME Y14.5-2009 and ASME Y14.5M-1994 Dimensioning and Tolerancing Standards.

Effective Training Inc. LAN and Site User Manual Jan 2013
7
C H A P T E R 2: Installation
Software and Hardware Requirements In order to make sure that the ETI eLearning System software works correctly and efficiently, please review the following hardware and software requirements. LAN Versions
Hardware Requirements
File Server* Client Workstations • Pentium 4-based computer with a
2GHz or higher CPU • 512 MB RAM minimum, 1024MB or
higher recommended • 4 GB hard drive space minimum, 8
GB or more recommended * The file server stores files; it does not run any processes. All processing is done by the client workstations.
• Pentium 4-based computer with a 2GHz or higher CPU
• 512 MB RAM minimum, 1024MB or higher recommended
• 500 MB or more of free hard drive space
• SoundBlaster or compatible sound card • Video card capable of displaying 24-bit
color at a resolution of 1024x768
Software Requirements
File Server* Client Workstations • Microsoft Windows Server
2003/2008/Novell Netware 5 or later • Windows XP Professional, Windows
Vista, Windows 7 (requires latest service packs and that PC be setup for file and printer sharing)
* The file server stores files; it does not run any processes. All processing is done by the client workstations.
• XP (all versions with Service Pack 3 or higher installed), XP Professional 64-bit, Windows Vista (all versions), Windows 7 (all versions)
• Adobe Flash Player 10.0 or higher • Visual Basic 6 Runtime (Admin and
Reporter only) • .NET Framework 2.0
Installation Overview The following guidelines will help you determine how to install the ETI eLearning System software correctly the first time. The ETI eLearning System software is available in several different options:
• The single-user can be installed on single desktop machine • The multi-user can be installed on a single computer for use by multiple individuals • The LAN version can be installed on a network server and shared by many users across a local
area network, at one physical site. LAN versions of the software cannot be accessed via WAN, VLAN, VPN, or dial-up connections, as this is a direct violation of the software license.
• The site version can be installed at one physical site. It supports a larger number of concurrent users than the LAN version. This version cannot be accessed via WAN, VLAN, VPN, or dialup connections.

Effective Training Inc. LAN and Site User Manual Jan 2013
8
• The corporate version can be installed on as many file servers as a company would like and supports the largest amount of concurrent users. Corporate versions can be accessed via WAN, VLAN, VPN, and dialup connections. Remote users will notice slower performance. Installing a separate file server for each physical location is recommended for performance reasons.
Although the ETI eLearning System is available in several versions, each version ships on its own media, so only one of those options will be available to you. Your installation option depends upon which version was purchased. Attempting to install a single-user or multi-user version to a network server will cause the software to fail to function. Network Considerations When the ETI eLearning System is used in a network environment, it is designed to be installed to a file server or to a workstation that supports file sharing. All the computers on the network will share this network installation. It is not designed to be used by installing a full copy of the software on each computer connected to the network. Rather, the user installation should be run on each computer to configure it to use the software installation. When running the user installation, it must use the same path that the software portion was installed to. For example, if you run the software installation portion to \\server\ apps\ETI_eLearning_System, all client PCs have to run setup.exe from \\server\apps\ ETI_eLearning_System. Using any other path or a mapped drive letter will result in the user PCs not being able to properly access the software and/or problems with repeated requests to activate the software. For a file server installation, select one of the user computers attached to the network run the software instllation. The software installation should not be installed using the actual file server; it must be installed to the share using a different PC. Start the installation software. When the installation software asks where you would like to install the ETI eLearning System, browse to or type in your UNC path. The network share must support long file names. The supported network operating systems for the ETI eLearning System are Microsoft Windows XP/2003/Vista/7 and Novell NetWare. All versions of Microsoft Windows XP/2003/Vista/7 support long file names. Certain versions of Novell Netware do not support long file names; make sure that your version supports long file names before installing the software to a Novell Netware server. Windows 2003/2008/Novell Server Installation Notes IMPORTANT: Do not install the ETI eLearning System directly to a 2003/2008/Novell server. The installation is not intended to be run on the file server. The server installation is run from one of the other computers attached to the network. The ETI eLearning System should not be run on the Windows 2003/2008/Novell computer that is being used as the server itself. It should only be run from the client computers on the network. To correctly install the software to the server, please do the following: • Run the installation from one of the computers attached to the network. • When asked where you want to install the ETI eLearning System, select the Windows
2003/2008/Novell server share, via UNC path. Using a Windows XP, Vista, or Windows 7 PC as the Server The file server installation of the ETI eLearning System Professional software can be performed on any Windows XP/Vista/7 computer that is configured to allow file and printer sharing. The steps are identical to those used when performing the software server installation onto a Windows 2003/2008/Novell server. It is recommended that simple file sharing be turned off on Windows XP, Windows Vista, and Windows 7 PCs that are being used for the server installation. Also, the “Everyone” group should be given full access to the folder being shared at the file and share level.

Effective Training Inc. LAN and Site User Manual Jan 2013
9
Network Drive Letter Mappings The use of mapped drive letters is NOT recommended. It is best to use the UNC path to the share (e.g. - \\server\ ETI_eLearning_System) on the file server.
Security Rights Requirements All ETI eLearning System users need to have full network rights to all the files in the “\ETI_eLearning_System” folder and subfolders. Configuring the Computers on the Network to Run the Network Copy of the ETI eLearning System The software installation installs all the common shared files. It is necessary to run the user installation (User Installer.exe) at each workstation that will be using the ETI eLearning System. The user installation will create a Start Menu program group and all of the shortcuts required to launch the ETI eLearning System. See the “File Server Installation” topic below for more details.
Effective Training Inc. LAN and Site User Manual Jan 2013
10
Installation Instructions – File Server Before you follow these instructions, you should have completed the following steps on your file server:
• Created a folder for the ETI eLearning System • Shared the folder • Set the permissions on this folder (both NTFS and share level) as the “Security Rights
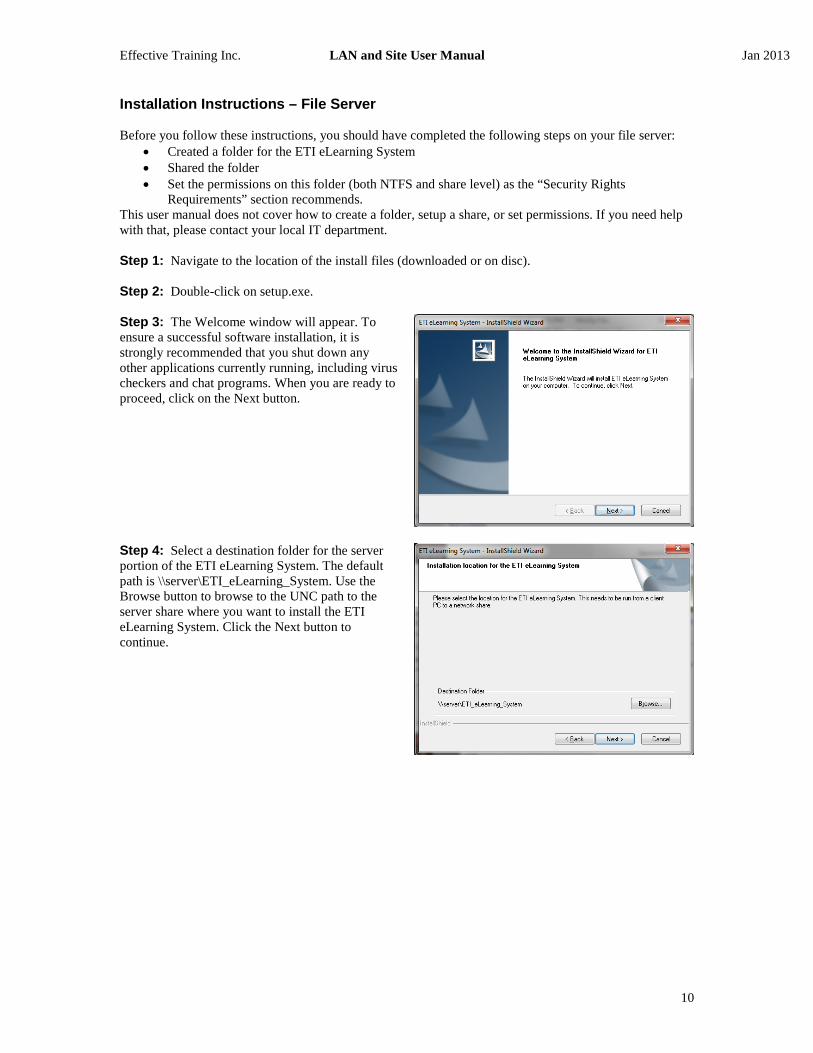
Requirements” section recommends. This user manual does not cover how to create a folder, setup a share, or set permissions. If you need help with that, please contact your local IT department. Step 1: Navigate to the location of the install files (downloaded or on disc). Step 2: Double-click on setup.exe. Step 3: The Welcome window will appear. To ensure a successful software installation, it is strongly recommended that you shut down any other applications currently running, including virus checkers and chat programs. When you are ready to proceed, click on the Next button.
Step 4: Select a destination folder for the server portion of the ETI eLearning System. The default path is \\server\ETI_eLearning_System. Use the Browse button to browse to the UNC path to the server share where you want to install the ETI eLearning System. Click the Next button to continue.

Effective Training Inc. LAN and Site User Manual Jan 2013
11
Step 5: The installation will now begin. The progress meter reveals the current state of the installation routine.
Step 6: Once the installation has completed, you will see the InstallShield Wizard Complete screen. Click the Finish button to exit the installer. If this computer will be running the ETI eLearning System software, proceed to the Installation Instructions – User Installation section. Proceed to the Registration/Activation chapter of this manual if this computer will not be running the ETI eLearning System software.
Installation Instructions – User Installation These instructions should only be followed for computers on which you intend to run the ETI eLearning System software. These instructions should never be followed on the server itself. Step 1: Browse to the location where you installed the software portion of the ETI eLearning System software. Locate the folder named Administrator Tools

Effective Training Inc. LAN and Site User Manual Jan 2013
12
Step 2: Double-click on the User Installer in \\server\ETI_eLearning_System\Administrator Tools.
Step 3: Click the Next button to continue. Step 4: The License Agreement window will appear. Read through the agreement using the scroll bar to advance. If you accept the terms of the agreement, select the “I accept the agreement” option and click on the Next button to continue.
Step 5: The user portion of the ETI eLearning System will be installed. You may also be prompted to install the .Net Framework 2.0 and the Adobe Flash Player. Both of these are required for the ETI eLearning System to function, and it is highly recommended that you install them if prompted.

Effective Training Inc. LAN and Site User Manual Jan 2013
13
Step 6: At the very end of the install you may notice a window that pops up and disappears quickly. This is a normal part of the installation. It configures the .NET Framework 2.0, allowing the ETI eLearning System client to properly access the network files.
Step 7: Click on the Finish button to complete the installation. If you have not registered the ETI eLearning System yet, proceed to the Registration/Activation section.
Installation Instructions – Administration Tools The administration tools for the ETI eLearning System consist of the GD&T Administrator and the GD&T Reporter programs. The GD&T Administrator is a program that allows the training administrator to create and delete students, reset forgotten passwords, adjust passing score requirements and more. Installing the program on more than one computer is not recommended. If multiple users try to use the GD&T Administrator program at the same time, only the changes of the first person to launch the software will be saved. The GD&T Reporter can be installed on as many computers as desired. The application allows users to create many different reports about the progress of the students using the ETI eLearning System software. Each administration tool has its own installer. Both installers are included in the ETI eLearning System in the Administration Tools folder. The following installation instructions detail how to install each administration tool. Installing the GD&T Administrator Program Step 1: Browse to the location where you installed the software portion of the ETI eLearning System software. Step 2: Double-click on the Administrator shortcut in ETI_eLearning_System\Administrator Tools.

Effective Training Inc. LAN and Site User Manual Jan 2013
14
Step 3: The Welcome to the InstallShield Wizard for GD&T Administrator window will open. Click on the Next button to proceed.
Step 4: The next window asks where the server portion of the software has been installed. This must point to the location on your server that was used during the installation of the network portion. Click on the Next button to proceed. Example: if you installed the ETI eLearning System to \\server\apps\ETI_eLearning_System, then you would click on the Browse button and select that folder during this step. Selecting any other path will cause the GD&T Administrator to install incorrectly and not function.
Step 5: This window asks for a local location to install the actual GD&T Administrator runtime files. The default location is C:\ETI\Administration Tools. You can leave it at this path, or you can change it to a different location if desired. ETI recommends installing the Administrator to a location on your hard drive, and not to a network location. Once you have the installation path for the local runtime files set, click on the Next button to proceed.

Effective Training Inc. LAN and Site User Manual Jan 2013
15
Step 6: You will now be asked to select a Program Folder on your Windows start menu for the program icons. Click Next to accept the default location, or select an existing group, then click Next to proceed.
Step 7: A window appears informing you that the installation is ready to proceed. Click the Back button to make changes to the locations entered in steps 5 through 7, if needed, or click the Install button to continue.
Step 8: A window displaying the installation progress will pop up. Once installation has completed, you may be asked to restart your computer so the program will function properly. Click the Finish button. The installer will close and your computer will be rebooted. If you are not prompted to reboot, click the Finish button to complete the installation.
Installing the GD&T Reporter Program

Effective Training Inc. LAN and Site User Manual Jan 2013
16
Step 1: Browse to the location where you installed the software portion of the ETI eLearning System software. Step 2: Double-click on the Reporter shortcut in ETI_eLearning_System\Administrator Tools. Step 3: The Welcome to the InstallShield Wizard for GD&T Reporter window will open. Click the Next button to proceed.
Step 4: This window asks where the server portion of the software has been installed. This must point to the location on your server that was used during the installation of the network portion. Click the Next button to proceed. Example: if you installed the ETI eLearning System to \\server\apps\ETI_eLearning_System, then you would click on the Browse button and select that folder during this step. Selecting any other path will cause the GD&T Reporter to install incorrectly and not function.
Step 5: This window asks for a local location to install the actual GD&T Reporter runtime files. The default location is C:\ETI\Administration Tools. Leave it at this path, or can change it to a different location if desired. ETI recommends installing the Administrator to a location on your hard drive, and not to a network location. Once you have the installation path for the local runtime files set, click on the Next button to proceed.

Effective Training Inc. LAN and Site User Manual Jan 2013
17
Step 6: You will now be asked to select a Program Folder on your Windows start menu for the program icons. Click Next to accept the default location, or select an existing group, then click Next to proceed.
Step 7: A window informs you that the installation is ready to proceed. Click the Back button to make changes to the locations entered in steps 5 through 7 if needed, or Click the Install button to continue.
Step 8: Once installation is complete, you may be asked to restart your computer so the program will function properly. Click on the Finish button. The installer will close and your computer will be rebooted. If you are not prompted to reboot, click the Finish button to complete the installation.

Effective Training Inc. LAN and Site User Manual Jan 2013
18
C H A P T E R 3: Registration/Activation
Once you have completed the ETI eLearning System software installation, the software must be registered or it will not function. You will be prompted to register the first time you run the ETI eLearning System, Quick Reference, or the Digital Design Dictionary. ETI offers three registration methods: internet, email, or an export code option. The registration process must be done while logged into the computer as an Administrator. If the registration process is done by a non-administrator, it will fail and the software must be uninstalled and reinstalled to repair the damaged files. You must deactivate your software before attempting to move it to a new computer or network server, or before attempting to reinstall it for any reason. Effective Training Inc. limits the number of times the ETI eLearning System can be registered and reserves the right to deny registration. If you are unable to deactivate your installation, please contact ETI technical support by emailing [email protected]. Internet Registration/Activation The ETI Registration Center is only installed on the computer where the server portion of the ETI eLearning System is installed. This is to prevent end-users from accidentally breaking a previously successful activation. Step 1: To begin the registration process, launch the ETI Registration Center. A shortcut to the tool is in the \\server\apps\ETI_eLearning_System\Administrator Tools Folder Step 2: The ETI Registration Center window will open. Click the Register/Activate button to proceed.

Effective Training Inc. LAN and Site User Manual Jan 2013
19
Step 3: Fill in all of the required fields as shown, then click the Next button to proceed. The Serial Number of your software is located on the front of the ETI eLearning System CD. The License ID and Password information is located on the back of the CD jewel case. Be sure that you enter your License ID and Password correctly. If not, activation will fail.
Step 4: Verify that the information you entered in Step 3 is correct. Click the Back button if you need to make changes. Click the Next button to proceed.
Step 5: Select a registration method. Click the Activate button to proceed with the internet method.
Step 6: If you entered your License ID and Password in Step 3, and your internet connection is active, you should see the Congratulations window. Click the Exit button to close the window. Proceed to Chapter 4 for information about how to launch the ETI eLearning System software. If you receive an error message that says Invalid Activation Data, verify that you entered your License ID and Password correctly. If you receive an error that says No Remaining Activations, please email [email protected].

Effective Training Inc. LAN and Site User Manual Jan 2013
20
Email Registration/Activation Step 1: To begin the registration process, launch the ETI Registration Center. A shortcut to the tool is in the \\server\apps\ETI_eLearning_System\Administrator Tools Folder Step 2: The ETI Registration Center window will open. Click the Register/Activate button to proceed.
Step 3: Fill in all of the required fields as shown, then click the Next button to proceed. The Serial Number of your software is located on the front of the ETI eLearning System CD. The License ID and Password information is located on the back of the CD jewel case. Be sure that you enter your License ID and Password correctly. If not, registration/activation will fail.
Step 4: Verify that the information you entered in Step 3 is correct. Click the Back button if you need to make changes. Click the Next button to proceed.

Effective Training Inc. LAN and Site User Manual Jan 2013
21
Step 5: Select a registration method. Click the Email Activate button to proceed with the email method.
Step 6: Click the Send Email button. You will receive a message thanking you for sending in your registration information. When you close the message, the ETI Registration Center will also close. When you receive an email from ETI with your activation code, proceed to Step 7.
Step 7: Run the ETI Registration Center as instructed in Step 1. Click the Continue Registration button.
Step 8: You will be returned to the window from Step 6. Copy the Activation Code from the email and paste it into the box on this page, then click the Activate button.

Effective Training Inc. LAN and Site User Manual Jan 2013
22
Step 9: If you have copied and pasted your activation code correctly, you should see the Congratulations window. Click the Exit button to close the ETI Registration Center. Proceed to Chapter 4 for information about how to launch the ETI eLearning System software.
Email Registration/Activation – Export Codes Button This option should only be used if you do not have internet access, or if the internet activation fails, and you receive a Status 417 error when attempting the email registration. Step 1: To begin the registration process, launch the ETI Registration Center. A shortcut to the tool is in the \\server\apps\ETI_eLearning_System\Administrator Tools Folder Step 2: The ETI Registration Center window will open. Click the Register/Activate button to proceed. The icon is located on the desktop of the computer you used for the server portion of the ETI eLearning System installation.
Step 3: Fill in all of the required fields as shown, then click the Next button to proceed. The Serial Number of your software is located on the front of the ETI eLearning System CD. The License ID and Password information is located on the back of the CD jewel case. Be sure that you enter your License ID and Password correctly. If not, registration/activation will fail.

Effective Training Inc. LAN and Site User Manual Jan 2013
23
Step 4: Verify that the information you entered in Step 3 is correct. Click the Back button if you need to make changes. Click the Next button to proceed.
Step 5: Select a registration method. Click the Email Activate button to proceed with the email method.
Step 6: Click the Export Code button. A pop-up appears stating that your registration details have been saved to: “C:\ETI\GDTTrainer\RegistrationCode.txt” You must find a means to transfer the text file from this computer to a computer that can send email. Email the file as an attachment to [email protected]. You will receive a return email with the activation code within two business days. Close the ETI Registration pop-up.
Step 7: Once you receive the activation code via email, copy and paste it into a text file. Save the text file and find a means to transfer it to the computer where you were using for the registration. Run the ETI Registration Center as instructed in Step 1. Click the Continue Registration button.
Effective Training Inc. LAN and Site User Manual Jan 2013
24
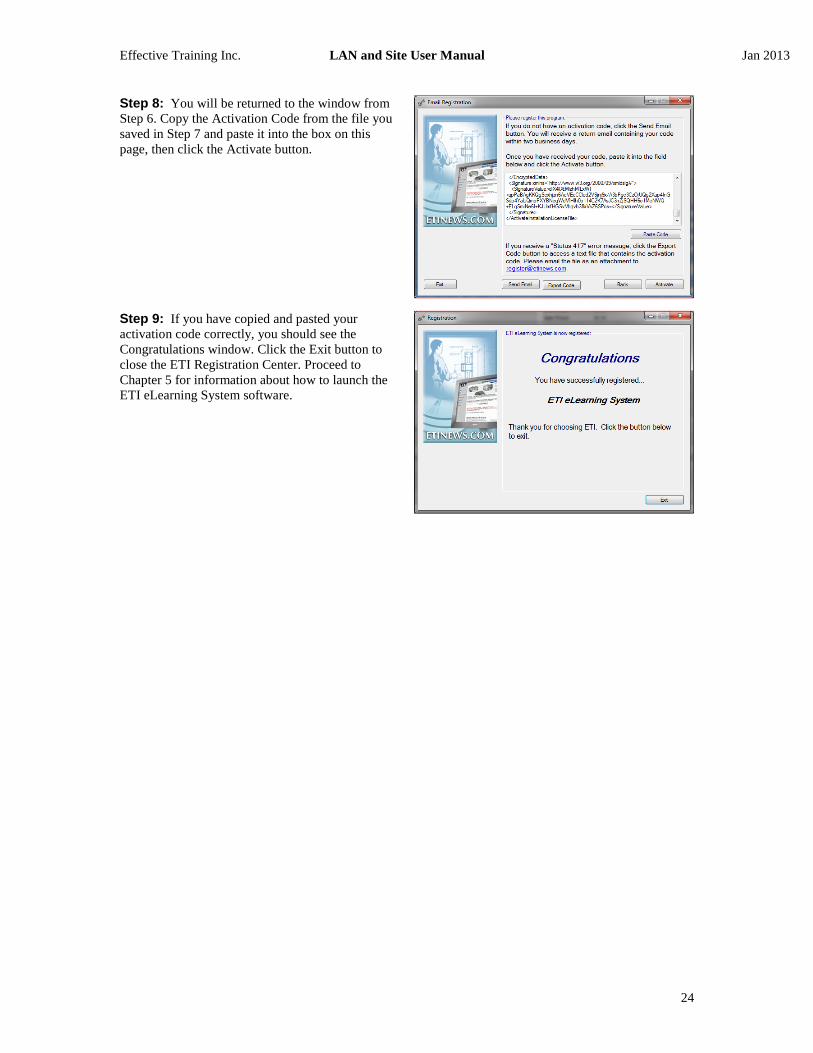
Step 8: You will be returned to the window from Step 6. Copy the Activation Code from the file you saved in Step 7 and paste it into the box on this page, then click the Activate button.
Step 9: If you have copied and pasted your activation code correctly, you should see the Congratulations window. Click the Exit button to close the ETI Registration Center. Proceed to Chapter 5 for information about how to launch the ETI eLearning System software.

Effective Training Inc. LAN and Site User Manual Jan 2013
25
C H A P T E R 4: Deactivation
You must deactivate your software before attempting to move it to a new computer or network server, or before attempting to reinstall it for any reason. Effective Training Inc. limits the number of times the ETI eLearning System can be registered and reserves the right to deny registration. If you are unable to deactivate your installation, please contact ETI technical support by emailing [email protected]. You must have an active internet connection in order to deactivate your software. Deactivation Step 1: To begin the deactivation process, launch the ETI Registration Center. The icon is located on the desktop of the computer you used for the server portion of the ETI eLearning System installation. It is not installed during the client installation process. Step 1A: If you don’t know which computer was used for the server portion of the installation, browse to the server share, via the UNC path, where the server portion was installed, then double-click on etiRegistration.exe. Step 2: The ETI Registration Center window will open. Click the Deactivate button to proceed.
Step 3: Fill in all of the required fields as shown, then click the Next button to proceed. The License ID and Password information is located on the back of the CD jewel case. Be sure that you enter your License ID and Password correctly. If not, deactivation will fail.

Effective Training Inc. LAN and Site User Manual Jan 2013
26
Step 4: Verify that you want to deactivate your software. Click the Yes button to proceed.
Step 5: If you have an active internet connection, deactivation is complete. Click the OK button to close the ETI Registration Center. You can now uninstall the ETI eLearning System software from your computer via the Control Panel, then install it and register it on another computer. C H A P T E R 5: Getting Started
The ETI eLearning System is now installed and registered, and you are ready to begin training. We highly suggest you run through the ETI eLearning System Tutorial first to get an idea of how to navigate through the software. To access the tutorial from within the ETI eLearning System, follow these steps:
• Launch the ETI eLearning System • Log into the Trainer • Select any of the courses available
At the main menu, the first link will launch the tutorial. Launching the ETI eLearning System Click the START button, select All Programs, select The ETI eLearning System, then click The ETI eLearning System icon. Once the ETI eLearning System has started, you will see the student selection window.

Effective Training Inc. LAN and Site User Manual Jan 2013
27
First time users must create an account by performing the following steps:
• Type in the last name, first name, and a password • Click the OK button • Verify the selected password
A returning student can simply:
• Click his or her name • Type the correct password • Click the OK button
.

Effective Training Inc. LAN and Site User Manual Jan 2013
28
The main menu will appear. For details about a course, click on the course name and read about it in the Course Description window. To select a course, double click the course name, or select a course and then click the advance to course button. At the main menu, you can select from the following options:
• License Information - Displays the registration information • Credits - Lists the people involved with the creation and development of the software • Audio On/Off - Allows the user to turn sound on or off for the entire course.

Effective Training Inc. LAN and Site User Manual Jan 2013
29
Navigation Within the ETI eLearning System Software As a quick reference, each element of the ETI eLearning System has been numbered in the screenshot below. See a brief description of each element below the image.
1. Lesson Topic – The topic being discussed on this page of the lesson 2. Lesson Title – The name of the lesson 3. Progress Meter – How far into the lesson you have progressed 4. Text Palette – Lesson content is shown here if audio is disabled 5. Page Navigation – Click on the page number to reveal a navigation menu that allows you to skip
to any page within the lesson 6. Navigation Controls – Move forward and back one page at a time 7. Audio Controls – Mute, restart, and pause page audio 8. Author’s Comment – When active, click the icon to reveal insights from Alex Krulikowski 9. Digital Design Dictionary – Click to access a reference dictionary of topics related to GD&T and
design 10. ASME Standard Reference – When active, put your mouse over the icon to display pages in the
ASME standards that cover the topic being discussed 11. Ultimate Pocket Guide page reference –The page number in the Ultimate Pocket Guide that
corresponds to the current topic 12. Lesson text and/or graphic content – Additional text, graphics, formulas, or charts that reinforce
the lesson content

Effective Training Inc. LAN and Site User Manual Jan 2013
30
C H A P T E R 6: Checking Quiz Results and Printing Certificates
Checking Quiz Results At the end of each lesson in the Fundamentals - Class course, you must take a quiz before proceeding to the next lesson. Once you have completed the quiz, the results can be reviewed on the last screen; however, a complete list of correct answers to the quizzes is not available. You can also access all your quiz scores in one report. To review quiz scores: Step 1: Click the START button, select All Programs, select The ETI eLearning System, then click The ETI eLearning System icon. Step 2: The Student Sign-on screen will load. Select your name from the list of students, type in your password, and click the OK button. Step 3: Select the course that contains the quiz results you would like to review and click the OK button. Step 4: After the introduction, the main menu will appear. Click on the Lesson Index to continue. Step 5: The Lesson Index will load. Click the Student Info button located in the upper right corner of the screen.
Step 6: The Student Information window will load. Select the lesson that contains the quiz results you would like to view by clicking the name in the upper right corner. The last ten quiz dates will appear in the left-most column in the bottom right corner of the window. Select the desired date, then click on the View Your Student Report button in the bottom left corner.

Effective Training Inc. LAN and Site User Manual Jan 2013
31
Step 7: The Student Report window will open. At the bottom of the window are two buttons: Print Report and Save Report. Print Report* allows you to print the contents of the Summary or Details tab to your default printer. Save Report allows you to save the contents of the Summary or Details tab to a plain text file, a comma separated value file (CSV), or a database file. When you are done reviewing the results, click the OK button to return to the Student Information Screen. You can then select a different test date or lesson test to review, or you can click on the OK button to return to the software Lesson Index. * When printing the reports, you may need to manually go into your printer’s settings via the Control Panel and set it to print to Landscape by default. You must make this change BEFORE clicking on the Print Report button, or your printout will be in the portrait layout, and may not display properly on the printed page.
Printing Certificates of Completion Once a course is finished, the student can print a certificate of completion. To receive the certificate, the student must have worked through every lesson and must have passed each quiz with the default score of 70% or higher. The passing score can be changed in the GD&T Administrator program. Certificates can be printed as many times as desired. Step 1: Click the START button, select All Programs, select The ETI eLearning System, then click The ETI eLearning System icon. Step 2: The Student Sign On screen will load. Select your name from the list of students, type in your password, and click on the OK button. Step 3: Select the course that has been successfully completed. Step 4: The certificate icon will appear in the bottom left of the screen.

Effective Training Inc. LAN and Site User Manual Jan 2013
32
Step 6: The certificate will be displayed on screen. In the lower left corner of the certificate is a Print button. Step 7: Click the Print button. The print dialog will come up. Select the printer you want to print to, then click on the OK button to print your certificate. C H A P T E R 7: Contacting Support
Contact ETI’s Technical Support department by submitting a ticket online at http://support.etinews.com or via email to [email protected]. You must have your serial number available. Without it, ETI cannot provide any technical support. If you have a valid Software Maintenance Agreement, please register an account on our support portal, http://support.etinews.com, to have access to knowledge-base articles, product updates, and all your technical support tickets. Technical support for non-installation related issues requires a valid Software Maintenance Agreement. For information on Software Maintenance Agreements, please contact the ETI Sales Department at 734-744-5940 or via email at [email protected].