blackboard training - segi...
TRANSCRIPT
Blackboard Training- Phase 3 Managing Assessment
1
BLACKBOARD TRAINING
PHASE 3
MANAGING ASSESSMENT
Assessment with Rubric page 5-6
Inline Grading page 7-8
Full Grade Center page 11-18
Retention Center page 19-20
My Grades (Students’ Favourite Page) page 24-25

Blackboard Training- Phase 3 Managing Assessment
2
Table of Content
PART1AddaGradingSchematotheGradeCenter.....................................................................................3PART2AssessmentwithRubric.........................................................................................................................52.1SubmittingSampleAssignmentwithStudentPreview.....................................................................................52.2GradingbyRubricinGradeCenter..........................................................................................................................5
PART3InlineGrading............................................................................................................................................7PART4GradedInteractiveTools........................................................................................................................94.1GradedJournal................................................................................................................................................................94.2GradedBlog......................................................................................................................................................................94.3GradedDiscussionBoard.........................................................................................................................................10
PART5GradeCenter............................................................................................................................................115.1ExploringGradeCenter.............................................................................................................................................115.1.1EnteringMarksintotheGradeColumn............................................................................................................................115.1.2OverridingMarks.......................................................................................................................................................................115.1.3RevertOverridingMarksbacktoOriginalGrade.........................................................................................................11
5.2AddingAColumn(NotGradedbythesystem)..................................................................................................135.3CustomisedWeightedTotal....................................................................................................................................145.4CreatingaGradingPeriod........................................................................................................................................165.5ColumnOrganisation.................................................................................................................................................175.6DownloadingGradesFromtheGradeCenter....................................................................................................185.7UploadingGradestotheGradeCenter................................................................................................................18
PART6RetentionCenter....................................................................................................................................196.1EarlyWarningSystem...............................................................................................................................................196.1.1CustomizingActivityRule.......................................................................................................................................................196.1.2CustomizingCourseAccessRule.........................................................................................................................................196.1.3CustomizingGradeRule..........................................................................................................................................................206.1.3CustomizingMissedDeadlineRule.....................................................................................................................................20
PART7CourseReport..........................................................................................................................................217.1GeneratingCourseReport........................................................................................................................................21
PART8PerformanceDashboard.....................................................................................................................23PART9MyGrades.................................................................................................................................................249.1CreatingaContentAreaforMyGrade.................................................................................................................249.2ViewingMyGradeinStudentPreview.................................................................................................................25
PART10BlackboardTeam(SEGiUniversity&CollegeKD)...................................................................26

Blackboard Training- Phase 3 Managing Assessment
3
PART 1 Add a Grading Schema to the Grade Center NOTES: SEGi University and Colleges use the grading system as follows:
1. Goto Control Panel on the sidebar, expand
Grade Center and click Full Grade Center.
2. Click Manage in the Action Bar of the Grade
Center.
3. Select Grading Schema from the Action Link menu.
4. On Grading Schemas page, click on the
contextual menu (arrow down) next to “Letter” and click on Edit.
5. Enter a Description, “Grade A-F” for the Grading Schema. 6. In the Schema Mapping section, follow the settings of figure below:
• In the Grades Scored Between text box, enter the percentage range for the letter grade. • In the Will Equal text box, enter the letter grade. • In the Will Calculate as text box, enter the percentage value to be used if a letter grade is
entered manually.
SEGi Grading System
CGPA System
Marks
Grade Letter Grade
Percentage Grade Point
75 to 100
Distinction A 80 – 100 4.00 A- 75 – 79 3.70
55 to 74
Credit B+ 70 – 74 3.30 B 65 – 69 3.00 B- 60 – 64 2.70 C+ 55 – 59 2.30
50 to 54
Pass * C 50 – 54 2.00
0 to 49
Fail C- 45 – 49 1.70 D 40 – 44 1.30 D- 35 – 39 1.00 F 0 – 34 0.00
X Absent EX Exempted

Blackboard Training- Phase 3 Managing Assessment
4
• Add more grading levels by clicking on the Insert Row buttons that look like left pointing arrows.
• Click Delete Row to remove unwanted rows. • Repeat steps for all letter grade values you want to edit.
7. Click Submit.

Blackboard Training- Phase 3 Managing Assessment
5
PART 2 Assessment with Rubric 2.1 Submitting Sample Assignment with Student Preview
1. Enter Student Preview by clicking the icon appears in the top-right corner of your course page.
2. Click Assignment on the sidebar; click “Assignment 1” or any assignment that you have
created. 3. If you are on Preview Assignment page, Please click Continue.
OR If you are on Review Submission History Page, Please click Start New button to do a new submission. OR If you are on Upload Assignment Page, goto Assignment Submission section, click Browse My Computer to locate the given sample assignment, “Submission2-Individual Asg.docx”. Optionally you may click on the Write Submission, copy and paste the content into it.
4. Click Submit. 5. Exit Student Preview.
2.2 Grading by Rubric in Grade Center
1. Goto Control Panel on the sidebar and expand Grade Center and click Needs Grading.
2. On Needs Grading page, under User Attempt, click “your_name_PreviewUser”, the latest attempt to
review the sample submission document that you have attached.
Blackboard Training- Phase 3 Managing Assessment
6
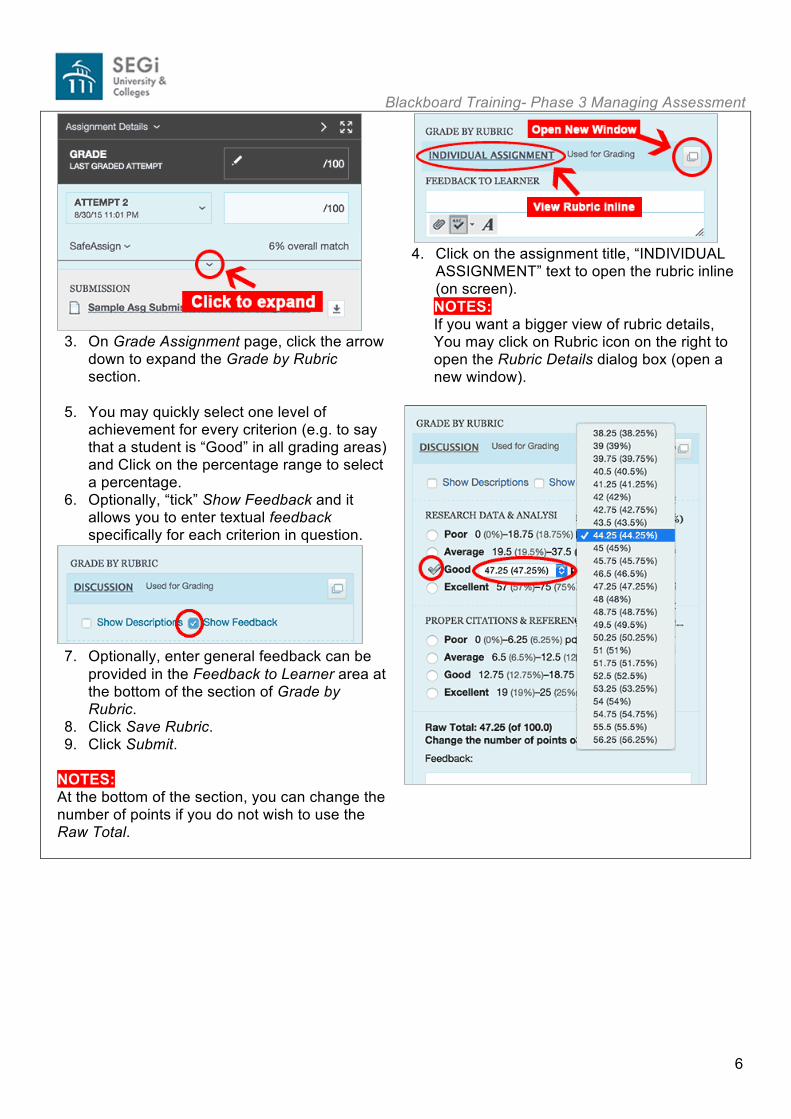
3. On Grade Assignment page, click the arrow
down to expand the Grade by Rubric section.
4. Click on the assignment title, “INDIVIDUAL
ASSIGNMENT” text to open the rubric inline (on screen). NOTES: If you want a bigger view of rubric details, You may click on Rubric icon on the right to open the Rubric Details dialog box (open a new window).
5. You may quickly select one level of achievement for every criterion (e.g. to say that a student is “Good” in all grading areas) and Click on the percentage range to select a percentage.
6. Optionally, “tick” Show Feedback and it allows you to enter textual feedback specifically for each criterion in question.
7. Optionally, enter general feedback can be
provided in the Feedback to Learner area at the bottom of the section of Grade by Rubric.
8. Click Save Rubric. 9. Click Submit.
NOTES: At the bottom of the section, you can change the number of points if you do not wish to use the Raw Total.

Blackboard Training- Phase 3 Managing Assessment
7
PART 3 Inline Grading With Inline Grading, you can grade, provide feedback, and make notes for yourself without leaving the Grade Assignment page. When a document submission is made, it will be converted to a viewable format on the Grade Assignment page. NOTES: After an assignment is graded, you will no longer find it in Needs Grading page. Therefore, if you need to further add on Inline Grading to the assignment submission, you have to locate the graded assignment in Full Grade Center.
1. Goto Control Panel, expand Grade Center and click Full Grade Center.
2. On Grade Center: Full Grade Center page, scroll the horizontal bar to locate Individual
Assignment column. On the row of “Your_name_PreviewUser”, locate the graded assignment score; in this case is 76.00; click on the arrow down button to open the contextual menu and click Attempt 8/31/15 76 to open the graded assignment submission.
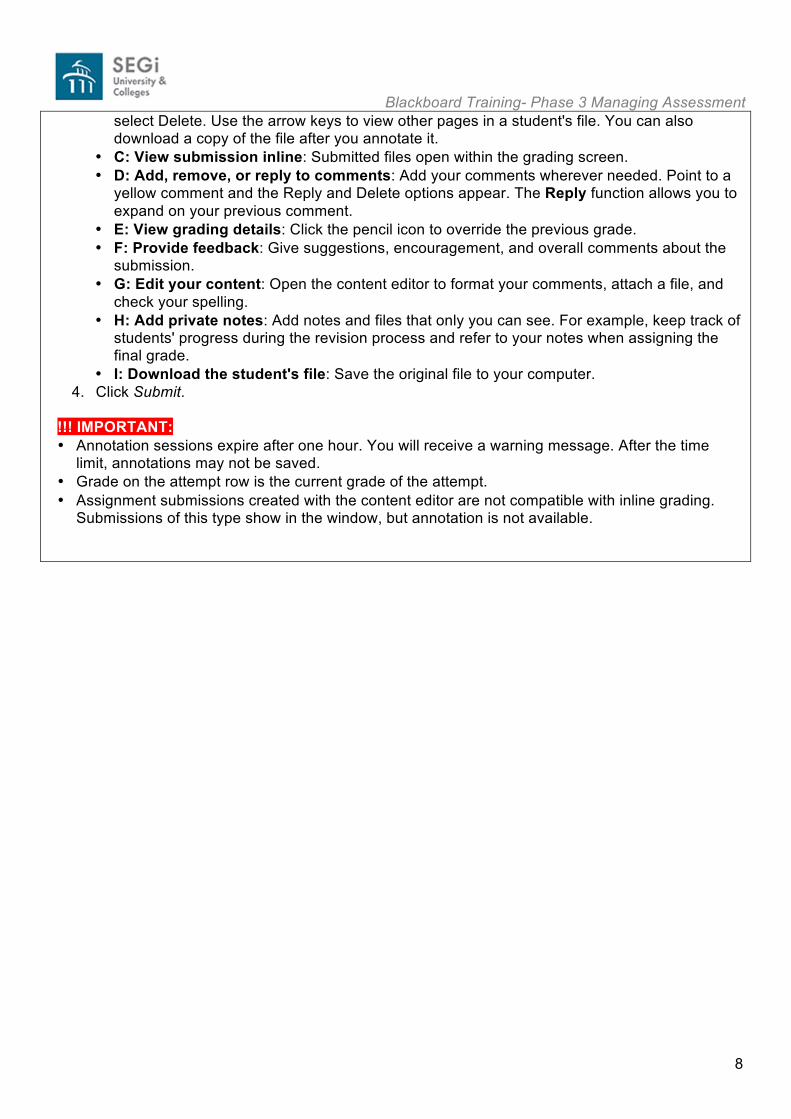
3. You may find the following functions:
• A: View instructions: Expand the assignment instructions. • B: Add comments and annotations: Click the Comment function and the annotation tools
expand. You can comment, highlight, draw, strikeout, and zoom in and out. Right-click an annotation to remove it. To remove a comment, point to the yellow comment and
Blackboard Training- Phase 3 Managing Assessment
8
select Delete. Use the arrow keys to view other pages in a student's file. You can also download a copy of the file after you annotate it.
• C: View submission inline: Submitted files open within the grading screen. • D: Add, remove, or reply to comments: Add your comments wherever needed. Point to a
yellow comment and the Reply and Delete options appear. The Reply function allows you to expand on your previous comment.
• E: View grading details: Click the pencil icon to override the previous grade. • F: Provide feedback: Give suggestions, encouragement, and overall comments about the
submission. • G: Edit your content: Open the content editor to format your comments, attach a file, and
check your spelling. • H: Add private notes: Add notes and files that only you can see. For example, keep track of
students' progress during the revision process and refer to your notes when assigning the final grade.
• I: Download the student's file: Save the original file to your computer. 4. Click Submit.
!!! IMPORTANT: • Annotation sessions expire after one hour. You will receive a warning message. After the time
limit, annotations may not be saved. • Grade on the attempt row is the current grade of the attempt. • Assignment submissions created with the content editor are not compatible with inline grading.
Submissions of this type show in the window, but annotation is not available.

Blackboard Training- Phase 3 Managing Assessment
9
PART 4 Graded Interactive Tools 4.1 Graded Journal
1. Goto Collaboration on the sidebar and click on Journal. OR Goto Control Panel, expand Course Tools and click Journals.
2. Select a Journal that you wish to grade; click the arrow down button to open the contextual menu, Click Edit.
3. On Edit Journal page, scroll down to Grade Settings and “tick” Grade and type 100 for Points
possible. “Tick” Show participations in “needs grading” status after 1 Entries.
4. Click Submit.
4.2 Graded Blog
1. Goto Collaboration on the sidebar and click on Blogs. OR Goto Control Panel, expand Course Tools and click Blogs.
2. Select a Blog that you wish to grade; click the arrow down button to open the contextual menu, Click Edit.
3. On Edit Blog page, scroll down to Grade Settings and “tick” Grade and type 100 for Points
possible. “Tick” Show participations in “needs grading” status after 1 Entries.
4. Click Submit.

Blackboard Training- Phase 3 Managing Assessment
10
4.3 Graded Discussion Board
1. Goto Discussions on the sidebar. OR Goto Control Panel, expand Course Tools and click Discussion Board.
2. Select a Discussion Board that you wish to grade; click the arrow down button to open the contextual menu, Click Edit.
3. On Edit Forum page, scroll down to Forum Settings and “tick” Grade Discussion Forum and
type 100 for Points possible. “Tick” Show participations in “needs grading” status after 1 Posts.
4. Click Submit.
Blackboard Training- Phase 3 Managing Assessment
11
PART 5 Grade Center 5.1 Exploring Grade Center
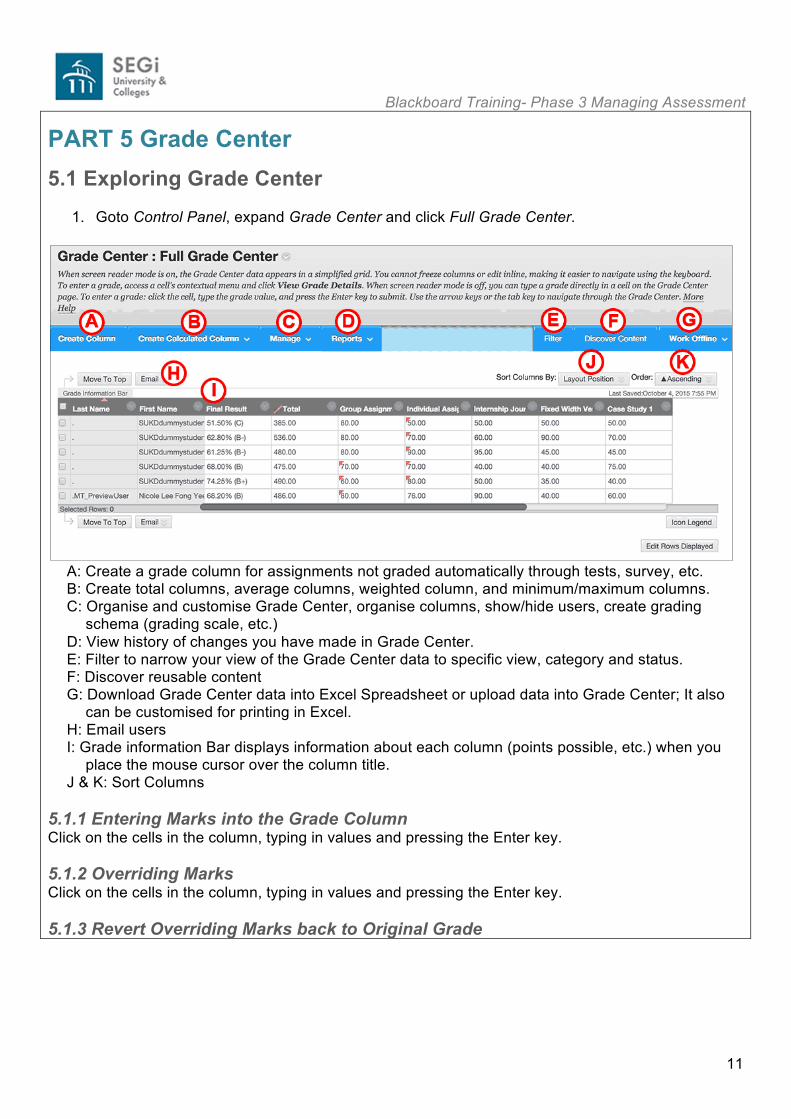
1. Goto Control Panel, expand Grade Center and click Full Grade Center.
A: Create a grade column for assignments not graded automatically through tests, survey, etc. B: Create total columns, average columns, weighted column, and minimum/maximum columns. C: Organise and customise Grade Center, organise columns, show/hide users, create grading
schema (grading scale, etc.) D: View history of changes you have made in Grade Center. E: Filter to narrow your view of the Grade Center data to specific view, category and status. F: Discover reusable content G: Download Grade Center data into Excel Spreadsheet or upload data into Grade Center; It also
can be customised for printing in Excel. H: Email users I: Grade information Bar displays information about each column (points possible, etc.) when you
place the mouse cursor over the column title. J & K: Sort Columns
5.1.1 Entering Marks into the Grade Column Click on the cells in the column, typing in values and pressing the Enter key. 5.1.2 Overriding Marks Click on the cells in the column, typing in values and pressing the Enter key. 5.1.3 Revert Overriding Marks back to Original Grade

Blackboard Training- Phase 3 Managing Assessment
12
1. Select a cell which has the override sign, click on the chevron button next to it and select View Grade Details.
2. Click on the Revert button to revert back to original grade.

Blackboard Training- Phase 3 Managing Assessment
13
5.2 Adding A Column (Not Graded by the system) You may add a column to be manually graded eg. presentation, class participation, project progress or even non-graded column such as attendance for your record.
1. Goto Control Panel, expand Grade Center and click Full Grade Center. 2. Click on the Create Column action button. 3. On Create Grade Column page, follow the following figure for settings:
4. Click Submit.

Blackboard Training- Phase 3 Managing Assessment
14
5.3 Customised Weighted Total !!!IMPORTANT Before you start to adjust the Weighted Total column, make sure you have a clear assessment breakdown that will be summed up to 100 marks. You may have a simple assessment breakdown as follows: Group Assignment 20% Individual Assignment 30% Examination 50% Total 100%
The following lesson use this assessment breakdown but you can pick your own assessment components which are summed up to 100 marks: Group Assignment 20% Individual Assignment 15% Journal 5% Blog 5% Wikis 5% Discussion Board 5% Test 10% Examination 30% Class Participation 5% Total 100%
1. Goto Control Panel, expand Grade Center and click Full Grade Center.
2. Locate the column of “Weighted Total”, click on the chevron button (grey) next to this item and select Edit Column Information.
3. On Edit Weighted Column page, follow the following figure for settings:

Blackboard Training- Phase 3 Managing Assessment
15
!!! IMPORTANT On Select Columns Section, you can pick the assessment components and key the marks that you like but the total weight must be 100%
4. Click Submit.
Blackboard Training- Phase 3 Managing Assessment
16
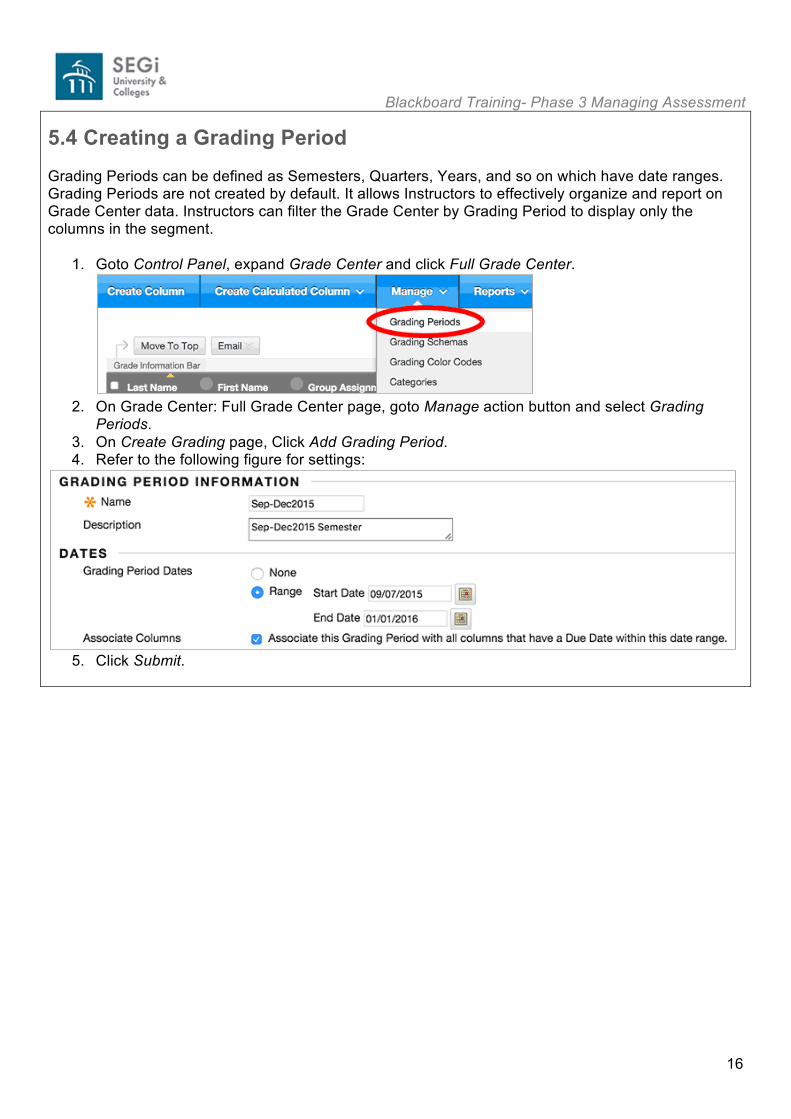
5.4 Creating a Grading Period Grading Periods can be defined as Semesters, Quarters, Years, and so on which have date ranges. Grading Periods are not created by default. It allows Instructors to effectively organize and report on Grade Center data. Instructors can filter the Grade Center by Grading Period to display only the columns in the segment.
1. Goto Control Panel, expand Grade Center and click Full Grade Center.
2. On Grade Center: Full Grade Center page, goto Manage action button and select Grading
Periods. 3. On Create Grading page, Click Add Grading Period. 4. Refer to the following figure for settings:
5. Click Submit.
Blackboard Training- Phase 3 Managing Assessment
17
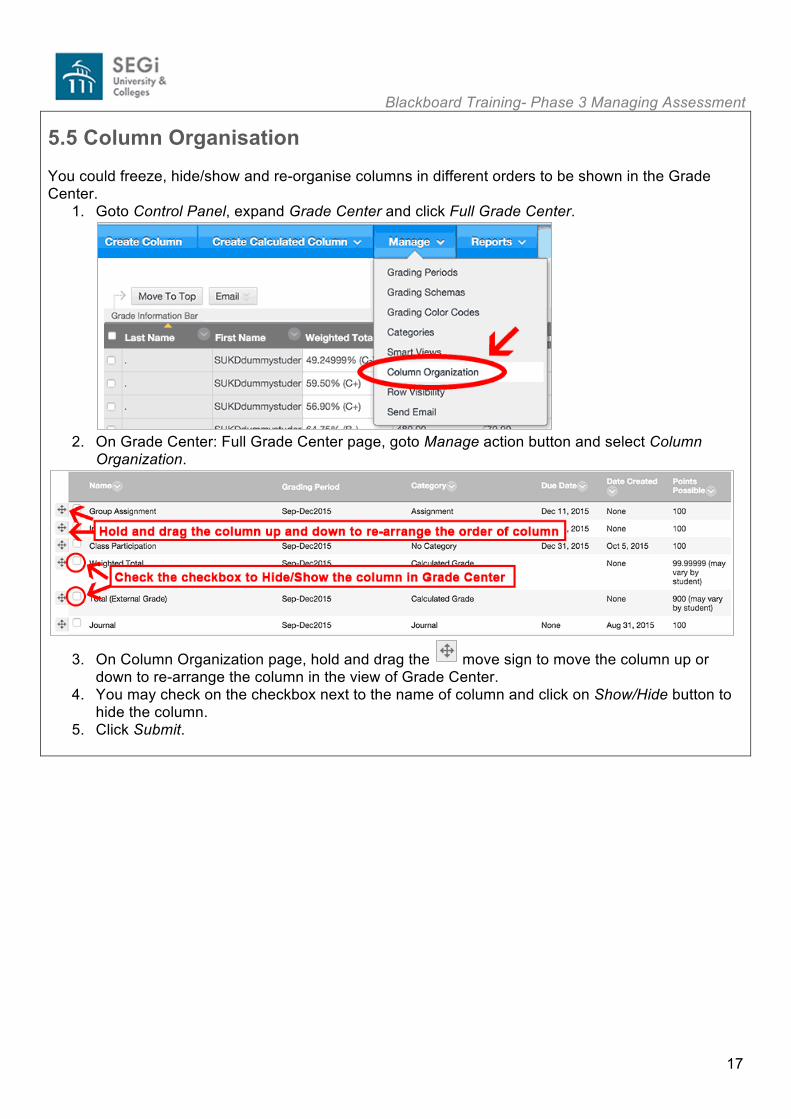
5.5 Column Organisation You could freeze, hide/show and re-organise columns in different orders to be shown in the Grade Center.
1. Goto Control Panel, expand Grade Center and click Full Grade Center.
2. On Grade Center: Full Grade Center page, goto Manage action button and select Column
Organization.
3. On Column Organization page, hold and drag the move sign to move the column up or down to re-arrange the column in the view of Grade Center.
4. You may check on the checkbox next to the name of column and click on Show/Hide button to hide the column.
5. Click Submit.
Blackboard Training- Phase 3 Managing Assessment
18
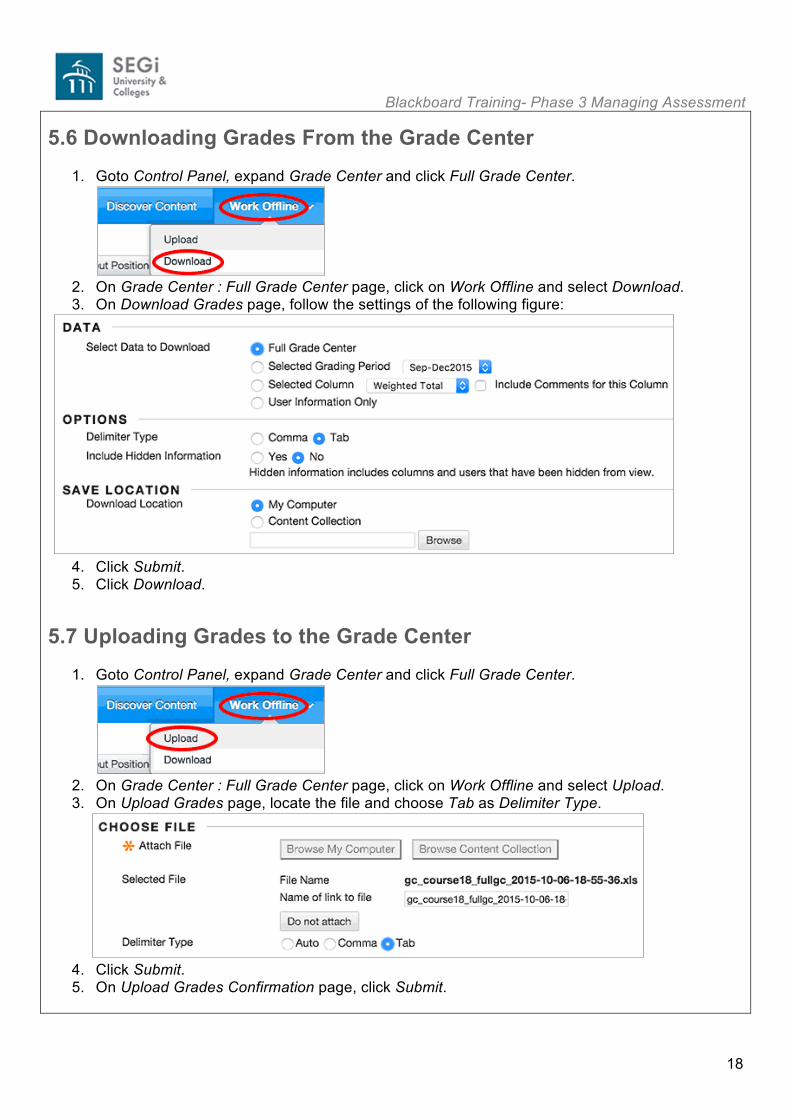
5.6 Downloading Grades From the Grade Center
1. Goto Control Panel, expand Grade Center and click Full Grade Center.
2. On Grade Center : Full Grade Center page, click on Work Offline and select Download. 3. On Download Grades page, follow the settings of the following figure:
4. Click Submit. 5. Click Download.
5.7 Uploading Grades to the Grade Center
1. Goto Control Panel, expand Grade Center and click Full Grade Center.
2. On Grade Center : Full Grade Center page, click on Work Offline and select Upload. 3. On Upload Grades page, locate the file and choose Tab as Delimiter Type.
4. Click Submit. 5. On Upload Grades Confirmation page, click Submit.

Blackboard Training- Phase 3 Managing Assessment
19
PART 6 Retention Center 6.1 Early Warning System The Early Warning System is a Blackboard Tool designed to help you identify students that may be at-risk in your course and require special attention. It does this in three different ways:
• Alerting you if a Student has a grade below a certain threshold. • Alerting you if a Student has not accessed Blackboard is a set number of days. • Alerting you if a Student has not submitted or taken an assignment or test by the due date.
6.1.1 Customizing Activity Rule 1. Goto Control Panel, expand Evaluation and click Retention Center.
Students who are at risk will be highlighted in the above Risk Table.
2. On Retention Center page, click on the customize button on the page title bar.
3. On Customize Retention Page, click on the chevron button next to Default Activity Rule and select Edit. 4. On Modify Course Activity Rule page, adjust the settings as follows:
5. Click Submit. The new changes will reflect on the Risk Table. 6.1.2 Customizing Course Access Rule 1. Goto Control Panel, expand Evaluation and click Retention Center.
2. On Retention Center page, click on the customize button on the page title bar.

Blackboard Training- Phase 3 Managing Assessment
20
3. On Customize Retention Page, click on the chevron button next to Default Course Access Rule and select Edit. 4. On Modify Course Access Rule page, adjust the settings as follows:
5. Click Submit. The new changes will reflect on the Risk Table. 6.1.3 Customizing Grade Rule 1. Goto Control Panel, expand Evaluation and click Retention Center.
2. On Retention Center page, click on the customize button on the page title bar.
3. On Customize Retention Page, click on the chevron button next to Default Grade Rule and select Edit. 4. On Modify Grade Rule page, adjust the settings as follows:
5. Click Submit. The new changes will reflect on the Risk Table. 6.1.3 Customizing Missed Deadline Rule 1. Goto Control Panel, expand Evaluation and click Retention Center.
2. On Retention Center page, click on the customize button on the page title bar.
3. On Customize Retention Page, click on the chevron button next to Default Missed Deadline Rule and select Edit. 4. On Modify Missed Deadline Rule page, adjust the settings as follows:
5. Click Submit. The new changes will reflect on the Risk Table.

Blackboard Training- Phase 3 Managing Assessment
21
PART 7 Course Report You can run these course reports to view information about course usage and activities:
• All User Activity Inside Content Areas displays a summary of all user activity inside content areas for a course. Use this report to determine which students are active in your course and which content areas they are using.
• Course Activity Overview displays overall activity within your course, sorted by student and date. Data includes the total and average time spent per user and the total amount of activity a user had in your course. You can also click an individual student's name to access the Student Overview for Single Course report. This report can help you determine which days of the week students are active in your course and see how much time overall students spend.
• Course Coverage Report displays data on course items that have been aligned to goals. • Course Performance displays how a single course performs against a selected set of goals. • Overall Summary of User Activity displays user activity for all areas of your course, as well
as activity dates, times, and days of the week. Use this report to view student access as well as how often course tools are used.
• Single Course User Participation Report displays the number of user submissions in your course for assignments, tests, discussions, blogs, and journals within the chosen time frame. You do not need to grade an item for data to be included in the report. The data is provided in a Microsoft® Excel® spreadsheet (XLS).
• Student Overview for Single Course displays an individual student's activity within your course, sorted by date. Data includes the total overall time a student spent in your course as well as detailed information about a student's activity, such as which items and content areas a student accessed and the time spent on each. Use this report to check a particular student's course activity.
• User Activity in Forums displays a summary of user activity in discussion board forums in your course. You can see which forums are used the most.
• User Activity in Groups displays a summary of user activity in groups for your course. You can see if students are active in their groups.
NOTES: If no activity exists for an item type, no column appears. For example, if no user submitted an assignment in the chosen time frame, no assignment column appears in the spreadsheet.
7.1 Generating Course Report
1. On the Control Panel, expand the Evaluation section and click Course Reports.
2. On Course Reports page, click on the chevron button next to the Overall Summary of User Activity and click Run.
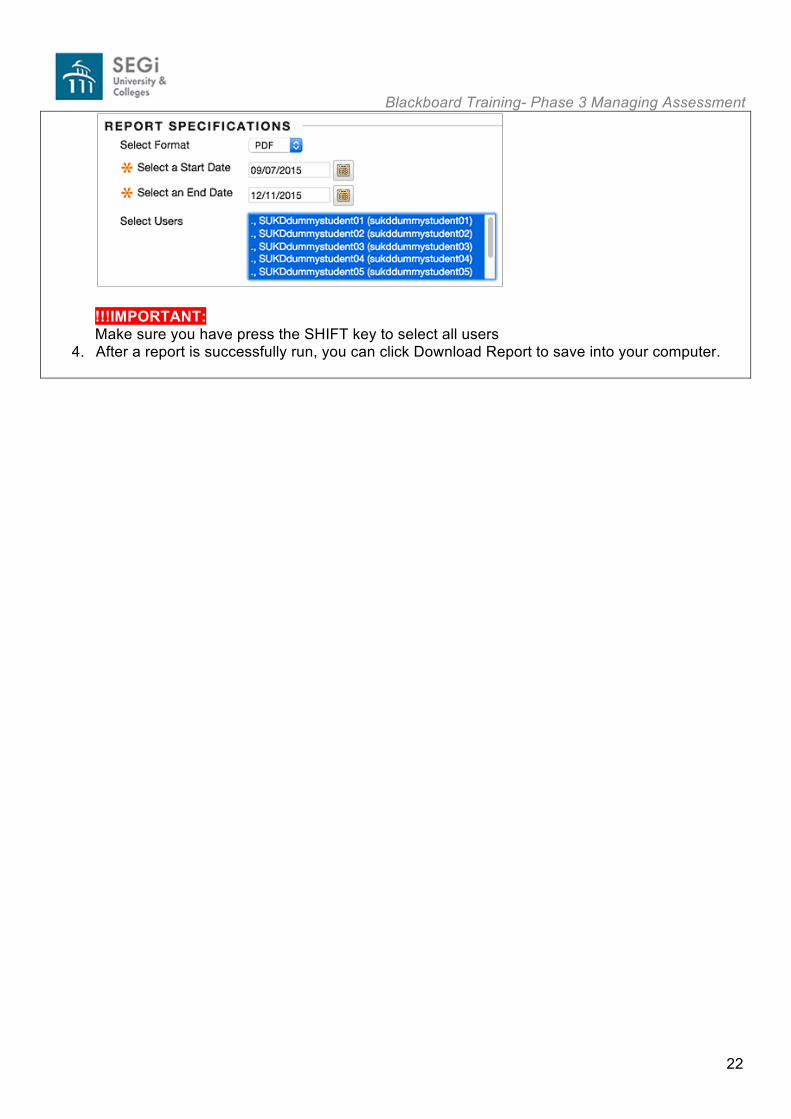
3. On the Run Reports page, follow the settings of the following figure:
Blackboard Training- Phase 3 Managing Assessment
22
!!!IMPORTANT: Make sure you have press the SHIFT key to select all users
4. After a report is successfully run, you can click Download Report to save into your computer.

Blackboard Training- Phase 3 Managing Assessment
23
PART 8 Performance Dashboard The Performance Dashboard provides an up-to-date report on the activity for all students. The information is displayed in a table, and can be sorted by clicking the arrow in any column header. Goto Control Panel, expand Evaluation and click Performance Dashboard.
View-Only Columns- The data in following columns can be used to sort the table, but cannot be changed or reviewed:
• Last Name • First Name • Username • Role • Last Course Access • Days Since Last Course Access
Interactive Columns- The following columns, when available, can be used to report on other performance features. Click the link or icon for a user to access their data.
• Review Status: Displays the number of content items that have been reviewed by a user. Click the link for a detailed view of these content items.
• Adaptive Release: Click the icon to display the menu for a user, showing every content item in the course. Icons indicate whether content items and folders are visible or invisible to the user and whether the items have been reviewed.
• Discussion Board: Displays the number of posts for the user. Click the link to display which forums the user has posted to and statistics about each post. Forum names link to a collection of posts for the user.
• Customize Retention Center/ Early Warning System: Displays the number of warnings and the number of total rules that result in a warning for a user. Click the link to open the Early Warning System page for the user.
• View Grades: Click the icon to display the Grade Center.

Blackboard Training- Phase 3 Managing Assessment
24
PART 9 My Grades 9.1 Creating a Content Area for My Grade
Create a Tool Link called “My Grades” on the sidebar. Goto the left sidebar, mouseover ‘+’ sign and click on Tool Link.
Give it a name, My Grades and make sure you “tick” the Available to Users.
Blackboard Training- Phase 3 Managing Assessment
25
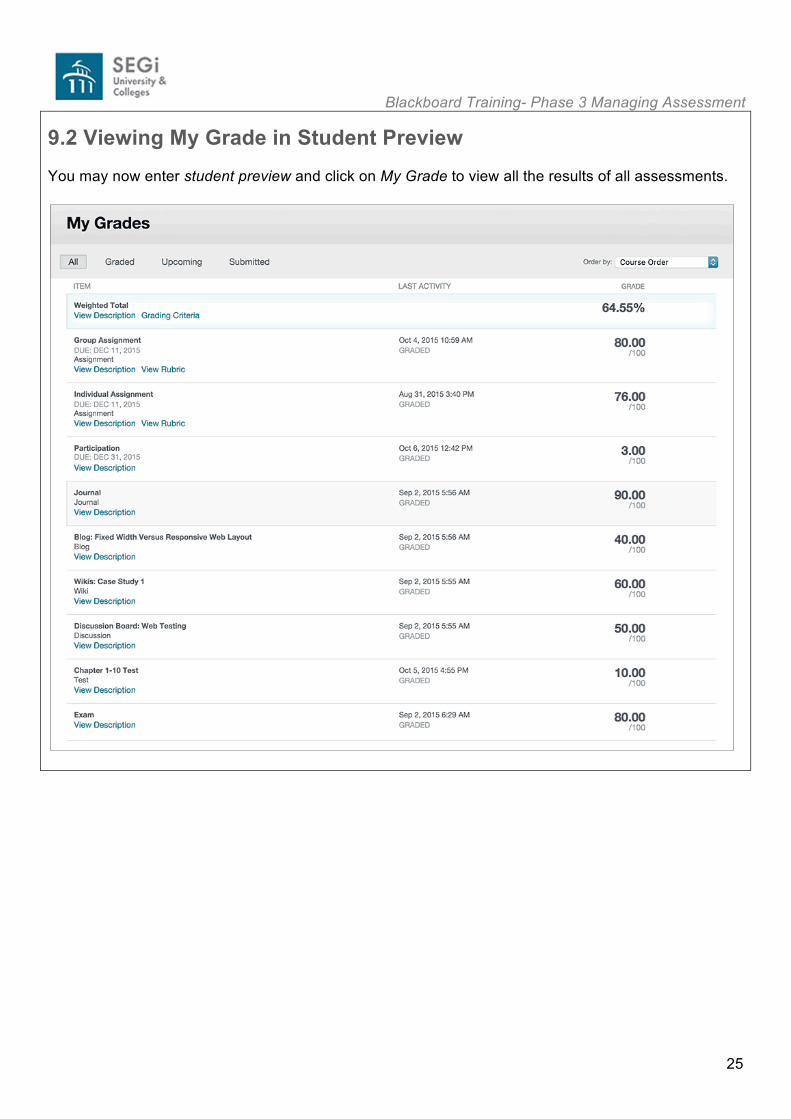
9.2 Viewing My Grade in Student Preview You may now enter student preview and click on My Grade to view all the results of all assessments.

Blackboard Training- Phase 3 Managing Assessment
26
PART 10 Blackboard Team (SEGi University & College KD)
Project Champion Ahmad Fadzlee Shah
Project Manager
Param Murgan
Promotional & Communication Imran Huneid Tyeb Charlene Nicholas
Teaching & Learning Nabila Mohd Yunus Wan Halimatul Dina
Technical Leong Kam Sun Joseph Cheng
Project Leaders Haw Wai Yee, [email protected] Moganavatsala, [email protected]
Master Trainers Moganavatsala, [email protected] Chen Woon Choong, [email protected] Nicole Lee Fong Yee, [email protected] Muhammad Afiq Sukiman, [email protected] Aida Maryani, [email protected]
System Administrator Joseph Cheng, [email protected] Nur Farah, [email protected]