application notes for configuring the quintum tenor...
TRANSCRIPT
Avaya Solution & Interoperability Test Lab
Application Notes for Configuring the Quintum Tenor AS or Tenor AX with Avaya Communication Manager and Avaya SIP Enablement Services - Issue 1.0
Abstract
These Application Notes describe the steps for configuring the Quintum Tenor AS or Tenor AX VoIP Multipath Switch with Avaya Communication Manager and Avaya SIP Enablement Services. The Quintum Tenor AS or AX VoIP Multipath Switch provides analog telephone access with VoIP capability and multipath switching for redundancy. Emphasis of the testing was placed on verifying Tenor AS or AX interoperability with Avaya SIP Enablement Services. Please note that beginning with release 3.0, the Avaya Converged Communication Server (CCS) has been renamed to Avaya SIP Enablement Services (SES). Information in these Application Notes has been obtained through DeveloperConnection compliance testing and additional technical discussions. Testing was conducted via the DeveloperConnection Program at the Avaya Solution and Interoperability Test Lab.
AL; Reviewed: SPOC 5/22/2006
Solution & Interoperability Test Lab Application Notes ©2006 Avaya Inc. All Rights Reserved.
1 of 42 TenorAS-AX
AL; Reviewed: SPOC 5/22/2006
Solution & Interoperability Test Lab Application Notes ©2006 Avaya Inc. All Rights Reserved.
2 of 42 TenorAS-AX
1. Introduction Avaya Communication Manager and Avaya SIP Enablement Services have the capability to extend advanced telephony features to SIP stations. This feature set can be extended to analog telephones through the use of the Quintum Tenor AS or AX VoIP Multipath Switch. These Application Notes describe a solution for configuring the Quintum Tenor AS or AX VoIP Multipath Switch to interoperate with Avaya Communication Manager and Avaya SIP Enablement Services (SES). The Tenor AS or AX is a multipath switch capable of supporting analog telephones. The Tenor AS or AX registers with Avaya SES on behalf of the analog telephones that are connected to it, using SIP signaling. When a call is place from an analog telephone, the Tenor AS or AX will send control messages to SES to set up the call. Once the call has been set up, the Tenor AS or AX digitizes the analog signals from the analog telephone using the agreed upon codec established during call setup and sends the digitized signals out in RTP packets over the data network. In addition, the Tenor AS or AX was configured to route call to the Main Site through the PSTN should the data network become unavailable. Quality of Service was achieved through the use of Layer-3 (DiffServ) parameter configuration on the Tenor AS or AX VoIP Multipath Switch.
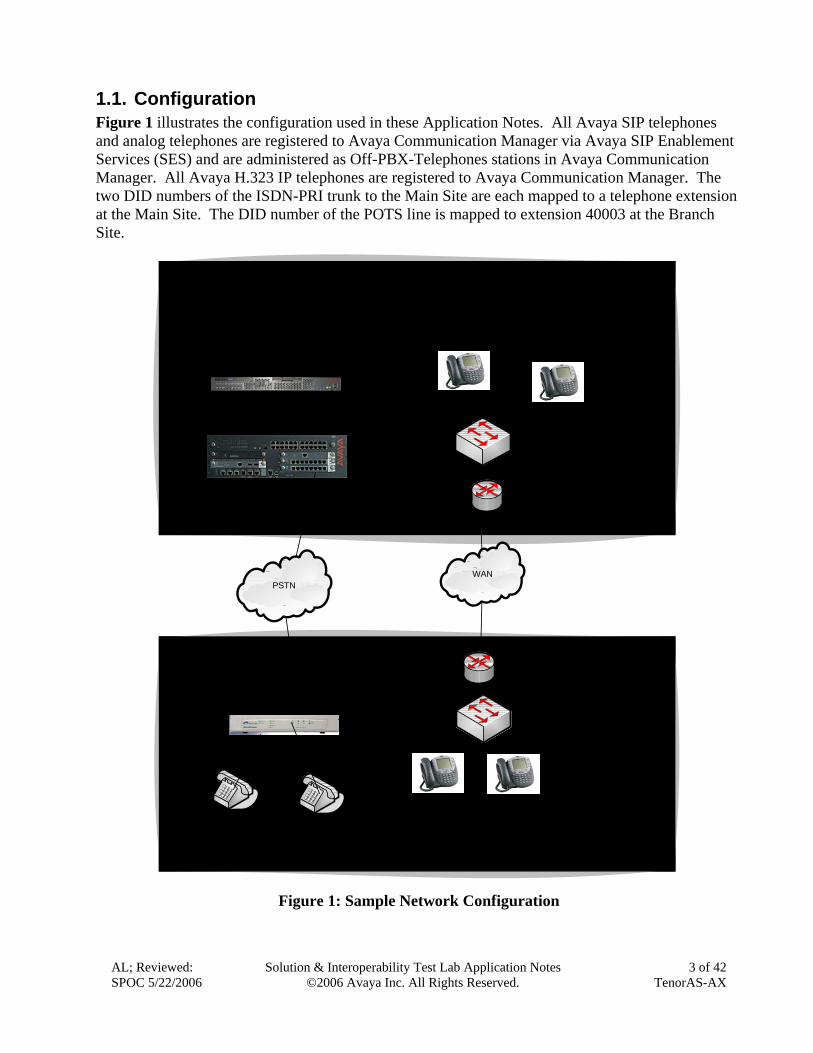
1.1. Configuration Figure 1 illustrates the configuration used in these Application Notes. All Avaya SIP telephones and analog telephones are registered to Avaya Communication Manager via Avaya SIP Enablement Services (SES) and are administered as Off-PBX-Telephones stations in Avaya Communication Manager. All Avaya H.323 IP telephones are registered to Avaya Communication Manager. The two DID numbers of the ISDN-PRI trunk to the Main Site are each mapped to a telephone extension at the Main Site. The DID number of the POTS line is mapped to extension 40003 at the Branch Site.
Tenor AS or AX VoIP MultiPath Switch
IP 10.1.1.40
Avaya 4620 SIP Telephone
Phone-B1IP 10.1.1.22Ext - 40000
Avaya 4620 H.323 Telephone
Phone-B2IP 10.1.1.211Ext - 40011
Avaya 4620 SIP TelephonePhone-A1
IP 50.1.1.10Ext - 40001 Avaya 4620 H.323 Telephone
Phone-A2IP 50.1.1.23Ext - 40012
Avaya SIP Enablement Services ServerIP 50.1.1.50
Avaya S8300 Media ServerIP 50.1.1.10
Avaya G350 Media Gateway
PSTNWAN
Analog TelephoneExt - 40002
Analog TelephoneExt - 40003
POTS line# 732-450-1001
ISDN-PRI line# 732-450-2001# 732-450-2002
Main Site
Branch Site
Figure 1: Sample Network Configuration
AL; Reviewed: SPOC 5/22/2006
Solution & Interoperability Test Lab Application Notes ©2006 Avaya Inc. All Rights Reserved.
3 of 42 TenorAS-AX
AL; Reviewed: SPOC 5/22/2006
Solution & Interoperability Test Lab Application Notes ©2006 Avaya Inc. All Rights Reserved.
4 of 42 TenorAS-AX
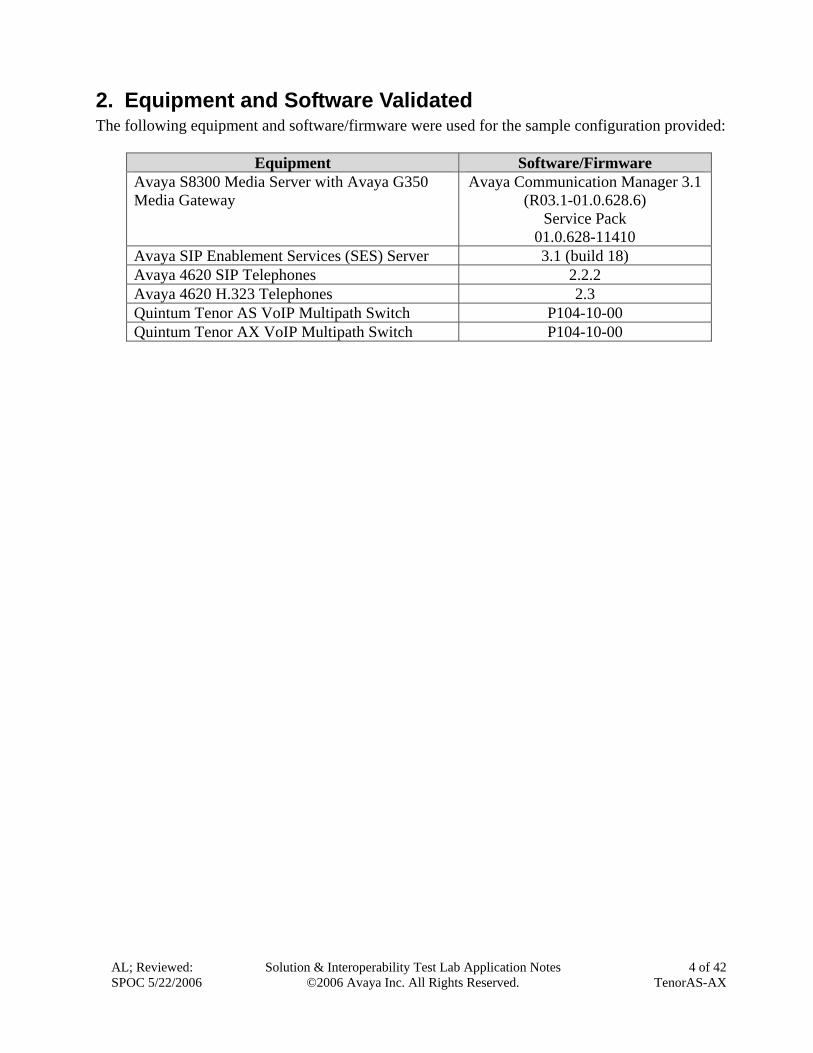
2. Equipment and Software Validated The following equipment and software/firmware were used for the sample configuration provided:
Equipment Software/Firmware Avaya S8300 Media Server with Avaya G350 Media Gateway
Avaya Communication Manager 3.1 (R03.1-01.0.628.6)
Service Pack 01.0.628-11410
Avaya SIP Enablement Services (SES) Server 3.1 (build 18) Avaya 4620 SIP Telephones 2.2.2 Avaya 4620 H.323 Telephones 2.3 Quintum Tenor AS VoIP Multipath Switch P104-10-00 Quintum Tenor AX VoIP Multipath Switch P104-10-00
AL; Reviewed: SPOC 5/22/2006
Solution & Interoperability Test Lab Application Notes ©2006 Avaya Inc. All Rights Reserved.
5 of 42 TenorAS-AX
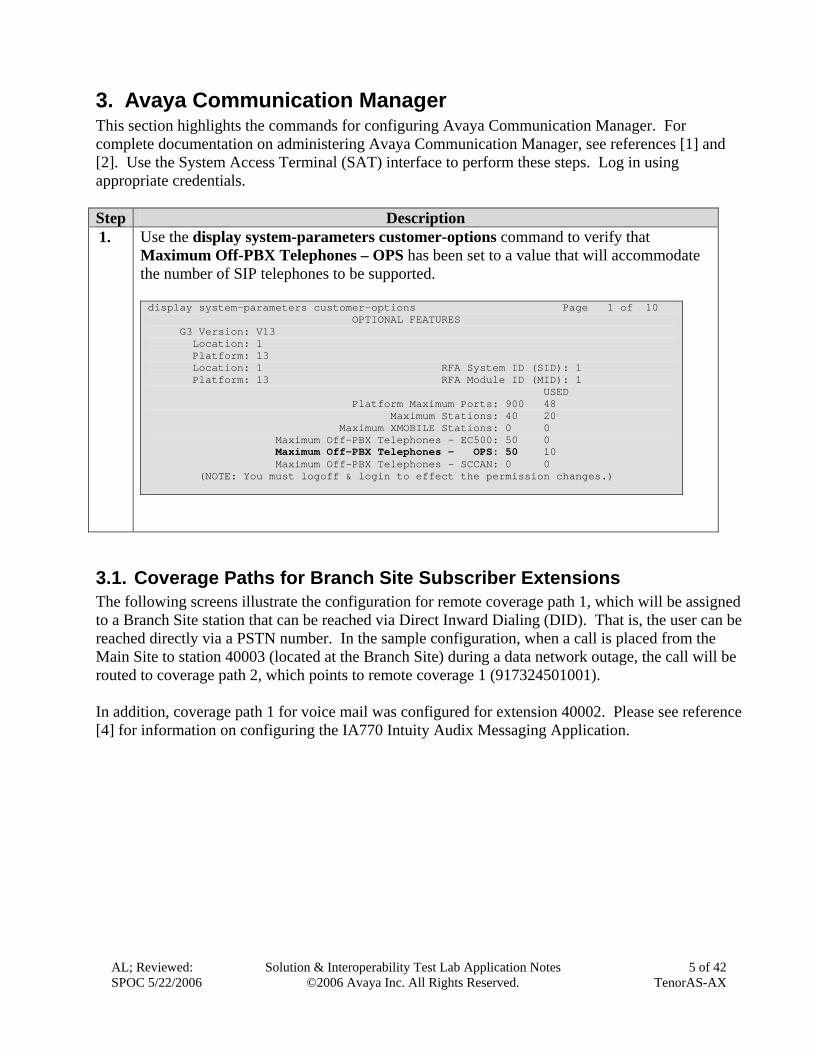
3. Avaya Communication Manager This section highlights the commands for configuring Avaya Communication Manager. For complete documentation on administering Avaya Communication Manager, see references [1] and [2]. Use the System Access Terminal (SAT) interface to perform these steps. Log in using appropriate credentials. Step Description 1. Use the display system-parameters customer-options command to verify that
Maximum Off-PBX Telephones – OPS has been set to a value that will accommodate the number of SIP telephones to be supported. display system-parameters customer-options Page 1 of 10 OPTIONAL FEATURES G3 Version: V13 Location: 1 Platform: 13 Location: 1 RFA System ID (SID): 1 Platform: 13 RFA Module ID (MID): 1 USED Platform Maximum Ports: 900 48 Maximum Stations: 40 20 Maximum XMOBILE Stations: 0 0 Ma 0 ximum Off-PBX Telephones - EC500: 50 Maximum Off-PBX Telephones - OPS: 50 10 Maximum Off-PBX Telephones - SCCAN: 0 0 (NOTE: You must logoff & login to effect the permission changes.)
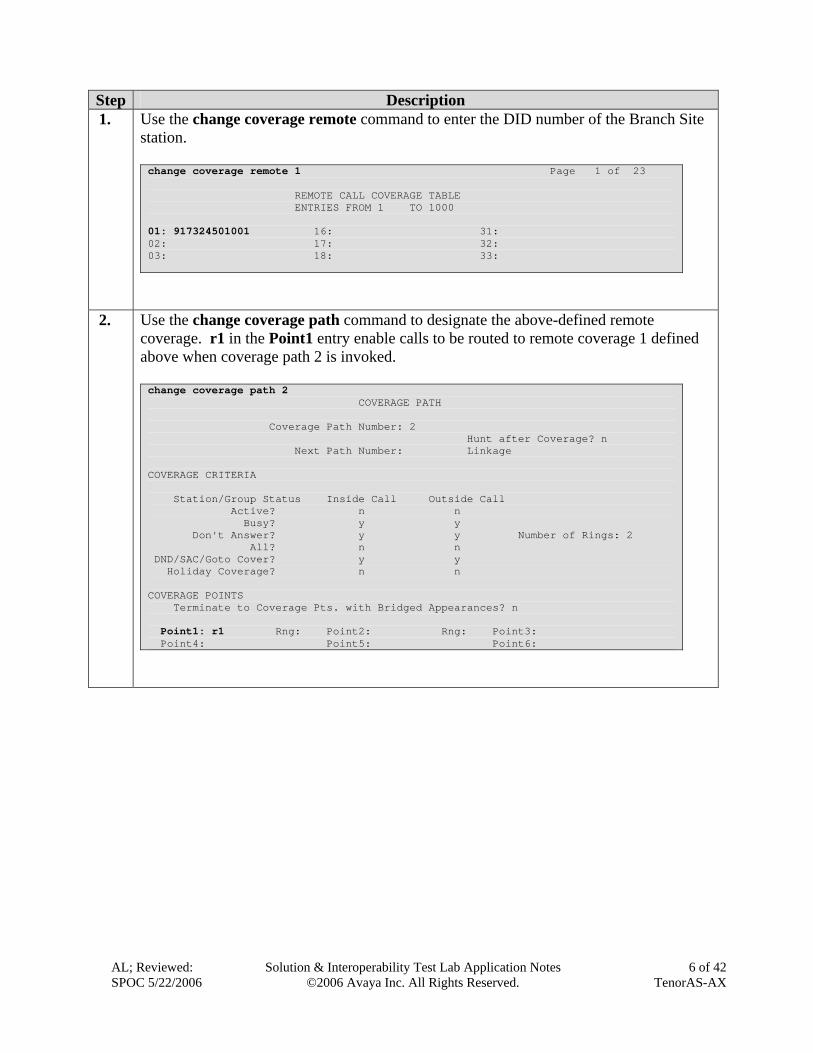
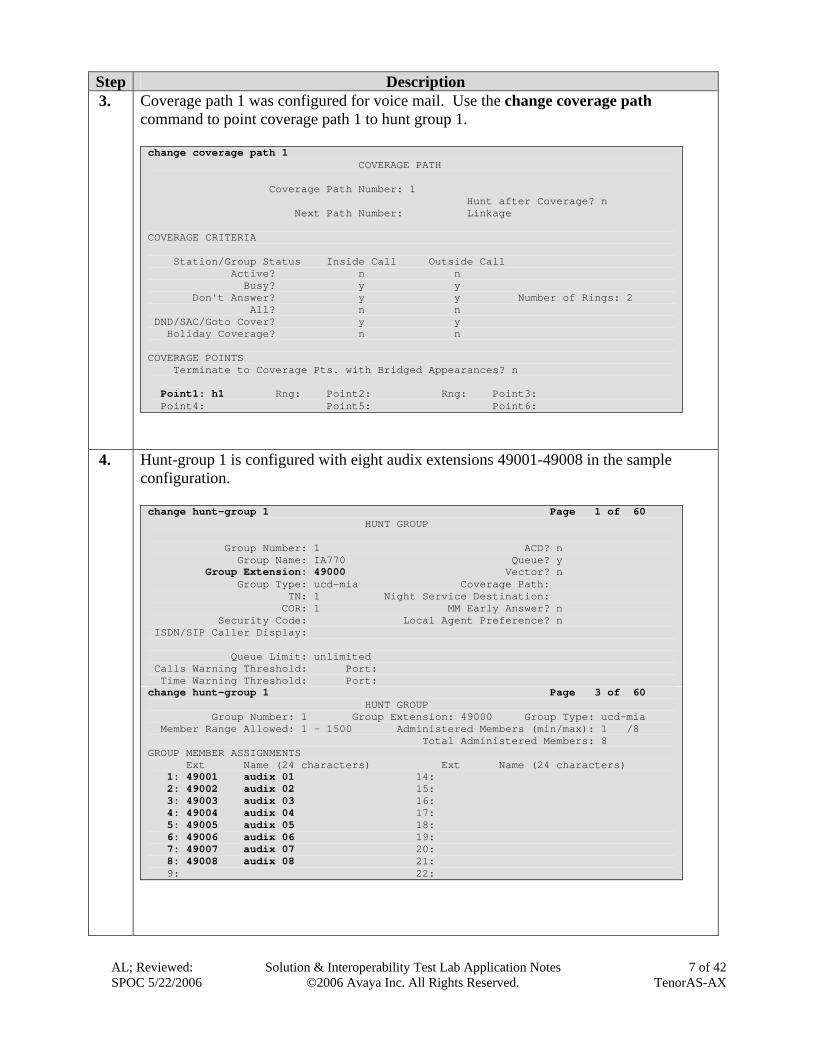
3.1. Coverage Paths for Branch Site Subscriber Extensions The following screens illustrate the configuration for remote coverage path 1, which will be assigned to a Branch Site station that can be reached via Direct Inward Dialing (DID). That is, the user can be reached directly via a PSTN number. In the sample configuration, when a call is placed from the Main Site to station 40003 (located at the Branch Site) during a data network outage, the call will be routed to coverage path 2, which points to remote coverage 1 (917324501001). In addition, coverage path 1 for voice mail was configured for extension 40002. Please see reference [4] for information on configuring the IA770 Intuity Audix Messaging Application.
AL; Reviewed: SPOC 5/22/2006
Solution & Interoperability Test Lab Application Notes ©2006 Avaya Inc. All Rights Reserved.
6 of 42 TenorAS-AX
Step Description 1. Use the change coverage remote command to enter the DID number of the Branch Site
station. change coverage remote 1 Page 1 of 23 REMOTE CALL COVERAGE TABLE ENTRIES FROM 1 TO 1000 01: 917324501001 16: 31: 02: 17: 32: 03: 18: 33:
2. Use the change coverage path command to designate the above-defined remote coverage. r1 in the Point1 entry enable calls to be routed to remote coverage 1 defined above when coverage path 2 is invoked. change coverage path 2 COVERAGE PATH Coverage Path Number: 2 Hunt after Coverage? n Next Path Number: Linkage COVERAGE CRITERIA Station/Group Status Inside Call Outside Call Active? n n Busy? y y Don't Answer? y y Number of Rings: 2 All? n n DND/SAC/Goto Cover? y y Holiday Coverage? n n COVERAGE POINTS Terminate to Coverage Pts. with Bridged Appearances? n Point1: r1 Rng: Point2: Rng: Point3: Point4: Point5: Point6:
AL; Reviewed: SPOC 5/22/2006
Solution & Interoperability Test Lab Application Notes ©2006 Avaya Inc. All Rights Reserved.
7 of 42 TenorAS-AX
Step Description 3. Coverage path 1 was configured for voice mail. Use the change coverage path
command to point coverage path 1 to hunt group 1. change coverage path 1 COVERAGE PATH Coverage Path Number: 1 Hunt after Coverage? n Next Path Number: Linkage COVERAGE CRITERIA Station/Group Status Inside Call Outside Call Active? n n Busy? y y Don't Answer? y y Number of Rings: 2 All? n n DND/SAC/Goto Cover? y y Holiday Coverage? n n COVERAGE POINTS Terminate to Coverage Pts. with Bridged Appearances? n Point1: h1 Rng: Point2: Rng: Point3: Point4: Point5: Point6:
4. Hunt-group 1 is configured with eight audix extensions 49001-49008 in the sample configuration. change hunt-group 1 Page 1 of 60 HUNT GROUP Group Number: 1 ACD? n Queue? y Group Name: IA770 Group Extension: 49000 Vector? n Group Type: ucd-mia Coverage Path: TN: 1 Night Service Destination: COR: 1 MM Early Answer? n Security Code: Local Agent Preference? n ISDN/SIP Caller Display: Queue Limit: unlimited Calls Warning Threshold: Port: Time Warning Threshold: Port: change hunt-group 1 Page 3 of 60 HUNT GROUP Group Number: 1 Group Extension: 49000 Group Type: ucd-mia Member Range Allowed: 1 - 1500 Administered Members (min/max): 1 /8 Total Administered Members: 8 GROUP MEMBER ASSIGNMENTS Ext Name (24 characters) Ext Name (24 characters) 1: 49001 audix 01 14: 2: 49002 audix 02 15: 3: 49003 audix 03 16: 4: 49004 audix 04 17: 5: 49005 audix 05 18: 6: 49006 audix 06 19: 7: 49007 audix 07 20: 8: 49008 audix 08 21: 9: 22:

AL; Reviewed: SPOC 5/22/2006
Solution & Interoperability Test Lab Application Notes ©2006 Avaya Inc. All Rights Reserved.
8 of 42 TenorAS-AX
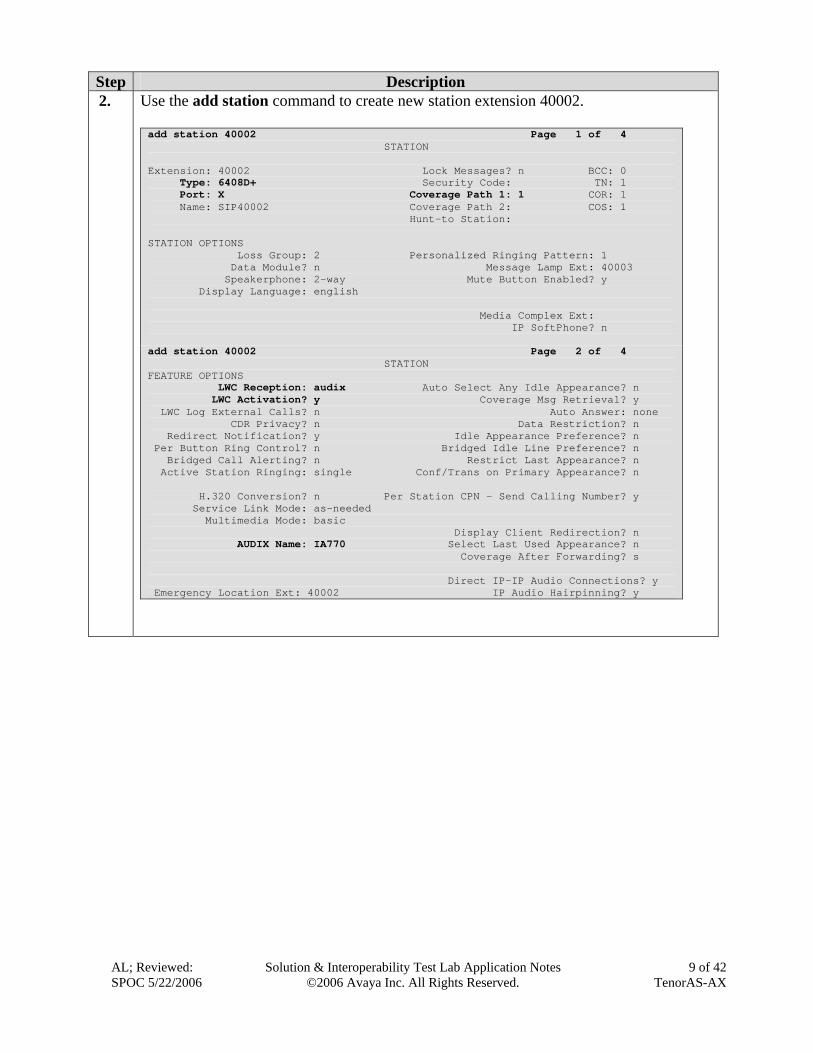
3.2. Define Stations in Avaya Communication Manager Assign the appropriate coverage path to the station. The sample configuration assigned the coverage path 2 defined in Section 3.1 to station 40003 and coverage path 1 to station 40002. In addition, the extensions assigned to the analog telephones connected to the Tenor AS or AX must be administered as OPS extensions, since the Tenor AS or AX will be communicating with Avaya SES on behalf of the analog stations. For additional information on Avaya SES, consult references [2] and [5]. Step Description 1. Use the add station command to create new station extension 40003.
add station 40003 Page 1 of 4 STATION Extensi Lock Messages? n BCC: 0 on: 40003 Type: 6408D+ Security Code: TN: 1 Port: X Coverage Path 1: 2 COR: 1 Name: SIP40003 Coverage Path 2: COS: 1 Hunt-to Station: STATION OPTIONS Loss Group: 2 Personalized Ringing Pattern: 1 Data Module? n Message Lamp Ext: 40003 Speakerphone: 2-way Mute Button Enabled? y Display Language: english Media Complex Ext: IP SoftPhone? n
AL; Reviewed: SPOC 5/22/2006
Solution & Interoperability Test Lab Application Notes ©2006 Avaya Inc. All Rights Reserved.
9 of 42 TenorAS-AX
Step Description 2. Use the add station command to create new station extension 40002.
add station 40002 Page 1 of 4 STATION Extensi Lock Messages? n BCC: 0 on: 40002 Type: 6408D+ Security Code: TN: 1 Port: X Coverage Path 1: 1 COR: 1 Name: SIP40002 Coverage Path 2: COS: 1 Hunt-to Station: STATION OPTIONS Loss Group: 2 Personalized Ringing Pattern: 1 Data Module? n Message Lamp Ext: 40003 Speakerphone: 2-way Mute Button Enabled? y Display Language: english Media Complex Ext: IP SoftPhone? n add station 40002 Page 2 of 4 STATION FEATURE OPTIONS LWC Reception: audix Auto Select Any Idle Appearance? n LWC Activation? y Coverage Msg Retrieval? y LWC Log External Calls? n Auto Answer: none CDR Privacy? n Data Restriction? n Redirect Notification? y Idle Appearance Preference? n Per Button Ring Control? n Bridged Idle Line Preference? n Bridged Call Alerting? n Restrict Last Appearance? n Active Station Ringing: single Conf/Trans on Primary Appearance? n H.320 Conversion? n Per Station CPN - Send Calling Number? y Service Link Mode: as-needed Multimedia Mode: basic Display Client Redirection? n AUDIX Name: IA770 Select Last Used Appearance? n Coverage After Forwarding? s Direct IP-IP Audio Connections? y Emergency Location Ext: 40002 IP Audio Hairpinning? y
AL; Reviewed: SPOC 5/22/2006
Solution & Interoperability Test Lab Application Notes ©2006 Avaya Inc. All Rights Reserved.
10 of 42 TenorAS-AX
Step Description 3. Use the change off-pbx-telephone station-mapping command to map Avaya
Communication Manager extensions to the Avaya SIP Enablement Service (SES) extensions. change off-pbx-telephone station-mapping 40003 Page 1 of 2 STATIONS WITH OFF-PBX TELEPHONE INTEGRATION Station Application Dial Phone Number Trunk Configuration Extension Prefix Selection Set 40003 OPS - 40003 1 1 40002 OPS - 40002 1 1 change off-pbx-telephone station-mapping 40003 Page 2 of 2 STATIONS WITH OFF-PBX TELEPHONE INTEGRATION Station Call Mapping Calls Bridged Extension Limit Mode Allowed Calls 40003 3 both all both 40002 3 both all both
3.3. Define Trunk Group in Avaya Communication Manager Step Description 1. The following shows the settings for trunk-group 1. This trunk group connects Avaya
Communication Manager with Avaya SES. For additional information on the installation and configuration of Avaya SES, please refer to [2] and [5].
display trunk-group 1 Page 1 of 20 TRUNK GROUP Group Number: 1 Group Type: sip CDR Reports: y Group Name: To SES COR: 1 TN: 1 TAC: 101 Direction: two-way Outgoing Display? n Dial Access? n Busy Threshold: 255 Night Service: Queue Length: 0 Service Type: tie Auth Code? n Signaling Group: 1 Number of Members: 24 TRUNK PARAMETERS Unicode Name? y Redirect On OPTIM Failure: 5000 SCCAN? n Digital Loss Group: 18
AL; Reviewed: SPOC 5/22/2006
Solution & Interoperability Test Lab Application Notes ©2006 Avaya Inc. All Rights Reserved.
11 of 42 TenorAS-AX
Step Description 2. The following shows the Signaling Group associated with Trunk Group 1.
display signaling-group 1 SIGNALING GROUP Group Number: 1 Group Type: sip Transport Method: tls Near-end Node Name: procr Far-end Node Name: CCS Near-end Listen Port: 5061 Far-end Listen Port: 5061 Far-end Network Region: Far-end Domain: devcon.com Bypass If IP Threshold Exceeded? y DTMF over IP: rtp-payload Direct IP-IP Audio Connections? y IP Audio Hairpinning? y Session Establishment Timer(min): 120
3. Define a Trunk Group for the ISDN-PRI connection using the add trunk-group command.
add trunk-group 10 Page 1 of 21 TRUNK GROUP Group Number: 10 Group Type: isdn CDR Reports: y Group Name: From PSTN COR: 1 T TAC: 110N: 1 Direction: two-way Outgoing Display? n Carrier Medium: PRI/BRI Dial Access? y Busy Threshold: 255 Night Service: Queue Length: 0 Service Type: tie Auth Code? n TestCall ITC: rest Far End Test Line No: TestCall BCC: 4 display trunk-group 10 Page 5 of 21 TRUNK GROUP Administered Members (min/max): 1/23 GROUP MEMBER ASSIGNMENTS Total Administered Members: 23 Port Code Sfx Name Night Sig Grp 1: 001V501 MM710 10 2: 001V502 MM710 10 3: 001V503 MM710 10 4: 001V504 MM710 10 5: 001V505 MM710 10 6: 001V506 MM710 10 7: 001V507 MM710 10 8: 001V508 MM710 10 9: 001V509 MM710 10 10: 001V510 MM710 10 11: 001V511 MM710 10 12: 001V512 MM710 10 13: 001V513 MM710 10 14: 001V514 MM710 10 15: 001V515 MM710 10
AL; Reviewed: SPOC 5/22/2006
Solution & Interoperability Test Lab Application Notes ©2006 Avaya Inc. All Rights Reserved.
12 of 42 TenorAS-AX
Step Description 4. Define a Signaling Group for the ISDN-PRI Trunk Group using the add signaling-
group command.
add signaling-group 10 Page 1 of 5 SIGNALING GROUP Group Number: 10 Group Type: isdn-pri Associated Signaling? y Max number of NCA TSC: 0 Primary D-Channel: 001V524 Max number of CA TSC: 0 Trunk Group for NCA TSC: Trunk Group for Channel Selection: Supplementary Service Protocol: a
3.4. Define Incoming Call Handling in Avaya Communication Manager At the Main Site, each DID number is mapped to a station extension using the change inc-handling-trmt trunk-group command. Trunk Group 10 is the ISDN-PRI trunk between the PSTN and Avaya Communication Manager. In the sample configuration, calls to DID 732-450-2001 will be sent to station 40001, and calls to DID 732-450-2002 will be sent to station 40012. Step Description 1.
change inc-call-handling-trmt trunk-group 10 Page 1 of 3 INCOMING CALL HANDLING TREATMENT Service/ Called Called Del Insert Per Call Night Feature Len Number CPN/BN Serv tie 10 7324502001 10 40001 tie 10 7324502002 10 40012
AL; Reviewed: SPOC 5/22/2006
Solution & Interoperability Test Lab Application Notes ©2006 Avaya Inc. All Rights Reserved.
13 of 42 TenorAS-AX
3.5. Configure Audio Codec
In order for calls to be established successfully, during initial call setup, the two end points must agree upon a mutually supported codec. Step Description 1. Use the change ip-codec-set command to change the appropriate codec-set. Tenor AS
or AX supports both G.711 and G.729 codecs. change ip-codec-set 1 Page 1 of 2 IP Codec Set Codec Set: 1 Audio Silence Frames Packet Codec Suppression Per Pkt Size(ms) 1: G.711MU n 2 20 2: G.729AB n 2 20
3.6. IP Network Region Step Description 1. Use the change ip-network-region command to set the Audio PHB Value. The Tenor
AS or AX will be set to use the same DiffServ value in Section 4, Step 15. change ip-network-region 1 Page 1 of 19 IP NETWORK REGION Region: 1 Location: 1 Authoritative Domain: devcon.com MEDIA PARAMETERS Intra-region IP-IP Direct Audio: yes Codec Set: 1 Inter-region IP-IP Direct Audio: yes UDP Port Min: 2048 IP Audio Hairpinning? y UDP Port Max: 3028 DIFFSERV/TOS PARAMETERS RTCP Reporting Enabled? y Call Cont RTCP MONITOR SERVER PARAMETERS rol PHB Value: 34 Audio PHB Value: 46 Use Default Server Parameters? y Video PHB Value: 26 802.1P/Q PARAMETERS Call Control 802.1p Priority: 6 Audio 802.1p Priority: 6 Video 802.1p Priority: 5 AUDIO RESOURCE RESERVATION PARAMETERS H.323 IP ENDPOINTS RSVP Enabled? n H.323 Link Bounce Recovery? y Idle Traffic Interval (sec): 20 Keep-Alive Interval (sec): 5 Keep-Alive Count: 5
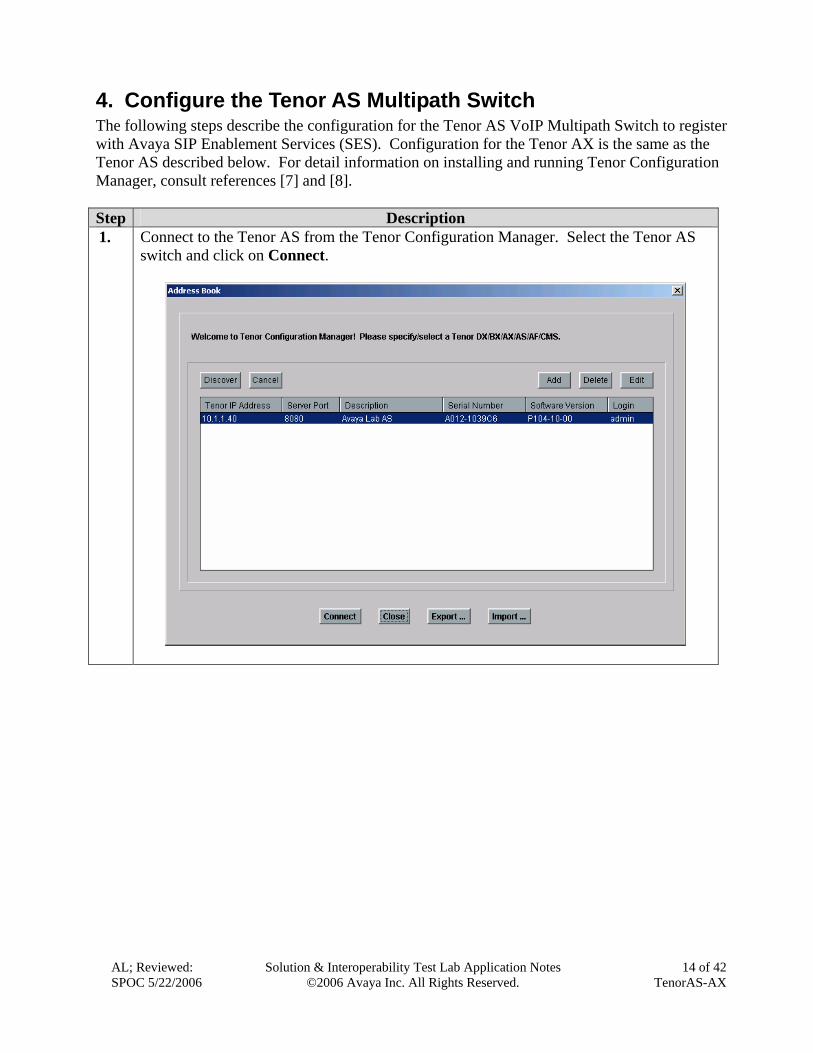
4. Configure the Tenor AS Multipath Switch The following steps describe the configuration for the Tenor AS VoIP Multipath Switch to register with Avaya SIP Enablement Services (SES). Configuration for the Tenor AX is the same as the Tenor AS described below. For detail information on installing and running Tenor Configuration Manager, consult references [7] and [8]. Step Description 1. Connect to the Tenor AS from the Tenor Configuration Manager. Select the Tenor AS
switch and click on Connect.
AL; Reviewed: SPOC 5/22/2006
Solution & Interoperability Test Lab Application Notes ©2006 Avaya Inc. All Rights Reserved.
14 of 42 TenorAS-AX
AL; Reviewed: SPOC 5/22/2006
Solution & Interoperability Test Lab Application Notes ©2006 Avaya Inc. All Rights Reserved.
15 of 42 TenorAS-AX
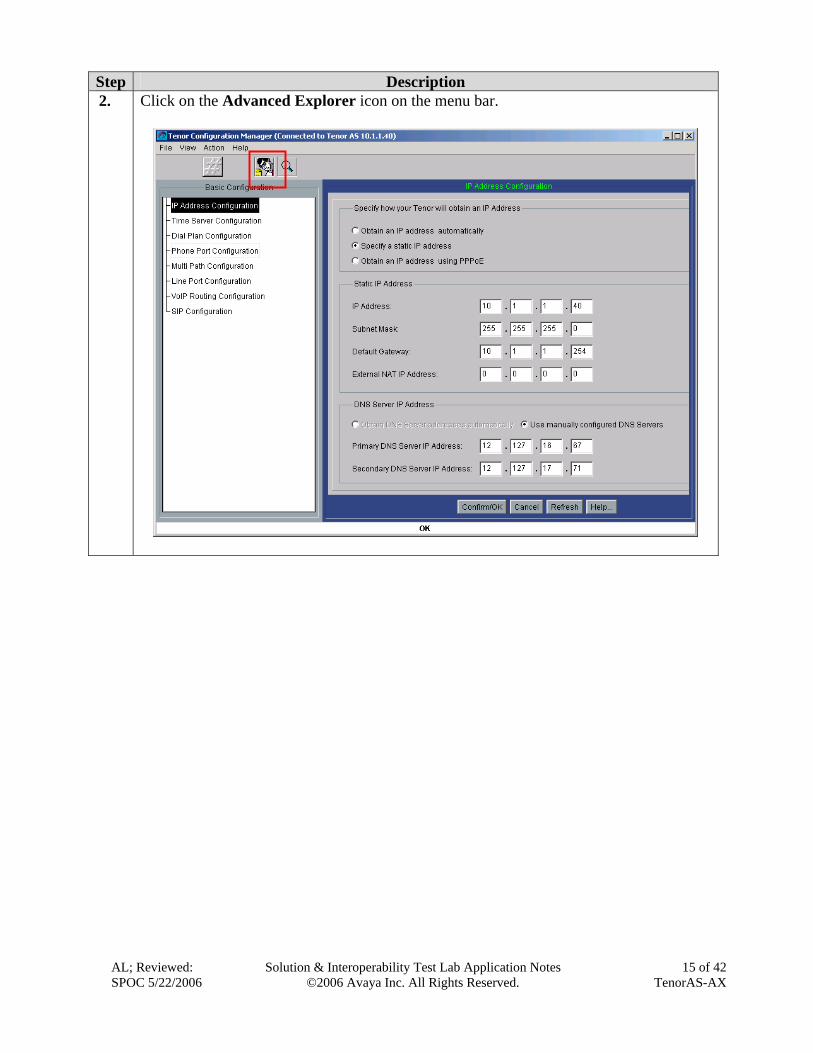
Step Description 2. Click on the Advanced Explorer icon on the menu bar.
AL; Reviewed: SPOC 5/22/2006
Solution & Interoperability Test Lab Application Notes ©2006 Avaya Inc. All Rights Reserved.
16 of 42 TenorAS-AX
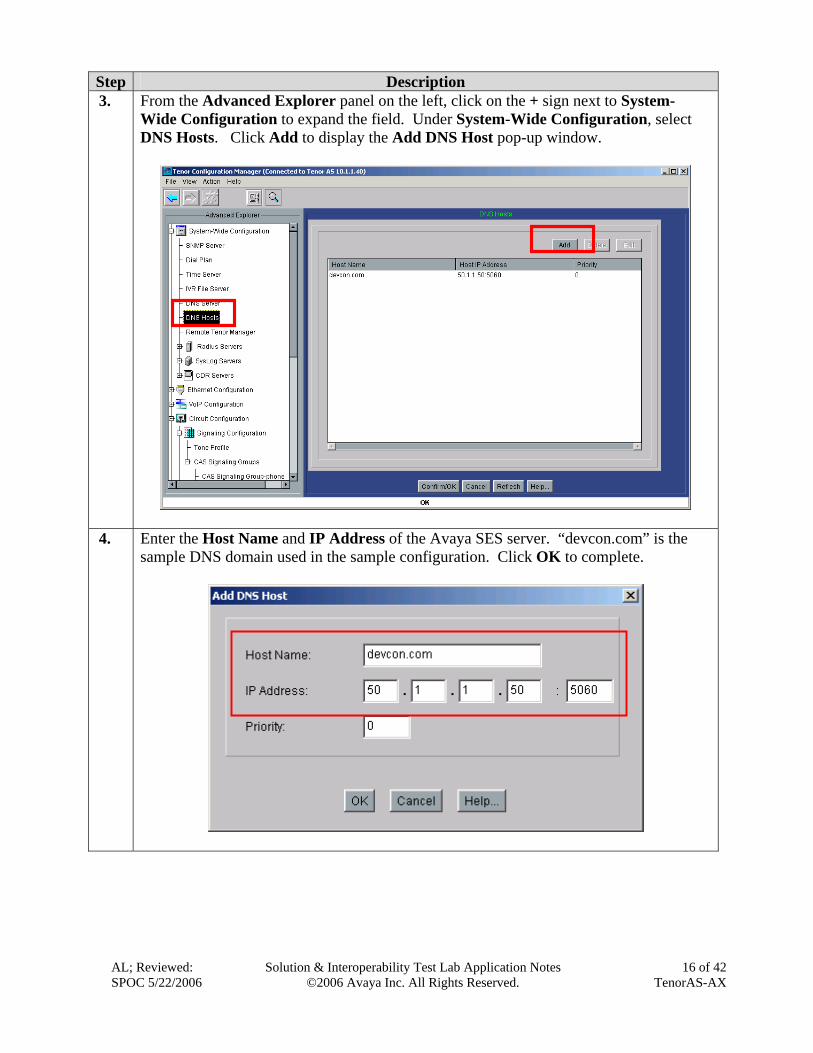
Step Description 3. From the Advanced Explorer panel on the left, click on the + sign next to System-
Wide Configuration to expand the field. Under System-Wide Configuration, select DNS Hosts. Click Add to display the Add DNS Host pop-up window.
4. Enter the Host Name and IP Address of the Avaya SES server. “devcon.com” is the sample DNS domain used in the sample configuration. Click OK to complete.
AL; Reviewed: SPOC 5/22/2006
Solution & Interoperability Test Lab Application Notes ©2006 Avaya Inc. All Rights Reserved.
17 of 42 TenorAS-AX
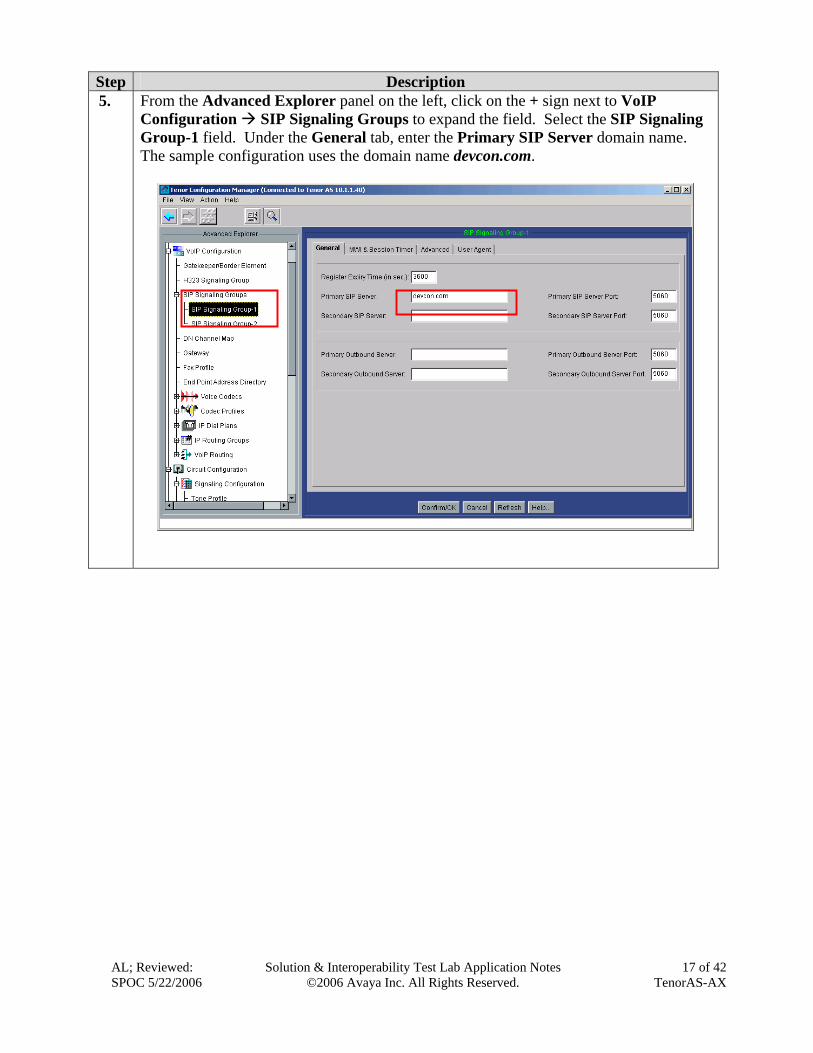
Step Description 5. From the Advanced Explorer panel on the left, click on the + sign next to VoIP
Configuration SIP Signaling Groups to expand the field. Select the SIP Signaling Group-1 field. Under the General tab, enter the Primary SIP Server domain name. The sample configuration uses the domain name devcon.com.
AL; Reviewed: SPOC 5/22/2006
Solution & Interoperability Test Lab Application Notes ©2006 Avaya Inc. All Rights Reserved.
18 of 42 TenorAS-AX
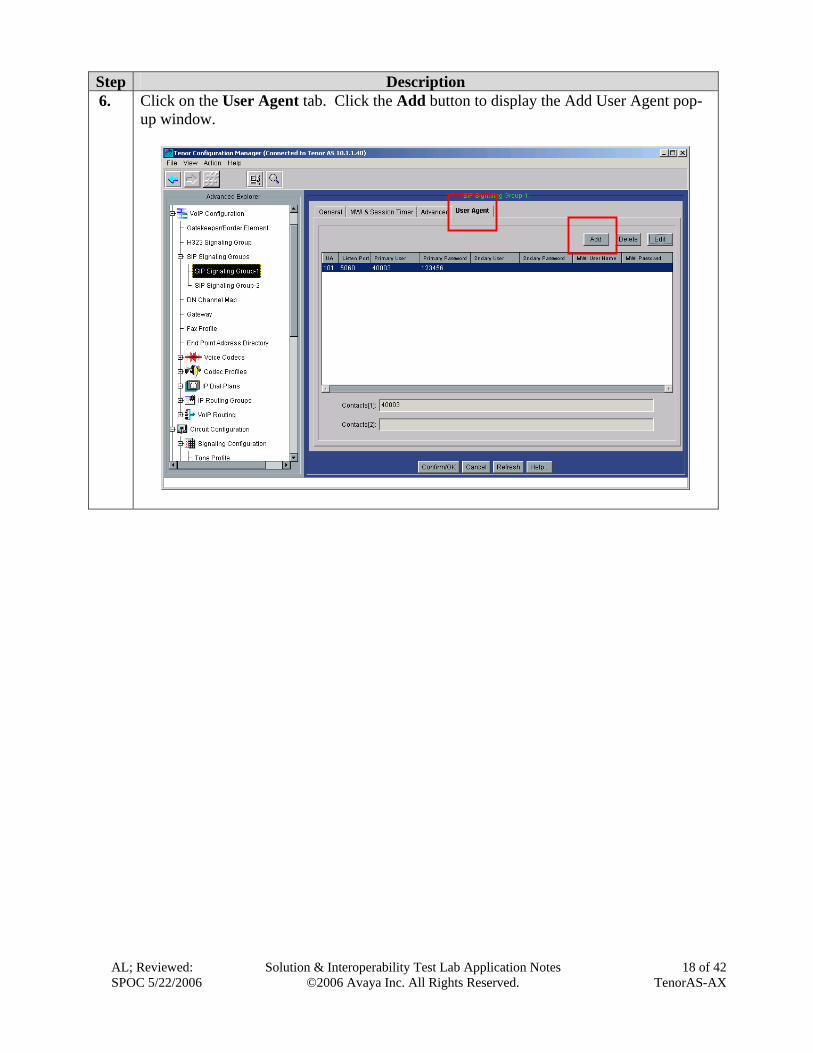
Step Description 6. Click on the User Agent tab. Click the Add button to display the Add User Agent pop-
up window.

AL; Reviewed: SPOC 5/22/2006
Solution & Interoperability Test Lab Application Notes ©2006 Avaya Inc. All Rights Reserved.
19 of 42 TenorAS-AX
Step Description 7. In the Add User Agent pop-up window, enter the following information:
Primary User: 40003 < --- station defined in Avaya SES Primary Password: 123456 < --- password defined in Avaya SES for above
extension Contact[1]: 40003 < --- station defined in Avaya SES Click OK to continue.
AL; Reviewed: SPOC 5/22/2006
Solution & Interoperability Test Lab Application Notes ©2006 Avaya Inc. All Rights Reserved.
20 of 42 TenorAS-AX
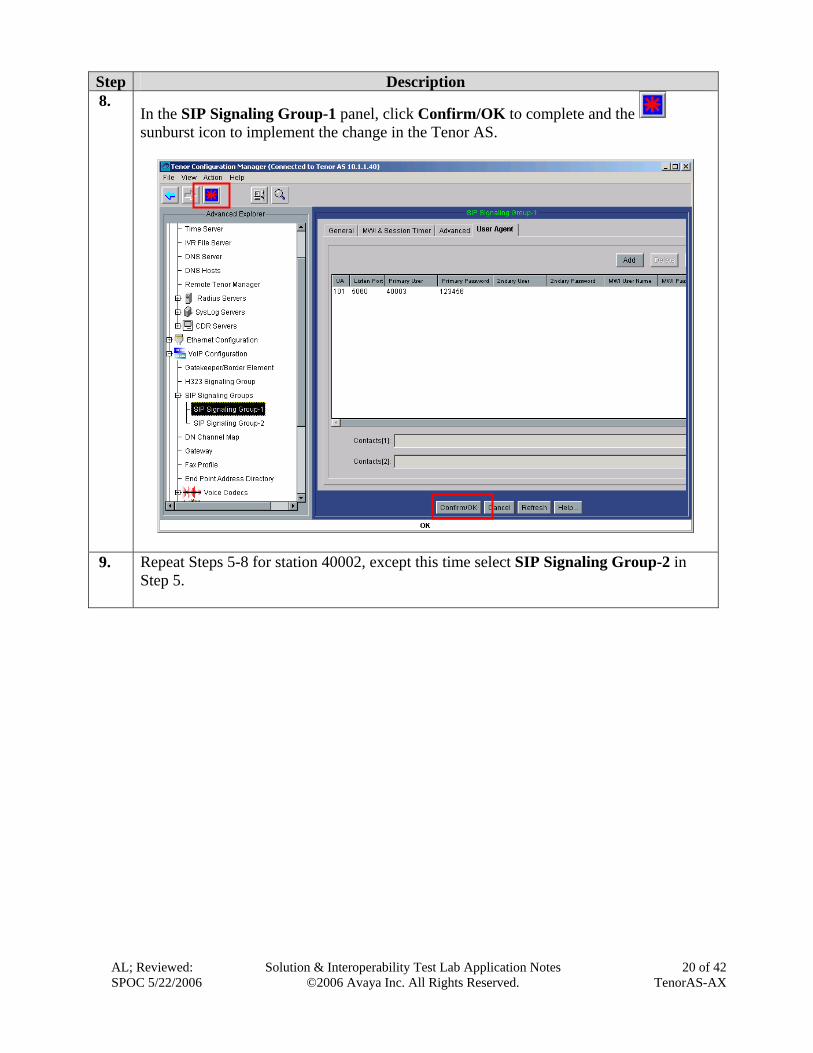
Step Description 8.
In the SIP Signaling Group-1 panel, click Confirm/OK to complete and the sunburst icon to implement the change in the Tenor AS.
9. Repeat Steps 5-8 for station 40002, except this time select SIP Signaling Group-2 in Step 5.
AL; Reviewed: SPOC 5/22/2006
Solution & Interoperability Test Lab Application Notes ©2006 Avaya Inc. All Rights Reserved.
21 of 42 TenorAS-AX
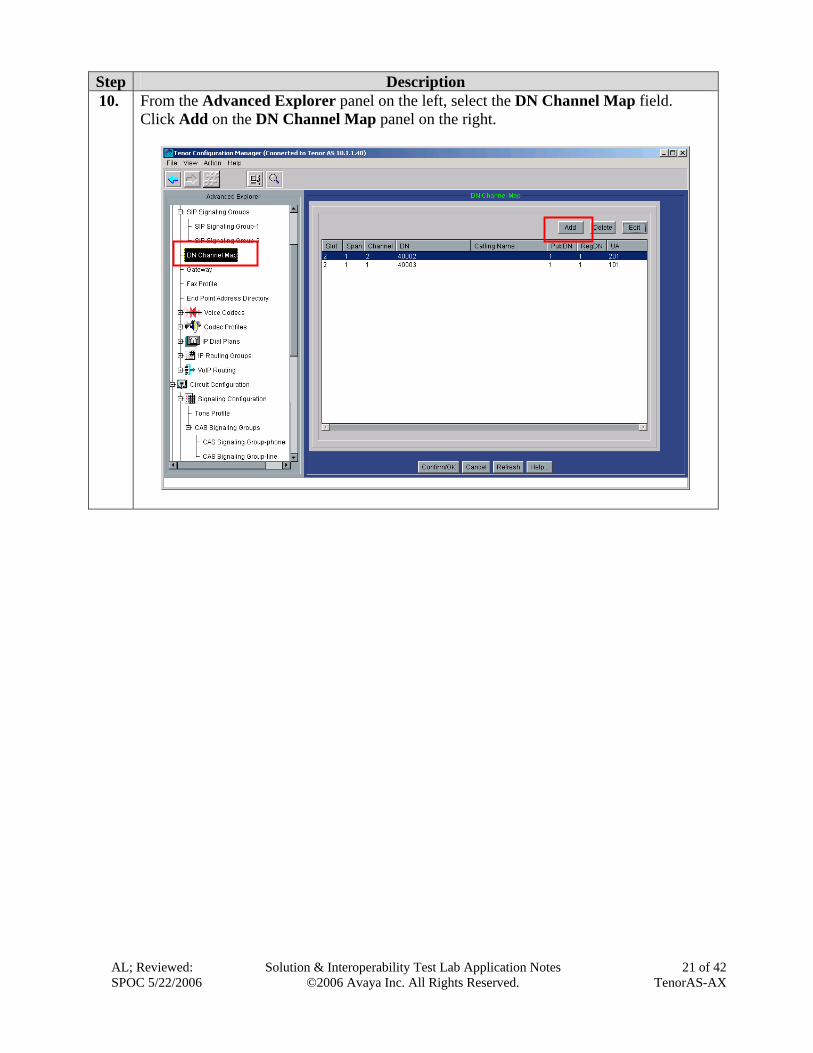
Step Description 10. From the Advanced Explorer panel on the left, select the DN Channel Map field.
Click Add on the DN Channel Map panel on the right.

AL; Reviewed: SPOC 5/22/2006
Solution & Interoperability Test Lab Application Notes ©2006 Avaya Inc. All Rights Reserved.
22 of 42 TenorAS-AX
Step Description 11. In the Add DN Channel Map pop-up window, enter the following information.
Channel: 1 < --- port number on the Tenor AS to which the analog
phone is connected DN: 40003 < --- extension User Agent: 101 < --- user agent defined for 40003 in Step 7 Public DN: checked < --- default Register DN: checked < --- default
Click OK to continue. At the DN Channel Map panel, click Confirm/OK and the sunburst icon to implement the change.

AL; Reviewed: SPOC 5/22/2006
Solution & Interoperability Test Lab Application Notes ©2006 Avaya Inc. All Rights Reserved.
23 of 42 TenorAS-AX
Step Description 12. From the Advanced Explorer panel on the left, select the Gateway. Enter a
Description and check the SIP only radio button for the Outgoing IP Routing field under the Gateway panel on the right.
Click Confirm/OK, and then the sunburst icon on the menu bar to implement the change.

AL; Reviewed: SPOC 5/22/2006
Solution & Interoperability Test Lab Application Notes ©2006 Avaya Inc. All Rights Reserved.
24 of 42 TenorAS-AX
Step Description 13. From the Advanced Explorer panel on the left, click on the + sign next to VoIP
Configuration Voice Codecs to expand the field. Select the Voice Codec-1 field. Select the desired Voice Codec from the drop-down menu. The sample configuration uses the G.711 Mu-law codec.
Click Confirm/OK, and then the sunburst icon on the menu bar to implements the change.
AL; Reviewed: SPOC 5/22/2006
Solution & Interoperability Test Lab Application Notes ©2006 Avaya Inc. All Rights Reserved.
25 of 42 TenorAS-AX
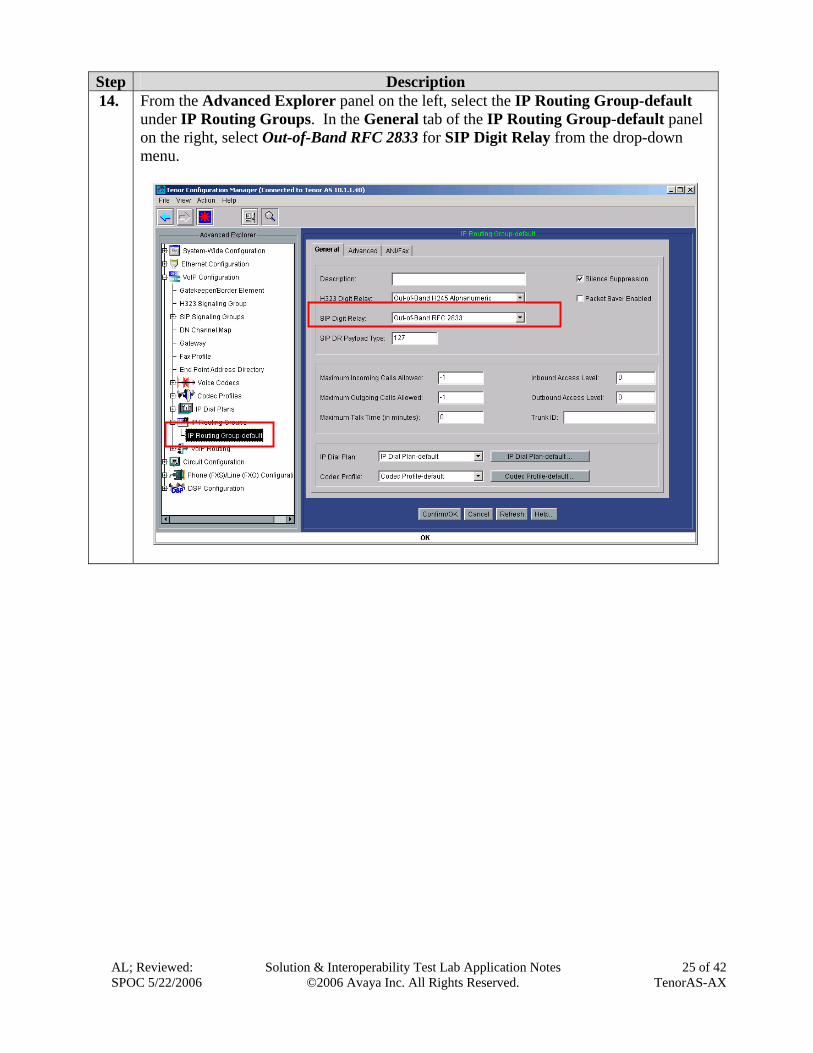
Step Description 14. From the Advanced Explorer panel on the left, select the IP Routing Group-default
under IP Routing Groups. In the General tab of the IP Routing Group-default panel on the right, select Out-of-Band RFC 2833 for SIP Digit Relay from the drop-down menu.

AL; Reviewed: SPOC 5/22/2006
Solution & Interoperability Test Lab Application Notes ©2006 Avaya Inc. All Rights Reserved.
26 of 42 TenorAS-AX
Step Description 15. Click on the Advanced tab under the IP Routing Group-default panel on the right.
Change the Media QOS Value to b8. This configures the DiffServ value in the RTP media stream to have a DiffServ value of b8 (same as the decimal value of 46 set in Avaya Communication Manager in Section 3.6).
Click Confirm/OK, and then the sunburst icon on the menu bar to implement the change.

AL; Reviewed: SPOC 5/22/2006
Solution & Interoperability Test Lab Application Notes ©2006 Avaya Inc. All Rights Reserved.
27 of 42 TenorAS-AX
Step Description 16. From the Advanced Explorer panel on the left, expand Circuit Configuration
Trunk Routing Configuration Hopoff Number Directories, and select the Hopoff Number Directory-1 field. Enter a Description for this Hopoff Number Directory-1. Click on Add to display the Add Hopoff Number pop-up window.
AL; Reviewed: SPOC 5/22/2006
Solution & Interoperability Test Lab Application Notes ©2006 Avaya Inc. All Rights Reserved.
28 of 42 TenorAS-AX
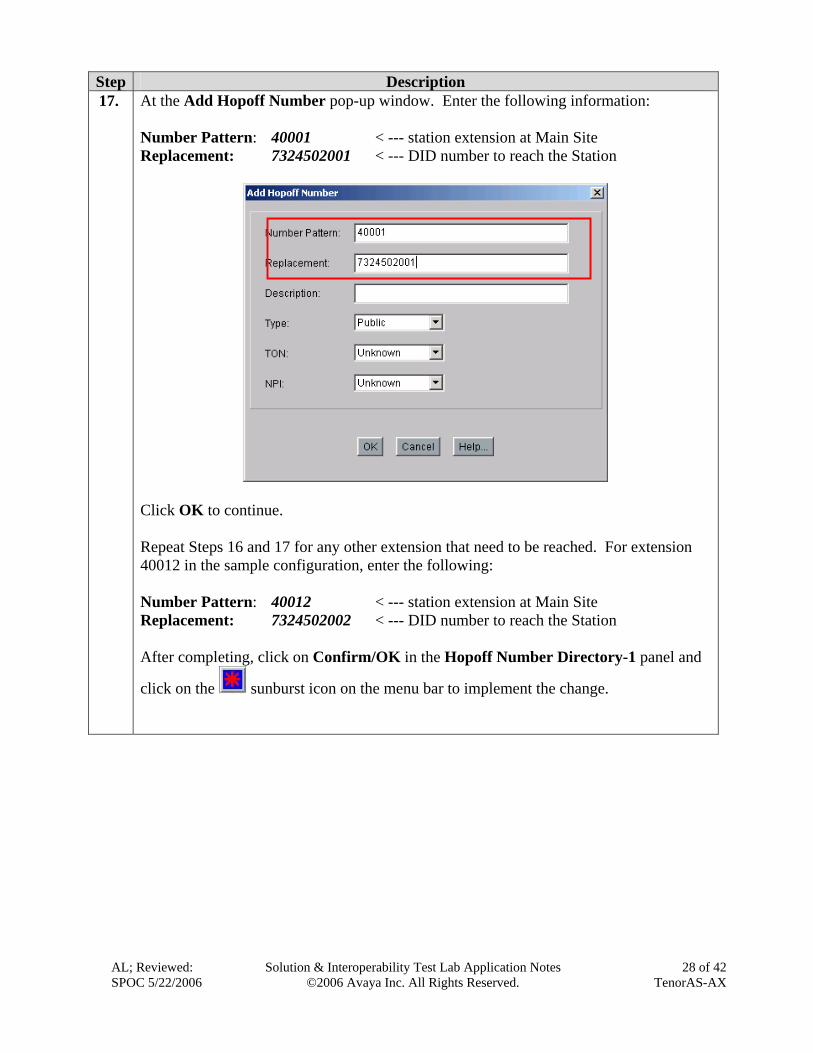
Step Description 17. At the Add Hopoff Number pop-up window. Enter the following information:
Number Pattern: 40001 < --- station extension at Main Site Replacement: 7324502001 < --- DID number to reach the Station
Click OK to continue. Repeat Steps 16 and 17 for any other extension that need to be reached. For extension 40012 in the sample configuration, enter the following: Number Pattern: 40012 < --- station extension at Main Site Replacement: 7324502002 < --- DID number to reach the Station After completing, click on Confirm/OK in the Hopoff Number Directory-1 panel and
click on the sunburst icon on the menu bar to implement the change.
AL; Reviewed: SPOC 5/22/2006
Solution & Interoperability Test Lab Application Notes ©2006 Avaya Inc. All Rights Reserved.
29 of 42 TenorAS-AX
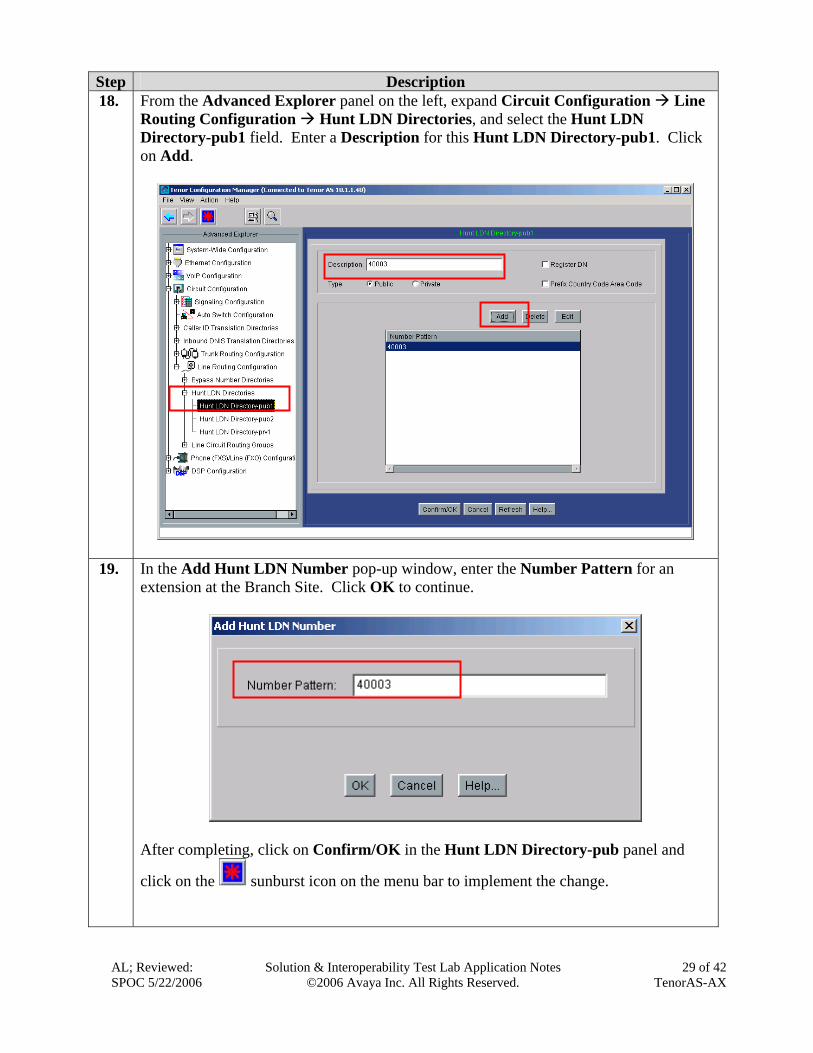
Step Description 18. From the Advanced Explorer panel on the left, expand Circuit Configuration Line
Routing Configuration Hunt LDN Directories, and select the Hunt LDN Directory-pub1 field. Enter a Description for this Hunt LDN Directory-pub1. Click on Add.
19. In the Add Hunt LDN Number pop-up window, enter the Number Pattern for an extension at the Branch Site. Click OK to continue.
After completing, click on Confirm/OK in the Hunt LDN Directory-pub panel and
click on the sunburst icon on the menu bar to implement the change.
AL; Reviewed: SPOC 5/22/2006
Solution & Interoperability Test Lab Application Notes ©2006 Avaya Inc. All Rights Reserved.
30 of 42 TenorAS-AX
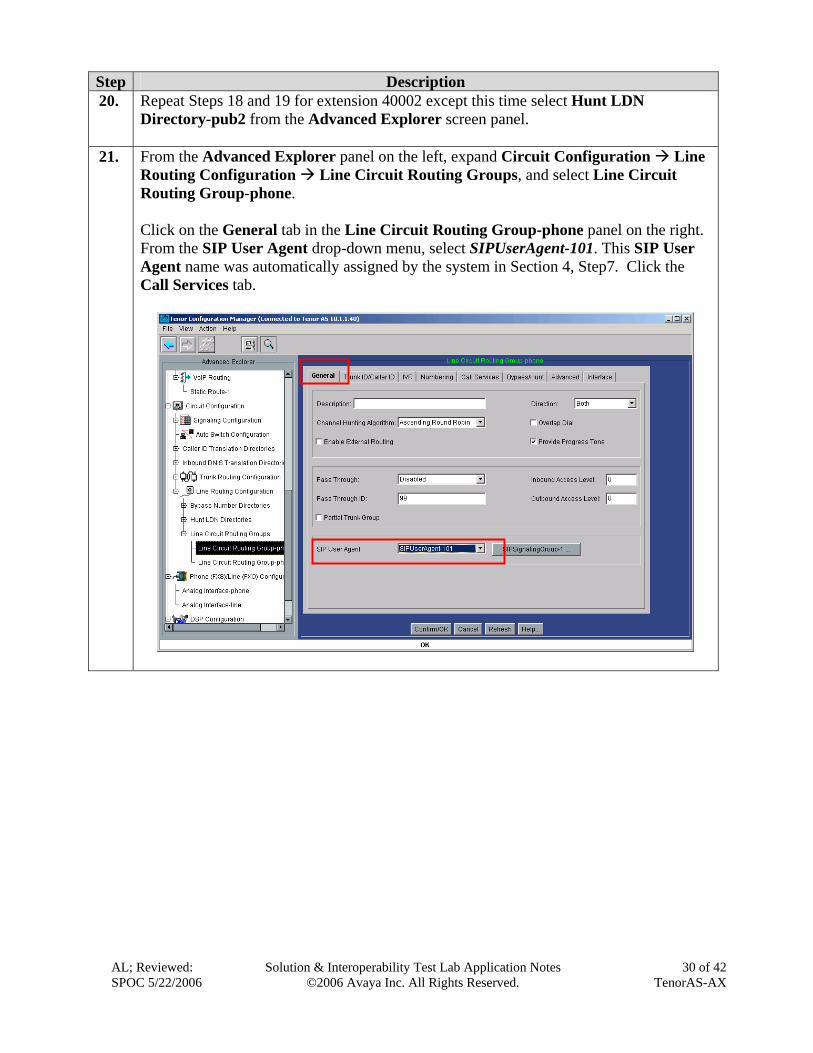
Step Description 20. Repeat Steps 18 and 19 for extension 40002 except this time select Hunt LDN
Directory-pub2 from the Advanced Explorer screen panel.
21. From the Advanced Explorer panel on the left, expand Circuit Configuration Line Routing Configuration Line Circuit Routing Groups, and select Line Circuit Routing Group-phone. Click on the General tab in the Line Circuit Routing Group-phone panel on the right. From the SIP User Agent drop-down menu, select SIPUserAgent-101. This SIP User Agent name was automatically assigned by the system in Section 4, Step7. Click the Call Services tab.
AL; Reviewed: SPOC 5/22/2006
Solution & Interoperability Test Lab Application Notes ©2006 Avaya Inc. All Rights Reserved.
31 of 42 TenorAS-AX
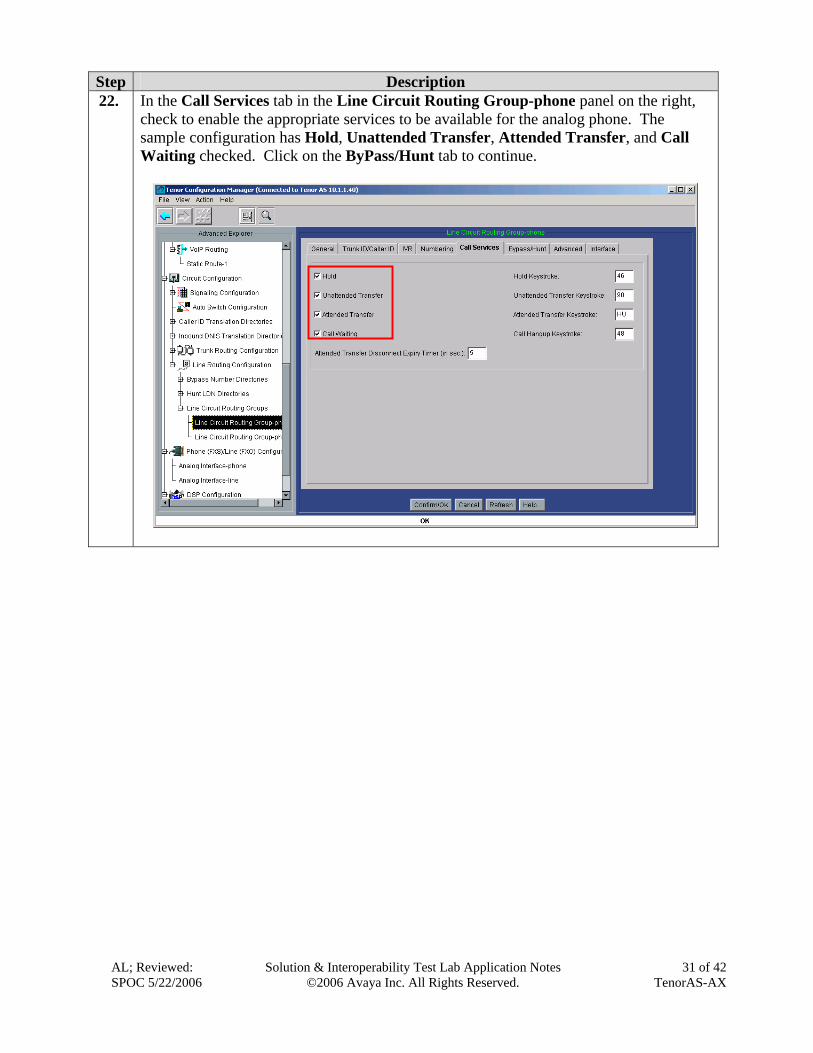
Step Description 22. In the Call Services tab in the Line Circuit Routing Group-phone panel on the right,
check to enable the appropriate services to be available for the analog phone. The sample configuration has Hold, Unattended Transfer, Attended Transfer, and Call Waiting checked. Click on the ByPass/Hunt tab to continue.
AL; Reviewed: SPOC 5/22/2006
Solution & Interoperability Test Lab Application Notes ©2006 Avaya Inc. All Rights Reserved.
32 of 42 TenorAS-AX
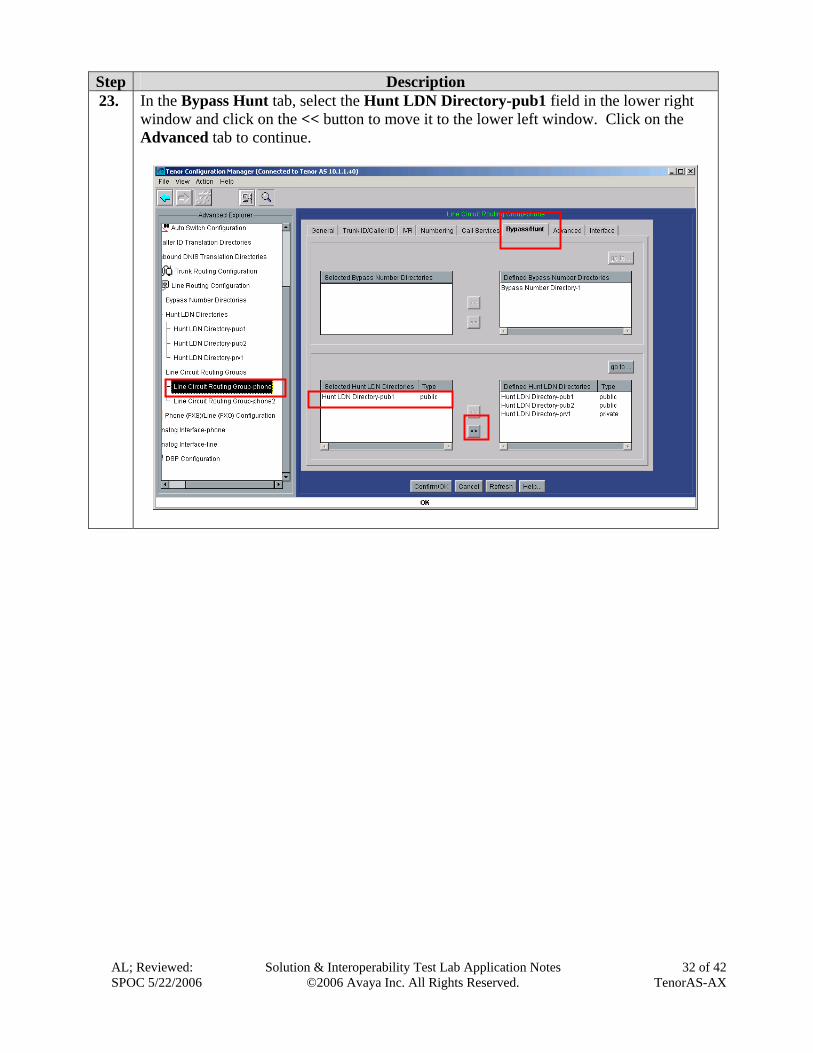
Step Description 23. In the Bypass Hunt tab, select the Hunt LDN Directory-pub1 field in the lower right
window and click on the << button to move it to the lower left window. Click on the Advanced tab to continue.
AL; Reviewed: SPOC 5/22/2006
Solution & Interoperability Test Lab Application Notes ©2006 Avaya Inc. All Rights Reserved.
33 of 42 TenorAS-AX
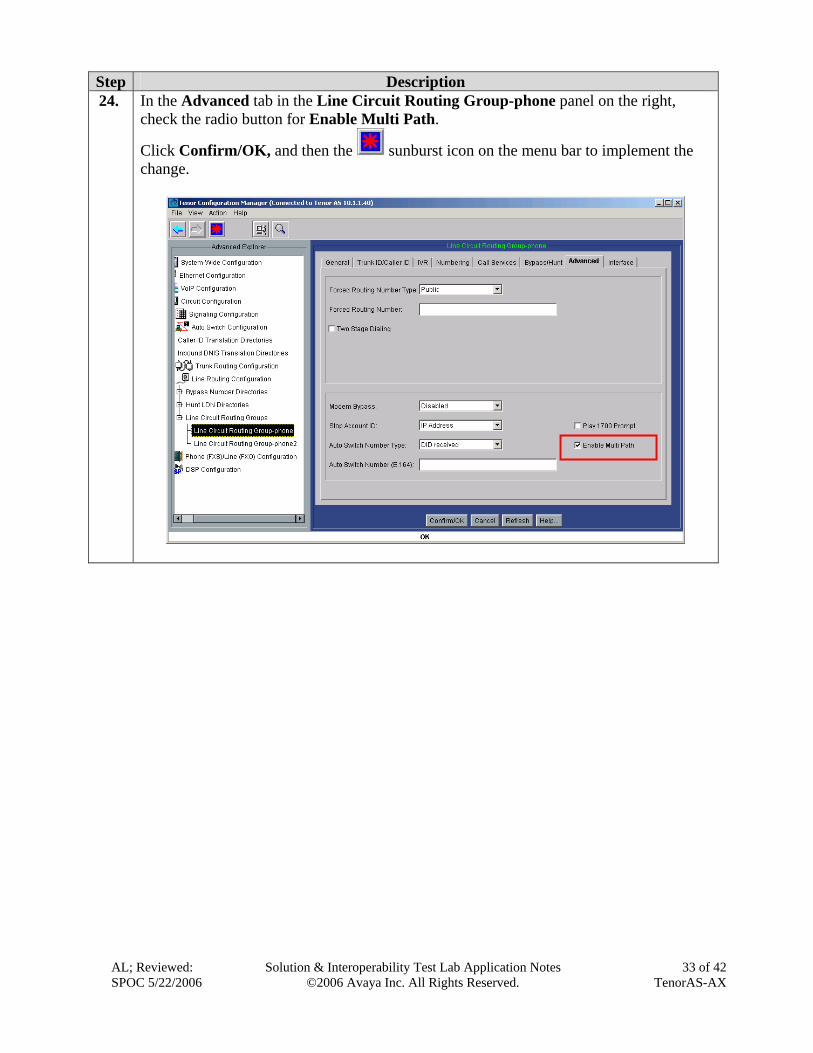
Step Description 24. In the Advanced tab in the Line Circuit Routing Group-phone panel on the right,
check the radio button for Enable Multi Path.
Click Confirm/OK, and then the sunburst icon on the menu bar to implement the change.
AL; Reviewed: SPOC 5/22/2006
Solution & Interoperability Test Lab Application Notes ©2006 Avaya Inc. All Rights Reserved.
34 of 42 TenorAS-AX
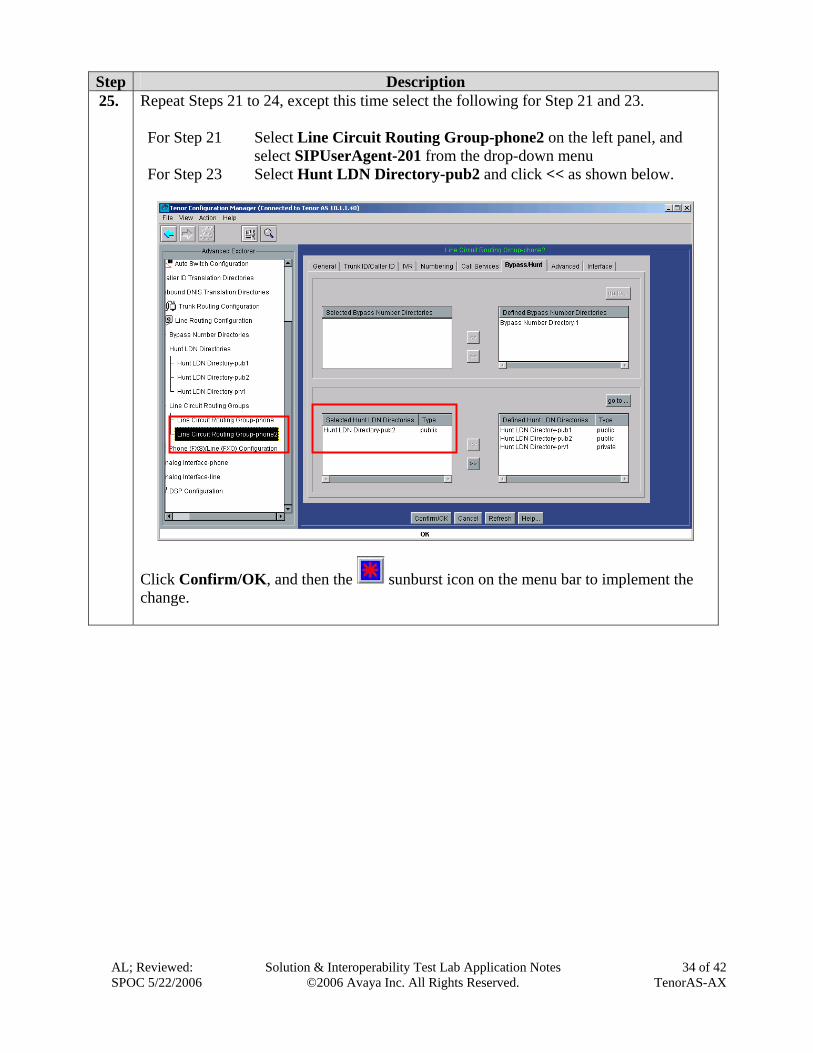
Step Description 25. Repeat Steps 21 to 24, except this time select the following for Step 21 and 23.
For Step 21 Select Line Circuit Routing Group-phone2 on the left panel, and
select SIPUserAgent-201 from the drop-down menu For Step 23 Select Hunt LDN Directory-pub2 and click << as shown below.
Click Confirm/OK, and then the sunburst icon on the menu bar to implement the change.
AL; Reviewed: SPOC 5/22/2006
Solution & Interoperability Test Lab Application Notes ©2006 Avaya Inc. All Rights Reserved.
35 of 42 TenorAS-AX
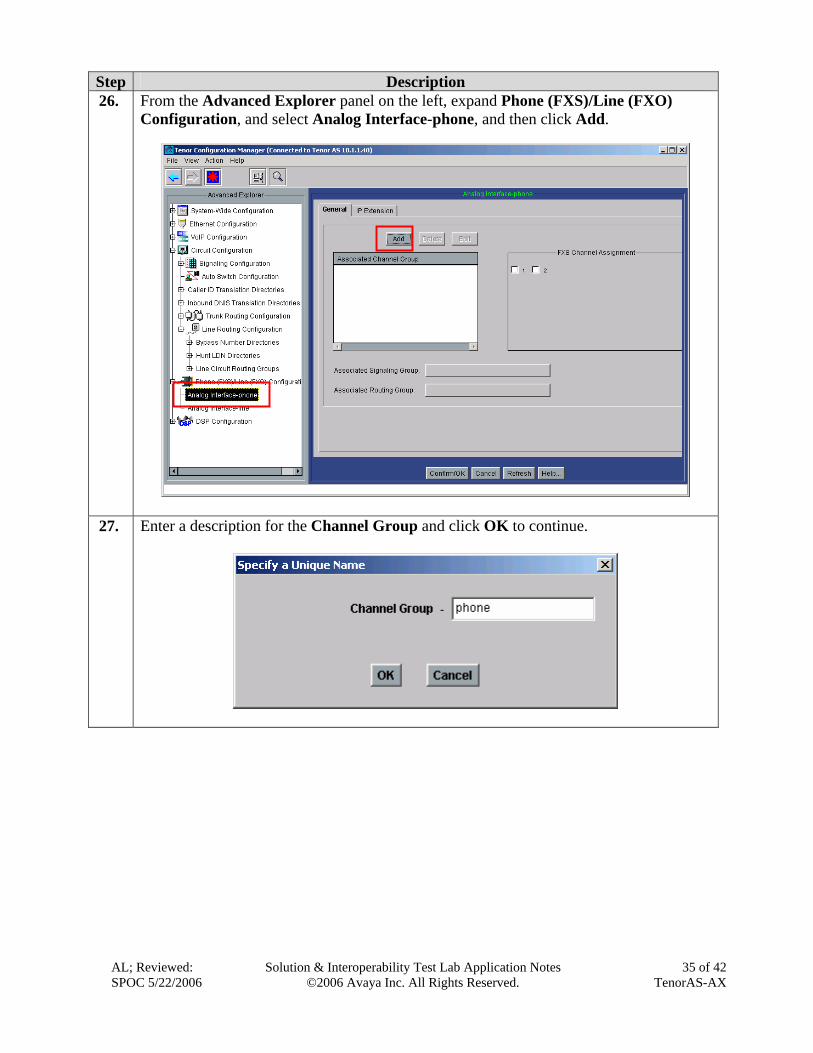
Step Description 26. From the Advanced Explorer panel on the left, expand Phone (FXS)/Line (FXO)
Configuration, and select Analog Interface-phone, and then click Add.
27. Enter a description for the Channel Group and click OK to continue.
AL; Reviewed: SPOC 5/22/2006
Solution & Interoperability Test Lab Application Notes ©2006 Avaya Inc. All Rights Reserved.
36 of 42 TenorAS-AX
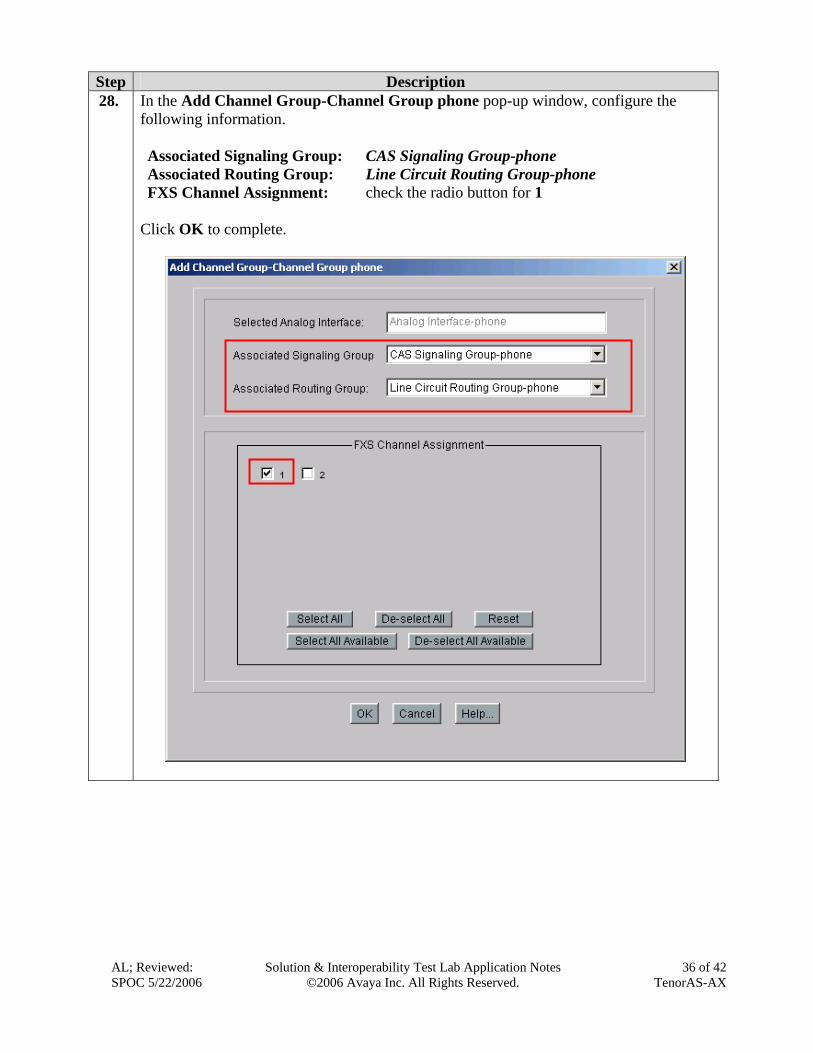
Step Description 28. In the Add Channel Group-Channel Group phone pop-up window, configure the
following information. Associated Signaling Group: CAS Signaling Group-phone Associated Routing Group: Line Circuit Routing Group-phone FXS Channel Assignment: check the radio button for 1
Click OK to complete.
AL; Reviewed: SPOC 5/22/2006
Solution & Interoperability Test Lab Application Notes ©2006 Avaya Inc. All Rights Reserved.
37 of 42 TenorAS-AX
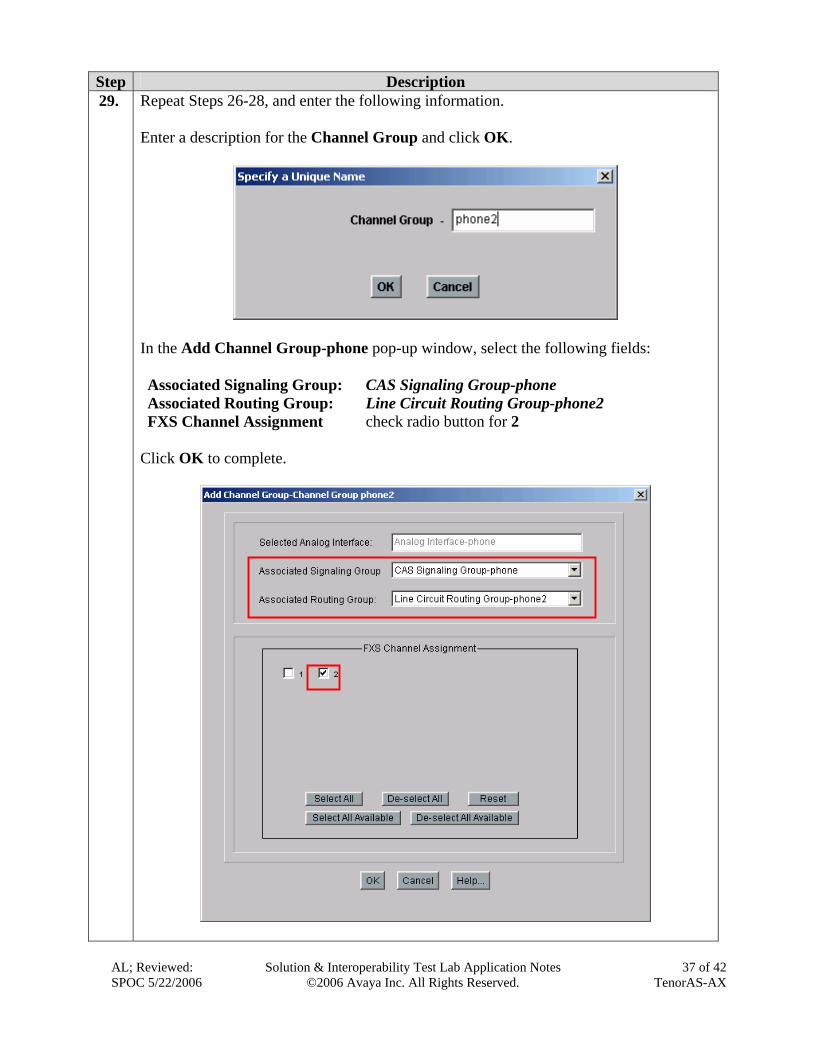
Step Description 29. Repeat Steps 26-28, and enter the following information.
Enter a description for the Channel Group and click OK.
In the Add Channel Group-phone pop-up window, select the following fields: Associated Signaling Group: CAS Signaling Group-phone Associated Routing Group: Line Circuit Routing Group-phone2 FXS Channel Assignment check radio button for 2
Click OK to complete.

AL; Reviewed: SPOC 5/22/2006
Solution & Interoperability Test Lab Application Notes ©2006 Avaya Inc. All Rights Reserved.
38 of 42 TenorAS-AX
Step Description 30. From the Advanced Explorer panel on the left, expand Phone (FXS)/Line (FXO)
Configuration, and select Analog Interface-line. Click Edit under the Analog Interface-line panel on the right.
AL; Reviewed: SPOC 5/22/2006
Solution & Interoperability Test Lab Application Notes ©2006 Avaya Inc. All Rights Reserved.
39 of 42 TenorAS-AX
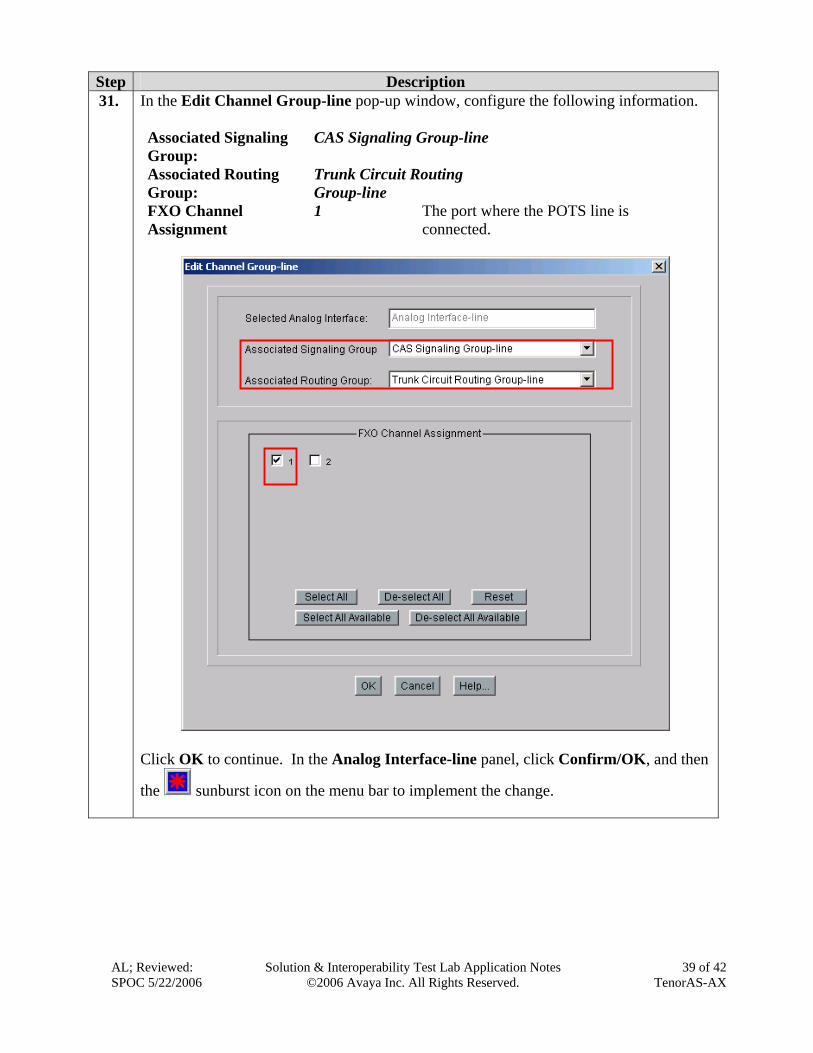
Step Description 31. In the Edit Channel Group-line pop-up window, configure the following information.
Associated Signaling Group:
CAS Signaling Group-line
Associated Routing Group:
Trunk Circuit Routing Group-line
FXO Channel Assignment
1 The port where the POTS line is connected.
Click OK to continue. In the Analog Interface-line panel, click Confirm/OK, and then
the sunburst icon on the menu bar to implement the change.
AL; Reviewed: SPOC 5/22/2006
Solution & Interoperability Test Lab Application Notes ©2006 Avaya Inc. All Rights Reserved.
40 of 42 TenorAS-AX
5. Interoperability Compliance Testing The interoperability compliance testing focused on assessing the ability of the Quintum Tenor AS or AX to register with Avaya SIP Enablement Services and interoperate with Avaya SIP and Avaya H.323 telephones, and to provide the capability of rerouting calls (Multipath Switching) through the PSTN during data network outages.
5.1. General Test Approach The general test approach was to place and receive calls through the analog telephones connected to the Tenor AS or Tenor AX at the Branch Site to and from Avaya SIP and Avaya H.323 IP telephones. The main objectives were to verify that:
• The Tenor AS and Tenor AX can successfully register with Avaya SIP Enablement Services. • Calls can be placed and received successfully through the Tenor AS and Tenor AX. • Analog telephones connected through the Tenor AS and Tenor AX can successfully access
features available from Avaya Communication Manager. These features include Transfer, Hold, Voice Mail, Message Waiting Indicator, and Off-PBX-Station Features Name Extensions such as call forwarding, forward to voice mail, and whisper page.
• DTMF is supported. • Call can be placed and received successfully during data network outages. • G.711 and G.729 codecs are supported. • Shuffled and non-shuffled calls are successfully completed. • QoS (Layer-3, DiffServ) is supported.
5.2. Test Results The Quintum Tenor AS and Tenor AX successfully achieved all main objectives. Calls from analog telephones successfully interoperated with Avaya SIP and Avaya H.323 telephones in the sample network. Through the use of the on/off hook button and/or the numeric keypad buttons, the analog telephone was able to support features such as Transfer, Hold, and Off-PBX-Station Features Name Extension such as call forwarding, forward to voice mail, and whisper page offered by Avaya Communication Manager. DTMF was successfully verified through access to the voice mail system. Layer-3 QoS information was confirmed via the use of a network analyzer. In simulated data network outage, calls to the Main Site were successfully routed through the PSTN as configured in the Tenor AS and Tenor AX. Local calling among analog telephones during a data network outage is not supported in the release tested.
6. Verification Steps The following steps may be used to verify the configuration:
• Place calls call from the analog telephones. • Log in to the Avaya SIP Enablement Service server via a web browser. Verify that the
analog stations extensions are registered with SES.
AL; Reviewed: SPOC 5/22/2006
Solution & Interoperability Test Lab Application Notes ©2006 Avaya Inc. All Rights Reserved.
41 of 42 TenorAS-AX
7. Support For technical support on the Quintum Tenor AS and Tenor AX, contact Quintum at:
• (toll-free) 1.877.435.7553 from within the United States, • +1.732.460.9399 from outside the United States • www.quintum.com
8. Conclusion These Application Notes have described the administration steps required to configure the Quintum Tenor AS or AX VoIP Multipath Switch to interoperate with Avaya SIP Enablement Services and Avaya Communication Manager in supporting analog telephones and enabling the multipath switching capability of the Tenor AS or Tenor AX.
9. Additional References [1] Administrator Guide for Avaya Communication Manager, Doc # 03-300509, Issue 2, February
2006 [2] Avaya Communication Manager Advanced Administration Quick Reference, Doc # 03-300364,
Issue 2, June 2005 Release 3.0 [3] Expanded Meet-me Conference (EMMC) version 1.0 Installation and Troubleshooting Guide for
the S8500, Doc # 04-300527, Issue 1, June 2005 [4] Avaya IA 770 INTUITY AUDIX Messaging Application, Doc # 11-300532, May 2005 [5] Installing and Administering SIP Enablement Services R3.1, Doc# 03-600768, Issue 1.5,
February 2006 [6] Avaya Extension to Cellular and Off-PBX Station (OPS) Installation and Administration Guide
Release 3.0, version 6.0, Doc # 210-100-500, Issue 9, June 2005 [7] Tenor AS VoIP Multipath/Gateway Switch Product Guide, P/N 480-0059-00-13 [8] Tenor Configuration Manager/Tenor Monitor Product Guide. P/N 480-0028 Product documentation for Avaya products may be found at http://support.avaya.com. Product documentation for Quintum Tenor AS or Tenor AX VoIP Multipath Switch products may be found at http://www.quintum.com/support/products/2G/tenor_2G/index.shtml.

AL; Reviewed: SPOC 5/22/2006
Solution & Interoperability Test Lab Application Notes ©2006 Avaya Inc. All Rights Reserved.
42 of 42 TenorAS-AX
©2006 Avaya Inc. All Rights Reserved. Avaya and the Avaya Logo are trademarks of Avaya Inc. All trademarks identified by ® and ™ are registered trademarks or trademarks, respectively, of Avaya Inc. All other trademarks are the property of their respective owners. The information provided in these Application Notes is subject to change without notice. The configurations, technical data, and recommendations provided in these Application Notes are believed to be accurate and dependable, but are presented without express or implied warranty. Users are responsible for their application of any products specified in these Application Notes. Please e-mail any questions or comments pertaining to these Application Notes along with the full title name and filename, located in the lower right corner, directly to the Avaya DeveloperConnection Program at [email protected].