all rights reserved - voicedirector€¦ · quintum tenor ax configuration guide for voicedirector...
TRANSCRIPT


All Rights Reserved
Copyright © 2005
The use, disclosure, modification, transfer, or transmittal of this work for any purpose, in any form, or by any means, without the written permission of the copyright holder, is strictly
forbidden.
Quintum Tenor AX Configuration Guide for VoiceDirector
03.28.2006

Disclaimer
This document is a guide to configure the Quintum Tenor AX for VoiceDirector. Your Quintum Tenor must have firmware version P104_12_10 on it in order to complete calls on the
network. If it does not, please download and install the latest firmware from www.quintum.com.
Quintum Tenor AX Configuration Guide for VoiceDirector
Page i
Table of Contents
1. Hardware Connections ..................................................... 1
2. Configuring the Tenor AX ................................................ 1
3. Making Calls .................................................................. 20
Placing Calls to Numbers within the VoiceDirector Network ............. 20
Placing Calls to Numbers Outside the VoiceDirector Network .......... 20
4. Configuring the FXO Ports for a Second Dial Tone ......... 21
Quintum Tenor AX Configuration Guide for VoiceDirector
Page 1
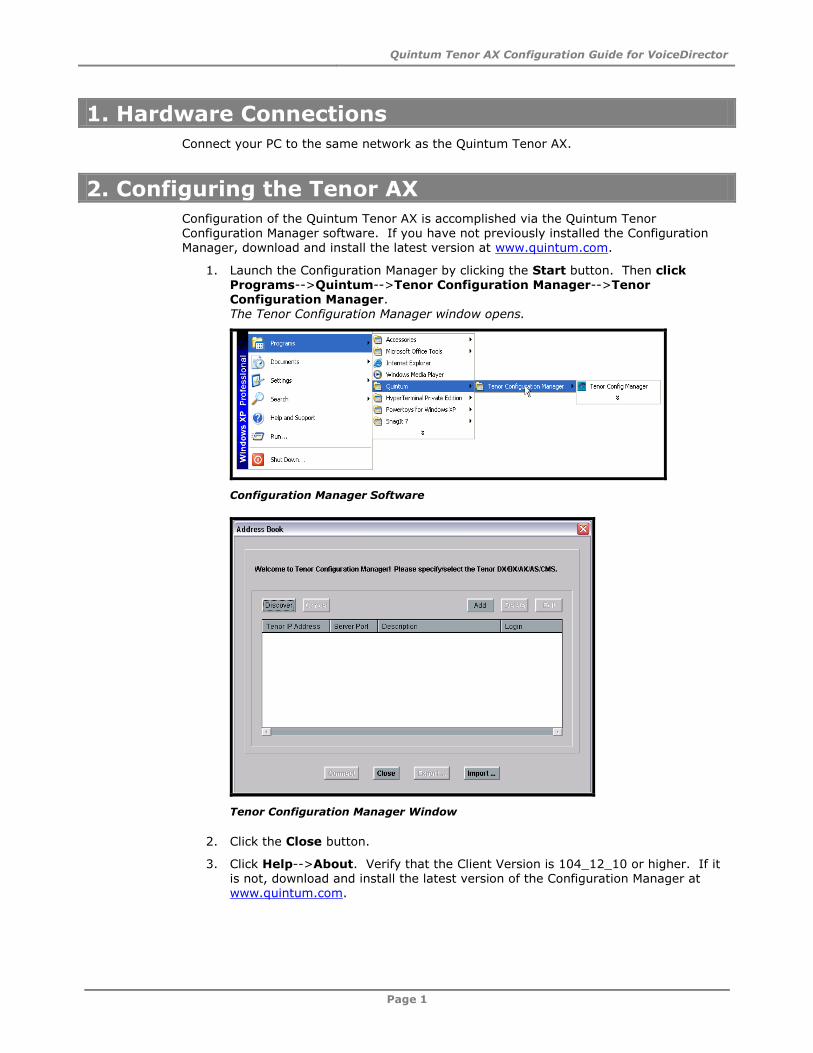
1. Hardware Connections
Connect your PC to the same network as the Quintum Tenor AX.
2. Configuring the Tenor AX
Configuration of the Quintum Tenor AX is accomplished via the Quintum Tenor Configuration Manager software. If you have not previously installed the Configuration Manager, download and install the latest version at www.quintum.com.
1. Launch the Configuration Manager by clicking the Start button. Then click Programs-->Quintum-->Tenor Configuration Manager-->Tenor Configuration Manager.
The Tenor Configuration Manager window opens.
Configuration Manager Software
Tenor Configuration Manager Window
2. Click the Close button.
3. Click Help-->About. Verify that the Client Version is 104_12_10 or higher. If it is not, download and install the latest version of the Configuration Manager at www.quintum.com.
Quintum Tenor AX Configuration Guide for VoiceDirector
Page 2
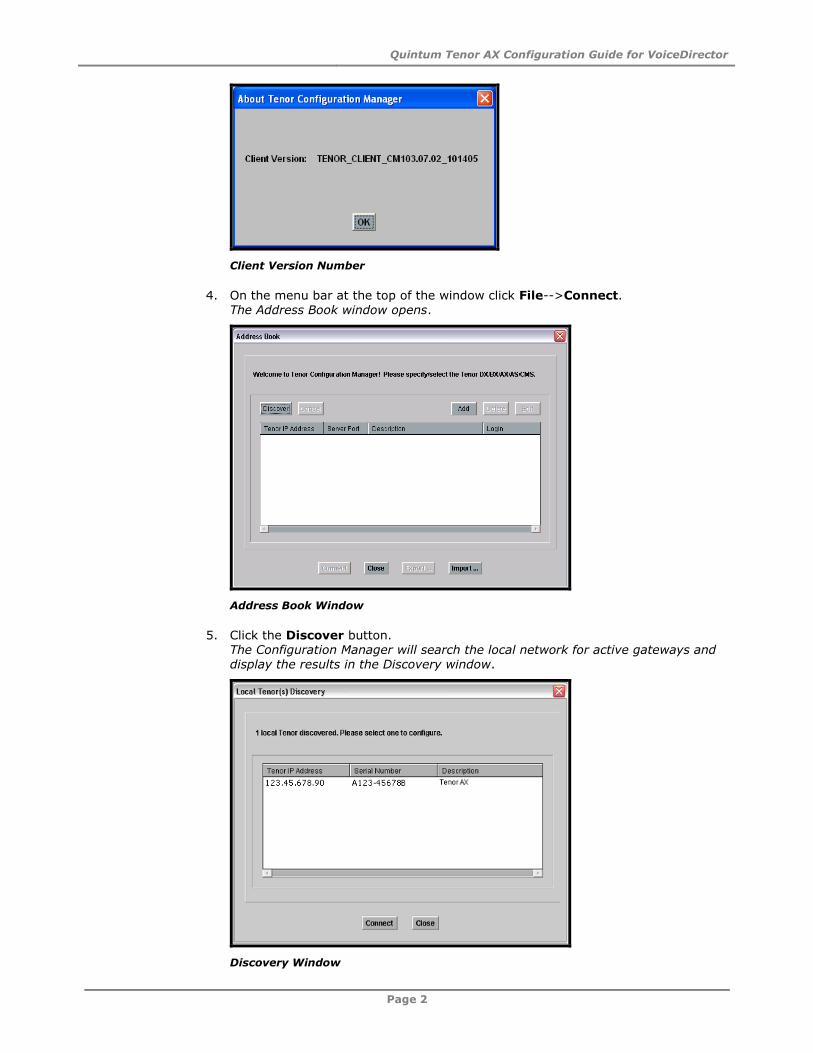
Client Version Number
4. On the menu bar at the top of the window click File-->Connect.
The Address Book window opens.
Address Book Window
5. Click the Discover button. The Configuration Manager will search the local network for active gateways and display the results in the Discovery window.
Discovery Window
Quintum Tenor AX Configuration Guide for VoiceDirector
Page 3
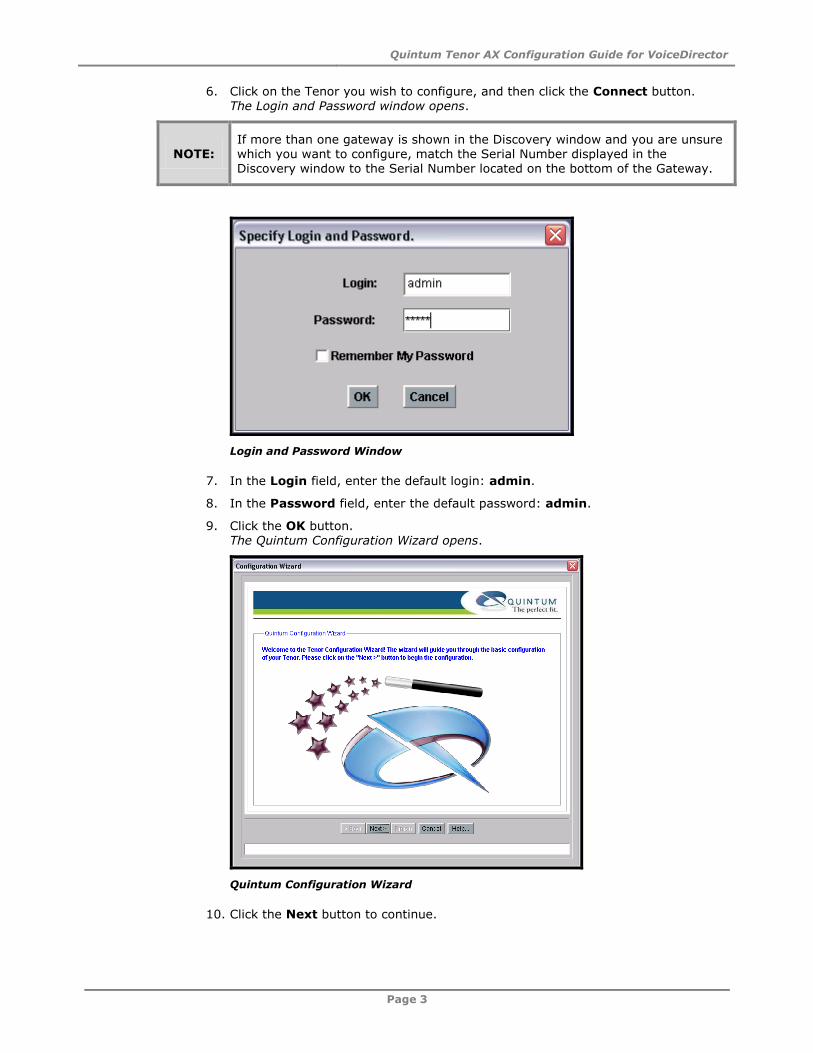
6. Click on the Tenor you wish to configure, and then click the Connect button.
The Login and Password window opens.
NOTE: If more than one gateway is shown in the Discovery window and you are unsure which you want to configure, match the Serial Number displayed in the Discovery window to the Serial Number located on the bottom of the Gateway.
Login and Password Window
7. In the Login field, enter the default login: admin.
8. In the Password field, enter the default password: admin.
9. Click the OK button. The Quintum Configuration Wizard opens.
Quintum Configuration Wizard
10. Click the Next button to continue.
Quintum Tenor AX Configuration Guide for VoiceDirector
Page 4
NOTE:
If the Configuration Wizard does not start, restore the Tenor’s factory default settings by clicking on Action-->Set Factory from the Tenor Configuration
Manager window. When the defaults have been restored, reconnect to the Tenor and the Wizard will start.
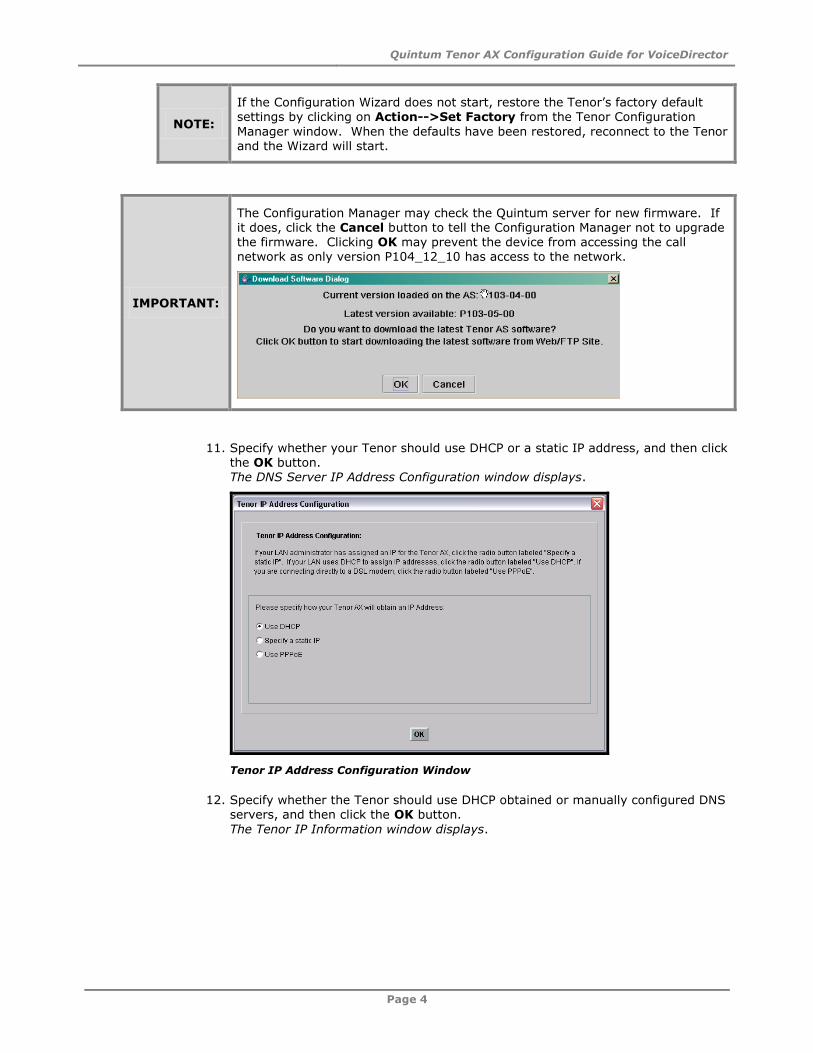
IMPORTANT:
The Configuration Manager may check the Quintum server for new firmware. If it does, click the Cancel button to tell the Configuration Manager not to upgrade the firmware. Clicking OK may prevent the device from accessing the call network as only version P104_12_10 has access to the network.
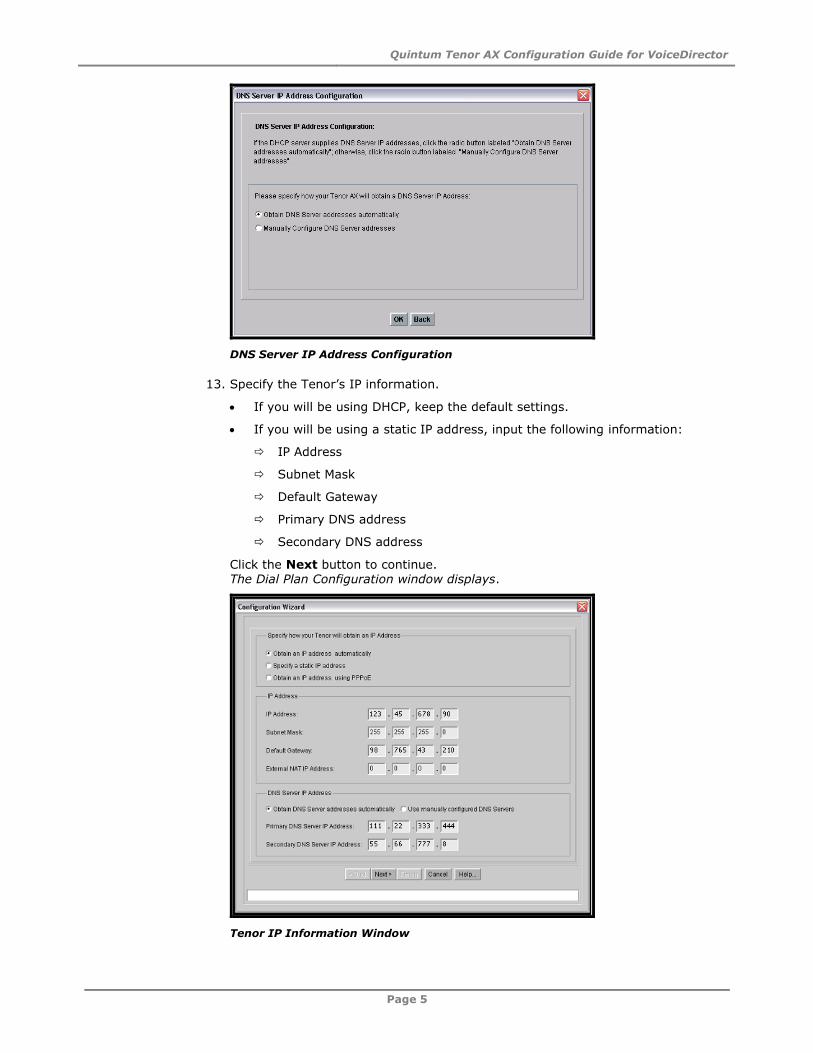
11. Specify whether your Tenor should use DHCP or a static IP address, and then click the OK button. The DNS Server IP Address Configuration window displays.
Tenor IP Address Configuration Window
12. Specify whether the Tenor should use DHCP obtained or manually configured DNS servers, and then click the OK button.
The Tenor IP Information window displays.
Quintum Tenor AX Configuration Guide for VoiceDirector
Page 5
DNS Server IP Address Configuration
13. Specify the Tenor’s IP information.
If you will be using DHCP, keep the default settings.
If you will be using a static IP address, input the following information:
IP Address
Subnet Mask
Default Gateway
Primary DNS address
Secondary DNS address
Click the Next button to continue. The Dial Plan Configuration window displays.
Tenor IP Information Window

Quintum Tenor AX Configuration Guide for VoiceDirector
Page 6
14. On the Dial Plan Configuration screen, click the Skip button.
The Dial Plan window displays.
Dial Plan Configuration Window
15. On the Dial Plan screen, enter 3 in the Minimum Dial Length field and click the Next button. The Phone Port Configuration window displays.
Dial Plan Window
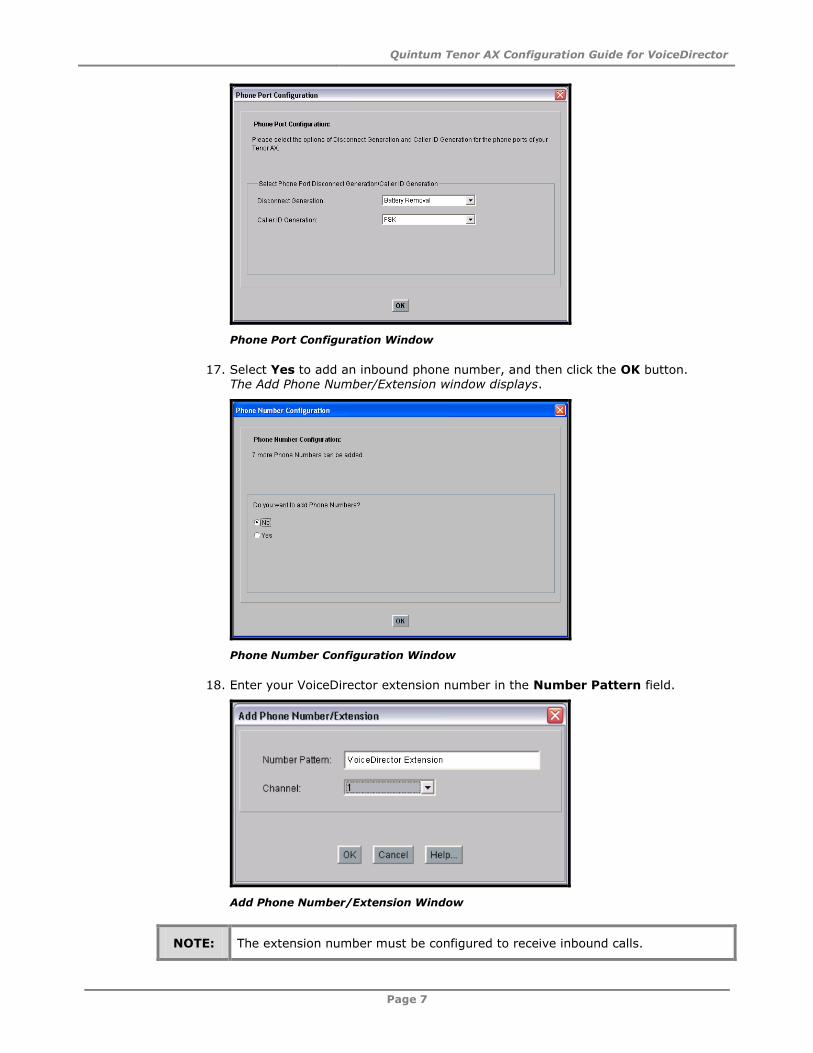
16. On the Phone Port Configuration screen, click the OK button.
The Phone Number Configuration window displays.
Quintum Tenor AX Configuration Guide for VoiceDirector
Page 7
Phone Port Configuration Window
17. Select Yes to add an inbound phone number, and then click the OK button. The Add Phone Number/Extension window displays.
Phone Number Configuration Window
18. Enter your VoiceDirector extension number in the Number Pattern field.
Add Phone Number/Extension Window
NOTE: The extension number must be configured to receive inbound calls.
Quintum Tenor AX Configuration Guide for VoiceDirector
Page 8
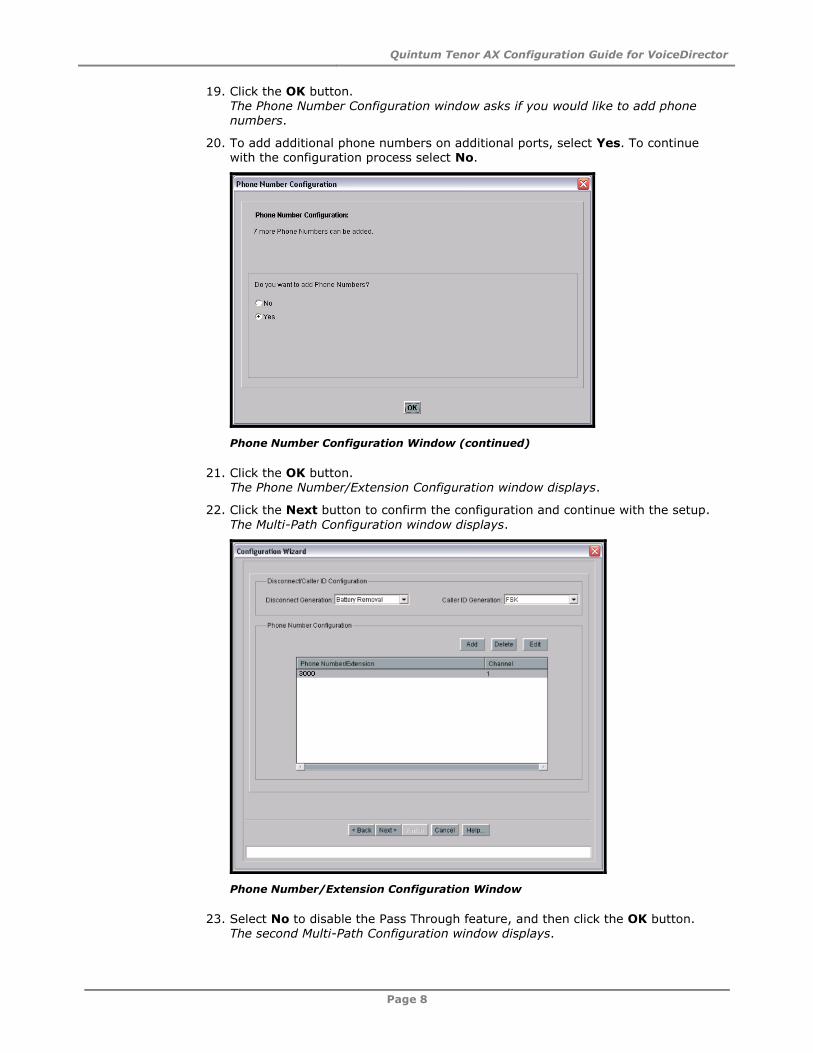
19. Click the OK button.
The Phone Number Configuration window asks if you would like to add phone numbers.
20. To add additional phone numbers on additional ports, select Yes. To continue with the configuration process select No.
Phone Number Configuration Window (continued)
21. Click the OK button. The Phone Number/Extension Configuration window displays.
22. Click the Next button to confirm the configuration and continue with the setup.
The Multi-Path Configuration window displays.
Phone Number/Extension Configuration Window
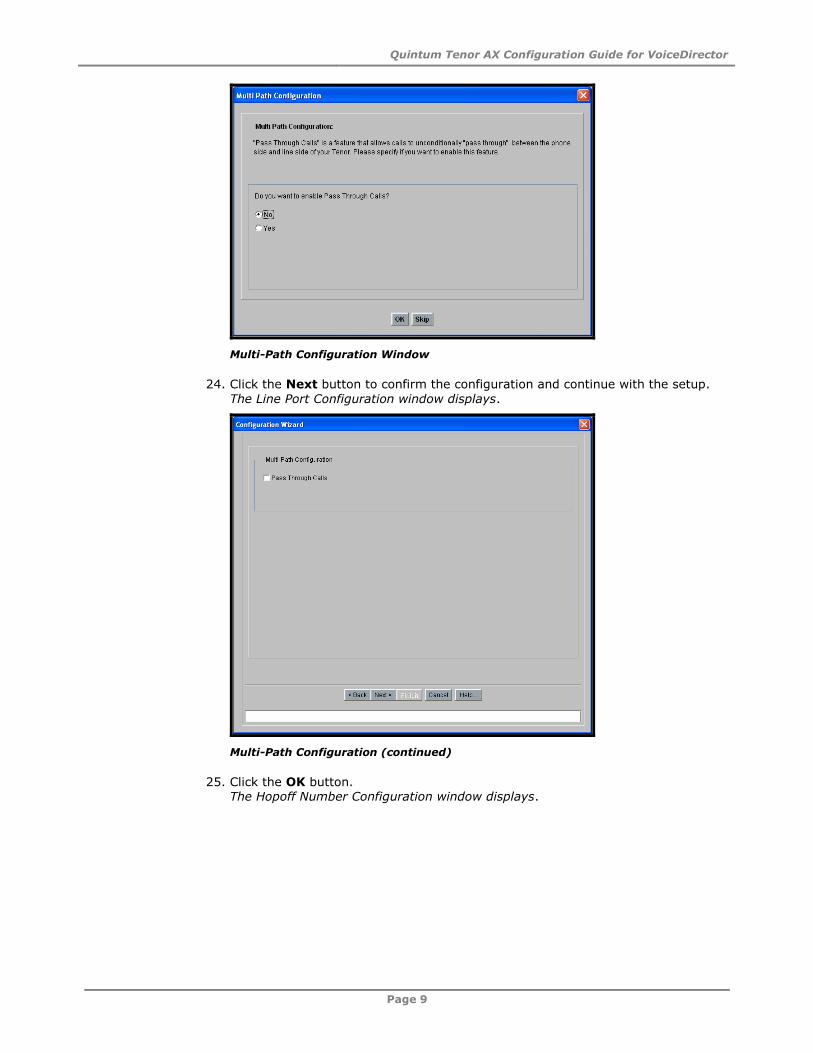
23. Select No to disable the Pass Through feature, and then click the OK button.
The second Multi-Path Configuration window displays.
Quintum Tenor AX Configuration Guide for VoiceDirector
Page 9
Multi-Path Configuration Window
24. Click the Next button to confirm the configuration and continue with the setup.
The Line Port Configuration window displays.
Multi-Path Configuration (continued)
25. Click the OK button. The Hopoff Number Configuration window displays.

Quintum Tenor AX Configuration Guide for VoiceDirector
Page 10
Line Port Configuration Window
26. Select No, and then click the OK button to continue.
The Disconnect/Caller ID Configuration window displays.
Hopoff Number Configuration Window
27. Click the Next button to confirm the configuration and continue with the setup.
The VoIP Gateway Configuration window displays.
Quintum Tenor AX Configuration Guide for VoiceDirector
Page 11
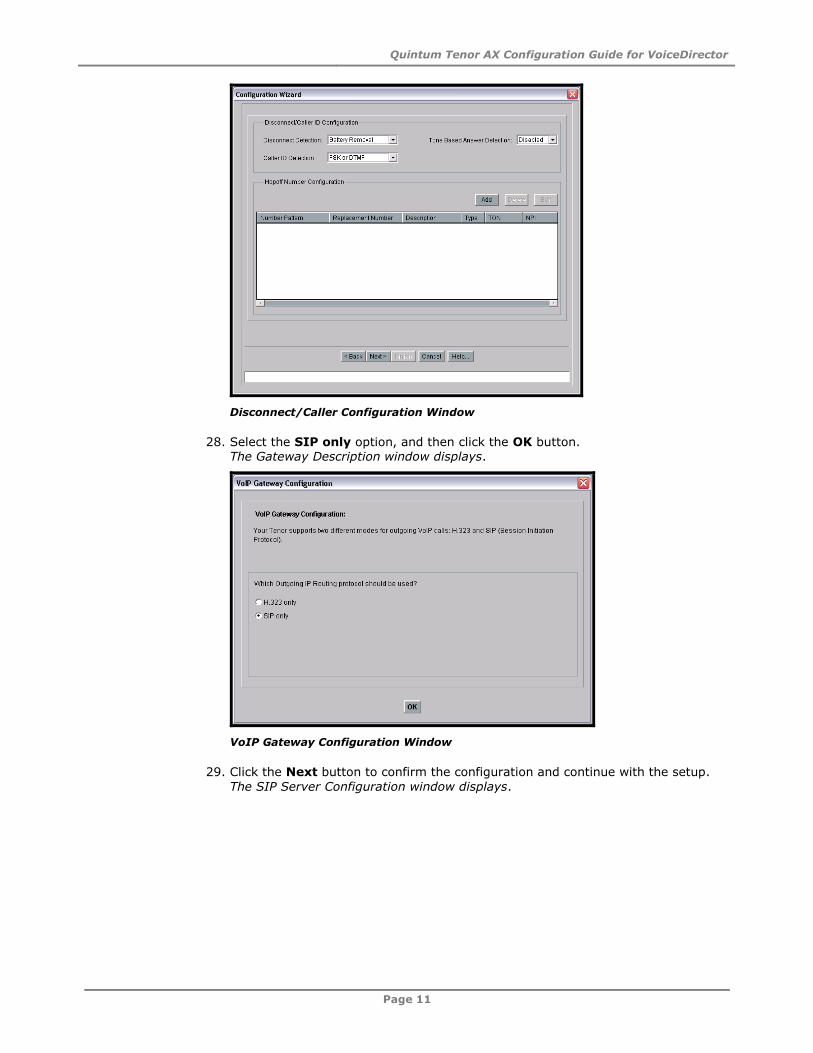
Disconnect/Caller Configuration Window
28. Select the SIP only option, and then click the OK button. The Gateway Description window displays.
VoIP Gateway Configuration Window
29. Click the Next button to confirm the configuration and continue with the setup.
The SIP Server Configuration window displays.
Quintum Tenor AX Configuration Guide for VoiceDirector
Page 12
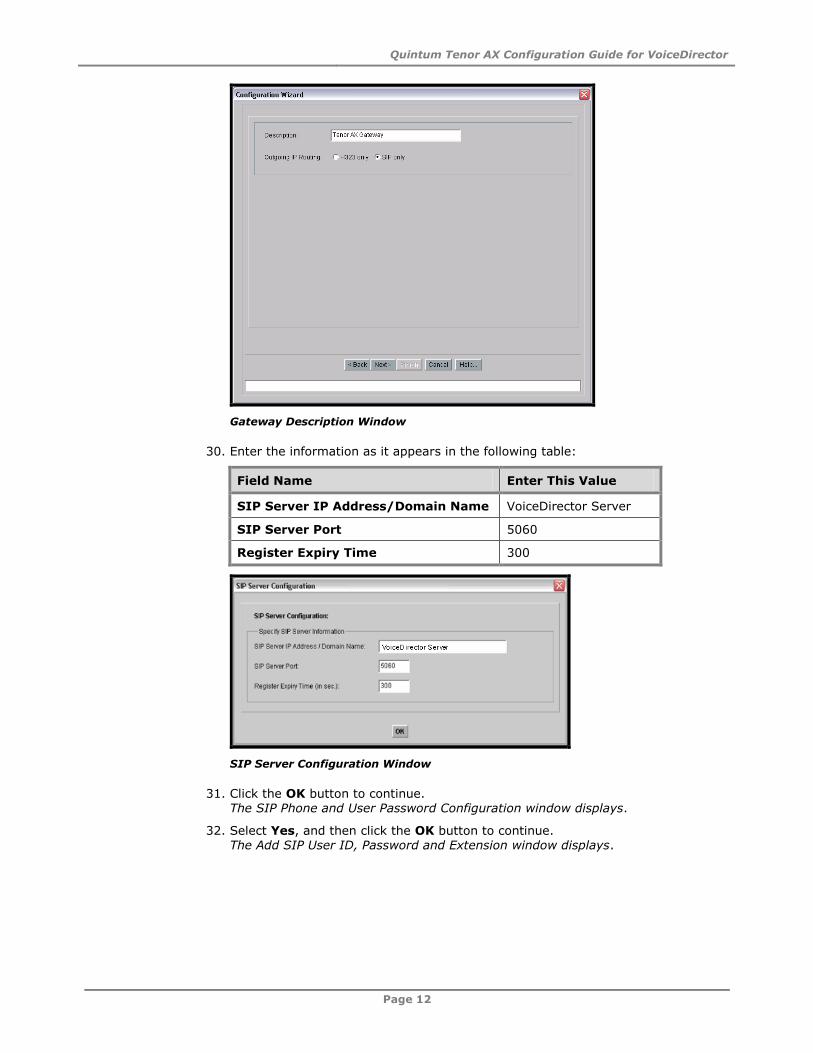
Gateway Description Window
30. Enter the information as it appears in the following table:
Field Name Enter This Value
SIP Server IP Address/Domain Name VoiceDirector Server
SIP Server Port 5060
Register Expiry Time 300
SIP Server Configuration Window
31. Click the OK button to continue. The SIP Phone and User Password Configuration window displays.
32. Select Yes, and then click the OK button to continue. The Add SIP User ID, Password and Extension window displays.
Quintum Tenor AX Configuration Guide for VoiceDirector
Page 13
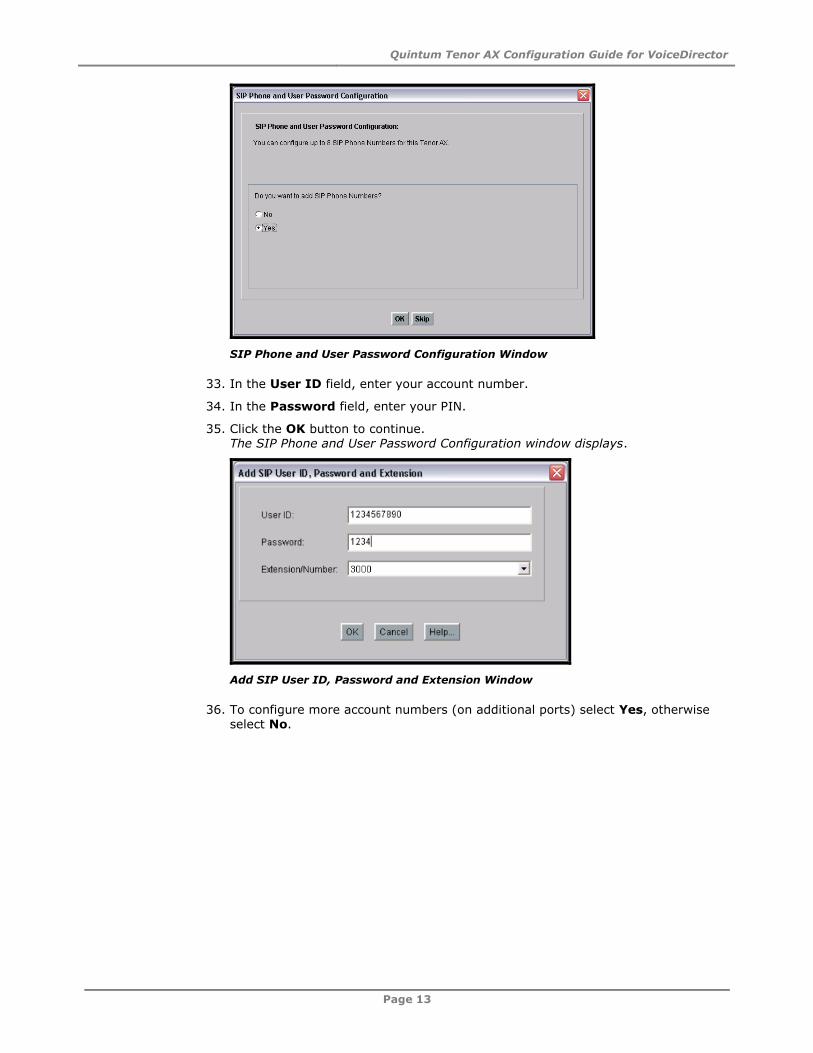
SIP Phone and User Password Configuration Window
33. In the User ID field, enter your account number.
34. In the Password field, enter your PIN.
35. Click the OK button to continue. The SIP Phone and User Password Configuration window displays.
Add SIP User ID, Password and Extension Window
36. To configure more account numbers (on additional ports) select Yes, otherwise
select No.

Quintum Tenor AX Configuration Guide for VoiceDirector
Page 14
SIP Phone and User Password Configuration Window (continued)
37. Click the OK button.
The SIP Proxy/Registration Server window displays.
38. Click the Next button to confirm the configuration and continue with the setup. The Tenor will save the settings, and the Configuration Summary window displays.
SIP Proxy/Registration Server Window
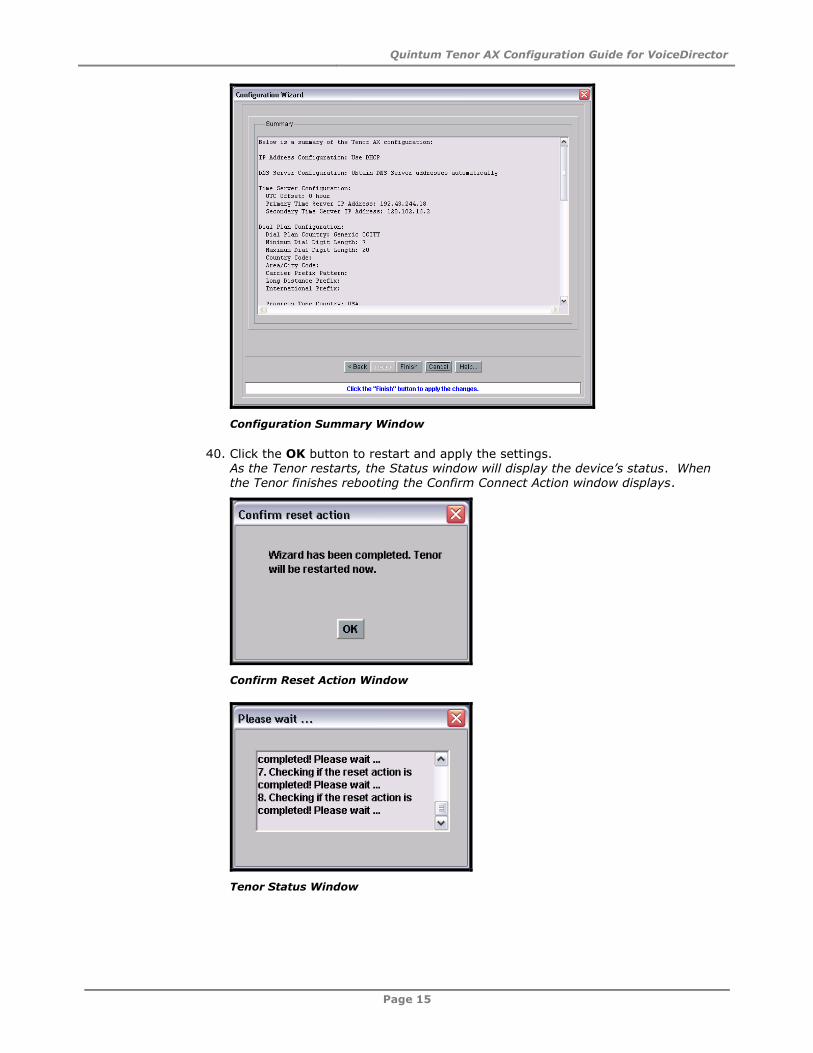
39. When the Finish message appears on the bottom of the screen, click the Finish
button to continue. The Confirm Reset Action window displays.
Quintum Tenor AX Configuration Guide for VoiceDirector
Page 15
Configuration Summary Window
40. Click the OK button to restart and apply the settings. As the Tenor restarts, the Status window will display the device’s status. When the Tenor finishes rebooting the Confirm Connect Action window displays.
Confirm Reset Action Window
Tenor Status Window
Quintum Tenor AX Configuration Guide for VoiceDirector
Page 16
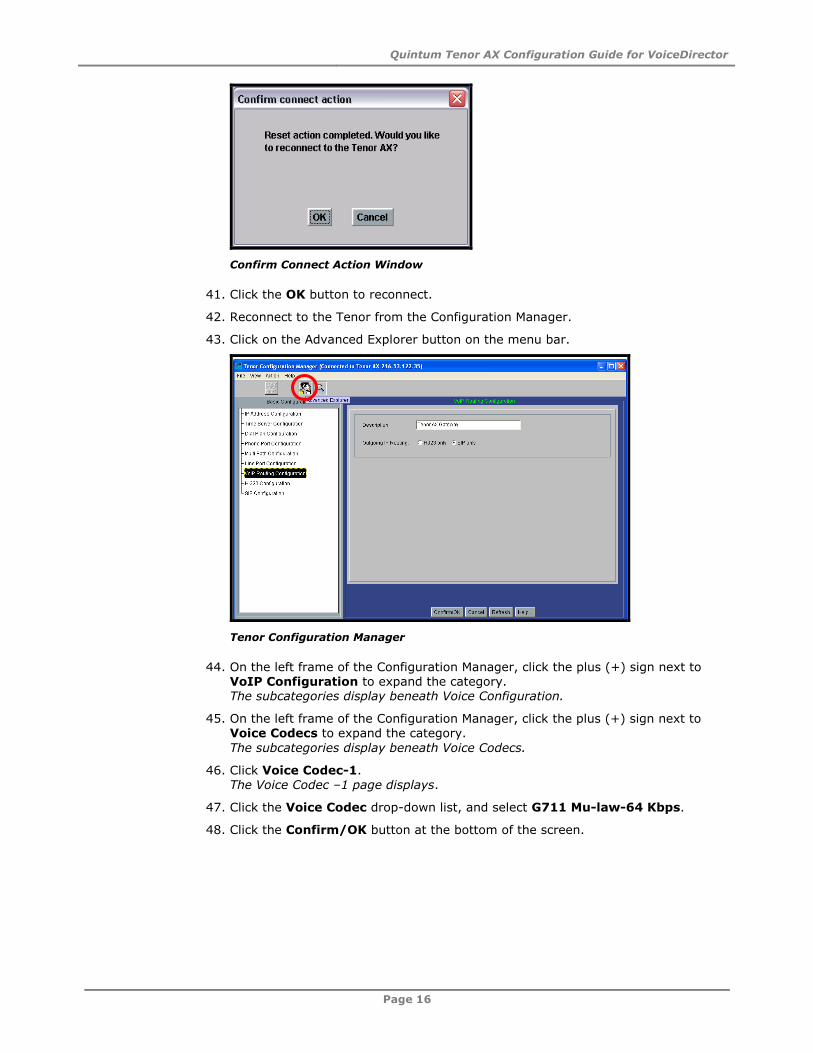
Confirm Connect Action Window
41. Click the OK button to reconnect.
42. Reconnect to the Tenor from the Configuration Manager.
43. Click on the Advanced Explorer button on the menu bar.
Tenor Configuration Manager
44. On the left frame of the Configuration Manager, click the plus (+) sign next to VoIP Configuration to expand the category. The subcategories display beneath Voice Configuration.
45. On the left frame of the Configuration Manager, click the plus (+) sign next to
Voice Codecs to expand the category.
The subcategories display beneath Voice Codecs.
46. Click Voice Codec-1. The Voice Codec –1 page displays.
47. Click the Voice Codec drop-down list, and select G711 Mu-law-64 Kbps.
48. Click the Confirm/OK button at the bottom of the screen.
Quintum Tenor AX Configuration Guide for VoiceDirector
Page 17
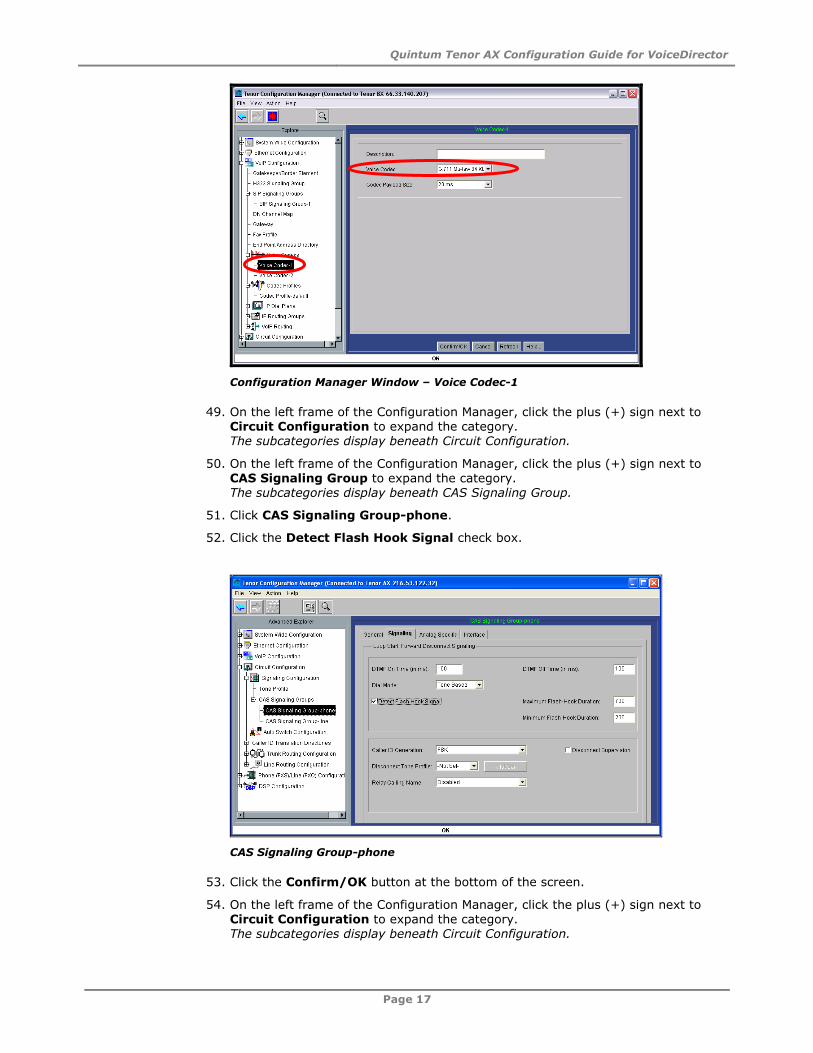
Configuration Manager Window – Voice Codec-1
49. On the left frame of the Configuration Manager, click the plus (+) sign next to Circuit Configuration to expand the category. The subcategories display beneath Circuit Configuration.
50. On the left frame of the Configuration Manager, click the plus (+) sign next to CAS Signaling Group to expand the category. The subcategories display beneath CAS Signaling Group.
51. Click CAS Signaling Group-phone.
52. Click the Detect Flash Hook Signal check box.
CAS Signaling Group-phone
53. Click the Confirm/OK button at the bottom of the screen.
54. On the left frame of the Configuration Manager, click the plus (+) sign next to Circuit Configuration to expand the category.
The subcategories display beneath Circuit Configuration.

Quintum Tenor AX Configuration Guide for VoiceDirector
Page 18
55. On the left frame of the Configuration Manager, click the plus (+) sign next to
Line Routing Configuration to expand the category. The subcategories display beneath Line Routing Configuration.
56. On the left frame of the Configuration Manager, click the plus (+) sign next to Line Circuit Routing Groups to expand the category. The subcategories display beneath Line Circuit Routing Groups.
57. Click Line Circuit Routing Group-phone.
58. Click the Hold, Unattended Transfer, Attended Transfer, and Call Waiting Checkboxes.
Line Circuit Routing Group- phone
59. Click the Confirm/OK button at the bottom of the screen.
60. Click the Submit Changes button on the menu bar (the button with the blue
background and red star, displayed below) to save the changes.
Configuration Manager Window – Submit Button

Quintum Tenor AX Configuration Guide for VoiceDirector
Page 19
IMPORTANT: The Submit Changes button must be pressed every time configuration changes are made to the Tenor; otherwise, the changes will not take
effect.
Congratulations! You are now able to make inbound and outbound calls on your Quintum Tenor AX.
Quintum Tenor AX Configuration Guide for VoiceDirector
Page 20
3. Making Calls
Placing Calls to Numbers within the VoiceDirector Network
To place a call to another extension within the VoiceDirector network:
1. Using a phone within the VoiceDirector network, place a call to:
the extension number.
2. When you have finished your call, simply hang up the phone.
Placing Calls to Numbers Outside the VoiceDirector
Network
You can call numbers on the standard telephone network, which consists of all phone
numbers outside the VoiceDirector network, by dialing 9, followed by the phone number (as you would dial it on a regular phone):
9 + 1 + the area code + phone number
9 + 011 + country code + area code + local phone number
When you have finished your call, simply hang up the phone.
Quintum Tenor AX Configuration Guide for VoiceDirector
Page 21
4. Configuring the FXO Ports for a Second Dial Tone
To configure your Tenor AX to provide a second dial tone when dialing into an FXO port, follow the instructions below.
1. Connect to the Tenor AX via the Tenor Configuration Manager as described in steps 1 through 10 in Chapter 2, Configuring the Tenor AX.
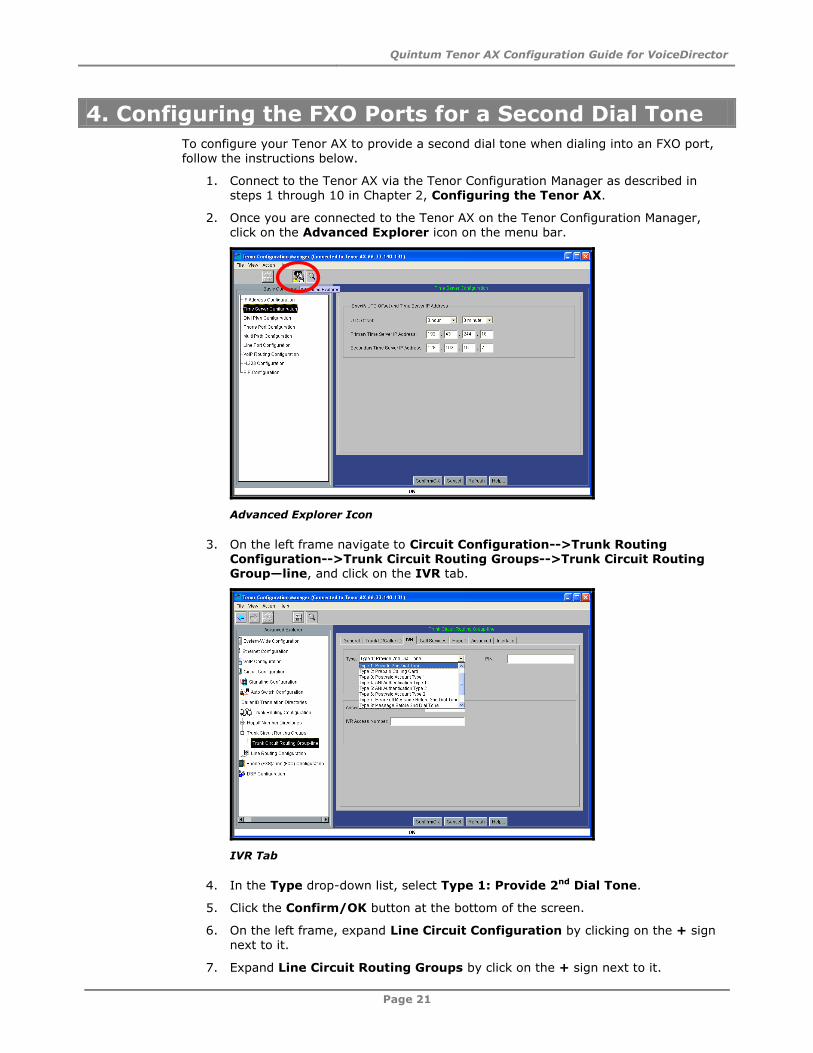
2. Once you are connected to the Tenor AX on the Tenor Configuration Manager, click on the Advanced Explorer icon on the menu bar.
Advanced Explorer Icon
3. On the left frame navigate to Circuit Configuration-->Trunk Routing Configuration-->Trunk Circuit Routing Groups-->Trunk Circuit Routing Group—line, and click on the IVR tab.
IVR Tab
4. In the Type drop-down list, select Type 1: Provide 2nd Dial Tone.
5. Click the Confirm/OK button at the bottom of the screen.
6. On the left frame, expand Line Circuit Configuration by clicking on the + sign next to it.
7. Expand Line Circuit Routing Groups by click on the + sign next to it.
Quintum Tenor AX Configuration Guide for VoiceDirector
Page 22
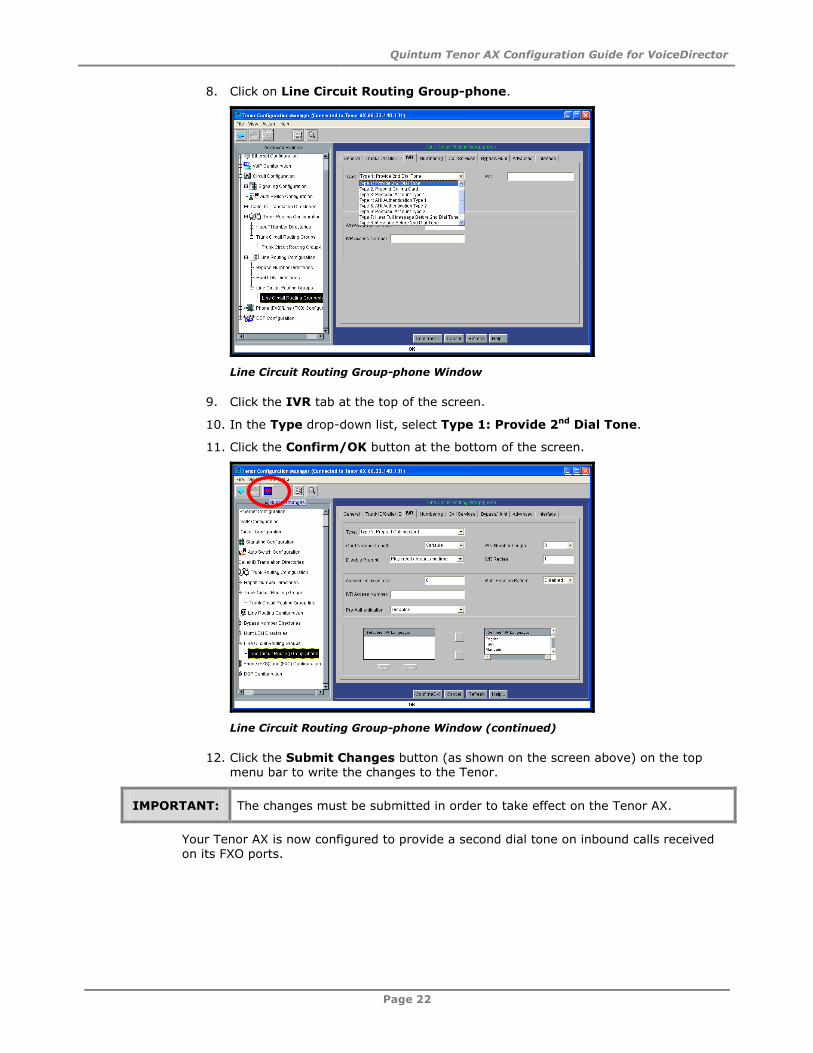
8. Click on Line Circuit Routing Group-phone.
Line Circuit Routing Group-phone Window
9. Click the IVR tab at the top of the screen.
10. In the Type drop-down list, select Type 1: Provide 2nd Dial Tone.
11. Click the Confirm/OK button at the bottom of the screen.
Line Circuit Routing Group-phone Window (continued)
12. Click the Submit Changes button (as shown on the screen above) on the top menu bar to write the changes to the Tenor.
IMPORTANT: The changes must be submitted in order to take effect on the Tenor AX.
Your Tenor AX is now configured to provide a second dial tone on inbound calls received on its FXO ports.