application manual smartblock system - … of the universal fixative ecap f on the smoothing...
TRANSCRIPT

APPLICATION MANUAL . SMARTBLOCK® SYSTEM


> APPLICATION PHASES Surface preparation pg. 06 Laying of the consecutive block rows pg. 07 Completion of the wall pg. 09 Fixing systems pg. 09 Elements cutting and realization of openings and trackings into the wall pg. 10 Lintels pg. 10 Correction of thermal bridges pg. 10
> INSTRUCTIONS FOR THE APPLICATION . INTERNAL AND EXTERNAL PLASTERS Cement plaster pg. 12 Cementplasterwithfibre pg.13 Gypsum based plaster pg. 14 Thermal insulating plaster pg. 15 Fibres based adhesive powder / smoothing plaster pg. 16 Masonry realized with smartblock system pg. 17
INDEX . APPLICATION MANUAL . SMARTBLOCK® SYSTEM

04
SMARTBLOCK® is a building system, composedbyblocksforinfillwalls,suita-ble for the construction of opaque wall of facades and for internal partition walls. In order to guarantee a perfect applica-tion it is very important to choose the right building system, the appropriate mortar or binder, the type of plaster or smoothing plaster during the application phase. SMARTBLOCK® system is fast and easy to realize thanks to its light-nessandmale/femaleprofile.Belowaresome simple rules to be followed to get
a proper installation, that are not diffe-rent from the traditional concrete block application. In order to achieve the cer-tifiedperformanceofmasonry, it isne-cessary to build according to the building regulation. In comparison with similar products, the excellent thermo insulating and mechanical characteristics allow to reach high-performances with lower thicknesses than other similar products and in accordance with the applicable re-gulations.

05
APPLICATION PHASES . SMARTBLOCK® SYSTEM

06
APPLICATION PHASESSMARTBLOCK® SYSTEM
1. SURFACE PREPARATION:
It is necessary to pay attention to this phase. It is recommended to be careful at the casting of ceiling and/or of the reinforced concrete beam to avoid excessive uneven-ness, and if needed to correct the defect. Accurately plot the masonry and verify the verticality of the wall.
It is suggested to put on the surface a waterproofing sheath or a polyethylene sheet for separating the floor and the wall made of SMARTBLOCK®.
Laythefirstlineofblocksusingcementmortarandverifytheplanarity,thehorizon-tality and the verticality by means of a spirit level. Remove possible differences in height.

07
2. LAYING OF THE CONSECUTIVE BLOCK ROWS:
Blocks must be laid with “half- full” offset junctions it means, a displacement betwe-en the lower and upper row of the block, using the traditional and/or thermal insula-ting mortar or polyurethane foam according to the building regulation. It is necessary to check the planarity and the verticality of the wall during the appli-cation of blocks.
Ifnecessarycorrectthealignmentwitharubberhammer.Thefirstlineofblockshasto be laid on a mortar substrate.

08
The application can be realized both with the assistance of traditional instruments (e.g. trowel) and by means of rollers for the mortar laying or precisely measured guns for polyurethane foam in order to optimise the thermal performances of walls.
If necessary, correct the alignment as above explained. In case of reinforced concrete structures it is recommended to use an appropriate galvanized pylon to distribute the weight and reduce the crackles creation. In case of intersected internal walls it is recommended to realize grips, in order to increase its stability avoiding cracks creation.
APPLICATION PHASESSMARTBLOCK® SYSTEM

09
3. COMPLETION OF THE WALL:
In order to avoid any possible alteration of the wall performances, it is suggested to leave a joint of 1-2 cm to seal on both faces with elastic materials such as polyuretha-nefoamandrockwoolorothermaterialslikethat.Thejointhastobefixedbeforethewall construction. Therefore the last line of blocks should be adequately cut.
4. FIXING SYSTEMS:
Wallsshouldbefixedtoload-bearingconcretestructuresaccordingtotheinstruc-tions provided by the designer. The most common methodology provides reinforced concretebarsormetalbracketseverythreelinesofblocks.Theyarefixedtothewalland to the structures with screws.

10
5. ELEMENTS CUTTING AND REALIZATION OF OPENINGS AND TRACKINGS INTO THE WALL:
SMARTBLOCK® can be cut with common building tools, such as cut off wheels, both circular and band saw. The blocks are designed with a special composition and densi-ty. Therefore they are easy to work and particularly suitable for the realization of ope-nings for electrical and piping system. This kind of operation can be executed using a milling or a disc groove cutting machine. It is recommended to seal the components applying the same type of mortar that has been used for the masonry.
6. LINTELS:
SMARTBLOCK® building system consists of a full range of reinforced concrete lin-tels that can be used to fabricate the opening of doors and windows up to 3 meters avoiding any possible thermal bridge. It is recommended to apply the lintel 25 cm. on every portion of masonry.Possibletemporarywoodendoorframesandfixtureshingesorshutterscanbefixedto the wall with concrete mortar or chemical resins. For the grouting of the internal openings use the same type of mortar that has been used for the laying of the ma-sonry.
7. CORRECTION OF THERMAL BRIDGES:
All the thermal bridges in correspondence with horizontal and vertical structures must be adequately adjusted in accordance with D.Lgs. 311/2006.
APPLICATION PHASESSMARTBLOCK® SYSTEM

11
INTERNAL AND EXTERNALPLASTERSINSTRUCTIONS FOR THE APPLICATION . SMARTBLOCK® SYSTEM

12
INSTRUCTIONS FOR THE APPLICATION OF CEMENT PLASTER (verify the instructions given by the manufacturer): FOR INTERNAL/EXTERNAL USE.
1. CLEANING THE SURFACE: the surface must be free of residual dust, traces of fria-bleand/orflimsymaterials,andwhateverelsemayhindergoodanddirectadhe-sion of the product to the surface. Before proceeding with the application, wet the surface and let it dry.
2. PREPARATION OF THE INTERMEDIATE CORNERS AND STRIPES: make plumb li-nes over the whole thickness using a galvanized steel staff angle and also make the intermediate stripes using the cement plaster.
3. CONCRETE PLASTER APPLICATION: (thickness between 1.0 cm and 2.0 cm). Apply thefirstcoatofplaster,keepingthespraygunfroma20-meterdistance,inorderto have a uniform spray, and a minimum thickness of 1.0 cm. Insert in it a plaster mesh (minimum 140 gr/m2) overlapped of 10 cm at least. After the application of the plaster and the mesh, proceed with the smoothing using an aluminium strip.
4. If necessary, apply a second coat.
5. SCRAPING: after 4 hours and when the product has hardened, scrape with a scra-pingknife,trowelorfloatinordertoeliminateanyimperfectionsleftonthesurfa-ce.
6. FINISHING PRODUCTS: the finishingmust be applied on the smoothing plasterlayer and can be done with the following materials:
a) Dry mortar (ISOLTECO RASATURA MONOCAP grain size 1.0 mm, or ECAP FM grain size 0.6 mm). Once the product has hardened, apply the suitable painting with rol-ler or brush (ECAP GP, ECAP SP, ECAP STP, ECAP EP Type). Before painting it is necessarytotreattheentiresurfacewithECAPFfixative.
b) Coloured mineral-based mortars to be applied with a trowel (type ECAP MC), and aftertheapplicationoftheuniversalfixativeECAPFonthesmoothingplaster.
c) Coloured silicate mortars to be applied with a trowel (type ECAP STC), and after the applicationoftheuniversalfixativeECAPFonthesmoothingplaster.
d) Othercolourfinishingpastrytobeappliedwithatrowel(typeECAPGP,ECAPSP,ECAPSCL),andaftertheapplicationoftheuniversalfixativeECAPFonthesmo-othing plaster.
INSTRUCTIONS FOR THE APPLICATIONSMARTBLOCK® SYSTEM

13
INSTRUCTIONS FOR THE APPLICATION OF CEMENT PLASTER WITH FI-BRE (verify the instructions given by the manufacturer): FOR INTERNAL/EXTERNAL USE.
1. CLEANING THE SURFACE: the surface must be free of residual dust, traces of fria-bleand/orflimsymaterials,andwhateverelsemayhindergoodanddirectadhe-sion of the product to the surface. Before proceeding with the application, wet the surface and let it dry.
2. PREPARATION OF THE INTERMEDIATE CORNERS AND STRIPS: make plumb lines over the whole thickness using a galvanized steel staff angle and also make the intermediatestripesusingthecementplasterwithfibre.
3. APPLICATION OF CONCRETE PLASTER WITH FIBRES (thickness between 1.0 cm and2.0cm):applythefirstcoatofplasterworkwithfibre,keepingthespraygunfrom a 20-meter distance, in order to have a uniform spray and minimum thickness of 1.0 cm. If there are discontinuities (beams, pillars and so on), it is suggested to useareinforcingfibreglassmeshthathastoremaininthemiddleoftheplaster(do not push it until the bottom) that have to extend of 20 cm at least from the other materials. After few minutes from the application of the plaster, proceed with the smoothing using an aluminium strip.
4. SCRAPING: after 4 hours and when the product has hardened, scrape with a scra-pingknife,trowelorfloatinordertoeliminateanyimperfectionsleftonsurface.
5. FINISHING PRODUCTS: the finishingmust be applied on the smoothing plasterlayer and can be done with the following materials:
a) Dry mortar (ISOLTECO RASATURA MONOCAP grain size 1.0 mm, or ECAP FM grain size 0.6 mm). Once the product has hardened, apply the suitable painting with rol-ler or brush (ECAP GP, ECAP SP, ECAP STP, ECAP EP Type). Before painting it is necessarytotreattheentiresurfacewithECAPFfixative.
b) Coloured mineral-based mortars to be applied with a trowel (type ECAP MC), and aftertheapplicationoftheuniversalfixativeECAPFonthesmoothingplaster.
c) Coloured silicate mortars to be applied with a trowel (type ECAP STC), and after the applicationoftheuniversalfixativeECAPFonthesmoothingplaster.
d) Othercolourfinishingpastrytobeappliedwithatrowel(typeECAPGP,EcapSP,EcapSCL),andaftertheapplicationoftheuniversalfixativeECAPFonthesmo-othing plaster.
14
INSTRUCTIONS FOR THE APPLICATION OF GYPSUM BASED PLASTER (verify the instructions given by the manufacturer): FOR INTERNAL USE.
1. CLEANING THE SURFACE: the surface must be free of residual dust, traces of fria-bleand/orflimsymaterials,andwhateverelsemayhindergoodanddirectadhe-sion of the product to the surface. Before proceeding with the application, wet the surface and let it dry.
2. PREPARATION OF THE INTERMEDIATE CORNERS AND STRIPES: make plumb li-nes over the whole thickness using a galvanized steel staff angle and also make the intermediate stripes using the same concrete mortar.
3. GYPSUM BASED PLASTER APPLICATION (thickness between 1.0 cm and 2.0 cm): applyingthefirstcoatofgypsumbasedplasterwithfibres,keepthespraygunfroma 20-meter distance, in order to have a uniform spray and a minimum thickness of 1.0 cm. If there are discontinuities (beams, pillars and so on), it is suggested to useareinforcingfibreglassmeshthathastoremaininthemiddleoftheplaster(do not push it until the bottom) that have to extend of 20 cm at least from the other materials. After a few minutes from the application of the plaster, proceed with the smoothing using an aluminium strip.
4. SCRAPING: after 4 hours and when the product has hardened, scrape with a scra-pingknife,trowelorfloatinordertoeliminateanyimperfectionsleftonthesurfa-ce.
5. FINISHING PRODUCTS: the finishingmust be applied on the smoothing plasterlayerandcanbemadewithfinemortar(grainsize0.6mm)orsmoothingmortar(withspecificfinishingproduct).Laterapplythesuitablepainting.
6. Application of ceramic coverings: it is recommended to use the suitable glue.
INSTRUCTIONS FOR THE APPLICATIONSMARTBLOCK® SYSTEM

15
ISOLTECO THERMAL INSULATING PLASTER:recommended FOR EXTERNAL USE.
1. CLEANING THE SURFACE: the surface must be free of residual dust, traces of fria-bleand/orflimsymaterials,andwhateverelsemayhindergoodanddirectadhe-sion of ISOLTECO to the surface. Before proceeding with the application, wet the surface and leave it till complete drying.
2. PREPARATION OF THE INTERMEDIATE STRIP AND CORNER: make plumb lines overthewholethicknessusingagalvanizedsteelstaffanglesforthecorners(fixedto the surface with thermal mortar). Make the intermediate stripes using Isolteco exclusively.
3. APPLICATION OF THERMAL INSULATING MORTAR (thickness up to 4.0 cm): ap-plythefirstcoatofthermalinsulatingplasterwithathicknessof1.0cm.After4hours it is recommended to apply a second coat of the thermal insulating plaster, according to the required thickness. For thicknesses higher than 4.0 cm, contact Edilteco’s technical department.
4. SCRAPING:crapewithascrapingknife,trowelorfloat inordertoeliminateanyimperfectionsleftonsurfaceafterfinalfloating.Scrapingalsohasthepurposeofeliminating the surface polystyrene beads not fully covered with binder.
Scraping must be carried out:a) Hotseason:24-48hoursaftertheapplicationofthefinishingcoat.b) Coldseason:72-96hoursaftertheapplicationofthefinishingcoat. 5. SMOOTHING PLASTER: This is a surface protection coating done with Isolteco. The
ideal product to use for this purpose is Isolteco Rasatura Monocap. The thickness ofthesmoothinghastobeof4-5mm.Itiscompulsorytoinsertglassfibremesh(minimum 140 gr/m2) into the smoothing thickness. The smoothing plaster must be applied:
a) Hot season: after 6 days.b) Cold season: after 10 days.
6. FINISHING PRODUCTS: the finishingmust be applied on the smoothing plasterlayer and can be done with the following materials:
a) Dry mortar (ISOLTECO RASATURA MONOCAP grain size 1.0 mm, or ECAP FM grain size 0.6 mm). Once the product has hardened, apply the suitable painting with rol-ler or brush (ECAP GP, ECAP SP, ECAP STP, ECAP EP Type). Before painting it is necessarytotreattheentiresurfacewithECAPFfixative.
b) Coloured mineral-based mortars to be applied with a trowel (type Ecap MC), and aftertheapplicationoftheuniversalfixativeECAPFonthesmoothingplaster.
c) Coloured silicate mortars to be applied with a trowel (type Ecap STC), and after the applicationoftheuniversalfixativeECAPFonthesmoothingplaster.
d) Othercolouredfinishinginpastetobeappliedwithatrowel(typeEcapGP,EcapSP,EcapSCL),andafter theapplicationof theuniversalfixativeECAPFon thesmoothing plaster.

16
REINFORCED SMOOTHING LAYER WITH FIBRES BASED ADHESIVE POWDER ECAP ADP OR SMOOTHING PLASTER ISOLTECO RASATURA MONOCAP BOTH FOR INTERIOR AND/OR EXTERIOR.
1. CLEANING THE SURFACE: the surface must be free of residual dust, traces of fria-bleand/orflimsymaterials,andwhateverelsemayhindergoodanddirectadhe-sion of ISOLTECO to the surface. Before proceeding with the application, wet the surface and let it dry.
2. CONCRETE SMOOTHING: the surface protection coating can be made with based fibreadhesivepowderECAPADPorsmoothingplasterISOLTECORASATURAMO-NOCAP. The thickness of the smoothing plaster must be of 4 - 5 mm and it is compulsory to insert in it aglassfibremesh (minimum160gr/m2) sized in the smoothing layer. The smoothing plaster must be applied:
a) Hot season: after 6 days.b) Cold season: after 10 days.
3. FINISHING PRODUCTS: the finishingmust be applied on the smoothing plasterlayer and can be done with the following materials:
a) Dry mortar (type ISOLTECO RASATURA MONOCAP grain size 1,0 mm, or ECAP FM grain size 0.6 mm). Painting must be applied with roller or brush (Type ECAP GP, ECAP SP, ECAP STP, ECAP EP), only after the smoothing plaster coat has cured. Before painting it is also recommended to apply on the smoothing plaster the uni-versalfixativeECAPF.
b) Coloured mineral-based mortars to be applied with a trowel (type ECAP MC), and aftertheapplicationoftheuniversalfixativeECAPFonthesmoothingplaster.
c) Coloured silicate mortars to be applied with a trowel (type ECAP STC), and after the applicationoftheuniversalfixativeECAPFonthesmoothingplaster.
d) Othercolouredfinishinginpastetobeappliedwithatrowel(typeECAPGP,ECAPSP,ECAPSCL),andaftertheapplicationoftheuniversalfixativeECAPFonthesmoothing plaster.
INSTRUCTIONS FOR THE APPLICATIONSMARTBLOCK® SYSTEM

17
PIACENZAOpeldealer:firstfloor.
LODI:dividingwallsforofficesandcanteen.
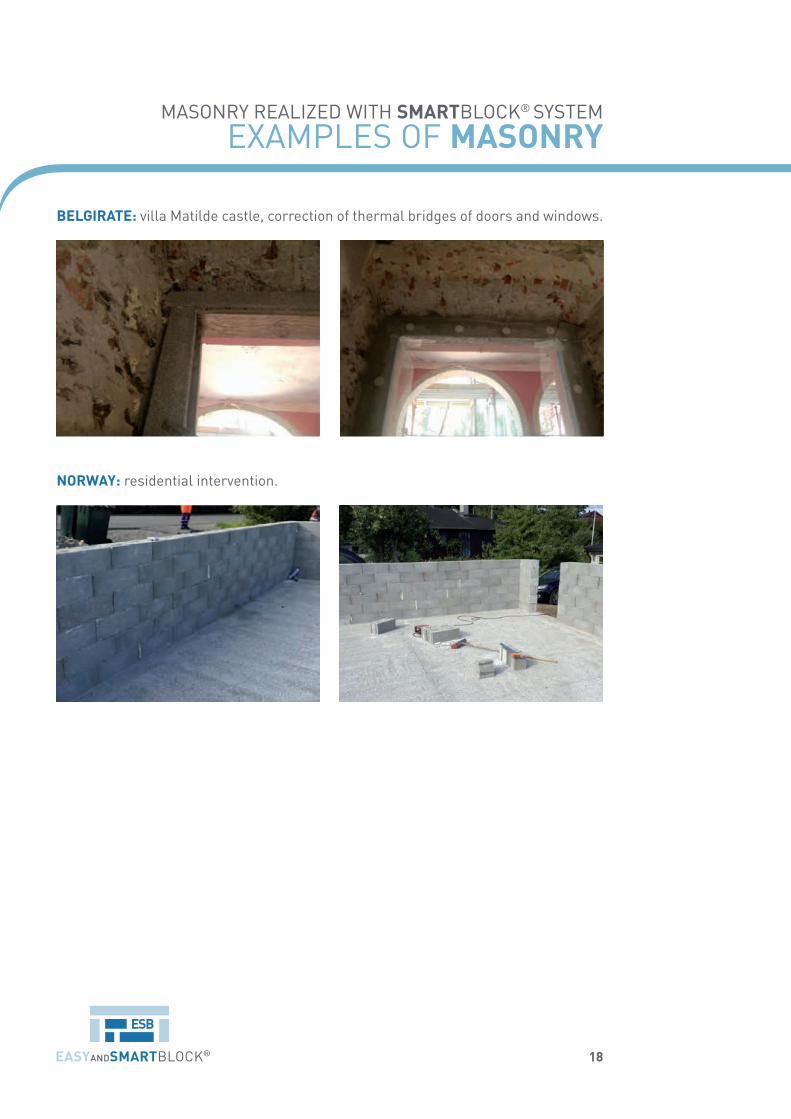
BELGIRATE: villa Matilde castle, correction of thermal bridges of doors and windows.
EXAMPLES OF MASONRYMASONRY REALIZED WITH SMARTBLOCK® SYSTEM
18
BELGIRATE: villa Matilde castle, correction of thermal bridges of doors and windows.
NORWAY: residential intervention.
EXAMPLES OF MASONRYMASONRY REALIZED WITH SMARTBLOCK® SYSTEM


ESB s.r.l. Headofficeandfactory:24050CAVERNAGO(BG)ViaRomanino-Loc.TriangoloTel. 035.4498498 - 4498499 - Fax 035.4498763 www.easyandsmartblock.it - [email protected]
© C
opyr
ight
ESB
S.r
.l. -
Not
aut
hori
zed
copy
is fo
rbid
den.
The
pro
duce
rs r
eser
ves
the
righ
t to
mak
e pr
oduc
t cha
nges
with
out p
rior
not
ice.
REV
. 10/
2014
. EN
G