admin guide - splitvie · this manual is copyrighted by vyooh low ... in any form or by any means -...
TRANSCRIPT
ADMIN GUIDE

2
3
COPYRIGHT NOTICE
© 2016 Vyooh Low Level Computing LLP. All Rights Reserved.
This manual is copyrighted by Vyooh Low Level Computing LLP. You may not reproduce,
transmit, transcribe, store in a retrieval system, or translate into any language or computer
language, in any form or by any means - electronic, mechanical, magnetic, optical, chemical,
manual, or otherwise - any part of this publication without the express written permission of
Vyooh Low Level Computing LLP.
TRADEMARKS
Microsoft and Windows are registered trademark of Microsoft Corporation in the United States and other countries. Citrix, Presentation Server, XenApp and ICA are trademarks of Citrix Systems, Inc. and/or one or more of its subsidiaries, and may be registered in the United States Patent and Trademark Office and in other countries. VMware is a registered trademark of VMware, Inc. in the United States and/or other jurisdictions. All other marks and names mentioned herein may be trademarks of their respective companies.

4
1 CONTENTS
2 Introduction ............................................................................................................................. 5
3 Installing SplitView .................................................................................................................. 6
3.1 System Requirements ...................................................................................................... 6
3.2 Installation ....................................................................................................................... 6
3.3 Automated Installation .................................................................................................... 8
3.4 SplitView GINA Installation .............................................................................................. 8
3.5 Installation Notes for Citrix Presentation Server ............................................................. 8
4 Using SplitView ...................................................................................................................... 10
4.1 Using multiple monitors with Remote Desktop ............................................................ 10
4.2 Usage ............................................................................................................................. 11
4.3 Customizing SplitView ................................................................................................... 13
4.4 License Activation .......................................................................................................... 21

5
2 INTRODUCTION
SplitView enables a true multi-monitor experience with VMware VDI, Citrix (RDP and ICA),
Terminal Services, Remote Desktop, HP RGS, Sun Ray ALP as well as other remote desktop
technologies and thin clients.
Although Remote Desktop (version 6.0 and above), Citrix and other remote desktop/thin client
technologies are able to use multiple monitors with remote sessions, they do not provide a true
multi-monitor experience in span mode. The remote session treats multiple monitors as one
giant display, not as the two (or more) separate displays over which it spans. This causes
multiple problems:
● Windows and the taskbar span across monitors instead of being confined to one
monitor
● Windows maximize across both monitors, not one monitor
● Pop-up dialogs appear right in the center of two monitors, half on one monitor, and half
on the other
Those who are used to the efficiency that true multi monitors provide immediately see the
problem with this. They want a true multi monitor solution with remote desktop, not a large
display stretched over two or more monitors.
SplitView provides a true multi-monitor experience with remote sessions by splitting the
remote desktop back into multiple parts – one for each monitor. When you maximize windows,
they maximize to one monitor. SplitView automatically repositions dialogs and windows so they
appear correctly on a monitor – not split between two adjacent monitors. Additionally,
SplitView provides several productivity boosting enhancements such as the ability to move
windows efficiently between multiple monitors.
SplitView detects when multiple monitors are used and splits the remote session
automatically
● Windows, including the taskbar, do not span across monitors
● Windows maximize to one monitor, not across both monitors
● Pop-up dialogs are re-positioned to the left or right monitor, and do not appear in
between adjacent monitors
This guide provides information on installation, configuration and use of SplitView to enable a
true multi monitor experience with remote desktop, virtualization, server based computing and
thin client technologies.
6
3 INSTALLING SPLITVIEW
SplitView is installed on the Terminal Server, Citrix Presentation Server, Windows workstation or
virtual desktop instance (VDI) being accessed remotely using multiple monitors.
There is no client-side install. The client can be any computer (running Windows XP, Windows
Vista, Windows CE, Windows XP Embedded or Linux) or multi-headed thin client (including Chip
PC, Wyse or Sun Ray thin client terminals).
3.1 SYSTEM REQUIREMENTS
SplitView supports the following workstation OS platforms:
● Windows 10
● Windows 8, 8.1
● Windows 7
● Windows Vista
● Windows XP
● Windows 2000
SplitView supports the following server platforms:
● Windows Server 2003
● Windows Server 2008
● Windows Server 2008 R2
● Windows Server 2012
● Citrix Presentation Server 4.0
● Citrix Presentation Server/XenApp 4.5
Notes:
● Both x86 (32 bit) and x64 (64 bit) platforms are supported.
● SplitView has been certified as a “Citrix Ready” product on Citrix Presentation
Server/XenApp 4.5
● Supported remote desktop protocols include Remote Desktop 6.0 or higher (RDP), Citrix
ICA, HP RGS and Sun Ray ALP
3.2 INSTALLATION Steps to install SplitView:
1. Start the SplitView setup wizard by double-clicking SplitView.msi.
2. Click Next to review the license agreement.
3. Review the license agreement and click I Agree to accept its terms. Click Next.

7
4. In the Select Installation Folder screen, use the default folder for installation, or choose
an alternate location if needed. Choose “Everyone” to install SplitView for all users of
the computer. Click Next
5. In the Install Options screen, choose “Terminal Server use” for enabling multi monitor
use with Remote Desktop, Citrix or VMware VDI sessions on this computer. The
“Personal use” option is meant for sub-dividing a widescreen or high resolution monitor
into multiple parts and does not enable the features needed for dual monitor use over
remote desktop sessions. Click Next.
6. In the second Install Options screen, you can choose to use the same settings for all
users, or allow them to customize their setting individually. By default, SplitView allows
all users to customize their settings individually using the SplitView Options menu. To
override this behavior, enable the option for “Use the same settings for all users”. With
this option selected, the settings chosen by an Administrator will apply to all users, and
users will not get the ability to customize their settings through the SplitView Options
menu. Click Next.
7. Click Next on the Confirm Installation screen to start the installation, and Close on the
next screen to close the install wizard.
A successful SplitView installation results in:
1. An installation folder (default C:\Program Files\SplitView) with the following files:
● SplitScr.exe
● Splat.dll
● SVGina.dll
● SplitViewLicenseAgreement.rtf
On 64 bit (X64) systems, the following files are additionally put down by the installer:
● SplitScrX64.exe
● SplatX64.dll
● SVGinaX.dll
2. Shortcut menu to launch SplitView in Start menu > All Programs > SplitView > Start
SplitView
3. Registry entry to launch SplitView on startup at
HKLM\Software\Microsoft\Windows\CurrentVersion\Run

8
3.3 AUTOMATED INSTALLATION
SplitView installation can be automated by running the SplitView installer MSI using batch
scripts or by using SMS or Marimba.
The SplitView installer accepts installation parameters and the license registration can be
automated as well for unattended deployments. The SplitView settings can be tweaked from
HKLM\Software\SplitView and HKCU\Software\SplitView to provide full control of configuring
SplitView during installation.
The SplitView installer MSI takes the following parameters:
● HKLM - this property is disabled by default, and should be set to 1 for using the same
settings for all users.
● MULTIMON - this property is set to 2 for Terminal Server usage. It should be set to 1 for
Personal usage.
For example, to install for all users, with the same settings for all users, in Terminal Server mode,
the following command line can be used:
SplitView.msi ALLUSERS=1 HKLM=1 MULTIMON=2 /qn
When installing with per user settings, do not specify HKLM.
3.4 SPLITVIEW GINA INSTALLATION
Note: SVGina.dll is supported on Windows XP and 2003 Server only. See the Microsoft KB article
at http://technet.microsoft.com/en-us/library/bb742447.aspx for additional details regarding
replacement GINAs.
For repositioning the Windows logon dialog, SplitView includes a replacement graphical
identification and authentication (GINA) library called SVGina.dll (SVGinaX.dll on X64 systems).
This replacement GINA can be used to reposition the Windows security and logon dialog boxes
to the center of one monitor instead of being cut in half by the monitor bezels. SVGina in turn
delegates to the default Microsoft GINA (msgina.dll) for normal GINA functionality.
SplitView's GINA can be enabled by adding the path to C:\Program Files\SplitView
<version>\SVGina.dll (SVGinaX.dll on 64 bit systems) to the HKLM\Software\Microsoft\Windows
NT\CurrentVersion\Winlogon\GinaDLL registry key.
3.5 INSTALLATION NOTES FOR CITRIX PRESENTATION SERVER
SplitView works with Citrix published desktops and published applications automatically,
without requiring any additional configuration.

9
The SplitView installer creates registry keys to automatically start SplitView for Terminal Server
users by employing logon scripts. This causes SplitView to be auto-started with each Citrix
session enabling the use of multiple monitors with published applications.
SplitView adds a logon script called SplitView.cmd to the %systemRoot%\System32 folder and
adds the name of this script to the HKEY_LOCAL_MACHINE\Software\Microsoft\Windows
NT\CurrentVersion\Winlogon\Appsetup registry key. The key and its usage are documented at
http://support.microsoft.com/kb/q195461/.
To close SplitView when all other Citrix published applications close, the SplitView installer adds
the path to SplitScr.exe to the following registry key:
HKEY_LOCAL_MACHINE\SYSTEM\CurrentControlSet\Control\Citrix\wfshell\TWI
LogoffCheckSysModules=SplitScr.exe
Note: This key may have other such exes listed as well. In that case, SplitScr.exe should be
separated by a comma (,)
When the last open normal app from that session is closed, Citrix will close SplitView and the
session will be logged off.
Using SplitView with Published Applications
SplitView should not be published by itself as a published application as it needs to work in
conjunction with other applications. In a Citrix farm environment, it is likely that published
applications run on several difference Citrix Presentation Servers. Thus, there is no guarantee
that SplitView will be able to add multi-monitor enhancements to published applications
running from another server in the farm.

10
4 USING SPLITVIEW
SplitView enables a true multi-monitor experience with VMware VDI, Citrix (RDP and ICA),
Terminal Services, Remote Desktop, HP RGS, Sun Ray ALP as well as other remote desktop
technologies and thin clients. The following section describes how multiple monitors can be
used with a Remote Desktop session spanning multiple monitors.
4.1 USING MULTIPLE MONITORS WITH REMOTE DESKTOP
Microsoft’s Remote Desktop client (version 6.0 or higher) supports spanning across multiple
monitors.
Spanning is available on Windows XP as well as Vista. You can check the version of Remote Desktop by clicking the About menu in the system menu of the Remote Desktop Connection client:
Checking the version of Remote Desktop client
The client PC needs the following for span mode to work correctly:
● Equal resolution monitors ● Total resolution of all monitors not exceeding 4096 x 2048 ● Top-left monitor being the primary - the screen needs to be orientated [ 1 ] [ 2 ]
Note that these are limitations of Remote Desktop client, not of SplitView. SplitView also works
with other remote desktop technologies that don’t have some of these limitations, such as HP
RGS. It is also possible to span monitors with Remote Desktop with unequal resolutions, but
requires some tweaking, as explained in the SplitView FAQ.

11
You can start the RDP client in span mode using the command line, as follows:
mstsc /span
Span mode can also be configured in the RDP file by specifying “span monitors:i:1”. Users can
then launch a remote session in span mode by double-clicking the RDP file.
4.2 USAGE
When SplitView is installed on the remote computer being accessed in span mode, it solves the
problems that occur due to the desktop stretching across both monitors. SplitView detects
when multiple monitors are used and splits the remote session automatically.
● Windows, including the taskbar, do not span across monitors
● Windows maximize to one monitor, not across both monitors
● Pop-up dialogs are re-positioned to the left or right monitor, and do not appear in
between adjacent monitors
Multi-monitor enhancements
SplitView provides several productivity boosting enhancements such as the ability to move
windows efficiently between multiple monitors.
● SplitView provides (optional) Window buttons and menus to move windows across
monitors
● Windows can be maximized across all screens by holding down the Ctrl key while
maximizing.
● SplitView enables Keyboard shortcuts for window management
SplitView buttons and menu items
SplitView buttons added to the window
caption
SplitView adds Go Left and Go Right buttons
to each windows caption to move windows to
the left or right monitor.

12
SplitView menus added to the system menu
It also adds Go Left and Go Right menu items to each window's system menu. Right click on the title-bar to access this menu.
SplitView menus can be accessed from the
taskbar
The SplitView menus can also be accessed from the taskbar by right clicking an application’s icon from the taskbar.
Keyboard shortcuts
SplitView enables the following keyboard shortcuts to move windows
Windows/Alt key + Left Arrow Move window to the left monitor
Windows/Alt key + Right
Arrow Move Window to the right monitor

13
Windows can also be placed in the corners by using Windows/Alt key in combination with keys
on the numeric keypad. For example, pressing Windows/Alt key + 7 moves a window to the top-
left corner, and pressing Windows/Alt key + 3 moves it to the bottom-right corner.
Note: The Windows key is not available as a shortcut key with Citrix Presentation Server
installations.
Maximize to desktop
Windows can be maximized to cover the entire desktop by holding down the Ctrl key while
maximizing a window.
4.3 CUSTOMIZING SPLITVIEW
SplitView is flexible and customizable - you can make it work the way you want it to work.
SplitView adds a system-tray icon that allows you to readily configure it.
You can right click on the icon and select the menu option to disable, enable, customize or close SplitView. SplitView is there when you need it, and gets out of the way when you don't.

14
SplitView can be customized using the SplitView Options dialog:
SplitView Options dialog
With the SplitView Options dialog, you can:
● Use two, three or even more monitors with Remote Desktop/Citrix
● Use monitors of different sizes with Remote Desktop/Citrix sessions
● Enable or disable the SplitView buttons, menus and keyboard shortcuts
To open the SplitView Options dialog, right-click the SplitView icon in the system tray and
choose the Options menu. Optionally, just double click the SplitView icon.
Note that the SplitView Options dialog is not available for non-administrative users if SplitView
has been installed with the “Use the same settings for all users” option.
Customizing Window Buttons
15
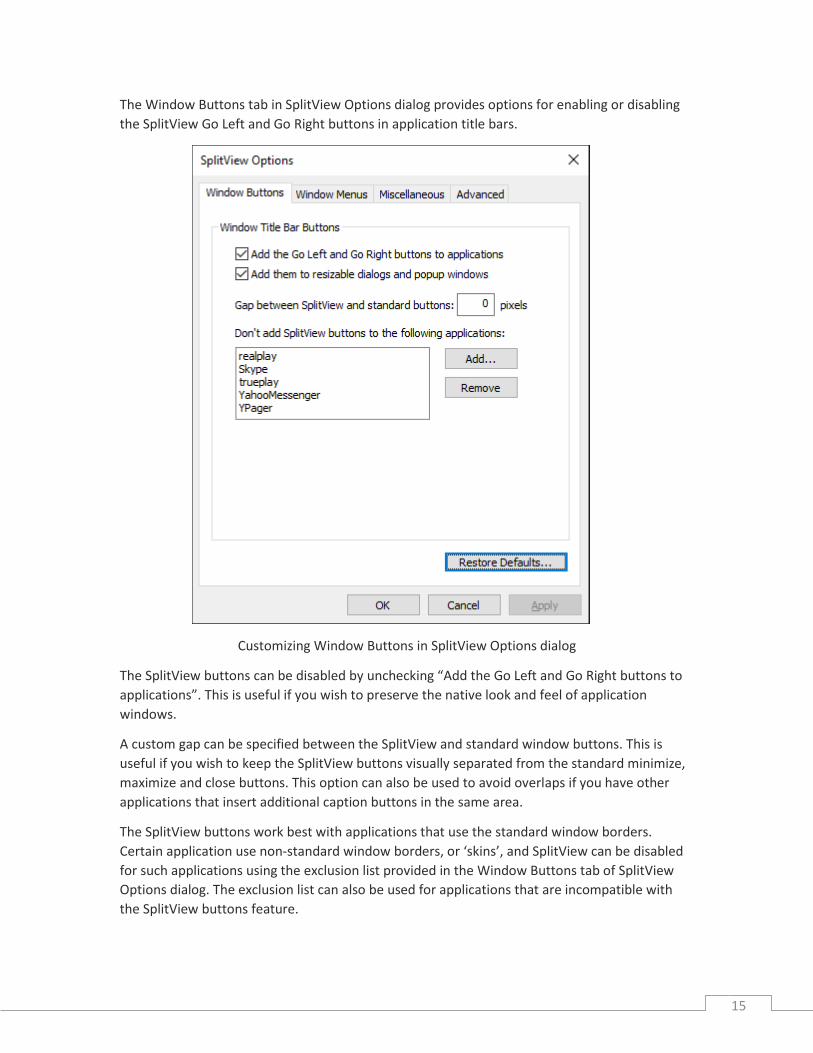
The Window Buttons tab in SplitView Options dialog provides options for enabling or disabling
the SplitView Go Left and Go Right buttons in application title bars.
Customizing Window Buttons in SplitView Options dialog
The SplitView buttons can be disabled by unchecking “Add the Go Left and Go Right buttons to
applications”. This is useful if you wish to preserve the native look and feel of application
windows.
A custom gap can be specified between the SplitView and standard window buttons. This is
useful if you wish to keep the SplitView buttons visually separated from the standard minimize,
maximize and close buttons. This option can also be used to avoid overlaps if you have other
applications that insert additional caption buttons in the same area.
The SplitView buttons work best with applications that use the standard window borders.
Certain application use non-standard window borders, or ‘skins’, and SplitView can be disabled
for such applications using the exclusion list provided in the Window Buttons tab of SplitView
Options dialog. The exclusion list can also be used for applications that are incompatible with
the SplitView buttons feature.

16
Customizing Window Menus
The Window Menus tab in SplitView Options dialog provides options for enabling or disabling
the SplitView menus shown in application’s system menu.
Customizing Window Menus in SplitView Options dialog
By default, the Go Left and Go Right menus are added to application system menus.
The Window Menus tab in SplitView Options dialog enables you to show menus for Go Up and
Go Down as well, or to disable the menus altogether.
The SplitView menus can be disabled by unchecking both check-boxes on this tab. This is useful
if you wish to preserve the native look and feel of application window’s system menu.
SplitView menus can be disabled for certain applications using the exclusion list provided in the
Window Menus tab of SplitView Options dialog.

17
Customizing Keyboard Shortcuts and Excluding Applications from SplitView
The Miscellaneous tab in SplitView Options dialog provides options for customizing keyboard shortcuts as well as excluding
certain applications from SplitView.
.
Customizing Keyboard shortcuts and excluded applications
SplitView enables keyboard shortcuts to efficiently move windows between monitors. This tab
can be used to customize the shortcut keys for moving windows. When Windows key + Array
keys are selected, windows may be moved to the left or right by pressing Windows + Left/Right
array keys on the keyboard. Alternatively, Alt + Arrow key keyboard shortcuts may be used for
this.
Note that on Citrix Presentation Server installs, only the Alt key shortcut is available.
SplitView can be disabled for certain applications altogether using the exclusion list provided in
the Miscellaneous tab of SplitView Options dialog. This isolates the excluded applications from
all SplitView functionality and can be used if there are any applications incompatible with
SplitView. Note that the changes take effect the next time SplitView is started
.

18
Customizing Screen Division and Multi-monitor Settings for Remote Desktop use
The Advanced tab in SplitView Options dialog provides options for specifying how the screen is
to be divided, and for configuring multi-monitor settings for Remote Desktop, Citrix
Presentation Server and VDI usage.
Screen Division and Multi-monitor settings for Remote Desktop use
Customizing Screen Division
SplitView divides the remote desktop into multiple parts based on how the screen division is
configured in this tab.
● If multiple monitors of the same resolution are used to access the remote desktop,
choose “Split the desktop horizontally in N parts”. N should be set equal to the number
of monitors used by the client.
● If two monitors of unequal sizes are used to access the remote desktop, choose “Split in
two parts with X pixels on left and Y pixels on top”. The left monitor’s width should be
19
used for X and half it’s height for Y. This option will let you use Remote Desktop with
two monitors of different resolutions as explained in the SplitView FAQ. This works best
if the height of the monitors is same or nearly same.
● Automatic screen division: In some IT environments, there is a mixture of desktops with
2, 3 or more monitors from which remote sessions are accessed. For such environments,
SplitView provides the “Auto-detect number of monitors and adjust screen division”
option in Multi-monitor settings on this tab. If this option is selected, SplitView auto-
detects the number of client monitors in a remote session and adjusts screen division
for multi-monitor settings accordingly.
Note that if “Auto-detect number of monitors” is selected, the screen division setting is
overridden.
Customizing Multi-monitor settings for Remote Desktop, Citrix Presentation Server, VMware VDI,
…
The “Multi-monitors settings for Remote Desktop, Citrix, VDI…” configuration settings in
Advanced tab of the SplitView Options dialog control the behavior of SplitView for dual and
multi-monitor use with remote desktop and virtualization
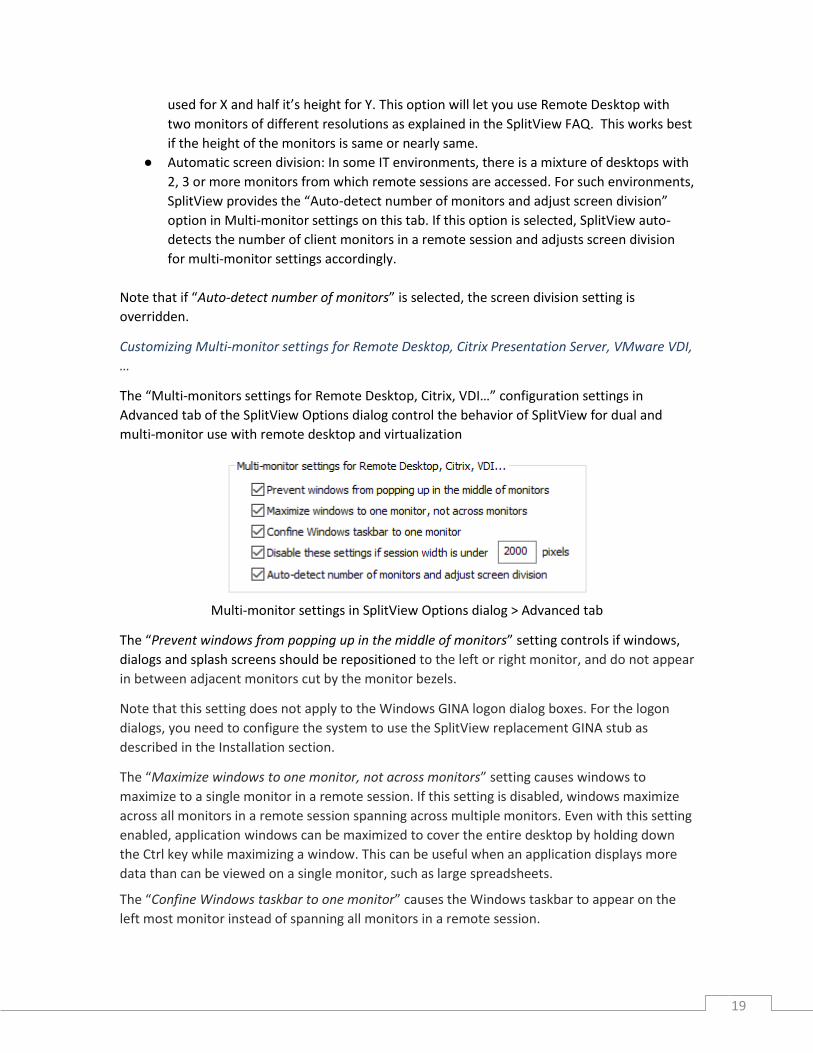
Multi-monitor settings in SplitView Options dialog > Advanced tab
The “Prevent windows from popping up in the middle of monitors” setting controls if windows,
dialogs and splash screens should be repositioned to the left or right monitor, and do not appear
in between adjacent monitors cut by the monitor bezels.
Note that this setting does not apply to the Windows GINA logon dialog boxes. For the logon
dialogs, you need to configure the system to use the SplitView replacement GINA stub as
described in the Installation section.
The “Maximize windows to one monitor, not across monitors” setting causes windows to
maximize to a single monitor in a remote session. If this setting is disabled, windows maximize
across all monitors in a remote session spanning across multiple monitors. Even with this setting
enabled, application windows can be maximized to cover the entire desktop by holding down
the Ctrl key while maximizing a window. This can be useful when an application displays more
data than can be viewed on a single monitor, such as large spreadsheets.
The “Confine Windows taskbar to one monitor” causes the Windows taskbar to appear on the
left most monitor instead of spanning all monitors in a remote session.
20
The “Disable these settings if session width is under X pixels” option causes the multi-monitor settings to be temporarily disabled when connecting from a single monitor. You should set the number of pixels(X) to more than the width of a single monitor and less than that of two monitors. A good value is 2000 pixels - it works with a range of horizontal resolution from 1024 to 1920. The multi monitor settings will get disabled for users with single monitors. The Go Left/Go Right buttons are not affected by this though - only the specific multi monitor settings on the advanced tab. This option is useful if you have both dual monitor and single monitor users in your organization connecting to that server, and you want SplitView multi-monitor settings to only kick in for users with dual monitors. The “Auto-detect the number of monitors and adjust screen division” option In many IT environments, there is a mixture of desktops with 2, 3 or more monitors from which
remote sessions are accessed. For such environments, SplitView provides the “Auto-detect
number of monitors and adjust screen division” option in Multi-monitor settings on the
Advanced tab of SplitView Options dialog. If this option is selected, SplitView auto-detects the
number of client monitors in a remote session and adjusts screen division for multi-monitor
settings accordingly.
Note that if “Auto-detect number of monitors” is selected, the screen division setting is
overridden.
Miscellaneous settings
The “Do not resize windows, just move them” option causes SplitView to move windows to the
left or right monitor, without causing them to resize to cover the entire monitor. If this option is
unchecked, the Go Left and Go Right buttons cause the window to not just move to the left or
right monitor respectively, but also be resized to full size of the monitor.
The ”Auto-start SplitView” option can control if SplitView should be auto-started for the current user. If this option is disabled, SplitView is not started for this user. This setting is useful if SplitView is to be disabled for specific users who connect to the remote session on this server using single monitor systems. By default, SplitView is auto-started for all users as the installer creates the following registry key:
HKEY_LOCAL_MACHINE/Software/Microsoft/Windows/CurrentVersion/Run/SplitView
For it to be started for only specific users, that registry key should be removed and a similar key entered in that user's profile:
HKEY_CURRENT_USER/Software/Microsoft/Windows/CurrentVersion/Run/SplitView

21
4.4 LICENSE ACTIVATION
SplitView requires a license key for use beyond the initial evaluation period. The evaluation
software can be converted to a licensed version by entering the license key. License keys for
SplitView can be purchased from http://www.splitview.com/buy
Steps to register SplitView
If you get prompted for a Name and License Key, enter the "Name" and "Key" in the registration
dialog.
To open the Registration dialog, right-click on the SplitView icon in the system tray, and choose
the About menu. In the About dialog, click the "Enter Key" button.
Automated license registration
SplitView can be registered from the command line, using the following command:
SplitScr.exe register <Name>, <Key>
You can suppress the "success" message-box by using QUIETREGISTER instead of REGISTER, but
if you don't supply a valid name and key on the command line, the dialogs will still be shown.
By wrapping this command in a script, you can register SplitView in an automated fashion.
Alternatively, you can create an INI file called SplitScr.ini and place it in the same folder as
SplitScr.exe. The INI file should have a [License] section containing the name and key, as shown
below:
[LICENSE]
Key=<Name>, <Key>
If this entry is in the INI file, SplitView will try to silently enter the name and key you specify here
when the program starts up. If it is successful, this line is removed from the INI file; if not, it is
ignored. Note that the portion cannot contain spaces or any punctuation (other than the dashes
that are part of a key to begin with). The comma between the name and key is optional; you can
use a space instead if you wish.