40873 parts list - kargo master step 1 for ram promaster city install “mount rail” as shown...
TRANSCRIPT
1
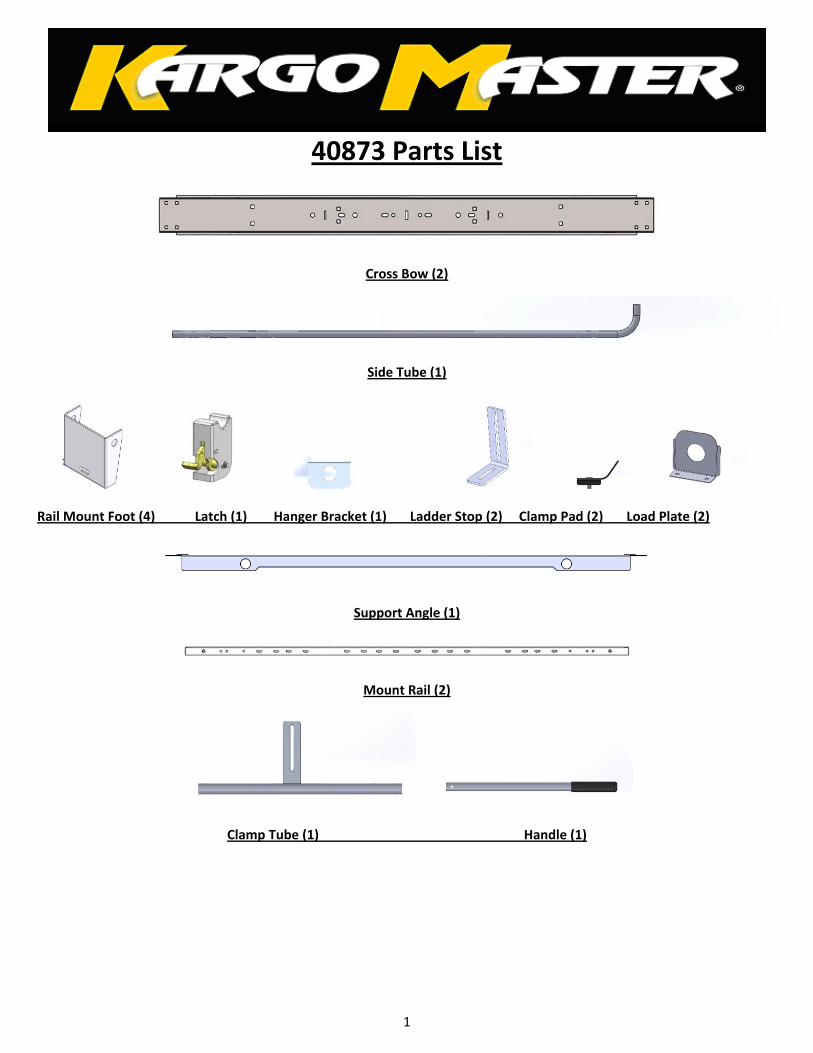
40873 Parts List
Cross Bow (2)
Side Tube (1)
Rail Mount Foot (4) Latch (1) Hanger Bracket (1) Ladder Stop (2) Clamp Pad (2) Load Plate (2)
Support Angle (1)
Mount Rail (2)
Clamp Tube (1) Handle (1)

Tools Needed Hardware Pack Cont'8' Tape Measure 1/2" End Wrench (k)1/2" Socket 9/16" End Wrench Qty 4 - 9/16" Socket Hammer 5/16"-18 x 1" Hex Bolt
(l)
Hardware Pack Qty 8 - 3/8"-16 x 3/4" Hex Bolt
(a) (m)Qty 7 - Qty 11 - 5/16"-18 x1-3/4" Carriage Bolt 3/8" Flat Washer
(b) (n)Qty 20 - Qty 8 - 5/16" Flat Washer 3/8" Lock Washer
(o)( c) Qty 3 - Qty 1 - 3/8"-16 Nyloc Nut5/16" Contour Washer (p)
Qty 1 -(d) 3/8"-16 x1" Carriage BoltQty 16 - (q) 5/16"-18 Nyloc Nut Qty 2 -
3/8"-16 x3/4" Carriage Bolt(e) (r)Qty 1 - Qty 4 -5/16"-18 x 2-3/4" Hex Bolt M8 x 25mm Hex Bolt
(s)(f) Qty 2 -Qty 6 - M8 x 20mm Counter Sink BoltRound Rubber pad (t)
Qty 4 -(g) M8 Nyloc NutQty 4 - (v)Fender Washer - 24mm OD x 2mm TK Qty 6 -
M6 x 20mm Hex Bolt(h) (w)Qty 2 - Qty 6 -5/16" ID, .74"OD Nylon Washer M6 Flat Washer
(x)(i) Qty 6 -Qty 2 - M6 Lock WasherFlange Bushing 1.75" (y)
Qty 1 -(u) Joint SealantQty 4 - (z)5/16"-18 x3/4" Carriage Bolt Qty 4 -
5/16" Lock Washer
40873 Hardware List
For TECHNICAL SUPPORT Call: 800-343-7486 Monday - Friday 7:00 A.M. to 4:00 P.M (PST)
2
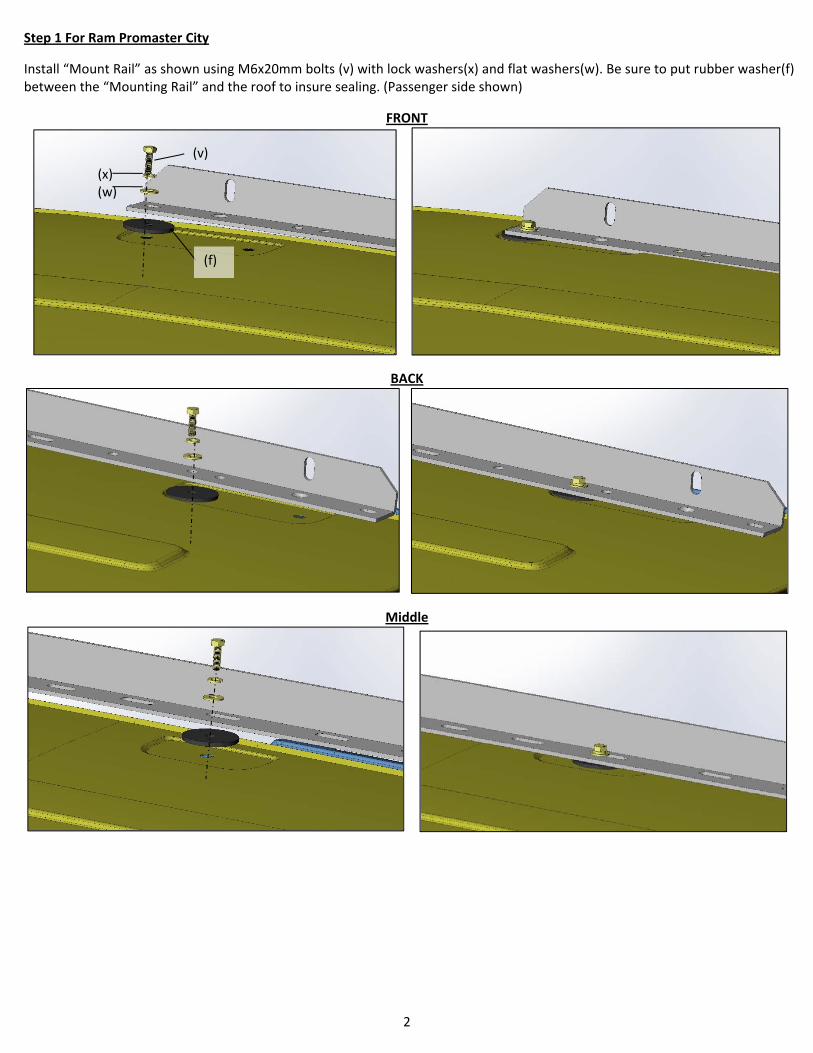
Step 1 For Ram Promaster City
Install “Mount Rail” as shown using M6x20mm bolts (v) with lock washers(x) and flat washers(w). Be sure to put rubber washer(f) between the “Mounting Rail” and the roof to insure sealing. (Passenger side shown)
FRONT
BACK
Middle
(v)
(w)
(f)
(x)
3
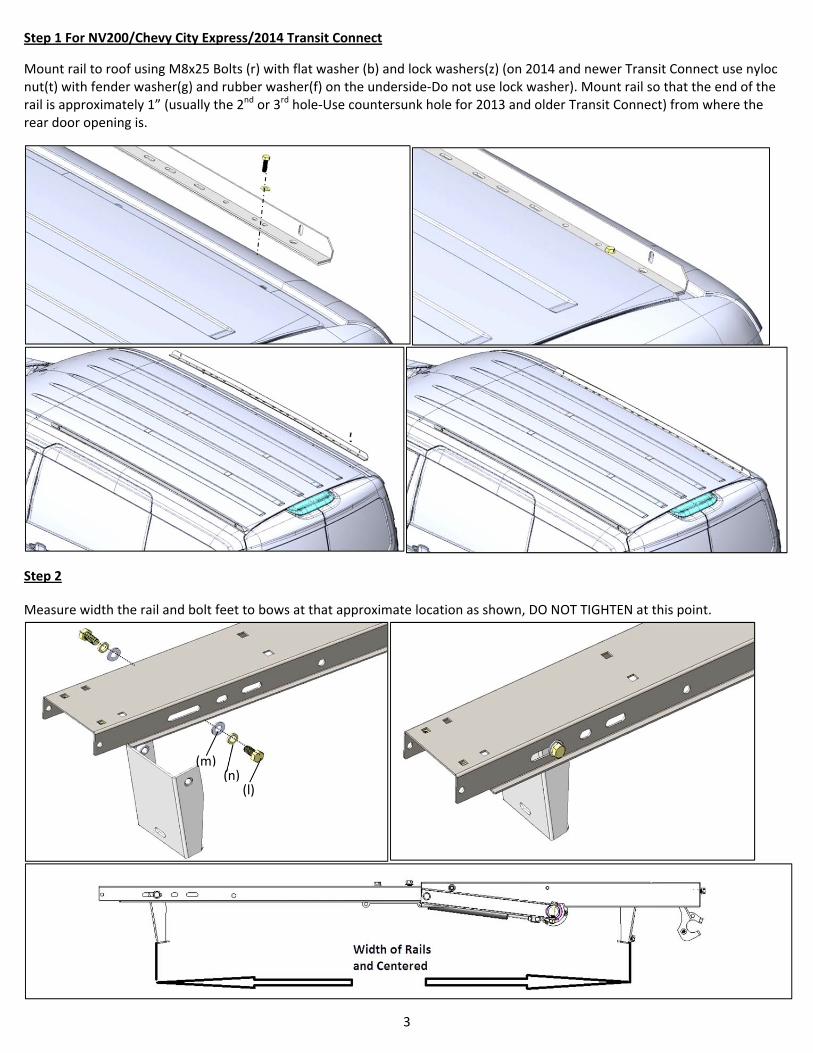
Step 1 For NV200/Chevy City Express/2014 Transit Connect
Mount rail to roof using M8x25 Bolts (r) with flat washer (b) and lock washers(z) (on 2014 and newer Transit Connect use nyloc nut(t) with fender washer(g) and rubber washer(f) on the underside‐Do not use lock washer). Mount rail so that the end of the rail is approximately 1” (usually the 2nd or 3rd hole‐Use countersunk hole for 2013 and older Transit Connect) from where the rear door opening is.
Step 2
Measure width the rail and bolt feet to bows at that approximate location as shown, DO NOT TIGHTEN at this point.
(m) (n)
(l)
4
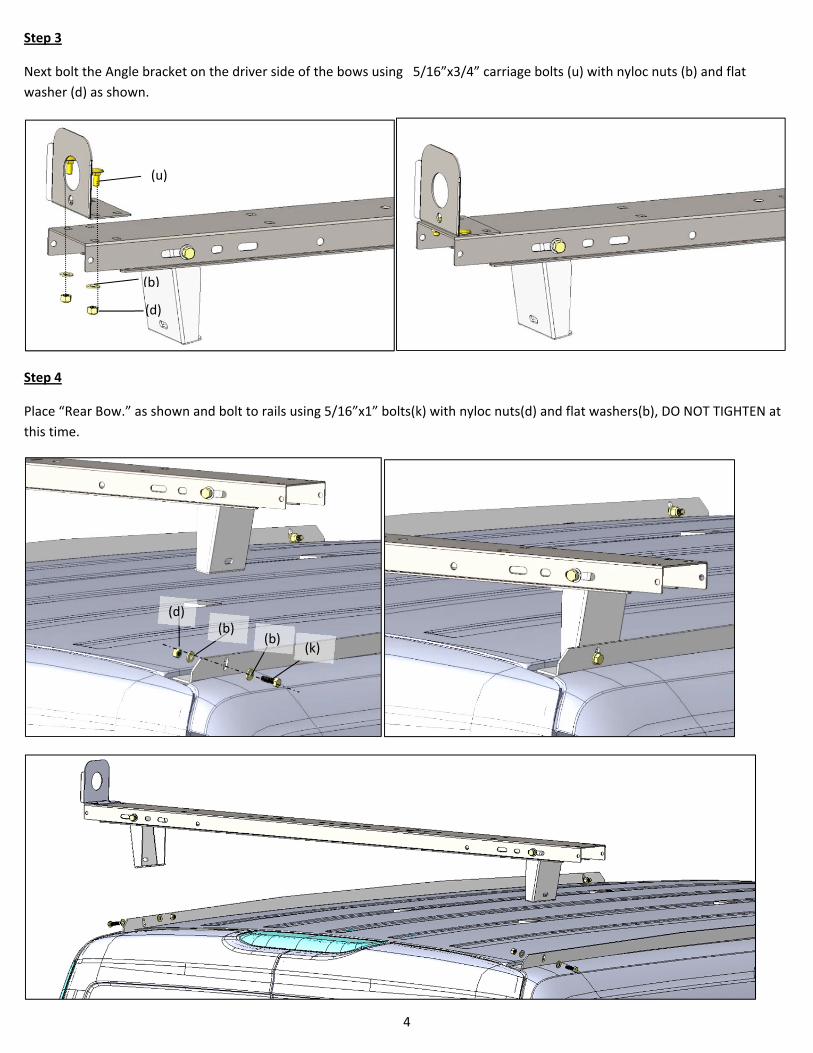
Step 3
Next bolt the Angle bracket on the driver side of the bows using 5/16”x3/4” carriage bolts (u) with nyloc nuts (b) and flat
washer (d) as shown.
Step 4
Place “Rear Bow.” as shown and bolt to rails using 5/16”x1” bolts(k) with nyloc nuts(d) and flat washers(b), DO NOT TIGHTEN at
this time.
(u)
(b)
(d)
(d) (b)
(b) (k)
5
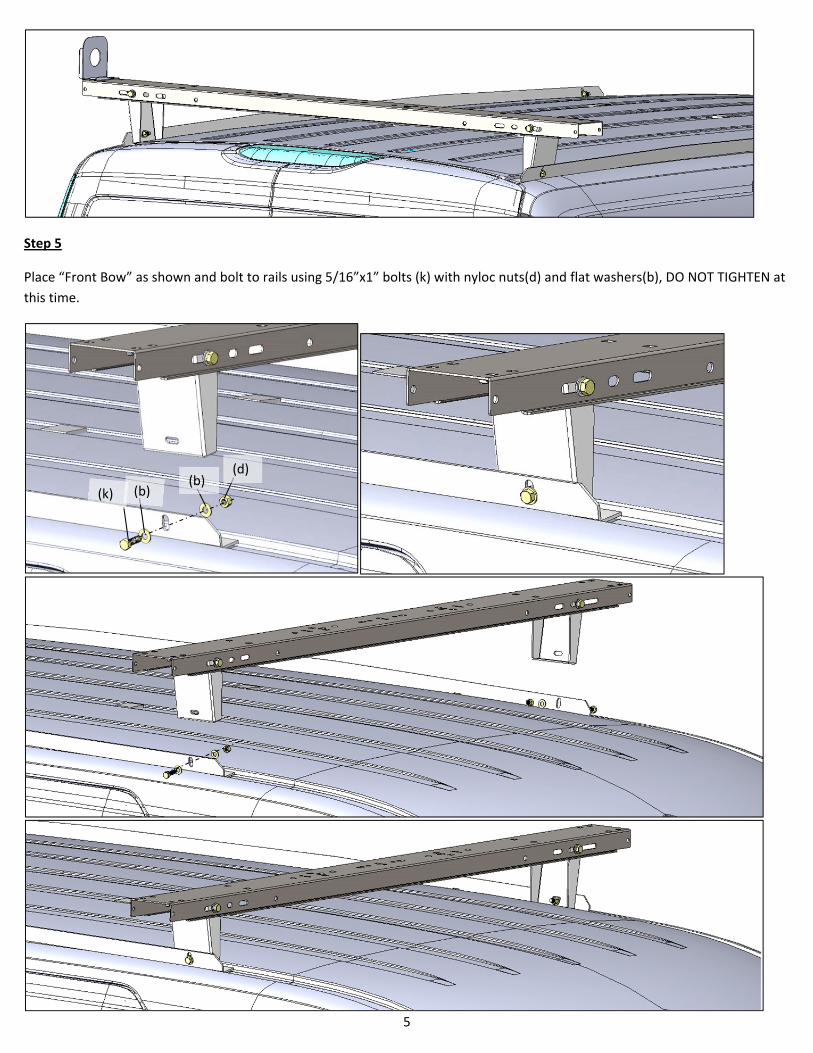
Step 5
Place “Front Bow” as shown and bolt to rails using 5/16”x1” bolts (k) with nyloc nuts(d) and flat washers(b), DO NOT TIGHTEN at
this time.
(k) (b) (b)
(d)

6
Step 6
Next bolt the “Side Tube” using 5/16”x1 ¾” carriage bolts(a) with flat washer(b) and nyloc nuts(d), using E6000(y) around each
bolt to prevent corrosion inside the tube.
(a)
(b)
(d)
(a)
(b)
(d)
7
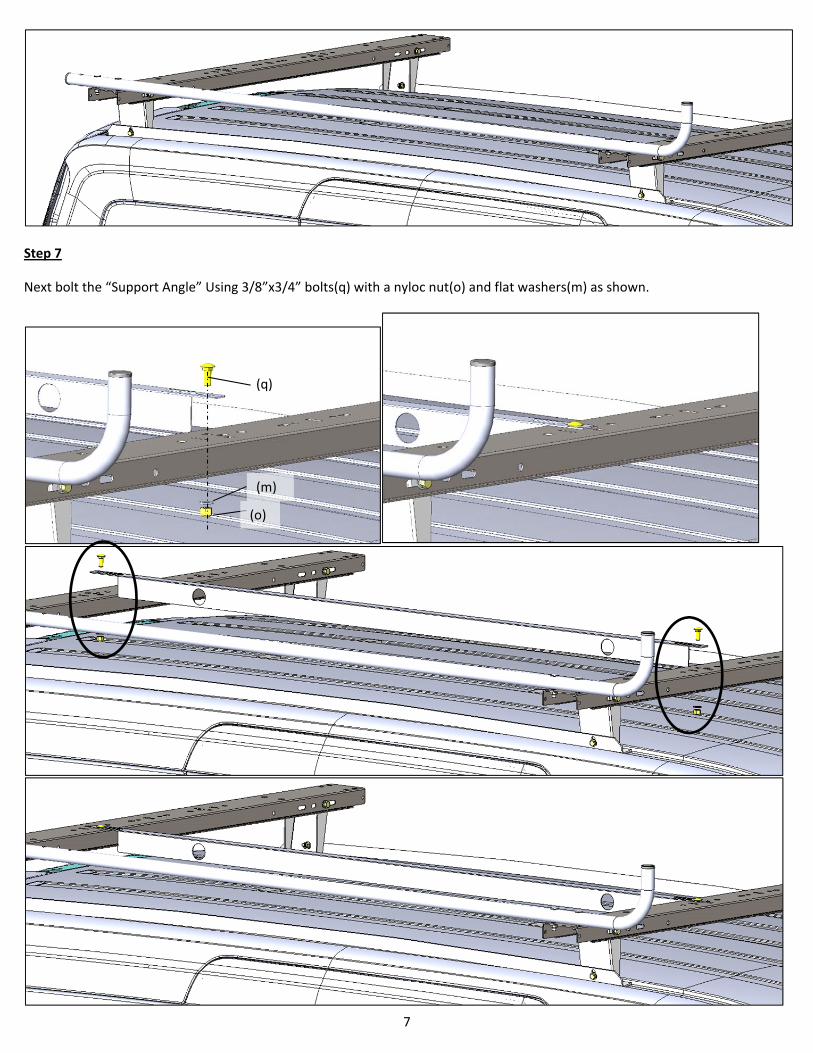
Step 7
Next bolt the “Support Angle” Using 3/8”x3/4” bolts(q) with a nyloc nut(o) and flat washers(m) as shown.
(o)
(m)
(q)
8
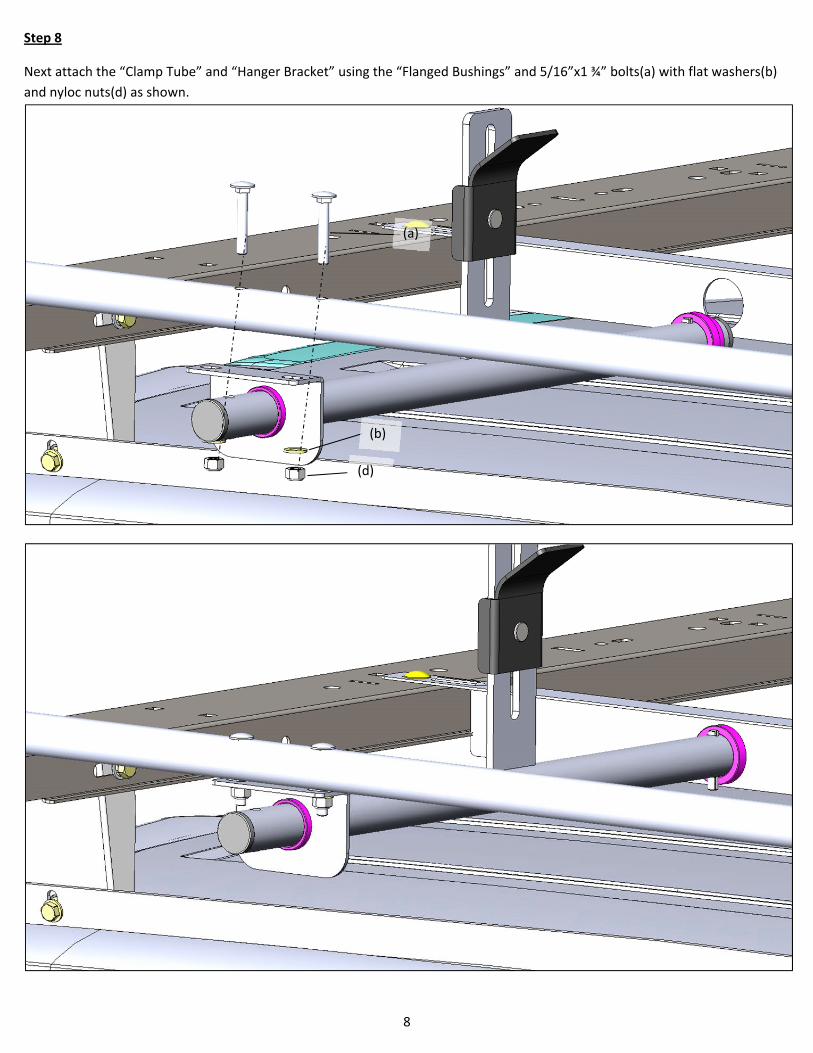
Step 8
Next attach the “Clamp Tube” and “Hanger Bracket” using the “Flanged Bushings” and 5/16”x1 ¾” bolts(a) with flat washers(b)
and nyloc nuts(d) as shown.
(a)
(b)
(d)
9
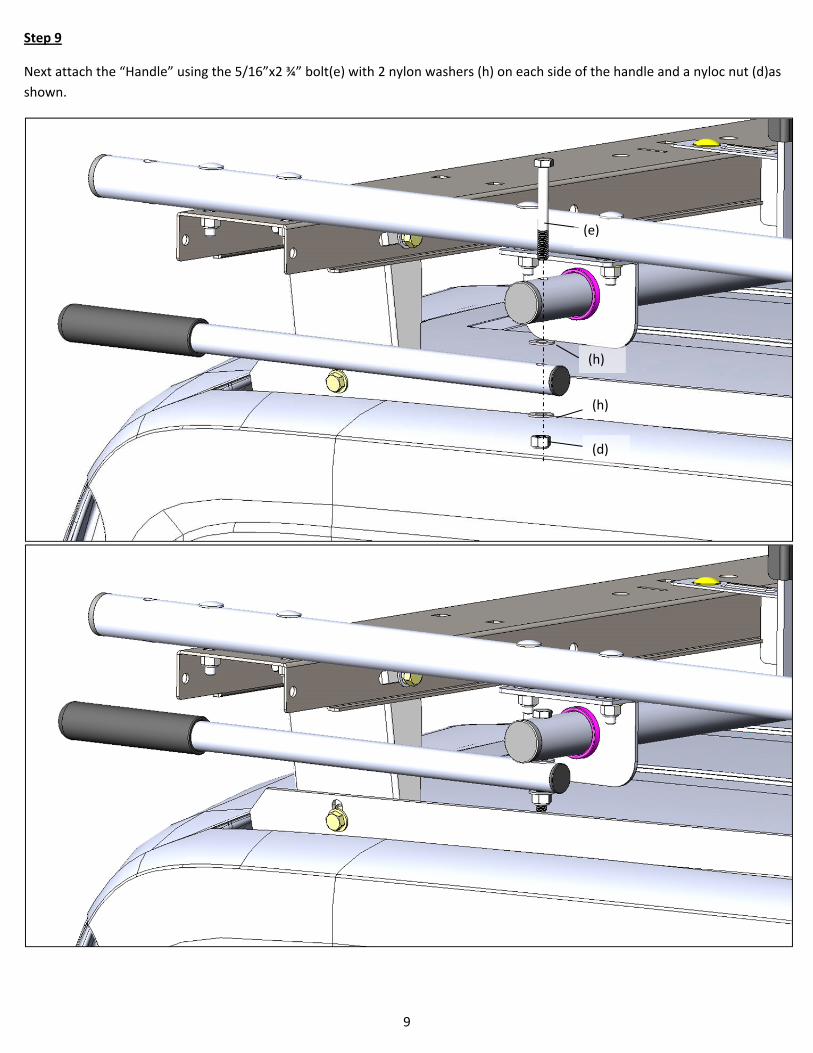
Step 9
Next attach the “Handle” using the 5/16”x2 ¾” bolt(e) with 2 nylon washers (h) on each side of the handle and a nyloc nut (d)as
shown.
(e)
(h)
(h)
(d)
10
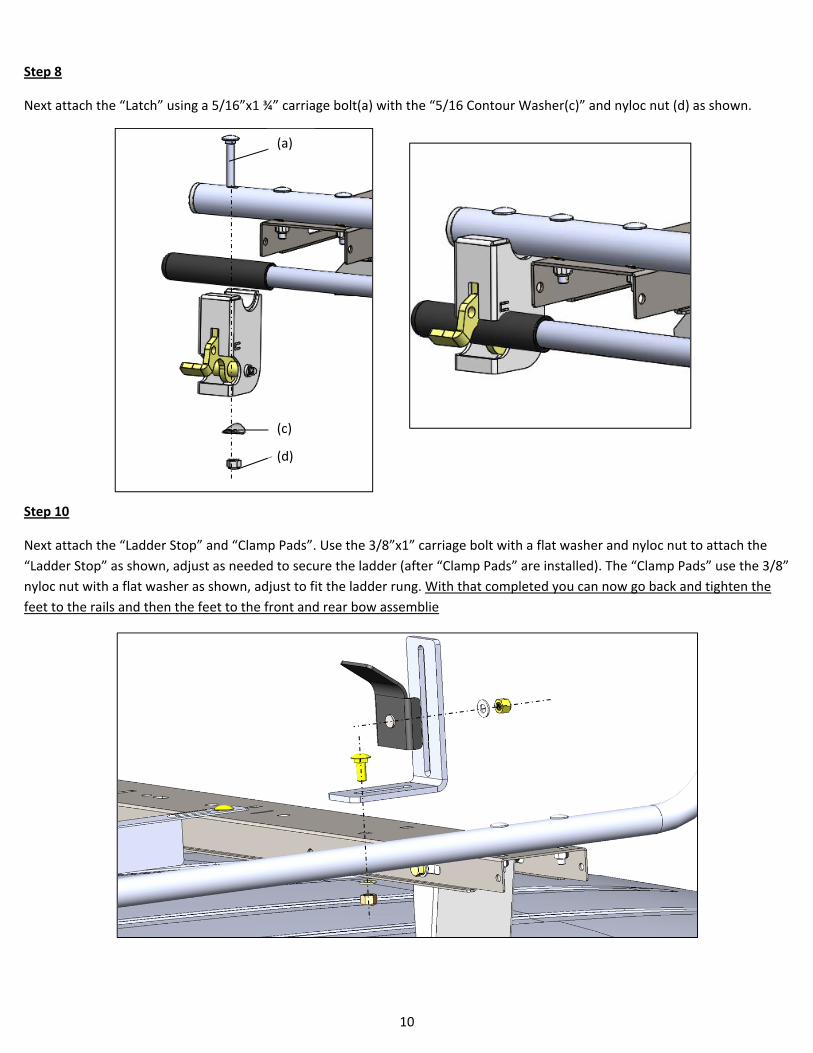
Step 8
Next attach the “Latch” using a 5/16”x1 ¾” carriage bolt(a) with the “5/16 Contour Washer(c)” and nyloc nut (d) as shown.
Step 10
Next attach the “Ladder Stop” and “Clamp Pads”. Use the 3/8”x1” carriage bolt with a flat washer and nyloc nut to attach the
“Ladder Stop” as shown, adjust as needed to secure the ladder (after “Clamp Pads” are installed). The “Clamp Pads” use the 3/8”
nyloc nut with a flat washer as shown, adjust to fit the ladder rung. With that completed you can now go back and tighten the
feet to the rails and then the feet to the front and rear bow assemblie
(a)
(d)
(c)
11
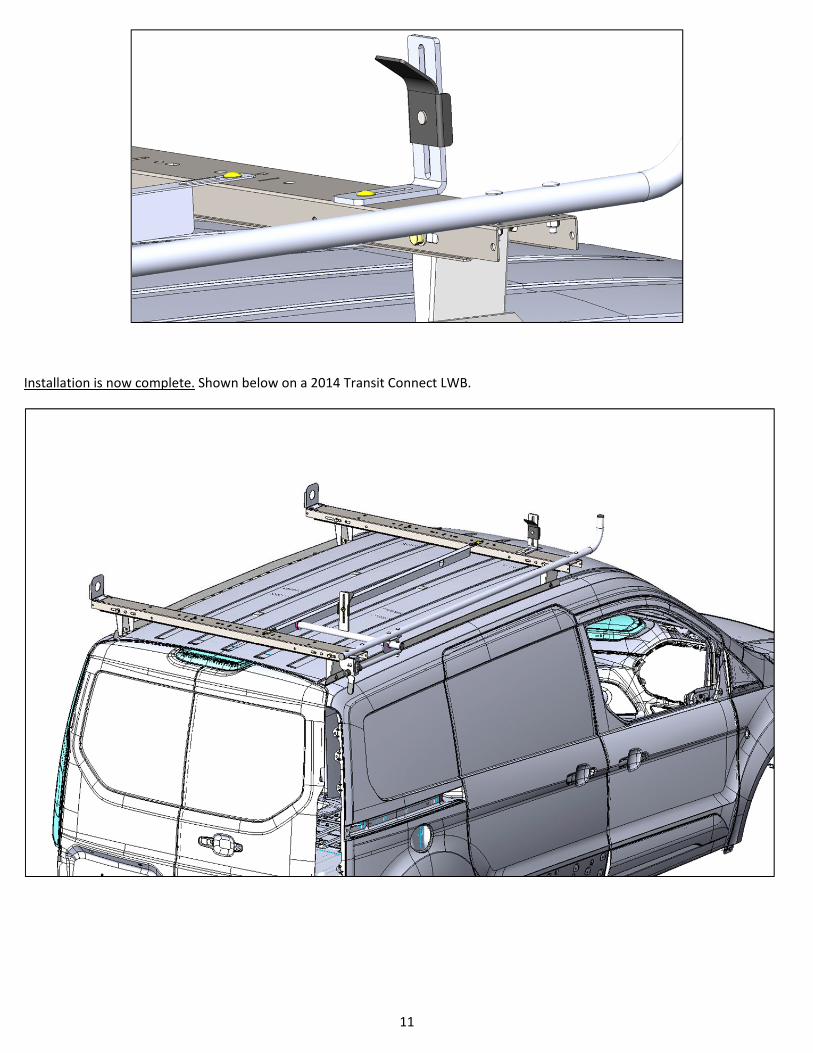
Installation is now complete. Shown below on a 2014 Transit Connect LWB.