ymca of austin afterschool curriculum
TRANSCRIPT

YMCA OF AUSTIN AFTERSCHOOL CURRICULUM
September THEME: Stem
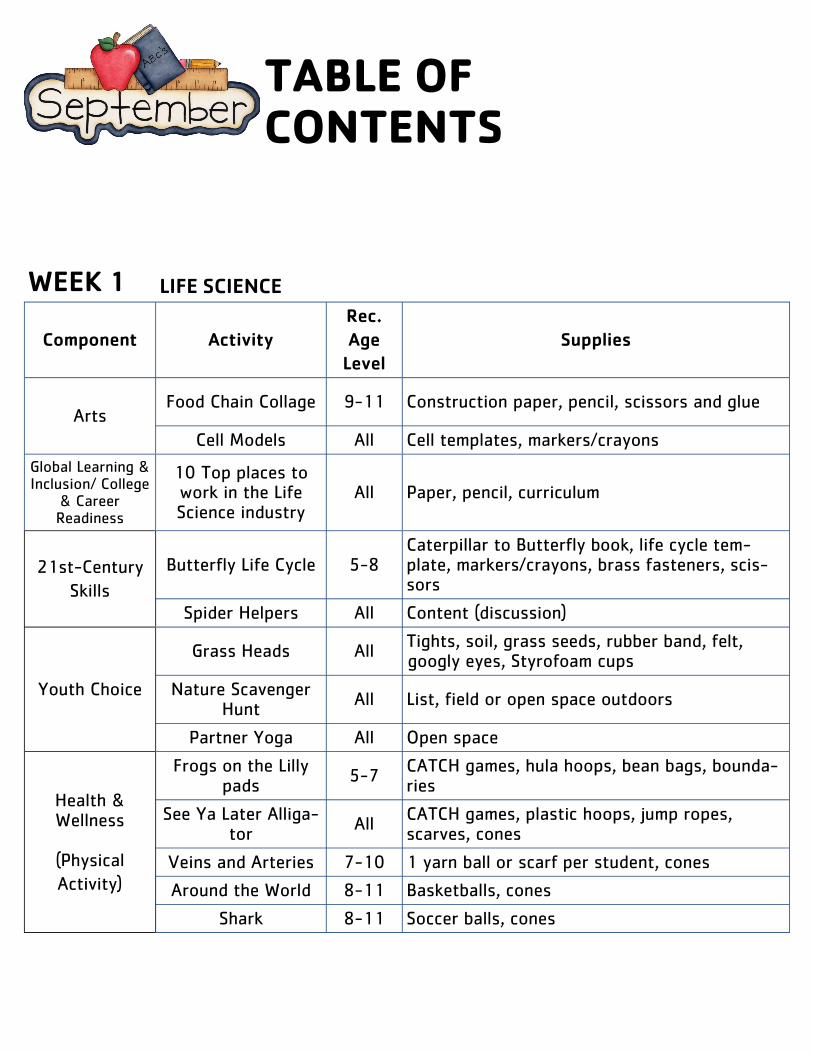
TABLE OF CONTENTS
WEEK 1 LIFE SCIENCE
Component Activity
Rec.
Age
Level
Supplies
Arts Food Chain Collage 9-11 Construction paper, pencil, scissors and glue
Cell Models All Cell templates, markers/crayons
Global Learning & Inclusion/ College
& Career Readiness
10 Top places to work in the Life Science industry
All Paper, pencil, curriculum
21st-Century
Skills
Butterfly Life Cycle 5-8 Caterpillar to Butterfly book, life cycle tem-plate, markers/crayons, brass fasteners, scis-sors
Spider Helpers All Content (discussion)
Youth Choice
Grass Heads All Tights, soil, grass seeds, rubber band, felt, googly eyes, Styrofoam cups
Nature Scavenger Hunt
All List, field or open space outdoors
Partner Yoga All Open space
Health & Wellness
(Physical
Activity)
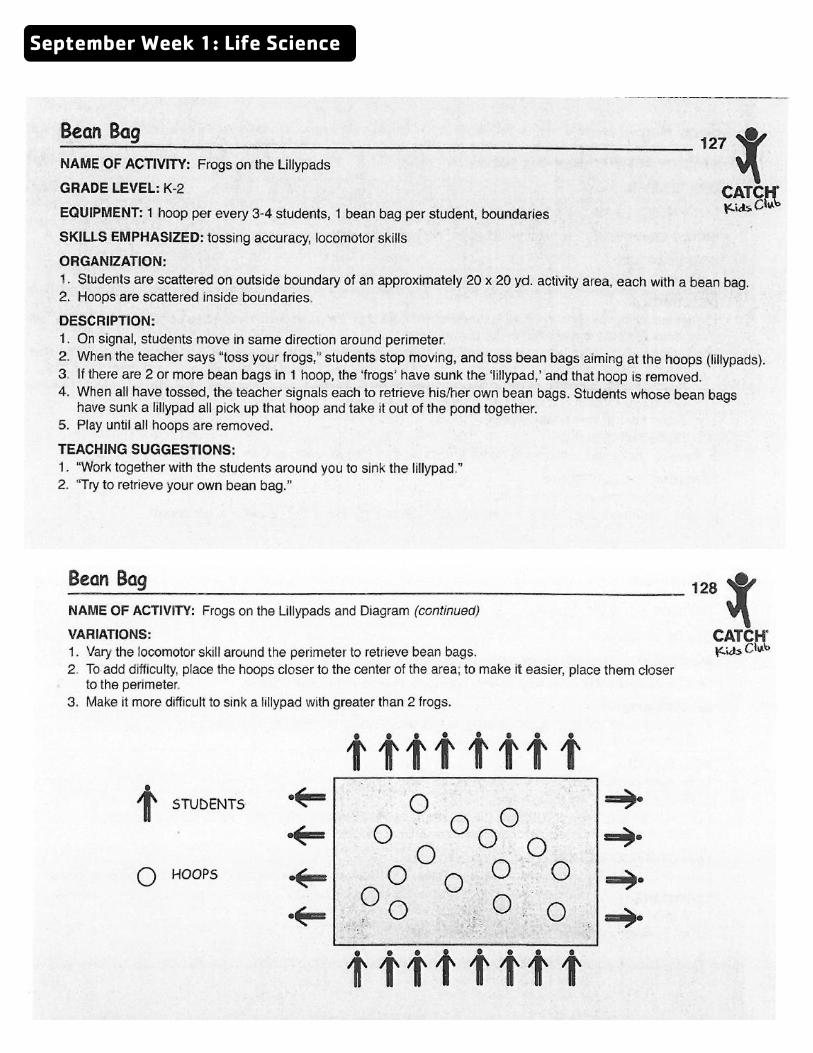
Frogs on the Lilly pads
5-7 CATCH games, hula hoops, bean bags, bounda-ries
See Ya Later Alliga-tor
All CATCH games, plastic hoops, jump ropes, scarves, cones
Veins and Arteries 7-10 1 yarn ball or scarf per student, cones
Around the World 8-11 Basketballs, cones
Shark 8-11 Soccer balls, cones

September Week 1: Life Science
Life Cycle Collage
Instructions:
Pick a piece of con-
struction paper for your
background color.
Then start with your
largest animal (the top
predator). It’s easier if you fold your paper
vertically so you only have to draw half the
animal and you make sure it’s symmetrical.
Then make all the other animals slightly smaller..
and smaller. You should finish with at least
three animals and a plant
Cell Models
Materials Needed:
Cell templates Markers/crayons
Instructions:
Allow the kids to pick if they want to color a plate or animal cell. Once they have
those as a group talk about the things that are the same and different about the
cells.
Information: Cell-the smallest structural and functional unit of an organism, typically mi-croscopic and consisting of cytoplasm and a nucleus enclosed in a membrane. Microscopic organisms typically consist of a single cell, which is either eukaryotic or prokaryotic.
The cell was first discovered and named by Robert Hooke in 1665. He remarked that it looked strangely similar to cellula or small rooms which monks inhabited, thus deriving the name. However what Hooke actually saw was the dead cell walls of plant cells (cork) as it appeared under the microscope.
Materials Needed:
Construction paper Scissors Pencil glue

September Week 1: Life Science
10 Top places to work in the Life Science industry Materials Needed:
Pencil Paper
Instructions:
Start having a discussion about what kind of jobs fall under life science such as doctors, pharmacists, biolo-
gists, bacteriology scientist, researchers, analysts, etc. This conversation needs to be child led and as in-depth
as they take it. Once they have an understanding of some of theses jobs have them individually or in groups
write what they think the 10 top places in the world are for these types of careers.
Once they have finished you can share with them the list. Have the kids saw if they picked some of the same,
why did they pick it, was it right, etc.
10. Canada– many pharmaceutical companies are based in Canada 9. Spain-in 2015 the government put 40% of a 12billion euro government fund went into research collabora-tions with hospitals and academic centers. 8. UK– a combination of pharmaceutical, biotechnology and medical device industry contribute to a huge chunk of he economy 7. Italy– pharmaceuticals and manufacturing of therapeutic and diagnostic products 6. Japan– pharmaceuticals that aid the ageing population with over 26% being over 65 5. Switzerland– Research Universities 4. Singapore– global life science companies such as Johnson & Johnson and Merck 3. France– global leader in the vaccine industry. Where the first approved vaccine for dengue fever was created 2. Germany– biopharmaceuticals, 1. USA-is on the forefront of drug development in oncology, diabetes, and autoimmune diseases
Butterfly Life Cycle
Instructions:
Start by going through the
book and talking about the life
cycle of a butterfly. Discuss the
evolution and allow time for the
kids to ask questions and create
a dialog.
Pass out the template and allow them time to
decorate and cut out their life cycle wheels. The
brass fastener is to connect one on top of the other. This can help them learn and
remember the discussion
Materials Needed:
Caterpillar to Butterfly book Copies of Life Cycle template (end of week of curriculum) Markers/crayons scissors Brass fasteners

Spider Helpers
Instructions: Read and discuss the different ways the spiders help all over the globe. Then have the kids
problem solves way to protect spiders and other insects.
In an acre of a sunny meadow, you’ll find about 2 million spiders. For some, that’s a scary thought. But when you consider that each spider probably catches a bug a day, it’s pretty good news. Scientists believe that spiders eat more insects than all other animals combined.
People have long understood that we need spiders for survival. Today, we’re finding new life-giving uses for their deadly venom and superstrong silk. As an old English saying goes: “If you wish to live and thrive, let the spider run alive.”
The beautiful fabric known as silk comes from the cocoons of caterpillars. People have also tried to mass-
produce the silk of spiders. But spiders will sometimes eat each other, so that makes it hard to raise them. Even so, some spider-silk clothes have been made. French emperor Napoléon is believed to have owned a pair of spider-silk gloves.
Everyone has heard the nursery rhyme about Little Miss Muffet who sat on a tuffet. It is based on an Eng-lishwoman named Patience Muffet, who lived in the early 1600s. Her father, Reverend Doctor Thomas Muf-fet, loved spiders. He believed that using them in medicines cured many illnesses. He tested these medicines on his daughter when she was ill. His cures probably did not work.However, today some tarantula venom is being devel-oped as blood thinner to help heart patients.
One company came up with an unusual way to create artifi-cial spider silk. It altered the DNA of goats to create spider-silk proteins in their milk. The proteins are taken out of the milk to make threads. But they are not as strong or stretchy as real silk. Still, one day the artificial silk could make stronger clothes and lighter bulletproof vests.
Most businesses would be embarrassed if they were overrun by spiders. But wineries and breweries in Western Europe like having house spiders. They keep out insects that can dig into wood and cork and ruin the wine and beer.
As a group, spiders are not endangered. But at least eight U.S. species are now part of the Endangered Species Act, because of habitat destruction. The Mexican red-kneed tarantula is also threatened. Too many people have collected them to keep as pets in the U.S. Colorful and calm, many tarantulas are kept and bred in captivity. The law restricts international trade of these spiders. However, they are still sold illegally in the U.S.
Some spiderwebs make excellent pollution detectors. Fine particles of pollution get trapped on them. How-ever, as spiders groom themselves, they eat the polluted dust. The dust also makes their webs less effective as traps for their prey. So the pollution is harming the spiders.
September Week 1: Life Science
“And furthermore,” said Charlotte, shaking one of her legs, “do you realize that if I didn’t catch bugs and eat them, bugs would increase and
multiply and get so numerous they’d destroy the Earth, wipe out everything?”
—from Charlotte’s Web, by E. B. White

September Week 1: Life Science
Grass Heads
Instructions:
1) Put 2-3 generous table spoons full of grass seeds at the bottom of your tights. 2) Then add a lot of earth until you have a nice sized ball. Tie the bot-tom of the tights. Shape into a ball if necessary. 3) Pinch a “nose”, twist it and
wrap and tie in place with cotton. This was quite fiddly, but we got there in the end. 4) Glue on googly eyes and mouth.
5) Place in a styrofoam cup and allow the kids to decorate. Add water and the tights will “soak the water up” into the earth. If you want to speed it up, you can give the head a quick shower under the tap to moisten the earth the first time round. After that take care
not make it too wet. Place in a sunny spot!
6) Wait for hair to grow. Make sure you don’t keep the head too wet – we did at first, which meant that the mouth fell off and that the googly of didn’t dry properly for ages. It also means your grass head can get moldy. So your head should feel moist but not soggy. Basically just add a little water to the pot every so often.
Nature Scavenger Hunt
Instructions: In groups or individually see how many different items in nature they can find.
Bird Tree roots Ant Spider web Green leaf Brown leaf Flower Log Two similar rocks Mushroom Squirrel Stick that looks like a letter Y Flying bug Dandelion Animal prints Pine cone ladybug
Materials Needed:
Tights Soil Grass seeds Rubber bands Googly eyes Felt Styrofoam cups

September Week 1: Life Science
September Week 1: Life Science

September Week 1: Life Science

September Week 1: Life Science

September Week 1: Life Science

September Week 1: Life Science

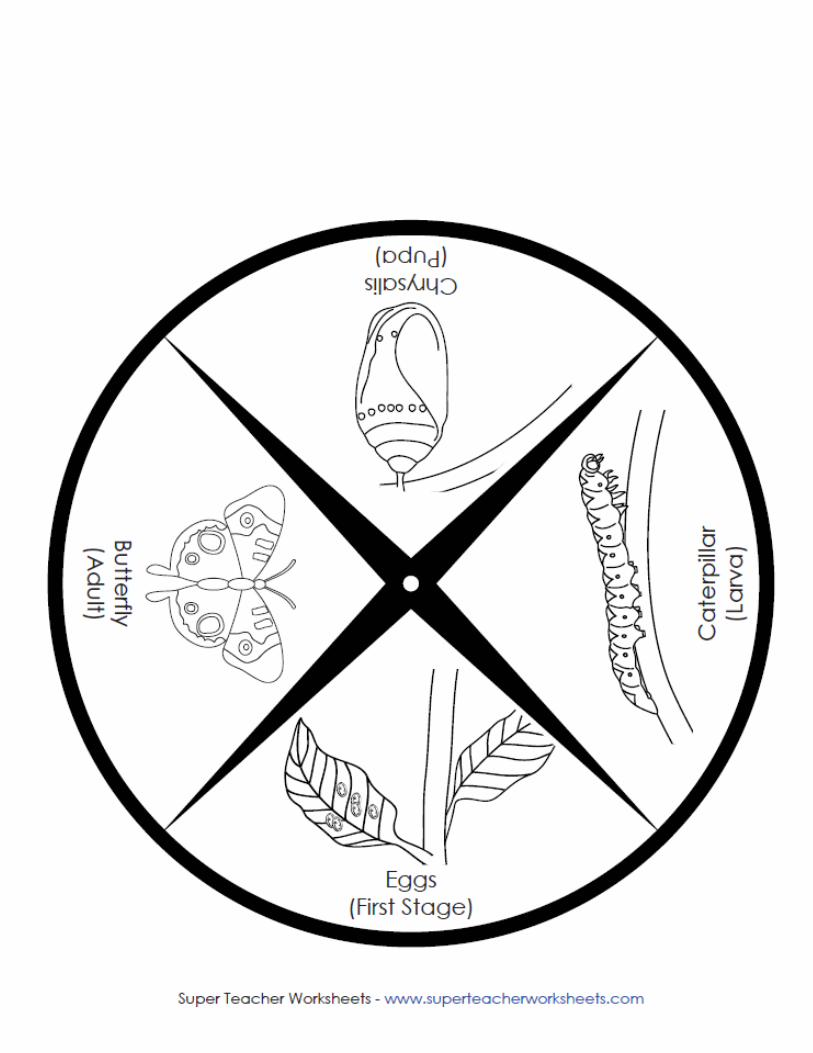

TABLE OF CONTENTS
WEEK 2 Construction
Component Activity
Rec.
Age
Level
Supplies
Arts
Mini town play mat *may take multi.
days* 5-7
Poster boards, construction paper, glue, pen-cils, glue scissors, markers/crayons
Mini Ferris Wheel 8-11 Straws, ruler, scissors, mini muffin papers, pipe cleaners, string, got glue gun
Global Learning & Inclusion
Iconic Building Challenge (60min)
All Recycle craft, use any odds and ends you have that can be spared
21st-Century
Skills
Marble Run (45-60min)
8-11 Box lid or cardboard, popsicle sticks, hot glue gun/glue, duct tape and marbles
Bubble Machine All Styrofoam, wooden dowel, pipe cleaners, long pan/bowl, bubble solution
Youth Choice
Shaving Cream Blocks
5-7 Blocks, shaving cream, table clothes
Lego Water Dams All Lego, plastic tubs, water, paper towels
Moon sand Castles All Flour, baby oil, plates, Ziploc bags
Health & Wellness
(Physical
Activity)
High Roller 8-11 CATCH games, 2-3 large dice (cardboard box-es), 6 high roller task cards, 1 roll masking/painter tape, t hula hoop
Villas in the Moun-tains
8-11 CATCH games, hula hoops, cones, gator balls, poly spots
Jackhammers All Basketballs or balls of similar size that bounce
Bean Bag Bucket Brigade
5-8 Hula hoops, bean bags
Cleaning House 8-11 Balls, hula hoops, cones

September Week 1: Life Science
Mini Town Play Mat
Instructions: Break the children up into
groups of four to five people and give each
group a poster board and access to the rest of
the material needed. First they will need to
decide what they would like to have in their
town. It’s recommended that they maybe create
a basic layout on a separate sheet of paper. Then they will work together to create
the different buildings and roads. Once this is done these mats can be used for centers time with cars and peo-
ple figures.
Mini Ferris Wheel
Instructions:
Cut 24 straws in 5 1/2 lengths.
Threading pipe cleaners through
3 of the straws, form a triangle and
twist the wire to keep the straws in
a tight triangle. Carefully bend/slide
the twisted pipe cleaner into the
straw, now hidden.
Thread a new piece of pipe cleaner into one side of the
first triangle and add 2 new straws to form an attached triangle, finishing it off as
in step 2.
Continue attaching triangles in this way until you have a hexagon made of 6 trian-
gles. Then repeat steps 2-4 to form a second identical hexagon.
Cut 6 straws into 30 lengths. Thread pipe cleaners through an edge of one hexa-
gon, add 1 short straw, thread through an edge of the other hexagon, add another
short straw, and twist the wire tight as usual. The two hexagons should now be connected.
Continue to connect the two hexagons as in step 5; thread through a hexagon edge, the attached short
straw, another hexagon edge, add on a new short straw, and
twist. Do this until all sides are attached.
Cut another 1/3 straw and hot glue it into the center of the
hexagons. This will keep the structure much more secure.
Cut 4 straws in 7″ lengths and 2 straws in 3″ lengths – I
chose to do this in a new color. Use the pipe cleaners to form two
triangles, as shown below.
Apply hot glue to the top of one triangle and attach to the
center-post of the ferris wheel. Hold it in place until secure, and
repeat for the second triangle.
Cut 8 lengths of string in 5″ lengths, two for each mini muffin
paper.
Loop two pieces of string over one of the 3″ straws and hot
glue into opposite sides of a muffin paper. Repeat for the remain-
ing strings and muffin papers.
Materials Needed:
Straws Ruler Scissors Mini muffin papers Pipe cleaners String Hot glue gun
Materials Needed:
Poster boards Scissors Markers/crayons Pencils Construction paper glue

Marble Run
Materials Needed:
Box lid or cardboard Popsicle sticks Hot glue gun/glue Duct tape marbles
Instructions: This activity is really about
letting the kids imaginations run wild and
seeing what they can come up with. Talk
about what a marble run is and show the
kids example photos. Then place them in
groups of 4-5 to work on their marble runs.
September Week 1: Life Science
Iconic Building Challenge
Materials Needed: RECYCLE CRAFT! Use any supplies you have available that you can spare
for this building challenge! Example: paper, glue, card board, duct tape, books, furniture have
the kids get creative.
Instructions: At this end of the Unit you will find the 10 most iconic buildings in the world. Place the kids in
groups and give each group photo to study. Their challenge is to send people to gather supplies and try to
make a replica of the building they have been given. They also can learn more about this building while they
build. Make sure to leave time at the end of the activity to share and have each group present. Talk about the
actual buildings and share stuff like how old are they and where they are!
September Week 1: Life Science
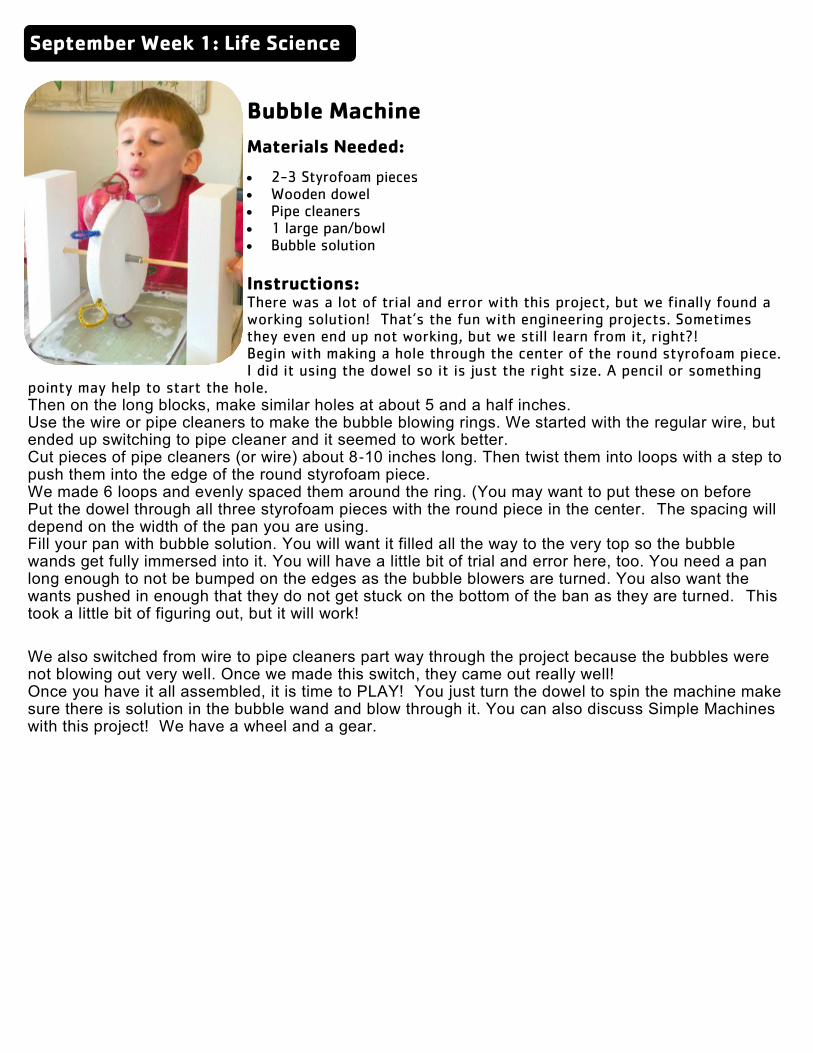
Bubble Machine
Materials Needed:
2-3 Styrofoam pieces Wooden dowel Pipe cleaners 1 large pan/bowl Bubble solution
Instructions: There was a lot of trial and error with this project, but we finally found a working solution! That’s the fun with engineering projects. Sometimes they even end up not working, but we still learn from it, right?! Begin with making a hole through the center of the round styrofoam piece. I did it using the dowel so it is just the right size. A pencil or something
pointy may help to start the hole. Then on the long blocks, make similar holes at about 5 and a half inches. Use the wire or pipe cleaners to make the bubble blowing rings. We started with the regular wire, but ended up switching to pipe cleaner and it seemed to work better. Cut pieces of pipe cleaners (or wire) about 8-10 inches long. Then twist them into loops with a step to push them into the edge of the round styrofoam piece. We made 6 loops and evenly spaced them around the ring. (You may want to put these on before Put the dowel through all three styrofoam pieces with the round piece in the center. The spacing will depend on the width of the pan you are using. Fill your pan with bubble solution. You will want it filled all the way to the very top so the bubble wands get fully immersed into it. You will have a little bit of trial and error here, too. You need a pan long enough to not be bumped on the edges as the bubble blowers are turned. You also want the wants pushed in enough that they do not get stuck on the bottom of the ban as they are turned. This took a little bit of figuring out, but it will work!
We also switched from wire to pipe cleaners part way through the project because the bubbles were not blowing out very well. Once we made this switch, they came out really well! Once you have it all assembled, it is time to PLAY! You just turn the dowel to spin the machine make sure there is solution in the bubble wand and blow through it. You can also discuss Simple Machines with this project! We have a wheel and a gear.

September Week 1: Life Science
Lego Water
Materials Needed:
Legos Water Plastic tubs Paper towels
Instructions: Once you have your inclined plane set up and on a tray or in a bin to catch overflow, it’s time to design your dam! This a great activity that multi-ple ages can work on together as well as differ-ent abilities. You can make your LEGO water dams as complex or simple as you like and tweak your design for desired results over and over again.
You can also encourage older kids to sketch a design first, write predic-tions, record observations, and analyze the results to draw a conclusion about the effectiveness of their design.
Moon Sand Castles
Instructions: 1. Give each child a paper plate with a scoop of flour and baby oil on top
2. With their hands have the kids start mixing the ingredients together. If you are worried
about the mess you can do this in a large bowl and then pass out. Keep adding baby oil until the flour starts to
stick together and be moldable and similar to the texture of wet sand.
3. Once this is achieved you can have them have sand castle competition and put their sand in a Ziploc bag to take home
Shaving Cream Blocks
Materials Needed:
Blocks shaving cream table clothes
Instructions: Set up this activity in a open space on top of a table cloth or surface that can be easily cleaned. Squirt piles of shaving cream on the mat for the kids to dip the blocks in. This is an experiment to see if the shaving cream acts like cement and making their structures stronger.
Bonus: have a competition to see who can build the biggest, strongest structure.
Materials Needed:
Flour Baby oil Paper plates Ziploc bags

September Week 1: Life Science
September Week 1: Life Science

September Week 1: Life Science

September Week 1: Life Science

September Week 1: Life Science

ICONIC BUILDING CHALLENGE #1– THE GIZA PYRAMID The oldest buildings on this list, the pyramids on the Giza plateau have intrigued mankind for centuries. Not only have they stood the test of time, but the accuracy with which they were built is impressive even by today’s standards. They were built as tombs for three separate pharaohs during the Third and Fourth Dynasty. It is also the only surviving wonder of the an-cient world and was the tallest building in the world until 1300 when it was surpassed by the Lincoln Cathedral. Despite their long history, or perhaps because of it, mysteries have swirled around the pyramids since they were found by the Ancient Greeks thousands of years ago. How were they built? How many people worked on the project? How long did the construction take? What was the Egyptians’ understanding of astronomy, mathematics, and geography? And even crazy questions like: did aliens help in their construction? While these questions go unan-swered, all we are left to do is marvel at a culture who were master builders even before the invention of the wheel.
Who built it? The oldest and largest of the three pyramids was built by Khufu between 2551 and 2531 BC. The second was built by Khufu’s grandson Khafre between 2558 and 2532 BC. And the third pyramid belongs to Khafre’s son Menkaure and despite not knowing the exact date of the con-struction many believe that it was finished somewhere around 2490 BC, several years after his death.

ICONIC BUILDING CHALLENGE #3– BIG BEN One of the world’s most famous clocks, Big Ben is actually the name of one of the bells but over the years it has come to be used for both the clock and the tower as well. It was complet-ed during the restoration of the Palace of Westminster in 1858. The tower stands 316 feet tall, each clock face is 23 feet square with 4 foot numbers and the great bell is seven and a half feet tall and weighs 13 tons. Nobody knows exactly whom Big Ben is named after but common theories include Sir Benjamin Hall (who oversaw the installation of the bell) or English Heavyweight Boxing Champion Benjamin Count.
Who built it? Charles Barry designed Westminster Palace, however, Augustus Pugin created the clock tower. Pugin fell into madness and died in 1852 and Big Ben was the last building he would ever de-sign. The clock itself was designed by Beckett Denison.

ICONIC BUILDING CHALLENGE #4– EIFFEL TOWER Towering high above Paris, the Eiffel Tower was built between 1887 and 1889 and acted as the entrance arch for the Exposition Universelle, which marked the centennial of the French Revolution. The tower was only supposed to stand for 20 years but it was a valuable commu-nication tool and remained as an unmistakable element of the Paris skyline (especially as build-ings in the city cannot surpass seven stories). During the German occupation of Paris during World War II, the lift cables were cut forcing German soldiers to climb the stairs to the top to hoist the swastika. Within hours of the Liberation of Paris, the lifts were back in working order.
Who built it? The Eiffel tower was designed by engineer Gustave Eiffel who had originally submitted the de-sign to Barcelona for the Universal Exposition in 1888 but they refused. When it was built, he engraved the names of 72 French scientists, engineers and other notable Frenchmen.

ICONIC BUILDING CHALLENGE #5– TAJ MAHAL The crowning jewel of India, the Taj Mahal is a testament to one man’s love for his wife. It looks like a palace, but it was actually built as a tomb for the Emperor’s favorite wife. Con-struction began one year after her death in 1632 and the mausoleum was completed in 1648 with the surrounding buildings and gardens taking another five years to complete. The con-struction took 20,000 workers and craftsmen that were recruited from all across northern In-dia. Soon after the Taj Mahal was completed, the Emperor was deposed by his son Aurungzeb and put under house arrest. When the Emperor died in 1658, he was buried beside his wife in-side the Taj Mahal. During world War II the Indian government erected scaffolding around the Taj to mislead German and Japanese bomber pilots. Today the Taj Mahal is under a different threat: acid rain and pollution from the Mathura Oil Refinery has begun to turn its white mar-ble yellow.
Who built it? The Taj Mahal was built by Mughal Emperor Shah Jahan when his third wife Mumtaz Mahal died while giving birth to their fourteenth child, Gauhara Begum. He exchanged a large palace in the center of Agra with Maharajah Jai Singh for the three acres of land where the Taj now sits.

ICONIC BUILDING CHALLENGE #6– EMPIRE STATE BUILDING Once the tallest building in the world, no film or television show set in New York is complete without including a shot of the grand Art Deco skyscraper. Originally the site of the Waldorf-Astoria, construction of the Empire State Building began on St Patrick’s Day 1930. 410 days later construction was finished and it won the title of world’s tallest building, surpassing both 40 Wall Street and the Chrysler Building, which were being built around the same time. The opening of the building coincided with the Great Depression so it sat almost empty for the next 20 years. This wasn’t the only challenge the building has had to face: there was a 1945 plane crash, shootings in 1997, and more than 30 suicides. Through it all the Empire State Building has endured as a timeless monument of New York City.
Who built it? The Empire State Building was designed by William F. Lamb, based on the designs for the Reyn-olds Building in Winston-Salem North Carolina and the Carew Tower in Cincinnati Ohio. Be-cause of this, the staff of the Empire State Building sends a Father’s Day card to the staff of the Reynolds Building every year.

ICONIC BUILDING CHALLENGE #7– SYDNEY OPERA HOUSE Rising out of the Sydney Harbour, the Sydney Opera House is not only the center of the arts scene in Australia but also stands out as a must see to anyone visiting the area. In the late 1940’s Eugene Goossens, the Director of the NSW State Conservatorium of Music lobbied for a new venue for large productions. In 1955 a design competition was held by NSW Premier Jo-seph Cahill, and by 1958 construction had begun. The winning design features several concrete shells and houses performance spaces like the concert hall, the opera theater, the drama thea-ter, the studio, the Utzon room, the forecourt as well as a recording studio, five restaurants, four souvenir shops and a guided tour operation.
Who built it? The winning designer was Jørn Utzon, an architect from Denmark. When Cahill insisted on radi-cal changes to the design, Utzon resigned mid-construction and the project was finished with-out him. In the 90s, the Sydney Opera House Trust reconciled with Utzon, naming him a design consultant for future work but he died in November of 2008.

ICONIC BUILDING CHALLENGE #8– THE BURJ AL ARAB In a city famous for its architecture, the Burj Al Arab defines the Dubai skyline. The newest building on a long list of architecture built on a grand scale, the Burj Al Arab was built in 1994 and is one of the most luxurious hotels in the world. Perched on a man-made island in the Per-sian Gulf, it was built to mimic the sail of a dhow. The hotel features a 590-foot tall atrium, a large seawater aquarium, two restaurants (one of which was voted in the top 10 restaurants in the world by Conde Nast) and 202 luxuriously appointed suites.
Who built it? The Burj Al Arab was designed by Tom Wright and built by Atkins for Jumeirah Hotels and Re-sorts. It is currently the second largest hotel in the world.

ICONIC BUILDING CHALLENGE #9– THE LOUVRE One of the most easily recognizable museums in the world, the Louvre’s Palace and the recent-ly added glass pyramid are as beautiful to those who visit as the priceless works of art that it houses. But it wasn’t always a museum, it was originally built in the 12th century as a museum but in the 14th century it was converted into a royal residence. In 1750 Louis XV turned it back into a royal museum to house parts of the royal collection. During the French Revolution it underwent another transformation, this time from royal to public museum. Throughout the years it has been added to by Napoleon I and restored by Louis XVIII and Charles X. Today the Louvre holds 380,000 pieces; 35,000 of which are on display, including such important works as The Mona Lisa and The Venus de Milo.
Who built it? Philip II built the Louvre Palace as a fortress somewhere between 1190 and 1202, although most of the original structure has been destroyed. The Salle Basse (Lower Hall) is all that re-mains of the Medieval Louvre.

ICONIC BUILDING CHALLENGE #10– HAGIA SOPHIA Built on the site of a 4th century church, of which nothing remains, the Hagia Sophia has been a focal point in Istanbul (formerly Constantinople) ever since. The great church is now a museum but it wasn’t always so: for centuries it served as a pillar of the Greek Orthodox Church and then as an Islamic Mosque. The second church was destroyed by a fire during the Nika Riots in 532, although remnants of it can still be seen today. The Hagia Sophia that can be seen today was built between 532 and 537 and is one of the greatest surviving examples of Byzantine ar-chitecture. The biggest draw to the ancient church is the impressive 102 foot diameter dome which reaches 182 feet into the sky. Other stunning characteristics of the Hagia Sophia are the countless mosaics, the Loge of the Empress, the Marble Door, the Sultan’s Lodge, Mahmut I’s Library and the Marble Jars.
Who built it? The first church was built on the spot where a pagan temple had stood, by Emperor Constan-tine himself in 360. In 405 the second church was built by Constantine’s son, Theodosius II. The third and final Hagia Sophia was built by Justinian in 532. In 1453 Sultan Mehmet II con-quered Constantinople and turned it into a mosque, and subsequent sultans have made various additions since then.

TABLE OF CONTENTS
WEEK 3 Energy
Component Activity
Rec.
Age
Level
Supplies
Arts Windmills 5-6
Paper cups, markers/crayons, paper, straight pins
Clay Sun 7-11 Modeling clay, paint or markers
Global Learning & Inclusion
World Energy Discussion
All Information
21st-Century
Skills
Rainbow Salt Circuit 8-11 Salt, glue, paperclips, food coloring, paper, LED bulbs, batter packs, AA batteries, alligator clip wires
Roller coaster sculpture
5-6 Construction paper, glue/tape, markers/crayons, scissors
Youth Choice
Charging up Dessert All Balloons, jell-o powder, sugar, salt, paper plates
Energy Board Games 8-11 Cardstock/poster board, markers/crayons
Capture the Treasure
All Tall cones, small balls, gator balls, whistle
Health & Wellness
(Physical
Activity)
Throw for Distance 5-7 CATCH game, bean bags
Team Relay 8-11 Jump ropes, basketballs, volleyballs, poly spots
Musical Hoops All Hula hoops, cones, music
Dribble Tag 8-11 Basketball or kickball, cones, scarves
Sunny Day All Cones, piece of equipment per person

September Week 3: Energy
Windmills
INSTRUCTIONS
1. Have this kids first decorate the cup and made the foundation of their windmill. 2. Once they have it decorate they can take some pieces of paper and cut the blades for the wind mill. Help them take a straight pin and attached the blades
ABOUT WINDMILLS A windmill is a mill that converts the energy of wind into rotational ener-gy by means of vanes called sails or blades. Centuries ago, windmills usu-ally were used to mill grain (gristmills), pump water (wind pumps), or both. The majority of modern windmills take the form of wind tur-bines used to generate electricity, or wind pumps used to pump water, either for land drainage or to ex-tract groundwater.
Clay Suns
Materials Needed:
Modeling clay Markers/paint
INSTRUCTIONS
1. Give each child a ball of clay 2. Have them separate a some to make the rays and have them start
making the main circle with the rest. 3. Then they add some wavy rays with the remaining clay as well as facial features if they desire 4. Once this is done they can either let the clay dry and decorate lat-er or immediately begin painting/coloring
ABOUT SOLAR POWER Solar panels work by absorbing sunlight with photovoltaic cells, generating direct current (DC) energy and then converting it to usable alternating cur-rent (AC) energy with the help of inverter technology. AC energy then flows through the home's electrical panel and is distributed accordingly.
Materials Needed:
Paper cups markers/crayons Paper straight pins

September Week 3: Energy
World Energy
INSTRUCTIONS The purpose of this is to have a discussion about what the different sources of energy are and how dif-ferent parts of the world utilize those resources. It is important to look at the information ahead of time and tailor the discussion to fit the age group.
Recommended: if you have a white board use that to help guide the talk. Have the kids tell you about what energy sources they know about. Have them try to explain the resources in their own words to guide the discussion. Use the information below to fill in the blanks and then discuss any that they didn’t know about.
COAL
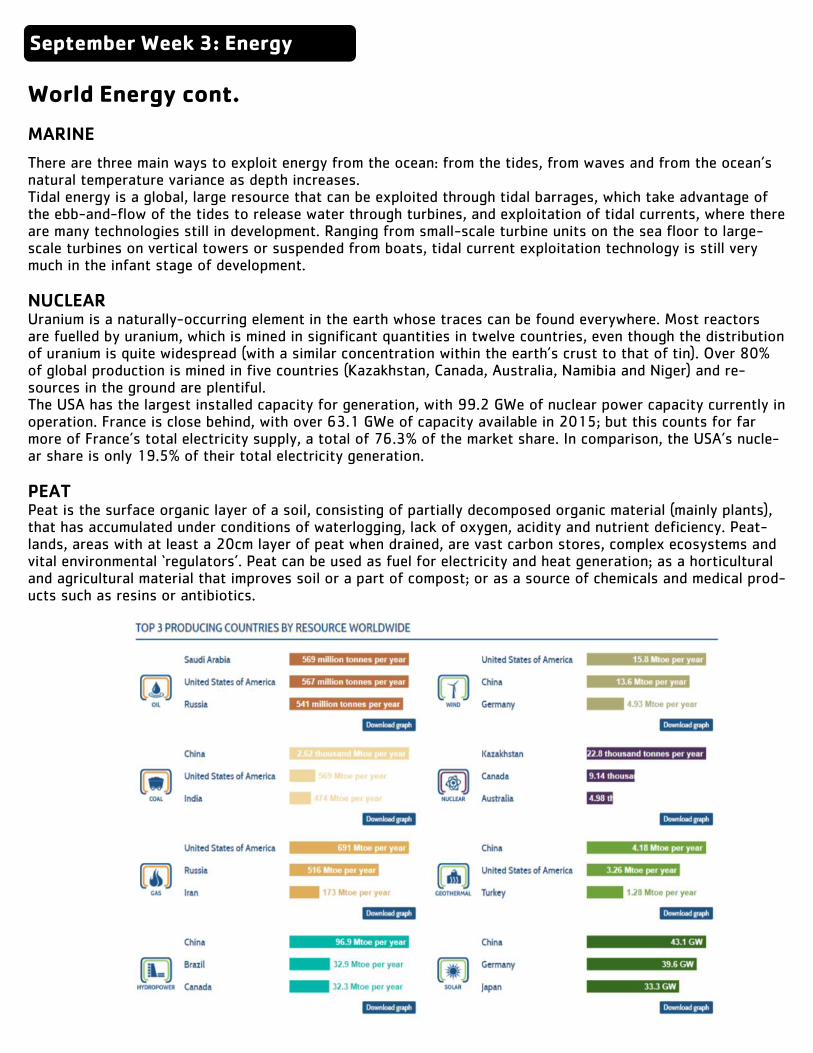
Coal is the most abundant of fossil fuels. The world currently consumes over 7,800 million tonnes of coal which is used by a variety of sectors including power generation, iron and steel production, cement manufac-turing and as a liquid fuel. The majority of coal is either utilized in power generation that utilizes steam coal or lignite, or iron and steel production that uses coking coal. The role of coal in power generation is set to continue. Coal currently fuels 40% of the world’s electricity and is forecast to continue to supply a strategic share over the next three decades. The largest coal producing coun-tries are not confined to one region. The top five producers are China, the US, India, Indonesia, Australia and South Africa.
OIL Crude oil consists of hydrocarbons which have formed from sediments rich in organic matter. ‘Conventional’ oil and gas reservoirs are created when hydrocarbons migrate from the source rock into permeable reservoirs, where they become trapped by an overlying layer of impermeable rock. Many of the hydrocarbons however, are not expelled and remain behind in the source rock. Oil and gas extracted directly from tight source rocks are generally termed ‘unconventional’. The largest five top liquids producers increased their share of total world production (to almost 49%), and the United States remained the world’s top producer (567 Mt). The second top producer was Saudi Arabia (568.5 Mt), followed by the Russian Federation (540.7 Mt), Canada (215.5 Mt) and the People’s Republic of China (214.6 Mt).
GAS
Natural gas is a mixture of hydrocarbons, and often contains a small amount of non-hydrocarbons. It can exist either as a gas or in solution with crude oil, where producers can then separate the two in the production pro-cess. Natural gas is the cleanest and most efficient of the fossil fuels. It is the only fossil fuel whose share of the primary energy mix is expected to grow, as it has the potential to play an important role in the world’s transi-tion to a cleaner, more affordable and secure energy future.
HYDROPOWER
Hydropower is the leading renewable source for electricity generation globally, supplying 71% of all renewable electricity. Reaching 1,064 GW of installed capacity in 2016, it generated 16.4% of the world’s electricity from all sources.
Hydropower is the most flexible and consistent of the renewable energy resources, capable of meeting base load electricity requirements as well as, with pumped storage technology, meeting peak and unexpected de-mand due to shortages or the use of intermittent power sources. There are many opportunities for hydropower development throughout the world and although there is no clear consensus, estimates indicate the availability of approximately 10,000 TWh/year of unutilised hydropower potential worldwide. At the end of 2015, the leading hydropower generating countries were China, the US, Brazil, Canada, India and Russia.

September Week 3: Energy
World Energy cont.
BIOMASS
Bioenergy is energy from organic matter (biomass), i.e. all materials of biological origin that are not embedded in geological formations (fossilised). Biomass can be used in its original form as fuel, or be refined to different kinds of solid, gaseous or liquid biofuels. Biomass fuels can be produced from agricultural, forestry and munici-pal wastes and residues, as well as from crops such as sugar, grain, and vegetable oil. Crops grown for use as biomass fuel can be grown on degraded, surplus and marginal agricultural land, and algae could, in the future, be exploited as a marine source of biomass fuel. These fuels can be used in all sectors of society, for produc-tion of electricity, for transport, for heating and cooling, and for industrial processes. Currently, the major use of biomass is in the form of heat in rural and developing countries. About 90% of all the bioenergy consumption is in the traditional use. The primary energy supply of forest biomass used world-wide is estimated at about 56 EJ, which means woody biomass is the source of over 10% of all energy supplied annually. Overall, woody biomass provides about 90% of the primary energy annually sourced from all forms of biomass.
SOLAR
Solar energy has a big part to play in reducing future carbon emissions and ensuring a sustainable energy fu-ture. It can be used for heating, cooling, lighting, electrical power, transportation and even environmental clean-up. The global average solar radiation, per m2 and per year, can produce the same amount of energy as a bar-rel of oil, 200 kg of coal, or 140 m3 of natural gas. Global installed capacity for solar-powered electricity has seen an exponential growth, reaching around 227 GWe at the end of 2015. It produced 1% of all electricity used globally. Germany has led PV capacity installa-tions over last decade and continues as a leader followed by China, Japan, Italy and the United States. Concen-trated Solar Power (CSP) remains with very limited capacity at 4 GW today.
GEOTHERMAL
Geothermal energy comes from the natural heat of the Earth, and requires a ‘carrier’ (hot water or steam) at a shallow depth that can be drilled and pumped to generate heat or electricity (through a steam-driven turbine). The Earth’s interior supplies an enormous quantity of heat to the crust. Various studies suggest the electrical potential of geothermal resources is 10 to 100 times the current generation. Direct use potential has similar multiples to current use. While estimating geothermal energy potential is difficult, the industry consensus is that growth will not be resource constrained over the next half century. At the end of 2015, global installed geothermal power capacity reached 13.2 GW. The countries with the larg-est installed capacity were the US, Philippines, Indonesia, Mexico and New Zealand.
WIND Wind energy is available virtually everywhere on Earth, but there are wide variations in wind strength and con-sistency. One estimate suggests that there is 1 million GW of wind energy available from the total land cover-age of the Earth, and if only 1% of this land was utilised at achievable efficiencies this would meet global elec-tricity demand. Although most wind energy is currently obtained onshore, offshore wind farms are becoming more popular as a larger resource area with low environmental impact (particularly considering noise and visual pollution). The wind power market can be divided into large wind onshore (422 GW, around 210,000 machines), small wind onshore (less than 1 GW installed end 2015, more than 800,000 machines), and offshore (around 12 GW installed end 2015, around 4,000 machines). Large onshore and offshore wind turbines are typically arranged in a wind park. The largest wind parks exceed 1 GW in size, such as Gansu Wind Farm in China, Muppandal Wind Park in India or Alta Wind Energy Center in USA.
September Week 3: Energy
World Energy cont.
MARINE
There are three main ways to exploit energy from the ocean: from the tides, from waves and from the ocean’s natural temperature variance as depth increases. Tidal energy is a global, large resource that can be exploited through tidal barrages, which take advantage of the ebb-and-flow of the tides to release water through turbines, and exploitation of tidal currents, where there are many technologies still in development. Ranging from small-scale turbine units on the sea floor to large-scale turbines on vertical towers or suspended from boats, tidal current exploitation technology is still very much in the infant stage of development.
NUCLEAR Uranium is a naturally-occurring element in the earth whose traces can be found everywhere. Most reactors are fuelled by uranium, which is mined in significant quantities in twelve countries, even though the distribution of uranium is quite widespread (with a similar concentration within the earth’s crust to that of tin). Over 80% of global production is mined in five countries (Kazakhstan, Canada, Australia, Namibia and Niger) and re-sources in the ground are plentiful. The USA has the largest installed capacity for generation, with 99.2 GWe of nuclear power capacity currently in operation. France is close behind, with over 63.1 GWe of capacity available in 2015; but this counts for far more of France’s total electricity supply, a total of 76.3% of the market share. In comparison, the USA’s nucle-ar share is only 19.5% of their total electricity generation.
PEAT Peat is the surface organic layer of a soil, consisting of partially decomposed organic material (mainly plants), that has accumulated under conditions of waterlogging, lack of oxygen, acidity and nutrient deficiency. Peat-lands, areas with at least a 20cm layer of peat when drained, are vast carbon stores, complex ecosystems and vital environmental ‘regulators’. Peat can be used as fuel for electricity and heat generation; as a horticultural and agricultural material that improves soil or a part of compost; or as a source of chemicals and medical prod-ucts such as resins or antibiotics.
September Week 3: Energy
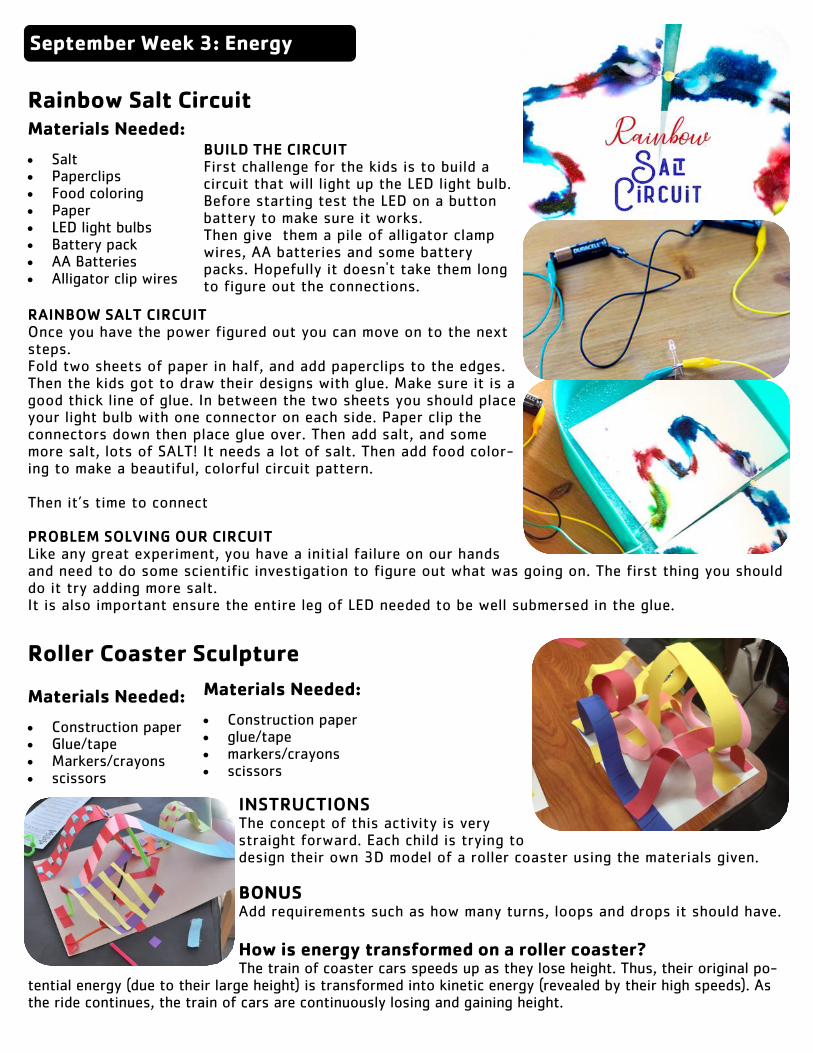
Rainbow Salt Circuit
BUILD THE CIRCUIT First challenge for the kids is to build a circuit that will light up the LED light bulb. Before starting test the LED on a button battery to make sure it works. Then give them a pile of alligator clamp wires, AA batteries and some battery packs. Hopefully it doesn't take them long to figure out the connections.
RAINBOW SALT CIRCUIT Once you have the power figured out you can move on to the next steps. Fold two sheets of paper in half, and add paperclips to the edges. Then the kids got to draw their designs with glue. Make sure it is a good thick line of glue. In between the two sheets you should place your light bulb with one connector on each side. Paper clip the connectors down then place glue over. Then add salt, and some more salt, lots of SALT! It needs a lot of salt. Then add food color-ing to make a beautiful, colorful circuit pattern. Then it’s time to connect PROBLEM SOLVING OUR CIRCUIT Like any great experiment, you have a initial failure on our hands and need to do some scientific investigation to figure out what was going on. The first thing you should do it try adding more salt. It is also important ensure the entire leg of LED needed to be well submersed in the glue.
Roller Coaster Sculpture
Materials Needed:
Construction paper glue/tape markers/crayons scissors
INSTRUCTIONS The concept of this activity is very straight forward. Each child is trying to design their own 3D model of a roller coaster using the materials given.
BONUS Add requirements such as how many turns, loops and drops it should have.
How is energy transformed on a roller coaster? The train of coaster cars speeds up as they lose height. Thus, their original po-
tential energy (due to their large height) is transformed into kinetic energy (revealed by their high speeds). As the ride continues, the train of cars are continuously losing and gaining height.
Materials Needed:
Salt Paperclips Food coloring Paper LED light bulbs Battery pack AA Batteries Alligator clip wires
Materials Needed:
Construction paper Glue/tape Markers/crayons scissors

September Week 3: Energy
Charging up Dessert
INSTRUCTIONS 1. Begin this experi-ment by having the children put their Jell-O powder on their plates. 2. The kids should rub their balloons across their hair for several seconds and then place the balloon about
an inch over the powder. The Jell-O should stretch up towards the charged surface of the balloons! 3. Have your students lift the balloons slowly away to see how far the Jell-O will rise! Continue the experiment
by having the kids repeat the process with different substances, such as sugar and salt to see which are attracted to the balloon.
Energy Board Games
Materials Needed: Cardstock/poster board Markers/crayons
INSTRUCTIONS The children should be given an energy related quest, jour-ney or scenario to develop as the premise for their game. For example, players could be travelling along a path starting at a dirty, polluted city called Smog Ville and ending at a clean, healthy city called Greenville. On the path players encounter spaces with environmental do’s and don’ts.
It should be a game where players can roll dice to progress down a path around the board. (Note: a game where cards are drawn generates more paper use).
Players can use recycled materials as playing pieces such as caps from milk jugs or old buttons.
Students will draw a path of spaces large enough to hold playing pieces. To keep the game design and play manageable teacher should determine approximately how many spaces the game should contain.
Students should identify the start of the path and mark it and end of path and mark it. For example, the start could be surrounded by the dirty city of Smogville and the end can be in the pristine city of Greenville. As players move down the path making green choices, the environment on the board can be getting increas-ingly clean.
Spaces along the path should contain positive and negative prompts relating to energy use and the theme of the game:
positive prompt samples:
Shut off lights when leaving room. Move ahead 2 spaces.
Remind mom to turn down thermostat at bedtime. Take an extra turn.
Use rechargeable batteries. Go ahead 1 space.
Negative prompt samples:
Leave television on when leaving room. Lose next turn.
Don’t shut off water while brushing your teeth. Go back 2 spaces.
Keep refrigerator door open for a long time. Go back 3 spaces.
Students will make a rough draft of game and test out the design by playing with classmates to determine if the spacing works.
16. Make final draft of game.
Materials Needed:
Balloons Jell-O powder Sugar Salt Paper plates

September Week 3: Energy
Capture the Treasure
Materials Needed: Tall cones Small balls Gator balls Whistle (or something that makes sounds)
INSTRUCTIONS There are two teams: one defends the treasure while the other tries to win it. As few as two kids may play this game. The de-fending team has a playground ball which it uses to try and hit the other team. The other team tries to get all the small balls off of the cones without getting hit to win the treasure. Each time they are hit with the playground ball, one small ball must be replaced on a cone.
Set up cones around the room, each with a small ball in a contrasting color placed on top.
Defending team has playground balls for throwing.
Capturing team moves around the space trying to remove all the small balls from the cones without getting hit by a defensive team ball. When all small balls are off the cones, the capturing team gets the treasure.
Variations Use cones of differing sizes to challenge students with some vision or more mobility skills. Hint: To prevent the throwing of the small balls, tell students to take the small balls and place them on the floor away from the playing area.
September Week 3: Energy

September Week 3: Energy

September Week 3: Energy

September Week 3: Energy
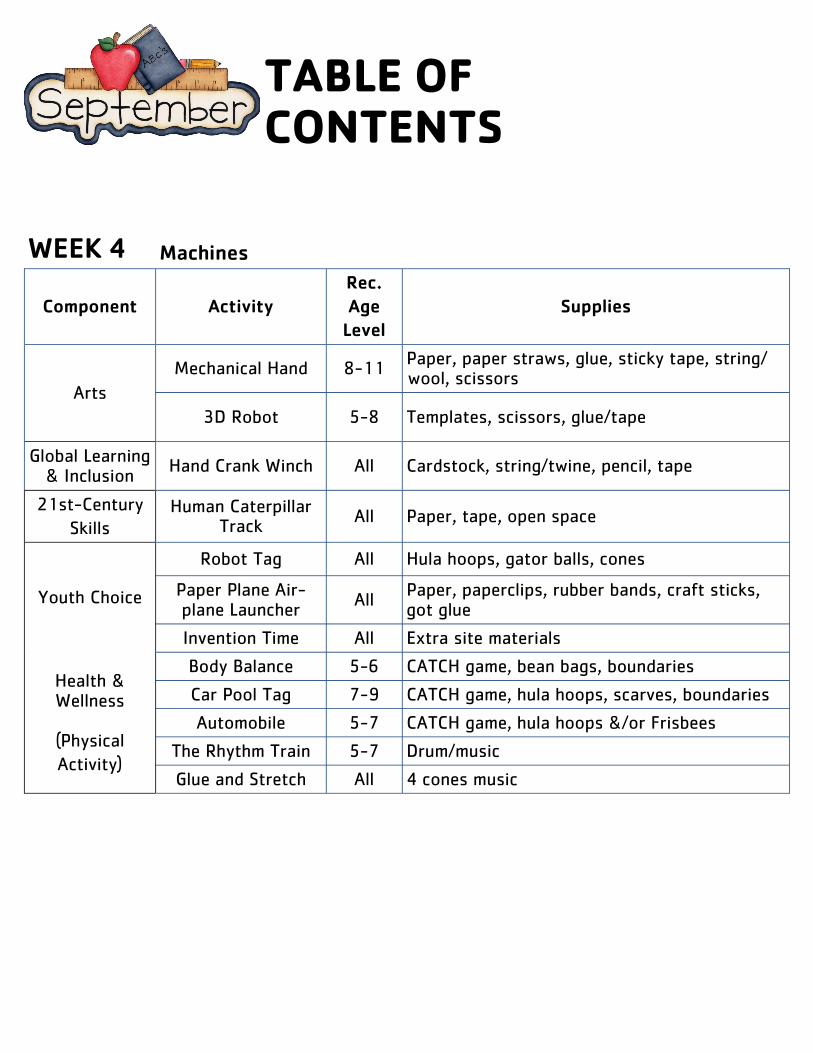
TABLE OF CONTENTS
WEEK 4 Machines
Component Activity
Rec.
Age
Level
Supplies
Arts
Mechanical Hand 8-11 Paper, paper straws, glue, sticky tape, string/wool, scissors
3D Robot 5-8 Templates, scissors, glue/tape
Global Learning & Inclusion
Hand Crank Winch All Cardstock, string/twine, pencil, tape
21st-Century
Skills
Human Caterpillar Track
All Paper, tape, open space
Youth Choice
Robot Tag All Hula hoops, gator balls, cones
Paper Plane Air-plane Launcher
All Paper, paperclips, rubber bands, craft sticks, got glue
Invention Time All Extra site materials
Health & Wellness
(Physical
Activity)
Body Balance 5-6 CATCH game, bean bags, boundaries
Car Pool Tag 7-9 CATCH game, hula hoops, scarves, boundaries
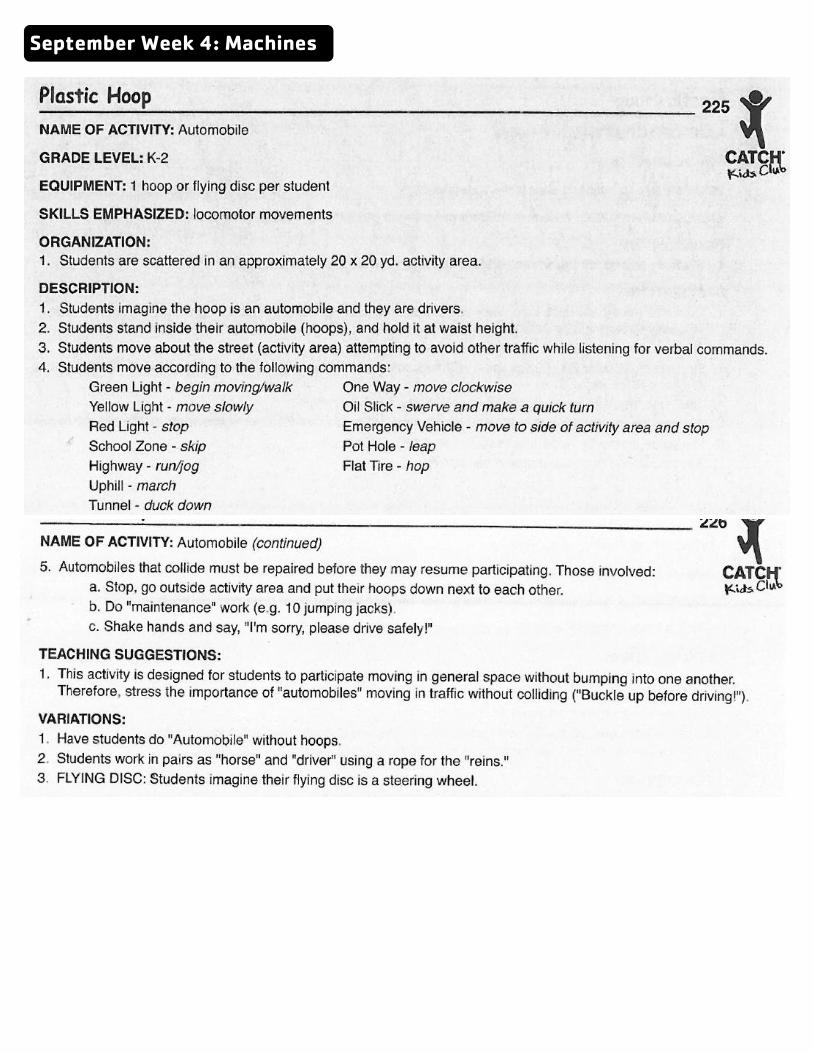
Automobile 5-7 CATCH game, hula hoops &/or Frisbees
The Rhythm Train 5-7 Drum/music
Glue and Stretch All 4 cones music
September Week 4: Machines
Hand Crank Winch
Instructions:
Get your piece of paper and draw round a hand
and cut out the shape
You will notice when you curl your own hand
into a fist that you have three bends to each finger,
they are your phalanges bones. Then end of the
last bend (your knuckles) you will notice is a little way further down your
hand than where your fingers appear to end. Mark this point with faint
lines on the copy of the hand.
Take a straw and put one end at the line you’ve made on your hand. Begin
drawing marks on the straws to represent each bone of the five digits, 4 finger and
a thumb.
Where each of the joint in the phalanges meet carefully cut of use a pencil to make
a diamond shaped hole like in the picture to the right. DO this for all four finger
and for the thumb you do one less.
Now you are ready to add your metacarpal bones (blue in picture), these are
the bones that run though your hand. Measure each straw, like in the picture,
from the bottom of your proximal phalanges to the wrist on your paper hand,
marking each off so you know where to cut.
Cut another triangle at the top of the metacarpal straw bone so they make a
diamond when fixed under the phalanges.
Carefully glue all the pieces down so the diamonds and triangles are all face
upwards. Wait for the glue to dry.
Thread your string up through a metacarpal and then up through the phalanges above it. Pull the string
over and round the back of the hand then stick it to the back of the finger with a piece of tape
To work your mechanical hand pull the string strands. Can you make a fist shape?
3D Robot
Materials Needed:
Template Scissors Tape/glue
Instructions:
Pass out copies of the template for the kids
Have them cut out the shapes along the black dotted lines.
Fold along all of the blue dotted lines and carefully glue all of the
tabs into place forming the robots body.
Glue/tape on body parts
Enjoy your new paper craft robot!
Materials Needed:
Paper, paper straws Glue Sticky tape String scissors

September Week 4: Machines
Hand Crank Winch
Materials Needed:
Cardstock String/twine
Pencil tape
Instructions:
1.Make two tubes out of cardstock and tape them to a solid surface. Use your pencil as a reference tool for how far apart they should be placed from each other.
2.Make 2 cuts at the top of each cardboard tube just big enough of the pencil to rest and be able to spin.
3.Put your spool on the straw or pencil. Now if you don’t have a spool, you can simply secure your rope to the pencil with a piece of tape. You still have a hand crank winch! If you do use a spool make sure to secure it with tape to the straw or pencil. What if you don’t secure it? The spool just spins around the straw and their is no ending up of string! If you are using a straw, you can even thread an-other straw into it and use the bendy part to make a handle! Secure your rope or string to spool with a piece of tape {or to straw directly if you don’t have a spool} and tie your basket or object to the bottom of the string. Go ahead and test out your hand crank winch simple ma-chine. What can you pull up with it? Do you think it makes lifting heavy things easier. Another great idea is test out a pulley simple machine! A simple machine such as this winch is used to raise and lower weight. An example of a winch that is pretty easy to get a picture of is a bucket in a well!
Human Caterpillar Track
Instructions:
You will first need to determine how many
groups you would like to break up into. And them
you will need to make a loop of paper that each
group can stand inside with part of the loop un-
derneath them, and wrap up over and back down under them. Use the pic-
ture as a visual aide.
The purpose of this activity is to have the kids recreate how the a cat-
erpillar track often used for tanks and construction equipment together. Working together standing inside
the loop they need to move from one side of the open space to the other.
Rules:
They cannot step on the ground
outside the paper.
They cannot rip the paper
They cannot fall down.
If any of the rules are broken they
must stop, step out of the paper.
Take it back to the beginning and
start again.
Materials Needed:
Paper Duct tape
Open space
How do caterpillar tracks work?
Caterpillar tracks work on the same
principle as a conveyer belt. The engine
rotates one or more steel sprockets,
which move a track made up of hun-
dreds of metal links. ... Tracked vehicles
can move easily over rough terrain be-
cause the track makes contact with a
wide area of the ground.

September Week 4: Machines
Robot Tag
Instructions: In this game, there are robots, and then there are taggers. The robots try their best to get away from the taggers, because if tagged then they must head to the repair shop for a fixing! Safe zones are available for the robots to recharge their energy when needed – but only for 10 seconds at a time.
1. Most of the players are robots who start spread out around the gym. 2. Choose a few players to be the ‘taggers. They will each get a gator ball to tag with. 3. Place 2 or 3 hula-hoops in the middle circle. Those are the battery charging areas (safe zones) for the ro-bots to use for 10 second breaks – but only for 10 seconds, then they must leave. 4. Using cones, create a rectangular area on the side. This is the ‘repair shop’ where robots must go once they are tagged. When in the repair shop, players must count out loud to 30 before re-entering the game. On the signal, the tag game is on! After awhile switch up taggers and play a new round.
Paper Airplane & Launcher
Paper Airplane Instructions: Take a piece of paper and fold the long sides together (hot dog style), creasing center Open it back up and bring in the top corners to the center fold. Crease. Fold over the top triangle and crease right where the flaps ended. Bring
the sides in to the center about one inch about the point. Fold the inverted triangle, so it’s top is pointing up. Fold it backwards on the cen-ter crease, so the folds are on the outside.
Fold each wing back, creasing them at the point where the paper goes from straight to angled.
To use the plane with a launcher, you need a paper clip. Pull the long outside wire on the paper clip, so it forms a 90-
degree angle Poke the point of the paperclip, through the plane about one inch
back from the nose, along the center crease Add a dab of hot glue
Launcher Instructions: Grab two rubber bands, thread on through the other,
and pull on end through the loop that is created to attach them together.
Now grab a wooden craft stick and lay it over one end of the rubber band strands. Pull the other end through the loop that’s created.
Hold one end of the wooden craft stick in your left hand. Holding the plan in your right hand, hook the paperclip on the plane through the end of the rubber band strand hanging off the craft stick. Pull back until the rubber band is stretched. Let go to launch the plane.
Materials Needed:
Hula hoops
Gator balls
cones
Materials Needed:
Paper Paperclip
Rubber bands
Craft sticks
Hot glue
September Week 4: Machines
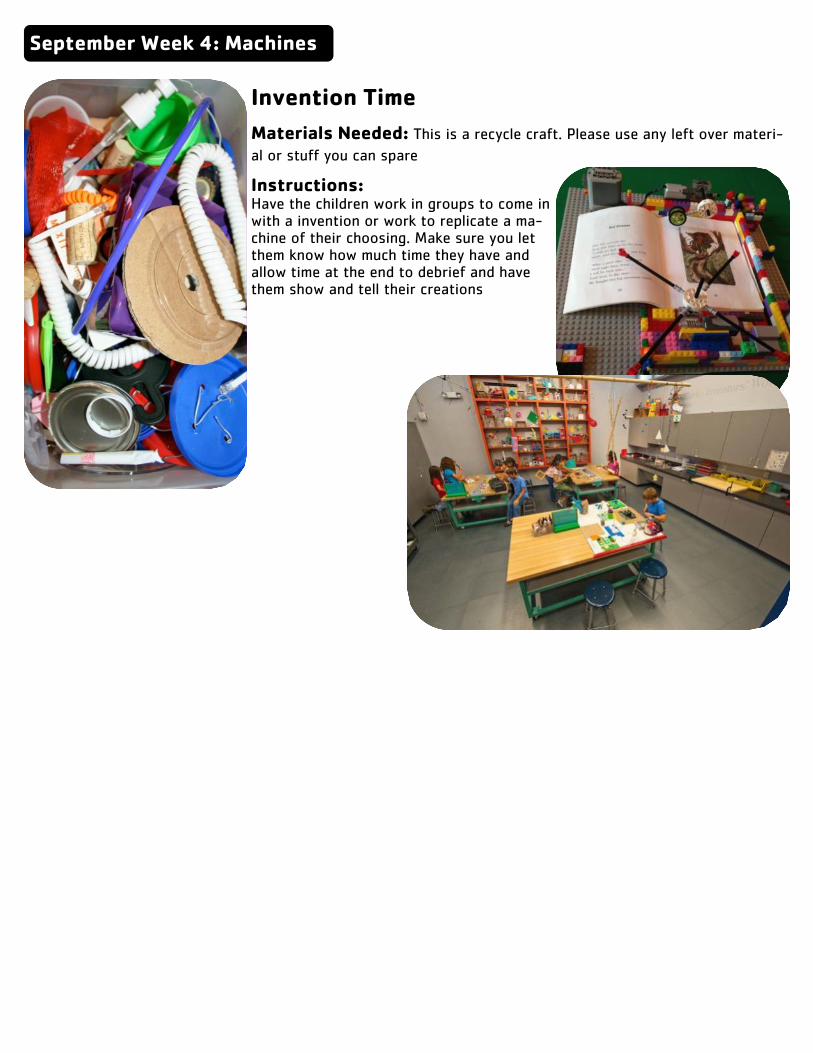
Invention Time
Materials Needed: This is a recycle craft. Please use any left over materi-
al or stuff you can spare
Instructions: Have the children work in groups to come in with a invention or work to replicate a ma-chine of their choosing. Make sure you let them know how much time they have and allow time at the end to debrief and have them show and tell their creations

September Week 4: Machines
September Week 4: Machines

September Week 4: Machines


