xilinx ug688 smartxplorer for command line users · ug688 september 21, 2010 smartxplorer for...
TRANSCRIPT
Tutorial [optional]
UG688 September 21, 2010 [optional]
SmartXplorer for Command Line Users
Tutorial (ISE 12.3)
UG688 September 21, 2010

SmartXplorer for Command Line Users www.xilinx.com UG688 September 21, 2010
Xilinx is disclosing this user guide, manual, release note, and/or specification (the "Documentation") to you solely for use in the development of designs to operate with Xilinx hardware devices. You may not reproduce, distribute, republish, download, display, post, or transmit the Documentation in any form or by any means including, but not limited to, electronic, mechanical, photocopying, recording, or otherwise, without the prior written consent of Xilinx. Xilinx expressly disclaims any liability arising out of your use of the Documentation. Xilinx reserves the right, at its sole discretion, to change the Documentation without notice at any time. Xilinx assumes no obligation to correct any errors contained in the Documentation, or to advise you of any corrections or updates. Xilinx expressly disclaims any liability in connection with technical support or assistance that may be provided to you in connection with the Information.
THE DOCUMENTATION IS DISCLOSED TO YOU “AS-IS” WITH NO WARRANTY OF ANY KIND. XILINX MAKES NO OTHER WARRANTIES, WHETHER EXPRESS, IMPLIED, OR STATUTORY, REGARDING THE DOCUMENTATION, INCLUDING ANY WARRANTIES OF MERCHANTABILITY, FITNESS FOR A PARTICULAR PURPOSE, OR NONINFRINGEMENT OF THIRD-PARTY RIGHTS. IN NO EVENT WILL XILINX BE LIABLE FOR ANY CONSEQUENTIAL, INDIRECT, EXEMPLARY, SPECIAL, OR INCIDENTAL DAMAGES, INCLUDING ANY LOSS OF DATA OR LOST PROFITS, ARISING FROM YOUR USE OF THE DOCUMENTATION.
© 2010 Xilinx, Inc. XILINX, the Xilinx logo, Virtex, Spartan, ISE, and other designated brands included herein are trademarks of Xilinx in the United States and other countries. All other trademarks are the property of their respective owners.
UG688 September 21, 2010 www.xilinx.com SmartXplorer for Command Line Users
Revision HistoryThe following table shows the revision history for this document.
Date Version Revision
6/12/09 1.0 Initial Xilinx release.
7/20/09 1.1 Updated for 11.2.
4/19/10 1.2 Updated for 12.1
9/7/2010 1.3 Updated for 12.3

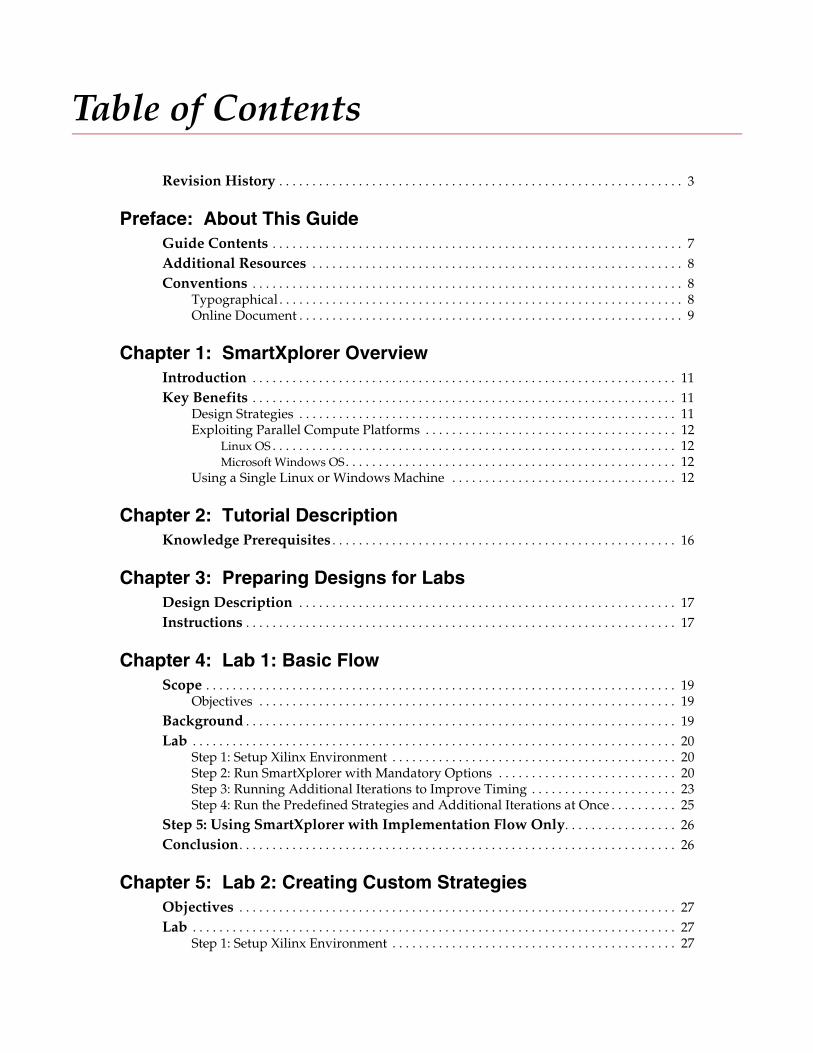
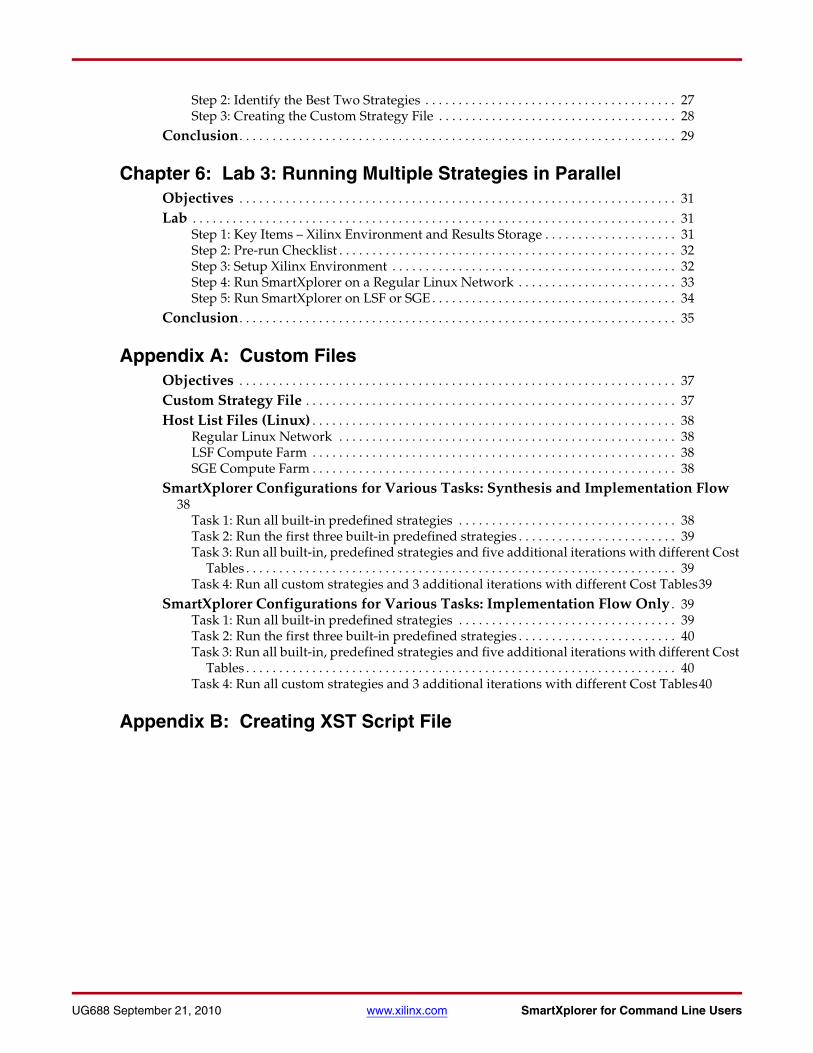
Table of Contents
Revision History . . . . . . . . . . . . . . . . . . . . . . . . . . . . . . . . . . . . . . . . . . . . . . . . . . . . . . . . . . . . . 3
Preface: About This GuideGuide Contents . . . . . . . . . . . . . . . . . . . . . . . . . . . . . . . . . . . . . . . . . . . . . . . . . . . . . . . . . . . . . . 7Additional Resources . . . . . . . . . . . . . . . . . . . . . . . . . . . . . . . . . . . . . . . . . . . . . . . . . . . . . . . . 8Conventions . . . . . . . . . . . . . . . . . . . . . . . . . . . . . . . . . . . . . . . . . . . . . . . . . . . . . . . . . . . . . . . . . 8
Typographical . . . . . . . . . . . . . . . . . . . . . . . . . . . . . . . . . . . . . . . . . . . . . . . . . . . . . . . . . . . . . 8Online Document . . . . . . . . . . . . . . . . . . . . . . . . . . . . . . . . . . . . . . . . . . . . . . . . . . . . . . . . . . 9
Chapter 1: SmartXplorer OverviewIntroduction . . . . . . . . . . . . . . . . . . . . . . . . . . . . . . . . . . . . . . . . . . . . . . . . . . . . . . . . . . . . . . . . 11Key Benefits . . . . . . . . . . . . . . . . . . . . . . . . . . . . . . . . . . . . . . . . . . . . . . . . . . . . . . . . . . . . . . . . 11
Design Strategies . . . . . . . . . . . . . . . . . . . . . . . . . . . . . . . . . . . . . . . . . . . . . . . . . . . . . . . . . 11Exploiting Parallel Compute Platforms . . . . . . . . . . . . . . . . . . . . . . . . . . . . . . . . . . . . . . 12
Linux OS . . . . . . . . . . . . . . . . . . . . . . . . . . . . . . . . . . . . . . . . . . . . . . . . . . . . . . . . . . . . . 12Microsoft Windows OS. . . . . . . . . . . . . . . . . . . . . . . . . . . . . . . . . . . . . . . . . . . . . . . . . . 12
Using a Single Linux or Windows Machine . . . . . . . . . . . . . . . . . . . . . . . . . . . . . . . . . . 12
Chapter 2: Tutorial DescriptionKnowledge Prerequisites . . . . . . . . . . . . . . . . . . . . . . . . . . . . . . . . . . . . . . . . . . . . . . . . . . . . 16
Chapter 3: Preparing Designs for LabsDesign Description . . . . . . . . . . . . . . . . . . . . . . . . . . . . . . . . . . . . . . . . . . . . . . . . . . . . . . . . . 17Instructions . . . . . . . . . . . . . . . . . . . . . . . . . . . . . . . . . . . . . . . . . . . . . . . . . . . . . . . . . . . . . . . . . 17
Chapter 4: Lab 1: Basic FlowScope . . . . . . . . . . . . . . . . . . . . . . . . . . . . . . . . . . . . . . . . . . . . . . . . . . . . . . . . . . . . . . . . . . . . . . . 19
Objectives . . . . . . . . . . . . . . . . . . . . . . . . . . . . . . . . . . . . . . . . . . . . . . . . . . . . . . . . . . . . . . . 19Background . . . . . . . . . . . . . . . . . . . . . . . . . . . . . . . . . . . . . . . . . . . . . . . . . . . . . . . . . . . . . . . . . 19Lab . . . . . . . . . . . . . . . . . . . . . . . . . . . . . . . . . . . . . . . . . . . . . . . . . . . . . . . . . . . . . . . . . . . . . . . . . 20
Step 1: Setup Xilinx Environment . . . . . . . . . . . . . . . . . . . . . . . . . . . . . . . . . . . . . . . . . . . 20Step 2: Run SmartXplorer with Mandatory Options . . . . . . . . . . . . . . . . . . . . . . . . . . . 20Step 3: Running Additional Iterations to Improve Timing . . . . . . . . . . . . . . . . . . . . . . 23Step 4: Run the Predefined Strategies and Additional Iterations at Once . . . . . . . . . . 25
Step 5: Using SmartXplorer with Implementation Flow Only. . . . . . . . . . . . . . . . . 26Conclusion. . . . . . . . . . . . . . . . . . . . . . . . . . . . . . . . . . . . . . . . . . . . . . . . . . . . . . . . . . . . . . . . . . 26
Chapter 5: Lab 2: Creating Custom StrategiesObjectives . . . . . . . . . . . . . . . . . . . . . . . . . . . . . . . . . . . . . . . . . . . . . . . . . . . . . . . . . . . . . . . . . . 27Lab . . . . . . . . . . . . . . . . . . . . . . . . . . . . . . . . . . . . . . . . . . . . . . . . . . . . . . . . . . . . . . . . . . . . . . . . . 27
Step 1: Setup Xilinx Environment . . . . . . . . . . . . . . . . . . . . . . . . . . . . . . . . . . . . . . . . . . . 27
UG688 September 21, 2010 www.xilinx.com SmartXplorer for Command Line Users
Step 2: Identify the Best Two Strategies . . . . . . . . . . . . . . . . . . . . . . . . . . . . . . . . . . . . . . 27Step 3: Creating the Custom Strategy File . . . . . . . . . . . . . . . . . . . . . . . . . . . . . . . . . . . . 28
Conclusion. . . . . . . . . . . . . . . . . . . . . . . . . . . . . . . . . . . . . . . . . . . . . . . . . . . . . . . . . . . . . . . . . . 29
Chapter 6: Lab 3: Running Multiple Strategies in ParallelObjectives . . . . . . . . . . . . . . . . . . . . . . . . . . . . . . . . . . . . . . . . . . . . . . . . . . . . . . . . . . . . . . . . . . 31Lab . . . . . . . . . . . . . . . . . . . . . . . . . . . . . . . . . . . . . . . . . . . . . . . . . . . . . . . . . . . . . . . . . . . . . . . . . 31
Step 1: Key Items – Xilinx Environment and Results Storage . . . . . . . . . . . . . . . . . . . . 31Step 2: Pre-run Checklist . . . . . . . . . . . . . . . . . . . . . . . . . . . . . . . . . . . . . . . . . . . . . . . . . . . 32Step 3: Setup Xilinx Environment . . . . . . . . . . . . . . . . . . . . . . . . . . . . . . . . . . . . . . . . . . . 32Step 4: Run SmartXplorer on a Regular Linux Network . . . . . . . . . . . . . . . . . . . . . . . . 33Step 5: Run SmartXplorer on LSF or SGE . . . . . . . . . . . . . . . . . . . . . . . . . . . . . . . . . . . . . 34
Conclusion. . . . . . . . . . . . . . . . . . . . . . . . . . . . . . . . . . . . . . . . . . . . . . . . . . . . . . . . . . . . . . . . . . 35
Appendix A: Custom FilesObjectives . . . . . . . . . . . . . . . . . . . . . . . . . . . . . . . . . . . . . . . . . . . . . . . . . . . . . . . . . . . . . . . . . . 37Custom Strategy File . . . . . . . . . . . . . . . . . . . . . . . . . . . . . . . . . . . . . . . . . . . . . . . . . . . . . . . . 37Host List Files (Linux) . . . . . . . . . . . . . . . . . . . . . . . . . . . . . . . . . . . . . . . . . . . . . . . . . . . . . . . 38
Regular Linux Network . . . . . . . . . . . . . . . . . . . . . . . . . . . . . . . . . . . . . . . . . . . . . . . . . . . 38LSF Compute Farm . . . . . . . . . . . . . . . . . . . . . . . . . . . . . . . . . . . . . . . . . . . . . . . . . . . . . . . 38SGE Compute Farm . . . . . . . . . . . . . . . . . . . . . . . . . . . . . . . . . . . . . . . . . . . . . . . . . . . . . . . 38
SmartXplorer Configurations for Various Tasks: Synthesis and Implementation Flow 38
Task 1: Run all built-in predefined strategies . . . . . . . . . . . . . . . . . . . . . . . . . . . . . . . . . 38Task 2: Run the first three built-in predefined strategies . . . . . . . . . . . . . . . . . . . . . . . . 39Task 3: Run all built-in, predefined strategies and five additional iterations with different Cost
Tables . . . . . . . . . . . . . . . . . . . . . . . . . . . . . . . . . . . . . . . . . . . . . . . . . . . . . . . . . . . . . . . . . 39Task 4: Run all custom strategies and 3 additional iterations with different Cost Tables39
SmartXplorer Configurations for Various Tasks: Implementation Flow Only . 39Task 1: Run all built-in predefined strategies . . . . . . . . . . . . . . . . . . . . . . . . . . . . . . . . . 39Task 2: Run the first three built-in predefined strategies . . . . . . . . . . . . . . . . . . . . . . . . 40Task 3: Run all built-in, predefined strategies and five additional iterations with different Cost
Tables . . . . . . . . . . . . . . . . . . . . . . . . . . . . . . . . . . . . . . . . . . . . . . . . . . . . . . . . . . . . . . . . . 40Task 4: Run all custom strategies and 3 additional iterations with different Cost Tables40
Appendix B: Creating XST Script File
SmartXplorer for Command Line Users www.xilinx.com 7UG688 September 21, 2010
Preface
About This Guide
The goal of this tutorial is to provide a quick introduction to SmartXplorer and how its capabilities can be used to help achieve timing closure.
This tutorial is delivered in two forms, each centered on the main user flow using the ISE® design tools:
• The first is targeted to ISE Project Navigator users. In this section we show how SmartXplorer can be used from Project Navigator.
• The second is targeted to command line users. Since a majority of Microsoft Windows users use Xilinx® tools from the ISE Project Navigator environment, for command line users we will mainly focus on using SmartXplorer on the Linux platform. Of course, you can easily adapt the provided material for Microsoft Windows operating systems, if required.
Both forms contain a similar set of labs, each with step-by-step exercises allowing you to learn different aspects of SmartXplorer.
Starting with the 12.1 release, SmartXplorer supports Xilinx Synthesis Technology (XST) and Synplify synthesis tools. Before running multiple implementation strategies you can now execute several synthesis strategies in order to select the best synthesized netlist for implementation runs. It is not mandatory to use synthesis with SmartXplorer - you may continue to use SmartXplorer for implementation only. Using SmartXplorer with implementation flow only is also covered in this tutorial.
See the Command Line Tools User Guide for more information regarding Synplify support.
Note: Synthesis in SmartXplorer is supported in command line mode only. It is not supported from the ISE environment. Not every SmartXplorer option and functionality is covered in this tutorial.
Guide ContentsThis manual contains the following chapters:
• Chapter 1, SmartXplorer Overview, describes the capabilities of SmartXplorer.
• Chapter 2, Tutorial Description, provides general information about the features covered in each lab. We also describe the time required to complete each lab segment.
• Chapter 3, Preparing Designs for Labs, contains instructions on how to obtain the designs for each lab.
• Chapters 4, 5, and 6 contain detailed information for each lab, and each includes an overall summary for that lab segment as well as the detailed instructions required for you to complete the lab.
• Chapter 4, Lab 1: Basic Flow
• Chapter 5, Lab 2: Creating Custom Strategies
8 www.xilinx.com SmartXplorer for Command Line UsersUG688 September 21, 2010
Preface: About This Guide
• Chapter 6, Lab 3: Running Multiple Strategies in Parallel
• Appendix A, Custom Files, provides examples for a custom strategy file and host list files. In addition, it contains a set of SmartXplorer configurations dedicated to various tasks.
• Appendix B, Creating XST Script File, shows how to quickly create an XST script file in order to run SmartXplorer with XST synthesis.
Additional ResourcesTo find additional documentation, see the Xilinx® Web site at:
http://www.xilinx.com/support/documentation/index.htm.
To search the Answer Database of silicon, software, and IP questions and answers, or to create a technical support WebCase, see the Xilinx Web site at:
http://www.xilinx.com/support/mysupport.htm.
ConventionsThis document uses the following conventions. An example illustrates each convention.
TypographicalThe following typographical conventions are used in this document:
Convention Meaning or Use Example
Courier fontMessages, prompts, and program files that the system displays
speed grade: - 100
Courier boldLiteral commands that you enter in a syntactical statement
ngdbuild design_name
Helvetica bold
Commands that you select from a menu
File → Open
Keyboard shortcuts Ctrl+C
Italic font
Variables in a syntax statement for which you must supply values
ngdbuild design_name
References to other manualsSee the Development System Reference Guide for more information.
Emphasis in textIf a wire is drawn so that it overlaps the pin of a symbol, the two nets are not connected.
Square brackets [ ]
An optional entry or parameter. However, in bus specifications, such as bus[7:0], they are required.
ngdbuild [option_name] design_name
SmartXplorer for Command Line Users www.xilinx.com 9UG688 September 21, 2010
Conventions
Online DocumentThe following conventions are used in this document:
Braces { }A list of items from which you must choose one or more
lowpwr ={on|off}
Vertical bar |Separates items in a list of choices
lowpwr ={on|off}
Vertical ellipsis...
Repetitive material that has been omitted
IOB #1: Name = QOUT’ IOB #2: Name = CLKIN’...
Horizontal ellipsis . . .Repetitive material that has been omitted
allow block block_name loc1 loc2 ... locn;
Convention Meaning or Use Example
Convention Meaning or Use Example
Blue textCross-reference link to a location in the current document
See the section “Additional Resources” for details.
Refer to “Title Formats” in Chapter 1 for details.
Blue, underlined text Hyperlink to a Web site (URL)Go to http://www.xilinx.com for the latest speed files.

10 www.xilinx.com SmartXplorer for Command Line UsersUG688 September 21, 2010
Preface: About This Guide
SmartXplorer for Command Line Users www.xilinx.com 11UG688 September 21, 2010
Chapter 1
SmartXplorer Overview
IntroductionDelivering timing closure in the shortest amount of time is the ultimate SmartXplorer goal.
Timing closure is undoubtedly one of the most challenging aspects in modern FPGA design. Xilinx® is committed to assisting designers overcome timing challenges by:
• Improving synthesis and implementation algorithms
• Providing powerful graphical analysis tools such as PlanAhead™ software and FPGA Editor
Although FPGA tools have become easier to use while offering ever more advanced features, it is difficult to anticipate all design situations. Some may stay hidden until the very last stages of a design cycle.
Regardless of their experience level, designers usually try to explore several possibilities by changing different tool options before deciding to make a change in their HDL code or trying placement constraints. Changing tool operations is a very easy thing to do. The main question facing this designer is this: How can a better set of options be identified in the first place?
Key BenefitsSmartXplorer has two key features:
• It automatically performs design exploration by using a set of built-in or user-created implementation strategies to try to meet timing.
Note: A design strategy is a set of tool options and their corresponding values that are intended to achieve a particular design goal such as area, speed, or power.
• It allows running these strategies in parallel on multiples machines, completing the job much faster.
Design StrategiesSmartXplorer is delivered with a set of predefined, built-in strategies. These strategies are tuned and selected separately for each FPGA family. This selection is revised for each major release to ensure that we have the best possible correlation with current software version.
Many designers create their own design strategies or scripts based on their experience. SmartXplorer allows users to integrate these custom strategies into the system and either use them exclusively or combine with some predefined strategies.
12 www.xilinx.com SmartXplorer for Command Line UsersUG688 September 21, 2010
Chapter 1: SmartXplorer Overview
SmartXplorer is not simply a tool to use during the late, time-limited portion of the design cycle. It can be used during the entire project cycle preventing or reducing emergency situations at the end of the design cycle. We suggest running it on a regular basis to monitor your design and ensure timing results stay within an acceptable range.
Exploiting Parallel Compute PlatformsExecuting several design strategies (jobs) in parallel is a powerful feature which allows designers to complete the project faster. This specific nature of this feature depends on the operating system in use.
Linux OS
SmartXplorer can run multiple jobs in parallel on different machines across the network. This can be done in two ways:
• You have a regular Linux network: in this case SmartXplorer manages the jobs distribution across the network. You must provide a list of machines which can be used.
• SmartXplorer supports LSF (Load Sharing Facility) or SGE (Sun Grid Engine) compute farms. In this case LSF or SGE manages jobs distribution. You must specify the number of machines which can be simultaneously allocated to SmartXplorer.
If you do not have access to the Linux network, but you have a personal Linux machine with multi-core processor or several processors, you can still run several jobs in parallel on this machine.
Microsoft Windows OS
In the current release, SmartXplorer allows several strategies to be run in parallel on a single Windows machine, if it has a multi-core processor or several processors.
Using a Single Linux or Windows MachineIf you do not have access to multiple Linux servers on a network and can only use your local computer, make sure your machine has at least one multi-core processor or several processors.
First of all, you have to estimate how many jobs your machine may run simultaneously.
Theoretically, the number of jobs you may run in parallel can be calculated in the following way:
Nb_Of_Jobs = P * C
Where P is the number of processors and C is the number of cores per processor.
If you have 4 dual-core processors, then you may run 8 jobs in parallel.
However, depending on the available memory, its speed, the speed of your hard drive, etc., your computer might not be able to deal with the maximum number of jobs calculated using the above formula.
Depending on your calculations, following are some tips you may use:
Tip1: If due to the memory requirements of your design, your machine can run only a single strategy at a time, then you will need to run all strategies sequentially. This is a good situation for using an overnight run of SmartXplorer.

SmartXplorer for Command Line Users www.xilinx.com 13UG688 September 21, 2010
Key Benefits
Tip2: When trying to solve timing problems, you can work on smaller blocks separately from the rest of the design.Your machine might be able to deal with multiple strategies in parallel for these blocks. If this is the case, parallel jobs can save you a lot of time.

14 www.xilinx.com SmartXplorer for Command Line UsersUG688 September 21, 2010
Chapter 1: SmartXplorer Overview

SmartXplorer for Command Line Users www.xilinx.com 15UG688 September 21, 2010
Chapter 2
Tutorial Description
Throughout the tutorials, we use a small design to allow you to complete the labs as quickly as possible. Less than 40 minutes is required to complete the entire tutorial, which covers all the major features of SmartXplorer.
We strongly suggest running the labs in order (Lab1, Lab2, Lab3). However, the labs are independent and therefore can be run out of order if you wish to immediately focus on one particular functional area.
SmartXplorer has two key features:
1. It helps to achieve timing closure by using the predefined built-in or user-defined design strategies.
2. It allows running these strategies in parallel on multiple machines, completing the job much faster.
For the sake of clarity these two key features are represented separately within this tutorial:
• Lab1 and Lab2 are dedicated to the aspects of timing closure. All design strategies in these labs will be run sequentially (the feature that allows running several strategies in parallel will be intentionally disabled).
• In contrast, Lab3 is dedicated to running multiple strategies in parallel.
The following table gives you a brief overview of all the labs:
Table 2-1: Lab Overview
Title Duration Covered Features
Lab 1: Basic Flow 25 min • How SmartXplorer can be easily launched (synthesis and implementation)
• How final results are reported, stored and can be further used• How to run additional iterations to improve upon previously obtained • How to configure SmartXplorer to run the predefined strategies and
additional iterations at once (for example, overnight runs)• How to run SmartXplorer with implementation flow only
Lab 2: Creating Custom Strategies
5 min • How to create a custom strategy file and use it in SmartXplorer
Lab 3: Running Multiple Strategies in Parallel
10 min • How to run several strategies in parallel

16 www.xilinx.com SmartXplorer for Command Line UsersUG688 September 21, 2010
Chapter 2: Tutorial Description
Knowledge PrerequisitesThe labs require some basic knowledge of the major steps of the Xilinx® FPGA implementation flow and how to run them: Synthesis, Translate (NGDBuild), Map, Place & Route, and Timing Analysis (TRCE).
SmartXplorer for Command Line Users www.xilinx.com 17UG688 September 21, 2010
Chapter 3
Preparing Designs for Labs
This section provides detailed instructions on how to prepare the design for each lab.
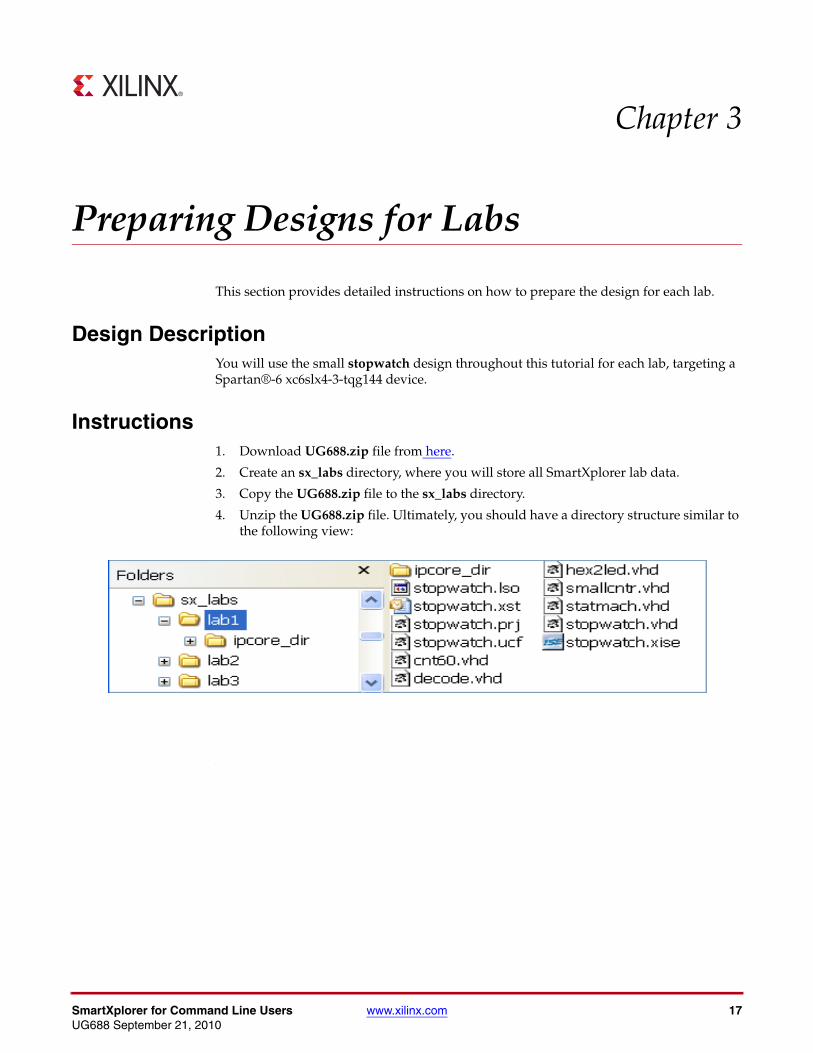
Design DescriptionYou will use the small stopwatch design throughout this tutorial for each lab, targeting a Spartan®-6 xc6slx4-3-tqg144 device.
Instructions1. Download UG688.zip file from here.
2. Create an sx_labs directory, where you will store all SmartXplorer lab data.
3. Copy the UG688.zip file to the sx_labs directory.
4. Unzip the UG688.zip file. Ultimately, you should have a directory structure similar to the following view:
1.Create a sx_labs directory, where you will store all SmartXplorer
2.Copy the sx_tutorial_examples.zip file to the sx_labs directory
Unzip the sx_tutorial_examples.zip file. Ultimately, you should have a directory structure similar to the following view:

18 www.xilinx.com SmartXplorer for Command Line UsersUG688 September 21, 2010
Chapter 3: Preparing Designs for Labs
SmartXplorer for Command Line Users www.xilinx.com 19UG688 September 21, 2010
Chapter 4
Lab 1: Basic Flow
Scope
ObjectivesThe goal of this 25-minute lab is to cover:
• How to run each of the predefined SmartXplorer Strategies (synthesis and implementation).
• How final results are reported, stored, and can be further used.
• How to run additional iterations based on the previously obtained results to improve timing.
• How to run SmartXplorer with implementation flow only.
BackgroundStarting with the 12.1 release, SmartXplorer supports Xilinx Synthesis Technology (XST) and Synplify synthesis tools. Before running multiple implementation strategies you can now execute several synthesis strategies in order to select the best synthesized netlist for implementation runs. It is not mandatory to use synthesis with SmartXplorer - you may continue to use SmartXplorer for implementation.
Important: In this tutorial:
• We will first focus on using both synthesis (XST) and implementation flows with SmartXplorer
• We will also cover how SmartXplorer can be used with implementation flow only.
When you use synthesis with SmartXplorer, the execution becomes a two phase process that includes synthesis and implementation.
• Phase 1 (Synthesis) - During this phase, SmartXplorer runs a set of synthesis strategies in order to identify the best synthesized netlist from performance point of view. Please note that in the current release, the synthesis tools do not generate a timing score allowing to select the best results. Each synthesized netlist is run through a single MAP and PAR (further referred as Quick Implementation) using a strategy optimized for runtime in order to obtain a timing score for each netlist.
Note: The Quick Implementation strategy is one of the predefined implementation SmartXplorer strategies.
• Phase 2 (Implementation) - During this phase SmartXplorer selects the best synthesized netlist and runs a set of implementation strategies to meet timing requirements.
20 www.xilinx.com SmartXplorer for Command Line UsersUG688 September 21, 2010
Chapter 4: Lab 1: Basic Flow
If SmartXplorer is used with implementation flow only, then only Phase 2 of SmartXplorer flow is active.
Lab
Step 1: Setup Xilinx Environment1. Open a terminal window and setup the Xilinx® environment.
2. Go to the lab1 directory: cd .../lab1
Step 2: Run SmartXplorer with Mandatory OptionsTo run SmartXplorer (smartxplorer) you have to specify the following mandatory options:
• A target device: -p xc6slx4-3-tqg144
• A UCF constraint file: -uc stopwatch.ucf
• An XST script file: stopwatch.xst
Note: Creation of XST script file is described in Appendix B.
In addition, we will use the following two options:
• Our design contains an external core (tenth.ngc) located in the ipcore_dir directory. We will use the –sd switch to reference to this directory.
• For the sake of clarity SmartXplorer will store its results in the smartxplorer_results directory: –wd smartxplorer_results
Now we are ready to run SmartXplorer.
1. In the current Terminal window, launch SmartXplorer using the following command:
smartxplorer -p xc6slx4-3-tqg144 -uc stopwatch.ucf -wd smartxplorer_results -sd ipcore_dir stopwatch.xst
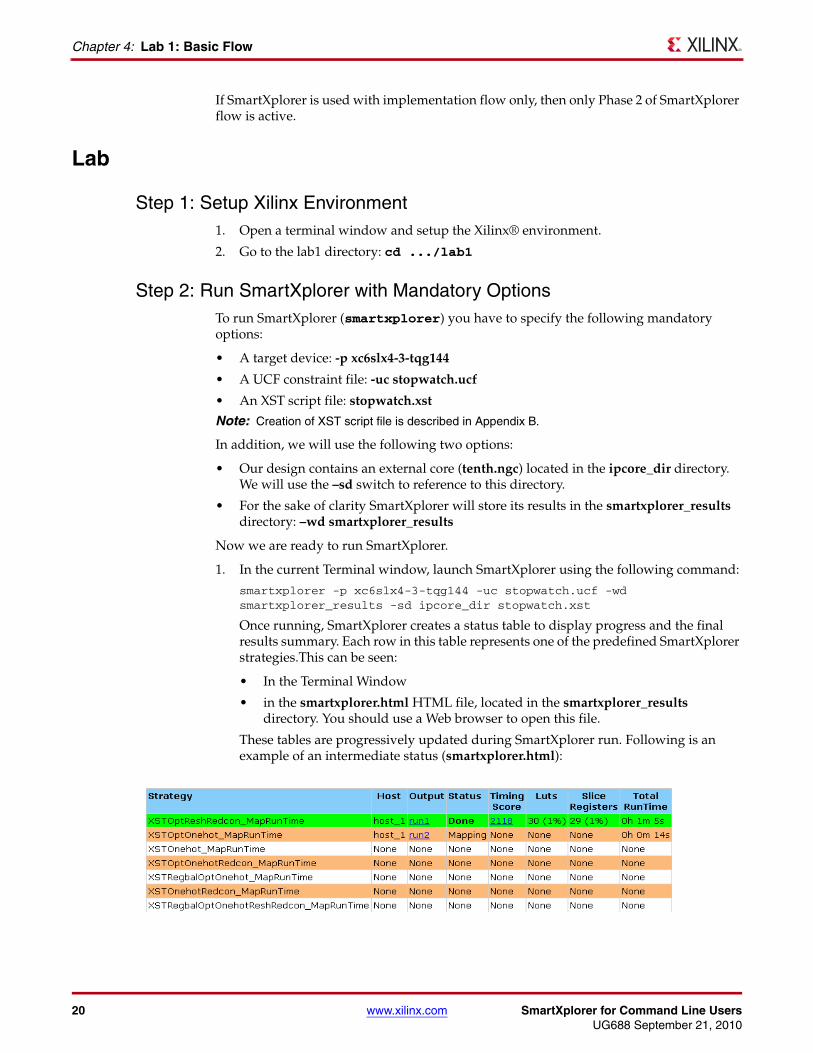
Once running, SmartXplorer creates a status table to display progress and the final results summary. Each row in this table represents one of the predefined SmartXplorer strategies.This can be seen:
• In the Terminal Window
• in the smartxplorer.html HTML file, located in the smartxplorer_results directory. You should use a Web browser to open this file.
These tables are progressively updated during SmartXplorer run. Following is an example of an intermediate status (smartxplorer.html):
SmartXplorer for Command Line Users www.xilinx.com 21UG688 September 21, 2010
Lab
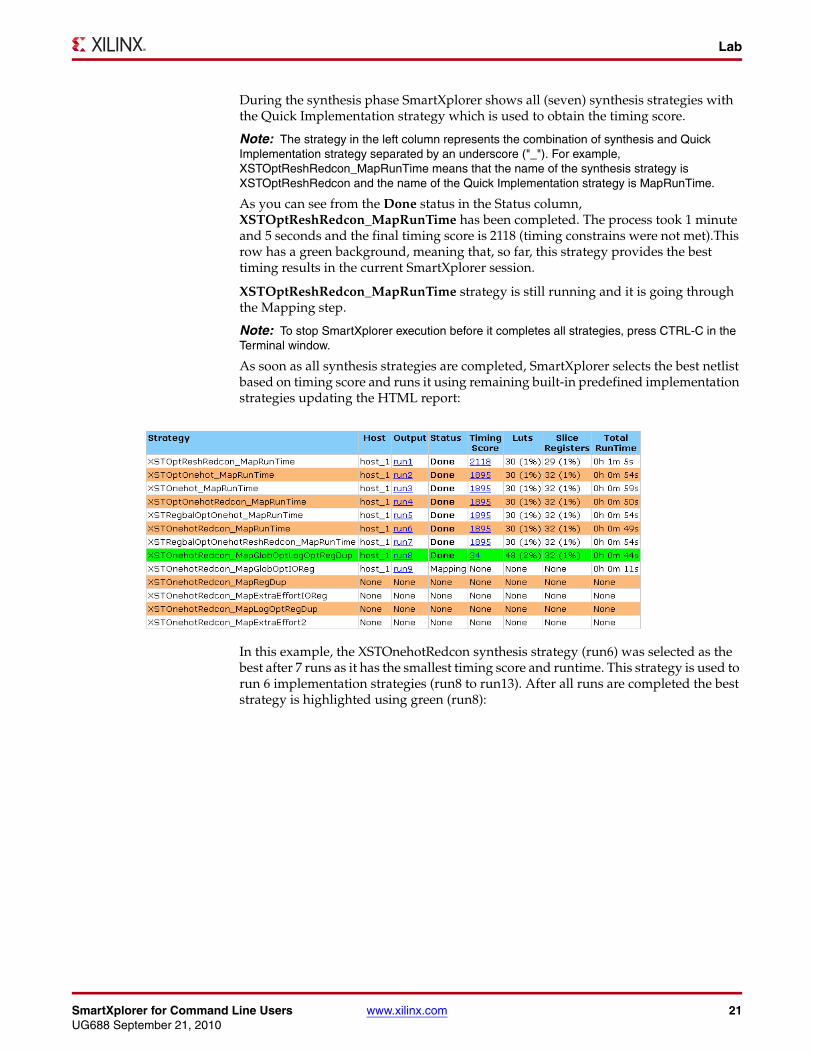
During the synthesis phase SmartXplorer shows all (seven) synthesis strategies with the Quick Implementation strategy which is used to obtain the timing score.
Note: The strategy in the left column represents the combination of synthesis and Quick Implementation strategy separated by an underscore ("_"). For example, XSTOptReshRedcon_MapRunTime means that the name of the synthesis strategy is XSTOptReshRedcon and the name of the Quick Implementation strategy is MapRunTime.
As you can see from the Done status in the Status column, XSTOptReshRedcon_MapRunTime has been completed. The process took 1 minute and 5 seconds and the final timing score is 2118 (timing constrains were not met).This row has a green background, meaning that, so far, this strategy provides the best timing results in the current SmartXplorer session.
XSTOptReshRedcon_MapRunTime strategy is still running and it is going through the Mapping step.
Note: To stop SmartXplorer execution before it completes all strategies, press CTRL-C in the Terminal window.
As soon as all synthesis strategies are completed, SmartXplorer selects the best netlist based on timing score and runs it using remaining built-in predefined implementation strategies updating the HTML report:
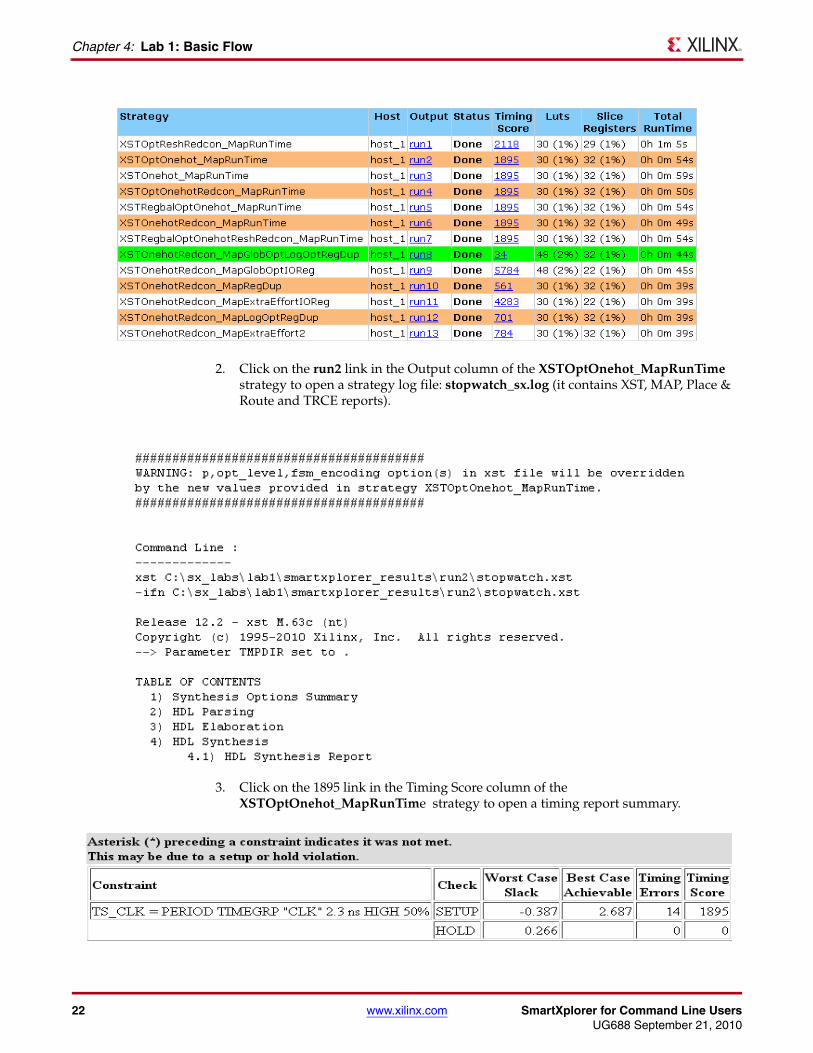
In this example, the XSTOnehotRedcon synthesis strategy (run6) was selected as the best after 7 runs as it has the smallest timing score and runtime. This strategy is used to run 6 implementation strategies (run8 to run13). After all runs are completed the best strategy is highlighted using green (run8):
22 www.xilinx.com SmartXplorer for Command Line UsersUG688 September 21, 2010
Chapter 4: Lab 1: Basic Flow
2. Click on the run2 link in the Output column of the XSTOptOnehot_MapRunTime strategy to open a strategy log file: stopwatch_sx.log (it contains XST, MAP, Place & Route and TRCE reports).
3. Click on the 1895 link in the Timing Score column of the XSTOptOnehot_MapRunTime strategy to open a timing report summary.
SmartXplorer for Command Line Users www.xilinx.com 23UG688 September 21, 2010
Lab
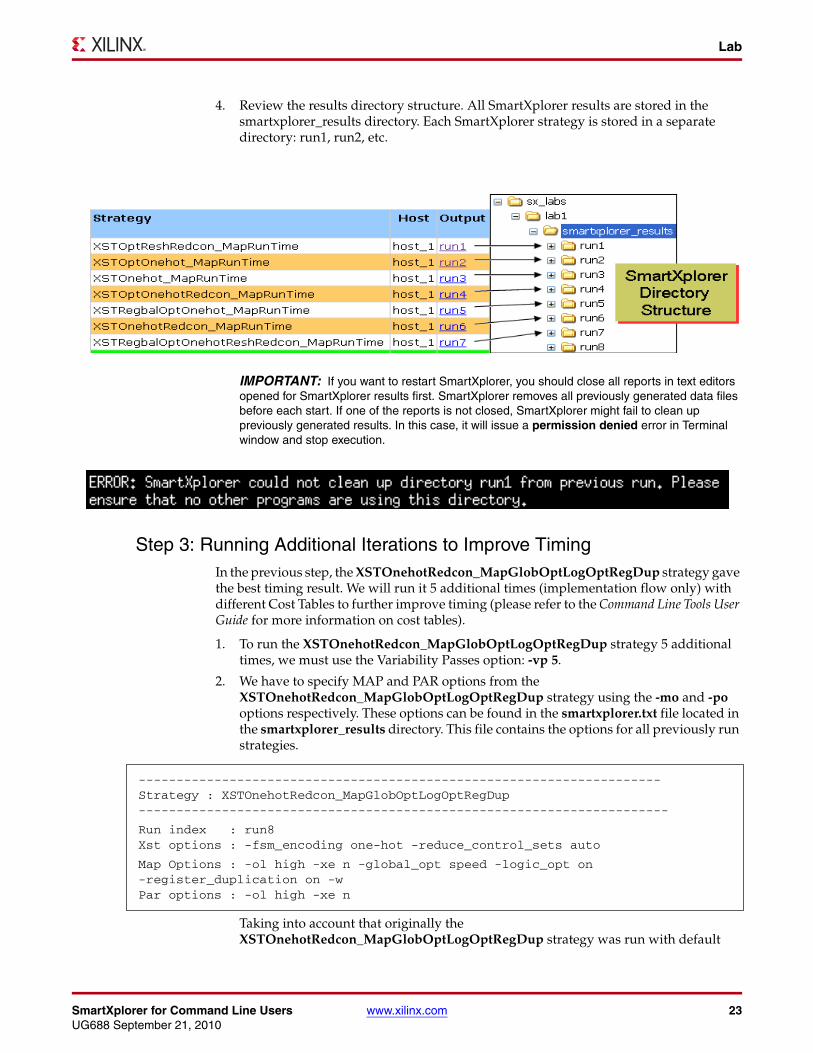
4. Review the results directory structure. All SmartXplorer results are stored in the smartxplorer_results directory. Each SmartXplorer strategy is stored in a separate directory: run1, run2, etc.
IMPORTANT: If you want to restart SmartXplorer, you should close all reports in text editors opened for SmartXplorer results first. SmartXplorer removes all previously generated data files before each start. If one of the reports is not closed, SmartXplorer might fail to clean up previously generated results. In this case, it will issue a permission denied error in Terminal window and stop execution.
Step 3: Running Additional Iterations to Improve TimingIn the previous step, the XSTOnehotRedcon_MapGlobOptLogOptRegDup strategy gave the best timing result. We will run it 5 additional times (implementation flow only) with different Cost Tables to further improve timing (please refer to the Command Line Tools User Guide for more information on cost tables).
1. To run the XSTOnehotRedcon_MapGlobOptLogOptRegDup strategy 5 additional times, we must use the Variability Passes option: -vp 5.
2. We have to specify MAP and PAR options from the XSTOnehotRedcon_MapGlobOptLogOptRegDup strategy using the -mo and -po options respectively. These options can be found in the smartxplorer.txt file located in the smartxplorer_results directory. This file contains the options for all previously run strategies.
Taking into account that originally the XSTOnehotRedcon_MapGlobOptLogOptRegDup strategy was run with default
---------------------------------------------------------------------Strategy : XSTOnehotRedcon_MapGlobOptLogOptRegDup----------------------------------------------------------------------
Run index : run8Xst options : -fsm_encoding one-hot -reduce_control_sets auto
Map Options : -ol high -xe n -global_opt speed -logic_opt on-register_duplication on -wPar options : -ol high -xe n
24 www.xilinx.com SmartXplorer for Command Line UsersUG688 September 21, 2010
Chapter 4: Lab 1: Basic Flow
Cost Table of 1, we now choose to set starting placer cost table to 2: -t 2. These options must be added to the MAP and PAR commands:
-mo "-timing -ol high -xe n -global_opt speed -logic_opt-register_duplication on -w -t 2"
-po "-ol high -xe n"
3. Finally, to run the implementation flow 5 additional times we must use a synthesized netlist (stopwatch.ngc) instead of XST script (stopwatch.xst) as the input file for SmartXplorer.
Copy stopwatch.ngc from the smartxplorer_results/run6 to the current (lab1) directory: cp smartxplorer_results/run6/stopwatch.ngc .
4. In the current Terminal window, launch SmartXplorer using the following command:
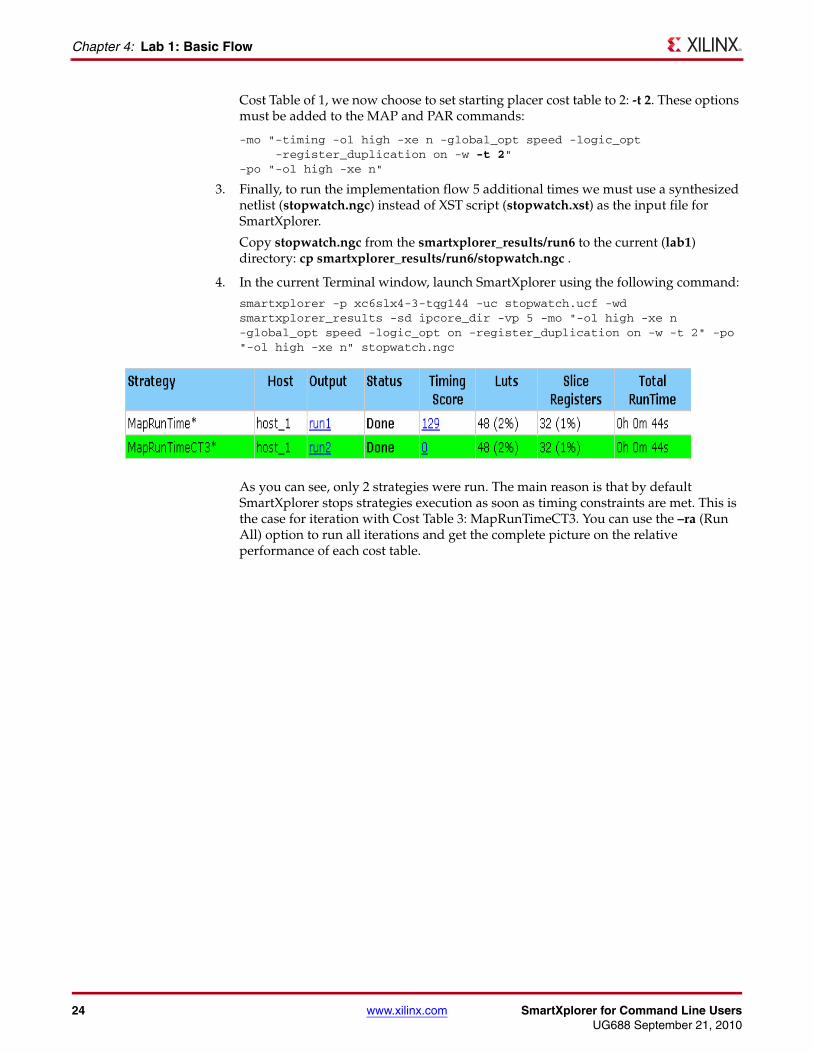
smartxplorer -p xc6slx4-3-tqg144 -uc stopwatch.ucf -wd smartxplorer_results -sd ipcore_dir -vp 5 -mo "-ol high -xe n -global_opt speed -logic_opt on -register_duplication on -w -t 2" -po "-ol high -xe n" stopwatch.ngc
As you can see, only 2 strategies were run. The main reason is that by default SmartXplorer stops strategies execution as soon as timing constraints are met. This is the case for iteration with Cost Table 3: MapRunTimeCT3. You can use the –ra (Run All) option to run all iterations and get the complete picture on the relative performance of each cost table.
SmartXplorer for Command Line Users www.xilinx.com 25UG688 September 21, 2010
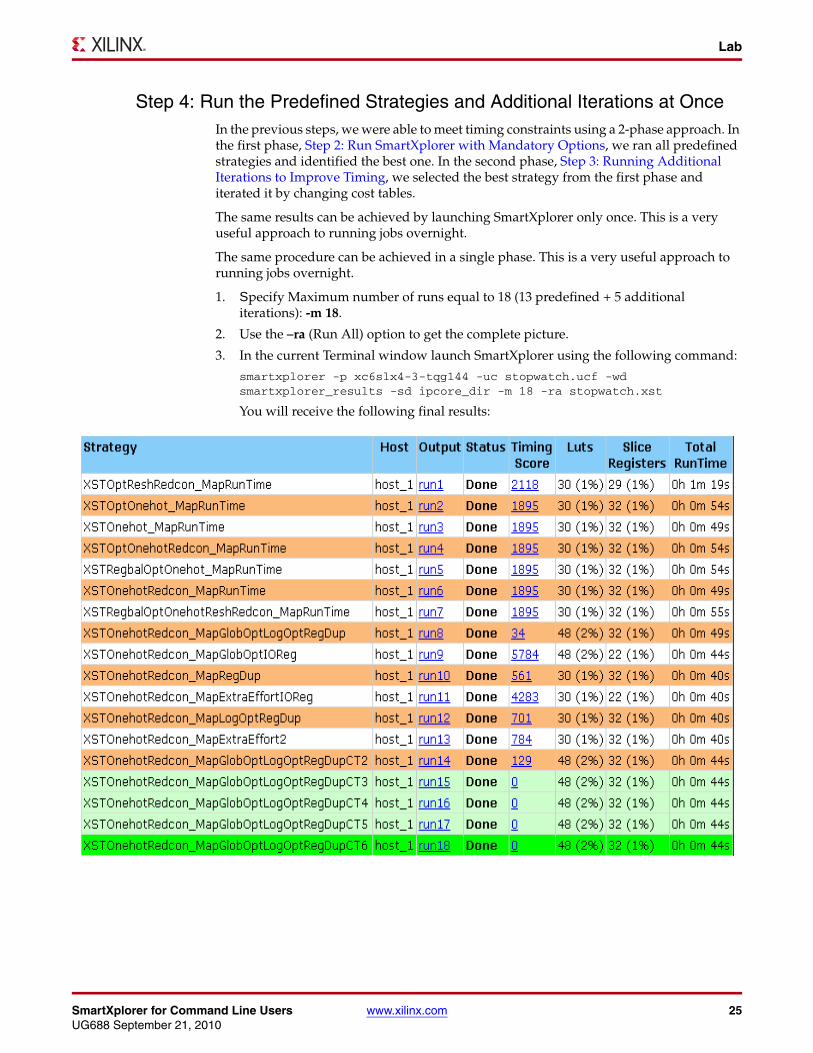
Lab
Step 4: Run the Predefined Strategies and Additional Iterations at OnceIn the previous steps, we were able to meet timing constraints using a 2-phase approach. In the first phase, Step 2: Run SmartXplorer with Mandatory Options, we ran all predefined strategies and identified the best one. In the second phase, Step 3: Running Additional Iterations to Improve Timing, we selected the best strategy from the first phase and iterated it by changing cost tables.
The same results can be achieved by launching SmartXplorer only once. This is a very useful approach to running jobs overnight.
The same procedure can be achieved in a single phase. This is a very useful approach to running jobs overnight.
1. Specify Maximum number of runs equal to 18 (13 predefined + 5 additional iterations): -m 18.
2. Use the –ra (Run All) option to get the complete picture.
3. In the current Terminal window launch SmartXplorer using the following command:
smartxplorer -p xc6slx4-3-tqg144 -uc stopwatch.ucf -wd smartxplorer_results -sd ipcore_dir -m 18 -ra stopwatch.xst
You will receive the following final results:
26 www.xilinx.com SmartXplorer for Command Line UsersUG688 September 21, 2010
Chapter 4: Lab 1: Basic Flow
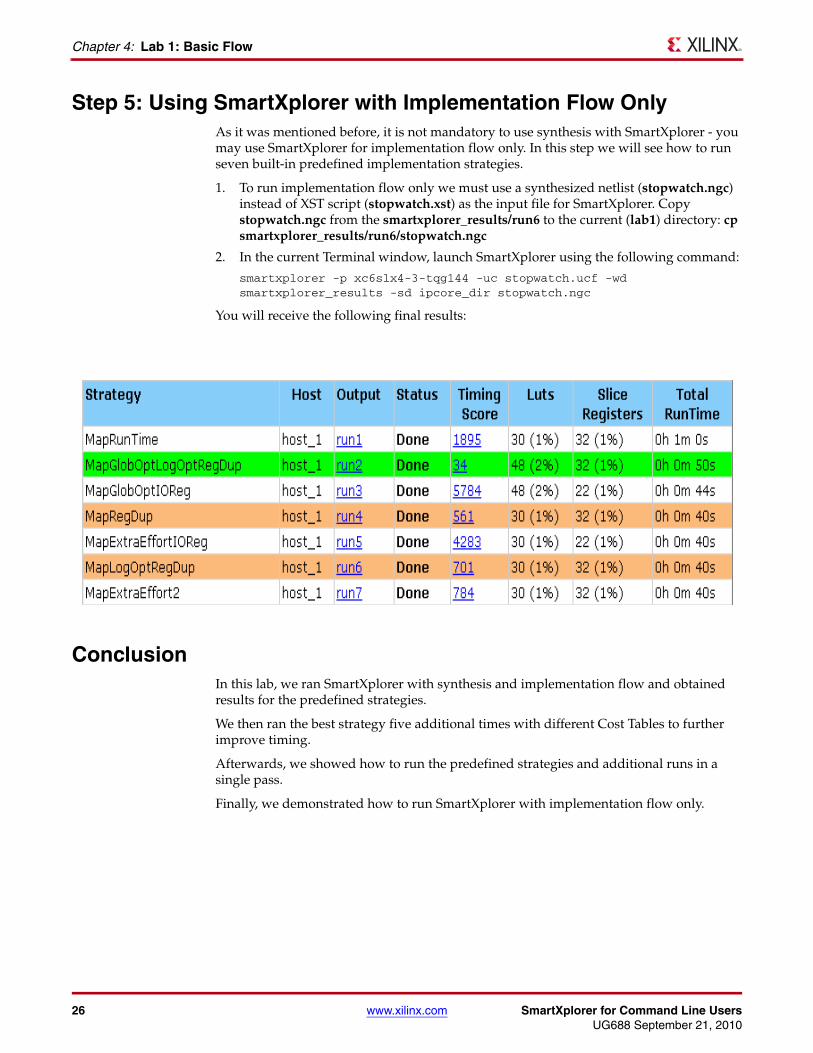
Step 5: Using SmartXplorer with Implementation Flow OnlyAs it was mentioned before, it is not mandatory to use synthesis with SmartXplorer - you may use SmartXplorer for implementation flow only. In this step we will see how to run seven built-in predefined implementation strategies.
1. To run implementation flow only we must use a synthesized netlist (stopwatch.ngc) instead of XST script (stopwatch.xst) as the input file for SmartXplorer. Copy stopwatch.ngc from the smartxplorer_results/run6 to the current (lab1) directory: cp smartxplorer_results/run6/stopwatch.ngc
2. In the current Terminal window, launch SmartXplorer using the following command:
smartxplorer -p xc6slx4-3-tqg144 -uc stopwatch.ucf -wd smartxplorer_results -sd ipcore_dir stopwatch.ngc
You will receive the following final results:
ConclusionIn this lab, we ran SmartXplorer with synthesis and implementation flow and obtained results for the predefined strategies.
We then ran the best strategy five additional times with different Cost Tables to further improve timing.
Afterwards, we showed how to run the predefined strategies and additional runs in a single pass.
Finally, we demonstrated how to run SmartXplorer with implementation flow only.
SmartXplorer for Command Line Users www.xilinx.com 27UG688 September 21, 2010
Chapter 5
Lab 2: Creating Custom Strategies
ObjectivesWorking on your design and running the seven predefined strategies you found out that two of them always gave you much better results than the other five. Therefore, for future runs, you ultimately choose to run only those two strategies and skip the others.
Alternatively, you may have manually found a set of strategies which give you the best results for your design and now you would like to use these strategies with SmartXplorer.
In both cases, you can create a custom strategy file and use it in SmartXplorer.
The goal of this 5-minute lab is to show how custom strategies can be created and run from SmartXplorer.
Lab
Step 1: Setup Xilinx Environment1. Open a terminal window and setup the Xilinx® environment.
2. Go to the lab2 directory: cd .../lab2
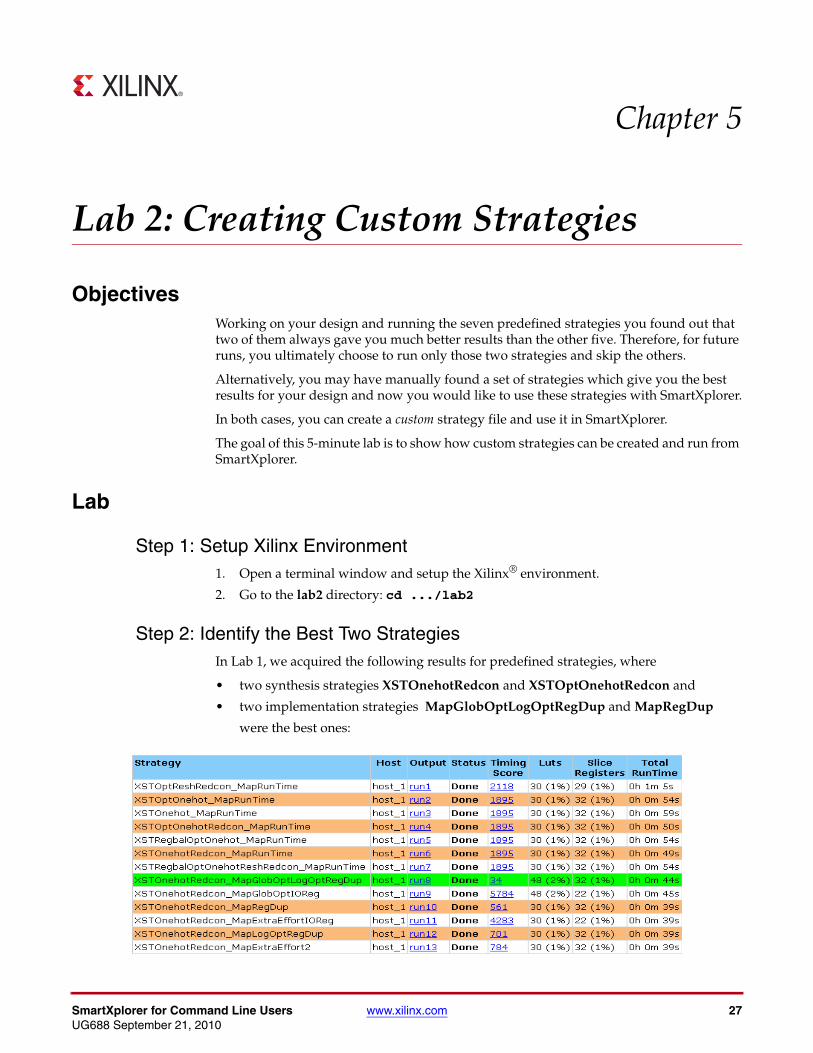
Step 2: Identify the Best Two StrategiesIn Lab 1, we acquired the following results for predefined strategies, where
• two synthesis strategies XSTOnehotRedcon and XSTOptOnehotRedcon and
• two implementation strategies MapGlobOptLogOptRegDup and MapRegDup
were the best ones:

28 www.xilinx.com SmartXplorer for Command Line UsersUG688 September 21, 2010
Chapter 5: Lab 2: Creating Custom Strategies
Step 3: Creating the Custom Strategy FileBefore we can create a custom strategy file based on the selected strategies, we must find out the set of options SmartXplorer used for these strategies.
This information is stored in the smartxplorer.txt file located in the smartxplorer_results directory of Lab 1. This file contains the options for all previously run strategies. The contents of this file can be found in the following location:
1. lab1_smartxplorer.txt file located in the lab2 directory.
2. Using the above information, we can create a strategy file. In addition, we will rename:
• The XSTOnehotRedcon and XSTOptOnehotRedcon synthesis strategies, using the names Syn1 and Syn2, respectively.
• The MapGlobOptLogOptRegDup and MapRegDup implementation strategies, using the names Impl1 and Impl2, respectively.
Open my_strategy.txt file located in lab2 directory. This file contains Syn1, Syn2, Impl1 andImpl2 definitions:
----------------------------------------------------------------------Strategy : XSTOnehotRedcon_MapRunTime----------------------------------------------------------------------Run index : run6Xst options : -fsm_encoding one-hot -reduce_control_sets autoMap options : -ol high -wPar options : -ol high
----------------------------------------------------------------------Strategy : XSTRegbalOptOnehotReshRedcon_MapRunTime----------------------------------------------------------------------Run index : run7Xst options : -register_balancing yes -opt_level 2 -fsm_encoding one-hot -resource_sharing no -reduce_control_sets auto
Map options : -ol high -wPar options : -ol high
----------------------------------------------------------------------Strategy : XSTOnehotRedcon_MapGlobOptLogOptRegDup----------------------------------------------------------------------Run index : run8Xst options : -fsm_encoding one-hot -reduce_control_sets autoMap options : -ol high -xe n -global_opt speed -logic_opt on -register_duplication on -w
Par options : -ol high -xe n---------------------------------------------------------------------- Strategy : XSTOnehotRedcon_MapRegDup----------------------------------------------------------------------Run index : run10Xst options : -fsm_encoding one-hot -reduce_control_sets autoMap options : -ol high -xe n -register_duplication on -w Par options : -ol high -xe n
SmartXplorer for Command Line Users www.xilinx.com 29UG688 September 21, 2010
Conclusion
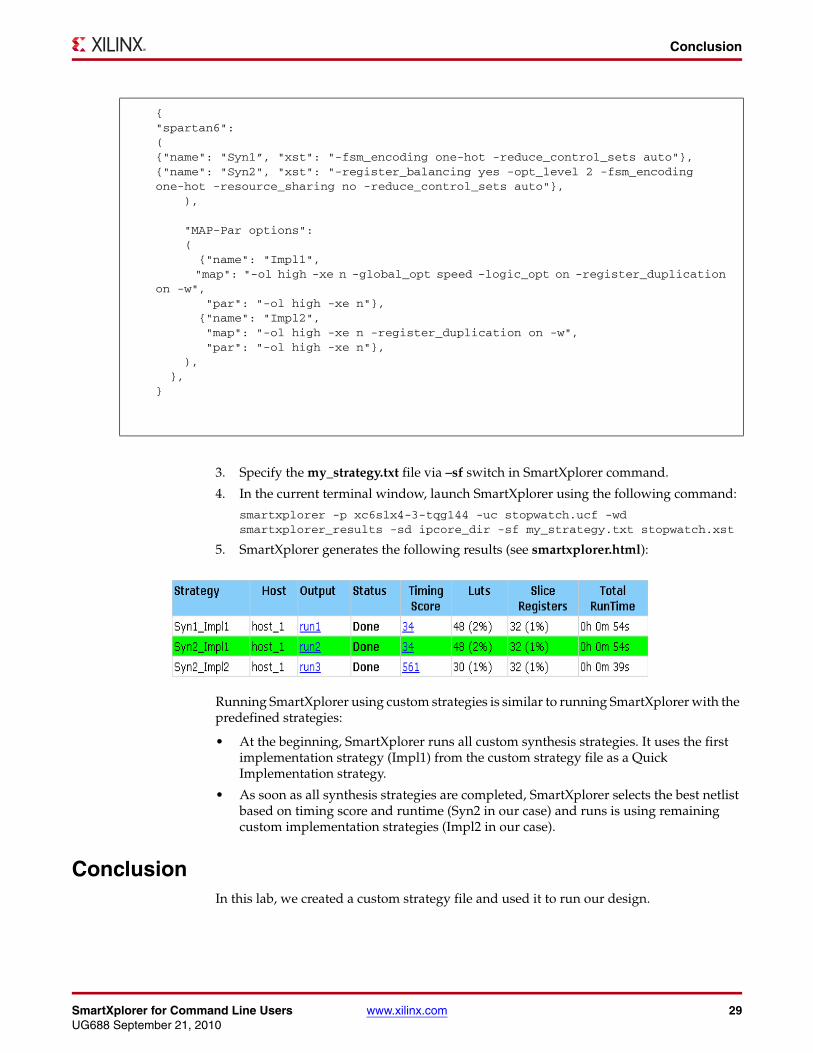
3. Specify the my_strategy.txt file via –sf switch in SmartXplorer command.
4. In the current terminal window, launch SmartXplorer using the following command:
smartxplorer -p xc6slx4-3-tqg144 -uc stopwatch.ucf -wd smartxplorer_results -sd ipcore_dir -sf my_strategy.txt stopwatch.xst
5. SmartXplorer generates the following results (see smartxplorer.html):
Running SmartXplorer using custom strategies is similar to running SmartXplorer with the predefined strategies:
• At the beginning, SmartXplorer runs all custom synthesis strategies. It uses the first implementation strategy (Impl1) from the custom strategy file as a Quick Implementation strategy.
• As soon as all synthesis strategies are completed, SmartXplorer selects the best netlist based on timing score and runtime (Syn2 in our case) and runs is using remaining custom implementation strategies (Impl2 in our case).
ConclusionIn this lab, we created a custom strategy file and used it to run our design.
{ "spartan6":({"name": "Syn1”, "xst": "-fsm_encoding one-hot -reduce_control_sets auto"},{"name": "Syn2", "xst": "-register_balancing yes -opt_level 2 -fsm_encoding one-hot -resource_sharing no -reduce_control_sets auto"}, ),
"MAP-Par options": ( {"name": "Impl1", "map": "-ol high -xe n -global_opt speed -logic_opt on -register_duplication on -w", "par": "-ol high -xe n"}, {"name": "Impl2", "map": "-ol high -xe n -register_duplication on -w", "par": "-ol high -xe n"}, ), },}

30 www.xilinx.com SmartXplorer for Command Line UsersUG688 September 21, 2010
Chapter 5: Lab 2: Creating Custom Strategies
SmartXplorer for Command Line Users www.xilinx.com 31UG688 September 21, 2010
Chapter 6
Lab 3: Running Multiple Strategies in Parallel
IMPORTANT: This lab is dedicated to users having one of the following:
• Access to a regular Linux network, LSF and SGE compute farms.
• A multi-core processor or a multi-processor machine (not a single core processor machine).
ObjectivesThe goal of this 10-minute lab is to show how to setup the Xilinx® environment and use SmartXplorer on a regular Linux network, LSF and SGE compute farms, or on a single, multi-core processor or a multi-processor machine.
We will list a set of key items you must take into account before using SmartXplorer across such networks.
Lab
Step 1: Key Items – Xilinx Environment and Results StorageThere are two important items we must clarify before launching SmartXplorer:
• Ηow to setup Xilinx software environment on each machine.
• Where SmartXplorer results will be stored.
1. Setting up Xilinx environment
First, let’s consider the case of a regular Linux network, where three Linux machines (L1, L2, and L3) will be used to run design strategies in parallel. In addition, L1 will be used to launch SmartXplorer.
Before launching a job on L2 (L3), SmartXplorer automatically sets up $XILINX environment variable on the L2 (L3) machine. For that, it will use the value of $XILINX from L1. This means that if Xilinx software is installed on:
• the network, then L2 (L3) must have access to this installation as well using the same network mount points so that the network paths defined for L1 are valid for all machines.
• the L1 local disk, then L2 (L3) must have the same version of Xilinx software installed on a local disk and placed in the directory with same path name as on L1.

32 www.xilinx.com SmartXplorer for Command Line UsersUG688 September 21, 2010
Chapter 6: Lab 3: Running Multiple Strategies in Parallel
This mechanism of using environment variables was created to ensure that each design strategy will be run under the same conditions. In addition to $XILINX, SmartXplorer will automatically collect all Xilinx environment variables (having the ‘XIL_’ prefix) set on L1 and propagate them to L2 and L3.
The same rules must be used for LSF and SGE compute farms – each machine eligible to run Xilinx software must be able to use the same Xilinx environment as set on the machine running SmartXplorer.
2. Results Storage
As we have seen in Lab 1, all SmartXplorer results are stored in a separate directory, named smartxplorer_results.
The same method is used in the case of multiple machines; all results are stored in the same disk area. Therefore, all machines must have access to this disk area and have read and write permissions.
Step 2: Pre-run Checklist1. Obtain the list of machines you will use.
2. Ensure that the same Xilinx® environment can be set up on each of them.
3. Verify that all machines have access and read and write permissions to the SmartXplorer results directory.
Step 3: Setup Xilinx Environment1. Open a terminal window and setup Xilinx environment.
2. Go to the lab3 directory: cd .../lab3
SmartXplorer for Command Line Users www.xilinx.com 33UG688 September 21, 2010
Lab
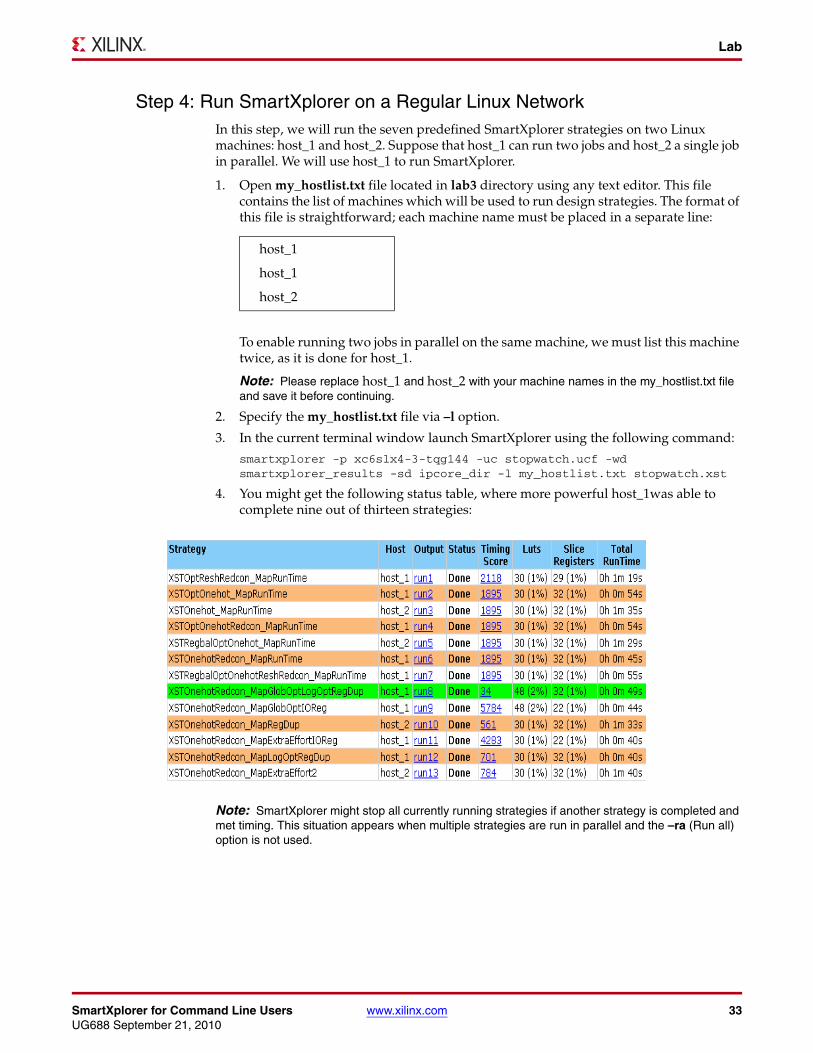
Step 4: Run SmartXplorer on a Regular Linux NetworkIn this step, we will run the seven predefined SmartXplorer strategies on two Linux machines: host_1 and host_2. Suppose that host_1 can run two jobs and host_2 a single job in parallel. We will use host_1 to run SmartXplorer.
1. Open my_hostlist.txt file located in lab3 directory using any text editor. This file contains the list of machines which will be used to run design strategies. The format of this file is straightforward; each machine name must be placed in a separate line:
To enable running two jobs in parallel on the same machine, we must list this machine twice, as it is done for host_1.
Note: Please replace host_1 and host_2 with your machine names in the my_hostlist.txt file and save it before continuing.
2. Specify the my_hostlist.txt file via –l option.
3. In the current terminal window launch SmartXplorer using the following command:
smartxplorer -p xc6slx4-3-tqg144 -uc stopwatch.ucf -wd smartxplorer_results -sd ipcore_dir -l my_hostlist.txt stopwatch.xst
4. You might get the following status table, where more powerful host_1was able to complete nine out of thirteen strategies:
Note: SmartXplorer might stop all currently running strategies if another strategy is completed and met timing. This situation appears when multiple strategies are run in parallel and the –ra (Run all) option is not used.
host_1
host_1
host_2
34 www.xilinx.com SmartXplorer for Command Line UsersUG688 September 21, 2010
Chapter 6: Lab 3: Running Multiple Strategies in Parallel
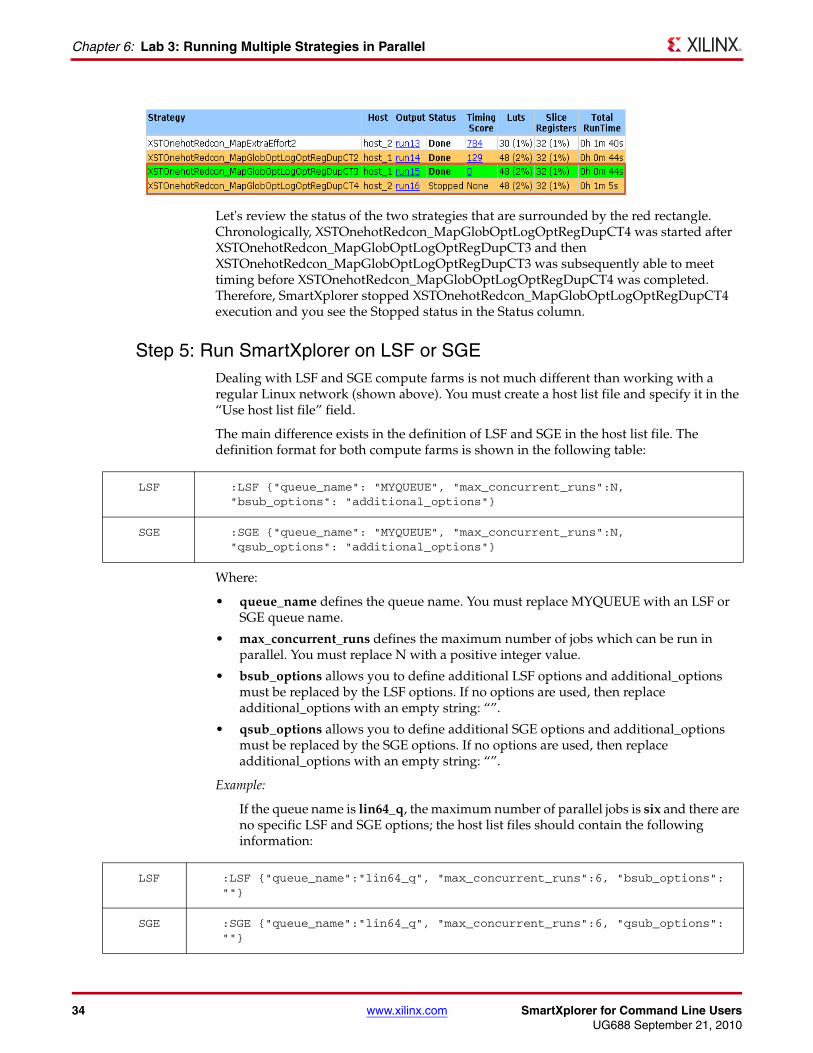
Let's review the status of the two strategies that are surrounded by the red rectangle. Chronologically, XSTOnehotRedcon_MapGlobOptLogOptRegDupCT4 was started after XSTOnehotRedcon_MapGlobOptLogOptRegDupCT3 and then XSTOnehotRedcon_MapGlobOptLogOptRegDupCT3 was subsequently able to meet timing before XSTOnehotRedcon_MapGlobOptLogOptRegDupCT4 was completed. Therefore, SmartXplorer stopped XSTOnehotRedcon_MapGlobOptLogOptRegDupCT4 execution and you see the Stopped status in the Status column.
Step 5: Run SmartXplorer on LSF or SGEDealing with LSF and SGE compute farms is not much different than working with a regular Linux network (shown above). You must create a host list file and specify it in the “Use host list file” field.
The main difference exists in the definition of LSF and SGE in the host list file. The definition format for both compute farms is shown in the following table:
Where:
• queue_name defines the queue name. You must replace MYQUEUE with an LSF or SGE queue name.
• max_concurrent_runs defines the maximum number of jobs which can be run in parallel. You must replace N with a positive integer value.
• bsub_options allows you to define additional LSF options and additional_options must be replaced by the LSF options. If no options are used, then replace additional_options with an empty string: “”.
• qsub_options allows you to define additional SGE options and additional_options must be replaced by the SGE options. If no options are used, then replace additional_options with an empty string: “”.
Example:
If the queue name is lin64_q, the maximum number of parallel jobs is six and there are no specific LSF and SGE options; the host list files should contain the following information:
LSF :LSF {"queue_name": "MYQUEUE", "max_concurrent_runs":N, "bsub_options": "additional_options"}
SGE :SGE {"queue_name": "MYQUEUE", "max_concurrent_runs":N, "qsub_options": "additional_options"}
LSF :LSF {"queue_name":"lin64_q", "max_concurrent_runs":6, "bsub_options": ""}
SGE :SGE {"queue_name":"lin64_q", "max_concurrent_runs":6, "qsub_options": ""}

SmartXplorer for Command Line Users www.xilinx.com 35UG688 September 21, 2010
Conclusion
ConclusionIn this lab, we showed how you can use SmartXplorer to run several design strategies in parallel on multiple Linux Machines.
We listed a set of key items that must be taken into account before using SmartXplorer across the network.

36 www.xilinx.com SmartXplorer for Command Line UsersUG688 September 21, 2010
Chapter 6: Lab 3: Running Multiple Strategies in Parallel

SmartXplorer for Command Line Users www.xilinx.com 37UG688 September 21, 2010
Appendix A
Custom Files
ObjectivesThis appendix provides examples for:
• Custom Strategy File
• Host List Files (Linux)
• SmartXplorer Configurations for Various Tasks: Synthesis and Implementation Flow
• SmartXplorer Configurations for Various Tasks: Implementation Flow Only
Custom Strategy FileFollowing is an example of a custom strategy file. It contains two strategies for Spartan®-6 devices and two strategies for Virtex®-6 devices.
{ "spartan6": { "XST Options": ( {"name": "Syn1", "xst": "-fsm_encoding one-hot -reduce_control_sets auto"}, {"name": "Syn2", "xst": "-register_balancing yes -opt_level 2 -fsm_encoding one-hot -resource_sharing no -reduce_control_sets auto"}, ),
"MAP-Par options": ( {"name": "Impl1", "map": "-ol high -xe n -global_opt speed -logic_opt on -register_duplication on -w", "par": "-ol high -xe n"}, {"name": "Impl2", "map": "-ol high -xe n -register_duplication on -w", "par": "-ol high -xe n"}, ), },
"virtex6": { "XST Options": ( {"name": "Syn3", "xst": "-fsm_encoding one-hot -opt_level 2"}, {"name": "Syn4", "xst": "-register_balancing yes -fsm_encoding one-hot -resource_sharing no -reduce_control_sets auto"},
38 www.xilinx.com SmartXplorer for Command Line UsersUG688 September 21, 2010
Appendix A: Custom Files
),
"MAP-Par options": ( {"name": "Impl3", "map": "-ol high -xe n -global_opt speed -logic_opt on -w", "par": "-ol high -xe n"}, {"name": "Impl4", "map": "-ol high -xe n -w", "par": "-ol high -xe n"}, ), },}
Host List Files (Linux)
Regular Linux NetworkThe following example shows a host list file for a regular Linux network.
lin_machine_1lin_machine_1lin_machine_2lin_machine_3
According to this example, SmartXplorer runs four strategies simultaneously. They are run on three different Linux machines and lin_machine_1 runs two strategies in parallel.
LSF Compute FarmThe following example shows a host list file for LSF compute farm. In this example, the name of the queue is lin64_q and the maximum number of parallel jobs is six.
:LSF {"queue_name":"lin64_q", "max_concurrent_runs":6, "bsub_options": ""}
SGE Compute FarmFollowing is an example of a host list file for SGE compute farm. In this example, the name of the queue is lin64_q and the maximum number of parallel jobs is 6.
:SGE {"queue_name":"lin64_q", "max_concurrent_runs":6, "qsub_options": ""}
SmartXplorer Configurations for Various Tasks: Synthesis and Implementation Flow
Task 1: Run all built-in predefined strategiesThe following script runs all synthesis and implementation built-in predefined strategies (the -m option with a default value of 13 is skipped). They are executed on the machines specified in the host list file (-l option). The execution stops as soon as timing is met.
SmartXplorer for Command Line Users www.xilinx.com 39UG688 September 21, 2010
SmartXplorer Configurations for Various Tasks: Implementation Flow Only
smartxplorer -p xc6slx4-3-tqg144 -uc <file>.ucf -l <host_list_file> <design>.xst
Task 2: Run the first three built-in predefined strategiesThe following script runs the first three synthesis (with Quick Implementaiton) built-in predefined strategies (-m 3 option). They are executed on the machines specified in the host list file (-l option). The execution stops as soon as timing is met.
smartxplorer -p xc6slx4-3-tqg144 -uc <file>.ucf -l <host_list_file> -m 3 <design>.xst
Task 3: Run all built-in, predefined strategies and five additional iterations with different Cost Tables
Phase 1: This script runs all thirteen built-in predefined strategies first.
Phase 2: SmartXplorer selects the best strategy from phase-1 and runs it five additional times with different Cost Tables (-m 18 option: 13+5=18).
Strategies are executed on the machines specified in the host list file (-l option).
The execution stops as soon as timing is met.
smartxplorer -p xc6slx4-3-tqg144 -uc <file>.ucf -l <host_list_file> -m 18 <design>.xst
Task 4: Run all custom strategies and 3 additional iterations with different Cost Tables
In this example, we suppose that the custom strategy file contains only two implementation strategies.
Phase 1: This script runs the two strategies specified in the custom strategy file (-sf option).
Phase 2: SmartXplorer selects the best strategy from phase-1 and runs it three additional 1times with different Cost Tables (-m 6option: 3+3=6).
Strategies are executed on the machines specified in the host list file (-l option).
All five strategies are run regardless of the timing results (-ra option).
smartxplorer -p xc6slx4-3-tqg144 -uc <file>.ucf -l <host_list_file> -m 6 -
sf <strategy_file> -ra <design>.xst
SmartXplorer Configurations for Various Tasks: Implementation Flow Only
Task 1: Run all built-in predefined strategiesThe following script runs all implementation built-in predefined strategies (the -m option with a default value of 7 is skipped). They are executed on the machines specified in the host list file (-l option). The execution stops as soon as timing is met.
smartxplorer -p xc6slx4-3-tqg144 -uc <file>.ucf -l <host_list_file> <design>.ngc
40 www.xilinx.com SmartXplorer for Command Line UsersUG688 September 21, 2010
Appendix A: Custom Files
Task 2: Run the first three built-in predefined strategiesThe following script runs the first three implementation built-in predefined strategies (-m 3 option). They are executed on the machines specified in the host list file (-l option). The execution stops as soon as timing is met.
smartxplorer -p xc6slx4-3-tqg144 -uc <file>.ucf -l <host_list_file> -m 3 <design>.ngc
Task 3: Run all built-in, predefined strategies and five additional iterations with different Cost Tables
Phase 1: This script runs all seven implementation built-in predefined strategies first.
Phase 2: SmartXplorer selects the best strategy from phase-1 and runs it five additional times with different Cost Tables (-m 12 option: 7+5=12).
Strategies are executed on the machines specified in the host list file (-l option).
The execution stops as soon as timing is met.
smartxplorer -p xc6slx4-3-tqg144 -uc <file>.ucf -l <host_list_file> -m 12 <design>.ngc
Task 4: Run all custom strategies and 3 additional iterations with different Cost Tables
In this example, we suppose that the custom strategy file contains only two implementation strategies.
Phase 1: This script runs the two strategies specified in the custom strategy file (-sf option).
Phase 2: SmartXplorer selects the best strategy from phase-1 and runs it three additional times with different Cost Tables (-m 5 option: 2+3=5).
Strategies are executed on the machines specified in the host list file (-l option).
All five strategies are run regardless of the timing results (-ra option).
smartxplorer -p xc6slx4-3-tqg144 -uc <file>.ucf -l <host_list_file> -m 5 -sf <strategy_file> -ra <design>.ngc

SmartXplorer for Command Line Users www.xilinx.com 41UG688 September 21, 2010
Appendix B
Creating XST Script File
If you use Xilinx tools in command line mode, then you must use the same design.xst script file that you use to run XST in the command line mode.
If ISE®Project Navigator uses your default design environment, you will find design.xst in the project directory. This file is automatically generated by Project Navigator when you launch XST, and it must be used as an input file to launch SmartXplorer.
Please note that other files and directories can be referenced from design.xst:
• design.prj - XST project file (mandatory)
• design.xcf - XST constraint file
• design.lso - Library search order file
• etc.
Therefore we suggest to launch SmartXplorer from the project directory.

42 www.xilinx.com SmartXplorer for Command Line UsersUG688 September 21, 2010
Appendix B: Creating XST Script File