working with objects - microstar publishing 6... · microstar publishing pty ltd 2010 123 working...
TRANSCRIPT
Microstar Publishing Pty Ltd 2010 123
Working with Objects Objects can easily be inserted into documents to illustrate the points you are making in the document. You can use drawing objects, clipart and other images.
Objectives In this section you will:
Create drawing objects
Create WordArt objects
Insert ClipArt and Photos
Format and work with drawings and images
Chapter
6
This is just a sample of the objects you can use in a Word document.
BSBITU303A Design and produce text documents
124 Microstar Publishing Pty Ltd 2010
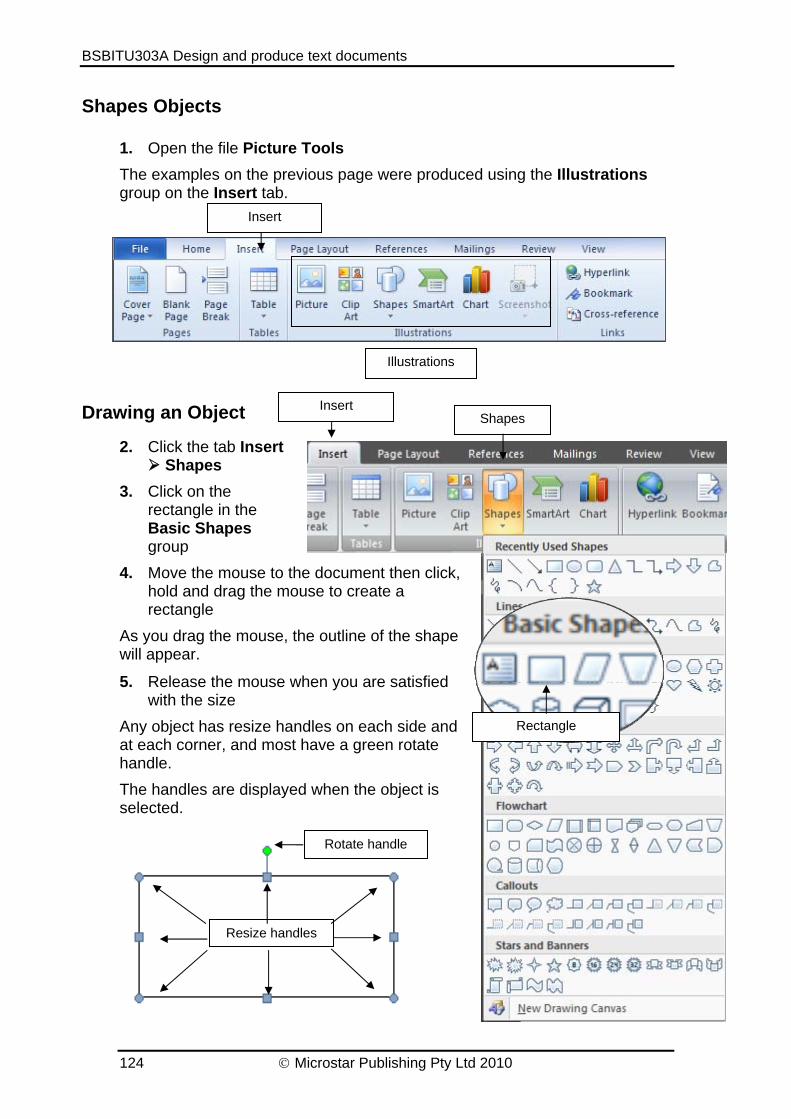
Shapes Objects 1. Open the file Picture Tools
The examples on the previous page were produced using the Illustrations group on the Insert tab.
Drawing an Object
2. Click the tab Insert Shapes
3. Click on the rectangle in the Basic Shapes group
4. Move the mouse to the document then click, hold and drag the mouse to create a rectangle
As you drag the mouse, the outline of the shape will appear.
5. Release the mouse when you are satisfied with the size
Any object has resize handles on each side and at each corner, and most have a green rotate handle.
The handles are displayed when the object is selected.
Illustrations
Insert
Insert Shapes
Resize handles
Rotate handle
Rectangle

Using Objects
Microstar Publishing Pty Ltd 2010 125
6Drawing a Line
The drawing tools are located together on the Shapes button. 1. Click on the tab Insert Shapes Line button
2. Click on the page to the left, hold the mouse button down.
The line will appear as a dotted line as shown below. Drag to the right, releasing the mouse when the line is the length you require
Drawing a Perfect Circle 1. Click on the Oval button in the Basic Shapes selection
2. Click on the screen to the left, hold the mouse button down, and hold the [Shift] key down at the same time and drag down and to the right, releasing the mouse when the circle is the size you require, then release the [Shift] button as well
Draw a Text Box A Text box is a small rectangle that you can enter text into. A text box is useful to add text to shapes. 1. Click on Insert Shapes Text box in the
Basic Shapes group
2. Click and drag down to the right to create the box
3. Type Step One in the box
4. Select the text and format it to be Font Size 26
Shapes
Lines
Step One
Text box

BSBITU303A Design and produce text documents
126 Microstar Publishing Pty Ltd 2010
Drawing an Arrow AutoShape
Some shapes have a handle that allows you to change the proportion of each section. For example an arrow as shown below. 1. Click on tab Insert Shapes button
2. Click on the Right Arrow
3. Click on the screen to the left, hold the mouse button down and drag to the right, releasing the mouse when the arrow is the length you require
Notice the little yellow diamond handles. You can use this handle to adjust the width of the arrow shaft and the length of the arrow head.
If you look closely at the arrow while it is selected you will notice a small diamond. This appears for some of the AutoShapes. It indicates that the shape is adjustable.
Shapes
Arrows
1. Move the mouse over the diamond handle
The mouse changes to just an arrow head which indicates you can adjust this shape.
2. Drag the diamond to the left and down to adjust the arrow head and shaft

Using Objects
Microstar Publishing Pty Ltd 2010 127
6Resize an Object
The resize handles are available so you can resize an object to be larger or smaller. 1. Move the mouse over the left middle resize handle
2. Click, hold and drag the mouse to the right to make the arrow smaller
Rotate Objects The rotate handles (the little green handle) enables you to rotate an object to desired direction. 1. Click on the shape so it is selected and the handle is displayed
2. Move the mouse over the handle, then click, hold and drag the handle to the right
3. The new position of the shape is indicated while you are dragging – release the mouse when the shape is in the correct position
Move Objects 1. Click on the text box to select it
2. Move the mouse over any part of the object except a handle
3. Click, hold and drag the box until it is positioned above the arrow
Rotate handle

BSBITU303A Design and produce text documents
128 Microstar Publishing Pty Ltd 2010
Selecting Multiple Objects We can select objects together. This is helpful if we want to maintain positioning relative to each other but want to alter placement of the set. We use the [Shift] key on the keyboard to select multiple objects. 1. Click on the Text Box shape
2. Press the [Shift] key down and hold
3. Click on the Arrow shape
4. Release the [Shift] key
Your selection should look like this shown to the right. 5. Click on the Format tab and click on Group and Group again
Now you can treat the group of objects as one – this makes it easy to move and copy. You can still work with the objects individually for formatting.
Group Group

Using Objects
Microstar Publishing Pty Ltd 2010 129
6
Copy a Drawing Object Any object that is selected can be copied then pasted elsewhere in the document. We will try it with the group, making a copy for the same page. 1. Click on the group to select it
2. Click on Copy button on the Home tab
3. Click on Paste on the Home tab
A copy of the group will be pasted to overlap the original. It will be selected. Now we can just move it to the correct position on the page.
4. Drag the new object down
5. Copy the object once more and drag down
6. Click on Save to save your progress
Ungroup a Group The last arrow is not needed in the diagram. 1. Click on the group of shapes to be ungrouped
2. Click on the Format tab and click on Group and Ungroup
3. Click on the last arrow in the group and press the [Delete] key on the keyboard to delete it
4. Ungroup the other two groups so you have five separate objects
Paste Copy
Ungroup
Group

BSBITU303A Design and produce text documents
130 Microstar Publishing Pty Ltd 2010
Arranging Objects Sometimes it is difficult to align objects manually.
1. Click on the first shape
2. Hold down the [Shift] key and click on the each of the other shapes so they are all selected
3. Click on the Format tab
4. Click on the Align button
5. Click on Align Centre – this will align all the objects
With the objects all still selected:
6. Click on the Align button again and click on Distribute Vertically
This will spread the objects out so there is equal space between them.
7. Click in the second text box and delete One and type Two
8. Click in the third text box and delete One and type Three
Format Objects with Quick Styles You can apply Quick Styles to objects to apply a fill and an outline in one step. 1. Click on a shape so its resize handles
appear
2. Click on the Quick Styles button on the Format tab and choose one of the Quick Styles
3. Repeat to apply the same format but different colour to each of the shapes
4. Format the text in each box to be White
Align
Align Centre
Distribute Vertically
Quick Styles

Using Objects
Microstar Publishing Pty Ltd 2010 131
6
Object Colours and Styles The Drawing Tool Format tab allows you more variety in colours and styles.
Fill Colour All drawing objects can be coloured in.
1. Click on the circle object
2. Click on the Shape Fill drop list button and choose a colour – an initial selection is provided based on the colour scheme of your document
3. Click on More Fill Colors
The Custom tab provides you with a large array of colours from which to choose. The Standard tab has a large selection which is also useful.
4. Click on a colour you like then click on OK
More Fill Colors

BSBITU303A Design and produce text documents
132 Microstar Publishing Pty Ltd 2010
Outline Colour All lines and outlines of drawing objects can be coloured. You have the same choices as when choosing Fill colour as shown on the previous page. 1. Click on the line or drawing object
2. Click on tab Format Shape Outline and choose a colour
Outline Style
Lines can be various thicknesses and styles. 1. Click on the line or drawing object
2. Click on tab Format Shape Outline Weight and choose a style
Dashed Lines
There are various types of dashed lines we can apply to the lines we have drawn, or the objects we have inserted on our page. 1. Click on the line or drawing project
2. Click on tab Format Shape Outline Dashes and choose a style
Arrow Heads There are various sizes of arrowheads we can apply to lines. 1. Click on the line
2. Click on tab Format Shape Outline Arrows and choose a style
Shape Outline
Weight
Dashes
Arrows

Using Objects
Microstar Publishing Pty Ltd 2010 133
6
Shadow Effects We can give drawing objects a shadow. 1. Click on the drawing object
2. Click on tab Format Shadow Effect and choose a style
Stacking Objects You can change the order of objects in a stack using the buttons shown below. 1. Scroll down to the second page of the Picture
Tools file
2. Click on the Circle to select it
3. Click on the Format tab Bring to Front 4. Select the circle again
5. Click on Send to Back droplist arrow Send Backward
This place the circle back one in order.
6. Click on Send to Back droplist arrow Send Backward
Now the circle is behind both the other shapes.
7. Click on the Bring to Front option
The circle will come right to the front in one step.
8. Experiment with the other shapes
Shadow Effects

BSBITU303A Design and produce text documents
134 Microstar Publishing Pty Ltd 2010
Practice Exercise 6.1 Use Text Boxes and Shapes 1. Scroll down the document to the page titled Practice Exercise 1 of the
Picture Tools file
2. Create a flow chart as illustrated below using shapes, text boxes and arrows
3. Apply formatting to the diagram
4. Align the shapes so they are centred
Receive handwritten draft of document
Type document
Use spelling and grammar checker
Proofread document for spelling, grammar
and punctuation
Print the document and return it to the writer for signing

Using Objects
Microstar Publishing Pty Ltd 2010 135
6
Image Wrapping
The default setting when inserting ClipArt or other images is to put the object in line with text. This makes it hard to move around and position it exactly where you want it.
You can change the setting in Word so that the object is easier to move.
1. Click on the tab File then the Options button
2. Click on the Advanced tab
3. Click on the droplist button for Insert/paste pictures as: and click on Tight
4. Click on OK
Now when you insert ClipArt or other images you will be able to move them around easily.
Options
Tight
Advanced

BSBITU303A Design and produce text documents
136 Microstar Publishing Pty Ltd 2010
Insert Clip Art
Adding pictures and graphics to a document creates some extra interest and can be used to illustrate the purpose of an article. Clip Art can add extra impact to the page. Microsoft Word has some great Clip Art that we can utilise.
1. Scroll to the page titled Inserting Clip Art of the Picture Tools file
2. Click on the tab Insert Clip Art in the ribbon to display the Insert Clip Art Task Pane as shown below
Search for – allows you to type a description of the kind of clip you are looking for Search in – this option allows you to search various collections or just one particular collection. Clip art on Office Online – will take you to the Internet to search the Microsoft Office web site. Tips for Finding Clips – opens Help 3. Click on Go – leaving the Search
Text box empty
4. Scroll through the Results and click on one
The Clip will appear on the screen. Repeat to enter several Clip Art pieces.
Go
Search in
Clip art on line
Hints…
Click on the clip to insert it

Using Objects
Microstar Publishing Pty Ltd 2010 137
6
Insert Clip Art from Microsoft Office Online
These steps show you how to download Clip Art so you can access them multiple times from the Clip Organiser.
1. Click on the Clip Art icon to activate the Clip Art task pane
2. Type telephone in the Search for box and click on Go
The Clip Art available on your computer is displayed. You may be lucky and find something suitable there. There is a huge range of Clip Art available on the Microsoft web site.
3. Click on the Find more at Office.com link at the base of the Clip Art task pane
Internet Explorer will start and display the Clip Art web page.
4. Click into the Search box and type Telephone then click on Search
Clip Art that match the search term are displayed. You can look at more pages by clicking on the Next button.
Find more at Office.com
Search
Search box

BSBITU303A Design and produce text documents
138 Microstar Publishing Pty Ltd 2010
5. Move the mouse over the picture that you would like to download and
then click on Add to Basket
6. Add three pictures to the Basket
7. Scroll to the top of the screen and click on the Selection Basket (3)
8. Click Download – you can select as many as you want and from more than one page but be mindful of the size of the collection you are downloading
Using Objects
Microstar Publishing Pty Ltd 2010 139
6
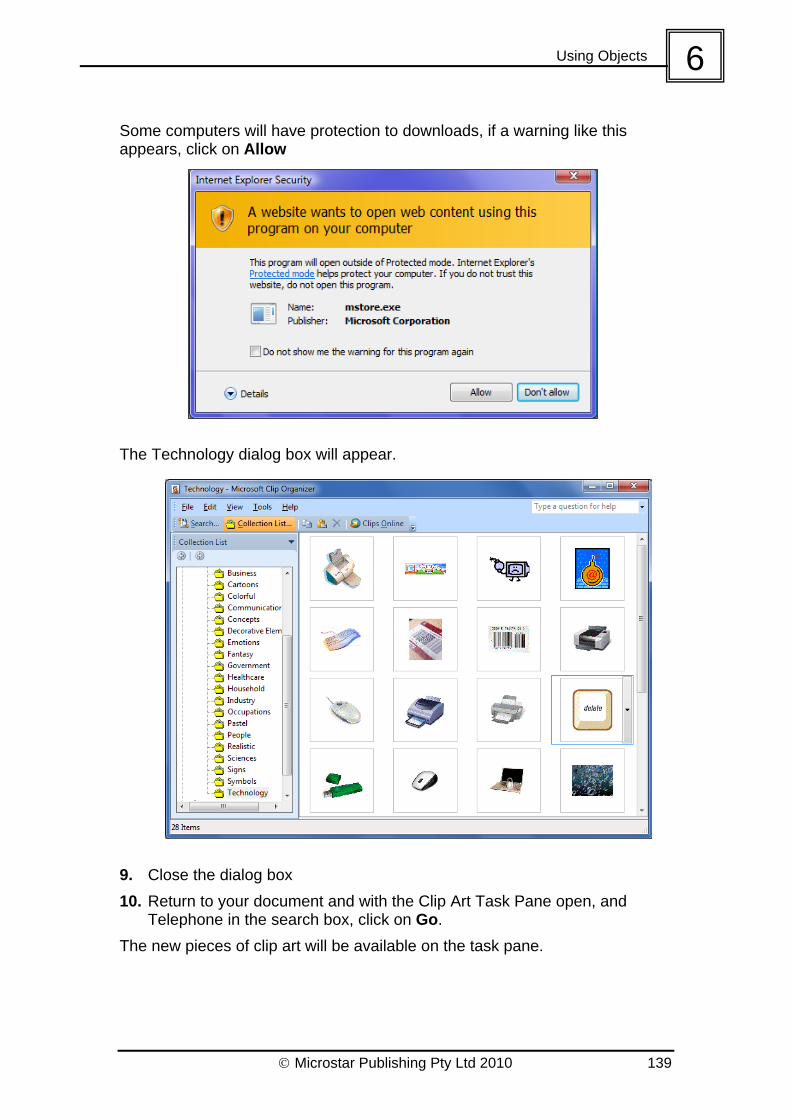
Some computers will have protection to downloads, if a warning like this appears, click on Allow
The Technology dialog box will appear.
9. Close the dialog box
10. Return to your document and with the Clip Art Task Pane open, and Telephone in the search box, click on Go.
The new pieces of clip art will be available on the task pane.

BSBITU303A Design and produce text documents
140 Microstar Publishing Pty Ltd 2010
Practice Exercise 6.2: Locate and Download ClipArt
1. Open the file Introduction to the Internet
2. Click on Find more at Office.com
3. Search for clips using the term Internet
4. Download the clips
5. Insert one each onto page 2, page 6 and page 8, positioning them and resizing as appropriate
6. Save the file and leave open

Using Objects
Microstar Publishing Pty Ltd 2010 141
6Practice Exercise 6.3 Use Shapes, ClipArt and Text Boxes
1. Start a new document and save it as Dingaling Links
2. Enter the following text:
Dingaling is making it simple for business Working smarter, not harder We’re always looking at ways to help make running your business smoother and easier. With Dingaling, you can link all you mobile needs, so you really can work smarter, not harder.
Let’s talk business We believe you should benefit from doing business with us. So now the more you integrate your Dingaling mobile products and services, the more you save, which just makes good business sense.
3. Insert the following objects (the images are a mobile phone, a blackberry/palm pilot, a pc or laptop)
4. Format the headings and text
5. Resize and place the objects and text so that the page is fully utilised
6. Save and close the file
Super Share Linking your business needs With Dingaling SuperShare you can now share your monthly commitment across
your business account for mobile services, blackberry and wireless
connections.

BSBITU303A Design and produce text documents
142 Microstar Publishing Pty Ltd 2010
Formatting Images The image of a picture is usually coloured when it is first inserted. It can be changed to be grayscale, colour variations, black and white or to appear as a washout. It will be difficult for you to see the difference in this example if this manual is in black and white, however if you look closely you may see subtle differences. 1. Scroll to the page titled Adjust the Image of the Picture Tools file
2. Click on the second image
3. Click on the tab Format then the Corrections button
These options adjust both Brightness and Contrast. The image in the middle is ground zero.
4. Move the mouse over the Brightness options and click on Brightness +40% Contrast 0% (Normal)
5. Click on the third image
6. Click on the tab Format then the Corrections button
7. Move the mouse over the Contrast options and watch how it affects the image
8. Move the mouse over the Contrast options and click on Brightness +0% (Normal) Contrast 40%

Using Objects
Microstar Publishing Pty Ltd 2010 143
69. Click on the fourth image
10. Click on the tab Format then the Color button
11. Look at the various Recolor Mode options available
12. Click on the Washout option
The Washout option is commonly used when images are used as a background for a page.

BSBITU303A Design and produce text documents
144 Microstar Publishing Pty Ltd 2010
Cropping an Image Cropping enables you to use just part of an image. 1. Scroll to the page titled Cropping an Image of the Picture Tools file
2. Click on the balloon image
3. Click on the Crop button on the Format tab
The mouse changes to a crop symbol. The image resize handles are replaced with crop handles. 4. Move the mouse to the middle handle
on the lower border
5. Click, hold and drag in slightly then release
6. Move the mouse to the left middle crop handle
7. Click, hold and drag in towards the centre then release
These actions trim off parts of the image making it smaller in size but maintaining the image
You could have achieved this in one action by using a corner crop handle. 8. Repeat these actions to crop the other
pictures on the slide
Crop
Using Objects
Microstar Publishing Pty Ltd 2010 145
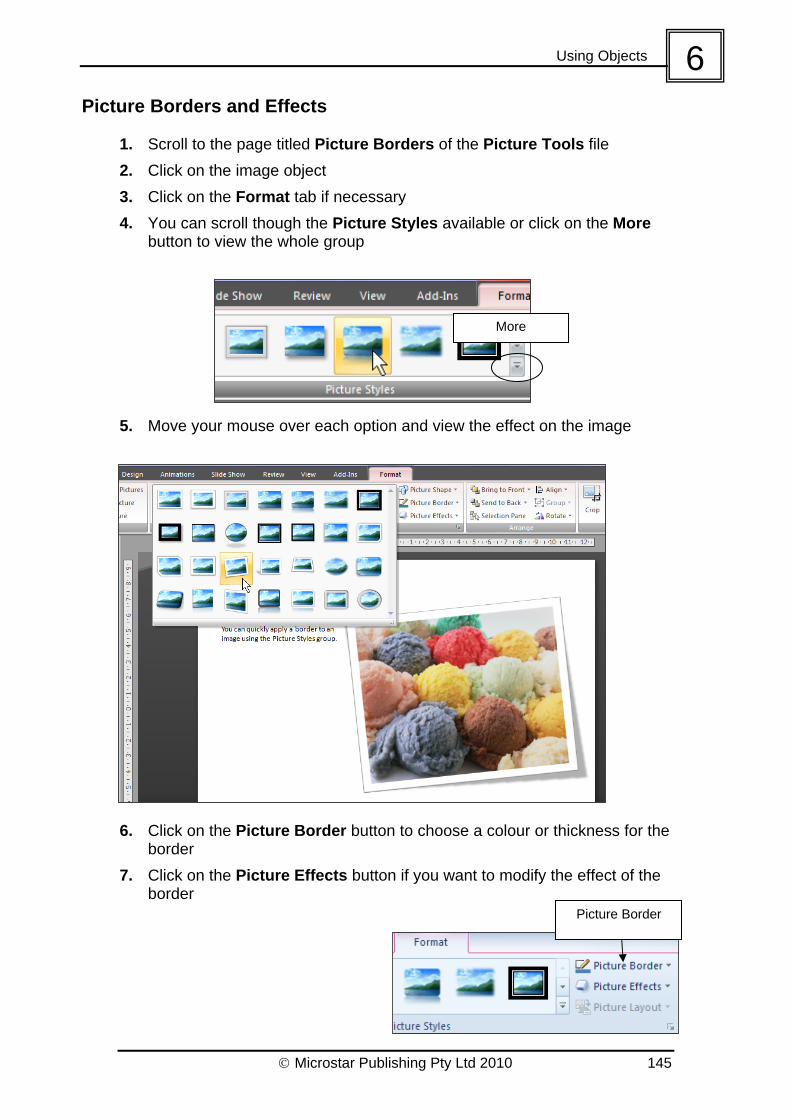
6Picture Borders and Effects
1. Scroll to the page titled Picture Borders of the Picture Tools file
2. Click on the image object
3. Click on the Format tab if necessary
4. You can scroll though the Picture Styles available or click on the More button to view the whole group
5. Move your mouse over each option and view the effect on the image
6. Click on the Picture Border button to choose a colour or thickness for the
border
7. Click on the Picture Effects button if you want to modify the effect of the border
More
Picture Border

BSBITU303A Design and produce text documents
146 Microstar Publishing Pty Ltd 2010
Text Wrapping around Pictures When pictures and Clip Art are inserted into a document they will push the text to be either above or below the image. However, sometimes you may want the text to “wrap” around the picture. 1. Scroll to the page titled Text and Pictures
2. Click on the ClipArt
3. Click on the Text Wrapping button in the Picture Tools Format tab display a list of available wrapping styles
4. Click on the Text Wrapping style Tight
5. Drag the clip around – the text will move around it
6. Click on Text Wrapping again and click on Top and Bottom
7. Try some of the other Text Wrapping styles
Resetting the Picture
The picture can be reset to its original size, colour etc, by clicking on the Reset Picture button. 1. Click on the picture to select it
2. Click on the Reset Picture button
3. The picture will return to its original format
4. Save and close the file
Reset Picture
Text Wrapping
Tight
Top and Bottom

Using Objects
Microstar Publishing Pty Ltd 2010 147
6Practice Exercise 6.4 Gather and Arrange Images and WordArt
In this exercise you are to create a flyer advertising an aquarium called Aquamarina.
1. Look at the design on the following page
2. Locate appropriate images in ClipArt or on Microsoft Office Online
3. Open the file Flyer Aquamarina
4. Insert the five images you gathered, modifying size to be similar to the design on the following page
5. Use the Stacking feature to place them in the order shown
6. Apply the Drop shadow rectangle as a Picture Border to each of the pictures
Your finished document should look something like this. You will probably have different pictures.
7. Save and close the file

BSBITU303A Design and produce text documents
148 Microstar Publishing Pty Ltd 2010
Inserting Picture Image Files Images and graphics from sources other then ClipArt can also be inserted. In this example you will insert a picture file from your student files 1. Open the file Picture Tools and scroll to the page titled Pictures
2. Click on the tab Insert Picture in the ribbon
The Insert Picture dialog box appears.
3. Click on the Look in box and select the drive your files are in and open the Design Word Documents 2010 folder
4. Click on the Mona Lisa file
5. Click on Insert
Look in
Insert
Views
To view a sample of the picture file, click on the Views button and click on Tiles.
Insert Picture

Using Objects
Microstar Publishing Pty Ltd 2010 149
6 The picture will appear on the page. The picture can be worked with as with any ClipArt object. The only exception is altering the colour of the picture. This usually needs to be done using a more sophisticated graphics program. If you are wondering why it is called Mona Lisa – this is the building in Rome where it was painted. 6. Use the tools on the Format tab to modify how the picture looks
7. Save and close the file
Insert a Picture File into a Table
A table can be used to place text and pictures. To do this exercise you will need to know how to create a table. See Chapter 4 if you need a refresher.
1. Start a new document and save it as Department sales contacts
2. Enter the first heading shown below and centre the text, the Font size is 20 pt
3. Insert a table that is four columns wide
4. Enter the text in each row leaving the second row blank
5. Format the text in the first row to be font size 18, third row to be font size 14 and the last row to be font size 12 and Bold
6. All text is centred horizontally and vertically
7. Format the first and fourth rows to have Aqua shading and the text in it to be White
Call our office now or call direct for expert assistance with sales and purchases
Homes Commercial Business Rentals
Miles Franklin John Harvey Peta Ellis Phillipa Faneco
0412 582 621 0437 889 245 0412 889 278 0412 808 808

BSBITU303A Design and produce text documents
150 Microstar Publishing Pty Ltd 2010
8. Resize the second row to be 4.5 cm deep
9. Click into the first cell in the second row
10. Click on tab Insert Picture in the ribbon
11. Locate your student files and insert the file Pic Miles
12. Crop the picture and resize so it appears as shown below
13. Click on the picture and click on the Format tab then click on Text Wrapping In front of text
14. Repeat steps 9 to 13 to insert the remaining files: Pic John, Pic Peta and Pic Phillipa
15. Format the table to have all borders white and 3 pt wide
16. Insert a row at the end of the table
17. Merge the cells and enter the text:
Office hours 8 am to 6 pm Monday to Saturday Ph 02 9856 9856
18. Format it to be size 14, bold and centred
19. Save and close the file
Call our office now or call direct for expert assistance with sales and purchases
Homes Commercial Business Rentals
Miles Franklin John Harvey Peta Ellis Phillipa Faneco
0412 582 621 0437 889 245 0412 889 278 0412 808 808
Office hours 8 am to 6 pm Monday to Saturday Ph 02 9856 9856

Using Objects
Microstar Publishing Pty Ltd 2010 151
6SmartArt
SmartArt is a great new feature that you can use to put across specific concepts or relationships.
1. Start a New file and save it as Balanced Diet
2. Type the following text:
A Balanced Diet
It is important for your health and wellbeing that you eat a
balanced diet. You can use this pyramid as a guide to how much
of each type of food you should try to eat every day.
3. The heading it Font Size 36, the body text is Font Size 16, all text is Centred
4. Click on the tab Insert Shapes Text box
5. Type a heading Cost/Profit Relationship and format it to be centred and 28 size font
6. Click on the tab Insert SmartArt in the ribbon
7. Click on the Pyramid group or scroll down to it
8. Click on the Basic Pyramid then click on OK
Pyramid
Basic Pyramid
Insert SmartArt

BSBITU303A Design and produce text documents
152 Microstar Publishing Pty Ltd 2010
The SmartArt object is put on the page. A piece of SmartArt is generally several objects placed together with text boxes attached. The text can be entered directly into the text boxes or you can use the box to the left of the SmartArt frame.
9. Type Fats 1-2 serves then press [Enter] to move to the next point
10. Type Lean meat, fish, poultry, eggs, nuts, pulses 2 serves then press [Enter]
11. Type Milk, yogurt, cheeses 3 serves then press [Enter]
12. Type Fruit, 2-3 serves, vegetables 5 or more then press [Enter]
13. Type Breads, cereals, rice, pasta, noodles, water 5-6 serves then press [Enter]
14. Oops, gone too far! Press the [Backspace] key to delete the extra section

Using Objects
Microstar Publishing Pty Ltd 2010 153
6You can also change the colours of the SmartArt. The Colour schemes provided are based on the Theme applied to the document 15. With the SmartArt selected click on the tab Design Change Colors
16. Click on the last option in Accent 1
17. Scroll down the styles and click on the second last as shown below – or choose one of your own
The new colour scheme is applied to the SmartArt. You can also change the style.
18. Scroll through the Styles and click on a few to view the effect on the pyramid
19. Click on the Reset Graphic button to put it back to basic formatting
Styles Change Colors
Color option
SmartArt Styles Reset Graphic
BSBITU303A Design and produce text documents
154 Microstar Publishing Pty Ltd 2010
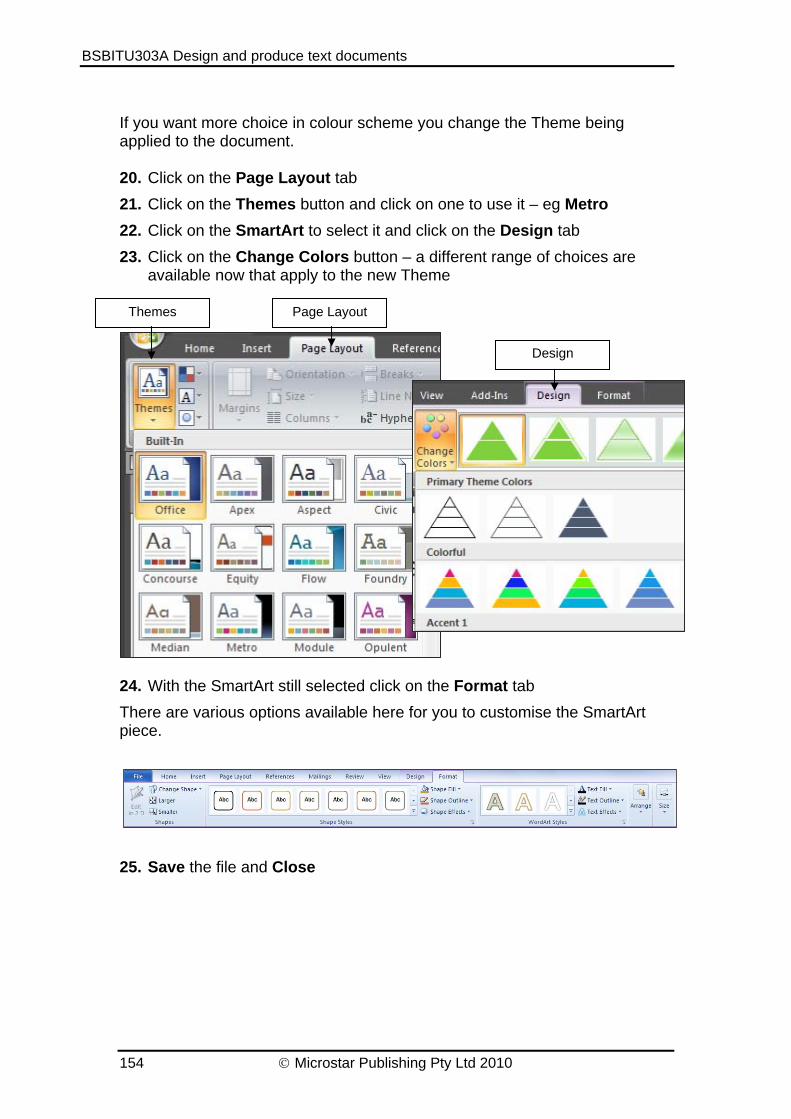
If you want more choice in colour scheme you change the Theme being applied to the document. 20. Click on the Page Layout tab
21. Click on the Themes button and click on one to use it – eg Metro
22. Click on the SmartArt to select it and click on the Design tab
23. Click on the Change Colors button – a different range of choices are available now that apply to the new Theme
24. With the SmartArt still selected click on the Format tab
There are various options available here for you to customise the SmartArt piece.
25. Save the file and Close
Page Layout Themes
Design