word up! 2007
DESCRIPTION
Word Up! 2007. (Everything You Needed To Know About Word 2007 , But Were Afraid To Ask) Presented By: Terence Peak. Topics. What’s new - Word 2007 Fields Newsletter functions Headers and footers Document review Mail Merge. What’s New. - PowerPoint PPT PresentationTRANSCRIPT

Word Up! 2007
(Everything You Needed To Know About Word 2007 , But Were Afraid To Ask)
Presented By: Terence Peak

TOPICS
What’s new - Word 2007FieldsNewsletter functionsHeaders and footersDocument reviewMail Merge

What’s New
This section will explain the Ribbon, Quick Access Toolbar, MS Office Button, Mini Toolbar, and Key Tips

WHAT’S NEW
Revisions in Office 2007 have created major changes in the layout of Word.The Ribbon, Quick Access Toolbar, and the MS Office Button replace the menu, Standard and Formatting Toolbars in Word 2003. The Mini Toolbar provides quick access to popular editing functions.Key Tips are shortcuts to tab and menu options on the Ribbon.

QUICK ACCESS TOOLBARLocated next to the MS Office Button, the Quick Access Toolbar offers one-click access to the most widely used office functions. By default, there are 3 buttons: Save, Undo, & Redo. Click on the arrow next to the toolbar, to open the customize menu Click the checkbox next to each feature to add and more options to the toolbarClick More commands to open up the Customize menu
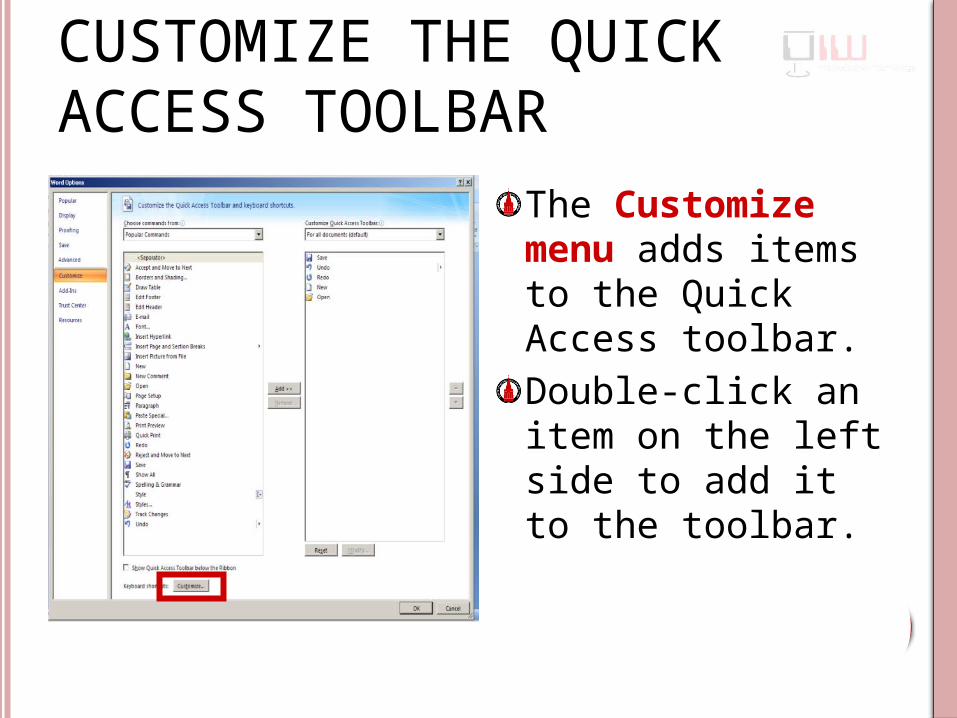
CUSTOMIZE THE QUICK ACCESS TOOLBAR
The Customize menu adds items to the Quick Access toolbar. Double-click an item on the left side to add it to the toolbar.

THE RIBBON
Commands: Buttons, boxes or menus relating to specific functions within Word
Tabs: 8 tabs representing common related activities
Groups: Sections containing Related items or tasks
Office 2007 is arranged differently. All menus are located within tabs on a menu bar called the RibbonThe three parts of the Ribbon are Tabs, Groups, & Commands.
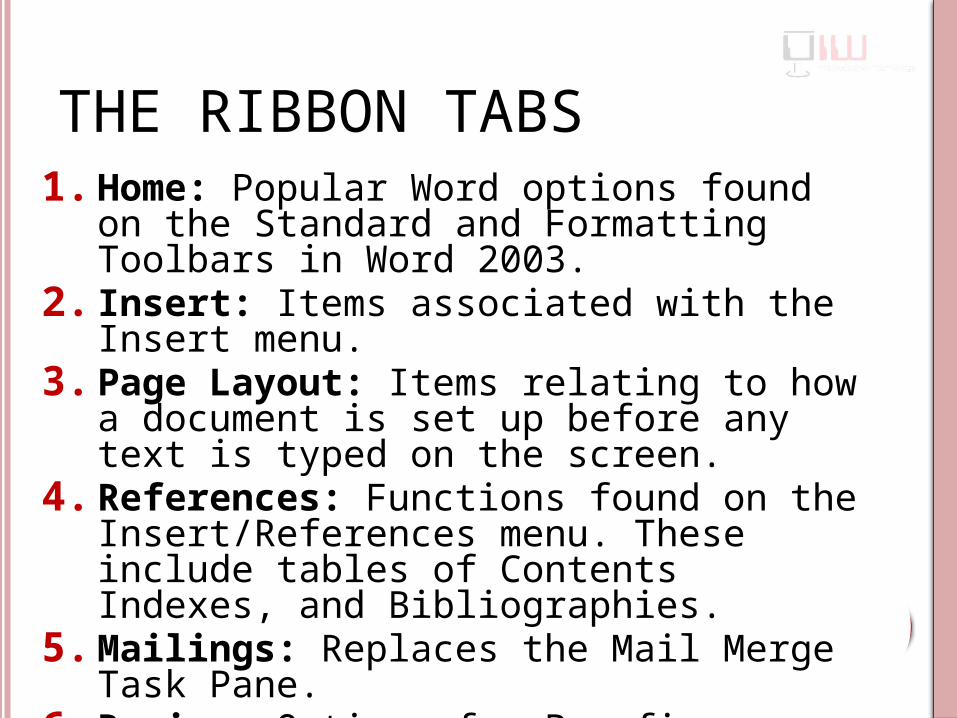
THE RIBBON TABS1. Home: Popular Word options found on the
Standard and Formatting Toolbars in Word 2003.2. Insert: Items associated with the Insert menu.3. Page Layout: Items relating to how a document is
set up before any text is typed on the screen.4. References: Functions found on the
Insert/References menu. These include tables of Contents Indexes, and Bibliographies.
5. Mailings: Replaces the Mail Merge Task Pane.6. Review: Options for Proofing, Comments, Tracking
Changes and Document protection.7. View: Options for how you see documents on the
screen.

THE MS OFFICE BUTTON REPLACES THE FILE MENU

THE MS OFFICE BUTTONThe MS Office Button is a New Feature of Word 2007. This button is the access point for:
Creating New Word Documents OpeningSavingPrinting Closing
This Button replaces the File menu.

THE MS OFFICE BUTTONThe MS Office Button also houses.
A list of Recently Used documents.Word Options (previously located under the Tools menu).Prepare to finalize documents for distribution.Send which distributes documents through facsimile or email. Publish to distribute a document to a server, blog, or shared workspace.

WORD OPTIONS
Word Options – Opens the Options menu previously located on the Tools menu. These options have changed significantly in 2007, so take a minute to look over the changes.

WORD OPTIONS
There are 9 categories of Word Options:
1. Popular2. Display3. Proofing4. Save5. Advanced6. Customize7. Add-Ins8. Trust Center9. Resources

POPULAR Top Options for Word:. Choose options by clicking the checkboxes.Personalize your copy of MS Office: Replaces the User Information tab on the Word 2003 Options menu.Language Settings replaces the Set Language option on the Word 2003 Tools menu.

DISPLAYPage Display Options, Always Show Formatting Marks, and Printing Options replace the options in the View tab on the Word 2003 Options menu.These items can also be selected by clicking on the Show Formatting Icon on the Home Ribbon.

PROOFING
AutoCorrect Options replaces the AutoCorrect tab on the Word 2003 Tools menu.Spelling and Grammar Options replace the Spelling and Grammar tab on the Word 2003 Options menu.

SAVESave Options replaces the Save tab on the Word 2003 Options menu.Click Save in this Format to change the file type to Word 97-2003 document. This way, all of your documents can be edited in both Word 2003 and 2007.

ADVANCED
The Advanced tab has several options, scroll down to view all of themEditing Options and Cut, Copy & Paste replace the Edit tab on the Word 2003 Options menu

ADVANCEDShow Document Content replaces the View tab on the Word 2003 Options menu.Display replaces functions found under both the View and General tabs on the Word 2003 Options menu.
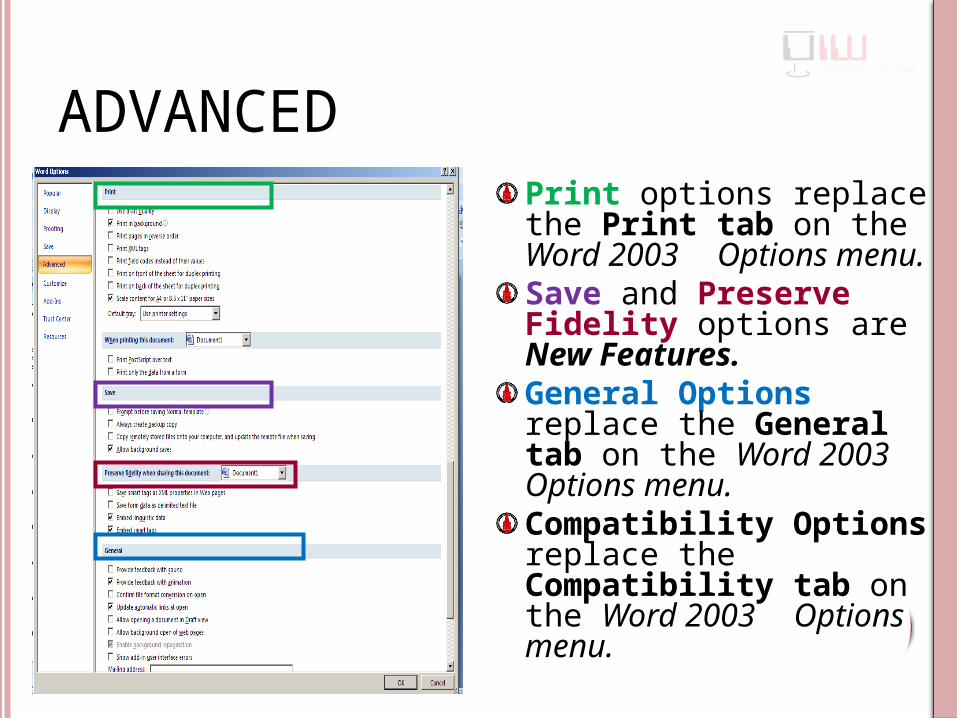
ADVANCEDPrint options replace the Print tab on the Word 2003 Options menu. Save and Preserve Fidelity options are New Features.General Options replace the General tab on the Word 2003 Options menu.Compatibility Options replace the Compatibility tab on the Word 2003 Options menu.

ADD-INSAdd-Ins are customizable by user.There are lists of both active and inactive Add-In.To activate an Add-In, choose from the Manage drop down menu at the bottom of the page.Click Go.Check the options that you want to Add-In and click OK.

TRUST CENTER
The Trust Center allows you to choose security settings for your documents.There are several tutorials that can be accessed by clicking on the links.

RESOURCES
The Resources Page is a one-stop location to:
Download.Troubleshoot.Help online
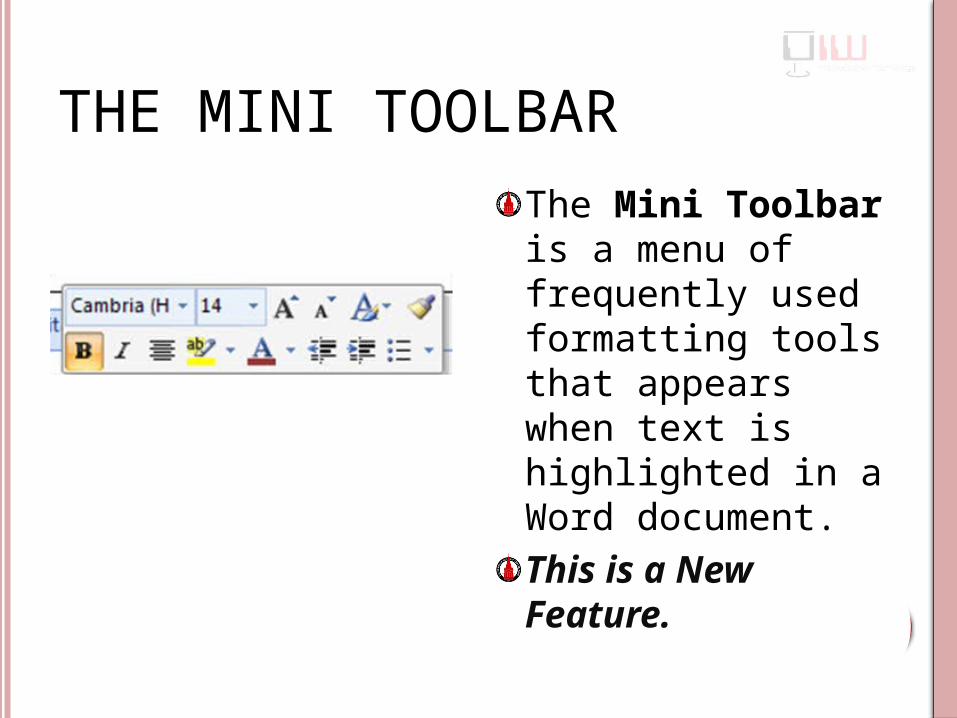
THE MINI TOOLBAR
The Mini Toolbar is a menu of frequently used formatting tools that appears when text is highlighted in a Word document. This is a New Feature.

KEY TIPS
Key Tips are shortcuts to tab and menu options on the Ribbon. This is a New FeaturePush the alt key to show the Key Tips, then push the corresponding letter on the keyboard to activate the Key Tip.
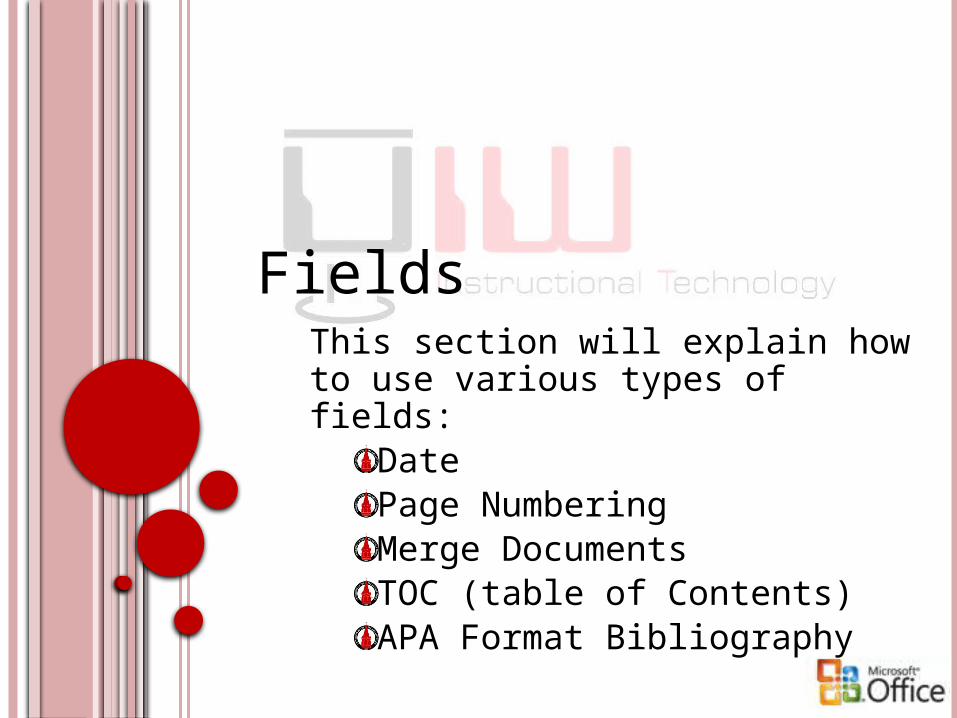
FieldsThis section will explain how to use various types of fields:
Date Page NumberingMerge DocumentsTOC (table of Contents)APA Format Bibliography

INSERT FIELDS
Fields are set of codes that instructs Microsoft Word to insert text, graphics, page numbers, and other material into a document automatically. This section will explain the following fields:
Date Page NumberingMerge DocumentsPage BreaksTOC (table of Contents)APA Bibliography

THE INSERT TAB
The Pages group: Inserts pages into a document.The table group: Inserts tables into a document. After the table is created, The Table Tools tab opens with Design and Layout options.The Illustration group: Inserts images and graphics. Opens the Picture Tools tab to edit images.The Links group: Adds links to a document. The Header/Footer group: Add header, footer, or page #The Text group: Adds several different text items.The Symbols group: Adds either an equation or a symbol.

INSERT DATE
Open the document “Letterhead”Click mouse at the top of the pageOn the Insert tab, choose Date and timeSelect a Date format Click the Update automatically box if the date changes each time the document opensClick OK

INSERT PAGE NUMBEROpen the document “Letterhead”On the Insert tab, locate the Page NumberChoose a PositionChoose Format Page Numbers for additional options

INSERT (MERGE) TEXT FROM A FILE
Inserting Text from Files combines 2 documents. Use this process to merge documents with similar formattingOpen “Letterhead”, and click the mouse below the titleOn the Insert tab, click on the arrow next to ObjectChoose Text from FileNavigate to the File “TOC”
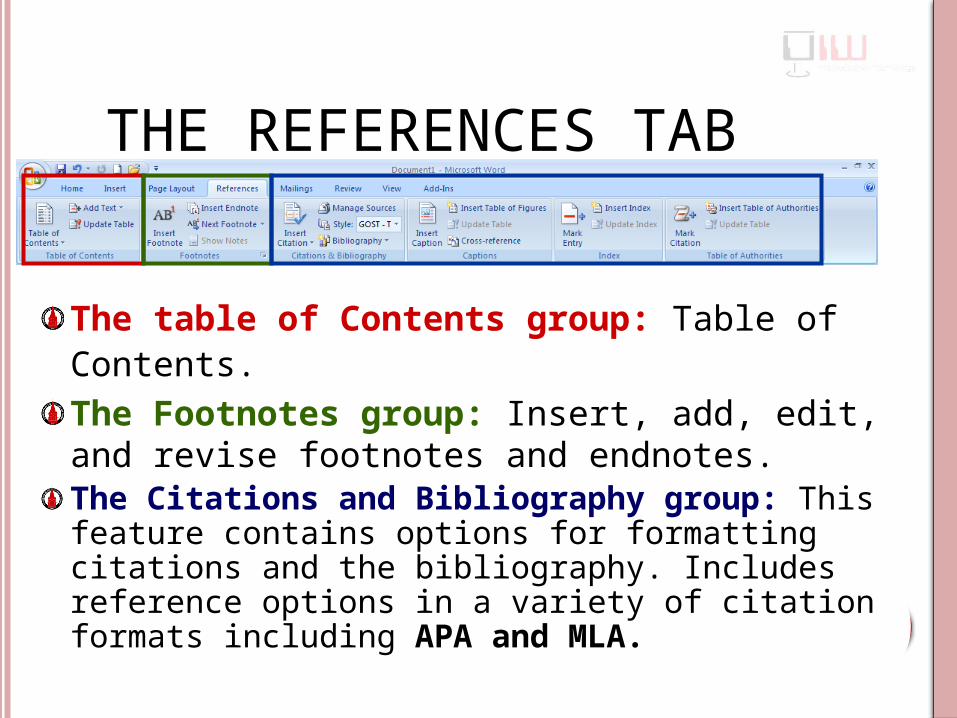
THE REFERENCES TAB
The table of Contents group: Table of Contents.The Footnotes group: Insert, add, edit, and revise footnotes and endnotes. The Citations and Bibliography group: This feature contains options for formatting citations and the bibliography. Includes reference options in a variety of citation formats including APA and MLA.

PAGE BREAKOpen “TOC”Click mouse at the bottom of Page 1On the Insert tab, click Page Break

TABLE OF CONTENTS
On the References tab, choose table of ContentsChoose a style by clicking on it
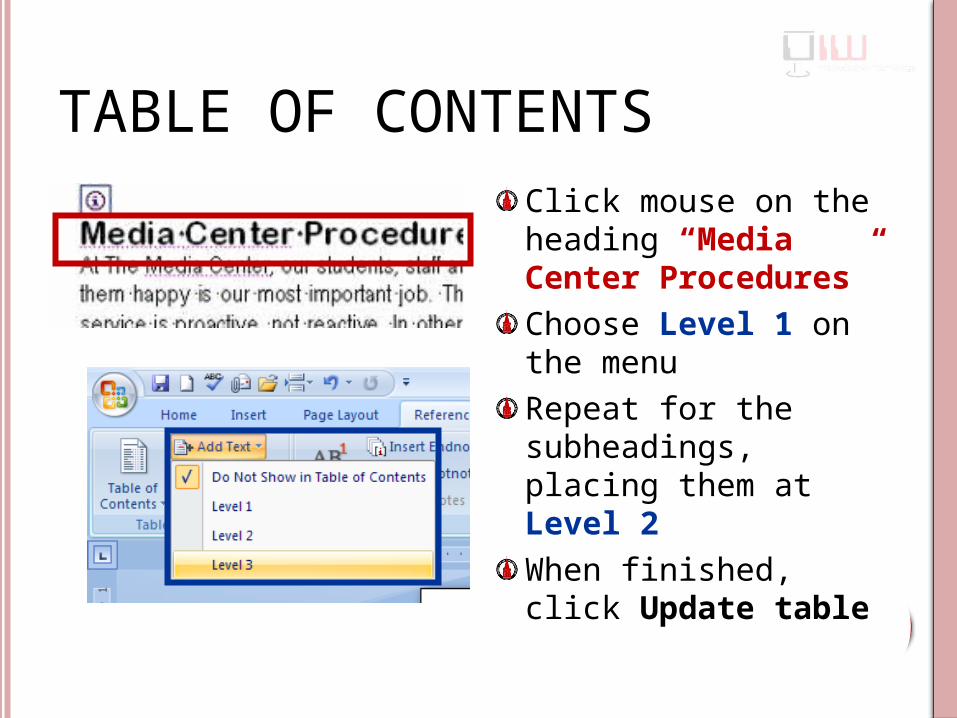
TABLE OF CONTENTSClick mouse on the heading “Media Center Procedures”Choose Level 1 on the menuRepeat for the subheadings, placing them at Level 2 When finished, click Update table
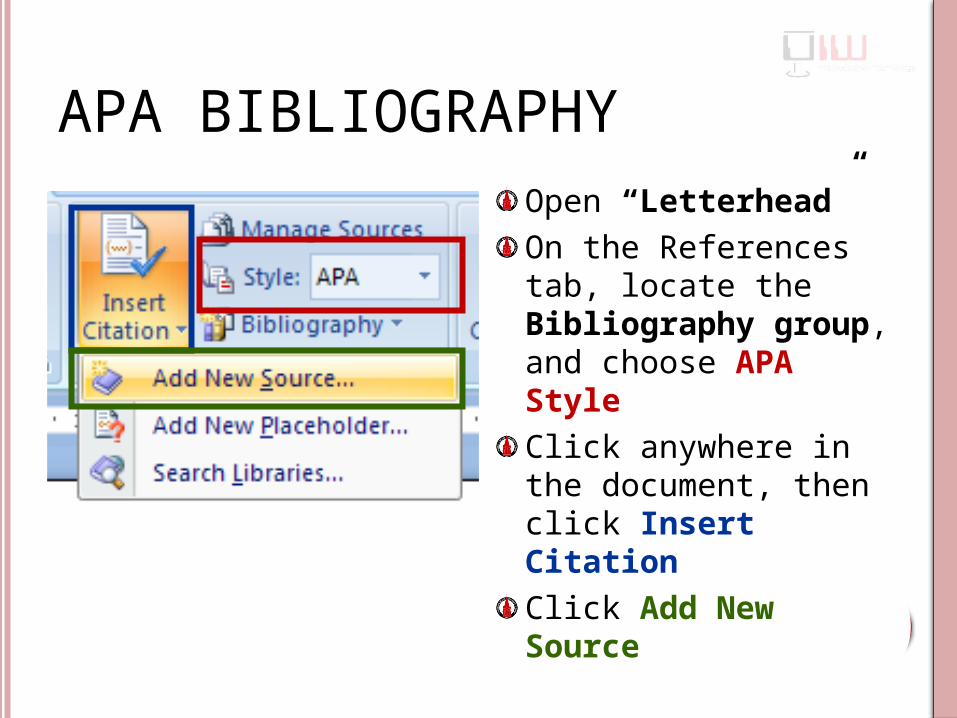
APA BIBLIOGRAPHYOpen “Letterhead”On the References tab, locate the Bibliography group, and choose APA StyleClick anywhere in the document, then click Insert Citation Click Add New Source

APA BIBLIOGRAPHY
Choose a Type of Source from the listFill out the remaining fields with information related to the citationClick OKThe citation appears on the page

APA BIBLIOGRAPHYInsert a page break at bottom of “Letterhead”Click BibliographyChoose Works CitedThe properly formatted Bibliography appearsComplete this step ONLY after references have been cited in the document.

Newsletter Functions
This section covers different functions useful for creating a newsletter. These functions include:
Format TextSection BreaksColumnsAdd, edit and format Clip Art

THE HOME TAB
Clipboard group: Options to cut, copy and paste.
The Font group: Edit fonts, font colors, font sizes & font styles.The Paragraph group: Edit bullets and numbering, indentation, sorting, show/hide paragraph marks, text alignment, line spacing, shading, and borders.The Styles group: Insert or change formatting styles in a Word document. The E dit group: Find, replace, go to and select options are located here.

THE BACKWARDS “P”There will be making a variety of formatting changes in this document. To keep track of all of them, activate Show/Hide.By clicking the ¶ in the Paragraph group on the Home tab.

FORMATTINGOpen “Letterhead”Using the functions located in the Font and Paragraph groups on the Home tabHighlight and Right align the text of the documentHighlight, Bold, and Center the titleChange the title font size to 16The changes will prep text to convert to newsletter format

THE PAGE LAYOUT TAB
The Themes group: Themes are a series of designs for background color, font color & effects.The Page Set-up group: Margins, orientation, columns, page breaks, and hyphenation. The Page Background group: Watermark, Page Color, Page Borders.The Paragraph group: functions for indentation and character spacing.The Arrange group: Formats images that are imbedded within text.

INSERT SECTION BREAKIn the Page Layout tab, in the Page Setup group, choose BreaksUnder Section Breaks, choose Continuous

BORDERSMove mouse to the title and click Page Borders on the Page Layout tabUnder the Borders tabChoose a style, color, and widthMake sure the “Apply To” box reads ParagraphClick OK

COLUMNS
Click mouse before “Overview”On the Page Layout tab, click ColumnsClick Three

ADD CLIPARTClick anywhere in the documentOn the Insert tab, choose Clip Art
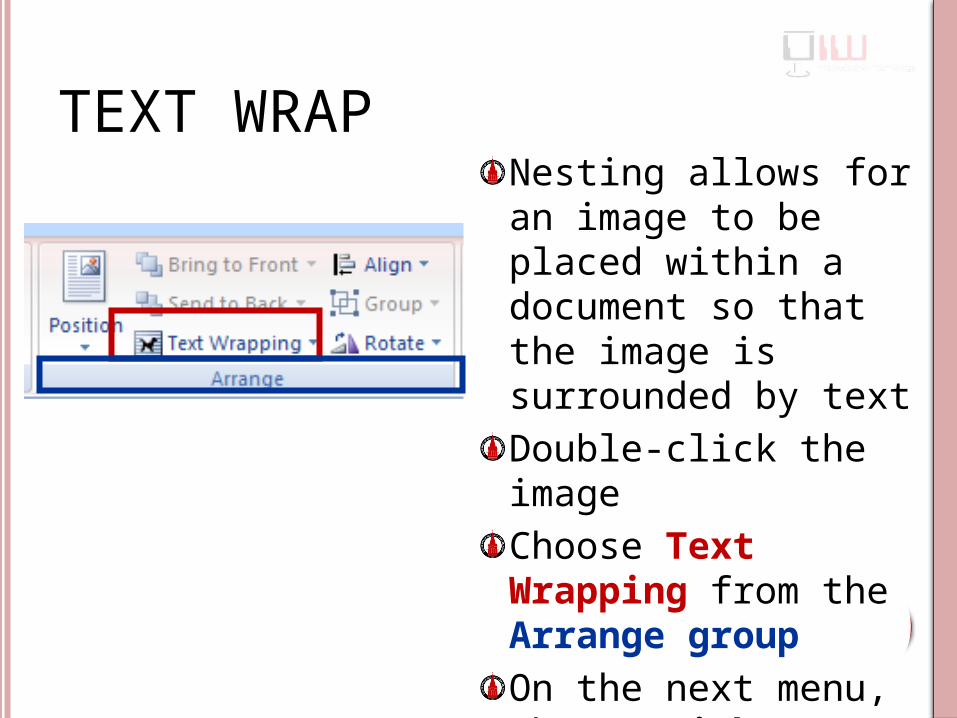
TEXT WRAPNesting allows for an image to be placed within a document so that the image is surrounded by textDouble-click the imageChoose Text Wrapping from the Arrange groupOn the next menu, choose Tight
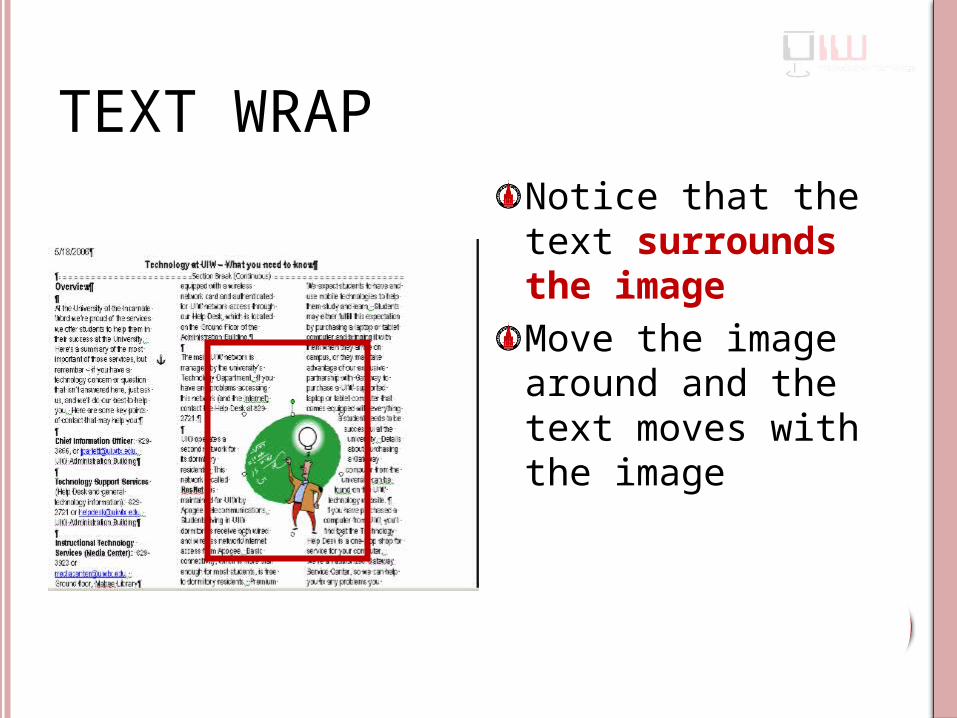
TEXT WRAPNotice that the text surrounds the imageMove the image around and the text moves with the image

Headers and FootersThis sections explains how to add and edit Headers and Footers by creating a letterhead

HEADERS AND FOOTERS
Headers and footers are the identifiers that run through the top or bottom of your document, providing important background information about it. They can include:
Page numberingTitleAuthor NameChapter NumberDate
Headers appear at the Top of a page; Footers at the bottom.

INSERT A HEADER OR FOOTER
Open “Letterhead”Click the Insert tabClick Header or FooterThere are several choices for pre-formatted headersScroll down to the bottom and click Edit Header
INSERT A HEADER OR FOOTER
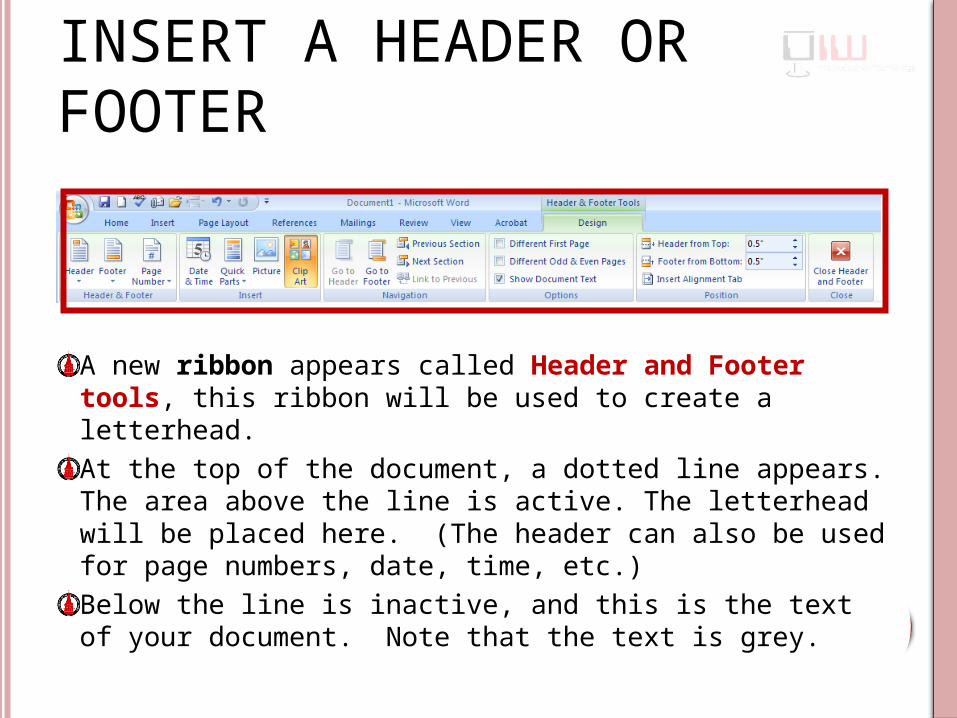
A new ribbon appears called Header and Footer tools, this ribbon will be used to create a letterhead.At the top of the document, a dotted line appears. The area above the line is active. The letterhead will be placed here. (The header can also be used for page numbers, date, time, etc.)Below the line is inactive, and this is the text of your document. Note that the text is grey.

INSERT A TABLEClick inside the header From the Insert tab, click tableMouse over the number of rows and columns to create the table - for this lesson, 2 columns and 1 row

THE TABLE TOOLS TAB
After a table is created, The table Tools tab opens with Design and Layout tabs
Design tab: This ribbon features table design options for style, shading, and bordersLayout tab: This ribbon features table layout options to format cells, insert rows and columns, cell alignment, and size

INSERT A TABLE IN THE HEADER
Highlight the tableClick on the Border Icon in the table Tools Design tabChange the border to No Border

ADD CLIPART TO THE HEADER
Click inside the table and insert a ClipArtDouble click on the Clip Art, and resize the clip Art to 1”Click on the cell border and move it to the left

CROP CLIPARTIt is possible to edit ClipArt by cropping itLocate the Crop Tool on the Size group at the right end of the menuClick on a corner, and Drag inward until the desired section is croppedIf you crop too much, reverse the processComplete the letterhead by adding name, address, etc.
Document Review Features
This section explains:Track Changes Advanced Spell CheckDictionary and Thesaurus

TRACK CHANGES
Track Changes keeps track of document changes.Lets other users review your work and edit it without changing the original document.Track changes is located on the Review tab. There are four parts to Track Changes.

THE REVIEW TAB
The Proofing group: Spell check, thesaurus, translate, language, and word count.The Comments group: controls the comments feature.
The Tracking group: Track changes set up.
The Changes group: Allows for the review, acceptance or rejection of changes.
The Compare group: Compare two documents (with & without changes) at the same time.

TURN TRACK CHANGES ON
Click the Track Changes icon in the Track Changes group to activate the featureTrack Changes show what change was made (format, insert, or delete), when, and who made the change

TRACK CHANGES STATES
Original: Shows the original document, with all changes (markup), hidden.Original: Showing Markup: Shows what changes were made. Format changes are not visible, Inserted text is visible.Final: Only the changes made to the document are visible.Final Showing Markup: Format changes and deleted items are visible, along with an explanation of all changes.

USING TRACK CHANGESOpen the document “Letterhead”Click the Track Changes Icon so that it has a yellow hueChoose Original Showing Markup Add , delete, and format text, and note the balloons on the right side of the page

ACCEPT, REJECT, OR SKIP CHANGES
There are three change options:
Accept one or all changes Reject one or all changesSkip a change and move on to the next
Click on the change, then choose an accept/reject/skip option

PRINT CHANGESClick the Office ButtonClick PrintIn the Print What box,Choose Document Showing Markup to print document with changesChoose List of Markup to print only the changesChoose Document to print without markup

MULTIPLE AUTHORS OR REVIEWERS
Multiple reviewers are defined by Login. To see who made a change, mouse over the change and the reviewer name and date will appear. Reviewers can be color-coded if there is more than one reviewer.

SHOW REVIEWERSShow Reviewers reveals the markup from one reviewerClick Show MarkupClick ReviewersClick the checkbox next to the reviewer whose changes you want to see.
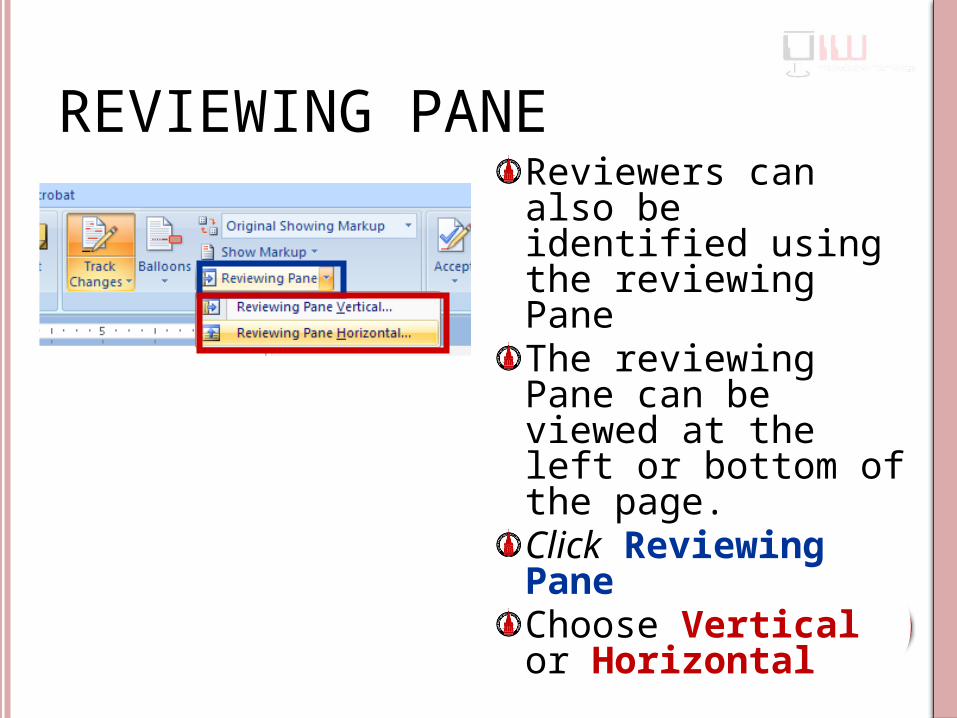
REVIEWING PANEReviewers can also be identified using the reviewing Pane The reviewing Pane can be viewed at the left or bottom of the page.Click Reviewing PaneChoose Vertical or Horizontal
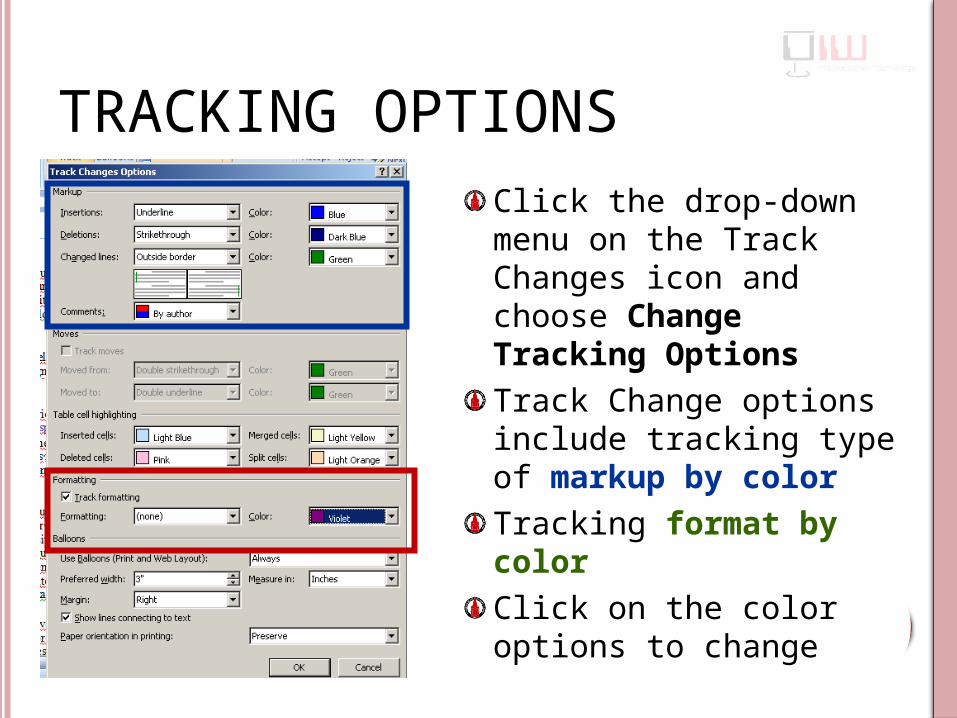
TRACKING OPTIONSClick the drop-down menu on the Track Changes icon and choose Change Tracking Options Track Change options include tracking type of markup by colorTracking format by colorClick on the color options to change

COMMENTSComments allow you to add feedback to a documentClick where you want to insert a commentIn the comment group, click New CommentA balloon will note the commented textType a comment inside the balloon

REMOVING COMMENTS
After reviewing a comment, Right- click the commentClick DeleteIf there are multiple comments, use the Previous/Next icons to skip to other comments

SPELL CHECK ON STEROIDSClick the Office Button (or push the F7 Key) Click Word Options

SPELL CHECK ON STEROIDSClick ProofingClick the checkbox Show readability statistics. This will show the Flesch-Kincaid Reading level for your paper after the Spell Check has been completed. You will want to strive for a twelfth grade reading level Click Settings

READABILITY AND WRITING STYLE
Under the Style menu Click on the check boxes to select
Passive Sentences
Click OK Continue with Spell Check

CUSTOM DICTIONARIESIf a word that the dictionary sees as “misspelled”, even though it is not. It is possible to add the word to your dictionaryRight-click on the wordChoose Add to Dictionary

EASY THESAURUSRight-click the word that you need a synonym forChoose SynonymsChoose a synonym from the menu

EASY DICTIONARYRight-click the word that you want to defineChoose Look UpReview the definitions

WORD COUNT
Want to know how mush you have written?Click the Review tabOn the Proofing group, click Word Count

Mail Merge

THE MAILINGS TAB
The Mailings tab: The Mailings tab replaces the Mail Merge Task Pane in Word 2003. The pane is arranged chronologically, so begin with the Create group (Letters or Envelopes), and continue until the merge is completed (the Finish group)
STEP 1: ENVELOPES OR LABELS?
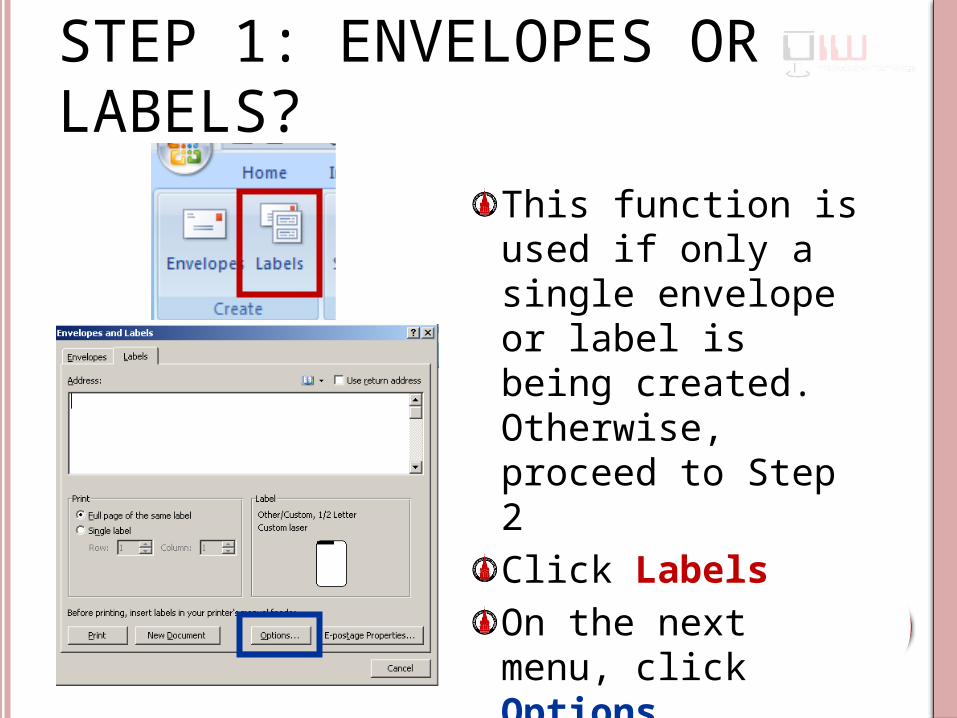
This function is used if only a single envelope or label is being created. Otherwise, proceed to Step 2Click Labels On the next menu, click Options

STEP 1: ENVELOPES OR LABELS?
Locate the Brand of label from the Label Vendor listLocate Product numberClick OKFill out the address information on the next menu.

STEP 2: START MAIL MERGE
Begin with this step for multiple addressees or addressing lettersClick Start Mail MergeChoose Labels

STEP 2: START MAIL MERGE
Locate the brand of envelope from the Label Vendor listLocate Product numberClick OKFill out the address information on the next menu.

STEP 3: SELECT RECIPIENTSClick Select RecipientsChoose Use Existing List This feature is used if you have a spreadsheet or database from which to select recipients. A list may also be generated by manually creating a list or using an Outlook contact list

STEP 3: SELECT RECIPIENTS
Navigate to sampleaddressbookClick OpenOn the next menu, select the name of the worksheet containing addressee informationClick OK
STEP 4: EDIT RECIPIENTS (OPTIONAL)
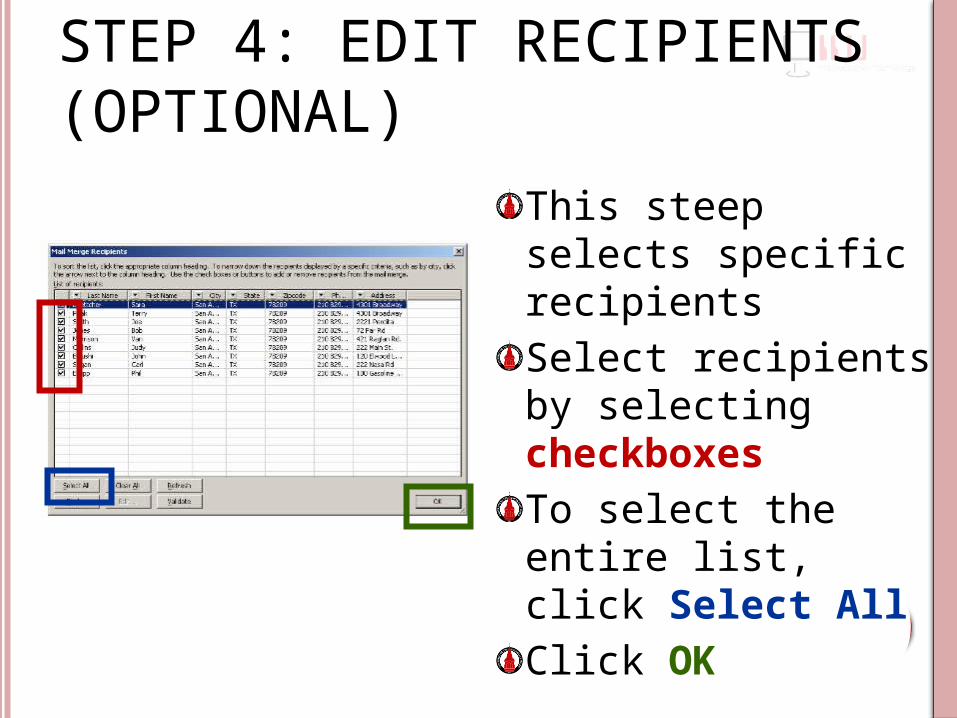
This steep selects specific recipientsSelect recipients by selecting checkboxesTo select the entire list, click Select AllClick OK

STEP 5: INSERT FIELDSThe Address Block adds an address to a label or letter. In addition, a greeting line (i.e. Dear ---) may be added by clicking Greeting LineSpecific field information may be inserted manually using Insert Merge FieldAdd these fields by inserting the cursor where the filed will be placed

STEP 5: INSERT FIELDS (ADDRESS BLOCK)
Select the name formatTo add or remove fields from the address line (i.e. a field may not be used on the label), click Match FieldsClick OK

STEP 5: INSERT FIELDS (ADDRESS BLOCK)
Click on the drop-down menu to add a field by matching the field nameTo remove a field, change the field name to not matchedIf this is the format for all labels, crick the Remember checkboxClick OK

STEP 5: INSERT FIELD (MERGE FIELDS)
Click Insert Merged Field Choose the field type to insertChoose the items to add to the letter from the listClick Insert after each item
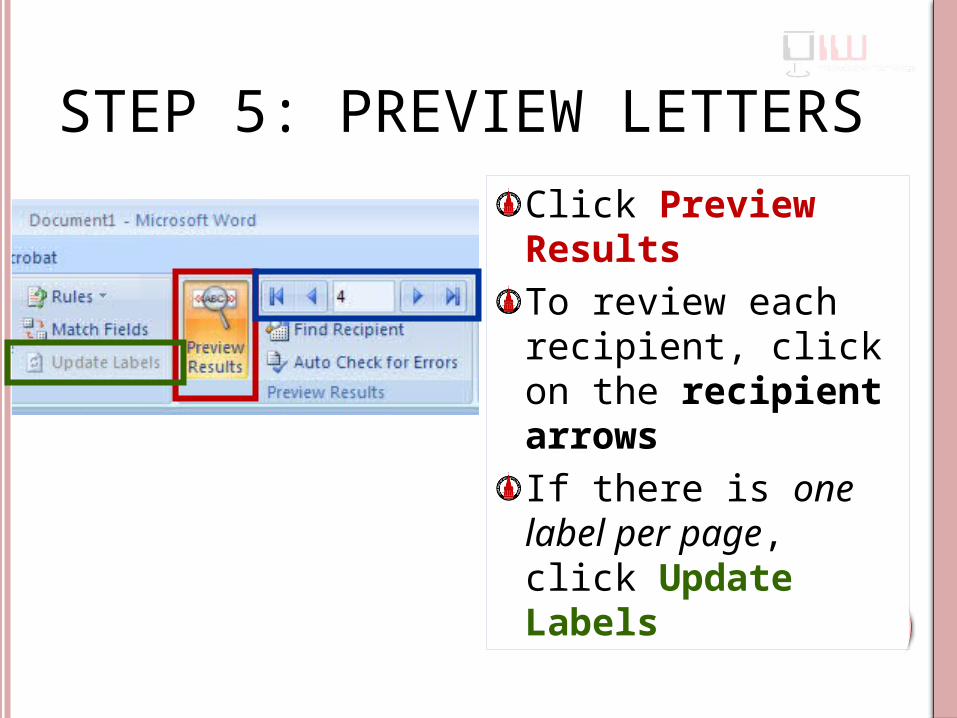
STEP 5: PREVIEW LETTERS
Click Preview ResultsTo review each recipient, click on the recipient arrowsIf there is one label per page, click Update Labels
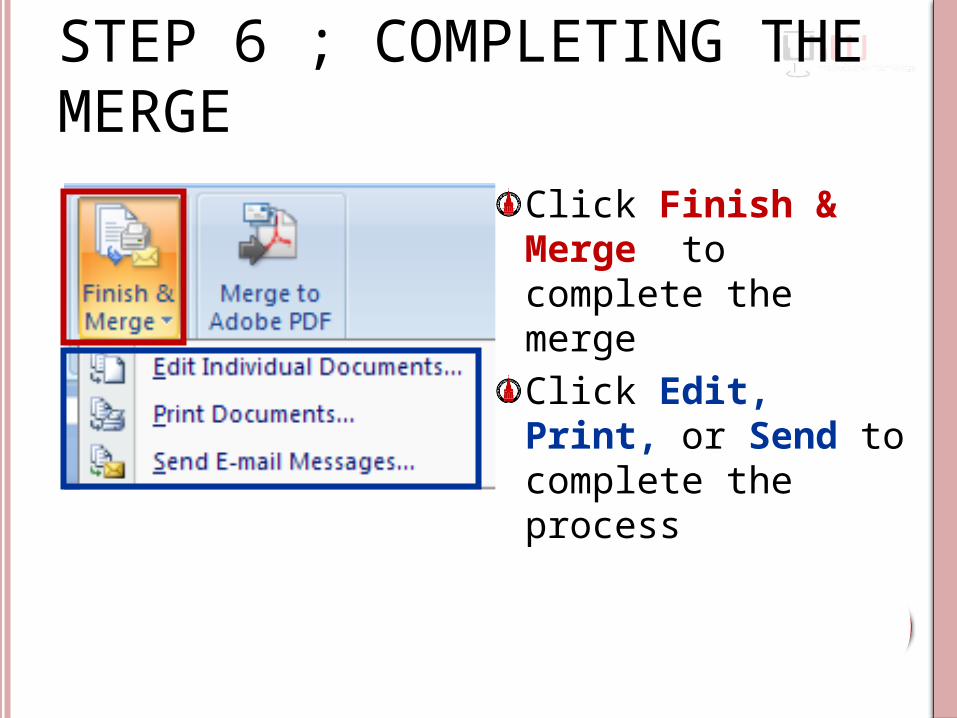
STEP 6 ; COMPLETING THE MERGE
Click Finish & Merge to complete the mergeClick Edit, Print, or Send to complete the process

QUESTIONS?Terence Peak, M.Ed.Coordinator of Technology TrainingBlackboard Certified TrainerThe University of the Incarnate Word(210) [email protected]